Creating a Website: The Missing Manual (2015)
.
Part 1. Building Basic Web Pages
Chapter 2. Becoming Fluent in HTML
Getting text into a web page is easy—you just open up an HTML file, drop in your content, and add the occasional HTML tag to format that content. But getting text to look exactly the way you want it to is a different story.
Before you can make your web pages look pretty, you need to organize their structure a bit. In this chapter, you’ll learn about the first set of tools you need: the collection of HTML elements that let you break masses of text into neatly separated headings, paragraphs, lists, and more. You already put several of these elements to work in the Lee Park resumé tutorial in Chapter 1. In this chapter, you’ll take a more detailed tour of all the HTML elements that let you structure text. Think of it as a condensed, one-chapter exploration of HTML’s most important elements.
What you won’t learn in this chapter is how to create the look of your pages. That’s because HTML has virtually no formatting features. Instead, you need a separate standard—that’s CSS, or Cascading Style Sheets—to change the way something looks on a web page. You’ll tackle that subject in the next chapter. But for now, you’ll focus on preparing properly structured HTML pages that you can pizazz up later.
Types of Elements
Before you dig in, it’s time to review a couple of HTML essentials. As you learned in Chapter 1, you need to know two things about every new element you meet:
§ Is it a container element or a standalone element?
§ Is it a block element or an inline element?
The answer to the first question tells you something about the syntax you use when you add an element to a document. Container elements (like the <b> element that boldfaces text) require a start and end tag, with the content sandwiched in between. Standalone elements (like the <img>element that inserts an image into a page) use a single, all-in-one tag.
The answer to the second question tells you something about where you can place an element and how a browser will position your content. When you build a page, you build its HTML framework first, using block elements. Block elements (like the <p> element) go inside a page’s main<body> element, or within another block element on the page. Each block element is a distinct chunk of content, and browsers automatically separate block elements from one another. Inline elements are for smaller bits of content, and they can slip seamlessly into another block element, with no extra spacing.
For example, consider this fragment of HTML:
<h1>Bread and Water</h1><p>This economical snack is really all you need to
sustain life.</p>
This snippet has a title in large, bold letters followed immediately by a paragraph of ordinary text. When a browser displays the page, you might expect to see both the heading and the text on the same line. However, the <h1> element is a block element. When you close it with the </h1> tag, the browser does a little housecleaning and adds a line break and some extra space before the next element. The paragraph of text starts on a new line, as you can see in Figure 2-1.
NOTE
In an attempt to talk less about formatting and more about structure, HTML5 proposes some new terminology. It suggests that inline elements be called phrasing elements and block elements be called flow elements. The goal is to emphasize the difference in the way you can use and place these types of elements, while downplaying the way they affect formatting. (After all, the formatting details can be changed with style sheets, as you’ll learn in the next chapter.) However, the terms “block element” and “inline element” are so common that it will be a while before new lingo replaces them—if the HTML5 jargon catches on at all.
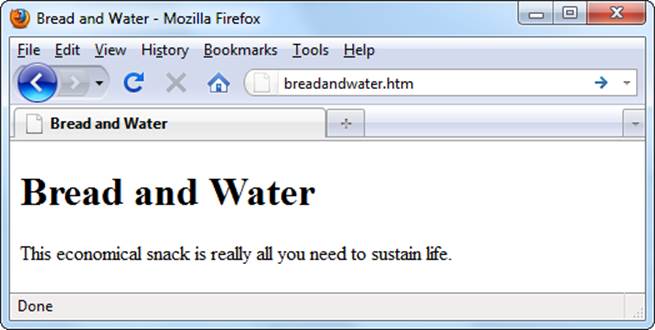
Figure 2-1. HTML separates block elements by a distance of approximately one and a half lines (in this figure, that’s the space between “Bread and Water” and the sentence below it).
Browsers space out block elements to help ensure that one section of text doesn’t run into another. However, in many cases, you won’t be happy with this automatic spacing. For example, for dense, information-laden pages, the standard spacing looks far too generous. You can tighten up your text and shrink the spaces in between block elements using style sheets (Text Alignment and Spacing).
TIP
If you’re ever in doubt about an element’s status (container or standalone? block or inline?), just refer to the HTML reference in Appendix B.
HTML Elements for Basic Text
Now that you’ve reviewed element types, it’s time to take a tour through your element toolkit. Once you learn all the text-structuring elements, you’ll get a chance to put your skills to work with an exercise that invites you to mark up plain text with HTML tags (Tutorial: Converting Raw Text to HTML).
But first, you’ll start at the beginning, with the humble paragraph—the fundamental ingredient of many a web page.
Paragraphs
You’ve already seen the basic paragraph element, <p>. It’s a block element that defines a paragraph of text.
<p>It was the best of times, it was the worst of times....</p>
You should get into the habit of thinking of the text in your web pages as a series of paragraphs. In other words, before you type in any text, add the <p> and </p> tags to serve as a container. Most of the time, paragraphs are the first level of structure you add to a page.
Figure 2-2 shows several paragraph elements in action.
NOTE
As you’ve no doubt noticed in your travels across the Internet, HTML paragraphs aren’t indented as they often are in print. That’s just the way of the Web, though you can change this with style sheets (Text Alignment and Spacing).
Web browsers don’t pay attention to hard returns (the line breaks you create when you hit the Enter key). Consider, for example, this paragraph:
<p>
It looks
like
this text is spaced out. But really, the browser doesn't care about your extra
spaces, no matter how many you add.
</p>
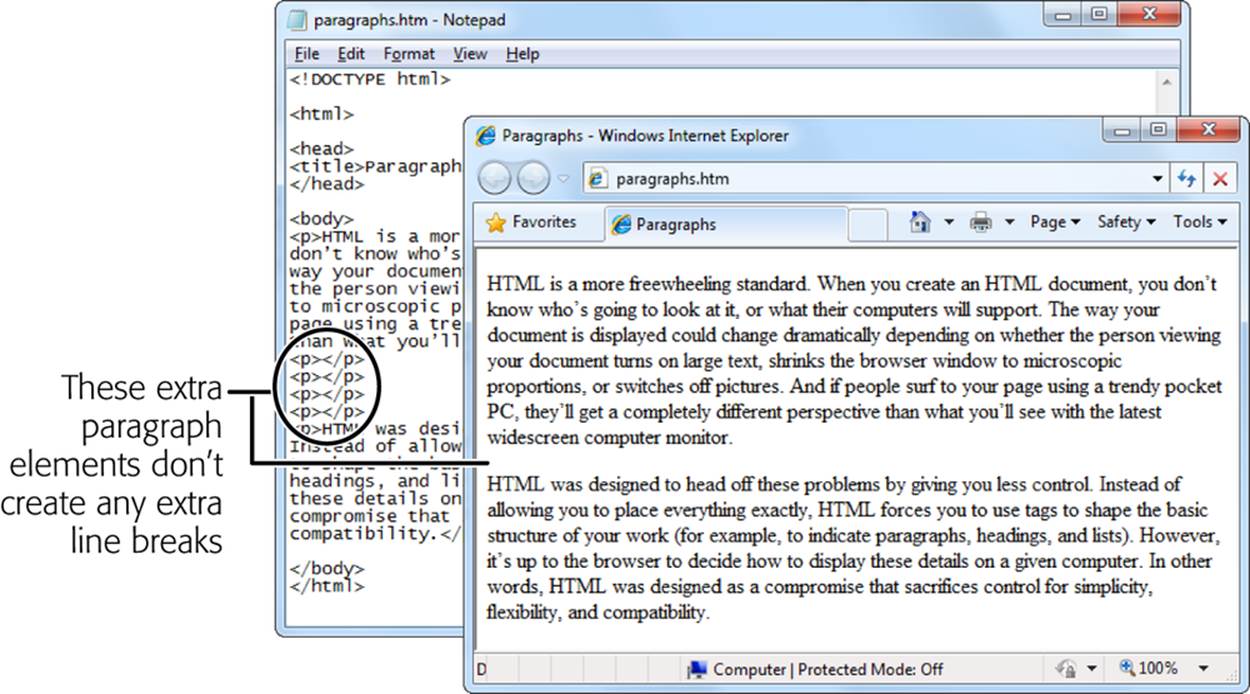
Figure 2-2. When you put several paragraphs of text in a row, a browser separates each one with a little over one line of space. Browsers ignore empty paragraph elements completely, however, and don’t add any extra space for them.
Although this paragraph contains a few extra hard returns, the browser displays it as an unbroken paragraph, wrapping the text to fit the window, like this:
It looks like this text is spaced out. But really, the browser doesn’t care about your extra spaces, no matter how many you add.
This is the way browsers treat the text inside all elements (except the <pre> element, discussed on Preformatted Text). Web page writers often take advantage of this behavior, spacing out their HTML over several lines as they type it in. That makes the code easier to read and edit in a text editor, and the browser still wraps the content to fit the window. To insert a real break between your lines, check out the next section.
NOTE
Technically, browsers don’t ignore line breaks. They actually treat every line break as a single space. However, whenever a browser finds more than one space in a row, it ignores the extra ones. So, in the example above, the browser converts the two line breaks between “like” and “this” into two spaces, and then changes that to a single space. This behavior is called collapsing the white space.
Line Breaks
Sometimes you want to start a new line of text, but you don’t want to use a paragraph element because browsers add extra space between paragraphs. This is the case, for example, when you want to include a business address on your site and you want it to appear in the standard single-spaced three-line format. In situations like this, the standalone line break element <br> comes in handy.
Line breaks are exceedingly simple: They tell a browser to move to the start of the following line (see Figure 2-3). They’re inline elements, so you need to use them inside a block element, like a paragraph:
<p>This paragraph appears <br />
on two lines</p>
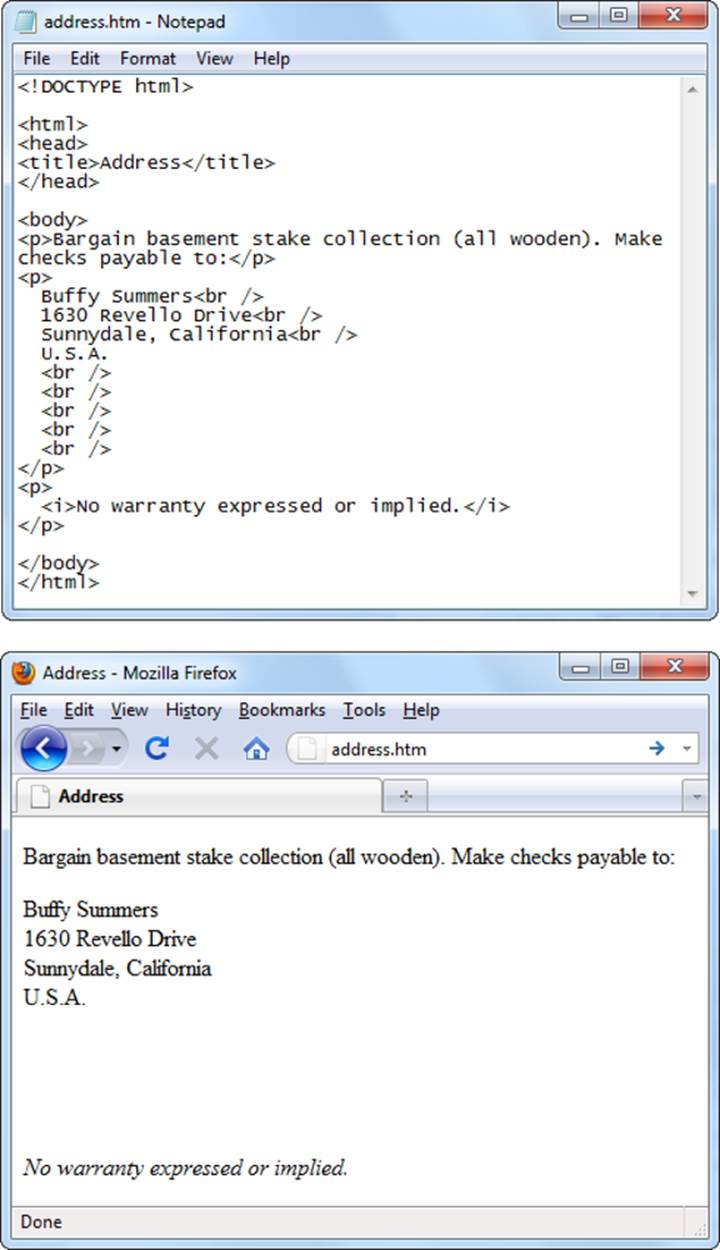
Figure 2-3. The line break element <br> is great for separating lines in an address. If you want to skip down several lines, you can use a series of <br> elements.
UP TO SPEED: GETTING MORE SPACE
The way that browsers ignore spaces can be exasperating. What if you really do want several spaces in a row? The trick is to use a special HTML character entity (see Special Characters) called the nonbreaking space, and written as . When a browser sees this entity, it interprets it as a space that it can’t ignore. So if you create a paragraph by typing in this:
<p>Hello Bye</p>
You end up with this:
Hello Bye
Some web editors automatically add nonbreaking spaces when you press the space bar. This happens in Dreamweaver, for example, when you use the graphical preview of your web page and press the space bar.
Try not to use nonbreaking spaces more than necessary. And never, ever use spaces to align columns of text—that always ends badly, with the browser scrambling your attempts. Instead, use the layout features described in Chapter 8.
Don’t overuse line breaks. Remember, when you resize a browser window, the browser reformats your text to fit the available space. If you try to perfect your paragraphs with line breaks, you’ll end up with pages that look bizarre at different browser window sizes. A good rule of thumb is to avoid line breaks in ordinary paragraphs. Instead, use them to force breaks in addresses, outlines, poems, and other types of text whose spacing you want to tightly control. Don’t use them for bulleted or numbered lists, either—HTML offers elements designed just for lists, as detailed onHTML Elements for Lists.
In some cases, you want to prevent a line break, like when you want to keep the longish name of a company or a product on a single line. The solution is to use the HTML nonbreaking space code (which looks like ) instead of just hitting the space bar. The browser still displays a space when it gets to the , but it won’t wrap the words on either side of it (see Figure 2-4).
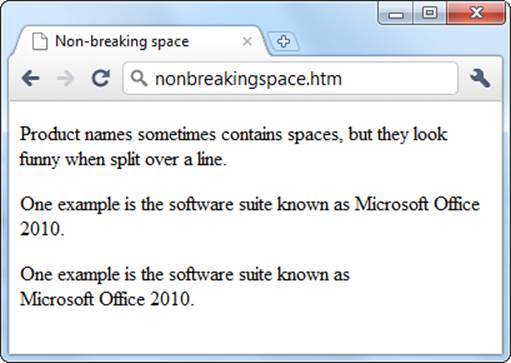
Figure 2-4. Paragraphs 2 and 3 in this figure show how the code affects line breaks. Paragraph 3 is actually coded as Microsoft Office 2010. As a result, the browser won’t split this term.
Headings
Headings are section titles, like the word Headings just above this paragraph. Browsers display them in boldface at various sizes, depending on the heading level. HTML supports six levels, starting at <h1> (the biggest) and dwindling down to <h6> (the smallest). Both <h5> and <h6> are smaller than regularly sized text.
Headings aren’t just useful for formatting—they also help define the hierarchy of your document. Big headings identify important topics, while smaller ones denote lesser issues related to that larger topic. To make sure your document makes sense, start with the largest headings (level 1) and then work your way down. For instance, don’t jump straight to a level-3 heading just because you like the way it looks.
NOTE
It’s probably occurred to you that if everyone uses the same heading levels in the same order, the Web will become as bland as a bagel in a chain supermarket. Don’t panic—it’s not as bad as it seems. When you add style sheets into the mix, you’ll see that you can completely change the look of any and every heading you use. So for now stick to using the right heading levels in the correct order.
DESIGN TIME: WEBIFYING YOUR TEXT
You can’t present text on the Web in the same way that you present it in print, but sometimes old habits are hard to shake. Here are some unwritten rules that can help you make good use of text in your web pages:
§ Split your text into small sections. Web pages (and the viewers who read them) don’t take kindly to long paragraphs.
§ Create short pages. If a page goes on for more than two screens, split it into two pages. Not only does this make your pages easier to read, but it also gives you more web pages, which helps with the next point.
§ Divide your content into several pages. The next step is to link these pages together (see Chapter 6). This gives readers the flexibility to choose what they want to read, and in what order.
§ Put your most important information on the first screen. The basic idea is to make sure there’s something eye-catching or interesting for visitors to read without having to scroll down. This technique is called designing above the fold. Well-designed newspapers use the same strategy; it gives newsstand visitors something interesting to read without having to flip over the folded broadsheet, hence the term “above the fold.”
§ Proofread, proofread, proofread. Typos and bad grammar shatter your site’s veneer of professionalism and web-coolness.
Horizontal Lines
Paragraphs and line breaks aren’t the only way to separate sections of text. Another useful divider is the standalone <hr> element, which translates to “horizontal rule.” A horizontal rule element adds a line that stretches from one side of its container to the other, separating everything above and below it.
NOTE
Usually, you position a horizontal break between paragraphs, which means it will stretch from one side of a page to the other. However, you can also put a horizontal rule in a narrower container, like a single cell in a table, in which case it won’t turn out nearly as long.
Horizontal rules are block elements, so you can stick them between paragraphs (see Figure 2-5).
Obviously, the <hr> element is a design element, because it draws a line on your page. But the authors of the HTML5 specification want you to think of it as part of a page’s structure by describing it not as a “horizontal rule” but as a “thematic break”—in other words, a basic way to separate different blocks of content, like scenes in a novel or topics in an academic paper. But it still looks like a line.
Preformatted Text
Preformatted text is a unique concept in HTML that breaks the rules you’ve read about so far. As you’ve seen, web browsers ignore multiple spaces and flow your text to fit the width of a browser window. Although you can change this to a certain extent using line breaks and nonbreaking spaces, some types of content are harder to deal with.
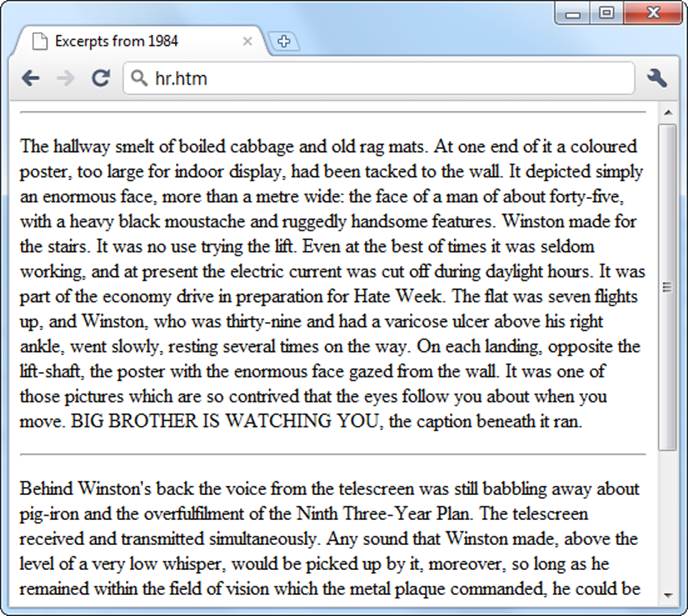
Figure 2-5. In this example, an <hr> element sits between the two paragraphs, inserting the solid line you see.
Imagine you want to display a bit of poetry. Using nonbreaking spaces to align the text is time-consuming and makes your HTML markup difficult to read. The <pre> element gives you a better option. It tells your browser to display the text just as you entered it, including every space and line break. Additionally, the browser puts all that text into a monospaced font (typically Courier), further setting this content off from the rest of the page. Figure 2-6 shows an example.
NOTE
In a monospaced font, every letter occupies the same amount of space. HTML documents and books like this one use proportional fonts, where letters like W and M are much wider than l and i. Browsers use monospaced fonts for preformatted text because they let you line up rows of text exactly. The results, however, don’t look as polished as when you use proportional fonts.
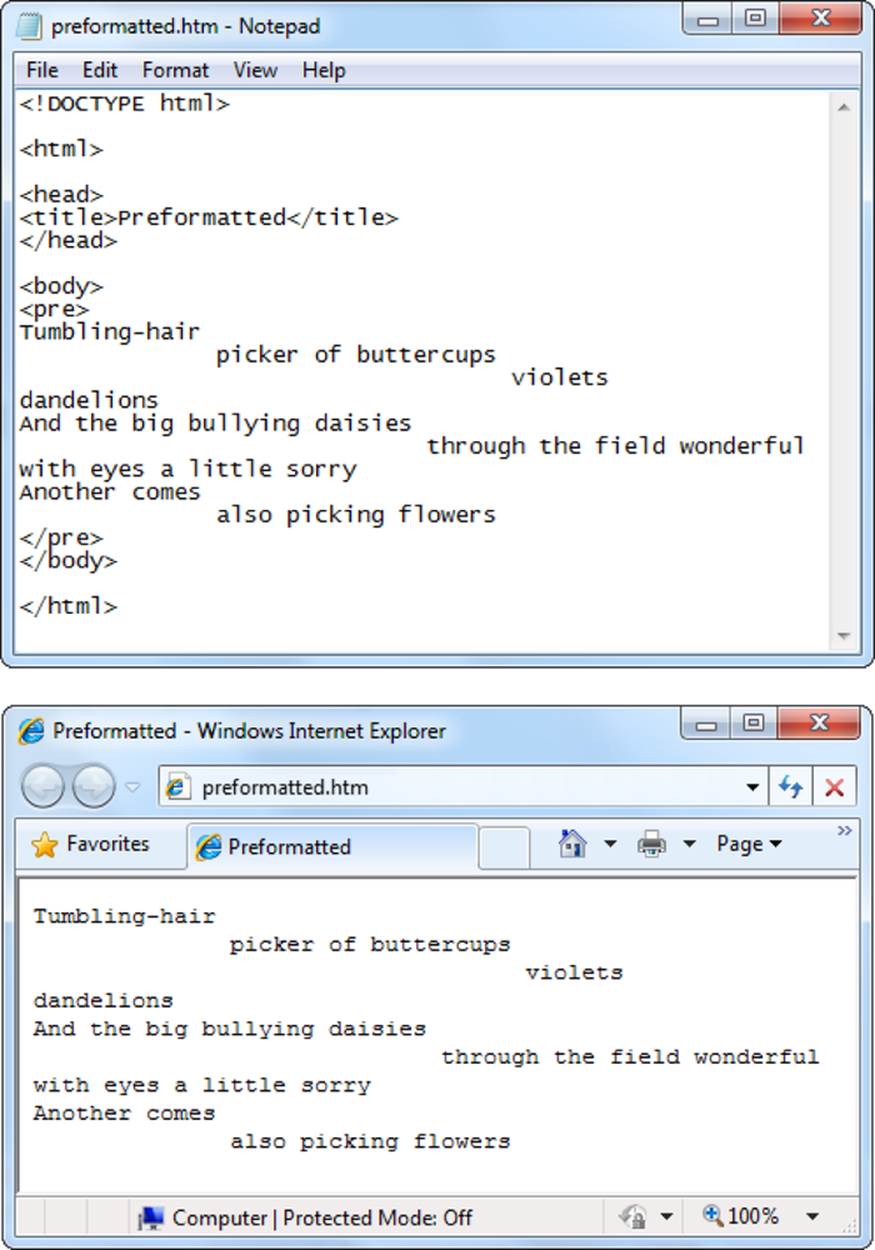
Figure 2-6. There’s no mystery as to how this e. e. cummings poem will turn out. Because it’s in a <pre> block, you get the exact spacing and line breaks as those in your HTML file. The <pre> element also works well for blocks of programming code.
Quotes
It may be a rare web page that spouts literary quotes, but the architects of HTML created a block element, named <blockquote>, especially for long quotations. When you use this element, your browser indents text on the left and right edges.
Here’s an example:
<p>Some words of wisdom from "A Tale of Two Cities":</p>
<blockquote>
<p>It was the best of times, it was the worst of times, it was the age of
wisdom, it was the age of foolishness, it was the epoch of belief, it was
the epoch of incredulity, it was the season of Light, it was the season of
Darkness, it was the spring of hope, it was the winter of despair, we had
everything before us, we had nothing before us, we were all going direct to
Heaven, we were all going direct the other way-in short, the period was so
far like the present period, that some of its noisiest authorities insisted
on its being received, for good or for evil, in the superlative degree of
comparison only.</p>
</blockquote>
<p>It's amazing what you can fit into one sentence...</p>
Figure 2-7 shows how this appears in a browser.
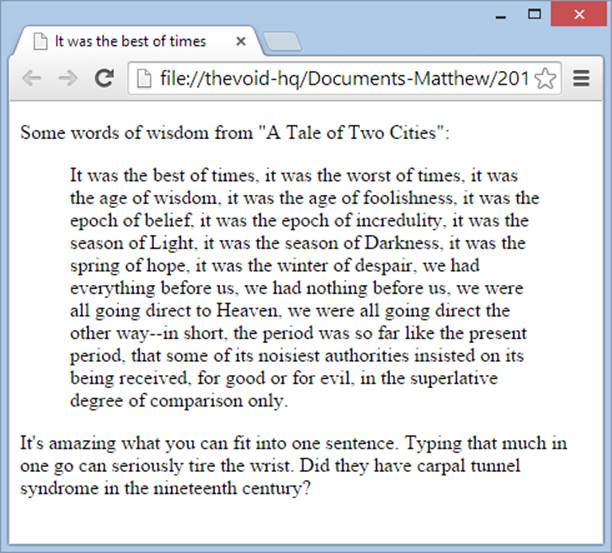
Figure 2-7. Here, the <blockquote> element indents the middle paragraph.
Occasionally, people use the <blockquote> element purely for its formatting capability—they like the way it sets off text. Of course, this compromises the spirit of the element, and you’d be better off using style sheets to achieve a similar effect.
As a block element, the <blockquote> element always appears independently of other block elements, like paragraphs and headings. It has one further restriction: It can hold only other block elements, which means that you need to put your content into paragraphs rather than simply type in free-form text between the blockquote start and end tags.
If, instead of using a quote that runs a paragraph or longer, you want to include a simple one-line quote, HTML’s got you covered. It defines an inline element for short quotes that you can nest inside a block element. It’s the <q> element, which stands for “quotation”:
<p>As Charles Dickens once wrote, <q>It was the best of times, it was the
worst of times</q>.</p>
Some browsers, like Firefox, add quotation marks around the text in a <q> element. Other browsers, like Internet Explorer, do nothing. If you want your quotation to stand out from the text around it in every browser, you might want to add some different formatting, like italics. You can do this by applying a style sheet rule (see Chapter 3).
And if you want to pack more information, you can add a URL that identifies the source of the quote (assuming it’s on the Web) using the cite attribute:
<p>As Charles Dickens once wrote,
<q cite="http://www.literature.org/authors/dickens-charles/two-cities">It
was the best of times, it was the worst of times</q>.</p>
Looking at this example, you might expect this link to take readers to the referenced website (when they click the paragraph, for example). But that doesn’t happen. In fact, the information in the cite attribute won’t appear on your page at all. The are available to programs that analyze your page, like automated programs that scan pages and compile a list of references, or a search engine that uses this information to provide better search results. Most of the time, however, the reference has little benefit, except that it stores an extra piece of information that you, the website creator, might need later to double-check your sources.
If you do want to reference a source in your text, you might want to use the <cite> element (not the cite attribute mentioned above). It identifies the title of a work, like this:
<p>The quote <q>It was the best of times, it was the worst of times</q> is
from <cite>A Tale of Two Cities</cite>.</p>
In this case, a browser displays the text in the <cite> element in italics, just as if you had used the <i> element.
TIP
Should you indeed want this paragraph to link to a reference, you need to investigate the <a> element described in Chapter 6.
Divisions and Spans
The last block element you’ll learn about—<div>—is one of the least interesting, at least at first glance. On its own, it doesn’t actually do anything.
You use <div> to group together one or more block elements. That means you could group together several paragraphs, or a paragraph and a heading, and so on. Here’s an example:
<div>
<h1>...</h1>
<p>...</p>
<p>...</p>
</div>
<p>...</p>
Given the fact that <div> doesn’t do anything, you’re probably wondering why it exists. The lowly <div> tag becomes a lot more interesting when you combine it with style sheets, because you can apply formatting commands directly to a <div> element, and therefore to all the otherelements and their contents in the <div>. For example, if a <div> element contains three paragraphs, you can format all three paragraphs at once simply by formatting the <div> element.
TIP
As you’ll see throughout this book, the <div> element is an indispensable, all-purpose container. You use it to shape the layout of your page, creating columns of text, navigation bars, floating figures, and more.
The <div> element has an important relative: the inline <span> element. Like its cousin, the <span> element doesn’t do anything on its own, but when you place it inside a block element and define its properties in a style sheet, you can use it to format just a portion of a paragraph, which is very handy. Here’s an example:
<p>In this paragraph, some of the text is wrapped in a span element. That
<span>gives you the ability</span> to format it in some fancy way later on.
</p>
You’ll put the <div> and <span> elements to good use in later chapters.
POWER USERS’ CLINIC: HTML5’S SUPERCHARGED STRUCTURE
The <div> element is supremely flexible, but it doesn’t say much about the real structure of your page. For example, one <div> element might represent a header that sits at the top of your page, while another might wrap a set of navigation links. For this reason, the <div> element isn’t much help to anyone (or any program) trying to scan your markup and figure out what it all means. While this isn’t a fatal flaw, it is a nagging shortcoming.
Part of the dream for the future of the Internet is to embed structural details into your pages, so that browsers, search engines, and automated tools can understand their structure and find important bits of information. To make the task easier, HTML5 offers several new elements that you can substitute for a plain-vanilla <div>, including <header>, <footer>, <article>, <section>,<aside>, and <nav>. Like the <div> element, these elements have no built-in formatting. They’re simply containers where you can place content (and then position and format it with style sheets, as you’ll learn in Chapter 3). But unlike the <div> element, these elements have more meaning in your markup—they tell the person editing your page something about its structure. For that reason, HTML5 purists prefer to put a group of navigation links in a <nav> element rather than a generic <div> element, even though the final result in the browser looks the same.
Of course, because the HTML5 elements are relatively new, not all browsers can interpret them. This isn’t a huge problem—after all, the <div>-replacement elements don’t apply any formatting anyway, so it’s perfectly fine if a browser chooses to ignore them. But there’s a wrinkle with Internet Explorer, which doesn’t let you use styles with elements it doesn’t recognize. To fix this, you need to use a JavaScript workaround. Appendix B describes this workaround (HTML5 Semantic Elements) and details the new elements that HTML5 adds. But people who don’t need to be on the bleeding edge may prefer to wait for a while and stick to the tried-and-true <div>.
Tutorial: Converting Raw Text to HTML
So far, you’ve considered a relatively small set of elements. But by combining these basic ingredients, you can create an endless number of different web pages. In this tutorial, you’ll use just a few of these elements to transform plain, unremarkable text into a proper web page.
TIP
Like all the tutorials in this book, you can find the solution for this exercise on the companion site at http://prosetech.com/web. Just look in the folder named Tutorial-2-1 (which stands for “Chapter 2, first tutorial”).
The starting point is the file PessimistReviews_unformatted.htm, which you can find in the Tutorial-2-1 folder. It contains the essential HTML elements that every web page requires: <html>, <head>, <title>, and <body>. But that’s it—you’ll find not a single formatting tag more:
<!DOCTYPE html>
<html>
<head>
<title>The Pessimist Reviews</title>
</head>
<body>
The Pessimist's Review Site
Here you'll learn about the greatest unpublished books ever (not) written.
The reviews on this Web site do not correspond to reality. Any correspondence
is purely coincidental.
How To Fail in Life
Chris Chu
Party Press, 1st edition
Tired of sabotaging yourself endlessly? With this book, the author Chris Chu
explains how to level the playing field and take on a challenge you can really
master. So throw away those old self-help books and start accomplishing
something!
Europe: Great Places to Miss
Antonio Cervantes<br>Focalio, 1st edition
Europe is brimming with world class attractions: glorious art galleries,
charming bed-and-breakfast inns, old school restaurants and much more. But who
can afford it? This book carefully documents some of the best attractions
across Europe, and provides detailed plans that explain how to miss them and
keep your last few paltry cents in your pocket.
</body>
</html>
Remember, browsers ignore line breaks and other white space in HTML, so if you open this unfinished file in a browser, all the text will flow in a single, unbroken paragraph (Figure 2-8).
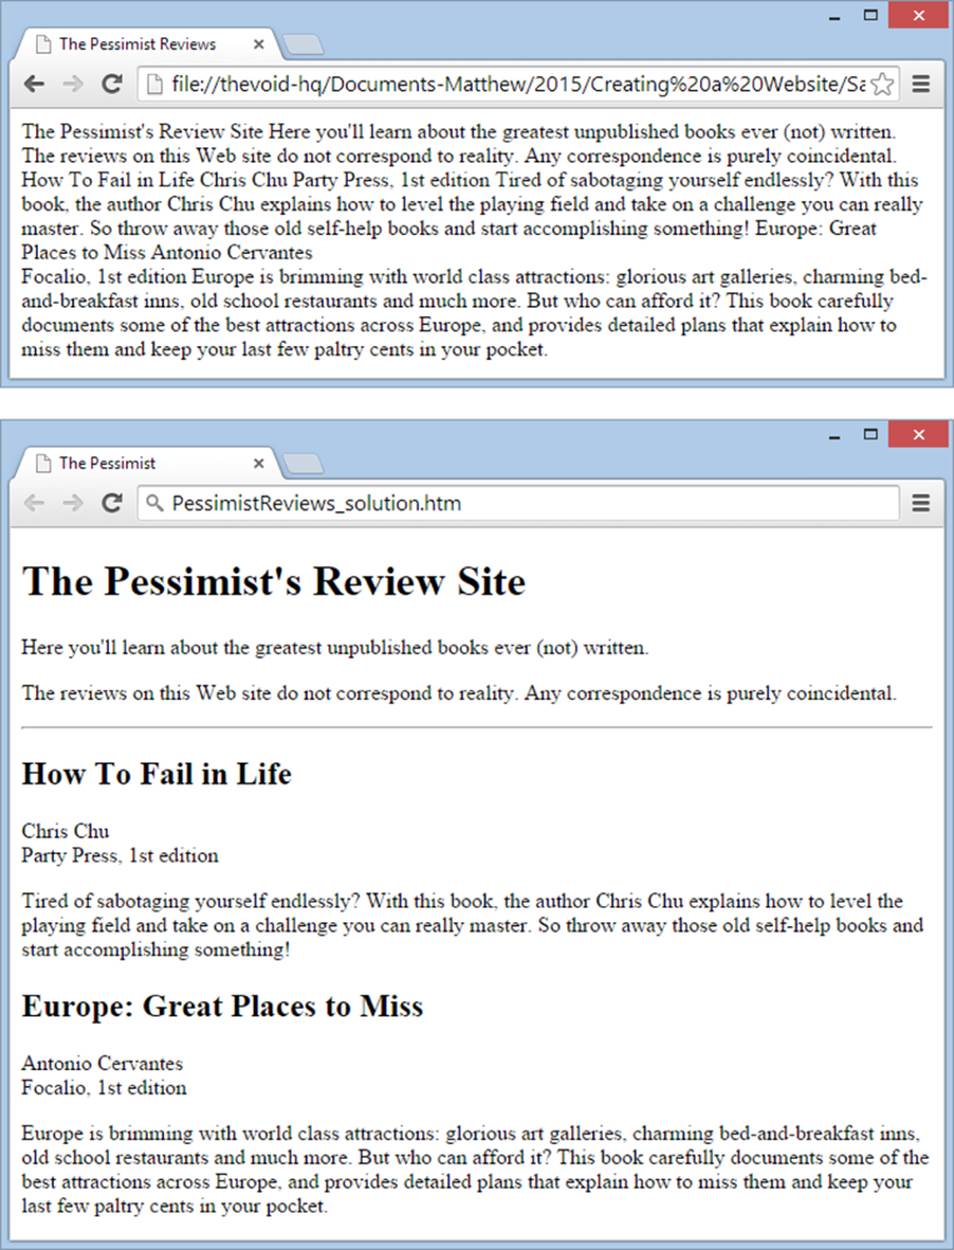
Figure 2-8. Top: With no formatting tags, you’ve got a mess on your hands. Bottom: Can you transform PessimistReviews _unformatted.htm to PessimistReviews_solution.htm using the basic HTML elements covered so far in this chapter?
To conquer this challenge, begin by looking at the solution file (PessimistReviews_solution.htm) either on your own computer or in Figure 2-8. Identify each section of content, or block element, as best you can. You should be able to spot two levels of headings, some paragraphs, and a horizontal line, for starters.
Then add the corresponding elements to the unformatted file (PessimistReviews _unformatted.htm). The text is already split up on separate lines and waiting; all you need to do is fill in the missing start and end tags. For example, here’s how you would mark up the title:
<h1> The Pessimist's Review Site </h1>
As you work, save your edits and check out the result in a browser. To double-check your finished effort, compare your work with PessimistReviews_solution.htm.
NOTE
Earlier incarnations of HTML still have a number of useful elements you can use in an HTML5-built page. In the rest of this chapter, you’ll look at the elements that let you build lists and tables, and the HTML codes you need to write special characters (like symbols and accented letters).
HTML Elements for Lists
Once you master HTML’s basic text elements, you can tackle its list elements. HTML lets you create three types of lists:
§ Ordered lists give each item in a list a sequential number (as in 1, 2, 3). They’re handy when sequence is important, like when you list a series of steps that tell your relatives how to drive to your house.
§ Unordered lists are also known as bulleted lists, because a bullet appears before each item. To some degree, you can control what the bullet looks like. You’re reading a bulleted list right now.
§ Definition lists are handy for displaying terms followed by definitions or descriptions. For example, the dictionary is one huge definition list. In a definition list on a web page, your browser left-aligns the terms and indents the definitions underneath them.
In the following sections, you’ll learn how to create all three types of lists.
Ordered Lists
In an ordered list, HTML numbers each item consecutively, starting at some value (usually 1). The neat part about ordered lists in HTML is that you don’t need to supply the numbers. Instead, the browser automatically adds the appropriate number next to each list item (sort of like the auto-number feature in Microsoft Word). This is handy for two reasons. First, it lets you insert and remove list items without screwing up your numbering. Second, HTML carefully aligns the numbers and list items, which isn’t easy to do on your own.
To create an ordered list, use <ol> (“ordered list”), a block element. Then, inside the <ol> element, place an <li> element for each item in the list (<li> stands for “list item”).
For example, here’s an ordered list with three items:
<p>To wake up in the morning:</p>
<ol>
<li>Rub eyes.</li>
<li>Assume upright position.</li>
<li>Turn on light.</li>
</ol>
In a browser, you’d see this:
To wake up in the morning:
1. Rub eyes.
2. Assume upright position.
3. Turn on light.
The browser inserts some space between the paragraph preceding the list and the list itself, as it does with all block elements. Next, it gives each list item a number.
Ordered lists get more interesting when you mix in the start and type attributes. The start attribute lets you start the list at a value other than 1. Here’s an example that starts the counting at 5:
<p>To wake up in the morning:</p>
<ol start="5">
<li>Rub eyes.</li>
<li>Assume upright position.</li>
<li>Turn on light.</li>
</ol>
Now you’ll get the same list but with the items numbered 5, 6, 7 instead of 1, 2, 3.
HTML doesn’t limit you to numbers in your ordered list. The type attribute lets you choose the numbering style. You can use sequential letters and Roman numerals, as described in Table 2-1. Figure 2-9 shows a few examples.
Table 2-1. Types of ordered lists.
|
TYPE ATTRIBUTE |
DESCRIPTION |
EXAMPLE |
|
1 |
Numbers |
1, 2, 3, 4… |
|
a |
Lowercase letters |
a, b, c, d… |
|
A |
Uppercase letters |
A, B, C, D… |
|
i |
Lowercase Roman numerals |
i, ii, iii, iv… |
|
I |
Uppercase Roman numerals |
I, II, III, IV… |

Figure 2-9. The type attribute in action. For example, the code to start off the first list is <ol type=“I”>.
Unordered Lists
Unordered lists are similar to ordered lists except that they aren’t consecutively numbered or lettered. They do, however, use the same container element, <ul>, and you wrap each item inside an <li> element. The browser indents each item in the list and automatically draws the bullets.
The most interesting option that comes with unordered lists is the type attribute, which lets you change the style of bullet. You can use disc (a black dot, which is automatic), circle (an empty circle), or square (a filled-in square). Figure 2-10 shows the different styles.
Definition Lists
Definition lists are perfect for creating your own online glossary. Each list item consists of two parts, a term (which the browser doesn’t indent) and a definition (which the browser indents underneath the term).

Figure 2-10. Varying the bullet style gives you three flavors of the same list.
Definition lists use a slightly different tagging system than ordered and unordered lists. First, you wrap the whole list in a dictionary list element (<dl>). Then you wrap each term in a <dt> element (dictionary term), and each definition in a <dd> element (dictionary definition). Here’s an example:
<dl>
<dt>eat</dt>
<dd>To perform successively (and successfully) the functions of mastication,
humectation, and deglutition.</dd>
<dt>eavesdrop</dt>
<dd>Secretly to overhear a catalog of the crimes and vices of another or
yourself.</dd>
<dt>economy</dt>
<dd>Purchasing the barrel of whiskey that you do not need for the price of
the cow that you cannot afford.</dd>
</dl>
In a browser you’d see this:
eat
To perform successively (and successfully) the functions of mastication, humectation, and deglutition.
eavesdrop
Secretly to overhear a catalog of the crimes and vices of another or yourself.
economy
Purchasing the barrel of whiskey that you do not need for the price of the cow that you cannot afford.
Nesting Lists
Lists work well on their own, but you can get even fancier by placing one complete list inside another. This technique is called nesting lists, and it lets you build multilayered outlines and detailed sequences of instructions.
To nest a list, declare a new list inside an <li> element in an existing list. For example, the following daily to-do list has three levels. “Monday” is an example of an item at the first level, “Plan schedule for week” is at the second level, and “Wild Hypothesis” is at the third level. Figure 2-11shows the result.
<ul>
<li>Monday
<ol>
<li>Plan schedule for week</li>
<li>Complete Project X
<ul style="square">
<li>Preliminary Interview</li>
<li>Wild Hypothesis</li>
<li>Final Report</li>
</ul>
</li>
<li>Edit bucket list</li>
</ol>
</li>
<li>Tuesday
<ol>
<li>Revise schedule</li>
<li>Procrastinate (time permitting). If necessary, put off
procrastination until another day.</li>
</ol>
</li>
<li>Wednesday
...
</ul>
TIP
When using nested lists, it’s a good idea to use indents in your HTML so you can see the different levels of list elements at a glance. Otherwise, you’ll find it difficult to determine where each list item belongs.
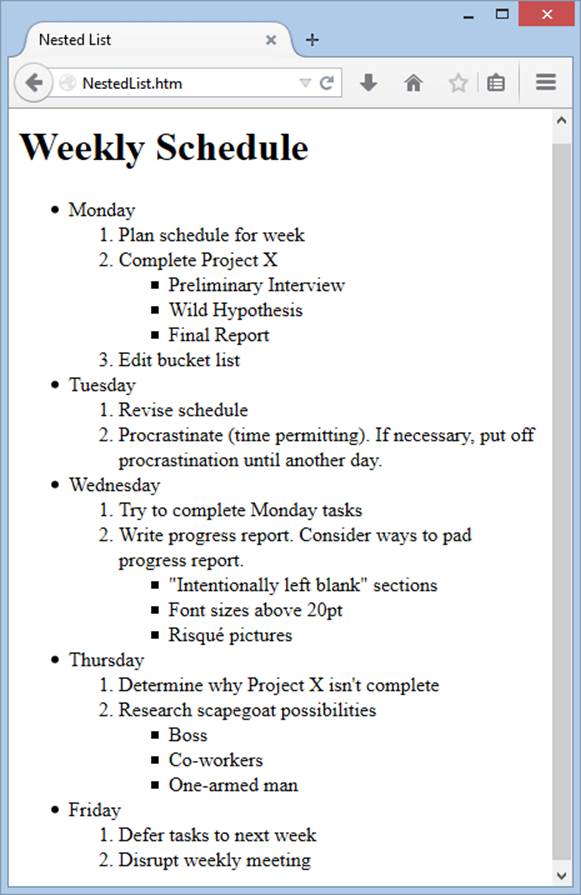
Figure 2-11. In nested lists, the different list styles really start to become useful for distinguishing each level. In this example, a bulleted list holds several numbered lists, and some of these numbered lists hold their own bulleted sub-lists. When you nest lists, browsers indent each subsequent list. Although you aren’t limited in the number of levels you can use, you’ll eventually run out of room in your browser window and force your text up against the right side of the page.
SHARPEN UP: FINISH THE NESTED LIST
The example in Figure 2-11 covers five days of the week. However, the sample code shows the markup for just two days: Monday and Tuesday. If you understand the way HTML works with nested lists, you can fill in the rest—and it makes for excellent list-writing practice.
To try this out, start with the HTML document for the two-day list, which you can find in the Tutorial-2-2 folder on the companion site at http://prosetech.com/web. Then add the extra content to match what you see in Figure 2-11. You’ll need to use the familiar suspects: the <ol>, <ul>, and <li> elements. When you finish, take a look in a browser, or check the solution in the Tutorial-2-2 folder to see if you got every detail.
HTML Elements for Tables
As with any table, an HTML table is a grid of cells built out of rows and columns using elements designed for the purpose. In the Bad Old Days of the Web, crafty web designers used invisible tables to line up pictures and arrange text into columns. Now style sheets fill that gap with top-notch layout features (as described in Chapter 8) and HTML tables are back to being just tables.
A Basic Table
You can whip up a table using these HTML elements:
§ <table> wraps the whole shebang. It’s the starting point for every table (and </table> is the end point).
§ <tr> represents a single row in a table. Every table element (<table>) contains a series of one or more <tr> elements.
§ <td> represents a table cell (“td” stands for “table data”). For each cell you want in a row, add one <td> element. Put the text you want to appear in the cell inside the <td> element. Browsers display it in the same font as ordinary body text.
§ <th> is an optional table element designed for column headings. (Technically, you can use a <th> element instead of a <td> element at any time, although it usually makes the most sense in the first row of a table.) Browsers format the text inside the <th> element in almost the same way as text in a <td> element, except that they automatically boldface and center the text (unless you apply different formatting rules with a style sheet).
Figure 2-12 shows a table at its simplest. Here’s a portion of the HTML used to create it:
<table>
<tr>
<th>Rank</th>
<th>Name</th>
<th>Population</th>
</tr>
<tr>
<td>1</td>
<td>Rome</td>
<td>450,000</td>
</tr>
<tr>
<td>2</td>
<td>Luoyang (Honan), China</td>
<td>420,000</td>
</tr>
<tr>
<td>3</td>
<td>Seleucia (on the Tigris), Iraq</td>
<td>250,000</td>
</tr>
...
</table>
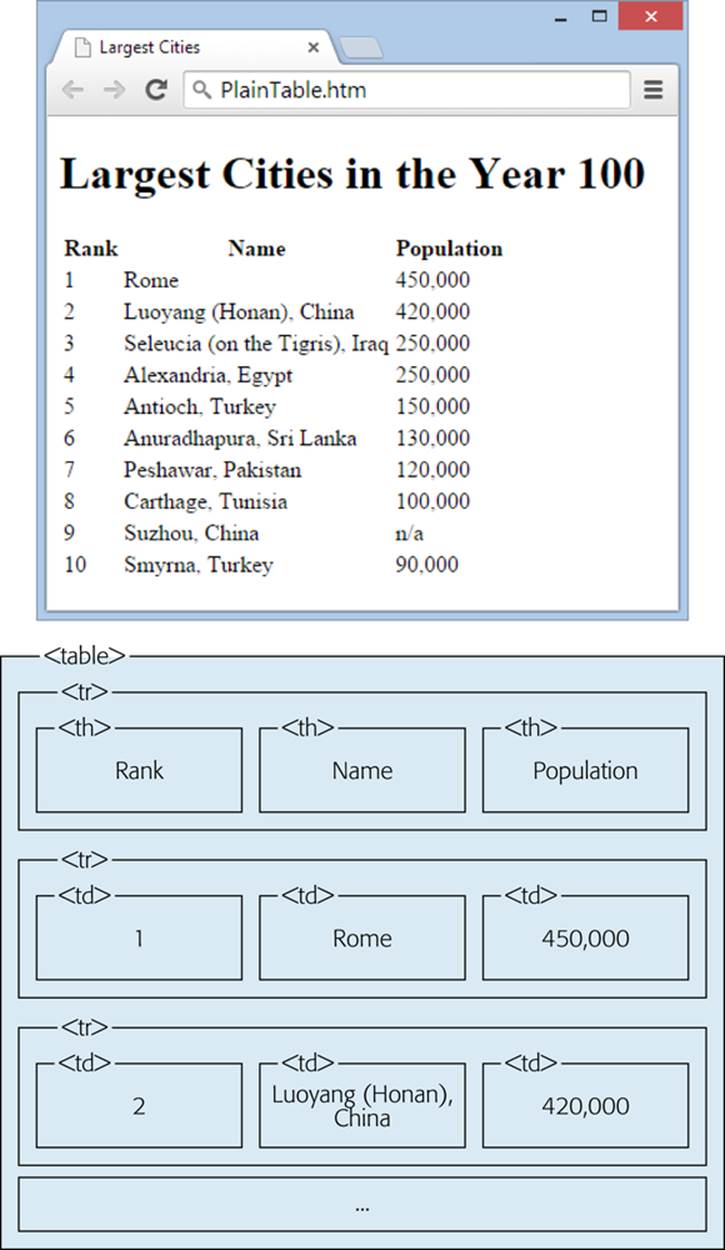
Figure 2-12. Top: This basic table doesn’t have any borders (which is standard), but you can still spot the signature feature of a table: text lined up neatly in rows and columns. Bottom: This behind-the-scenes look at the HTML powering the table above shows the <table>, <tr>, <th>, and <td> elements for the first three rows.
The markup for this table uses indented table elements to help you see the table’s structure. Indenting table elements like this is always a good idea, as it helps you spot mismatched tags. In this example, the only content in the <td> elements is ordinary text. But you can put other HTML elements in cells, too, including images (the <img> element), numbers, and pretty much any other HTML you like.
NOTE
To add borders to tables or control the breadth of table columns, you need to use a style sheet. Using Borders with Tables shows you how to use CSS properties to create table borders.
Spanning Cells
Tables support spanning, a feature that lets a single cell stretch out over several columns or rows. Think of spanning as HTML’s version of the Merge Cells feature in Microsoft Word and Excel.
Spanned cells let you tweak your tables in all kinds of funky ways. You can, for example, specify a column span to stretch a cell over two or more columns beside it. Just add a colspan attribute to the <td> element you want to extend, and specify the total number of columns you want to merge.
Here’s an example that stretches a cell over two columns:
<table>
<tr>
<td>Column 1</td>
<td>Column 2</td>
<td>Column 3</td>
<td>Column 4</td>
</tr>
<tr>
<td> </td>
<td colspan="2">Look out, this cell spans two columns!</td>
<td> </td>
</tr>
...
</table>
Figure 2-13 shows this column-spanning in action. To make sure your table doesn’t get mangled, you need to keep track of the total number of columns you have to work with in each row. In the previous example, the first row starts off by defining four columns:
<tr>
<td>Column 1</td>
<td>Column 2</td>
<td>Column 3</td>
<td>Column 4</td>
</tr>
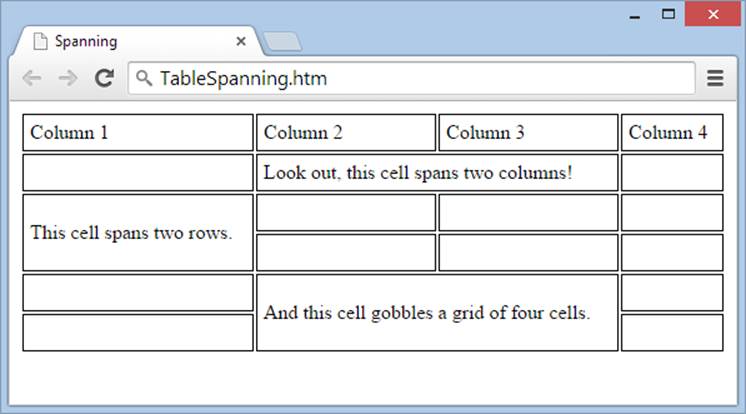
Figure 2-13. A table with row spanning and column spanning run amok. Here, the page creator turned on table borders (page 111) so you can see the outline of each cell.
In the next row, the second column extends over the third column, thanks to column spanning (see the markup below). As a result, the third <td> element actually represents the fourth column. That means you need only three <td> elements to fill up the full width of the table:
<tr>
<!-- This fills column 1 -->
<td> </td>
<!-- This fills columns 2 and 3 -->
<td colspan="2">Look out, this cell spans two columns!</td>
<!-- This fills column 4 -->
<td> </td>
</tr>
This same principle applies to row spanning and the rowspan attribute. In the following example, the first cell in the row actually takes up two rows:
<tr>
<td rowspan="2">This cell spans two rows.</td>
<td> </td>
<td> </td>
<td> </td>
</tr>
In the next row, the cell from above already occupies the first cell, so the first <td> element you declare actually applies to the second column. All in all, therefore, this row needs only three <td> elements:
<tr>
<td> </td>
<td> </td>
<td> </td>
</tr>
If you miscount and add too many cells to a row, you end up with an extra column at the end of your table.
Inline Formatting
It’s best not to format HTML too heavily. To get maximum control over your pages’ appearance and to more easily update your website’s look later on, you should head straight to style sheets (as described in the next chapter). However, a few basic HTML formatting elements are truly useful. You’re certain to come across them, and you’ll probably want to use them in your own pages. These elements are all inline elements, so you use them inside a block element, like a paragraph, a heading, or a list.
Formatting Text: Italics and Bold
You know the elements for bold (<b>) and italic (<i>) formatting from Chapter 1. They’re staples in the HTML world, letting you quickly format snippets of text. Here’s an example:
<p>
<b>Stop!</b> The mattress label says <i>do not remove under penalty
of law</i> and you <i>don't</i> want to mess with mattress companies.
</p>
A browser displays that HTML like this:
Stop! The mattress label says do not remove under penalty of law and you don’t want to mess with mattress companies.
To make life more interesting, HTML has a second set of elements that appear—at first glance—to do the same things. These are <em> (for emphasized text) and <strong>.
Here’s the previous example rewritten to use the <em> and <strong> elements:
<p>
<strong>Stop!</strong> The mattress label says <em>do not remove under penalty
of law</em> and you <em>don't</em> want to mess with mattress companies.
</p>
Ordinarily, the <em> element italicizes text, just like the <i> element does. Similarly, the <strong> element bolds text, just as the <b> element does. The difference is philosophical.
Here’s what the latest version of the HTML standard suggests:
§ Use <strong> for words that are more important than the surrounding text. The word “Stop!” in the previous example is a good example.
§ Use <b> for text that should be presented in bold but doesn’t have greater importance than the rest of your text. This could include keywords, product names, and anything else that would be bold in print. For example, you might decide to bold the first three words of every paragraph in your document for stylistic reasons. It wouldn’t be pretty, but <b> would be a better choice than <strong>.
§ Use <em> for emphasized text, which would have a different inflection if read out loud. One example is the word “don’t” in the previous example.
§ Use <i> for text in an alternate voice, such as foreign words, technical terms, and anything else that you’d set in italics in print. The mattress warning in the previous example is a good model.
NOTE
Truthfully, very few web designers haven’t broken these guidelines at least a few times. The best advice is to be as consistent as possible in your own work. Also, remember that you can change the way you emphasize your text long after you apply your markup. For example, you might decide that you don’t want <strong> text to be bold, but to have a different color, a different font, or a different size. As you’ll see in Chapter 3, you can change the formatting of any element with style sheets.
A Few More Formatting Elements
A few more elements can change the appearance of small snippets of text (see Figure 2-14), although you won’t use them much, if at all. Do take the time to learn them, however, so you can be ready, in the rare case that you need one.
First up are two elements that change the size and placement of your text. You can use the <sub> element for subscripts—text that’s smaller than and placed at the bottom of the current line. The <sup> element stands for superscript—small text at the top of the current line.
Next is the <del> element, which generally represents deleted text in a revised document or text that doesn’t apply anymore. The browser displays this text but crosses it out with a horizontal line. (HTML5 adds a complementary <mark> element for highlighting text, but it’s still too new to get reliable browser support.)
Finally, the <small> element is the right way to format “small print,” like the legalese at the bottom of a contract that a business is really hoping you’ll overlook. In the past, the <small> element simply meant “small-looking text,” and web designers rarely used it. HTML5, however, redefined it with a perfectly logical meaning, and with that gave it a new lease on life.
NOTE
HTML also has a <u> element for underlining text, but webmasters consider it obsolete. If you really want to underline text, put it in a <span> element (which applies no formatting on its own), and then use the text-decoration style property to format the span using CSS (see Basic Fonts).
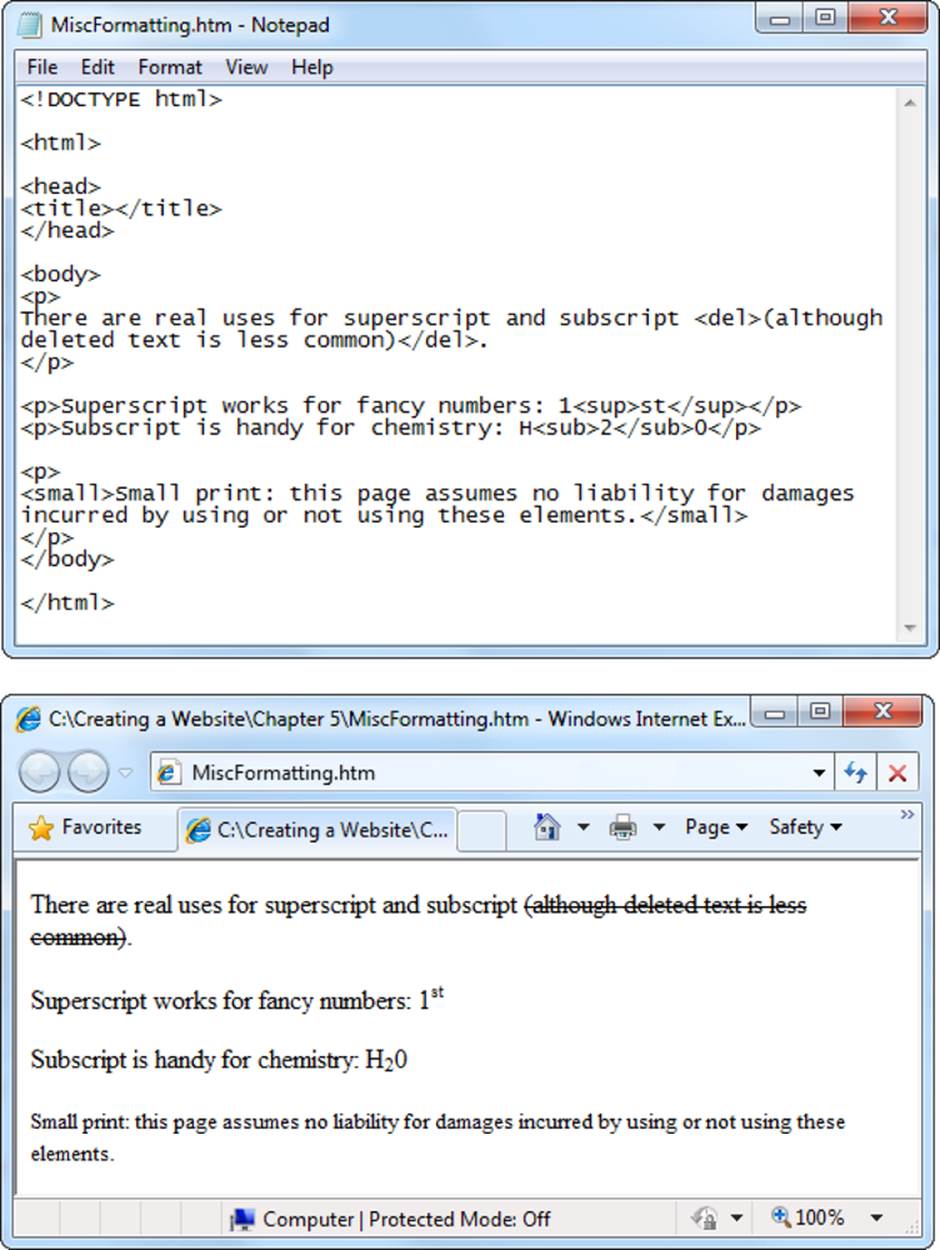
Figure 2-14. Deleted text, superscript, subscript, and small print in action.
Special Characters
Not all characters are available from your keyboard. For example, what if you want to add a copyright symbol (©), a paragraph mark (¶), or an accented e (é)? Good news: HTML supports them all, along with about 250 relatives, including mathematical symbols and Icelandic letters. To add them, however, you need to use some sleight of hand. The trick is to use HTML character entities—special codes that browsers recognize as requests for unusual characters. Table 2-2 has some common options, with a sprinkling of accent characters.
Table 2-2. Common special characters.
|
CHARACTER |
NAME OF CHARACTER |
WHAT TO TYPE |
|
© |
Copyright |
© |
|
® |
Registered trademark |
® |
|
¢ |
Cent sign |
¢ |
|
£ |
Pound sterling |
£ |
|
¥ |
Yen sign |
¥ |
|
€ |
Euro sign |
€ (but € is better supported) |
|
° |
Degree sign |
° |
|
± |
Plus or minus sign |
± |
|
÷ |
Division sign |
÷ |
|
x |
Multiply sign |
× |
|
µ |
Micro sign |
µ |
|
¼ |
One-fourth fraction |
¼ |
|
½ |
One-half fraction |
½ |
|
¾ |
Three-fourths fraction |
¾ |
|
¶ |
Paragraph sign |
¶ |
|
§ |
Section sign |
§ |
|
« |
Left angle quote, guillemot left |
« |
|
» |
Right angle quote, guillemot right |
» |
|
¡ |
Inverted exclamation mark |
¡ |
|
¿ |
Inverted question mark |
¿ |
|
æ |
Small ae diphthong (ligature) |
æ |
|
ç |
Small c, cedilla |
ç |
|
è |
Small e, grave accent |
è |
|
é |
Small e, acute accent |
é |
|
ê |
Small e, circumflex accent |
ê |
|
ë |
Small e, dieresis or umlaut mark |
ë |
|
ö |
Small o, dieresis or umlaut mark |
ö |
|
É |
Capital E, acute accent |
É |
HTML character entities aren’t just for non-English letters and exotic symbols. You also need them to deal with characters that have special meaning in HTML—namely angle brackets (< >) and the ampersand (&). You shouldn’t enter these characters directly into a web page because a browser will assume you’re trying to give it a super-special instruction. Instead, you need to use the equivalent character entity, as shown in Table 2-3.
Table 2-3. HTML character entities.
|
CHARACTER |
NAME OF CHARACTER |
WHAT TO TYPE |
|
< |
Left angle bracket |
< |
|
> |
Right angle bracket |
> |
|
& |
Ampersand |
& |
|
“ |
Double quotation mark |
" |
Strictly speaking, you don’t need all these entities all the time. For example, it’s safe to insert ordinary quotation marks into your web page text. However, you can’t use quotation marks in attribute values, because there they have a special meaning (they indicate the beginning and ending of the value). If you need a quotation mark in an attribute value, you need to rely on the " character entity. On the other hand, the character entities for in-text angle brackets are always necessary, no matter where you plan to put them in a page.
Here’s some flawed text that won’t display correctly:
I love the greater than (>) and less than (<) symbols. Problem is, when I type
them my browser thinks I'm trying to use a tag.
And here’s the corrected version, with HTML character entities. When a browser processes and displays this text, it replaces the entities with the characters you really want.
I love the greater than (>) and less than (<) symbols. Problem is, when
I type them my browser thinks I'm trying to use a tag.
TIP
To get a more comprehensive list of special characters and see how they look in your browser, check out the reference on http://tinyurl.com/special-chrs, courtesy of the folks at Wired Webmonkey.
UP TO SPEED: TAMING LONG URLS WITH TINYURL
Keen eyes will notice something unusual about the web address mentioned in the Tip box on Tip (that’s the URL http://tinyurl.com/special-chrs). Although the address leads to the Webmonkey site, the URL starts with the seemingly unrelated domain name http://tinyurl.com. That’s because the full Webmonkey URL has been deliberately shortened using TinyURL, a free website redirection service. TinyURL is a handy tool you can use whenever you come across a URL that’s so impractically long or convoluted that you’d ordinarily have no chance of jotting it down, typing it in, or shouting it over the phone.
Here’s how to use TinyURL. First, copy your awkwardly long URL. Then, head to the website http://tinyurl.com, type or paste the URL into the text box on the front page, and click Make TinyURL. The site rewards you with a much shorter URL that starts with http://tinyurl.com. You can suggest some descriptive text for the URL (like special-chrs in the Webmonkey example) or you can let TinyURL pick an arbitrary address that includes random characters (like http://tinyurl.com/ye8mf7k).
Best of all, a TinyURL works just as well as the original one—type it into any browser and you’ll get to the original site. So how does this system work? When you type a TinyURL, your browser takes you to the TinyURL website. TinyURL keeps a long list of all the whacked-out URLs people provide, as well as the new, shorter URLs it issues in their place. When you request a page, the site looks up the TinyURL in that list, finds the original URL, and redirects your browser to the site you really want. Here’s the neat part: The whole process unfolds so quickly that you’d have no idea it was taking place if you hadn’t read this box.
Non-English Languages
Although character entities work perfectly well, they can be a bit clumsy if you need to rely on them all the time. For example, consider the famous French phrase, “We were given speech to hide our thoughts,” shown here:
La parole nous a été donnée pour déguiser notre pensée.
Here’s what it looks like with character entities replacing all the accented characters:
La parole nous a été donnée pour déguiser notre pensée.
French-speaking web creators would be unlikely to put up with this for long. Fortunately, there’s a solution called Unicode encoding. Essentially, Unicode is a system that converts characters into the bytes that computers understand and that display properly on your web page. By using Unicode encoding, you can create accented characters just as easily as if they were keys on your keyboard.
So how does it work? First, you need a way to get the accented characters into your web page. Here are some options:
§ Type it in. Many non-English speakers will have the benefit of keyboards that include accented characters.
§ Use a utility. In Windows, you can run a little utility called charmap (short for Character Map) that lets you pick from a range of special characters and copy your selected character to the Clipboard so it’s ready for pasting into your text editor. To run charmap, click the Start button and then type charmap in the search box. Click the program name when it appears (Figure 2-15).
§ Use your web page editor. Some web page editors include their own built-in symbol-pickers. In Dreamweaver, you can use Insert→HTML→Special Characters→Other. In Expression Web, choose Insert→Symbol. Usually, this process inserts character entities, not Unicode characters. Though the end result is the same, your HTML markup will still include a clutter of codes.
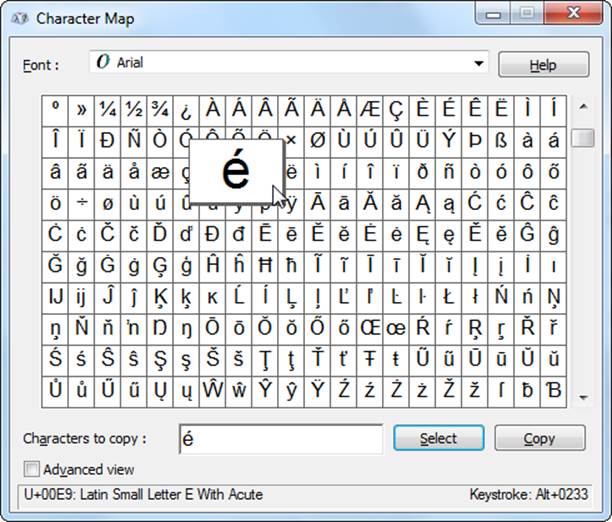
Figure 2-15. Charmap gives you a comprehensive list of special characters you can copy and paste into any program. Just double-click the character you want, and then click the Copy button. When you paste the character into another program, you get the actual character, Unicode-style, not the cryptic character entity.
When you use Unicode encoding, make sure you save your web page correctly. This isn’t a problem if you use a professional web page editor, which is smart enough to get it right the first time, but Unicode can trip up text editors. For example, in Windows Notepad, you need to choose File→Save As, and then pick UTF-8 from the Encoding list (see Figure 2-16). For the Mac’s TextEdit, go to TextEdit→Preferences. Choose the “Open and Save” tab and make sure you select “Unicode (UTF-8)” for the Encoding setting.
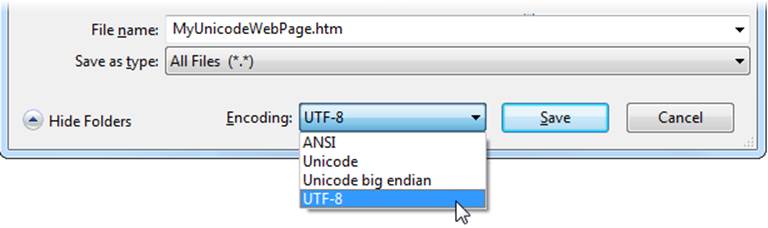
Figure 2-16. The overwhelming standard of the Web, UTF-8 is a slimmed-down version of Unicode. However, you need to explicitly tell Notepad to use UTF-8 encoding when you save a web page that includes special characters, like accented letters.
SHARPEN UP: DECODE THE MARKUP
Here’s an excellent exercise that will force you to think like a web browser. In your text editor, open an HTML file that you’ve never seen before. Then read through the markup and try to piece together the document’s structure, just by remembering what each element represents. When you finish, you can take a look at the page in a browser to see if you correctly interpreted all the tags.
Interested in giving it a shot? In the Tutorial-2-3 folder on the companion site, there’s a small collection of sample web pages that feature the common text elements you explored in this chapter. However, there’s a twist. Each web page uses HTML comments (Where Are All the Pictures?) to hide the web page content. That means that you can’t sneak a peek in your browser—if you do, all you’ll see is a blank page.
Instead, you need to open the web page in a text editor, remove the two comment markers (that’s the <!-- code at the beginning of the content and the --> code at the end), and save the changes. Then you can open the page in your browser and see the result. But by this point, you’ll have read through the markup, and you can make your prediction about what you’ll see.
All materials on the site are licensed Creative Commons Attribution-Sharealike 3.0 Unported CC BY-SA 3.0 & GNU Free Documentation License (GFDL)
If you are the copyright holder of any material contained on our site and intend to remove it, please contact our site administrator for approval.
© 2016-2026 All site design rights belong to S.Y.A.