Creating a Website: The Missing Manual (2015)
Part 3. Connecting with Your Audience
Chapter 13. Making Money with Your Site
If it’s not for sale on the Web, it’s probably not for sale at all. It’s no secret that the Internet is a global bazaar with more merchandise than a decade’s worth of garage sales. Web surfers generate huge amounts of traffic hunting for travel discounts, discussing hot deals, and scouring eBay for bargains. So how can you get your share of web capital?
One obvious option is to sell a real, tangible product. The Internet abounds with specialty shops hawking art, jewelry, and handmade goods. But even if you have a product ready to sell, you need a few specialized tools to transform your corner of the Web into a bustling ecommerce storefront. For example, you’ll probably want a virtual shopping cart, which lets visitors collect items they want to buy as they browse. And when they check out, you need a secure way to accept their cash—usually by way of a credit card transaction. In this chapter, you’ll learn how to implement both of these features on your site using PayPal’s merchant tools.
Even if you aren’t looking for a place to unload your hand-crafted fishbone pencils, your website can still help fatten your wallet. In fact, just about any website can become profitable, either by selling ad space or by recommending other companies’ products. In this chapter, you’ll use two of the Web’s most popular affiliate programs—Google AdSense and Amazon Associates—to collect some spare cash.
NOTE
Not a U.S. citizen? Don’t worry—all the money-making ideas in this chapter use companies that provide services worldwide. Google, Amazon, and PayPal let you rake in the cash no matter where you live.
Money-Making the Web Way
The Web offers many paths to fiduciary gain. Here are some of the most popular:
§ Donations. It sounds crazy, but some websites badger visitors for spare change. Donations might work if your site provides some truly valuable and unique content (see Figure 13-1). Otherwise, save yourself the bother. Don’t be seduced by logic like “If 1,000 visitors come to my site and every one pays just 10 cents….” They won’t.
TIP
If you think that your website offers some unique, practical information, and you think your visitors might be tempted to cough up a few cents in appreciation, you can add a Donate button to your page using PayPal (PayPal Merchant Tools). Consider including a message like “Buy me a beer/cup of coffee” above the Donate button to make the virtual transaction feel like a real-world tip (and to emphasize that you’re hoping to collect spare change, not the next payment on your car loan).
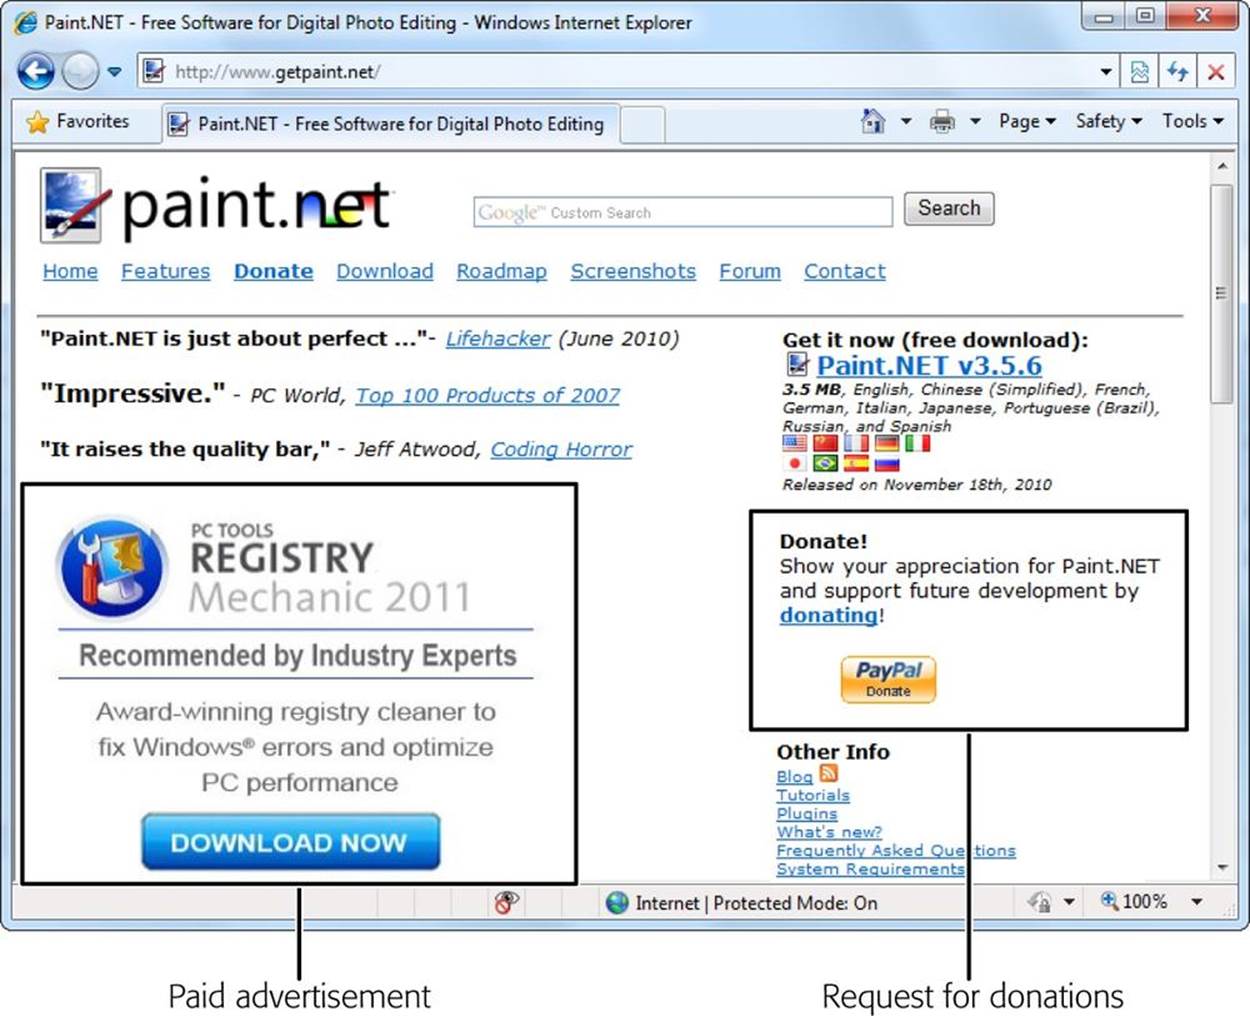
Figure 13-1. Sites that offer free programs are some of the most likely to ask for a handout. But even the best websites have trouble making real money this way. Here, Paint.net asks for spare change but hedges its bets by selling ad space, too.
§ Advertisements. The most popular way to make money on the Web is by selling small pieces of web page real estate. Unfortunately, it’s also a great way to exasperate your visitors, especially if the ads are distracting, unrelated to your site, or simply take up too much space. Not long ago, ads were the worst thing you could do to web pages. Fortunately, in the 21st century, monitors are bigger, and companies like Google provide targeted, unobtrusive ads that fit right in with the rest of your page.
§ Affiliate programs. Rather than plaster ads across your site, why not put in a good word for a company you really believe in? Many affiliate programs give you a commission for referring customers to their sites. For example, if you review gourmet cookbooks, why not include links to those books on Amazon’s website? If an interested reader buys a book, Amazon’s associate program forks over a few dollars.
§ Sell stuff. If you have your own products to sell, the Web is the perfect medium, since the cost to set up shop online is much smaller than it is in the real world. You can build a slick store, complete with product pictures and a shopping cart, with surprisingly little work. (And if you don’t have your own products to sell, you can whip up some simple customized goods at CafePress, as described in the box on Sell Your Custom Designs.)
§ Pay-for-content. If you have really great content, you can ask for cash before letting your visitors into your site. Warning: This is even harder to pull off than asking for donations, because visitors need to take a huge leap of faith. It’s a technique used by established media companies like the Wall Street Journal and by hucksters promising secret ways to conquer the real estate market or get free camcorders.
NOTE
Pay-for-content is the only money-making scheme you won’t learn to pull off in this chapter. That’s because in order for it to work, you need a way to authenticate visitors—in other words, you need to be able to identify visitors to tell whether they’ve paid you or not. This requires some heavy-duty programming (or the ability to pay a company for the service).
Google AdSense
Even if you don’t have a product to sell, you still have one valuable asset: the attention of your visitors. The good news is that a huge number of companies are ready to pay for those eyes.
Some of these companies pay you a minuscule fee every time someone visits a page that carries their ad, while others pay you only when a reader actually clicks an ad, or when a visitor both clicks an ad and buys something. Fortunately, you don’t need to waste hours checking out all these options, because Google has an advertising program that handily beats just about every other system out there. It’s called Google AdSense.
The AdSense program requires you to display small text, image, or video advertisements on your pages. You sign up, set aside some space on one or more pages, and paste in some Google-supplied HTML (see Figure 13-2). Google takes care of the rest, filling that space with one or more ads every time someone requests your page.
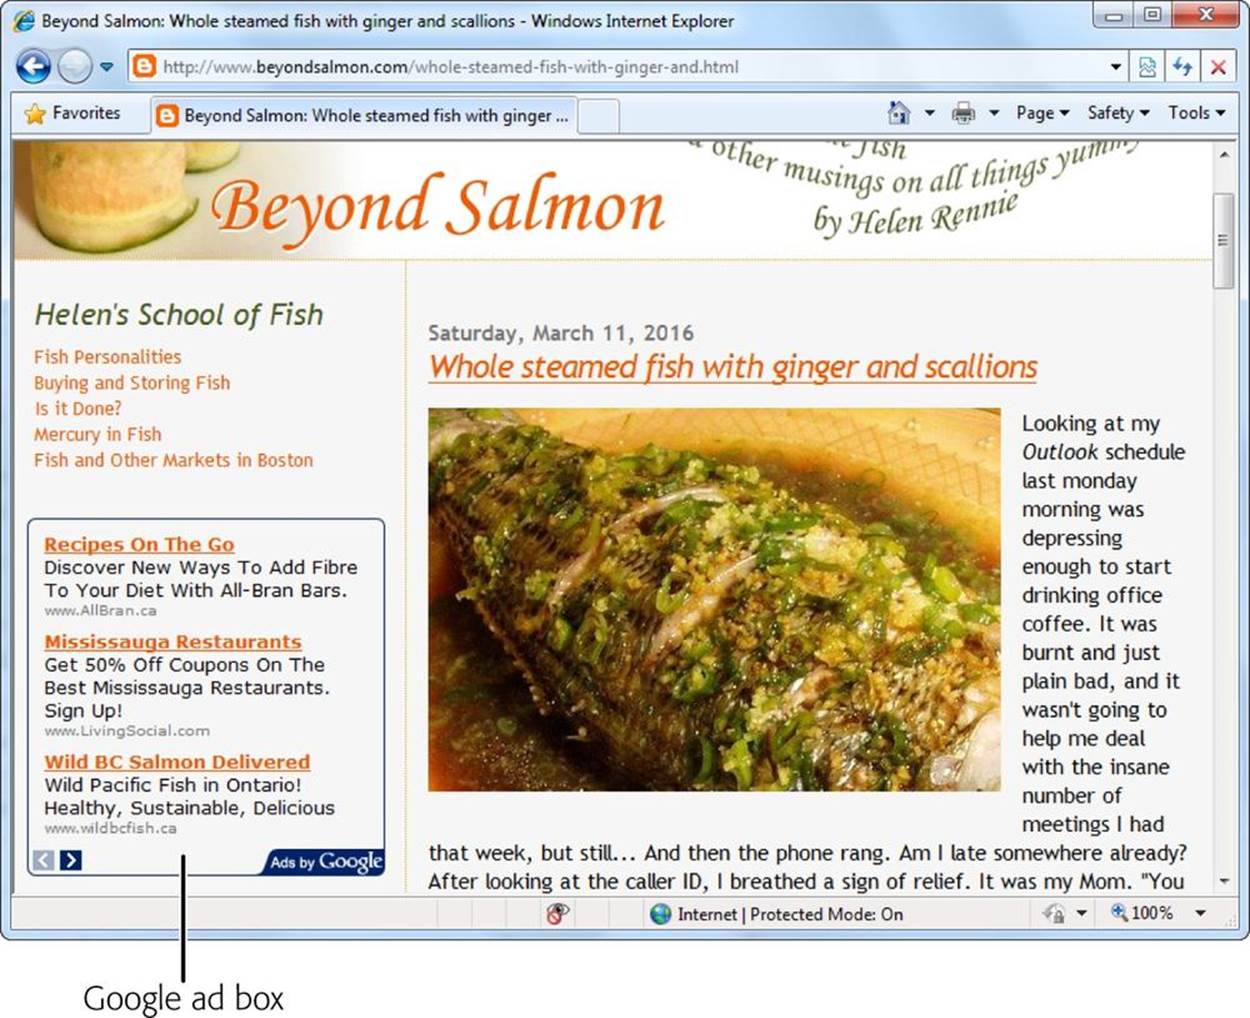
Figure 13-2. This website nestles a box of three Google AdSense ads alongside a scrumptious recipe. The ads blend into the scenery perfectly because they have a similar visual style (the same background color and font), and because the content matches the article. Google calls this grouping of ads an “ad unit.” You choose the ad layout and the number of ads you want per page, so it’s up to you whether you want to slip a few ads in quietly or have them dominate your page.
Just displaying Google AdSense ads doesn’t get you anything, but whenever a visitor clicks one of those ads (and travels to the advertiser’s website), you earn a few cents. When your total reaches $100, Google mails you a check or sends the cash straight to your bank account.
There’s no way to know for sure how much money an individual AdSense click is worth. That’s because Google advertisers compete for keywords by bidding on them, and keyword prices can fluctuate over time. Google does let you know how much your clicks were worth (in total) when it pays you. A typical click nets you about 10 cents, but per-click prices often range from a few pennies to several dollars.
Before you become an AdSense devotee, you should know what makes AdSense different from other ad programs. Here are some of its top advantages:
§ AdSense ads are relevant. Google automatically scans your site and picks ads based on your content. So if you have a site devoted to SpongeBob SquarePants, Google provides ads hawking SpongeBob DVDs, inflatable dolls, and birthday gear. Using content-based ads is far, far better than aggravating your visitors with offers for completely unrelated products, like high-tech spy cameras. Even better from a profit perspective, these “targeted” ads dramatically increase the chance that a visitor will click an ad, netting you a click-through fee. And if you’re worried about a competitor’s site turning up in an advertisement, you can tell Google to filter it out (see Creating an Ad).
§ AdSense ads blend in with the scenery. Google gives you a range of layout and color options for its ads, so you can match the design and slick color scheme of your site.
§ Google provides fair payment. Google charges advertisers different amounts of money for different keywords. Some advertising providers pay their members the same amount for any click-through and swallow the extra money. Not Google. It pays you according to the current value of the keyword, which guarantees that you always get a competitive rate.
§ There are no startup charges. The AdSense program is free.
TIP
Don’t try to cheat AdSense. Devious web developers have tried to game the system by clicking their own ads over and over again, or even firing up automated programs to do that for them. The problem is that Google uses various techniques to spot suspicious usage patterns. If it sees a ridiculous number of clicks over a short period of time, all originating from the same computer, it’s likely to spot the deception and ban your site outright.
Signing Up for AdSense
When you’re ready to get started with AdSense, follow these steps:
1. Go to the AdSense home page (www.google.com/adsense).
If you’re not already logged in with your Google Account, click “Sign in.” Use the same account you use for other Google services, including Gmail, the Webmaster Tools, and Google Analytics. After you sign into your Google account, you still need to explicitly sign up for the AdSense program.
2. Click the “Sign up” link or the “Get Started Now” button to join up with AdSense.
Clicking either one starts the AdSense enrollment process. Next, Google starts gathering account information.
3. Enter your site URL and identify its language (Figure 13-3). Then click Continue.
Google insists on checking out your site before it places ads there. If your website is still in the planning stage and you haven’t picked a domain yet, you’ll need to sign up for AdSense later. (However, Google will let you add more websites to your AdSense account after you create it.)
TIP
You can learn much more about the specifics of Google’s ad program by visiting www.google.com/adsense. There’s also a great, not-too-detailed walkthrough at www.google.com/services/adsense_tour.
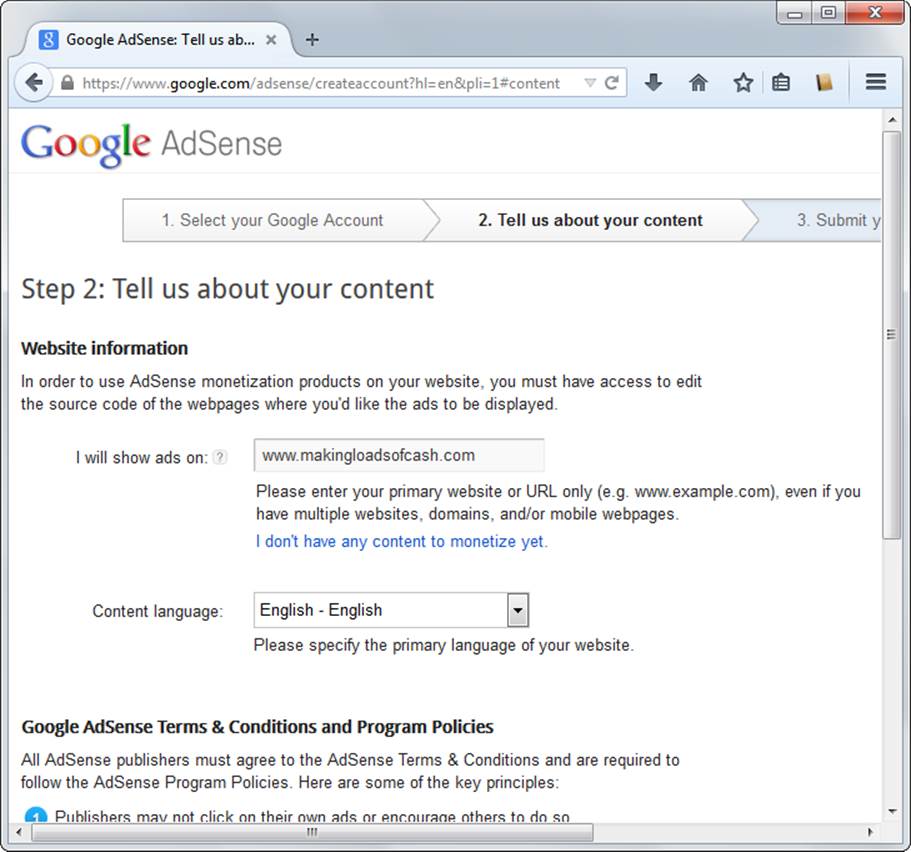
Figure 13-3. Google asks you to fill out two pages of information before you can sign up for AdSense. The bottom of this page includes a long list of rules about how you can use AdSense and the types of sites Google allows into the program (see the box on page 420 for a recap).
4. Fill in your contact details (Figure 13-4).
When applying for AdSense, you need to indicate whether your account is for an individual (you, personally) or a business (your registered business). This determines the kind of tax information Google needs to collect. Registered businesses based in the U.S. need an EIN (Employer Identification Number). U.S. citizens applying as individuals need to give Google a Social Security number. Citizens of other countries may need to apply for a U.S. Taxpayer Identification Number—see www.google.com/adsense/taxinfo for the lowdown.
Finally, fill in your name, address, and phone number.
NOTE
Google won’t pay you until it gets your tax details. To help make the process less painful, it guides you to the correct tax form and lets you submit it online. However, Google won’t prompt you for tax information until you collect at least $10 in advertising revenue.
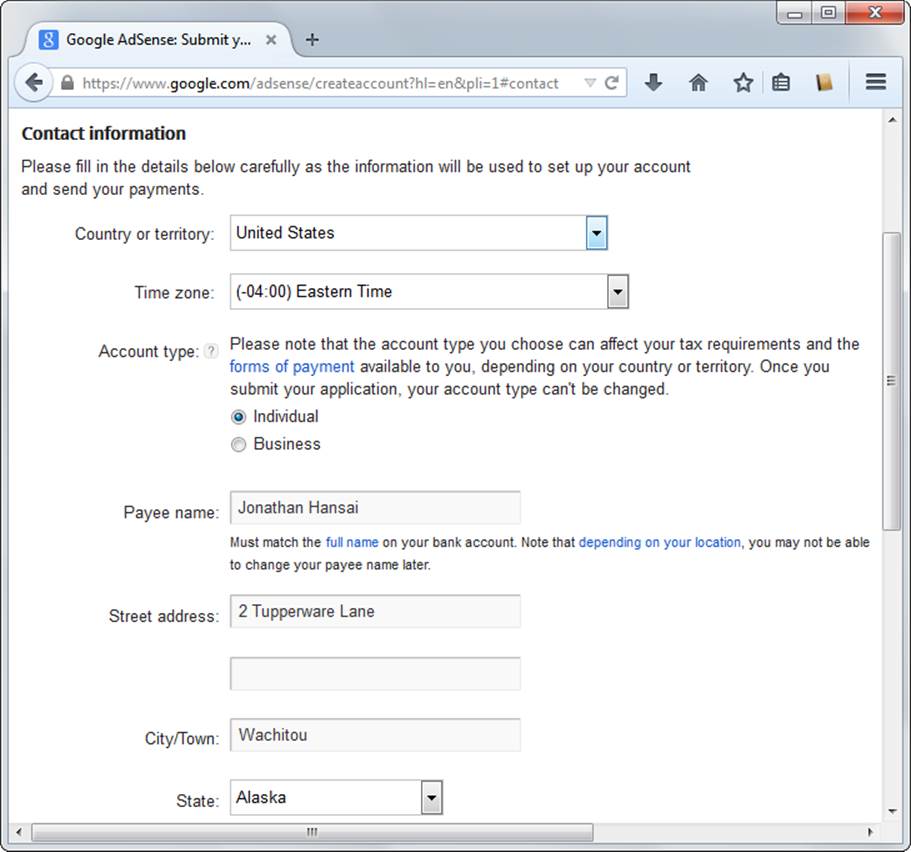
Figure 13-4. In the final step, Google needs to know exactly who you are. Get this info right, because you can’t change it later on.
5. Once you finish, click “Submit my application.”
Now you need to wait for Google to approve your application. This usually takes a couple of days, during which someone at Google takes a quick look at your site to confirm that it exists and that it isn’t promoting illegal activity (for example, offering pirated copies of Windows 10). Once this is done, you’ll get a message confirming that Google has activated your AdSense account.
The AdSense Window
Now that you have an AdSense account, you’re ready to design some ads and put them on your site. Go to www.google.com/adsense and log in with your email address and password. Google opens the AdSense page, which displays a summary of your recent earnings. You can switch to a different AdSense page using the tabs at the top of the window (see Figure 13-5).
UP TO SPEED: ADSENSE RULES
Google enforces a handful of rules that your website has to follow. Many are common sense, but it’s still worth taking a quick look at them.
§ You can’t put the Google ads in email messages or pop-up windows; the temptation for spammers to abuse the system that way is just too great.
§ You can’t put ads on pages that don’t feature any “real” content. This includes error, login, registration, welcome, and under-construction pages. You definitely can’t create pages that include nothing but ads.
§ You can’t try to obscure parts of an ad (for example, by placing other elements over them using a style sheet rule). The entire content of an ad needs to be visible.
§ You can’t click your own ads, or use automated programs to do that for you. Finally, you can’t entice your visitors to click your links using threats or incentives.
§ Your website can’t include excessive profanity, copyrighted material, pornography, content about hacking high-tech security systems, advocacy for illegal drugs, hate speech, or anything related to gambling.
To read the full AdSense policy, visit www.google.com/adsense/policies.
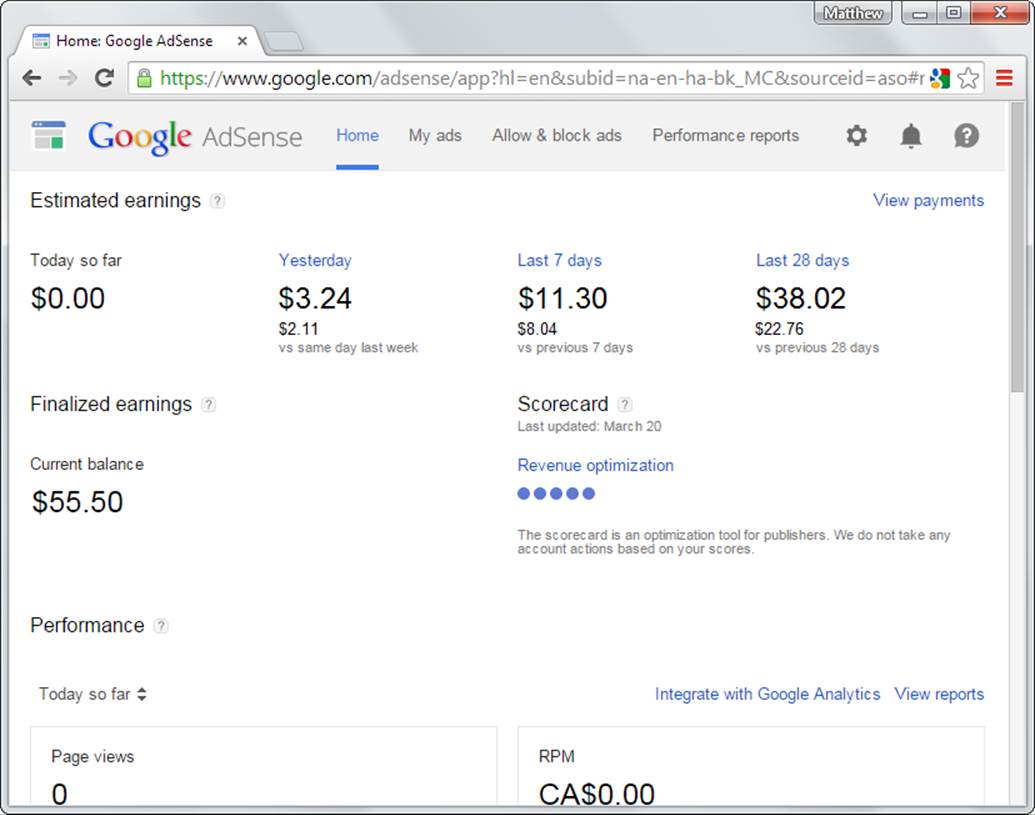
Figure 13-5. Use the tabs at the top of the AdSense window to switch to another page. Initially, you begin on the Home tab, where you configure your AdSense account and review the money you’ve made so far.
These pages include the following:
§ Home. This page gives you some critical summary information, including the amount of money you’ve made today, and notifications about any problems that prevent your ads from running (called alerts).
You’ll also see some additional links in the panel on the left. For example, you can view your payment history, which lists each check Google mailed you (click Payments), and you can update the account information you supplied when you registered, such as your mailing address and tax information (click “Account settings”). Or click Resources to browse the AdSense blog, chat with others in AdSense’s help forum, and watch some inspiring success stories on video.
§ My ads. This is your starting point for creating AdSense ads—it’s where you specify your ads’ display format and get the code you need to insert into your web pages.
§ Allow & block ads. Here you manage one of AdSense’s most advanced features: filtering out the ads you don’t want. For example, you can tell Google to refrain from showing ads in certain categories or from specific websites. The idea here is twofold: to bar your competition and to ensure that your visitors see ads relevant to them. (If the ads aren’t useful, your visitors are less likely to click, and your earnings will plummet.)
§ Performance reports. These reports help you assess the success of your ads. You start out with a graph that charts how much money you made over the last week. You can customize this graph by changing options and playing with filters until you find exactly the data you need. And if you want to do some heavy-duty analysis, you can download the numbers in an Excel-friendly CSV format in a single click.
NOTE
No matter which report you run, Google won’t tell you what each individual click was worth or which particular ad caught a reader’s eye. Instead, it gives you an estimate of the click value on a given day (what Google calls the CPC, or cost-per-click). Google displays other useful information, too, like the percentage of times your visitors clicked your ads (called the CTR, orclick-through rate). For example, a click-through rate of 2 percent means that if your page was requested 100 times, an ad on the page was clicked just twice.
Creating an Ad
Google provides different types of ads, from plain two- or three-word text links to video boxes. However, most ads are of two types:
§ Text ads. These are brief, text-only pitches, like the ones you saw in Figure 13-2. They typically include a title (which is also a link), followed by a line or two of text, and may include the advertiser’s website name at the bottom.
NOTE
Text ads are still the most popular type of Google ad. They’re particularly adept at blending into page backgrounds, which means less irritation for your visitors (which is good) but fewer clicks (which is not so good).
§ Display ads. These ads are actually images that range in size from banner strips to large squares. Image ads are more obtrusive than text ads, but they’re steadily gaining in popularity. If your web page already has plenty of pictures, image ads look particularly good—for example, you’ll often see them blending in at the side of a news article.
Before you can create the right ads, you need a basic idea of where you plan to put them. Consider whether you want a vertical or horizontal strip of ads, and how wide or long that bar should be. Figure 13-6 previews just a few of your layout options.
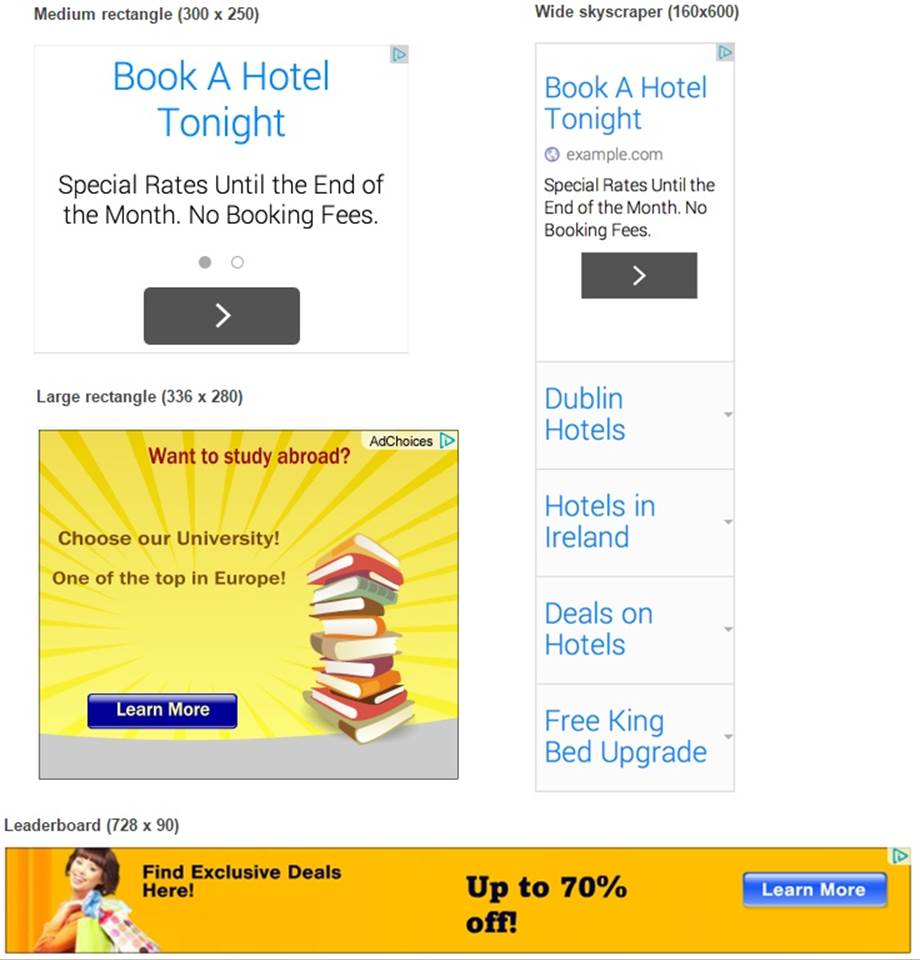
Figure 13-6. Ads come in a variety of shapes and sizes, from squares to vertical and horizontal strips. That means you can always find an ad design to fit your layout. Here are two text ads (“Book a Hotel Tonight”) and two display ads, out of the many orientations and sizes available.
When you’re ready to dive in and build your first ad (which Google calls an ad unit), follow these steps:
1. Click the “My ads” tab at the top of the page.
This opens the “My ads” section, which lists all the ads you’ve created. Right now, the list is empty.
2. Click the “New ad unit” button, which appears under the Content→“Ad units” heading.
Now it’s time to fill in the information for your ad.
3. Choose a name for your ad.
This name doesn’t actually appear in the ad; it just makes your life easier as you manage ads. After you create your ad, you can call it up by name (for example, Travel Page Ad) and modify it. This saves you the trouble of rebuilding your ad from scratch.
4. Choose the size of the ad box from the “Ad size” list (Figure 13-7).
Google always packages AdSense ads in boxes. A box can include one or several ads. The format you choose determines whether you’ll get a vertical stack of ads or a horizontal row. It also determines how many ads you see at once (from one to five).
TIP
To get a closer look at a specific ad size, click its Preview link. Google opens a window that shows a sample ad at that size.
Google provides one special size option, called Responsive. Choose this, and Google supplies just enough ads to fill the width of the containing element. For example, say you create a <div> that’s 140 pixels wide. Choose the Responsive ad size, and Google might give you a block of ads that’s 120 pixels wide (because that fits inside the 140-pixel width) and 240 pixels tall (because that’s a standard height for an ad block with that width). But the real reason to use Responsive ad sizes is if you’re creating a layout that changes based on the size of the browser window, such as the proportional layouts discussed on Switching to a Resizable Layout.
Say, for example, you have a column that has a proportional width of 30% of the browser window. If you use the Responsive ad size and a viewer makes the window wider, Google fetches a bigger ad block to match. If you have a fixed layout (Attaching Your Style Sheet), on the other hand, you already know exactly how much space is available for your ad, so you don’t need to use the Responsive ad size.
5. Select a type of ad from the “Ad type” list.
Choose whether you want to use text ads, display ads, or a mix of the two (the preselected choice). Generally, image ads stand out more than text ads, but you need to balance two conflicting goals: your desire to make money by attracting clicks with eye-catching ads and your desire to minimize distraction by choosing less obtrusive ads.
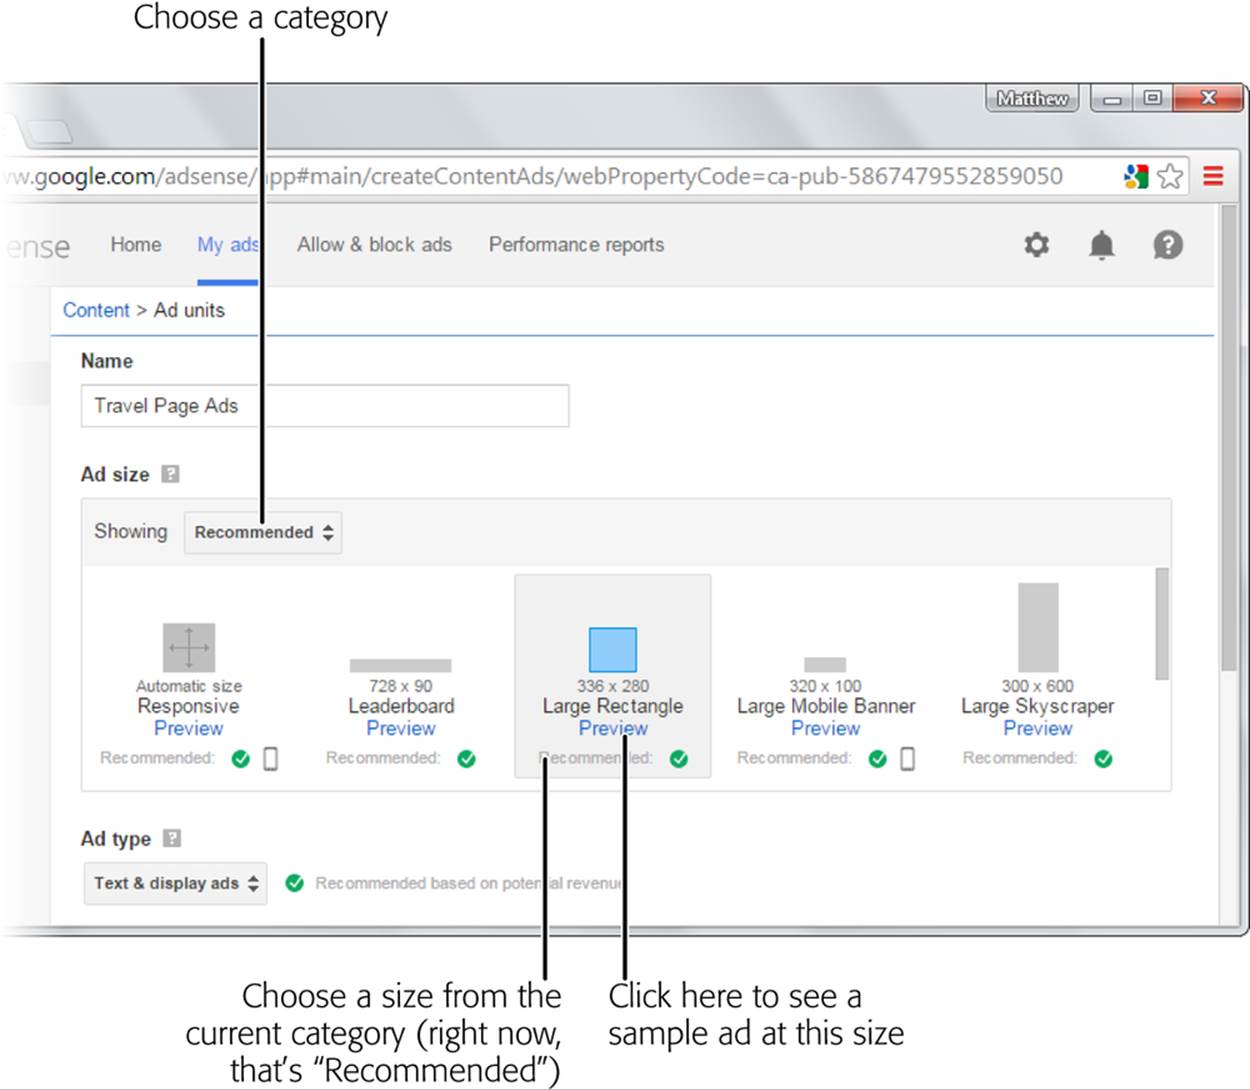
Figure 13-7. Google recommends a small set of common ad sizes. You pick the one that fits your layout best. For more choices, click the drop-down list above the gallery and choose the type of ad layout you want (such as Horizontal, Vertical, or Custom Size, the latter if you want to specify the exact dimensions yourself).
6. Customize your ad’s colors, borders, and fonts in the “Text ad style” section (optional).
You can choose from a ready-made color palette, like Minimalist (black and gray text on white) or Neon (purple on black). But if you want to make the colors in your buttons match the colors on your site, click the “Create ad style” button (Figure 13-8). For example, you might want the ad box’s border or background color to blend in with the background on your page.
To change the colors of an ad, modify the color codes in the boxes underneath the list of color palettes. You can also choose a font family (from a very limited list) and font size. When you finish, make sure your custom style has a name and then click Save.
NOTE
The color and font settings apply to text ads. If you choose to use display ads only, you can skip this section because the settings won’t have any effect.
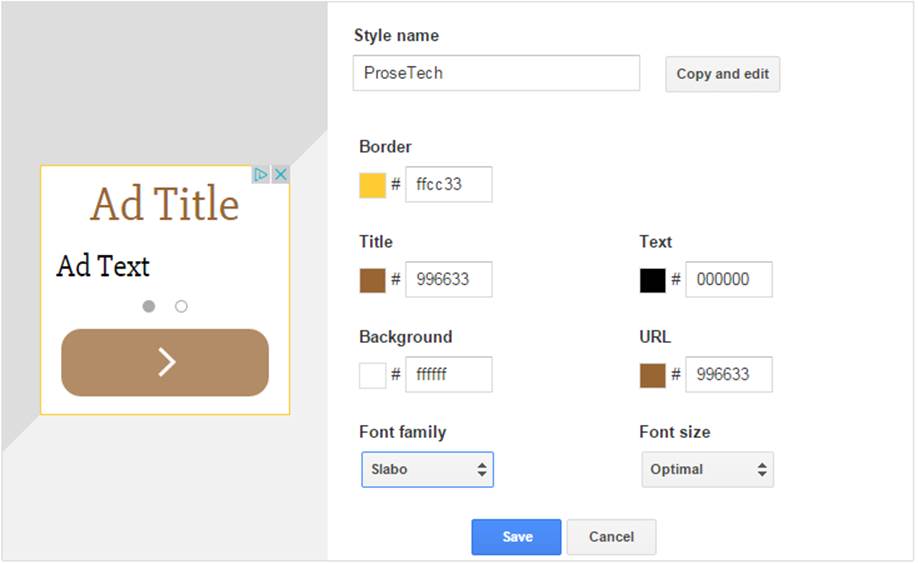
Figure 13-8. As you change your ad’s colors, font, and borders, Google previews the results in a single-ad format.
TIP
If you don’t change Google’s standard ad colors, your ad box will have the same background color as your web page (because it’s transparent) and no border. For advice on how to choose custom HTML colors, see Finding the Right Color.
7. Choose a channel in the “Custom channels” section (optional).
If you create a half-dozen ads and scatter them on different pages throughout your site, you don’t know which ones are making you money. Google’s ad sales report shows you only the total number of clicks for all the pages on your site. Many site owners want more detail about which ads are working. Enter Google’s channels feature.
To track the performance of individual ads, you place each ad in a separate, virtual “channel,” which tallies ad clicks. Google lets you create reports that compare channels so you can tell which ads perform best.
To create a new channel, click “Create new custom channel,” which opens a window asking you to name the channel.
Once you create a channel, you can assign an ad to it by clicking the tiny “include” link next to the channel name. (Click it again to stop tracking an ad.)
TIP
Channels are a great way to try out different ad strategies and see which ad format and placement work best. You can add multiple ads to the same channel to track them as a group, or you can create a separate channel for each ad.
8. Choose a backup ad.
When you first put an ad on a page, Google doesn’t yet know what ads are a good match for your content, so it temporarily keeps that space blank. If you don’t like that, you have two options. You can choose a solid color, in which case Google fills the ad with that color only. The idea is to use a color that matches the background of your page, so the “ad” disappears entirely. Your second option is to specify a URL for a page you want to place there. Until the real ads are ready, that content appears on your page.
9. Click “Save and get code.”
Once you do, a window pops up with the JavaScript code for your ad (see Figure 13-9).
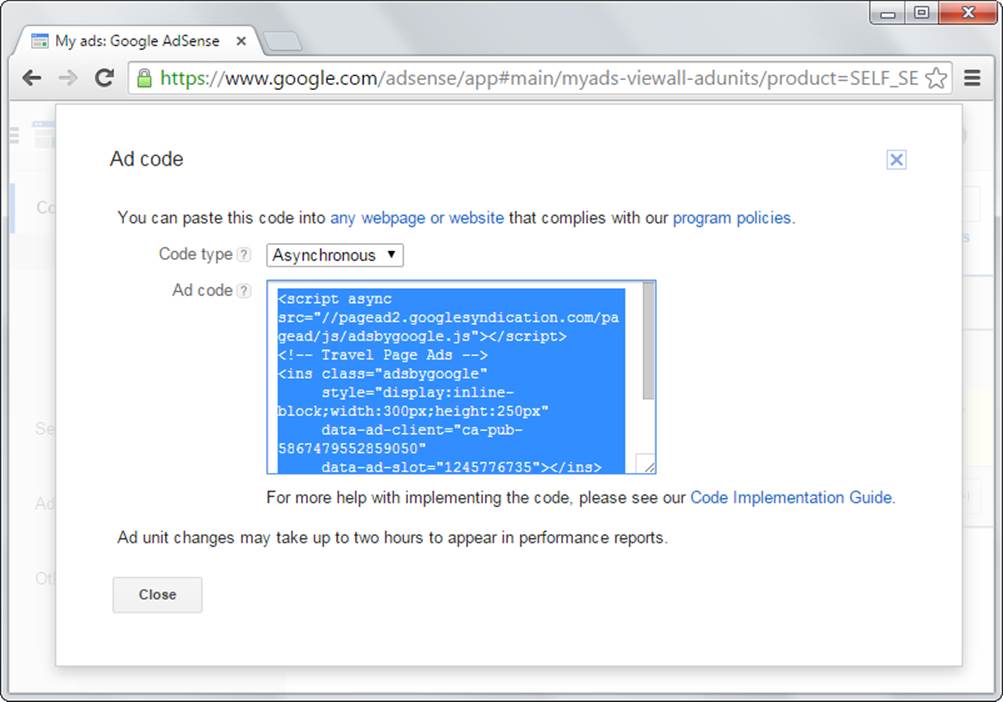
Figure 13-9. You’ll notice that the AdSense code doesn’t include HTML. Instead, it’s a script that uses the JavaScript programming language (which you’ll learn about in Chapter 14). Every time a visitor views a page that contains an AdSense ad, the script runs. It fetches a relevant ad from Google’s web servers and inserts the ad’s HTML into the page, in the same spot as the script block.
10.Copy your ad code, and then click Close.
Select all the code in the text box, right-click the markup, and then choose Copy. You can now paste the code into one or more pages, as described in the next section.
NOTE
If you need to modify your ad later, log back into Google AdSense, click the “My ads” tab, and find your ad in the list. When you click the ad, Google displays its details and lets you edit them. Most changes—say, altering the ad box color scheme—take effect immediately. However, if you want to change the format of your ad box, you need to get new code and paste it into your pages, because the size of your ad will change.
Placing Ads in Your Web Pages
After Google creates your ad script, you’re ready to pop it into your web page. Horizontal strips are the easiest to position; you simply paste the entire script right where you want the ad to appear.
Here’s an example that places ads at the bottom of a page:
<!DOCTYPE html>
<html>
<head>...</head>
<body>
<h1>A Trip to Remember</h1>
<p><img src="me.jpg" alt="Me" class="floatLeft" />
After returning from my three-month travel adventure ...</p>
<p>I hope you enjoy these pictures as much as I do.</p>
<p>See pictures from ...</p>
<script async src="//pagead2.googlesyndication.com/pagead/js/adsbygoogle.js">
</script>
<!-- Travel Page Ads -->
<ins class="adsbygoogle"
style="display:inline-block;width:300px;height:250px"
data-ad-client="ca-pub-5867479552859050"
data-ad-slot="1245776735"></ins>
<script>
(adsbygoogle = window.adsbygoogle || []).push({});
</script>
</body>
</html>
Figure 13-10 shows the result.
Positioning vertical ads requires a little more work, but it’s easy once you learn the trick. The challenge is flowing the rest of your page content beside the vertical ad. As you learned in Chapter 8, you can use style sheet rules to float content on the side of a page.
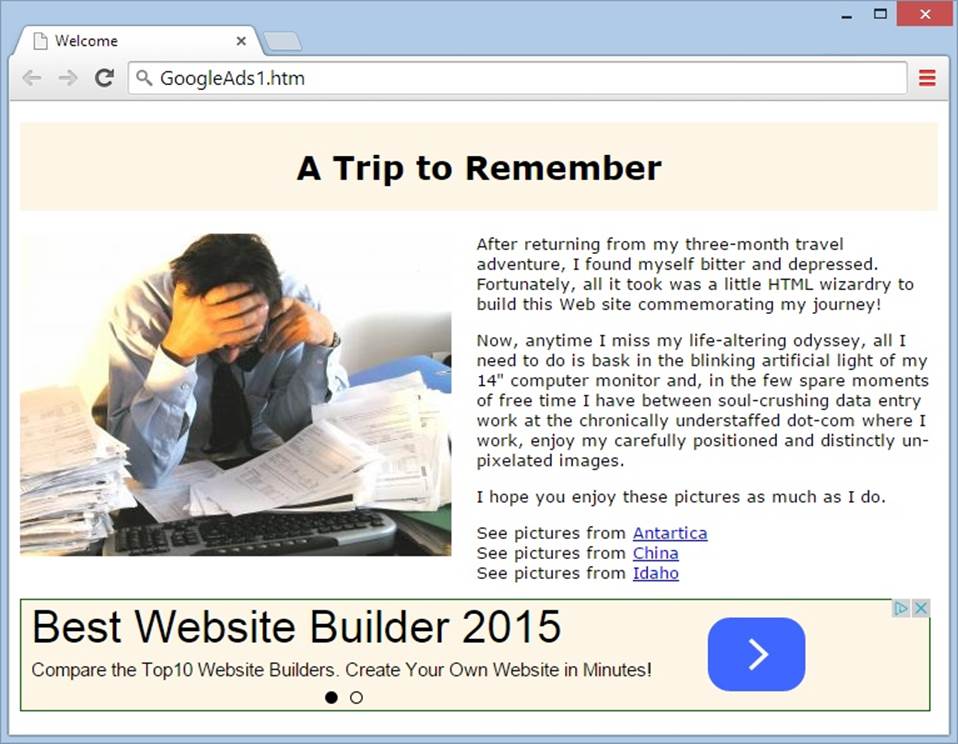
Figure 13-10. This page displays a 728 x 90-pixel horizontal banner ad. Notice how the background color of the ad matches the background color of the heading, thanks to the custom colors you specified (page 424).
To use the style sheet approach, begin by wrapping your ad script in a <div> element. Here’s an example featuring the content you saw in Figure 13-10:
<!DOCTYPE html>
<html>
<head>...</head>
<body>
<h1>A Trip to Remember</h1>
<img src="me.jpg" alt="Me" class="floatLeft" />
<div class="floatRight">
<script async src="//pagead2.googlesyndication.com/pagead/js/adsbygoogle.js">
</script>
<!-- Travel Page Ads -->
<ins class="adsbygoogle"
style="display:inline-block;width:300px;height:250px"
data-ad-client="ca-pub-5867479552859050"
data-ad-slot="1245776735"></ins>
<script>
(adsbygoogle = window.adsbygoogle || []).push({});
</script>
</div>
<p>After returning from my three-month travel adventure ...</p>
<p>I hope you enjoy these pictures as much as I do.</p>
<p>See pictures from ...</p>
</body>
</html>
Notice that the <div> element (which has no formatting on its own), uses the style sheet class floatRight. In your style sheet, use the rule below to make the <div> section float using the float attribute (see Understanding Style-Based Layout):
.floatRight {
float: right;
margin-left: 20px;
}
Figure 13-11 shows the result.
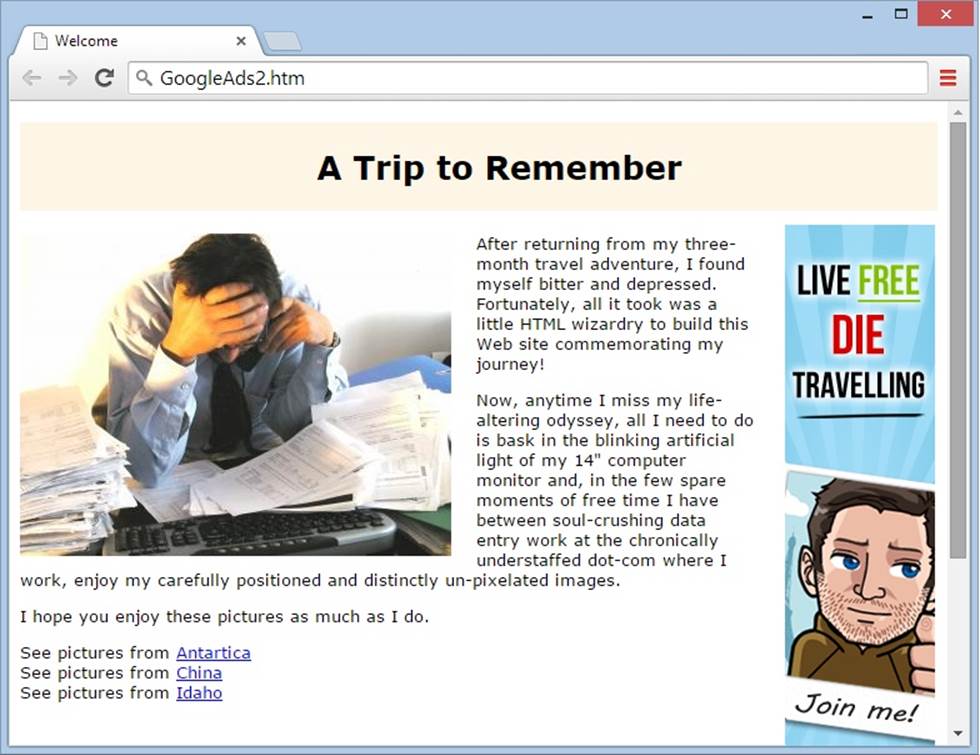
Figure 13-11. A 120 x 600-pixel vertical banner (shown here, partially) can fit several ads or one very tall ad. If you make them long enough, visitors get the chance to click an ad even as they scroll down the page.
UP TO SPEED: HOW ADSENSE CREATES TARGETED ADS
Every time you serve up a web page that contains Google ads, the AdSense script sends a message to Google’s web server asking for ads. This message includes your ad preference information and your unique client ID. (Your client ID is something like pub-5876479552359052; you can see it in the script Google produces.)
The first time Google receives this request, it realizes that it hasn’t examined your page yet, and it doesn’t know what types of ads are best suited for it. So it sends you a block of generic ads (or your alternate content, if you chose that feature, as described on Creating an Ad). Google also adds your page to a list of pages it needs to visit. Sometime in the next couple of days, the Google bot heads over to your site and analyzes its content. From that point forward, you’ll see ads based on the content of your page.
If 48 hours pass and you still aren’t getting targeted ads, there could be a problem. One of the most common mistakes is putting ads on pages that don’t have much text, in which case Google can’t figure out what your site is really all about. Remember, AdSense considers only a single page—the one with the ad in it—when it checks out your site. You can run into another potential problem if you put your ad on an inaccessible page. For example, the Google bot can’t get to any page that’s not on the Internet—pages on your desktop computer or local network just won’t cut it. Likewise with password-protected pages. Some websites block robots through exclusion rules (see Hiding from Search Engines), which stops the Google bot cold.
Finally, remember that Google may create ads that aren’t appropriate for your site. For example, you might be discussing the pros and cons of the programming language Python, and Google might respond with a promotional ad for a pet store. Often, Google will figure out this sort of problem on its own, both by analyzing your pages and by discarding ads that don’t generate many clicks. But you may be able to help it rule out some inappropriate options using the ad-blocking feature. To get started, log into AdSense and click the “Allow & block ads” tab.
Google-Powered Searches
Google gives you another way to please your visitors (and earn some cash in the process). You can add a search box to your pages, letting visitors launch Google queries right from your site. Even better, you get the earnings for any ads they click in the search results—a feature Google calls (rather unimaginatively) AdSense for Search.
From your AdSense account, you can easily add a Google search box to your site:
1. Log into your AdSense account, and then click the “My ads” link.
This is the same place you create ads, but you want to go to a different subsection to build your search box.
2. In the panel on the left, click Search to see its subcategories. Click the “Custom search engines” link, and then click the “New custom search engine” button.
Now you can fill in the information for your search box.
3. Name the search.
The name lets you retrieve your customized search box, tweak your settings, and get new code, without starting from scratch.
4. Choose the search type.
Choose “The entire web” to create a search box that uses the familiar Google search engine we all know and love.
Choose “Only sites I select” to restrict the search to a limited set of sites. You can use this feature to limit searches to your site only.
5. If you choose to limit the search, fill in a list of searchable sites in the “Selected sites” box (Figure 13-12).
You can enter individual pages (as in http://www.NewTravelDiaries.com/trip_arctic.html), an entire folder (http://www.NewTravelDiaries.com/trips), or your whole site (as in http://www.NewTravelDiaries.com), which is the most common choice. If you need to enter multiple URLs, put them on separate lines in the box.
NOTE
Even when you limit searches to your website, Google polls its standard, centralized catalog of web pages—it just limits the results it displays to the pages from your site. If Google doesn’t have your pages in its catalog (either because you just created the site or because Google doesn’t know your site exists), these pages won’t turn up in any searches, no matter how you customize the search box. For a refresher about getting Google to notice you, see Registering with Search Engines.
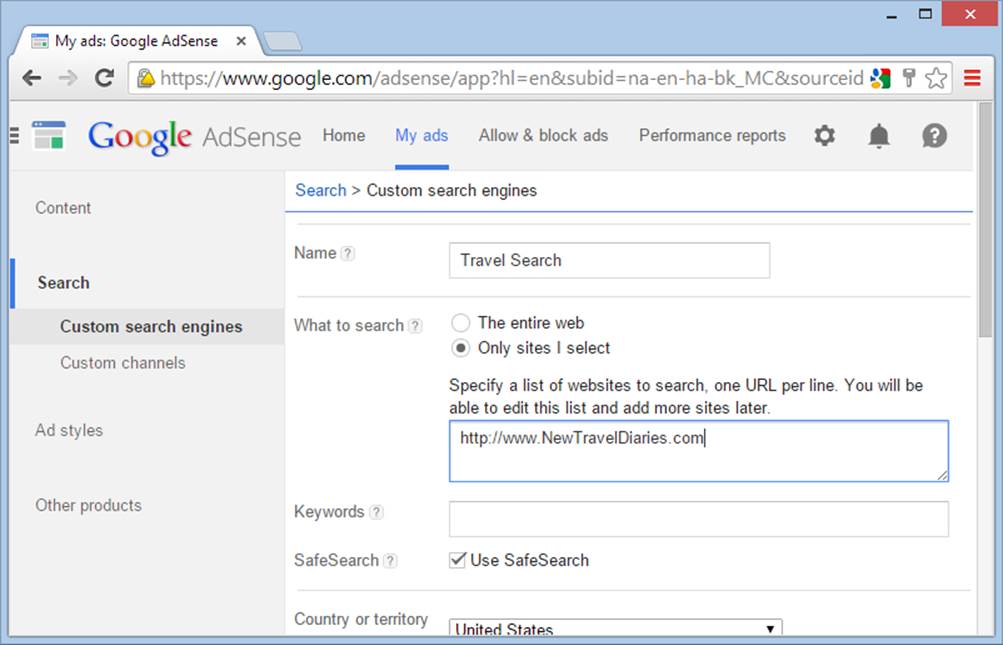
Figure 13-12. Usually, when you pick “Only sites I select,” you enter just one site in the “Selected sites” box—yours. That way, visitors can search your pages without being tempted to go to another site on the Web. For example, if you have dozens of pages of travel stories, a visitor could home in on the page she wants by searching for “funny story about rubber chicken in Peru.”
6. Fill in the Keywords box (optional).
Google automatically adds any keywords you include here to your visitors’ searches. This gives you a way to design a search box that’s targeted to certain types of content. For example, if your site is all about golf, you might include the keyword golf. That way, if a visitor searches fortiger, the search returns pages about Tiger Woods, not the African savanna.
7. Check the SafeSearch box, if you want to switch it on.
SafeSearch filters profanity and sexual content from search results. You’ll find SafeSearch useful in three situations: First, it’s de rigueur for children’s sites. Second, it’s useful if you want to shield your guests from possibly offensive search results. And finally, it’s handy if your website deals with a topic that shares some keywords with adult-only sites. For example, if you create a breast cancer awareness page, you don’t want someone to type “breast exam” into your web search box and dig up the wrong goods.
8. Tweak the country and language settings on the page, if they apply to you.
These settings identify your website’s language and geographic location. As you probably know, Google has country-specific pages that can tweak search results, providing them in different languages or giving priority to local sites.
9. Optionally, click the plus-sign (+) box next to the “Custom channels” section, and pick a custom channel.
You can place your search box in a specific channel, just as you can an ad. This technique is useful if you have a Google search box on more than one website, and you want to track ad clicks separately for each domain. See Creating an Ad for more about channels.
10.Click the plus-sign (+) box next to the “Search box style” section so you can tailor the appearance of the Google search box (optional).
There’s not a lot to change here. You can alter the size of the search box and the placement of Google’s logo, and choose between a white, black, and dark-gray background.
11.Optionally, click the plus-sign (+) box next to the “Ad style” section so you can customize how Google displays ads in its search results.
This way, the ads can blend in with your site’s color scheme. This feature is almost the same as the color palettes for AdSense ads (Creating an Ad).
12.Optionally, click the plus-sign (+) box next to the “Search results” section so you can customize how Google shows its search results.
Google gives you a few minor options for tweaking the placement of its logo. But more important, you can choose where Google puts the search results with the “Display results” setting. You have three choices:
o Choose “on a Google page in the same window” to replace the current page with Google’s standard search results page.
o Choose “on a Google page in a new window” to have the browser open a new window with the search results in it. Visitors usually find pop-up windows annoying, but this technique is handy if you want to make sure your visitor doesn’t leave your website.
o Choose “on my website using an iframe” to keep your visitors on your website, and show the search results alongside your content. This is everyone’s favorite option, but it requires slightly more work because you need to create two pages: one with the search box, and one that holds the search results. Google gives you some markup to place on each page.
To use this option, you need to supply the URL for your search results page (for example, http://www.NewTravelDiaries.com/searchresults.html). Don’t worry if you haven’t created this page yet—you can create and upload it when you finish with the search box. You also need to tell Google how wide the search results should be. The standard option is 800 pixels, which is a good choice if you don’t plan to pad the sides of your search page with extra content (like ads or a menu bar). Google will inject the search results into your page dynamically, in the same way that it inserts an ad every time you view an AdSense page. If you have other content you want to show on the page, you can place it above the search results.
13.Click the “Save and get code” button.
The final setup page includes the markup for your complete, customized search box (see Figure 13-13) in a <form> element. (Interactive Forms has more about forms in HTML.) As with the AdSense code, you can paste this HTML into any web page.
If you chose to use a search results page on your own site, you’ll get a second box with the markup you need to create that page. It consists of a <div> element and some JavaScript code, and works in much the same way as the AdSense code. You simply place the <div> element where you want the search results to appear.
Amazon Associates
As popular as ads are with website owners, they have one serious drawback: They clutter up your pages. Once you perfect a design with carefully chosen pictures and style sheets, you might not want to insert someone else’s ad. And although Google ads aren’t as visually distracting as other ads can be, like animated banners or pop-up windows, they still chew up valuable screen space. If you can’t bear to disturb your web page masterpieces, you might be interested in a subtler option.
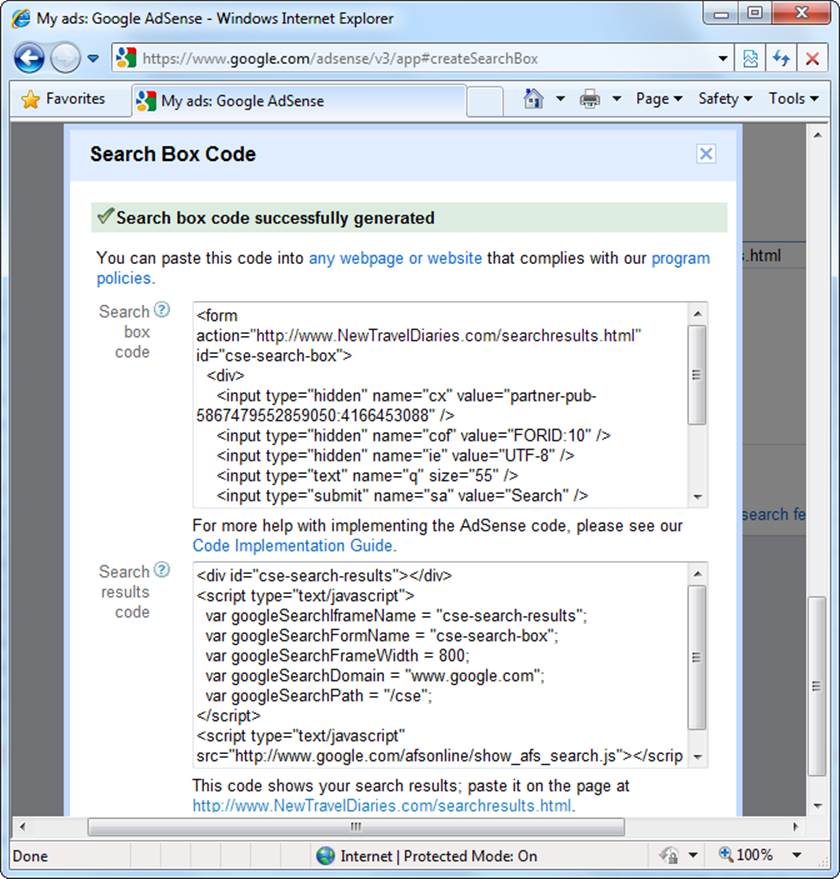
Figure 13-13. This example includes the markup for the custom search box (top) and the search results listing (bottom). As tempting as it may be, resist the urge to change the search box markup, as Google strictly forbids the practice.
Amazon Associates is the Web’s longest-running affiliate program. If you have a personal site with a “favorite books” page, or if you just refer to the odd book here and there, you might be able to make some extra money by signing up as an affiliate.
The basic idea is that you provide links to book pages and other product pages on Amazon’s website. For example, if you write a blurb about a great recipe, you could add a link to the Amazon page that sells the cookbook you’re quoting. The link itself is a nice feature for your site, because it lets visitors branch out and possibly get more information about the topic at hand. But the best part is what happens if a visitor decides to buy the book. You wind up making a healthy commission of 4 percent of the book’s sale price.
NOTE
Amazon commissions aren’t just for books. You can provide links to pretty much everything for sale on Amazon (except items that other retailers, like Target and Office Depot, sell). But Amazon Associates limits how much you can make on non-book items. For example, with personal computers, you’re capped at a maximum $25 commission per item. You can also earn more than 4 percent for some category types (like MP3 downloads) or if you sell a certain number of items per month. These rules change from time to time, so make sure you scour the Amazon Associates website carefully to get the lowdown.
Signing Up as an Associate
Signing up for the Amazon Associates program is even easier than joining AdSense. Just follow these steps:
1. Go to http://affiliate-program.amazon.com, click the “Join now” button, and then log in with your Amazon email and password.
To join the associates program, you need an Amazon account. If you don’t have one, click “I am a new customer” to create one.
2. Enter your personal information, and then click Next
Amazon needs your name, address, and telephone number.
3. Enter your website information and then click Next.
You need to supply a website name, URL, and brief description (see Figure 13-14). You also need to answer a long list of questions about how many visitors you get, how you attract traffic, how you heard about Amazon Associates, how you make money from your site (if you do), and so on.
4. Use your phone number to confirm your identity.
Enter your phone number and then click “Call me now.” An Amazon robot will call you and recite a unique number. You must then type this number into the box on the signup page to prove it’s really your phone number.
5. Tick the box that confirms you agree to Amazon’s terms, and then click Finish to submit your application.
Shortly afterward, you’ll get a confirmation message saying that you’re approved on a trial basis. This email includes your unique associate ID. This number is important, because it’s the single piece of information you need to add to all your Amazon links to start earning commissions. You can now use the associate tools at http://associates.amazon.com (see the next section).
In a couple of days, after someone at Amazon verifies your site and confirms that it doesn’t run afoul of the law, you’ll get a second message confirming that you’re in for good.
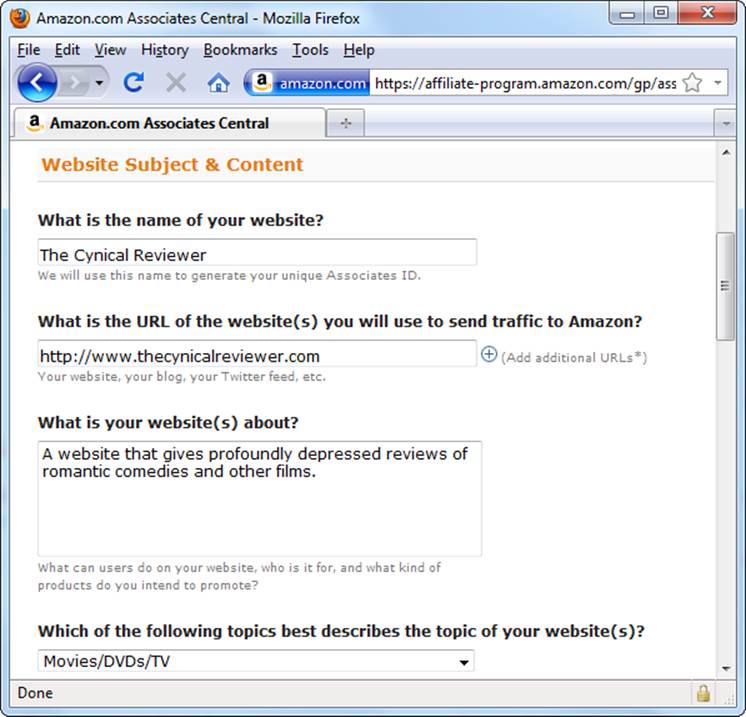
Figure 13-14. To become an Amazon associate, you need to supply some basic information about your site. Don’t skip this step, because someone from Amazon will take a quick look at your site before she approves you for the program.
6. If you’d like to tell Amazon how to pay you right now, click Specify Payment Method Now.
You can choose your preferred form of payment even before Amazon officially accepts you into its program. Your choices include payment by check, Amazon gift certificate, or direct deposit to a U.S. bank account. Amazon doesn’t send checks until you make at least $100, and it charges you a $15 processing fee. Other payment types kick in once you reach $10, and they don’t involve any fees.
Generating Associate Links
Once you have your associate ID, you can create associate links, the hyperlinks that send your visitors to Amazon. The trick is formatting the URLs the right way.
You add your associate ID to the very end of the associate link. For example, the first email Amazon sends includes an example of the associate link to its home page. It looks like this:
http://www.amazon.com?tag=prosetech-22
In this example, the associate ID is prosetech-22. (Replace it with your own ID to create a link for your website.) If someone follows this link and buys something, you earn a 4 percent commission.
Here’s how you link to the Amazon page using an anchor element:
Visit <a href="http://www.amazon.com?tag=prosetech-22">Amazon</a> and
help me save up to buy a Ferrari.
Product Links
You get better commissions with links that lead directly to a specific product. Amazon offers several associate link formats, and here’s one of the simplest:
http://www.amazon.com/dp/ASIN/?tag=AssociateID
And here’s a specific example:
http://www.amazon.com/dp/0141181265/?tag=prosetech-22
You customized two details in this link, the ASIN (Amazon Standard Item Number) and the associate ID. The ASIN is 0141181265 (which leads to the book Finnegans Wake) and the associate ID is prosetech-22. Figure 13-15 shows you where to find an ASIN.
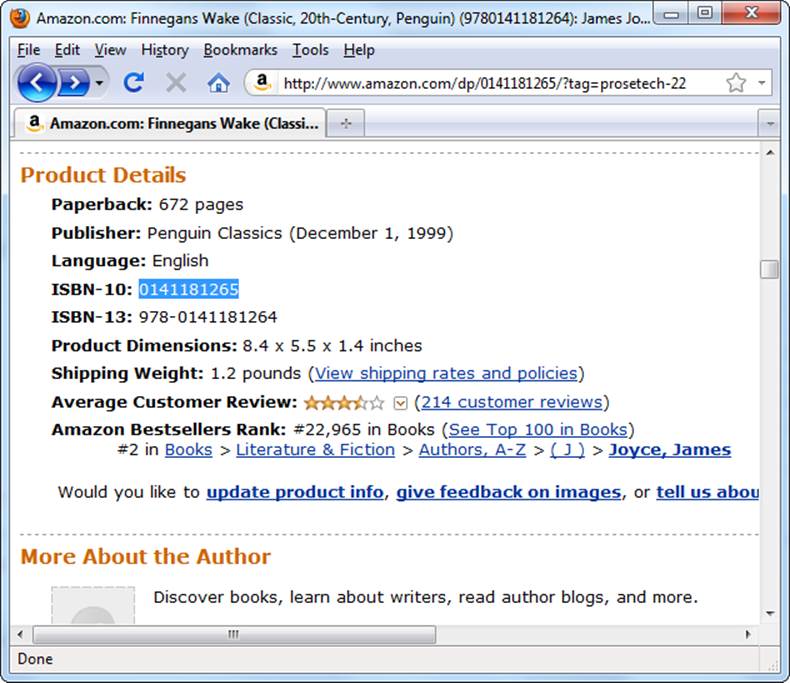
Figure 13-15. Every item in the Amazon catalog has a unique ASIN, which you can find in the Product Details section of that product’s page. For books, the ASIN is the same as the 10-digit ISBN number (highlighted), which is the book industry’s way of uniquely identifying products.
Here’s an example of a complete link:
The development of the modern personal computer was first presaged in Joyce's
<a href="http://www.amazon.com/dp/0141181265/?tag=prosetech-22">
Finnegans Wake</a>.
That’s all you need.
NOTE
If a visitor follows a link to a specific Amazon product but goes on to buy something completely different, it’s all good—you still get the same 4 percent commission.
Advanced Links
Amazon has a set of specialized tools that help you generate links. Using them, you can create a range of snazzy links. Your options include:
§ Links with thumbnail pictures
§ Links to product categories (like equestrian magazines or bestselling kitchen gadgets)
§ Ad banners that advertise a specific Amazon department
§ Amazon search boxes that let visitors perform their own queries
Even if you don’t want these fancier links (and if your life isn’t dedicated to selling books, you probably don’t), there’s still good reason to build links with the tools Amazon provides: its links have built-in tracking, so you can determine how many people see each link.
NOTE
Amazon tracking is very clever. Essentially, it embeds an <a> element within the link that requests a tiny 1-pixel image from Amazon’s servers. When someone requests a page that contains one of these links, the browser automatically fetches the invisible picture from Amazon. When Amazon sees the request for the invisible picture, it knows someone saw the link, and it records a single impression (page view) in its tracking database.
Here’s how you use Amazon’s link-building tools:
1. Go to http://affiliate-program.amazon.com and log in.
This takes you to the Amazon Associates home page, which offers a variety of reports for checking your sales progress to date, as well as tools for building links.
TIP
For detailed information about the more ambitious things you can do with Amazon Associates, click the Get Started Now button. You can also get invaluable advice from other associates by visiting the discussion forums—look for the Discussion Boards link at the bottom of the menu bar on the left.
2. Click the “Links & Banners” tab. Then, in the pop-up menu, choose Product Links.
Amazon lets you build many types of links. Product links point to individual items on Amazon’s site. They’re generally the most useful. But if you plan to go Amazon-crazy, feel free to explore all the other types of links.
3. In the search box, type the ASIN for your product, and then click Go.
If you don’t know the ASIN, select what you think is the most appropriate category, and then type in the product name. When you click Go, Amazon searches for the product and lists the results (see Figure 13-16).
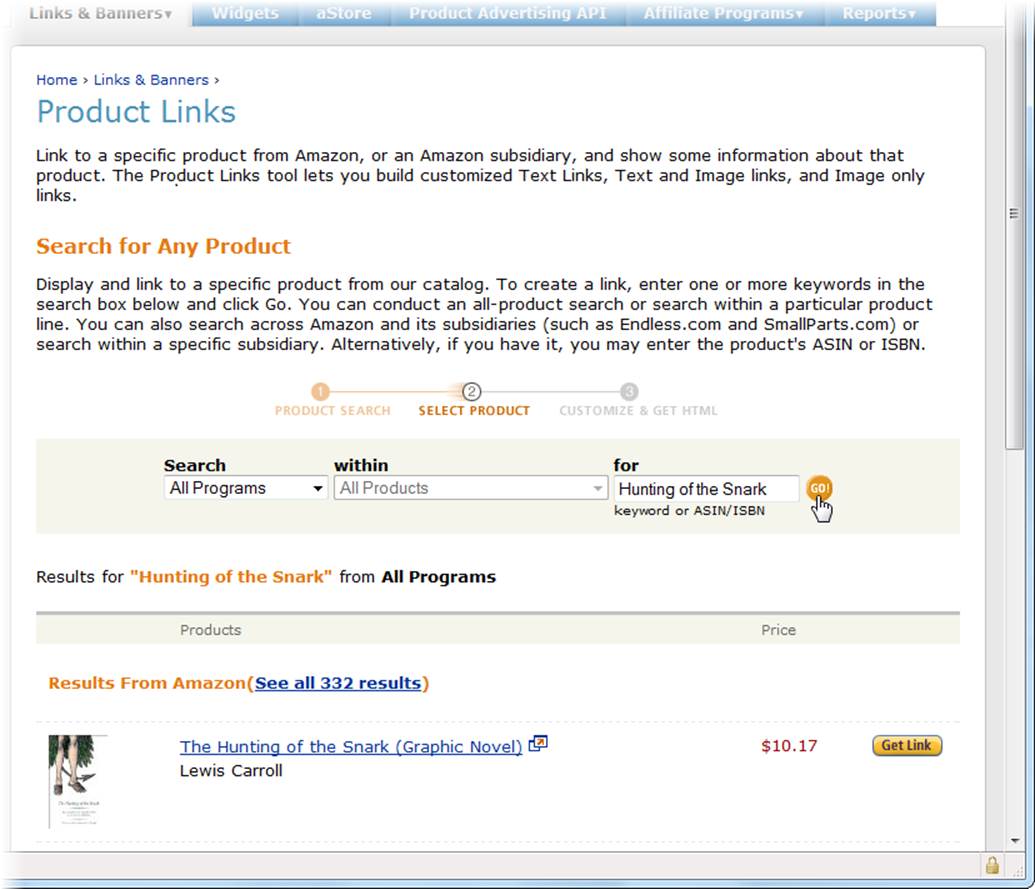
Figure 13-16. When you build a link, you can search for the specific product you want. This search works in more or less the same way as a search from Amazon’s home page.
4. Click the Get Link button next to the product you want to link to.
You’ll see a page that shows you the product and previews the link you’re about to create.
5. Choose the type of link you want by clicking one of the tabs on top (Figure 13-17).
You start out at the “Text and Image” tab, which creates a detailed box that includes a product picture and price. To create a plain text link, click the Text Only tab. To create a clickable book cover image, click the Image Only tab.
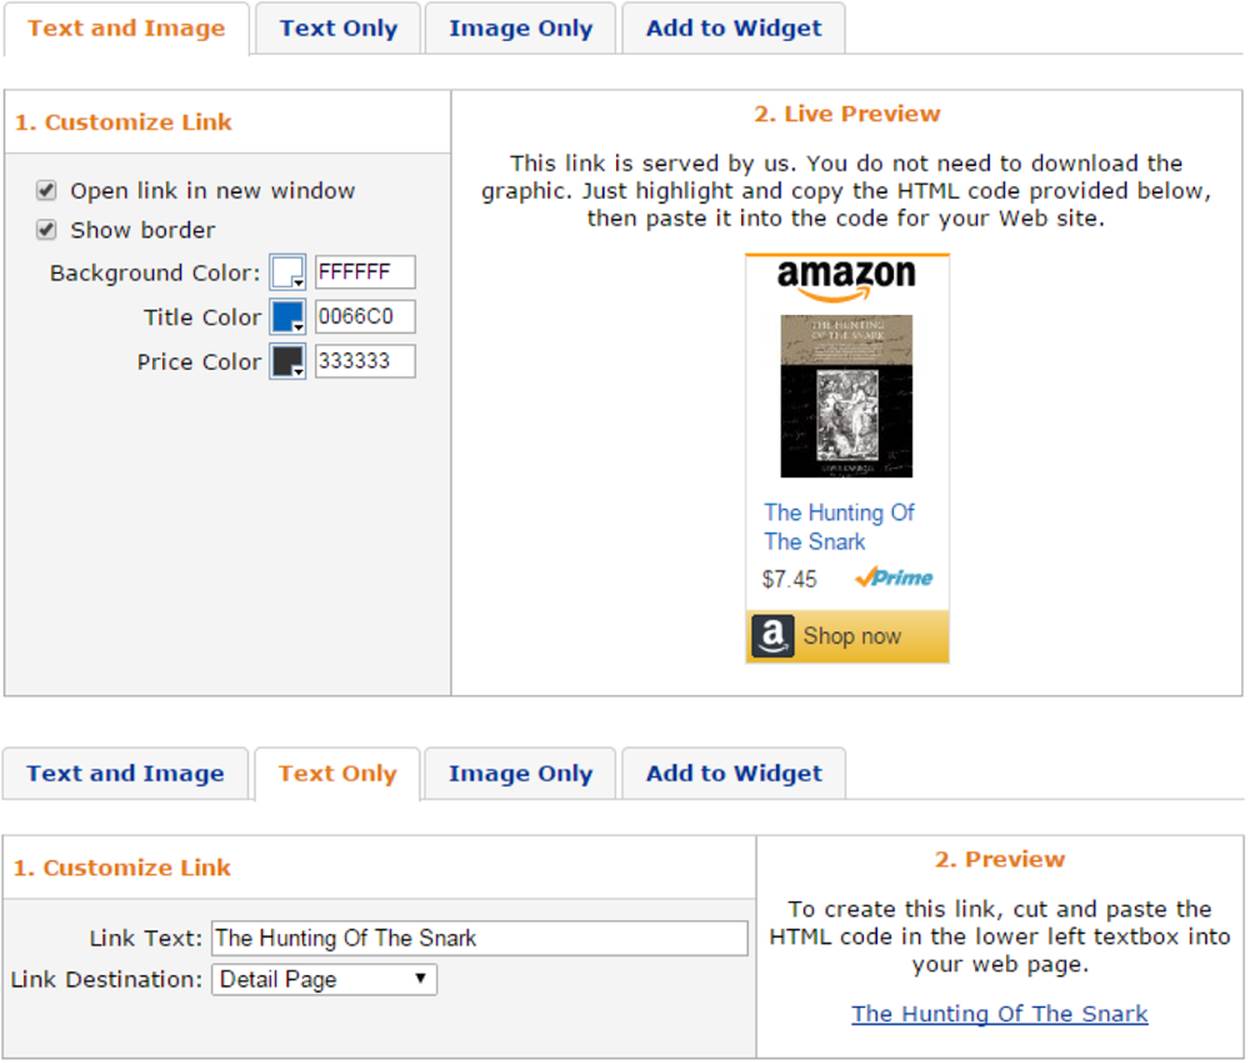
Figure 13-17. As you choose your link options, Amazon previews the result. You can choose to make a text-and-image link (top) or a plainer, easier-to-integrate text-only link (bottom).
6. Customize the appearance of your link.
You can pick the text and background colors. You can also choose whether your page opens the product-page link in a new browser window, how big the image is, what price information the product box includes, and what colors it uses.
7. Put the link on your page.
As you configure your link, Amazon puts the matching HTML in a text box underneath. When you perfect your link’s appearance, copy that HTML and paste it in one of your web pages.
When you create a text link, Amazon creates an anchor element that looks fairly complex. (As described earlier, the anchor element contains an invisible <img> element that lets Amazon track how many times it displays the link.)
However, like all anchor elements, it’s relatively easy to put this element where you want it. Just pop it into an existing paragraph, like this:
<p>Lewis Carroll's work as a mathematician may have driven him insane,
as his famous book
<a href="http://www.amazon.com/exec/obidos/...">The Hunting of the Snark</a>
<img src="http://www.assoc-amazon.com/" width="1" height="1" />
attests.</p>
NOTE
Amazon puts the full title of the book inside the anchor element. This might make your link a little longer than you intend, because it might include information about the edition or a byline. If that happens, just edit the title down.
Amazon sends you monthly emails to let you know how much you’re earning, but if you can’t stand the suspense, you can log into Amazon Associates any time. Click the Reports tab (Figure 13-18) to get detailed information on how much you’re earning per day, week, month, or quarter.
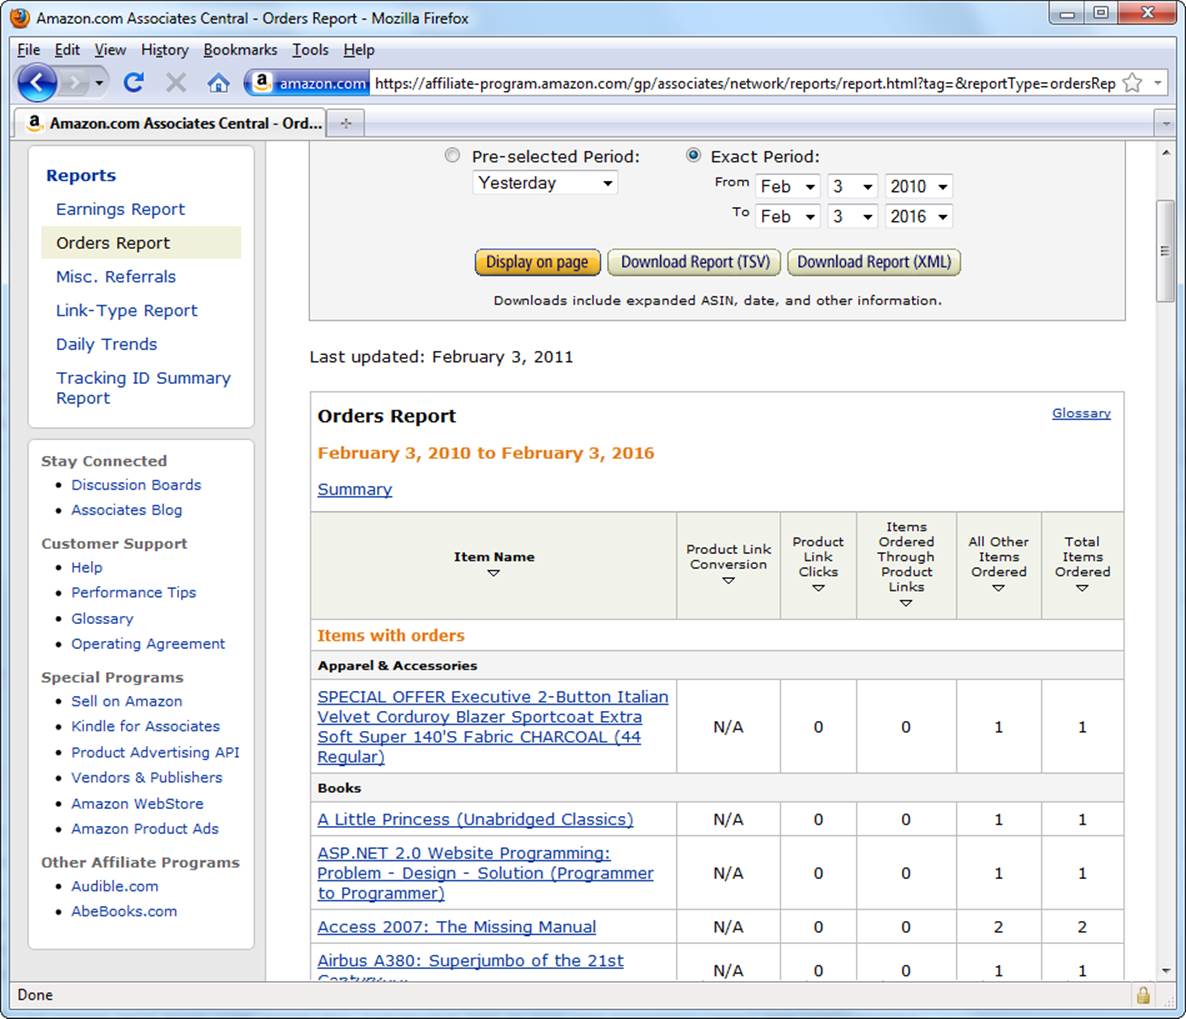
Figure 13-18. Amazon provides many different types of reports. To get a fascinating look at the items your visitors are buying, click Orders Report in the menu on the left.
DESIGN TIME: SELL YOUR CUSTOM DESIGNS
It’s no secret that the Web is full of small-scale businesses selling handmade and custom goods. You can expand your product offerings beyond those from Amazon, but it might take some effort. Depending on what you want to sell, you might need to search out the right wholesalers or craftspeople, or just build a woodworking shop in your basement. But if you have something a bit simpler in mind, like customized clothes, mugs, hats, magnets, posters, buttons, iPhone cases, or yoga mats, then CafePress (www.cafepress.com) and Zazzle (www.zazzle.com) are your new best friends.
Both sites let you design your own goods and offer them for sale on a personalized section of the website (no HTML coding required). The genius of CafePress and Zazzle is that they let you use your own artwork. If, for example, you want to create a custom beer mug, you aren’t limited to typing in a cheesy message and picking a preset font. Instead, you can upload your own graphics file (whether it’s a digital picture or a Photoshop masterpiece), and slap that on the side of your product. Of course, life isn’t perfect.
On many products, CafePress and Zazzle limit where you can place your pictures. For example, you can put graphics on the front and back of most clothes, but you can’t fill the whole surface or wrap around the sides. (Zazzle’s shoes are an eye-catching exception. They let you wrap graphics along the entire outer surface.)
Once you create a design, you can order one for yourself or peddle it to an audience of millions by sending your visitors to an automatically generated store page on the CafePress or Zazzle site. If someone buys an item, you get a small cut of the price, and CafePress or Zazzle processes the payment, prints the item, and ships it to your customer.
If you’re interested in the idea but still in search of some inspiration, head to Zazzle and click the Search button without typing in a product name. You’ll see a list of everything they offer, organized so that the bestsellers come first. Timely t-shirts with corny graphics, sophomoric slogans, or a reference to politics or current events are always among the most popular items.
PayPal Merchant Tools
Unless your website is wildly popular, ads and other affiliate programs will net you only spare change. If you have all-consuming dreams of web riches, you need to actually sell something.
You don’t need to go far to run into self-made Internet commerce kingpins. A surprisingly large number of people have made their living with creative products. Examples include t-shirts with political catchphrases, empty bottles of wine with R.M.S. Titanic labels, and collectable toys from a relative’s basement. Your path to a thriving e-business might involve little more than buying tin spoons from Honest Ed’s and decorating them with macramé.
No matter how good your goods, you need a way to sell vast quantities of them easily and conveniently. Very few people will go through the hassle of mailing you a personal check. But if they can make an impulse purchase with a credit card, your odds of making a sale improve significantly.
Accepting credit cards isn’t the easiest thing in the world to do. You can do so two ways:
§ Open a merchant account with a bank. This is the traditional way businesses accept credit cards. Requirements vary from country to country, but you may need a business plan, an accountant, and some up-front capital.
§ Use a third-party service. A number of companies accept credit card payments on your behalf in exchange for a flat fee or a percentage of the sale. In this chapter, you’ll learn how to use one of the best—PayPal.
Unless you have a large business, the second option is always better because of the additional risks that accompany web-based sales.
First of all, the Internet is an open place. Even if you have a merchant account, you need a secure way to accept credit card information from your customers. That means the credit card number needs to be encrypted (scrambled using a secret key) so that Internet eavesdroppers can’t get at it. Most webmasters don’t have a secure server sitting in their basement, and many web hosts charge extra for the privilege of using theirs.
Another problem is that when you conduct a sale over the Web, you don’t have any way to collect a signature from the e-shopper. This makes you vulnerable to chargebacks (see the box on Understanding Chargebacks).
NOTE
PayPal is a staggeringly large Internet company that offers its payment services in nearly 200 countries. If you were to rank banks by the sheer number of accounts they hold, PayPal (with roughly 150 million account members) would be one of the largest banks in the world.
Signing Up with PayPal
Once you sign up with PayPal, you can accept payments from customers across the globe. Here’s how you go about it:
1. Head to the PayPal website (www.paypal.com ) and click the Sign Up link on the home page.
This takes you to PayPal’s Sign Up page.
2. Choose your country and language.
3. Choose the type of account you want to create (Personal, Premier, or Business), and then click the Get Started button in the corresponding box.
A personal account is ideal if you want to use PayPal to buy items on sites like eBay using your credit card or with funds from your bank account. You can also accept money transfers from other PayPal members without having to pay any fees. However, there’s a significant catch:Personal accounts can’t accept credit card payments. As a result, customers who want to do business with you need to have money in their PayPal accounts (which they get by selling something and receiving a PayPal payment, or by transferring money into their account from a linked bank account).
FREQUENTLY ASKED QUESTION: UNDERSTANDING CHARGEBACKS
What’s a chargeback?
Credit card companies issue a chargeback when a cardholder asks them to remove a charge from their account. The buyer may claim that he never made the purchase in the first place or that the seller didn’t live up to his end of the agreement. A chargeback can occur weeks or months after someone buys an item.
From the buyer’s point of view, a chargeback is relatively easy. He simply phones the credit card company and reverses the transaction. The money you made is deducted from your account, even though you already shipped the product. If you want to dispute the buyer’s claim, you’re in the unenviable position of trying to persuade a monolithic credit card company to take your side. Many small businesses don’t dispute chargebacks at all, because the process is too difficult, expensive, and unsuccessful.
However, when you use a third-party service, the odds tilt in your favor. If the buyer asks for a chargeback, the chargeback is made against the third-party company that accepted the payment (like PayPal), not you. And even though PayPal isn’t as large as the average multinational bank, it’s still a major customer of most credit card companies, which means it has significant clout to fight a chargeback.
The end result is that buyers are less likely to charge back items when they pay through PayPal. And if they do, PayPal gives you the chance to dispute the chargeback. It even lets you contact the buyer to see if there’s a simple misunderstanding (for example, to check whether you sent the item to the wrong address). And if you’re really paranoid, you can use PayPal’s Seller Protection policy, which, if you take a few additional steps (like retaining proof of delivery), insures you for up to a $5,000 loss. For more information about how PayPal handles chargebacks, check out www.paypal.com/chargeback. To learn about PayPal’s Seller Protection program, refer to www.paypal.com/SellerProtection.
A premier account is the best way to run a small business. You can send money (great if you crave a rare movie poster on eBay) and accept any type of payment that PayPal accepts, including both credit and debit cards. You also get to use PayPal’s ecommerce tools. However, PayPal charges you a fee for every payment you receive, an amount that varies by sales volume but ranges from 1.9 percent to 2.9 percent of the payment’s total value (with a minimum fee of 30 cents). That means that on a $25 sale, PayPal takes about $1 off the top. If you accept payments in another currency, you surrender an extra 2.5 percent. To get the full scoop on fees and to see the most current rates, refer to www.paypal.com/fees.
A business account is almost identical to a premier account, except that it allows multiple logins. This is the best choice if you have a large business with employees who need to use your PayPal account to help you manage your site.
4. Enter your email address and choose a password, and then fill in your name, address, and phone number.
Make your password complex; you don’t want a malicious hacker guessing it and using your PayPal account to go on an electronic buying binge.
TIP
As a general rule, guard your PayPal account information the same way you guard your bank PIN. If you’re really paranoid, don’t use your PayPal account to buy items on other websites. Don’t use your credit card to do so either—electronic eavesdroppers can snag your info and then head out on a first-class cruise to Ibiza.
5. Finally, click “Agree and Create Account” to complete the process.
PayPal sends you an email confirmation immediately. Click the link in the message to activate your account, and then you can start creating PayPal buttons and shopping carts to collect payments (see below for details).
Accepting Payments
PayPal makes creating ecommerce web pages ridiculously easy. One way is to add a Buy Now button to any page on your site:
1. Go to www.paypal.com and sign in.
You start out on a page that summarizes your account history, including recent purchases and credits.
2. Scroll down until you see the “Selling tools” link near the bottom of the sidebar on the left. Click it.
You’ll see a variety of tools for collecting money, as explained in Figure 13-19.
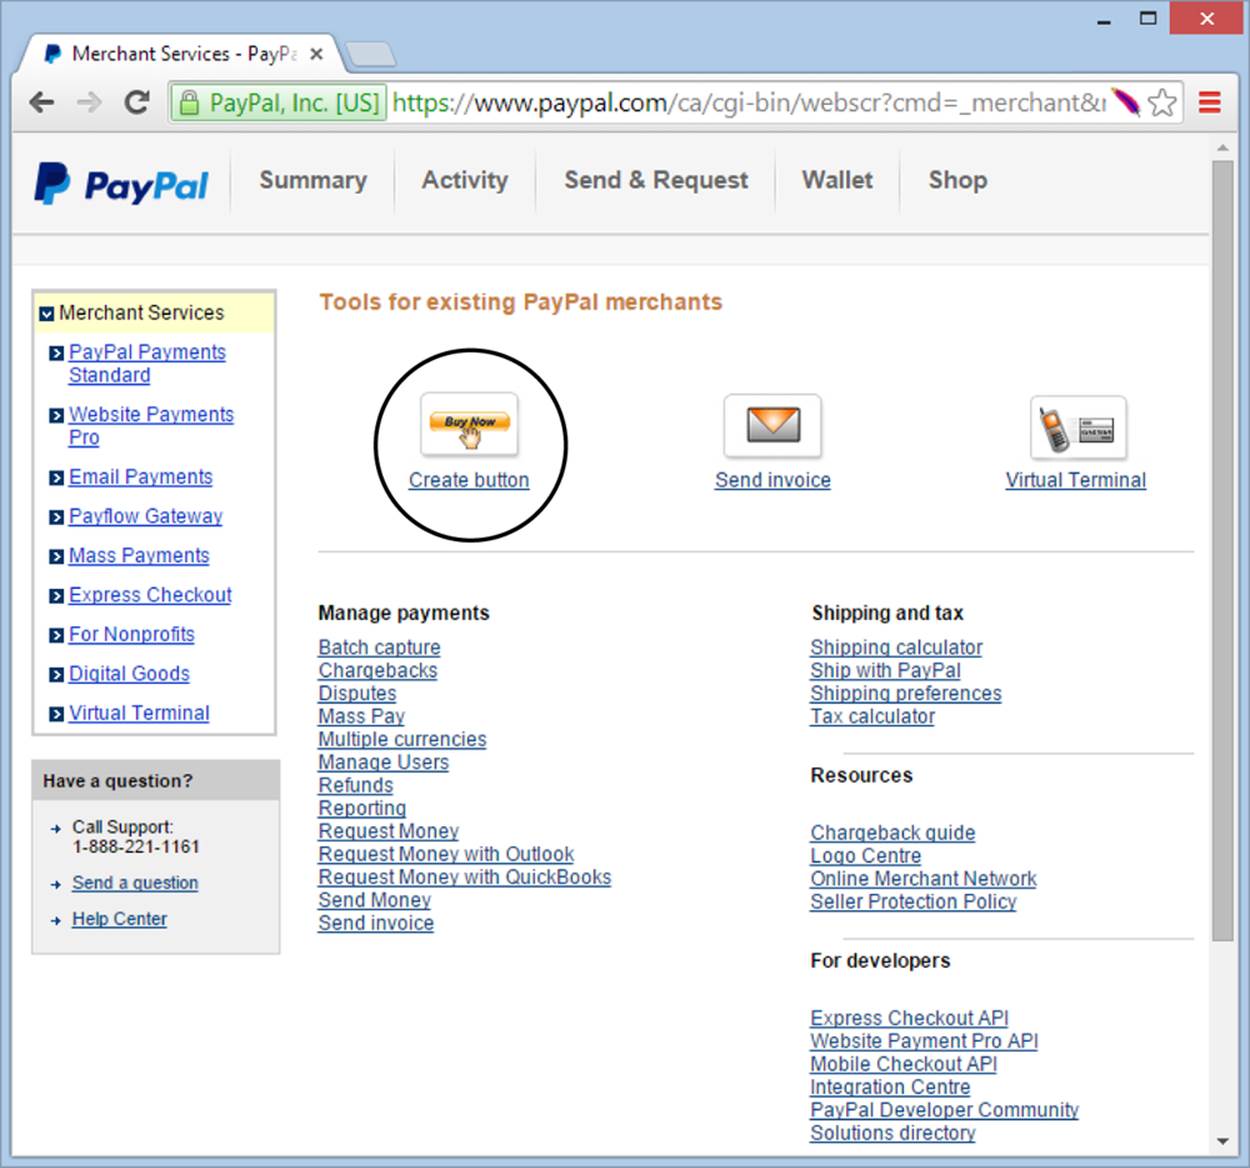
Figure 13-19. For a simple way to put PayPal on your site, nothing beats a button. You can create a basic Buy Now button, a button for a shopping cart, a donation button, or a subscription button, among other options.
3. Click the Create Button link.
PayPal displays the page where you configure your button’s appearance and set the price of your product (Figure 13-20).
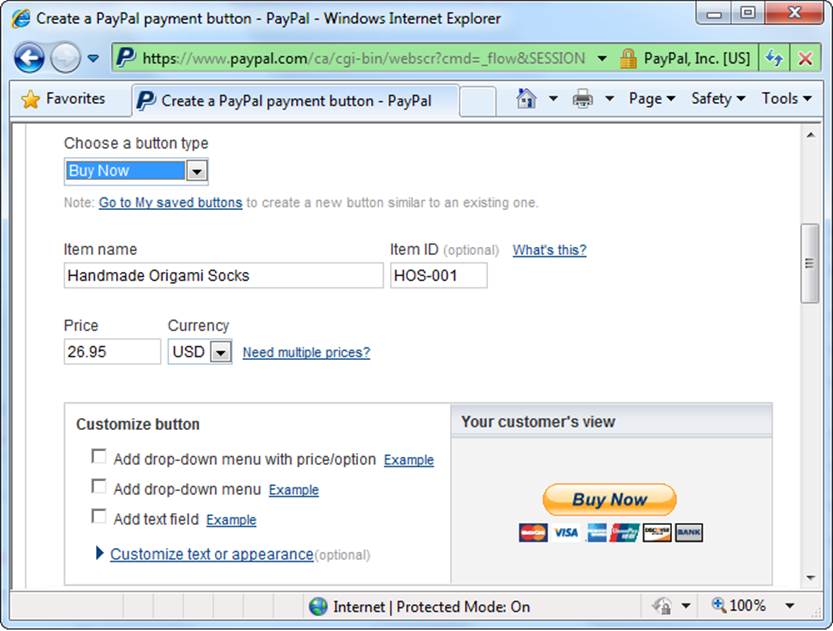
Figure 13-20. Here you specify the necessary info for a Buy Now button.
4. Choose Buy Now as the button type.
PayPal has plenty more types of buttons. You’ll create a shopping cart button on Building a Shopping Cart.
5. Give your item a name and, if you want to keep track of it, a product code. Then supply the price and currency.
Don’t worry about locking out international visitors when you set your currency. Credit card companies are happy to charge Canadian customers in U.S. dollars, U.S. customers in euros, and European customers in rupees. Just choose the currency you think your buyers expect to see.
6. If you want to let customers specify options for the products they buy, fill in the information in the “Customize button” box.
You can collect extra buying information from your buyers in three nifty ways:
o “Add drop-down menu with price/option” lets you give buyers a list of options for your product, each with a different price (see Figure 13-21). For example, you could let a buyer choose between a plain, premium, or organic tin of hamster food.
o “Add drop-down menu” gives your buyers a list of options, but without changing the product’s price. For example, you could use a list like this to let buyers choose the color of the embroidered undergarments they’re about to buy.
o “Add text field” adds a text box where buyers can type in anything. Use this if you need to collect information that varies, like the name your buyer wants engraved on a magnetic screwdriver.
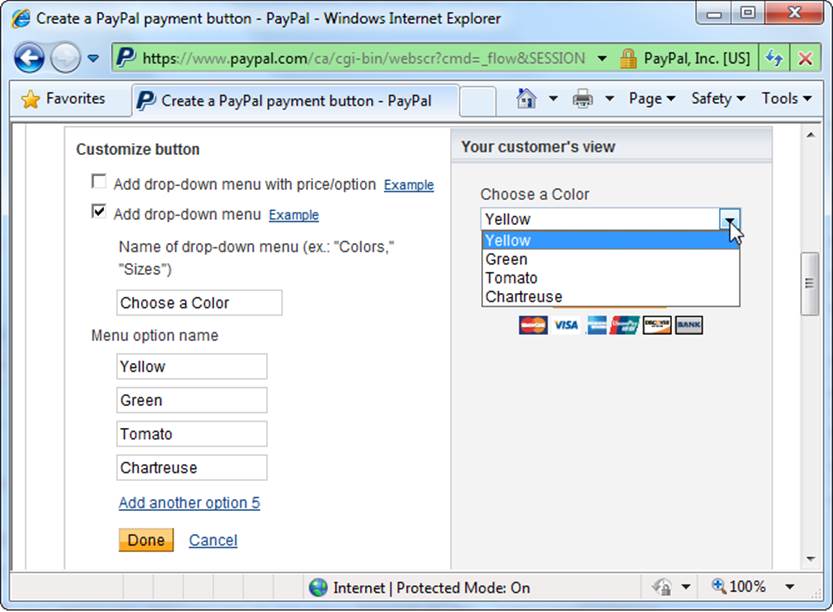
Figure 13-21. With a drop-down list of options, you can collect additional information about the type of product your visitor wants. This is useful if you offer the same item in multiple sizes or colors (as shown here). To add another color to the list, click the “Add another option” link under the current set of options. After you click Done, PayPal updates the button preview on the right to show you what the list will look like.
7. To change the appearance of a button, click “Customize appearance.”
PayPal gives you limited options for the button’s size and text.
The standard Buy Now button is perfectly usable but a little plain. If you created a nicer button picture, upload it to your site, and then supply the URL for it here. (You can always change the HTML that PayPal generates if you want to use a different button later on.)
8. Scroll down and fill in any additional options you want.
PayPal gives you a heap of extra payment possibilities. You can add a flat fee for shipping and a percentage for sales tax. You can instruct PayPal to track how many items you have in stock and to stop selling your product when it’s sold out—all you do is fill in the number of items you currently have.
And PayPal has an entire section of advanced possibilities, like whether you need a buyer’s address (PayPal assumes you do), if you want your customers to fill in additional comments with their payments (ordinarily they can’t), and where PayPal should send visitors after they complete or cancel a payment (you can send shoppers to a specific URL on your site, rather than to PayPal’s generic pages).
9. Click Create Button.
PayPal displays a text box with the markup for your customized Buy Now button. Copy and paste the markup into your web page.
When you create a Buy Now button, PayPal puts everything inside a <form> element (explained on Form Elements). Here’s an example of a button for a pair of handmade origami socks:
<form action="https://www.paypal.com/cgi-bin/webscr" method="post">
<input type="hidden" name="cmd" value="_s-xclick" />
<input type="hidden" name="hosted_button_id" value="633788" />
<table>
<tr><td>
<input type="hidden" name="on0" value="Choose a Color" />
Choose a Color</td></tr><tr><td>
<select name="os0">
<option value="Yellow">Yellow</option>
<option value="Green">Green</option>
<option value="Tomato">Tomato</option>
<option value="Chartreuse">Chartreuse</option>
</select>
</td></tr>
</table>
<input type="image" border="0" name="submit" alt=""
src="https://www.paypal.com/en_US/i/btn/btn_buynowCC_LG.gif" />
<img src="https://www.paypal.com/en_US/i/scr/pixel.gif" alt=""
width="1" height="1" />
</form>
If you added any options, you’ll see <select> and <option> elements in the HTML that define the relevant list boxes (A Basic Form). The form also includes the Buy Now button. Clicking it sends the form to PayPal. You can change the button’s src attribute (bolded in the listing above) to point to a different image file. PayPal inserts the invisible tracking image (pixel.gif in the example above) after the code for the Buy Now button. (This tracking technique is the same one Amazon uses.)
TIP
As long as you don’t tamper with the <input> fields and you keep everything inside the <form> tags, you can tweak the markup PayPal creates for you. For example, you can add other elements to the form or gussy it up with a style sheet. Or you might want to change the layout by removing the invisible table (represented by the <table>, <tr>, and <td> elements) that PayPal uses to organize your button and your options.
So what happens when a shopper clicks the Buy Now button and submits this form? The action attribute in the very first line of the code above tells the story: The browser sends the buyer’s information to PayPal using the action URL (which is https://www.paypal.com/cgi-bin/webscr). As it does, it uses a secure channel to prevent Internet eavesdroppers—that’s why the URL starts with “https” instead of “http.”
Notice that this form doesn’t include key pieces of information, like the product name or price. That’s a safety measure designed to prevent troublemakers from tampering with the markup in your web page and paying you less than your products are worth. When PayPal receives the form data, it retrieves the hidden ID value (633788 in the example above), and looks it up in its giant, private database of products to identify the relevant product, price, and seller (you).
In fact, the PayPal markup doesn’t provide any information about the item you’re selling. You put the item name, picture, description, and price into your web page (probably before the Buy Now button). Here’s an example:
<!DOCTYPE html>
<html>
<head>...</head>
<body>
<h1>Handmade Origami Socks</h1>
<p><img src="origami.jpg" alt="Handmade Origami Socks" class="float">
You've waited and they're finally here. Order your own
pair of origami socks for only $26.95 and get them in time
for the holidays. What better way to show your loved ones how
poor your gift giving judgement really is?</p>
<form action="https://www.paypal.com/cgi-bin/webscr" method="post">
...
</form>
</body>
</html>
Figure 13-22 shows the result. This example displays the standard PayPal ordering page, but you can customize it with your own logo (see the next section).
Building a Shopping Cart
PayPal’s Buy Now button gives you a great way to make a quick sale. But if you dream about an ecommerce empire, you need to create a store where visitors can collect several items at once and pay for them all at the same time.
To give your buyers this kind of convenience, you need a shopping cart, which is a staple of ecommerce websites. The good news is that you don’t need to program your own cart—you can use a prebuilt one from PayPal, which integrates smoothly into your website.
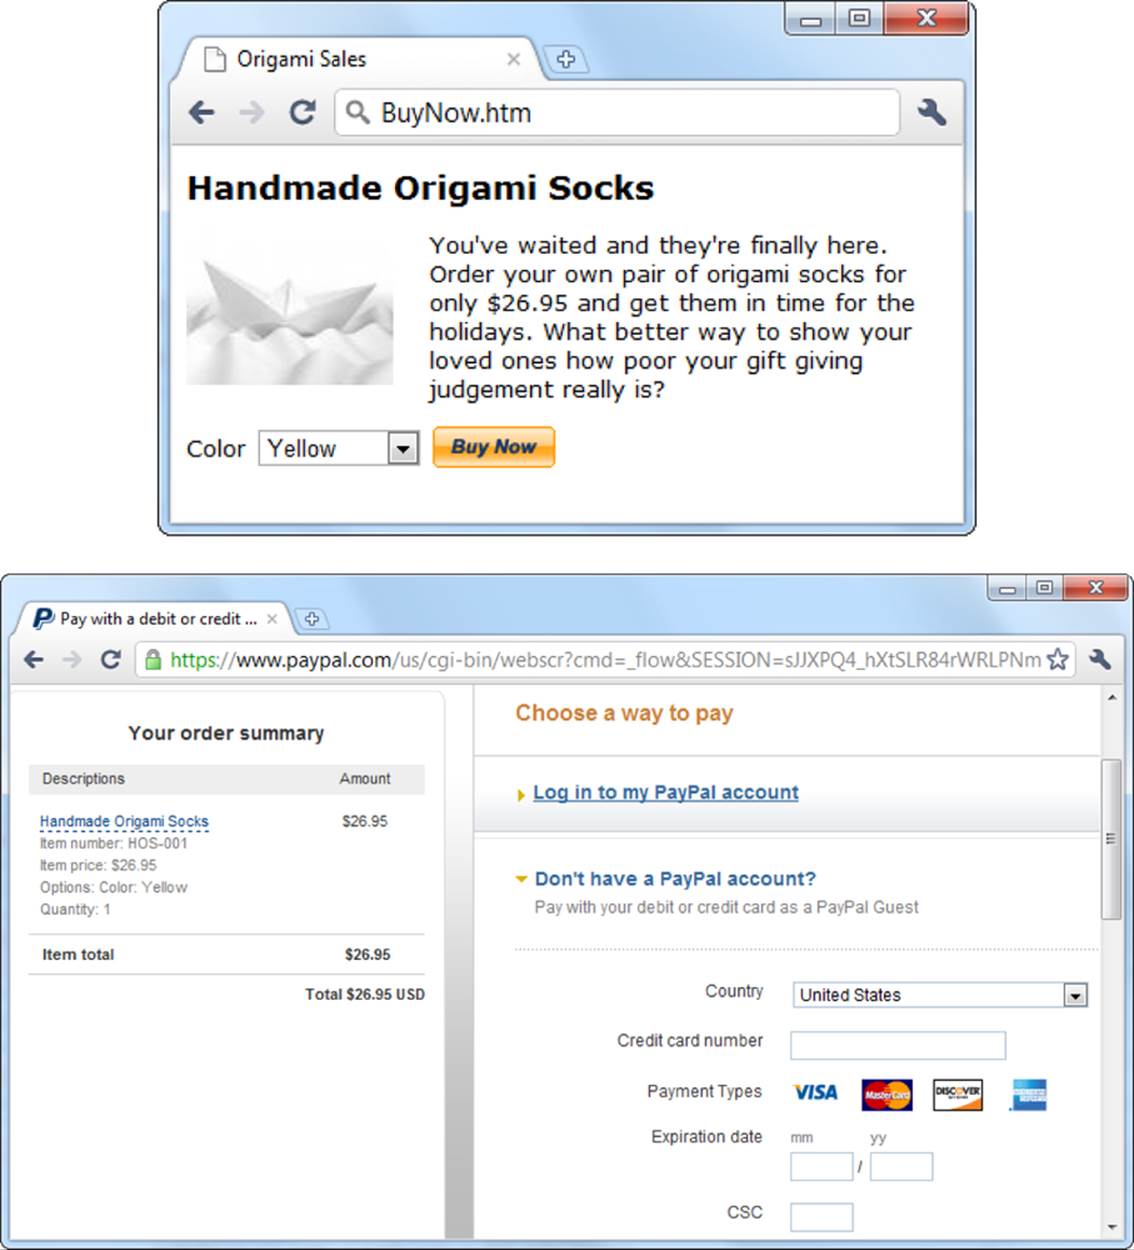
Figure 13-22. Top: The Buy Now button waits patiently on your page. Bottom: Clicking the Buy Now button starts a secure checkout process using PayPal. Your visitor can pay for an item by credit card, and you both get an email confirming the transaction. Then it’s up to you to fulfill your end of the deal.
Creating a PayPal shopping cart is remarkably similar to creating a Buy Now button (so if you haven’t tried that, you might want to play around with it before you go any further). The basic idea is that you create a separate “Add to Cart” button for each item you sell. You get many of the same options you did with the Buy Now button. For example, you can set a price, product code, shipping charges, and so on. The difference is that when visitors click an “Add to Cart” button, PayPal doesn’t send them straight to a checkout page; it displays a shopping cart page in a new window. Visitors can keep shopping until they have everything they want. Then they click a Checkout button to complete their purchase.
To show you how this works, the following example uses the page pictured in Figure 13-23 as a starting point. This example also shows a great use of style-based layout. Check out the downloadable samples—available from the companion site at http://prosetech.com/web—to try it out for yourself.
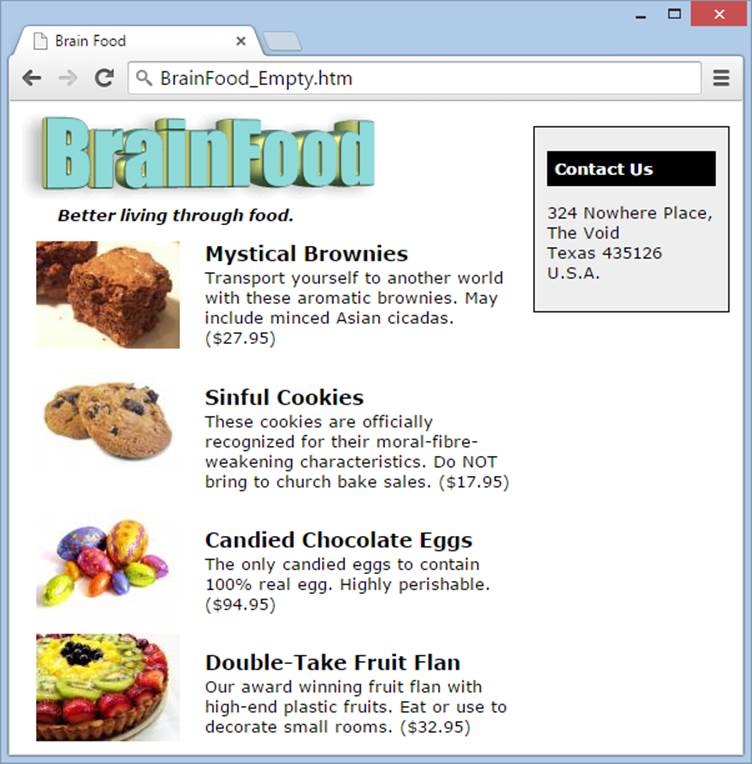
Figure 13-23. Right now, this BrainFood page has a great list of products but no way for your visitors to make an impulse purchase. You can change that by adding a PayPal shopping cart button.
Creating a Custom Page Style
Before you create your shopping cart, you can take an extra step to really personalize your payment page. If you’re happy with the PayPal standard, feel free to skip to the next section. But if you’d like to have your company logo appear on the shopping cart pages, keep reading.
1. If you’re not already there, head to www.paypal.com and sign in.
2. Scroll down and click the “Seller preferences” link at the bottom of the panel on the left.
This brings you to a page with a pile of information about your preferences. In this case, you’re interested in the “Selling online” section.
3. In the “Selling online” section, find the “Custom payment pages” setting, and click the Update link next to it.
This takes you to a page that lists all the page styles you’ve created. At first, you start off with only a single style—the PayPal standard, which sports a basic PayPal logo.
4. Click Add to create a new page style.
PayPal displays a set of options that let you define how your page looks and functions.
5. Fill in whatever information you want to customize on your payment page.
First, type a descriptive title into the Page Style Name box to help you remember which style is which.
Next, use the Header Image URL to point to the picture you want to appear in the top-left corner of the shopping cart page. You can use an image that’s up to 750 pixels wide and 90 pixels high, and you need to upload it to your web server. Optionally, you can supply a Logo Image URL to set a similar picture for the order summary page (make this one 190 x 60 pixels).
NOTE
Because PayPal’s shopping cart is a secure page, when you use a custom logo, the shopper may get a message informing her that there are some insecure items on the page (namely, your picture). To prevent that from happening, talk to your web hosting company about putting your picture on a secure (HTTPS) server.
You can specify color codes for the Header Background Color, Header Border Color, and Background Color settings. This part is optional; leave it out if you’re happy with the standard white.
6. Click Save to store your page style.
Before you commit, you can click Preview to take a sneak peek at what the payment page looks like.
7. Select your new page style, and then click Make Primary.
All your visitors will see your customized page when they check out.
Building the Shopping Cart Buttons
Now you’re ready to build the buttons that add items to your customer’s cart. Here’s how:
1. If you’re not already there, head to www.paypal.com and sign in.
2. Scroll down and click the “Selling tools” link on the left.
You’ve been here before.
3. Click the “Create button” link.
A shopping cart functions a bit differently from the Buy Now button you built before, but you still need to supply the same product and price information.
4. For the button type, choose “Shopping cart.”
PayPal displays a page where you configure the “Add to Cart” button for a single item.
5. Give your item a name and, if you want to keep track of it, a product code. Then supply the price, currency, and any other relevant information.
These settings are exactly the same as those for a Buy Now button.
6. Click Create Button.
You’ll see a text box with the markup for your customized “Add to Cart” button. Copy the markup and paste it into your web page. But remember, this “Add to Cart” code applies to a single, specific product. If you have more than one item on a page (as in the BrainFood example), you need to create multiple buttons. To do so, click “Create similar button” and return to step 3. When you finish building all the buttons and copying them into your page, continue with the next step.
7. Create a View Cart button.
Your shopping cart wouldn’t be complete without a button that lets shoppers see what’s in their carts (and then head to the virtual checkout counter). To create one, click the “Create a View Cart button” link.
You have virtually no options for the View Cart button, as its purpose is pretty straightforward. You can use the standard View Cart button or supply a URL that points to a button of your own design. Once you make your selection, click Create Button, and then copy the markup into your page along with all the other buttons. Figure 13-24 shows the result.
Withdrawing Your Money
PayPal safely stashes all your payments in your PayPal account (which is like a virtual bank account). You can see the balance at any time. Just log in and click the My Account tab.
If you earn a small amount of money, you may be happy leaving it with PayPal so you can buy other stuff on a variety of websites, from eBay to Etsy. But if you’re raking in significant dough, you’ll want to transfer some of it to the real world.
The most common approach is to send the money to your bank account. To do this, you need to give PayPal your bank account information. PayPal waives its transfer fee as long as your withdrawal meets a certain minimum (like $150). However, your bank may apply an electronic transaction fee. Depending on the country you live in, PayPal may offer other withdrawal options, too. For example, it may let you transfer money to a debit card or a credit card.
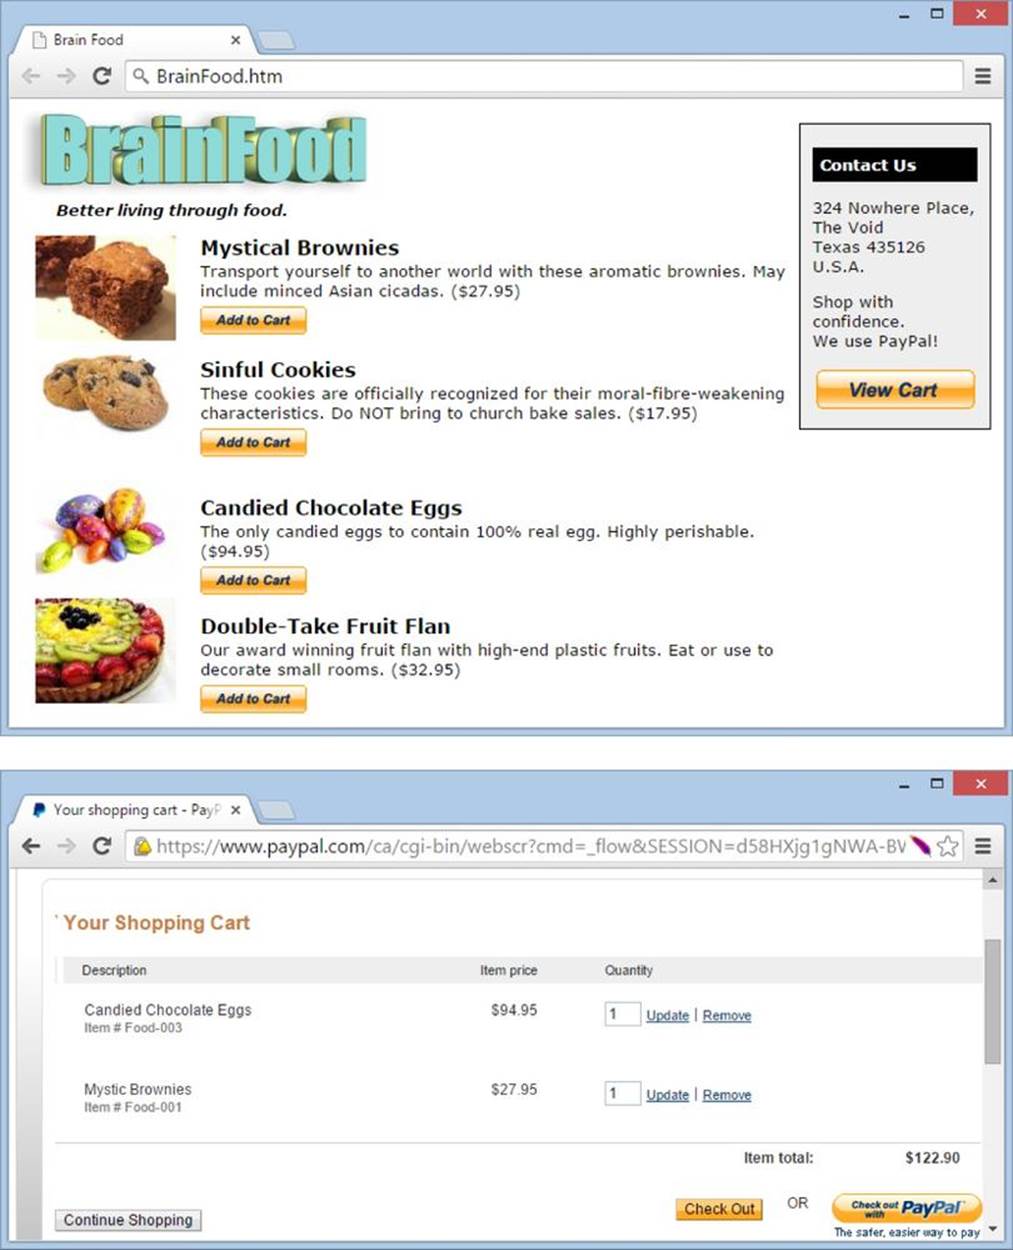
Figure 13-24. Top: Here’s the revised BrainFood page, with shopping cart buttons. Bottom: After clicking a few “Add to Cart” buttons, here’s the shopping cart page your visitors will see (in a separate window). All they need to do is click Check Out to complete a purchase.
To get started with any of these approaches, log in, click the My Account tab, and then click the Withdraw link underneath and follow the instructions.