Creating a Website: The Missing Manual (2015)
Part 3. Connecting with Your Audience
Chapter 12. Adding a Blog
A traditional website is the gold standard of the web world. It’s infinitely flexible—able to chronicle a personal trip to Machu Picchu just as well as it powers an ecommerce storefront.
However, there’s something distinctly unspontaneous about a website. For example, imagine you want to post a piece of gossip about a celebrity sighting in your hometown. Before you can share your thoughts with the rest of the word, you need to pick a web page filename, decide what HTML elements you’ll use, determine how you’ll link your page to other pages, and so on. None of these tasks is really that difficult, but taken together, they’re enough to discourage casual web authors from writing anything that doesn’t seem worth the trouble.
That’s where blogs fit into the picture. Blogs are a self-publishing format that gets your thoughts online quickly and easily, while avoiding the headaches of website management. They’re a fresh, straightforward, and slightly chaotic way to communicate on the Web. To maintain a blog, you publish short entries whenever the impulse hits you. High-powered blogging software collects, chronologically organizes, and presents your posts on web pages. That means that if you don’t want to fuss with the fine details of website management, you don’t need to. All you need to worry about is posting your thoughts—and with some blogging software, that’s as easy as firing off an email.
In this chapter you’ll learn how blogs work, and you’ll see how to create your own blog with Google’s Blogger, one of the Web’s most popular blogging services.
Understanding Blogs
The word “blog” is an combination of the words web and log, which makes sense because blogs are logs of a sort—regular, dated blurbs, like a cross between a diary entry and a posting in a discussion forum. “Blog” is also a verb, as in “I just ate at a terrible restaurant; when I get home I’m going to blog about it.” Figure 12-1 dissects the anatomy of a basic blog.
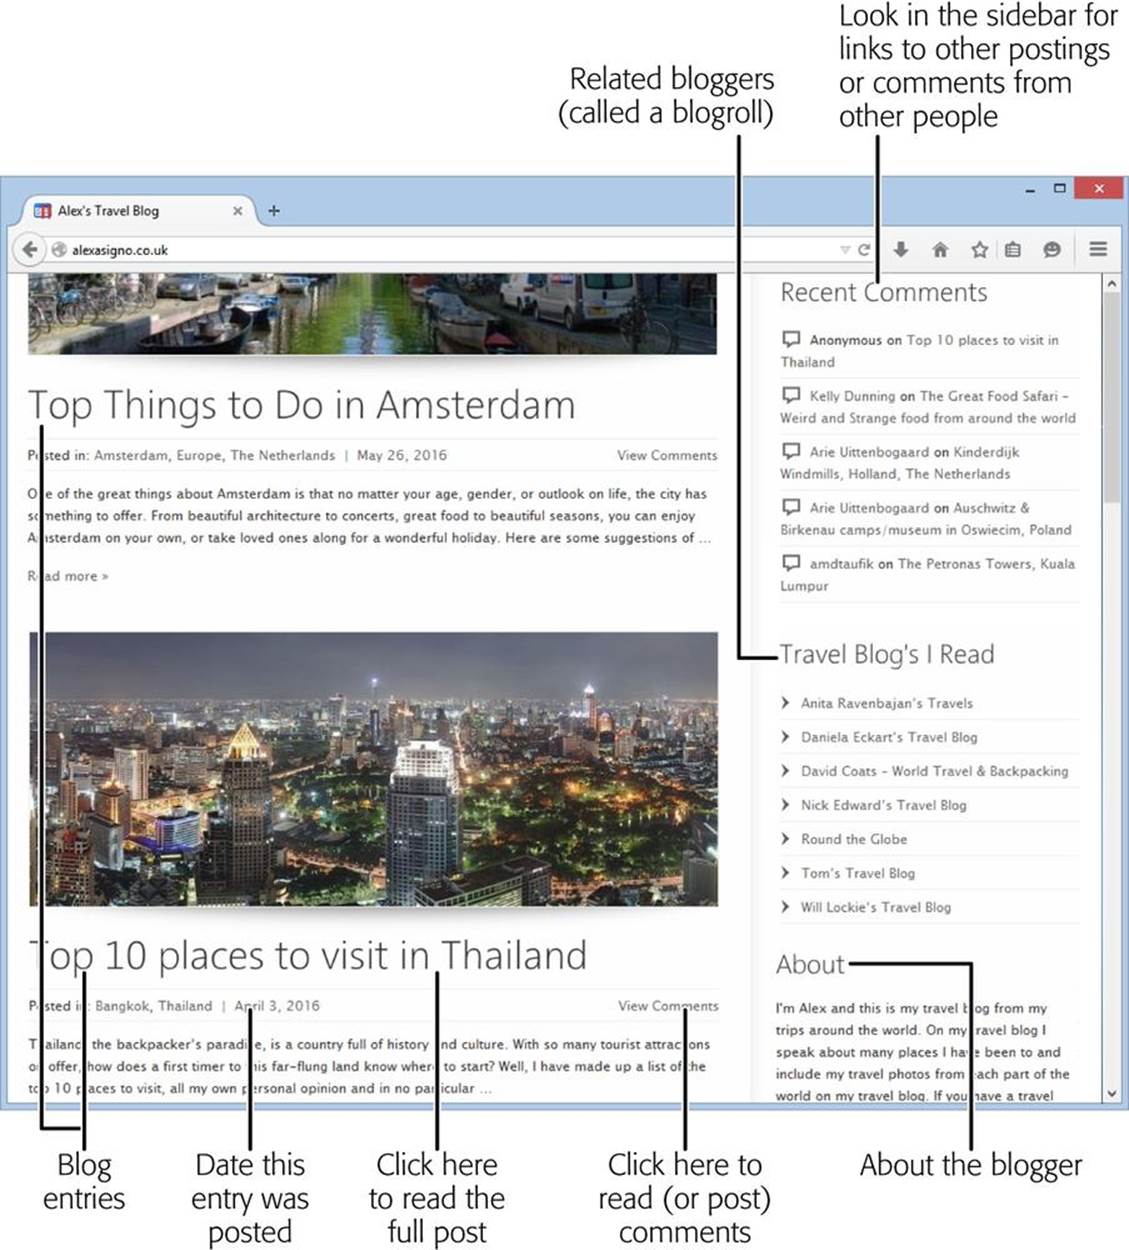
Figure 12-1. A typical blog displays posts in reverse chronological order, starting with the most recent post at the top of the page. A blog’s home page may feature the last few entries or just the most recent one, depending on the options you set. If blog entries are extremely long, the home page might display just the post’s first few paragraphs, with a link to the rest of the post (as in this example). Off to the side, you’ll find other details, like a calendar or set of links that let you read older posts, a picture of or blurb about the author, or a list of recommended blogs (called a blogroll).
Although blogs make it easy to post your thoughts on the Web, it’s unfair to say that they’re just a simplified way to publish online. Rather, blogs are a wholly different form of online communication. And although there’s no definitive test to determine what is or isn’t a blog, most blogs share several characteristics:
§ Blogs are often personal. You can find topic-based blogs, work-based blogs, political blogs, and great numbers of blogs filled with random, offbeat musings. No matter their mission, however, blogs usually emphasize the author’s point of view. They rarely attempt to be objective—instead, they’re unapologetically idiosyncratic opinions.
§ Blogs are organized chronologically. When you design a website, you spend a lot of time deciding how best to organize your material, often using menus or links to guide visitors through an assortment of topics. Blogs take a radically different approach. They have no organization other than ordering your posts chronologically. Anything else would just slow down restless bloggers.
§ Blogs are updated regularly. Blogs emphasize fast, freewheeling communication rather than painstakingly crafted web pages. Bloggers are known to add content obsessively, often several times a week. Because blog entries are dated, it’s glaringly obvious if you don’t keep your blog up to date. If you can’t commit to blogging regularly, don’t start a blog—set up a simple web page instead.
§ Blogs are flexible. There’s a bit of blog wisdom that says no thought is too small for a blog. And it’s true—a blog post communicates equally well whether you write a detailed discussion on the viability of peanut-butter Oreos or a three-sentence summary of an uneventful day.
§ Blogs create a broader conversation. Blogs form communities more readily than websites do. Not only are blogs more conversational in nature, but they also support comments and links that can tie different blogs together in a conversation. If someone posts an interesting item on a blog, a legion of fellow bloggers follow up with replies, blog posts, Twitter messages, and Facebook Likes. Scandalous blog gossip can rocket around the globe in a heartbeat.
Blogs occupy a specialized web niche, distinct from a lot of the other types of sites you’ve seen. For example, you can’t effectively sell a line of trench coats for dogs on a personal blog. But many people start blogs in addition to ordinary websites. This is a great combination. Visitors love blogs because they crave a glimpse behind the scenes. They’re also sure to visit again and again if they can count on a regularly updated blog that offers a steady stream of news, gossip, and insight.
NOTE
A significant number of big businesses have found that they can make their companies seem friendlier and more open by adding a blog from a senior executive, manager, designer—or even the CEO.
Syndication
One neat feature that many blogs provide is syndication, which lets avid readers monitor their favorite blogs using a program called a feed reader. To use a feed reader, you provide links to all your favorite blogs and then keep an eye out for updates. The reader periodically checks these blogs and alerts you to new posts, saving you from having to check every blog 94 times a day to see if there’s fresh content. If you follow blogs regularly, feed readers are the most practical way to stay current with your friends in the blogosphere.
WORD TO THE WISE: THE HAZARDS OF BLOGGING
There’s something about the first-person nature of a blog that sometimes lures people into revealing much more information than they should. Thanks to reckless moments of blogging, lovers have discovered their cheating spouses, grandmothers have read memorable accounts of their granddaughters’ nights on the town, and well-meaning employees have lost their jobs.
The dangers of impulse blogging are particularly great in the workplace. In most countries, companies can fire employees who make damaging claims about a business (even if they’re true). Even famously open-minded Google ditched Mark Jen after he blogged a few choice words about a Google sales conference that he claimed resembled a drunken frat party. The notable part of his story is that he didn’t set out to undermine Google or publicize his blog. In fact, only his close friends and family even knew he had a blog. Unfortunately, a few Google-watching sites picked up on the post and sent the link around the Internet.
There are many more stories like this, where employees have lost their jobs after revealing trade secrets, admitting to inappropriate on-the-job conduct (for example, posting risqué at-work photos or bragging about time-wasting games of computer solitaire), or just complaining about the boss.
To protect yourself from the hazards of blogging, remember these rules:
§ “Anonymous” never is.
§ If you plan to hide your identity, adopt a pseudonym, or conceal personal details, remember the first rule.
§ Funny is in the mind of the beholder. Your humorous work-related stories will be seen in a different light when read by high-powered executives who lack your finely developed sense of irony.
§ Think before you write. There’s a fine line between company secrets and information in the public domain.
§ There’s no going back. Although many blogging tools let you edit or remove old posts, the original versions can stick around in search-engine caches for eternity (see The Google Webmaster Tools).
Although most blogs work with feed readers, some don’t. To work with a reader, blogs need to provide a feed (Figure 12-2), a computer-friendly format of recent blog posts. Readers interpret the feeds and cull important information from them, like the post’s title, description, date, and text. They display that information for your reading pleasure, without forcing you to make a separate trip to the blog itself.
If you click a feed link or icon (like the one shown in Figure 12-2), you’ll see the feed itself, with its list of recent posts (Figure 12-3).
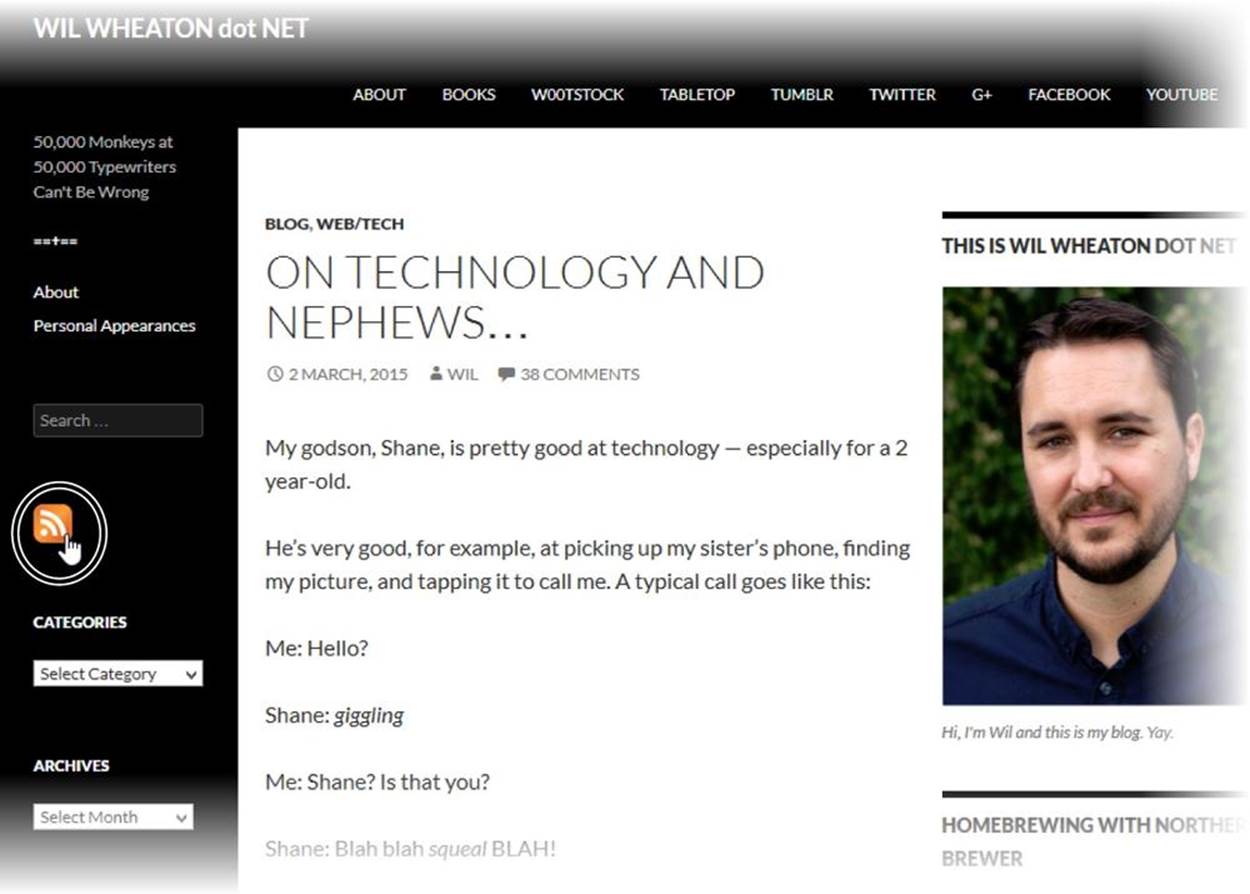
Figure 12-2. Most blogs have a feed link somewhere on the home page. Look for an orange radar icon, like the one shown here, or the word “feed,” “syndication,” “subscribe,” or “RSS” (which is shorthand for the technology that feeds use).
You can subscribe to a feed by right-clicking the feed icon and copying the URL (choose “Copy link address” or “Copy shortcut”—the exact wording depends on your browser). Then, open your feed-reading program, select “Add a new feed” (here again, the wording might differ depending on your reader), and paste the link.
If you don’t have a feed reader of your own, there’s no shortage to choose from. Here are three of the most popular:
§ Feedly (http://feedly.com)
§ The Old Reader (http://theoldreader.com)
§ NewsBlur (http://newsblur.com)
The best readers let you keep up with your favorite blogs on multiple platforms. For example, they let you browse the blogs you follow by visiting a website (on your desktop computer) or using an app (on your mobile phone or tablet). They also keep track of what you read, no matter where you read it.
NOTE
Most feed readers start out free but charge a monthly fee for premium features like better blog searching and the ability to add more than a hundred feeds.
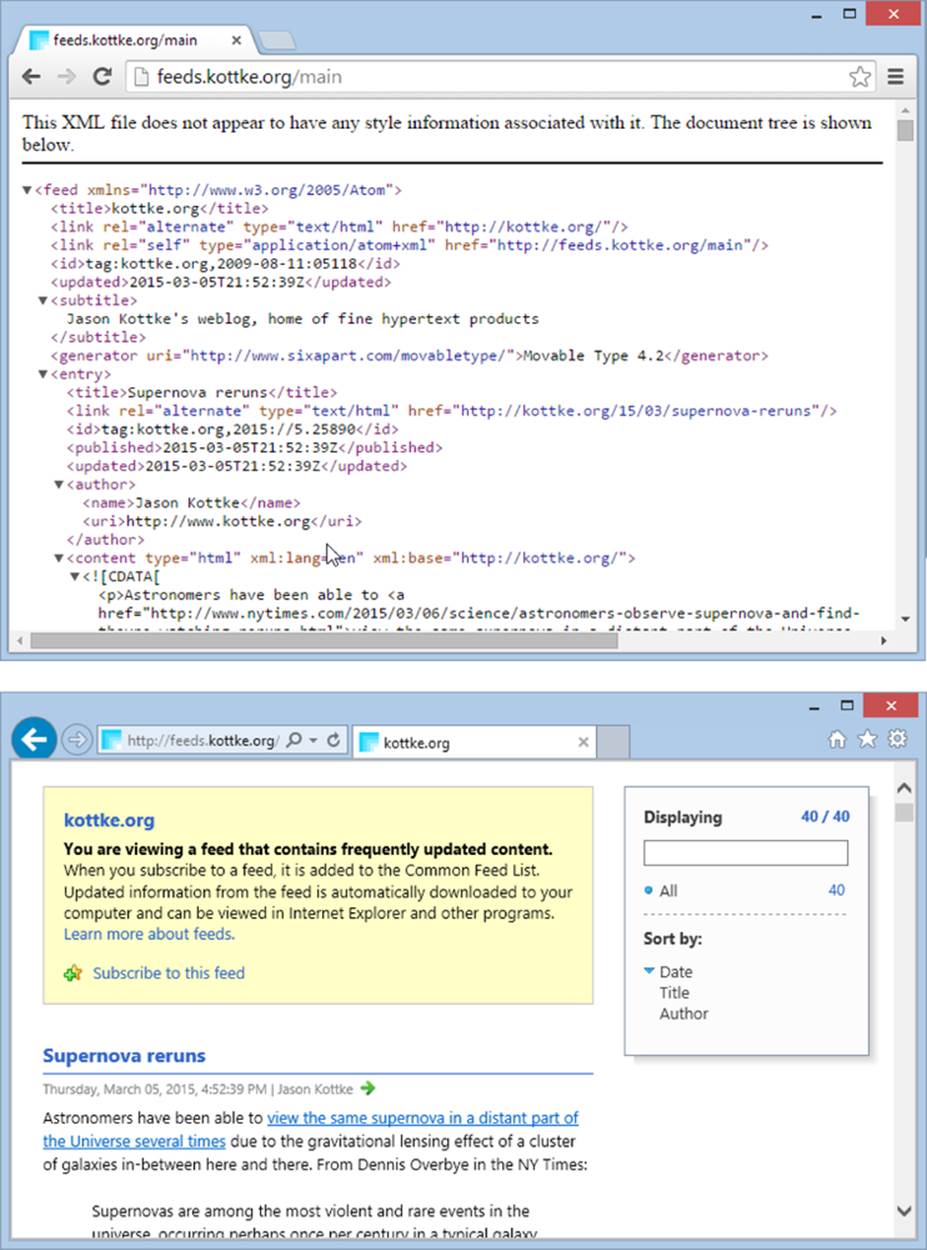
Figure 12-3. Different browsers present feeds in different ways. In Chrome (top), you’ll see the feed’s raw code (XML, a distant relative of HTML). But visit the feed page with Firefox or Internet Explorer, and your browser creates a nicely formatted post list (bottom).
Some web browsers include their own built-in feed readers. Although they’re far less powerful than dedicated readers, they might be enough to satisfy a casual blog-browser:
§ Internet Explorer lets you subscribe to a feed in much the same way you bookmark a site. First, visit a blog’s feed page (Figure 12-3, bottom) by clicking the feed icon or link on a blog. Then click the “Subscribe to this feed” link at the top of the page. Now you can get a list of recent posts quickly and at any time from the Favorites Center (click the Favorites star in the top-right corner of the browser window).
§ Chrome doesn’t have a feed reader, but you can easily get a plug-in that offers basic feed-reading features. Try the one at http://tinyurl.com/chromefeeds.
§ Firefox has a live bookmarks feature that tracks feeds. Figure 12-4 shows how it works.
§ Safari once had feed-reading features, but Apple tossed them out in recent years. It now recommends a separate feed reader service instead.
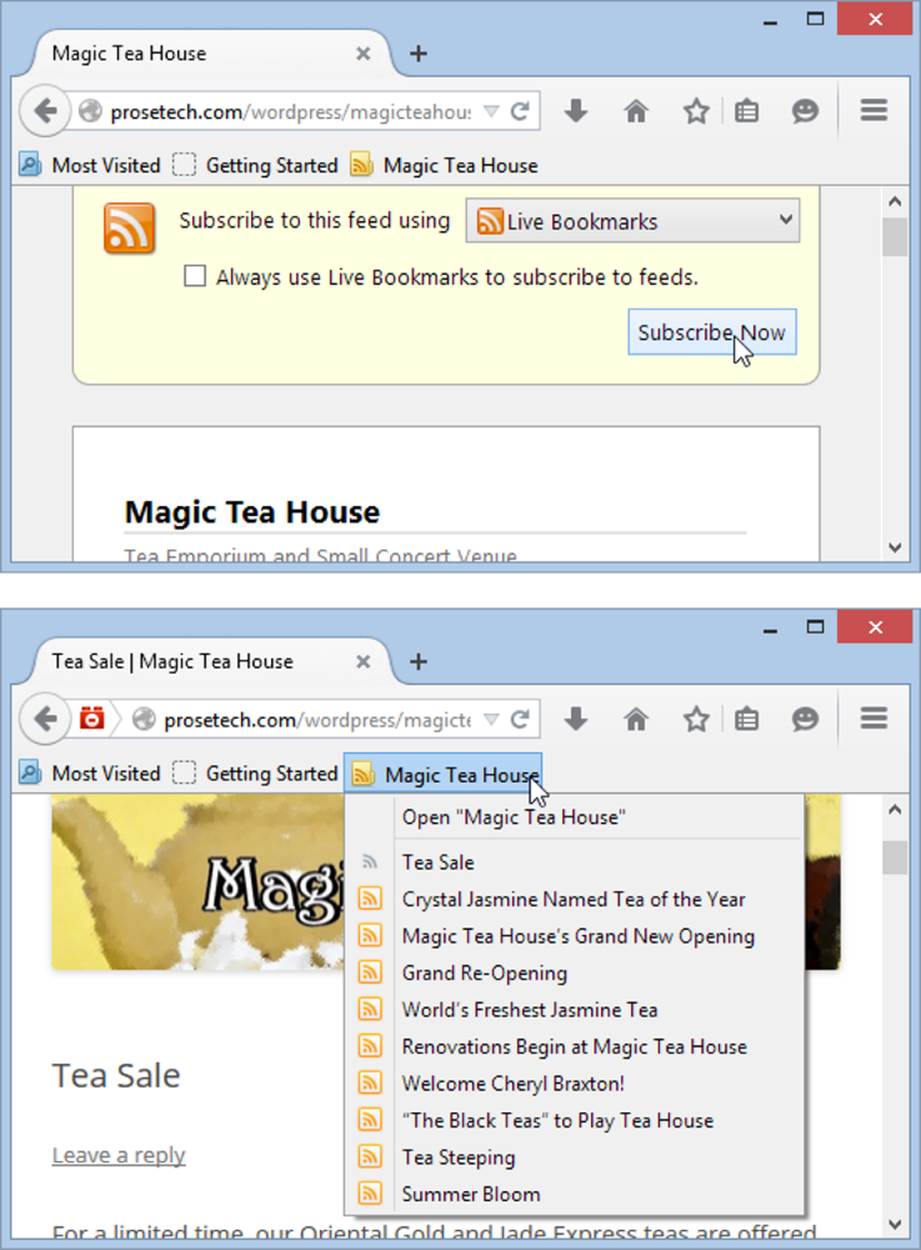
Figure 12-4. Top: Firefox asks you how you want to store your feed bookmark. You can use its Live Bookmarks feature or a separate feed-reading program, if you’ve installed it (just pick it from the list). Click the “Always use” setting if you don’t want to see this options page again, and then click the Subscribe Now button. Bottom: You can’t tell a live bookmark from an ordinary one on the Bookmarks toolbar, but click it and you’ll see a menu of current blog posts, which Firefox updates automatically. You still need to check the live bookmark to see if there’s a new post, but you don’t need to visit the original site.
TIP
Most blogs let you subscribe by email, which means you get new postings delivered to your inbox. If you follow just a few blogs and they aren’t too busy, email subscriptions can avoid the hassle of setting up a feed reader.
Blog Hosting Options
Before you set up your own blog, it helps to understand the different kinds of blog-making options out there. There are really two types of blogs:
§ Self-hosted blogs. If you want the greatest amount of control over your blog, you might be interested in hosting it entirely on your own. To do this, you need to pick the blogging program you want to use, find a web host that supports it, and then configure everything. This approach gives you unlimited flexibility (and possibly better performance), but it also requires a bit more work to get off the ground.
By far the most popular example of blogging software is WordPress (http://wordpress.org), although you can also experiment with the CMS software described in the note at the bottom of this page.
§ Hosted blogs. To post using a hosted blog, you simply sign up with a blog provider and start writing. Adding a blog entry is as simple as filling out a form in your browser. You never need to hassle with installing a program or figure out how to upload content, because the blog provider manages your files for you. You don’t even need to have a website. Hosted blogs are a great bet for new bloggers, because they’re completely painless.
Examples of hosted blog providers include Blogger (www.blogger.com), WordPress (http://wordpress.com, not http://wordpress.org, which is where you get the free blog-hosting program), and TypePad (www.typepad.com).
In this chapter, you’ll spend your time using one blogging tool, called Blogger. Blogger is tremendously popular—in fact, it consistently ranks in the list of most-visited websites (http://mostpopularwebsites.net/1-50). The advantages to Blogger are that it’s simple to use yet remarkably powerful, with support for group blogging, personalized domain names, customized templates, and a variety of add-on features. These attributes make Blogger the best candidate for all-around blogging champ.
NOTE
A number of website-creation tools called content management systems (CMSes) let you build ordinary blogs and other types of websites. Two popular examples are Drupal (http://drupal.org) and Joomla (www.joomla.org). Typically, these products suit businesspeople who need to set up complex web applications—say, a sprawling ecommerce store or a web magazine with a team of contributors—without building everything from scratch.
POWER USERS’ CLINIC: WHY YOU MIGHT WANT TO SELF-HOST
Some die-hard blogging fanatics prefer self-hosted blogs, which offer a few unique advantages that Blogger can’t match. Here are some examples:
§ Censorship-proof. When you use a free blogging service like Blogger, Google is in control of your content. If other users complain that your blog has offensive content or pornography, Google can force prospective readers to click through a warning page before they reach your posts. And if Google decides that you’re breaking copyright laws or encouraging criminal activity, it can vaporize your blog without warning. Furthermore, some censorship-crazy countries like China block Blogger’s sites, which means that no one in those countries can see your blog (unless you pay for a custom domain name, as described in the box on Giving Your Blog a Custom Domain Name).
§ Linked websites. Thanks to HTML’s linking power, it’s easy enough to send readers from your website to your blog and back again. They don’t even need to know that they’re changing web servers. However, if you host both your website and blog on the same server, you gain some unique advantages. They can use the same domain name, they can share content (like pictures), and they can benefit each other in the search engine rankings because Google sees them as part of the same site.
§ Complete control. Some blogs involve multiple authors and huge amounts of traffic. Their scope and popularity rival traditional newspapers. (Two popular examples are the news and gossip sites Gawker Media, at www.gawker.com, and the Huffington Post, at www.huffingtonpost.com.) The creators of this sort of site need complete control over every fine detail to craft search engine campaigns and advertising strategies. Clearly, in this echelon, a free blog service just won’t do.
These features don’t come without a cost. Self-hosted blogs are more complicated to set up and manage, and you need to pay a monthly hosting fee. But if you’re still interested, start out with WordPress (http://wordpress.org), the favorite of hard-core technogeeks everywhere. (You can read a whole book’s worth of WordPress coverage in WordPress: The Missing Manual.) And if you’re still not sure, don’t be afraid to embrace Blogger—or any blogging service. Your choice won’t limit your success, as there are mind-blowingly popular blogs on all the blogging platforms mentioned in this chapter.
Getting Started with Blogger
Blogger is one of the most commonly used blogging services. It provides the easiest way to start a blog, and it’s chock-full of nifty blog management tools. Once upon a time, Blogger’s premium features required a small yearly contribution. But all that changed when Google bought Blogger. Now all of Blogger’s features are free.
Setting up a blog on Blogger is ridiculously easy. In the following sections, you’ll learn how to create a blog, add posts, and take charge of a few neat features.
TIP
You can also check out the official catalog of Blogger help at http://help.blogger.com and the discussion boards at http://productforums.google.com/forum, where bloggers share tips, ask questions, and vent their frustrations.
Creating a Blog
Before you create your blog, it’s a good idea to assess your goals and decide exactly what type of content you plan to showcase. Although you can create a blog with random thoughts or a chronicle of daily life, the most successful blogs have a clear voice and purpose. They attract a loyal audience with targeted, topic-specific posts.
Once you know how you want to position your blog, you’ll be able to choose a snappy name and suitable URL. Start with these steps:
1. Go to www.blogger.com.
This is the home page for the Blogger service.
2. If you have a Google account, enter your login information and click Sign In. If not, click “Get started” to create an account.
By this point, you almost certainly have a Google account. In this book, you’ve used it for Google Analytics, the Google Webmaster Tools, and Google+ Communities. Even if you’ve ignored all these useful services, you may have picked up a Google account to keep track of videos on YouTube or to write emails on Gmail.
NOTE
You need to create an account only once. However, you can create multiple blogs for the same account.
Once you log in, Google takes you to the Blogger dashboard (Figure 12-5).
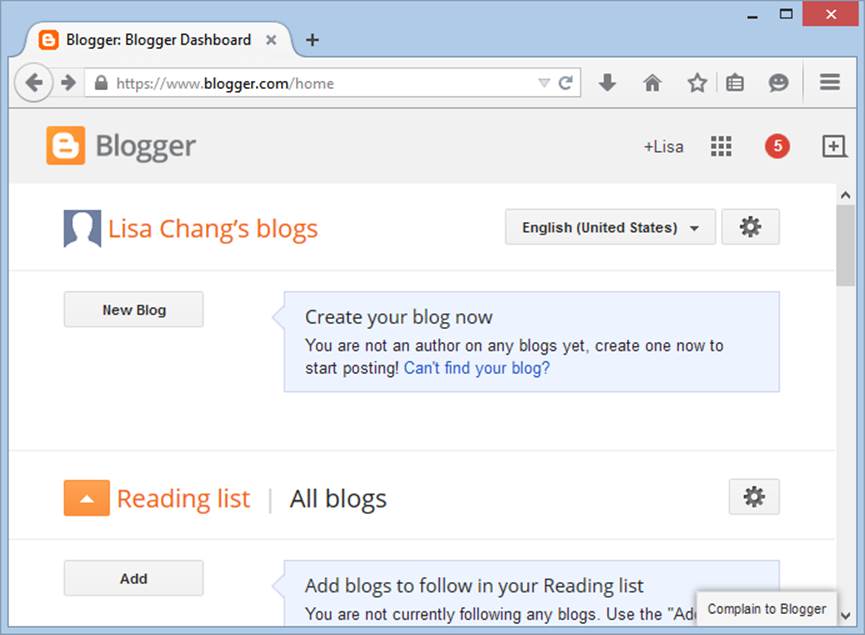
Figure 12-5. The Blogger dashboard lists all the blogs you’ve created (right now, you’ve got none). Underneath that, in the “Reading list” section, Blogger lists all the blogs you’ve asked it to follow.
NOTE
When you follow a blog in Blogger, it shows you a list of new posts every time you log in, and it keeps track of which ones you’ve read. However, people rarely use this feature anymore, because dedicated feed readers (Syndication) work so much better.
3. Click New Blog.
Google asks for three key pieces of information (Figure 12-6).
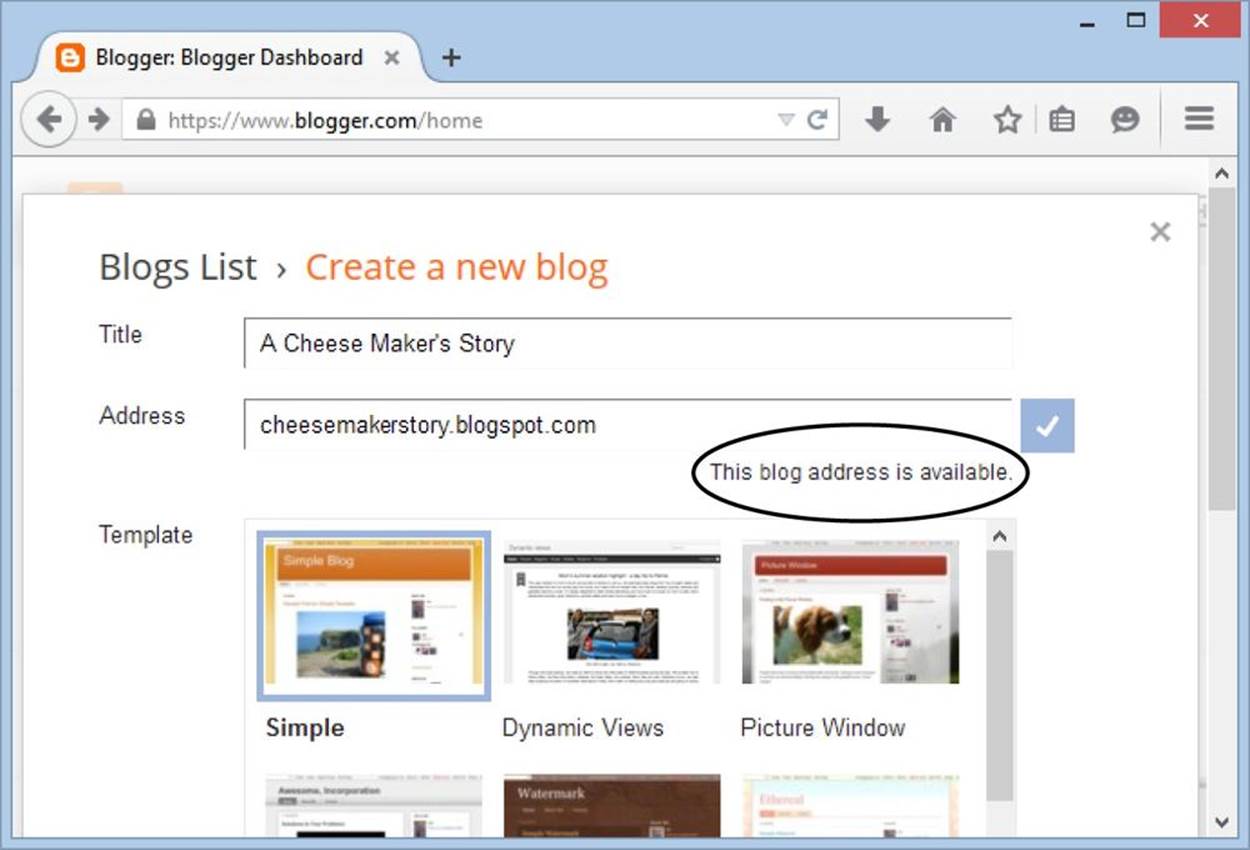
Figure 12-6. To create a blog, you need to specify a name for it, a web address, and a template. As you type in the address you want, Google checks to see if it’s available. If it isn’t, you need to try something else.
4. Supply the title and URL you want your blog to have.
A blog title is just like a web page title—it’s the descriptive bit of text that appears in a browser title bar.
The URL is the really important part, because you don’t want to change this later on and risk losing your loyal readers. It’s the address that eager web followers use to find your blog. Google lets you use just about any URL, so long as it ends with .blogspot.com. Although other bloggers have already taken some of the most obvious names, it’s still reasonably easy to create short-and-sweet blog names like http://secretsandchocolate.blogspot.com or http://wildrichman.blogspot.com.
If you want to use a custom domain name for your blog, which lets you use your own URL, you first need to create a blog with an ordinary .blogspot address. The box on Giving Your Blog a Custom Domain Name explains the process.
5. Choose a template for your blog.
When you create a blog, you choose a preset template, and Blogger formats your posts using that template’s color, graphics, and layout. If you change your template later on, Blogger adjusts all your posts to match the new style.
Blogger gives you just a few starter templates to choose from. But fear not—once you create your blog, you can modify your template’s formatting or swap in something completely different.
6. Click the “Create blog!” button.
Blogger displays a congratulatory message and brings you back to the dashboard (Figure 12-7).
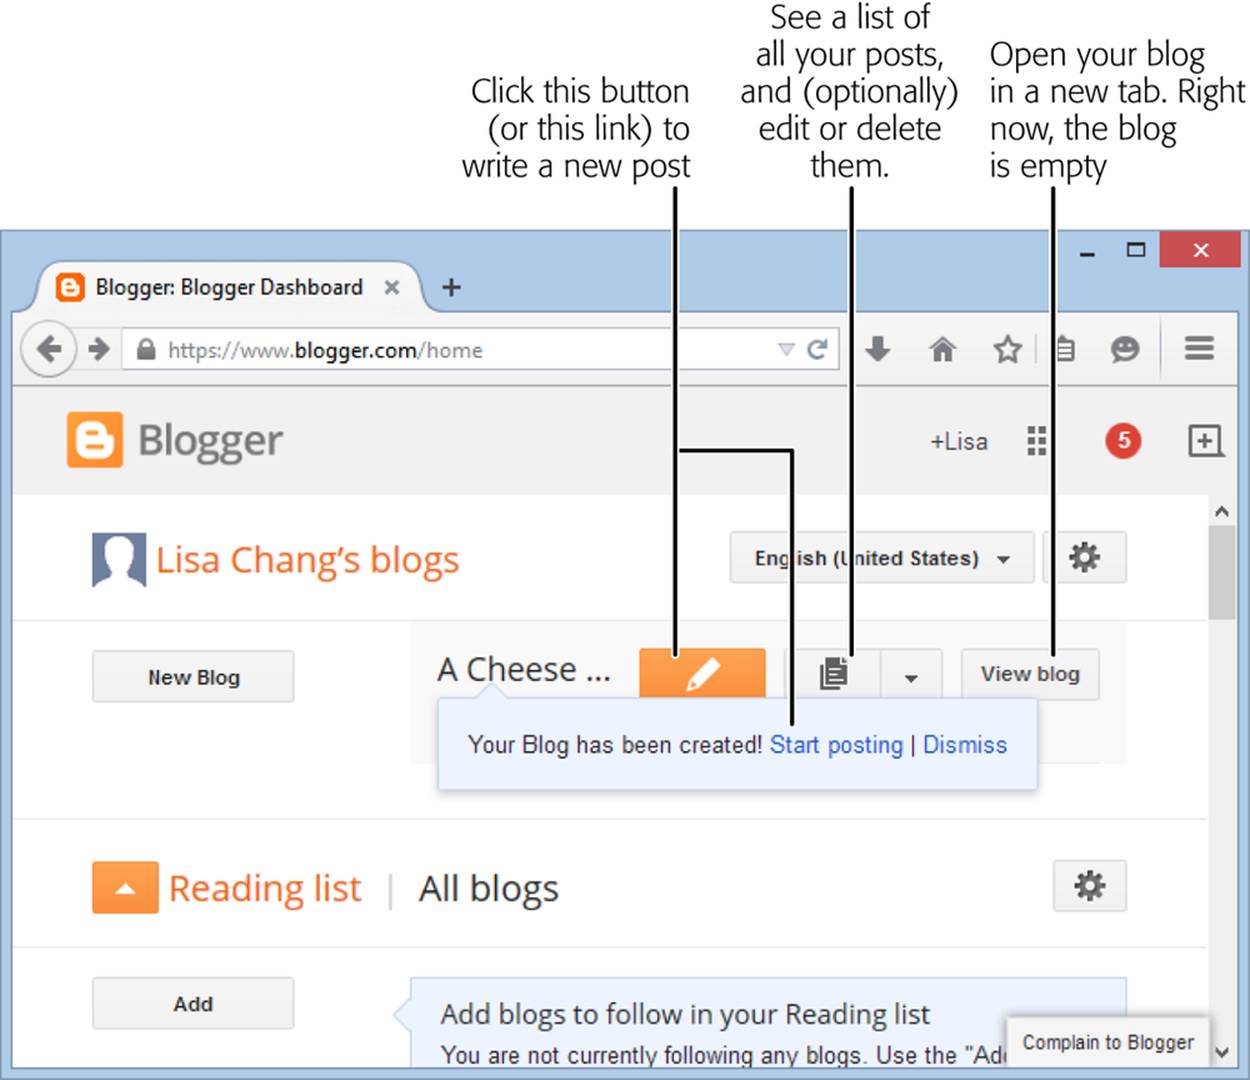
Figure 12-7. Your new blog (A Cheese Maker’s Story) shows up in your dashboard.
7. It’s time to create your first post. Click the “Create new post” button (the one with the pencil icon) or the “Start posting” link.
You can return to manage your blog any time by going to www.blogger.com. For now, continue with the next step to create your first blog entry.
8. Enter the title for your blog post, and then type the content of your post into the large text box (see Figure 12-8).
Don’t worry about all the fancy frills in the editing window just yet—you’ll learn about those in the next section.
NOTE
A blog entry can be as long or as short as you want. Some people blog lengthy stories, while others post one or two sentences that simply provide a link to an interesting news item (or, more commonly, to a post from another blogger).
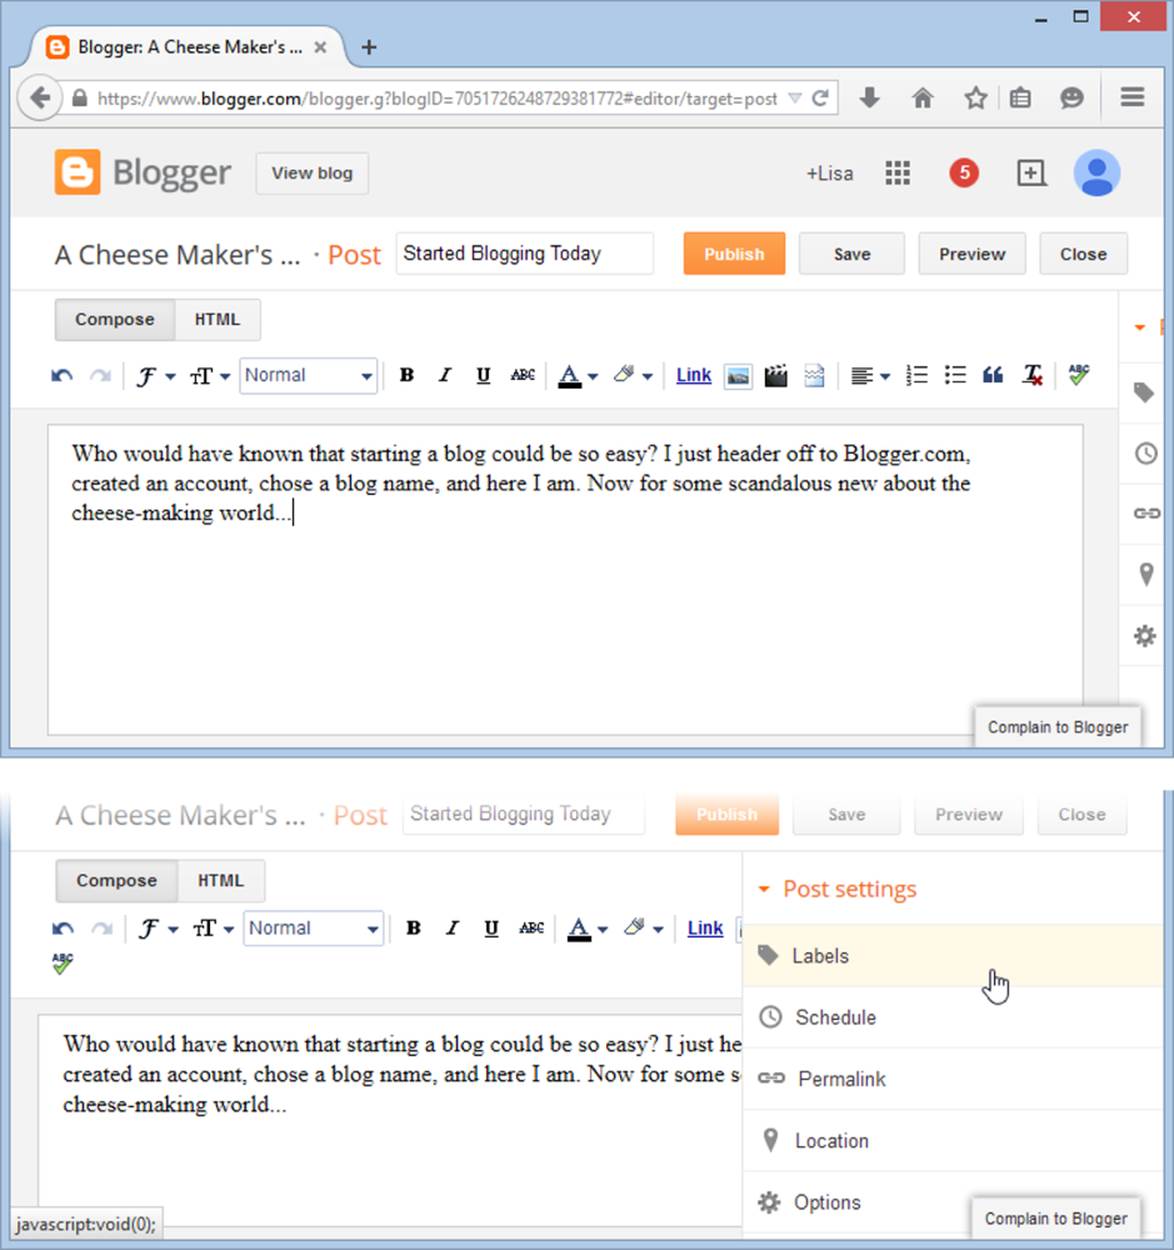
Figure 12-8. Blogger’s post editor is like a mini word processor (top). A bar on the right holds extra options. To see them, point to the side of the page (bottom).
9. Categorize your posts with one or more keywords.
People search your blog by keyword. For best results, always use the same keywords to identify the same types of posts. For example, every time you talk about your pet hogs, add the label pig.
To supply a keyword, point to the sidebar on the right (see Figure 12-8), click Labels, and then type your keyword into the text box. To supply more than one keyword, separate them with commas.
NOTE
Keywords can have spaces. So “American Idol” is a valid keyword. But for best results, keep your keywords as short and simple as possible.
10.Optionally, decide to defer your post’s publication.
If you don’t want your post to appear right away, click Schedule, choose “Set date and time,” and then pick a date in the future. Blogger waits until then to add your post to the blog.
11.Decide whether you want people to make comments on your post.
Normally, you do—and that’s Blogger’s standard setting. But if you don’t, point to the bar on the right, click Options, and then change the “Reader comments” setting to “Don’t allow.”
12.Click the Publish button to add the new post to your blog.
If, instead of publishing right away, you want to take some time to think over your post, click Save. That way, Blogger saves the text you just typed and keeps it waiting for you the next time you return to your blog. (Managing Posts explains how you can find an unposted entry and edit it.)
TIP
Blogger automatically saves a draft of your post as you type, just in case you run into Internet troubles (or you accidentally close the browser window). However, it saves your entry only every few minutes. Clicking Save stores your current draft immediately.
13.Optionally, share your work on Google+.
When you publish a new post, Google invites you to publicize your work on the Google+ social network. If you have a thriving network of followers, you might want to explore this option (click Share). Otherwise, click Cancel to get on with your blogging.
Next, Google takes you to the blog management page, which lists your recently written posts. Right now, there’s just one entry in the list: the new post you just finished.
14.Click the “View blog” button to take a look at your handiwork.
Now is a great time to check out what your post looks like. Figure 12-9 shows an example of what you’ll see.
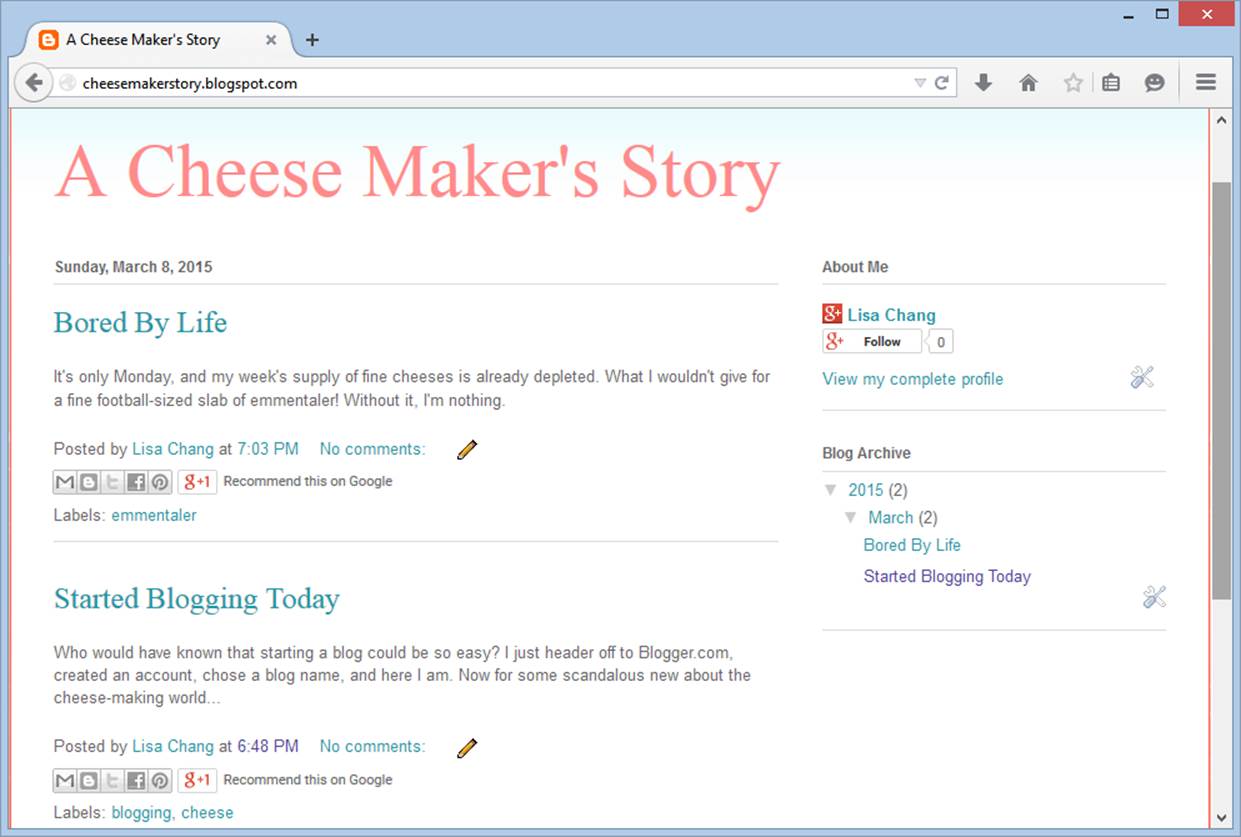
Figure 12-9. This blog shows two recent posts (in reverse chronological order, so the most recent one appears first). On the right, a sidebar provides information about the author, along with links to recent posts.
Formatting Your Posts
So far, you’ve seen how to post text on a blog. But Blogger is pretty flexible when it comes to customizing your blog. You can add all sorts of fancy design elements, from highlighted text to graphics. Best of all, Blogger lets you run rampant with the HTML markup. You just need to know your way around the Blogger editor.
To do some customizing, start a new post by clicking the “Create new post” pencil button. Choose your post title and type in some content. Next, select some text and try out some of the buttons in the toolbar above the text box (see Figure 12-10). Behind the scenes, Blogger uses inline styles (Using Inline Styles) to format your post.
Blogger’s editor, called the visual composer, is designed to mimic a word processor. However, if you’re itching for some HTML action, click the HTML button above the toolbar over the edit window. Now you can add elements and other HTML goodies directly. Click the Compose button to switch back to the WYSIWYG view.
TIP
To get a glimpse of what your post will look like once it’s on your blog, you don’t need to publish it. Instead, click the Preview button to open a new tab that shows what you’ll see based on the formatting you’ve applied so far.
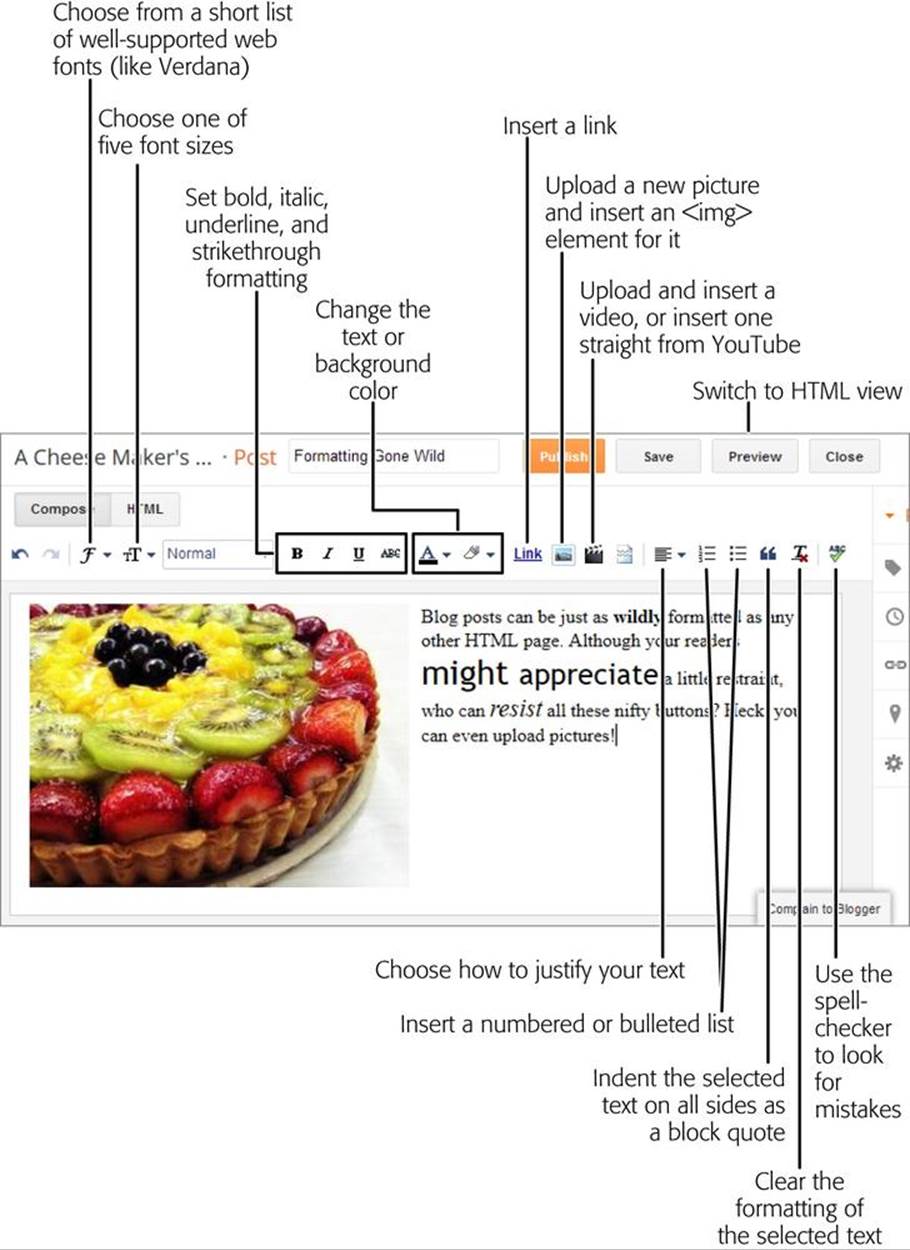
Figure 12-10. The toolbar buttons in Compose mode give you a few basic but powerful formatting choices. You can change your post’s font, resize the text, add bold or italic characters, create simple lists, and add pictures.
Remember, this sort of formatting is a one-off. To consistently change the way common elements appear in your posts (like post titles, the blog text, the author byline, and so on), you need to modify your blog’s template (Customizing Your Template). This approach is akin to using a style sheet on a large website: By editing your template, you create a set of formatting rules that customizes the look of your blog.
Blog Management
Once you create your blog, you can perform any of the following tasks:
§ Add new posts.
§ Edit existing posts.
§ Review comments left by other people.
§ Change your blog settings.
You do most of this work on the blog management page (Figure 12-11). To get there, head to www.blogger.com, find the blog you want to work with in the list, and then click the adjacent “Go to post list” button (it appears next to the pencil button, and its icon looks like a page of paper).
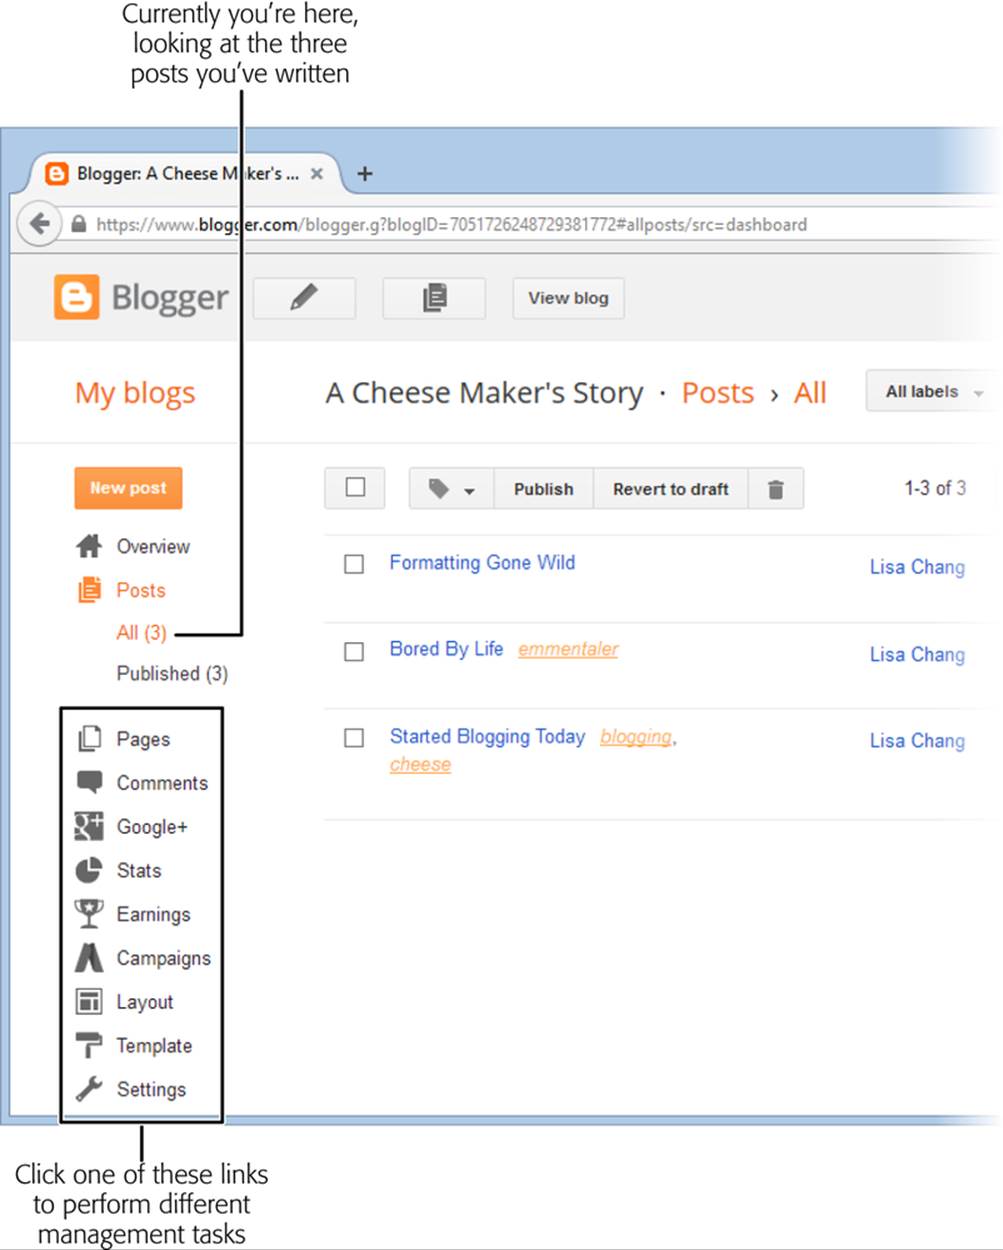
Figure 12-11. This page puts a number of blog management tasks in one place. Choose what you want to do by clicking one of the links on the left. Right now, you’re in the Posts section, so the page lists all the posts on your blog.
NOTE
After you publish a new post, Blogger takes you to the blog management page.
There’s a lot of stuff packed into this page. In the following sections, you’ll explore its nooks and crannies.
Managing Posts
The post list is one of the most useful parts of the blog management page. (If you aren’t there already, click Posts in the sidebar.)
You don’t see the actual content of your posts in the list, but you can see some key details, including each post’s title, its keywords, its author, and the number of views and comments it’s collected so far (Figure 12-12). You can also check on a post’s status—whether it’s live on your site or saved for the future. The word “Draft” appears next to posts you’ve saved but not yet published. The word “Scheduled” appears next to posts set for upcoming publication, using the scheduling feature described on Creating a Blog.
If you point to a post, Blogger displays some useful links, as you can see in the “Bored By Life” post in Figure 12-12. These links let you quickly edit, view, or delete any post. If it’s a published post, you’ll also see a Share link you can click to promote your post to friends on Google+.
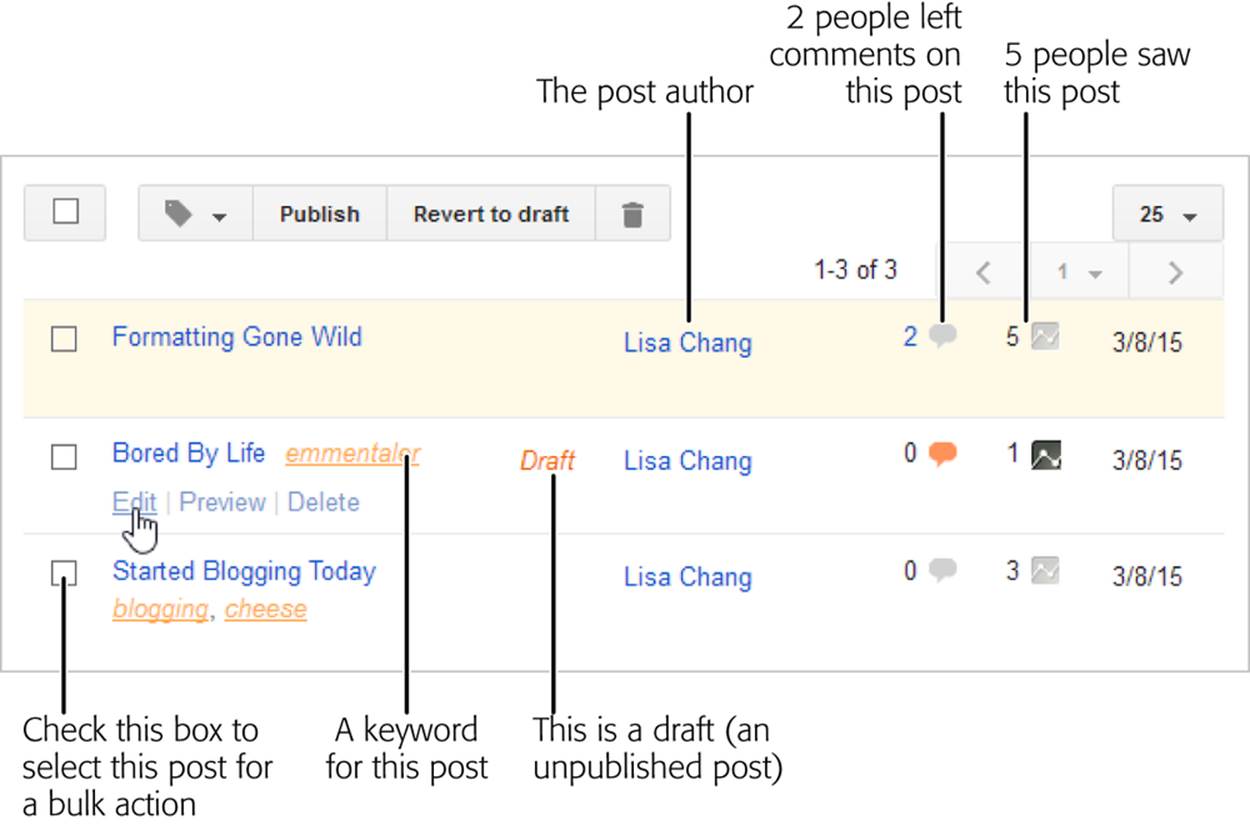
Figure 12-12. The post list packs a lot of info into a small space. But the most useful feature just might be post editing: the ability to fix up a published post or pick up where you left off with a draft.
Want to be a blog-editing whiz? Using the post list, you can perform bulk operations, which are tasks that act on several posts at a time. Start by clicking the checkbox next to each post you want to change (it appears in the first column on the left), and then specify an action. Here are three quick bulk operations you can apply once you select at least one post:
§ Publish the posts. Click the Publish button on draft or scheduled posts to make them live now.
§ Unpublish the posts. If you have second thoughts about one or more posts, click the “Revert to draft” button to turn them into drafts. Blogger stores the content so you can work on it later, but it won’t show up on your blog.
§ Add or remove a keyword. Click the “Label selected posts” button, which has a tiny picture of a tag on it. This opens a list of keywords you use on your blog. Click a keyword to apply it to the selected posts. Click it again to remove it from the selected posts.
§ Delete the posts. To clear out the garbage, click the trash can icon.
Tweaking Common Settings
Now that your blog is up and running, take some time to fine-tune a few settings. In the following steps, you’ll add a description for your blog, choose how many posts you want to display on your home page, and set the time zone to make sure your posts get the right date stamp. Along the way, you’ll get a look at some of the many Blogger settings under your control.
1. On the management page, in the sidebar on the left, click the Settings link.
You’ll see several submenus, each of which has its own group of settings. Initially, Blogger displays the Basic section, which includes some of the most commonly tweaked options.
2. Find the Description setting and then click Edit. Type in a description for your blog.
This text appears on your home page, usually just under your blog title, though the exact spot depends on your template. Try to keep the description to a sentence or two that hints at the flavor of your blog. Two good descriptions are “The sober confessions of an unlicensed meat handler,” and “An on-again, off-again look at my life and adventures.”
3. Click the “Save changes” button at the bottom of the page.
When you save your settings, your changes take effect immediately. But before you check out your blog, there’s more work to do.
4. Take another look at the Settings section in the bar on the left. Click the “Post and comments” submenu.
Blogger displays a hodgepodge of settings for posts and comments.
5. In the “Show at most” box at the top, choose how many posts you want to appear on your blog’s home page (Figure 12-13).
You can ask Blogger to show a certain number of posts, or the posts for a specific number of days. For example, you could tell Blogger to display your 12 most recent posts, no matter when you published them (type 12 in the “Show at most” box). Or you could ask Blogger to show your last 30 days’ worth of posts (type 30 in the “Show at most” box), and then choose “days” instead of “posts.”
For best results, don’t crowd your front page with too many entries. If you post daily, stick to a small number of posts or to topics from the current week. Ordinarily, Blogger shows just your seven most recent posts.

Figure 12-13. Here’s how to configure your blog to show two weeks’ worth of posts.
6. Click the “Save settings” button at the top of the page.
You’re not quite finished.
7. Under the Settings section (in the bar on the left), click the “Language and formatting” submenu item.
Choose your language and a time format.
8. Specify your time zone in the Time Zone list, and pick a date format from the Date Header Format list.
Blogger dates every post at the beginning or end of your entry, depending on your template. By setting the time zone, you won’t need to manually set the date every time you create a post.
9. Click Save Settings.
To see how these changes look, click the “View blog” button.
GEM IN THE ROUGH: GROUP BLOGGING
Having trouble keeping your blog up to date? If you want to be part of the blogosphere but just can’t manage to post more than once a month, consider sharing the effort with some friends. Look for a natural reason to band together—for example, colleagues can create a blog to discuss a specific work project, and families can use one to keep in touch (if they’re not already addicted to Facebook). On a larger scale, group blogging lets like-minded people create a blog that’s greater than the sum of its parts. Two wildly popular, trend-setting group blogs are Lifehacker (http://lifehacker.com), which posts do-it-yourself productivity tips you can apply to real life, and the Daily Kos (www.dailykos.com), which provides left-leaning political news and analysis.
Creating a team blog in Blogger is easy. First, go to your blog management page, click the Settings link on the left, and then click Basic. Scroll down to the “Permissions” section, find the Blog Authors box, which lists all the people who are authorized to contribute to your blog, and then click the “Add authors” link to add your collaborators.
You need to supply just one piece of information—the email address of the blogger you want to enlist. Blogger sends an invitation to each potential blogger. To accept the invitation, the recipient clicks a link in the email message (and creates a Google account, if the blogger-to-be doesn’t have one).
All blog authors have the ability to post entries on your blog. Additionally, you can give some bloggers administrator status, which means they can add more bloggers themselves (and delete existing ones).
Customizing Your Template
Templates are keenly important in Blogger. They not only reflect your blog’s visual style (irreverent, serious, technical, breezy, and so on), but they also determine its ingredients and how those ingredients appear on the page. Fortunately, Blogger lets you change many of your template’s components. For example, you can move the About Me box to a new position, modify its appearance, or remove it entirely.
You can also add new sections, like a set of links that point to your favorite fellow bloggers, or a sidebar of targeted Google ads (Google AdSense). You can even get more radical and replace your template entirely, even if you’ve been posting for years. Blogger retrofits all your old posts to the new template, so your thoughts, both old and new, remain available for eager readers.
To control these details, click the Template link in the bar on the left side of the blog management page (Figure 12-11). Blogger shows a thumbnail-sized preview of your blog’s template, along with its mobile view (the simplified template that kicks into action if a visitor browses your site on a smartphone). You also get options that let you customize your template or choose a new one.
To change your template to something completely different, scroll down. You’ll find many more template choices, with odd names like Awesome and Ethereal. Most templates come in several different color schemes. If you see something you want to try out on your blog, click the template thumbnail for a preview. If you like what you see, click the “Apply to Blog” button to make it the face of your blog.
To really get the look you want, you need to customize your template. There are three ways to do that:
§ Change the formatting settings. These choices let you pick fonts, text colors, and column widths.
§ Change the layout. You can rearrange your blog, remove parts you don’t want, or add new types of content. For example, you can quickly throw in a list of links, a poll for your readers, a slideshow, or a Facebook sharing link.
§ Edit your template’s HTML. Use this approach to customize the raw HTML in your template. If you aren’t afraid to muck around in the markup, you can do anything.
You’ll see how to use all these features in the following sections.
Reformatting a Template
When you choose a template, it applies a combination of formatting settings. But if you peek under the hood, you can tweak most of them to get exactly what you want. Here’s how:
1. If you aren’t already looking at the template settings, click the Template link on the left side of the blog management page.
2. Click Customize.
Blogger opens a two-part page, with a pile of formatting tools at the top and a preview of your blog at the bottom (see Figure 12-14).
Blogger splits the formatting tools into several categories:
o Templates lets you pick a whole new template, though it limits you to the same few templates you saw when you created your blog, so there’s not much point to this option.
o Background lets you choose a set of themed background colors and a background picture. For the background picture, you can upload your own creation, or you can pick from a wide selection of premade backgrounds organized into categories like “Abstract,” “Food & Drink,” and “Travel.”
o Adjust Widths lets you set the maximum width (in pixels) of your blog’s main column and sidebars. Blogs use adjustable layouts that shrink to fit a browser window, along with a maximum-width limit that keeps page components from growing ridiculously big. Maximum Width: The Safety Net describes this type of layout.
o Layout lets you switch between a few basic layouts. You can have a simple, single column of content, add a sidebar on either or both sides, or pump up the footer with room for extra widgets (like your blog archive and author information).
o Advanced has the most interesting formatting controls. Start by using Blogger’s scrolling list to pick the detail you want to format (Page Text, Links, Blog Title, Post, and so on), and then use the controls on the right to change its font and colors. The font options are particularly impressive. Not only do they support common web fonts like Arial, Verdana, and Georgia, but they also include a library of free Google fonts, implemented using CSS’s hot new embedded fonts feature (Web Fonts with Google).

Figure 12-14. Ready for a change? Here you’re giving your blog a new background, a wider single-column layout, fancy fonts (note the heading in particular), and a matching color scheme.
3. Click the “Apply to Blog” button to make your changes permanent (at least until you need your next formatting fix).
Or, if you don’t like the changes you made, click “Back to Blogger” to abandon them.
Adding, Deleting, and Rearranging Gadgets
The focus of your blog is the series of posts that runs down the middle of the page. However, every blog includes extra blocks of content, positioned in a sidebar next to your posts or in a footer at the bottom of the page. Examples include an About Me box, a Blog Archive box (which lists your most recent posts, organized in a tree diagram by month), and the Google Friends list (which lists the Google+ people following your blog). Blogger calls these ingredients gadgets, and it gives you complete control to move them, add new ones, or remove existing ones. Here’s how:
1. On the blog management page, click the Layout link on the left.
Blogger displays an outline of your blog’s current structure, showing you the location of your current gadgets (Figure 12-15).
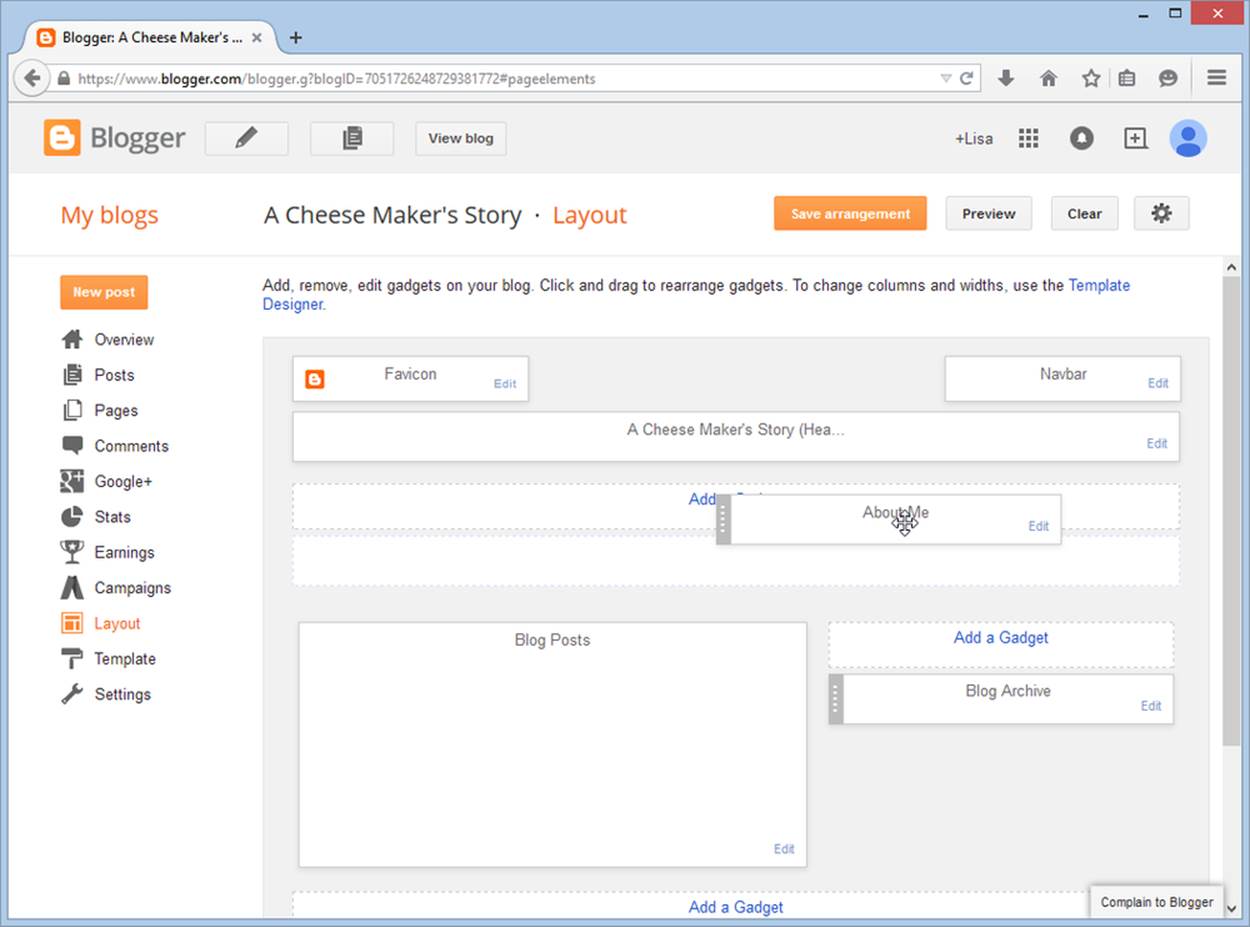
Figure 12-15. You can drag any gadget to one of the carved-out regions of a page. Your possibilities depend on the layout you selected in the template designer (page 403). You may be able to choose from a left or right sidebar, a top header region, and a bottom footer region. Here you’re relocating the About Me section to a more prominent place: after the blog title but before the list of posts.
2. Move your gadgets around.
Initially, your page displays whatever content blocks your template defines. However, you have plenty of ways to mix things up. The easiest change you can make is to move a gadget. Simply drag it to a new place (Figure 12-15).
3. Add new gadgets.
If you want to add a gadget, click one of the “Add a Gadget” links in the preview. Blogger displays a pop-up list with a wide choice of handy add-ons. Click one, and Blogger previews it for you. If you like what you see, click the plus-sign button (+) to pop it into your page, and then drag it to any spot you want.
Some gadgets are plain—blocks of ordinary text, lists, pictures, and links, for example (see Figure 12-16). But others are more interesting. Here are some examples:
o Blog List catalogs the blogs you follow or admire, complete with links. Link List does the same thing, but for websites rather than blogs.
o Search Box adds a Google search box that visitors can use to search the posts in your blog.
o Popular Posts lists the most visited posts on your blog, so new readers can find them quickly and check them out. This feature is wildly popular on news sites. Recent Comments is similar, but it displays the most recently left comments for any post. It lets readers quickly see what others are saying.
o AdSense displays the money-making Google ads described on Google AdSense.
o Slideshow shows a rotating gallery of your pictures, culled from a photo service like Picasa, Flickr, or Photobucket.
o Poll lets you survey your readers and tally their votes.
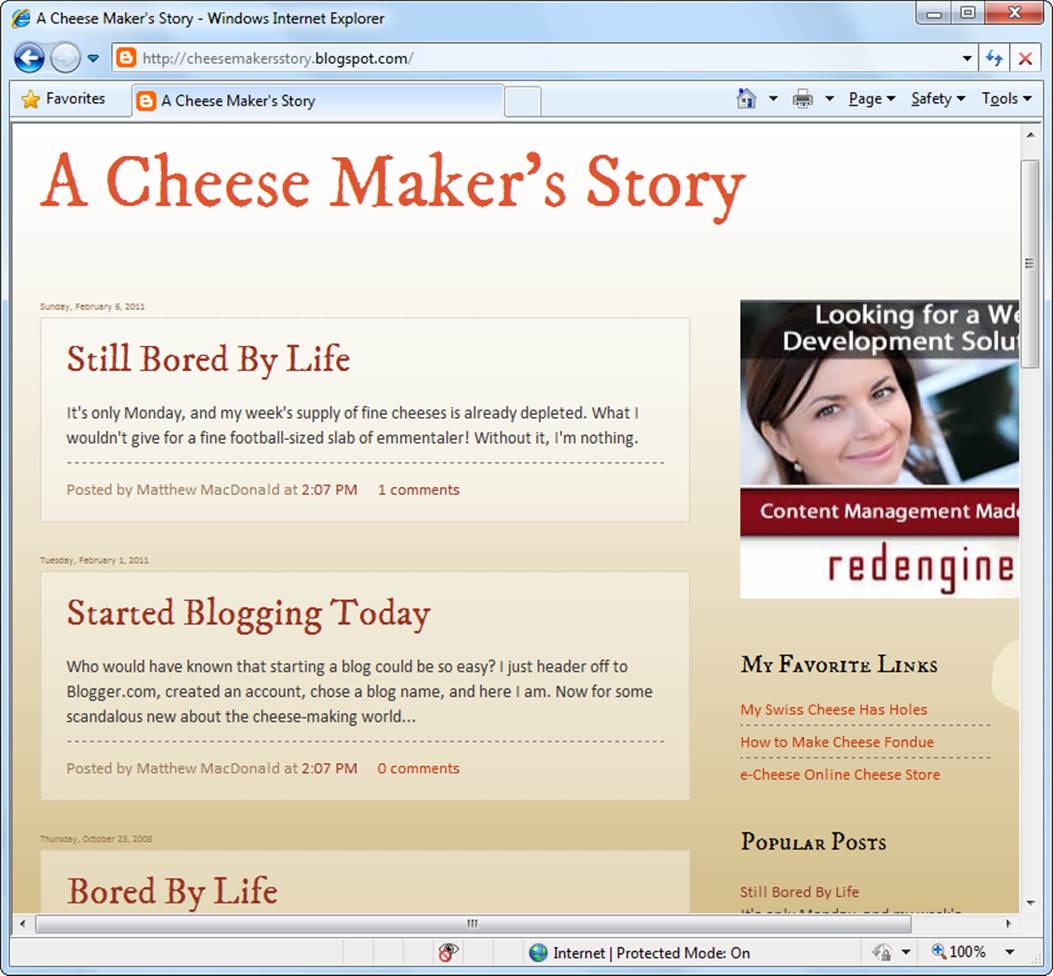
Figure 12-16. This blog has three new gadgets on the right: an ad box, a list of links, and a list of popular posts.
4. Configure or remove your existing gadgets.
To change a gadget’s settings, point to it and then click Edit in the gadget box. Your options depend on the gadget. For example, the Blog Archive gadget displays a calendar of previous blog entries. You can change the order of the entries, the way Blogger groups the posts, or the way it formats the dates. If you edit the Blog List gadget, you can add or remove the blogs you link to.
To remove a gadget, click the Edit link, and then click Remove. One detail you can’t remove is the NavBar, the thin strip that appears at the top of your blog. Visitors who view your blog can use it to travel from one blog to another, sign up for their own blog, or (most usefully) search your blog for keywords. The good news is that, although you can’t remove the NavBar, you can assign it a color so that it matches your template and blends in with the scenery.
5. When you finish adding and arranging gadgets, click the “Save arrangement” button.
Alternatively, you can click Preview to see what your blog will look like when you commit to the changes, or click Clear Edits to abandon your changes and go back to the way things were.
Editing the HTML in a Template
The tools you’ve used so far give you a lot of control over your blog’s appearance, but there’s one more frontier for die-hard bloggers who want unrestricted control over their pages: your template’s HTML markup. Using the skills you’ve learned throughout this book, you can change virtually any element there.
This is obviously more work than using Blogger’s template designer, so why take this extra step? There are a few good reasons:
§ You want to use an entirely new template. Blogger includes only a small set of templates for you to choose from. You can find more online (search for “blogger template”).
§ You want to use advanced CSS formatting. Blogger doesn’t give you much design control beyond fonts and colors. If you want to change something else—tweak margins and padding, for example, or add borders or set a background picture—you need to dig into the template and modify its style sheet.
§ You want no-holds-barred customization. Adding gadgets is a powerful system, but it doesn’t give you the complete, fine-grained control that editing the HTML does. Of course, sometimes too much control makes life unnecessarily complicated.
Blogger’s templates are really just HTML documents that define the look of your blog pages. At first glance, this seems a little unusual—after all, a modest blog has dozens of pages, and you have only a relatively simple template! The trick is that the template defines special replaceable regions. When a visitor requests a page in your blog, Blogger starts with your template and fills in the appropriate content wherever it finds special codes.
For example, if Blogger finds this odd-looking code:
<title><data:blog.pageTitle /></title>
It replaces the highlighted element above with your blog’s title. The final HTML file it creates for your home page actually contains this text:
<title>A Cheese Maker's Story</title>
To change the HTML in your template, follow these steps:
1. If you aren’t already looking at the template settings, click the Template link on the left side of the blog management page.
2. Click Edit HTML.
You see a text box with the full HTML for your template, codes and all. You can change some details right away, like the formatting rules in the inline style sheet. But if you want to add new content or rearrange the page, you need to understand Blogger’s template codes. You can get that information at http://tinyurl.com/295vg5.
3. When you finish making changes, click Save Template.
Blogger updates your blog to use the new template immediately.
4. If you like the results, consider making a backup of your work.
Once you alter your template, you should back it up before you make any more changes. Otherwise, you could muck up your template and have no way to get back to the version you like.
To make a backup, click the Template link on the left side of the blog-management page, and then click the Backup/Restore button in the top-right corner of the page. Finally, click the “Download full template” button, and then pick a safe storage location on your computer.
If you need to restore a backup you’ve made previously, the process is similar. First, click Template, and then click the Backup/Restore button. Next, click the Browse button or the Choose File button (the wording depends on your browser) to find the backup file on your computer. Once you select the right file, click Upload to transfer it back to Blogger.
Reviewing Comments
Ordinarily, Blogger lets visitors comment on your posts. That means your readers can add their own thoughts and follow-ups, and Blogger displays them along with your posts.
To leave a comment, a visitor must have a Google account or an OpenID account (a standard that many blogging services and websites use). Blogger imposes this restriction to reduce comment spam—distracting comments, usually posted by automated programs, that advertise the spammer’s products. Fortunately, Blogger has your back. It intercepts comments that look like spam and moves them to a special holding zone. It’s then up to you to review these comments and decide whether to let them through. To do that, go to the blog management page, click Comments (on the left), and then click Spam underneath. Blogger lists the quarantined comments from all your blog posts. If you find a valid comment, select it and click Not Spam. And if you’re drowning in junk comments, click Select All, and then click Delete to clear away the clutter.
POWER USERS’ CLINIC: GIVING YOUR BLOG A CUSTOM DOMAIN NAME
Even though there’s nothing wrong with a .blogspot.com URL, there’s a good reason to get a custom domain name for your blog. No matter how much you love Blogger right now, someday you might move on to a different service. It’s always easier to make this transition if you don’t need to tell all your readers to update their bookmarks and head to a completely new web address.
To use a custom domain name with Blogger, you first need to buy one from a domain seller, as you learned to do in Chapter 9. Then you can configure your domain name to point to Blogger’s web servers.
Of course, you probably don’t want Blogger to take over your entire domain, because you want room for a traditional website, too. One good solution is to add a subdomain to a domain you own. For example, if you have a website at www.deviousweevils.org, you might want to host your blog at the subdomain blog.deviousweevils.org. This you can do. Unfortunately, it’s not possible to connect a subfolder of your website to Blogger, so give up your dreams of having your blog appear at www.deviousweevils.org/blog. For that, you need a self-hosted blog, like WordPress (Getting Started with Blogger).
Even after you configure your custom domain, your blog’s .blogspot.com address will remain in service, and all your files will stay on Blogger’s web servers. You’re just creating a new way for fans to find your blog.
To make this change, follow Blogger’s instructions at http://tinyurl.com/n2zsbl. You’ll need the help of your web host, but the instructions cover all the technical issues you need to know.
The comment spam feature isn’t as good at catching objectionable comments left by real-life people. If your blog discusses controversial topics, you might want to impose stricter regulations to prevent unhinged commenters from attacking one another. You can wrangle comments in two ways: by deleting them or by moderating them.
Deleting the Junk
The first approach is to delete objectionable comments after the fact. To do this, go to the blog management page and click the Comments link in the sidebar on the left. Blogger lists all the comments left on all your posts, in reverse chronological order (so new comments top the list, no matter how old the post is). If you find a comment you don’t like, you have three ways to dispatch it, as shown in Figure 12-17.
§ Delete removes the comment immediately.
§ Spam deletes it immediately and alerts Blogger that a spammer is at work (which may get the commenter’s ID blacklisted)
§ Remove content deletes the text of the comment but leaves the record of the comment on the blog post, with the user’s ID and the message “This post has been removed by the author.” Sometimes, this approach can shame unruly commenters into better behavior, and it prevents people from criticizing you for sneaky censorship.
TIP
Just as you can edit multiple posts at once with a bulk action, so you can delete an entire batch of troublemaking comments. To do so, tick the checkbox next to each one, and then click the Delete, Spam, or “Remove content” button above the list (see Figure 12-17).
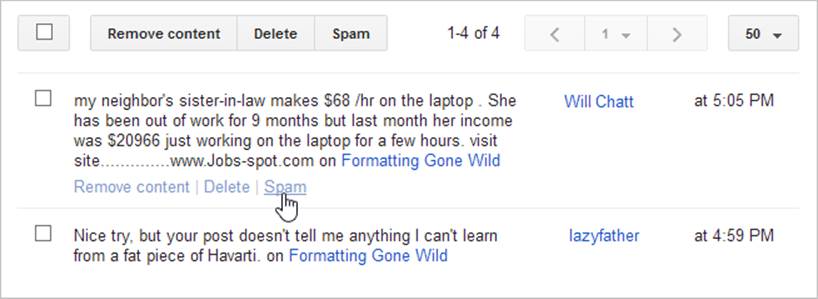
Figure 12-17. When you point to a comment, Blogger displays a set of relevant links.
The only problem with deleting comments is that you have to log on regularly, and your edits take place after the fact. If you don’t have the time to keep checking or you want to make sure no one gets a chance to post inflammatory remarks (even briefly), you need a different approach.
Moderating Comments
Your other option is to moderate the comments, allowing them on your blog only after you give them your personal thumbs-up. Moderating comments imposes extra work, but in some situations it’s the only way to lock out undesirable comments—particularly if you have a popular blog on a hot topic. Here’s how you moderate comments:
1. On the blog management page, click the Settings link on the left.
2. Click “Posts and comments.” Scroll down to the section of comment settings.
Blogger gives you a surprisingly thorough set of options to control comments. For example, you can control whether anonymous readers can post comments (ordinarily they can’t), or you can switch off comments entirely. But the most interesting option is the one that controls moderation.
NOTE
Regardless of whether you allow anonymous readers or use comment moderation, you should always keep the “Show word verification” option switched on. This forces readers to type in a word from a picture before they can post their comments. Annoying as it sometimes is, this technique cripples automated comment-posting software that leaves the worst comment spam.
3. Change the “Comment moderation” setting from Never to Always (or, optionally, to Sometimes).
If you pick Always, there’s no chance of a bad comment making it onto your blog. You need to approve everything. This is the safest choice, but it can make for a lot of work.
The Sometimes option is an interesting compromise. It lets readers post comments freely when your blog entry is new, which is when most comments come in, but it switches to moderated comments after a certain number of days. This model works well because spammers are far more likely to comment on old postings than your readers are. The standard setting is two weeks, but you can choose a different number of days. Reduce the number to fight comment spam more aggressively, or increase it to give your readers more time to speak their mind without hassle.
If you choose Always or Sometimes, the “Email moderation requests to” box appears. Optionally, type your email address here if you want Blogger to notify you whenever someone posts a comment.
4. Click the “Save settings” button.
Now you’re ready to try the system out. First, log out of Blogger. To test the moderating system, sign back in with a different Google account or as an anonymous visitor (if your blog lets anonymous readers leave comments). You could leave a comment while you’re logged in as the blog owner, but Blogger will assume you don’t need to second-guess yourself and skips the moderation step.
5. Post a new comment.
To leave a comment, click the Comment link at the end of a blog entry. Add a comment and your account information, and then click Publish to make it official. Blogger is smart enough to know that the blog uses moderation, so it displays a message explaining that the comment won’t appear until the blog’s owner (that’s you) approves it.
6. Review your comments.
To look at new comments, log in as the blog owner again, head to the blog management page, click the Comments link, and then click the “Awaiting moderation” link underneath. You’ll see just the comments that await your approval.
GEM IN THE ROUGH: PROMOTING YOUR BLOG
You need to promote your blog just as you do any other website. Although you can use all the techniques you learned in Chapter 11, there are some others that are unique to the blogosphere. Here are some important tips to get you started:
§ Add a blogroll to your site. A blogroll is really just a set of links to blogs you like. But blogrolls also make a statement. They say, “These are the people I like” or “This is the crowd I want to be associated with.” To use a blogroll, add a Blog List gadget.
§ Participate with others. Bloggers are an open-minded bunch. If you leave an insightful comment in response to someone else’s blog entry, odds are good that at least some readers will head over to your blog to see what else you have to say.
§ Make it easy for people to share your post. You need to capitalize on the enthusiasm of your visitors. If you blog about a truly fascinating piece of gossip or news, readers might just decide to tell all their friends about it—if you make it easy enough. To encourage this impulse, add the Share It gadget, which adds links that visitors can use to quickly recommend your post on Facebook or Twitter.
§ Promote your feed. Feeds, discussed on Syndication, work with feed readers. True blog aficionados love them because they can track dozens or even hundreds of blogs at a time. Blogger’s software lets you create a feed, and it’s worth promoting your feed to your regular readers. To see your feed, click the “Subscribe to Posts (Atom)” link on your home page. To add the familiar orange radar icon, which makes this option more obvious, add the Feed gadget to your blog.
§ Use BlogThis. A huge number of blog posts simply call attention to interesting news stories, scandalous gossip, or funny pictures that appear online. If you’re an infrequent blogger, linking to these stories is a great way to beef up your blog. Using a nifty tool called BlogThis, you can create a new blog entry that links to an existing web page with a single click. You can do this two ways—add the Google Toolbar to your browser, which has a button for just this purpose, or add a link to your Bookmarks or Favorites menu that does the same thing. For the full details, check out http://tinyurl.com/3n4hvu.
All materials on the site are licensed Creative Commons Attribution-Sharealike 3.0 Unported CC BY-SA 3.0 & GNU Free Documentation License (GFDL)
If you are the copyright holder of any material contained on our site and intend to remove it, please contact our site administrator for approval.
© 2016-2026 All site design rights belong to S.Y.A.