Creating a Website: The Missing Manual (2015)
Part 2. From Web Page to Website
Chapter 6. Linking Pages
So far in this book, you’ve worked on individual web pages. While creating a single page is a crucial first step in building a site, sooner or later you’ll want to wire several pages together so a web trekker can easily jump from one page to another. After all, linking is what the Web is all about.
It’s astoundingly easy to create links—officially called hyperlinks—between pages. In fact, all it takes is a single element, called the anchor element. Once you master this bit of HTML, you’re ready to start organizing your pages into separate folders and transforming your humble collection of standalone documents into a full-fledged site.
Understanding the Anchor
In HTML, you use the anchor element, <a>, to create a link. When a visitor clicks the link, her browser opens the associated page.
The anchor element is a straightforward container element. It looks like this:
<a>...</a>
You put the text a visitor clicks inside the anchor element:
<a>Click Me</a>
The problem with this link is that, as written above, it doesn’t point anywhere. To turn it into a fully functioning link, you need to supply the address of the destination page using the href attribute (which stands for hypertext reference). For example, if you want a link to take a reader to a page named LinkedPage.htm, you create this link:
<a href="LinkedPage.htm">Click Me</a>
For this link to work, the LinkedPage.htm file has to reside in the same folder as the web page that contains the Click Me link. (You’ll learn how to better organize your site by sorting pages into subfolders in the tutorial that starts on Tutorial: Linking the Pages in a Site.)
The anchor tag is an inline element—it fits inside any block element. That means that it’s completely acceptable to make a link out of just a few words in an otherwise ordinary paragraph, like this:
<p>
When you're alone and life is making you lonely<br />
You can always go <a href="Downtown.htm">downtown</a>
</p>
Figure 6-1 shows this link in action.
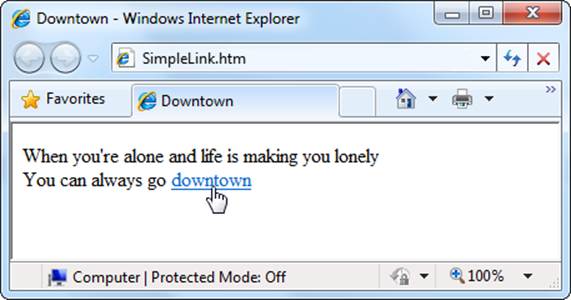
Figure 6-1. If you don’t take any steps to customize an anchor element, its text appears in a browser with the familiar underline and blue lettering. When you point to a hyperlink, your cursor turns into a hand. You can’t tell by looking at a link whether or not it works—if the link points to a non-existing page, you’ll get an error message only after you click it.
It’s worth noting that the label you give a link—that’s the text inside the <a> element—is important. As you’ll discover in Chapter 10, search engines pay extra attention to this label. Getting it right increases the odds that your website will turn up in a Web search and attract new visitors. Here are some examples of good, descriptive link text: “Products,” “Register,” “Our Policies,” and “Contact Me.” By comparison, unhelpful link labels usually consists of one or two vague words in a sentence, like “click,” “here,” “more,” or “this link.”
Internal and External Links
Links can shuttle you from one page to another within the same website, or they can transport you to a completely different site on a far-off web server. You use a specific type of link in each case:
§ Internal links point to other pages on your site. They can also point to other types of resources on your site (like pictures or PDF files).
§ External links point to pages (or resources) on other websites.
UP TO SPEED: LINKING TO OTHER TYPES OF CONTENT
Most of the links you write will point to HTML web pages, but that’s not your only option—you can link directly to other types of files as well. The only catch is that it’s up to the browser to decide what to do when someone clicks a link that points to a different type of file.
Here are some common examples:
§ You can link to a JPEG, GIF, or PNG image file. When visitors click a link like this, their browser displays the image in a new window without any other content. Websites often use this approach to let visitors take a closeup look at photos, like products in a catalog site. You’ll use an image link in the tutorial on Making Image Links.
§ You can link to a specialized type of file, like a PDF file, a Microsoft Office document, or an audio MP3 file. These links rely on a browser having a plug-in (a mini-program that handles specific tasks) that recognizes the file type or on your visitor having a suitable program installed on his computer. If you use a less common file type and the computer doesn’t have the right plug-in, the only thing your visitors will be able to do is download the file, where it will sit like an inert binary blob. However, if a browser has the right plug-in, a small miracle happens, and the file opens up right inside the browser window.
§ You can link to a file you want others to download. If a link points to a file of a specialized type and the browser doesn’t have the proper plug-in, visitors get a choice: They can ignore the content altogether, open it using another program on their computer, or save it on their computer. This is a handy way to distribute large files (like a ZIP file featuring your personal philosophy of planetary motion).
Say you have two files on your site, a biography page and an address page. If you want visitors to go from your bio page (MyBio.htm) to your address page (ContactMe.htm), you create an internal link. Whether you store both files in the same folder or in different folders, they’re part of the same website on the same web server, so you’d use an internal link.
On the other hand, if you want visitors to go from your Favorite Books page (FavBooks.htm) to a page on Amazon.com (www.amazon.com), you need an external link. Clicking an external link transports your guest from your website to a new site, located elsewhere on the Web.
So how do you create internal and external links? It’s all in the way you write the web address, or URL. Internal links use something called relative URLs, while external links use absolute URLs. The following sections break down the differences between them.
Relative URLs
When you create an internal link, you use a relative URL, which tells browsers the location of the target page relative to the current folder. In other words, it gives your browser instructions on how to find the page by telling it to move down into or up from the current folder. (Moving down into a folder means moving from the current folder into a subfolder. Moving up from a folder is the reverse—you travel from a subfolder up into the parent folder, the one that contains the current subfolder.) All the examples you’ve seen so far use relative URLs.
Imagine you visit a page named Products.htm, which has this address:
http://www.GothicGardenCenter.com/Sales/Products.htm
And say the text on the Products.htm page includes a sentence with this relative link to Flowers.htm:
Would you like to learn more about our purple
<a href="Flowers.htm">hydrangeas</a>?
If you click the word “hydrangeas,” your browser attempts to send you to the Flowers.htm page. Because the <a> element in this example uses a relative link, your browser assumes that Flowers.htm is in the same location as Products.htm, and it fills in the rest of the URL. That means the browser actually requests this page:
http://www.GothicGardenCenter.com/Sales/Flowers.htm
One of the nicest parts about relative links is that you can test them on your own computer and they’ll work exactly as they would online. For example, imagine you develop the site www.GothicGardenCenter.com on your computer and store it inside the folder C:\MyWebsite (that’d beMacintosh HD/MyWebsite, in Mac-ese). If you click the relative link that leads from Products.htm to Flowers.htm, the browser looks for the target page in the C:\MyWebsite (Macintosh HD/MyWebsite) folder.
Once you polish your work to perfection, you upload the site to your web server, which has the domain name www.GothicGardenCenter.com. Because you used relative links, you don’t need to rewrite any of the links when you move your pages to the server. When a guest clicks a link, his browser requests the corresponding page from www.GothicGardenCenter.com. If you decide to buy a new, shorter domain name like www.ggc.com and move your website there, the links still work. For all these reasons, relative links are the best way to connect the different pages in your site.
NOTE
Relative links can also travel into (and out of) subfolders. You’ll learn how to write links that do that in the tutorial on Tutorial: Linking the Pages in a Site.
Absolute URLs
HTML gives you another linking option, called an absolute URL, which is an address that includes the target’s domain name, full path, and page name. If you convert the previous relative URL to an absolute URL, it looks like this:
Would you like to learn more about our purple <a href=
"http://www.GothicGardenCenter.com/Sales/Flowers.htm">hydrangeas</a>?
This absolute link works just as well as the relative link did, but here’s the catch: If you move the page to a different website or folder, the link stops working. Instead, when you click “hydrangeas,” your browser tries to find the Flowers.htm page in the Sales folder, where it no longer exists.
For this reason, absolute URLs aren’t a great way to connect the pages within your site. However, if you want to create an external link that travels to another site, they’re essential. For example, imagine you want to link to the page home.html on Amazon’s website. Here, a relative URL just won’t work, because a browser assumes that home.html refers to a file of that name on your website.
FREQUENTLY ASKED QUESTION: OPENING PAGES IN A NEW WINDOW
How do I create a link that opens the requested page in a new browser window?
When visitors click external links, you might not want to let them leave your site. Web developers sometimes use a technique that opens external pages in separate browser windows (or in a new tab, depending on the browser’s settings). This way, your site remains open in the visitor’s original window, ensuring that she won’t forget about you.
To make this work, you need to set another attribute in the <a> element—the target attribute. Here’s how:
<a href="LinkedPage.htm"
target="_blank">Click Me</a>
The target=“_blank” syntax tells a browser to open the link in a new window.
But before you start adding the target attribute to all your anchors, it’s important to realize that it may not always work. Some browsers’ vigilant pop-up blockers intercept this type of link and prevent the new window from opening. (Pop-up blockers are standalone programs or browser features designed to prevent annoying pop-up ads from appearing.)
Some people love the new-window feature, while others think it’s an immensely annoying and disruptive act of website intervention. If you use it, apply it sparingly on the occasional link.
Tutorial: Linking the Pages in a Site
Now that you’ve taken a good first look at the <a> element and learned the difference between relative and absolute URLs, you’re ready to put this knowledge into practice. In the following tutorial, you’ll begin with a small assortment of web pages that you’ll transform into a tiny, interconnected site, all through the magic of links.
TIP
Like all the tutorials in this book, you can find the solution for this exercise on the companion site at http://prosetech.com/web. Look inside the Tutorial-6-1 folder (which stands for “Chapter 6, first tutorial”). Inside you’ll find two more folders: Start, which has the set of pages you begin the exercise with, and End, which holds the finished page.
The Starter Site
This tutorial is a bit different from those you’ve seen in previous chapters, because you start with a collection of pages that, taken together, represent a very small website. The only things that are missing from these pages are the links that let visitors jump from one page to another.
Figure 6-2 shows the website you’re working with in its initial state. It holds four web pages, spread out in several subfolders for better organization. Connecting these pages requires internal links that use relative URLs.
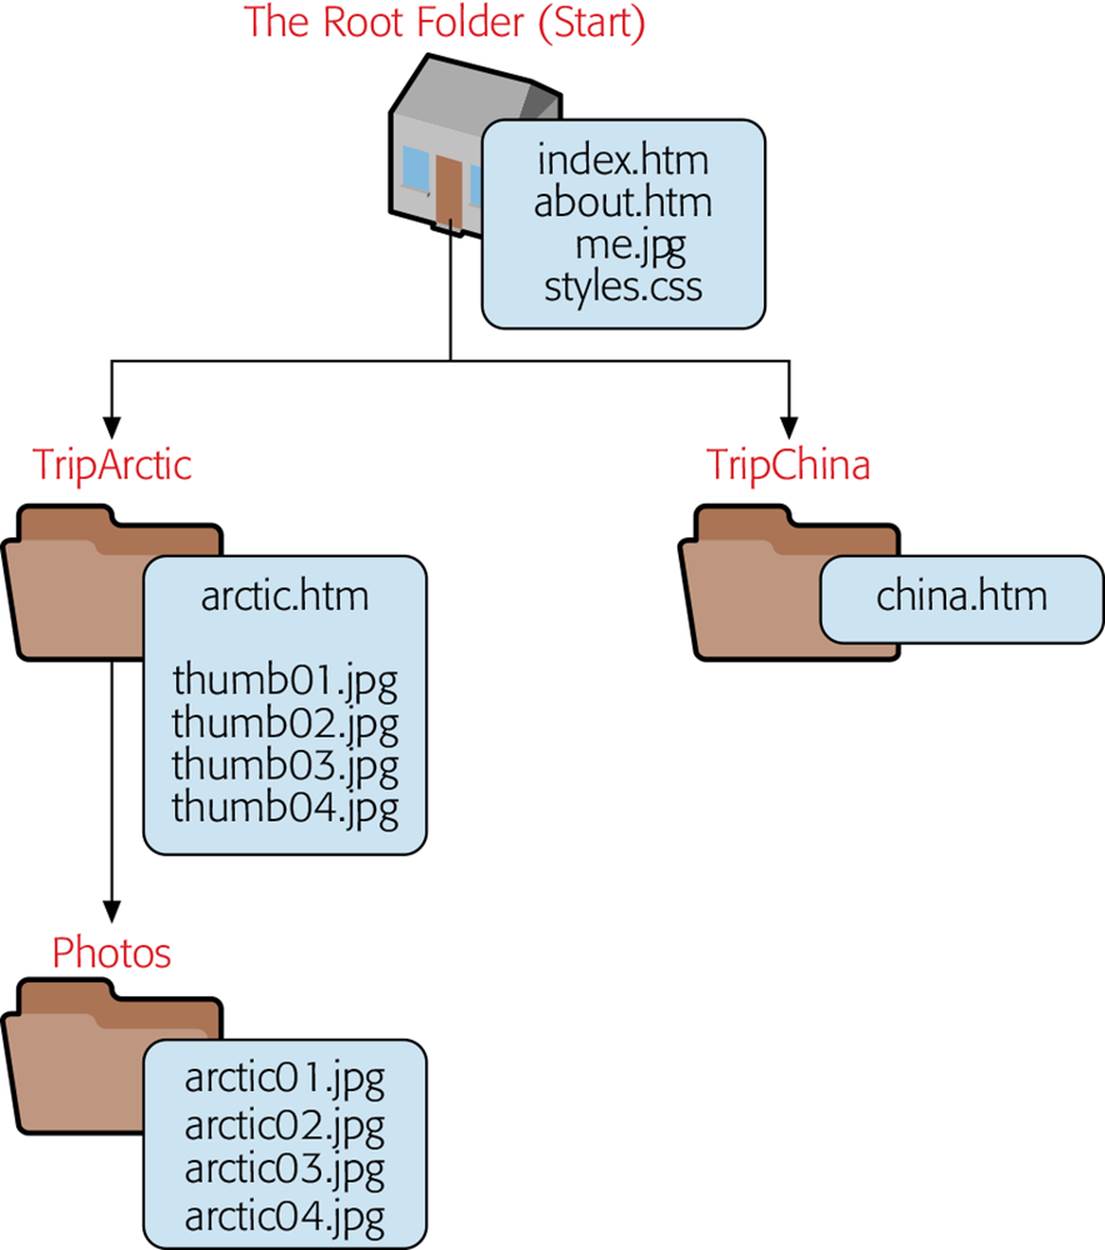
Figure 6-2. This diagram maps the structure of a very small website featuring photos taken on a trip. The root folder contains a style sheet used across the entire site (styles.css), a picture (me.jpg), and two HTML pages. Two subfolders, TripChina and TripArctic, contain an additional page each. The TripArctic folder also contains several thumbnail images of pictures taken on one of the trips. For each thumbnail, there’s a corresponding full-size picture in the Photos subfolder.
The root folder is the core of your website—it contains all your other site files and folders. The root folder of this website is named Start, but this is the least important detail. That’s because when you put your website online, you copy all the files and subfolders from the root folder on your hard drive and transfer them to the root of your website. So it makes no difference whether you call your root folder Start, Root, TripSite, or Zingbobulous, because you don’t use that name on your web server (or, by extension, in any of the links you write for your site).
If you’re feeling a bit hazy on the relationship between folders and websites, check out the box on The Anatomy of a Site. And if you’re wondering how to get your site online, hold that thought—you’ll explore this operation in detail in Chapter 9.
NOTE
Most sites include a page with the name index.htm or index.html in the root folder. This is known as the default page. If a browser sends a request to your website without supplying a filename, the server sends back the default page. For example, requesting www.TripToRemember.com automatically returns the default page www.TripToRemember.com/index.htm. However, this feature only works once you put your website on the Web. Until then, using index.htm for your website home page is just a smart bit of preparation.
UP TO SPEED: THE ANATOMY OF A SITE
A website is nothing more than a collection of pages and related resources, like images, style sheets, and JavaScript files. You can dump all these files into a single root folder, or you can split them into different subfolders inside the root folder.
So far in this book, you’ve kept your pages in a single folder, the root folder, with an optional subfolder for pictures. But now that you’re creating a site with many pages, each of which may have its own related resources, it’s time to consider adding more subfolders to help keep your site organized.
There’s no ironclad rule about whether a website should use subfolders (and, if it does, how many it should have). That’s up to you to decide based on what you find easiest to manage. However, it’s important to standardize the organization of your site now, because that arrangement determines how you’ll write links.
Right now, everything works in the pages shown in Figure 6-2. They have some content, they all link to the same style sheet, and the arctic.htm page includes one <img> element for each thumbnail. But each page is a standalone creation—there’s no way to get from one page to another without typing in the full page URL. You’re about to fix that.
Linking to Pages Within the Same Folder
The easiest links to create are those where both the source page (the one that contains the link) and the target page (the one that opens when you click the link) are in the same folder. That’s the kind of link you’ll create to connect the index.htm page to the about.htm page, both of which sit in the root folder (Figure 6-3).
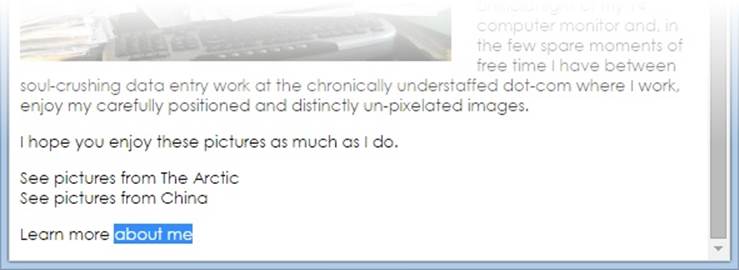
Figure 6-3. Your first task in creating a link is the easiest: Take this plain text at the bottom of the index.htm page and wrap it with a link that, when clicked, opens the about.htm page.
Here’s what you need to do:
1. Open index.htm in your editor.
You can use a garden-variety text editor or a professional tool like Dreamweaver; it doesn’t matter.
2. Find the paragraph that contains the text “About Me.”
It looks like this:
<p>About Me</p>
3. Add an anchor element around the words “About Me.”
All you need is an <a> tag at the beginning and an </a> tag at the end.
4. Add and set the href attribute.
The href attribute uses a relative URL because both the source and target pages are in the same folder. The relative URL is simply the name of the destination page (that’s about.htm).
5. Save the page, open it in a browser, and try clicking your link.
You probably found this exercise pretty easy. (Don’t worry, you’re just warming up.) But if you stumbled over an unexpected problem, here’s what your final link should look like:
<p><a href="about.htm">About Me</a></p>
Moving Down into a Subfolder
The index.htm page also needs links that can take visitors to the two trip pages, arctic.htm and china.htm. Each of them is in its own subfolder (TripArctic and TripChina, respectively).
To create a URL that leads into a subfolder, you simply add the name of the folder, followed by a slash (/), followed by the page name. Here’s the link you need to add to the text “The Arctic” to jump from index.htm to arctic.htm:
See pictures from <a href="TripsArctic/arctic.htm">The Arctic</a>
This link gives a browser two instructions. First, it tells the browser to go into the subfolder TripArctic, and then it directs it to open the page arctic.htm. Figure 6-4 shows both sides of this equation.
NOTE
You may remember this syntax, because you used it with the <img> element in Chapter 4 to grab an image from a subfolder. It also turns up when you link to an external style sheet with the <style> element and the <img> element.
Once you add the link to the arctic.htm page, add a similar link from the word “China” to the china.htm page.
There’s no limit to how many levels of subfolders you can traverse with a relative URL. For example, imagine you want to add a link to the index.htm page that connects to the picture arctic01.jpg. This picture is two subfolders away, in a folder called Photos, which is inside the TripArctic folder. The URL you need looks like this:
Click to see a <a href="TripsArctic/Photos/arctic01.jpg">polar bear</a>
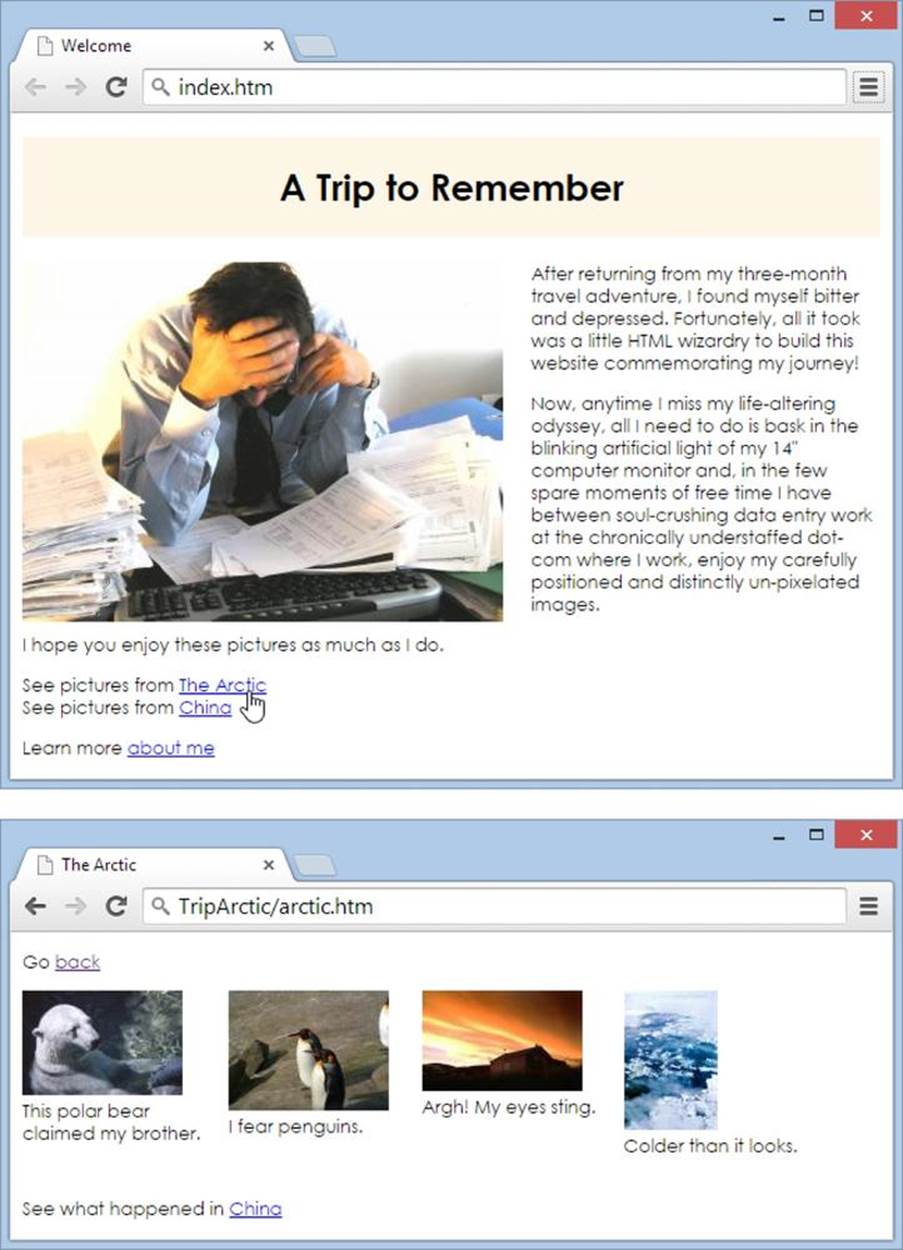
Figure 6-4. Using a relative link, you can jump from the main index.htm page (top) to a page with picture thumbnails (bottom).
Using relative URLs, you can dig even deeper, into subfolders of subfolders of subfolders. All you need to do is add the folder name and a slash character for each subfolder, in order.
TIP
Once you start specifying subfolders in relative links, you shouldn’t change any of the folder names or move them around because you may break a link. That said, web editors like Dreamweaver and Expression Web are crafty enough to adjust your relative links, provided you make any changes from within the program, and you define your website first.
UP TO SPEED: THE RULES FOR URLS
The rules for correctly writing URLs in anchor elements are fairly strict, and a few common mistakes creep into even the best web pages. Here are some pointers to help you avoid these headaches:
§ Don’t mix up the backslash (\) and the ordinary forward slash (/). Windows uses the backslash in file paths (like C:\Windows\win.ini), but in the web world, the forward slash separates subfolders (as in http://www.ebay.com/Help/index.html). Many web servers tolerate backslash confusion, but if you’re unlucky, a stray slash can break your link.
§ Don’t use spaces or special characters in your file or folder names, even if these special characters are allowed. For example, it’s perfectly acceptable to put a space in a filename (like My Photos.htm), but in order to request this page, the browser needs to translate that space into a special character code (My%20 Photos.htm). To prevent this confusion, steer clear of anything that isn’t a number, letter, dash (-), or underscore (_).
§ Don’t ever use file paths (like file:///C:/Temp/myPage.htm) instead of a URL. It’s possible to create a URL that points to a file on your computer using the file protocol, but this link won’t work on anyone else’s computer, because they won’t have the same file on their hard drive. Sometimes, design tools like Dreamweaver or Expression Web may insert one of these so-called local URLs (for example, if you drag and drop a picture file into your web page). Be vigilant—check all your links to make sure this doesn’t happen.
§ When you create an absolute URL, you have to start with its protocol (usually http://). You don’t need to follow this rule when typing a URL into a browser, however. For example, if you type www.google.com, most browsers are intelligent enough to assume the http:// part. However, in an HTML document, it’s mandatory.
Moving Up into a Parent Folder
You’ve now added all the links you need to the index.htm page. Now you need to add two links to the arctic.htm page.
The first link leads back to the index.htm page. To add it, put the <a> element around the word “back” at the top of the page, as shown in Figure 6-4 (bottom image).
To go up a folder level, you use the character sequence ../ (two periods and a slash). So to add a link in the arctic.htm page that brings the reader back to the index.htm page, you type this:
Go <a href="../index.htm">back</a>
If you like, you can add the same link to the china.htm page, so visitors can get back to your home page at any time.
You can use the “go up” command twice in a row to jump up two levels. For example, if you have a page in the Photos folder that leads to the home page, you’d use a link like this to get back:
Go <a href="../../index.htm">back</a>
For a more interesting feat, you can write a relative link that travels up one or more levels and then travels down a different path. That’s how you create the second link in the arctic.htm page, which jumps straight to china.htm. To add this link, put the <a> element around the word “China” in the final line of the page, as shown in Figure 6-4 (bottom image):
See what happened in <a href="../TripChina/china.htm">China</a>
This link starts at the current folder (TripArctic), moves up one level to the root folder, and then down one level to the TripChina folder.
Moving to the Root Folder
The only problem with the relative links you’ve seen so far is that they’re difficult to maintain if you ever reorganize your site.
For example, imagine you have a web page in the root directory. Say you want to feature an image on that page that’s stored in the Images subfolder. You use this URL:
<img src="Images/flower.jpg" alt="A flower" />
But then, a little later on, you decide your page really belongs in another spot—a subfolder named Plant—so you move it there. The problem is that this relative link now points to Plant/Images/flower.jpg, which doesn’t exist—the Images folder isn’t a subfolder in Plants; it’s a subfolder in your site’s root folder. As a result, your browser displays a broken link icon.
There are a few workarounds. Programs like Dreamweaver and Expression Web automatically update all the relative links when you drag a file to a new location, saving you the hassle. You can also try to keep related files in the same folder, so you always move them as a unit. However, there’s a third approach, called root-relative links.
So far, the relative links you’ve seen have been document-relative, because you specify the location of the target page relative to the current document. Root-relative links point to a target page relative to your website’s root folder.
Root-relative links always start with the slash (/) character (which indicates the root folder). Here’s the <img> element for flower.jpg with a root-relative link:
<img src="/Images/flower.jpg" alt="A flower" />
The remarkable thing about this link is that it works no matter where you put the web page that contains it. For example, if you copy this page to the Plant subfolder, the link still works, because the first slash tells your browser to start at the root folder.
The only catch to using root-relative folders is that you need to keep the real root of your website in mind. When using a root-relative link, the browser follows a simple procedure to figure out where to go. First, it strips all the path and filename information out of the current page address, so that only the domain name is left. Then it adds the root-relative link to the end of the domain name. So if the link to flower.jpg appears on this page:
http://www.jumboplants.com/horticulture/plants/annuals.htm
The browser strips away the /horticulture/plants/annuals.htm portion, adds the relative link you supplied in the src attribute (/Images/flower.jpg), and looks for the picture here:
http://www.jumboplants.com/Images/flower.jpg
This makes perfect sense. But consider what happens if you don’t have your own website domain name, and your web pages are stuck in some subfolder on a web server. Here’s an example:
http://www.superISP.com/~user9212/horticulture/plants/annuals.htm
The domain name part of the URL is www.superISP.com, but for all practical purposes, the root of your website is your personal folder, ~user9212. That means you need to add this detail to all your root-relative links. So, to get the result you want with the flower.jpg picture, you need to use this messier root-relative link:
<img src="/~user9212/Images/flower.jpg" alt="A flower" />
As before, the browser keeps the domain name part of the URL (www.superISP.com) and adds the relative part of the path. But in this case, the path starts with your personal folder (/~user9212).
Making Image Links
The links you’ve seen so far have acted on small bits of text, but you can turn images into links, too. This is a useful trick for the current website. You can use it to link each thumbnail on the arctic.htm page to the corresponding image file. That way, when a visitor clicks a thumbnail, his browser opens the full-size photo (Figure 6-5).
There’s no secret to creating an image link. You just put an <img> element inside an anchor element (<a>). To try this out, take the <img> that holds the first thumbnail in the arctic.htm page:
<img src="thumb01.jpg" alt="Polar bear" /></a>
Now, wrap the entire thing in an anchor element:
<a href="Photos/arctic01.jpg"><img src="thumb01.jpg" alt="Polar bear" /></a>
When you point to a linked picture, the cursor changes to a hand, just like when you point to a text link.
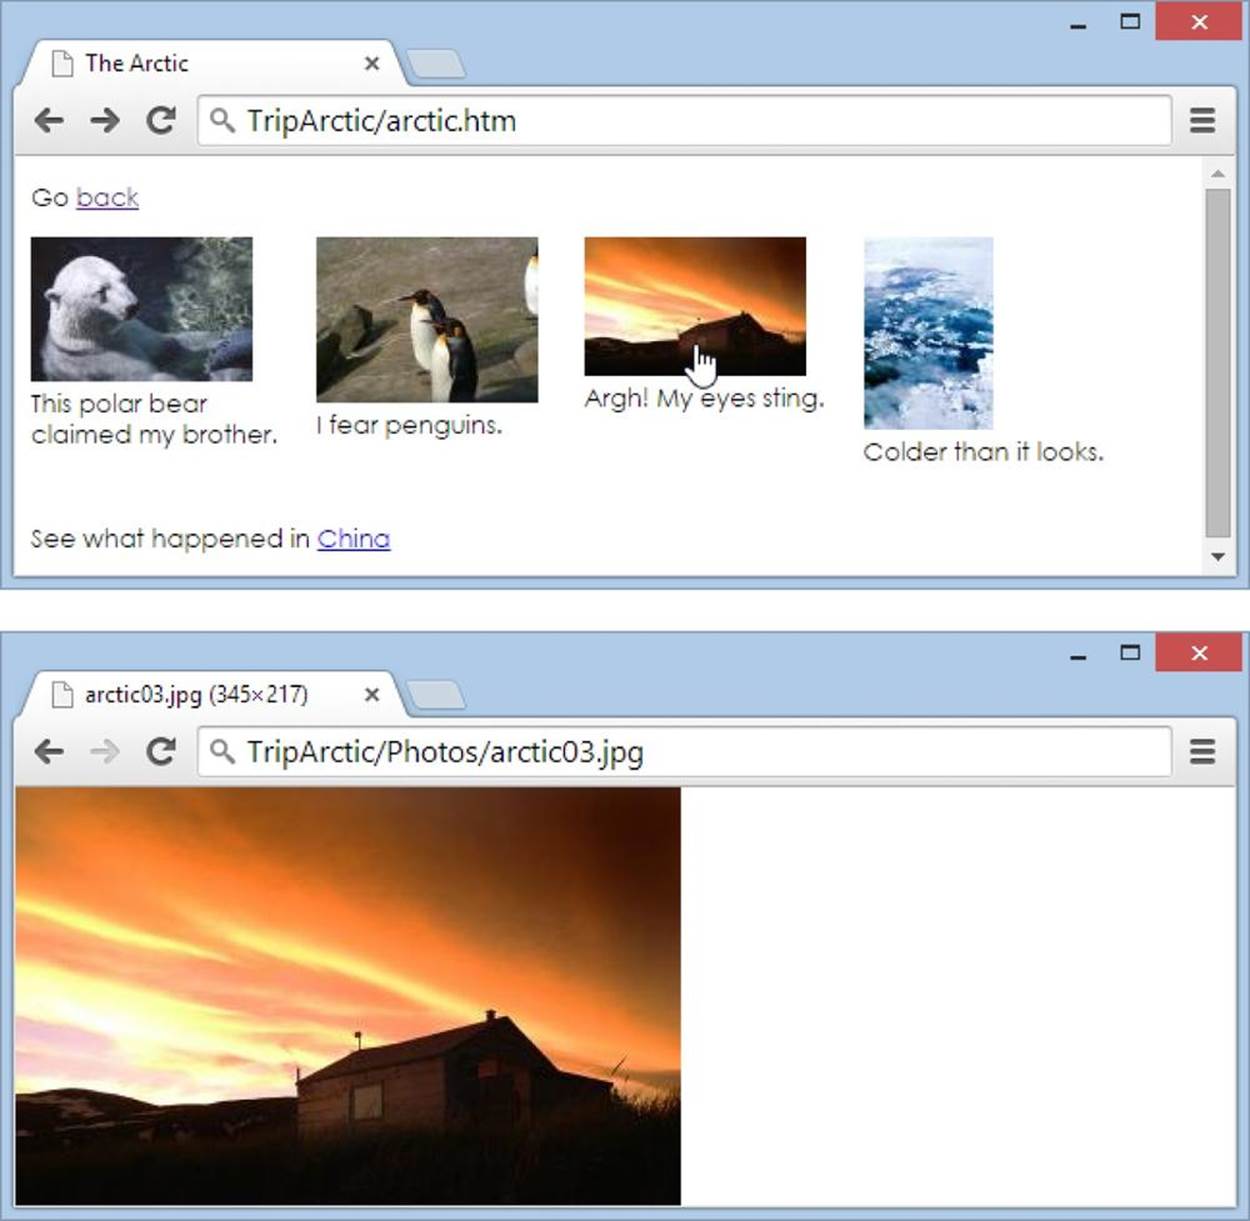
Figure 6-5. Click a thumbnail in the arctic.htm page (top) and you get a closer look at the matching full-size photo (bottom). If you want to get even fancier, you can create a separate page for each picture and include some descriptive details.
There’s one quirk with linked images. If you view a page that has a linked image in it using Internet Explorer, you’ll see an unsightly blue border around the picture, which is meant to indicate that visitors can click it. Usually, you want to turn this clunky-looking border off using the style sheet border properties (Basic Borders). For example, here’s a style rule that removes the border from all images, including linked ones:
img {
border: none;
}
If you want to get a bit more sophisticated and remove the border from linked images only, you have two choices. You can use a class selector (Class Selectors), and then apply that class to all the thumbnail <img> elements. Or you can create a contextual selector that acts only on <img>elements inside <a> elements (Saving Work with the <div> Element).
Text and images aren’t the only thing you can use as links. In fact, you can link any HTML, including entire paragraphs of text, bulleted lists, and so on. If you try this, you’ll see that all the text inside becomes blue and underlined, and all the images sport blue borders. Web browsers have supported this bizarre behavior for years, but it’s only HTML5 that makes it an official part of the HTML standard.
NOTE
Once you finish adding the four image links to the arctic.htm page, you’ve finished this tutorial. Congratulations—you should now be able to craft URLs that can walk up and down the folders of your site. To see the final site, with all these different types of links in place, check out the Tutorial-6-1\End folder.
More Tricks with Links
Using the knowledge you’ve picked up so far, you can get links to do 90% of everything you’ll ever need them to do. But sometimes it’s nice to have a few more tricks in your bag. In the following sections, you’ll meet two unusual types of links, and you’ll learn the easiest way to style the color of linked text.
“Mailto” Links
A mailto link is a special type of link that helps visitors send a message to you. When you click a mailto link, your browser opens your email program and begins creating a message. It’s still up to you to actually send the message, but the mailto link can get the process started with a boilerplate subject line and body text.
To create a mailto link, specify a path that starts with the word “mailto,” followed by a colon (:) and your email address. Here’s an example:
<a href="mailto:me@myplace.com">Email Me</a>
NOTE
The mailto link doesn’t work for every visitor, especially ones who use web-based email services (like Hotmail and Gmail). Clicking a mailto link in a message may open a desktop email program they never use or even give them an error message (depending on their browser and computer settings). To solve the problem or find a workaround on your computer, do a Google search for “mailto link” and your browser name.
Most browsers also let you supply text for the message’s subject line and body. When someone clicks the mailto link, the new message includes this information, ready for sending (or editing).
To supply the subject line and body text, you have to use a slightly wonky syntax that follows these rules:
§ Put a question mark after the email address.
§ To include a subject line, add subject= followed by the subject text.
§ To include body text, add the character sequence & after your subject text, and then type body= followed by the body text.
§ Replace characters that could cause problems with specialized codes. Letters, numbers, and the period are all fine, but most other punctuation isn’t. For example, you have to replace every space in the subject and body text with the character sequence %20. This gets quite tedious and makes your message hard to read after you compose it, but it ensures that the mailto link works in every browser. The easiest way to prepare your message text is to visit a page like http://meyerweb.com/eric/tools/dencoder, which adds the code sequences for you. Simply type your message text in the provided box, and then click Encode to replace potentially problematic characters with the appropriate codes.
Confused? The easiest way to grasp these rules is to take a look at a couple of examples. First, here’s a mailto link that includes the subject text “Automatic Email”:
<a href="mailto:me@myplace.com?subject=Automatic%20Email">
Email Me</a>
And here’s a link that includes both subject text and body text:
<a href="mailto:me@myplace.com?subject=Automatic%20Email&body=
I%20love%20your%20site.">Email Me</a>
When a guest clicks this link, she’ll probably see some sort of warning message informing her that the web page is about to open her email program and asking her permission (the exact message depends on her browser and operating system). If she agrees, she’ll see an email form like the one in Figure 6-6 pop up.
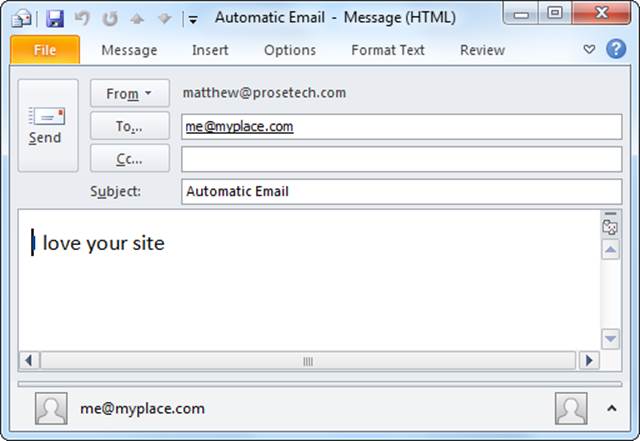
Figure 6-6. When you click a mailto link, your browser creates an email message (as shown here). It fills in the recipient, subject, and body text according to information in the link, although whoever clicked the link can change these details (or close the window without clicking Send). This example shows the message window from Microsoft Outlook, though the window your visitor sees may differ, depending on the email program installed on her computer.
Image Maps: Links Inside Pictures
You’ve already learned how to turn an ordinary picture into a clickable link (Making Image Links). That’s the most common way to link an image, but web developers who want to get fancier have other ways to turn a portion of a picture into a link. For example, they may use JavaScript code to intercept picture clicks and examine the coordinates. (This is the most popular approach for power users who aren’t intimidated by the prospect of writing—and debugging—some code.) But HTML provides another option with its often-overlooked image map feature.
An image map lets you create distinct clickable regions, called hotspots, inside a picture. For example, consider Figure 6-7.
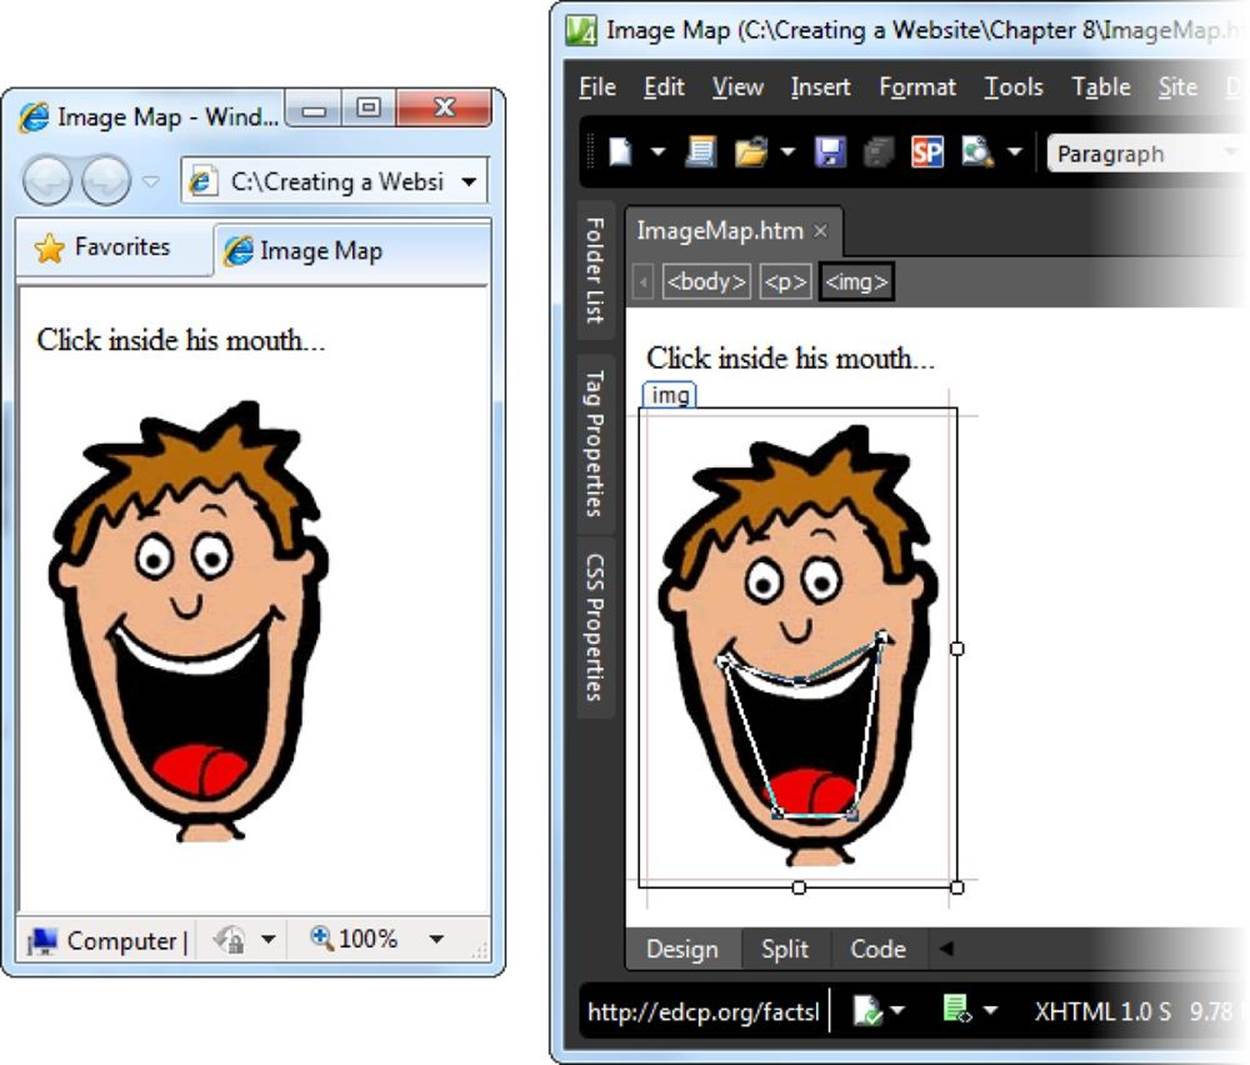
Figure 6-7. Left: An ordinary picture, courtesy of the <img> element. Right: An irregularly shaped region inside the mouth becomes a hotspot—a clickable region that takes visitors to another page. In this example, you can see the hotspot because it’s being edited in Expression Web. Ordinarily, visitors can’t see hotspots when they look at a picture in a browser.
To add a hotspot to a picture, you start by creating an image map using HTML’s <map> element. This part’s easy—all you do is choose a unique name for your image map so you can refer to it later on:
<map id="FaceMap" name="FaceMap">
</map>
NOTE
If you noticed that the <map> element uses two attributes that duplicate the same information (id and name), you’re correct. Although in theory just the id attribute should do the trick, you need to keep the name attribute there to ensure compatibility with a wide range of browsers.
Then you need to define each hotspot, which you do between the start and end tags of the <map> element. You can add as many hotspots as you want, although they shouldn’t overlap. (If they do, the one defined first takes precedence.)
To define each hotspot in an image, you add an <area> element, which identifies three important details: the target page a visitor goes to after clicking the hotspot (which you specify in the href attribute), the shape of the hotspot (the shape attribute), and the exact dimensions of the shape (the coords attribute, for “coordinates”). Much like an image element, the <area> element requires an alt attribute with alternate text that describes the image map to search engines, reader programs, and ancient text-only browsers.
Here’s a sample <area> element:
<area href="Mouth.htm" shape="rect" coords="5,5,95,195"
alt="A clickable rectangle" />
This hotspot defines a rectangular region. When visitors click it, they go to Mouth.htm.
The shape attribute lets you define three types of shapes, each of which requires a different set of values for the attribute. You can specify a circle (circle), a rectangle (rect), or a multi-edged shape (poly). Once you choose your shape, you need to supply the coordinates for it. But to understand hotspot coordinates, you first need to understand how browsers measure pictures, as outlined in Figure 6-8.
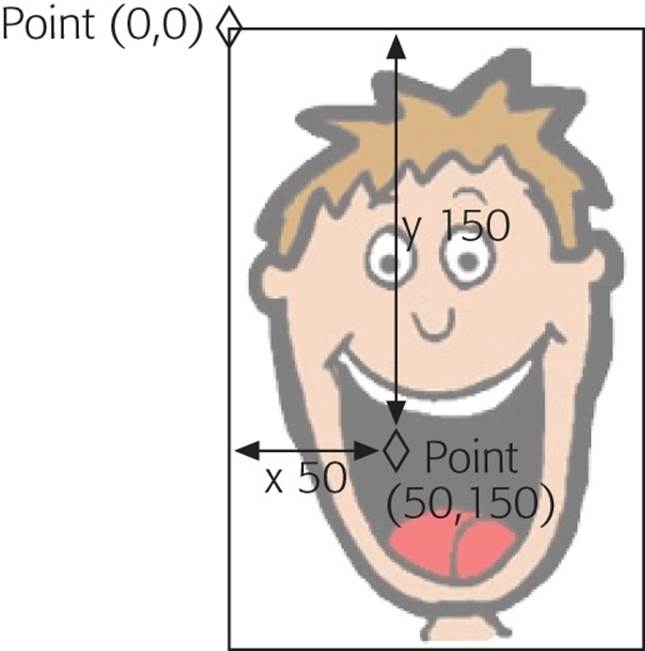
Figure 6-8. Browsers designate the top-left corner of a picture as point (0, 0). As you move down the picture, the y-coordinate (the second number) gets bigger. For example, the point (0, 100) is at the left edge of the picture, 100 pixels from the top. As you move to the right, the x-coordinate gets bigger. That means the point (100, 0) is at the top of a picture, 100 pixels from the left edge.
You indicate image map coordinates as a list of numbers separated by commas. For a circle, list the coordinates in this order: center point for the x-coordinate, center point for the y-coordinate, and radius. For any other shape, identify the corners, in order, as a series of x-y coordinates, like this: x1, y1, x2, y2, and so on. For a polygon, you supply every point. For a rectangle, you need only two points: the top-left corner and the bottom-right corner.
For example, you define the rectangle in the <area> element above by these two points: (5, 5) at the top left and (95, 195) at the bottom right. You define the more complex polygon that represents the mouth region in Figure 6-7 like this:
<area href="Mouth.htm" shape="poly" title="Smiling Mouth" alt="Mouth"
coords="38, 122, 76, 132, 116, 110, 102, 198, 65, 197" />
In other words, your browser creates this shape by drawing lines between these five points: (38, 122), (76, 132), (116, 110), (102, 198), and (65, 197).
NOTE
Getting your coordinates right can be difficult. Many web page editors, like Dreamweaver and Expression Web, have built-in hotspot editors that let you create an image map by dragging shapes over your picture, which is a lot easier than trying to guess the correct coordinates. To use this tool in Dreamweaver, select a picture, and then look for the three hotspot icons (circle, square, and polygon) in the Properties panel. Expression Web offers similar icons in the Picture toolbar. (If you can’t see the Picture toolbar, right-click the picture, and then select Show Picture Toolbar.)
Once you perfect all your hotspots, you need to apply them to the image by adding a usemap attribute to your <img> element. Use the same name for this attribute as you did for the image map itself, but precede it with the number-sign character (#), which tells browsers that you defined an image map for the picture:
<img src="face.gif" usemap="#FaceMap" alt="Smiling Face" />
Here’s the complete HTML for the mouth hotspot example:
<!DOCTYPE html>
<html>
<head>
<title>Image Map</title>
<style type="text/css">
img {
border-style: none;
}
</style>
</head>
<body>
<p>Click inside his mouth...</p>
<p>
<map id="FaceMap" name="FaceMap">
<area href="Mouth.htm" shape="poly"
coords="38, 122, 76, 132, 116, 110, 102, 198, 65, 197"
alt="Smiling Mouth" />
</map>
<img src="face.gif" usemap="#FaceMap" alt="Smiling Face" />
</p>
</body>
</html>
The hotspots you create are invisible (unless you draw lines on the picture to indicate where they are). When a visitor points to one, his cursor changes to a hand. Clicking a hotspot has the same effect as clicking an ordinary <a> link: Your visitor gets transported to a new page.
TIP
It’s tempting to use image maps to create links in all kinds of graphics, including buttons you may custom-design in an image editor, but hold off for a bit. You can create fancier menus and buttons with the JavaScript know-how you’ll learn in Chapter 14.
Changing Link Colors and Underlining
Virtually everyone born since 1900 instinctively understands that blue underlined text is there to be clicked. But what if blue links are at odds with the overall look of your site? Thanks to style sheets, you don’t need to play by the link-color rules.
Using CSS, you can quickly build a style sheet rule that changes the text color of all the link-producing anchor tags on your site. Here’s an example:
a {
color: fuchsia;
}
But watch out: custom link colors change the way the links behave. Ordinarily, when you click a link, it turns purplish red to show that you visited the page. Custom links, however, never change color—they retain their hue even after you click them.
A better way to create colorful links is to use another style sheet technique: pseudo-classes. Pseudo-classes are specialized versions of the CSS classes you learned about earlier (see Class Selectors). They rely on details that a browser tracks behind the scenes. For example, ordinary classes apply rules indiscriminately to a given element, like an anchor. But pseudo-classes apply rules to elements that meet certain criteria, in this case links that are either clicked or unclicked.
Four pseudo-classes help you format links. They are :link for links that point to virgin ground; :visited for links a reader has already visited; :active for the color a link turns as a reader clicks it, before releasing the mouse button; and :hover, the color a link turns when a visitor points to it. As you can see, pseudo-classes always start with a colon (:).
Here’s a style rule that uses pseudo-classes to create a misleading page—one where visited links are blue and unvisited links are red:
a:link {
color: red;
}
a:visited {
color: blue;
}
If you want to apply these rules to some, but not all, of your links, add a class name to your rule:
a.BackwardLink:link {
color: red;
}
a.BackwardLink:visited {
color: blue;
}
Now an anchor element needs to specify the class name to display your new style, as shown here:
<a class="BackwardLink" href="...">...</a>
Finally, it’s worth noting that you can use this technique with the text-decoration style sheet property to change whether browsers automatically underline links. Here’s an example that removes the standard underlining:
a {
text-decoration: none;
}
This technique is generally a bad idea with links you embed in the main content of a page, because it can make them hard to spot. However, it’s useful if you have a panel that consists of nothing but links (like a menu sidebar) and you want to give it a cleaner look.
Links That Lead to Bookmarks
Most links lead from one page to another. When you make the jump to a new page, your browser plunks you down at the very top of the page. But you can also create links that lead to specific parts of a page, whether that’s the current page (see Figure 6-9) or a newly opened one. This is particularly useful if you create long, scrolling pages and you want to direct your visitors’ attention to a particular passage. The place you send your reader is technically called a fragment.
Creating a link that points to a fragment is a two-step process. First, you need to identify the fragment. You do this with the id attribute, which assigns a unique name to any HTML element on a page.
For example, imagine you want to send a visitor to the third level-3 heading in a web page named sales.htm. Initially, the markup looks like this:
...
<h3>Pet Canaries</h3>
<p>Pet canary sales have plummeted in the developed world, due in large part
to currency fluctuations and other macroeconomic forces.</p>
...
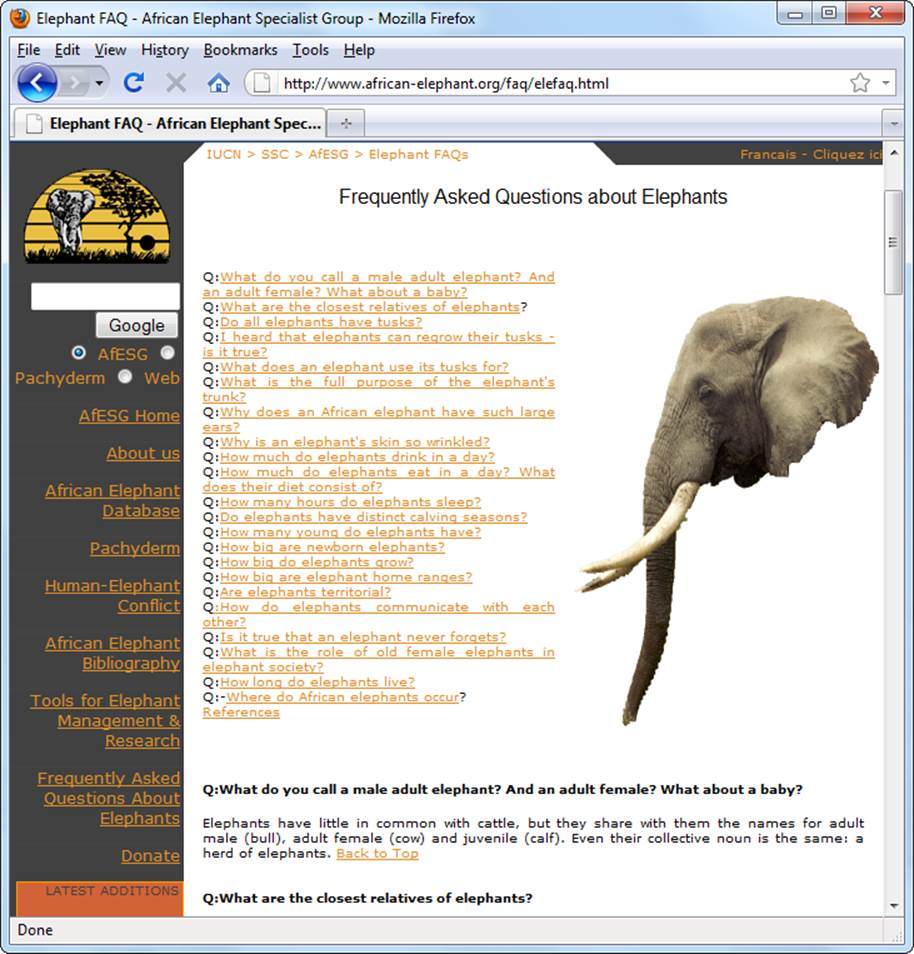
Figure 6-9. This FAQ (frequently asked questions) page is an example of bookmarks at work. Here, the entire FAQ consists of a single long page, with a series of bookmark links at the top that let you jump to just the topic you’re interested in. You could break an FAQ into separate pages, but readers wouldn’t be able to scan through the whole list of questions, nor would they have a way to print the entire document at once.
And here’s the change that gives the Pet Canaries heading a unique name (in this case, the name is Canaries):
...
<h3 id="Canaries">Pet Canaries</h3>
<p>Pet canary sales have plummeted in the developed world, due in large part
to currency fluctuations and other macroeconomic forces.</p>
...
This doesn’t affect the way the page looks; visitors never see the id attribute. However, it gives you a convenient way to drop visitors at the Pet Canaries heading. Essentially, you’ve created a bookmark that’s locked onto this heading.
Once you create your bookmark, you can write a URL that points to it. The trick is to add the bookmark information to the end of the URL. To do this, you add the number-sign symbol (#) followed by the bookmark name.
For example, here’s the link to send a reader to a bookmark named Canaries in the sales.htm page:
Learn about recent developments in <a href="sales.htm#Canaries">
canary sales</a>.
When you click this link, the browser heads to the sales.htm page and scrolls down until it encounters the Canaries bookmark. The browser then displays, at the very top of the browser window, the text that starts with the heading Pet Canaries.
TIP
If your bookmark is near the bottom of a page, a browser might not be able to scroll the bookmarked section all the way to the top of the browser window. Instead, it appears somewhere in the middle of it. This happens because the browser hits the bottom of the page and can’t scroll down any farther. If you suspect some potential for confusion (perhaps because you have several bookmarked sections close to one another at the bottom of a page), you can add a few <br> elements at the end of your document, which lets the browser scroll down.
Sometimes you want to create a link that points to a bookmark in your current page. In this case, you don’t need to specify a page name at all. Just start with the number sign, followed by the bookmark name:
Jump to the <a href="#Canaries">canary</a> section.
Using bookmarks effectively is an art. Resist the urge to overcrowd your pages with links that direct readers to relatively small sections of content. Only use bookmarks to tame large pages that would otherwise take visitors a long time to scroll through.
When Good Links Go Bad
Now that you’ve learned all the ways to build links, it’s a good time to consider what can go wrong. Links that go to pages on the same site can break when you rename or move files or folders. Links to other websites are particularly fragile; they can break at any time, without warning. You won’t know that anything has gone wrong until you click the link and get a “Page Not Found” error message.
Broken links are so common that web developers have coined a term to describe how websites gradually lose their linking abilities: link rot. Sadly, you can upload a perfectly working website today and return a few months later to find that many of its external links have died off. They point to websites that no longer exist, have moved, or have been rearranged.
Link rot is an insidious problem because it reduces visitor confidence in your site. They see a link in a page that promises to lead to other interesting resources, but when they click it, they’re disappointed. Experienced visitors won’t stay long at a site that’s suffering from an advanced case of link rot—they’ll assume you haven’t updated your site in a while and move on to a snazzier site somewhere else.
So how can you reduce the problem of broken links? First you should rigorously test your internal links—the ones that point to pages within your own site. Check for minor errors that can stop a link from working, and travel every path at least once. You can do this by hand, but leading web page editors include built-in tools that automate this drudgery. The next section explains how to use the link-checking features in Dreamweaver and Expression Web.
External links pose a different challenge. You can’t create iron-clad external links, because link destinations are beyond your control and can change at any time. You could reduce the number of external links you include in your website to minimize the problem, but that isn’t a very satisfying solution. Part of the beauty of the Web is the way a single click can take you from a comprehensive rock discography to a memorabilia site with hand-painted Elvis office supplies. As long as you want to connect your website to the rest of the world, you need to include external links. A better solution is to test your site regularly with an online link checker, which walks through every one of your pages and checks each link to make sure it still leads somewhere. Unlike the link checkers that you find in web-editing tools like Dreamweaver, online link checkers test both internal and external links. You’ll learn how to use the most popular online link checker on Checking Your Links Online.
Checking Your Links in a Web Editor
Dreamweaver and Expression Web include their own tools to make sure internal links actually lead to a real page. They ignore external links, however.
NOTE
To use the link-checking features in Dreamweaver and Expression Web, you must first define your folder as an official website (a process described on Defining a Dreamweaver Site for Dreamweaver and Defining a Site in Expression Web for Expression Web).
In Dreamweaver, you scan links using the command Site→Check Links Sitewide. Dreamweaver pops open its Link Checker panel and reports any broken links as it works through your pages.
In Expression Web, you use a similar feature by following a three-step process. First, click the Site View tab. Then, click the Reports button at the bottom to see a list of all the reports you can run on your site. Finally, click Hyperlinks to investigate your links (Figure 6-10). Expression Web lists all the links in your site and puts a handy broken-link icon next to any that are problematic. You can also use the “Unlinked Files” link to find pages that don’t have any links leading to them, and so can’t be reached unless your visitors type the page name into their browsers.
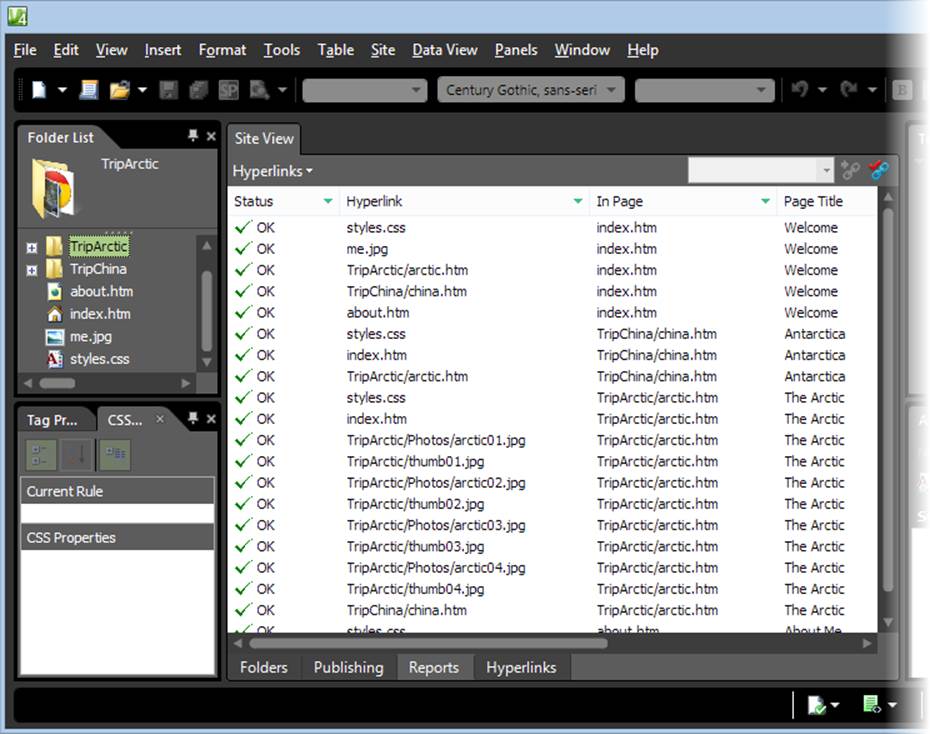
Figure 6-10. A quick scroll down the list of links reveals some good news: all this site’s links are intact.
Checking Your Links Online
The link checkers built into these web page editors work on the copy of your website stored on your computer. That’s the best way to keep watch for errors as you develop your site, but it’s no help once your site is out in the wild. For example, it won’t catch mistakes like a link to a file on your hard drive or to a file you forgot to upload to the web server.
To get the final word on your website’s links, you might want to try a free online link checker. The World Wide Web Consortium provides a solid choice at http://validator.w3.org/checklink. Its link checker can scan any website that’s currently online.
To start checking links, follow these steps:
1. Go to http://validator.w3.org/checklink.
This takes you to the W3C Link Checker utility.
2. In the text box, type in the full URL of the page you want to check.
It should point to the home page of your site on the Web (like http://PoniesAreMagic.org/Ponies.htm). If your website has a default page like index.htm (see the note on Note), you don’t need to supply the filename, you can type in just the domain name (likehttp://PoniesAreMagic.org).
3. Choose the options you want to apply (Figure 6-11).
Select “Summary only” if you want the checker to omit the detailed list of steps it takes as it examines each page. It’s best to leave this option turned off so you can better understand exactly what pages the link checker examines.
Select “Hide redirects” if you want the checker to ignore instructions that would redirect it to a web page other than the target page specified in the link (see Using Redirects for more). Usually, redirects indicate that your link still works, but also that you should update it to point to a new destination page.
The “Don’t send the Accept-header” option prevents a link checker from telling a website its language preferences. This setting matters only if you’re creating a multilingual website, which is beyond the scope of this book.
The “Check linked documents recursively” option validates links using recursion. If you don’t use this option, the validator simply checks every link in the page you specify and makes sure it points to a live web page. If you use recursion, the validator checks all the links in the current page, and then follows each internal link on your site. For example, if a link points to a page named info.htm, the link checker first verifies that info.htm exists. Then it finds all the internal links in info.htm and starts testing them. In fact, if info.htm links to yet another internal page (likecontact.htm), the link checker branches out to that page and starts checking its links as well. The link checker is smart enough to avoid checking the same page twice, so it doesn’t waste time checking links it has already validated.
NOTE
Link checkers don’t use recursion on external links. That means that if you start your link checker on the home page of your website, it follows the links to get to every other page on your site but won’t go any further. Still, recursion is a great way to drill through all the links in your site in one go.
If you want to limit recursion (perhaps because you have a lot of pages and don’t need to check them all), you can supply a “recursion depth,” which specifies the maximum number of levels the checker digs down. For example, with a recursion depth of 1, the checker follows only the first set of links it encounters. If you don’t supply a recursion depth, the checker checks everything.
4. Select “Save options in a cookie” if you want your browser to remember your link-checker settings.
If you use this option, the next time you use the link checker, your browser fills in the checkboxes using your previous settings.
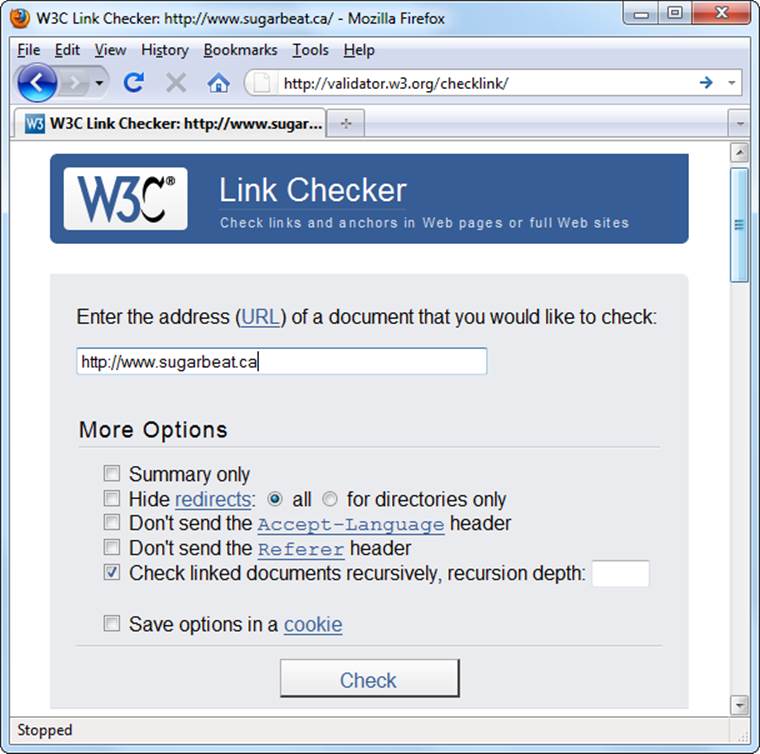
Figure 6-11. When you use a link checker, specify the web page you want to check and whether or not you want to use recursion, as in this example. (For the inside scoop on recursion and how it works, see the description in step 3 on the previous page.) Then click Check to get started.
5. Click the Check button to start checking links.
The link checker lists each link it checks (Figure 6-12), updating the list as it goes along. If you use recursion, you’ll see the link checker branch out from one page to another. The report adds a separate section for each page.
Using Redirects
To be a good web citizen, you need to respect people who link to your site. That means that once you create your site and it becomes popular, try to avoid tinkering with page and folder names. Making a minor change could disrupt someone else’s link, making it difficult for return visitors to get back to your site.
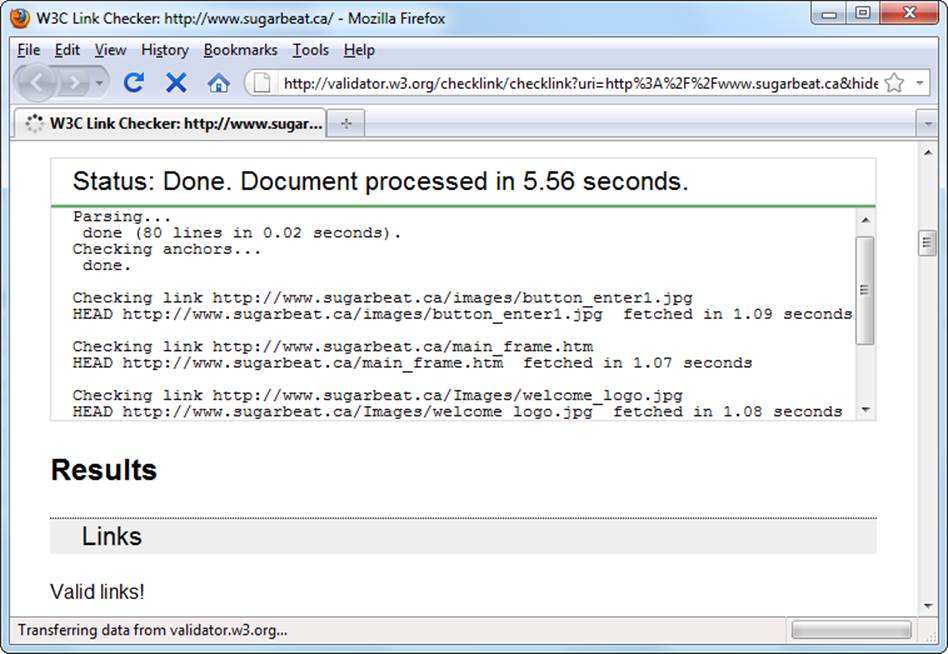
Figure 6-12. The link checker’s final report shows a list of links found in anchors and images. The checker highlights links that lead to dead ends in red and flags those that may need attention in yellow. One example of potential problem links are redirected links. Although they still work, they may be out of date and might not last for long.
Some web experts handle this problem using redirects. When they rearrange their sites, they keep all the old files, removing the content from them and replacing the old pages with a redirect—a special instruction that tells browsers to automatically navigate to a new page. The advantages ofredirects are twofold: they prevent broken links, and they don’t lock you into the old structure of your site if you decide to make a change.
To create a redirect, you add a special <meta> element to the <head> portion of your web page. This element indicates the new destination using an absolute URL and lists the number of seconds a browser should wait before performing the redirect. Here’s an example:
<!DOCTYPE html>
<html>
<head>
<meta http-equiv="REFRESH"
content="10; URL=http://www.mysite.com/homepage.htm" />
<title>Redirect</title>
</head>
<body>
<h1>The page you want has moved</h1>
<p>
Please update your bookmarks. The new home page is
<a href="http://www.mysite.com/homepage.htm">
http://www.mysite.com/homepage.htm</a>.
</p>
<p>
You should be redirected to the new site in 10 seconds. Click
<a href="http://www.mysite.com/homepage.htm">
here</a> to visit the new page immediately.
</p>
</body>
</html>
To adapt this page for your own purposes, change the number of seconds (currently at 10) and the redirect URL. When a browser tries to open this page, it shows the temporary page for the indicated number of seconds and then automatically requests the new page.
NOTE
Although redirects are designed for live pages on the Web, you can test them on your own computer. For example, if you put the page shown above on your hard drive and open it, your browser will wait 10 seconds and then follow the URL to the new location.
Redirected pages really serve two purposes: They keep your pages working when you change your site’s structure, and they inform visitors that the link is obsolete. That’s where the time delay comes in—it provides a few seconds to notify visitors that they’re entering the site the wrong way. Many sites keep their redirect pages around for a relatively short amount of time (for example, a year), after which they remove the page altogether.