Learning JavaScript Data Structures and Algorithms (2014)
Chapter 5. Linked Lists
In Chapter 2, Arrays, we learned about the array data structure. An array (or we can also call it a list) is a very simple data structure that stores a sequence of data. In this chapter, you will learn how to implement and use a linked list, which is a dynamic data structure, meaning we can add or remove items from it at will and it will grow as needed.
Arrays (or lists) are probably the most common data structure used to store a collection of elements. As we mentioned before in this book, each language has its own implementation of arrays. This data structure is very convenient and provides a handy [] syntax to access its elements. However, this data structure has a disadvantage: the size of the array is fixed (in most languages) and inserting or removing items from the beginning or from the middle of the array is expensive because the elements need to be shifted over (even though we learned that JavaScript has methods from the array class that will do that for us, this is what happens behind the scenes as well).
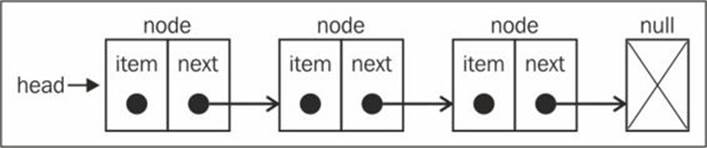
Linked lists store a sequential collection of elements; but unlike arrays, in linked lists the elements are not placed contiguously in memory. Each element consists of a node that stores the element itself and also a reference (also known as a pointer or link) that points to the next element. The following diagram exemplifies the structure of a linked list:
One of the benefits of a linked list over a conventional array is that we do not need to shift elements over when adding or removing elements. However, we need to use pointers when working with a linked list, and because of it, we need to pay some extra attention when implementing a linked list. Another detail in the array is that we can directly access any element at any position; with the linked list, if we want to access an element from the middle, we need to start from the beginning (head) and iterate the list until we find the desired element.
We have some real-world examples that can be exemplified as a linked list. The first example is a conga line. Each person is an element, and the hands would be the pointer that links to the next person in the conga line. You can add people to the line—you just need to find the spot where you want to add this person, decouple the connection, and then insert the new person and make the connection again.
Another example would be a scavenger hunt. You have a clue, and this clue is the pointer to the place where you can find the next clue. With this link, you go to the next place and get another clue that will lead to the next one. The only way to get a clue from the middle of the list is to follow the list from the beginning (from the first clue).
We have another example, which might be the most popular one used to exemplify linked lists, which is a train. A train consists of a series of vehicles (also known as wagons). Each vehicle or wagon is linked to each other. You can easily decouple a wagon, change its place, or add or remove it. The following figure demonstrates a train. Each wagon is the element of the list and the link between the wagons is the pointer:

In this chapter, we will cover the linked list and also the doubly linked list. But let's start with the easiest data structure first.
Creating a linked list
Now that we understand what a linked list is, let's start implementing our data structure. This is the skeleton of our LinkedList class:
function LinkedList() {
var Node = function(element){ // {1}
this.element = element;
this.next = null;
};
var length = 0; // {2}
var head = null; // {3}
this.append = function(element){};
this.insert = function(position, element){};
this.removeAt = function(position){};
this.remove = function(element){};
this.indexOf = function(element){};
this.isEmpty = function() {};
this.size = function() {};
this.toString = function(){};
this.print = function(){};
}
For the LinkedList data structure, we need a helper class called Node (line {1}). The Node class represents the item that we want to add to the list. It contains an element attribute, which is the value we want to add to the list, and a next attribute, which is the pointer that contains the link to the next node item of the list.
We also have the length property (line {2}) in the LinkedList class (internal/private variable) that will store how many items we have on the list.
Another important note is that we need to store a reference for the first node as well. To do this, we can store this reference inside a variable that we will call head (line {3}).
Then, we have the methods of the LinkedList class. Let's see what each method will be responsible for before we implement each one:
· append(element): This adds a new item to the end of the list.
· insert(position, element): This inserts a new item at a specified position in the list.
· remove(element): This removes an item from the list.
· indexOf(element): This returns the index of the element in the list. If the element is not in the list, it returns -1.
· removeAt(position): This removes an item from a specified position in the list.
· isEmpty(): This returns true if the linked list does not contain any elements and false if the size of the linked list is bigger than 0.
· size(): This returns how many elements the linked list contains. It is similar to the length property of the array.
· toString(): As the list uses a Node class as an item, we need to overwrite the default toString method inherited from the JavaScript object to output only the element values.
Appending elements to the end of the linked list
When adding an element to the end of a LinkedList object, there are two scenarios that can happen: the list is empty and we are adding its first element, or the list is not empty and we are appending elements to it.
Here, we have the implementation of the append method:
this.append = function(element){
var node = new Node(element), //{1}
current; //{2}
if (head === null){ //first node on list //{3}
head = node;
} else {
current = head; //{4}
//loop the list until find last item
while(current.next){
current = current.next;
}
//get last item and assign next to node to make the link
current.next = node; //{5}
}
length++; //update size of list //{6}
};
The first thing we need to do is to create the Node item passing element as its value (line {1}).
Let's implement the first scenario first: adding an element when the list is empty. When we create a LinkedList object, the head will be pointing to null:
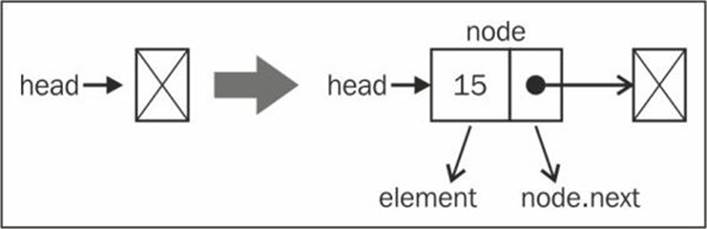
If the head element is null (the list is empty—line {3}), it means we are adding the first element to the list. So, all we have to do is point the head element to the node element. The next node element will be null automatically (check the source code from the previous topic).
Note
The last node from the list will always have null as the next element.
So, we have covered the first scenario. Let's go to the second one, which is adding an element to the end of the list when it is not empty.
To add an element to the end of the list, we first need to find the last element. Remember that we only have a reference to the first element (line {4}), so we need to iterate through the list until we find the last item. To do so, we will need a variable that will point to the current item of the list (line {2}). When looping through the list, we know we reached its end when the current.next element is null. Then, all we have to do is link the current element's (which is the last one) next pointer to the node we want to add to the list (line {5}). The following diagram exemplifies this action:
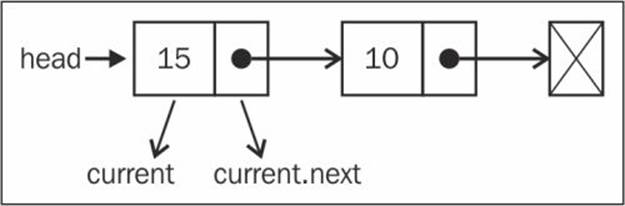
And as and when we create a Node element, its next pointer will always be null. We are OK with this because we know that it is going to be the last item of the list.
And of course, we cannot forget to increment the size of the list so that we can control it and easily get the list size (line {6}).
We can use and test the data structure we've created so far with the following code:
var list = new LinkedList();
list.append(15);
list.append(10);
Removing elements from the linked list
Now, let's see how we can remove elements from the LinkedList object. There are also two scenarios when removing elements: the first one is removing the first element, and the second one is removing any element but the first one. We are going to implement two remove methods: the first one is removing an element from a specified position and the second one is based on the element value (we will present the second remove method later).
Here is the implementation of the method that will remove an element based on a given position:
this.removeAt = function(position){
//check for out-of-bounds values
if (position > -1 && position < length){ // {1}
var current = head, // {2}
previous, // {3}
index = 0; // {4}
//removing first item
if (position === 0){ // {5}
head = current.next;
} else {
while (index++ < position){ // {6}
previous = current; // {7}
current = current.next; // {8}
}
//link previous with current's next: skip it to remove
previous.next = current.next; // {9}
}
length--; // {10}
return current.element;
} else {
return null; // {11}
}
};
We will dive into this code step by step. As the method is going to receive the position of the element that needs to be removed, we need to verify that the position value is a valid one (line {1}). A valid position would be from 0 (included) to the size of the list (size - 1, as the index starts from zero). If it is not a valid position, we return null (meaning no element was removed from the list).
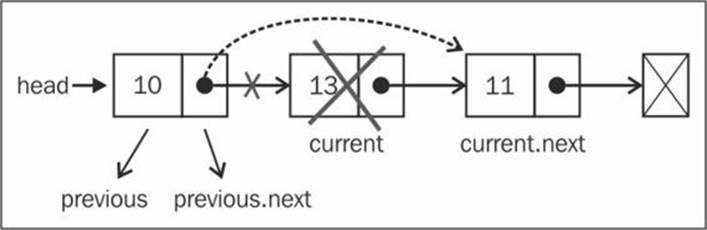
Let's write the code for the first scenario: we want to remove the first element from the list (position === 0—line {5}). The following diagram exemplifies this:

So, if we want to remove the first element, all we have to do is point head to the second element of the list. We will make a reference to the first element of the list using the current variable (line {2}—we will also use this to iterate the list, but we will get there in a minute). So, the currentvariable is a reference to the first element of the list. If we assign head to current.next, we will be removing the first element.
Now, let's say we want to remove the last item of the list or an item from the middle of the list. To do so, we need to iterate the list until the desired position (line {6}—we will use an index variable for internal control and increment) with one detail: the current variable will always make a reference to the current element of the list that we are looping through (line {8}). And we also need to make a reference to the element that comes before the current element (line {7}); we will name it previous (line {3}).
So, to remove the current element from the list, all we have to do is link previous.next with current.next (line {9}). This way, the current element will be lost in the computer memory and will be available to be cleaned by the garbage collector.
Note
To understand better how the JavaScript garbage collector works, please read https://developer.mozilla.org/en-US/docs/Web/JavaScript/Memory_Management.
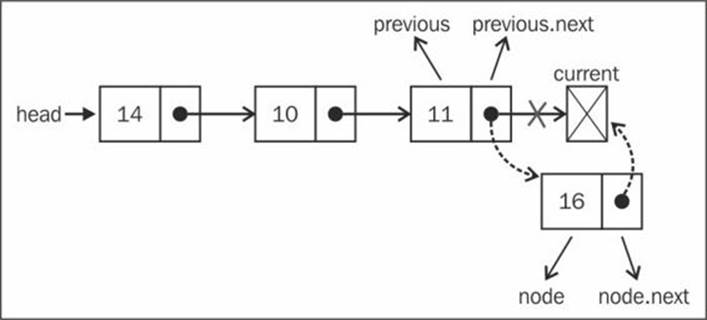
Let's try to understand this better with some diagrams. First, let's consider that we want to remove the last element:
In the case of the last element, when we get off the loop in line {6}, the current variable will be a reference to the last element of the list (the one we want to remove). The current.next value will be null (because it is the last element). As we also keep a reference of the previous element (one element before the current one), previous.next will be pointing to current. So to remove current, all we have to do is change the value of previous.next to current.next.
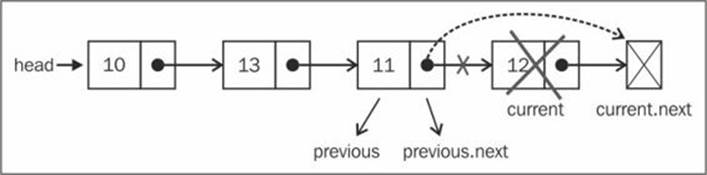
Now let's see whether the same logic applies to an element from the middle of the list:
The current variable is a reference to the element we want to remove. The previous variable is a reference to the element that comes before the element we want to remove. So to remove the current element, all we need to do is link previous.next to current.next. So, our logic works for both cases.
Inserting an element at any position
Next, we are going to implement the insert method. This method provides you with the capability to insert an element at any position. Let's take a look at its implementation:
this.insert = function(position, element){
//check for out-of-bounds values
if (position >= 0 && position <= length){ //{1}
var node = new Node(element),
current = head,
previous,
index = 0;
if (position === 0){ //add on first position
node.next = current; //{2}
head = node;
} else {
while (index++ < position){ //{3}
previous = current;
current = current.next;
}
node.next = current; //{4}
previous.next = node; //{5}
}
length++; //update size of list
return true;
} else {
return false; //{6}
}
};
As we are handling positions, we need to check the out-of-bound values (line {1}, just like we did in the remove method). If it is out of bounds, we return the value false to indicate no item was added to the list (line {6}).
Now, we are going to handle the different scenarios. The first scenario is if in case we need to add an element at the beginning of the list, meaning the first position. The following diagram exemplifies this scenario:
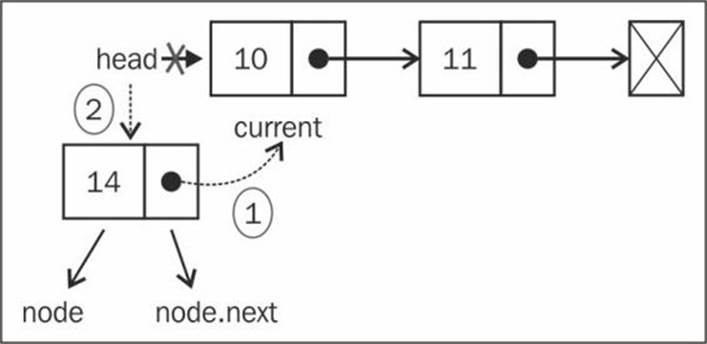
We have the current variable doing a reference to the first element of the list. What we need to is set the node.next value to current (the first element of the list). Now we have head and also node.next pointing to current. Next, all we have to do is change the head reference to node (line{2}) and we have a new element in the list.
Now let's handle the second scenario: adding an element in the middle or at the end of the list. First, we need to loop through the list until we reach the desired position (line {3}). When we get out of the loop, the current variable will be a reference to an element present after the position we would like to insert the new item, and previous will be a reference to an element present before the position we would like to insert the new item. In this case, we want to add the new item between previous and current. So, first we need to make a link between the new item (node) and current item (line {4}), and then we need to change the link between previous and current. We need previous.next to point to node (line {5}).
Let's see the code in action using a diagram to exemplify it:
If we try to add a new element to the last position, previous will be a reference to the last item of the list and current will be null. In this case, node.next will point to current and previous.next will point to node, and we have a new item in the list.
Now, let's see how to add a new element in the middle of the list:
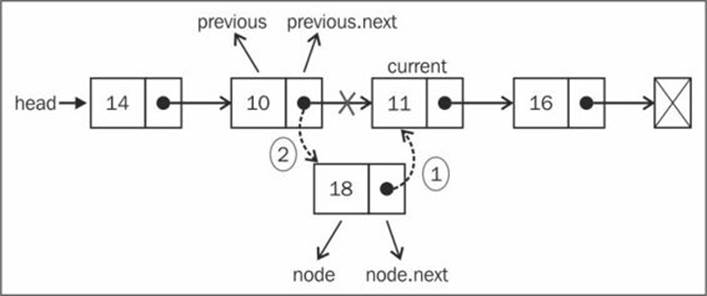
In this case, we are trying to insert the new item (node) between the previous and current elements. First, we need to set the value of the node.next pointer to current. Then, set the value of previous.next to node. And then we have a new item in the list!
Tip
It is very important to have variables referencing the nodes we need to control so that we do not lose the link between the nodes. We could work with only one variable (previous), but it would be harder to control the links between the nodes. For this reason, it is better to declare an extra variable to help us with these references.
Implementing other methods
In this section we will learn how to implement the other methods from the LinkedList class, such as toString, indexOf, isEmpty, and size.
The toString method
The toString method converts the LinkedList object into a string. The following is the implementation of the toString method:
this.toString = function(){
var current = head, //{1}
string = ''; //{2}
while (current) { //{3}
string = current.element; //{4}
current = current.next; //{5}
}
return string; //{6}
};
First, to iterate through all elements of the list, we need a starting point, which is head. We will use the current variable as our index (line {1}) and navigate through the list. We also need to initialize the variable that we will be using to concatenate the elements' values (line {2}).
Next, we iterate each element of the list (line {3}). We are going to use current to check whether there is an element (if the list is empty or we reach the next of last element of the list (null), the code inside the while loop will not be executed). Then, we get the element's content and concatenate it to our string (line {4}). And finally, we iterate the next element (line {5}).
And at last, we return the string with the list's content (list {6}).
The indexOf method
The next method we will implement is the indexOf method. The indexOf method receives the value of an element and returns the position of this element if it is found. Otherwise, it returns -1.
Let's take a look at its implementation:
this.indexOf = function(element){
var current = head, //{1}
index = -1;
while (current) { //{2}
if (element === current.element) {
return index; //{3}
}
index++; //{4}
current = current.next; //{5}
}
return -1;
};
As always, we need a variable that will help us iterate through the list; this variable is current and its first value is the head (the first element of the list—we also need a variable to increment to count the position number, index (line {1})). Then, we iterate through the elements (line {2}) and check if the element we are looking for is the current one. If positive, we return its position (line {3}). If not, we continue counting (line {4}) and go to the next node of the list (line {5}).
The loop will not be executed if the list is empty or we reach the end of the list (current = current.next will be null). If we do not find the value, we return -1.
With this method implemented, we can implement other methods, such as the remove method:
this.remove = function(element){
var index = this.indexOf(element);
return this.removeAt(index);
};
We already have a method that removes an element at a given position (removeAt). Now that we have the indexOf method, if we pass the element's value, we can find its position and call the removeAt method passing the position that we found. It is very simple and it is also easier if we need to change the code from the removeAt method—it will be changed for both methods (this is what is nice about reusing code). This way, we do not need to maintain two methods to remove an item from the list, we need only one! Also, the bounds constraints will be checked by the removeAtmethod.
The isEmpty, size, and getHead methods
The isEmpty and size methods are the same as the ones we implemented for the classes implemented in previous chapter. But let's take a look at them anyway:
this.isEmpty = function() {
return length === 0;
};
The isEmpty method returns true if there is no element in the list and false otherwise:
this.size = function() {
return length;
};
The size method returns the length of the list. As a difference from the classes we implemented in earlier chapters, the length of the list is controlled internally as LinkedList is a class built from scratch.
And finally, we have the getHead method:
this.getHead = function(){
return head;
};
The head variable is a private variable from the LinkedList class (meaning it can be accessed and changed only by the LinkedList instance, not outside of the instance). But if we need to iterate the list outside the class implementation, we need to provide a way to get the first element of the class.
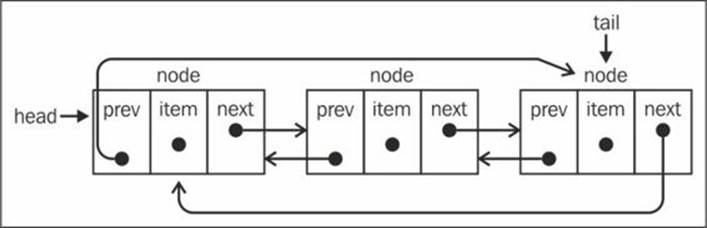
Doubly linked lists
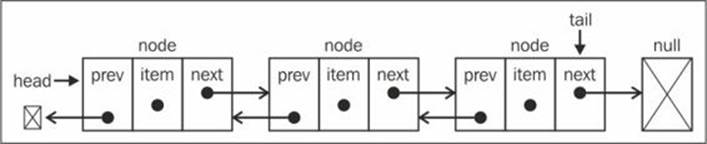
There are some different types of linked lists. In this section, we are going to cover the doubly linked list. The difference between a doubly linked list and a normal linked list is that in the linked list we make the link from one node to the next one only. In the doubly linked list, we have a double link: one for the next element and one for the previous element, as shown in the following diagram:
Let's get started with the changes that are needed to implement the DoublyLinkedList class:
function DoublyLinkedList() {
var Node = function(element){
this.element = element;
this.next = null;
this.prev = null; //NEW
};
var length = 0;
var head = null;
var tail = null; //NEW
//methods here
}
As we can see in this code, the differences between the LinkedList class and the DoublyLinkedList class are marked by NEW. Inside the Node class we have the prev attribute (a new pointer) and inside the DoublyLinkedList class we also have the tail attribute to keep the reference of the last item of the list.
The doubly linked list provides us with two ways to iterate the list: from the beginning to its end or vice versa. We can also go to the next element or the previous element of a particular node. In the singly linked list, when you are iterating the list and you miss the desired element, you need to go back to the beginning of the list and start iterating it again. This is one of the advantages of the doubly linked list.
Inserting a new element at any position
Inserting a new item in the doubly linked list is very similar to the linked list. The difference is that in the linked list we only control one pointer (next), and in the doubly linked list we have to control both next and prev (previous).
Here we have the algorithm to insert a new element at any position:
this.insert = function(position, element){
//check for out-of-bounds values
if (position >= 0 && position <= length){
var node = new Node(element),
current = head,
previous,
index = 0;
if (position === 0){ //add on first position
if (!head){ //NEW {1}
head = node;
tail = node;
} else {
node.next = current;
current.prev = node; //NEW {2}
head = node;
}
} else if (position === length) { //last item //NEW
current = tail; // {3}
current.next = node;
node.prev = current;
tail = node;
} else {
while (index++ < position){ //{4}
previous = current;
current = current.next;
}
node.next = current; //{5}
previous.next = node;
current.prev = node; //NEW
node.prev = previous; //NEW
}
length++; //update size of list
return true;
} else {
return false;
}
};
Let's analyze the first scenario: insert a new element at the first position of the list (beginning of the list). If the list is empty (line {1}), we simply need to point head and tail to the new node. If not, the current variable will be a reference to the first element of the list. As we did for the linked list, we set node.next to current and head will point to the node (it will be the first element of the list). The difference now is that we also need to set a value for the previous pointer of the elements. The current.prev pointer will be pointing to the new element (node—line {2}) instead ofnull. And the node.prev pointer is already null, so we do not need to update anything.
The following diagram demonstrates this process:
Now let's analyze this, just in case we want to add a new element as the last element of the list. As we are also controlling the pointer to the last element, this is a special case. The current variable will reference the last element (line {3}). Then, we start making the first link: node.prev will reference current. The current.next pointer (which is pointing to null) will point to node (node.next will be pointing to null already because of the constructor). Then, there is only one thing left to be done, which is updating tail, which will point to node instead of current. The following diagram demonstrates all these actions:
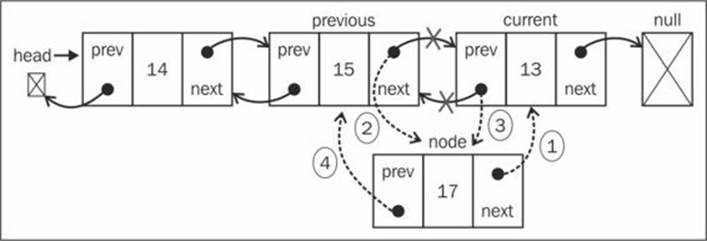
Then we have the third scenario: inserting a new element in the middle of the list. As we did for the previous methods, we will iterate the list until we get to the desired position (line {4}). We will be inserting the new element between the current and previous elements. First, node.next will point to current (line {5}) and previous.next will point to node, so that we do not lose the link between the nodes. Then, we need to fix all the links: current.prev will point to node and node.prev will point to previous. The following diagram exemplifies this:
Tip
We can do some improvements in both methods we implemented: insert and remove. In the case of a negative result, we could insert elements at the end of the list. There is also a performance improvement; for example, if position is greater than length/2, it is best to iterate from the end than start from the beginning (we will have to iterate fewer elements from the list).
Removing elements from any position
Removing elements from a doubly linked list is also very similar to a linked list. The only difference is that we need to set the previous pointer as well. Let's take a look at the implementation:
this.removeAt = function(position){
//look for out-of-bounds values
if (position > -1 && position < length){
var current = head,
previous,
index = 0;
//removing first item
if (position === 0){
head = current.next; // {1}
//if there is only one item, update tail //NEW
if (length === 1){ // {2}
tail = null;
} else {
head.prev = null; // {3}
}
} else if (position === length-1){ //last item //NEW
current = tail; // {4}
tail = current.prev;
tail.next = null;
} else {
while (index++ < position){ // {5}
previous = current;
current = current.next;
}
//link previous with current's next - skip it
previous.next = current.next; // {6}
current.next.prev = previous; //NEW
}
length--;
return current.element;
} else {
return null;
}
};
We need to handle three scenarios: removing an element from the beginning, from the middle, and the last element.
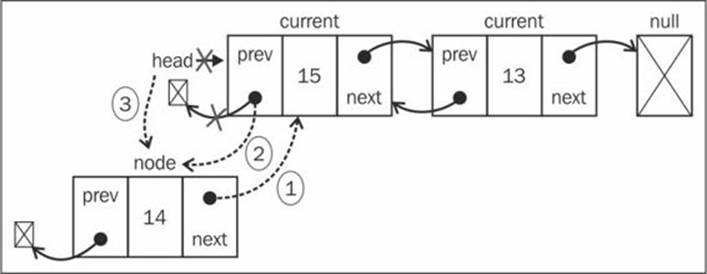
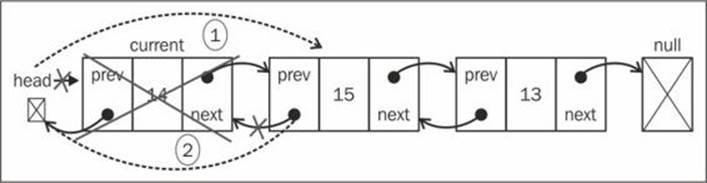
Let's take a look how to remove the first element. The current variable is a reference to the first element of the list, the one we want to remove. All we need to do is change the reference from head; instead of current, it will be the next element (current.next—line {1}). But we also need to update the current.next previous pointer (as the first element prev pointer is a reference to null). So, we change the reference of head.prev to null (line {3}—as head is also pointing to the new first element of the list or we can also use current.next.prev). As we also need to control thetail reference, we can check whether the element we are trying to remove is the first one and if positive, all we need to do is set tail to null as well (line {2}).
The following diagram illustrates the removal of the first element from a doubly linked list:
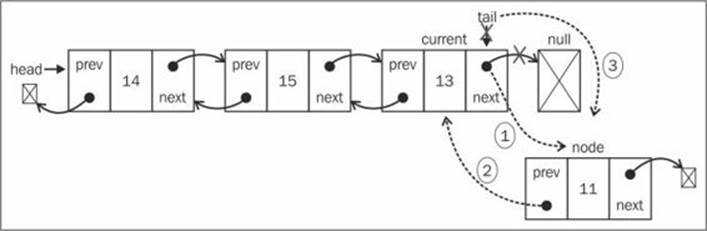
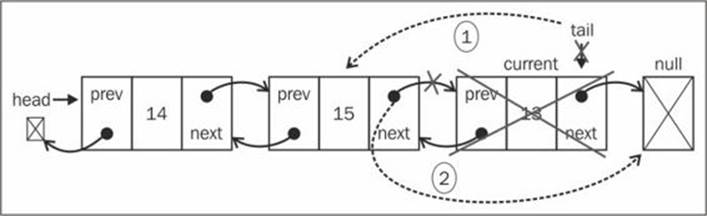
The next scenario removes an element from the last position. As we have the reference to the last element already (tail), we do not need to iterate the list to get to it. So, we can assign the tail reference to the current variable as well (line {4}). Next, we need to update the tail reference to the second-last element of the list (current.prev or tail.prev works as well). And now that tail is pointing to the second-last element, all we need to do is update the next pointer to null (tail.next = null). The following diagram demonstrates this action:
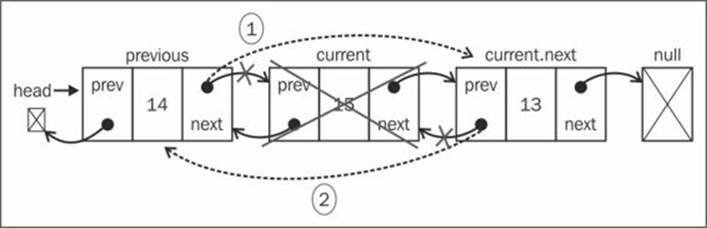
And the third and final scenario: removing an element from the middle of the list. First, we need to iterate until we get to the desired position (line {5}). The element we want to remove would be referenced by the current variable. So, to remove it, we can skip it in the list by updating the references of previous.next and current.next.prev. So, previous.next will point to current.next and current.next.prev will point to previous, as demonstrated by the following diagram:
Note
To know the implementation of other methods of doubly linked lists, refer to the source code of the book. The download link of the source code is mentioned in the preface of the book.
Circular linked lists
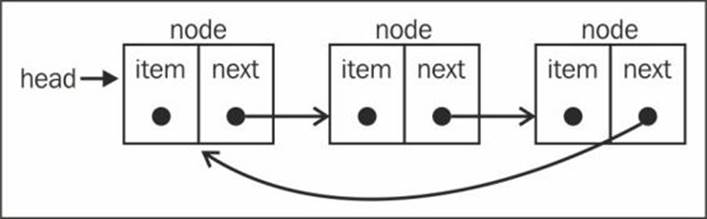
A circular linked list can have only one reference direction (as the linked list) or a double reference as the doubly linked list. The only difference between the circular linked list and a linked list is that the last element's next (tail.next) pointer does not make a reference to null, but to the first element (head), as we can see in the following diagram:
And a doubly circular linked list has tail.next pointing to the head element and head.prev pointing to the tail element:
Note
We don't have the scope to cover the CircularLinkedList algorithm in this book (the source code is very similar to LinkedList and DoublyLinkedList). However, you can access the code by downloading this book's source code.
Summary
In this chapter, you learned about the linked list data structure and its variants, the doubly linked list and the circular linked list. You learned how to remove and add elements at any position and how to iterate through a linked list. You also learned that the most important advantage of a linked list over an array is that you can easily add and remove elements from a linked list without shifting over its elements. So, whenever you need to add and remove lots of elements, the best option would be a linked list instead of an array.
In the next chapter, you will learn about sets, the last sequential data structure that we will cover in this book.
All materials on the site are licensed Creative Commons Attribution-Sharealike 3.0 Unported CC BY-SA 3.0 & GNU Free Documentation License (GFDL)
If you are the copyright holder of any material contained on our site and intend to remove it, please contact our site administrator for approval.
© 2016-2026 All site design rights belong to S.Y.A.