Developing Backbone.js Applications (2013)
Chapter 11. Backbone Boilerplate and Grunt-BBB
Boilerplates provide us a starting point for working on projects. They’re a base for building upon using the minimum required code to get something functional put together. When you’re working on a new Backbone application, a new model typically takes only a few lines of code to get working.
That alone probably isn’t enough, however, as you’ll need a collection to group those models, a view to render them, and perhaps a router if you’re looking to make specific views of your collection data bookmarkable. If you’re starting on a completely fresh project, you may also need a build process in place to produce an optimized version of your app that can be pushed to production.
This is where boilerplate solutions are useful. Rather than having to manually write out the initial code for each piece of your Backbone app, a boilerplate could do this for you, also ideally taking care of the build process.
Backbone Boilerplate—or just BB—does exactly this. It is an excellent set of best practices and utilities for building Backbone.js applications, created by Backbone contributor Tim Branyen. He took the gotchas, pitfalls, and common tasks he ran into while heavily using Backbone to build apps and crafted BB as a result of his experience.
Grunt-BBB or Boilerplate Build Buddy is the companion tool to BB, which offers scaffolding, file watcher, and build capabilities. Used together with BB, it provides an excellent base for quickly starting new Backbone applications. See Figure 11-1.
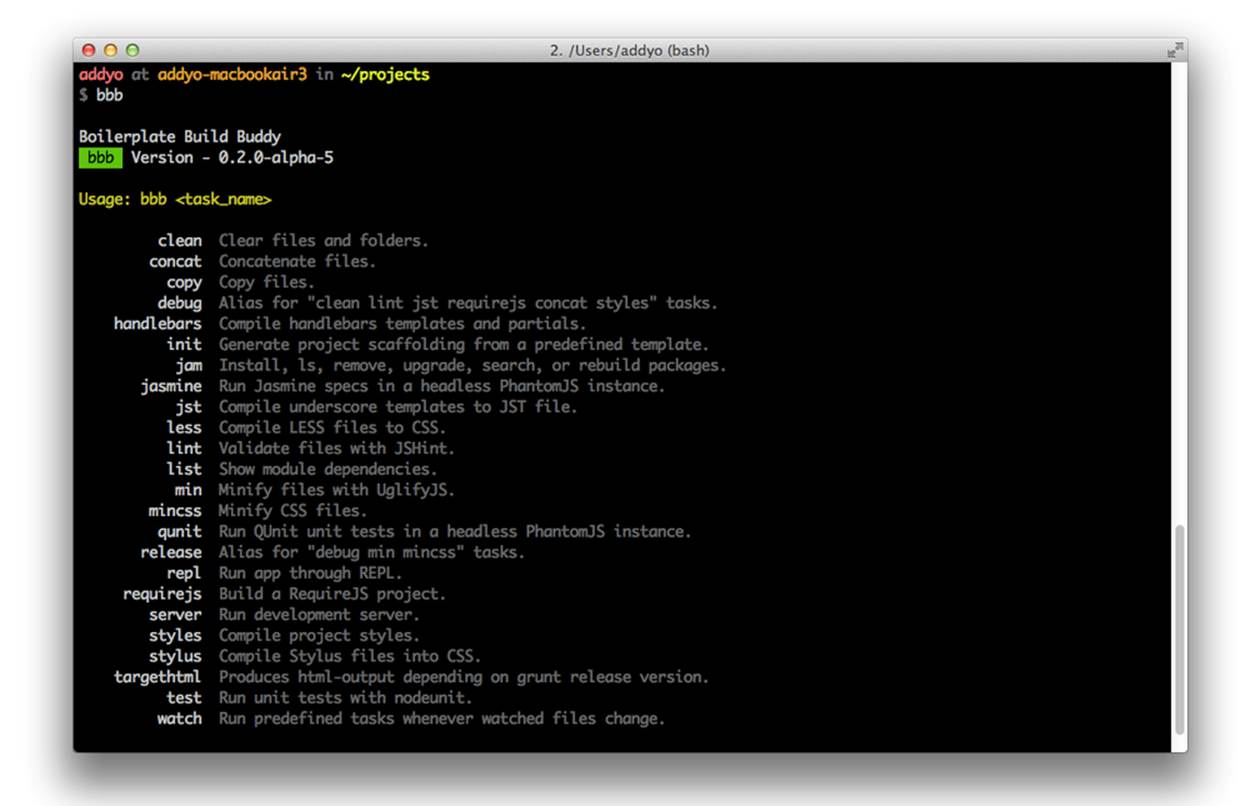
Figure 11-1. The Grunt-BBB authoring tool running at the command line
Out of the box, BB and Grunt-BBB provide us with:
§ Backbone; Lo-Dash, an Underscore.js alternative; and jQuery with an HTML5 Boilerplate foundation.
§ Boilerplate and scaffolding support, allowing us to spend minimal time writing boilerplate for modules, collections, and so on.
§ A build tool for template precompilation, concatenation and minification of all our libraries, application code, and stylesheets.
§ A lightweight Node.js web server.
Notes on build tool steps:
§ Template precompilation: using a template library such as Underscore microtemplating or Handlebars.js generally involves three steps: (1) reading a raw template, (2) compiling it into a JavaScript function, and (3) running the compiled template with your desired data. Precompiling eliminates the second step from runtime by moving this process into a build step.
§ Concatenation is the process of combining multiple assets (in our case, script files) into a fewer number of files (or a single file) to reduce the number of HTTP requests required to obtain them.
§ Minification is the process of removing unnecessary characters (such as whitespace, new lines, comments) from code and compressing it to reduce the overall size of the scripts being served.
Getting Started
To get started we’re going to install Grunt-BBB, which will include Backbone Boilerplate and any third-party dependencies it might need such as the Grunt build tool.
We can install Grunt-BBB via npm by running:
npm install -g bbb
That’s it. We should now be good to go.
Here’s a typical workflow for using Grunt-BBB, which we will use later:
1. Initialize a new project (bbb init).
2. Add new modules and templates (bbb init:module).
3. Preview changes using the built-in server (bbb server.)
4. Run the build tool (bbb build).
5. Link JavaScript, compile templates, build your application using r.js, and minify CSS and JavaScript (using bbb release).
Creating a New Project
Let’s create a new directory for our project and run bbb init to kick things off. A number of project subdirectories and files will be stubbed out for us, as shown here:
$ bbb init
Running "init" task
This task will create one or more files in the current directory, based on the
environment and the answers to a few questions. Note that answering "?" to any
question will show question-specific help and answering "none" to most questions
will leave its value blank.
"bbb" template notes:
This tool will help you install, configure, build, and maintain your Backbone
Boilerplate project.
Writing app/app.js...OK
Writing app/config.js...OK
Writing app/main.js...OK
Writing app/router.js...OK
Writing app/styles/index.css...OK
Writing favicon.ico...OK
Writing grunt.js...OK
Writing index.html...OK
Writing package.json...OK
Writing readme.md...OK
Writing test/jasmine/index.html...OK
Writing test/jasmine/spec/example.js...OK
Writing test/jasmine/vendor/jasmine-html.js...OK
Writing test/jasmine/vendor/jasmine.css...OK
Writing test/jasmine/vendor/jasmine.js...OK
Writing test/jasmine/vendor/jasmine_favicon.png...OK
Writing test/jasmine/vendor/MIT.LICENSE...OK
Writing test/qunit/index.html...OK
Writing test/qunit/tests/example.js...OK
Writing test/qunit/vendor/qunit.css...OK
Writing test/qunit/vendor/qunit.js...OK
Writing vendor/h5bp/css/main.css...OK
Writing vendor/h5bp/css/normalize.css...OK
Writing vendor/jam/backbone/backbone.js...OK
Writing vendor/jam/backbone/package.json...OK
Writing vendor/jam/backbone.layoutmanager/backbone.layoutmanager.js...OK
Writing vendor/jam/backbone.layoutmanager/package.json...OK
Writing vendor/jam/jquery/jquery.js...OK
Writing vendor/jam/jquery/package.json...OK
Writing vendor/jam/lodash/lodash.js...OK
Writing vendor/jam/lodash/lodash.min.js...OK
Writing vendor/jam/lodash/lodash.underscore.min.js...OK
Writing vendor/jam/lodash/package.json...OK
Writing vendor/jam/require.config.js...OK
Writing vendor/jam/require.js...OK
Writing vendor/js/libs/almond.js...OK
Writing vendor/js/libs/require.js...OK
Initialized from template "bbb".
Done, without errors.
Let’s review what has been generated.
index.html
This is a fairly standard stripped-down HTML5 boilerplate foundation with the notable exception of including RequireJS at the bottom of the page.
<!doctype html>
<html lang="en">
<head>
<meta charset="utf-8">
<meta http-equiv="X-UA-Compatible" content="IE=edge,chrome=1">
<meta name="viewport" content="width=device-width,initial-scale=1">
<title>Backbone Boilerplate</title>
<!-- Application styles. -->
<!--(if target dummy)><!-->
<link rel="stylesheet" href="/app/styles/index.css">
<!--<!(endif)-->
</head>
<body>
<!-- Application container. -->
<main role="main" id="main"></main>
<!-- Application source. -->
<!--(if target dummy)><!-->
<script data-main="/app/config" src="/vendor/js/libs/require.js"></script>
<!--<!(endif)-->
</body>
</html>
RequireJS—the AMD module and script loader—will assist us with managing the modules in our application. We’ve already covered it in Chapter 10, but let’s recap what this particular block does in terms of the boilerplate:
<script data-main="/app/config" src="/vendor/js/libs/require.js"></script>
The data-main attribute is used to inform RequireJS to load app/config.js (a configuration object) after it has finished loading itself. You’ll notice that we’ve omitted the .js extension here because RequireJS can automatically add it for us; however, it will respect your paths if we do choose to include it regardless. Let’s now look at the config file being referenced.
config.js
A RequireJS configuration object allows us to specify aliases and paths for dependencies we’re likely to reference often (e.g., jQuery), bootstrap properties like our base application URL, and shim libraries that don’t support AMD natively. This is what the config file in Backbone Boilerplate looks like:
// Set the require.js configuration for your application.
require.config({
// Initialize the application with the main application file and the JamJS
// generated configuration file.
deps: ["../vendor/jam/require.config", "main"],
paths: {
// Put paths here.
},
shim: {
// Put shims here.
}
});
The first option defined in the preceding config is deps: ["../vendor/jam/require.config", "main"]. This informs RequireJS to load up additional RequireJS configuration as well as a main.js file, which is considered the entry point for our application.
You may notice that we haven’t specified any other path information for main. Require will infer the default baseUrl using the path from our data-main attribute in index.html. In other words, our baseUrl is app/, and any scripts we require will be loaded relative to this location. We could use the baseUrl option to override this default if we wanted to use a different location.
The next block is paths, which we can use to specify paths relative to the baseUrl as well as the paths/aliases to dependencies we’re likely to regularly reference.
After this comes shim, an important part of our RequireJS configuration that allows us to load libraries that are not AMD-compliant. The basic idea here is that rather than requiring all libraries to implement support for AMD, the shim takes care of the hard work for us.
Going back to deps, the contents of our require.config file are as follows:
var jam = {
"packages": [
{
"name": "backbone",
"location": "../vendor/jam/backbone",
"main": "backbone.js"
},
{
"name": "backbone.layoutmanager",
"location": "../vendor/jam/backbone.layoutmanager",
"main": "backbone.layoutmanager.js"
},
{
"name": "jquery",
"location": "../vendor/jam/jquery",
"main": "jquery.js"
},
{
"name": "lodash",
"location": "../vendor/jam/lodash",
"main": "./lodash.js"
}
],
"version": "0.2.11",
"shim": {
"backbone": {
"deps": [
"jquery",
"lodash"
],
"exports": "Backbone"
},
"backbone.layoutmanager": {
"deps": [
"jquery",
"backbone",
"lodash"
],
"exports": "Backbone.LayoutManager"
}
}
};
The jam object is to support configuration of Jam, a package manager for the frontend that helps install, upgrade, and configure the dependencies used by your project. It is currently the package manager of choice for Backbone Boilerplate.
Under the packages array, a number of dependencies are specified for inclusion, such as Backbone, the Backbone.LayoutManager plug-in, jQuery, and Lo-Dash.
For those curious about Backbone.LayoutManager, it’s a Backbone plug-in that provides a foundation for assembling layouts and views within Backbone.
Additional packages you install using Jam will have a corresponding entry added to packages.
main.js
Next, we have main.js, which defines the entry point for our application. We use a global require() method to load an array containing any other scripts needed, such as our application app.js and our main router router.js. Note that most of the time, we will use require() only for bootstrapping an application and a similar method called define() for all other purposes.
The function defined after our array of dependencies is a callback that doesn’t fire until these scripts have loaded. Notice how we’re able to locally alias references to app and router as app and Router for convenience.
require([
// Application.
"app",
// Main Router.
"router"
],
function(app, Router) {
// Define your master router on the application namespace and trigger all
// navigation from this instance.
app.router = new Router();
// Trigger the initial route and enable HTML5 History API support, set the
// root folder to '/' by default. Change in app.js.
Backbone.history.start({ pushState: true, root: app.root });
// All navigation that is relative should be passed through the navigate
// method, to be processed by the router. If the link has a `data-bypass`
// attribute, bypass the delegation completely.
$(document).on("click", "a[href]:not([data-bypass])", function(evt) {
// Get the absolute anchor href.
var href = { prop: $(this).prop("href"), attr: $(this).attr("href") };
// Get the absolute root.
var root = location.protocol + "//" + location.host + app.root;
// Ensure the root is part of the anchor href, meaning it's relative.
if (href.prop.slice(0, root.length) === root) {
// Stop the default event to ensure the link will not cause a page
// refresh.
evt.preventDefault();
// `Backbone.history.navigate` is sufficient for all Routers and will
// trigger the correct events. The Router's internal `navigate` method
// calls this anyways. The fragment is sliced from the root.
Backbone.history.navigate(href.attr, true);
}
});
});
Inline, Backbone Boilerplate includes boilerplate code for initializing our router with HTML5 History API support and handling other navigation scenarios, so we don’t have to.
app.js
Let us now look at our app.js module. Typically, in non-Backbone Boilerplate applications, an app.js file may contain the core logic or module references needed to kick start an app.
In this case, however, this file is used to define templating and layout configuration options as well as utilities for consuming layouts. To a beginner, this might look like a lot of code to comprehend, but the good news is that for basic apps, you’re unlikely to need to heavily modify this. Instead, you’ll be more concerned with modules for your app, which we’ll look at next.
define([
"backbone.layoutmanager"
], function() {
// Provide a global location to place configuration settings and module
// creation.
var app = {
// The root path to run the application.
root: "/"
};
// Localize or create a new JavaScript Template object.
var JST = window.JST = window.JST || {};
// Configure LayoutManager with Backbone Boilerplate defaults.
Backbone.LayoutManager.configure({
// Allow LayoutManager to augment Backbone.View.prototype.
manage: true,
prefix: "app/templates/",
fetch: function(path) {
// Concatenate the file extension.
path = path + ".html";
// If cached, use the compiled template.
if (JST[path]) {
return JST[path];
}
// Put fetch into `async-mode`.
var done = this.async();
// Seek out the template asynchronously.
$.get(app.root + path, function(contents) {
done(JST[path] = _.template(contents));
});
}
});
// Mix Backbone.Events, modules, and layout management into the app object.
return _.extend(app, {
// Create a custom object with a nested Views object.
module: function(additionalProps) {
return _.extend({ Views: {} }, additionalProps);
},
// Helper for using layouts.
useLayout: function(name, options) {
// Enable variable arity by allowing the first argument to be the options
// object and omitting the name argument.
if (_.isObject(name)) {
options = name;
}
// Ensure options is an object.
options = options || {};
// If a name property was specified use that as the template.
if (_.isString(name)) {
options.template = name;
}
// Create a new Layout with options.
var layout = new Backbone.Layout(_.extend({
el: "#main"
}, options));
// Cache the refererence.
return this.layout = layout;
}
}, Backbone.Events);
});
NOTE
JST stands for JavaScript templates and generally refers to templates that have been (or will be) precompiled as part of a build step. When you’re running bbb release or bbb debug, Underscore/Lo-dash templates will be precompiled to avoid the need to compile them at runtime within the browser.
Creating Backbone Boilerplate Modules
Not to be confused with simply being an AMD module, a Backbone Boilerplate module is a script composed of a:
§ Model
§ Collection
§ Views (optional)
We can easily create a new Boilerplate module with grunt-bbb, once again using init:
# Create a new module
$ bbb init:module
# Grunt prompt
Please answer the following:
[?] Module Name foo
[?] Do you need to make any changes to the above before continuing? (y/N)
Writing app/modules/foo.js...OK
Writing app/styles/foo.styl...OK
Writing app/templates/foo.html...OK
Initialized from template "module".
Done, without errors.
This will generate a module foo.js as follows:
// Foo module
define([
// Application.
"app"
],
// Map dependencies from above array.
function(app) {
// Create a new module.
var Foo = app.module();
// Default Model.
Foo.Model = Backbone.Model.extend({
});
// Default Collection.
Foo.Collection = Backbone.Collection.extend({
model: Foo.Model
});
// Default View.
Foo.Views.Layout = Backbone.Layout.extend({
template: "foo"
});
// Return the module for AMD compliance.
return Foo;
});
Notice how boilerplate code for a model, collection, and view have been scaffolded out for us.
Optionally, we may also wish to include references to plug-ins such as the Backbone localStorage or Offline adapters. One clean way of including a plug-in in the preceding boilerplate could be:
// Foo module
define([
// Application.
"app",
// Plug-ins
'plugins/backbone-localstorage'
],
// Map dependencies from above array.
function(app) {
// Create a new module.
var Foo = app.module();
// Default Model.
Foo.Model = Backbone.Model.extend({
// Save all of the items under the `"foo"` namespace.
localStorage: new Store('foo-backbone'),
});
// Default Collection.
Foo.Collection = Backbone.Collection.extend({
model: Foo.Model
});
// Default View.
Foo.Views.Layout = Backbone.Layout.extend({
template: "foo"
});
// Return the module for AMD compliance.
return Foo;
});
router.js
Finally, let’s look at our application router, which is used for handling navigation. The default router Backbone Boilerplate generates for us includes sane defaults out of the box and can be easily extended.
define([
// Application.
"app"
],
function(app) {
// Defining the application router, you can attach subrouters here.
var Router = Backbone.Router.extend({
routes: {
"": "index"
},
index: function() {
}
});
return Router;
});
If, however, we would like to execute some module-specific logic, when the page loads (such as when a user hits the default route), we can pull in a module as a dependency and optionally use the Backbone LayoutManager to attach views to our layout as follows:
define([
// Application.
'app',
// Modules
'modules/foo'
],
function(app, Foo) {
// Defining the application router, you can attach subrouters here.
var Router = Backbone.Router.extend({
routes: {
'': 'index'
},
index: function() {
// Create a new Collection
var collection = new Foo.Collection();
// Use and configure a 'main' layout
app.useLayout('main').setViews({
// Attach the bar View into the content View
'.bar': new Foo.Views.Bar({
collection: collection
})
}).render();
}
});
// Fetch data (e.g., from localStorage)
collection.fetch();
return Router;
});
Other Useful Tools and Projects
When working with Backbone, you usually need to write a number of different classes and files for your application. Scaffolding tools such as Grunt-BBB can help automate this process by generating basic boilerplates for the files you need.
Yeoman
If you appreciated Grunt-BBB but would like to explore a tool for assisting with your broader development workflow, I’m happy to recommend a tool I helped create called Yeoman. See Figure 11-2.
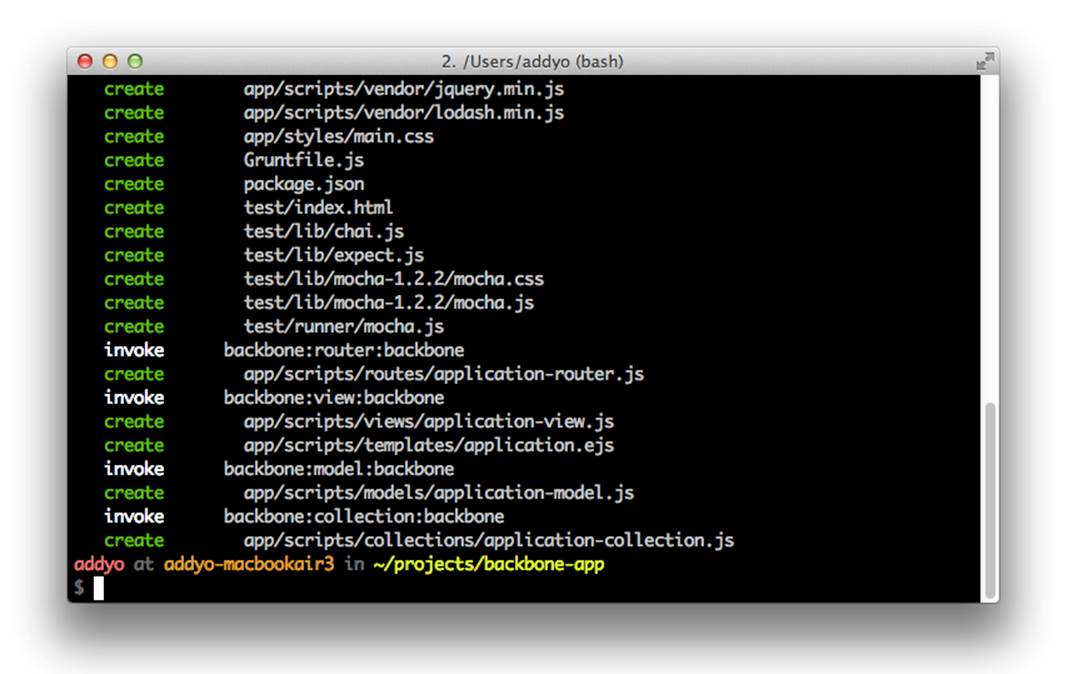
Figure 11-2. The Yeoman ‘yo’ scaffolding tool being used to scaffold a new Backbone application
Yeoman is a workflow comprising a collection of tools and best practices for helping you develop more efficiently. It’s composed of yo, a scaffolding tool shown in Figure 11-2; Grunt, a build tool; and Bower, a client-side package manager shown in Figure 11-3.
Where Grunt-BBB focuses on offering an opinionated start for Backbone projects, Yeoman allows you to scaffold apps using Backbone (or other frameworks); get Backbone plug-ins directly from the command line; and compile your CoffeeScript, Sass, or other abstractions without additional effort.
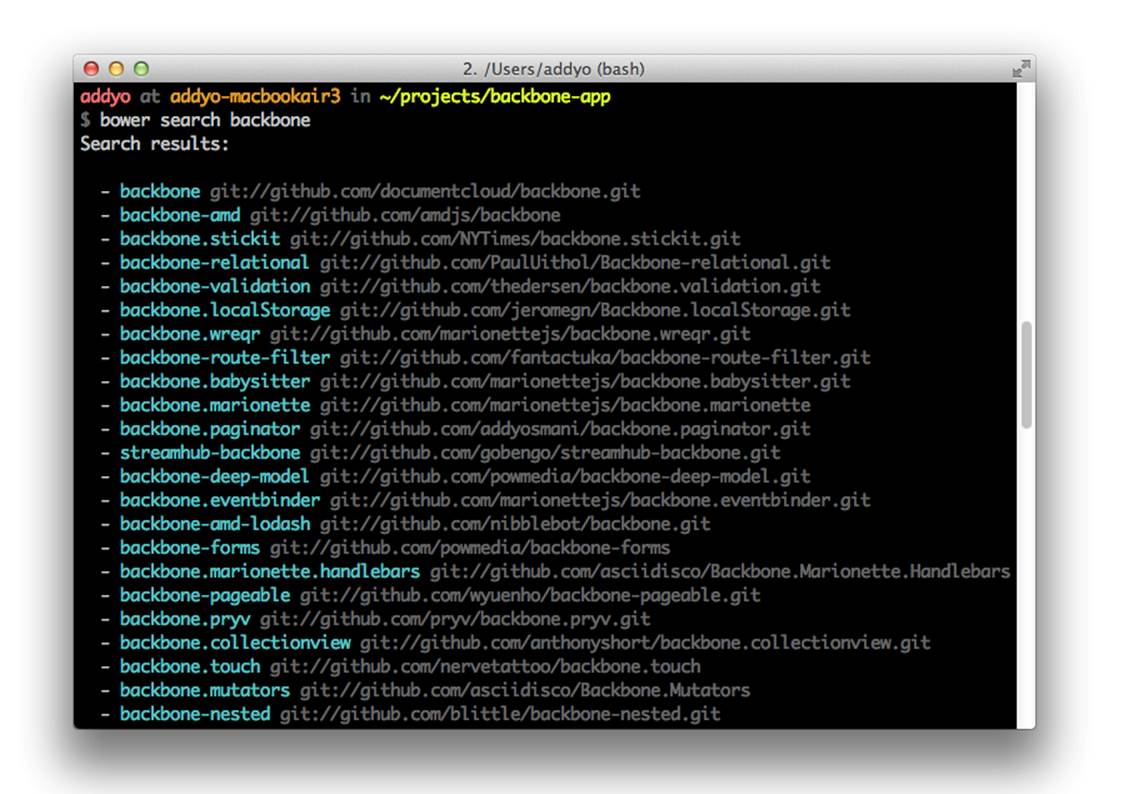
Figure 11-3. A list of Backbone plug-ins and extensions available via the Bower package manager
You may also be interested in Brunch, a similar project that uses skeleton boilerplates to generate new applications.
Backbone DevTools
When you’re building an application with Backbone, there’s some additional tooling available for your day-to-day debugging workflow.
For example, Backbone DevTools is a Chrome DevTools extension that allows you to inspect events, syncs, View-DOM bindings, and what objects have been instantiated (see Figure 11-4).
A useful view hierarchy is displayed in the Elements panel. Also, when you inspect a DOM element, the closest view will be exposed via $view in the console.
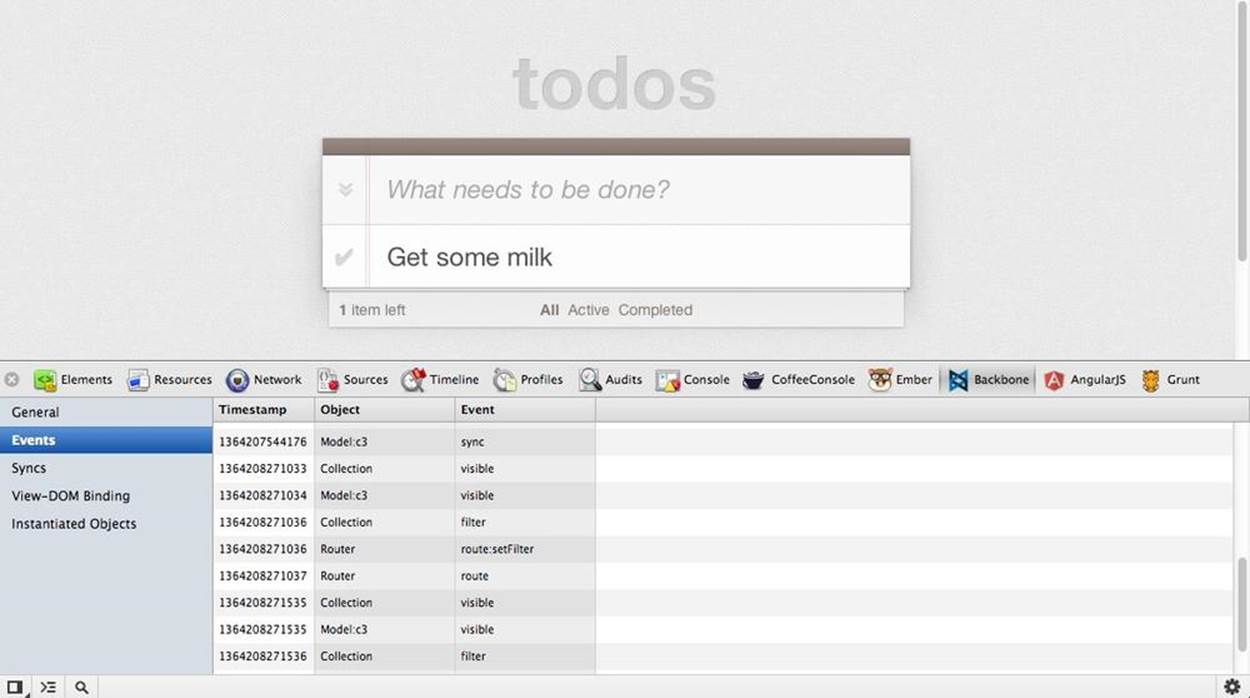
Figure 11-4. The Backbone DevTools extension being used to debug the Todo application we created earlier in the book
At the time of writing, the project is available on GitHub.
Summary
In this section we reviewed Backbone Boilerplate and learned how to use the bbb tool to help us scaffold out our application.
If you would like to learn more about how this project helps structure your app, BBB includes some built-in boilerplate sample apps that you can easily generate for review.
These include a boilerplate tutorial project (bbb init:tutorial) and an implementation of my TodoMVC project (bbb init:todomvc). I recommend checking these out, as they’ll provide you with a more complete picture of how Backbone Boilerplate and its templates fit into the overall setup for a web app.
For more about Grunt-BBB, remember to take a look at the official project repository. There is also a related slidedeck available for those interested in reading more.