Continuous Enterprise Development in Java (2014)
Chapter 3. Scratch to Production
The way to get started is to quit talking and begin doing.
— Walt Disney
Enterprise Java has long suffered the (possibly correct) critique that it’s difficult to bootstrap a new project. Couple the lack of definitive jumpstart documentation with vendor-specific techniques for application deployment, throw a mess of third-party dependencies into the mix, and we’ve got a prime recipe yielding barriers to entry for programmers new to web development in Java.
Of course, this all runs contrary to the mission of Java EE: to make our experience with enterprise features easier. So while the programming model has certainly evolved past the days of confusingly verbose and explicitly required metadata, the warts that lead to frustrating stack traces and unexpected deployment behaviors unfortunately persist.
Some of this is by design. The specifications that comprise the Java EE Platform intentionally leave room for vendors to implement features like server startup and deployment at their discretion. (Although there is some limited facility to, for instance, create an EJB container in a running JVM and bring EJB deployments on the classpath into service, a full-scale deployment is still typically achieved in a vendor-specific manner.)
In the interest of providing a uniformly workable solution to the reader, this text will routinely opt for vendor-specific approaches in favor of generic guidelines. By the end of this chapter, you should be comfortable creating a new Java EE web application and pushing it live to production using a few tools and services offered by the JBoss Community.
The Development Environment
Although all projects used here are ultimately standalone and require no plug-ins or special environments aside from a Java runtime, we’re going to make our lives easier by taking advantage of the integration facilities provided by JBoss Developer Studio (JBDS).
The JBDS plug-ins atop the Eclipse Integrated Development Environment (IDE) will unify our development experience and allow us to stay inside one window. Installation is via an executable JAR available from the JBDS site (see Figure 3-1).
To kick off the installation process, either double-click the icon (if your environment has the .jar extension correctly associated as a Java executable) or launch the installer from the command line via the Java runtime:
$> java -jar jbdevstudio-product-universal-7.0.0.GA-v20130720-0044-B364.jar
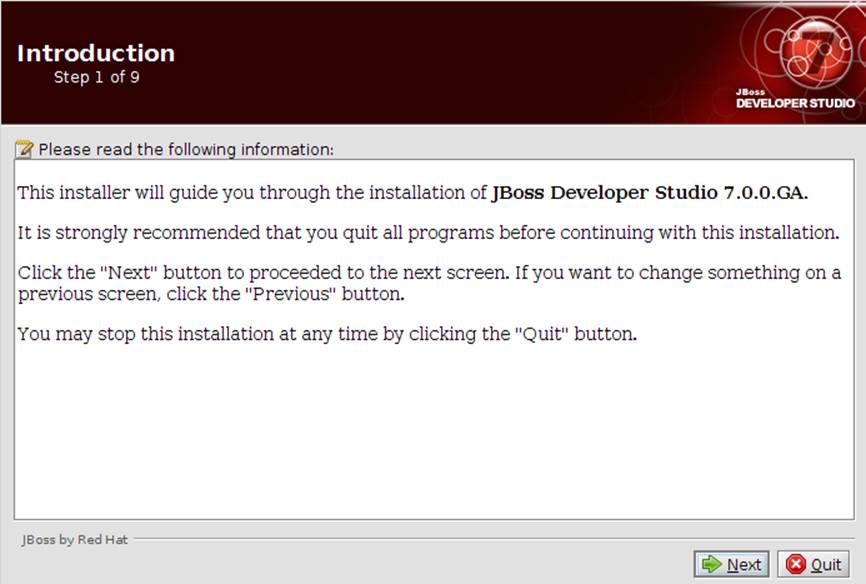
Figure 3-1. JBoss Developer Studio installation
Following the graphical wizard will install the JDBS IDE (and all requisite plug-ins we’ll be using) onto your local machine.
A New Project
The previous chapter introduced us to JBoss Forge, a tool that aims to make project creation and enhancement more declarative and less manual. Because we’re starting fresh now, it makes sense to use Forge to create our project layout. This will ultimately give us a functional skeleton from database to view layer that we can use either as a learning tool or a quick shortcut to writing some real code.
Forge’s user interface is a shell, so it can be installed manually and used from the terminal like any other command-line application. However, JBDS removes the need for us to do this setup. As shown in Figure 3-2, selecting Window → Show View → Other will give us immediate access to the Forge Console.
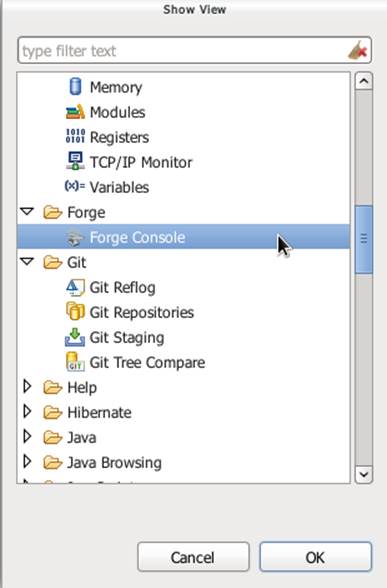
Figure 3-2. Forge Console view selection
With our new Forge Console view, we’re now free to start up the Forge runtime, which came embedded with the JBDS installation. Clicking the green play button, as shown in Figure 3-3, will give us access to the Forge shell:
_____
| ___|__ _ __ __ _ ___
| |_ / _ \| `__/ _` |/ _ \ \\
| _| (_) | | | (_| | __/ //
|_| \___/|_| \__, |\___|
|___/
JBoss Forge, version [ 1.3.3.Final ] - JBoss, by Red Hat, Inc.
[ http://forge.jboss.org ]
[no project] workspace $
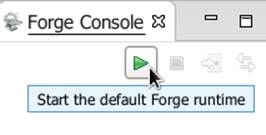
Figure 3-3. Click the play button to start Forge
JBDS integration with Forge is especially useful in this console because the IDE will automatically refresh any changes we make in Forge with our project view and open text editors.
As a decent shell, Forge supports tab-completion of commands and known parameters; if you get stuck, feel free to use the Tab key to see what’s available.
To ease up on our configuration options, let’s first start off by instructing Forge to accept defaults:
$> set ACCEPT_DEFAULTS true;
And now let’s create the filesystem layout and pom.xml for our new Maven-based Java EE project. We’ll be creating a simple application that will allow users to leave comments, so we’ll name the application feedback:
$> new-project --named feedback --topLevelPackage org.cedj.ch03.feedback
--projectFolder feedback;
Once we hit Enter, we’ll see that Forge has dutifully created our new project’s layout:
***SUCCESS*** Created project [feedback] in new working directory [./feedback]
Wrote ./feedback
Wrote ./feedback/pom.xml
Wrote ./feedback/src/main/java
Wrote ./feedback/src/test/java
Wrote ./feedback/src/main/resources
Wrote ./feedback/src/test/resources
Wrote ./feedback/src/main/java/org/cedj/feedback
Wrote ./presentations/feedback/src/main/resources/META-INF/forge.xml
Additionally, our project has appeared in the Project View, as shown in Figure 3-4.
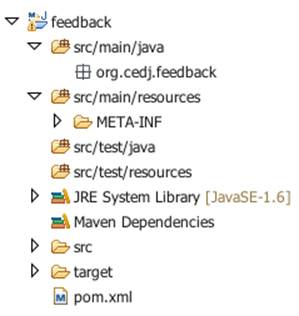
Figure 3-4. Our project created in Project View
Users of Maven Archetypes may be familiar with this type of technique to create a new project, but because Forge is an incremental tool, it’s capable of reading a project’s state and adding behaviors after creation.
Let’s add support for Java Persistence API (JPA) to our project, a task that typically would involve some searching for the correct dependencies for the spec APIs (as well as those for any vendor-specific extensions). Forge is helpful here as well, via its persistence plug-in:
$> persistence setup --provider HIBERNATE --container JBOSS_AS7;
In this case we’ve chosen Hibernate as our persistence provider, and have targeted JBoss AS7 as our container. Forge will equip our POM with the proper dependencies and supply us with a default persistence.xml preconfigured to work with the AS7 runtime (for a list of supported options, look to tab completion):
***SUCCESS*** Installed [forge.spec.jpa] successfully.
***INFO*** Setting transaction-type="JTA"
***INFO*** Using example data source [java:jboss/datasources/ExampleDS]
***SUCCESS*** Persistence (JPA) is installed.
Wrote ./feedback/src/main/resources/META-INF/persistence.xml
Wrote ./feedback/pom.xml
A peek into the generated persistence.xml will show us a decent default configuration:
<?xml version="1.0" encoding="UTF-8" standalone="no"?>
<persistence xmlns="http://java.sun.com/xml/ns/persistence"
xmlns:xsi="http://www.w3.org/2001/XMLSchema-instance" version="2.0"
xsi:schemaLocation="http://java.sun.com/xml/ns/persistence
http://java.sun.com/xml/ns/persistence/persistence_2_0.xsd">
<persistence-unit name="forge-default" transaction-type="JTA">
<description>Forge Persistence Unit</description>
<provider>org.hibernate.ejb.HibernatePersistence</provider>
<jta-data-source>java:jboss/datasources/ExampleDS</jta-data-source>
<exclude-unlisted-classes>false</exclude-unlisted-classes>
<properties>
<property name="hibernate.hbm2ddl.auto" value="create-drop"/>
<property name="hibernate.show_sql" value="true"/>
<property name="hibernate.format_sql" value="true"/>
<property name="hibernate.transaction.flush_before_completion"
value="true"/>
</properties>
</persistence-unit>
</persistence>
Let’s make one tweak; the property hibernate.hbm2ddl.auto is set to automatically drop the database tables so they can’t be reused across deployments. Though this might be handy in development to ensure we’re always coding from a clean slate, we’d actually like to use some real persistence later, so let’s change that property to a value of update.
Java EE6 introduced the Bean Validation Specification, which allows for validation constraints at the database, application, and view layers all with a single declaration. Let’s enable BV for our project, similar to how we put in place support for persistence:
$> validation setup --provider HIBERNATE_VALIDATOR
Once again we’re given the appropriate dependencies in our POM, as well as a valid validation.xml configuration file such that we don’t have to apply any boilerplate XML on our own:
***SUCCESS*** Installed [forge.spec.validation] successfully.
Wrote ./feedback/src/main/resources/META-INF/validation.xml
Wrote ./feedback/pom.xml
The generated validation.xml should be fine for our uses without any modification:
<?xml version="1.0" encoding="UTF-8" standalone="no"?>
<validation-config xmlns="http://jboss.org/xml/ns/javax/validation/configuration"
xmlns:xsi="http://www.w3.org/2001/XMLSchema-instance">
<default-provider>org.hibernate.validator.HibernateValidator</default-provider>
<message-interpolator>org.hibernate.validator.messageinterpolation.
ResourceBundleMessageInterpolator</message-interpolator>
<traversable-resolver>org.hibernate.validator.engine.resolver.
DefaultTraversableResolver</traversable-resolver>
<constraint-validator-factory>org.hibernate.validator.engine.
ConstraintValidatorFactoryImpl</constraint-validator-factory>
</validation-config>
Now we’re all set to add some entities to our project. For the uninitiated, this will be our interface to accessing persistent (i.e., database-backed) data as an object. For now we’ll just create one simple bean to represent a database table, and we’ll call it FeedbackEntry:
$> entity --named FeedbackEntry;
Forge will create a new Java class for us, adding the proper @Entity annotation, an ID field to represent our primary key, a version field for optimistic locking, and stubbed-out methods for the value-based equals(Object) and hashCode():
package org.cedj.feedback.model;
import javax.persistence.Entity;
import java.io.Serializable;
import javax.persistence.Id;
import javax.persistence.GeneratedValue;
import javax.persistence.GenerationType;
import javax.persistence.Column;
import javax.persistence.Version;
import java.lang.Override;
@Entity
public class FeedbackEntry implements Serializable
{
@Id
private @GeneratedValue(strategy = GenerationType.AUTO)
@Column(name = "id", updatable = false, nullable = false)
Long id = null;
@Version
private @Column(name = "version")
int version = 0;
public Long getId()
{
return this.id;
}
public void setId(final Long id)
{
this.id = id;
}
public int getVersion()
{
return this.version;
}
public void setVersion(final int version)
{
this.version = version;
}
public String toString()
{
String result = "";
if (id != null)
result += id;
return result;
}
@Override
public boolean equals(Object that)
{
if (this == that)
{
return true;
}
if (that == null)
{
return false;
}
if (getClass() != that.getClass())
{
return false;
}
if (id != null)
{
return id.equals(((FeedbackEntry) that).id);
}
return super.equals(that);
}
@Override
public int hashCode()
{
if (id != null)
{
return id.hashCode();
}
return super.hashCode();
}
}
Our FeedbackEntry entity should be capable of recording feedback for some user with a Twitter ID, so let’s add fields to represent that data (as well as some validation constraints dictating that these cannot be null):
field string --named twitterHandle;
constraint NotNull --onProperty twitterHandle;
field string --named feedback;
constraint NotNull --onProperty feedback;
It’s worth noting now that our Forge prompt reads that the current location is inside our entity, because that’s where we’re currently working. Forge’s ls command is handy for seeing the current state of our entity as we build:
[feedback] FeedbackEntry.java $ ls
[fields]
private::Long::id;
private::String::feedback;
private::String::twitterHandle;
private::int::version;
[methods]
public::equals(Object that)::boolean
public::getFeedback()::String
public::getId()::Long
public::getTwitterHandle()::String
public::getVersion()::int
public::hashCode()::int
public::setFeedback(final String feedback)::void
public::setId(final Long id)::void
public::setTwitterHandle(final String twitterHandle)::void
public::setVersion(final int version)::void
public::toString()::String
With our sole entity in place, it’s time to let Forge generate a UI layer for us as a starting point for the view in our web application. The scaffold command makes short work of this:
$> scaffold setup
***SUCCESS*** Installed [forge.maven.WebResourceFacet] successfully.
***SUCCESS*** Installed [forge.spec.ejb] successfully.
***SUCCESS*** Installed [forge.spec.cdi] successfully.
***SUCCESS*** Installed [forge.spec.servlet] successfully.
***SUCCESS*** Installed [forge.spec.jsf.api] successfully.
***SUCCESS*** Installed [faces] successfully.
Wrote ./feedback/src/main/webapp
Wrote ./feedback/pom.xml
Wrote ./feedback/src/main/webapp/WEB-INF/beans.xml
Wrote ./feedback/src/main/webapp/WEB-INF/faces-config.xml
Wrote ./feedback/src/main/webapp/favicon.ico
Wrote ./feedback/src/main/webapp/resources/scaffold/paginator.xhtml
Wrote ./feedback/src/main/webapp/resources/scaffold/pageTemplate.xhtml
Wrote ./feedback/src/main/webapp/index.html
Wrote ./feedback/src/main/webapp/index.xhtml
Wrote ./feedback/src/main/webapp/error.xhtml
Wrote ./feedback/src/main/webapp/resources/add.png
Wrote ./feedback/src/main/webapp/resources/bootstrap.css
Wrote ./feedback/src/main/webapp/resources/false.png
Wrote ./feedback/src/main/webapp/resources/favicon.ico
Wrote ./feedback/src/main/webapp/resources/forge-logo.png
Wrote ./feedback/src/main/webapp/resources/forge-style.css
Wrote ./feedback/src/main/webapp/resources/remove.png
Wrote ./feedback/src/main/webapp/resources/search.png
Wrote ./feedback/src/main/webapp/resources/true.png
Wrote ./feedback/src/main/webapp/WEB-INF/web.xml
As shown by the somewhat lengthy output, we’re now equipped with a src/main/webapp folder laid out with a nice starting point from which we can build our own UI. With just one more command, we can generate a CRUD (Create, Read, Update, Delete) interface to our entities:
$> scaffold from-entity org.cedj.feedback.model.*;
***INFO*** Using currently installed scaffold [faces]
***SUCCESS*** Generated UI for [org.cedj.feedback.model.FeedbackEntry]
Wrote ./feedback/src/main/java/org/cedj/feedback/view/FeedbackEntryBean.java
Wrote ./feedback/src/main/webapp/feedbackEntry/create.xhtml
Wrote ./feedback/src/main/webapp/feedbackEntry/view.xhtml
Wrote ./feedback/src/main/webapp/feedbackEntry/search.xhtml
Wrote ./feedback/src/main/webapp/resources/scaffold/pageTemplate.xhtml
Wrote ./feedback/src/main/java/org/cedj/feedback/view/ViewUtils.java
Wrote ./feedback/src/main/webapp/WEB-INF/classes/META-INF/forge.taglib.xml
Wrote ./feedback/src/main/java/org/cedj/feedback/model/FeedbackEntry.java
And that’s enough for now; we’ve created the skeleton for a fully functional application. Of course, the thematic element of this book is testable development, so it’s best we throw in the facility to run some integration tests on our little application.
Writing Our First Integration Test with Arquillian
We’ve mentioned before that Forge is based on a plug-in architecture; all commands we’ve used thus far are actually plug-ins called by the Forge runtime when we request them in the console. Up to this point, we’ve used support that comes standard with the Forge distribution. Now we’d like to add some tests, and we’ll use the Arquillian Test Platform as both the programming model and the JUnit test runner. The first order of business is to install the Arquillian plug-in into our Forge runtime, and we do this by way of the forge install-plugin command:
$> forge install-plugin arquillian
Connecting to remote repository [https://raw.github.com/forge/plugin-repository/
master/repository.yaml]... connected!
***INFO*** Preparing to install plugin: arquillian
***INFO*** Checking out plugin source files to
[/tmp/forgetemp1365281623326595751/repo] via 'git'
***INFO*** Switching to branch/tag [refs/heads/1.0.2.Final]
***INFO*** Invoking build with underlying build system.
...
***INFO*** Installing plugin artifact.
***SUCCESS*** Installed from [https://github.com/forge/plugin-arquillian.git]
successfully.
This instructs Forge to connect to its plug-in repository, grab the latest version of the requested plug-in, build it from source, and install the binaries into the current runtime. Because Forge is built on a modular class-loading architecture, we’re able to load in plug-ins without the need to restart the process or concern ourselves with conflicting dependencies.
With the Arquillian plug-in installed, we now have access to the arquillian command. Let’s instruct Forge to equip our POM with the dependencies needed to run Arquillian tests on the JBoss AS7 container:
$> arquillian setup --containerType REMOTE
--containerName JBOSS_AS_REMOTE_7.X --testframework
You’ll be prompted for the versions of Arquillian, JUnit, and JBoss AS7 that you’d like to use, and the available options will expand over time as new versions are released. These instructions have been tested with:
[org.jboss.arquillian:arquillian-bom:pom::1.1.1.Final]
[junit:junit:::4.11]
[org.jboss.as:jboss-as-arquillian-container-remote:::7.1.1.Final]
With the POM config changes out of the way, let’s ask Forge to now create for us a jumping-off point from which we’ll write our test:
$> arquillian create-test
--class org.cedj.ch03.feedback.model.FeedbackEntry.java
Picked up type <JavaResource>: org.cedj.feedback.model.FeedbackEntryTest
Wrote ./feedback/src/test/java/org/cedj/feedback/model/FeedbackEntryTest.java
The newly created FeedbackEntryTest is technically an Arquillian test, but it really doesn’t do too much for us. After all, we can automate quite a bit, but in the end it’s up to us to write our own business and test logic. So let’s replace the contents of this class with:
package org.cedj.feedback.model;
import java.io.File;
import javax.persistence.EntityManager;
import javax.persistence.PersistenceContext;
import org.jboss.arquillian.container.test.api.Deployment;
import org.jboss.arquillian.junit.Arquillian;
import org.jboss.shrinkwrap.api.ShrinkWrap;
import org.jboss.shrinkwrap.api.spec.WebArchive;
import org.junit.Assert;
import org.junit.Test;
import org.junit.runner.RunWith;
@RunWith(Arquillian.class)
public class FeedbackEntryTest {
@PersistenceContext
private EntityManager em;
@Deployment
public static WebArchive createDeployment() {
return ShrinkWrap.createFromZipFile(WebArchive.class, new File(
"target/feedback.war"));
}
@Test
public void canFindFeedbackByUser() {
final FeedbackEntry feedback = em.createQuery(
"from " + FeedbackEntry.class.getSimpleName()
+ " where twitterHandle='@ALRubinger'",
FeedbackEntry.class).getSingleResult();
Assert.assertNotNull(feedback);
}
@Test
public void testIsDeployed() {
Assert.assertNotNull(em);
}
}
Before going forward, let’s break down the anatomy of this test.
First, we’ll note that there are no references in the import statements to any particular application server or target container. This is because Arquillian is designed to decouple the programming model of the test from the target runtime; any container that can handle the capabilities demanded by the test will work. This keeps the portability goals of Java EE intact, moving the mechanics of startup and deployment to configuration elements. In this case, the Arquillian runner will note that the JBoss AS7 container adaptor is available on the classpath because it was defined in the POM when we ran the setup command for the Arquillian Forge plug-in.
The next point of interest is the class-level annotation:
@RunWith(Arquillian.class)
@RunWith is a standard JUnit construct that directs control to a specified test runner. This is Arquillian’s entry point; from here Arquillian can receive lifecycle events from JUnit and perform its own handling. The benefit to this design decision is that Arquillian requires no special plug-ins or configuration on the part of the user. Anything that is capable of launching a JUnit test—be it a Maven build, an Ant task, a manual command, or an IDE—can take advantage of Arquillian without any additional handling. For instance, you can use JBDS and Eclipse to launch a full-scale integration test with Arquillian by right-clicking on the class and selecting Run As → JUnit Test.
Next up is the class declaration:
public class FeedbackEntryTest {...}
The important bit here is what’s not required. Because of the Arquillian JUnit Test Runner, you’re free to use whatever class hierarchy you’d like, and there’s no need to extend a base support class. This keeps Arquillian tests in line with the POJO programming model originally introduced in Java EE5.
Another feature of Arquillian is its capability to provide services like injection to the test. Here we’re going to interact with persistent storage via the JPA EntityManager:
@PersistenceContext
private EntityManager em;
The EntityManager is typically used by server-side business components like EJBs or CDI beans, but because this test is going to run inside the container as part of a deployment, we’ll be able to interact with it directly.
Because Arquillian aims to follow the standards set forth by Java EE, instead of requiring the user to do a lookup or manual creation of the EntityManager, we’ll be able to receive an instance by requesting injection via use of the @PersistenceContext annotation.
The final important fixture of the Arquillian test anatomy is the @Deployment method:
@Deployment
public static WebArchive createDeployment() {
return ShrinkWrap.createFromZipFile(WebArchive.class, new File(
"target/feedback.war"));
}
Because Java EE application servers work off deployments like Web Archives (WARs), Java Archives (JARs), or Enterprise Archives (EARs), we need to instruct Arquillian with the artifact to be deployed. This method must be static and return any ShrinkWrap Archive type; for this first exercise we’ll simply grab the output of the current project’s build feedback.war, but as we’ll soon see in later examples, we don’t need to rely on flat files at all! This will free us to skip the build entirely in between code changes and test runs, instead letting us rely on ShrinkWrap’s packaging of .class files created from the IDE’s incremental complication features.
The rest of the file is all test logic! Remember, the focus of the Arquillian programming model is to allow you to write less boilerplate and setup, and focus on the bits of code that only you as the developer can write. It’s not your job to deal with bootstrapping an application server or calling upon vendor-specific deployment hooks; Arquillian will handle all of that for you behind the scenes.
Running the Application Locally
Time to see our generated application in action. First we should run the build to package our flat-file deployable feedback.war for manual deployment into JBoss AS7. We can trigger Maven from the Forge Console:
$> build --notest --profile arq-jboss_as_remote_7.x;
After a series of informative build output messages from Maven, we should see BUILD SUCCESS, indicating that the WAR has been properly built from sources.
The missing bit is that we need a server into which we can deploy our web app! JBoss AS7 has a simple installation process (simply download and unzip onto the filesystem), but again Forge can help automate this for us, so we don’t need to locate the JBossAS binaries. For this we’ll turn to the Forge JBoss AS7 plug-in, which is installed similarly to the Arquillian plug-in we put in place in the previous section:
$> forge install-plugin jboss-as-7
Once installation is complete, we can use the newly acquired as7 command to set up our server:
$> as7 setup
You’ll be prompted for your $JAVA_HOME location and JBoss AS7 version; be sure to align the versions with the Arquillian Container Adaptor Version we chose before. Again, in this example we recommend 7.1.1.Final. Forge will additionally ask for the location to a JBoss AS7 installation on the filesystem, but simply hitting Enter will download the server for us into the target directory of our project.
Now it’s time to fire up the server. We’ll first cd into the root of our project in the Forge shell, then execute the following command:
$> as7 start --jboss-home target/jboss-as-dist/jboss-as-7.1.1.Final/
If you’ve opted for a different version of JBoss AS7, you may have to make substitutions to point to JBOSS_HOME correctly. Assuming all goes as planned, you should see the JBoss AS7 startup sequence in the Forge shell, followed by:
***INFO*** JBoss AS 7.1.1.Final has successfully started.
With the server up, let’s deploy our application:
$> as7 deploy
Again, after a series of JBoss AS7 deployment messages, you should see:
The deployment operation (FORCE_DEPLOY) was successful.
We’re up and running! Point your browser of choice to the root of the application at http://localhost:8080/feedback, and you should see the home screen of the UI that Forge has generated for us, as shown in Figure 3-5.
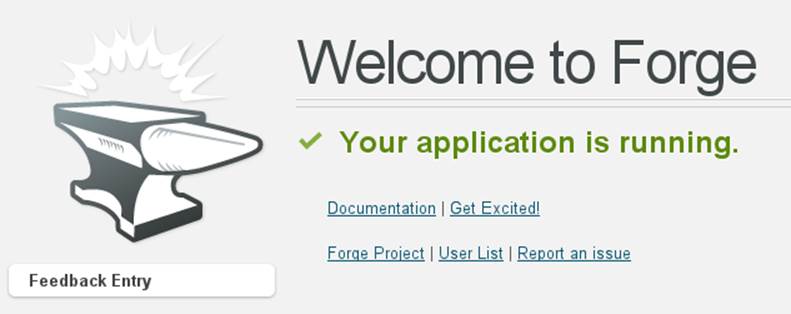
Figure 3-5. Feedback application home page
Clicking the Feedback Entry button in Figure 3-5 will grant us access to the CRUD editor for this entity. From here we can create a new row in the database table, as shown in Figure 3-6.
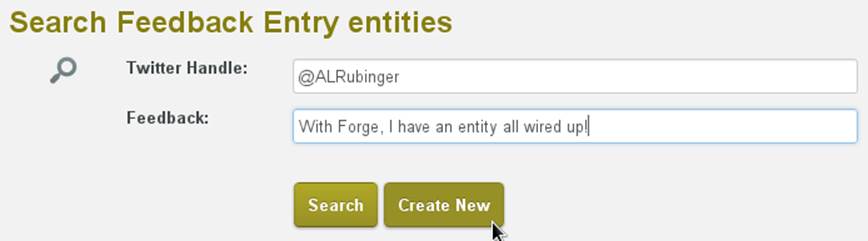
Figure 3-6. New feedback entry
Although CRUD applications are little more than a UI frontend to an entity, the benefit here is in having a fully functioning application to use as a base from which to start. For newcomers to Java EE, this is especially useful as a learning tool.
With our new entry now persisted into the database, let’s undeploy the application in preparation to perform our first integration test run with Arquillian:
$> as7 undeploy
...
The deployment operation (UNDEPLOY_IGNORE_MISSING) was successful.
Running the Arquillian Integration Test
At this point, we still have a running JBoss AS7 server and have undeployed the feedback application. Because we’d chosen the JBOSS_AS_REMOTE_7.X option as part of the Forge Arquillian plug-in setup command, our POM is equipped with a profile that enables a dependency on the JBoss AS7 Arquillian container:
<profile>
<id>arq-jboss_as_remote_7.x</id>
<dependencies>
<dependency>
<groupId>org.jboss.as</groupId>
<artifactId>jboss-as-arquillian-container-remote</artifactId>
<version>7.1.1.Final</version>
</dependency>
</dependencies>
</profile>
Let’s inform JBDS that we should consider the metadata in this profile; this will impact our compilation and JUnit runtime classpaths. Right-clicking the pom.xml file and using the Maven context menu will give us the option to select a Maven profile, as shown in Figure 3-7.
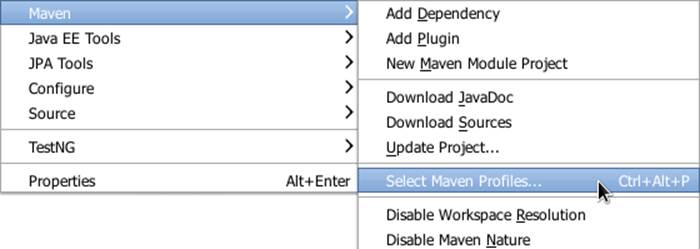
Figure 3-7. Selecting a Maven profile
Now the Arquillian test launcher will know to pick up the proper adaptor to a remote JVM instance of JBoss AS7 when running tests; it will connect to the currently running instance, deploy the defined @Deployment, execute the tests, and undeploy to clean up. If we’d like to allow Arquillian to automatically control the server start/stop lifecycle alongside each test suite, we could alternatively use the JBOSS_AS_MANAGED_7.X setup option, which defines org.jboss.as:jboss-as-arquillian-container-managed as a dependency in a POM profile.
With JBDS now configured with the proper classpath for test execution, all that’s left to do is launch the test. A simple right-click on the test class in the Project Explorer yields the option Run As → JUnit Test. The IDE’s JUnit launcher will create a new process, fire up JUnit, and yield control to Arquillian. We’ll receive results just as we’d expect from any other JUnit test; The standard JUnit Test Report for Eclipse is shown in Figure 3-8.
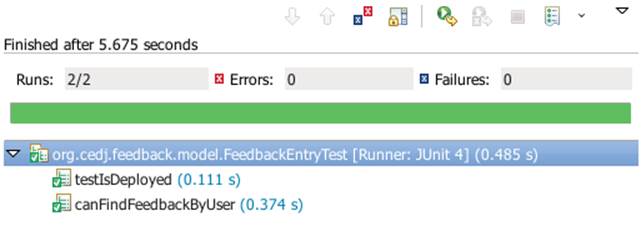
Figure 3-8. Passing the tests
With assurance that our application has some minimal level of tested functionality, let’s take a risk and move this off the isolation of our local machine and into the public realm, accessible to the world.
Deploying to OpenShift via JBoss Developer Studio
JBDS provides us a convenient user interface to the OpenShift cloud service, which will run our applications on the publicly available Web. Complete information is available at the OpenShift site; for our purposes we’ll be running the Java EE web app we created earlier in a JBoss AS7cartridge, OpenShift’s moniker for a canned set of cloud services.
Before continuing, we are required to create an account; we can do this by clicking the Sign Up button from the home page and completing the requisite form, as shown in Figure 3-9.
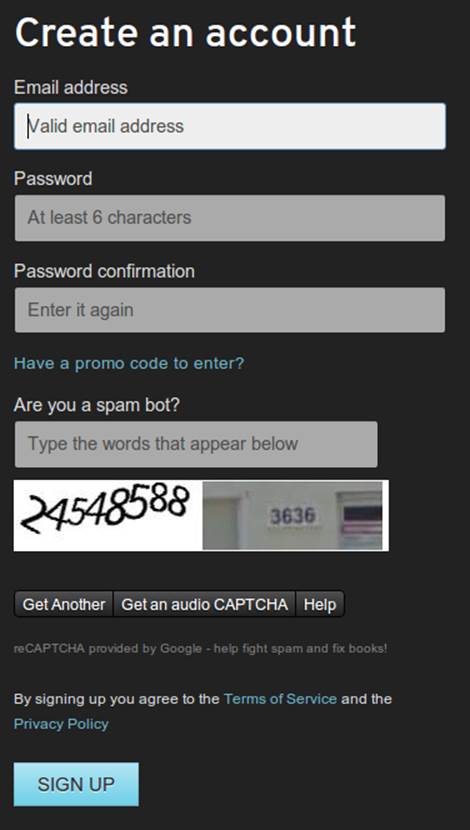
Figure 3-9. OpenShift signup
Existing users can simply log in to see active applications, as shown in Figure 3-10.
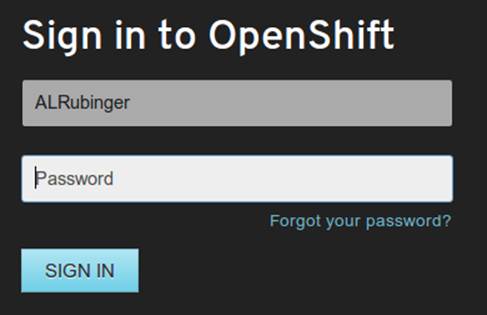
Figure 3-10. OpenShift login
With that accomplished, we can use JBDS to connect our current feedback project to a new application on OpenShift and bring it all the way to deployment. The actions we need are available in the “OpenShift Explorer,” a view in JBDS (see Figure 3-11).
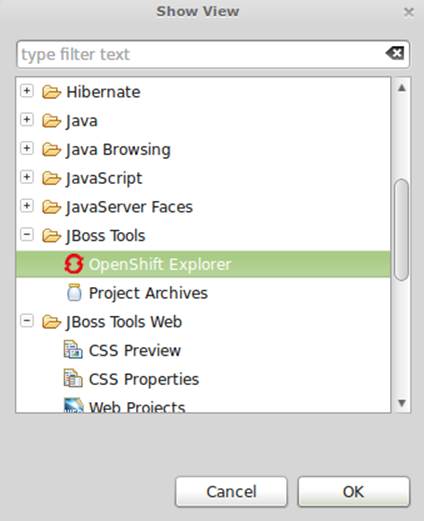
Figure 3-11. OpenShift Explorer view selection
In the Explorer, we can sign in to OpenShift from JBDS using the Connect to OpenShift button, as shown on the far right in Figure 3-12.

Figure 3-12. OpenShift Explorer
This will open the prompt shown in Figure 3-13 for us to enter our authentication information; simply provide the same credentials you used to log in to the OpenShift site.
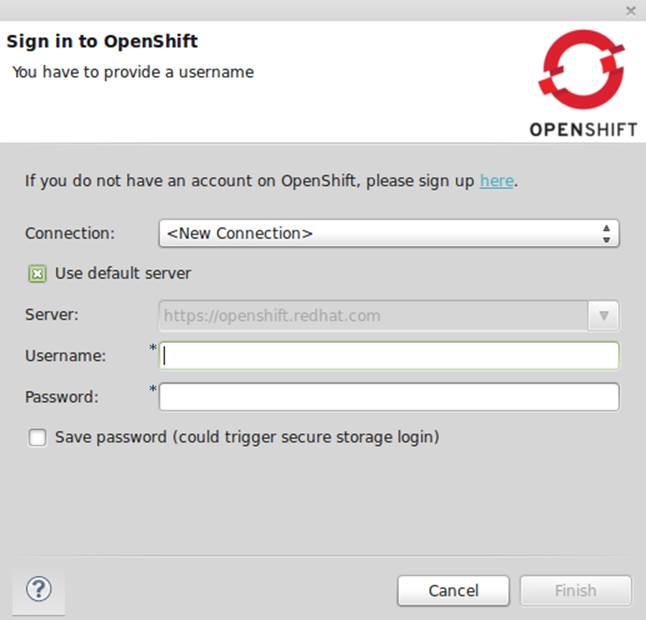
Figure 3-13. Sign in to OpenShift
Right-clicking our account will allow us to create a “New OpenShift Application…” As shown in Figure 3-14, here we’ll supply a name (“feedback” seems appropriate) and choose the target cartridge or “type” as “JBoss Application Server 7 (jbossas-7).”
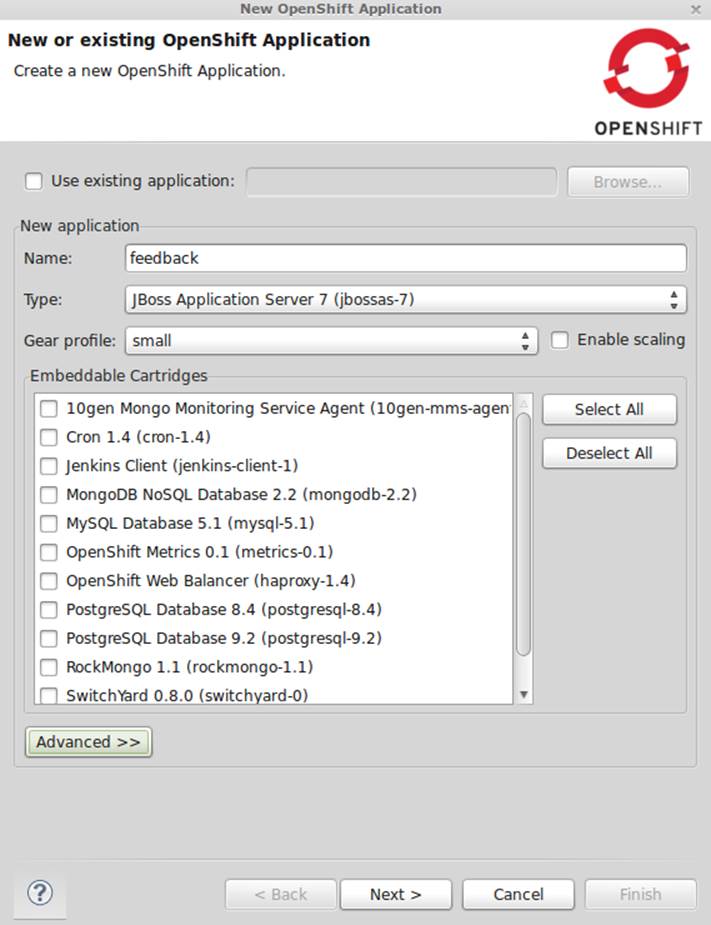
Figure 3-14. New OpenShift application
Next we’ll be asked to set up a new project to back the application on OpenShift. Because we just created the project, we can choose “Use existing project” and select the feedback project from our JBDS workspace (see Figure 3-15).
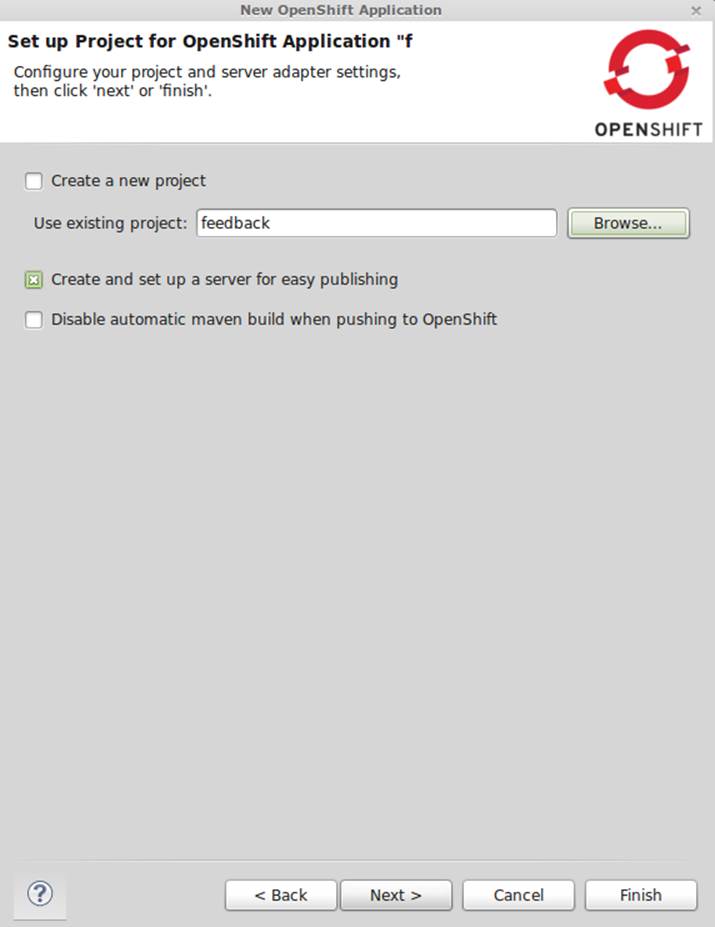
Figure 3-15. Project for OpenShift application
Because the OpenShift deployment mechanism is powered by Git, JBDS will now prompt us to accept some defaults for the Git metadata it’ll write into our local project directory. You can tailor these as you see fit, though we use the defaults in this example. Figure 3-16 shows the dialog to import an existing OpenShift application.
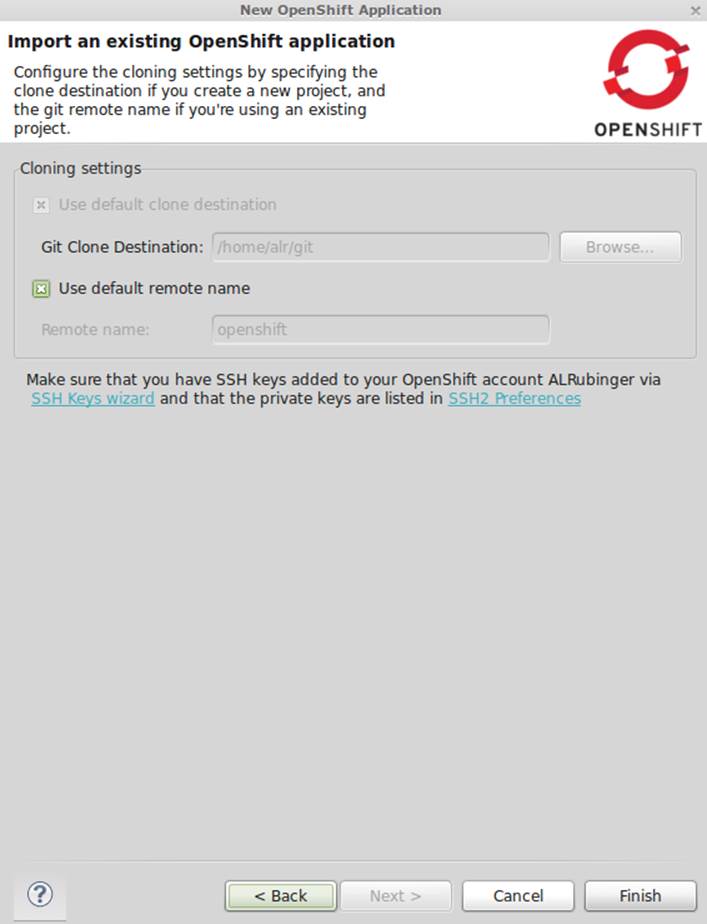
Figure 3-16. Import existing OpenShift application
Finishing this setup will trigger the deployment of our built artifacts from our project, and JBDS will report this for us (see Figure 3-17).
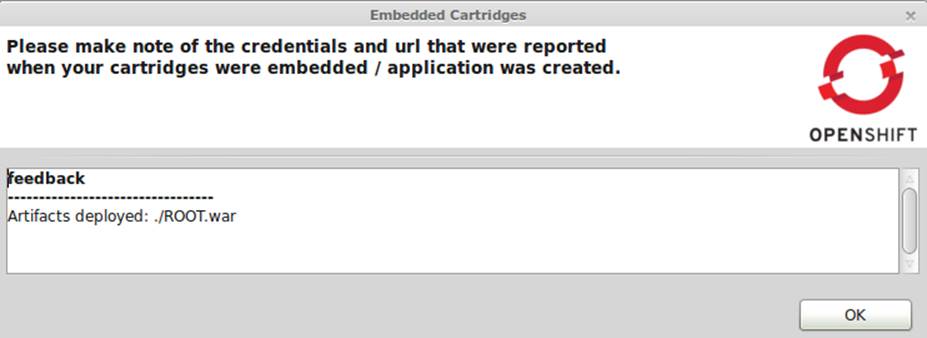
Figure 3-17. Embedded cartridges
We’ll also want to confirm the Git metadata to be written into our project directory a final time. As JBDS notes, this cannot be undone (though you can manually delete the .git directory from your project should you choose to disconnect your local workspace from any OpenShift or Git references). Figure 3-18 displays the dialog allowing us to confirm the addition of Git metadata.
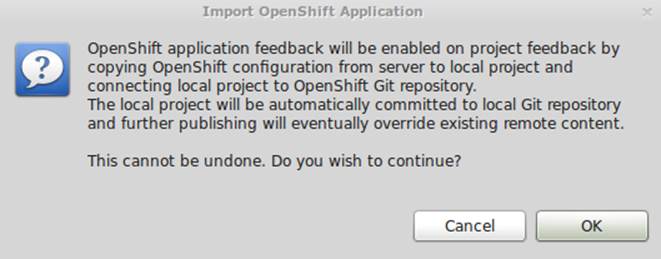
Figure 3-18. Adding Git repo information to the project
Because OpenShift is using Git under the covers, and by extension SSH authentication, there may be some system-specific confirmation needed to continue. For instance, we may need to confirm that it’s OK to connect, as shown in Figure 3-19.
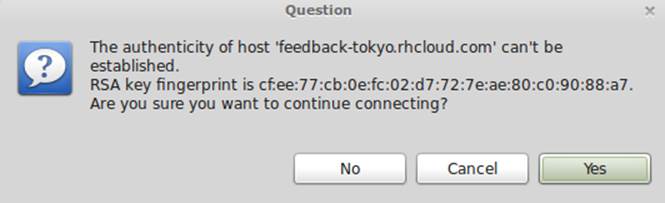
Figure 3-19. Establishing SSH keys
And if you have a passphrase enabled on your SSH key, you will be asked to provide this as well, as shown in Figure 3-20.
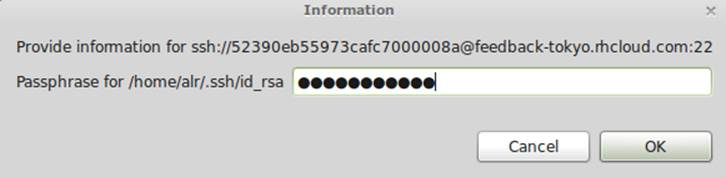
Figure 3-20. Unlocking SSH keys
With these steps completed, our console view should show us output similar to the following:
Deploying JBoss
Starting jbossas cartridge
Found 127.13.6.1:8080 listening port
Found 127.13.6.1:9999 listening port
/var/lib/openshift/52390eb55973cafc7000008a/jbossas/standalone/deployments
/var/lib/openshift/52390eb55973cafc7000008a/jbossas
CLIENT_MESSAGE: Artifact: ./ROOT.war is still deploying
/var/lib/openshift/52390eb55973cafc7000008a/jbossas
CLIENT_RESULT: Artifacts deployed: ./ROOT.war
Although this is not indicative of the steps we’d traditionally take to develop a more realistic application, we’ve found that Forge, JBoss AS7 (WildFly support forthcoming), and OpenShift make a powerful team in quickly prototyping or learning the components involved in bringing a blank slate to a fully deployed, live, Java EE application.
All materials on the site are licensed Creative Commons Attribution-Sharealike 3.0 Unported CC BY-SA 3.0 & GNU Free Documentation License (GFDL)
If you are the copyright holder of any material contained on our site and intend to remove it, please contact our site administrator for approval.
© 2016-2026 All site design rights belong to S.Y.A.