Neo4j in Action (2015)
Part 1. Introduction to Neo4j
Chapter 4. The power of traversals
This chapter covers
· Querying Neo4j using the Core Java API
· Traversing nodes and relationships using the Neo4j Traversal API
· Extending and customizing built-in Neo4j traversal operations
Chapter 3 introduced you to the Neo4j Core Java API and you created a graph representing a social network of users and the movies they like. In this chapter we’re going to look at graph traversals—a powerful way of querying the graph data. Graph traversal is the process of visiting nodes in the graph by following the relationships between nodes in a particular manner.
We’ll demonstrate the traversal options by showing you how to solve simple traversal problems, followed by more complex ones. In this chapter you’ll get more familiar with the Neo4j Core Java API, as well as with the more advanced Neo4j Traversal Framework Java API (or “Neo4j Traversal API” for short).
Let’s start with the simplest traversal, which follows relationships to find direct neighbors of the starting node using the Neo4j Core Java API.
4.1. Traversing using the Neo4j Core Java API
The first traversal approach we’ll look at makes use of standard methods available on the Neo4j Core Java API. We’ll use the graph created in chapter 3 to perform the traversals.
The first traversal we’ll look at can be described as “Starting from the node representing the user John Johnson, find all the movies that this user has seen.” Figure 4.1 illustrates the part of the graph we’re interested in.
Figure 4.1. The selected user and the movies he’s seen are marked with a bold border.
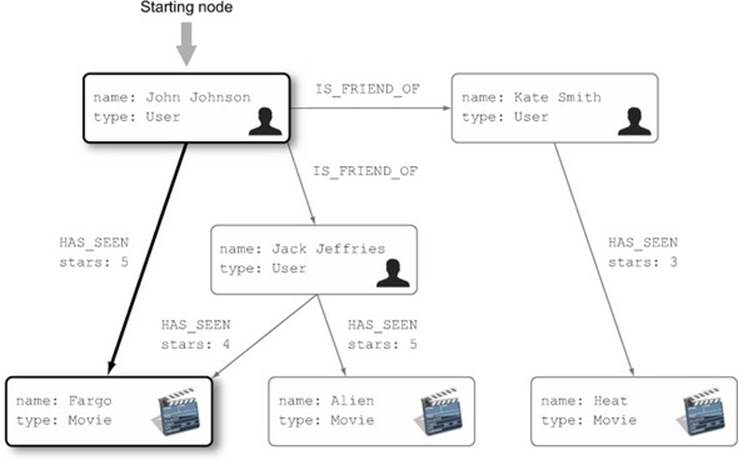
To navigate to nodes representing movies John has seen, you’ll start from the node representing John Johnson, then follow all of the HAS_SEEN relationships to the target movies. The nodes and relationships you want to visit as part of the traversal are marked with a dark border in figure 4.1.
The first task is locating the starting node for the traversal: user John Johnson.
4.1.1. Finding the starting node
Before you can proceed with the traversal, you need to find the node from which you’re going to start the traversal, typically called the starting node. The Neo4j Core Java API has a single lookup method that can be used to load nodes from the graph database—GraphDatabaseService.getNodeById(Long id). This method loads the node by its internal identifier, which is represented as a java.util.Long number in Neo4j. We’ll assume that the ID of the John Johnson user node is known and stored in the static variableJOHN_JOHNSON_NODE_ID:

Note
Ideally, you’d look up the starting node based on some property value instead of the node ID. For example, you’d find the user node by its name or email address. Ad hoc node lookup in Neo4j is performed using the index, which we’ll cover in detail in chapter 5. In this chapter, node lookups will be performed using the node ID.
Now that you have the starting node, you can traverse the graph to find the movie nodes you’re interested in.
4.1.2. Traversing direct relationships
To find all the movies John has seen, you first load John’s node, then follow all the HAS_SEEN relationships from that node, as shown in the following listing.
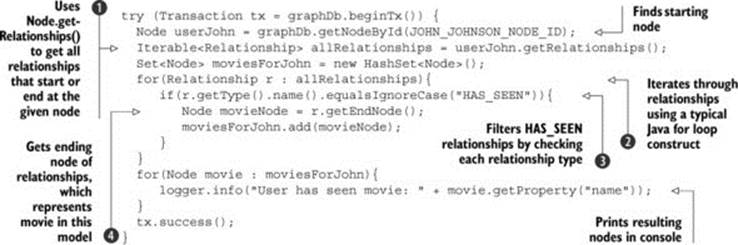
Listing 4.1. Filtering movies by iterating through all relationships from the node
Note
Recall from chapter 3 that all Neo4j operations (including read operations from Neo4j 2.0 onward) need to be wrapped in a transaction. Listing 4.1 includes this initial boilerplate wrapping code, but we’ll leave it out of future listings to reduce clutter and focus on the core aspects of the API under discussion. Don’t forget about it, though, as the code won’t work without it!
In listing 4.1, you use the Node.getRelationships() method call to get all relationships that either start or end at the selected node ![]() . This method returns a java.lang.Iterable object that contains instances of org.neo4j.graphdb.Relationship, which you can iterate through using the Java for loop in the typical Java manner
. This method returns a java.lang.Iterable object that contains instances of org.neo4j.graphdb.Relationship, which you can iterate through using the Java for loop in the typical Java manner ![]() . The userJohn.getRelationships() method will return all relationships starting or ending at the starting node, including the IS_FRIEND_OF relationships that you’re not interested in (see figure 4.1). To identify only the relationships of type HAS_SEEN that you’re interested in, you need to check the name of each relationship within the loop
. The userJohn.getRelationships() method will return all relationships starting or ending at the starting node, including the IS_FRIEND_OF relationships that you’re not interested in (see figure 4.1). To identify only the relationships of type HAS_SEEN that you’re interested in, you need to check the name of each relationship within the loop ![]() .
.
To get the nodes that the relationship is associated with, the org.neo4j.graphdb.Relationship interface defines two methods: getStartNode(), which returns the starting node of the relationship, and getEndNode(), which returns the ending node of the relationship. We mentioned earlier that Neo4j incorporates a directed property graph model for its underlying graph storage. Every relationship in the Neo4j graph is directed, originating from the starting node to the ending node. For example, a HAS_SEEN relationship always originates from the user node to themovie node. As a result, the starting node will always be the node representing a user, and the ending node will be the node representing a movie.
In listing 4.1, this is exactly how you find the movies that John has seen: movie will always be an ending node of the HAS_SEEN relationship, so you get a reference to it by calling the Relationship.getEndNode() method ![]() .
.
Note
Although all relationships must be directed, the actual traversal can go either way—down or up the relationship.
When the code in listing 4.1 is run, the resulting node is printed on the screen:
User has seen movie: Fargo
Based on the graph in figure 4.1, the result is correct. You performed a query of the graph data using the Neo4j Core Java API.
Note
The Node.getRelationships() method doesn’t guarantee the order of relationships traversed. The order of the movies wasn’t important for this example, but if you need ordered results, ordering would have to be performed as a separate step after traversal.
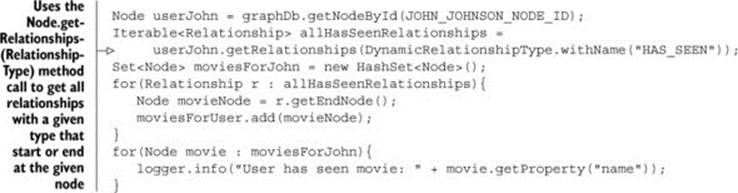
In the previous example, you filtered the relationships you’re interested in by checking the name of every relationship connected to the starting node representing user John Johnson. Filtering relationships by name is a very common pattern in graph traversals. Neo4j provides an API that does exactly that, out of the box, so you don’t have to repeat the if clause in the code that checks the relationship types. The following listing illustrates the improved code using Neo4j’s built-in capabilities.
Listing 4.2. Filtering movies using the Neo4j Core Java API filtering capabilities
As you can see, the code doesn’t have the if statement you used previously to filter relationships by required type. It’s much more readable and concise, and it gives the same result as before:
User has seen movie: Fargo
If you need to be very specific, the Neo4j Core Java API allows filtering by relationship direction in addition to relationship type. To load only outgoing HAS_SEEN relationships for the starting user node, you could use the following snippet:
Iterable<Relationship> allOutgoingHasSeenRelationships =
userJohn.getRelationships(Direction.OUTGOING,
DynamicRelationshipType.withName("HAS_SEEN"));
As you can see, this code is improved by using the more advanced filtering features of the Neo4j Core Java API. But this is a very simple traversal, only looking at the direct neighbors of the selected node. In the next section, you’ll go one step further and traverse the nodes beyond the direct neighbors by determining what movies John’s friends like.
4.1.3. Traversing second-level relationships
Let’s take the example to the next level and implement a simple recommendation engine that finds the movies that John’s friends like, but that John hasn’t seen.
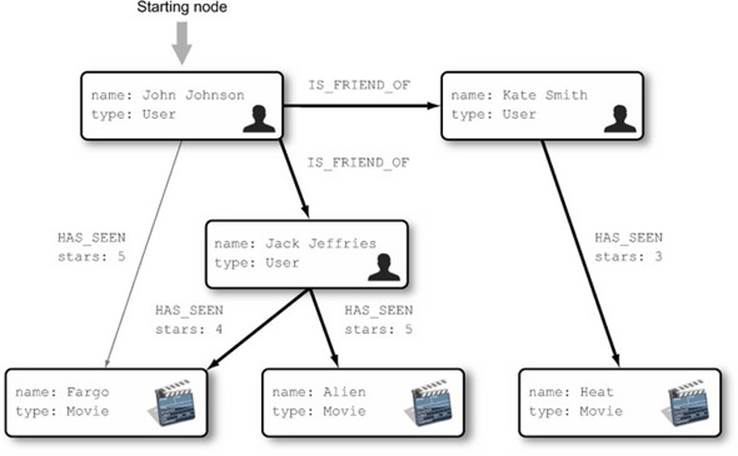
Looking at the graph, John has two friends: Jack and Kate. Jack has seen Fargo and Alien, and Kate has seen Heat. But John has already seen Fargo, so you’d expect two movies to result from the traversal: Alien and Heat. Figure 4.2 illustrates the nodes and relationships you’ll have to visit during the traversal.
Figure 4.2. Nodes and relationships to follow to find movies that John’s friends like
To solve this problem, we’ll split it into several steps. First, you’ll find all of John’s friends by following the IS_FRIEND_OF relationships from the starting node. Next, you’ll follow the HAS_SEEN relationships from the nodes representing friends to find the movies they’ve seen. The next listing shows the implementation of these two steps, again simply using the Neo4j Core Java API.
Listing 4.3. Finding movies that have been seen by John’s friends
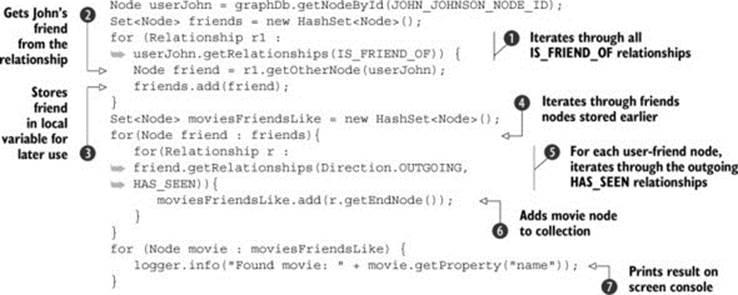
The first part of this code stores the friends of John in the local variable friends ![]() ,
, ![]() ,
, ![]() . First, you iterate through all the IS_FRIEND_OF relationships of the starting node, regardless of their direction
. First, you iterate through all the IS_FRIEND_OF relationships of the starting node, regardless of their direction ![]() . Remember, although the IS_FRIEND_OF relationship has a starting and an ending node, you can go upstream as well as downstream to locate friends. But because you don’t know whether John is the starting or ending node of the relationships, you can’t use the Relationship.getStartNode() or Relationship.getEndNode() methods to determine the other participant in the friendship. Luckily, the Neo4j Core Java API has a solution for that: the Relationship.getOtherNode(Node node) method. This method, given a node on one end of the relationship, returns the node on the other end. In this case, because you know that the relationship has one end at the John node, you can use this method to find out John’s friends
. Remember, although the IS_FRIEND_OF relationship has a starting and an ending node, you can go upstream as well as downstream to locate friends. But because you don’t know whether John is the starting or ending node of the relationships, you can’t use the Relationship.getStartNode() or Relationship.getEndNode() methods to determine the other participant in the friendship. Luckily, the Neo4j Core Java API has a solution for that: the Relationship.getOtherNode(Node node) method. This method, given a node on one end of the relationship, returns the node on the other end. In this case, because you know that the relationship has one end at the John node, you can use this method to find out John’s friends ![]() . Finally, you add the friend node to the local java.lang.Set variable friends
. Finally, you add the friend node to the local java.lang.Set variable friends ![]() , which you’ll use later.
, which you’ll use later.
In the second part of the code, you find all the movies John’s friends have seen ![]() ,
, ![]() ,
, ![]() . For each of the nodes stored in the temporary local variable
. For each of the nodes stored in the temporary local variable ![]() , you check all outgoing HAS_SEEN relationships
, you check all outgoing HAS_SEEN relationships ![]() . Just as you did in the previous example, you load the ending node of theHAS_SEEN relationship (which you know represents a movie) and store it in the local Set variable moviesFriendsLike, which represents your result
. Just as you did in the previous example, you load the ending node of theHAS_SEEN relationship (which you know represents a movie) and store it in the local Set variable moviesFriendsLike, which represents your result ![]() .
.
Finally, you print the result to the console ![]() . You should see something like the following:
. You should see something like the following:
Found movie: Fargo
Found movie: Alien
Found movie: Heat
Obviously, there’s something wrong. Although all three movies have been seen by John’s friends (Fargo and Alien by Jack and Heat by Kate), Fargo should not have been listed because John has seen it!
You have to make sure you remove the movies that John has seen from the list before you print it on the screen. To do that, you need to find all movies that John has seen (just as you did in section 4.1.2) and remove them from the result. The code in the following listing shows one way to do this.
Listing 4.4. Finding movies that have been seen by John’s friends but not by John
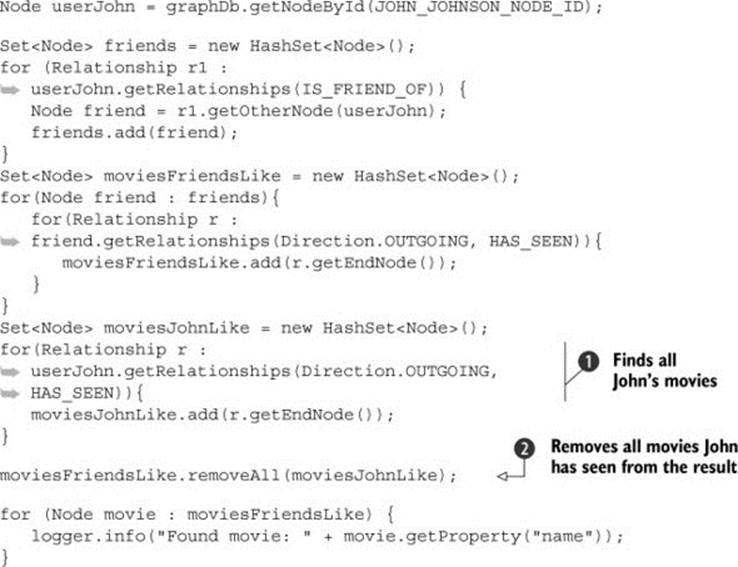
You’ve added another step to the traversal algorithm. First, you discovered which movies John has already seen ![]() , then used the standard Java Collections API to remove John’s movies from the original collection
, then used the standard Java Collections API to remove John’s movies from the original collection ![]() . If you run the code from listing 4.4, you’ll get two results, as expected:
. If you run the code from listing 4.4, you’ll get two results, as expected:
Found movie: Alien
Found movie: Heat
You finally have code that works as a simple recommendation engine—recommending movies that have been seen by the user’s friends, but not by the user.
Let’s reflect on this implementation. You used a simple algorithm, implementing the solution in a series of steps: finding all friends, then movies friends have seen, and finally removing the movies the user has seen. While understandable and easy to read, this approach has one major flaw: it uses a lot of memory. After each step, you store the intermediate results in the local variable using Java heap space. This isn’t a problem when dealing with few users and movies, but if your data set grows to hundreds of thousands, you’d most likely get the dreaded OutOfMemoryErrorexception while running the application. That’s not a concern with this example, because you only have three users and three movies in total. But now is a good time to look at how Neo4j deals with large traversal results.
4.1.4. Memory usage considerations
You’ve seen that Node.getRelationships(...) methods return an Iterable<Relationship> object. An Iterable interface allows the implementing class to be used in Java’s for loop, which you did a few times in the previous examples. There are a lot of examples of classes implementing the Iterable interface throughout Java code—for example, all java.util.Collection classes, such as java.util.Set and java.util.List implementations, as well as java.util.Vector and java.util.Stack. But Node.getRelationships(...)methods don’t return any of these well-known classes. They return Neo4j’s Iterable implementation, org.neo4j.kernel.impl.util.ArrayIntIterator, which implements both Java Iterable and Iterator interfaces and is a thin wrapper around the java.util.Iteratorclass. No elements contained in the Iterable result are actually accessed before you iterate through the result. This implementation is lazily loaded on first access, and once used, it can’t be used again—it becomes spent (this is the expected behavior for Java iterators).
This is very important when working with the Neo4j Core Java API. The Iterable allows Neo4j to return very large result sets, and it’s the developer’s responsibility to make sure elements are accessed in the correct manner. As we mentioned, if you load a large result from a Neo4jIterable into a Java List or Set in your code, you have to be aware that your code will require a large amount of Java heap memory, and that you’re in danger of generating OutOfMemoryError exceptions at runtime. This is why it’s a good practice to use Iterable as much as possible in your code, without converting the code to memory-hungry structures whenever possible.
The following listing shows a solution to the same problem as before—finding movies that John’s friends have seen but John hasn’t—but this time using only the Java for loop constructs over the Neo4j Iterable implementation, without unnecessary memory consumption in local variables.
Listing 4.5. Using iterables to lower Java heap memory consumption
Node userJohn = graphDb.getNodeById(JOHN_JOHNSON_NODE_ID);
Set<Node> moviesFriendsLike = new HashSet<Node>();
for (Relationship r1 :
![]() userJohn.getRelationships(IS_FRIEND_OF)) {
userJohn.getRelationships(IS_FRIEND_OF)) {
Node friend = r1.getOtherNode(userJohn);
for (Relationship r2 :
![]() friend.getRelationships(Direction.OUTGOING, HAS_SEEN)) {
friend.getRelationships(Direction.OUTGOING, HAS_SEEN)) {
Node movie = r2.getEndNode();
boolean johnLikesIt = false;
for (Relationship r3 :
![]() movie.getRelationships(Direction.INCOMING, HAS_SEEN)) {
movie.getRelationships(Direction.INCOMING, HAS_SEEN)) {
if (r3.getStartNode().equals(userJohn)) {
johnLikesIt = true;
}
}
if (!johnLikesIt) {
moviesFriendsLike.add(movie);
}
}
}
for (Node movie : moviesFriendsLike) {
logger.info("Found movie: " + movie.getProperty("name"));
}
Note
While this solution looks better, there’s a potential performance bottleneck for movies that have been seen by millions of users (because you check whether John has already seen the movie in each loop iteration). This won’t have an impact on our limited data set, but it points out that for large data sets, it sometimes may be better to write simpler code, even if that means writing more of it. In this example, you could find all movies John has seen once up front, and then use that set to filter out movies in the for loop.
You’ve now managed to refactor your solution to use less memory and work better with potentially large data sets. And the results are as expected, so the solution is still correct. But the code in listing 4.5 is still not the prettiest we’ve ever seen. The Neo4j Core Java API allows you to access the low-level Neo4j structures to implement the required traversal, but at the price of writing more code and worrying about other aspects such as memory consumption. Luckily, Neo4j ships with a higher-abstraction API that can be used to describe the traversal requirements concisely and naturally. In the next section you’ll refactor the traversal solution further to use the Neo4j Traversal API.
4.2. Traversing using the Neo4j Traversal API
You’ve implemented a recommendation engine using the Neo4j Core Java API, which allows you to use the low-level Neo4j data structures to achieve your goal. In this section you’ll improve on this solution by using the expressive, and more fluent, Neo4j Traversal API.
4.2.1. Using Neo4j’s built-in traversal constructs
The Neo4j Traversal API is a callback-based framework with a fluent builder API that allows you to expressively build the traversal rules in a single line of code. The main part of the Traversal API is the org.neo4j.graphdb.traversal.TraversalDescription interface, which defines builder methods for describing traverser behavior. You can think of a traverser as a robot that jumps from node to node via relationships, with a well-defined set of rules about the order of traversal, the relationship to follow, the nodes and relationships to include in the result, and so on. TraversalDescription is an immutable object that’s used to define the traversal rules. Adding any new traversal rule (by invoking one of the builder methods on the TraversalDescription interface) always returns a new instance of TraversalDescription.
To illustrate how the Neo4j Traversal API works, let’s refactor the traversal from the previous section to use the Neo4j Traversal API. In the following listing, the traversal that returns movies that have been seen by John’s friends is implemented, without removing movies seen by John himself.
Listing 4.6. Using the Neo4j Traversal API to find movies seen by friends
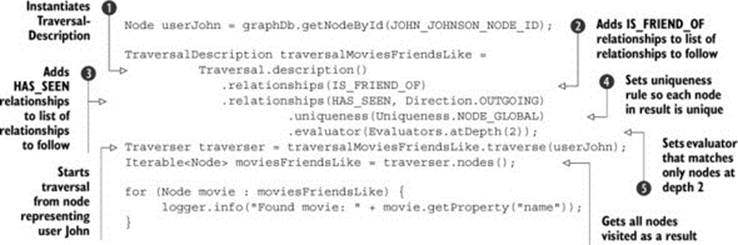
Neo4j provides a default implementation of the TraversalDescription interface, which you can instantiate using the static factory method Traversal.description() ![]() . This will typically be your starting point when building a TraversalDescription, as you’ll rarely need to provide your own implementation. Next, you define the relationships you want to include in the traversal
. This will typically be your starting point when building a TraversalDescription, as you’ll rarely need to provide your own implementation. Next, you define the relationships you want to include in the traversal ![]() ,
, ![]() . TraversalDescription maintains the list of relationships added using the TraversalDescription.relationships(...) method, and only relationships that this list contains will be followed by the traverser. You can add the relationship type without specifying a direction, in which case both directions will be allowed
. TraversalDescription maintains the list of relationships added using the TraversalDescription.relationships(...) method, and only relationships that this list contains will be followed by the traverser. You can add the relationship type without specifying a direction, in which case both directions will be allowed ![]() , or you can specify the allowed direction relative to the starting node
, or you can specify the allowed direction relative to the starting node ![]() .
.
In the next line you specify how the traverser should behave with respect to the uniqueness of the nodes and relationships it encounters during the traversal. You want each node to be visited exactly once, so you set uniqueness to Uniqueness.NODE_GLOBAL ![]() . Other allowed values are, for example, Uniqueness.NODE_PATH, which allows multiple traversals through the same node while the path from the starting node to the current node is unique; or Uniqueness.RELATIONSHIP_GLOBAL, which allows traversal through each relationship only once. We’ll explain the differences between uniqueness values in more detail in chapter 8.
. Other allowed values are, for example, Uniqueness.NODE_PATH, which allows multiple traversals through the same node while the path from the starting node to the current node is unique; or Uniqueness.RELATIONSHIP_GLOBAL, which allows traversal through each relationship only once. We’ll explain the differences between uniqueness values in more detail in chapter 8.
Finally, you add an evaluator to TraversalDescription ![]() . The evaluator is responsible for two decisions as part of the Neo4j Traversal API:
. The evaluator is responsible for two decisions as part of the Neo4j Traversal API:
· It determines whether or not the current node being visited should be added to the traversal result.
· It determines if the traversal should continue further down the current path of the graph, or if the path it currently evaluates should be abandoned, moving to the next path if possible.
The evaluators in Neo4j are defined using the org.neo4j.graphdb.traversal.Evaluator interface. Neo4j provides a number of convenient out-of-the-box implementations that you can use. The provided implementations are accessible via static factory methods in theorg.neo4j.graphdb.traversal.Evaluators class. In listing 4.6, you use the Evaluators.atDepth(int depth) evaluator, which simply accepts all nodes at the specified depth, counting from the starting node. In addition, this evaluator stops any traversal at a depth higher than specified.
The other useful evaluator implementations provided by Neo4j are covered in chapter 8. Evaluators are one of the key concepts of the Neo4j Traversal API, and it’s likely that you’ll need to implement your own custom evaluators often. We’ll look at a custom implementation of theEvaluator interface in the next section.
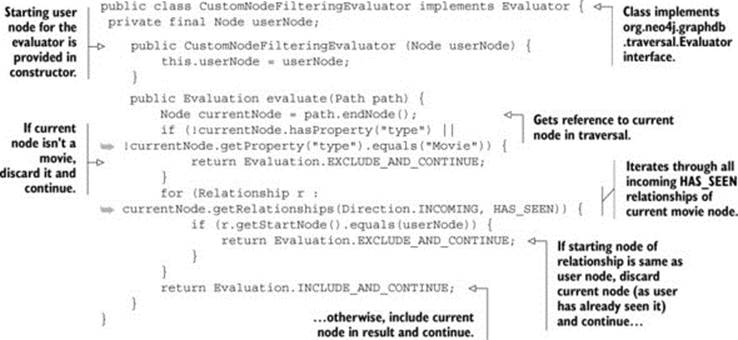
4.2.2. Implementing a custom evaluator
You now need to improve the previous section’s code to exclude movies that John has seen from the result. To do that, you need to add a new rule to the traversal description. We mentioned earlier that Neo4j’s Evaluator implementation defines which nodes to keep in the result and which to discard. In addition, it defines when the traverser should stop the traversal altogether. Based on that, you can implement an additional custom evaluator that will exclude the movies already seen by the user.
The Evaluator interface defines a single method that you need to implement, public Evaluation evaluate(Path path). This method accepts a single argument of type org.neo4j.graphdb.Path that represents all nodes and relationships that were traversed until the current node. This interface defines a number of convenient methods for collecting information about the current state of traversal, such as all nodes traversed, all relationships traversed, the path starting node, the path ending node, and so on. Table 4.1 lists the methods that are available from thePath interface.
Table 4.1. The methods defined on the org.neo4j.graphdb.Path interface
|
Method signature |
Description |
|
Node startNode(); |
Starting node of the path, not to be confused with the starting node of the relationship |
|
Node endNode(); |
Ending node of the path, which is the current node of the traversal, not to be confused with the ending node of the relationship |
|
Relationship lastRelationship(); |
Last relationship traversed |
|
Iterable<Relationship> relationships(); |
All relationships traversed until the current node, in traversal order |
|
Iterable<Node> nodes(); |
All nodes in the path, in traversal order |
|
int length(); |
Returns the length of the path, which is actually the number of relationships traversed (or the number of nodes minus one) |
Note
It’s important not to confuse the path’s starting and ending nodes with the starting and ending nodes of a relationship. Relationship starting and ending nodes depend on the direction of the relationship. Path starting and ending nodes depend on the traversal order. As Neo4j allows you to traverse relationships in any direction, this can sometimes lead to confusion if you’re new to Neo4j.
The evaluate(..) method has the return type org.neo4j.graphdb.traversal.Evaluation, which is a Java enumeration with four possible values. Based on the returned Evaluation, the traverser decides whether to stop (or prune in Neo4j terminology) or continue with the traversal. In addition, the returned Evaluation is used to determine whether to keep the current node in the result (include) or to discard it (exclude). A combination of these two variables defines the four values of the Evaluation enumeration. Table 4.2 explains the differentEvaluation values.
Table 4.2. The possible values of the Evaluation enumeration
|
Method signature |
Description |
|
INCLUDE_AND_CONTINUE |
Include the current node in the result and continue traversing |
|
INCLUDE_AND_PRUNE |
Include the current node in the result but stop going further down this path |
|
EXCLUDE_AND_CONTINUE |
Discard the current node and continue traversing |
|
EXCLUDE_AND_PRUNE |
Discard the current node and stop traversing |
Now that you understand the Path interface and the Evaluation enumeration, it’s time to implement a custom evaluator. The following listing shows the code implementation.
Listing 4.7. Custom evaluator to exclude movies that the user has seen
You can now include the implemented custom evaluator in the traversal definition. The next listing shows the improved traversal definition.
Listing 4.8. Improved traversal definition with a custom evaluator
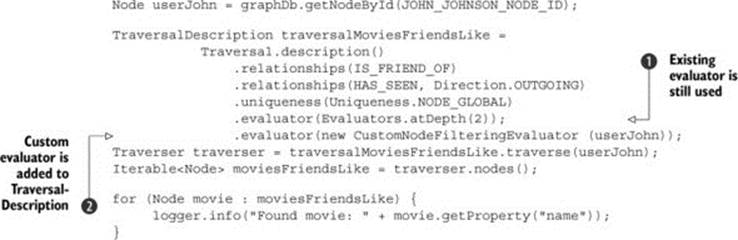
You’ll remember that there’s one evaluator already, which includes only nodes at depth level 2 ![]() . The good thing is that you don’t need to remove it, but simply add the new one
. The good thing is that you don’t need to remove it, but simply add the new one ![]() . In the Neo4j Traversal API, multiple evaluators can be composed together, so you can add many evaluators to the single TraversalDescription. If multiple evaluators are included during the traversal, then Boolean algebra applies: for the current node to be included in the result, all evaluators must return an Evaluation with an INCLUDE element (INCLUDE_AND_CONTINUE orINCLUDE_AND_PRUNE). Similarly, to continue the traversal down the same path, all evaluators must return a CONTINUE evaluator (INCLUDE_AND_CONTINUE or EXCLUDE_AND_CONTINUE).
. In the Neo4j Traversal API, multiple evaluators can be composed together, so you can add many evaluators to the single TraversalDescription. If multiple evaluators are included during the traversal, then Boolean algebra applies: for the current node to be included in the result, all evaluators must return an Evaluation with an INCLUDE element (INCLUDE_AND_CONTINUE orINCLUDE_AND_PRUNE). Similarly, to continue the traversal down the same path, all evaluators must return a CONTINUE evaluator (INCLUDE_AND_CONTINUE or EXCLUDE_AND_CONTINUE).
If you run the improved application on the same data set, you’ll see the expected output as before:
Found movie: Alien
Found movie: Heat
This time, however, you used the more fluent Neo4j Traversal API and managed to implement a solution in a more expressive manner. The Neo4j Traversal API has a declarative nature: you simply declare how you want the traverser to behave, and start it doing its job. If you’re using the Java API, we recommend you use the Neo4j Traverser Framework API for graph traversals whenever possible, as it allows you to produce readable, maintainable, and performant code when dealing with complex graph traversals.
We’ll come back to this topic in chapter 8, where we’ll be covering more advanced traversal concepts.
4.3. Summary
In this chapter we introduced traversals as a powerful approach to querying interconnected data that’s specific to graph databases.
In the first part of the chapter you learned how to use the Neo4j Core Java API to traverse the sample graph and find all movies a user’s friends saw. The Neo4j Core Java API is powerful and flexible for traversing a graph, but for complex traversals the Neo4j Core Java API implementation could quickly become complex.
That’s where the Neo4j Traversal API comes in, which we discussed in the second part of the chapter. Using the fluent Neo4j Traversal API, you can describe the traversal query in a simple and declarative manner, without sacrificing any of the power of graph traversal, and with minimal performance impact.
We’ll prefer the Neo4j Traversal API for most of the examples throughout the book for its fluency and readability, but in some complex cases we’ll also drop down to the Neo4j Core Java API—both approaches have their strengths and should be used to solve graph problems accordingly.
But before you start traversing a graph, you need to select one or more nodes as starting points. In this chapter you used a known node ID to find the starting node for traversal, but in practice it’s unlikely you’ll know specific node IDs—you’re more likely to select a particular node based on one of its properties. To use that kind of “flat” node lookup, you need to use indexes, and that’s exactly what we’re going to explore in the next chapter. Read on!
All materials on the site are licensed Creative Commons Attribution-Sharealike 3.0 Unported CC BY-SA 3.0 & GNU Free Documentation License (GFDL)
If you are the copyright holder of any material contained on our site and intend to remove it, please contact our site administrator for approval.
© 2016-2026 All site design rights belong to S.Y.A.