Neo4j in Action (2015)
Part 1. Introduction to Neo4j
Chapter 3. Starting development with Neo4j
This chapter covers
· Modeling graph data
· Creating connected nodes using the Neo4j Java API
· Adding additional information to nodes and relationships using properties
· Strategies for differentiating between types of nodes
In chapter 1 we demonstrated the performance and scalability improvements available when using Neo4j as a database for graph data. We also discussed how data that’s naturally modeled as a graph fits well with the Neo4j data model. Now it’s time to get some hands-on practice.
In this chapter we’ll introduce you to the Neo4j Core Java API by modeling and creating an example graph in the Neo4j graph database. We’ll build on the social network example from chapter 1, but we’ll make it slightly more complex by allowing users to rate movies they’ve seen.
The users in the social network can be friends. In addition, users can mark the movies they’ve seen and rate them with one to five stars based on how much they liked them.
In the first part of this chapter, we’re going to model the requirements for this example using a series of diagrams, simulating the software design process. In the second part, we’ll demonstrate how to create the same social network using the Neo4j Core Java API.
3.1. Modeling graph data structures
Before we dig into the world of Neo4j, let’s model the social network domain as a generic graph. If you were doing modeling in your office, you’d probably draw the model on a whiteboard. We’ll illustrate the whiteboard modeling with figures throughout this chapter.
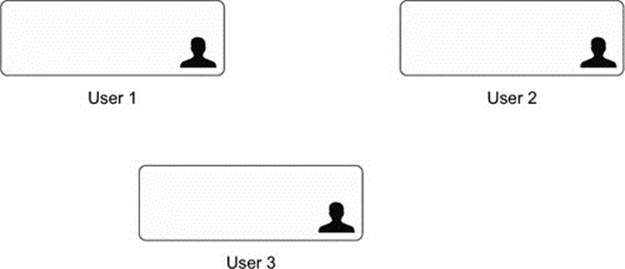
First, you need a few users in your social network. The users are represented as boxes, as in figure 3.1.
Figure 3.1. Users in a social network represented as boxes

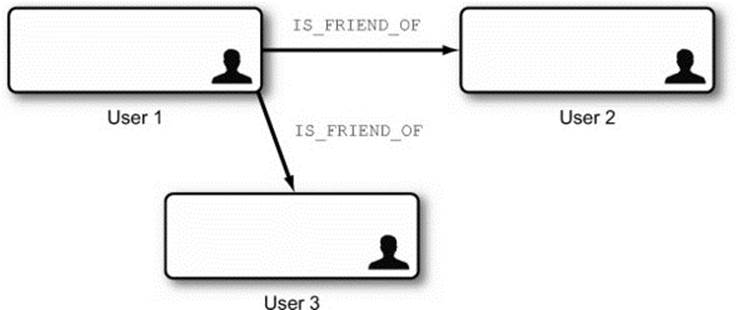
Your goal is to build a social network of movie lovers, so the next natural step is to add the social element to the model. First, connect users who are friends using arrows. Say that User 1 has two friends, User 2 and User 3. Figure 3.2 illustrates the diagram with connections between friends.
Figure 3.2. Simple social network graph with users connected as friends

Note
To be semantically correct, the friendship relationship should be bidirectional, but Neo4j’s graphs are directed, which means that each relationship must have well-defined start and end nodes. Bidirectional relationships in Neo4j can be modeled with two separate relationships, one in each direction. For simplicity, we’ve modeled friendships as single, directed relationships. As you’ll see in later chapters, this will not affect our querying capabilities in Neo4j, because relationships can be followed in either direction, which will simplify our model significantly.
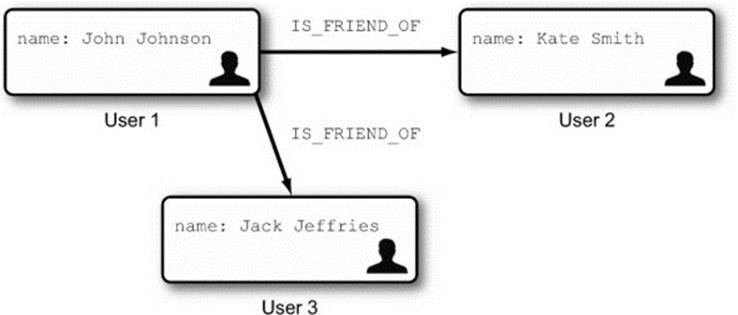
Okay, you have a few users, represented as boxes, who are friends in the social network. To differentiate between users, you can add a name property to each one, as shown in figure 3.3.
Figure 3.3. Richer model with a name property assigned to each user
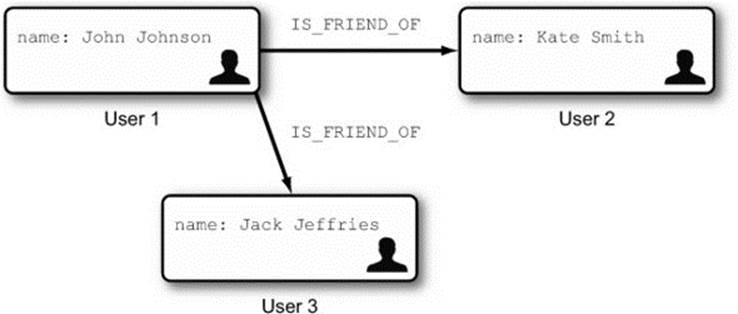
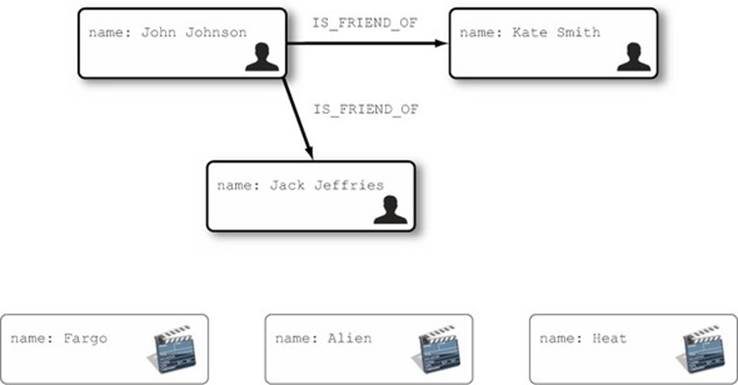
Figure 3.3 finally looks like a proper social network. But your goal is to build a social network of movie lovers, so the next step is to add a few movies to the model.
You can represent movies as boxes with a name property, as shown in figure 3.4.
Figure 3.4. Introducing movies to the model
There’s one problem here: because both users and movies are represented as boxes with a name property, you don’t have any way to differentiate between them. The easiest way to make a difference between user boxes and movie boxes is to introduce a type property, with a different value for different types of objects. Figure 3.5 illustrates the model with relevant types.
Figure 3.5. Introducing type properties to differentiate between User and Movie elements

You’re almost there—the final step is to add the movie-lovers element to the social network. Let’s say that John liked Fargo and gave it five stars, Kate saw Heat and gave it three stars, and Jack liked Fargo and gave it four stars and Alien and gave it five stars. Figure 3.6 illustrates the modeling board after adding movie ratings.
Figure 3.6. Complete model of a movie-lover’s social network
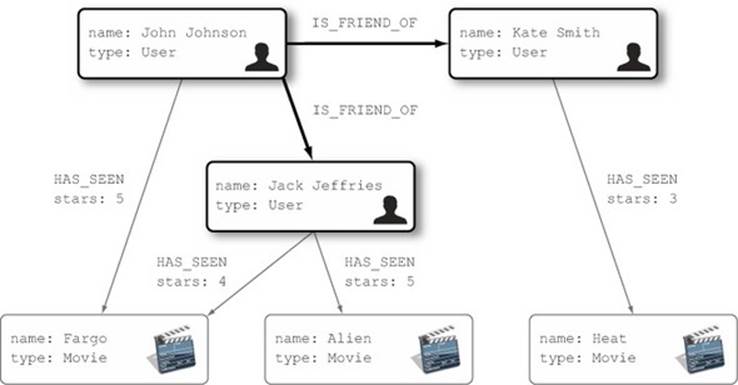
And that’s it—you have a model that represents the social network requirements, illustrated in the diagram, or the whiteboard if you’re doing this exercise in the office.
This modeling process is typically performed in the initial stages of every software project. The drawings help you understand the requirements of the project and make the architectural decision-making easier and more transparent. The modeling exercise outcome often takes the form of documentation about the model, requirements, and architecture decisions and suggestions, along with diagrams.
After the model is ready, the development team would generally take over the project and start writing code to build the software product, based on the model and architecture. As part of that process, the model would be normalized and mapped to the persistence layer, which is typically a relational database.
Interestingly, the social network modeled in figure 3.6 represents a graph, with users and movies as nodes, and relationships connecting friends (IS_FRIEND_OF) and rated movies (HAS_SEEN). The same graph structure would typically be used in the code, using object-oriented programming (OOP) techniques. Yet the data would be stored in a number of tables, and accessed using the relational algebra. This “translation” from a graph object model to a relational database and vice versa adds more complexity to the project and increases the number of lines of code you have to write, affecting efficiency and prolonging project delivery time. This is simply because you have to think about, implement, and configure a translation mechanism, using, for example, object-relational mapping (ORM) tools.
This is where Neo4j comes into play. Instead of storing graph-like structures in relational databases with the additional effort of creating a mapping mechanism, you can store graph objects like nodes and relationships natively in the Neo4j graph database. This allows you to model and code the software application at the same time, using the structure and terminology from the whiteboard more or less directly to drive your code.
3.2. Using the Neo4j API
When using Neo4j as underlying storage for the graph data structures, the modeling and coding can go hand in hand, as we’ll demonstrate in the following sections.
3.2.1. Creating nodes
You can start by creating a node representing a user in the social network, using the instantiated graph database. Figure 3.1 (reproduced here as figure 3.7) illustrates the model drawing at this stage, containing three users.
Figure 3.7. Graph with only node entities
You can write Java code that creates the graph in figure 3.7. The first two listings (3.1 and 3.2) create a single user node, using both the Java 6 (Neo4j 1.9.X) and Java 7 (Neo4j 2.0.X) idiomatic styles.
The main difference between the two is in the handling of transactions. The APIs that create the node itself are identical, but as this is the first code we’re presenting, we wanted to give you an initial taste of both versions upfront. Moving forward, this chapter and the remainder of the book will be using the Java 7 style of transaction management unless otherwise stated.
Listing 3.1. Creating a single user node in Neo4j (Java 6/Neo4j 1.9.X style)
Listing 3.2. Creating single user node in Neo4j (Java 7/Neo4j 2.0.X style)

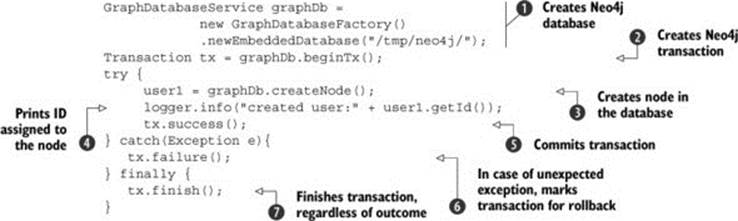
In both styles, the first step is to instantiate a Neo4j database ![]() . You provide the filesystem location where the data is located as the constructor argument. If this represents an existing Neo4j database, that database will be used; if the location doesn’t exist, Neo4j will create an empty database at that location. The database should be created only once and reused for the application’s lifecycle. In the following code examples, we’ll assume that we’re reusing an already configured, but empty, Neo4j database instance.
. You provide the filesystem location where the data is located as the constructor argument. If this represents an existing Neo4j database, that database will be used; if the location doesn’t exist, Neo4j will create an empty database at that location. The database should be created only once and reused for the application’s lifecycle. In the following code examples, we’ll assume that we’re reusing an already configured, but empty, Neo4j database instance.
We mentioned before that Neo4j is a fully ACID-compliant graph database, supporting all standard transactional properties, as is expected from any other database. When using a Neo4j-embedded database, the transaction boundary is managed using the Neo4j Core Java API programmatically. Steps ![]() and
and ![]() in both listings (and
in both listings (and ![]() and
and ![]() in listing 3.1) are part of the Neo4j API for transaction management. (Don’t worry if you don’t understand it all yet; we’ll take an in-depth look at Neo4j transactions in chapter 7.) As all Neo4j operations must be executed within a transaction, you’ll see these same lines of code in all code examples that write to Neo4j; without them, the code simply won’t work. (In Neo4j 1.9 and below, transactions are only mandatory for operations that update the database, but from 2.0 onward, this includes read operations as well.) For now, all you need to note is that every block of code that accesses the Neo4j database is implemented within either a try/catch/finally block (Neo4j 1.9/Java 6) or a try (try with resource) block (Neo4j 2.0/Java 7), and that these patterns are used to handle the transaction boundary of the executed code.
in listing 3.1) are part of the Neo4j API for transaction management. (Don’t worry if you don’t understand it all yet; we’ll take an in-depth look at Neo4j transactions in chapter 7.) As all Neo4j operations must be executed within a transaction, you’ll see these same lines of code in all code examples that write to Neo4j; without them, the code simply won’t work. (In Neo4j 1.9 and below, transactions are only mandatory for operations that update the database, but from 2.0 onward, this includes read operations as well.) For now, all you need to note is that every block of code that accesses the Neo4j database is implemented within either a try/catch/finally block (Neo4j 1.9/Java 6) or a try (try with resource) block (Neo4j 2.0/Java 7), and that these patterns are used to handle the transaction boundary of the executed code.
In both approaches, the core part of the example is the code within the try block ![]() ,
, ![]() . We’ll include the transaction management code in all the examples throughout this chapter for consistency reasons, but we’ll discuss Neo4j’s transaction handling and API in more detail in chapter 7.
. We’ll include the transaction management code in all the examples throughout this chapter for consistency reasons, but we’ll discuss Neo4j’s transaction handling and API in more detail in chapter 7.
The GraphDatabaseService.createNode() method creates the node in the Neo4j database ![]() . This method returns the created node itself, which you can use to inspect its properties or to manipulate the node further. In the preceding listings, you’re using the returned node instance to print the internal ID of the node as generated by the Neo4j database
. This method returns the created node itself, which you can use to inspect its properties or to manipulate the node further. In the preceding listings, you’re using the returned node instance to print the internal ID of the node as generated by the Neo4j database ![]() .
.
You’ve now seen the creation of a single user node, but because you’re creating a social network, you’ll need a few more users. The following listing creates three more users.
Listing 3.3. Creating multiple nodes in a single transaction
try (Transaction tx = graphDb.beginTx()) {
Node user1 = graphDb.createNode();
logger.info("created user:"+user1.getId());
Node user2 = graphDb.createNode();
logger.info("created user:"+user2.getId());
Node user3 = graphDb.createNode();
logger.info("created user:"+user3.getId());
tx.success();
}
After the operations from listing 3.3, your graph will look exactly like figure 3.7, both in the object model and on disk, using the Neo4j graph database storage.
The next step is to connect the created user nodes using relationships.
3.2.2. Creating relationships
Before you start implementing relationships to connect users as friends, remind yourself of the model diagram in figure 3.2, shown again here as figure 3.8.
Figure 3.8. Simple social network graph with users connected as friends
Relationships are the other main entity of the graph database, besides nodes. Every relationship has a name, which represents the label or type of relationship. In the Neo4j Core Java API, relationships are defined using the RelationshipType interface, which defines a single method that returns the relationship name, as illustrated in the following snippet:
public interface RelationshipType{
public String name();
}
In the social network example, you’re going to create friendship relationships between the users. For that, you need to implement the RelationshipType interface:

The RelationshipType interface has one interesting side effect: the signature of the only method it defines (String name()) looks exactly like the signature of the method available on all Java enumerations (enums). That gives you an option to implement Neo4j relationship types in a strongly typed, more expressive, and concise manner, using Java enums. The following snippet illustrates the same IS_FRIEND_OF relationship type implemented as a Java enum:
public enum MyRelationshipTypes implements RelationshipType{
IS_FRIEND_OF;
}
The name of the enum represents the relationship name, as per the standard enum contract.
The DynamicRelationshipType class
If you know what relationship types are required at compile time, defining an actual class or (preferably) using the enum idiom to represent relationships is the recommended way to go. There may, however, be cases where you can only detect the relationship type at runtime and you still need a way to represent it. For these scenarios, the org.neo4j.graphdb.DynamicRelationshipType class can come in very handy.
The following snippet shows how the IS_FRIEND_OF relationship could be created with a DynamicRelationshipType class:
String runtimeVal = "IS_FRIEND_OF";
RelationshipType rel = DynamicRelationshipType.withName(runtimeVal);
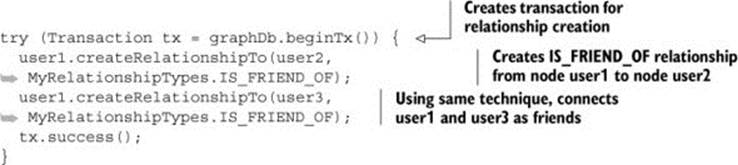
Now that you’ve defined the relationship type you’re going to use, you can create relationships between user nodes. To create relationships between two nodes, you need only call the Node.createRelationshipTo(...) method on one of the nodes, and pass in the target node and the relationship type.
Note
As we mentioned earlier, Neo4j’s graphs are directed, with relationships having defined start and end nodes. When calling the createRelationshipTo method, the node on which the method is called will become the start node, and the node passed as an argument will become the end node. This will not affect the query flexibility or performance, as you’ll see in the next chapters.
Like all write operations on the graph database, the creation of relationships requires a running transaction. The following listing shows how you can create the IS_FRIEND_OF relationship between the user nodes you created earlier.
Listing 3.4. Creating relationships between nodes using the Neo4j Core Java API
Next, we’ll identify users in the graph using the name property.
3.2.3. Adding properties to nodes
Neo4j is a directed property graph. Property graph means that every graph entity can have a number of properties that describe it. Properties are stored as key-value pairs with the property name as the key referencing the property value. To illustrate the concept of properties, we’re going to show you how to add the name property to the user nodes.
To add a property to a node, you need to call the Node.setProperty(name, value) method on the target node. The next listing shows how you can use the Core Java API to add names to all the users.
Listing 3.5. Adding name property to user nodes

Now you have a richer graph model, where the users have names you can differentiate them by.
Note
In Neo4j, the property value must be set for every property added. In other words, properties with a null value are not permitted in Neo4j.
The property values in the preceding example are strings. But Neo4j supports a number of different types that can be set as node properties. Table 3.1 shows the property types that can be used, with their corresponding Java types.
Table 3.1. The property types in Neo4j
|
Description |
Java type |
|
Sequence of Unicode values |
java.lang.String |
|
Single Unicode value |
char |
|
True/false |
boolean |
|
8-bit integer |
byte |
|
16-bit integer |
short |
|
32-bit integer |
int |
|
64-bit integer |
long |
|
32-bit floating-point number |
double |
|
64-bit floating-point number |
float |
|
Arrays of any of above types |
[] |
Nodes with properties are schemaless, semi-structured elements. Each node can have any number of properties; the next listing illustrates how you can add different properties to different nodes.
Note
Properties can be added to relationships as well; that will be covered later in this chapter.
Listing 3.6. Adding different property types to nodes

You’ve now made the graph model richer by storing additional information about nodes using properties. Figure 3.9 illustrates the social network after the enhancements from listing 3.5 (but not the example in listing 3.6) have been applied.
Figure 3.9. Rich property graph representing the social network
Note
As we mentioned before, Neo4j does not allow null properties. If you need to remove the property from a node, you have to do it explicitly using the Neo4j Core Java API: Node.removeProperty(String propertyName);.
Next you need to add a few more nodes representing the movies that the users watched and rated.
3.2.4. Node type strategies
The next step in the example is to add movies, which will be rated by the users, to the graph. You’re going to add three movie nodes, following the same pattern used to add users earlier. The following listing illustrates the use of the Neo4j Core Java API to add nodes that represent movies.
Listing 3.7. Creating movie nodes using Neo4j Core Java API
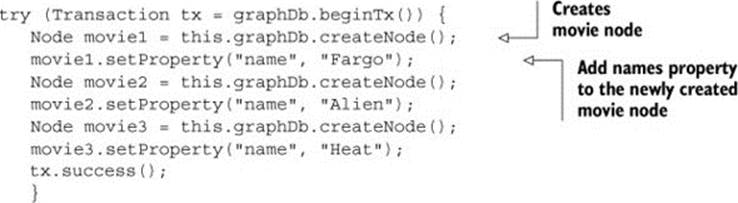
Figure 3.10 illustrates the graph at this stage.
Figure 3.10. Graph with nodes representing users and movies
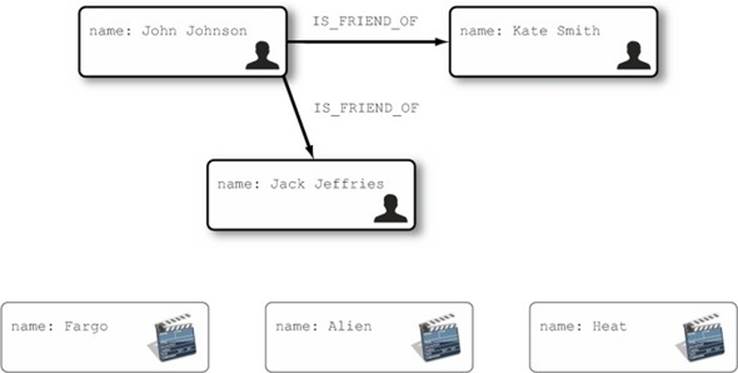
As you can see in figure 3.10, both user and movie nodes are represented as boxes. This is a very important point about Neo4j graph databases: there is no difference between user nodes and movie nodes from the Neo4j perspective. In Neo4j, by default, nodes are not typed, and determining the strategy for how each node is represented in the domain model is the responsibility of the developer.
In Neo4j 1.9 and below, the simplest strategy you can use is to add a type property to each node, with the value of the property determining the node type. This is a well-known strategy used in other NoSQL technologies (such as document databases) because it’s easy to implement and understand. From Neo4j 2.0 onward, the recommended strategy is to make use of a new feature called “labels,” which we’ll cover in section 3.3. For now, we’ll start with the Neo4j 1.9-compatible non-label strategies.
Using the type property strategy involves adding a type property to each node in the same way you previously added the name property to all nodes:
Listing 3.8. Adding a type property to determine node types
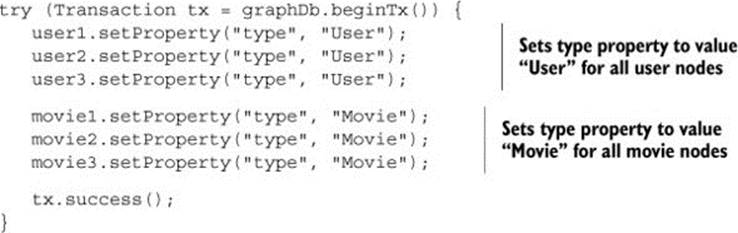
As in all previous examples, all graph database operations must be wrapped within the try transaction-handling block of code.
With the addition of node types, you can now determine the node type by simply checking the property value:
if("Movie".equals(node.getProperty("type"))){
//this is a movie
}
if("User".equals(node.getProperty("type"))){
//this is a user
}
Note
With this strategy, finding all nodes of a given type (such as all movies) by property requires using indexes, which we’ll cover in chapter 5.
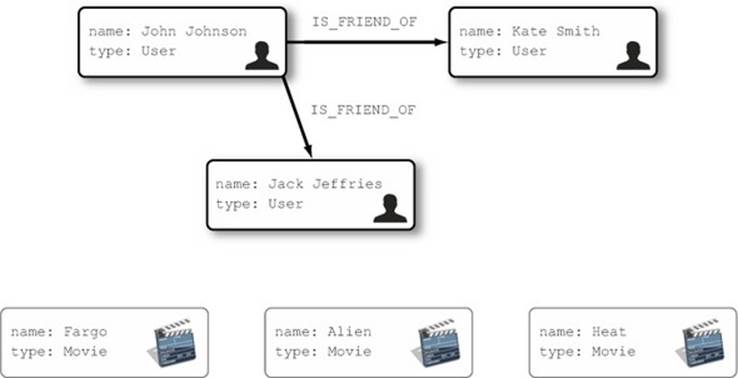
Figure 3.11 illustrates the graph with the type property set for each node.
Figure 3.11. Nodes using the type property strategy
You’re almost there. All that’s left to do is create relationships from users to the movies they like.
3.2.5. Adding properties to relationships
To make the social network graph complete, all you need to add is the relationship (called HAS_SEEN) between users and movies they rated. The HAS_SEEN relationship will start from the user node and be directed to the movie node, the same as the IS_FRIEND_OF relationship you used before.
There is one significant difference between the HAS_SEEN and IS_FRIEND_OF relationships: the HAS_SEEN relationship contains the additional information about how much the user liked the movie (represented by the number of stars the user gave to the movie). The number of stars is therefore not a property of the user node (because a user can rate multiple movies) or of the movie node (the movie can be rated by multiple users), but rather a property of the relationship between the user and the movie. You’ve seen how you can add properties to nodes, but adding properties to relationships is a new concept at this point.
We mentioned before that Neo4j is a property graph. In Neo4j, property graph applies to all graph entities—relationships as well as nodes. Adding a property to a relationship in Neo4j is as simple as adding a property to a node. We’ll guide you through using the Neo4j Core Java API to add properties to relationships.
Before we proceed, you need to add a new relationship type to the relationship enum. The following snippet shows the updated MyRelationshipTypes enum with the new HAS_SEEN relationship:
public enum MyRelationshipTypes implements RelationshipType{
IS_FRIEND_OF,
HAS_SEEN;
}
The next step is to create named relationships between nodes, which is achieved in the same way that you added friendship relationships between users earlier in the chapter. The API call for the creation of a relationship will return the Neo4j Relationship object, and you can use it to add properties by calling the Relationship.set-Property(String name, Object value) method.
The following listing shows the code that creates the HAS_SEEN relationships and adds stars properties to them.
Listing 3.9. Creating relationships with properties
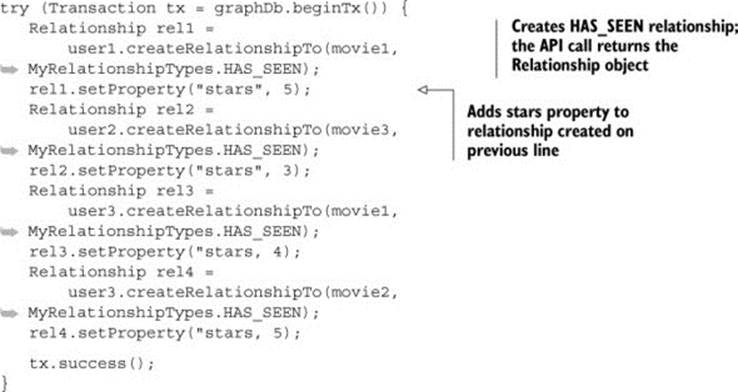
Once you’ve added the HAS_SEEN relationships to the graph, you’ve finally completed the social network using the Neo4j Core Java API. Figure 3.12 shows the final graph structure with all nodes, relationships, and properties.
Figure 3.12. Complete model of a movie-lovers’ social network
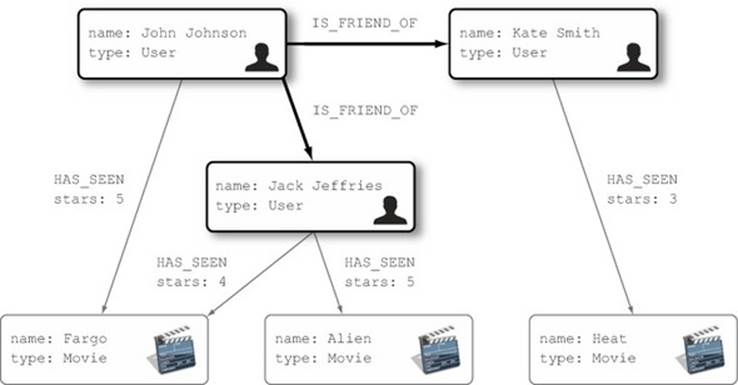
Figure 3.12 is the same as figure 3.6. You’ve managed to create the same graph in the Neo4j graph database using the Neo4j Core Java API.
3.3. Node labels
In the previous section we mentioned that nodes in the Neo4j database don’t have types—they’re just “boxes.” In order to differentiate between movie nodes and user nodes, we added property types to each node, with corresponding values.
In version 2.0, Neo4j introduced the (built-in) concept of node labels, which can help you group similar nodes. Node labels are very similar to the relationship type names we discussed earlier.
Each node can optionally have one or more text descriptions, which we call node labels. Nodes with the same labels are stored in a specific manner so that they can be grouped and used together. Neo4j supports the following label-related operations out of the box in the Core Java API: loading all nodes by label and finding nodes by label and property. Schema indexes are also defined using labels.
Note
Labels can be used for node lookup operations in Cypher queries as well. This use of labels will be discussed in chapter 6.
Just as in relationship types, node labels are defined using a simple interface with a single method, String name():
public interface Label {
java.lang.String name();
}
To create a new label, you can simply implement this interface, or, as with relationship types, use the Java enumeration idiom, which fulfills the Label interface contract:
public enum MyLabels implements Label{
MOVIES, USERS
}
The following listing illustrates how you can create labels using the Neo4j Java API.
Listing 3.10. Adding labels to nodes

To add a label, you use the addLabel() method on the selected node ![]() . To find all nodes with a given label, you can use the static getAllNodesWithLabel(Label label) method on the GlobalGraphOperations class
. To find all nodes with a given label, you can use the static getAllNodesWithLabel(Label label) method on the GlobalGraphOperations class ![]() .
.
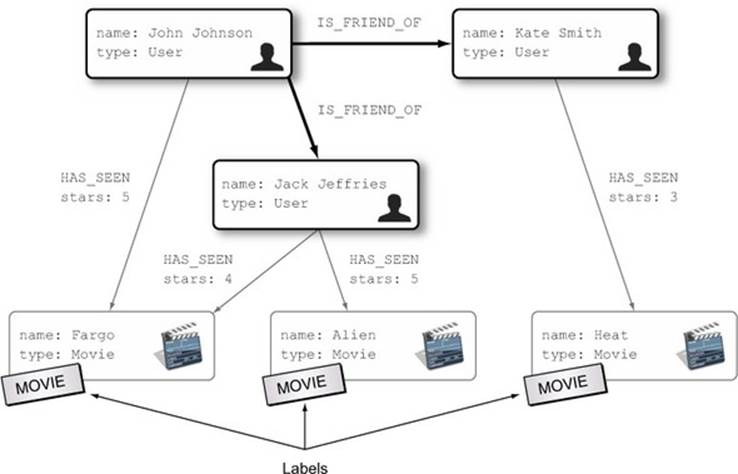
Figure 3.13 shows the graph with the added labels.
Figure 3.13. Movie nodes grouped using the label MOVIE
Note
In this example, the node labels supersede the type property for determining which nodes represent movies, so you can remove one of them. It’s recommended that you use labels wherever possible, simply because they’re a built-in feature of the Neo4j database, which allows greater flexibility with querying and schema-based indexing.
In addition to finding all nodes with a given label, Neo4j Core Java API exposes operations for finding all nodes with a given label and property, as is done in the following listing.
Listing 3.11. Finding nodes with a given label and property

By default, the lookup for nodes by label and property is performed by brute force by the Neo4j engine (by iterating all through all nodes with the given label, and comparing the required property name and value). But if a schema index is defined on label and property, the Neo4j engine will use the much faster index lookup. We’ll discuss using schema indexes in chapter 5.
Note
As you saw in listing 3.10, finding all nodes with a given label is considered a graph-global operation (as by design it can fetch large parts of the graph), so the operation is available via the GlobalGraphOperations class. On the other hand, finding all nodes by label and property (listing 3.11) is exposed via the GraphDatabaseService interface, because it’s expected to return a small proportion of nodes in the graph.
Labels are a nice addition to Neo4j, and not only as a typing strategy. Because nodes can have multiple labels, you can create labels to group nodes that are often used together (even with different types), without the need to use properties. For example, RED_THINGS (for all nodes that are red), FLYING (for all nodes that represent things that can fly), and so on.
3.4. Summary
In the first part of this chapter, we showed how you could model the requirements for a movie-lovers’ social network example. You modeled the requirements using a set of diagrams, or a virtual whiteboard, just as you’d approach application design in the software development process.
In the second part of this chapter, we demonstrated step by step how you could create that same graph model in the Neo4j graph database using the Neo4j Core Java API.
What was interesting was that both sets of steps looked almost the same. Just as drawing was the natural way to describe graphs for human understanding, the Neo4j Core Java API allows you to follow the same pattern to describe the graph in the code. Using the graph’s natural language, you’re able to implement the design with the Neo4j Core Java API and without any other tools or frameworks—no mapping or translation tools were required.
Graphs are indeed very powerful structures, and we use them daily to visualize models and problems related to software projects. Neo4j allows you to use clear and simple graphs as the programming model as well, making the transition from software design and requirements to programming easy and straightforward.
We scratched the surface of the Neo4j Core Java API in this chapter, showing how to create nodes in the graph, connect nodes using relationships, and to describe nodes and relationships using properties. In the next chapter, we’re going to look at how you can use the power of graphs to query the data.
All materials on the site are licensed Creative Commons Attribution-Sharealike 3.0 Unported CC BY-SA 3.0 & GNU Free Documentation License (GFDL)
If you are the copyright holder of any material contained on our site and intend to remove it, please contact our site administrator for approval.
© 2016-2026 All site design rights belong to S.Y.A.