Node.js in Action (2014)
Part 3. Going further with Node
Chapter 14. The Node ecosystem
This chapter covers
· Finding online help with Node
· Collaborating on Node development using GitHub
· Publishing your work using the Node Package Manager
To get the most out of Node development, you need to know where to go for help and how to share your contributions with the rest of the community.
As in most open source communities, the development of Node and related projects happens via online collaboration. Many developers work together to submit and review code, document projects, and report bugs. When developers are ready to release a new version of Node, it’s published on the official Node website. When a release-worthy third-party module has been created, it can be published to the npm repository to make it easy for others to install. Online resources provide the support you need to work with Node and related projects.
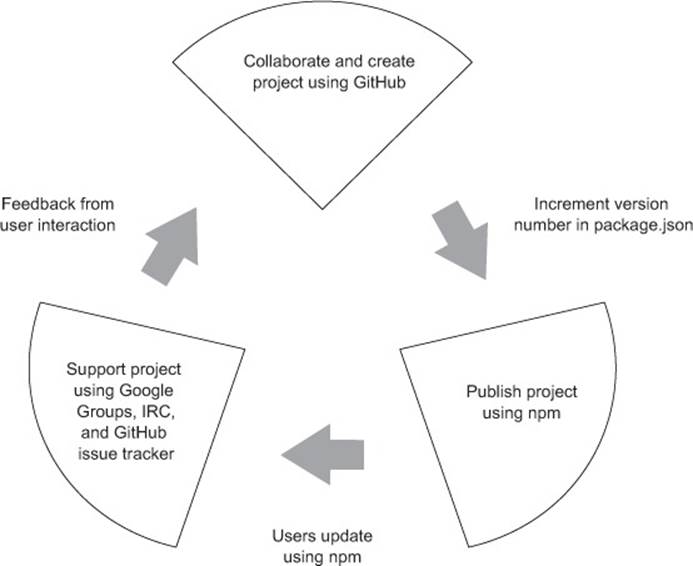
Figure 14.1 illustrates how you can use online resources for Node-related development, distribution, and support.
Figure 14.1. Node-related projects are created online collaboratively, often via the GitHub website. They’re then published to npm, and documentation and support are provided via online resources.
You’ll likely need support before you need to collaborate, so let’s first look at where you can go online to get help when you need it.
14.1. Online resources for Node developers
As the Node world is an ever-changing one, you’ll find the most up-to-date references online. At your disposal are numerous websites, online discussion groups, and chat rooms where you can find the information you need.
14.1.1. Node and module references
Table 14.1 lists a number of Node-related online references and resources. The most useful websites for referencing the Node APIs and learning about available third-party modules are the Node.js and npm homepages, respectively.
Table 14.1. Useful Node.js references
|
Resource |
URL |
|
Node.js homepage |
http://nodejs.org/ |
|
Node.js up-to-date core documentation |
http://nodejs.org/api/ |
|
Node.js blog |
http://blog.nodejs.org/ |
|
Node.js job board |
http://jobs.nodejs.org/ |
|
Node Package Manager (npm) homepage |
http://npmjs.org/ |
When you attempt to implement something using Node, or any of its built-in modules, the Node homepage is an invaluable resource. The site (shown in figure 14.2) documents the entirety of the Node framework, including each of its APIs. You’ll always find documentation for the most recent version of Node on the site. The official blog also documents the latest Node advances and shares important community news. There’s even a job board.
Figure 14.2. In addition to providing links to useful Node-related resources, nodejs.org offers authoritative API documentation for every released version of Node

When you’re shopping for third-party functionality, the npm repository search page is the place to go. It lets you use keywords to search through the thousands of modules available in npm. If you find a module that you’d like to check out, click on the module’s name to bring up its detail page, where you’ll find links to the module’s project homepage, if any, and useful information such as what other npm packages depend on the module, the module’s dependencies, which versions of Node the module is compatible with, and license information.
Nevertheless, these websites may not answer all your questions about how to use Node or other third-party modules. Let’s look at some other great places to ask for help online.
14.1.2. Google Groups
Google Groups have been set up for Node and some other popular third-party modules, including npm, Express, node-mongodb-native, and Mongoose.
Google Groups are useful for tough or in-depth questions. For example, if you were having trouble figuring out how to delete MongoDB documents using the node-mongodb-native module, you could go to the node-mongodb-native Google Group (https://groups.google.com/forum/?fromgroups#!forum/node-mongodb-native) and search it to see if anyone else had the same problem. If no one has dealt with your problem, the next step would be to join the Google Group and post your question. You can write lengthy Google Groups posts, which is helpful for complicated questions, because you can explain your issue thoroughly.
There’s no central list that includes all Node-related Google Groups. You may find them mentioned in project documentation, but generally you’ll have to search the web. You could, for example, search Google for “nameofsomemodule node.js google group” to check if a Google Group exists for a particular third-party module.
The drawback to using Google Groups is that often you have to wait hours or days to get a response, depending on the parameters of the Google Group. For simple questions when you need a quick reply, you should consider entering an internet chat room, where you can often get a quick answer.
14.1.3. IRC
Internet Relay Chat (IRC) was created way back in 1988, and while some think it archaic, it’s still alive and active—and it’s the best online way to get answers to quick questions about open source software. IRC rooms are called channels, and they exist for Node and various third-party modules. You won’t find a list of Node-related IRC channels anywhere, but third-party modules that have a corresponding IRC channel will sometimes mention it in their documentation.
To get your question answered on IRC, connect to an IRC network (http://chatzilla.hacksrus.com/faq/#connect), change to the appropriate channel, and send your question to the channel. Out of respect to the folks in the channel, it’s good to do some research beforehand to make sure your question can’t be solved with a quick web search.
If you’re new to IRC, the easiest way to get connected is using a web-based client. Freenode, the IRC network on which most Node-related IRC channels exists, has a web client available at http://webchat.freenode.net/. To join a channel, enter the appropriate name into the connection form. You don’t need to register, and you can enter any nickname you want. (If someone is already using the name you choose, the underscore character (_) will be appended to the end of your nickname to differentiate you.)
Once you click Connect, you’ll end up in a channel with any other users in the room listed on the right in a sidebar.
14.1.4. GitHub issues
If a project’s development occurs on GitHub, another place to look for problems and solutions is the project’s GitHub issue queue. To get to the issue queue, navigate to the project’s main GitHub page and click the Issues tab. You can use the search field to look for issues related to your problem. An example issue queue is shown in figure 14.3.
Figure 14.3. For projects hosted on GitHub, the issue queue can be helpful if you think you’ve identified a problem in the project’s code.
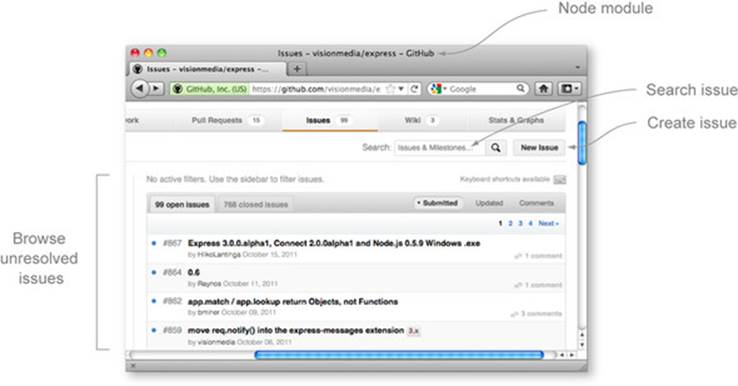
If you’re unable to find an issue that addresses your problem, and you think your problem may be due to a bug in the project’s code, you can click the New Issue button on the issues page to describe the bug. Once you’ve created an issue, the project maintainers will be able to reply on that issue page and either address the issue or ask questions to get a better idea of your problem.
Issue Tracker is Not a Support Forum
Depending on the project, it may not be considered appropriate for you to open general support questions on the project’s GitHub issue tracker. This is usually the case if the project has set up another means for users to get general support, like a Google Group. It’s a good idea to check the project’s README file to see if it has a preference regarding general support or questions.
Now that you know where to go to file issues online for projects, we’ll talk about GitHub’s nonsupport role—it’s the website through which most Node development collaboration takes place.
14.2. GitHub
GitHub is the center of gravity for much of the open source world, and it’s critical for Node developers. The GitHub service provides hosting for Git, a powerful version control system (VCS), and includes a web interface that allows you to easily browse Git repositories. Open source projects can use GitHub for free.
Git
The Git VCS has become a favorite among open source projects. It’s a distributed version control system (DVCS), which, unlike Subversion and many other VCSs, you can use without a network connection to a server. Git was released in 2005, inspired by a proprietary VCS called BitKeeper. The publisher of BitKeeper had granted the Linux kernel development team free use of the software, but revoked it when suspicion arose that members of the team were attempting to figure out BitKeeper’s inner workings. Linus Torvalds, the creator of Linux, decided to create an alternative VCS with similar functionality, and, within months, Git was being used by the Linux kernel development team.
In addition to Git hosting, GitHub provides projects with issue tracking, wiki, and web page hosting functionality. Because most Node projects in the npm repository are hosted on GitHub, knowing how to use GitHub is helpful for getting the most out of Node development. GitHub gives you a convenient way to browse code, check for unresolved bugs, and, if need be, contribute fixes and documentation.
Another use of GitHub is to watch a project. Watching a project provides you with notification of any changes to the project. The number of people watching a project is often used to gauge a project’s overall popularity.
GitHub may be powerful, but how do you use it? Let’s delve into that next.
14.2.1. Getting started on GitHub
When you’ve come up with an idea for a Node-based project or a third-party module, you’ll want to set up an account on GitHub, if you haven’t already, for easy access to Git hosting. After you’re set up, you can add your projects, which you’ll learn to do in the next section.
Because GitHub requires use of Git, you’ll want to configure it before continuing to GitHub. Thankfully, GitHub offers help pages for Mac, Windows, and Linux to help you properly get set up (https://help.github.com/articles/set-up-git). Once you’ve configured Git, you’ll need to get set up on GitHub by registering on its website and providing a Secure Shell (SSH) public key. You need the SSH key to keep your interactions with GitHub secure.
You’ll learn the details of each of these steps in the next section. Note that you only have to do these steps once, not every time you add a project to GitHub.
Git configuration and GitHub registration
To use GitHub, you need to configure your Git tool. You need to provide it with your name and email address using the following two commands:
git config --global user.name "Bob Dobbs"
git config --global user.email subgenius@example.com
Next, register on the GitHub website. Go to the sign-up page (https://github.com/signup/free), fill it in, and click Create an Account.
Providing GitHub with an SSH public key
Once you’re registered, you’ll need to provide GitHub with an SSH public key (https://help.github.com/articles/generating-ssh-keys). You’ll use this key to authenticate your Git transactions. Follow these steps:
1. Visit https://github.com/settings/ssh in your browser.
2. Click Add SSH Key.
At this point, what you need to do varies depending on your operating system. GitHub will detect your operating system and show the relevant instructions.
14.2.2. Adding a project to GitHub
Once you’re set up on GitHub, you can add a project to your account and begin pushing commits to it.
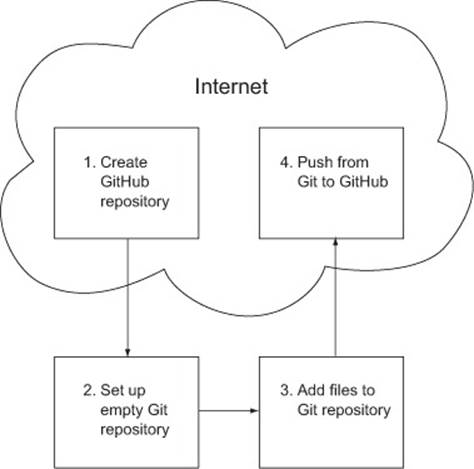
To do so, you first create a GitHub repository for your project, which we’ll go over shortly. After that, you create a Git repository on your local workstation, which is where you do your work before pushing it to the GitHub repository. Figure 14.4 outlines this process.
Figure 14.4. The steps in adding a Node project to GitHub
You can also view your project files using GitHub’s web interface.
Creating a GitHub repository
Creating a repository on GitHub involves the following steps:
1. Log in to github.com in your web browser.
2. Visit https://github.com/new.
3. Fill out the resulting form, describing your repository, and click Create Repository.
4. GitHub creates an empty Git repository and issues a queue for your project.
5. GitHub will present the steps you need to take to use Git to push your code to GitHub.
It’s helpful to understand what each of these steps does, so we’ll run through an example and demonstrate the bare essentials of using Git.
Setting up an empty Git repository
To add an example project to GitHub, you’ll first need to create an example Node module. For this example, we’ll create a module containing some URL-shortening logic and call it node-elf.
First, create a temporary directory for your project using the following commands:
mkdir -p ~/tmp/node-elf
cd ~/tmp/node-elf
To use this directory as a Git repository, enter the following command (which will create a directory called .git that contains repository metadata):
git init
Adding files to a Git repository
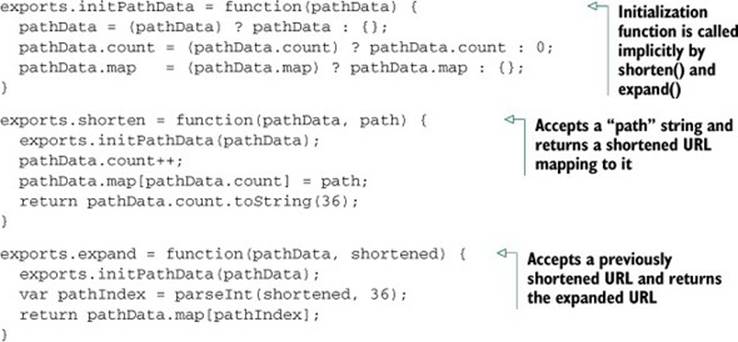
Now that you’ve set up an empty repository, you’ll want to add some files. For this example, we’ll add a file containing URL-shortening logic. Save the following listing’s content in a file called index.js in this directory.
Listing 14.1. A Node module for URL shortening
Next, let Git know that you want this file in your repository. The git add command works differently than other version control systems. Instead of adding files to your repository, the add command adds files to Git’s staging area. The staging area can be thought of as a checklist where you indicate newly added files, or files that you’ve changed and that you’d like to be included in the next revision of your repository:
git add index.js
Git now knows that it should track this file. You could add other files to the staging area if you want to, but for now you only need to add this one file.
To let Git know you’d like to make a new revision in the repository, including the changed files you’ve selected in the staging area, use the commit command. As in other VCSs, the commit command can take a -m command-line flag to indicate a message describing the changes in the new revision:
git commit -m "Added URL shortening functionality."
The version of the repository on your workstation now contains a new revision. To view a list of repository changes, enter the following command:
git log
Pushing from Git to GitHub
At this point, if your workstation was suddenly struck by lightning, you’d lose all your work. To safeguard against unexpected events, and to get the full benefits of GitHub’s web interface, you’ll want to send changes you’ve made in your local Git repository to your GitHub account. But before doing this, you’ve got to let Git know where it should send changes to. To do this, you need to add a Git remote repository. These are referred to as remotes.
The following line shows how you add a GitHub remote to your repository. Replace username with your username, and note that node-elf.git indicates the name of the project:
git remote add origin git@github.com:username/node-elf.git
Now that you’ve added a remote, you can send your changes to GitHub. In Git terminology, sending changes is called a repository push. In the following command, you tell Git to push your work to the origin remote defined in the previous command. Every Git repository can have one or more branches, which are, conceptually, separate working areas in the repository. You want to push your work into the master branch:
git push -u origin master
In the push command, the -u option tells Git that this remote is the upstream remote and branch. The upstream remote is the default remote used.
After doing your first push with the -u option, you’ll be able to do future pushes by using the following command, which is easier to remember:
git push
If you go to GitHub and refresh your repository page, you should now see your file.
Creating a module and hosting it on GitHub is a quick and dirty way to be able to reuse it. For example, if you want to use your sample module in a project, you could enter the commands in the following example:
mkdir ~/tmp/my_project/node_modules
cd ~/tmp/my_project/node_modules
git clone https://github.com/mcantelon/node-elf.git elf
cd ..
The require('elf') command would then provide access to the module. Note that when cloning the repository, you use the last command-line argument to name the directory into which you’re cloning.
You now know how to add projects to GitHub, including how to create a repository on GitHub, how to create and add files to a Git repository on your workstation, and how to push your workstation repository to GitHub. You’ll find many excellent resources online to help you go further. If you’re looking for comprehensive instruction on how to use Git, Scott Chacon, one of the founders of GitHub, has written a thorough book called Pro Git that you can purchase or read free online (http://progit.org/). If a hands-on approach is more your style, the official Git site’s documentation page lists a number of tutorials that will get you up and running (http://git-scm.com/documentation).
14.2.3. Collaborating using GitHub
Now that you know how to create a GitHub repository from scratch, let’s look at how you can use GitHub to collaborate with others.
Suppose you’re using a third-party module and you run into a bug. You may be able to examine the module’s source code and figure out a way to fix it, and you could email the author of the code, describing your fix and attaching files containing your fixes. But this would require the author to do some tedious work. The author would have to compare your files to the latest code and incorporate the fixes from your files. But if the author was using GitHub, you could clone the author’s project repository, make some changes, and then inform the author via GitHub of the bug fix. GitHub would then show the author, on a web page, the differences between your code and the version you duplicated, and, if the bug fix is acceptable, combine the fixes with the latest code via a single mouse click.
In GitHub parlance, duplicating a repository is known as forking. Forking a project allows you to do anything you want to your copy with no danger to the original repository. You don’t need the permission of the original author to fork: anyone can fork any project and submit their contributions back to the original project. The original author may not approve your contribution, but even then you still have your own fixed version, which you can continue to maintain and enhance independently. If your fork were to grow in popularity, others might well fork your fork, and offer contributions of their own.
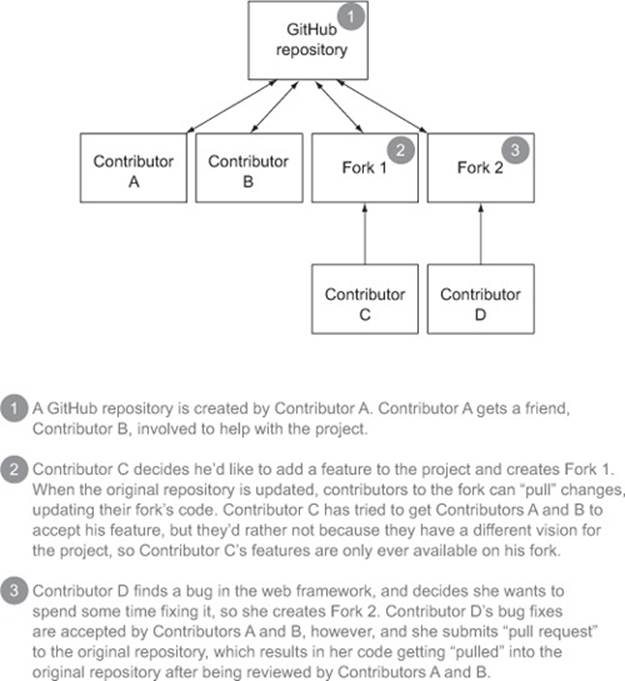
Once you’ve made changes to a fork, you can submit these changes to the original author with a pull request, which is a message asking a repository author to pull changes. Pulling, in Git parlance, means importing work from a fork and combining the work with your own. Figure 14.5illustrates a GitHub collaboration scenario.
Figure 14.5. A typical GitHub development scenario
Now, let’s walk through an example of forking a GitHub repository for the purpose of collaboration. This process is shown in figure 14.6.
Figure 14.6. The process of collaborating on GitHub via forking

Forking starts the collaboration process by duplicating the repository on GitHub to your own account (known as forking) (A). You then clone the forked repository to your workstation (B), make changes to it, commit the changes (C), push your work back to GitHub (D), and send a pull request to the owner of the original repository asking them to consider your changes (E). If they want to include your changes in their repository, they’ll approve your pull request.
Let’s say you want to fork the node-elf repository you created earlier in this chapter and add code that exports the module’s version. This would allow anyone using the module to ensure that they’re using the right version.
First, log into GitHub and navigate to the repository’s main page: https://github.com/mcantelon/node-elf. On the repository page, click the Fork button to duplicate the repository. The resulting page will be similar to the original repository page, with something like “forked from mcantelon/node-elf” displayed under the repository name.
After forking, your next steps are to clone the repository to your workstation, make your changes, and push the changes to GitHub. The following commands will do this for the node-elf repository:
mkdir -p ~/tmp/forktest
cd ~/tmp/forktest
git clone git@github.com:chickentown/node-elf.git
cd node-elf
echo "exports.version = '0.0.2';" >> index.js
git add index.js
git commit -m "Added specification of module version."
git push origin master
Once you’ve pushed your changes, click Pull Request on your fork’s repository page, and enter the subject and body of a message describing your changes. Click Send Pull Request. Figure 14.7 shows a screenshot containing typical content.
Figure 14.7. The details of a GitHub pull request

The pull request is then added to the issue queue of the original repository. The owner of the original repository can then, after reviewing your changes, incorporate them by clicking Merge Pull Request, entering a commit message, and clicking Confirm Merge. This automatically closes the issue.
Once you’ve collaborated with someone and have created a great module, the next step is getting it out into the world. The best way to do so is to add it to the npm repository.
14.3. Contributing to the npm repository
Suppose you’ve worked on the URL-shortening module for some time, and you think it would be useful to other Node users. To publicize it, you could post on Node-related Google Groups, describing its functionality. But you’d be limited in the number of Node users you’d reach, and as people start using your module, you wouldn’t have a way to let them know about updates to the module.
To solve the problems of discoverability and providing updates, you can publish to npm. With npm, you can easily define a project’s dependencies, allowing them to be automatically installed at the same time as your module. If you’ve created a module designed to store comments about content (such as blog posts), you could include a module handling MongoDB storage of comment data as a dependency. Or a module that provides a command-line tool might have a helper module for parsing command-line arguments as a dependency.
Up to this point in the book, you’ve used npm to install everything from testing frameworks to database drivers, but you haven’t yet published anything. In the next sections, we’ll show you the steps involved in publishing your own work on npm:
1. Preparing a package
2. Writing a package specification
3. Testing a package
4. Publishing a package
We’ll start with preparing the package.
14.3.1. Preparing a package
Any Node module you want to share with the world should be accompanied by related resources, such as documentation, examples, tests, and related command-line utilities. The module should come with a README file that provides enough information to get users started quickly.
The package directory should be organized using subdirectories. Table 14.2 lists conventional subdirectories—bin, docs, example, lib, and test—and what you’d use each of them for.
Table 14.2. Conventional subdirectories in a Node project
|
Directory |
Use |
|
bin |
Command-line scripts |
|
docs |
Documentation |
|
example |
Examples of application use |
|
lib |
Core application functionality |
|
test |
Test scripts and related resources |
Once you’ve organized your package, you’ll want to prepare it for publishing to npm by writing a package specification.
14.3.2. Writing a package specification
When you publish a package to npm, you need to include a machine-readable package specification file. This JSON file is called package.json, and it includes information about your module, such as its name, description, version, dependencies, and other characteristics. Nodejitsu has a handy website that shows a sample package.json file and explains what each part of the sample file is for when you hover your mouse over it (http://package.json.nodejitsu.com/).
In a package.json file, only the name and version are mandatory. Other characteristics are optional, but some, if defined, can make your module more useful. By defining a bin characteristic, for example, you can let npm know which files in your package are meant to be command-line tools, and npm will make them globally available.
A sample specification might look like this:
{
"name": "elf"
, "version": "0.0.1"
, "description": "Toy URL shortener"
, "author": "Mike Cantelon <mcantelon@example.com>"
, "main": "index"
, "engines": { "node": "0.4.x" }
}
For comprehensive documentation on available package.json options, enter the following command:
npm help json
Because generating JSON by hand is only slightly more fun than hand-coding XML, let’s look at some tools that make it easier. One such tool, ngen, is an npm package that, when installed, adds a command-line tool called ngen. After asking a number of questions, ngen will generate a package.json file. It’ll also generate a number of other files that are normally included in npm packages, such as a Readme.md file.
You can install ngen with the following command:
npm install -g ngen
After ngen is installed, you’ll have a global ngen command that, when run in your project root directory, will ask you questions about your project and generate a package .json file, as well as some other files commonly used when writing Node packages. Some files that you don’t need may be generated, and you can delete them. Generated files include a .gitignore file that specifies a number of files and directories that shouldn’t normally be added to the Git repository of a project that will be published to npm. Also, an .npmignore file is generated, which serves a similar function, letting npm know what files can be ignored when publishing the package to npm.
Here’s a sample output of running the ngen command:
Project name: elf
Enter your name: Mike Cantelon
Enter your email: mcantelon@gmail.com
Project description: URL shortening library
create : /Users/mike/programming/js/shorten/node_modules/.gitignore
create : /Users/mike/programming/js/shorten/node_modules/.npmignore
create : /Users/mike/programming/js/shorten/node_modules/History.md
create : /Users/mike/programming/js/shorten/node_modules/index.js
...
Generating a package.json file is the hardest part of publishing to npm. Once you’ve completed this step, you’re ready to publish your module.
14.3.3. Testing and publishing a package
Publishing a module to npm involves three steps, which we’ll go over in this section:
1. Test the installation of your package locally.
2. Add an npm user, if you haven’t already.
3. Publish the package to npm.
Testing package installation
To test a package locally, use npm’s link command from the root directory of your module. This command makes your package globally available on your workstation, where Node can use it like a package conventionally installed by npm.
sudo npm link
Now that your project is linked globally, you can install it in a separate test directory by using the link command followed by the name of the package:
npm link elf
When you’ve installed the package, do a quick test of requiring the module by executing the require function in the Node REPL, as shown in the following code. In the results, you should see the variables or functions that your module provides:
node
> require('elf');
{ version: '0.0.1',
initPathData: [Function],
shorten: [Function],
expand: [Function] }
If your package passed the test and you’ve finished developing it, use npm’s unlink command from the root directory of your module:
sudo npm unlink
Your module will now no longer be globally available on your workstation, but later, once you’ve completed publishing your module to npm, you’ll be able to install it normally using the install command.
Having tested your npm package, the next step is to create an npm publishing account, if you haven’t previously set one up.
Adding an npm user
Enter the following to create your own npm publishing account:
npm adduser
You’ll be prompted for a username, an email address, and a password. If your account is successfully added, you won’t see an error message.
Publishing to npm
The next step is to publish. Enter the following to publish your package to npm:
npm publish
You may see the warning, “Sending authorization over an insecure channel,” but if you don’t see additional errors, your module was published successfully. You can verify that your publish was successful by using npm’s view command:
npm view elf description
If you’d like to include one or more private repositories as npm package dependencies, you can. Perhaps you have a module of useful helper functions you’d like to use, but not release publicly on npm.
To add a private dependency, where you’d normally put the dependency module’s name, you can put any name that’s different from the other dependency names. Where you’d normally put the version, you put a Git repository URL. In the following example, an excerpt from a package.json file, the last dependency is a private repository:
"dependencies" : {
"optimist" : ">=0.1.3",
"iniparser" : ">=1.0.1",
"mingy": ">=0.1.2",
"elf": "git://github.com/mcantelon/node-elf.git"
},
Note that any private modules should also include package.json files. To make sure you don’t accidentally publish one of these modules, set the private property in its package.json file to true:
"private": true,
Now you’re equipped to set up, test, and publish your own modules to the npm repository.
14.4. Summary
As with most successful open source projects, Node has an active online community, which means you’ll find plenty of available online resources as well as quick answers to your questions using online references, Google Groups, IRC, or GitHub issue queues.
In addition to being a place where projects keep track of bugs, GitHub also provides Git hosting and the ability to browse Git repository code using a web browser. Using GitHub, other developers can easily fork your open source code if they want to contribute bug fixes, add features, or take a project in a new direction. You can also easily submit changes made to a fork back to the original repository.
Once a Node project has reached the stage where it’s worth sharing with the world, you can submit it to the Node Package Manager repository. Inclusion in npm makes your project easier for others to find, and if your project is a module, inclusion in npm means your module will be easy to install.
You know how to get the help you need, collaborate online, and share your work. Node is what it is because of the active and involved community that surrounds it. You’re encouraged to get active and be a part of the Node community!