Building Polyfills: Web Platform APIs for the Present and Future (2014)
Part I. Building Polyfills
Chapter 5. Building Your First Polyfill, Part 3: Performance and Edge-Case Testing
Over the last two chapters, we’ve built a pretty nice cross-browser polyfill from the ground up, and we’ve even added a complete testing setup to ensure that your library always works as expected. So while Chapters 3 and 4 were about making sure that your polyfill works, this chapter is about making sure that it works well. In particular, we’re going to discuss optimizing your polyfill for performance, as well as how to handle quirky, browser-specific edge cases that can reveal themselves from time to time.
Building for Performance
In Chapter 2, I introduced several principles of responsible polyfill development. One of these was “Build with performance in mind.” The spirit of this principle is to encourage polyfill developers to go beyond only delivering a functional equivalent to a native browser feature via their library, but to ensure that this equivalent is also as fast as it can possibly be.
This is a high bar, for sure. Your polyfill’s performance baseline is the native rendering capabilities of the browser. Chances are, your library won’t be able to match the speed of a native feature, and attempting to do so should not be your focus. Instead, you should instead strive to pass the frontend developers’ noticeability test. It’s a simple test. If, after including your library in a developer’s application, that app runs noticeably slower, you can expect that your polyfill will be dropped on the floor, quickly. That, or the developer will contact you and complain. Remember, polyfills are designed to emulate native browser capabilities, so you should consider it your solemn duty not to be noticed by developers, or end users, for that matter. And while the noticeability test itself is both far from scientific and something that varies from developer to developer, there are some strategies you can adopt to increase the chances that you’ll pass this test:
1. Setup performance benchmarks.
2. Don’t execute code too early or too often.
3. Iterate until you’re happy and then iterate some more.
We’ll look at each of these, in turn.
1. Set Up Performance Benchmarks
First things first: if you want to build for performance, you need to be able to test and assess the performance of your polyfill. You certainly could eyeball it and judge your library by how fast it “feels” to you, but I suggest being a bit more intentional if you can stand it. Specifically, I suggest using JSPerf to benchmark and test your polyfill, not only at the start, but as you continue to iterate and make changes. JSPerf, which is based on the open source Benchmark.js library, is a quick and easy way to set up tests of your library’s features and functionality. Alternatively, you coulduse Benchmark.js directly, the grunt-benchmark Grunt plug-in, or just use the DevTools in your favorite browser to run ad hoc tests, but I find that JSPerf has everything I need to run performance tests and comparisons across revisions to my polyfills. Plus, it has pretty charts, courtesy ofBrowserscope. In the next section, I’ll walk through setting up a simple JSPerf test to show the delta after a simple tweak to my polyfill.
2. Don’t Execute Code Too Early or Too Often
The next strategy we can employ to pass the noticeability test is to make sure that our polyfill doesn’t execute any code it doesn’t have to. This is especially important if your library is a drop-in or opt-in polyfill that performs its own feature detection. For instance, our HTML5 Forms polyfill needs to test for browser support of several input types. In Chapter 3, we perform feature detection as we loop over each input in a form, as shown in Example 5-1.
Example 5-1. Form support with feature detection in kendo.forms.js
(function($, kendo) {
var ui = kendo.ui,
Widget = ui.Widget;
var typeUpgrades = [
{
type: 'color',
upgrade: function(inputs) {
inputs.kendoColorPicker({ palette: 'basic' });
}
},
{
type: 'number',
upgrade: function(inputs) {
inputs.kendoNumericTextBox();
}
},
{
type: 'range',
upgrade: function(inputs) {
inputs.kendoSlider({
showButtons: false,
tickPlacement: 'none'
});
}
}];
var Form = Widget.extend({
init: function(element, options) {
var form = $(element),
that = this;
var i, len;
// base call to widget initialization
Widget.fn.init.call(this, element, options);
function isFormTypeSupported(type) {
if (type === 'text') { return true; }
if (that.options.alwaysUseWidgets) {
return false;
}
var input = document.createElement('input');
input.setAttribute('type', type);
return input.type !== 'text';
}
for (i = 0, len = typeUpgrades.length; i < len; i++) {
var typeObj = typeUpgrades[i];
if (!isFormTypeSupported(typeObj.type)) { ![]()
var inputs = form.find('input[type=' + typeObj.type + ']');
typeObj.upgrade(inputs);
}
}
},
options: {
// the name is what will appear in the kendo namespace (kendo.ui.Form).
// The jQuery plug-in would be jQuery.fn.kendoForm.
name: 'Form',
alwaysUseWidgets: false
}
});
ui.plugin(Form);
} (jQuery, kendo));
![]()
Test each feature before “upgrading”
In this snippet, I create an array called typeUpgrades to represent each form input type and the “upgrade” logic needed to convert these into Kendo UI widgets. Then I create a custom widget for my polyfill and specify the logic to perform when that widget is initialized, which iterates over each type, finds any form fields that match, and finally, upgrades each field based on its type.
The first perf tweak: caching feature tests
The preceding approach works, but perhaps you noticed that we perform the feature detection test—creating an in-memory input element and setting its type—each and every time. So, if I have 20 inputs on my form with the new color type, I’ll perform this dance 20 times. This is unnecessary. The user’s browser won’t change in the middle of a page load, so there’s really no reason for me to perform these feature tests each time through. Instead, it makes more sense to test each feature when my library loads, and cache the result of each test as a Boolean that I can access later. Example 5-2 shows an example of this for my HTML5 Forms polyfill.
Example 5-2. Caching feature tests at first run in kendo.forms.js
(function($, kendo) {
var ui = kendo.ui,
Widget = ui.Widget;
var typeUpgrades = [
{
type: 'color',
upgrade: function(inputs) {
inputs.kendoColorPicker({ palette: 'basic' });
}
},
{
type: 'number',
upgrade: function(inputs) {
inputs.kendoNumericTextBox();
}
},
{
type: 'range',
upgrade: function(inputs) {
inputs.kendoSlider({
showButtons: false,
tickPlacement: 'none'
});
}
}];
function isFormTypeSupported(type) {
var input = document.createElement('input');
input.setAttribute('type', type);
return input.type !== 'text';
}
var featureDetects = { ![]()
color: isFormTypeSupported('color'),
number: isFormTypeSupported('number'),
range: isFormTypeSupported('range')
};
var Form = Widget.extend({
init: function(element, options) {
var form = $(element),
that = this;
var i, len;
// base call to widget initialization
Widget.fn.init.call(this, element, options);
for (i = 0, len = typeUpgrades.length; i < len; i++) {
var typeObj = typeUpgrades[i];
if (!featureDetects[typeObj.type] || that.alwaysUseWidgets) { ![]()
var inputs = form.find('input[type=' + typeObj.type + ']');
typeObj.upgrade(inputs);
}
}
},
options: {
// the name is what will appear in the kendo namespace (kendo.ui.Form).
// The jQuery plug-in would be jQuery.fn.kendoForm.
name: 'Form',
alwaysUseWidgets: false
}
});
ui.plugin(Form);
} (jQuery, kendo));
![]()
Test and cache each feature test during the initial script load
![]()
Access the cached test value during the “upgrade” process
In Example 5-2, I moved the isFormTypeSupported function outside my widget initialization code, and created a local featureDetects object to hold the cached Boolean values for each test. Finally, in my main initialization loop, I access those cached values, and bypass repeated code paths.
This is nice in theory, and it certainly looks a bit cleaner, but just how fast is it? To answer that question, I can head over to JSPerf and create a test.
Using JSPerf
JSPerf can seem a bit daunting if you’ve only ever viewed others’ tests before, but it’s actually quite simple to create tests of your own. The basic idea behind JSPerf is to create multiple test cases that execute blocks of JavaScript code—performing operations, mutating the DOM, and so forth—which the tool then executes over and over again in order to determine which operations are fastest and slowest. JSPerf takes care of all of the looping and reruns, so all you need to do is specify the test cases, and any setup or teardown that should happen before or after each test run.
In order to test just how much feature test caching improves the performance of our code, I created the test shown in Figure 5-1. You can also access the test online, and run it yourself, if you so desire.
The “Preparation code” section in Figure 5-1 shows the setup and teardown code that will run before each test. This code does not impact the timing of the tests. Here, I create a global feature test method, isFormTypeSupported, as well as a global featureDetects object, similar toExample 5-2.
The “Test Runner” section in Figure 5-1 contains my actual tests. The “Test Each Time” section does exactly what it says: each time that block is called, it will call the isTypeSupported method. This block mimics my original functionality in Example 5-1. The “Cache Tests” section inFigure 5-1, on the other hand, simply accesses the cached feature test values once. If I run these tests a few times, I’ll get a result similar to Figure 5-2, which shows the test case from Figure 5-1 after I’ve run the test several times through in Chrome.
As you can see in Figure 5-2, caching my feature tests is not only faster, it’s nearly 60 times faster on Chrome than performing feature tests each time! It’s important to note that since JSPerf runs each test case several dozen times over, reported numbers aren’t indicative of raw, overall performance gains in my library. Rather, JSPerf is most valuable as a measure of relative performance between options. I should also point out that performance gains—or losses—will vary from one browser to the next. In the preceding example, our gains in Chrome are far higher than IE, so it’s important to test across browsers to get an accurate picture of changes. The bottom line, in this case, is that we know that caching feature tests is faster and thus an excellent refactoring choice for my library.
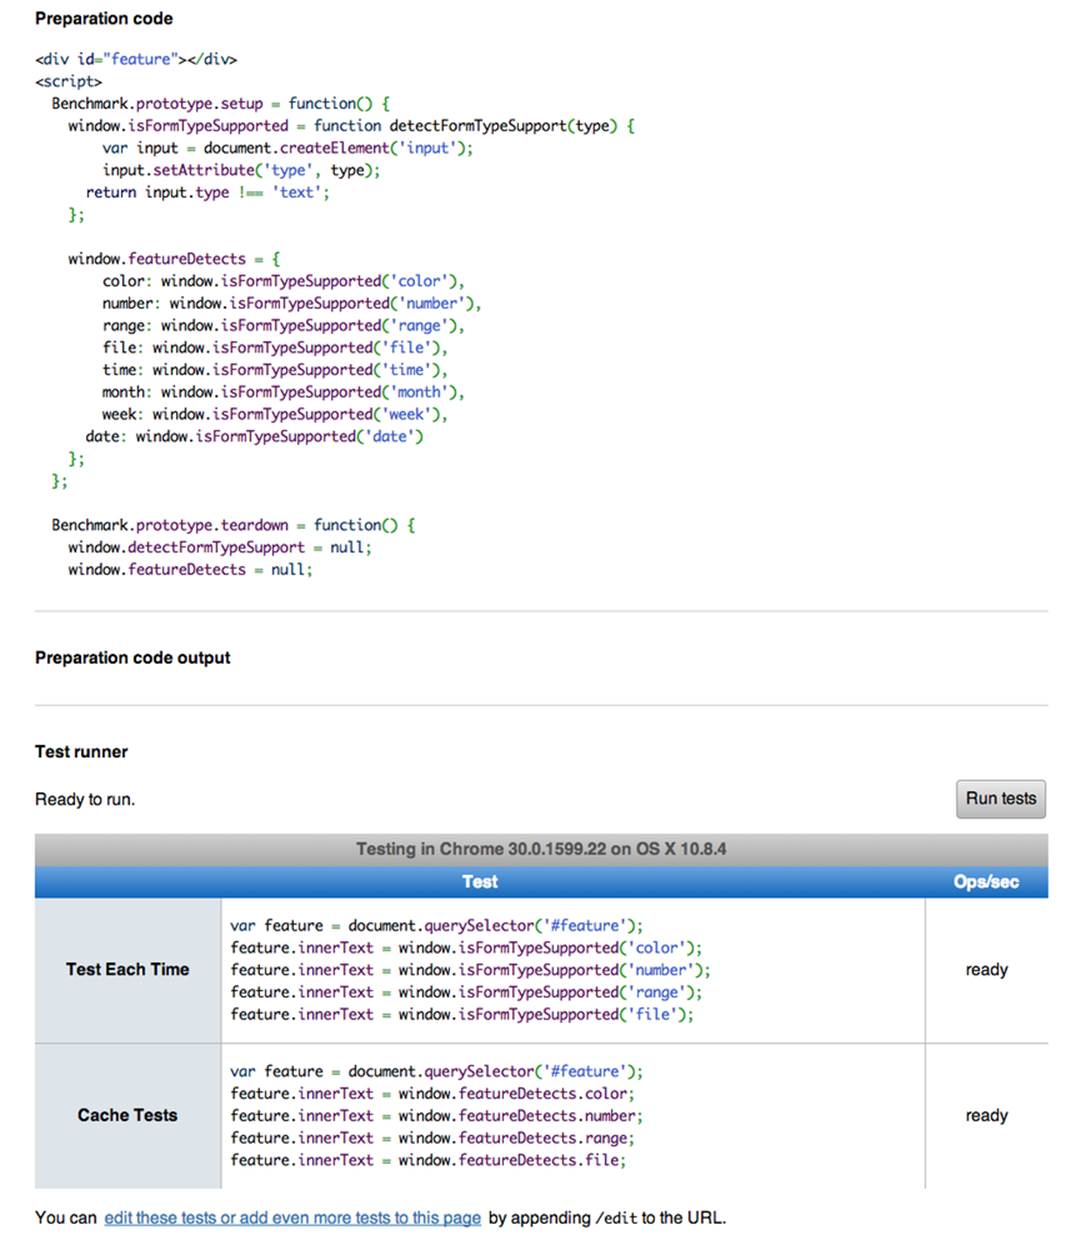
Figure 5-1. JSPerf test for feature test caching
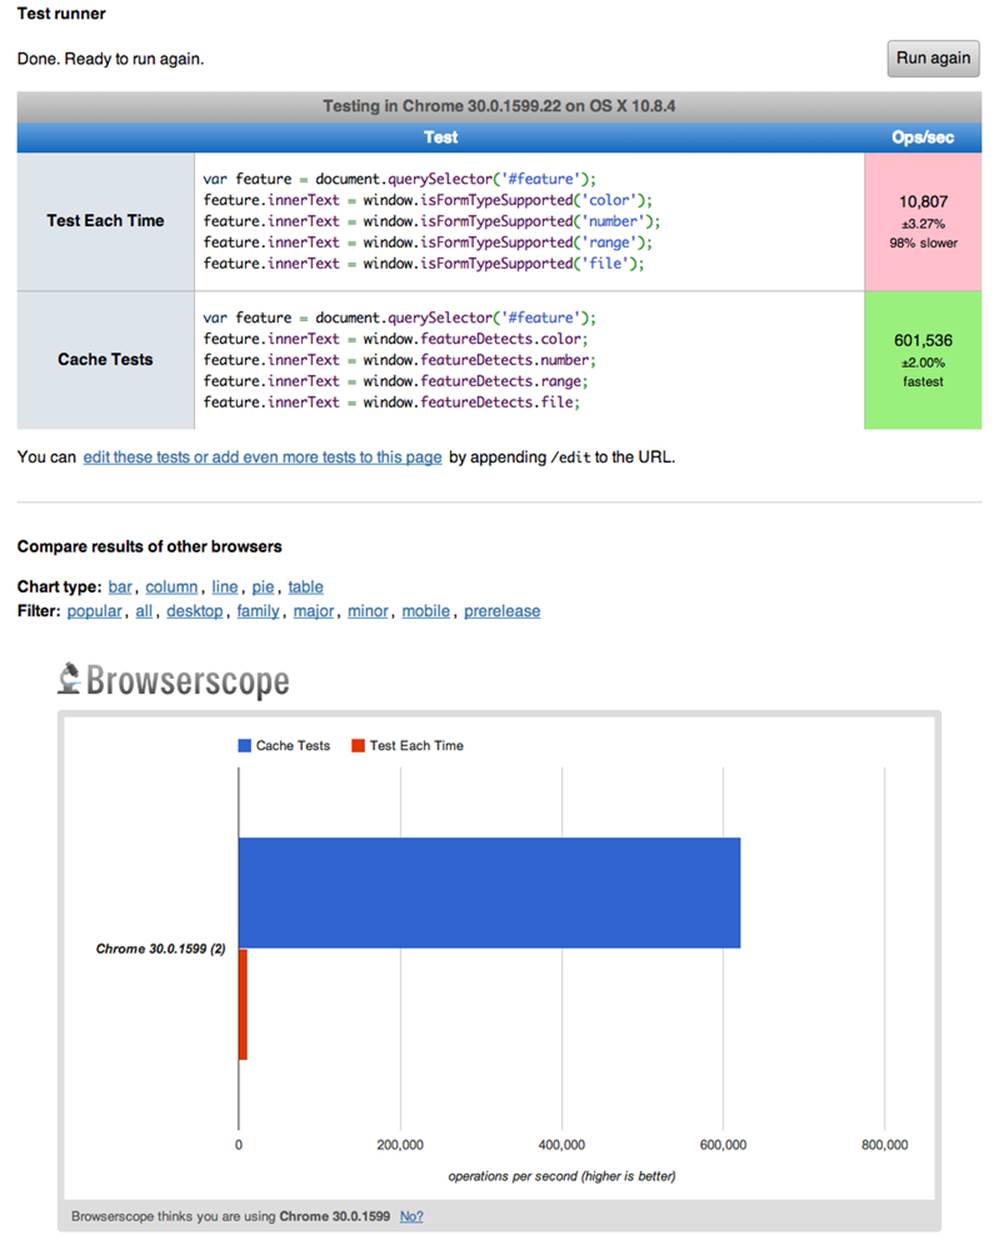
Figure 5-2. JSPerf test results for feature test caching
So far in this section, we’ve avoided executing unnecessary code by ensuring that feature-detection tests run only once when my library is loaded. Another important optimization I can perform is to ensure that my library doesn’t perform any unnecessary initialization or setup. Any features or functionality that my library might not need for all browsers should remain dormant until it’s needed. Obviously, stylesheets and JavaScript will need to be parsed when they are included, but I try to execute as little of that code as possible, until my library is called upon. In the case of my polyfill, the only code that runs before I initialize a form widget is my now cached feature tests, which I’ve deemed necessary to run up front since the performance gains are considerable.
3. Iterate Until You’re Happy, Then Iterate Some More
The final strategy to keep your library performing well under the watchful eyes of consuming devs is to iterate, test, and iterate again. This is a bit of a hunt-and-peck exercise, where I look for micro- and macro-optimizations in my library, make changes, and then test those against the last version, using JSPerf. Some changes will make no difference in the performance of my library, while others will make a noticeable difference. Some might even harm performance, innocent as they may seem. The key is to code, test, iterate, and then test some more.
There’s no science to this process, unfortunately, so I can’t give you a bunch of tried-and-true tweaks that can be made to every library under the sun. I can, however, show you a couple of tweaks I made to my HTML5 Forms polyfill to give you an idea of what minor and major improvements might look like. Beyond these, your best bet is to pay attention to JavaScript best practices, as well as the proven practices of the libraries or frameworks you’re utilizing. Best practices are often named as such because they promote maintenance, readability of code, and good performance, so you’ll benefit from these even if they don’t show considerable gains in your performance tests.
Before we proceed with the next few performance tweaks, I want to share the code samples for the complete HTML5 Forms polyfill. Thus far, I’ve included snippets only for three new input types. However, to properly show the impact of the next couple of refactors, we need to look at the complete source. In the production version of my polyfill, the source is broken into three modules, or files, that I concatenate during my build process. Those files are as follows:
kendo.forms.types.js
Contains all of the input types supported by my polyfill, and the logic used to “upgrade” each to use a Kendo UI widget. The full source of this file can be viewed in Example 5-3.
kendo.forms.features.js
Feature detection tests for my polyfill. The full source of this file can be viewed in Example 5-4.
kendo.forms.js
The main source file for my polyfill. Contains widget initialization code and depends on kendo.forms.types.js and kendo.forms.features.js. The full source of this file can be viewed in Example 5-5.
Example 5-3. Contents of kendo.forms.types.js
(function (kendo) {
kendo.forms = kendo.forms || {};
var typeUpgrades = [
{
type: 'color',
upgrade: function(index, val) {
$(val).kendoColorPicker({ palette: 'basic' });
}
},
{
type: 'number',
upgrade: function(index, val) {
$(val).kendoNumericTextBox();
}
},
{
type: 'range',
upgrade: function(index, val) {
$(val).kendoSlider({
showButtons: false,
tickPlacement: 'none'
});
}
},
{
type: 'file',
upgrade: function(index, val) {
$(val).kendoUpload();
}
},
{
type: 'datetime',
upgrade: dateTimeUpgrade
},
{
type: 'datetime-local',
upgrade: dateTimeUpgrade
},
{
type: 'time',
upgrade: function(index, val) {
var input = $(val),
dummyDate = '2013-10-04T';
input.kendoTimePicker({
value: input.val().length > 0 ? new Date(dummyDate + input.val())
: null,
min: input.attr('min') ? new Date(dummyDate + input.attr('min'))
: new Date(2049, 0, 1, 0, 0, 0),
max: input.attr('max') ? new Date(dummyDate + input.attr('max'))
: new Date(2099, 11, 31, 0, 0, 0),
// Step attribute is seconds, interval in minute
interval: input.attr('step') ?
Math.round(parseInt(input.attr('step'), 10)/60) : 30
});
}
},
{
type: 'month',
upgrade: function(index, val) {
var input = $(val),
value = convertMonthPartToDate(input.val()),
min = convertMonthPartToDate(input.attr('min')),
max = convertMonthPartToDate(input.attr('max'));
input.kendoDatePicker({
// Set the start and depth properties to year, which means
// that only month values are displayed.
start: 'year',
depth: 'year',
// If the conversion returned a NaN, use the default values
value: isNaN(value) ? null : new Date(value),
min: isNaN(min) ? new Date(1900, 0, 1) : new Date(min),
max: isNaN(max) ? new Date(2099, 11, 31) : new Date(max)
});
}
},
{
type: 'week',
upgrade: function(index, val) {
var input = $(val),
value = getDateFromWeekString(input.val()),
min = getDateFromWeekString(input.attr('min')),
max = getDateFromWeekString(input.attr('max'));
input.kendoDatePicker({
// Set the start and depth properties to month, which means
// that only day/week values are displayed.
depth: 'month',
// If the conversion returned a null date, use the default values
value: value,
min: min === null ? new Date(1900, 0, 1) : min,
max: max === null ? new Date(2099, 11, 31) : max
});
}
},
{
type: 'date',
upgrade: function(index, val) {
var input = $(val);
var defaults = getDateTimeDefaults(input);
input.kendoDatePicker(defaults);
}
}];
function convertMonthPartToDate(val) {
// Add dummy day of month for valid date parsing
val = val + '-' + new Date().getDate();
return Date.parse(val);
}
function getDateFromWeekString(weekString) {
var week, year,
dateParts = weekString.split('-');
if (dateParts.length < 2) {
return null;
}
year = dateParts[0];
week = dateParts[1].replace(/w/gi, '');
if (isNaN(parseInt(week, 10)) || isNaN(parseInt(year, 10))) {
return null;
}
// Jan 1 + 7 days per week
var day = (1 + (week - 1) * 7);
return new Date(year, 0, day);
}
function dateTimeUpgrade(index, val) {
var input = $(val);
// Step attribute is seconds, interval in minute
var defaults = getDateTimeDefaults(input);
defaults.interval = input.attr('step') ?
Math.round(parseInt(input.attr('step'), 10)/60) : 30;
input.kendoDateTimePicker(defaults);
}
function getDateTimeDefaults(input) {
return {
value: input.val().length > 0 ? new Date(input.val()) : null,
min: input.attr('min') ? new Date(input.attr('min'))
: new Date(1900, 0, 1),
max: input.attr('max') ? new Date(input.attr('max'))
: new Date(2099, 11, 31)
};
}
kendo.forms.types = typeUpgrades;
} (kendo));
Example 5-4. Contents of kendo.forms.features.js
(function (kendo) {
kendo.forms = kendo.forms || {};
function detectFormTypeSupport(type) {
var input = document.createElement('input');
input.setAttribute('type', type);
return input.type !== 'text';
}
function detectDateTimeFields(type) {
var dummyVal = ':(';
var i = document.createElement('input');
i.setAttribute('type', type);
// Credit to Mike Taylor //gist.github.com/miketaylr/310734
i.value = dummyVal;
return (i.value !== dummyVal);
}
var featureDetects = {
color: detectFormTypeSupport('color'),
number: detectFormTypeSupport('number'),
range: detectFormTypeSupport('range'),
file: detectFormTypeSupport('file'),
datetime: detectDateTimeFields('datetime'),
datetime_local: detectFormTypeSupport('datetime-local'),
time: detectFormTypeSupport('time'),
month: detectFormTypeSupport('month'),
week: detectFormTypeSupport('week'),
date: detectFormTypeSupport('date'),
placeholder: (function() {
return 'placeholder' in document.createElement('input') &&
'placeholder' in document.createElement('textarea');
}())
};
kendo.forms.features = featureDetects;
} (kendo));
Example 5-5. Contents of kendo.forms.js
(function($, kendo) {
var ui = kendo.ui,
Widget = ui.Widget,
typeUpgrades = kendo.forms.types;
var Form = Widget.extend({
init: function(element, options) {
var that = this;
var form = $(element);
var i, len;
var upgradeFormType = function(type, callback) {
var modType = type.replace(/-/g,'_');
if (!kendo.forms.features[modType] ||that.options.alwaysUseWidgets) {
form.find('input[type=' + type + ']').each(callback);
}
};
// base call to widget initialization
Widget.fn.init.call(this, element, options);
if (that.options.styleInputs) {
form.find('input, button').each(function(index, val) {
// Add the k-input class to each form element (or
// k-button for buttons), providing Kendo UI styling
// to all elements, not just those the widget will transform.
var el = $(val);
if (val.type === 'button' ||
val.type === 'submit' ||
val.type === 'reset') {
el.addClass('k-button');
} else {
el.addClass('k-input');
}
});
}
// Add basic support for form types defined in the typeUpgrades array
for (i = 0, len = typeUpgrades.length; i < len; i++) {
var typeObj = typeUpgrades[i];
upgradeFormType(typeObj.type, typeObj.upgrade);
}
// Add placeholder support if not provided by the browser
if(!kendo.forms.features.placeholder) {
form.find('[placeholder]').each(function(index, val) {
var el = $(val);
// Strip CR and LF from attribute vales, as specified in
// www.w3.org/TR/html5/forms.html#the-placeholder-attribute
var placeholderText = el.attr('placeholder')
.replace(/(\\r\\n|\\n|\\r)/gm,'');
// When the field loses focus, clear out the placeholder if
// the input contains a value.
el.on('blur', function() {
var $el = $(this);
var labelNode = this.previousSibling;
if (this.value) {
labelNode.nodeValue = '';
$el.addClass('relPlaceholder');
} else if (labelNode.nodeValue !== placeholderText) {
labelNode.nodeValue = placeholderText;
$el.removeClass('relPlaceholder');
}
});
el.wrap('<label class="placeholder">' + placeholderText + '</label>');
el.addClass('placeholder');
});
}
},
options: {
// The name is what will appear in the kendo namespace (kendo.ui.Form).
// The jQuery plug-in would be jQuery.fn.kendoForm.
name: 'Form',
alwaysUseWidgets: false,
styleInputs: true
}
});
ui.plugin(Form);
} (jQuery, kendo));
As we go through the next three performance tweaks, we’ll make minor and major changes to the preceding sources. Once we’re done with all three, I’ll create another JSPerf test to compare each change so that we can measure the relative impact to performance. Let’s take a look, first, at an easy change.
The second perf tweak: caching DOM elements
As you probably know, accessing and mutating the DOM is one of the most expensive operations you can make in JavaScript. Whether you’re using a library like jQuery or a raw DOM selector method, such as getElementById or querySelector, selecting elements from your page is a memory-hogging, thread-blocking process that you want to perform with caution. This is not to say, of course, that you should avoid interacting with the DOM, because that would be silly. Rather, you should keep this reality in mind as you build your polyfills and do your best to minimize DOM interactions as much as possible.
While there are many ways to minimize DOM interactions in our JavaScript apps and polyfills, the two most common best practices are as follows:
§ Minimize DOM reads by caching the result of selection operations into local variables.
§ Minimize DOM writes by batching mutation operations together.
As an example of the batching approach, let’s assume that I’m iterating over some collection of values in JavaScript and building up an HTML list (<ul> or <li>). Instead of appending each row (<li>) to my list, one at a time, a batching approach would lead me to build up the entire list in a string or DOM DocumentFragment and append the entire collection to the list container a single time. With this approach, I’m mutating the DOM—and triggering the browser’s expensive layout, paint, and render operations—a single time, instead of once for each list item.
Chances are, if you’ve been doing frontend work for a while, this approach isn’t news to you. We know that DOM writes are slow, and we take necessary precautions to avoid them. DOM reads, on the other hand, are a bit less worrisome, but still worth minimizing. As such, we address these by creating local variables for the result of DOM reads and operate on these variables when we need to access page elements.
An example of this element-caching approach with jQuery can be seen in Example 5-5. On line 10, you’ll see the following:
var form = $(element);
In this case, element represents the <form> that I’m calling the Kendo UI widget constructor on (new kendoForm()). The jQuery method gives me the <form> element, which I then assign to the form variable.
Further down the sample, you’ll notice that I then access this variable three additional times, each time calling form.find to further refine the list. In this case, even though the form itself is cached, jQuery has to return to the DOM to give me the collection of elements that match my findselector. Since all of my find operations are meant to operate on HTML input elements, I can make my cached variable a bit more targeted, which I’ve done in Example 5-6. Note that I’ve clipped some code from the source that’s not relevant to the current discussion.
Example 5-6. kendo.forms.js polyfill main logic refactored to cache form inputs
(function($, kendo) {
var ui = kendo.ui,
Widget = ui.Widget,
typeUpgrades = kendo.forms.types;
var Form = Widget.extend({
init: function(element, options) {
var that = this;
var inputs = $(element).find('input, button'); ![]()
var i, len;
var upgradeFormType = function(type, callback) {
// replace dash with underscore for features object lookup
var modType = type.replace(/-/g,'_');
if (!kendo.forms.features[modType] || that.options.alwaysUseWidgets) {
inputs.filter('input[type=' + type + ']').each(callback); ![]()
}
};
// base call to widget initialization
Widget.fn.init.call(this, element, options);
if (that.options.styleInputs) {
inputs.each(function(index, val) { ![]()
/* clipped */
});
}
for (i = 0, len = typeUpgrades.length; i < len; i++) {
var typeObj = typeUpgrades[i];
upgradeFormType(typeObj.type, typeObj.upgrade);
}
// Add placeholder support if not provided by the browser
if(!kendo.forms.features.placeholder) {
/* clipped */
}
},
options: { /* clipped */ }
});
ui.plugin(Form);
} (jQuery, kendo));
![]()
Cache the collection of <input> and <button> elements in my form
![]()
Use jQuery’s filter method to get only the inputs that match the current type
![]()
No need to filter here since the full collection is already cached.
Instead of caching the entire form in a local variable, I cache all of the <input> and <button> elements, since those are the only parts of the form I’m interested in at this point. With that new collection in hand, I’ll use jQuery’s filter method to refine the collection when I’m operating on a smaller subset. It’s a small change, but it cleans up the DOM reads for my polyfill and makes things a bit more readable to boot. Now, before we test the performance impact of this change, let’s make a few more tweaks so that we can view everything side by side at once.
The third perf tweak: ordering of arguments
The next change I’m going to make is a very small one, but it harkens back to the idea of avoiding unnecessary code paths as a way to get micro-optimizations in our code. Many times, these unneeded paths can be found in if statements that access one or more values before taking action. InExample 5-5, you’ll notice the following if statement on line 17:
if (!kendo.forms.features[modType] || that.options.alwaysUseWidgets)
This statement determines whether the current input type (number) is supported by the user’s browser or if the developer passed the alwaysUseWidgets option into the widget constructor. If either is true, we upgrade all instances of that input type on the form.
When dealing with multiconditioned if statements, it’s always a good idea to consider how the order of arguments affects code execution. For instance, since the feature tests appear first, these will always be evaluated. If, however, I reorder these arguments, I can ensure that my feature test object will be accessed only if alwaysUseWidgets is false:
if (that.options.alwaysUseWidgets || !kendo.forms.features[modType])
Had I not already refactored my feature tests to run once during script evaluation, this would likely be a noticeable performance gain. As it stands now, each feature is returning a simple Boolean, so I don’t expect to see much difference. Even still, I’m making this change to “future proof” my polyfill a bit. The alwaysUseWidgets option will always be a simple Boolean, but my feature tests could grow and become more complex as my library matures. Making this change now will keep me from introducing unintended performance costs down the road.
While the preceding example is a simple case for ordering arguments, it’s always a good idea to order your simple Booleans first in your if statements. When performing an or (||) evaluation, this will ensure that the right-hand arguments aren’t assessed unless the simple Boolean is false. When performing an and (&&) evaluation, right-hand arguments aren’t assessed unless the simple Boolean is true. In both cases, your more complex method-call Booleans won’t be evaluated unless their values are needed to fulfill or reject the condition in question.
The fourth perf tweak: minimizing loops
The final performance change I plan to make to my polyfill is a larger one, and is also a change that I expect to impact performance quite a bit. If you take a look at Example 5-5 a final time, you’ll notice that I’m looping (with for or jQuery’s each method) no less than four times during widget initialization. This can’t be the best approach, so I’m going to refactor my polyfill to loop as infrequently as possible.
In Example 5-5, I’m looping over the typeUpgrades collection defined in kendo.forms.types, and then separately looping over each input that matches that type. What’s more, I’m looping over each input to determine whether it needs separate widget styling (provided via CSS classes that Kendo UI uses to style “vanilla” inputs) and, finally, looping over each element that contains a placeholder attribute and upgrading those as well, if not supported by the browser.
As we built up our polyfill in Chapter 3, each of these additions made sense, and they do fulfill the functional requirements of my library. And yet, it all seems so inefficient. This inefficiency was likely introduced as a result of my initial decision to loop first over input types and second over elements. At the time, this made sense because it allowed me to simultaneously upgrade all of the color, number, or datetime inputs on the form using jQuery’s each method. But as I add other features, it becomes clear that my library will need to operate on each input individually, upgrading its type, dealing with attribute support, and even adding validation after I expand my library with that functionality.
So, to shift from several loops to a single loop, I need to move a few things around. For starters, my kendo.forms.types object needs to change. As illustrated in Example 5-7, I’ve changed the object from an array of type objects to a single object of key-value pairs. This will make it much easier for me to work with each type. You’ll also notice that I moved some of the “upgrade” logic for vanilla inputs and buttons out of my main file and into this object as well.
Example 5-7. Refactored kendo.forms.types source
(function (kendo) {
kendo.forms = kendo.forms || {};
var typeUpgrades = {
text: function(val) {
$(val).addClass('k-input');
},
color: function(val) {
$(val).kendoColorPicker({ palette: 'basic' });
},
number: function(val) {
$(val).kendoNumericTextBox();
},
range: function(val) {
$(val).kendoSlider({
showButtons: false,
tickPlacement: 'none'
});
},
file: function(val) {
$(val).kendoUpload();
},
/* clipped */
};
/* clipped */
kendo.forms.types = typeUpgrades;
} (kendo));
Next, I’ll make some changes to the core widget logic for my polyfill, as illustrated in Example 5-8. Not only have I collapsed things down into a single loop (inputs.each()), but I’ve also cleaned up my init method and moved some of the core logic into helper methods (shouldUpgradeType, upgradeInputType, upgradePlaceholder).
Example 5-8. kendo.forms.js refactored to use a single loop
(function($, kendo) {
var ui = kendo.ui,
Widget = ui.Widget,
typeUpgrades = kendo.forms.types,
features = kendo.forms.features,
vanillaInputRegEx = /text|button|submit|reset/i;
var Form = Widget.extend({
init: function(element, options) {
var that = this;
var inputs = $(element).find('input, button');
Widget.fn.init.call(this, element, options);
inputs.each(function(index, el) { ![]()
that.upgradeInputType(that, el); ![]()
if (el.getAttribute('placeholder') &&
!kendo.forms.features.placeholder) {
that.upgradePlaceholder(el); ![]()
}
});
},
shouldUpgradeType: function(type) {
/* clipped */
},
upgradeInputType: function(that, el) {
var type = el.getAttribute('type');
if (!type && el.nodeName === 'BUTTON') {
type = 'button';
}
if(vanillaInputRegEx.test(type) && that.options.styleInputs) {
typeUpgrades[type](el);
}
if (that.shouldUpgradeType(type)) {
typeUpgrades[type](el);
}
},
upgradePlaceholder: function(el) {
/* clipped */
},
options: {
name: 'Form',
alwaysUseWidgets: false,
styleInputs: true
}
});
ui.plugin(Form);
} (jQuery, kendo));
![]()
Single loop for evaluating all form inputs
![]()
Core upgrade functionality, refactored into an external function
![]()
Upgrade functionality for the placeholder attribute, refactored into an external function
I think you’ll agree that this is much cleaner, but is it any faster? For that matter, have any of these changes made a difference? Let’s take a look in the next section.
Running Performance Benchmarks
One of the nice things about JSPerf is that, with a little bit of setup, it’s easy to do side-by-side testing of revisions to your code. Along those lines, I created a new JSPerf test that includes all of the tweaks we’ve made in this chapter, and you can view it online. You can also append /edit to the end of the URL if you want to see how the test was set up, or make edits of your own.
For this test, I included the same sample form that we created in Chapter 3, and used JSPerf’s setup capability to load a different version of my polyfill source, depending on the individual test case. All told, I created four tests:
§ A baseline test, before any changes were made
§ A test for the element-caching refactor
§ A test of the argument-ordering refactor
§ A test for the single loop refactor
The results can be seen in Figure 5-3. The results for an individual run can be seen in the top part of the image, with summary results for all browsers at the bottom. There are a couple of things to take away from this image:
1. Individual test runs can give different results, so be sure to run your tests several times, and in as many browsers as possible. In the last image, my element-cache refactor looks like the slowest test, though it’s still well within the standard deviation (+/–) of 4.96% indicated by JSPerf. If you look at the bar charts at the bottom of the image, you’ll note that, over a larger sample size, the element-cache refactor (in yellow) is faster than my baseline test (in red) in most browsers.
2. For most browsers, the argument-reordering change isn’t much faster than the element-cache refactor. I expected this; so as long as it’s not noticeably slower, it’s a worthwhile change. However, it does seem to be visibly faster in the current version of Chrome (at the time of writing), so I’ll take it.
3. Finally, as expected, the single-loop refactor yielded the largest gains across most browsers, especially Chrome. It’s faster in Opera and Safari, though because of the huge speed improvements in modern browsers, the IE8 row looks empty. Surprisingly, these changes are all about even on Firefox but, again, since performance isn’t markedly worse, I’m OK with an outlier or two.
Tune It But Don’t Overdo It
As I have mentioned before, there’s not really much science involved in making performance tweaks to your polyfill. It’s more an exercise of trial and error with the goal of finding micro- and macro-optimizations that make your library faster. In the preceding examples, I made some small and large changes based on my knowledge of good JavaScript practices, and it turned out that those changes yielded some gains in most browsers.
Before I close this section, a word of caution: performance tuning is important, and it’s something you should spend time on, but I suggest being careful with it. It’s easy to make common sense changes that you might have missed in initial development, but once you’ve made a handful of obvious or even non-obvious tweaks, diminishing returns will start to set in, and you’ll be spending far too much time making changes to eke out an extra tenth of a percent speed improvement. When it starts to feel like each change isn’t moving the performance needle enough, or even moving it in the wrong direction, it’s time to feel confident that you’ve done your best, and move on.
Dealing with Browser-Specific Edge Cases
Now that we’ve talked about general performance testing, I’ll close this chapter with a brief discussion about browser-specific edge cases. As you can see from the previous sections, it’s possible to set up a very robust process for testing performance across several browsers. This is useful, but there will always be outliers in both performance and functionality (in our case, IE7 and 8). Once we’ve identified these, it’s time to investigate with some additional, manual tests.
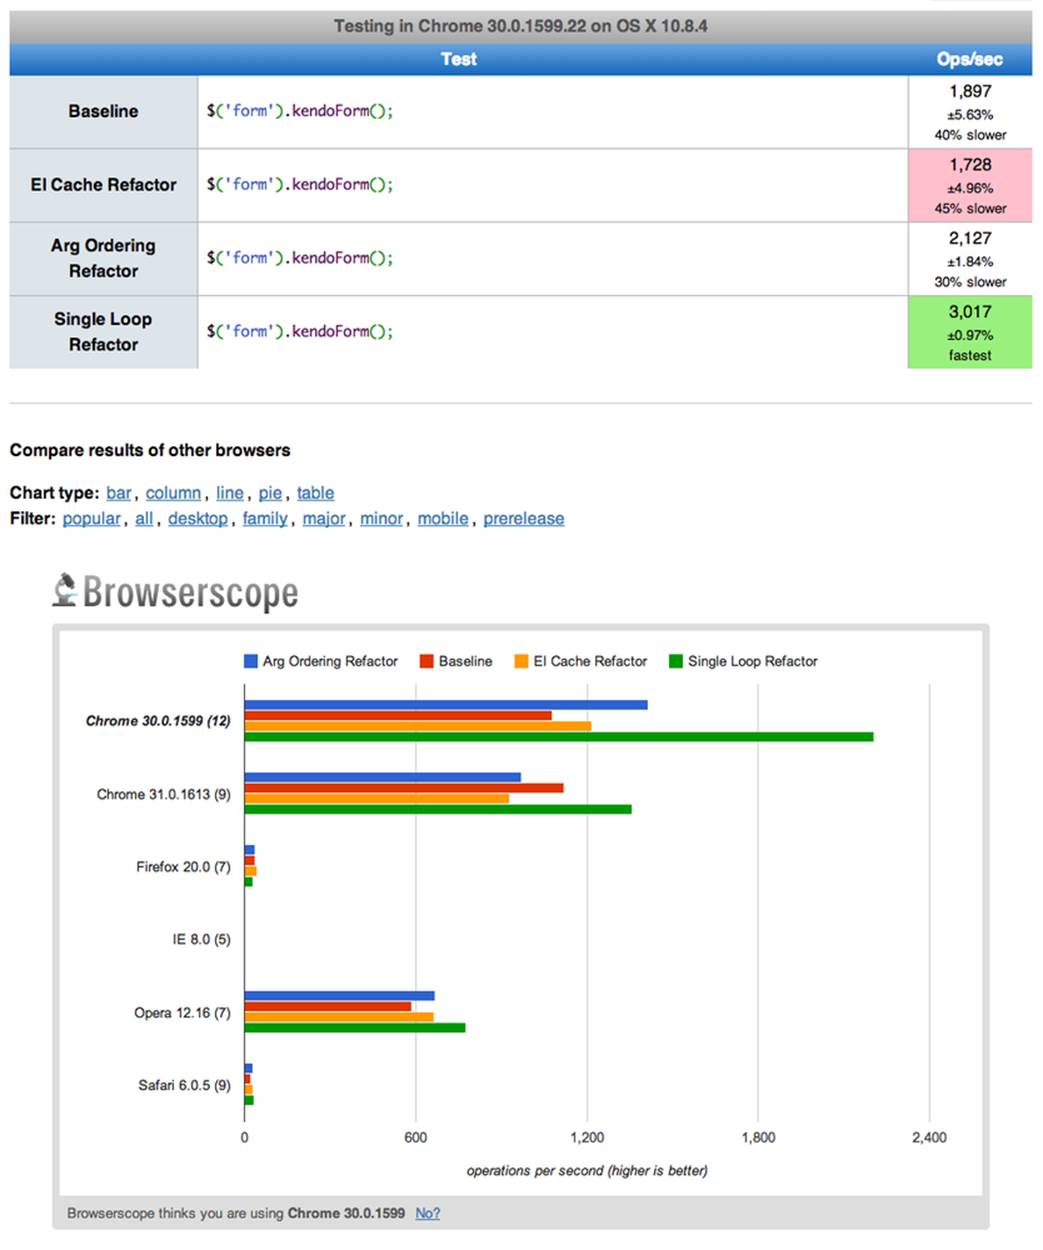
Figure 5-3. JSPerf test for tweaks 2–4
Regardless of your build and automated testing workflow, there’s no substitute for hands-on actual testing with certain browsers, especially oldIE. While it’s still important to test IE7 and 8 for most kinds of sites and apps, it’s critically important when you are building polyfills. More often than not, IE7 and 8 will need the functionality your polyfill provides, so you’ll want to test on these browsers early and often.
After making each of the performance tweaks listed in this chapter, I was sure to run all of my automated tests with the grunt test and grunt x-test commands I set up in Chapter 4. Everything looks great in the latest browsers, but when I open up a VM with IE8 or IE7, I see something that looks more like Figure 5-4.
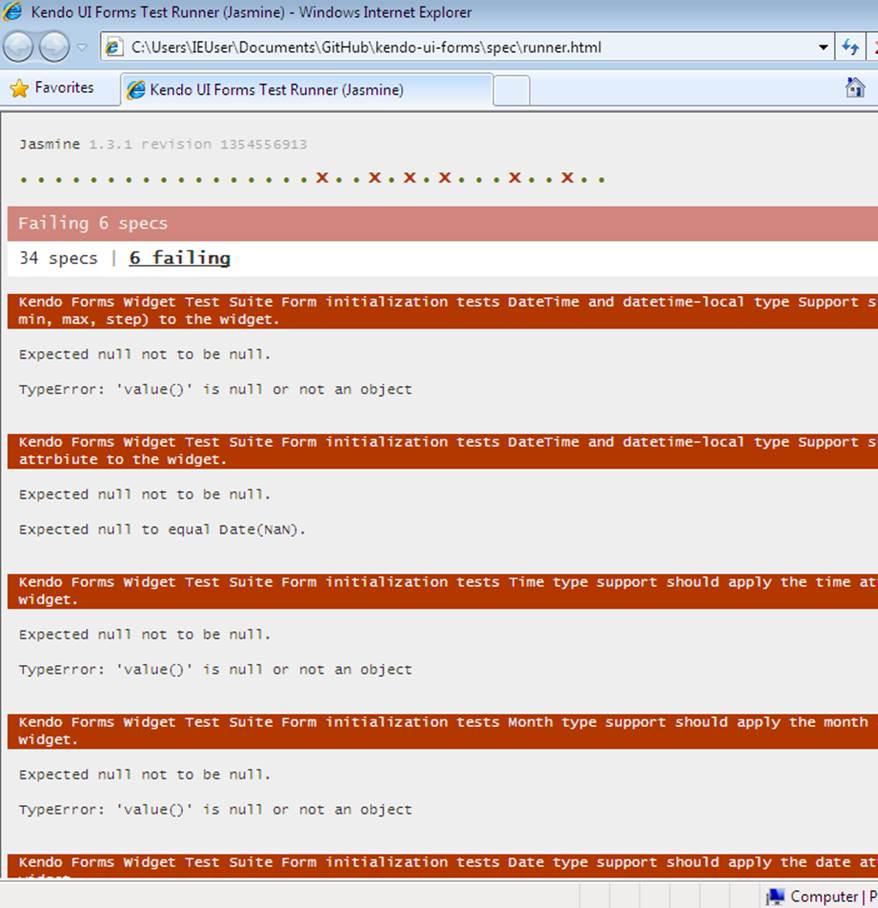
Figure 5-4. Testing my polyfill with IE8
In spite of all of my testing, I still have a handful of failing tests in IE7 and 8. Digging deeper, however, I see that they’re all date- and time-related tests, which suggests a common cause for all of these. Let’s take a look at the first failing test, which is listed in Example 5-9.
Example 5-9. DateTime Jasmine test block in fixtures.js
describe('DateTime and datetime-local type Support', function() {
it('should apply the datetime attributes (val, min, max, step) to the widget',
function() {
fixtures.load('datetime-type.html');
$('#datetime-form').kendoForm();
var datetimeInput = $('#datetime');
var datetimeObject = datetimeInput.data('kendoDateTimePicker');
var dateRegex = /\/|-| /g;
var valParts = datetimeInput.val().split(dateRegex);
var minParts = datetimeInput.attr('min').split(dateRegex);
var maxParts = datetimeInput.attr('max').split(dateRegex);
expect(datetimeObject.value()).not.toBeNull();
expect(datetimeObject.value().getMonth()+1).toEqual(
parseInt(valParts[0], 10)); ![]()
expect(datetimeObject.value().getDate()).toEqual(
parseInt(valParts[1], 10));
expect(datetimeObject.value().getFullYear()).toEqual(
parseInt(valParts[2], 10));
// Run Same tests for min and max date values
// ...
});
}
![]()
This test fails here in IE7 and 8
This test, which I’ve clipped for readability, is designed to make sure that the Kendo UI DateTime widget is properly initialized with the date input’s value attribute. In IE7 and 8, this test fails at the second expect. Upon further investigation, it appears that the dateTimeObject variable is null because my DateTime widget wasn’t properly initialized. That means that the problem is in my “upgrade” function, which I’ve included in Example 5-10.
Example 5-10. DateTime upgrade logic added to kendo.forms.features.js
var typeUpgrades = {
datetime: function (val) {
var input = $(val);
// Step attribute is seconds, interval in minute
var defaults = getDateTimeDefaults(input);
defaults.interval = input.attr('step') ?
Math.round(parseInt(input.attr('step'), 10)/60) : 30;
input.kendoDateTimePicker(defaults);
}
/* Other upgrades */
};
function getDateTimeDefaults(input) {
return {
value: input.val().length > 0 ? new Date(input.val()) : null,
min: input.attr('min') ? new Date(input.attr('min'))
: new Date(1900, 0, 1),
max: input.attr('max') ? new Date(input.attr('max'))
: new Date(2099, 11, 31)
};
}
kendo.forms.types = typeUpgrades;
The issue, it would seem, is with the getDateTimeDefaults helper function, which takes my input and returns an object with date values that I then pass to the Kendo UI kendoDateTimePicker method. If you look closely, you’ll notice that I’m not properly sanitizing my attribute values to make sure that they contain a valid date. Instead, I’m merely checking for the presence of any value before calling the new Date() constructor on that value. Even still, these are my own unit tests, and I’m passing only perfectly valid ISO date strings, as per the forms section of the HTML5 spec, so why in the world are my tests failing?
The answer is deceptively simple: IE7 and 8 don’t support the ISO Date standard when parsing date strings. Welcome to the world of cross-browser polyfill development, my friends! Thankfully, it’s a relatively simple fix. If I wanted to take an external dependency, I could include a library like Moment.js to handle the hassle of date parsing. I can also leverage built-in features of Kendo UI or jQuery to help. For the sake of completeness, however, in this case, I’m going to add my own fix. First, I’ll add a new createDateFromInput method to the kendo.forms.types.js file, as shown in Example 5-11.
Example 5-11. Handling ISO and non-ISO date formats for oldIE in kend.forms.features.js
function createDateFromInput(val, defaultDate, prefix) {
if (!val) { return defaultDate; }
if (prefix) { val = prefix + val; }
if (!Date.parse(val)) {
// Valid ISO Dates may not parse on some browsers (IE7,8)
var altDate = new Date(val.replace(/-/g, '/'));
if (altDate) {
// If this alternate value is valid, add a day
// to account for UA parsing
return new Date(altDate.setDate(altDate.getDate() + 1));
}
return defaultDate;
}
return new Date(val);
}
This simplistic solution takes a string value, a defaultDate, and an optional prefix value, which I’ll need to parse the HTML5 time and month input types. If the passed-in value parses correctly, I’ll return a new Date object with that value. If not, I’ll replace the dashes (–) with slashes (/) and attempt to parse again, which should resolve my issues in IE7 and 8.
Next, I can modify my getDateTimeDefaults function to use this new function:
function getDateTimeDefaults(input) {
return {
value: createDateFromInput(input.val(), null),
min: createDateFromInput(input.attr('min'), new Date(1900, 0, 1)),
max: createDateFromInput(input.attr('max'), new Date(2099, 11, 31))
};
}
With this in place, my datetime and datetime-local tests will pass. The remaining failing tests relate to similar problems with the time and month input types, and as soon as I modify those upgrade functions to use my new helper method, I should see all passing tests in IE7 and 8, as shown in Figure 5-5.
Much like performance testing, cross-browser issues are hard to generalize. Each browser has its own quirks and edge cases that behave differently from all the rest. IE7 and 8 certainly aren’t alone in this regard. Modern specs have done a great job of minimizing these types of differences in newer browsers, but you should expect to encounter hairy issues from time to time as you build cross-browser polyfills. Thankfully, these quirks and their workarounds are often well documented, so you shouldn’t need to go far to find a fix.
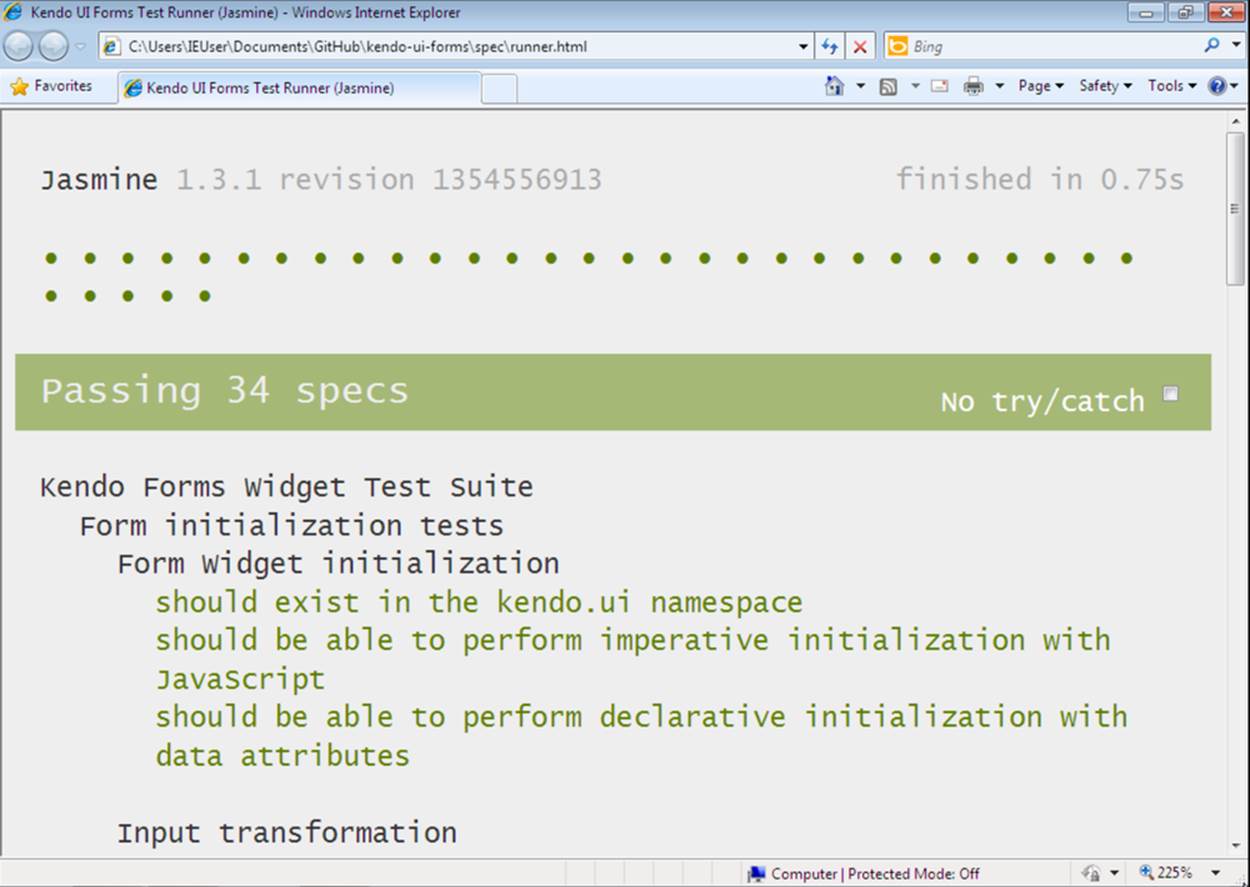
Figure 5-5. All tests passing in IE8
Mobile-Specific Considerations
In this chapter, we’ve focused mostly on overall JavaScript and DOM rendering performance considerations. While this is important for all browsers, you’ll often find that you need to focus specifically on mobile for polyfills that are meant to be used on devices. In addition to the tips shared previously, let’s look at a couple of mobile-specific performance recommendations:
§ File size matters.
§ Always test on devices.
File Size Matters
While also true for the desktop, it’s critical that you pay attention to overall file size when building polyfills for mobile and devices. Not only does the size of a JavaScript or CSS file affect the rendering time on devices—which often have browser engines that don’t perform as fast as their desktop counterparts—but a larger file means more bytes for the mobile device to download from the network, which has a cost on both the user’s battery and data plan.
Web developers are becoming increasingly aware of the performance impact on app resources, so do your fellow developers a favor and make sure that your polyfill is as small as possible, both by including only the needed functionality and also by delivering a minified production version of your library. If your polyfill is broad in scope, as is the case of the HTML5 Forms Library, you might even consider providing functionality in modules that can be delivered separately or combined via a custom build process.
In the case of our Forms polyfill, it’s also important for me to think about the file size of my dependencies. Specifically, in the case of Kendo UI Web, I’m using only a subset of all of the widgets and features available in this library, so it doesn’t make sense to require the end user to download that entire file. Thankfully, Kendo UI provides its widgets in a modular form, and I can use these to create a custom build of the library that uses only the widgets required, and then ship this with the source of my polyfill.
Always Test on Devices
Perhaps it goes without saying, but in today’s mobile world, testing across browsers means testing device browsers, too. And even though the device browsers are mobile versions of their desktop counterparts, it doesn’t mean that every feature available in Chrome for the desktop is also available in Chrome for mobile. What’s more, because the speed and performance of your library is just as important as its functionality, it’s critical that you regularly run your tests on physical mobile devices to ensure that you’re delivering a great polyfill experience.
Unfortunately, it’s not possible to use Karma to automatically test mobile browsers—BrowserStack does have mobile emulators, but it’s a paid product—so you’ll likely need to rely on friends, family, and the goodwill of developers working with your polyfill to test across devices. Even better, if you live in a city with an open device lab, consider scheduling regular visits for testing. Finally, there are paid services—for example, DeviceAnywhere—for accessing physical devices for testing, but since you’re not likely to be building your polyfill for profit, it’s probably not worth the steep cost of these services.
Over the last three chapters, we’ve discussed many of the ins and outs of building your own cross-browser polyfills. In Chapter 3, we explored some practices for project structure and explored the ins and outs of adding initial functionality and a bit of refactoring. Then, in Chapter 4, we configured a solid build and test environment that allowed us to test our polyfill in the browser and via command-line tools like Grunt, Jasmine, and Karma. Finally, we looked at performance and edge-case tuning, and explored some examples using JSPerf to fine-tune the speed of our polyfill. Collectively, you should have a solid foundation to use for building your own polyfills, and I can’t wait to see what you’ll come up with!
Next, we’ll turn the discussion to future polyfilling, or the practice of adding new APIs and functionality to our browsers, for the purpose of vetting and testing out what’s next for the web platform.