Sams Teach Yourself Java in 24 Hours, 7th Edition (2014)
Part IV: Programming a Graphical User Interface
Hour 14. Laying Out a User Interface
THIS HOUR’S TO-DO LIST:
![]() Create a layout manager.
Create a layout manager.
![]() Assign a layout manager to a container.
Assign a layout manager to a container.
![]() Use panels to organize components in an interface.
Use panels to organize components in an interface.
![]() Work with unusual layouts.
Work with unusual layouts.
![]() Create a prototype for a Java application.
Create a prototype for a Java application.
When you begin designing graphical user interfaces (GUIs) for your Java programs, one obstacle you face is that your components can move around. Whenever a container changes size—such as when a user resizes a frame—the components it holds may rearrange themselves to fit its new dimensions.
This fluidity works in your favor because it takes into account the differences in how interface components are displayed on different operating systems. A clickable button might look different in Windows than it does in Linux or Mac OS.
Components are organized in an interface by using a set of classes called layout managers. These classes define how components are displayed within a container. Each container in an interface can have its own layout manager.
Using Layout Managers
In Java, the placement of components within a container depends on the size of the component, the size of other components, and the height and width of the container. The layout of buttons, text fields, and other components can be affected by the following things:
![]() The size of the container
The size of the container
![]() The size of other components and containers
The size of other components and containers
![]() The layout manager that is being used
The layout manager that is being used
There are several layout managers you can use to affect how components are shown. The default manager for panels is the FlowLayout class in the java.awt package, which was used during the previous hour.
Under FlowLayout, components are dropped onto an area in the same way words are organized on a page in English—from left to right and then down to the next line when there’s no more space.
The following example could be used in a frame so that it employs flow layout when components are added:
FlowLayout topLayout = new FlowLayout();
setLayout(topLayout);
You also can set up a layout manager to work within a specific container, such as a JPanel object. You can do this by using the setLayout() method of that container object.
The Crisis application has a GUI with five buttons. Create a new Java file for a class named Crisis. Enter text from Listing 14.1 into the file and save the file.
LISTING 14.1 The Full Text of Crisis.java
1: package com.java24hours;
2:
3: import java.awt.*;
4: import javax.swing.*;
5:
6: public class Crisis extends JFrame {
7: JButton panicButton;
8: JButton dontPanicButton;
9: JButton blameButton;
10: JButton mediaButton;
11: JButton saveButton;
12:
13: public Crisis() {
14: super("Crisis");
15: setLookAndFeel();
16: setSize(348, 128);
17: setDefaultCloseOperation(JFrame.EXIT_ON_CLOSE);
18: FlowLayout flo = new FlowLayout();
19: setLayout(flo);
20: panicButton = new JButton("Panic");
21: dontPanicButton = new JButton("Don't Panic");
22: blameButton = new JButton("Blame Others");
23: mediaButton = new JButton("Notify the Media");
24: saveButton = new JButton("Save Yourself");
25: add(panicButton);
26: add(dontPanicButton);
27: add(blameButton);
28: add(mediaButton);
29: add(saveButton);
30: setVisible(true);
31: }
32:
33: private void setLookAndFeel() {
34: try {
35: UIManager.setLookAndFeel(
36: "com.sun.java.swing.plaf.nimbus.NimbusLookAndFeel"
37: );
38: } catch (Exception exc) {
39: // ignore error
40: }
41: }
42:
43: public static void main(String[] arguments) {
44: Crisis frame = new Crisis();
45: }
46: }
Figure 14.1 shows the application running.
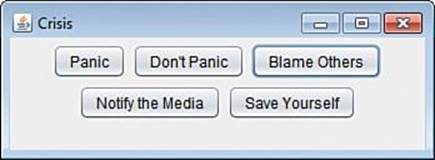
FIGURE 14.1 Arranging components using flow layout.
The FlowLayout class uses the dimensions of its container as the only guideline for how to lay out components. Resize the window of the application to see how components are instantly rearranged. Make the window twice as wide, and you see all of the JButton components are now shown on the same line.
The GridLayout Manager
The GridLayout class in the java.awt package organizes all components in a container into a specific number of rows and columns. All components are allocated the same amount of size in the display area, so if you specify a grid that is three columns wide and three rows tall, the container is divided into nine areas of equal size.
GridLayout places all components as they are added into a place on a grid. Components are added from left to right until a row is full, and then the leftmost column of the next grid is filled.
The following statements create a container and set it to use a grid layout that is two rows wide and three columns tall:
GridLayout grid = new GridLayout(2, 3);
setLayout(grid);
Figure 14.2 shows what the Crisis application would look like if it used grid layout.
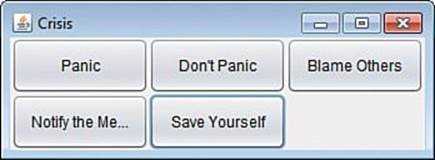
FIGURE 14.2 Arranging components using grid layout.
One label in Figure 14.2 displays text that has been shortened. If the text is wider than the area available in the component, the label is shortened using ellipses (...).
Note
This book’s website contains modified versions of the Crisis application that demonstrate each of the layout managers introduced during this hour, starting with CrisisGridDemo.java to show off grid layout. To see their source code, visit www.java24hours.com, click the cover of your book, and navigate to the Hour 14 page.
The BorderLayout Manager
The BorderLayout class, also in java.awt, arranges components at specific positions within the container that are identified by one of five directions: north, south, east, west, or center.
The BorderLayout manager arranges components into five areas: four denoted by compass directions and one for the center area. When you add a component under this layout, the add() method includes a second argument to specify where the component should be placed. This argument should be one of five class variables of the BorderLayout class: NORTH, SOUTH, EAST, WEST, and CENTER are used for this argument.
Like the GridLayout class, BorderLayout devotes all available space to the components. The component placed in the center is given all the space that isn’t needed for the four border components, so it’s usually the largest.
The following statements create a container that uses border layout:
BorderLayout crisisLayout = new BorderLayout();
setLayout(crisisLayout);
add(panicButton, BorderLayout.NORTH);
add(dontPanicButton, BorderLayout.SOUTH);
add(blameButton, BorderLayout.EAST);
add(mediaButton, BorderLayout.WEST);
add(saveButton, BorderLayout.CENTER);
Figure 14.3 shows how this looks in the Crisis application.
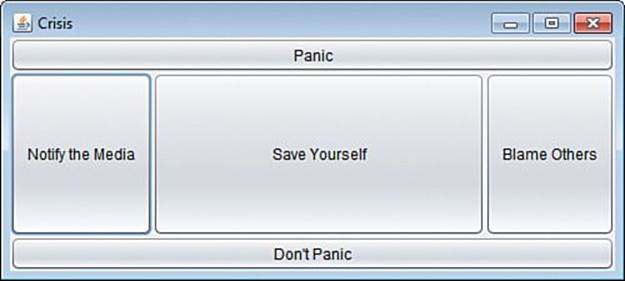
FIGURE 14.3 Arranging components using border layout.
The BoxLayout Manager
Another handy layout manager, BoxLayout in the javax.swing package, makes it possible to stack components in a single row horizontally or vertically.
To employ this layout, create a panel to hold components, and then create a layout manager with two arguments:
![]() The component to organize in box layout
The component to organize in box layout
![]() The value BoxLayout.Y_AXIS for vertical alignment and BoxLayout.X_AXIS for horizontal alignment
The value BoxLayout.Y_AXIS for vertical alignment and BoxLayout.X_AXIS for horizontal alignment
Here’s code to stack the Crisis components:
JPanel pane = new JPanel();
BoxLayout box = new BoxLayout(pane, BoxLayout.Y_AXIS);
pane.setLayout(box);
pane.add(panicButton);
pane.add(dontPanicButton);
pane.add(blameButton);
pane.add(mediaButton);
pane.add(saveButton);
add(pane);
Figure 14.4 shows how this turns out.
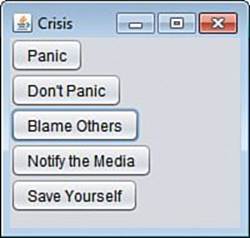
FIGURE 14.4 Stacking components using box layout.
Separating Components with Insets
As you are arranging components within a container, you can move components away from the edges of the container using Insets, an object that represents the border area of a container.
The Insets class, which is part of the java.awt package, has a constructor that takes four arguments: the space to leave at the top, left, bottom, and right of the container. Each argument is specified using pixels, the same unit of measure employed when defining the size of a frame.
The following statement creates an Insets object:
Insets around = new Insets(10, 6, 10, 3);
The around object represents a container border that is 10 pixels inside the top edge, 6 pixels inside the left, 10 pixels inside the bottom, and 3 pixels inside the right.
To make use of an Insets object in a container, you must override the container’s getInsets() method. This method has no arguments and returns an Insets object, as in the following example:
public Insets getInsets() {
Insets squeeze = new Insets(50, 15, 10, 15);
return squeeze;
}
Figure 14.5 shows how this would change the FlowLayout-managed interface shown in Figure 14.1.
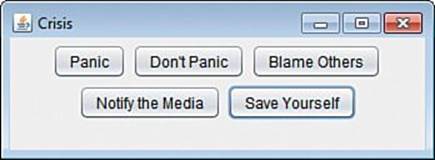
FIGURE 14.5 Using insets to add space around components.
The container shown in Figure 14.5 has an empty border that’s 15 pixels from the left edge, 10 pixels from the bottom edge, 15 pixels from the right edge, and 50 pixels from the top edge.
Note
A JFrame container has a built-in inset to make room for the frame’s title bar. When you override getInsets() and set your own values, a low inset value causes the container to display components underneath the title bar.
Laying Out an Application
The layout managers you have seen thus far were applied to an entire frame; the setLayout() method of the frame was used, and all components followed the same rules. This setup can be suitable for some programs, but as you try to develop a GUI with Swing, you often find that none of the layout managers fit.
One way around this problem is to use a group of JPanel objects as containers to hold different parts of a GUI. You can set up different layout rules for each of these parts by using the setLayout() methods of each JPanel. After these panels contain all the components they need to contain, you can add the panels directly to the frame.
The next project develops a full interface for the program you write during the next hour. The program is a Lotto number cruncher that assesses a user’s chance of winning one of the multimillion dollar Lotto contests in the span of a lifetime. This chance is determined by running random six-number Lotto drawings again and again until the user’s numbers turn up as the big winner. Figure 14.6 shows the GUI you are developing for the application.

FIGURE 14.6 Displaying the GUI of the LottoMadness application.
Create a new Java file called LottoMadness, enter text from Listing 14.2 into the source editor, and save the file.
LISTING 14.2 The Full Text of LottoMadness.java
1: package com.java24hours;
2:
3: import java.awt.*;
4: import javax.swing.*;
5:
6: public class LottoMadness extends JFrame {
7:
8: // set up row 1
9: JPanel row1 = new JPanel();
10: ButtonGroup option = new ButtonGroup();
11: JCheckBox quickpick = new JCheckBox("Quick Pick", false);
12: JCheckBox personal = new JCheckBox("Personal", true);
13: // set up row 2
14: JPanel row2 = new JPanel();
15: JLabel numbersLabel = new JLabel("Your picks: ", JLabel.RIGHT);
16: JTextField[] numbers = new JTextField[6];
17: JLabel winnersLabel = new JLabel("Winners: ", JLabel.RIGHT);
18: JTextField[] winners = new JTextField[6];
19: // set up row 3
20: JPanel row3 = new JPanel();
21: JButton stop = new JButton("Stop");
22: JButton play = new JButton("Play");
23: JButton reset = new JButton("Reset");
24: // set up row 4
25: JPanel row4 = new JPanel();
26: JLabel got3Label = new JLabel("3 of 6: ", JLabel.RIGHT);
27: JTextField got3 = new JTextField("0");
28: JLabel got4Label = new JLabel("4 of 6: ", JLabel.RIGHT);
29: JTextField got4 = new JTextField("0");
30: JLabel got5Label = new JLabel("5 of 6: ", JLabel.RIGHT);
31: JTextField got5 = new JTextField("0");
32: JLabel got6Label = new JLabel("6 of 6: ", JLabel.RIGHT);
33: JTextField got6 = new JTextField("0", 10);
34: JLabel drawingsLabel = new JLabel("Drawings: ", JLabel.RIGHT);
35: JTextField drawings = new JTextField("0");
36: JLabel yearsLabel = new JLabel("Years: ", JLabel.RIGHT);
37: JTextField years = new JTextField();
38:
39: public LottoMadness() {
40: super("Lotto Madness");
41:
42: setSize(550, 400);
43: setDefaultCloseOperation(JFrame.EXIT_ON_CLOSE);
44: GridLayout layout = new GridLayout(5, 1, 10, 10);
45: setLayout(layout);
46:
47: FlowLayout layout1 = new FlowLayout(FlowLayout.CENTER,
48: 10, 10);
49: option.add(quickpick);
50: option.add(personal);
51: row1.setLayout(layout1);
52: row1.add(quickpick);
53: row1.add(personal);
54: add(row1);
55:
56: GridLayout layout2 = new GridLayout(2, 7, 10, 10);
57: row2.setLayout(layout2);
58: row2.add(numbersLabel);
59: for (int i = 0; i < 6; i++) {
60: numbers[i] = new JTextField();
61: row2.add(numbers[i]);
62: }
63: row2.add(winnersLabel);
64: for (int i = 0; i < 6; i++) {
65: winners[i] = new JTextField();
66: winners[i].setEditable(false);
67: row2.add(winners[i]);
68: }
69: add(row2);
70:
71: FlowLayout layout3 = new FlowLayout(FlowLayout.CENTER,
72: 10, 10);
73: row3.setLayout(layout3);
74: stop.setEnabled(false);
75: row3.add(stop);
76: row3.add(play);
77: row3.add(reset);
78: add(row3);
79:
80: GridLayout layout4 = new GridLayout(2, 3, 20, 10);
81: row4.setLayout(layout4);
82: row4.add(got3Label);
83: got3.setEditable(false);
84: row4.add(got3);
85: row4.add(got4Label);
86: got4.setEditable(false);
87: row4.add(got4);
88: row4.add(got5Label);
89: got5.setEditable(false);
90: row4.add(got5);
91: row4.add(got6Label);
92: got6.setEditable(false);
93: row4.add(got6);
94: row4.add(drawingsLabel);
95: drawings.setEditable(false);
96: row4.add(drawings);
97: row4.add(yearsLabel);
98: years.setEditable(false);
99: row4.add(years);
100: add(row4);
101:
102: setVisible(true);
103: }
104:
105: private static void setLookAndFeel() {
106: try {
107: UIManager.setLookAndFeel(
108: "com.sun.java.swing.plaf.nimbus.NimbusLookAndFeel"
109: );
110: } catch (Exception exc) {
111: // ignore error
112: }
113: }
114:
115: public static void main(String[] arguments) {
116: LottoMadness.setLookAndFeel();
117: LottoMadness frame = new LottoMadness();
118: }
119: }
Even though you haven’t added any statements that make the program do anything yet, you can run the application to make sure that the graphical interface is organized correctly and collects the information you need.
This application uses several layout managers. To get a clearer picture of how the application’s user interface is laid out, take a look at Figure 14.7. The interface is divided into five horizontal rows that are separated by horizontal black lines in the figure. Each of these rows is a JPanelobject, and the overall layout manager of the application organizes these rows into a GridLayout of five rows and one column.
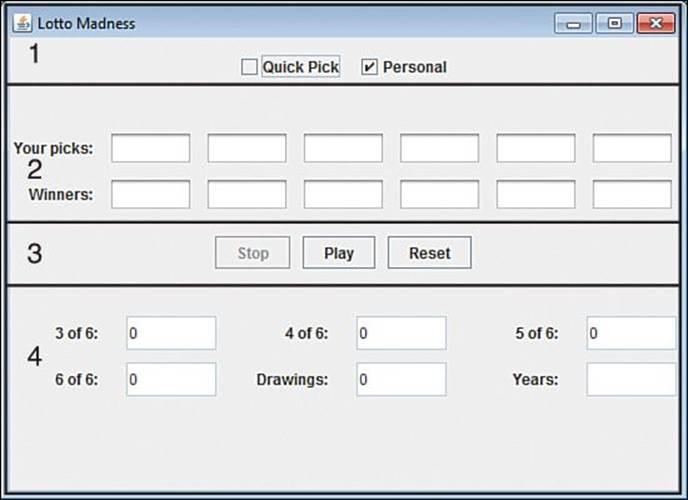
FIGURE 14.7 Dividing the LottoMadness application into panels.
Within the rows, different layout managers are used to determine how the components should appear. Rows 1 and 3 use FlowLayout objects. Lines 47–48 of the program show how these are created:
FlowLayout layout1 = new FlowLayout(FlowLayout.CENTER,
10, 10);
Three arguments are used with the FlowLayout() constructor. The first argument, FlowLayout.CENTER, indicates that the components should be centered within their container—the horizontal JPanel on which they are placed. The last two components specify the width and height that each component should be moved away from other components. Using a width of 10 pixels and a height of 10 pixels puts a small amount of extra distance between the components.
Row 2 of the interface is laid out into a grid that is two rows tall and seven columns wide. The GridLayout() constructor also specifies that components should be set apart from other components by 10 pixels in each direction. Lines 56–57 set up this grid:
GridLayout layout2 = new GridLayout(2, 7, 10, 10);
row2.setLayout(layout2);
Row 4 uses GridLayout to arrange components into a grid that is two rows tall and three columns wide.
The LottoMadness application uses several components described during this hour. Lines 9–37 are used to set up objects for all the components that make up the interface. The statements are organized by row. First, a JPanel object for the row is created, and then each component that goes on the row is set up. This code creates all the components and containers, but they are not displayed unless an add() method is used to add them to the application’s main frame.
In Lines 47–100, the components are added. Lines 47–54 are indicative of the entire LottoMadness() constructor:
FlowLayout layout1 = new FlowLayout(FlowLayout.CENTER,
10, 10);
option.add(quickpick);
option.add(personal);
row1.setLayout(layout1);
row1.add(quickpick);
row1.add(personal);
add(row1);
After a layout manager object is created, it is used with the setLayout() method of the row’s JPanel object—row1 in this case. When the layout has been specified, components are added to the JPanel by using its add() method. After all the components have been placed, the entirerow1 object is added to the frame by calling its own add() method.
The LottoMadness application sets the look and feel of the graphical user interface differently than in previous Swing applications. The setLookAndFeel() method is created as a class method—note the static keyword in Line 105—and called in the main() method in Line 116.
Previous applications made setLookAndFeel() an object method and called it within the object’s constructor. The reason this doesn’t happen in LottoMadness is because the look and feel must be selected before any instance variables have been created and given values.
Summary
When you design a Java program’s GUI for the first time, you might have trouble believing that it’s an advantage for components to move around. Layout managers provide a way to develop an attractive GUI that is flexible enough to handle differences in presentation.
During the next hour, you learn more about the function of a GUI. You get a chance to see the LottoMadness interface in use as it churns through lottery drawings and tallies up winners.
Workshop
Q&A
Q. Why are some of the text fields in the LottoMadness application shaded in gray while others are white?
A. The setEditable() method has been used on the gray fields to make them impossible to edit. The default behavior of a text field is to enable users to change the value of the text field by clicking within its borders and typing any desired changes. However, some fields are intended to display information rather than take input from the user. The setEditable() method prevents users from changing a field they should not modify.
Q. Was there really a Willy Wonka golden ticket winner in Willy Wonka and the Chocolate Factory whose death was too horrible for the movie?
A. The fate of Miranda Piker was so gruesome that she was dropped from the final draft of Roald Dahl’s book Charlie and the Chocolate Factory, which inspired the 1971 movie and its 2005 remake. Piker was a smug child who believed children should never play so they could attend school all the time. Her father was a school headmaster.
Piker and the other kids at Wonka’s factory are introduced to Spotty Powder, a sugary concoction that causes the eater to break out in red spots so they can feign illness and miss school. Piker and her father become outraged and decide to destroy the machine that makes it.
As their screams are heard from the adjacent room, Wonka explains that they’ve gone into the place where the candy’s ingredients are ground into powder. “That’s part of the recipe,” he tells Miranda’s mother. “We’ve got to use one or two schoolmasters occasionally or it doesn’t work.”
The Oompa-Loompas celebrate her demise with song: “Oh, Miranda Mary Piker,/How could anybody like her,/Such a priggish and revolting little kid./So we said, ‘Why don’t we fix her/In the Spotty-Powder mixer/Then we’re bound to like her better than we did.’/Soon this child who is so vicious/Will have gotten quite delicious,/And her classmates will have surely understood/That instead of saying, ‘Miranda!/Oh, the beast! We cannot stand her!’/They’ll be saying, ‘Oh, how useful and how good!’”
Quiz
To see whether your brain cells are laid out properly, test your Java layout management skills by answering the following questions.
1. What container is often used when subdividing an interface into different layout managers?
A. JWindow
B. JPanel
C. Container
2. What is the default layout manager for a panel?
A. FlowLayout
B. GridLayout
C. No default
3. The BorderLayout class gets its name from where?
A. The border of each component
B. The way components are organized along the borders of a container
C. Sheer capriciousness on the part of Java’s developers
Answers
1. B. JPanel, which is the simplest of the containers.
2. A. Panels use flow layout, but the default manager for frames and windows is border layout.
3. B. You must specify the border position of components with the use of directional variables such as BorderLayout.WEST and BorderLayout.EAST as you add them to a container.
Activities
If you’d like to keep going with the flow (and the grid and the border), undertake the following activities:
![]() Create a modified version of the Crisis application with the panic and dontPanic objects organized under one layout manager and the remaining three buttons under another.
Create a modified version of the Crisis application with the panic and dontPanic objects organized under one layout manager and the remaining three buttons under another.
![]() Make a copy of the LottoMadness.java file that you can rename to NewMadness.java. Make changes to this program so the quick pick or personal choice is a combo box and the start, stop, and reset buttons are check boxes.
Make a copy of the LottoMadness.java file that you can rename to NewMadness.java. Make changes to this program so the quick pick or personal choice is a combo box and the start, stop, and reset buttons are check boxes.
To see Java programs that implement these activities, visit the book’s website at www.java24hours.com.