Hands-On Sencha Touch 2 (2014)
Part II. Building the FindACab App
This part will be the starting point for building a real-world application, the FindACab app.
The FindACab app is a touch application for tablets that can be used to browse through nearby taxi services (provided by Yelp). This MVC app uses all the techniques covered in this part—creating the application architecture, requesting live data through the Yelp API web service, saving data offline, handling forms, theming your app, and creating production/native device builds.
If you want to create a Sencha Touch application without using Sencha Architect (Sencha’s visual design tool), you’ll need to use Sencha Cmd, command-line tools for generating and building a Sencha Touch app. As depicted in Figure 34, the first important step is to generate your folder structure with Sencha Cmd. It’s important to use Sencha Cmd, because it also saves metadata in a hidden .sencha folder that is required for building your application later. Step 2 is to write your application logic and classes, using the coding editor or IDE of your choice. Step 3, the last step, is to build your application. You need to build the application to create a minified package before going to production.
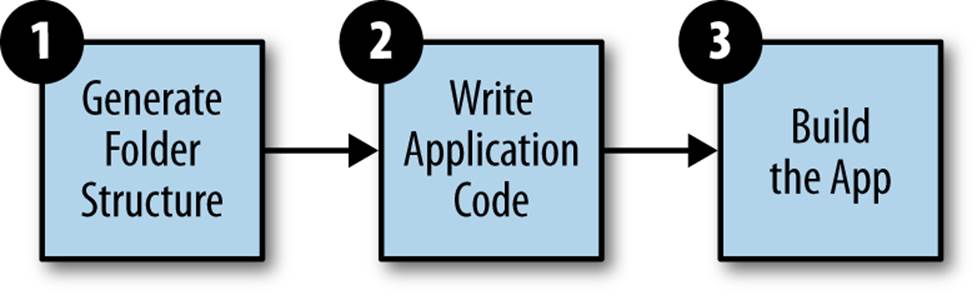
Figure 34. The process for writing a Sencha Touch application
This part focuses on all three steps of this process, and you’ll learn:
§ How to structure your code
§ How to implement data models
§ How to make remote connections by implementing server proxies
§ How to implement data stores
§ How to save data offline by implementing client proxies
§ How to work with view components like maps, lists, and floating panels
§ How to implement and handle forms
§ How to create a custom theme
§ How to create production and native builds
I’ll kick off with Step 1, how to generate the structure with Sencha Cmd. We will end this part with Step 3, how to create production and native builds (Chapter 14).
Chapter 6. Structured Code
If you work in software development, you probably will recognize the following situation: your manager comes in and drops a bombshell. Your coworker, the lead developer of the FindACab app, is ill. The app needs to go live today, but there’s a huge bug in it. The app doesn’t display any results. “Can you help fix this?” your boss asks (read: demands).
Together with the project manager, you review the application in Google Chrome. When you click on the Network tab, you see that the AJAX request returns no results. Digging deeper, you learn that this is because the parameters in the URL are incorrect. “Piece of cake,” you say, “there’s something wrong with the request URL. Just give me an hour.” But, once you open your coworker’s project file, you see that the entire project exists as one single JavaScript file. There is no structure in it at all. What should have taken one hour suddenly turns into five. Wouldn’t it be better if there were a bit more structure in the code?
Design Patterns
Another expression for building structure in code is creating a design pattern. When you are working with a large code base, you’re probably also working with a team. When working with teams, you’ll have to create standards because you don’t want to deal with a different coding style for every team member.
As of the release of Sencha Touch version 2.0, Sencha solves this challenge with the Model-View-Controller (MVC) pattern. The benefits of using this pattern are scalability, maintainability, and flexibility. Once your code is broken into smaller chunks, bugs are easier to find and fix. This improves code maintainability—which means that it will be that much easier if your manager asks you to implement the ability to find clubs in the Find-a-Bar app. The MVC pattern improves teamwork too, because it’s much easier for multiple developers to work on the app because they can all work on different parts simultaneously (and at the end of the day, you will like your coworkers better!).
In the previous scenario with the Find-a-Bar app, you noticed that there was something wrong with the AJAX request. With an MVC pattern, you don’t need to search in your whole project—you’ll know that there’s a bug in the application logic, so you just need to open the controller. The whole functionality wherein the application creates Sencha Touch view components may be a black box for you. Figure 6-1 shows such a schema.
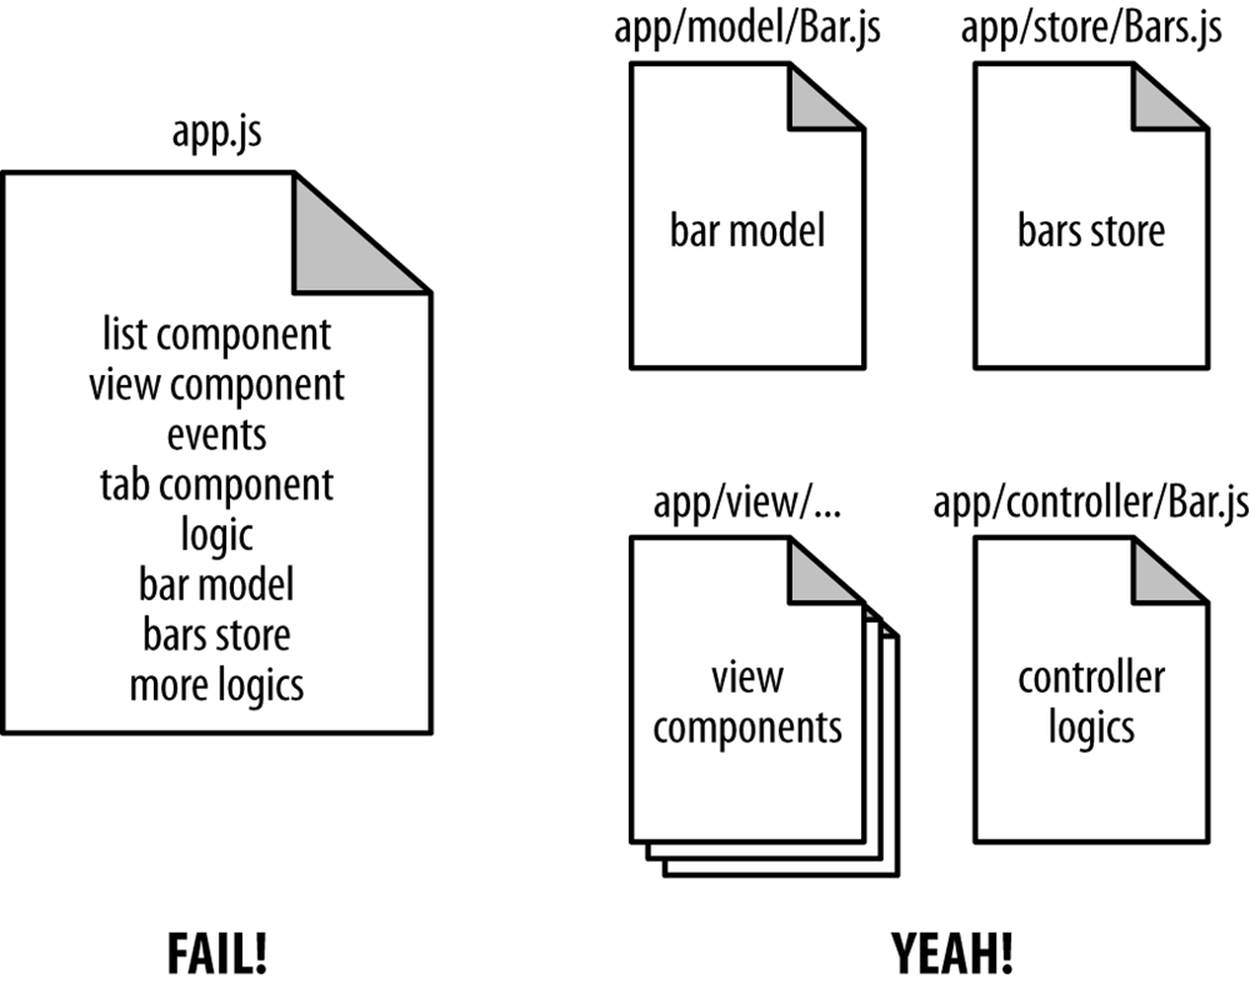
Figure 6-1. On the left, a fail scenario: all the code is in one single file. On the right, how it should be: a nice structured way. If there is a bug in the app logic, it’s much easier to find because you don’t have to open and read all the UI-related code files.
Let’s start with an overview of the MVC pattern to get a more in-depth understanding of design patterns in general.
The MVC Pattern
The more functionality your app gains, the more code you’ll have to write. More code means your app will be harder to maintain. If you don’t prepare for that larger code base in advance, you can end up with a hard-to-read, maintenance headache.
In server-side technologies, MVC is a common pattern, used in such popular frameworks as Ruby on Rails, Django, Spring MVC, and the Zend Framework for PHP. As web applications have become more and more advanced, JavaScript frameworks are implementing MVC ideas too. Thetraditional MVC design pattern decouples the design of the application into three important components: the data model (model), the data presentation (view), and the application logic (controller). With this pattern, code can easily be reused and changes in the interface (view) won’t mess up the model (and vice versa). See Figure 6-2 for an illustration of this pattern.
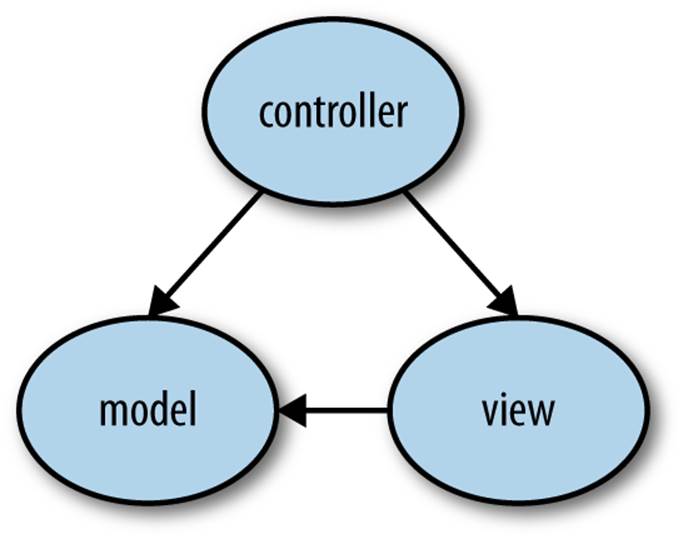
Figure 6-2. An overview of the classic MVC pattern: the controller updates the model and view. The view can update the model.
There are several JavaScript frameworks that have implemented the core ideas of the MVC pattern. Some examples are Ext JS, KnockOut JS, YUI, Backbone JS, and, the focus of this book, Sencha Touch.
Sencha MVC
Sencha Touch and Ext JS have their own implementation of the MVC design pattern. Although it is partly based on the traditional MVC design pattern, the Sencha Touch MVC design pattern differs a bit from the familiar server-side MVC pattern. First of all, Sencha Touch apps are single-page applications (SPAs), meaning they have one HTML page instead of multiple HTML pages. This is because most mobile web apps load content in the screen instead of surfing to a real URL. This is very common for mobile web applications. With server-side MVC, you could have one controller file that dispatches events to the correct page URL. Although Sencha Touch applications have only one HTML page, you can have multiple views and you could also have multiple controllers that can listen to user input.
Beyond this, there is one other way in which the Sencha Touch MVC differs from the traditional (or server-side) MVC; in the traditional MVC, the term model is a general term, encompassing application data. In Sencha Touch (and also in Ext JS), model is more clearly defined, comprising a model class definition (which contains the application data structure), and two other class definitions: store (the data pool) and record (the actual data).
The following explains what these terms stand for:
§ The model (Ext.data.Model) is a class definition that represents some object—for example, a TaxiService. Like a database table, it describes the structure of the data. A model can contain fields (Ext.data.Field); for example, the TaxiService has an id, a name, and aphonenumber field.
§ A record (Ext.data.Record) could be a specific TaxiService Model object, or the instance of the TaxiService class—for example, the record with the name “Taxi Amsterdam” and phone number “020xxxxxxx.”
§ The Ext.data.Store is the whole set of model objects, a client-side cache of all records together. Figure 6-3 illustrates this.
Sencha Touch’s views are classes that contain view components—basically, any Sencha component that you can see on the screen. All Sencha Touch view components extend from Ext.Component; therefore, every component has a certain set of configurations, like to set an html string, or to hide() and show() components. We will discuss Sencha Touch views in Chapter 11.
Sencha Touch’s controller (Ext.app.Controller) is like the glue between the model and the view. Controllers are responsible for responding to events that occur within your app. You can compare the Sencha Touch controller with a helpdesk—for example, the helpdesk of an Internet provider to call when your Internet is down. In my experience, usually the person who answers my call does not understand the Internet service at all, but she knows who I am because I am a customer in the database, and she can forward my call to a technical support person who can help me out. That is exactly how the controller in Sencha Touch works: it doesn’t know much about the application, but it has references to view components and it can access the data. It works as a dispatcher, listening to (user, system, or lifecycle) events and forwarding to some method. SeeFigure 6-3. Now, you can choose to write down all your (business) logic within the controller, or you choose to keep the controller clean and small, and forward to a static or singleton method in a separate class.
Once you have defined all the class definitions for your models, stores, views, and controllers, there needs to be one certain place to hook it all up and kickstart the application. This is what happens in the app.js file that defines Ext.application; it is the entry point for every MVC in Sencha Touch.
A Sencha Touch application can consist of multiple models, stores, views, and controllers. In the upcoming chapters, you will build the FindACab app. This application will also make use of the Sencha MVC, and its architecture will look like Figure 6-4.
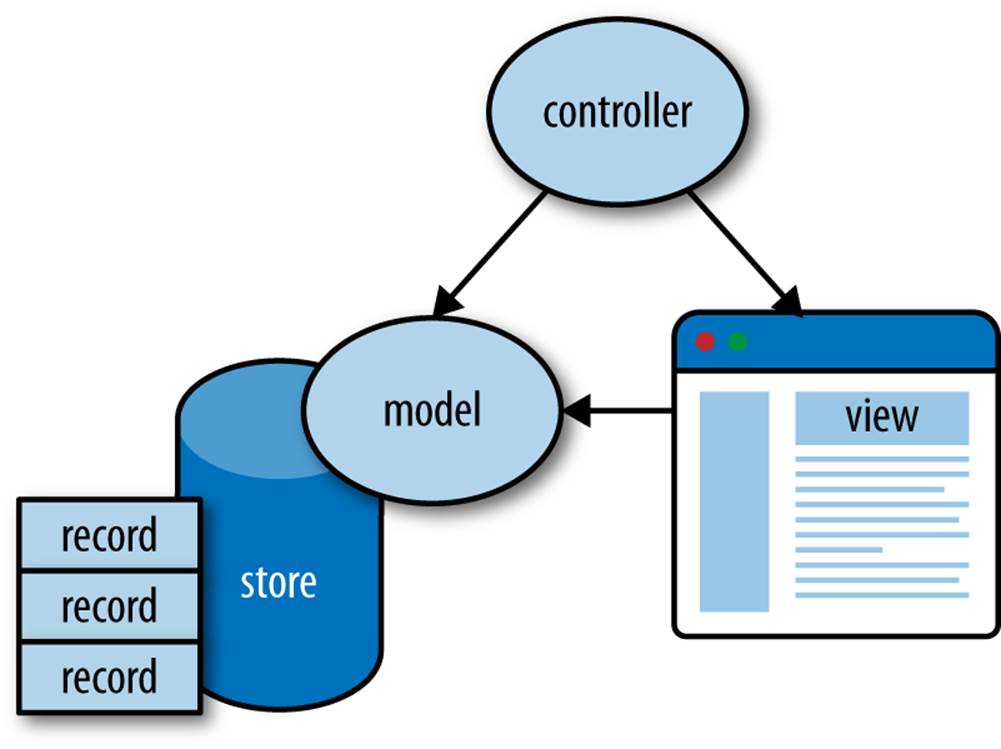
Figure 6-3. An overview of the Sencha MVC pattern: the term “model” encompasses a model, store, and record class definition.
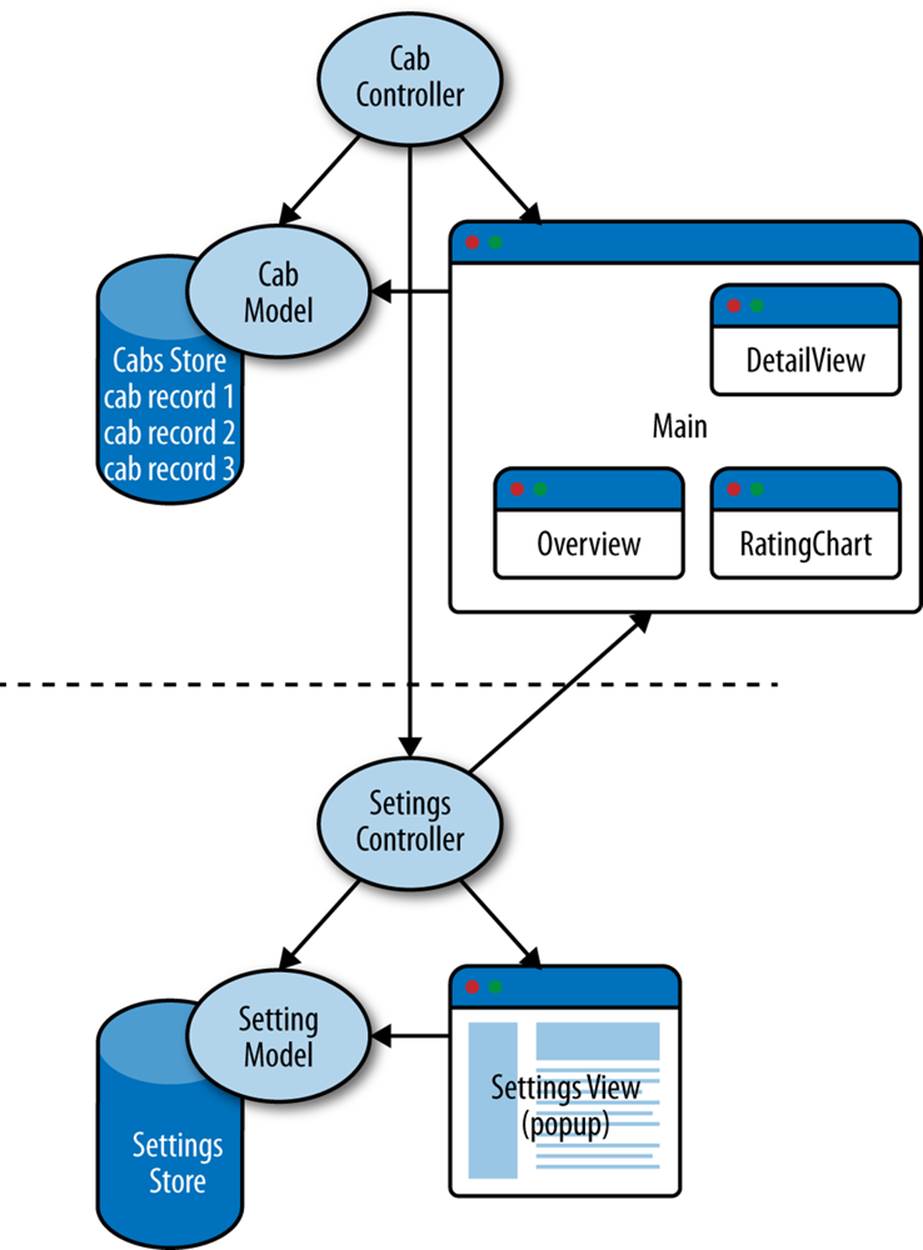
Figure 6-4. The architecture of the FindACab app
The FindACab app has a main view, which contains an overview list with all the Cab items (names of TaxiServices). The overview list is hooked up to the Cabs store, to display all items. When you select a TaxiService from the list, it will show a detail screen with a rating chart. Both views (the chart and the detail view) get populated by a record selected from the Cabs store. The Cab controller will take care of that. From the main view you can open the Settings view, which is a pop-up window that contains a form. The user can enter a location, and the Settingscontroller will make sure that this information will be saved in the Settings store.
Now that you have a sense of the MVC pattern and how this concept translates to a Sencha MVC pattern, you probably want to know where to start. Well, honestly, it is very easy; with Sencha Touch in combination with Sencha Cmd, you can generate the Sencha Touch MVC application and folder structure. Let’s begin with the first step: generating an application with Sencha Cmd to start developing.
What Is Sencha Cmd?
Sencha Cmd is a tool to design, develop, and deploy Sencha desktop and touch applications based on design standards with good performance. This cross-platform command-line tool provides many automated tasks around the full lifecycle of your applications, from generating a new workspace, MVC application, or form, to deploying an application for a production, test, or native environment.
As mentioned, Sencha Cmd is a tool that runs on the command line. To make sure it’s installed, enter sencha in the terminal or command prompt. When Sencha Cmd is correctly installed, it will output the version number and an overview of all the available Sencha commands. If it’s not correctly installed, consult Chapter 2 for installation instructions. Figure 6-5 shows how Sencha Cmd should look.
TIP
The Sencha documentation is a great online resource that tells you all the information you need about Sencha Cmd. Also, typing the command sencha help will tell you which options are available for Sencha Cmd.
Is Sencha Cmd correctly installed? Yes? OK, let’s start!
In this chapter, you’ll learn:
§ How to generate an application with Sencha Cmd
§ How to generate a model with Sencha Cmd
§ How to implement a data store
§ How to implement a view
§ How to generate a controller with Sencha Cmd
§ How to reference a component from a controller
§ How to listen to events from a controller
§ How to implement the MVC entry point
§ How to load external classes
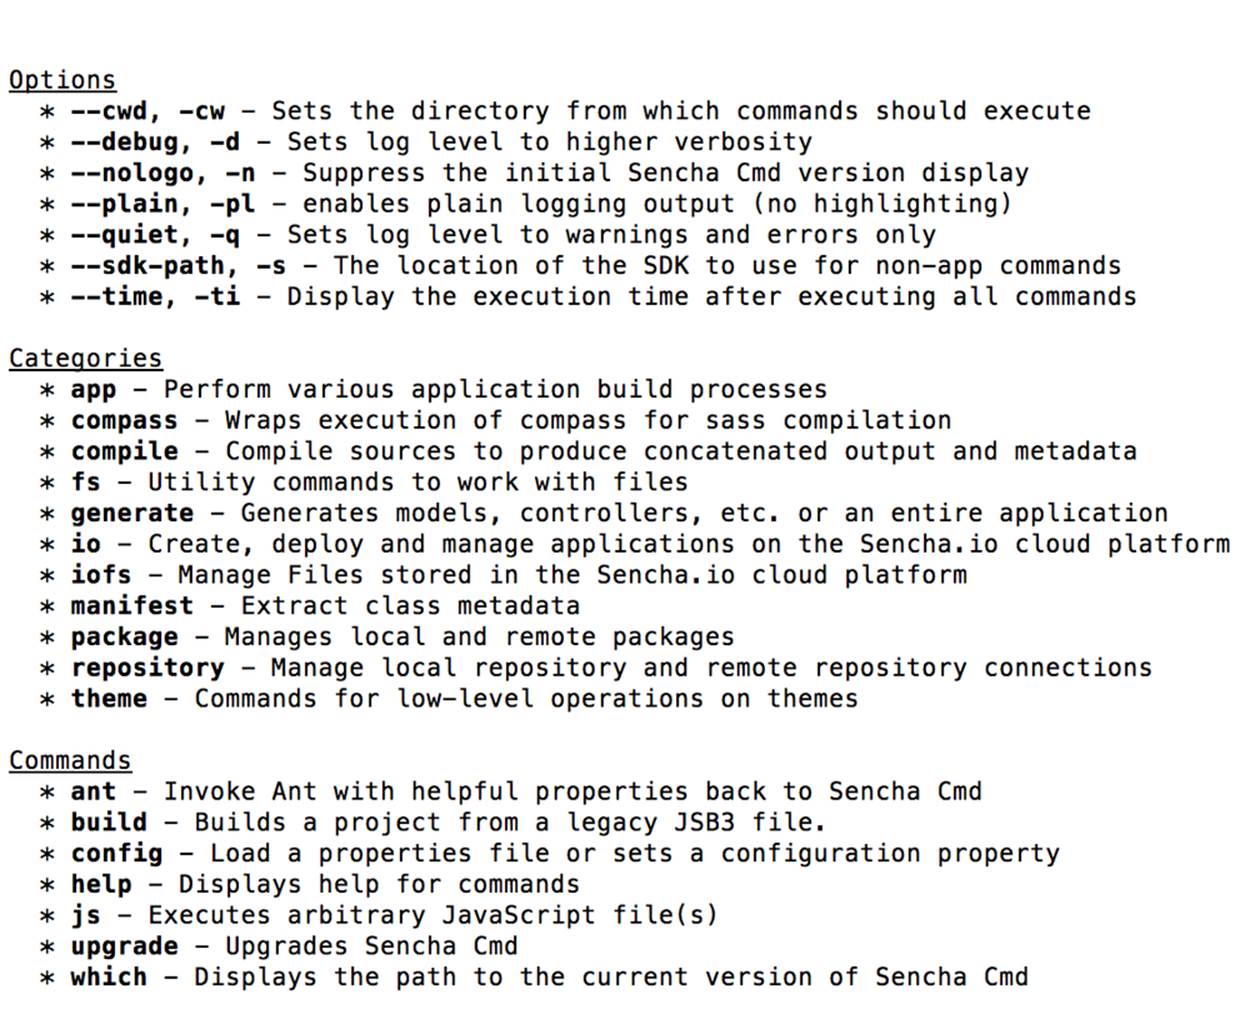
Figure 6-5. Sencha Cmd running on the command line.
Generating an Application with Sencha Cmd
When you generate an MVC application with Sencha Cmd, it generates the folder structure and all the files for you.
Make sure Sencha Cmd is installed and sencha is added to your classpaths. Open your terminal/command prompt and on the command line navigate to the Sencha Touch sdk (framework) folder.
(If you followed Chapter 2, it will be the touch folder.)
The following command generates a new application with the namespace FindACab to the findacab folder in your web root:
cd /path/to/sencha-touch-2-sdk
sencha generate app -name <namespace> -path ../<appfolder>
This preceding line generates the MVC folder structure for the FindACab app as follows:
§ .sencha/
§ touch/
§ app/
§ sencha.cfg
§ plugin.xml
§ app/
§ controller/
§ model/
§ profile/
§ store/
§ view/
§ app.js
§ app.json
§ bootstrap.js
§ bootstrap.json
§ build.xml
§ index.html
§ packager.json
§ resources/
§ css/
§ app.css
§ sass/
§ app.scss
§ icons/
§ …
§ loading/
§ …
§ images/
Here’s a description of each folder:
The hidden .sencha folder
The hidden .sencha. folder contains config/meta files and Ant scripts for build processes with Sencha Cmd. These are settings such as the paths to the namespace (in this case, FindACab) and references to the Sencha Touch folder and folders that are outside the app folder. If you are not going to add new folders outside the app MVC folder structure, you probably don’t need to edit the sencha.cfg file. But if you are adding new folders outside the app folder, you will have to add the new folder paths to the app classpath in .sencha/app/sencha.cfg to make sure your build processes won’t fail.
What else is in the .sencha folder? Lots of Ant build scripts. You can use these to figure out what’s going on during the build, but in general you shouldn’t change them. If you want to change the build process (e.g., to copy additional folders over to a production folder), you would change the build.xml file that’s located in the root of your project folder.
TIP
Apache Ant is a software tool for automating software build processes. It requires the Java platform, and it uses XML to describe the build process and its dependencies. By default, the XML file is named build.xml.
Ant is open source software, and is released under the Apache Software License. For more information about Apache Ant, check out the Ant manual.
The app folder
The generate app command generates the app folder. This folder contains the MVC folder structure—folders for the models, views, controllers, stores, and profiles. We will discuss all the MVC folders in this chapter. For now, it autogenerates a single view: app/view/Main.js. This displays the demo application, a tabpanel with two panels: the welcome tab and the video tab. (Go ahead, you can test it in your modern browser; just open http://localhost/findacab.) See Figures 6-6 and 6-7.
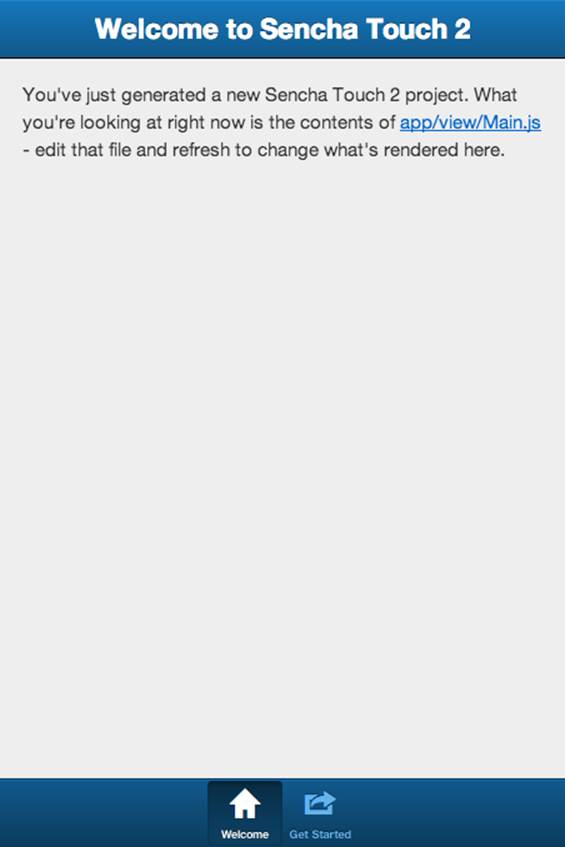
Figure 6-6. The generated FindACab app; it contains a tabpanel with a demo view like the welcome tab
The resources folder
The resources folder contains subfolders with files for CSS, Sass, and app assets such as icons and splash screens.
The touch folder
If the application is generated without a workspace, there will be a touch folder. When the application is generated in a workspace, this touch folder will be located one folder up. The touch folder is a copy of the Sencha Touch sdk. All the necessary framework files, Sencha documentation, and example applications are not included in this copy.
The other files
Then there are some files in the root of the folder. app.js is the starting point of your MVC application. app.json, packager.json, and build.xml contain settings and instructions for building or distributing your application. The bootstrap.js and bootstrap.json files are required for development purposes. They contain metadata (things like aliases, alternate class names, and filepaths) for the dynamic loader to make sure that your application will load the correct files in the correct order.
The index.html file
This is just the HTML index page you browse to in order to load the application. It contains the references to the Sencha Touch framework, the JavaScript start point (the app.js), and the stylesheet.
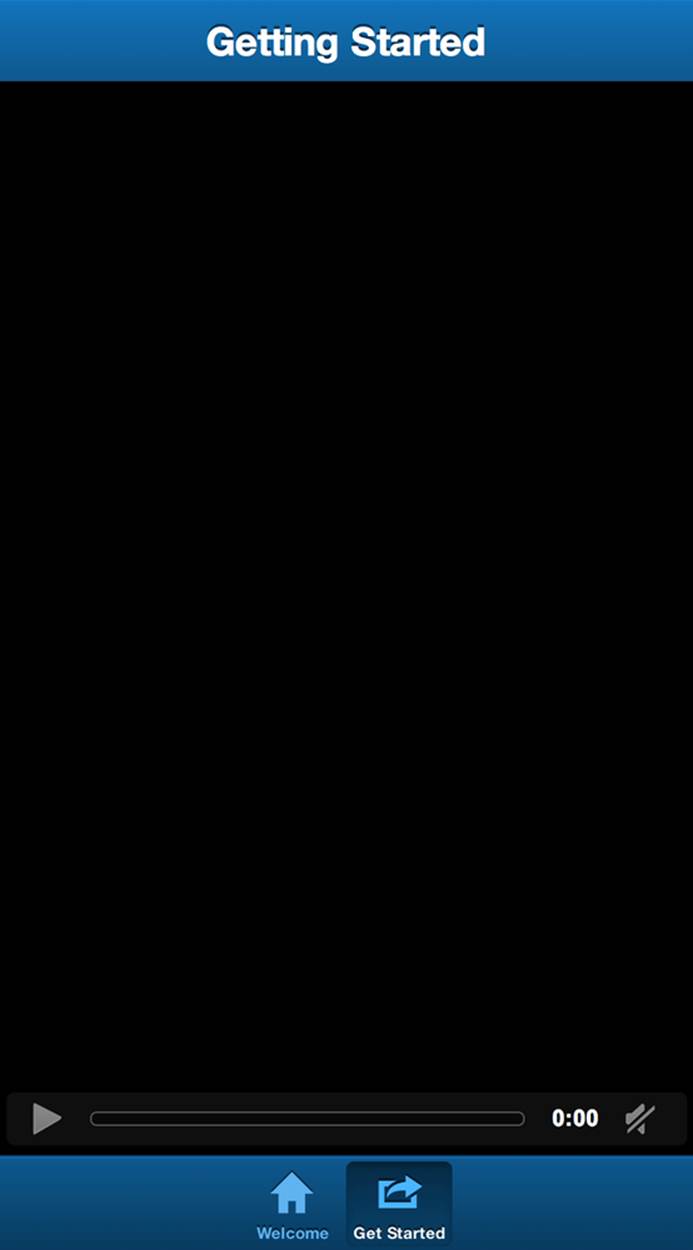
Figure 6-7. The generated FindACab app; it contains a tabpanel with a demo view like the video tab
Review the folder structure in Figure 6-8.
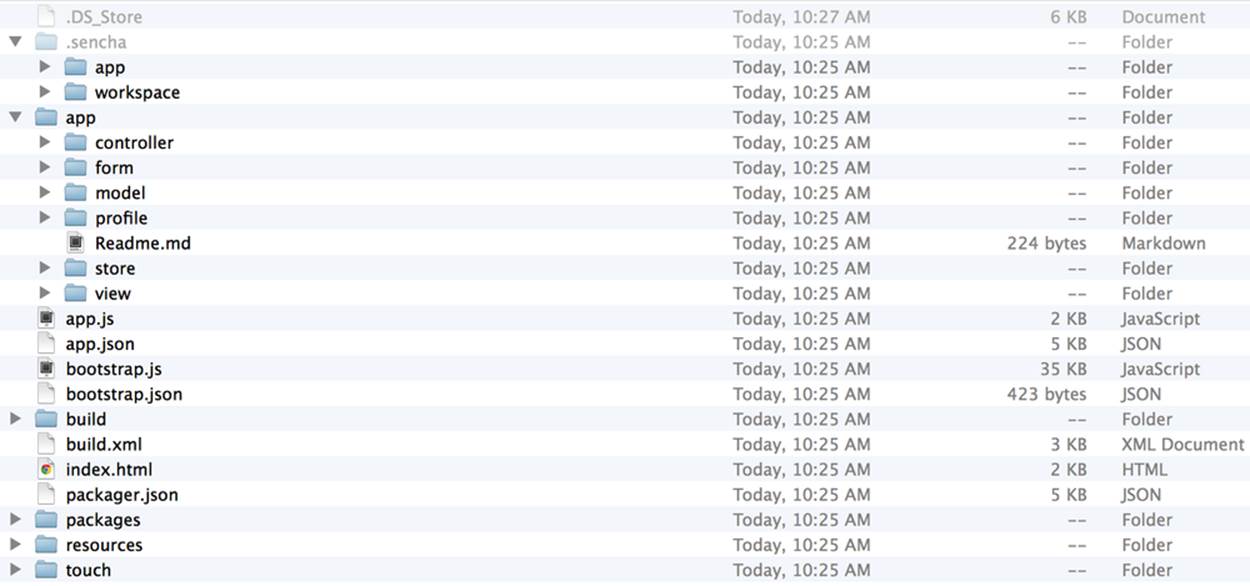
Figure 6-8. Sencha Touch application folder structure
NOTE
There is a shorter version of the generate app sencha g a FindACab ../findacab. There is only one command in Sencha Cmd that starts with a g (for generate), and within the generate command, there is only one thing you can generate that starts with an a (app).
Generating Workspaces
If you want to create multiple Touch applications that share the Sencha Touch framework, or maybe even share code, the correct procedure would be to generate a workspace. (It’s even possible to host a copy of Ext JS—Sencha’s framework for rich desktop applications—in a workspace.) To generate a workspace, run the following command:
sencha generate workspace <../myworkspacefolder>
The generate workspace command will generate workspace metadata in the hidden .sencha folder, which contains the workspace classpath. It will copy the touch framework folder in the root of the workspace folder. (This is a little different than when generating just an app because in that case the touch folder would be located in the application root folder.) The generate workspace command will also create two new (empty) folders: a packages folder, in case you want to download Sencha plug-ins, and a build folder, which will be the location where your build packages will be created and stored.
Once you have a workspace, generating apps is the same as before:
cd <../myworkspacefolder>
cd touch
sencha generate app -name <namespace}> -path <../appfolder>
Figure 6-9 shows the folder structure of a Sencha Touch workspace.
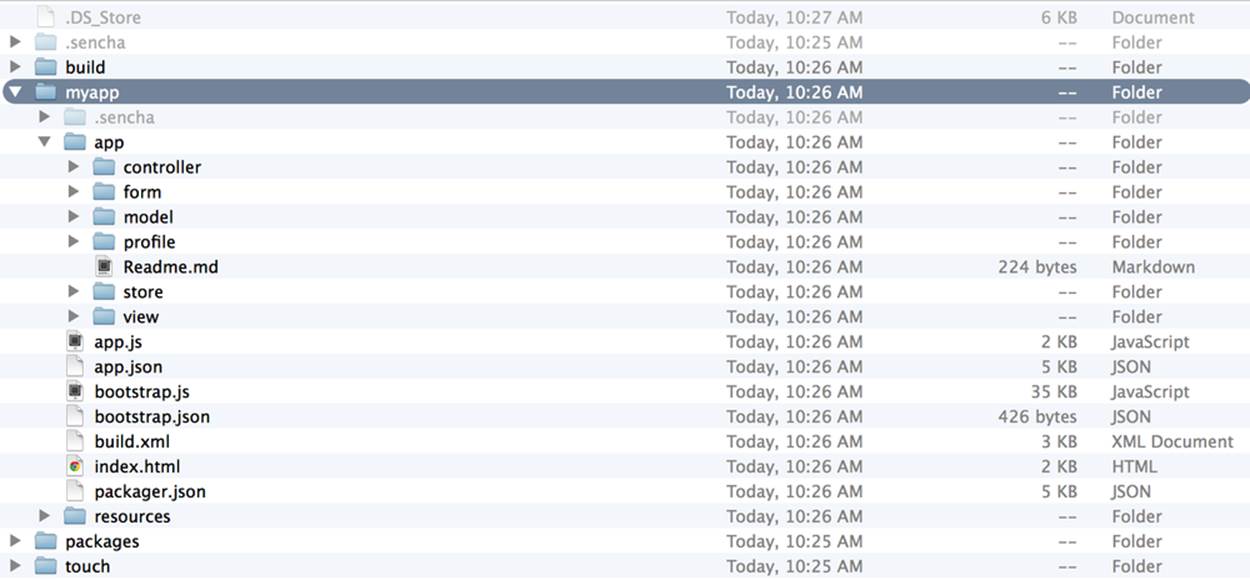
Figure 6-9. Sencha Touch workspace folder structure
TIP
If you want to upgrade to a newer version of Sencha Touch, you can download the latest version from the website and let Sencha Cmd update your folder structure. Here’s an example of how to upgrade the app (or workspace) from the command line:
sencha app upgrade ../path-new-sdk-folder
When upgrading your framework, you don’t need to worry—it won’t touch your self-written classes. It basically just copies a newer version of the sdk in your application root or workspace, and it might change some metadata in the hidden .sencha folder. However, it’s also possible that it will need to update the app.js, app.json, or bootstrap.js files.
Now that you have all the files, you can start modifying the generated application, to build your own Touch application. But before doing so, let’s take a deeper look into all the layers of the Sencha MVC. Let’s inspect the data model first. For more detailed information about Sencha Cmd, check out the Sencha Guide.
Generating a Model with Sencha Cmd
To create the model definition, you create a new JavaScript file and save it in the app/model directory. But a better choice is to have Sencha Cmd generate it for you.
Here’s the general syntax for implementing the model definition for a Sencha MVC application. On the command line, navigate to the app folder and run the following command:
sencha generate model <MyModelName> <fieldstring>
Make sure you already have an MVC application generated with Sencha Cmd. To generate our FindACab app model, navigate to your project folder and type the following:
sencha generate model Cab id:auto,name:string,latitude:float,longitude:float,
address1:string,phone:string,state_code:string,zip:string,city:string,
userinput:string,country_code:string,avg_rating:float,distance:float
Sencha Cmd will generate the code shown in Example 6-1.
Example 6-1. app/model/Cab.js
Ext.define('FindACab.model.Cab', {
extend: 'Ext.data.Model',
config: {
fields: [
{ name: 'id', type: 'auto' },
{ name: 'name', type: 'string' },
{ name: 'latitude', type: 'float' },
{ name: 'longitude', type: 'float' },
{ name: 'address1', type: 'string' },
{ name: 'phone', type: 'string' },
{ name: 'state_code', type: 'string' },
{ name: 'zip', type: 'string' },
{ name: 'city', type: 'string' },
{ name: 'userinput', type: 'string'},
{ name: 'country_code', type: 'string' },
{ name: 'avg_rating', type: 'float' },
{ name: 'distance', type: 'float' }
]
}
});
That’s pretty impressive, eh? Sencha Cmd has created the full data model for you. Now you don’t need to type it all yourself (although you could).
The code in our newly generated JavaScript file defines the model Cab.js. Usually, the name of a model is a noun, because it has the namespace: FindACab.model.Cab translates to app/model/Cab.js. It makes this class behave like a model class because it extends all its properties fromExt.data.Model. Furthermore, this model has a lot of fields. Every field name has a type; for example, the field name phone has a type string. The possible field types for a model are string, int, float, boolean, and auto. The type auto means there is no type conversion at all.This might be handy when the model field represents an object (or array—note that an array in JavaScript is an object too).
Now that you have the model in the model folder, it should be linked somehow to the application. (For now, in the FindACab app, you will create a reference to the model in the app.js file. Later, you will move these references to a corresponding controller.) In Ext.application(), create amodels array, and assign the Cab model to it:
models:[
'Cab'
],
CONNECT A MODEL OR STORE TO APP.JS OR TO THE CONTROLLER?
A model can be hooked up to MVC architecture via the app.js models array or via the corresponding controller models array, as long as the corresponding controller is hooked up to the app.js controllers array. But which way is better? Honestly, it is an architecture choice. Imagine you have Cab and Car functionalities. Both have Cab and Car models, stores, and controllers. Say we hook up all Cab models and stores to a CabController and all Car models and stores to a CarController, and next week we decide to release the app but without the Car functionality. That would be just a simple matter of decoupling the CarController, whereas otherwise we would have had to go through all our code. So the choice is up to you!
The application knows where to find app/model/Cab.js because Cab in the models array defaults to the <NAMESPACE>.model.<MODELNAME> (FindACab.model.Cab), which again maps to the folder structure.
Now that you have built the model, you can start creating the data store.
Implementing a Data Store
Unfortunately, there is no command in Sencha Cmd that can generate stores. You have to create a JavaScript file yourself in the app/store/ directory:
Ext.define('NameSpace.store.MyStore', {
extend: 'Ext.data.Store',
});
The next code snippet defines the Cabs data store for the FindACab app. In this case, you have to create a new JavaScript file in the app/store/ folder that is called Cabs.js. Write the following in your new JavaScript file:
Ext.define('FindACab.store.Cabs', {
extend: 'Ext.data.Store',
});
The Sencha convention for naming the store class is to take the model class name (usually a noun) and make it plural. This model is called Cab, so the name of your data store will be Cabs. Once you know the store name, you can easily define a class; the format is the namespace plus the package name store plus the store filename (<NAMESPACE>.store.<STORENAME>), so in this case it’s FindACab.store.Cab. It makes this class behave like a store class because it extends all its properties from the Ext.data.Store.
A data store can be linked to a model. The FindACab app uses the FindACab.model.Cab model to define the data structure of Cab data. Let’s edit the app/store/Cabs.js file:
Ext.define('FindACab.store.Cabs', {
extend: 'Ext.data.Store',
config: {
model: 'FindACab.model.Cab',
autoLoad: true
}
});
The model is written within a config object, and therefore you can use getter and setter methods later on. Store.getModel() would retrieve an Ext.data.Model object (in this case, a Cab model). Store.setModel() could set the string name of a model.
There is another important config you will set: the autoLoad. This setting makes sure the store will load its data automatically after creation.
WARNING
For now, there is no data in the Cabs store. That’s fine; you will create it in Chapter 8 after setting a proxy on the model.
After you create the data store, the store should be linked to the MVC architecture. For now, in the FindACab app, you will create a reference to the store in the app.js file. (Later, you will need to move these references to a corresponding controller.) To create a reference, go toExt.application(), create an array called stores, and assign the Cabs store to it:
stores:[
'Cabs'
],
The application knows where to find the app/store/Cabs.js file because Cabs in the stores array defaults to the <NAMESPACE>.store.<STORENAME> (FindACab.store.Cabs), which again maps to the folder structure. After everything is done, you can start coding a view.
TIP
Stores can be written without models. You can write the model in-line in the store by just defining a fields array.
Implementing a View
As is the case with models, you need to manually create view class definitions. You create them in the app/view/ folder. I will not go into detail here about all the different views that are possible; you can read about this in Chapter 11.
Create in the app/view/ folder a new JavaScript file and write the view component:
Ext.define('NameSpace.view.MyView', {
extend: 'Ext.Container',
});
When you define a view, you just define a custom Sencha class definition (see Chapter 4) that extends from some view component that in turn extends from Ext.Component, which again extends from Ext.Base.
Although it’s very basic, the Ext.Container is a component and therefore it extends from the Ext.Component class. If you changed the extend to Ext.Component instead of Ext.Container, you might not see a difference while running it in the browser, but there is one. A container component can nest other components inside; it can even add or remove child components at runtime. Those child components (let’s call them items) can be positioned next to each other, underneath each other, or on top of each other. You specify this positioning with the layout config. If you want more information about components and layouts, check out Chapters 4 and 5. For now, it’s important that you know how to extend from a container, so you can nest multiple child items to your class definition. That’s the trick for creating entire interfaces.
Using the FindACab app, you can create an empty container as a simple view. Create the Main.js view component in the app/view folder:
Ext.define('FindACab.view.Main', {
extend: 'Ext.Container',
config: {
html: 'Here comes the view.'
}
});
The code example shows a basic Container component, the FindACab.view.Main class, and an xtype that has been set to refer to this view component later. The html string is just for stubbing out the interface. I do this all the time when I create new views. Before specifying all its properties, I just set the html property so I end up with a whole clickthrough with just…yep, placeholders.
After the view is created, it should be linked to the Ext.application() views array. In Ext.application(), create an array called views and assign the Main view to it:
views:[
'Main'
],
The application knows where to find the app/view/Main.js file because Main in the views array defaults to the <NAMESPACE>.view.<VIEWNAME> (FindACab.view.Main), which again maps to the folder structure. The next time your application loads the file, it knows where to look for this class.
After the model, store, and view, you can work on the controller. While the model is the data and the view is the way the data is presented, the controller is the way the data and the layout interact (see Figure 6-10). Let’s create one next.
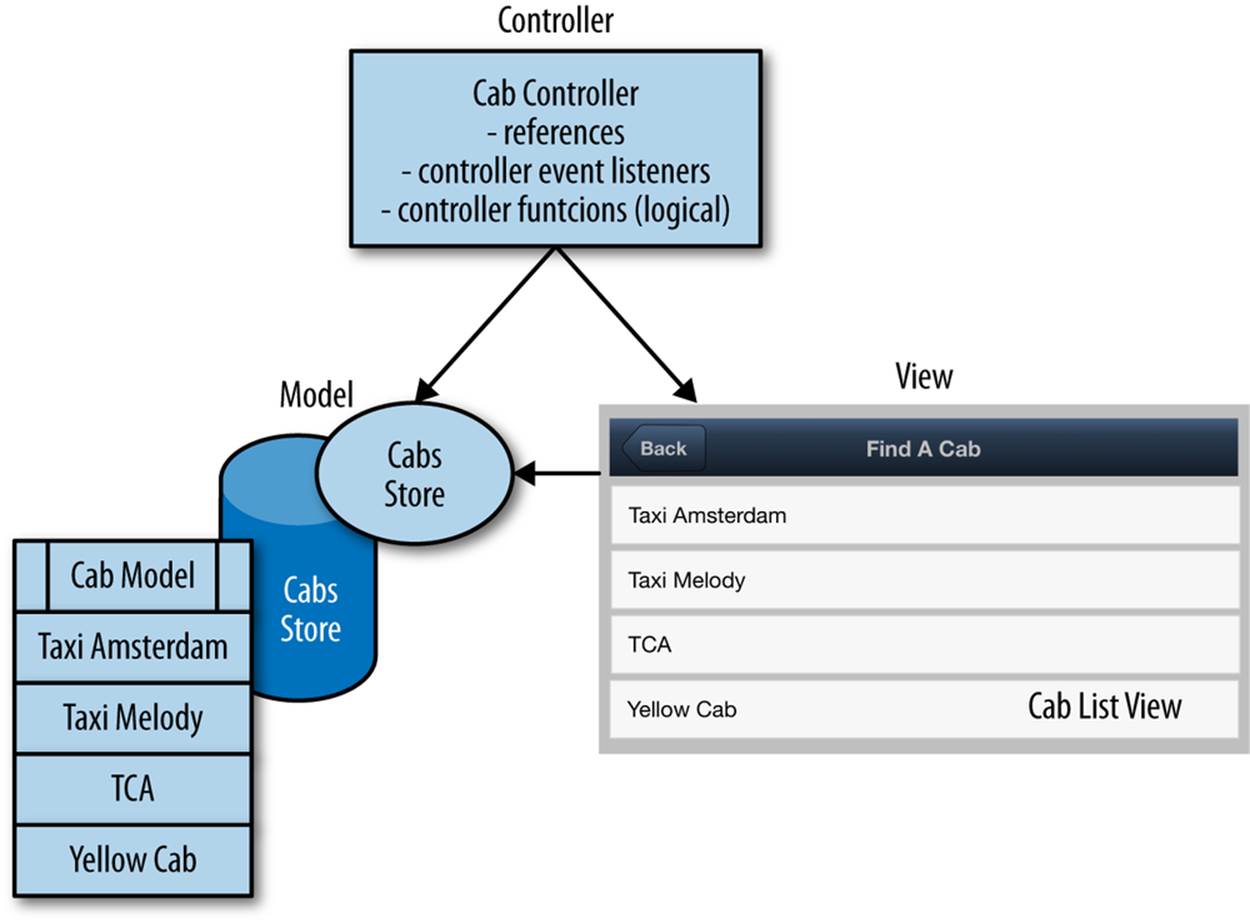
Figure 6-10. A general overview of MVC for the FindACab app
Generating a Controller with Sencha Cmd
To create the controller definition, you create a new JavaScript file and save it in the app/controller directory. But a better choice is to have Sencha Cmd generate it for you.
On the command line, navigate to the app folder and run the following command:
sencha generate controller <MyController>
In your console, navigate to the FindACab project folder and type the following command:
sencha generate controller CabController
which generates the code shown in Example 6-2 for the FindACab app.
Example 6-2. app/controller/CabController.js
Ext.define('FindACab.controller.CabController', {
extend: 'Ext.app.Controller',
config: {
models: ['Cab'],
stores: ['Cabs'],
refs: {
},
control: {
}
},
//called when the application is launched; remove if not needed
launch: function(app) {
}
});
Let’s go quickly through this code. Sencha Cmd defines a class called CabController, which is subclassed from the Sencha Touch class Ext.app.Controller. It stubs out a config object, which includes the objects refs and control. Both objects are empty, but you can use therefs object later to enter references to view components, such as form elements or buttons. The control object dispatches events that belong to certain view components to custom methods.
Sencha Cmd already generated one (empty) function for you: the launch() method. This function does not need a control; it will automatically be run by the controller, immediately after the launch of the application (Ext.application()). This method is usually a good place to run any logic that has to run after the app UI is initialized.
It is also possible to create an init method in the controller. Like the launch() method, this function will also be automatically called by the controller. However, while the launch() method runs after the whole application is started, the init() method is called during the application initialization.
As with models, stores, and views, all controllers need to be linked to the application. You should create a reference to the controller in app.js. In Ext.application(), create a controllers array and assign the CabController controller to it:
controller:[
'CabController'
],
The application knows where to find the app/controller/CabController.js file because CabController in the controllers array defaults to the <NAMESPACE>.controller.<CONTROLLERNAME> (FindACab.controller.CabController), which again maps to the folder structure.
Let’s look more into the controller methods that will run after being invoked by an user or data event, such as a button tap or data change. In this case, you will need two additional steps. The first step is to create a reference, and the second step is to dispatch events. The next sections will dive into that.
Referencing a Component from a Controller
When you want to create a reference from the Sencha MVC controller to a component, you can either use refs or you can use the component query, (see Chapter 3).
Controller refs are available only in (of course) the controller, as demonstrated in Example 6-3.
Example 6-3. Defining a Controller reference
refs: {
myRef: 'somextype'
}
The component query can be used anywhere in your code:
Ext.ComponentQuery.query('somextype');
References leverage the component query syntax, and you can create as many as you want. You define a reference, and you pass in a (CSS-like) selector to locate a view component on your page. Every ref that is created will automatically generate a getter. In Example 6-3, then,this.getMyRef() would find the component that has the xtype: "somextype".
Example 6-4 shows the Cab controller, which hooks up the Cab data model and the Cabs data store. We’ll write down some log messages to see the order of execution.
Example 6-4. app/controller/CabController.js
Ext.define('FindACab.controller.CabController', {
extend: 'Ext.app.Controller',
config: {
models: ['Cab'],
stores: ['Cabs'],
refs: {
main: 'mainview'
}
},
init: function(){
console.log("On init app found "
+ Ext.ComponentQuery.query('mainview').length
+ " mainviews: ",
Ext.ComponentQuery.query('mainview'));
console.log("On init app found the reference: ",
this.getMain());
},
launch: function(app) {
console.log("On launch app found "
+ Ext.ComponentQuery.query('mainview').length
+ " mainviews: ",
Ext.ComponentQuery.query('mainview'));
console.log("On launch app found the reference: ",
this.getMain());
}
});
I have created one ref; it maps to the xtype name mainview, which is defined in the FindACab.view.Main class. I can access this component with this.getMain() or with Ext.ComponentQuery.query("mainview"). In the init() method of the controller, the controller can’t find the component. That makes sense, because the components are not there yet and they need to be loaded; and they will, but after the controller is loaded. On the launch() method of the controller, the components are present. When I use the query() method, I will retrieve an array ofmainview xtypes. (Yes, you can reuse your component somewhere else in the app.) When I use the this.getMain() getter generated by the controller, it will return the first component found.
TIP
A ref needs to be specific enough that it fetches only the components that you really want. But be careful! When it’s too specific, if you ever decide to move a component, it’s possible that the ref won’t find anything.
Now that we’ve created component references in the controller, our next step is to bind events to the components. Let’s take a look.
Listening to Events from a Controller
When you want to control events in the Sencha MVC controller, add a control object to the controller’s config object. This control object contains a reference to a component (in this example, myref) and adds an event listener with some event that dispatches to myFunction:
control: {
'myref' : {
<event>: 'myFunction',
}
},
Once you have a reference to a component, you can bind an event to it. The trick is the control object, which listens to key/value pairs. For the key, you enter the reference name (the CSS-like selector, or it could also be the xtype); this key has another object as a value. This object accepts the name of the event as a key (for example, tap or initialize) and as a value, the string name of controller function that should be called after the event has happened.
See Example 6-5 for how this works in the FindACab app.
Example 6-5. app/controller/CabController.js
Ext.define('FindACab.controller.CabController', {
extend: 'Ext.app.Controller',
config: {
models: ['Cab'],
stores: ['Cabs'],
refs: {
main: 'mainview'
},
control: {
'mainview': {
initialize: 'onInitMain',
},
'button[action=press]': {
tap: 'onTapMain'
}
}
},
onInitMain: function() {
console.log("Initialize mainview");
},
onTapMain: function() {
console.log("Tapped a button in mainview");
}
});
In this example, the reference main will execute the controller method onInitMain() while initializing the view. The CSS-like selector button[action=press] invokes the controller method onTapMain(), which listens to all button xtypes that have the config action: press set.
When you’re working with events, it is always handy to open the API docs, which describe all the available events with signatures for every component.
Now you know how to create models, stores, views, and controllers, but how does this all work together? How are all the classes loaded? The good news is that Sencha maintains this all for you. Next, we’ll check out how to implement the Sencha MVC entry point.
Implementing the MVC Entry Point
After you create models, stores, views, and controllers (and profiles), you have to hook them up to implement the Sencha MVC entry point for setting up the Sencha architecture.
In your app.js file, set up the Ext.app.Application to define your application:
Ext.application();
Ext.app.Application() is the entry point for every MVC app. It sets your namespace with the name property, and it could define the sets of models, stores, views, controllers, and profiles to automatically load all these dependencies.
The Ext.Application() does more nice things for you. Take a look at Example 6-6.
Example 6-6. app.js
/*
This file is generated and updated by Sencha Cmd. You can edit this file as
needed for your application, but these edits will have to be merged by
Sencha Cmd when it performs code generation tasks such as generating new
models, controllers, or views and when running "sencha app upgrade".
Ideally, changes to this file would be limited and most work would be done
in other places (such as Controllers). If Sencha Cmd cannot merge your
changes and its generated code, it will produce a "merge conflict" that you
will need to resolve manually.
*/
// DO NOT DELETE - this directive is required for Sencha Cmd packages to work.
//@require @packageOverrides
//<debug>
Ext.Loader.setPath({
'Ext': '../../touch/src',
'FindACab': 'app',
'Utils': 'utils'
});
//</debug>
Ext.application({
name: 'FindACab',
requires: [
'Ext.MessageBox',
'Utils.Commons'
],
views: ['Main'],
controllers: [
'CabController'
],
icon: { //![]()
'57': 'resources/icons/Icon.png',
'72': 'resources/icons/Icon~ipad.png',
'114': 'resources/icons/Icon@2x.png',
'144': 'resources/icons/Icon~ipad@2x.png'
},
isIconPrecomposed: true, //![]()
startupImage: { //![]()
'320x460': 'resources/startup/320x460.jpg',
'640x920': 'resources/startup/640x920.png',
'768x1004': 'resources/startup/768x1004.png',
'748x1024': 'resources/startup/748x1024.png',
'1536x2008': 'resources/startup/1536x2008.png',
'1496x2048': 'resources/startup/1496x2048.png'
},
launch: function() { //![]()
// Destroy the #appLoadingIndicator element
Ext.fly('appLoadingIndicator').destroy(); //![]()
// Initialize the main view
Ext.Viewport.add(Ext.create('FindACab.view.Main')); //![]()
},
onUpdated: function() { //![]()
Ext.Msg.confirm(
"Application Update",
"This application has just successfully been updated" +
" to the latest version. Reload now?",
function(buttonId) {
if (buttonId === 'yes') {
window.location.reload(); //![]()
}
}
);
}
});
![]()
The icon object can set the icon that will be bookmarked on your phone’s home screen for various sizes. By default, Sencha Cmd generates references to four different icons for mobile phones and tablets. You have to create the icons yourself, though.
![]()
isIconPrecomposed is set to the boolean value true, for not having a glossy effect applied by the OS by default (which is currently only the case with iOS devices).
![]()
The startupImage object does almost the same as the icon object: it saves references to the startup splash images. These images will be shown once the app is bookmarked and launched from the home screen (currently only on iOS devices).
![]()
The launch() method is an optional function that overrides the launch() method on the controller. The app will call this function when all the dependencies are loaded. Usually this method is used to draw the screen. That is also what Sencha Cmd generated for you.
![]()
Did you see the nice loading animation when you ran the FindACab app in your browser? The image and the styles are set in the inline stylesheet directly in the index.html; these are the first objects that are available in the DOM (therefore you also don’t move it to a stylesheet, because then it needs to be downloaded). Once the Sencha dynamic loader has loaded all your dependencies, this launch() method will search for an HTML element with the id #appLoadingIndicator (which displays the loading animation) and destroy it.
![]()
Then it will draw the FindACab.view.Main view class to the screen by adding it to the Ext.Viewport.
![]()
The onUpdated() method is magic! Sencha Touch has a mechanism that can automatically check versions of your app and only download the updated code. (When building for production, it saves differences in the deltas folder.) Sencha Cmd generates the onUpdated() method for you; when the onUpdated() method is fired, it will show a confirmation messagebox.
![]()
When you accept this box, it will refresh the page. The Sencha framework will do the rest and show you the updated version of the app.
It is also possible to specify application dependencies from outside your application. This can be handy when you share code between multiple applications. I will discuss this next.
CAUTION
When you use Sencha Cmd 3.1.1.x, this version of the tool will automatically add models, stores, controllers, and views to the Ext.application() for you. This is handy, but note that this happens every time you use Sencha Cmd for generating code. When you add this code manually, look out for merge errors in the app.js file. Such a merge error might look like:
<<<<<<< Generated
'MyStore1',
'MyStore2',
'MyStore3'
= = = = = = =
'MyStore1', 'MyStore2'
>>>>>>> Custom
As you can see, every magic trick comes with a price. In this case, it is easy to solve, though, by removing the <, =, > characters and the duplicated code.
Loading External Classes
Now that you know how to hook up models, stores, views, and controllers, you might want to hook up other classes that are not defined in the app MVC folders. This might not be so common if you decide to create all your business logic within a new directory within app. However, there might be occasions when you’d rather save your custom Sencha classes outside the app folder—for example, because you want to create two Sencha Touch applications in one workspace and you want to share code between both Sencha Touch apps.
This is how you can hook up Sencha classes that are not located in the app folder. In app.js, specify the paths to the classes in the Ext.Loader:
Ext.Loader.setPath({
'Ext': '../touch/src',
'FindACab': 'app'
'<new namespace>': '<folder-to-point-to>'
});
The trick is to create a folder alongside your app folder and then configure the paths to the Ext.Loader. Let’s do this for the FindACab app. We will create a new JavaScript folder and file, utils/Commons.js.
Let’s add "Utils":"utils" to the Ext.Loader paths in the app.js file:
Ext.Loader.setPath({
'Ext': '../touch/src',
'FindACab': 'app'
'Utils': 'utils'
});
This doesn’t load anything in memory yet; it just tells the Sencha Touch loader where to find files that use the Utils namespace. You will use the Utils.Commons class in your app so the Sencha Touch loader needs to load the class in its memory. Therefore, you add Utils.Commons to the requires array in the app.js.
The Utils.Commons class is just a class with static members. I can access the defined properties from anywhere in my code. For example, in the FindACab app, I will need to have global access to the YELP_API URL. If I add it to the Utils.Commons class, I can access it from anywhere in my code by calling Utils.Common.YELP_API. The code for Utils.Commons will look like Example 6-7.
Example 6-7. utils/Commons.js
Ext.define('Utils.Commons', {
statics: {
YELP_API: 'http://api.yelp.com/business_review_search?',
YELP_KEY: 'ftPpQUCgfSA3yV98-uJn9g',
YELP_TERM: 'Taxi',
LOCATION: 'Amsterdam NL',
getUrl: function() {
return this.YELP_API + "term=" + this.YELP_TERM +
"&ywsid=" + this.YELP_KEY +
"&location=" + this.LOCATION;
}
}
});
Using the Ext.Loader is really powerful. You no longer have to worry about loading scripts in the correct order. For example, in other frameworks, or in Sencha Touch version 1, you had to maintain this order yourself by including all the JavaScript in the <head> of your index.html file.
It’s a really good thing that the Sencha Touch loader takes care of this. However, you do need to tell the Ext.Loader, “Hey loader, I require this class, so don’t forget to load it.” You can give this instruction by setting the requires array in a class (like how import works in Java). See theapp.js file. It informs the loader to require Ext.MessageBox, which is used in the onUpdated() method.
NOTE
When you’re adding Sencha classes to your project and they are not saved within the app folder, you will also need to specify the paths to the classpath used for the build process; otherwise, your builds will fail.
There is an app and workspace classpath. The workspace classpath matters when you have multiple applications and you want to share code; in all other situations, the app classpath should be good enough.
In Chapter 14, you will add the utils folder to the app classpath in the hidden .sencha/sencha.cfg file so the FindACab app can be built:
app.classpath=${app.dir}/app.js,${app.dir}/app,${app.dir}/utils
You can forget to inform the Ext.Loader about your dependencies, or just ignore it. When you run your application in debug mode (you can enable it in the app.json file by loading the sencha-touch-debug.js framework with debug messages instead of sencha-touch.js), the console will throw some warnings and indicate which classes you need to require. When you ignore these warnings as well, strange things may happen. Sometimes parts of your app won’t be visible, and you will certainly run into problems when building your app for production. So you’d better pay attention!
Summary
You should now be familiar with the MVC design pattern, and Sencha Touch’s particular approach to MVC app development. With your new knowledge of Sencha MVC and Sencha Cmd concepts, you could also build Ext JS (rich desktop) applications. In that case, you need to generate an app from the Sencha Ext JS sdk.
We’ve completed the first step in the process of writing a Sencha Touch application—generating an application with Sencha Cmd. The next steps will be to start writing your custom classes, and at the end of the full process you will create a Sencha Touch build with Sencha Cmd.
If you’ve followed every step in this chapter, then you should have a fully set-up Sencha MVC pattern (Figure 6-11). It should have a model, a store, a controller, a view, and an app.js entry point. Of course, this app is only a skeleton. If you run the application now, you will see a blank page with the dummy text: "Here comes the view." The Chrome developer tools will show some log messages that describe the order of loading.
There is no interface yet and there is no data. I always prefer to start with writing the data first; after I have all the data in my application, I can think about how to display it in the view. So let’s take this approach. In the next chapter, we will dive into data models to describe the data structure for the FindACab app.
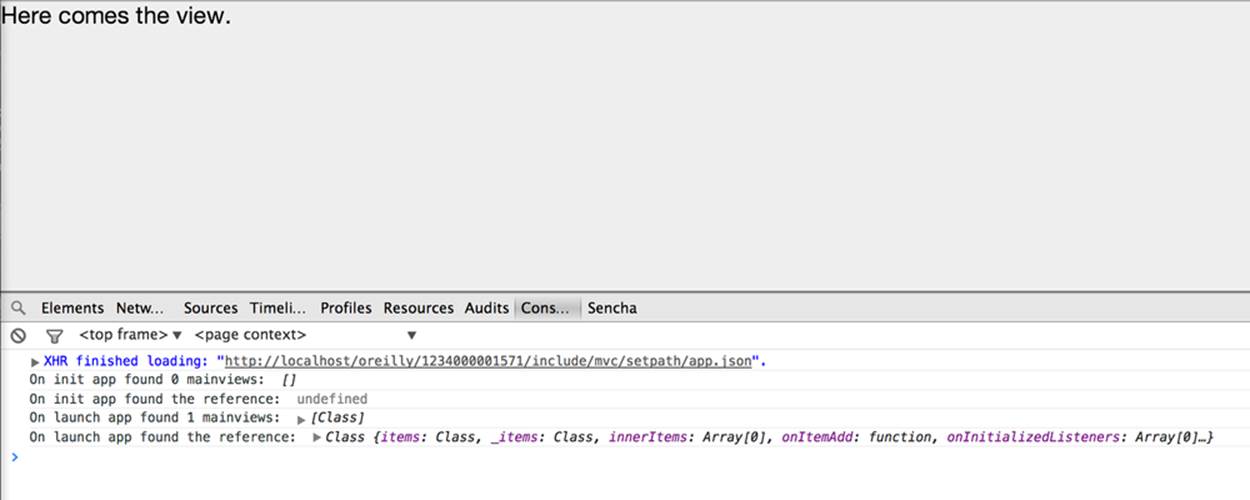
Figure 6-11. If you’ve followed every step in this chapter, you will see the skeleton of the FindACab app