Spring in Action, 4th Edition: Covers Spring 4 (2015)
Part 4. Integrating Spring
Chapter 16. Creating REST APIs with Spring MVC
This chapter covers
· Writing controllers that serve REST resources
· Representing resources in XML, JSON, and other formats
· Consuming REST resources
Data is king.
As developers, we’re often focused on building great software to solve business problems. Data is just the raw material that your software processes need to get their job done. But if you were to ask most business people which is most valuable to them, data or software, they’d likely choose data. Data is the lifeblood of many businesses. Software is often replaceable, but the data gathered over the years can never be replaced.
Don’t you think it’s odd that, given the importance of data, the way we develop software often treats data as an afterthought? Take the remote services from the previous chapter as an example. Those services were centered on actions and processes, not information and resources.
In recent years, Representational State Transfer (REST) has emerged as a popular information-centric alternative to traditional SOAP-based web services. Whereas SOAP typically focused on actions and processing, REST’s concern is with the data being handled.
Starting with Spring 3.0, Spring introduced first-class support for creating REST APIs. And Spring’s REST implementation has continued to evolve through Spring 3.1, 3.2, and now 4.0.
The good news is that Spring’s REST support builds on Spring MVC, so we’ve already covered much of what you’ll need for working with REST in Spring. In this chapter, you’ll build on what you already know about Spring MVC to develop controllers that handle requests for RESTful resources. But before we get too carried away, let’s examine what working with REST is all about.
16.1. Getting REST
I’ll wager that this isn’t the first time you’ve heard or read about REST. There’s been a lot of talk about REST in recent years, and you’ll find that it’s fashionable in software development to speak ill of SOAP-based web services while promoting REST as an alternative.
Certainly, SOAP can be overkill for many applications, and REST brings a simpler alternative. Moreover, many modern applications have mobile and rich JavaScript clients that consume REST APIs running on a server.
The problem is that not everybody has a solid grasp of what REST really is. As a result, a lot of misinformation is floating about, and many things are labeled REST that don’t fit the true REST intent. Before we can talk about how Spring supports REST, we need to establish a common understanding of what REST is all about.
16.1.1. The fundamentals of REST
A mistake that’s often made when approaching REST is to think of it as “web services with URLs”—to think of REST as another remote procedure call (RPC) mechanism, like SOAP, but invoked through plain HTTP URLs and without SOAP’s hefty XML namespaces.
On the contrary, REST has little to do with RPC. Whereas RPC is service oriented and focused on actions and verbs, REST is resource oriented, emphasizing the things and nouns that comprise an application.
To understand what REST is all about, it helps to break down the acronym into its constituent parts:
· Representational —REST resources can be represented in virtually any form, including XML, JavaScript Object Notation (JSON), or even HTML—whatever form best suits the consumer of those resources.
· State —When working with REST, you’re more concerned with the state of a resource than with the actions you can take against resources.
· Transfer —REST involves transferring resource data, in some representational form, from one application to another.
Put more succinctly, REST is about transferring the state of resources—in a representational form that is most appropriate for the client or server—from a server to a client (or vice versa).
Resources in REST are identified and located with URLs. There are no strict rules regarding RESTful URL structure, but the URL should identify a resource, not bark a command to the server. Again, the focus is on things, not actions.
That said, there are actions in REST, and they’re defined by HTTP methods. Specifically, GET, POST, PUT, DELETE, PATCH, and other HTTP methods make up the verbs in REST. These HTTP methods are often mapped to CRUD verbs as follows:
· Create—POST
· Read—GET
· Update—PUT or PATCH
· Delete—DELETE
Even though this is the common mapping of HTTP methods to CRUD verbs, it’s not a strict requirement. There are cases where PUT can be used to create a new resource and POST can be used to update a resource. In fact, the non-idempotent nature of POST makes it a rogue method, capable of performing operations that don’t easily fit the semantics of the other HTTP methods.
Given this view of REST, I try to avoid terms such as REST service, RESTfulweb service, and anything similar that incorrectly gives prominence to actions. Instead, I prefer to emphasize the resource-oriented nature of REST and speak of RESTful resources.
16.1.2. How Spring supports REST
Spring has long had some of the ingredients needed for exposing REST resources. Starting with version 3.0, however, Spring began adding enhancements to Spring MVC to provide first-class REST support. Now, at version 4.0, Spring supports the creation of REST resources in the following ways:
· Controllers can handle requests for all HTTP methods, including the four primary REST methods: GET, PUT, DELETE, and POST. Spring 3.2 and higher also supports the PATCH method.
· The @PathVariable annotation enables controllers to handle requests for parameterized URLs (URLs that have variable input as part of their path).
· Resources can be represented in a variety of ways using Spring views and view resolvers, including View implementations for rendering model data as XML, JSON, Atom, and RSS.
· The representation best suited for the client can be chosen using ContentNegotiatingViewResolver.
· View-based rendering can be bypassed altogether using the @ResponseBody annotation and various HttpMethodConverter implementations.
· Similarly, the @RequestBody annotation, along with HttpMethodConverter implementations, can convert inbound HTTP data into Java objects passed in to a controller’s handler methods.
· Spring applications can consume REST resources using RestTemplate.
Throughout this chapter, we’ll explore these features that make Spring more RESTful starting with how to produce REST resources using Spring MVC. Then in section 16.4, we’ll switch to the client side of REST and see how to consume these resources. Let’s start by looking at what goes into a RESTful Spring MVC controller.
16.2. Creating your first REST endpoint
One of the nice things about Spring’s support for REST is that you already know a lot about what goes into creating RESTful controllers. What you learned in chapters 5–7 about creating web applications can now be used to expose resources in a REST API. Let’s start by creating your first REST endpoint in a new controller named Spittle-ApiController.
The following listing shows the beginnings of a new REST controller that will serve Spittle resources. It’s a small start, but you’ll build on this controller throughout this chapter as you learn the ins and outs of Spring’s REST programming model.
Listing 16.1. RESTful Spring MVC controller
package spittr.api;
import java.util.List;
import org.springframework.beans.factory.annotation.Autowired;
import org.springframework.stereotype.Controller;
import org.springframework.web.bind.annotation.RequestMapping;
import org.springframework.web.bind.annotation.RequestMethod;
import org.springframework.web.bind.annotation.RequestParam;
import spittr.Spittle;
import spittr.data.SpittleRepository;
@Controller
@RequestMapping("/spittles")
public class SpittleController {
private static final String MAX_LONG_AS_STRING="9223372036854775807";
private SpittleRepository spittleRepository;
@Autowired
public SpittleController(SpittleRepository spittleRepository) {
this.spittleRepository = spittleRepository;
}
@RequestMapping(method=RequestMethod.GET)
public List<Spittle> spittles(
@RequestParam(value="max",
defaultValue=MAX_LONG_AS_STRING) long max,
@RequestParam(value="count", defaultValue="20") int count) {
return spittleRepository.findSpittles(max, count);
}
}
Take a close look at listing 16.1. Can you see how it serves a REST resource instead of just a web page?
Probably not. Nothing about this controller, as it’s written, makes it a RESTful, resource-serving controller. In fact, you may recognize the spittles() method; you’ve seen it before in chapter 5 (section 5.3.1).
As you’ll recall, when a GET request comes in for /spittles, the spittles() method is called. It looks up and returns a Spittle list retrieved from the injected SpittleRepository. That list is placed into the model for a view to render. For a browser-based web application, this probably means the model data is rendered to an HTML page.
But we’re talking about creating a REST API. In that case, HTML isn’t the appropriate representation of the data.
Representation is an important facet of REST. It’s how a client and a server communicate about a resource. Any given resource can be represented in virtually any form. If the consumer of the resource prefers JSON, then the resource can be presented in JSON format. Or if the consumer has a fondness for angle brackets, the same resource can be presented in XML. Meanwhile, a human user viewing the resource in a web browser will likely prefer seeing it in HTML (or possibly PDF, Excel, or some other human-readable form). The resource doesn’t change—only how it’s represented.
Note
Although Spring supports a variety of formats for representing resources, you aren’t obligated to use them all when defining your REST API. JSON and XML are often sufficient representations expected by most clients.
Certainly, if you’ll be presenting content to be consumed by a human, you should probably support HTML formatted resources. Depending on the nature of the resource and the requirements of your application, you may even choose to present the resource as a PDF document or an Excel spreadsheet.
For non-human consumers, such as other applications or code that invokes your REST endpoints, the leading choices for resource representation are XML and JSON. It’s easy enough to support both of these options using Spring, so there’s no need to make a choice.
With that said, I recommend that you at minimum support JSON. JSON is at least as easy to work with as XML (and many would argue that it’s much easier). And if the client is JavaScript (which is increasingly common these days), JSON is a clear winner because essentially no marshaling/demarshaling is required to use JSON data in JavaScript.
It’s important to know that controllers usually don’t concern themselves with how resources are represented. Controllers deal with resources in terms of the Java objects that define them. But it’s not until after the controller has finished its work that the resource is transformed into a form that best suits the client.
Spring offers two options to transform a resource’s Java representation into the representation that’s shipped to the client:
· Content negotiation —A view is selected that can render the model into a representation to be served to the client.
· Message conversion —A message converter transforms an object returned from the controller into a representation to be served to the client.
Because I discussed view resolvers in chapters 5 and 6, and you’re already familiar with view-based rendering (from chapter 6), we’ll start by looking at how to use content negotiation to select a view or view resolver that can render a resource into a form that’s acceptable to the client.
16.2.1. Negotiating resource representation
As you’ll recall from chapter 5 (and as depicted in figure 5.1), when a controller’s handler method finishes, a logical view name is usually returned. If the method doesn’t directly return a logical view name (if the method returns void, for example), the logical view name is derived from the request’s URL. DispatcherServlet then passes the view name to a view resolver, asking it to help determine which view should render the results of the request.
In a human-facing web application, the view chosen is almost always rendered as HTML; view resolution is a one-dimensional activity. If the view name matches a view, then that’s the view you go with.
When it comes to resolving view names into views that can produce resource representations, there’s an additional dimension to consider. Not only does the view need to match the view name, but the view also needs to be chosen to suit the client. If the client wants JSON data, then an HTML-rendering view won’t do—even if the view name matches.
Spring’s ContentNegotiatingViewResolver is a special view resolver that takes the content type that the client wants into consideration. In it’s simplest possible form, ContentNegotiatingViewResolver can be configured like this:
@Bean
public ViewResolver cnViewResolver() {
return new ContentNegotiatingViewResolver();
}
A lot is going on in that simple bean declaration. Understanding how ContentNegotiatingViewResolver works involves getting to know the content-negotiation two-step:
1. Determine the requested media type(s).
2. Find the best view for the requested media type(s).
Let’s dig deeper into each of these steps to see what makes ContentNegotiatingView-Resolver tick. You start by figuring out what kind of content the client wants.
Determining the requested media types
The first step in the content-negotiation two-step is determining what kind of resource representation the client wants. On the surface, that seems like a simple job. Shouldn’t the request’s Accept header give a clear indication of what representation should be sent to the client?
Unfortunately, the Accept header can’t always be deemed reliable. If the client in question is a web browser, there’s no guarantee that what the client wants is what the browser sends in the Accept header. Web browsers typically only accept human-friendly content types (such astext/html), and there’s no way (short of developer-oriented browser plugins) to specify a different content type.
ContentNegotiatingViewResolver considers the Accept header and uses whatever media types it asks for, but only after it first looks at the URL’s file extension. If the URL has a file extension on the end, ContentNegotiatingViewResolver tries to figure out the desired type based on that extension. If the extension is .json, then the desired content type must be application/json. If it’s .xml, then the client is asking for application/xml. Of course, an .html extension indicates that the client wants the resource represented as HTML (text/html).
If the file extension doesn’t produce any usable clues for the media type, then the Accept header in the request is considered. In that case, the Accept header’s value indicates the MIME type(s) that the client wants; there’s no need to look it up.
In the end, if there is no Accept header and the extension is no help, ContentNegotiatingViewResolver falls back to / as the default content type, meaning the client has to take whatever representation the server sends it.
Once a content type has been determined, it’s time for ContentNegotiatingView-Resolver to resolve the logical view name into a View for rendering the model. Unlike Spring’s other view resolvers, ContentNegotiatingViewResolver doesn’t resolve views on its own. Instead, it delegates to other view resolvers, asking them to resolve the view.
ContentNegotiatingViewResolver asks the other view resolvers to resolve the logical view name into a view. Every view that’s resolved is added to a list of candidate views. With the candidate view list assembled, ContentNegotiatingViewResolver cycles through all the requested media types, trying to find a view from among the candidate views that produces a matching content type. The first match found is the one that’s used to render the model.
Influencing how media types are chosen
The media-type selection process, as described so far, outlines the default strategy for determining the requested media types. But you can change how it behaves by giving it a ContentNegotiationManager. A few of the things you can do via a ContentNegotiationManager are as follows:
· Specify a default content type to fall back to if a content type can’t be derived from the request.
· Specify a content type via a request parameter.
· Ignore the request’s Accept header.
· Map request extensions to specific media types.
· Use the Java Activation Framework (JAF) as a fallback option for looking up media types from extensions.
There are three ways to configure a ContentNegotiationManager:
· Directly declare a bean whose type is ContentNegotiationManager.
· Create the bean indirectly via ContentNegotiationManagerFactoryBean.
· Override the configureContentNegotiation() method of WebMvcConfigurerAdapter.
Creating a ContentNegotiationManager directly is a bit involved and not something you’ll want to do unless you have good reason to. The other two options exist to make the creation of a ContentNegotiationManager easier.
ContentNegotiationManager added in Spring 3.2
ContentNegotiationManager is relatively new to Spring, having been introduced in Spring 3.2. Prior to Spring 3.2, much of ContentNegotiatingViewResolver’s behavior was configured by setting properties on ContentNegotiatingView-Resolver itself. As of Spring 3.2, most of the setter methods of ContentNegotiatingViewResolver have been deprecated, and you’re encouraged to configure it via a ContentNegotiationManager.
Although I won’t cover the old way of configuring ContentNegotiatingView-Resolver in this chapter, many of the properties you’ll set when creating a ContentNegotiationManager have corresponding properties in ContentNegotiatingViewResolver. You should be able to easily map the new style of configuration to the old style if you’re working with an older version of Spring.
Generally speaking, ContentNegotiationManagerFactoryBean is most useful when you’re configuring the ContentNegotiationManager in XML. For example, you might configure a ContentNegotiationManager with a default content type of application/json in XML like this:
<bean id="contentNegotiationManager"
class="org.springframework.http.ContentNegotiationManagerFactoryBean"
p:defaultContentType="application/json">
Because ContentNegotiationManagerFactoryBean is an implementation of FactoryBean, this results in a ContentNegotiationManager bean being created. That ContentNegotiationManager can then be injected into ContentNegotiatingView-Resolver’scontentNegotiationManager property.
For Java configuration, the easiest way to get a ContentNegotiationManager is to extend WebMvcConfigurerAdapter and override the configureContentNegotiation() method. Chances are you already extended WebMvcConfigurerAdapter when you started creating your Spring MVC application. In the Spittr application—for example, you already have an extension of WebMvcConfigurerAdapter called Web-Config, so all you need to do is override configureContentNegotiation(). Here’s an implementation ofconfigureContentNegotiation() that sets the default content type:
@Override
public void configureContentNegotiation(
ContentNegotiationConfigurer configurer) {
configurer.defaultContentType(MediaType.APPLICATION_JSON);
}
As you can see, configureContentNegotiation() is given a ContentNegotiation-Configurer to work with. ContentNegotiationConfigurer has several methods that mirror the setter methods of ContentNegotiationManager and enable you to set whatever content-negotiation behavior you’d like on the ContentNegotiation-Manager that will be created. In this case, you’re calling the defaultContentType() method to set the default content type to application/json.
Now that you have a ContentNegotiationManager bean, all you need to do is inject it into the contentNegotiationManager property of ContentNegotiating-ViewResolver. That requires a small change to the @Bean method where you declare theContentNegotiatingViewResolver:
@Bean
public ViewResolver cnViewResolver(ContentNegotiationManager cnm) {
ContentNegotiatingViewResolver cnvr =
new ContentNegotiatingViewResolver();
cnvr.setContentNegotiationManager(cnm);
return cnvr;
}
The @Bean method is injected with a ContentNegotiationManager and calls set-ContentNegotiationManager() with it. As a result, the ContentNegotiatingView-Resolver now takes on the behavior defined in the ContentNegotiationManager.
There are so many different twists on configuring ContentNegotiationManager that it would be impossible to cover them all here. The following listing is an example of a fairly simple configuration that I generally prefer when I use ContentNegotiating-ViewResolver: it defaults to HTML views but renders JSON output for certain view names.
Listing 16.2. Configuring a ContentNegotiationManager
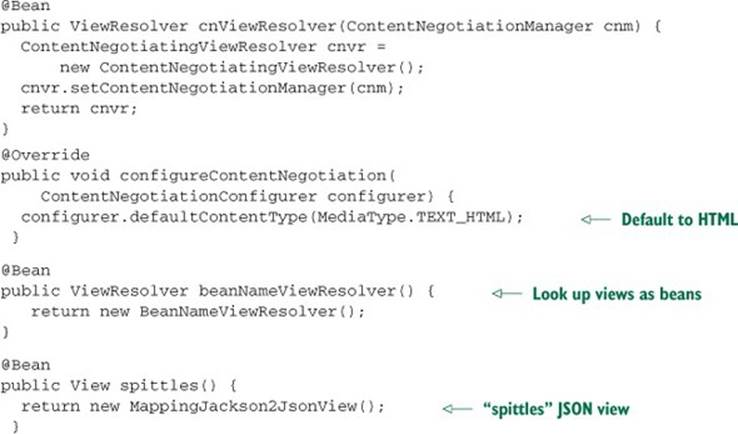
In addition to what’s shown in listing 16.2, there would also be an HTML-capable view resolver (such as InternalResourceViewResolver or TilesViewResolver). Under most circumstances, ContentNegotiatingViewResolver assumes that the client wants HTML, as configured in its ContentNegotiationManager. But if the client specifies that it wants JSON (either with a .json extension on the request path or via the Accept header), then ContentNegotiatingViewResolver attempts to find a view resolver that can serve a JSON view.
If the logical view name is “spittles”, then the configured BeanNameViewResolver resolves the View declared in the spittles() method. That’s because the bean name matches the logical view name. Otherwise, unless there’s another matching View,ContentNegotiatingViewResolver falls back to the default, serving HTML.
Once ContentNegotiatingViewResolver knows what media types the client wants, it’s time to find a view that can render that kind of content.
The benefits and limitations of ContentNegotiatingViewResolver
The key benefit of using ContentNegotiatingViewResolver is that it layers REST resource representation on top of the Spring MVC with no change in controller code. The same controller method that serves human-facing HTML content can also serve JSON or XML to a non-human client.
Content negotiation is a convenient option when there’s a great deal of overlap between your human and non-human interfaces. In practice, though, human-facing views rarely deal at the same level of detail as a REST API. The benefit of ContentNegotiatingViewResolver isn’t realized when there isn’t much overlap between the human and non-human interfaces.
ContentNegotiatingViewResolver also has a serious limitation. As a View-Resolver implementation, it only has an opportunity to determine how a resource is rendered to a client. It has no say in what representations a controller can consume from the client. If the client is sending JSON or XML, then ContentNegotiating-ViewResolver isn’t much help.
There’s one more gotcha associated with using ContentNegotiatingView-Resolver. The View chosen renders the model—not the resource—to the client. This is a subtle but important distinction. When a client requests a list of Spittle objects in JSON, the client is probably expecting a response that looks something like this:
[
{
"id": 42,
"latitude": 28.419489,
"longitude": -81.581184,
"message": "Hello World!",
"time": 1400389200000
},
{
"id": 43,
"latitude": 28.419136,
"longitude": -81.577225,
"message": "Blast off!",
"time": 1400475600000
}
]
But because the model is a map of key-value pairs, the response looks more like this:
{
"spittleList": [
{
"id": 42,
"latitude": 28.419489,
"longitude": -81.581184,
"message": "Hello World!",
"time": 1400389200000
},
{
"id": 43,
"latitude": 28.419136,
"longitude": -81.577225,
"message": "Blast off!",
"time": 1400475600000
}
]
}
Although this isn’t a terrible thing, it may not be what your client is expecting.
Because of these limitations, I generally prefer not to use ContentNegotiating-ViewResolver. Instead, I lean heavily toward using Spring’s message converters for producing resource representations. Let’s see how you can employ Spring’s message converters in your controller methods.
16.2.2. Working with HTTP message converters
Message conversion is a more direct way to transform data produced by a controller into a representation that’s served to a client. When using message conversion, DispatcherServlet doesn’t bother with ferrying model data to a view. In fact, there is no model, and there is no view. There is only data produced by the controller and a resource representation produced when a message converter transforms that data.
Spring comes with a variety of message converters, listed in table 16.1, to handle the most common object-to-representation conversion needs.
Table 16.1. Spring provides several HTTP message converters that marshal resource representations to and from various Java types.
|
Message converter |
Description |
|
AtomFeedHttpMessageConverter |
Converts Rome Feed objects to and from Atom feeds (media type application/atom+xml). Registered if the Rome library is present on the classpath. |
|
BufferedImageHttpMessageConverter |
Converts BufferedImage to and from image binary data. |
|
ByteArrayHttpMessageConverter |
Reads and writes byte arrays. Reads from all media types (*/*), and writes as application/octet-stream. |
|
FormHttpMessageConverter |
Reads content as application/x-www-form-urlencoded into a MultiValueMap<String,String>. Also writes MultiValueMap<String,String> as application/x-www-form-urlencoded and MultiValueMap<String, Object> as multipart/form-data. |
|
Jaxb2RootElementHttpMessageConverter |
Reads and writes XML (either text/xml or application/xml) to and from JAXB2-annotated objects. Registered if JAXB v2 libraries are present on the classpath. |
|
MappingJacksonHttpMessageConverter |
Reads and writes JSON to and from typed objects or untyped HashMaps. Registered if the Jackson JSON library is present on the classpath. |
|
MappingJackson2HttpMessageConverter |
Reads and writes JSON to and from typed objects or untyped HashMaps. Registered if the Jackson 2 JSON library is present on the classpath. |
|
MarshallingHttpMessageConverter |
Reads and writes XML using an injected marshaler and unmarshaler. Supported (un)marshalers include Castor, JAXB2, JIBX, XMLBeans, and XStream. |
|
ResourceHttpMessageConverter |
Reads and writes org.springframework.core.io.Resource. |
|
RssChannelHttpMessageConverter |
Reads and writes RSS feeds to and from Rome Channel objects. Registered if the Rome library is present on the classpath. |
|
SourceHttpMessageConverter |
Reads and writes XML to and from javax.xml.transform.Source objects. |
|
StringHttpMessageConverter |
Reads all media types (*/*) into a String. Writes String to text/plain. |
|
XmlAwareFormHttpMessageConverter |
An extension of FormHttpMessageConverter that adds support for XML-based parts using a SourceHttpMessageConverter. |
For example, suppose the client has indicated via the request’s Accept header that it can accept application/json. Assuming that the Jackson JSON library is in the application’s classpath, the object returned from the handler method is given toMappingJacksonHttpMessageConverter for conversion into a JSON representation to be returned to the client. On the other hand, if the request header indicates that the client prefers text/xml, then Jaxb2RootElementHttpMessageConverter is tasked with producing an XML response to the client.
Note that all but five of the HTTP message converters in table 16.1 are registered by default, so no Spring configuration is required to use them. But you may need to add additional libraries to your application’s classpath to support them. For instance, if you want to useMappingJacksonHttpMessageConverter to convert JSON messages to and from Java objects, you’ll need to add the Jackson JSON Processor library to the classpath. Similarly, the JAXB library is required for Jaxb2RootElement-HttpMessageConverter to convert messages between XML and Java objects. And the Rome library is required for AtomFeedHttpMessageConverter and RssChannel-HttpMessageConverter when the message comes in Atom or RSS format.
As you may have guessed, a slight twist to Spring MVC’s programming model is required to support message conversion. Let’s tweak the controller from listing 16.1 so that it will use message conversion.
Returning resource state in the response body
Normally, when a handler method returns a Java object (anything other than String or an implementation of View), that object ends up in the model for rendering in the view. But if you’re going to employ message conversion, you need to tell Spring to skip the normal model/view flow and use a message converter instead. There are a handful of ways to do this, but the simplest is to annotate the controller method with @ResponseBody.
Revisiting the spittles() method from listing 16.1, you can add @ResponseBody to have Spring convert the returned List<Spittle> to the body of the response:
@RequestMapping(method=RequestMethod.GET,
produces="application/json")
public @ResponseBody List<Spittle> spittles(
@RequestParam(value="max",
defaultValue=MAX_LONG_AS_STRING) long max,
@RequestParam(value="count", defaultValue="20") int count) {
return spittleRepository.findSpittles(max, count);
}
The @ResponseBody annotation tells Spring that you want to send the returned object as a resource to the client, converted into some representational form that the client can accept. More specifically, DispatcherServlet considers the request’s Accept header and looks for a message converter that can give the client the representation it wants.
For illustration’s sake, if the client’s Accept header specifies that the client will accept application/json, and if the Jackson JSON library is in the application’s classpath, then either MappingJacksonHttpMessageConverter or MappingJackson2Http-MessageConverter will be chosen (depending on which version of Jackson is in the classpath). The message converter will convert the Spittle list returned from the controller into a JSON document that will be written to the body of the response. That response might look a little something like this:
[
{
"id": 42,
"latitude": 28.419489,
"longitude": -81.581184,
"message": "Hello World!",
"time": 1400389200000
},
{
"id": 43,
"latitude": 28.419136,
"longitude": -81.577225,
"message": "Blast off!",
"time": 1400475600000
}
]
Jackson uses reflection by default
Be aware that by default, the Jackson JSON libraries use reflection in producing the JSON resource representation from the returned object. For simple representations, this may be fine. But if you refactor the Java type by adding, removing, or renaming properties, then the produced JSON will be changed as well (which might break clients, depending on those properties).
You can, however, influence how the JSON is produced by applying Jackson’s mapping annotations on the Java type. This gives you more control over what the resulting JSON looks like and prevents changes that could break your API and its clients.
Jackson’s mapping annotations are well outside the scope of this book, but there’s some useful documentation on the subject at http://wiki.fasterxml.com/Jackson-Annotations.
Speaking of the Accept header, note spittle()’s @RequestMapping. I’ve added a produces attribute to declare that this method will only handle requests where JSON output is expected. That is, this method will only handle requests whose Accept header includesapplication/json. Any other kind of request, even if it’s a GET request whose URL matches the path specified, won’t be handled by this method. Either it will be handled by some other handler method (if an appropriate one exists) or the client will be sent an HTTP 406 (Not Acceptable) response.
Receiving resource state in the request body
So far, we’ve been focused on REST endpoints that serve resources to the client. But REST isn’t read-only. A REST API can also receive resource representations from the client. It’d be inconvenient if your controller had to convert a JSON or XML representation sent from a client into an object it can use. Spring’s message converters were able to convert objects into representations on the way out of your controllers—can they do the same in reverse for representations coming in?
Just as @ResponseBody tells Spring to employ a message converter when sending data to a client, the @RequestBody tells Spring to find a message converter to convert a resource representation coming from a client into an object. For example, suppose that you need a way for a client to submit a new Spittle to be saved. You can write the controller method to handle such a request like this:
@RequestMapping(
method=RequestMethod.POST
consumes="application/json")
public @ResponseBody
Spittle saveSpittle(@RequestBody Spittle spittle) {
return spittleRepository.save(spittle);
}
If you disregard the annotations, saveSpittle() is a fairly straightforward method. It takes a single Spittle object as a parameter, saves it using the SpittleRepository, and then returns the Spittle returned from calling spittleRepository.save().
But by applying the annotations, it becomes much more interesting and powerful. The @RequestMapping indicates that it will only handle POST requests for /spittles (as declared in the class-level @RequestMapping). The body of the POST request is expected to carry a resource representation for a Spittle. Because the Spittle parameter is annotated with @RequestBody, Spring will look at the Content-Type header of the request and try to find a message converter that can convert the request body into a Spittle.
For example, if the client sent the Spittle data in a JSON representation, then the Content-Type header might be set to application/json. In that case, DispatcherServlet will look for a message converter that can convert JSON into Java objects. If the Jackson 2 library is on the classpath, then MappingJackson2Http-MessageConverter will get the job and will convert the JSON representation into a Spittle that’s passed into the saveSpittle() method. The method is also annotated with @ResponseBody so that the returned Spittle will be converted into a resource representation to be returned to the client.
Notice that the @RequestMapping has a consumes attribute set to application/json. The consumes attribute works much like the produces attribute, only with regard to the request’s Content-Type header. This tells Spring that this method will only handle POST requests to/spittles if the request’s Content-Type header is application/json. Otherwise, it will be up to some other method (if a suitable one exists) to handle the request.
Defaulting controllers for message conversion
The @ResponseBody and @RequestBody annotations are succinct yet powerful ways to engage Spring’s message converters when handling requests. But if you’re writing a controller that has several methods, all of which should use message conversion, then those annotations get somewhat repetitive.
Spring 4.0 introduced the @RestController annotation to help with that. If you annotate your controller class with @RestController instead of @Controller, Spring applies message conversion to all handler methods in the controller. You don’t need to annotate each method with@ResponseBody. SpittleController, as defined thus far, can look like the next listing.
Listing 16.3. Using the @RestController annotation
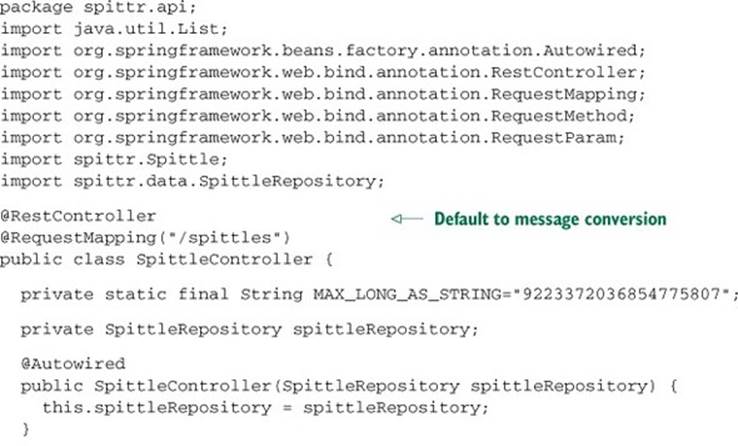
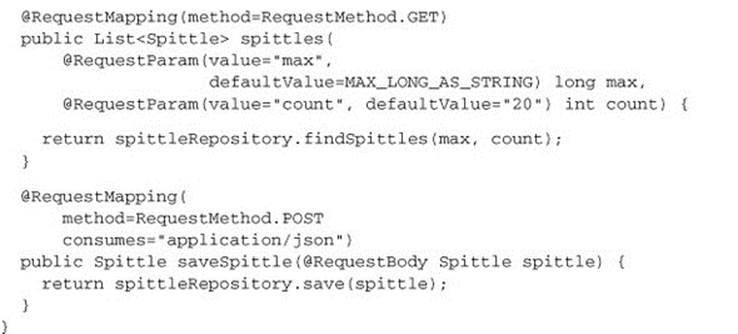
The key thing to notice in listing 16.3 is what’s not in the code. Neither of the handler methods are annotated with @ResponseBody. But because the controller is annotated with @RestController, the objects returned from those methods will still go through message conversion to produce a resource representation for the client.
So far, you’ve seen how to use Spring MVC’s programming model to publish RESTful resources in the body of responses. But there’s more to a response than the payload. There are headers and status codes that can also provide useful information about the response to the client. Let’s see how to populate response headers and set the status code when serving resources.
16.3. Serving more than resources
The @ResponseBody annotation is helpful in transforming a Java object returned from a controller to a resource representation to send to the client. As it turns out, serving a resource’s representation to a client is only part of the story. A good REST API does more than transfer resources between the client and server. It also gives the client additional metadata to help the client understand the resource or know what has just taken place in the request.
16.3.1. Communicating errors to the client
For example, let’s start by adding a new handler method to SpittleController to serve a single Spittle:
@RequestMapping(value="/{id}", method=RequestMethod.GET)
public @ResponseBody Spittle spittleById(@PathVariable long id) {
return spittleRepository.findOne(id);
}
That ID is passed in to the id parameter and used to look up a Spittle from the repository by calling findOne(). The Spittle returned from findOne() will be returned from the handler method, and message conversion will take care of producing a resource representation consumable by the client.
Simple enough, right? This couldn’t be made any better. Or could it?
What do you suppose will happen if there isn’t a Spittle whose ID matches the given ID, and findOne() returns null?
The funny thing is that if spittleById() returns null, the body of the response is empty. No useful data is returned to the client. Meanwhile, the default HTTP status code carried on the response is 200 (OK), which means everything is fine.
But everything is not fine. The client asks for a Spittle, but it gets nothing. It receives neither a Spittle nor any indication that anything is wrong. The server is essentially saying, “Here’s a useless response, but just know that everything’s OK!”
Now consider what should happen in that scenario. At the least, the status code shouldn’t be 200. It should be 404 (Not Found) to tell the client that what they asked for wasn’t found. And it would be nice if the response body carried an error message instead of being empty.
Spring offers a few options for dealing with such scenarios:
· Status codes can be specified with the @ResponseStatus annotation.
· Controller methods can return a ResponseEntity that carries more metadata concerning the response.
· An exception handler can deal with the error cases, leaving the handler methods to focus on the happy path.
This is another area where Spring offers a lot of flexibility, and there’s no one correct approach. Instead of trying to nail down a single strategy for dealing with these kind of errors or trying to cover all possible scenarios, I’ll show you a couple of ways you could change spittleById() to handle the case where a Spittle can’t be found.
Working with ResponseEntity
As an alternative to @ResponseBody, controller methods can return a Response-Entity. ResponseEntity is an object that carries metadata (such as headers and the status code) about a response in addition to the object to be converted to a resource representation.
Because ResponseEntity allows you to specify the response’s status code, it seems like a good choice for communicating an HTTP 404 error when the Spittle can’t be found. Here’s a new version of spittleById() that returns a ResponseEntity:
@RequestMapping(value="/{id}", method=RequestMethod.GET)
public ResponseEntity<Spittle> spittleById(@PathVariable long id) {
Spittle spittle = spittleRepository.findOne(id);
HttpStatus status = spittle != null ?
HttpStatus.OK : HttpStatus.NOT_FOUND;
return new ResponseEntity<Spittle>(spittle, status);
}
As before, the ID from the path is used to retrieve a Spittle from the repository. If one is found, the status is set to HttpStatus.OK (which was the default before). But if the repository returns null, then the status is set to HttpStatus.NOT_FOUND, which translates to an HTTP 404. Finally, a new ResponseEntity is created to carry the Spittle and the status code to the client.
Notice that spittleById() isn’t annotated with @ResponseBody. In addition to carrying response headers, a status code, and a payload, ResponseEntity implies the semantics of @ResponseBody, so the payload will be rendered into the response body just as if the method were annotated with @ResponseBody. There’s no need to annotate the method with @ResponseBody if it returns ResponseEntity.
This is a step in the right direction, for sure. Now the client is given a proper status code if the Spittle it asks for can’t be found. But the body of the response is still empty in that case. You’d like for the body to carry additional error information.
Let’s try again. First, define an Error object to carry the error information:
public class Error {
private int code;
private String message;
public Error(int code, String message) {
this.code = code;
this.message = message;
}
public int getCode() {
return code;
}
public String getMessage() {
return message;
}
}
Then you can change spittleById() to return the Error:
@RequestMapping(value="/{id}", method=RequestMethod.GET)
public ResponseEntity<?> spittleById(@PathVariable long id) {
Spittle spittle = spittleRepository.findOne(id);
if (spittle == null) {
Error error = new Error(4, "Spittle [" + id + "] not found");
return new ResponseEntity<Error>(error, HttpStatus.NOT_FOUND);
}
return new ResponseEntity<Spittle>(spittle, HttpStatus.OK);
}
Now this controller method should behave as you wish. If the Spittle is found, it’s returned, wrapped in a ResponseEntity with a status code of 200 (OK). On the other hand, if findOne() returns null, you construct an Error object and return it wrapped in a ResponseEntity with a status code of 404 (Not Found).
I suppose you could stop here. After all, the method works as you’d like it to. But a few things trouble me.
First, it’s a bit more involved than when we started. There’s a bit more logic involved, including a conditional statement. And the fact that the method returns ResponseEntity<?> feels wrong. The generic use of ResponseEntity leaves too much open for interpretation or mistake.
Fortunately, you can fix this with an error handler.
Handling errors
The if block in spittleById() is handling an error. But that’s what controller error handlers are good for. Error handlers deal with the ugly realities of what could go wrong, leaving the regular handler methods to blissfully focus on the happy path.
Let’s refactor some of the code to take advantage of an error handler. Begin by defining an error handler that reacts to a SpittleNotFoundException:
@ExceptionHandler(SpittleNotFoundException.class)
public ResponseEntity<Error> spittleNotFound(
SpittleNotFoundException e) {
long spittleId = e.getSpittleId();
Error error = new Error(4, "Spittle [" + spittleId + "] not found");
return new ResponseEntity<Error>(error, HttpStatus.NOT_FOUND);
}
The @ExceptionHandler annotation can be applied to controller methods to handle specific exceptions. Here, it’s indicating that if a SpittleNotFoundException is thrown from any of the handler methods in the same controller, the spittleNotFound() method should be called to handle that exception.
As for SpittleNotFoundException, it’s a fairly basic exception class:
public class SpittleNotFoundException extends RuntimeException {
private long spittleId;
public SpittleNotFoundException(long spittleId) {
this.spittleId = spittleId;
}
public long getSpittleId() {
return spittleId;
}
}
Now you can remove most of the error handling from the spittleById() method:
@RequestMapping(value="/{id}", method=RequestMethod.GET)
public ResponseEntity<Spittle> spittleById(@PathVariable long id) {
Spittle spittle = spittleRepository.findOne(id);
if (spittle == null) { throw new SpittleNotFoundException(id); }
return new ResponseEntity<Spittle>(spittle, HttpStatus.OK);
}
This cleans up spittleById() quite a bit. Aside from checking for a null return value, it’s completely focused on the successful case where the requested Spittle is found. And you were able to get rid of the strange use of generics in the return type.
You can clean things up a little more, though. Now that you know that spittleById() will return a Spittle and that the HTTP status will always be 200 (OK), you no longer need to use ResponseEntity and can replace it with @ResponseBody:
@RequestMapping(value="/{id}", method=RequestMethod.GET)
public @ResponseBody Spittle spittleById(@PathVariable long id) {
Spittle spittle = spittleRepository.findOne(id);
if (spittle == null) { throw new SpittleNotFoundException(id); }
return spittle;
}
Of course, if the controller class is annotated with @RestController, you don’t even need @ResponseBody:
@RequestMapping(value="/{id}", method=RequestMethod.GET)
public Spittle spittleById(@PathVariable long id) {
Spittle spittle = spittleRepository.findOne(id);
if (spittle == null) { throw new SpittleNotFoundException(id); }
return spittle;
}
Knowing that the error handler method always returns an Error and always responds with an HTTP status code of 404 (Not Found), you can apply a similar cleanup process to spittleNotFound():
@ExceptionHandler(SpittleNotFoundException.class)
@ResponseStatus(HttpStatus.NOT_FOUND)
public @ResponseBody Error spittleNotFound(SpittleNotFoundException e) {
long spittleId = e.getSpittleId();
return new Error(4, "Spittle [" + spittleId + "] not found");
}
Because spittleNotFound() always returns an Error, the only reason to keep Response-Entity around is so you can set the status code. But by annotating spittleNotFound() with @ResponseStatus(HttpStatus.NOT_FOUND), you can achieve the same effect and get rid ofResponseEntity.
Again, if the controller class is annotated with @RestController, you can remove the @ResponseBody annotation and clean up the code a little more:
@ExceptionHandler(SpittleNotFoundException.class)
@ResponseStatus(HttpStatus.NOT_FOUND)
public Error spittleNotFound(SpittleNotFoundException e) {
long spittleId = e.getSpittleId();
return new Error(4, "Spittle [" + spittleId + "] not found");
}
In some ways, you’ve gone full circle. In order to set the response status code, you began using ResponseEntity. But then you were able to use an exception handler and @ResponseStatus to eliminate the need for ResponseEntity and tighten up the code.
It almost seems that you won’t ever need ResponseEntity. But there’s one more thing that ResponseEntity does well that can’t be done with other annotations or exception handlers. Let’s see how to set headers in the response.
16.3.2. Setting headers in the response
In the case of the saveSpittle() method, you’re creating a new Spittle resource in the course of handling a POST request. But as it’s currently written (refer to listing 16.3), you’re not accurately communicating that to the client.
After saveSpittle() handles the request, the server responds to the client with a representation of the Spittle in the body and an HTTP status code of 200 (OK). That’s not a horrible thing, but it’s not entirely accurate.
Certainly, assuming that the request successfully creates the resource, the status can be thought of as OK. But there’s more to be said than “OK.” Something was just created, and an HTTP status code communicates that to the client. HTTP 201 says that the request completed successfully, but it also says that something was created. If you’re trying to communicate completely and accurately to the client, shouldn’t the response be a 201 (Created) and not just 200 (OK)?
Applying what you’ve learned so far, that’s easy to fix. All you need to do is annotate saveSpittle() with @ResponseStatus like this:
@RequestMapping(
method=RequestMethod.POST
consumes="application/json")
@ResponseStatus(HttpStatus.CREATED)
public Spittle saveSpittle(@RequestBody Spittle spittle) {
return spittleRepository.save(spittle);
}
That should do the trick. Now the status code accurately reflects what took place. It tells the client that a resource was created. Problem solved.
There’s just one thing, though. The client knows that something was created, but don’t you think it might be interested in knowing where the resource was created? After all, it’s a new resource, and a new URL is associated with it. Must the client guess what the URL for the new resource should be? Or can you communicate that somehow?
When creating a new resource, it’s considered good form to communicate the resource’s URL to the client in the Location header of the response. Therefore, you need some way to populate the response headers. Your old friend ResponseEntity can help you with that.
The following listing shows a new version of saveSpittle() that returns a Response-Entity to communicate that a new resource was created.
Listing 16.4. Setting headers in the response when returning a ResponseEntity
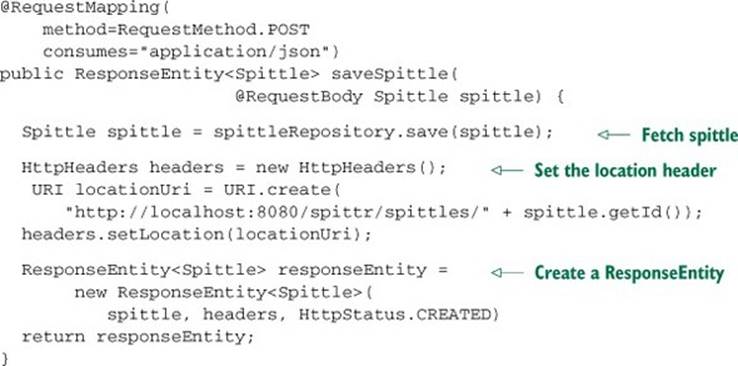
In this new version, an instance of HttpHeaders is created to carry the header values you want on the response. HttpHeaders is a special implementation of MultiValueMap<String, String> with some convenient setter methods (such as setLocation()) for setting common HTTP headers. After calculating the URL of the newly created Spittle resource, the headers are used to create the ResponseEntity.
Wow! The simple saveSpittle() method suddenly put on weight. What’s more concerning, however, is that it calculates the Location header value using hard-coded values. The localhost and 8080 portions of the URI are of particular concern, because those won’t be applicable if this application is deployed anywhere other than your local system.
Rather than construct the URI manually, Spring offers some help in the form of UriComponentsBuilder. It’s a builder class that lets you build up a UriComponents instance by specifying the various components of the URI (such as the host, port, path, and query) a piece at a time. From the UriComponents object that UriComponentsBuilder builds, you can obtain a URI suitable for setting the Location header.
To use a UriComponentsBuilder, all you have to do is ask for it as a parameter to the handler method, as shown next.
Listing 16.5. Using a UriComponentsBuilder to construct the location URI
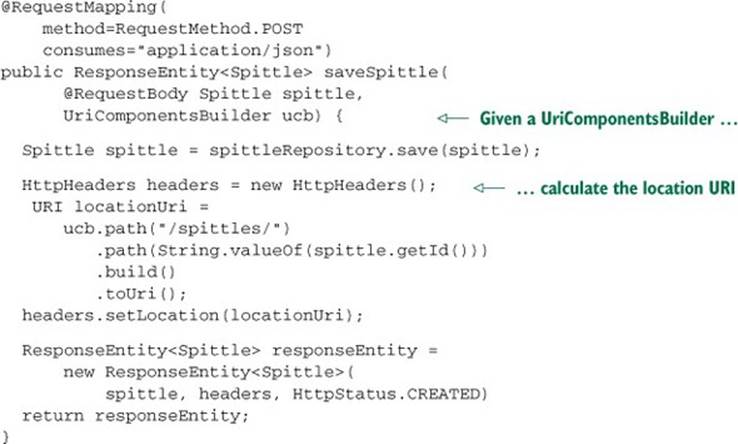
The UriComponentsBuilder given to the handler method is preconfigured with known information such as the host, port, and servlet content. It obtains this foundational information from the request that the handler method is serving. From there, the code builds up the rest of theUriComponents by setting the path.
Notice that the path is built up in two steps. The first step calls path() to set it to /spittles/, the base path that the controller handles. Then the saved Spittle ID is given in a second call to path(). As you may surmise, each call to path() builds on the previous calls.
After the path is completely set, the build() method is called to construct a UriComponents object. From that, a call to toUri() gives the URI of the newly created Spittle resource.
Exposing resources in a REST API represents only one side of the conversation. It does no good to publish an API if nobody comes along and uses it. Commonly, mobile and JavaScript applications are the clients of a REST API, but there’s no reason a Spring application can’t consume those resources, too. Let’s shift gears and see how to write Spring code that works for the client side of a RESTful interaction.
16.4. Consuming REST resources
Writing code that interacts with a REST resource as a client can involve some tedium and boilerplate. For example, let’s say you need to write a method to fetch someone’s Facebook profile from Facebook’s Graph API. But the code to fetch the profile data is a bit more involved, as shown in the following listing.
Listing 16.6. Fetching a Facebook profile using Apache HTTP Client
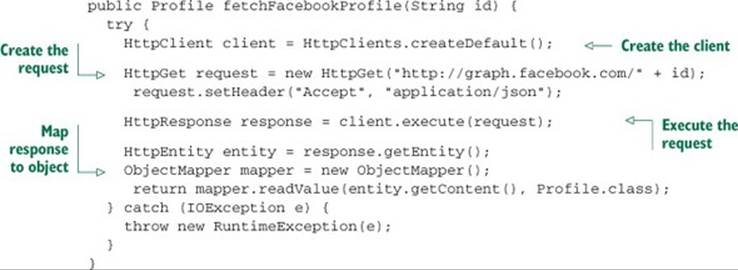
As you can see, a lot goes into consuming a REST resource. And I’m even cheating by using Apache HTTP Client to make the request and the Jackson JSON processor to parse the response.
Looking closely at the fetchFacebookProfile() method, you’ll realize that little is specific to the task of fetching a Facebook profile. Most of it is boilerplate code. If you were to write another method to consume a different REST resource, it would probably share a lot of code withfetchFacebookProfile().
What’s more, there are a few places along the way where an IOException could be thrown. Because IOException is a checked exception, you’re forced to either catch it or throw it. In this case, I’ve chosen to catch it and throw an unchecked Runtime-Exception in its place.
With so much boilerplate involved in resource consumption, you’d think it would be wise to encapsulate the common code and parameterize the variations. That’s precisely what Spring’s RestTemplate does. Just as JdbcTemplate handles the ugly parts of working with JDBC data access, RestTemplate frees you from the tedium of consuming RESTful resources.
In a moment, you’ll see how you can rewrite the fetchFacebookProfile() method, using RestTemplate to dramatically simplify it and eliminate the boilerplate. But first, let’s take a high-level survey of all the REST operations that RestTemplate offers.
16.4.1. Exploring RestTemplate’s operations
RestTemplate defines 36 methods for interacting with REST resources, and most of these methods map to HTTP methods. I don’t have enough space to go over all 36 methods in this chapter, but as it turns out, there are only 11 unique operations. Ten of these are overloaded into 3 method variants, while an 11th is overloaded 6 times for a total of 36 methods. Table 16.2 describes the 11 unique operations provided by RestTemplate.
Table 16.2. RestTemplate defines 11 unique operations, each of which is overloaded for a total of 36 methods.
|
Method |
Description |
|
delete() |
Performs an HTTP DELETE request on a resource at a specified URL |
|
exchange() |
Executes a specified HTTP method against a URL, returning a ResponseEntity containing an object mapped from the response body |
|
execute() |
Executes a specified HTTP method against a URL, returning an object mapped from the response body |
|
getForEntity() |
Sends an HTTP GET request, returning a ResponseEntity containing an object mapped from the response body |
|
getForObject() |
Sends an HTTP GET request, returning an object mapped from a response body |
|
headForHeaders() |
Sends an HTTP HEAD request, returning the HTTP headers for the specified resource URL |
|
optionsForAllow() |
Sends an HTTP OPTIONS request, returning the Allow header for the specified URL |
|
postForEntity() |
POSTs data to a URL, returning a ResponseEntity containing an object mapped from the response body |
|
postForLocation() |
POSTs data to a URL, returning the URL of the newly created resource |
|
postForObject() |
POSTs data to a URL, returning an object mapped from the response body |
|
put() |
PUTs resource data to the specified URL |
With the exception of TRACE, RestTemplate has methods to cover all the HTTP verbs. In addition, execute() and exchange() offer lower-level, general-purpose methods for using any of the HTTP methods.
Most of the operations in table 16.2 are overloaded into three method forms:
· One that takes a java.net.URI as the URL specification with no support for parameterized URLs
· One that takes a String URL specification with URL parameters specified as a Map
· One that takes a String URL specification with URL parameters specified as a variable argument list
Once you get to know the 11 operations provided by RestTemplate and how each of the variant forms works, you’ll be well on your way to writing resource-consuming REST clients. Let’s survey RestTemplate’s operations by looking at those that support the four primary HTTP methods: GET, PUT, DELETE, and POST. We’ll start with getForObject() and getForEntity(), the GET methods.
16.4.2. GETting resources
You may have noticed that table 16.2 lists two kinds of methods for performing GET requests: getForObject() and getForEntity(). As described earlier, each of these methods is overloaded into three forms. The signatures of the three getForObject() methods look like this:
<T> T getForObject(URI url, Class<T> responseType)
throws RestClientException;
<T> T getForObject(String url, Class<T> responseType,
Object... uriVariables) throws RestClientException;
<T> T getForObject(String url, Class<T> responseType,
Map<String, ?> uriVariables) throws RestClientException;
Similarly, the signatures of the getForEntity() methods are as follows:
<T> ResponseEntity<T> getForEntity(URI url, Class<T> responseType)
throws RestClientException;
<T> ResponseEntity<T> getForEntity(String url, Class<T> responseType,
Object... uriVariables) throws RestClientException;
<T> ResponseEntity<T> getForEntity(String url, Class<T> responseType,
Map<String, ?> uriVariables) throws RestClientException;
Except for the return type, the getForEntity() methods are mirror images of the getForObject() methods. And they work much the same way. They both perform a GET request, retrieving a resource given a URL. And they both map that resource to an instance of some type specified by the responseType parameter. The only difference is that getForObject() returns an object of the type requested, whereas getFor-Entity() returns that object along with extra information about the response.
Let’s first look at the simpler getForObject() method. Then you’ll see how to get more information from a GET response by using the getForEntity() method.
16.4.3. Retrieving resources
The getForObject() method is a no-nonsense option for retrieving a resource. You ask for a resource, and you receive that resource mapped to a Java type of your choosing. As a simple example of what getForObject() can do, let’s take another stab at implementingfetchFacebookProfile():
public Profile fetchFacebookProfile(String id) {
RestTemplate rest = new RestTemplate();
return rest.getForObject("http://graph.facebook.com/{spitter}",
Profile.class, id);
}
Back in listing 16.6, fetchFacebookProfile() involved more than a dozen lines of code. Using RestTemplate, it’s reduced to a handful of lines (and could be even less if I didn’t have to wrap lines to fit within the margins of this book).
fetchFacebookProfile() starts by constructing an instance of RestTemplate (an alternate implementation might use an injected instance instead). Then it invokes the getForObject() method to retrieve a Facebook profile. In doing so, it asks for the result as a Profile object. Upon receiving that Profile object, the method returns it to the caller.
Note that in this new version of fetchFacebookProfile() you don’t use String concatenation to produce the URL. Instead, you take advantage of the fact that RestTemplate accepts parameterized URLs. The {id} placeholder in the URL will ultimately be filled by the method’s idparameter. The last argument of getForObject() is a variable-sized list of arguments, where each argument is inserted into a placeholder in the specified URL in the order it appears.
Alternatively, you could place the id parameter into a Map with a key of id and pass in that Map as the last parameter to getForObject():
public Spittle[] fetchFacebookProfile(String id) {
Map<String, String> urlVariables = new HashMap<String, String();
urlVariables.put("id", id);
RestTemplate rest = new RestTemplate();
return rest.getForObject("http://graph.facebook.com/{spitter}",
Profile.class, urlVariables);
}
One thing that’s absent here is any sort of JSON parsing or object mapping. Under the covers, getForObject() converts the response body into an object for you. It does this by relying on the same set of HTTP message converters from table 16.1 that Spring MVC uses for handler methods that are annotated with @ResponseBody.
What’s also missing from this method is any sort of exception handling. That’s not because getForObject() couldn’t throw an exception, but because any exception it throws is unchecked. If anything goes wrong in getForObject(), an unchecked RestClientException (or some subclass thereof) will be thrown. You can catch it if you’d like—but you’re not forced by the compiler to catch it.
16.4.4. Extracting response metadata
As an alternative to getForObject(), RestTemplate also offers getForEntity(). The getForEntity() methods work much the same as the getForObject() methods. But where getForObject() returns only the resource (converted into a Java object by an HTTP message converter), getForEntity() returns that same object carried in a ResponseEntity. The ResponseEntity also carries extra information about the response, such as the HTTP status code and response headers.
One thing you might want to do with a ResponseEntity is retrieve the value of one of the response headers. For example, suppose that in addition to retrieving the resource, you want to know when that resource was last modified. Assuming that the server provides that information in theLastModified header, you can use the get-Headers() method like this:
Date lastModified = new Date(response.getHeaders().getLastModified());
The getHeaders() method returns an HttpHeaders object that provides several convenience methods for retrieving response headers, including getLastModified(), which returns the number of milliseconds since January 1, 1970.
In addition to getLastModified(), HttpHeaders includes the following methods for retrieving header information:
public List<MediaType> getAccept() { ... }
public List<Charset> getAcceptCharset() { ... }
public Set<HttpMethod> getAllow() { ... }
public String getCacheControl() { ... }
public List<String> getConnection() { ... }
public long getContentLength() { ... }
public MediaType getContentType() { ... }
public long getDate() { ... }
public String getETag() { ... }
public long getExpires() { ... }
public long getIfNotModifiedSince() { ... }
public List<String> getIfNoneMatch() { ... }
public long getLastModified() { ... }
public URI getLocation() { ... }
public String getOrigin() { ... }
public String getPragma() { ... }
public String getUpgrade() { ... }
For more general-purpose HTTP header access, HttpHeaders includes a get() method and a getFirst() method. Both take a String argument that identifies the key of the desired header. The get() method returns a list of String values—one for each value assigned to the header. The getFirst() method returns only the first header value.
If you’re interested in the response’s HTTP status code, then you’ll want to call the getStatusCode() method. For example, consider this method that fetches a Spittle:
public Spittle fetchSpittle(long id) {
RestTemplate rest = new RestTemplate();
ResponseEntity<Spittle> response = rest.getForEntity(
"http://localhost:8080/spittr-api/spittles/{id}",
Spittle.class, id);
if(response.getStatusCode() == HttpStatus.NOT_MODIFIED) {
throw new NotModifiedException();
}
return response.getBody();
}
Here, if the server responds with a status of 304, it indicates that the content on the server hasn’t been modified since the client previously requested it. In that event, a custom NotModifiedException is thrown to indicate that the client should check its cache for the Spittle.
16.4.5. PUTting resources
For performing PUT operations on a resource, RestTemplate offers a simple set of three put() methods. As with all of RestTemplate’s methods, the put() method comes in three forms:
void put(URI url, Object request) throws RestClientException;
void put(String url, Object request, Object... uriVariables)
throws RestClientException;
void put(String url, Object request, Map<String, ?> uriVariables)
throws RestClientException;
In its simplest form, the put() method takes a java.net.URI that identifies (and locates) the resource being sent to the server, and an object that’s the Java representation of that resource.
For example, here’s how you might use the URI-based version of put() to update a Spittle resource on the server:
public void updateSpittle(Spittle spittle) throws SpitterException {
RestTemplate rest = new RestTemplate();
String url = "http://localhost:8080/spittr-api/spittles/"
+ spittle.getId();
rest.put(URI.create(url), spittle);
}
Here, although the method signature is simple, the implication of using a java.net.URI argument is evident. In order to create the URL for the Spittle object to be updated, you have to do String concatenation.
As you’ve already seen with getForObject() and getForEntity(), using one of the other String-based put() methods alleviates most of the discomfort associated with creating a URI. These methods enable you to specify the URI as a template, plugging in values for the variable parts. Here’s a new updateSpittle() method rewritten to use one of the String-based put() methods:
public void updateSpittle(Spittle spittle) throws SpitterException {
RestTemplate rest = new RestTemplate();
rest.put("http://localhost:8080/spittr-api/spittles/{id}",
spittle, spittle.getId());
}
The URI is now expressed as a simple String template. When RestTemplate sends the PUT request, the URI template will be expanded to replace the {id} portion with the value returned from spittle.getId(). Just like getForObject() and getFor-Entity(), the last argument to this version of put() is a variable-sized list of arguments, each of which is assigned to the placeholder variables in the order they appear.
Optionally, you could pass in the template variables as a Map:
public void updateSpittle(Spittle spittle) throws SpitterException {
RestTemplate rest = new RestTemplate();
Map<String, String> params = new HashMap<String, String>();
params.put("id", spittle.getId());
rest.put("http://localhost:8080/spittr-api/spittles/{id}",
spittle, params);
}
When you use a Map to send the template variables, the key of each entry in the Map corresponds to the placeholder variable of the same name in the URI template.
In all versions of put(), the second argument is the Java object that represents the resource being PUT to the server at the given URI. In this case, it’s a Spittle object. RestTemplate uses one of the message converters from table 16.1 to convert the Spittle into a representation to send to the server in the request body.
The content type into which the object will be converted depends largely on the type being passed in to put(). If given a String value, the StringHttpMessage-Converter kicks in: the value is written directly to the body of the request, and the content type is set to text/plain. When given a MultiValueMap<String,String>, the values in the map are written to the request body in application/x-www-form-urlencoded form by FormHttpMessageConverter.
Because you’re passing in a Spittle object, you need a message converter that can work with arbitrary objects. If the Jackson 2 library is in the classpath, then the MappingJackson2HttpMessageConverter writes the Spittle to the request as application/json.
16.4.6. DELETEing resources
When you don’t want a resource to be kept around on the server anymore, you’ll want to call RestTemplate’s delete() methods. Much like the put() methods, the delete() methods have only three versions, whose signatures are as follows:
void delete(String url, Object... uriVariables)
throws RestClientException;
void delete(String url, Map<String, ?> uriVariables)
throws RestClientException;
void delete(URI url) throws RestClientException;
Hands down, the delete() methods are the simplest of all the RestTemplate methods. The only thing you need to supply them with is the URI of the resource to be deleted. For example, to get rid of a Spittle whose ID is given, you might call delete() like this:
public void deleteSpittle(long id) {
RestTemplate rest = new RestTemplate();
rest.delete(
URI.create("http://localhost:8080/spittr-api/spittles/" + id));
}
That’s easy enough, but here again you rely on String concatenation to create a URI object. Let’s turn to one of the simpler versions of delete() to avoid doing so:
public void deleteSpittle(long id) {
RestTemplate rest = new RestTemplate();
rest.delete("http://localhost:8080/spittr-api/spittles/{id}", id));
}
There. I feel better about that. Don’t you?
Now that I’ve shown you the simplest set of RestTemplate methods, let’s look at RestTemplate’s most diverse set of methods—those that support HTTP POST requests.
16.4.7. POSTing resource data
Looking back at table 16.2, you see that RestTemplate comes with three different kinds of methods for sending POST requests. When you multiply that by the three variants that each is overridden into, that’s a total of nine methods for POSTing data to the server.
Two of those methods have names that look familiar. The postForObject() and postForEntity() methods work with POST requests in a way that’s similar to how getForObject() and getForEntity() work for sending GET requests. The other method, postForLocation(), is unique for POST requests.
16.4.8. Receiving object responses from POST requests
Let’s say that you’re using RestTemplate to POST a new Spitter object to the Spittr application’s REST API. Because it’s a brand-new Spitter, the server doesn’t know about it (yet). Therefore, it’s not officially a REST resource and doesn’t have a URL. Also, the client won’t know the ID of the Spitter until it’s created on the server.
One way of POSTing a resource to the server is to use RestTemplate’s post-ForObject() method. The three varieties of postForObject() have the following signatures:
<T> T postForObject(URI url, Object request, Class<T> responseType)
throws RestClientException;
<T> T postForObject(String url, Object request, Class<T> responseType,
Object... uriVariables) throws RestClientException;
<T> T postForObject(String url, Object request, Class<T> responseType,
Map<String, ?> uriVariables) throws RestClientException;
In all cases, the first parameter is the URL to which the resource should be POSTed, the second parameter is the object to post, and the third parameter is the Java type expected to be given in return. In the case of the two versions that take the URL as a String, a fourth parameter identifies the URL variables (as either a variable arguments list or a Map).
When you POST new Spitter resources to the Spitter REST API, they should be posted to http://localhost:8080/spittr-api/spitters, where a POST-handling controller handler method is waiting to save the object. Because this URL requires no URL variables, you can use any version ofpostForObject(). But in the interest of keeping it simple, let’s make the call like this:
public Spitter postSpitterForObject(Spitter spitter) {
RestTemplate rest = new RestTemplate();
return rest.postForObject("http://localhost:8080/spittr-api/spitters",
spitter, Spitter.class);
}
The postSpitterForObject() method is given a newly created Spitter object and uses postForObject() to send it to the server. In response, it receives a Spitter object and returns it to the caller.
As with the getForObject() methods, you may want to examine some of the metadata that comes back with the request. In that case, postForEntity() is the preferred method. postForEntity() comes with a set of signatures that mirror those of postForObject():
<T> ResponseEntity<T> postForEntity(URI url, Object request,
Class<T> responseType) throws RestClientException;
<T> ResponseEntity<T> postForEntity(String url, Object request,
Class<T> responseType, Object... uriVariables)
throws RestClientException;
<T> ResponseEntity<T> postForEntity(String url, Object request,
Class<T> responseType, Map<String, ?> uriVariables)
throws RestClientException;
Suppose that, in addition to receiving the Spitter resource in return, you’d also like to see the value of the Location header in the response. In that case, you can call postForEntity() like this:
RestTemplate rest = new RestTemplate();
ResponseEntity<Spitter> response = rest.postForEntity(
"http://localhost:8080/spittr-api/spitters",
spitter, Spitter.class);
Spitter spitter = response.getBody();
URI url = response.getHeaders().getLocation();
Just like the getForEntity() method, postForEntity() returns a Response-Entity<T> object. From that object, you can call getBody() to get the resource object (a Spitter in this case). And the getHeaders() method gives you an HttpHeaders from which you can access the various HTTP headers returned in the response. Here, you’re calling getLocation() to retrieve the Location header as a java.net.URI.
16.4.9. Receiving a resource location after a POST request
The postForEntity() method is handy for receiving both the resource posted and any response headers. But often you don’t need the resource to be sent back to you (after all, you sent it to the server in the first place). If the value of the Location header is all you need to know, then it’s even easier to use RestTemplate’s postFor-Location() method.
Like the other POST methods, postForLocation() sends a resource to the server in the body of a POST request. But instead of responding with that same resource object, postForLocation() responds with the location of the newly created resource. It has the following three method signatures:
URI postForLocation(String url, Object request, Object... uriVariables)
throws RestClientException;
URI postForLocation(
String url, Object request, Map<String, ?> uriVariables)
throws RestClientException;
URI postForLocation(URI url, Object request) throws RestClientException;
To demonstrate postForLocation(), let’s try POSTing a Spitter again. This time, you want the resource’s URL in return:
public String postSpitter(Spitter spitter) {
RestTemplate rest = new RestTemplate();
return rest.postForLocation(
"http://localhost:8080/spittr-api/spitters",
spitter).toString();
}
Here, you’re passing in the target URL as a String, along with the Spitter object to be POSTed (there are no URL variables in this case). If, after creating the resource, the server responds with the new resource URL in the response’s Location header, then postForLocation() will return that URL as a String.
16.4.10. Exchanging resources
Up to this point, you’ve seen all manner of RestTemplate methods for GETting, PUTting, DELETEing, and POSTing resources. Among those you saw two special methods, getForEntity() and postForEntity(), that give you the resulting resource wrapped in a RequestEntity from which you can retrieve response headers and status codes.
Being able to read headers from the response is useful. But what if you want to set headers on the request sent to the server? That’s what RestTemplate’s exchange() methods are good for.
Like all the other methods in RestTemplate, exchange() is overloaded into three signature forms. One takes a java.net.URI to identify the target URL, whereas the other two take the URL in String form with URL variables, as shown here:
<T> ResponseEntity<T> exchange(URI url, HttpMethod method,
HttpEntity<?> requestEntity, Class<T> responseType)
throws RestClientException;
<T> ResponseEntity<T> exchange(String url, HttpMethod method,
HttpEntity<?> requestEntity, Class<T> responseType,
Object... uriVariables) throws RestClientException;
<T> ResponseEntity<T> exchange(String url, HttpMethod method,
HttpEntity<?> requestEntity, Class<T> responseType,
Map<String, ?> uriVariables) throws RestClientException;
The exchange() method also takes an HttpMethod parameter to indicate the HTTP verb that should be used. Depending on the value given to this parameter, the exchange() method can perform the same jobs as any of the other RestTemplate methods.
For example, one way to retrieve a Spitter resource from the server is to use RestTemplate’s getForEntity() method like this:
ResponseEntity<Spitter> response = rest.getForEntity(
"http://localhost:8080/spittr-api/spitters/{spitter}",
Spitter.class, spitterId);
Spitter spitter = response.getBody();
As you can see in the next snippet of code, exchange() is also up to the task:
ResponseEntity<Spitter> response = rest.exchange(
"http://localhost:8080/spittr-api/spitters/{spitter}",
HttpMethod.GET, null, Spitter.class, spitterId);
Spitter spitter = response.getBody();
By passing in HttpMethod.GET as the HTTP verb, you’re asking exchange() to send a GET request. The third argument is for sending a resource on the request, but because this is a GET request, it can be null. The next argument indicates that you want the response converted into aSpitter object. And the final argument is the value to place into the {spitter} placeholder in the specified URL template.
Used this way, the exchange() method is virtually identical to the previously used getForEntity(). But unlike getForEntity()—or getForObject()—exchange() lets you set headers on the request sent. Instead of passing null to exchange(), you pass in an HttpEntitycreated with the request headers you want.
Without specifying the headers, exchange() sends the GET request for a Spitter with the following headers:
GET /Spitter/spitters/habuma HTTP/1.1
Accept: application/xml, text/xml, application/*+xml, application/json
Content-Length: 0
User-Agent: Java/1.6.0_20
Host: localhost:8080
Connection: keep-alive
Look at the Accept header. It says it can accept several different XML content types as well as application/json. That leaves a lot of room for the server to decide which format to send the resource back as. Suppose you want to demand that the server send the response back as JSON. In that case, you need to specify application/json as the only value in the Accept header.
Setting request headers is a simple matter of constructing the HttpEntity sent to exchange() with a MultiValueMap loaded with the desired headers:
MultiValueMap<String, String> headers =
new LinkedMultiValueMap<String, String>();
headers.add("Accept", "application/json");
HttpEntity<Object> requestEntity = new HttpEntity<Object>(headers);
Here, you create a LinkedMultiValueMap and add an Accept header set to application/json. Then you construct an HttpEntity (with a generic type of Object), passing the MultiValueMap as a constructor argument. If this were a PUT or a POST request, you would also give theHttpEntity an object to send in the body of the request—but for a GET request, this isn’t necessary.
Now you can call exchange(), passing in the HttpEntity:
ResponseEntity<Spitter> response = rest.exchange(
"http://localhost:8080/spittr-api/spitters/{spitter}",
HttpMethod.GET, requestEntity, Spitter.class, spitterId);
Spitter spitter = response.getBody();
On the surface, the results should be the same. You should receive the Spitter object that you asked for. Under the surface, the request is sent with the following headers:
GET /Spitter/spitters/habuma HTTP/1.1
Accept: application/json
Content-Length: 0
User-Agent: Java/1.6.0_20
Host: localhost:8080
Connection: keep-alive
And, assuming that the server can serialize the Spitter response into JSON, the response body should be represented in JSON format.
16.5. Summary
RESTful architecture uses web standards to integrate applications, keeping the interactions simple and natural. Resources in a system are identified by URLs, manipulated with HTTP methods, and represented in one or more forms suitable for the client.
In this chapter, you’ve seen how to write Spring MVC controllers that respond to requests to manipulate RESTful resources. By utilizing parameterized URL patterns and associating controller handler methods with specific HTTP methods, controllers can respond to GET, POST, PUT, andDELETE requests for the resources in an application.
In response to those requests, Spring can represent the data behind those resources in a format that’s best for the client. For view-based responses, ContentNegotiatingViewResolver can select the best view produced from several view resolvers to satisfy the client’s desired content type. Or a controller handler method can be annotated with @ResponseBody to completely bypass view resolution and have one of several message converters convert the returned value into a response for the client.
REST APIs expose an application’s functionality to a client to build on, and they expose it in ways that maybe even the original API designers never dreamed of. Often, the clients of a REST API are mobile applications or JavaScript running in a web browser. But Spring applications can also consume those APIs using RestTemplate.
The REST resources defined in this chapter are part of a public API. That is, if you were to deploy them to an application somewhere on the internet, there’d be nothing stopping anyone from writing a client that uses them. Coming up in the next chapter, you’ll start locking them down, as we look at ways to secure the REST resources so that only authorized clients are allowed to consume them.
All materials on the site are licensed Creative Commons Attribution-Sharealike 3.0 Unported CC BY-SA 3.0 & GNU Free Documentation License (GFDL)
If you are the copyright holder of any material contained on our site and intend to remove it, please contact our site administrator for approval.
© 2016-2026 All site design rights belong to S.Y.A.