PROFESSIONAL JAVA FOR WEB APPLICATIONS (2014)
Part I Creating Enterprise Applications
Chapter 10 Making Your Application Interactive with WebSockets
IN THIS CHAPTER
· How Ajax evolved to WebSockets
· A discussion on the WebSocket APIs
· Using WebSockets to create multiplayer games
· Communicating in a cluster with WebSockets
· How to add chatting to a web application
WROX.COM CODE DOWNLOADS FOR THIS CHAPTER
You can find the wrox.com code downloads for this chapter at http://www.wrox.com/remtitle.cgi?isbn=1118656464 on the Download Code tab. The code for this chapter is divided into the following major examples:
· Game-Site Project
· Simulated-Cluster Project
· Customer-Support-v8 Project
NEW MAVEN DEPENDENCIES FOR THIS CHAPTER
In addition to the Maven dependencies introduced in previous chapters, you also need the following Maven dependencies:
<dependency>
<groupId>javax.websocket</groupId>
<artifactId>javax.websocket-api</artifactId>
<version>1.0</version>
<scope>provided</scope>
</dependency>
<dependency>
<groupId>org.apache.commons</groupId>
<artifactId>commons-lang3</artifactId>
<version>3.1</version>
<scope>compile</scope>
</dependency>
<dependency>
<groupId>com.fasterxml.jackson.core</groupId>
<artifactId>jackson-core</artifactId>
<version>2.3.2</version>
<scope>compile</scope>
</dependency>
<dependency>
<groupId>com.fasterxml.jackson.core</groupId>
<artifactId>jackson-annotations</artifactId>
<version>2.3.2</version>
<scope>compile</scope>
</dependency>
<dependency>
<groupId>com.fasterxml.jackson.core</groupId>
<artifactId>jackson-databind</artifactId>
<version>2.3.2</version>
<scope>compile</scope>
</dependency>
<dependency>
<groupId>com.fasterxml.jackson.datatype</groupId>
<artifactId>jackson-datatype-jsr310</artifactId>
<version>2.3.2</version>
<scope>compile</scope>
</dependency>
EVOLUTION: FROM AJAX TO WEBSOCKETS
In the beginning, man created HTML and saw that it was not enough. Users wanted web pages that interacted with them. The answer to this was JavaScript. In the early days of JavaScript, there was almost no standardization between browsers (in the earliest days, only one browser supported it) and JavaScript was extremely slow and insecure. Over the years it has improved significantly in speed, security, and capability. With many JavaScript frameworks available on the web, you can now create extremely rich, single-page web applications with very little JavaScript. The biggest driver of this innovation was the adoption of a technology known as Ajax.
Problem: Getting New Data from the Server to the Browser
Ajax, an acronym for Asynchronous JavaScript and XML, has become synonymous with the idea of asynchronously communicating (or synchronously, for that matter) with a remote server using JavaScript. It does not necessitate the use of XML, as the name implies. (JSON is often used instead of XML, and in such cases it can still be called Ajax or may also be called AJAJ.) With Ajax, web applications in the browser could now communicate with server-side components without the browser page changing or refreshing. This communication could happen completely transparently, without the user knowing, and it could be used to send new data to the server or fetch new data from the server. This, however, was the crux of the problem: The browser could only fetch new data from the server. But the browser doesn’t necessarily know when new data is available to fetch. The server knows that. Just like only the browser knows when it has new data to send to the server, only the server knows when it has new data to send to the browser. For example, when two users are chatting in a web application, only the server knows when user A has sent a message to user B. User B’s browser won’t know until it contacts the server. Even with something as powerful as Ajax, this was a difficult problem to solve.
Over the past 14 years, dozens of solutions have emerged, some of them widely supported, whereas others were extremely browser-specific. This book doesn’t cover all of them, nor would that be useful. However, four major approaches have served as the basis for the varying solutions to this problem, and understanding them and their weaknesses is key to understanding the need for something better.
NOTE The actual details of making Ajax requests and receiving responses using JavaScript is not important to the discussion in this chapter and outside the scope of this book. If you are unfamiliar with this topic, there are thousands of Ajax tutorials available online.
Solution 1: Frequent Polling
Perhaps one of the most prevalent approaches to this problem is frequently polling the server for new data. The concept is fairly simple: At a regular interval, often once per second, the browser sends an Ajax request to the server polling for new data. If the browser has new data to send to the server, that data hitches a ride on the request. If the server has new data for the browser, it replies with the new data. If it does not, it replies with no content. (This may mean an empty JSON object or XML document, or a Content-Lengthheader of 0.) This protocol looks something like the four requests represented in Figure 10-1, except there are usually many more requests and responses.
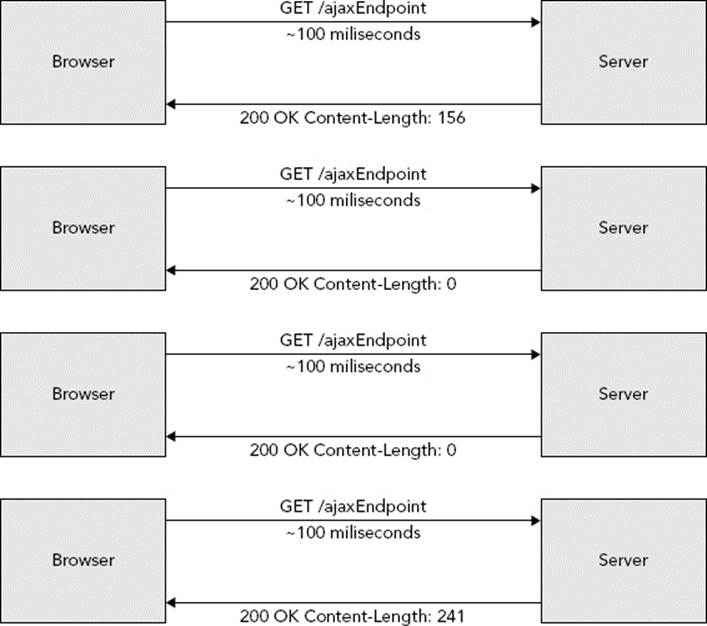
FIGURE 10-1
The downside to this protocol is huge and obvious: An enormous number of wasted requests could be made and replied to needlessly. Notice that the second and third requests in the figure achieved nothing! Add to this the overhead of establishing a connection, sending and receiving headers, and tearing down a connection, and a lot of processing and network resources are wasted to find out that the server has no new data for the browser. Though this technique is still in widespread use due to the sheer simplicity of implementing it, it was clear early on that it was not a good solution to this problem.
Solution 2: Long Polling
Long polling, represented in Figure 10-2, is similar to frequent polling, except that the server doesn’t respond until it has data to send back to the browser. This is more efficient because fewer compute and network resources are wasted, but it brings some problems of its own to the table:
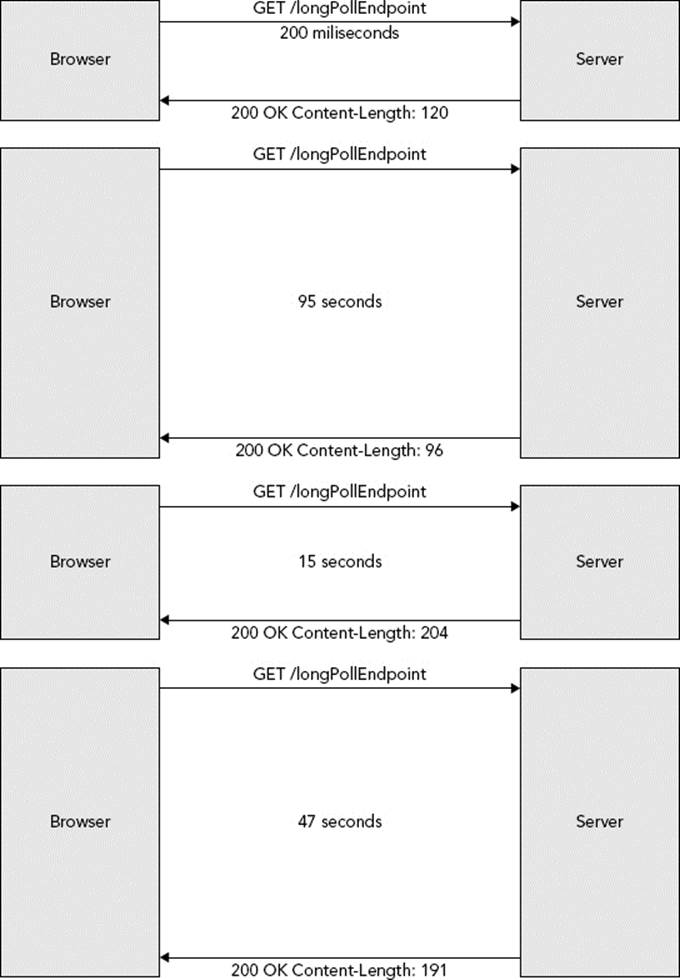
FIGURE 10-2
· What if the browser has new data to send to the server before the server responds? The browser must either make a separate, parallel request, or it must terminate the current request (from which the server must recover gracefully) and begin another one.
· Connection timeouts are built into the TCP and HTTP specifications. Because of this, the server and client must periodically close and re-establish a connection. Sometimes the connection closes as often as every 60 seconds, although some implementations have been successful at holding a connection for several minutes.
· A connection limit mandate exists in the HTTP/1.1 specification. Browsers must permit no more than two simultaneous connections to any given hostname. If one connection is constantly tied up waiting for data to be pushed from the server, it cuts in half the number of connections that can be used to fetch web pages, graphics, and other resources from the server.
Regardless of these issues, this is a popular approach that has gained widespread use over the past several years and is often generically referred to as Comet (an ironic play on words with Ajax, as both names can refer to cleaning products).
Solution 3: Chunked Encoding
Very similar to the long polling solution, chunked encoding takes advantage of an HTTP/1.1 feature that enables servers to respond to requests without advertising a content length. In place of the Content-Length: n header, a response can contain a Transfer-Encoding: chunked header. This tells the browser that the response is coming in “chunks.” In the response, each chunk starts with a number indicating the length of the chunk, a series of optional characters indicating chunk extensions (irrelevant to this discussion), and a CRLF(carriage return + line feed) sequence. This is then followed by the data contained in that chunk and another CRLF. Any number of chunks can follow, and they can be separated, theoretically, by any amount of time, small or great. When a zero-length chunk (a 0followed by two CRLFs) is sent, this indicates the end of the response.
How you typically use chunked encoding to solve the problem at hand is to establish a connection at the beginning for the sole purpose of receiving events sent from the server. Each chunk from the server is a new event and triggers another call to the JavaScriptXMLHttpRequest object’s onreadystatechange event handler. Occasionally, though not nearly as often as with long polling, the connection has to be refreshed. When the browser needs to send new data to the server, it does so with a second short-lived request.
This protocol is represented in Figure 10-3. On the left-hand side, the browser sends new data to the “upstream endpoint,” whenever it needs to, using short-lived requests. On the right-hand side, the browser establishes a single, long-lived connection with the “downstream endpoint,” and the server uses that connection to send the browser updates in chunks. Chunked encoding solves the major timeout problem present with long polling (browsers tolerate responses taking a long time to complete much better than responses taking a long time to start — large file downloads are the perfect example), but the issue with browsers being limited to two connections remains. Additionally, with both long polling and chunked encoding, older browsers tended to indefinitely display a message in the status bar that the page was still loading — though modern browsers have eliminated this behavior.
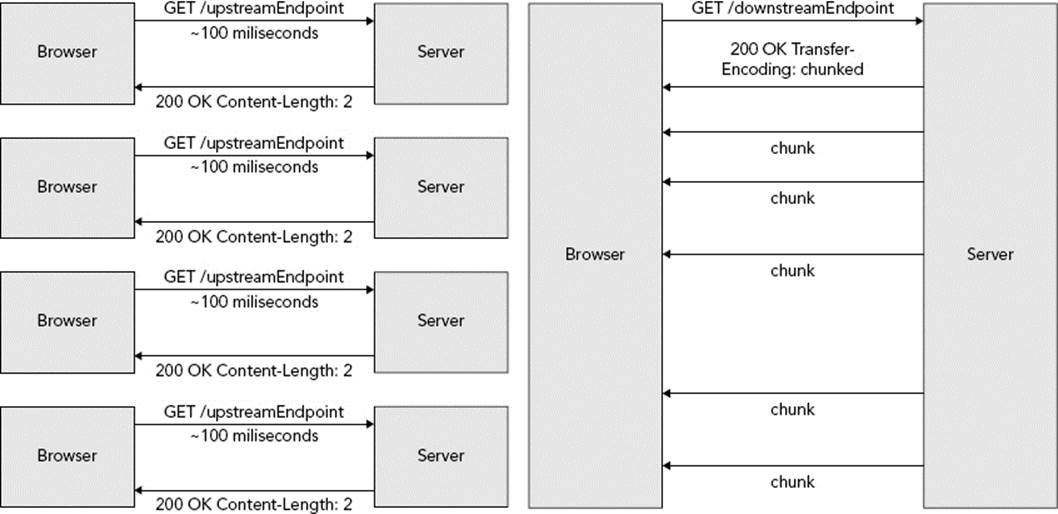
FIGURE 10-3
Solution 4: Applets and Adobe Flash
Early in this evolutionary process, many realized that what all of these solutions were emulating was true full-duplex communications between a browser and server over a single connection. Simply put, this was not going to happen using Ajax and XMLHttpRequest. A popular, though short-lived, approach to this problem was to use Java Applets or Adobe Flash movies, demonstrated in Figure 10-4. Essentially, the developer would create a 1-pixel-square transparent Applet or Flash movie and embed it in the page. This plug-in would then establish an ordinary TCP socket connection (instead of an HTTP connection) to the server. This eliminated all of the restrictions and limitations present in the HTTP protocol. When the server sent messages to the browser, the Applet or Flash movie would call a JavaScript function with the message data. When the browser had new data for the server, it would call a Java or Flash method using a JavaScript DOM function exposed by the browser plug-in, and that method would forward the data on to the server.
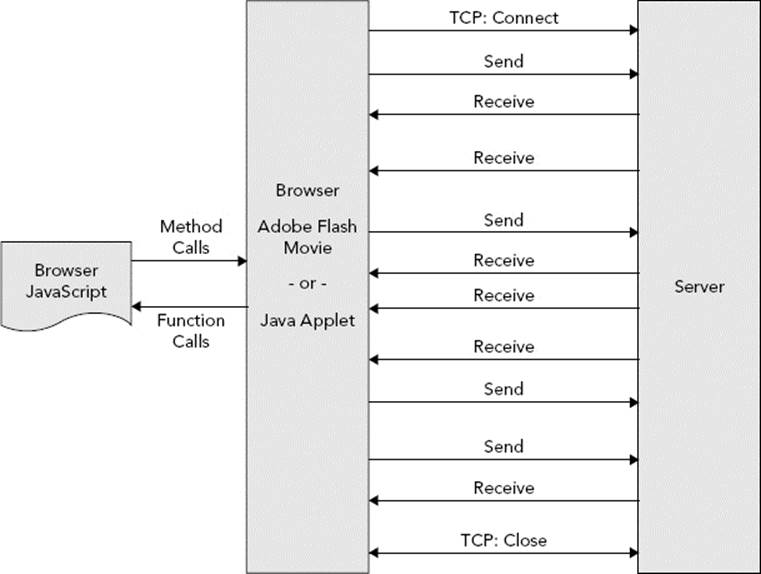
FIGURE 10-4
This protocol achieved true full-duplex communications over a single connection and eliminated issues such as timeouts and concurrent connection limitations (and even avoided the security constraint placed on Ajax connections that they must originate from a page on the same fully qualified domain name). But it came at a high cost: It required third-party (Java or Flash) plug-ins, which were inherently insecure, slow, and memory-intensive. Because there were no security protocols built in to this solution and each developer was left to his own devices, it also revealed some interesting vulnerabilities.
This technology took off for a while, but not long after that, the mobile web took the technology world by storm. Browsers in most popular mobile device operating systems would not (and to this day still do not) run Java or Flash plug-ins. With an increasing percentage of Internet traffic coming from mobile devices (one-quarter of all traffic as of late 2012), web developers quickly abandoned this approach to getting data from the server. They needed something better. They needed a solution that used raw TCP connections, was secure, was fast, could be easily supported on mobile platforms, and didn’t require browser plug-ins to accomplish.
WebSockets: The Solution Nobody Knew Kind of Already Existed
The HTTP/1.1 specification in RFC 2616 was formalized in 1999. It provided the framework for all HTTP communications used for more than a decade to the present day. Section 14.42 included a rarely used, often overlooked featured called HTTP Upgrade.
The HTTP/1.1 Upgrade Feature
The premise is simple: Any HTTP client (not just browsers) can include the header name and value Connection: Upgrade in a request. To indicate what the client wants to upgrade to, the additional Upgrade header must specify a list of one or more protocols. These protocols should be something incompatible with HTTP/1.1, such as IRC or RTA. The server, if it accepts the upgrade request, returns the response code 101 Switching Protocols along with a response Upgrade header with a single value: the first protocol that the server supports from the list of the requested protocols. Originally, this feature was most often used to upgrade from HTTP to HTTPS, but was subject to man-in-the-middle attacks because the entire connection wasn’t secured. Thus, the technique was quickly replaced with the https URI scheme. Since then, Connection: Upgrade has largely fallen out of use.
The most important feature of an HTTP Upgrade is that the resulting protocol can be anything. It ceases to be an HTTP connection after the Upgrade handshake is complete and can even turn into a persistent, full-duplex TCP socket connection. Theoretically speaking, you could use HTTP Upgrade to establish any kind of TCP communications between any two endpoints with a protocol of your own design. However, browsers aren’t about to turn JavaScript developers loose on the TCP stack (nor should they), so some protocol needed to be agreed upon. Thus, the WebSockets protocol was born.
NOTE If a particular resource on a server accepts only HTTP Upgrade requests and a client connects to this resource without requesting an upgrade, the server can respond with 426 Upgrade Required to indicate that an upgrade is mandatory. In this case the response could also include the Connection: Upgrade header and the Upgrade header containing a list of the upgrade protocols the server supports. If a client requests an upgrade to a protocol the server doesn’t support, the server responds with 400 Bad Request and can include the Upgrade header containing a list of the upgrade protocols the server supports. Finally, if the server does not accept upgrade requests, it responds with 400 Bad Request.
WebSocket Protocol Sits on Top of HTTP/1.1 Upgrade
A WebSocket connection, represented in Figure 10-5, begins with a not-so-unordinary HTTP request to a URL with a special scheme. The URI schemes ws and wss correspond to their HTTP counterparts http and https, respectively. The Connection: Upgrade header is present along with the Upgrade: websocket header, instructing the server to upgrade the connection to the WebSocket protocol, a persistent, full-duplex communications protocol formalized as RFC 6455 in 2011. After the handshake is completed, text and binary messages are sent in either direction at the same time without closing and re-establishing the connection. At this point, there is essentially no difference between client and server — they have equal capabilities and power over the connection, and are simply peers.
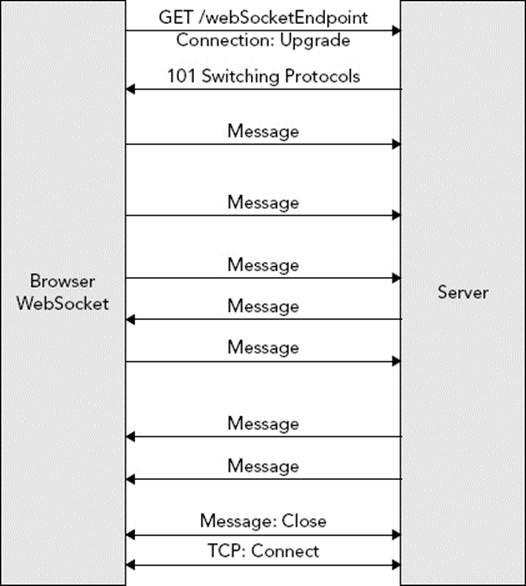
FIGURE 10-5
NOTE The ws and wss schemes aren’t strictly part of the HTTP protocol, since HTTP requests and request headers don’t actually include URI schemes. Instead, HTTP requests include only the server-relative URL in the first line of the request and the domain name in the Host header. The specialized WebSocket schemes are mainly used to inform browsers and APIs as to whether you intend to connect using SSL/TLS (wss) or no encryption (ws).
There are many advantages to the way the WebSocket protocol is implemented:
· Because the connection is established on port 80 (ws) or 443 (wss), the same ports used for HTTP, almost no firewalls block WebSocket connections.
· The protocol integrates naturally into Internet browsers and HTTP servers because the handshake takes place over HTTP.
· Heartbeat messages called pings and pongs are sent back and forth to keep WebSocket connection alive nearly indefinitely. Essentially, one peer periodically sends a tiny packet to the other (the ping), and the other peer responds with a packet containing the same data (the pong). This establishes that both peers are still connected.
· Messages are framed on your behalf without any extra code so that the server and client both know when a message starts and when all its content arrives.
· The closing of the WebSocket connection involves a special close message that can contain reason codes and text explaining why the connection was closed.
· The WebSocket protocol can securely allow cross-domain connections, eliminating restrictions placed on Ajax and XMLHttpRequest.
· The HTTP specification requiring browsers to limit simultaneous connections to two per hostname does not apply after the handshake is complete because the connection ceases to be an HTTP connection.
The handshake request headers in a WebSocket connection are simple. A typical WebSocket upgrade request may appear as follows if studied in a traffic analyzer like Wireshark or Fiddler:
GET /webSocketEndpoint HTTP/1.1
Host: www.example.org
Connection: Upgrade
Upgrade: websocket
Origin: http://example.com
Sec-WebSocket-Key: x3JJHMbDL1EzLkh9GBhXDw==
Sec-WebSocket-Version: 13
Sec-WebSocket-Protocol: game
You should already be familiar with the HTTP prelude (GET /webSocketEndpoint HTTP/1.1) and the Host header. Also the Connection and Upgrade headers were previously explained. The Origin header is a security mechanism that protects against unwanted cross-domain requests. The browser sets this header to the domain from which the web page was served, and the server checks that value against a list of “approved” domains.
The Sec-WebSocket-Key header is a specification conformance check: The browser generates a random key, base64 encodes it, and places it in the request header. The server appends 258EAFA5-E914-47DA-95CA-C5AB0DC85B11 to the request header value, SHA-1 hashes it, and returns the hashed value base64 encoded in the Sec-WebSocket-Accept response header. Sec-WebSocket-Version indicates the current version of the protocol that the client implements, and Sec-WebSocket-Protocol is an optional header that further indicates which protocol is used on top of the WebSocket protocol. (This is a protocol you define, such as chat, game, or stockticker.) The following is what the response to the previous request might look like:
HTTP/1.1 101 Switching Protocols
Server: Apache 2.4
Connection: Upgrade
Upgrade: websocket
Sec-WebSocket-Accept: HSmrc0sMlYUkAGmm5OPpG2HaGWk=
Sec-WebSocket-Protocol: game
At this point, the HTTP connection goes away and is replaced by a WebSocket connection using the same, underlying TCP connection. The biggest hurdle to the success of this connection is HTTP proxies, which historically don’t handle HTTP Upgrade requests well (nor, for that matter, HTTP traffic in general). Browsers typically try to detect if the connection is going over a proxy and issue an HTTP CONNECT before the handshake, but this does not always work. Truly the most reliable way to use WebSockets is to always use SSL/TLS (wss). Proxies typically leave SSL/TLS connections alone and let them do their own thing, and with this strategy, your WebSocket connections can work in nearly all circumstances. It’s also secure: The traffic is encrypted, in both directions, using the same industry-tested security as HTTPS.
Although all these details — upgrades, headers, protocols, framing, and binary and text messages — may sound daunting, the good news is that you don’t have to worry about any of it. There are several APIs that cover all the protocol’s difficult tasks and leave you only the task of creating your application on top of it.
WARNING The WebSocket protocol is a very new technology relative to the timeframe that browsers typically adopt technologies. As such, you need to have very modern browsers installed on your client machine to use WebSockets. The examples throughout this chapter require you to have two different browsers (not just two windows — two actual different browsers). These browsers need to be from the following list or newer:
· Microsoft Internet Explorer 10.0 (must have Windows 7 SP1 or newer)
· Mozilla Firefox 18.0
· Google Chrome 24.0
· Apple Safari 6.0
· Opera 12.1
· Apple Safari iOS 6.0
· Google Android Browser 4.4
· Microsoft Internet Explorer Mobile 10.0
· Opera Mobile 12.1
· Google Chrome for Android 30.0
· Mozilla Firefox for Android 25.0
· Blackberry Browser 7.0
The Many Uses of WebSockets
The WebSocket protocol has virtually unlimited uses, much of which includes browser applications, but some of which exists outside of Internet browsers. You see examples from both categories in this chapter. Though this book cannot list them all, the following is a taste of the many uses for WebSockets:
· JavaScript Chat
· Multiplayer online games (Mozilla hosts a fun, involved MMORPG called BrowserQuest written entirely in HTML5 and JavaScript using WebSockets.)
· Live Stock Ticker
· Live Breaking News Ticker
· HD Video Streaming (Yes, believe it or not, it really is that fast and powerful.)
· Communications between nodes in an application cluster
· Bulk, transactional data transfer between applications across the network
· Real-time monitoring of remote system or software status and performance
UNDERSTANDING THE WEBSOCKET APIS
One key thing you should understand about WebSockets is that they are not just for communication between browsers and servers. Two applications written in any framework supporting WebSockets can, theoretically, establish communications over WebSockets. Therefore, many of the WebSocket implementations available contain both client and server endpoint tools. This is true, for example, in Java and .NET. JavaScript, however, is meant to serve only as a client endpoint of a WebSocket connection. In this section, you learn about using the JavaScript WebSocket client endpoint first, and then move on to the Java client endpoint and finally the Java server endpoint.
NOTE When this book refers to the JavaScript capabilities, it’s referring solely to JavaScript as implemented by Internet browsers. Some JavaScript frameworks, such as Node.js, can run outside of the context of a browser and provide additional capabilities (including a WebSocket server) that are not discussed in this book. Learning about these frameworks is an exercise outside the scope of this book.
HTML5 (JavaScript) Client API
As noted previously, all modern browsers offer WebSocket support, and that support is standardized across supporting browsers. The World Wide Web Consortium (W3C) formalized the requirements and interface for WebSocket communications within a browser as an extension of HTML5. Although you use JavaScript to perform WebSocket communications, the WebSocket interface is actually part of HTML5. All browsers provide WebSocket communications through an implementation of the WebSocket interface. (If you remember the early days of Ajax, when different browsers had different classes and functions for performing Ajax requests, this will be a pleasant surprise for you.)
Creating a WebSocket Object
Creating a WebSocket object is straightforward:
var connection = new WebSocket('ws://www.example.net/stocks/stream');
var connection = new WebSocket('wss://secure.example.org/games/chess');
var connection = new WebSocket('ws://www.example.com/chat', 'chat');
var connection = new WebSocket('ws://www.example.com/chat', {'chat.v1','chat.v2'});
The first parameter to the WebSocket constructor is the required URL of the WebSocket server to which you want to connect. The optional second argument can be a string or array of strings defining one or more client-defined protocols that you want to accept. Remember that these protocols are of your own implementation and are not managed by the WebSocket technology. This argument simply provides a mechanism for passing the information along if you need to do so.
Using the WebSocket Object
There are several properties in the WebSocket interface. The first, readyState, indicates the current state of the WebSocket connection. Its value is always either CONNECTING (the number 0), OPEN (1), CLOSING (2) or CLOSED (3).
if(connection.readyState == WebSocket.OPEN) { /* do something */ }
It is primarily used internally; however, it is useful to ensure you do not attempt to send messages when the connection is not open. Unlike XMLHttpRequest, WebSocket does not have an onreadystatechange event that gets called whenever any type of event happens, forcing you to check readyState to determine a course of action. Instead, WebSocket has four separate events representing the four distinct things that can happen to a WebSocket:
connection.onopen = function(event) { }
connection.onclose = function(event) { }
connection.onerror = function(event) { }
connection.onmessage = function(event) { }
The event names clearly indicate when these events are triggered. Importantly, the onclose event is triggered when readyState changes from CLOSING to CLOSED. When the handshake completes and onopen is called (readyState changes from CONNECTING to OPEN), the read-only url, extensions (server-provided extensions) and protocol (server-selected protocol) object properties are set and fixed. The event object passed in to onopen is a standard JavaScript Event with nothing particularly interesting in it. The Event passed in to onclose, however, does have three useful properties: wasClean, code, and reason. You can use these to report improper closures to the user:
connection.onclose = function(event) {
if(!event.wasClean)
alert(event.code + ': ' + event.reason);
}
The legal closure codes are defined in RFC 6455 Section 7.4 (http://tools.ietf.org/html/rfc6455#section-7.4). Code 1000 is normal and all other codes are abnormal. The onerror event contains a data property containing the error object, which could be any number of things (typically it is a string message). This event is triggered only for client-side errors; protocol errors result in closure of the connection. onmessage is the event handler you must deal with most carefully. Its event also contains a data property. This property is a string if the message is text message, a Blob if the message is a binary message and the WebSocket’s binaryType property is set to “blob” (default), or an ArrayBuffer if the message is a binary message and binaryType is set to “arraybuffer.” You should typically setbinaryType immediately after instantiating the WebSocket object and leave it at that value for the rest of the connection; however, it is legal to change the value whenever needed.
var connection = new WebSocket('ws://www.example.net/chat');
connection.binaryType = 'arraybuffer';
...
The WebSocket object has two methods: send and close. The close method accepts an optional close code as its first argument (default 1000) and an optional string reason as its second argument (default blank). The send method, which accepts a string, Blob, ArrayBuffer, or ArrayBufferView as its sole argument, is the only place you are likely to use the WebSocket interface’s bufferedAmount property. bufferedAmount indicates how much data from previous send calls is still waiting to be sent to the server. Although you may continue to send data even if data is still waiting to be sent, sometimes you may want to push new data to the server only if no data is still waiting:
connection.onopen = function() {
var intervalId = window.setInterval(function() {
if(connection.readyState != WebSocket.OPEN) {
window.clearInterval(intervalId);
return;
}
if(connection.bufferedAmount == 0)
connection.send(updatedModelData);
}, 50);
}
The previous example sends fresh data at most every 50 milliseconds but, if the buffer has outgoing data in it still, it waits another 50 milliseconds and tries again. If the connection is not open, it stops sending data and clears the interval.
Java WebSocket APIs
The Java API for WebSocket was formalized in the JCP as JSR 356 and included in Java EE 7. It contains both a client and a server API. The client API is the foundational API: It specifies a set of classes and interfaces in the javax.websocket package that include all the necessary common functionality for a WebSocket peer. The server API contains javax.websocket.server classes and interfaces that use and/or extend client classes to provide additional functionality. As such, there are two artifacts for this API: the client-only artifact and the full artifact (which includes client and server classes and interfaces). Both APIs contain many classes and interfaces, and not all of them are covered here. That’s what the API documentation is for (which you can find athttp://docs.oracle.com/javaee/7/api/ with the rest of the Java EE documentation). The rest of this section highlights the important details of the two APIs. The example code throughout the chapter can give you a better idea of exactly how to use the APIs.
The Client API
The client API is built on the ContainerProvider class and the WebSocketContainer, RemoteEndpoint, and Session interfaces. WebSocketContainer provides access to all the WebSocket client features, and the ContainerProvider class provides a static getWebSocketContainermethod for obtaining the underlying WebSocket client implementation. WebSocketContainer provides four overloaded connectToServer methods that all accept a URI to connect to a remote endpoint and initiate a handshake. These methods accept either a POJO instance of any type annotated with @ClientEndpoint, a Class<?> for a POJO of any type annotated with @ClientEndpoint, an instance of the Endpoint class, or a Class<? extends Endpoint>. If you use either of the Class-variety methods, the class you supply must have a zero-argument constructor and will be instantiated on your behalf.
If you use the Endpoint or Class<? extends Endpoint> methods, you must also supply a ClientEndpointConfig. When the handshake is complete, the connectToServer method returns a Session. You can do many things with the Session object, most notably close the Session(which closes the WebSocket connection) or send messages to the remote endpoint.
NOTE The Java API for WebSocket specifies an API, not an implementation. You can program against this API, but at run time you need an implementation to back it. If your application runs in a Java EE application server or a web container supporting WebSockets, client and server implementations are provided for you already. If it runs standalone, you need to find a standalone client or server implementation (depending on your needs) to deploy with your application.
The WebSocket Endpoint has onOpen, onClose, and onError methods that are called on those events, whereas @ClientEndpoint classes can have (optional) methods annotated @OnOpen, @OnClose, and @OnError. @ClientEndpoint classes and classes extending Endpoint can specify one or more methods annotated with @OnMessage to handle receiving messages from the remote endpoint. Using annotated classes and methods, you have a lot of flexibility in what method parameters you can require.
1. @OnOpen methods can have:
· One optional Session parameter
· One optional EndpointConfig parameter
2. @OnClose methods can have:
· One optional Session parameter
· One optional CloseReason parameter
3. @OnError methods can have:
· One optional Session parameter
· One required Throwable parameter
4. @OnMessage methods are more complex. In addition to the standard optional Session parameter, they must have exactly one of the following combinations of parameters:
· One String to receive an entire text message
· One String plus one boolean to receive a text message in chunks, with the boolean set to true on the last chunk
· One Java primitive or primitive wrapper to receive an entire text message converted to that type
· One java.io.Reader to receive a text message as a blocking stream
· One byte[] or one java.nio.ByteBuffer to receive an entire binary message
· One byte[] or one ByteBuffer, plus one boolean to receive a binary message in chunks
· One java.io.InputStream to receive a binary message as a blocking stream
· One PongMessage for custom handling of heartbeat responses
· Any Java object if the endpoint has a Decoder.Text, Decoder.Binary, Decoder.TextStream, or Decoder.BinaryStream registered to convert that type. The message type of text or binary must match the registered decoder.
An endpoint can have only one method each to handle open, close, and error events; however, it may have up to three message-handling methods: no more than one for text messages, no more than one for binary messages, and no more than one for pong messages. One final note about the client API: The WebSocket Maven dependency used in this chapter is for the server API, which includes a dependency on the client API. If you ever need to write a Java application that is only a WebSocket client, you need only the client API Maven dependency:
<dependency>
<groupId>javax.websocket</groupId>
<artifactId>javax.websocket-client-api</artifactId>
<version>1.0</version>
<scope>provided</scope>
</dependency>
The Server API
The server API depends on the entire client API and adds only a handful of classes and interfaces. ServerContainer extends WebSocketContainer and adds methods to programmatically register ServerEndpointConfig instances or classes annotated with @ServerEndpoint. In a Servlet environment, you obtain a ServerContainer instance by calling ServletContext.getAttribute("javax.websocket.server.ServerContainer"). In a standalone application, you need to follow the instructions of the particular WebSocket implementation you are using to get a ServerContainer instance.
However, in nearly all use cases (including all uses within Java EE web containers) you never actually need to obtain a ServerContainer. Instead, simply annotate your server endpoint class or classes with @ServerEndpoint; the WebSocket implementation can scan your classes for this annotation and automatically pick up and register your server endpoints for you. The container creates a new instance of your endpoint class each time it receives a new WebSocket connection for that endpoint and disposes of each instance after its connection closes.
When using @ServerEndpoint, you specify at least the required value attribute, which indicates the application-relative URL that this endpoint responds to. The URL path, which must start with a leading slash, can contain template parameters. So, for example, consider the following annotation:
@ServerEndpoint("/game/{gameType}")
If your application were deployed at http[s]://www.example.org/app, this server endpoint would respond to ws[s]://www.example.org/app/game/chess, ws[s]://www.example.org/app/game/checkers, and so on. Then, any @OnOpen, @OnClose, @OnError, or @OnMessage method in the server endpoint could have an optional additional parameter annotated with @PathParam("gameType"), and the container would provide “chess” and “checkers,” respectively, as the values to that parameter. The event handling methods in your server endpoints work just like the event handling methods in your client endpoints. The difference between server and client only matters at the time of handshake. After the handshake is complete and the connection is established, the server and client become peers and are completely equal endpoints with the same capabilities and responsibilities.
NOTE Because the primary purpose of the WebSocket protocol is communications between the server and browser, this chapter contains a lot of JavaScript code. Some of this code includes extensive use of the jQuery JavaScript library. This book would have to be hundreds of pages longer to teach you about JavaScript programming for the web, so it is assumed that you have a basic working knowledge of both JavaScript and jQuery (used to make easier, shorter examples). If you are not familiar with JavaScript, you are encouraged to take a break now and go find a JavaScript and jQuery book or tutorial. Otherwise, some of the code could be hard to follow.
CREATING MULTIPLAYER GAMES WITH WEBSOCKETS
You saw earlier that one of the many things WebSockets can do is facilitate communication for multiplayer online games, even Massively Multiplayer Online Role Playing Games (MMORPGs). In this section, you create a simple multiplayer game to demonstrate the power of WebSockets. The key for multiplayer games is responsiveness: When a player takes some action, his opponents must see that action as soon as possible. This is especially critical for battle and action sequences, where opponents must compete in real time.
It would take many thousands of lines of code to create an action-packed game where responsiveness was critical. Instead, you can implement a simple, two-player Tic-tac-toe game. Tic-tac-toe (also known as Xs and Os or Noughts and Crosses) is a simplistic strategy game where the player’s goal is to place three Xs or Os (whichever is his piece) in a row vertically, horizontally, or diagonally. Although Tic-tac-toe certainly does not require responsiveness, this example still demonstrates just how responsive WebSockets can be. You should follow along in the Game-Site project available on the wrox.com code download site. Only some of the code is printed in this book, and there are graphics and style sheets that are necessary for the game.
Implementing the Basic Tic-Tac-Toe Algorithm
Online Tic-tac-toe can be played against either a human opponent or a computer. The algorithm gets very complex when you include computer play because you must implement some artificial intelligence algorithms that are beyond the scope of this book. Besides, that wouldn’t be as good a demonstration of WebSockets. Instead, your Tic-tac-toe game requires two human opponents. The core algorithm is contained within the TicTacToeGame class. This class is important to the project but doesn’t perform any WebSocket operations. This is an example of separation of concerns — the game is abstracted into its own class so that any user interface, including a WebSocket interface, can use the game logic.
Because the class contains nothing new, it is not printed in this book. Open the Game-Site project and review TicTacToeGame. It contains some simple methods for retrieving a player’s name — whose ever turn it is — including whether the game is a tie or over, and who the winner is (if anyone). The move method checks whether the intended move is legal, executes the move, and then calls other methods to calculate if the game is over and who the winner is. calculateWinner implements the algorithm for determining the winner of the game. Finally, several static methods serve as a mechanism for starting, joining, and coordinating games.
Creating the Server Endpoint
Enough with game logic, what you really came here to see is the Java WebSocket code. This is found in the TicTacToeServer class in Listing 10-1. The TicTacToeGame could be used by any user interface code to play Tic-tac-toe, but TicTacToeServer acts as a gateway for two WebSocket Sessions to interact with a TicTacToeGame. This requires some careful machinations. (Imagine if this were an unlimited-player game!)
The onOpen method gets the game ID and username from the path parameters (this game site is obviously not worried about security) and then, depending on whether the user is starting a new game or joining an existing game, creates or completes a Game object. The inner Game class associates the Session objects for the two players with their TicTacToeGame instance. When both users have joined, the GameStartedMessage is sent to both endpoints using the internal sendJsonMessage helper method.
LISTING 10-1: TicTacToeServer.java
@ServerEndpoint("/ticTacToe/{gameId}/{username}")
public class TicTacToeServer
{
private static Map<Long, Game> games = new Hashtable<>();
private static ObjectMapper mapper = new ObjectMapper();
@OnOpen
public void onOpen(Session session, @PathParam("gameId") long gameId,
@PathParam("username") String username) {
try {
TicTacToeGame ticTacToeGame = TicTacToeGame.getActiveGame(gameId);
if(ticTacToeGame != null) {
session.close(new CloseReason(
CloseReason.CloseCodes.UNEXPECTED_CONDITION,
"This game has already started."
));
}
List<String> actions = session.getRequestParameterMap().get("action");
if(actions != null && actions.size() == 1) {
String action = actions.get(0);
if("start".equalsIgnoreCase(action)) {
Game game = new Game();
game.gameId = gameId;
game.player1 = session;
TicTacToeServer.games.put(gameId, game);
} else if("join".equalsIgnoreCase(action)) {
Game game = TicTacToeServer.games.get(gameId);
game.player2 = session;
game.ticTacToeGame = TicTacToeGame.startGame(gameId, username);
this.sendJsonMessage(game.player1, game,
new GameStartedMessage(game.ticTacToeGame));
this.sendJsonMessage(game.player2, game,
new GameStartedMessage(game.ticTacToeGame));
}
}
} catch(IOException e) {
e.printStackTrace();
try {
session.close(new CloseReason(
CloseReason.CloseCodes.UNEXPECTED_CONDITION, e.toString()
));
} catch(IOException ignore) { }
}
}
@OnMessage
public void onMessage(Session session, String message,
@PathParam("gameId") long gameId) {
Game game = TicTacToeServer.games.get(gameId);
boolean isPlayer1 = session == game.player1;
try {
Move move = TicTacToeServer.mapper.readValue(message, Move.class);
game.ticTacToeGame.move(
isPlayer1 ? TicTacToeGame.Player.PLAYER1 :
TicTacToeGame.Player.PLAYER2,
move.getRow(), move.getColumn()
);
this.sendJsonMessage((isPlayer1 ? game.player2 : game.player1), game,
new OpponentMadeMoveMessage(move));
if(game.ticTacToeGame.isOver()) {
if(game.ticTacToeGame.isDraw()) {
this.sendJsonMessage(game.player1, game,
new GameIsDrawMessage());
this.sendJsonMessage(game.player2, game,
new GameIsDrawMessage());
} else {
boolean wasPlayer1 = game.ticTacToeGame.getWinner() ==
TicTacToeGame.Player.PLAYER1;
this.sendJsonMessage(game.player1, game,
new GameOverMessage(wasPlayer1));
this.sendJsonMessage(game.player2, game,
new GameOverMessage(!wasPlayer1));
}
game.player1.close();
game.player2.close();
}
} catch(IOException e) {
this.handleException(e, game);
}
}
@OnClose
public void onClose(Session session, @PathParam("gameId") long gameId) {
Game game = TicTacToeServer.games.get(gameId);
if(game == null)
return;
boolean isPlayer1 = session == game.player1;
if(game.ticTacToeGame == null) {
TicTacToeGame.removeQueuedGame(game.gameId);
} else if(!game.ticTacToeGame.isOver()) {
game.ticTacToeGame.forfeit(isPlayer1 ? TicTacToeGame.Player.PLAYER1 :
TicTacToeGame.Player.PLAYER2);
Session opponent = (isPlayer1 ? game.player2 : game.player1);
this.sendJsonMessage(opponent, game, new GameForfeitedMessage());
try {
opponent.close();
} catch(IOException e) {
e.printStackTrace();
}
}
}
private void sendJsonMessage(Session session, Game game, Message message) {
try {
session.getBasicRemote()
.sendText(TicTacToeServer.mapper.writeValueAsString(message));
} catch(IOException e) {
this.handleException(e, game);
}
}
private void handleException(Throwable t, Game game) {
t.printStackTrace();
String message = t.toString();
try {
game.player1.close(new CloseReason(
CloseReason.CloseCodes.UNEXPECTED_CONDITION, message
));
} catch(IOException ignore) { }
try {
game.player2.close(new CloseReason(
CloseReason.CloseCodes.UNEXPECTED_CONDITION, message
));
} catch(IOException ignore) { }
}
private static class Game {
public long gameId;
public Session player1;
public Session player2;
public TicTacToeGame ticTacToeGame;
}
public static class Move {
private int row;
private int column;
// accessor and mutator methods
}
public static abstract class Message {
private final String action;
public Message(String action) {
this.action = action;
}
public String getAction() { ... }
}
public static class GameStartedMessage extends Message {
private final TicTacToeGame game;
public GameStartedMessage(TicTacToeGame game) {
super("gameStarted");
this.game = game;
}
public TicTacToeGame getGame() { ... }
}
public static class OpponentMadeMoveMessage extends Message {
private final Move move;
public OpponentMadeMoveMessage(Move move) {
super("opponentMadeMove");
this.move = move;
}
public Move getMove() { ... }
}
public static class GameOverMessage extends Message {
private final boolean winner;
public GameOverMessage(boolean winner) {
super("gameOver");
this.winner = winner;
}
public boolean isWinner() { ... }
}
public static class GameIsDrawMessage extends Message {
public GameIsDrawMessage() {
super("gameIsDraw");
}
}
public static class GameForfeitedMessage extends Message {
public GameForfeitedMessage() {
super("gameForfeited");
}
}
}
In this system, messages sent from the browser to the server are always Moves (an inner class), whereas messages sent from the server to the browser are always Messages (another inner class). WebSocket messages here are exchanged in text format, and the Jackson Data Processor library serializes Messages into outgoing messages and deserializes incoming messages into Moves. When onMessage is called, that means a player has made a move and sent that move to the endpoint. The server endpoint registers the move with theTicTacToeGame and then notifies the opponent of the move by sending a WebSocket message over the opposing Session. If the game is over, it sends both players the GameOverMessage or GameIsDrawMessage as appropriate and then closes both Sessions. If a connection is closed, onClose makes sure that the game was over or never started. If the game is in progress, the user who closed their Session forfeited the game. (Likely they closed their browser or navigated away from the page.)
Of course, all this is useless without a user interface, and you might wonder how that TicTacToeGame got created in the first place. This is all coming up next.
Writing the JavaScript Game Console
To create the user interface, the first thing you need is a Servlet for starting or joining games, getting usernames for players, and forwarding requests to the appropriate JSPs. TicTacToeServlet accomplishes exactly that. First, a user starts a game by simply entering a username for that game session. Next, the game is added to a list of pending games. When another user comes to the site, he sees the list of pending games and choses one to join. When he joins that game by providing his username, the game will move from pending to in-progress. The list.jsp page is where pending games are listed and contains the UI code for starting a new game as well. There shouldn’t be much new or exciting in either the Servlet or this JSP, so they aren’t printed here.
The game.jsp page in Listing 10-2 is where all the fun JavaScript code is happening. You’ll notice at the top the inclusion of the ticTacToe.css style sheet, the jQuery JavaScript library, and the Bootstrap JavaScript library and CSS file. Without these doing some of the boring non-WebSockets work, you would have to write many more lines of code. The game surface is a basic div layout with three rows and three columns. To simplify the code, the local player is always Os and the opponent is always Xs. (Although typically the first player to move is Xs.) When it’s your turn, you can hover over each game square and, if it’s a legal move, the square displays a faded O in it. Clicking a square commits to that move and cannot be undone.
When the document has loaded, the code checks that the browser supports WebSockets and displays an error if it does not. It then connects to the server and, when the connection is established, it displays a message about waiting for the opponent to join. Anonbeforeunload event is added to the window object to ensure that the user forfeits if he closes the browser or leaves the page. The onclose event ensures that the closure of the connection was clean and the onerror event handles errors. onmessage handles the five different types of messages the server could send (GameStartedMessage, OpponentMadeMoveMessage, GameOverMessage, GameIsDrawMessage, and GameForfeitedMessage), clears squares that the opponent claims, and notifies the user when the game is over. Finally, the move function, which is called when you click a game square, sends your moves to the server.
LISTING 10-2: game.jsp
<%--@elvariable id="action" type="java.lang.String"--%>
<%--@elvariable id="gameId" type="long"--%>
<%--@elvariable id="username" type="java.lang.String"--%>
<!DOCTYPE html>
<html>
<head>
<title>Game Site :: Tic Tac Toe</title>
<link rel="stylesheet" href="http://cdnjs.cloudflare.com/ajax/libs/twitter-
bootstrap/2.3.1/css/bootstrap.min.css" />
<link rel="stylesheet"
href="<c:url value="/resource/stylesheet/ticTacToe.css" />" />
<script src="http://code.jquery.com/jquery-1.9.1.js"></script>
<script src="http://cdnjs.cloudflare.com/ajax/libs/twitter-bootstrap/2.3.1/
js/bootstrap.min.js"></script>
</head>
<body>
<h2>Tic Tac Toe</h2>
<span class="player-label">You:</span> ${username}<br />
<span class="player-label">Opponent:</span>
<span id="opponent"><i>Waiting</i></span>
<div id="status"> </div>
<div id="gameContainer">
<div class="row">
<div id="r0c0" class="game-cell" onclick="move(0, 0);"> </div>
<div id="r0c1" class="game-cell" onclick="move(0, 1);"> </div>
<div id="r0c2" class="game-cell" onclick="move(0, 2);"> </div>
</div>
<div class="row">
<div id="r1c0" class="game-cell" onclick="move(1, 0);"> </div>
<div id="r1c1" class="game-cell" onclick="move(1, 1);"> </div>
<div id="r1c2" class="game-cell" onclick="move(1, 2);"> </div>
</div>
<div class="row">
<div id="r2c0" class="game-cell" onclick="move(2, 0);"> </div>
<div id="r2c1" class="game-cell" onclick="move(2, 1);"> </div>
<div id="r2c2" class="game-cell" onclick="move(2, 2);"> </div>
</div>
</div>
<div id="modalWaiting" class="modal hide fade">
<div class="modal-header"><h3>Please Wait...</h3></div>
<div class="modal-body" id="modalWaitingBody"> </div>
</div>
<div id="modalError" class="modal hide fade">
<div class="modal-header">
<button type="button" class="close" data-dismiss="modal">×
</button>
<h3>Error</h3>
</div>
<div class="modal-body" id="modalErrorBody">A blah error occurred.
</div>
<div class="modal-footer">
<button class="btn btn-primary" data-dismiss="modal">OK</button>
</div>
</div>
<div id="modalGameOver" class="modal hide fade">
<div class="modal-header">
<button type="button" class="close" data-dismiss="modal">×
</button>
<h3>Game Over</h3>
</div>
<div class="modal-body" id="modalGameOverBody"> </div>
<div class="modal-footer">
<button class="btn btn-primary" data-dismiss="modal">OK</button>
</div>
</div>
<script type="text/javascript" language="javascript">
var move;
$(document).ready(function() {
var modalError = $("#modalError");
var modalErrorBody = $("#modalErrorBody");
var modalWaiting = $("#modalWaiting");
var modalWaitingBody = $("#modalWaitingBody");
var modalGameOver = $("#modalGameOver");
var modalGameOverBody = $("#modalGameOverBody");
var opponent = $("#opponent");
var status = $("#status");
var opponentUsername;
var username = '<c:out value="${username}" />';
var myTurn = false;
$('.game-cell').addClass('span1');
if(!("WebSocket" in window))
{
modalErrorBody.text('WebSockets are not supported in this ' +
'browser. Try Internet Explorer 10 or the latest ' +
'versions of Mozilla Firefox or Google Chrome.');
modalError.modal('show');
return;
}
modalWaitingBody.text('Connecting to the server.');
modalWaiting.modal({ keyboard: false, show: true });
var server;
try {
server = new WebSocket('ws://' + window.location.host +
'<c:url value="/ticTacToe/${gameId}/${username}">
<c:param name="action" value="${action}" />
</c:url>');
} catch(error) {
modalWaiting.modal('hide');
modalErrorBody.text(error);
modalError.modal('show');
return;
}
server.onopen = function(event) {
modalWaitingBody
.text('Waiting on your opponent to join the game.');
modalWaiting.modal({ keyboard: false, show: true });
};
window.onbeforeunload = function() {
server.close();
};
server.onclose = function(event) {
if(!event.wasClean || event.code != 1000) {
toggleTurn(false, 'Game over due to error!');
modalWaiting.modal('hide');
modalErrorBody.text('Code ' + event.code + ': ' +
event.reason);
modalError.modal('show');
}
};
server.onerror = function(event) {
modalWaiting.modal('hide');
modalErrorBody.text(event.data);
modalError.modal('show');
};
server.onmessage = function(event) {
var message = JSON.parse(event.data);
if(message.action == 'gameStarted') {
if(message.game.player1 == username)
opponentUsername = message.game.player2;
else
opponentUsername = message.game.player1;
opponent.text(opponentUsername);
toggleTurn(message.game.nextMoveBy == username);
modalWaiting.modal('hide');
} else if(message.action == 'opponentMadeMove') {
$('#r' + message.move.row + 'c' + message.move.column)
.unbind('click')
.removeClass('game-cell-selectable')
.addClass('game-cell-opponent game-cell-taken');
toggleTurn(true);
} else if(message.action == 'gameOver') {
toggleTurn(false, 'Game Over!');
if(message.winner) {
modalGameOverBody.text('Congratulations, you won!');
} else {
modalGameOverBody.text('User "' + opponentUsername +
'" won the game.');
}
modalGameOver.modal('show');
} else if(message.action == 'gameIsDraw') {
toggleTurn(false, 'The game is a draw. ' +
'There is no winner.');
modalGameOverBody.text('The game ended in a draw. ' +
'Nobody wins!');
modalGameOver.modal('show');
} else if(message.action == 'gameForfeited') {
toggleTurn(false, 'Your opponent forfeited!');
modalGameOverBody.text('User "' + opponentUsername +
'" forfeited the game. You win!');
modalGameOver.modal('show');
}
};
var toggleTurn = function(isMyTurn, message) {
myTurn = isMyTurn;
if(myTurn) {
status.text(message || 'It\'s your move!');
$('.game-cell:not(.game-cell-taken)')
.addClass('game-cell-selectable');
} else {
status.text(message ||'Waiting on your opponent to move.');
$('.game-cell-selectable')
.removeClass('game-cell-selectable');
}
};
move = function(row, column) {
if(!myTurn) {
modalErrorBody.text('It is not your turn yet!');
modalError.modal('show');
return;
}
if(server != null) {
server.send(JSON.stringify({ row: row, column: column }));
$('#r' + row + 'c' + column).unbind('click')
.removeClass('game-cell-selectable')
.addClass('game-cell-player game-cell-taken');
toggleTurn(false);
} else {
modalErrorBody.text('Not connected to came server.');
modalError.modal('show');
}
};
});
</script>
</body>
</html>
Playing WebSocket Tic-Tac-Toe
Now that you have reviewed the code and see how all the pieces fit together, you can do the following:
1. Compile the Game-Site project.
2. Start up Tomcat in your debugger, and open up two different browsers (such as Firefox and Safari, or Internet Explorer 10 and Chrome). Make them small enough so that you can place them side-by-side or one on top of the other in your screen.
3. Go to http://localhost:8080/games/ticTacToe in both browsers. There should be no games listed yet.
4. Click Start a Game in one browser and enter your name or favorite username in the prompt, and then click OK. You will be taken to the game page and presented with the message about waiting for your opponent.
5. In the other browser, reload the listing page and you should see the pending game listed. Click that game and enter in a different name or username in the prompt. As soon as you land on the game page, the waiting message should disappear in the first browser. You’ll notice that it is nearly instantaneous. One of the browsers should have a message that says, It’s Your Move!, whereas the message in the other says, Waiting on Your Opponent to Move.
6. Go back and forth between browsers making moves. Before long your screen should look something like Figure 10-6 (where John is about to beat Scott with a move in the lower-left corner). Notice how quickly the move from one player shows up in the other player’s browser. The delay is imperceptible. The speed and scalability of WebSockets make it an extraordinarily powerful technology.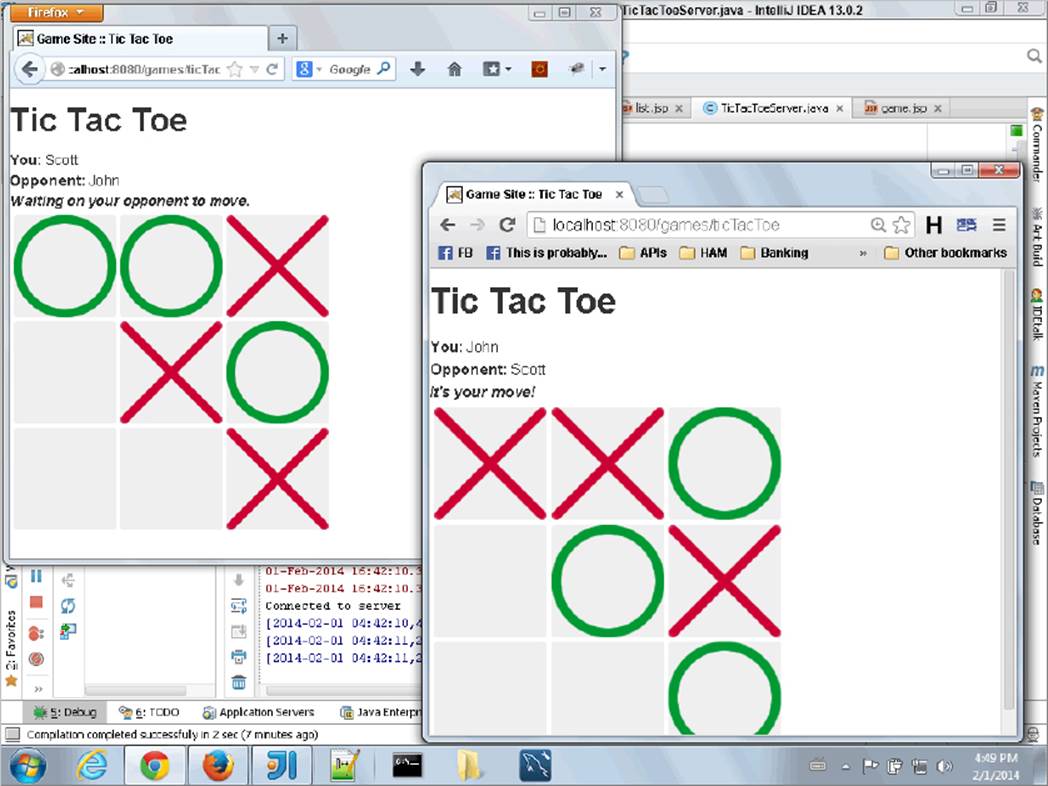
FIGURE 10-6
USING WEBSOCKETS TO COMMUNICATE IN A CLUSTER
Now that you’ve seen how Java server endpoints work, and how to communicate with server endpoints using JavaScript, it’s time to explore the Java client endpoint. Because the client endpoint can’t be used to connect to a browser, you need to connect to some other application. There are many possible uses for this, from data transfers to coordination of distributed activities across multiple servers. There are endless possibilities. As a software developer, chances are you will have to deal with a cluster of servers at some point to scale a web application to handle large numbers of users, and WebSockets might be a way to help application nodes communicate with each other.
Simulating a Simple Cluster Using Two Servlet Instances
In a standard cluster scenario, nodes would notify each other of their existence through some means, often by sending a packet to an agreed-upon multicast IP address and port. They would then establish communications through some other channel, such as a TCP socket. This is a complicated scenario to replicate in a small example, but you can easily simulate it by using multiple servlets in a single application. On the wrox.com code download site, this example is the Simulated-Cluster project. Take a look at web.xml first, and you’ll notice two Servlet mappings. The first Servlet mapping is in the following code. The second Servlet mapping is identical except that the name, init parameter value, and URL pattern have a 2 in them instead of a 1. If you’re wondering why you need this in the deployment descriptor, remember that you can’t map the same Servlet twice using annotations. You must use either the deployment descriptor or programmatic configuration to accomplish this.
<servlet>
<servlet-name>clusterNode1</servlet-name>
<servlet-class>com.wrox.ClusterNodeServlet</servlet-class>
<init-param>
<param-name>nodeId</param-name>
<param-value>1</param-value>
</init-param>
</servlet>
<servlet-mapping>
<servlet-name>clusterNode1</servlet-name>
<url-pattern>/clusterNode1</url-pattern>
</servlet-mapping>
The ClusterNodeServlet class in Listing 10-3, which extends HttpServlet, is annotated with @ClientEndpoint. Unlike @ServletEndpoint, @ClientEndpoint does not mean the class will be instantiated automatically. @ClientEndpoint is a marker to tell the container that this is a valid endpoint.
Alternatively, you could implement the Endpoint abstract class. Any class can be an endpoint. A Servlet is used here only because it’s easy and convenient. The init method, which is called on the first request, connects to the server endpoint, and the destroy method closes the connection. Every time a request comes in, the Servlet sends a message to the cluster about it. The onMessage method (annotated with @OnMessage) accepts messages echoed from other cluster nodes, and onClose (annotated with @OnClose) prints an error message if the connection is closed abnormally.
LISTING 10-3: ClusterNodeServlet.java
@ClientEndpoint
public class ClusterNodeServlet extends HttpServlet
{
private Session session;
private String nodeId;
@Override
public void init() throws ServletException {
this.nodeId = this.getInitParameter("nodeId");
String path = this.getServletContext().getContextPath() +
"/clusterNodeSocket/" + this.nodeId;
try {
URI uri = new URI("ws", "localhost:8080", path, null, null);
this.session = ContainerProvider.getWebSocketContainer()
.connectToServer(this, uri);
} catch(URISyntaxException | IOException | DeploymentException e) {
throw new ServletException("Cannot connect to " + path + ".", e);
}
}
@Override
public void destroy() {
try {
this.session.close();
} catch(IOException e) {
e.printStackTrace();
}
}
@Override
protected void doGet(HttpServletRequest request, HttpServletResponse response)
throws ServletException, IOException {
ClusterMessage message = new ClusterMessage(this.nodeId,
"request:{ip:\"" + request.getRemoteAddr() +
"\",queryString:\"" + request.getQueryString() + "\"}");
try(OutputStream output = this.session.getBasicRemote().getSendStream();
ObjectOutputStream stream = new ObjectOutputStream(output)) {
stream.writeObject(message);
}
response.getWriter().append("OK");
}
@OnMessage
public void onMessage(InputStream input) {
try(ObjectInputStream stream = new ObjectInputStream(input)) {
ClusterMessage message = (ClusterMessage)stream.readObject();
System.out.println("INFO (Node " + this.nodeId +
"): Message received from cluster; node = " +
message.getNodeId() + ", message = " + message.getMessage());
} catch(IOException | ClassNotFoundException e) {
e.printStackTrace();
}
}
@OnClose
public void onClose(CloseReason reason) {
CloseReason.CloseCode code = reason.getCloseCode();
if(code != CloseReason.CloseCodes.NORMAL_CLOSURE) {
System.err.println("ERROR: WebSocket connection closed unexpectedly;" +
" code = " + code + ", reason = " + reason.getReasonPhrase());
}
}
}
Transmitting and Receiving Binary Messages
You probably noticed that the ClusterNodeServlet used Java serialization to send and receive the ClusterMessage implements Serializable messages over the WebSocket connection. To do this, the WebSocket messages have to be binary. This is different from the Tic-tac-toe server endpoint, which translates messages to and from JSON and sends and receives them as text messages. Java serialization is faster than JSON, so when possible it’s better to use Java serialization. However, you can only do so when both peers are Java. If only one peer is Java, you have to use a different serialization technology, such as JSON. Although ClusterNodeServlet sends and receives binary messages using OutputStreams and InputStreams, ClusterNodeEndpoint in Listing 10-4 uses byte arrays. In this case, this takes slightly more code because ObjectOutputStreams and ObjectInputStreams are already needed to perform the serialization and deserialization. In some cases using byte arrays will be easier, and in others using ByteBuffers or streams will be easier, so it’s valuable to learn both approaches. It all depends on where your data comes from or what you want to do with it. If you need to send data that already exists as a byte array, it’s easier to just use that byte array. On the other hand, if you’re already dealing with streams, it’s usually easier to just stick to streams.
The endpoint’s only responsibilities are echoing messages sent from one node to all the other nodes and notifying connected nodes when other nodes join or leave the cluster. In another cluster scenario, you might not have a central endpoint that collects and echoes all messages. Instead, each node might connect directly to all other nodes. It all depends on your use case and the needs of your application.
LISTING 10-4: ClusterNodeEndpoint.java
@ServerEndpoint("/clusterNodeSocket/{nodeId}")
public class ClusterNodeEndpoint
{
private static final List<Session> nodes = new ArrayList<>(2);
@OnOpen
public void onOpen(Session session, @PathParam("nodeId") String nodeId) {
System.out.println("INFO: Node [" + nodeId + "] connected to cluster.");
ClusterMessage message = new ClusterMessage(nodeId, "Joined the cluster.");
try {
byte[] bytes = ClusterNodeEndpoint.toByteArray(message);
for(Session node : ClusterNodeEndpoint.nodes)
node.getBasicRemote().sendBinary(ByteBuffer.wrap(bytes));
} catch(IOException e) {
System.err.println("ERROR: Exception when notifying of new node");
e.printStackTrace();
}
ClusterNodeEndpoint.nodes.add(session);
}
@OnMessage
public void onMessage(Session session, byte[] message) {
try {
for(Session node : ClusterNodeEndpoint.nodes) {
if(node != session)
node.getBasicRemote().sendBinary(ByteBuffer.wrap(message));
}
} catch(IOException e) {
System.err.println("ERROR: Exception when handling message on server");
e.printStackTrace();
}
}
@OnClose
public void onClose(Session session, @PathParam("nodeId") String nodeId) {
System.out.println("INFO: Node [" + nodeId + "] disconnected.");
ClusterNodeEndpoint.nodes.remove(session);
ClusterMessage message = new ClusterMessage(nodeId, "Left the cluster.");
try {
byte[] bytes = ClusterNodeEndpoint.toByteArray(message);
for(Session node : ClusterNodeEndpoint.nodes)
node.getBasicRemote().sendBinary(ByteBuffer.wrap(bytes));
} catch(IOException e) {
System.err.println("ERROR: Exception when notifying of left node");
e.printStackTrace();
}
}
private static byte[] toByteArray(ClusterMessage message) throws IOException {
try(ByteArrayOutputStream output = new ByteArrayOutputStream();
ObjectOutputStream stream = new ObjectOutputStream(output)) {
stream.writeObject(message);
return output.toByteArray();
}
}
}
Testing the Simulated Cluster Application
Testing the simulated cluster application is fairly straightforward. Just take the following steps:
1. Compile the application and start Tomcat from your IDE.
2. Go to http://localhost:8080/cluster/clusterNode1 in your favorite browser, and you should see the following message in the debugger output. This is the result of the first Servlet instance’s init method being called and connecting to the WebSocket server endpoint.
INFO: Node [1] connected to cluster.
3. Now go to http://localhost:8080/cluster/clusterNode2. You should see a couple of messages this time. In this case the second Servlet instance connected to the endpoint, and when it sent a message, the endpoint echoed that message back to the first Servlet.
4. INFO: Node [2] connected to cluster.
5. INFO (Node 1): Message received from cluster; node = 2, message =
6. Joined the cluster.
7. INFO (Node 1): Message received from cluster; node = 2, message =
request:{ip:"127.0.0.1",queryString:""}
8. Try the first URL again, but this time add a query string to it: http://localhost:8080/cluster/clusterNode1?hello=world&foo=bar. Notice this time there is no connection message because both Servlets are started now.
9. INFO (Node 2): Message received from cluster; node = 1, message =
request:{ip:"127.0.0.1",queryString:"hello=world&foo=bar"}
10.One last time, try the second URL again, also with a query string: http://localhost:8080/cluster/clusterNode2?baz=qux&animal=dog.
11. INFO (Node 1): Message received from cluster; node = 2, message =
request:{ip:"127.0.0.1",queryString:"baz=qux&animal=dog"}
12.If you want to experiment further, create another instance of the Servlet and map it to /clusterNode3; then compile and start the application again. Try going to all three URLs, and you’ll see that whenever a Servlet responds to a GET request, the other two Servlets receive a WebSocket message about it.
This may seem like a juvenile example, but it’s a simple way to demonstrate how the Java WebSocket client and server APIs can work together. It is also a good opportunity for you to learn about using byte arrays, ByteBuffers, and streams for binary messages. This approach might be very useful for you in some clustered applications, and you may need a different set of technologies in other clustered applications. You explore more options in Chapter 18.
NOTE You may have noticed that the Servlet instances in this project were set to initialize on the first request instead of on application start-up. There is a very important reason for this: The ClusterNodeServlet connects to the WebSocket endpoint in the init method. If the application is in the process of starting when the Servlets initialize, they won’t connect to the endpoint. Thus, the Servlets must initialize after application start-up.
ADDING “CHAT WITH SUPPORT” TO THE CUSTOMER SUPPORT APPLICATION
Perhaps the most ubiquitous example of the usefulness of WebSockets is Internet chatting. Many applications provide chatting capabilities from your desktop and most use some kind of service provider through which chat messages are routed. Chat is also common on websites, with many social networks, forums, and online communities offering chat capabilities. Typically, chat works one of two ways:
· Chat room — This has more than two, and usually unlimited, participants. Chat rooms are also usually public, requiring only membership on the site to join.
· Private chat — This usually has only two participants. Nobody else can see the contents of the chat.
Whether a chat is private or in a chat room, the server-side implementation is essentially the same: The server accepts connections, associates all the related connections, and echoes incoming messages to all associated connections. It also publishes interesting events, such as when somebody connects to or disconnects from the chat. The only big difference is how many connections are associated with each other.
Multinational Widget Corporation needs support chat in its Customer Support application. Support chat is a basic concept: In an urgent situation, a customer might need live help. The customer could log on to the support site and enter a private chat with a customer support representative. Typically, this would be offered only during certain hours. Also, usually customers have the ability to download or have the chat log e-mailed to them at the end of the chat session. In this section, you use WebSockets to add “Chat with Support” to the Customer Support application. You should follow along in the Customer-Support-v8 project available on the wrox.com code download site because there is not enough room in this book to print it all.
There are some changes to the main.css style sheet and a new chat.css style sheet to correctly style the chat pages. The /WEB-INF/tags/template/main.tag file now includes some third-party CSS and JavaScript libraries and defines a couple of JavaScript functions for use on any pages. Also, basic.tag now has links for creating a new chat with support or viewing pending chat requests.
Normally, only customer support representatives could view and respond to pending chat requests, but the customer support application doesn’t have full security with user permissions yet. You’ll add that in Part IV of this book. The ChatServlet has a fairly simple task: It manages the listing, creating, and joining of chat sessions. The doPost method sets the Expires and Cache-Control headers to ensure the browser doesn’t cache the chat page. /WEB-INF/jsp/view/chat/list.jsp is responsible for listing pending chats for customer support personnel to respond to. Finally, the Configurator class now also maps the AuthenticationFilter to the /chat URL so that the ChatServlet is protected.
Using Encoders and Decoders to Translate Messages
Earlier in the chapter you learned about all the possible parameters you could specify for @OnMessage methods. Remember:
· You can specify any Java object as a parameter as long as you provide a decoder capable of translating incoming text or binary messages into that object.
· You can send any object using the sendObject methods of RemoteEndpoint.Basic or RemoteEndpoint.Async as long as you provide an encoder capable of translating that object into a text or binary message.
· You provide encoders by implementing Encoder.Binary, Encoder.BinaryStream, Encoder.Text, or Encoder.TextStream and specifying their classes in the encoders attribute of @ClientEndpoint or @ServerEndpoint.
· You can implement Decoder.Binary, Decoder.BinaryStream, Decoder.Text, or Decoder.TextStream and use the decoders attribute of the endpoint annotations to provide decoders for your messages.
·public class ChatMessage
·{
· private OffsetDateTime timestamp;
· private Type type;
· private String user;
· private String content;
·
· // accessor and mutator methods
·
· public static enum Type
· {
· STARTED, JOINED, ERROR, LEFT, TEXT
· }
}
The previous code for the ChatMessage shows that it is a simple POJO. The WebSocket API needs both an encoder and a decoder so that your chat application can send and receive messages. Listing 10-5 contains a simple class that encodes and decodes ChatMessages. It uses the Jackson Data Processor to encode and decode the messages. The encode method takes a ChatMessage and an OutputStream, encodes the message by converting it to JSON, and writes it to the OutputStream. The decode method does the opposite: Given anInputStream, it reads and deserializes the JSON ChatMessage. The init and destroy methods are specified in both the Encoder and Decoder interfaces. They are not used here, but could come in handy if you ever need to initialize or release resources that your encoders and decoders use.
LISTING 10-5: ChatMessageCodec.java
public class ChatMessageCodec
implements Encoder.BinaryStream<ChatMessage>,
Decoder.BinaryStream<ChatMessage>
{
private static final ObjectMapper MAPPER = new ObjectMapper();
static {
MAPPER.findAndRegisterModules();
MAPPER.configure(JsonGenerator.Feature.AUTO_CLOSE_TARGET, false);
}
@Override
public void encode(ChatMessage chatMessage, OutputStream outputStream)
throws EncodeException, IOException {
try {
ChatMessageCodec.MAPPER.writeValue(outputStream, chatMessage);
} catch(JsonGenerationException | JsonMappingException e) {
throw new EncodeException(chatMessage, e.getMessage(), e);
}
}
@Override
public ChatMessage decode(InputStream inputStream)
throws DecodeException, IOException {
try {
return ChatMessageCodec.MAPPER.readValue(
inputStream, ChatMessage.class
);
} catch(JsonParseException | JsonMappingException e) {
throw new DecodeException((ByteBuffer)null, e.getMessage(), e);
}
}
@Override
public void init(EndpointConfig endpointConfig) { }
@Override
public void destroy() { }
}
Creating the Chat Server Endpoint
The server endpoint uses the following ChatSession class to associate a user requesting a chat with the support representative who responds. It includes the opening message and a log of all messages sent during the chat.
public class ChatSession
{
private long sessionId;
private String customerUsername;
private Session customer;
private String representativeUsername;
private Session representative;
private ChatMessage creationMessage;
private final List<ChatMessage> chatLog = new ArrayList<>();
// accessor and mutator methods
@JsonIgnore
public void log(ChatMessage message) { ... }
@JsonIgnore
public void writeChatLog(File file) throws IOException {
ObjectMapper mapper = new ObjectMapper();
mapper.findAndRegisterModules();
mapper.configure(JsonGenerator.Feature.AUTO_CLOSE_TARGET, false);
mapper.configure(SerializationFeature.WRITE_DATES_AS_TIMESTAMPS, false);
try(FileOutputStream stream = new FileOutputStream(file))
{
mapper.writeValue(stream, this.chatLog);
}
}
}
The ChatEndpoint class in Listing 10-6 receives chat connections and coordinates them appropriately. Some of the code has been omitted due to its length, but concepts that are new to you have been included. Nested within the class is the EndpointConfigurator class, which overrides the modifyHandshake method. At handshake time, this method is called and exposes the underlying HTTP request.
You can get the HttpSession object from this request, and in this case you want the HTTP session to make sure the user is logged in and also close the WebSocket session if the user logs out. This is also why the endpoint is an HttpSessionListener. When a session gets invalidated, the sessionDestroyed method is called, and the endpoint ends the chat session. One thing to keep in mind is that a new instance of this class is created at startup as a web listener, and a new instance is created each time a client endpoint connects to the server endpoint. That’s why all the fields are static: so that the information about the Sessions, HttpSessions, and ChatSessions can be coordinated between instances.
The onOpen method, called when a new handshake has completed, first checks to make sure an HttpSession was associated with the Session (in the modifyHandshake method) and that the user is logged in. If the chat session ID is 0 (a new session has been requested), a new chat session is created and added to the list of pending sessions. If it is greater than 0, a representative is joining a requested session and messages are sent to both clients. When onMessage receives a message from either client, it echoes that message back to both clients. When a Session is closed, an error occurs, or an HttpSession is destroyed, a message is sent to the other user notifying her that the chat is over, and both connections are closed.
LISTING 10-6: ChatEndpoint.java
@ServerEndpoint(value = "/chat/{sessionId}",
encoders = ChatMessageCodec.class,
decoders = ChatMessageCodec.class,
configurator = ChatEndpoint.EndpointConfigurator.class)
@WebListener
public class ChatEndpoint implements HttpSessionListener
{
...
private static final Map<Long, ChatSession> chatSessions = new Hashtable<>();
private static final Map<Session, ChatSession> sessions = new Hashtable<>();
private static final Map<Session, HttpSession> httpSessions =
new Hashtable<>();
public static final List<ChatSession> pendingSessions = new ArrayList<>();
@OnOpen
public void onOpen(Session session, @PathParam("sessionId") long sessionId) {
HttpSession httpSession = (HttpSession)session.getUserProperties()
.get(ChatEndpoint.HTTP_SESSION_PROPERTY);
try {
if(httpSession==null || httpSession.getAttribute("username")==null) {
session.close(new CloseReason(
CloseReason.CloseCodes.VIOLATED_POLICY,
"You are not logged in!"
));
return;
}
String username = (String)httpSession.getAttribute("username");
session.getUserProperties().put("username", username);
ChatMessage message = new ChatMessage();
message.setTimestamp(OffsetDateTime.now());
message.setUser(username);
ChatSession chatSession;
if(sessionId < 1) {
message.setType(ChatMessage.Type.STARTED);
message.setContent(username + " started the chat session.");
chatSession = new ChatSession();
synchronized(ChatEndpoint.sessionIdSequenceLock) {
chatSession.setSessionId(ChatEndpoint.sessionIdSequence++);
}
chatSession.setCustomer(session);
chatSession.setCustomerUsername(username);
chatSession.setCreationMessage(message);
ChatEndpoint.pendingSessions.add(chatSession);
ChatEndpoint.chatSessions.put(chatSession.getSessionId(),
chatSession);
} else {
message.setType(ChatMessage.Type.JOINED);
message.setContent(username + " joined the chat session.");
chatSession = ChatEndpoint.chatSessions.get(sessionId);
chatSession.setRepresentative(session);
chatSession.setRepresentativeUsername(username);
ChatEndpoint.pendingSessions.remove(chatSession);
session.getBasicRemote()
.sendObject(chatSession.getCreationMessage());
session.getBasicRemote().sendObject(message);
}
ChatEndpoint.sessions.put(session, chatSession);
ChatEndpoint.httpSessions.put(session, httpSession);
this.getSessionsFor(httpSession).add(session);
chatSession.log(message);
chatSession.getCustomer().getBasicRemote().sendObject(message);
} catch(IOException | EncodeException e) {
this.onError(session, e);
}
}
@OnMessage
public void onMessage(Session session, ChatMessage message) {
ChatSession c = ChatEndpoint.sessions.get(session);
Session other = this.getOtherSession(c, session);
if(c != null && other != null) {
c.log(message);
try {
session.getBasicRemote().sendObject(message);
other.getBasicRemote().sendObject(message);
} catch(IOException | EncodeException e) {
this.onError(session, e);
}
}
}
@OnClose
public void onClose(Session session, CloseReason reason) { ... }
@OnError
public void onError(Session session, Throwable e) { ... }
@Override
public void sessionDestroyed(HttpSessionEvent event) { ... }
@Override
public void sessionCreated(HttpSessionEvent event) { /* do nothing */ }
@SuppressWarnings("unchecked")
private synchronized ArrayList<Session> getSessionsFor(HttpSession session) {
try {
if(session.getAttribute(WS_SESSION_PROPERTY) == null)
session.setAttribute(WS_SESSION_PROPERTY, new ArrayList<>());
return (ArrayList<Session>)session.getAttribute(WS_SESSION_PROPERTY);
} catch(IllegalStateException e) {
return new ArrayList<>();
}
}
private Session close(Session s, ChatMessage message) { ... }
private Session getOtherSession(ChatSession c, Session s) { ... }
public static class EndpointConfigurator
extends ServerEndpointConfig.Configurator {
@Override
public void modifyHandshake(ServerEndpointConfig config,
HandshakeRequest request,
HandshakeResponse response) {
super.modifyHandshake(config, request, response);
config.getUserProperties().put(
ChatEndpoint.HTTP_SESSION_PROPERTY, request.getHttpSession()
);
}
}
}
Writing the JavaScript Chat Application
The /WEB-INF/jsp/view/chat/chat.jsp file contains the user interface for the support chat. Much of the code is presentation, connection, and error handling, which you have seen before with the Tic-tac-toe game. Of particular importance are the onmessage event and thesend function, which deal with receiving and sending binary messages, respectively. Because this application uses JSON to send messages between the browser and the server, it would have been easier to use text messages instead of binary messages. However, you have not yet seen how to handle binary WebSocket messages in JavaScript, so this example demonstrates that.
server.onmessage = function(event) {
if(event.data instanceof ArrayBuffer) {
var message = JSON.parse(String.fromCharCode.apply(
null, new Uint8Array(event.data)
));
objectMessage(message);
if(message.type == 'JOINED') {
otherJoined = true;
if(username != message.user)
infoMessage('You are now chatting with ' +
message.user + '.');
}
} else {
modalErrorBody.text('Unexpected data type [' +
typeof(event.data) + '].');
modalError.modal('show');
}
};
send = function() {
if(server == null) {
modalErrorBody.text('You are not connected!');
modalError.modal('show');
} else if(!otherJoined) {
modalErrorBody.text(
'The other user has not joined the chat yet.');
modalError.modal('show');
} else if(messageArea.get(0).value.trim().length > 0) {
var message = {
timestamp: new Date(), type: 'TEXT', user: username,
content: messageArea.get(0).value
};
try {
var json = JSON.stringify(message);
var length = json.length;
var buffer = new ArrayBuffer(length);
var array = new Uint8Array(buffer);
for(var i = 0; i < length; i++) {
array[i] = json.charCodeAt(i);
}
server.send(buffer);
messageArea.get(0).value = '';
} catch(error) {
modalErrorBody.text(error);
modalError.modal('show');
}
}
};
Now compile and start the Customer-Support-v8 application, and open two different Internet browsers to http://localhost:8080/support. Log in to the support application in both browsers as different users. (Remember, you can view the available usernames and passwords in the LoginServlet code.) In one browser, click Chat with Support to request a chat session. In the other browser click View Chat Requests and then click the chat session you previously opened. Type messages in each browser and click Send. You should soon see something like Figure 10-7. You are now chatting with yourself through both browsers.
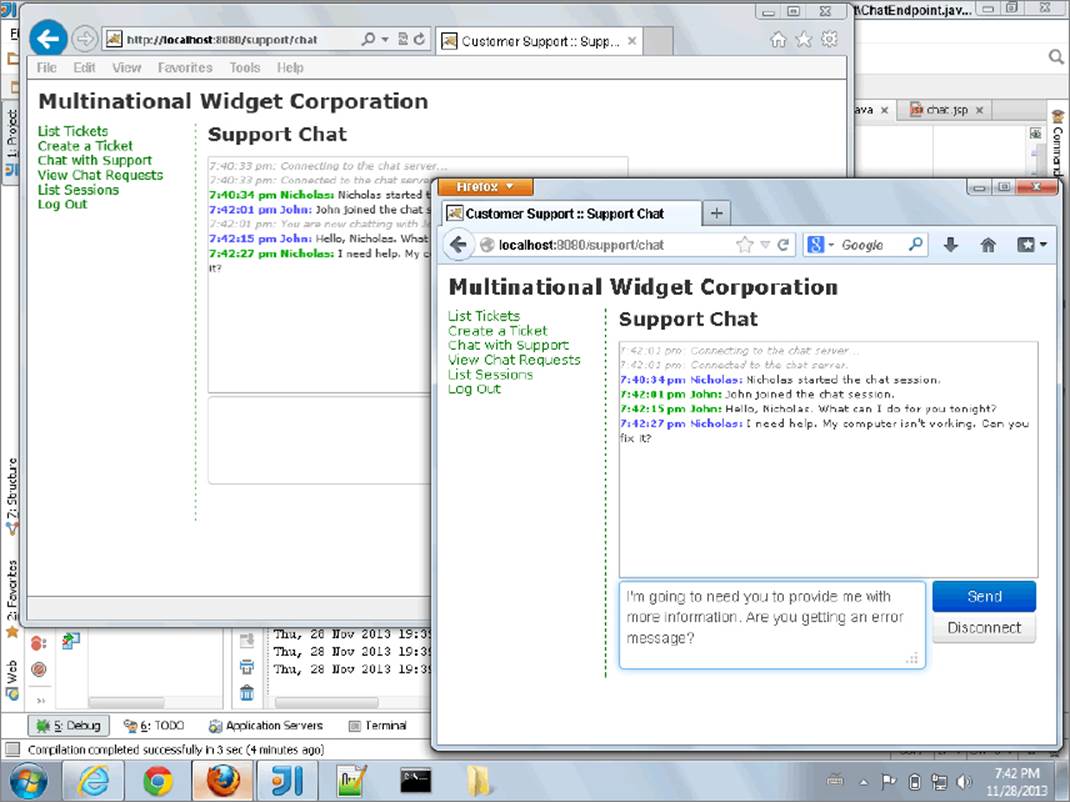
FIGURE 10-7
SUMMARY
WebSockets are an extremely useful, powerful new technology in the Internet world. Like the HTTP protocol, which underwent many changes in its early days, the WebSockets protocol is likely to undergo many changes in the coming years as well. Currently, it has a framework for extensions, but no existing extensions. That is likely to change as more and more developers begin using the technology. There are endless uses for WebSockets, and you explored several of those uses in this chapter. You created a multiplayer game of Tic-tac-toe, used WebSockets to communicate within nodes in an application cluster, and added support chat to the Customer Support application. You learned about the technologies that led to WebSockets and how WebSockets solved many of the problems those technologies couldn’t. By now you should be familiar with the protocol and the Java and JavaScript APIs necessary to use it.
In the next chapter you learn about application logging principles and the technologies you can use to facilitate debugging and tracing your application and identifying errors that occur.
All materials on the site are licensed Creative Commons Attribution-Sharealike 3.0 Unported CC BY-SA 3.0 & GNU Free Documentation License (GFDL)
If you are the copyright holder of any material contained on our site and intend to remove it, please contact our site administrator for approval.
© 2016-2026 All site design rights belong to S.Y.A.