Wrox Press Beginning JavaScript 5th (2015)
Chapter 10. Events
WHAT YOU WILL LEARN IN THIS CHAPTER:
· Connecting your code to events to respond to user actions
· Writing standards-compliant, event-driven code
· Writing event code for older versions of Internet Explorer
· Handling the difference between standards-compliant and old-IE event models
· Dragging and dropping content with HTML5’s native drag-and-drop capabilities
· Animating elements by manipulating their positioning
WROX.COM CODE DOWNLOADS FOR THIS CHAPTER
You can find the wrox.com code downloads for this chapter at http://www.wiley.com/go/BeginningJavaScript5E on the Download Code tab. You can also view all of the examples and related files at http://beginningjs.com.
There’s no doubt that JavaScript is a useful tool in web programming. You’ve seen how to dynamically create, remove, and manipulate HTML in the page, and in the coming chapters, you learn how to process user input and send data to the server.
Although these capabilities are very important in today’s web programming, perhaps the most important concept you’ll learn and use is that of events. In the real world, an event is, put simply, something that happens. For example, a ringing telephone is an event. If you are expecting a friend or colleague to call, you usually want to do something: Answer the call.
In programming, events are very similar to a telephone call. Something in the page will happen, and if it’s something you are expecting, you can respond to it. For example, the user clicking the page, pressing a key on the keyboard, or moving the mouse pointer oversome text all cause events to occur. Another example, which is used quite frequently, is the load event for the page: The window raises (or fires) a notification when the page is completely loaded in the browser.
Why should you be interested in events?
Take as an example the situation in which you want to make a menu pop up when the user clicks anywhere in your web page. Assuming that you can write a function that will make the pop-up menu appear, how do you know when to make it appear, or in other words, when to call the function? You somehow need to intercept the event of the user clicking in the document, and make sure your function is called when that event occurs.
To do this, you need to use something called an event handler, or listener. You associate this with the code that you want to execute when the event occurs. This provides you with a way of intercepting events and making your code execute when they have occurred. You will find that adding an event handler to your code is often known as “connecting your code to the event.” It’s a bit like setting an alarm clock—you set the clock to make a ringing noise when a certain event happens. With alarm clocks, the event is when a certain time is reached.
TYPES OF EVENTS
Web development, especially when it comes to JavaScript, is primarily event-driven, meaning that the flow of the program is controlled by events. In other words, a large portion of your JavaScript code usually only executes when an event occurs, and you can listen for many events.
Take a moment and think about how you interact with a web page. On a computer or laptop, you move your mouse around the page, perhaps you select text that you want to copy and paste into your note-taking program, and you definitely click things (like links). On touch-based devices, you tap items in the page. And on all web-enabled devices, you fill out forms by typing keys on the keyboard. Virtually everything you do triggers an event, and a lot of the time, you want to write code that reacts to some of those events.
Following is a list of the many types of events that you can listen for and react to:
· Mouse events: These occur when the user does something with the mouse, such as moving the cursor, clicking, double-clicking, dragging, and so on.
· Keyboard events: These occur when keys on the keyboard are pressed or depressed. Though commonly used in conjunction with forms, keyboard events occur every time the user presses or depresses a key.
· Progression events: These are more generic events that occur at different stages of an object. For example, when the document loads.
· Form events: These occur when something in the form changes.
· Mutation events: These occur when DOM nodes are modified.
· Touch events: These occur when the user touches the sensor.
· Error events: These occur when an error occurs.
The most common user-based events are mouse events, and rightly so. The primary way users interact with their computers is with the mouse, but that’s starting to change as more and more people own touch-enabled devices.
The main focus of this chapter is to teach you how to listen for events, and it does so primarily with mouse events. In the next chapter, you use some keyboard events to interact with forms.
CONNECTING CODE TO EVENTS
Browsers have been around for quite some time, and as you can guess, the way in which we listen for events has evolved over the years. But even with the many changes the JavaScript community has seen over the years, the old ways of listening for events are still supported and useful in certain situations.
Chapter 5 introduced objects defined by their methods and properties. However, objects also have events associated with them. This was not mentioned before, because native JavaScript objects do not have these events, but the objects of the browser object model (BOM) and document object model (DOM) do.
You can connect your code to an event in three ways:
· Assigning HTML attributes
· Assigning an object’s special properties
· Calling an object’s special methods
Handling Events via HTML Attributes
In this section you create a simple HTML page with a single hyperlink, given by the element <a/>. Associated with this element is the a object, and one of the events the a object has is the click event. The click event fires, not surprisingly, when the user clicks the hyperlink. Feel free to follow along; open your text editor and type the following:
<!DOCTYPE html>
<html lang="en">
<head>
<title>Connecting Events Using HTML Attributes</title>
</head>
<body>
<a href="somepage.html">Click Me</a>
</body>
</html>
As it stands, this page does nothing a normal hyperlink doesn’t do. You click it, and it navigates the window to another page, called somepage.html, which would need to be created. There’s been no event handler added to the link—yet!
As mentioned earlier, one way of connecting the event to your code is to add it directly to the opening tag of the element object whose event you are capturing. In this case, it’s the click event of the a object, as defined by the <a/> element. On clicking the link, you want to capture the event and connect it to your code. You need to add the event handler, in this case onclick, as an attribute to the opening <a> tag. You set the value of the attribute to the code you want to execute when the event occurs.
Rewrite the opening <a> tag to do this as follows:
<a href="somepage.html" onclick="alert('You clicked?')">Click Me</a>
This code adds onclick="alert('You Clicked?')" to the definition of the opening <a> tag. Now, when the link is clicked, you see an alert box. After this, the hyperlink does its usual stuff and takes you to the page defined in the href attribute.
This is fine if you have only one line of code to connect to the event handler, but what if you want a number of lines to execute when the link is clicked?
Well, all you need to do is define the function you want to execute and call it in the onclick code. Do that now:
<!DOCTYPE html>
<html lang="en">
<head>
<title>Connecting Events Using HTML Attributes</title>
</head>
<body>
<a href="somepage.html" onclick="return linkClick()">Click Me</a>
<script>
function linkClick() {
alert("You Clicked?");
return true;
}
</script>
</body>
</html>
Within the script block, you have created a standard function. The onclick attribute is now connected to some code that calls the function linkClick(). Therefore, when the user clicks the hyperlink, this function will be executed.
You’ll also see that the function returns a value, true in this case. Also, where you define your onclick attribute, you return the return value of the function by using the return statement before the function name. Why do this?
The value returned by onclick="return linkClick()" is used by JavaScript to decide whether the normal action of the link—that is, going to a new page—should occur. If you return true, the action continues, and you go to somepage.html. If you return false, the normal chain of events (that is, going to somepage.html) does not happen. You say that the action associated with the event is canceled. Try changing the function to this:
function linkClick() {
alert("This link is going nowhere");
return false;
}
Now you’ll find that you just get a message, and no attempt is made to go to somepage.html.
NOTE Not all objects and their events make use of the return value, so sometimes it’s redundant.
Some events are not directly linked with the user’s actions as such. For example, the window object has the load event, which fires when a page is loaded, and the unload event, which fires when the page is unloaded (that is, when the user either closes the browser or moves to another page).
Event handlers for the window object actually go inside the opening <body> tag. For example, to add an event handler for the load and unload events, you’d write the following:
<body onload="myOnLoadfunction()"onunload="myOnUnloadFunction()">
TRY IT OUT Displaying Random Images with HTML Attribute Event Handlers
In this Try It Out, you connect to an image’s click event to randomly change the image loaded in a page. Open your editor and type in the following code:
<!DOCTYPE html>
<html lang="en">
<head>
<title>Chapter 10: Example 1</title>
</head>
<body>
<img src="usa.gif" onclick="changeImg(this)" />
<img src="mexico.gif" onclick="changeImg(this)" />
<script>
var myImages = [
"usa.gif",
"canada.gif",
"jamaica.gif",
"mexico.gif"
];
function changeImg(that) {
var newImgNumber = Math.round(Math.random() * 3);
while (that.src.indexOf(myImages[newImgNumber]) != -1) {
newImgNumber = Math.round(Math.random() * 3);
}
that.src = myImages[newImgNumber];
}
</script>
</body>
</html>
Save the page as ch10_example1.html. You will need four image files for the example, which you can create or retrieve from the code download available with this book.
Load the page into your browser. You should see a page like that shown in Figure 10.1.

Figure 10.1
If you click an image, you’ll see it change to a different image, which is selected randomly.
The first line in the script block at the top of the page defines a variable with page-level scope. This is an array that contains your list of image sources:
var myImages = [
"usa.gif",
"canada.gif",
"jamaica.gif",
"mexico.gif"
];
Next you have the changeImg() function, which will be connected to the onclick event handler of the <img/> elements defined in the page. You are using the same function for the onclick event handlers of both images, and indeed, can connect one function to as many event handlers as you like. This function accepts one parameter called that. It is called that because you pass the this keyword to the function, which gives you immediate access to the img object you click. You can actually name the parameter whatever you want, but most developers use the word “that” when it references this.
In the first line of the function, you set the newImgNumber variable to a random integer between 0 and 3:
function changeImg(that) {
var newImgNumber = Math.round(Math.random() * 3);
The Math.random() method provides a random number between 0 and 1, and you multiply that by three to get a number between 0 and 3. This number is rounded to the nearest whole number (0, 1, 2, or 3) by means of Math.round(). This integer provides the index for the image src that you will select from the myImages array.
The next lines are a while loop, the purpose of which is to ensure that you don’t select the same image as the current one. If the string contained in myImages[newImgNumber] is found inside the src property of the current image, you know it’s the same and that you need to get another random number. You keep looping until you get a new image, at which point myImages[newImgNumber] will not be found in the existing src, and -1 will be returned by the indexOf() method, breaking out of the loop:
while (that.src.indexOf(myImages[newImgNumber]) != -1) {
newImgNumber = Math.round(Math.random() * 3);
}
Next, you set the src property of the img object to the new value contained in your myImages array:
that.src = myImages[newImgNumber];
}
You connect the onclick event of the first <img/> element to the changeImg() function:
<img src="usa.gif" onclick="changeImg(this)" />
And now to the second <img/> element:
<img src="mexico.gif" onclick="changeImg(this)" />
Passing this in the changeImg() function gives the function direct access to this <img/> element’s corresponding object. When you pass this to an HTML element’s attribute event handler, the corresponding object of that element is passed to the function. It’s a nice, clean way of accessing the element’s object in your JavaScript code.
This example had you pass this as an argument to the function handling the element’s click event. This is a simple and easy way of accessing the element that received the event, but there’s a far more useful object you can pass: an Event object that contains all the information about the event.
Passing the Event object is very simple to do; simply pass event instead of this. For example, in the following code the <p/> element will raise a dblclick event:
<p ondblclick="handle(event)">Paragraph</p>
<script>
function handle(e) {
alert(e.type);
}
</script>
Notice that event is passed to the handle() function in the ondblclick attribute. This event variable is special in that it is not defined anywhere; instead, it is an argument used only with event handlers that are connected through HTML attributes. It passes a reference to the current event object when the event fires.
If you ran the previous example, it would just tell you what kind of event raised your event-handling function. This might seem self-evident in the preceding example, but if you had included the following extra lines of code, any one of three elements could have raised the function:
<p ondblclick="handle(event)">Paragraph</p>
<h1 onclick="handle(event)">Heading 1</h1>
<span onmouseover="handle(event)">Special Text</span>
<script>
function handle(e) {
alert(e.type);
}
</script>
This makes the code much more useful. In general, you will use relatively few event handlers to deal with any number of events, and you can use the event properties as a filter to determine what type of event happened and what HTML element triggered it, so that you can treat each event differently.
In the following example, you see that you can take different courses of action depending on what type of event is returned:
<p ondblclick="handle(event)">Paragraph</p>
<h1 onclick="handle(event)">Heading 1</h1>
<span onmouseover="handle(event)">Special Text</span>
<script>
function handle(e) {
if (e.type == "mouseover") {
alert("You moved over the Special Text");
}
}
</script>
This code uses the type property to determine what type of event occurred. If users move their mouse cursor over the <span/> element, an alert box tells them so.
You learn a lot more about the Event object later in the chapter, but for now, just know that it exposes a property called target. This is the target of the event, the element object that received the event. With this information, you can rewrite ch10_example1.html to use the more versatile Event object.
TRY IT OUT Displaying Random Images with Object Property Event Handlers and the Event Object
In this Try It Out, you rewrite ch10_example1.html to use the Event object instead of this. Type in the following code:
<!DOCTYPE html>
<html lang="en">
<head>
<title>Chapter 10: Example 2</title>
</head>
<body>
<img src="usa.gif" onclick="changeImg(event)" />
<img src="mexico.gif" onclick="changeImg(event)" />
<script>
var myImages = [
"usa.gif",
"canada.gif",
"jamaica.gif",
"mexico.gif"
];
function changeImg(e) {
var el = e.target;
var newImgNumber = Math.round(Math.random() * 3);
while (el.src.indexOf(myImages[newImgNumber]) != -1) {
newImgNumber = Math.round(Math.random() * 3);
}
el.src = myImages[newImgNumber];
}
</script>
</body>
</html>
Save the page as ch10_example2.html. Load the page into your browser, and you will see a page similar to ch10_example1.html. Click an image, and you’ll see it change to a random picture.
The code for this page is almost identical to ch10_example1.html. This new version just has a few changes.
The first two changes are in the onclick event handlers of the <img/> elements. Instead of passing this to changeImg(), you pass event.
The next change is in the changeImg() declaration:
function changeImg(e) {
The parameter name is now e, meaning event. Keep in mind that it doesn’t matter what you call this parameter, but the general convention is to use e.
When the browser calls this function, it will pass an Event object as the e parameter, and you can retrieve the img element object that received the event by using e.target:
var el = e.target;
You assign this object to a variable called el (short for element), and you use it in the while loop:
while (el.src.indexOf(myImages[newImgNumber]) != -1) {
newImgNumber = Math.round(Math.random() * 3);
}
You also use it to assign its src property in the last line of the function:
el.src = myImages[newImgNumber];
The changes made to changeImg() are minimal, and though it does require just a little bit more code, it is much more versatile, as you learn later in the chapter.
Using the HTML attribute event handlers is an easy way to connect your JavaScript code to an element’s events, but they have some downsides:
· Your HTML and JavaScript are mixed together. This makes it more difficult to maintain and find and fix bugs.
· You can’t remove an event handler without changing the HTML.
· You can only set up event handlers for elements that appear in your HTML code, as opposed to elements you create dynamically (like, for example, when you create an element using document.createElement()).
These issues, however, are solved with an object’s event handler properties.
Handling Events via Object Properties
With this method, you first need to define the function that will be executed when the event occurs. Then you need to set that object’s event handler property to the function you defined.
This is illustrated in the following example. Open your editor and type in the following code:
<!DOCTYPE html>
<html lang="en">
<head>
<title>Chapter 10, Example 3</title>
</head>
<body>
<a id="someLink" href="somepage.html">
Click Me
</a>
<script>
function linkClick() {
alert("This link is going nowhere");
return false;
}
document.getElementById("someLink").onclick = linkClick;
</script>
</body>
</html>
Save this as ch10_example3.html.
First, you have the <a/> element, whose object’s event you are connecting to. You’ll notice there is no mention of the event handler or the function within the attributes of the tag, but do notice that it now has an id attribute. This is so that you can easily find the element in the document with the getElementById() method.
Next, you define the function linkClick(), much as you did previously. As before, you can return a value indicating whether you want the normal action of that object to happen.
The connection is made between the object’s event and the function on the final lines of script, as shown in the following code:
document.getElementById("someLink").onclick = linkClick;
As you learned in the previous chapter, the getElementById() method finds the element with the given id and returns the a object. You set this object’s onclick property to reference your function—this makes the connection between the object’s event handler and your function. Note that no parentheses are added after the function name. You are assigning the linkClick function object to the element’s onclick property, not executing linkClick() and assigning its return value to onclick.
Take a moment and look back at ch10_example2.html. When you listened for the click event using the onclick attribute, you had complete control over how changeImg() was called; you simply called the function and passed it the event object.
But that’s now an issue. Look again at the onclick property assignment:
document.getElementById("someLink").onclick = linkClick;
You no longer control how the event handler function is executed; the browser executes the function for you. How then do you attain a reference to the Event? When an event triggers and an event handler executes, the browser automatically passes an Event object to the handler function.
TRY IT OUT Displaying Random Images with Object Property Event Handlers
In this Try It Out, you rewrite ch10_example2.html to use the onclick property of the img objects. Type in the following code:
<!DOCTYPE html>
<html lang="en">
<head>
<title>Chapter 10: Example 4</title>
</head>
<body>
<img id="img0" src="usa.gif" />
<img id="img1" src="mexico.gif" />
<script>
var myImages = [
"usa.gif",
"canada.gif",
"jamaica.gif",
"mexico.gif"
];
function changeImg(e) {
var el = e.target;
var newImgNumber = Math.round(Math.random() * 3);
while (el.src.indexOf(myImages[newImgNumber]) != -1) {
newImgNumber = Math.round(Math.random() * 3);
}
el.src = myImages[newImgNumber];
}
document.getElementById("img0").onclick = changeImg;
document.getElementById("img1").onclick = changeImg;
</script>
</body>
</html>
Save the page as ch10_example4.html. Load the page into your browser, and you will see a page similar to ch10_example2.html. Click an image, and you’ll see it change to a random picture.
The code for this page is almost identical to ch10_example2.html. The first changes are in the <img> tags. They no longer have onclick attributes, and they now have id attributes. The first image has an id of img0, and the second is img1. These elements have an id so that you can reference them in your JavaScript code.
The only other changes are the final two lines of JavaScript code:
document.getElementById("img0").onclick = changeImg;
document.getElementById("img1").onclick = changeImg;
You use document.getElementById() to retrieve the two img objects from the DOM and assign their onclick properties, thus setting up the changeImg() functions to handle the click events on both img objects.
Removing an event handler is rather trivial. Simply assign null to the event handler property, like this:
img1.onclick = null;
By assigning null, you have overwritten the previous value contained by the property, and that introduces the main problem with these types of event handlers: you can assign only one function to handle a given event. For example:
img2.onclick = functionOne;
img2.onclick = functionTwo;
The first line of this code assigns a function called functionOne() to an element’s onclick property. The second line, however, overwrites the value of img2.onclick by assigning it a new value. So, when the user clicks img2, only functionTwo() executes. That behavior is fine if it’s what you actually want, but more often than not, you want both functionOne() and functionTwo() to execute when img2 is clicked.
You can do that thanks to the standard DOM event model.
THE STANDARD EVENT MODEL
Up until this point, you’ve been working with nonstandard techniques for listening for events. Yes, they work in every browser, but that support exists primarily for backward compatibility. They are not guaranteed to work in future browser versions.
First, some history. The two major browsers in the late 1990s were Internet Explorer 4 and Netscape 4—the first browser war. Not surprisingly, both browser vendors implemented vastly different DOMs and event models, fragmenting the web into two groups: websites that catered to Netscape only, and websites that catered to IE only. Very few developers chose the frustrating task of cross-browser development.
Obviously, a need for a standard grew from this fragmentation and frustration. So the W3C introduced the DOM standard, which grew into DOM level 2, which included a standard event model.
The DOM standard defines an object called EventTarget. Its purpose is to define a standard way of adding and removing listeners for an event on the target. Every element node in the DOM is an EventTarget, and as such, you can dynamically add and remove event listeners for a given element.
The standard also describes an Event object that provides information about the element that has generated an event and enables you to retrieve it in script. It provides a set of guidelines for a standard way of determining what generated an event, what type of event it was, and when and where the event occurred. If you want to make it available in script, it must be passed as a parameter to the function connected to the event handler.
NOTE Older versions of Internet Explorer (8 and below) do not implement the DOM event model. The code in this section only works with modern browsers: IE9+, Chrome, Firefox, Opera, and Safari.
Connecting Code to Events—The Standard Way
The EventTarget object defines two methods for adding and removing event listeners (remember that an EventTarget is an element). The first method, addEventListener(), registers an event listener on the target on which it’s called. You call it on a target/element object, as you see in the following example. Type in the following code:
<!DOCTYPE html>
<html lang="en">
<head>
<title>Chapter 10, Example 5</title>
</head>
<body>
<a id="someLink" href="somepage.html">
Click Me
</a>
<script>
var link = document.getElementById("someLink");
link.addEventListener("click", function (e) {
alert("This link is going nowhere");
e.preventDefault();
});
</script>
</body>
</html>
Save this as ch10_example5.html. This is a re-creation of ch10_example3.html, but it uses the standard event model application programming interface (API), which is a set of objects, properties, and methods, to register an event listener and prevent the default action of a link from occurring.
The first line of JavaScript retrieves the element that has an id of someLink, and stores it in the link variable. You then call the addEventListener() method and pass it two arguments. The first is the name of the event without the "on" prefix. In this example, an event listener is registered for the click event.
The second argument is the function that executes when the event occurs. The previous code uses an anonymous function, a common pattern that you’ll see very often, but it’s more useful to pass a declared function, like this:
function linkClick() {
alert("This link is going nowhere");
e.preventDefault();
}
link.addEventListener("click", linkClick);
Using a declared function lets you reuse it for multiple event listeners, as you see in the next exercise. But first, notice that linkClick() no longer returns false; instead, it calls the preventDefault() method on the Event object. This is the standard way that you prevent the default action from occurring.
TRY IT OUT Displaying Random Images with Standard Event Handlers
In this Try It Out, you rewrite ch10_example4.html to use the standard DOM event model. Type in the following code:
<!DOCTYPE html>
<html lang="en">
<head>
<title>Chapter 10: Example 6</title>
</head>
<body>
<img id="img0" src="usa.gif" />
<img id="img1" src="mexico.gif" />
<script>
var myImages = [
"usa.gif",
"canada.gif",
"jamaica.gif",
"mexico.gif"
];
function changeImg(e) {
var el = e.target;
var newImgNumber = Math.round(Math.random() * 3);
while (el.src.indexOf(myImages[newImgNumber]) != -1) {
newImgNumber = Math.round(Math.random() * 3);
}
el.src = myImages[newImgNumber];
}
document.getElementById("img0").addEventListener("click", changeImg);
document.getElementById("img1").addEventListener("click", changeImg);
</script>
</body>
</html>
Save the page as ch10_example6.html. Load the page into your browser, and you will see the familiar page from the previous examples. Click an image, and you’ll see it change to a random picture.
The only changes from ch10_example4.html are the final two lines of JavaScript:
document.getElementById("img0").addEventListener("click", changeImg);
document.getElementById("img1").addEventListener("click", changeImg);
Instead of using each element object’s onclick property, you register the click event handler using addEventListener().
Using a declared function is also useful because it enables you to unregister an event listener with the removeEventListener() method:
elementObj.removeEventListener("click", elementObjClick);
When you remove an event listener, you must provide the same exact information that you called addEventListener() with; this includes not only the same name of the event, but the same function object that you passed to addEventListener().
The beauty of the standard DOM event model is that you can register multiple event listeners for a single event on a single element. This is extremely useful when you need to listen for the same event on an element with different and unrelated functions. To do this, simply call addEventListener() as many times as you need to, like this:
elementObj.addEventListener("click", handlerOne);
elementObj.addEventListener("click", handlerTwo);
elementObj.addEventListener("click", handlerThree);
This code registers three listeners for the click event on the element referenced by elementObj. As you may suspect, these listeners execute in the order in which they were registered. So, when you click elementObj, handlerOne() executes first, handlerTwo() executes second, and handlerThree() executes third.
TRY IT OUT Adding and Removing Multiple Event Listeners
In this Try It Out, you practice registering multiple event listeners for a single element, and you remove those listeners when a condition is met. Type in the following code:
<!DOCTYPE html>
<html lang="en">
<head>
<title>Chapter 10: Example 7</title>
</head>
<body>
<img id="img0" src="usa.gif" />
<div id="status"></div>
<script>
var myImages = [
"usa.gif",
"canada.gif",
"jamaica.gif",
"mexico.gif"
];
function changeImg(e) {
var el = e.target;
var newImgNumber = Math.round(Math.random() * 3);
while (el.src.indexOf(myImages[newImgNumber]) != -1) {
newImgNumber = Math.round(Math.random() * 3);
}
el.src = myImages[newImgNumber];
}
function updateStatus(e) {
var el = e.target;
var status = document.getElementById("status");
status.innerHTML = "The image changed to " + el.src;
if (el.src.indexOf("mexico") > -1) {
el.removeEventListener("click", changeImg);
el.removeEventListener("click", updateStatus);
}
}
var imgObj = document.getElementById("img0");
imgObj.addEventListener("click", changeImg);
imgObj.addEventListener("click", updateStatus);
</script>
</body>
</html>
Save the page as ch10_example7.html. Load the page into your browser, and you will see a page with a single image. Click the image, and it will change to a random picture. You’ll also see the text of the <div/> element change to contain the URL of the new picture, as shown in Figure 10.2.
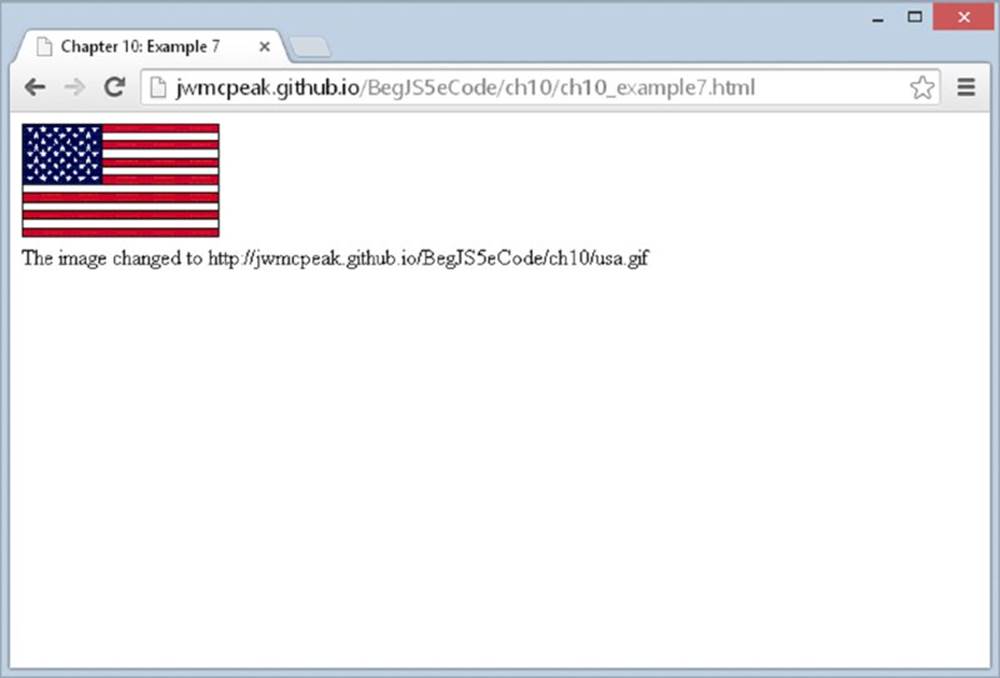
Figure 10.2
This code is reminiscent of the past few examples; so, let’s just focus on what’s different. First, the HTML:
<img id="img0" src="usa.gif" />
<div id="status"></div>
Instead of two image elements, this HTML defines a single <img/> element with an id of img0 and a <div/> element whose id is status. The contents of the <div/> element will change when the user clicks the image.
There’s a new function called updateStatus(), and its purpose is to update the text inside <div id="status"/>. The first two lines of this function acquire references to the event target (the image) and <div/> element:
function updateStatus(e) {
var el = e.target;
var status = document.getElementById("status");
The next line of code changes the text of the status element:
status.innerHTML = "The image changed to " + el.src;
Element objects have an innerHTML property that lets you set the contents of the element to whatever value you assign to it. In this code, you change the <div/> element’s contents to contain the URL of the picture currently displayed in the browser.
To add some variety, the next few lines of code remove the image’s click event listeners if the Mexico flag is displayed in the browser:
if (el.src.indexOf("mexico") > -1) {
el.removeEventListener("click", changeImg);
el.removeEventListener("click", updateStatus);
}
}
The if statement uses the indexOf() method on the image’s src to determine if the Mexico flag is currently displayed. If so, you remove the image’s two event listeners using the removeEventListener() method. We have yet to discuss the code for registering these click event listeners, but you pass the same information to removeEventListener() that you pass to addEventListener(). If you don’t, you won’t remove the event listeners.
The final lines of code set up the event listeners:
var imgObj = document.getElementById("img0");
imgObj.addEventListener("click", changeImg);
imgObj.addEventListener("click", updateStatus);
The first line retrieves the <img id="img0" /> element, and you register the click event handlers by calling addEventListener() and passing click for the event and the two functions, changeImg() and updateStatus(), respectively.
It’s important to remember that when you register multiple event handlers on a single element, the listening functions execute in the order in which you registered them. In this example, you registered a listener with changeImg() before a listener withupdateStatus(). This is ideal because you want the status to display the URL of the image after you change it. If you had registered updateStatus() before changeImg(), the status would update before the image, thus displaying incorrect information.
Using Event Data
The standard outlines several properties of the Event object that offer information about that event: what element it happened at, what type of event took place, and what time it occurred. These are all pieces of data offered by the Event object. The following table lists the properties outlined in the specification.
|
PROPERTIES OF THE EVENT OBJECT |
DESCRIPTION |
|
bubbles |
Indicates whether an event can bubble—passing control from one element to another starting from the event target and bubbling up the hierarchy |
|
cancelable |
Indicates whether an event can have its default action canceled |
|
currentTarget |
Identifies the current target for the event as the event traverses the DOM |
|
defaultPrevented |
Indicates whether or not preventDefault() has been called on the event |
|
eventPhase |
Indicates which phase of the event flow an event is in |
|
target |
Indicates which element caused the event; in the DOM event model, text nodes are a possible target of an event |
|
timestamp |
Indicates at what time the event occurred |
|
type |
Indicates the name of the event |
Secondly, the DOM event model introduces a MouseEvent object, which deals with events generated specifically by the mouse. This is useful because you might need more specific information about the event, such as the position in pixels of the cursor, or the element the mouse has come from. The following table lists some of the MouseEvent object’s properties:
|
PROPERTIES OF THE MOUSEEVENT OBJECT |
DESCRIPTION |
|
altKey |
Indicates whether the Alt key was pressed when the event was generated |
|
button |
Indicates which button on the mouse was pressed |
|
clientX |
Indicates where in the browser window, in horizontal coordinates, the mouse pointer was when the event was generated |
|
clientY |
Indicates where in the browser window, in vertical coordinates, the mouse pointer was when the event was generated |
|
ctrlKey |
Indicates whether the Ctrl key was pressed when the event was generated |
|
metaKey |
Indicates whether the meta key was pressed when the event was generated |
|
relatedTarget |
Used to identify a secondary event target. For mouseover events, this property references the element at which the mouse pointer exited. For mouseout events, this property references the element at which the mouse pointer entered |
|
screenX |
Indicates the horizontal coordinates relative to the origin in the screen |
|
screenY |
Indicates the vertical coordinates relative to the origin in the screen |
|
shiftKey |
Indicates whether the Shift key was pressed when the event was generated |
Although any event might create an Event object, only a select set of events can generate a MouseEvent object. On the occurrence of a MouseEvent event, you’d be able to access properties from the Event object and the MouseEvent object. With a non-mouse event, none of the MouseEvent object properties in the preceding table would be available. The following mouse events can create a MouseEvent object:
· click occurs when a mouse button is clicked (pressed and released) with the pointer over an element or text.
· mousedown occurs when a mouse button is pressed with the pointer over an element or text.
· mouseup occurs when a mouse button is released with the pointer over an element or text.
· mouseover occurs when a mouse button is moved onto an element or text.
· mousemove occurs when a mouse button is moved and it is already on top of an element or text.
· mouseout occurs when a mouse button is moved out and away from an element or text.
Unlike MouseEvent, the current DOM specification does not define a KeyboardEvent object for keyboard-related events (although one will be defined in the next version, DOM level 3). You can, however, still access information about keyboard-related events with the properties listed in the following table.
|
PROPERTIES OF THE KEYBOARDEVENT OBJECT |
DESCRIPTION |
|
altKey |
Indicates whether the Alt key was pressed when the event was generated |
|
charCode |
Used for the keypress event. The Unicode reference number of the key |
|
ctrlKey |
Indicates whether the Ctrl key was pressed when the event was generated |
|
keyCode |
A system- and browser-dependent numerical code identifying the pressed key |
|
metaKey |
Indicates whether the meta key was pressed when the event was generated |
|
shiftKey |
Indicates whether the Shift key was pressed when the event was generated |
TRY IT OUT Using the DOM Event Model
In this Try It Out, you take a quick look at an example that uses some properties of the MouseEvent object.
Open a text editor and type the following:
<!DOCTYPE html>
<html lang="en">
<head>
<title>Chapter 10: Example 8</title>
<style>
.underline {
color: red;
text-decoration: underline;
}
</style>
</head>
<body>
<p>This is paragraph 1.</p>
<p>This is paragraph 2.</p>
<p>This is paragraph 3.</p>
<script>
function handleEvent(e) {
var target = e.target;
var type = e.type;
if (target.tagName == "P") {
if (type == "mouseover") {
target.className = "underline";
} else if (type == "mouseout") {
target.className = "";
}
}
if (type == "click") {
alert("You clicked the mouse button at the X:"
+ e.clientX + " and Y:" + e.clientY + " coordinates");
}
}
document.addEventListener("mouseover", handleEvent);
document.addEventListener("mouseout", handleEvent);
document.addEventListener("click", handleEvent);
</script>
</body>
</html>
Save this as ch10_example8.html and run it in your browser. When you move your mouse over one of the paragraphs, you’ll notice its text changes color to red and it becomes underlined. Click anywhere in the page, and you’ll see an alert box like Figure 10.3.
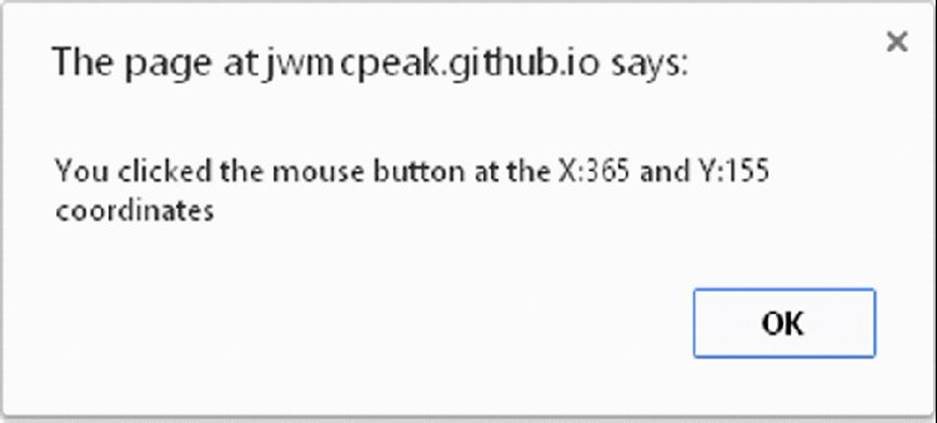
Figure 10.3
Now click OK, move the pointer in the browser window, and click again. A different result appears.
This example is consistent with the event-handling mouseover, mouseout, and click events on the document object:
document.addEventListener("mouseover", handleEvent);
document.addEventListener("mouseout", handleEvent);
document.addEventListener("click", handleEvent);
One function, handleEvent(), handles all three of these events.
Whenever any of these events fire, the handleClick() function is raised and a new MouseEvent object is generated. Remember that MouseEvent objects give you access to Event object properties as well as MouseEvent object properties, and you use some of them in this example.
The function accepts the MouseEvent object and assigns it the reference e:
function handleEvent(e) {
var target = e.target;
var type = e.type;
if (target.tagName == "P") {
Inside the function, the first thing you do is initialize the target and type variables with the target and type event properties, respectively. These are convenience variables to make accessing that information easier. You then check if the event target (the element that caused the event) has a tagName of P. If the target is a paragraph element, the next bit of information you need to find is what kind of event took place by using the type variable:
if (type == "mouseover") {
target.className = "underline";
} else if (type == "mouseout") {
target.className = "";
}
}
If the event is a mouseover, the paragraph’s CSS class is assigned the underline class defined in the page’s style sheet. If the event type is mouseout, the element’s className property is cleared, which returns the text to its original style. This style-changing code runs only if the element that caused the event is a paragraph element.
Next, the function determines if the user clicked his mouse by again checking the type variable:
if (type == "click") {
alert("You clicked the mouse button at the X:"
+ e.clientX + " and Y:" + e.clientY + " coordinates");
}
If the user did indeed click somewhere in the page, you use the alert() method to display the contents of the clientX and clientY properties of the MouseEvent object on the screen.
The MouseEvent object supplied to this function is overwritten and re-created every time you generate an event, so the next time you click the mouse or move the pointer, it creates a new MouseEvent object containing the coordinates for the x and y positions and the information on the element that caused the event to fire.
Let’s look at another example.
TRY IT OUT A Crude Tab Strip
In this Try It Out, you will write a functional, yet flawed, tab strip using the mouseover, mouseout, and click events. Open your text editor and type the following:
<!DOCTYPE html>
<html lang="en">
<head>
<title>Chapter 10: Example 9</title>
<style>
.tabStrip {
background-color: #E4E2D5;
padding: 3px;
height: 22px;
}
.tabStrip div {
float: left;
font: 14px arial;
cursor: pointer;
}
.tabStrip-tab {
padding: 3px;
}
.tabStrip-tab-hover {
border: 1px solid #316AC5;
background-color: #C1D2EE;
padding: 2px;
}
.tabStrip-tab-click {
border: 1px solid #facc5a;
background-color: #f9e391;
padding: 2px;
}
</style>
</head>
<body>
<div class="tabStrip">
<div data-tab-number="1" class="tabStrip-tab">Tab 1</div>
<div data-tab-number="2" class="tabStrip-tab">Tab 2</div>
<div data-tab-number="3" class="tabStrip-tab">Tab 3</div>
</div>
<div id="descContainer"></div>
<script>
function handleEvent(e) {
var target = e.target;
switch (e.type) {
case "mouseover":
if (target.className == "tabStrip-tab") {
target.className = "tabStrip-tab-hover";
}
break;
case "mouseout":
if (target.className == "tabStrip-tab-hover") {
target.className = "tabStrip-tab";
}
break;
case "click":
if (target.className == "tabStrip-tab-hover") {
target.className = "tabStrip-tab-click";
var num = target.getAttribute("data-tab-number");
showDescription(num);
}
break;
}
}
function showDescription(num) {
var text = "Description for Tab " + num;
descContainer.innerHTML = text;
}
document.addEventListener("mouseover", handleEvent);
document.addEventListener("mouseout", handleEvent);
document.addEventListener("click", handleEvent);
</script>
</body>
</html>
Save this file as ch10_example9.html. Open it in your browser, and when you move your mouse pointer over a tab, its style changes to a blue background with a darker blue border. When you click a tab, its style changes yet again to make the tab’s background color a light orange with a darker orange border color. Also, when you click a tab, text is added to the page. For example, clicking tab 3 results in the text “Description for Tab 3” being added to the page.
Take a look at the HTML in the body, and its style, first:
<div class="tabStrip">
<div data-tab-number="1" class="tabStrip-tab">Tab 1</div>
<div data-tab-number="2" class="tabStrip-tab">Tab 2</div>
<div data-tab-number="3" class="tabStrip-tab">Tab 3</div>
</div>
<div id="descContainer"></div>
The first <div/> element has a CSS class of tabStrip. The three <div/> elements contained within it represent three tabs. Each tab <div/> element has a numeric value assigned to its data-tab-number attribute, and a CSS class of tabStrip-tab.
The tab strip <div/> element has a sibling <div/> element with an id value of descContainer. It doesn’t contain any children, and it doesn’t have a CSS class associated with it.
In this example, the tab strip is visually set apart from the rest of the page by giving it a gray background:
.tabStrip {
background-color: #E4E2D5;
padding: 3px;
height: 22px;
}
It’s given an actual height of 28 pixels (height + top padding + bottom padding). This height and padding vertically centers the tab <div/> elements within the tab strip.
The tabs have several CSS rules to define the way they are rendered in the browser because they have three states: normal, hover, and click. Despite these three states, they are still tabs and thus share some visual characteristics. The first rule dictates these shared properties:
.tabStrip div {
float: left;
font: 14px arial;
cursor: pointer;
}
The selector tells the browser to apply these properties to all <div/> elements inside the tab strip. The elements are set to float left to give them an inline appearance (<div/> elements are block elements, and appear on a new line by default).
The next rule, the tabStrip-tab class, defines the normal state:
.tabStrip-tab {
padding: 3px;
}
All this rule adds is a padding of three pixels on all sides of the element. Next is the hover state, as defined by the tabStrip-tab-hover class:
.tabStrip-tab-hover {
border: 1px solid #316AC5;
background-color: #C1D2EE;
padding: 2px;
}
This rule reduces the padding to two pixels, adds a one-pixel-wide border, and changes the background color to a shade of blue. Borders, like padding, add to the actual dimensions of an element; reducing the padding while adding a border keeps the element in a hover state, the same height and width as it was in the normal state.
The final rule declares the tabStrip-tab-click class:
.tabStrip-tab-click {
border: 1px solid #facc5a;
background-color: #f9e391;
padding: 2px;
}
This class is similar to the hover class; the only difference is the dark orange border color and light orange background color.
Now let’s look at the JavaScript code that performs the magic. The code consists of the handleEvent() function, which is registered as the document object’s mouseover, mouseout, and click event listeners:
document.addEventListener("mouseover", handleEvent);
document.addEventListener("mouseout", handleEvent);
document.addEventListener("click", handleEvent);
The function begins by declaring a variable called target, which is initialized with the event object’s target property:
function handleEvent(e) {
var target = e.target;
Now you need to determine what type of event took place and make the appropriate changes to the DOM. A switch statement works well here, and you use the event object’s type property as the switch expression:
switch (e.type) {
case "mouseover":
if (target.className == "tabStrip-tab") {
target.className = "tabStrip-tab-hover";
}
break;
First, check for the mouseover event. If the element that caused the event has a class name of tabStrip-tab, a tab in its normal state, change the element’s className property to tabStrip-tab-hover. In doing so, the tab is now in the hover state.
If a mouseout event occurred, you also need to make changes to the DOM:
case "mouseout":
if (target.className == "tabStrip-tab-hover") {
target.className = "tabStrip-tab";
}
break;
This code changes the tab’s className property to tabStrip-tab (the normal state) only when the tab in which the mouse pointer exited is in the hover state.
The last event you need to look for is the click event, so check for it now with the following code:
case "click":
if (target.className == "tabStrip-tab-hover") {
target.className = "tabStrip-tab-click";
This code changes the tab element’s className to tabStrip-tab-click, thus putting it into the click state.
Next, you need to add the tab’s description to the page, and you start this process by getting the tab’s number from the <div/> element’s data-tab-number attribute. You use the getAttribute() method to retrieve this value:
var num = target.getAttribute("data-tab-number");
showDescription(num);
}
break;
}
}
Now that you have the tab’s number, you pass it to the showDescription() function:
function showDescription(num) {
var descContainer = document.getElementById("descContainer");
The tabs’ descriptions are added to the <div/> element with an id of descContainer, so as this code shows, you first retrieve that element using the getElementById() method.
The descriptions are dynamically created by this function, so now you need to build the description text and display that text in the descContainer element. First, create a string containing the description for the tab. In this example, the description is simple and includes the tab’s number:
var text = "Description for Tab " + num;
Then add the text to the description element by using its innerHTML property:
descContainer.innerHTML = text;
}
One problem that has plagued the web is the lack of compatibility between the major browsers. Today’s modern browsers do a very good job of implementing the standard DOM, but older browsers, specifically IE8 and below, only partially support the DOM standard. Despite the lack of support for the DOM standard in these old browsers, you can still acquire the same useful information on a given event with old-IE’s event model.
EVENT HANDLING IN OLD VERSIONS OF INTERNET EXPLORER
Old-IE’s event model incorporates the use of a global event object (it is a property of the window object), and one such object exists for each open browser window. The browser updates the event object every time the user causes an event to occur, and it provides information similar to that of the standard DOM Event object.
NOTE To be clear, the information in this section applies to IE8 and below. We will refer to these old browsers as “old-IE.” IE9 and later implement the standard DOM event model. Thankfully, old-IE’s usage continues to dwindle with each passing year.
Accessing the event Object
Because the event object is a property of window, it is very simple to access:
<p ondblclick="handle()">Paragraph</p>
<script>
function handle() {
alert(event.type);
}
</script>
This code assigns the handle() function to handle the <p/> element’s dblclick event. When the function executes, it gets the type of event that caused the handle() function’s execution. Because the event object is global, there is no need to pass the object to the handling function like the DOM event model. Also note that like other properties of the window object, it’s not required that you precede the event object with window.
NOTE Even though you don’t have to pass event to an event handler, you still want to do so in order to support both old-IE and modern browsers.
The same holds true when you assign event handlers through JavaScript using object properties:
<p id="p">Paragraph</p>
<h1 id="h1">Heading 1</h1>
<span id="span">Special Text</span>
<script>
function handle() {
if (event.type == "mouseover") {
alert("You moved over the Special Text");
}
}
document.getElementById("p").ondblclick = handle;
document.getElementById("h1").onclick = handle;
document.getElementById("span").onmouseover = handle;
</script>
Old-IE does not support addEventListener() and removeEventListener(), but it does implement two similar methods: attachEvent() and detachEvent(). Rewrite Example 5 using old-IE’s event API:
<!DOCTYPE html>
<html lang="en">
<head>
<title>Chapter 10, Example 10</title>
</head>
<body>
<a id="someLink" href="somepage.html">
Click Me
</a>
<script>
var link = document.getElementById("someLink");
function linkClick(e) {
alert("This link is going nowhere");
e.returnValue = false;
}
link.attachEvent("onclick", linkClick);
</script>
</body>
</html>
Save this as ch10_example10.html.
Let’s first look at the call to attachEvent(). The overall pattern is the same as addEventListener() (and thus removeEventListener()); you pass the event you want to listen for and the function to execute when the event occurs. But as you’ll notice from this code, the event names are prefixed with “on”.
The second argument is the function that executes when the event occurs. Notice, though, that the linkClick() function defines a parameter called e. When you register an event handler with attachEvent(), old-IE passes the event object to the handling function.
Also notice that linkClick() does not return false or call preventDefault(). Instead, old-IE’s event object has a property called returnValue, and setting it to false achieves the same result.
Using Event Data
Unsurprisingly, IE’s event object provides some different properties from the DOM standard’s Event and MouseEvent objects, although they typically provide you with similar data.
The following table lists some of the properties of IE’s event object.
|
PROPERTIES OF THE EVENT OBJECT |
DESCRIPTION |
|
altKey |
Indicates whether the Alt key was pressed when the event was generated |
|
button |
Indicates which button on the mouse was pressed |
|
cancelBubble |
Gets or sets whether the current event should bubble up the hierarchy of event handlers |
|
clientX |
Indicates where in the browser window, in horizontal coordinates, the mouse pointer was when the event was generated |
|
clientY |
Indicates where in the browser window, in vertical coordinates, the mouse pointer was when the event was generated |
|
ctrlKey |
Indicates whether the Ctrl key was pressed when the event was generated |
|
fromElement |
Gets the element object the mouse pointer is exiting |
|
keyCode |
Gets the Unicode keycode associated with the key that caused the event |
|
returnValue |
Gets or sets the return value from the event |
|
screenX |
Indicates where in the browser window, in horizontal coordinates relative to the origin in the screen coordinates, the mouse pointer was when the event was generated |
|
screenY |
Indicates where in the browser window, in vertical coordinates relative to the origin in the screen coordinates, the mouse pointer was when the event was generated |
|
shiftKey |
Indicates whether the Shift key was pressed when the event was generated |
|
srcElement |
Gets the element object that caused the event |
|
toElement |
Gets the element object that the mouse pointer is entering |
|
type |
Retrieves the event’s name |
Let’s revisit some previous examples and make them work exclusively in old-IE.
TRY IT OUT Adding and Removing Multiple Event Handlers in Old-IE
In this Try It Out, you rewrite ch10_example7.html to use old-IE’s attachEvent() and detachEvent() methods. Type in the following code:
<!DOCTYPE html>
<html lang="en">
<head>
<title>Chapter 10: Example 11</title>
</head>
<body>
<img id="img0" src="usa.gif" />
<div id="status"></div>
<script>
var myImages = [
"usa.gif",
"canada.gif",
"jamaica.gif",
"mexico.gif"
];
function changeImg(e) {
var el = e.srcElement;
var newImgNumber = Math.round(Math.random() * 3);
while (el.src.indexOf(myImages[newImgNumber]) != -1) {
newImgNumber = Math.round(Math.random() * 3);
}
el.src = myImages[newImgNumber];
}
function updateStatus(e) {
var el = e.srcElement;
var status = document.getElementById("status");
status.innerHTML = "The image changed to " + el.src;
if (el.src.indexOf("mexico") > -1) {
el.detachEvent("onclick", changeImg);
el.detachEvent("onclick", updateStatus);
}
}
var imgObj = document.getElementById("img0");
imgObj.attachEvent("onclick", updateStatus);
imgObj.attachEvent("onclick", changeImg);
</script>
</body>
</html>
Save the page as ch10_example11.html. Load the page into your browser, and you will see it behave like ch10_example7.html. Clicking the image results in it changing to a random picture, and the text of the <div/> element changes to contain the URL of the new picture.
Let’s jump right to the code, which is mostly the same as ch10_example7.html. The first big difference is how you register the event handlers for the image object. Instead of using addEventListener(), you use old-IE’s attachEvent() method:
imgObj.attachEvent("onclick", updateStatus);
imgObj.attachEvent("onclick", changeImg);
But there’s another big difference here. Unlike the standard addEventListener(), the handlers registered with attachEvent() execute in reverse order. So, you register the handler with the updateStatus() function before registering with changeImg().
The next change is in the first statement of the changeImg() function. You want to retrieve the element that received the event, and old-IE’s event object gives you that information with the srcElement property:
function changeImg(e) {
var el = e.srcElement;
The rest of the function is left unchanged.
You want to do the same thing in the updateStatus() function, so you change the first statement to use old-IE’s srcElement property as well:
function updateStatus(e) {
var el = e.srcElement;
After you retrieve the status element and set its innerHTML, you then want to remove the event handlers if the Mexico flag is displayed. You do this with the detachEvent() method:
if (el.src.indexOf("mexico") > -1) {
el.detachEvent("onclick", changeImg);
el.detachEvent("onclick", updateStatus);
}
Here, the order in which you call detachEvent() doesn’t matter. It will simply remove the event handler from the element.
Next, you rewrite Example 8 to use old-IE’s event model.
TRY IT OUT Using the IE Event Model
In this Try It Out, you use the old-IE’s event model. Open your text editor and type the following. Feel free to copy and paste the elements within the body and the style sheet from ch10_example8.html.
<!DOCTYPE html>
<html lang="en">
<head>
<title>Chapter 10: Example 12</title>
<style>
.underline {
color: red;
text-decoration: underline;
}
</style>
</head>
<body>
<p>This is paragraph 1.</p>
<p>This is paragraph 2.</p>
<p>This is paragraph 3.</p>
<script>
function handleEvent(e) {
var target = e.srcElement;
var type = e.type;
if (target.tagName == "P") {
if (type == "mouseover") {
target.className = "underline";
} else if (type == "mouseout") {
target.className = "";
}
}
if (type == "click") {
alert("You clicked the mouse button at the X:"
+ e.clientX + " and Y:" + e.clientY + " coordinates");
}
}
document.attachEvent("onmouseover", handleEvent);
document.attachEvent("onmouseout", handleEvent);
document.attachEvent("onclick", handleEvent);
</script>
</body>
</html>
Save this as ch10_example12.html, and load it into old-IE. It’ll look and behave exactly like Example 8; the paragraph text will change to red and have an underline as you move your mouse pointer over the paragraphs. When your mouse pointer leaves a paragraph, the text returns to the original state. When you click your mouse, an alert box tells you the coordinates of where your mouse pointer was when you clicked.
You assign the handleEvent() function to handle the mouseover, mouseout, and click events on the document object:
document.attachEvent("onmouseover", handleEvent);
document.attachEvent("onmouseout", handleEvent);
document.attachEvent("onclick", handleEvent);
When you cause any of these events to fire, the browser updates the event object and calls the handleEvent() function:
function handleEvent(e) {
var target = e.srcElement;
var type = e.type;
First, you want to get the target of the event (or in old-IE speak, the source element), so initialize the target variable with the event object’s srcElement property and the type variable with the event object’s type property.
Next, you check if the event target has a tagName of P. If so, you determine what kind of event took place by using the type variable:
if (target.tagName == "P") {
if (type == "mouseover") {
target.className = "underline";
} else if (type == "mouseout") {
target.className = "";
}
}
For mouseover events, you change the paragraph’s CSS class to underline. If the event type is mouseout, the element’s className property is set to an empty string—returning the text to its original style.
Before moving on, notice the name of these events: mouseover and mouseout. Like the standard DOM, old-IE’s type property returns the name of the event without the "on" prefix. So even though you register the event handlers with onmouseover, onmouseout, and onclick, the type property will return mouseover, mouseout, and click, respectively.
The next bit of code displays the mouse pointer’s location if the mouse button was clicked:
if (type == "click") {
alert("You clicked the mouse button at the X:"
+ e.clientX + " and Y:" + e.clientY + " coordinates");
}
}
If you compare Example 8 with Example 12, you will notice the two primary differences are how the event handlers are registered, and how to retrieve the element that caused the event to occur. Most everything else is shared between the standard DOM event model and IE’s event model.
Now let’s look at Example 9 through the prism of old-IE.
TRY IT OUT A Crude Tab Strip for Old-IE
In this Try It Out, you will rewrite ch10_example9.html to use old-IE’s event model. Open your text editor and type the following, or you can copy ch10_example9.html and change the highlighted lines of code:
<!DOCTYPE html>
<html lang="en">
<head>
<title>Chapter 10: Example 13</title>
<style>
.tabStrip {
background-color: #E4E2D5;
padding: 3px;
height: 22px;
}
.tabStrip div {
float: left;
font: 14px arial;
cursor: pointer;
}
.tabStrip-tab {
padding: 3px;
}
.tabStrip-tab-hover {
border: 1px solid #316AC5;
background-color: #C1D2EE;
padding: 2px;
}
.tabStrip-tab-click {
border: 1px solid #facc5a;
background-color: #f9e391;
padding: 2px;
}
</style>
</head>
<body>
<div class="tabStrip">
<div data-tab-number="1" class="tabStrip-tab">Tab 1</div>
<div data-tab-number="2" class="tabStrip-tab">Tab 2</div>
<div data-tab-number="3" class="tabStrip-tab">Tab 3</div>
</div>
<div id="descContainer"></div>
<script>
function handleEvent(e) {
var target = e.srcElement;
switch (e.type) {
case "mouseover":
if (target.className == "tabStrip-tab") {
target.className = "tabStrip-tab-hover";
}
break;
case "mouseout":
if (target.className == "tabStrip-tab-hover") {
target.className = "tabStrip-tab";
}
break;
case "click":
if (target.className == "tabStrip-tab-hover") {
target.className = "tabStrip-tab-click";
var num = target.getAttribute("data-tab-number");
showDescription(num);
}
break;
}
}
function showDescription(num) {
var text = "Description for Tab " + num;
descContainer.innerHTML = text;
}
document.attachEvent("onmouseover", handleEvent);
document.attachEvent("onmouseout", handleEvent);
document.attachEvent("onclick", handleEvent);
</script>
</body>
</html>
Save this file as ch10_example13.html. Open it in your browser, and you’ll see it work exactly like ch10_example9.html. When you move your mouse pointer over a tab, its style changes to a blue background with a darker blue border. When you click a tab, its style changes yet again and adds the tab’s description to the page.
Four things are different in this version of the tab script. The first three are how you register the event handlers:
document.attachEvent("onmouseover", handleEvent);
document.attachEvent("onmouseout", handleEvent);
document.attachEvent("onclick", handleEvent);
Instead of using addEventListener(), you use old-IE’s attachEvent() method to register the event handlers.
The next and last modification is the first statement of handleEvent():
function handleEvent(e) {
var target = e.srcElement;
As in the previous examples, you use the event object’s srcElement property to retrieve the event target. The rest of the function remains unchanged.
In the next section, you learn how to handle the fundamental differences between both event models and to write cross-browser DHTML code.
WRITING CROSS-BROWSER CODE
By now you’ve written two versions of multiple examples: one for standards-compliant browsers and one for old-IE. In the real world, creating separate versions of websites is rarely considered best practice, and it’s much, much easier to write a cross-browser version of the web page. In this section, you use the knowledge you’ve gained of the DOM, the standard DOM event model, and old-IE’s event model to write cross-browser code.
The trick to cross-browser JavaScript is to create a unified API that hides the complexity of working with different browser implementations. For example, to register a new event listener, you need to do three things:
· Check if the browser supports the standard DOM event model.
· If so, use addEventListener()
· If not, use attachEvent()
Using the technique of feature detection, which you learned about in Chapter 8, you can easily determine if the browser supports addEventListener(). Simply check to see if it exists, like this:
if (typeof addEventListener != "undefined") {
// use addEventListener()
} else {
// use attachEvent()
}
When writing cross-browser JavaScript, you always want to check for standards compliance first because some browsers may support both options. For example, IE9 and IE10 support both addEventListener() and attachEvent(). If you check for attachEvent() instead of addEventListener(), like this:
// wrong! Do not do!
if (typeof attachEvent != "undefined") {
// use attachEvent
} else {
// use addEventListener
}
IE9 and IE10 will use attachEvent() instead of addEventListener(). We know that attachEvent() exhibits different behavior than addEventListener(), and as such, we want to avoid that behavior as much as possible. Plus, we always want to use standards-compliant code because it is guaranteed to work in every standards-compliant browser.
The previous example uses the typeof operator to determine if the addEventListener() method is not undefined, but you can simplify the code by using addEventListener as a truthy or falsy value, like this:
if (addEventListener) {
// use addEventListener()
} else {
// use attachEvent()
}
Whether you use the typeof operator or truthy/falsy values, either approach will give you the same results. Just keep in mind that you want to be consistent as you write your code. If you use typeof, use it for all of your feature-detection code.
So with this in mind, you can write a function like this:
function addListener(obj, type, fn) {
if (obj.addEventListener) {
obj.addEventListener(type, fn)
} else {
obj.attachEvent("on" + type, fn);
}
}
Let’s break down this code. Here, you define a function called addListener(). It has three parameters—the object to register the event listener on, the event type, and the function to execute when the event fires:
function addListener(obj, type, fn) {
The first thing you do inside this function is to check if the given object has an addEventListener() method:
if (obj.addEventListener) {
obj.addEventListener(type, fn)
}
If addEventListener() exists, you call it and pass the type and fn parameters to it. But if addEventListener() doesn’t exist, you want to call attachEvent():
else {
obj.attachEvent("on" + type, fn);
}
}
Here, you append on to the value contained within the type variable. This way, you can pass the standard name of the event, such as click, to the addListener() function, and it’ll work with both standards-compliant browsers and old-IE.
To use this function, you’d call it like this:
addListener(elementObj, "click", eventHandler);
Assuming elementObj is an element object and eventHandler() is a function, you’d successfully register an event listener/handler for standards-compliant browsers and old-IE.
Following the pattern used in the addListener() function, you can write an event utility object that makes it easier to write cross-browser, event-driven code. An event utility object should provide the capability to add and remove listeners, as well as get the event target.
TRY IT OUT A Cross-Browser Event Utility
In this Try It Out, you will write a utility to make it easier to write cross-browser code. Open your text editor and type the following:
var evt = {
addListener: function(obj, type, fn) {
if (obj.addEventListener) {
obj.addEventListener(type, fn);
} else {
obj.attachEvent("on" + type, fn);
}
},
removeListener: function(obj, type, fn) {
if (obj.removeEventListener) {
obj.removeEventListener(type, fn);
} else {
obj.detachEvent("on" + type, fn);
}
},
getTarget: function(e) {
if (e.target) {
return e.target;
}
return e.srcElement;
},
preventDefault: function(e) {
if (e.preventDefault) {
e.preventDefault();
} else {
e.returnValue = false;
}
}
};
Save it as event-utility.js.
Using object literal notation, you create an object called evt. Its purpose is to make it easier to write cross-browser code:
var evt = {
The first method you write is the addListener() method, and it is exactly the same as the addListener() function you previously wrote:
addListener: function(obj, type, fn) {
if (obj.addEventListener) {
obj.addEventListener(type, fn);
} else {
obj.attachEvent("on" + type, fn);
}
},
If the browser supports addEventListener(), it uses the method to register an event listener. Otherwise, the browser calls attachEvent().
The next method is removeListener(). As its name implies, it removes a listener that was added previously to an object:
removeListener: function(obj, type, fn) {
if (obj.removeEventListener) {
obj.removeEventListener(type, fn);
} else {
obj.detachEvent("on" + type, fn);
}
},
The code is almost identical to addListener() except for a few key changes. First, it checks if the given object has a removeEventListener() method, and if so, it calls removeEventListener(). If not, it assumes the browser is old-IE and calls detachEvent().
The third method, getTarget(), is responsible for getting the event target from the event object:
getTarget: function(e) {
if (e.target) {
return e.target;
}
return e.srcElement;
}
};
It follows the same pattern used in addListener() and removeListener(); it uses the target property as a truthy/falsy value to determine if the browser supports the standard API. If target is supported, it is returned. Otherwise, the function returns the element object contained within srcElement.
The fourth and final method is preventDefault(). The purpose of this method is to prevent the default action of the event that took place (if such an action exists). It first checks for standards compliance by determining if the supplied event object has apreventDefault() method. If so, it calls the method; otherwise, it sets the event object’s returnValue to false.
Before moving on, it’s important to realize that this event utility object is based on an assumption: If the browser doesn’t support the standard event model, it must be old-IE. Although this is a safe assumption to make, it is not always 100 percent correct. Some old mobile browsers do not support either the standard event model or old-IE’s event model. However, as Windows, Android, and iOS mobile devices continue to gain market share, these old, non-compliant mobile browsers are vanishing from the market. In most cases, it’s safe to ignore them.
Now that you have a utility for making it easier to write cross-browser, event-driven code, let’s revisit the previous examples and put it to use.
Start by modifying Example 10. Here’s the revised code:
<!DOCTYPE html>
<html lang="en">
<head>
<title>Chapter 10, Example 14</title>
</head>
<body>
<a id="someLink" href="somepage.html">
Click Me
</a>
<script src="event-utility.js"></script>
<script>
var link = document.getElementById("someLink");
function linkClick(e) {
alert("This link is going nowhere");
evt.preventDefault(e);
}
evt.addListener(link, "click", linkClick);
</script>
</body>
</html>
Save this as ch10_example14.html.
The highlighted lines of code are the only changes. First, you include event-utility.js. The code in this example assumes the file is in the same directory as ch10_example14.html:
<script src="event-utility.js"></script>
You then register the event listener using evt.addListener():
evt.addListener(link, "click", linkClick);
You pass it the element object you want to register the listener on, the name of the event you want to listen for, and the function to execute when the event occurs.
The final change is inside the linkClick() function. You want to prevent the browser from navigating to somepage.html, so you call your event utility’s preventDefault() method and pass it the event object. Now, when you click the link, the browser will stay on the same page.
TRY IT OUT Adding and Removing Multiple Event Handlers
In this Try It Out, you rewrite ch10_example11.html and use your event utility object to add and remove event listeners/handlers. You can write it from scratch, or you can copy and paste from ch10_example11.html. The highlighted lines indicate what changed in this example.
<!DOCTYPE html>
<html lang="en">
<head>
<title>Chapter 10: Example 15</title>
</head>
<body>
<img id="img0" src="usa.gif" />
<div id="status"></div>
<script src="event-utility.js"></script>
<script>
var myImages = [
"usa.gif",
"canada.gif",
"jamaica.gif",
"mexico.gif"
];
function changeImg(e) {
var el = evt.getTarget(e);
var newImgNumber = Math.round(Math.random() * 3);
while (el.src.indexOf(myImages[newImgNumber]) != -1) {
newImgNumber = Math.round(Math.random() * 3);
}
el.src = myImages[newImgNumber];
}
function updateStatus(e) {
var el = evt.getTarget(e);
var status = document.getElementById("status");
status.innerHTML = "The image changed to " + el.src;
if (el.src.indexOf("mexico") > -1) {
evt.removeListener(el, "click", changeImg);
evt.removeListener(el, "click", updateStatus);
}
}
var imgObj = document.getElementById("img0");
evt.addListener(imgObj, "click", changeImg);
evt.addListener(imgObj, "click", updateStatus);
</script>
</body>
</html>
Save the page as ch10_example15.html. Load the page into your browser, and you will see it behave like ch10_example11.html. Clicking the image results in it changing to a random picture, and the text of the <div/> element changes to contain the URL of the new picture.
You’ve seen this code a few times now, so the pertinent changes are highlighted. First, you want to include your event-utility.js file.
The next change is how you register the event listeners for the image object. Using your event utility’s addListener() method, you pass it the image object, event name, and the function:
evt.addListener(imgObj, "click", changeImg);
evt.addListener(imgObj, "click", updateStatus);
In the changeImg() and updateStatus() functions, you change their first lines to retrieve the event target to use your new getTarget() method:
var el = evt.getTarget(e);
Then inside updateStatus(), you modify the code inside the if statement to use your new removeListener() method:
if (el.src.indexOf("mexico") > -1) {
evt.removeListener(el, "click", changeImg);
evt.removeListener(el, "click", updateStatus);
}
There is, however, an issue with this new version: In old-IE, the event listeners execute in reverse order. This is a problem, but one you’ll fix at the very end of this chapter.
Next, you rewrite Example 12 to use your new evt object.
TRY IT OUT Using the Event Models of Differing Browsers
In this Try It Out, you will rewrite ch10_example12.html using your event utility. Open your text editor and type the following. Feel free to copy and paste the elements within the body and the style sheet from ch10_example12.html.
<!DOCTYPE html>
<html lang="en">
<head>
<title>Chapter 10: Example 16</title>
<style>
.underline {
color: red;
text-decoration: underline;
}
</style>
</head>
<body>
<p>This is paragraph 1.</p>
<p>This is paragraph 2.</p>
<p>This is paragraph 3.</p>
<script src="event-utility.js"></script>
<script>
function handleEvent(e) {
var target = evt.getTarget(e);
var type = e.type;
if (target.tagName == "P") {
if (type == "mouseover") {
target.className = "underline";
} else if (type == "mouseout") {
target.className = "";
}
}
if (type == "click") {
alert("You clicked the mouse button at the X:"
+ e.clientX + " and Y:" + e.clientY + " coordinates");
}
}
evt.addListener(document, "mouseover", handleEvent);
evt.addListener(document, "mouseout", handleEvent);
evt.addListener(document, "click", handleEvent);
</script>
</body>
</html>
Save this as ch10_example16.html, and load it into different browsers (preferably a standards-compliant browser and old-IE, if you have access to one). It’ll look and behave exactly like ch10_example12.html; the paragraph text will change to red and have an underline as you move your mouse pointer over the paragraphs. When your mouse pointer leaves a paragraph, the text returns to the original state. When you click your mouse, an alert box tells you the coordinates of where your mouse pointer was when you clicked.
Once again, the majority of code is left untouched with only five lines of code having changes. First, you want to include the event-utility.js file using a <script/> element:
<script src="event-utility.js"></script>
Next, you register the mouseover, mouseout, and click event listeners using your evt.addListener() method:
evt.addListener(document, "mouseover", handleEvent);
evt.addListener(document, "mouseout", handleEvent);
evt.addListener(document, "click", handleEvent);
And finally, you change the first line of the handleEvent() function:
function handleEvent(e) {
var target = evt.getTarget(e);
Instead of using any browser-specific code, you use evt.getTarget() to retrieve the element object that received the event.
Now let’s look at ch10_example13.html and use the evt object.
TRY IT OUT A Crude Tab Strip for All Browsers
In this Try It Out, you will rewrite ch10_example13.html using your cross-browser event utility. Open your text editor and type the following, or you can copy ch10_example13.html and change the highlighted lines of code:
<!DOCTYPE html>
<html lang="en">
<head>
<title>Chapter 10: Example 17</title>
<style>
.tabStrip {
background-color: #E4E2D5;
padding: 3px;
height: 22px;
}
.tabStrip div {
float: left;
font: 14px arial;
cursor: pointer;
}
.tabStrip-tab {
padding: 3px;
}
.tabStrip-tab-hover {
border: 1px solid #316AC5;
background-color: #C1D2EE;
padding: 2px;
}
.tabStrip-tab-click {
border: 1px solid #facc5a;
background-color: #f9e391;
padding: 2px;
}
</style>
</head>
<body>
<div class="tabStrip">
<div data-tab-number="1" class="tabStrip-tab">Tab 1</div>
<div data-tab-number="2" class="tabStrip-tab">Tab 2</div>
<div data-tab-number="3" class="tabStrip-tab">Tab 3</div>
</div>
<div id="descContainer"></div>
<script src="event-utility.js"></script>
<script>
function handleEvent(e) {
var target = evt.getTarget(e);
switch (e.type) {
case "mouseover":
if (target.className == "tabStrip-tab") {
target.className = "tabStrip-tab-hover";
}
break;
case "mouseout":
if (target.className == "tabStrip-tab-hover") {
target.className = "tabStrip-tab";
}
break;
case "click":
if (target.className == "tabStrip-tab-hover") {
target.className = "tabStrip-tab-click";
var num = target.getAttribute("data-tab-number");
showDescription(num);
}
break;
}
}
function showDescription(num) {
var descContainer = document.getElementById("descContainer");
var text = "Description for Tab " + num;
descContainer.innerHTML = text;
}
evt.addListener(document, "mouseover", handleEvent);
evt.addListener(document, "mouseout", handleEvent);
evt.addListener(document, "click", handleEvent);
</script>
</body>
</html>
Save this file as ch10_example17.html. Open it in multiple browsers, and you’ll see it work exactly like Example 13.
The code is mostly unchanged; this new version changes only five lines of code. As with the past two examples, you need to include the file containing your evt object:
<script src="event-utility.js"></script>
Next, you register the event listeners on the document object for the click, mouseover, and mouseout events using the evt object’s addListener() method:
evt.addListener(document, "mouseover", handleEvent);
evt.addListener(document, "mouseout", handleEvent);
evt.addListener(document, "click", handleEvent);
And finally, you change the first line of the handleEvent() function:
function handleEvent(e) {
var target = evt.getTarget(e);
Instead of directly using the standard or old-IE’s target and srcElement properties, you use evt.getTarget() to retrieve the element object that received the event.
Thankfully with each passing year, the importance of cross-browser JavaScript diminishes as old-IE continues to lose market share. IE8 is currently the most popular version of old-IE, and the number of people using that browser is dwindling. Whether or not you need to support old-IE is determined by your target audience, and only you can decide if you need to put forth the effort of supporting it.
The past few sections have been rather repetitive, but understanding events and how they work is absolutely vital in JavaScript development. Much of the code you write will be in reaction to an event occurring within the page.
Additionally, you’ll find that more events are added to browsers as they implement new features—for example, the new HTML5 Drag and Drop API.
NATIVE DRAG AND DROP
Dragging and dropping objects within a web page has been the Holy Grail of JavaScript development, and rightly so—the system we spend the majority of our time with, our computer’s/device’s operating system, has always provided that functionality.
Unfortunately, true drag-and-drop support has been elusive in web development, although some JavaScript libraries came close. Though they enabled us to drag and drop elements within the web page, they were limited by the capabilities, or lack of in this case, exposed by the browser; interacting with dropped objects from the operating system was impossible.
But HTML5 changes that. For browsers that support it, you can now incorporate true drag-and-drop capabilities within your web pages thanks to HTML5’s Drag and Drop API. Not only can you move elements around the page by dragging and dropping them, but the API enables you to drag objects from the operating system, like files, and drop them in your page.
NOTE Native drag and drop is only supported in IE10+, Chrome, Firefox, Opera, and Safari.
Making Content Draggable
HTML5 makes it easy to create draggable content. By simply adding the draggable attribute to an element and setting it to true, you tell the browser that the element can be used for drag and drop:
<div draggable="true">Draggable Content</div>
In most browsers, images, links, and selected text are draggable by default. Figure 10.4 shows some selected text being dragged in Chrome.
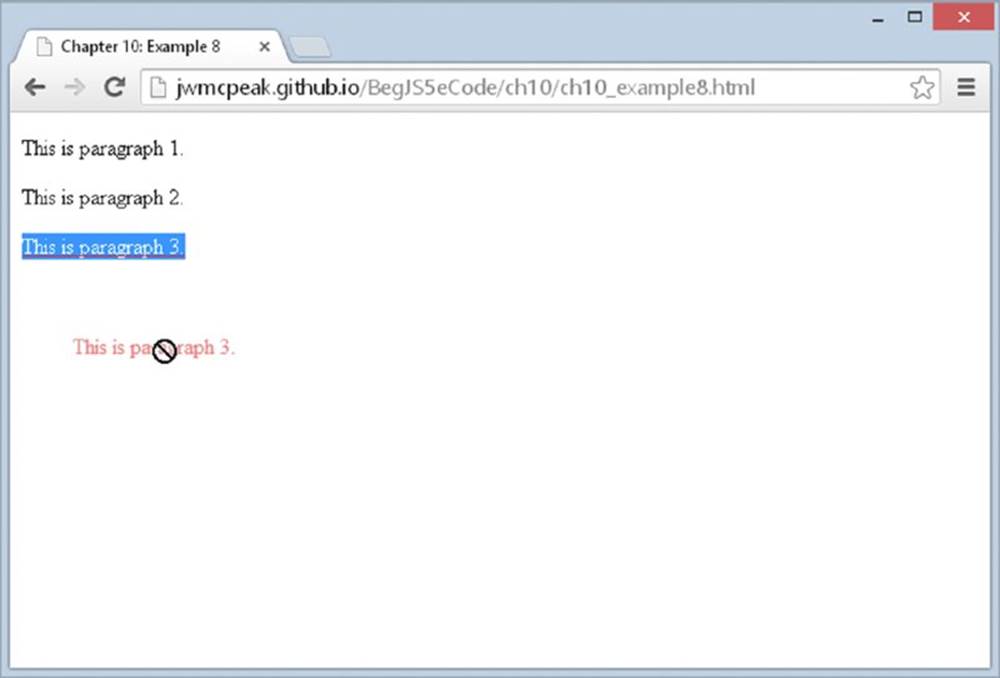
Figure 10.4
Three events are related to the source of the drag—that is, the element that is being dragged. The following table lists them.
|
DRAG SOURCE EVENTS |
DESCRIPTION |
|
dragstart |
Fires on the element when a drag is started. This does not fire when dragging an object from the filesystem |
|
drag |
Fires continuously while the object is dragged |
|
dragend |
Fires when the drag operation is complete, regardless of whether the object was dropped. This does not fire when dragging an object from the filesystem |
To perform a drag-and-drop operation, the only event you need to listen for is dragstart, but that doesn’t mean the drag and dragend events are not useful. You can use them to add extra functionality and/or visual cues to enhance the user’s experience.
Creating a Drop Target
If you are dragging objects, chances are very good that you need some place to drop them—a drop target. There aren’t special attributes or HTML to signify an element as a drop target. Instead, you listen for one or multiple events on the element serving as the drop target.
One of them is the dragenter event. This event fires when the mouse cursor enters the target while dragging an object. For example:
<!DOCTYPE html>
<html lang="en">
<head>
<title>Chapter 10: Example 18</title>
<style>
.drop-zone {
width: 300px;
padding: 20px;
border: 2px dashed #000;
}
</style>
</head>
<body>
<div id="dropZone" class="drop-zone">Drop Zone!</div>
<div id="dropStatus"></div>
<script>
function handleDragEnter(e) {
dropStatus.innerHTML = "You're dragging something!";
}
var dropZone = document.getElementById("dropZone");
var dropStatus = document.getElementById("dropStatus");
dropZone.addEventListener("dragenter", handleDragEnter);
</script>
</body>
</html>
Save this file as ch10_example18.html. Open it and you’ll see something like Figure 10.5.
Figure 10.5
Drag anything to the target. It can be selected text, a file on your computer, and so on. As your mouse pointer enters the target, you’ll see the text You're dragging something! appear on the page. Figure 10.6 shows text being dragged over the drop zone in Chrome.
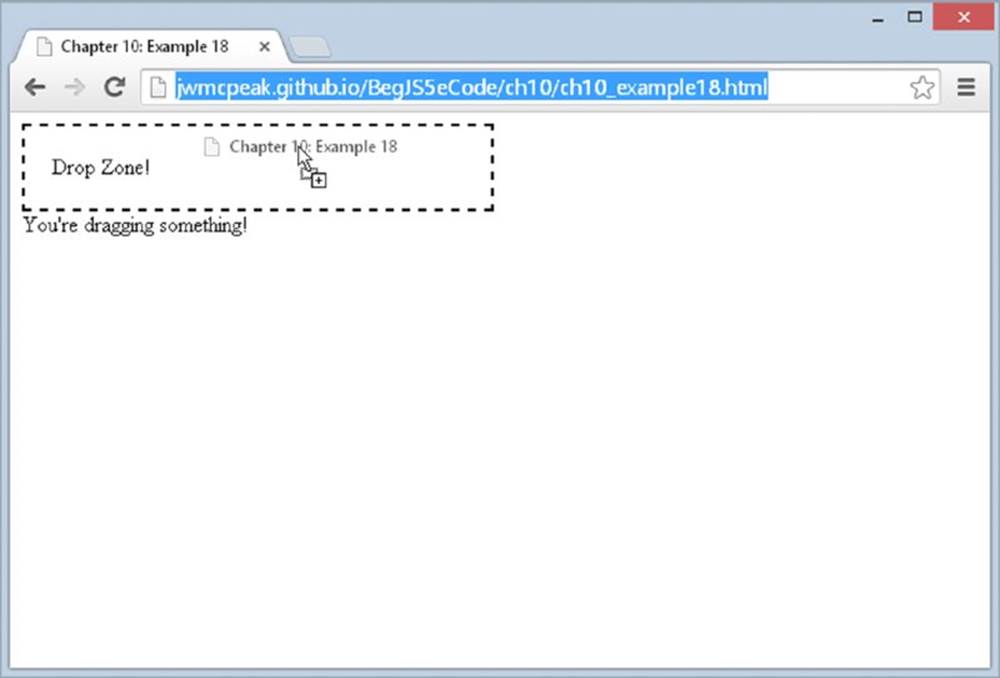
Figure 10.6
In this page, a <div/> element is used as the drop zone:
<div id="dropZone" class="drop-zone">Drop Zone!</div>
It has an id of dropZone and has the CSS class of drop-zone. The CSS is unimportant from a functional standpoint, but it does add visual clarity because it defines the area in which you can drop something.
The important stuff is in the JavaScript. First, you retrieve the drop target element by using the document.getElementById() method and listen for its dragenter event. You also retrieve the <div/> element with an id of dropStatus. You’ll use it to display status messages during the drag operation:
var dropZone = document.getElementById("dropZone");
var dropStatus = document.getElementById("dropStatus");
dropZone.addEventListener("dragenter", handleDragEnter);
This event fires only when you are dragging something and the mouse cursor enters the target. When this happens, the handleDragEnter() function executes:
function handleDragEnter(e) {
dropStatus.innerHTML = "You're dragging something!";
}
This simple function changes the status element’s contents to state, You're dragging something!
The dragenter event is one of four events you can listen for on the target element. The following table lists them.
|
DRAG SOURCE EVENTS |
DESCRIPTION |
|
dragenter |
Fires when the mouse is first moved over the target element while dragging |
|
dragover |
Fires on the target as the mouse moves over an element while dragging |
|
dragleave |
Fires on the target when the mouse leaves the target while dragging |
|
drop |
Fires on the target when the drop (the user releases the mouse button) occurs |
The dragenter event looks important; after all, it lets you know when the mouse cursor enters the drop zone while dragging an object. But in actuality, it’s optional. You cannot complete a drag-and-drop operation with the dragenter event. Instead, you have to listen for the drop zone’s dragover event.
This is where things start to get weird. For the drop event to fire, you have to prevent the behavior of the dragover event. So, you basically have to call preventDefault() on the Event object every time you listen for the dragover event.
TRY IT OUT Dropping Objects on a Target
In this Try It Out, you write a simple example that lets you drag and drop an element onto a target. Open your text editor and type the following:
<!DOCTYPE html>
<html lang="en">
<head>
<title>Chapter 10: Example 19</title>
<style>
.box {
width: 100px;
height: 100px;
}
.red {
background-color: red;
}
.drop-zone {
width: 300px;
padding: 20px;
border: 2px dashed #000;
}
</style>
</head>
<body>
<div draggable="true" class="box red"></div>
<div id="dropZone" class="drop-zone">Drop Zone!</div>
<div id="dropStatus"></div>
<script>
function dragDropHandler(e) {
e.preventDefault();
if (e.type == "dragover") {
dropStatus.innerHTML = "You're dragging over the drop zone!";
} else {
dropStatus.innerHTML = "You dropped something!";
}
}
var dropZone = document.getElementById("dropZone");
var dropStatus = document.getElementById("dropStatus");
dropZone.addEventListener("dragover", dragDropHandler);
dropZone.addEventListener("drop", dragDropHandler);
</script>
</body>
</html>
Save this file as ch10_example19.html, and open it. Your web page will look like Figure 10.7.
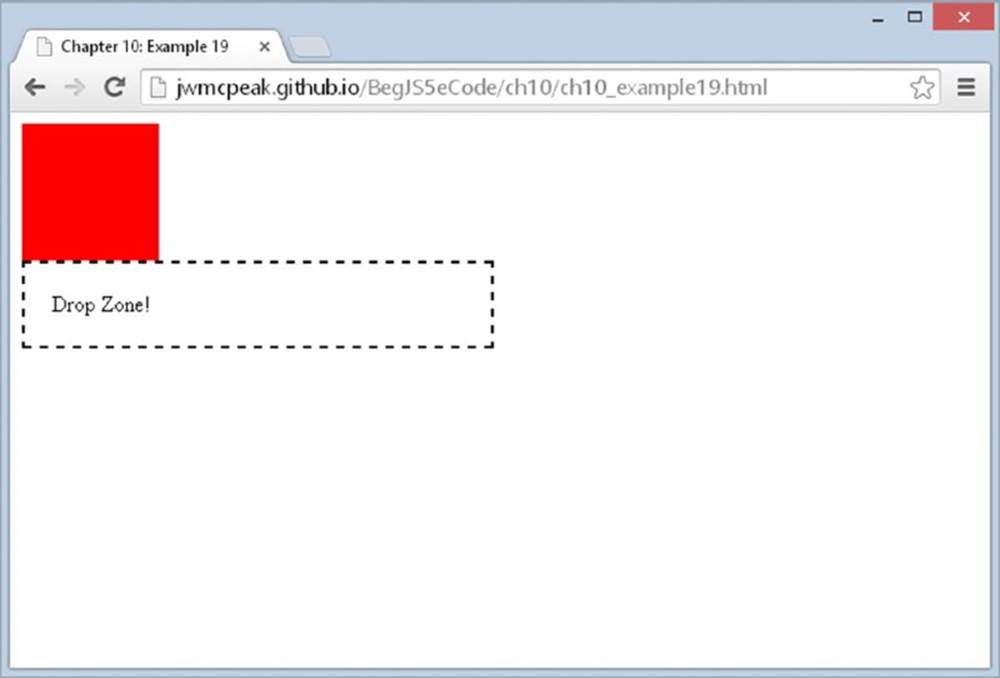
Figure 10.7
Drag the red box over the target element, and you’ll see the text of the status element change to You're dragging over the drop zone! Drop the element in the drop zone, and the status text will change to You dropped something!
There is one exception, however: Firefox will not let you drag the red box, but it will let you drop objects from other sources (such as text, files on the filesystem, and so on). We’ll explain why later.
The CSS of this example defines three classes. You’ve already seen the drop-zone class, and the box and red classes are extremely simple:
.box {
width: 100px;
height: 100px;
}
.red {
background-color: red;
}
The box class sets the element’s width and height properties to 100 pixels, and red gives the element a background color of red. These are arbitrary values meant to only give the draggable element some visibility.
Next, the HTML. The only new element in this HTML document is a draggable <div/> element:
<div draggable="true" class="box red"></div>
To make it draggable, you set the draggable attribute to true, and you apply the box and red CSS classes to make it easier to drag and drop.
But as with Example 18, the good stuff is in the JavaScript. First, you register listeners for the dropZone’s dragover and drop events:
dropZone.addEventListener("dragover", dragDropHandler);
dropZone.addEventListener("drop", dragDropHandler);
Let’s look at the dragDropHandler() function. The very first line calls the Event object’s preventDefault() method:
function dragDropHandler(e) {
e.preventDefault();
This is crucial for two reasons. First, the dragover’s default behavior must be prevented in order for the drop event to fire (and that’s kind of important).
Second, the browser will do something when you drop an object. In other words, the drop event has a default behavior, but the exact behavior depends on the browser and the object that you drop. Some examples are:
For a file or image, most browsers will attempt to open it.
Dropping a URL may cause the browser to navigate to the URL.
In Firefox, dropping an element will cause the browser to navigate to the value in the element’s id attribute.
Therefore, you want to prevent the drop event’s default behavior in most cases.
After preventing the default behavior, the dragDropHandler() function changes the content of the dropStatus element based on the type of event:
if (e.type == "dragover") {
dropStatus.innerHTML = "You're dragging over the drop zone!";
} else {
dropStatus.innerHTML = "You dropped something!";
}
}
For the dragover event, it simply states that you are dragging over the target element; otherwise, the function knows that you dropped something and tells you so.
Frustratingly, native drag and drop doesn’t work exactly the same in all modern browsers. The aforementioned partial list of the browsers’ default behavior for the drop event is just one thing JavaScript developers have to contend with.
But also remember that Example 19 doesn’t completely work in Firefox. Although it is frustrating that JavaScript developers have to cope with inconsistent implementations, Firefox’s drag-and-drop implementation, whether it’s right or wrong, does make some sense in this regard. As we try to drag the red box, we haven’t told the browser what we’re transferring.
Transferring Data
When you think about it, a drag-and-drop operation is the transference of data. For example, when you drag a file on your filesystem from one folder to another, you are transferring the data (the file) between the two folder locations. When dragging text from one application to another, you are transferring the textual data between the two applications.
Drag and drop in the browser follows a similar concept. When starting a drag, you need to tell the browser what you plan to transfer, and when you drop the object, you need to specify how that data transfers from the source to the target.
The drag-and-drop specification defines a DataTransfer object that is used to hold the data that is being dragged during a drag-and-drop operation. You access this object with the Event object’s dataTransfer property. You set data with the DataTransfer object’s setData()method in the dragstart event handler, and you read that data in the drop event handler with the getData() method.
To make Example 19 work in Firefox, you need to handle the dragstart event and use the DataTransfer object’s setData() method. The following adds the necessary code:
<!DOCTYPE html>
<html lang="en">
<head>
<title>Chapter 10: Example 20</title>
<style>
.box {
width: 100px;
height: 100px;
}
.red {
background-color: red;
}
.drop-zone {
width: 300px;
padding: 20px;
border: 2px dashed #000;
}
</style>
</head>
<body>
<div draggable="true" class="box red"></div>
<div id="dropZone" class="drop-zone">Drop Zone!</div>
<div id="dropStatus"></div>
<script>
function dragStartHandler(e) {
e.dataTransfer.setData("text", "Drag and Drop!");
}
function dragDropHandler(e) {
e.preventDefault();
if (e.type == "dragover") {
dropStatus.innerHTML = "You're dragging over the " +
"drop zone!";
} else {
dropStatus.innerHTML = e.dataTransfer.getData("text");
}
}
var dragBox = document.querySelector("[draggable]");
var dropZone = document.getElementById("dropZone");
var dropStatus = document.getElementById("dropStatus");
dragBox.addEventListener("dragstart", dragStartHandler);
dropZone.addEventListener("dragover", dragDropHandler);
dropZone.addEventListener("drop", dragDropHandler);
</script>
</body>
</html>
Save this file as ch10_example20.html, and open it in Firefox. Now drag the red box to the target, and you’ll see that it behaves similarly to ch10_example19.html in all browsers (Firefox included).
Let’s focus only on the new lines of code. First, you store the draggable box in the dragBox variable by using document.querySelector() and passing the attribute selector of “[draggable]”:
var dragBox = document.querySelector("[draggable]");
Next, you register an event listener for the dragstart event on the dragBox object:
dragBox.addEventListener("dragstart", dragStartHandler);
The dragStartHandler() function executes when you start a drag operation on the dragBox object. This function makes use of the DataTransfer object’s setData() method to hold data for the drag-and-drop operation:
function dragStartHandler(e) {
e.dataTransfer.setData("text", "Drag and Drop!");
}
The setData() function accepts two arguments: the type of data to store and the actual data. The only data types supported by all browsers are “text” and “url”; therefore, this function stores the textual data of Drag and Drop!
NOTE Most browsers support other data types, such as MIME types (for example, text/plain, text/html, and so on). IE10 and IE11, however, only support text and url.
The last new/changed line is in the dragDropHandler() function. Instead of displaying an arbitrary string value in the status element when the drop event fires, you retrieve the data from the dataTransfer object by using the getData() method:
dropStatus.innerHTML = e.dataTransfer.getData("text");
The getData() method accepts only one argument: the data type you used when calling setData(). Therefore, this code retrieves the value of Drag and Drop! and uses it as the inner HTML of the status element.
TRY IT OUT Full Drag and Drop
In this Try It Out, you apply everything you’ve learned about native drag and drop and write a page that lets you drag and drop elements between two drop targets.
Open your text editor and type the following:
<!DOCTYPE html>
<html lang="en">
<head>
<title>Chapter 10: Example 21</title>
<style>
[data-drop-target] {
height: 400px;
width: 200px;
margin: 2px;
background-color: gainsboro;
float: left;
}
.drag-enter {
border: 2px dashed #000;
}
.box {
width: 200px;
height: 200px;
}
.navy {
background-color: navy;
}
.red {
background-color: red;
}
</style>
</head>
<body>
<div data-drop-target="true">
<div id="box1" draggable="true" class="box navy"></div>
<div id="box2" draggable="true" class="box red"></div>
</div>
<div data-drop-target="true"></div>
<script>
function handleDragStart(e) {
e.dataTransfer.setData("text", this.id);
}
function handleDragEnterLeave(e) {
if (e.type == "dragenter") {
this.className = "drag-enter";
} else {
this.className = "";
}
}
function handleOverDrop(e) {
e.preventDefault();
if (e.type != "drop") {
return;
}
var draggedId = e.dataTransfer.getData("text");
var draggedEl = document.getElementById(draggedId);
if (draggedEl.parentNode == this) {
return;
}
draggedEl.parentNode.removeChild(draggedEl);
this.appendChild(draggedEl);
this.className = "";
}
var draggable = document.querySelectorAll("[draggable]");
var targets = document.querySelectorAll("[data-drop-target]");
for (var i = 0; i < draggable.length; i++) {
draggable[i].addEventListener("dragstart", handleDragStart);
}
for (i = 0; i < targets.length; i++) {
targets[i].addEventListener("dragover", handleOverDrop);
targets[i].addEventListener("drop", handleOverDrop);
targets[i].addEventListener("dragenter", handleDragEnterLeave);
targets[i].addEventListener("dragleave", handleDragEnterLeave);
}
</script>
</body>
</html>
Save this file as ch10_example21.html and open it in your modern browser of choice. You’ll see a page that consists of two columns. On the left, a blue box sits on top of a red one, and on the right is a solid grayish rectangle, as shown in Figure 10.8.
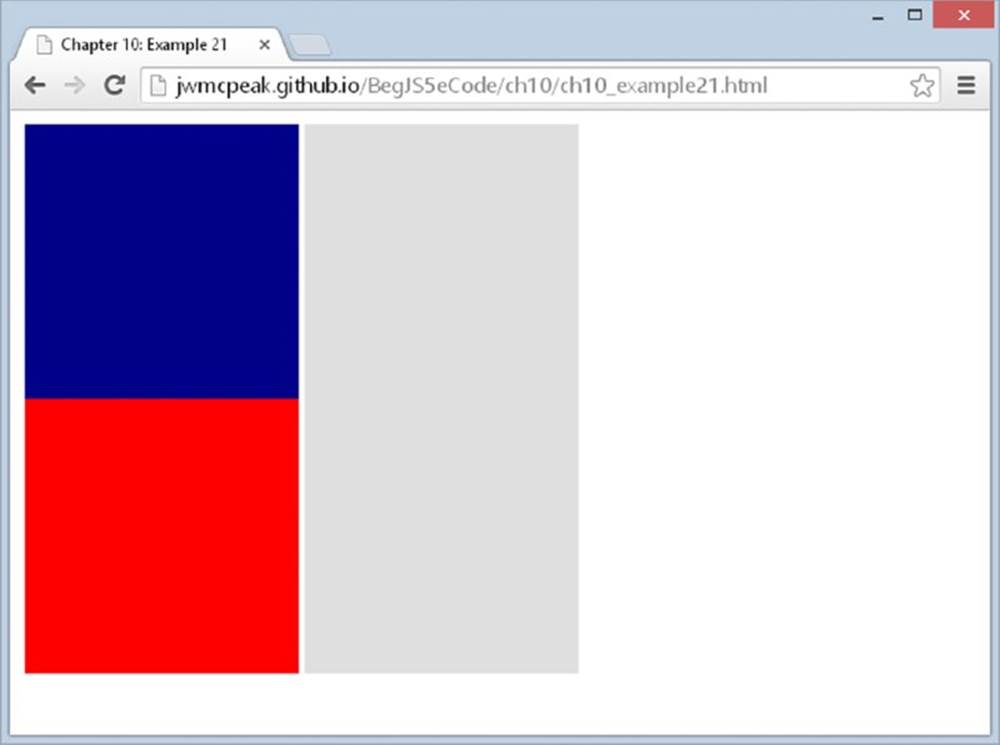
Figure 10.8
The grayish areas are drop targets, and the blue and red boxes are draggable objects. Drag the blue box to the empty drop target, and you’ll see a dashed border appear around the target (Figure 10.9).
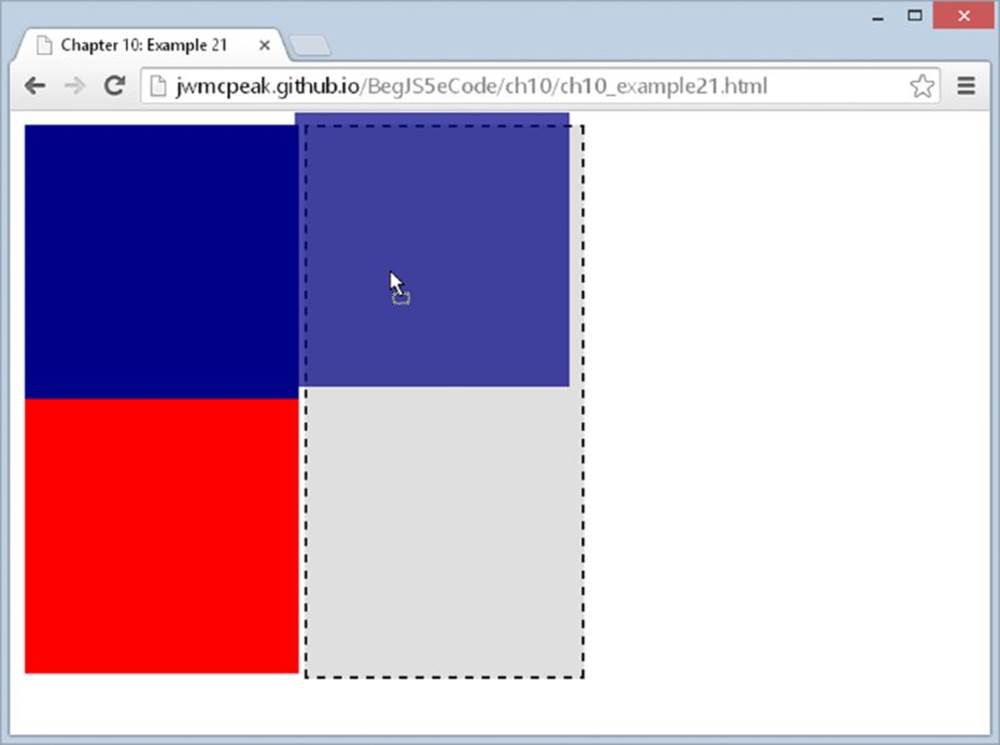
Figure 10.9
Drop the blue box on that target, and you’ll see it move from the left target to the right. Now drag the boxes between the two drop targets to see the full effect.
Let’s start with the HTML. A drop target in this example is an element identified with the data-drop-target attribute set to true. This example consists of two drop targets, although you can easily add more:
<div data-drop-target="true">
<div id="box1" draggable="true" class="box navy"></div>
<div id="box2" draggable="true" class="box red"></div>
</div>
<div data-drop-target="true"></div>
The first drop target contains two draggable <div/> elements, and they each have an id attribute. Other than their id values, the only difference is their CSS. Both use the box CSS class, but one also uses the navy CSS class, whereas the other uses the redclass.
Speaking of CSS, let’s look at the styles defined in the style sheet. The first rule matches all elements that have a data-drop-target attribute:
[data-drop-target] {
height: 400px;
width: 200px;
margin: 2px;
background-color: gainsboro;
float: left;
}
The height and width are set to accommodate two draggable boxes at a time. A margin of two pixels gives just enough space between the drop target elements to visually separate them. A background color makes them easily distinguishable between the page’s background, and they each float left.
The next rule also applies to drop targets:
.drag-enter {
border: 2px dashed #000;
}
The drag-enter class is used as a visual cue. As you drag an object over a drop target element, this drag-enter class is applied to the element. This isn’t necessary for the drag-and-drop operation to complete, but it does enhance the user’s experience.
The final set of CSS rules is used for the draggable elements:
.box {
width: 200px;
height: 200px;
}
.navy {
background-color: navy;
}
.red {
background-color: red;
}
Each draggable element uses the box class to set its height and width. The navy and red classes are used in conjunction with the box class to give the element a background color of navy or red, respectively.
As for the JavaScript, you first retrieve two groups of elements—those that are draggable and those that are drop targets:
var draggable = document.querySelectorAll("[draggable]");
var targets = document.querySelectorAll("[data-drop-target]");
So using the document.querySelectorAll() method, you retrieve both groups of elements with their respective [draggable] and [data-drop-target] CSS selectors and assign them to the draggable and targets variables.
Next, you want to register the dragstart event listeners on the draggable elements:
for (var i = 0; i < draggable.length; i++) {
draggable[i].addEventListener("dragstart", handleDragStart);
}
Using a for loop, you iterate over the draggable collection and call the addEventListener() method on each draggable object, passing dragstart as the event and the handleDragStart() function object as the handler.
You then want to use a similar process on the target elements:
for (i = 0; i < targets.length; i++) {
targets[i].addEventListener("dragover", handleOverDrop);
targets[i].addEventListener("drop", handleOverDrop);
targets[i].addEventListener("dragenter", handleDragEnterLeave);
targets[i].addEventListener("dragleave", handleDragEnterLeave);
}
By using another for loop, you loop through the targets collection and register event handlers for the dragover, drop, dragenter, and dragleave events. Two functions are used to handle these four events: the handleOverDrop() function handles the dragoverand drop events, and handleDragEnterLeave() handles dragenter and dragleave.
The first function, handleDragStart(), contains just a single line of code:
function handleDragStart(e) {
e.dataTransfer.setData("text", this.id);
}
Its purpose is simple: to store the id of the draggable element. Notice the use of this in this.id. When you register an event listener, the handler function executes within the context of the element object the event fired on. In this case, the dragstart event fired on one of the draggable elements; so, this refers to that element. In other words, this is the same as e.target.
The next function is handleDragEnterLeave(), and as mentioned earlier, it executes when the dragenter and dragleave events fire on a drop target:
function handleDragEnterLeave(e) {
if (e.type == "dragenter") {
this.className = "drag-enter";
} else {
this.className = "";
}
}
The first line of this function checks the type of event that occurred. If the event is dragenter, the CSS class of the drop target element is set to drag-enter (once again, notice this is used instead of e.target—it’s much easier to type). If the event isn’tdragenter, the element’s CSS class is set to an empty string, thus removing the drag-enter class.
The final function, handleOverDrop(), performs the real magic of the drag-and-drop operation. This function handles both the dragover and drop events and should therefore prevent the default action from occurring. Thus, the first line of the function callse.preventDefault():
function handleOverDrop(e) {
e.preventDefault();
This is all that is needed for the dragover event. So, if the event isn’t a drop event, the function simply exits:
if (e.type != "drop") {
return;
}
If it is a drop event, the function continues on and retrieves the draggable element’s id from the DataTransfer object:
var draggedId = e.dataTransfer.getData("text");
var draggedEl = document.getElementById(draggedId);
And with this id, you retrieve the draggable element’s object with document.getElementById() and store it in the draggedEl variable.
You have two options when it comes to dropping one of the draggable boxes: you can either drop it in the target it’s currently in, or you can drop it in another target. If dropped in its current location, there’s nothing left to do except reset the target’s CSS class. This is easy enough to check; simply use the element’s parentNode property:
if (draggedEl.parentNode == this) {
this.className = "";
return;
}
If the dragged element’s parent node is the target drop zone, you set the className property to an empty string and exit the function using the return statement. Otherwise, you want to move the dragged element node from its old parent/drop target to its new parent/drop target:
draggedEl.parentNode.removeChild(draggedEl);
this.appendChild(draggedEl);
This is a simple process, as you can see. To remove the draggable element from its current parent, you retrieve its parentNode and call the removeChild() method. The removeChild() method doesn’t delete the node; it simply removes it so that you can append it to another node in the DOM.
With the dragged element moved from one drop target to another, the drag-and-drop operation is complete, and you set the drop target element’s CSS class to an empty string:
this.className = "";
This visually resets the drop target, giving users a visual cue that the drag-and-drop operation is complete.
A web page is an interactive environment. Users are busy clicking, typing, dragging, and doing other things. As such, events are an extremely important matter for web developers. Not only are events how we respond and interact with the user, they also enable us to execute code when specific things happen in the page. In later chapters, you see examples of such and use events to respond to an object’s action, rather than a user’s action.
SUMMARY
You’ve covered a lot in this chapter, but now you have a solid basis on how to work with and handle events in the browsers that are currently in use on the web. You even know the difference between the standard DOM event model and old-IE’s event model, and you wrote an event utility that makes writing cross-browser JavaScript relatively simple.
This chapter covered the following points:
· You saw that HTML elements have events as well as methods and properties. You handle these events in JavaScript by using event handlers, which you connect to code that you want to have executed when the event occurs. The events available for use depend on the object you are dealing with.
· You can connect a function to an element’s event handler using the element’s “on” attributes. But you also learned that doing so mixes your HTML and JavaScript, and this approach should be avoided most of the time.
· Events can be handled by using an object’s "on" properties, which is a better solution than the HTML attributes, but still has its own issues.
· The standard DOM event model is supported by all modern browsers, and it provides the best way to connect your code to events.
· You learned about the standard Event object and how it provides a lot of information about the event that occurred, including the type of event and the element that received the event.
· You learned about old-IE’s proprietary event model, how to connect events with attachEvent(), and how to access old-IE’s event object.
· Some differences exist between the standard DOM event model and the old-IE event model. You learned the key differences and wrote a simple cross-browser event utility.
· Some events have a default action that occurs when the event fires, and you can prevent that action with the standard Event object’s preventDefault() method and old-IE’s returnValue property.
· Modern browsers support native drag-and-drop capabilities, and you can write code that takes advantage of this new feature.
· In some instances, such as for the document object, a second way of connecting event handlers to code is necessary. Setting the object’s property with the name of the event handler to your function produces the same effect as if you did it using the event handler as an attribute.
· In some instances, returning values from event functions enables you to cancel the action associated with the event. For example, to stop a clicked link from navigating to a page, you return false from the event handler’s code.
That’s it for this chapter. In the next chapter, you move on to form scripting, where you can add various controls to your page to help you gather information from the user.
EXERCISES
1. Add a method to the event utility object called isOldIE() that returns a boolean value indicating whether or not the browser is old-IE.
2. Example 15 exhibits some behavior inconsistencies between standards-compliant browsers and old-IE. Remember that the event handlers execute in reverse order in old-IE. Modify this example to use the new isOldIE() method so that you can write specific code for old-IE and standards-compliant browsers (Hint: you will call the addListener() method four times).
3. Example 17 had you write a cross-browser tab script, but as you probably noticed, it behaves peculiarly. The basic idea is there, but the tabs remain active as you click another tab. Modify the script so that only one tab is active at a time.
All materials on the site are licensed Creative Commons Attribution-Sharealike 3.0 Unported CC BY-SA 3.0 & GNU Free Documentation License (GFDL)
If you are the copyright holder of any material contained on our site and intend to remove it, please contact our site administrator for approval.
© 2016-2026 All site design rights belong to S.Y.A.