Wrox Press Beginning JavaScript 5th (2015)
Chapter 11. HTML Forms: Interacting with the User
WHAT YOU WILL LEARN IN THIS CHAPTER:
· Scripting text, password, text area, and hidden form controls
· Writing code for select, check box, and radio button form controls
· Using JavaScript to interact with new HTML5 form controls
WROX.COM CODE DOWNLOADS FOR THIS CHAPTER
You can find the wrox.com code downloads for this chapter at http://www.wiley.com/go/BeginningJavaScript5E on the Download Code tab. You can also view all of the examples and related files at http://beginningjs.com.
Web pages would be very boring if you could not interact with or obtain information from the user, such as text, numbers, or dates. Luckily, with JavaScript this is possible. You can use this information within the web page, or you can post it to the web server where you can manipulate it and store it in a database if you wish. This chapter concentrates on using the information within the web browser, which is called client-side processing.
You’re quite accustomed to various user interface elements. For example, every operating system has a number of standard elements, such as buttons you can click; lists, drop-down list boxes, and radio buttons you can select from; and boxes you can check. These elements are the means by which you now interface with applications. The good news is that you can include many of these types of elements in your web page—and even better, it’s very easy to do so. When you have such an element—say, a button—inside your page, you can then tie code to its events. For example, when the button is clicked, you can fire off a JavaScript function you created.
All of the HTML elements used for interaction should be placed inside an HTML form. Let’s start by taking a look at HTML forms and how you interact with them in JavaScript.
HTML FORMS
Forms provide you with a way of grouping together HTML interaction elements with a common purpose. For example, a form may contain elements that enable the input of a user’s data for registering on a website. Another form may contain elements that enable the user to ask for a car insurance quote. It’s possible to have a number of separate forms in a single page. You don’t need to worry about pages containing multiple forms until you have to submit information to a web server—then you need to be aware that the information from only one of the forms on a page can be submitted to the server at one time.
To create a form, use the <form> and </form> tags to declare where it starts and where it ends. The <form/> element has a number of attributes, such as the action attribute, which determines where the form is submitted; the method attribute, which determines how the information is submitted; and the target attribute, which determines the frame to which the response to the form is loaded.
Generally speaking, for client-side scripting where you have no intention of submitting information to a server, these attributes are not necessary. For now the only attribute you need to set in the <form/> element is the name attribute, so that you can reference the form.
So, to create a blank form, the tags required would look something like this:
<form name="myForm">
</form>
You won’t be surprised to hear that these tags create an HtmlFormElement object, which you can use to access the form. You can access this object in two ways.
First, you can access the object directly using its name—in this case document.myForm. Alternatively, you can access the object through the document object’s forms collection property. Remember that Chapter 8 included a discussion of the document object’s imagescollection and how you can manipulate it like any other array. The same applies to the forms collection, except that instead of each element in the collection holding an HtmlImageElement object, it now holds an HtmlFormElement (hereby called simply Form) object. For example, if it’s the first form in the page, you reference it using document.forms[0].
NOTE Of course, you can also access a form using the document.getElementById() and document.querySelector() methods.
Many of the attributes of the <form/> element can be accessed as properties of the HtmlFormElement object. In particular, the name property mirrors the name attribute of the <form/> element.
TRY IT OUT The forms Collection
In this Try It Out, you’ll use the forms collection to access each of three Form objects and show the value of their name properties in a message box. Open your text editor and type the following:
<!DOCTYPE html>
<html lang="en">
<head>
<title>Chapter 11: Example 1</title>
</head>
<body>
<form action="" name="form1">
<p>
This is inside form1.
</p>
</form>
<form action="" name="form2">
<p>
This is inside form2
</p>
</form>
<form action="" name="form3">
<p>
This is inside form3
</p>
</form>
<script>
var numberForms = document.forms.length;
for (var index = 0; index < numberForms; index++) {
alert(document.forms[index].name);
}
</script>
</body>
</html>
Save this as ch11_example1.html. When you load it into your browser, you should see an alert box display the name of the first form. Click the OK button to display the next form’s name, and then click OK a third time to display the third and final form’s name.
Within the body of the page you define three forms. You give each form a name and a paragraph of text.
In the JavaScript code, you loop through the forms collection. Just like any other JavaScript array, the forms collection has a length property, which you can use to determine how many times you need to loop. Actually, because you know how many forms you have, you can just write the number in. However, this example uses the length property, because that makes it easier to add to the collection without having to change the code. Generalizing your code like this is a good practice to get into.
The code starts by getting the number of Form objects within the forms collection and storing that number in the variable numberForms:
var numberForms = document.forms.length;
Next you define the for loop:
for (var formIndex = 0; formIndex < numberForms; formIndex++) {
alert(document.forms[formIndex].name);
}
Remember that because the indexes for arrays start at 0, your loop needs to go from an index of 0 to an index of numberForms – 1. You enable this by initializing the index variable to 0, and setting the condition of the for loop to index < numberForms.
Within the for loop’s code, you pass the index of the form you want (that is, index) to document.forms[], which gives you the Form object at that index in the forms collection. To access the Form object’s name property, you put a dot at the end of the name of the property, name.
TRADITIONAL FORM OBJECT PROPERTIES AND METHODS
The HTML form controls commonly found in forms, which you look at in more detail shortly, also have corresponding objects. One way to access these is through the elements property of the Form object, another collection. The elements collection contains all the objects corresponding to the HTML interaction elements within the form, with the exception of the little-used <input type="image"/> element. As you see later, this property is very useful for looping through each of the elements in a form. For example, you can loop through each element to check that it contains valid data prior to submitting a form.
Being a collection, the elements property of the Form object has the length property, which tells you how many elements are in the form. The Form object also has the length property, which also gives you the number of elements in the form. Which of these you use is up to you because both do the same job, although writing myForm.length is shorter, and therefore quicker to type and less lengthy to look at in code, than myForm.elements.length.
When you submit data from a form to a server, you normally use the Submit button, which you will come to shortly. However, the Form object also has the submit() method, which does nearly the same thing.
NOTE The submit() method submits the form, but it does not fire the submit event of the Form object; thus, submit event listeners are not called when submitting the form with submit().
Recall that in Chapter 10 you learned that you can affect whether the normal course of events continues or is canceled. You saw, for example, that calling preventDefault() in a hyperlink’s click event handler causes the link’s navigation to be canceled. Well, the same principle applies to the Form object’s submit event, which fires when the user submits the form. By calling preventDefault(), the submission is canceled. This makes the submit event handler’s code a great place to do form validation—that is, to check that what the user has entered into the form is valid. For example, if you ask for the users’ ages and they enter mind your own business, you can spot that this is text rather than a valid number and stop them from continuing.
In addition to there being a Reset button, which is discussed later in the chapter, the Form object has the reset() method, which clears the form, or restores default values if these exist.
Creating blank forms is not exactly exciting or useful, so now let’s turn our attention to the HTML elements that provide interaction functionality inside forms.
HTML Elements in Forms
About ten elements are commonly found within <form/> elements. The most useful are shown in Figures 11.1, 11.2, 11.3, and 11.4, ordered into general types. Each type name is given and, in parentheses, the HTML needed to create it, though note this is not the full HTML but only a portion. The new HTML5 form controls are not listed here; you examine them later in the chapter.
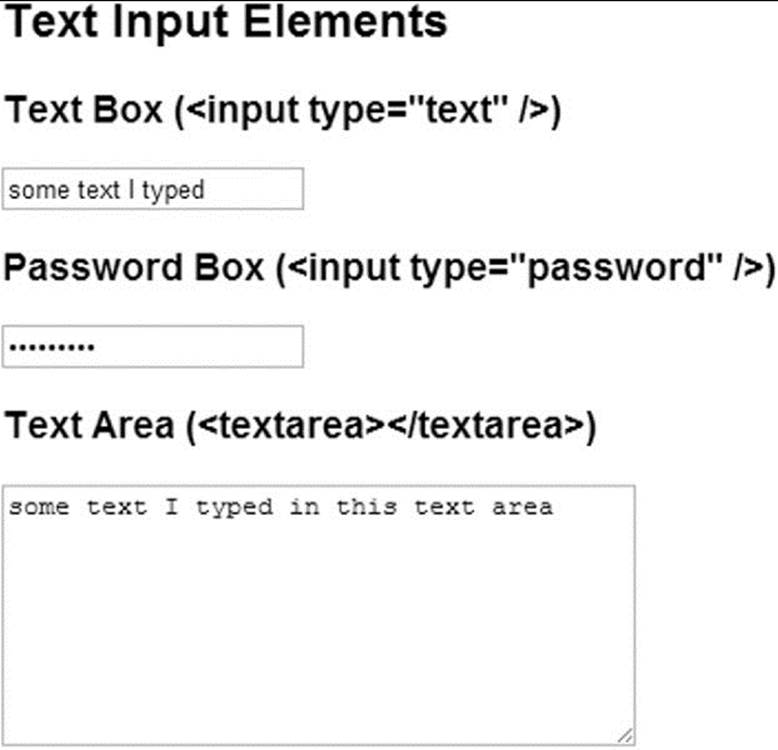
Figure 11.1
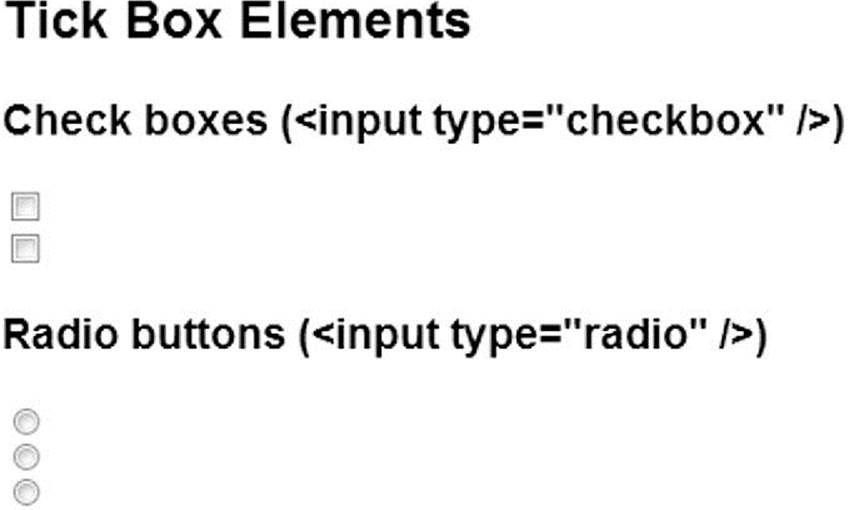
Figure 11.2
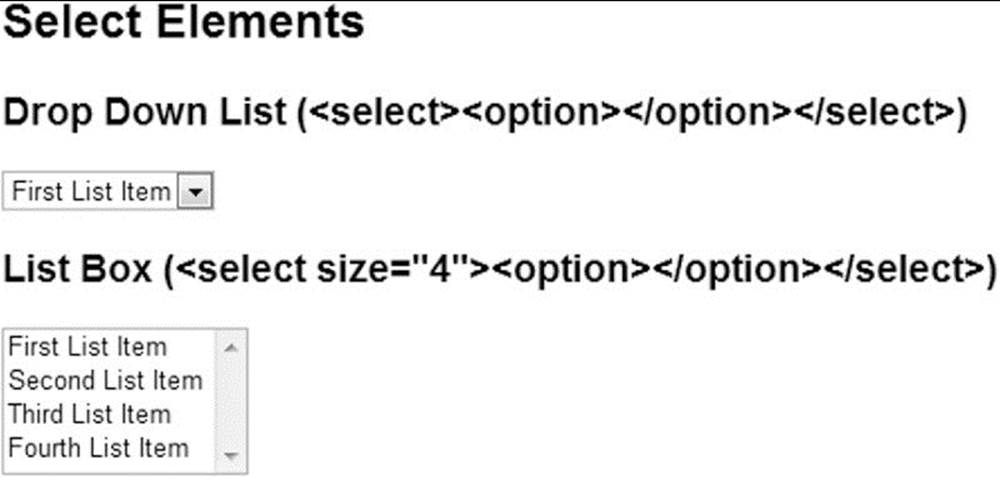
Figure 11.3
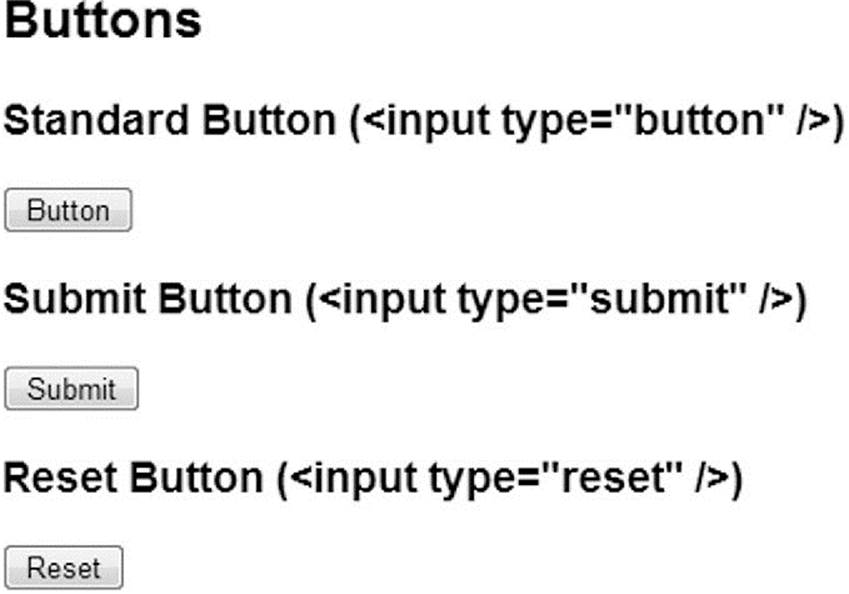
Figure 11.4
As you can see, most form elements are created by means of the <input/> element. One of the <input/> element’s attributes is the type attribute. It’s this attribute that decides which of the form elements this element will be. Examples of values for this attribute includebutton (to create a button) and text (to create a text box).
Each form element inside the web page is made available to you as—yes, you guessed it—an object. As with all the other objects you have seen, each element’s object has its own set of distinctive properties, methods, and events. You’ll be taking a look at each form element in turn and how to use its particular properties, methods, and events, but before you do that, let’s look at properties and methods that the objects of the form elements have in common.
Common Properties and Methods
Because most form elements are created by the <input/> element, it would be correct to guess that all form elements share several properties and methods in common.
Here are a few.
The name Property
One property that all the objects of the form elements have in common is the name property. You can use the value of this property to reference that particular element in your script. Also, if you are sending the information in the form to a server, the element’s nameproperty is sent along with any value of the form element, so that the server knows what the value relates to.
The value Property
Most form element objects also have the value property, which returns the value of the element. For example, for a text box, the value property returns the text that the user entered in the text box. Also, setting the value of the value property enables you to put text inside the text box. However, the use of the value property is specific to each element, so you’ll look at what it means as you look at each individual element.
The form Property
All form element objects also have the form property, which returns the Form object in which the element is contained. This can be useful in cases where you have a generic routine that checks the validity of data in a form. For example, when the user clicks a Submit button, you can pass the Form object referenced by the form property of the Submit button to your data checker, which can use it to loop through each element on the form in turn, checking that the data in the element is valid. This is handy if you have more than one form defined on the page or where you have a generic data checker that you cut and paste to different pages—this way you don’t need to know the form’s name in advance.
The type Property
Sometimes it’s useful to know what type of element you’re dealing with, particularly where you’re looping through the elements in a form using the elements collection property. This information can be retrieved by means of the type property, which each element’s object has. This property returns the type of the element (for example, button or text).
The focus() and blur() Methods
All form element objects also have the focus() and blur() methods. Focus is a concept you might not have come across yet. If an element is the center of the focus, any key presses made by the user are passed directly to that element. For example, if a text box has focus, pressing keys will enter values into the text box. Also, if a button has the focus, pressing the Enter key causes the button’s onclick event handler code to fire, just as if a user had clicked the button with his mouse.
The user can set which element currently has the focus by clicking it or by using the Tab key to select it. However, you as the programmer can also decide which element has the focus by using the form element’s object’s focus() method. For example, if you have a text box for the user to enter his age and he enters an invalid value, such as a letter rather than a number, you can tell him that his input is invalid and send him back to that text box to correct his mistake.
Blur, which perhaps could be better called “lost focus,” is the opposite of focus. If you want to remove a form element from being the focus of the user’s attention, you can use the blur() method. When used with a form element, the blur() method usually results in the focus shifting to the page containing the form.
In addition to the focus() and blur() methods, all the form element’s objects have the onfocus and onblur event handlers. These are fired, as you’d expect, when an element gets or loses the focus, respectively, due to user action or the focus() and blur() methods. Theonblur event handler can be a good place to check the validity of data in the element that has just lost the focus. If the data is invalid, you can set the focus back to the element and let the user know why the data he entered is wrong.
NOTE Remember that the submit() method behaves differently than focus() and blur() in that it does not fire the submit event.
One thing to be careful of is using the focus() and blur() methods in the focus or blur event listener code. There is the danger of an infinite loop occurring. For example, consider two elements, each of whose focus events passes the focus to the other element. Then, if one element gets the focus, its focus event will pass the focus to the second element, whose focus event will pass the focus back to the first element, and so on until the only way out is to close the browser down. This is not likely to please your users!
Also be very wary of using the focus() and blur() methods to put focus back in a problem field if that field or others depend on some of the user’s input. For example, say you have two text boxes: one in which you want users to enter their city and the other in which you want them to enter their state. Also say that the input into the state text box is checked to make sure that the specified city is in that state. If the state does not contain the city, you put the focus back on the state text box so that the user can change the name of the state. However, if the user actually input the wrong city name and the right state name, she may not be able to go back to the city text box to rectify the problem.
Button Elements
We’re starting our look at form elements with the standard button element because it’s probably the most commonly used and is fairly simple. The HTML element to create a button is <input/>. For example, to create a button called myButton, which has the words “Click Me” on its face, the <input/> element would need to be as follows:
<input type="button" name="myButton" value="Click Me" />
The type attribute is set to button, and the value attribute is set to the text you want to appear on the face of the button. You can leave the value attribute off, but you’ll end up with a blank button, which will leave your users guessing as to its purpose.
This element creates an associated HTMLInputElement object (in fact, all <input/> elements create HTMLInputElement objects); in this example it is called myButton. This object has all the common properties and methods described earlier, including the value property. This property enables you to change the text on the button face using JavaScript, though this is probably not something you’ll need to do very often. What the button is really all about is the click event.
You connect to the button’s click event just as you would with any other element. All you need to do is define a function that you want to execute when the button is clicked (say, buttonClick()) and then register a click event listener with the addEventListener()method.
TRY IT OUT Counting Button Clicks
In the following example, you use the methods described previously to record how often a button has been clicked.
<!DOCTYPE html>
<html lang="en">
<head>
<title>Chapter 11: Example 2</title>
</head>
<body>
<form action="" name="form1">
<input type="button" name="myButton" value="Button clicked 0 times" />
</form>
<script>
var myButton = document.form1.myButton;
var numberOfClicks = 0;
function myButtonClick() {
numberOfClicks++;
myButton.value = "Button clicked " + numberOfClicks + " times";
}
myButton.addEventListener("click", myButtonClick);
</script>
</body>
</html>
Save this page as ch11_example2.html. If you load this page into your browser, you will see a button with “Button clicked 0 times” on it. If you repeatedly press this button, you will see the number of button clicks recorded on the text of the button.
You start the script block by defining two variables called myButton and numberOfClicks. The former holds a reference to the <input/> element object. You record the number of times the button has been clicked in the latter and use this information to update the button’s text.
The other piece of code in the script block is the definition of the function myButtonClick(). This function handles the <input/> element’s click event:
myButton.addEventListener("click", myButtonClick);
This element is for a Button element called myButton and is contained within a form called form1:
<form action="" name="form1">
<input type="button" name="myButton" value="Button clicked 0 times" />
</form>
Let’s look at the myButtonClick() function a little more closely. First, the function increments the value of the variable numberOfClicks by one:
function myButtonClick() {
numberOfClicks++;
Next, you update the text on the button face using the Button object’s value property:
myButton.value = "Button clicked " + numberOfClicks + " times";
}
The function in this example is specific to this form and button, rather than a generic function you’ll use in other situations. Therefore, the code in this example directly refers to a button using the myButton variable.
TRY IT OUT mouseup and mousedown Events
Two less commonly used events supported by the Button object are the mousedown and mouseup events. You can see these two events in action in the next example.
<!DOCTYPE html>
<html lang="en">
<head>
<title>Chapter 11: Example 3</title>
</head>
<body>
<form action="" name="form1">
<input type="button" name="myButton" value="Mouse goes up" />
</form>
<script>
var myButton = document.form1.myButton;
function myButtonMouseup() {
myButton.value = "Mouse Goes Up";
}
function myButtonMousedown() {
myButton.value = "Mouse Goes Down";
}
myButton.addEventListener("mousedown", myButtonMousedown);
myButton.addEventListener("mouseup", myButtonMouseup);
</script>
</body>
</html>
Save this page as ch11_example3.html and load it into your browser. If you click the button with your left mouse button and keep it held down, you’ll see the text on the button change to “Mouse Goes Down.” As soon as you release the button, the text changes to “Mouse Goes Up.”
In the body of the page, you define a button called myButton within a form called form1:
<form action="" name="form1">
<input type="button" name="myButton" value="Mouse goes up" />
</form>
Your JavaScript code retrieves this Button object from the document and stores it in the myButton variable, and you register event listeners for the mouseup and mousedown events.
The myButtonMouseup() and myButtonMousedown() functions handle those events, respectively. Each function consists of just a single line of code, in which you use the value property of the Button object to change the text that is displayed on the button’s face.
An important point to note is that events like mouseup and mousedown are triggered only when the mouse pointer is actually over the element in question. For example, if you click and hold down the mouse button over your button, then move the mouse away from the button before releasing the mouse button, you’ll find that the mouseup event does not fire and the text on the button’s face does not change. In this instance it would be the document object’s mouseup event that would fire, if you’d connected any code to it.
Don’t forget that, like all form element objects, the Button object also has the focus and blur events, though they are rarely used in the context of buttons.
Two additional button types are the Submit and Reset buttons. You define these buttons just as you do a standard button, except that the type attribute of the <input> tag is set to submit or reset rather than to button. For example, the Submit and Reset buttons inFigure 11.4 were created using the following code:
<input type="submit" value="Submit" name="submit1" />
<input type="reset" value="Reset" name="reset1" />
These buttons have special purposes, which are not related to script.
When the Submit button is clicked, the form data from the form that the button is inside gets sent to the server automatically, without the need for any script.
When the Reset button is clicked, all the elements in a form are cleared and returned to their default values (the values they had when the page was first loaded).
The Submit and Reset buttons have corresponding objects called Submit and Reset, which have exactly the same properties, methods, and events as a standard Button object.
Text Elements
The standard text elements enable users to enter a single line of text. This information can then be used in JavaScript code or submitted to a server for server-side processing.
The Text Box
A text box is created by means of the <input/> element, much as the button is, but with the type attribute set to text. Again, you can choose not to include the value attribute, but if you do, this value will appear inside the text box when the page is loaded.
In the following example the <input/> element has two additional attributes, size and maxlength. The size attribute determines how many characters wide the text box is, and maxlength determines the maximum number of characters the user can enter in the box. Both attributes are optional and use defaults determined by the browser.
For example, to create a text box 10 characters wide, with a maximum character length of 15, and initially containing the words Hello World, your <input/> element would be as follows:
<input type="text" name="myTextBox" size="10" maxlength="15" value="Hello World" />
The object that this element creates has a value property, which you can use in your scripts to set or read the text contained inside the text box. In addition to the common properties and methods discussed earlier, the object representing the text box also has theselect() method, which selects or highlights all the text inside the text box. This may be used if the user has entered an invalid value, and you can set the focus to the text box and select the text inside it. This then puts the user’s cursor in the right place to correct the data and makes it very clear to the user where the invalid data is. The value property always returns a string data type, even if number characters are being entered. If you use the value as a number, JavaScript normally does a conversion from a string data type to a number data type for you, but this is not always the case. For example, JavaScript won’t do the conversion if the operation you’re performing is valid for a string. If you have a form with two text boxes and you add the values returned from these, JavaScript concatenates rather than adds the two values, so 1 plus 1 will be 11 and not 2. To fix this, you need to convert all the values involved to a numerical data type, for example by using parseInt() or parseFloat() or Number(). However, if you subtract the two values, an operation only valid for numbers, JavaScript says “Aha, this can only be done with numbers, so I’ll convert the values to a number data type.” Therefore, 1 minus 1 will be returned as 0 without your having to use parseInt() or parseFloat(). This is a tricky bug to spot, so it’s best to get into the habit of converting explicitly to avoid problems later.
In addition to the common events, such as focus and blur, the text box has the change, select, keydown, keypress, and keyup events.
The select event fires when the user selects some text in the text box.
More useful is the change event, which fires when the element loses focus if (and only if) the value inside the text box is different from the value it had when it got the focus. This enables you to do things like validity checks that occur only if something has changed.
You can use the readonly attribute of the <input/> element, or the corresponding readOnly property, to prevent the contents from being changed:
<input type="text" name="txtReadonly" value="Look but don't change"
readonly="readonly">
The keypress, keydown, and keyup events fire, as their names suggest, when the user presses a key, when the user presses a key down, and when a key that is pressed down is let back up, respectively.
TRY IT OUT A Simple Form with Validation
Let’s put all the information on text boxes and buttons together into an example. In this example, you have a simple form consisting of two text boxes and a button. The top text box is for the users’ name, and the second is for their age. You do various validity checks. You check the validity of the age text box when it loses focus. However, the name and age text boxes are only checked to see if they are empty when the button is clicked. This example does not work properly on Firefox; we’ll discuss this shortly.
<!DOCTYPE html>
<html lang="en">
<head>
<title>Chapter 11: Example 4</title>
</head>
<body>
<form action="" name="form1">
Please enter the following details:
<p>
Name:
<input type="text" name="txtName" />
</p>
<p>
Age:
<input type="text" name="txtAge" size="3" maxlength="3" />
</p>
<p>
<input type="button" value="Check details" name="btnCheckForm">
</p>
</form>
<script>
var myForm = document.form1;
function btnCheckFormClick(e) {
var txtName = myForm.txtName;
var txtAge = myForm.txtAge;
if (txtAge.value == "" || txtName.value == "") {
alert("Please complete all of the form");
if (txtName.value == "") {
txtName.focus();
} else {
txtAge.focus();
}
} else {
alert("Thanks for completing the form " + txtName.value);
}
}
function txtAgeBlur(e) {
var target = e.target;
if (isNaN(target.value)) {
alert("Please enter a valid age");
target.focus();
target.select();
}
}
function txtNameChange(e) {
alert("Hi " + e.target.value);
}
myForm.txtName.addEventListener("change", txtNameChange);
myForm.txtAge.addEventListener("blur", txtAgeBlur);
myForm.btnCheckForm.addEventListener("click", btnCheckFormClick);
</script>
</body>
</html>
After you’ve entered the text, save the file as ch11_example4.html and load it into your web browser.
In the text box shown in Figure 11.5, type your name. When you leave the text box, you’ll see Hi yourname appear in an alert box.
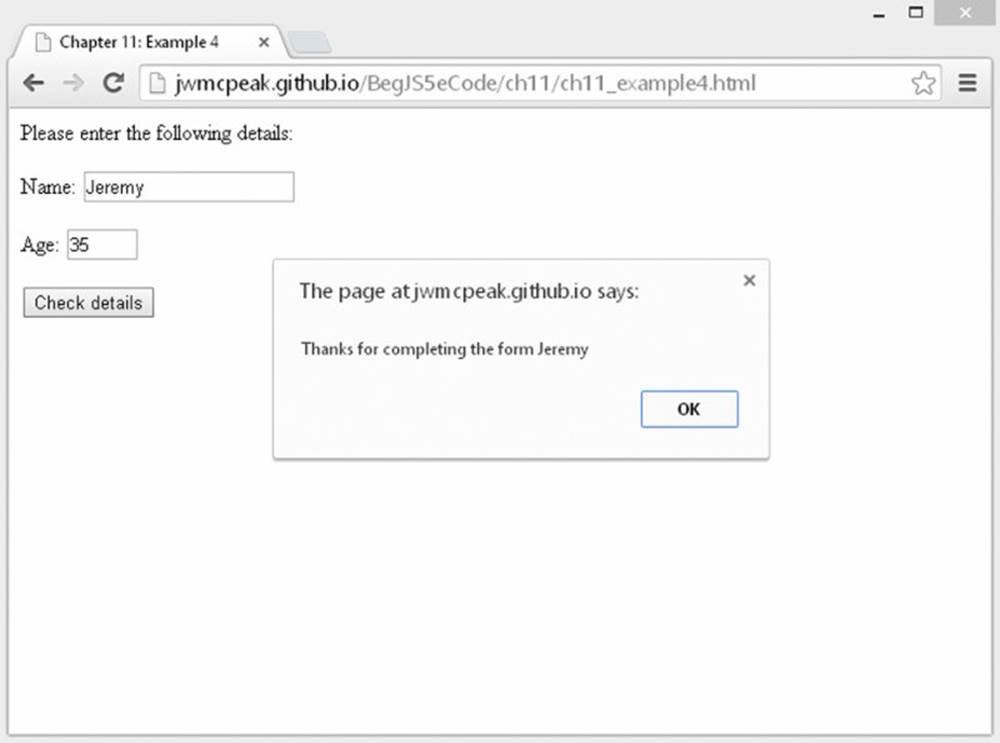
Figure 11.5
Enter an invalid value into the age text box, such as aaaa, and when you try to leave the box, it’ll tell you of the error and send you back to correct it.
Finally, click the Check Details button and both text boxes will be checked to see that you have completed them. If either is empty, you’ll get a message telling you to complete the whole form, and it’ll send you back to the box that’s empty.
If everything is filled in correctly, you’ll get a message thanking you, as shown in Figure 11.5.
Within the body of the page, you create the HTML elements that define your form. Inside your form, which is called form1, you create three form elements with the names txtName, txtAge, and btnCheckForm:
<form action="" name="form1">
Please enter the following details:
<p>
Name:
<input type="text" name="txtName" />
</p>
<p>
Age:
<input type="text" name="txtAge" size="3" maxlength="3" />
</p>
<p>
<input type="button" value="Check details"
name="btnCheckForm">
</p>
</form>
You’ll see that for the second text box (the txtAge text box), you have included the size and maxlength attributes inside the <input/> element. Setting the size attribute to 3 gives the user an idea of how much text you are expecting, and setting the maxlengthattribute to 3 helps ensure that you don’t get overly large numbers entered for the age value.
You register listeners for various events on these elements:
var myForm = document.form1;
myForm.txtName.addEventListener("change", txtNameChange);
myForm.txtAge.addEventListener("blur", txtAgeBlur);
myForm.btnCheckForm.addEventListener("click", btnCheckFormClick);
The first text box’s change event is handled by the txtNameChange(), the second text box’s blur event is handled by txtAgeBlur(), and the button’s click event will cause btnCheckFormClick() to execute. Let’s look at each of these functions in turn, starting withbtnCheckFormClick().
The first thing you do is define two variables, txtName and txtAge, and set them to reference <input/> elements with the same names:
function btnCheckFormClick(e) {
var txtName = myForm.txtName;
var txtAge = myForm.txtAge;
These are convenience variables, thus reducing the size of your code (you don’t have to type myForm.txtName every time you reference the txtName object). It makes your code more readable and therefore easier to debug, and it saves typing.
After getting the reference to the <input/> element objects, you then use it in an if statement to check whether the value in the text box named txtAge or the text box named txtName actually contains any text:
if (txtAge.value == "" || txtName.value == "") {
alert("Please complete all of the form");
if (txtName.value == "") {
txtName.focus();
} else {
txtAge.focus();
}
}
If you do find an incomplete form, you alert the user. Then in an inner if statement, you check which text box was not filled in. You set the focus to the offending text box, so that the user can start filling it in straightaway without having to move the focus to it herself. It also lets the user know which text box your program requires her to fill in. To avoid annoying your users, make sure that text in the page tells them which fields are required.
If the original outer if statement finds that the form is complete, it lets the user know with a thank-you message:
else {
alert("Thanks for completing the form " + txtName.value);
}
}
In this sort of situation, it’s probably more likely that you’ll submit the form to the server than to let the user know with a thank-you message. You can do this using the Form object’s submit() method or using a normal Submit button.
The next of the three functions is txtAgeBlur(), which handles the blur event of the txtAge text box. This function’s purpose is to check that the string value the user entered into the age box actually consists of numeric characters:
function txtAgeBlur(e) {
var target = e.target;
At the start of the function, you retrieve the target of the event (the txtAge text box) and store it in the target variable. You could use myForm.txtAge to reference the same txtAge text box, but using the Event object’s target property is a better solution. ThetxtAgeBlur() function works only with the element that received the blur event. As such, using the Event object’s target property gives you a generalized function that doesn’t depend on any external variables, such as myForm. Plus, it’s less typing.
The following if statement checks to see whether what has been entered in the txtAge text box can be converted to a number. You use the isNaN() function to do this for you. If the value in the txtAge text box is not a number, it tells the user and sets the focus back to the text box by calling the focus() method. Additionally, this time you highlight the text by using the select() method. This makes it even clearer to the users what they need to fix. It also allows them to rectify the problem without needing to delete text first.
if (isNaN(target.value)) {
alert("Please enter a valid age");
target.focus();
target.select();
}
}
You could go further and check that the number inside the text box is actually a valid age—for example, 191 is not a valid age, nor is 255 likely to be. You just need to add another if statement to check for these possibilities.
This function handles the blur event of the txtAge text box, but why didn’t you use the change event, with its advantage that it only rechecks the value when the value has actually been changed? The change event would not fire if the box was empty both before focus was passed to it and after focus was passed away from it. However, leaving the checking of the form completion until just before the form is submitted is probably best because some users prefer to fill in information out of order and come back to some form elements later.
The final function is for the txtName text box’s change event. Its use here is a little flippant and intended primarily as an example of the change event:
function txtNameChange(e) {
alert("Hi " + e.target.value);
}
When the change event fires (when focus is passed away from the name text box and its contents have changed), you take the value of the event target (again, making use of the target property) and put it into an alert box. It simply says Hi yourname.
Problems with Firefox and the blur Event
The previous example will fail with Firefox if you enter a name in the name text box and then an invalid age into the age box (for example, if you enter abc and then click the Check Form button). With other browsers the blur event fires and displays an alert box if the age is invalid, but the button’s click event doesn’t fire. However, in Firefox, both events fire with the result that the invalid age alert is hidden by the “form completed successfully” alert box.
In addition, if you enter an invalid age and then switch to a different program altogether, the “invalid age” alert box appears, which is annoying for the user. It could be that the user was opening up another program to check the details.
Although this is a fine example, it is not great for the real world. A better option would be to check the form when it’s finally submitted and not while the user is entering data. Or, alternatively, you can check the data as it is entered but not use an alert box to display errors. Instead you could write out a warning in red next to the erroneous input control, informing the user of the invalid data, and then also get your code to check the form when it’s submitted.
The Password Text Box
The only real purpose of the password box is to enable users to type in a password on a page and to have the password characters hidden, so that no one can look over the user’s shoulder and discover his or her password. However, this protection is visual only. When sent to the server, the text in the password is sent as plaintext—there is no encryption or any attempt at hiding the text (unless the page is served over a secure connection from the server).
Defining a password box is identical to defining a text box, except that the type attribute is password:
<input name="password1" type="password" />
This form element creates an <input/> element object and has the same properties, methods, and events as normal text boxes.
The Hidden Text Box
The hidden text box can hold text and numbers just like a normal text box, with the difference being that it’s not visible to the user. A hidden element? It may sound as useful as an invisible painting, but in fact it proves to be very useful.
To define a hidden text box, you use the following HTML:
<input type="hidden" name="myHiddenElement" />
The hidden text box creates yet another <input/> element object, and it can be manipulated in JavaScript like any other object—although, you can actually set its value only through its HTML definition or through JavaScript. As with a normal text box, its value is submitted to the server when the user submits the form.
So why are hidden text boxes useful? Imagine you have a lot of information that you need to obtain from the user, but to avoid having a page stuffed full of elements and looking like the control panel of the space shuttle, you decide to obtain the information over more than one page. The problem is, how do you keep a record of what was entered in previous pages? Easy—you use hidden text boxes and put the values in there. Then, in the final page, all the information is submitted to the server—it’s just that some of it is hidden.
The textarea Element
The <textarea/> element allows multi-line input of text. Other than this, it acts very much like the text box element.
However, unlike the text box, the <textarea/> element has its own tag, the <textarea> tag, and it creates an HTMLTextAreaElement object. It also has two additional attributes: cols and rows. The cols attribute defines how many characters wide the text area will be, and therows attribute defines how many character rows there will be. You set the text inside the element by putting it between the start and closing tags, rather than by using the value attribute. So if you want a <textarea/> element 40 characters wide by 20 rows deep with initial text Hello World on the first line and Line 2 on the second line, you define it as follows:
<textarea name="myTextArea" cols="40" rows="20">Hello World
Line 2
</textarea>
Another attribute of the <textarea/> element is the wrap attribute, which determines what happens when the user types to the end of a line. The default value for this is soft, so the user does not have to press Return at the end of a line, though this can vary from browser to browser. To turn wrapping on, you can use one of two values: soft and hard. As far as client-side processing goes, both do the same thing: They switch wrapping on. However, when you come to server-side processing, they do make a difference in terms of which information is sent to the server when the form is posted.
If you set the wrap attribute on by setting it to soft, wrapping will occur on the client side, but the carriage returns won’t be posted to the server, just the text. If the wrap attribute is set to hard, any carriage returns caused by wrapping will be converted to hard returns—it will be as if the user had pressed the Enter key, and these returns will be sent to the server. Also, you need to be aware that the carriage-return character is determined by the operating system that the browser is running on—for example, in Windows a carriage return is \r\n, on UNIX, UNIX-like systems, and Mac OS X, a carriage return is \n. To turn off wrapping client-side, set wrap to off.
NOTE The \n character is the universal line feed character. If you are formatting raw text output and need a new line, \n works in every browser on every operating system.
The object created by the <textarea/> element has the same properties, methods, and events as the text box object you saw previously, except that the text area doesn’t have the maxlength attribute. Note that there is a value property even though the <textarea/> element does not have a value attribute. The value property simply returns the text between the <textarea> and </textarea> tags. The events supported by the <textarea/> element object include the keydown, keypress, keyup, and change event handlers.
TRY IT OUT Event Watching
To help demonstrate how the keydown, keypress, keyup, and change events work (in particular, the order in which they fire), you’ll create an example that tells you what events are firing:
<!DOCTYPE html>
<html lang="en">
<head>
<title>Chapter 11: Example 5</title>
</head>
<body>
<form action="" name="form1">
<textarea rows="15" cols="40" name="textarea1"></textarea>
<textarea rows="15" cols="40" name="textarea2"></textarea>
<br />
<input type="button" value="Clear event textarea" name="button1" />
</form>
<script>
var myForm = document.form1;
var textArea1 = myForm.textarea1;
var textArea2 = myForm.textarea2;
var btnClear = myForm.button1;
function displayEvent(e) {
var message = textArea2.value;
message = message + e.type + "\n";
textArea2.value = message;
}
function clearEventLog(e) {
textArea2.value = "";
}
textArea1.addEventListener("change", displayEvent);
textArea1.addEventListener("keydown", displayEvent);
textArea1.addEventListener("keypress", displayEvent);
textArea1.addEventListener("keyup", displayEvent);
btnClear.addEventListener("click", clearEventLog);
</script>
</body>
</html>
Save this page as ch11_example5.html. Load the page into your browser, and see what happens when you type any letter into the first text area box. You should see the events being fired listed in the second text area box (keydown, keypress, and keyup), as shown in Figure 11.6. When you click outside the first text area box, you’ll see the change event fire.
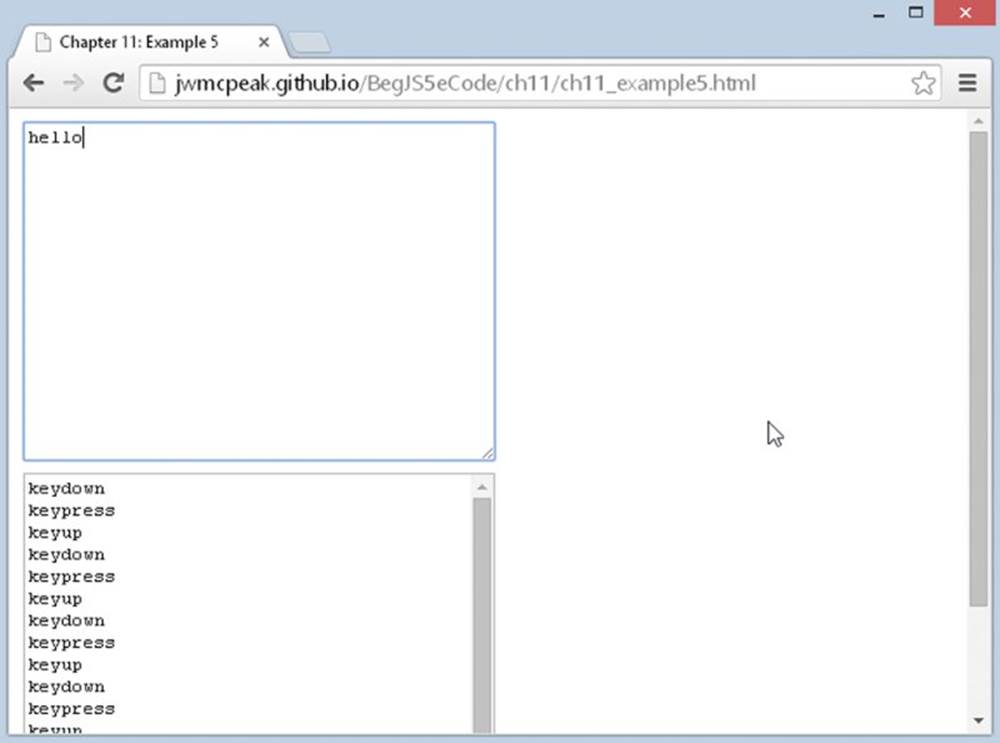
Figure 11.6
Experiment with the example to see what events fire and when.
Within a form called form1 in the body of the page, you define two text areas and a button. The first text area is the one whose events you are going to monitor:
<form action="" name="form1">
<textarea rows="15" cols="40" name="textarea1"></textarea>
Next, you have an empty text area the same size as the first:
<textarea rows="15" cols="40" name="textarea2"></textarea>
Finally, you have your button:
<input type="button" value="Clear event textarea" name="button1" />
</form>
You’ll register event listeners for the textarea1 and button1 elements in your JavaScript code. But first, you need to retrieve those element objects from the document. You do this very simply by using the form hierarchy:
var myForm = document.form1;
var textArea1 = myForm.textarea1;
var textArea2 = myForm.textarea2;
var btnClear = myForm.button1;
You start by creating the myForm variable to contain the <form/> element object, and then you use that variable to retrieve the other form elements. Now that you have the element objects, registering event listeners is as easy as calling theaddEventListener() method:
textArea1.addEventListener("change", displayEvent);
textArea1.addEventListener("keydown", displayEvent);
textArea1.addEventListener("keypress", displayEvent);
textArea1.addEventListener("keyup", displayEvent);
btnClear.addEventListener("click", clearEventLog);
On the first <textarea/> element (textArea1), you listen for the change, keydown, keypress, and keyup events, using the displayEvent() function as the handling function. For the button, you listen for the click event with the clearEventLog() function.
The latter function is the simplest, so let’s look at that first:
function clearEventLog(e) {
textArea2.value = "";
}
The purpose of clearEventLog() is to clear the contents of the second <textarea/> element, and it achieves this by setting the <textarea/> element’s value property to an empty string ("").
Now let’s look at the displayEvent() function. It adds the name of the event that occurred to the text already contained in the second text area:
function displayEvent(e) {
var message = textArea2.value;
message = message + e.type + "\n";
You first retrieve the <textarea/> element’s value and store it in the message variable. You then append the name of the event as well as a new line to the message. Putting each event name on a separate line makes it much easier to read and follow.
Then finally, you assign the new message to the text area’s value property:
textArea2.value = message;
}
Check Boxes and Radio Buttons
The discussions of check boxes and radio buttons are together because their objects have identical properties, methods, and events. A check box enables the user to check and uncheck it. It is similar to the paper surveys you may get where you are asked to “check the boxes that apply to you.” Radio buttons are basically a group of check boxes where only one can be checked at a time. Of course, they also look different, and their group nature means that they are treated differently.
Creating check boxes and radio buttons requires our old friend the <input/> element. Its type attribute is set to "checkbox" or "radio" to determine which box or button is created. To set a check box or a radio button to be checked when the page is loaded, you simply insert the attribute checked into the <input> tag and assign its value as checked. This is handy if you want to set a default option like, for example, those “Check this box if you want our junk mail” forms you often see on the Net, which are usually checked by default, forcing you to uncheck them. So to create a check box that is already checked, your <input> tag will be the following:
<input type="checkbox" name="chkDVD" checked="checked" value="DVD" />
To create a checked radio button, the <input> tag would be as follows:
<input type="radio" name="radCPUSpeed" checked="checked" value="1 GHz" />
As previously mentioned, radio buttons are group elements. In fact, there is little point in putting just one on a page, because the user won’t be able to choose between any alternative boxes.
To create a group of radio buttons, you simply give each radio button the same name. This creates an array of radio buttons going by that name that you can access, as you would with any array, using its index.
For example, to create a group of three radio buttons, your HTML would be as follows:
<input type="radio" name="radCPUSpeed" checked="checked" value="800 mhz" />
<input type="radio" name="radCPUSpeed" value="1 ghz" />
<input type="radio" name="radCPUSpeed" value="1.5 ghz" />
You can put as many groups of radio buttons in a form as you want, by just giving each group its own unique name. Note that you have only used one checked attribute, because only one of the radio buttons in the group can be checked. If you had used the checkedattribute in more than one of the radio buttons, only the last of these would have actually been checked.
Using the value attribute of the check box and radio button elements is not the same as with previous elements you’ve looked at. It tells you nothing about the user’s interaction with an element because it’s predefined in your HTML or by your JavaScript. Whether a check box or radio button is checked or not, it still returns the same value.
Each check box has an associated Checkbox object, and each radio button in a group has a separate Radio object. As mentioned earlier, with radio buttons of the same name you can access each Radio object in a group by treating the group of radio buttons as an array, with the name of the array being the name of the radio buttons in the group. As with any array, you have the length property, which will tell you how many radio buttons are in the group.
NOTE There actually aren’t objects called Checkbox and Radio. All <input /> elements create an object of type HtmlInputElement. But for the sake of clarity, this text uses Checkbox and Radio to make explanations easier to follow and understand.
For determining whether a user has actually checked or unchecked a check box, you need to use the checked property of the Checkbox object. This property returns true if the check box is currently checked and false if not.
Radio buttons are slightly different. Because radio buttons with the same name are grouped together, you need to test each Radio object in the group in turn to see if it has been checked. Only one of the radio buttons in a group can be checked, so if you check another one in the group, the previously checked one will become unchecked, and the new one will be checked in its place.
Both Checkbox and Radio have the click, focus, and blur events, and these operate identically to the other elements, although they can also be used to cancel the default action, such as clicking the check box or radio button.
Scripting check box and radio buttons usually automatically adds extra stuff to your code—namely loops because you are working with multiple, near-identical elements. The next example demonstrates this.
TRY IT OUT Check Boxes and Radio Buttons
Let’s look at an example that makes use of all the properties, methods, and events we have just discussed. The example is a simple form that enables a user to build a computer system. Perhaps it could be used in an e-commerce situation, to sell computers with the exact specifications determined by the customer.
<!DOCTYPE html>
<html lang="en">
<head>
<title>Chapter 11: Example 6</title>
</head>
<body>
<form action="" name="form1">
<p>
Tick all of the components you want included on your computer
</p>
<p>
<label for="chkDVD">DVD-ROM</label>
<input type="checkbox" id="chkDVD" name="chkDVD" value="DVD-ROM" />
</p>
<p>
<label for="chkBluRay">Blu-ray</label>
<input type="checkbox" id="chkBluRay" name="chkBluRay"
value="Blu-ray" />
</p>
<p>
Select the processor speed you require
</p>
<p>
<input type="radio" name="radCpuSpeed" checked="checked"
value="3.2 ghz" />
<label>3.2 GHz</label>
<input type="radio" name="radCpuSpeed" value="3.7 ghz" />
<label>3.7 GHz</label>
<input type="radio" name="radCpuSpeed" value="4.0 ghz" />
<label>4.0 GHz</label>
</p>
<input type="button" value="Check form" name="btnCheck" />
</form>
<script>
var myForm = document.form1;
function getSelectedSpeedValue() {
var radios = myForm.radCpuSpeed;
for (var index = 0; index < radios.length; index++) {
if (radios[index].checked) {
return radios[index].value;
}
}
return "";
}
function findIndexOfSpeed(radio) {
var radios = myForm.radCpuSpeed;
for (var index = 0; index < radios.length; index++) {
if (radios[index] == radio) {
return index;
}
}
return -1;
}
function radCpuSpeedClick(e) {
var radIndex = findIndexOfSpeed(e.target);
if (radIndex == 1) {
e.preventDefault();
alert("Sorry that processor speed is currently unavailable");
// to fix an issue with IE
myForm.radCpuSpeed[0].checked = true;
}
}
function btnCheckClick() {
var numberOfControls = myForm.length;
var compSpec = "Your chosen processor speed is ";
compSpec = compSpec + getSelectedSpeedValue();
compSpec = compSpec + "\nWith the following additional components:\n";
for (var index = 0; index < numberOfControls; index++) {
var element = myForm[index];
if (element.type == "checkbox") {
if (element.checked) {
compSpec = compSpec + element.value + "\n";
}
}
}
alert(compSpec);
}
for (var index = 0; index < myForm.radCpuSpeed.length; index++) {
myForm.radCpuSpeed[index].addEventListener("click", radCpuSpeedClick);
}
myForm.btnCheck.addEventListener("click", btnCheckClick);
</script>
</body>
</html>
Save the page as ch11_example6.html and load it into your web browser. You should see a form like the one shown in Figure 11.7.
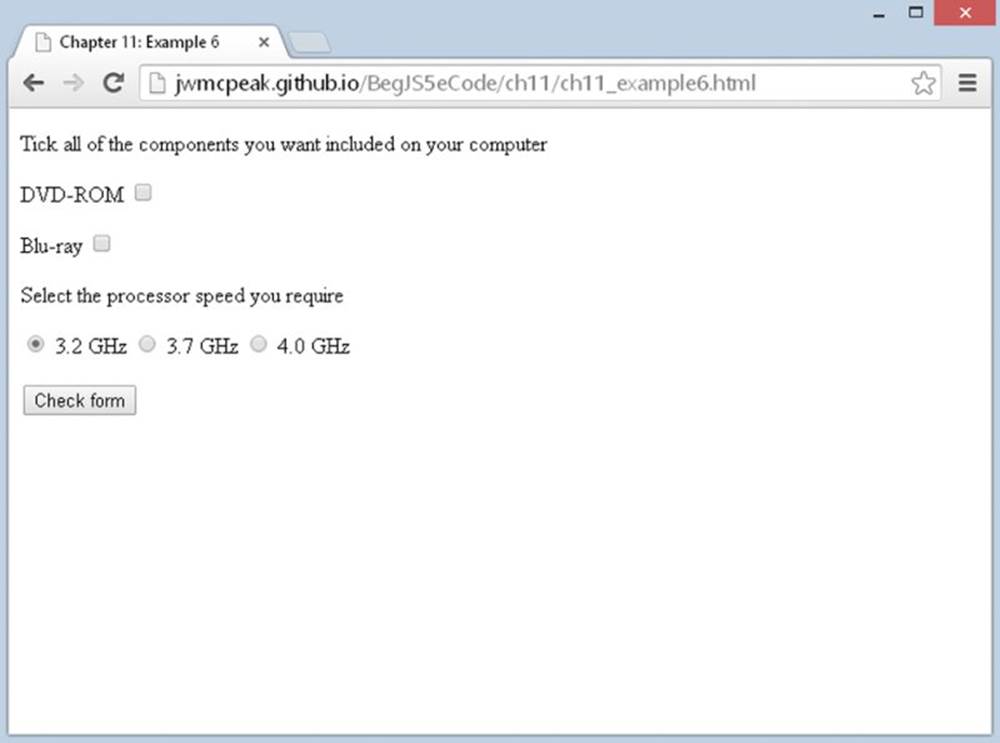
Figure 11.7
Check some of the check boxes, change the processor speed, and click the Check Form button. A message box appears and lists the components and processor speed you selected. For example, if you select a DVD-ROM and a 4.0 GHz processor speed, you will see something like what is shown in Figure 11.8.

Figure 11.8
Note that the 3.7 GHz processor is out of stock, so if you choose that, a message box tells you it’s out of stock, and the 3.2 GHz processor speed radio button won’t be selected. The previous setting will be restored when the user dismisses the message box.
Let’s first look at the body of the page, where you define the check boxes and radio buttons and a standard button inside a form called form1. You start with the check boxes:
<p>
Tick all of the components you want included on your computer
</p>
<p>
<label for="chkDVD">DVD-ROM</label>
<input type="checkbox" id="chkDVD" name="chkDVD" value="DVD-ROM" />
</p>
<p>
<label for="chkBluRay">Blu-ray</label>
<input type="checkbox" id="chkBluRay" name="chkBluRay" value="Blu-ray" />
</p>
Each check box has a label and is contained within a <p/> element for formatting purposes.
Next come the radio buttons for selecting the required CPU speed. Again, each has a label, but unlike the check boxes, these radio buttons are contained within a single <p/> element:
<p>
Select the processor speed you require
</p>
<p>
<input type="radio" name="radCpuSpeed" checked="checked"
value="3.2 ghz" />
<label>3.2 GHz</label>
<input type="radio" name="radCpuSpeed" value="3.7 ghz" />
<label>3.7 GHz</label>
<input type="radio" name="radCpuSpeed" value="4.0 ghz" />
<label>4.0 GHz</label>
</p>
The radio button group name is radCpuSpeed. Here, the first one is set to be checked by default by the inclusion of the checked attribute inside the <input/> element’s definition. It’s a good idea to ensure that you have one radio button checked by default, because if you do not and the user doesn’t select a button, the form will be submitted with no value for that radio group.
Next, the standard button that completes your form:
<input type="button" value="Check form" name="btnCheck" />
Before proceeding further, a note: To make the JavaScript code easier, you could use the onclick attributes on each of the radio buttons as well as the standard button. But as mentioned in Chapter 10, you want to avoid those attributes as much as possible because it couples your HTML and JavaScript together.
Two functions are used to handle the click events for the standard button and the radio buttons: btnCheckClick() and radCpuSpeedClick(), respectively. And before we look at these functions, you first need to register the click event listeners on their respective elements. As in previous examples, first create a variable called myForm to reference the form in the document:
var myForm = document.form1;
Now, register the click event listener on your radio buttons. Unfortunately, there’s no magical command that says “use this function to handle all the radio buttons’ click events.” So, you’ll have to call addEventListener() on every Radio object. This isn’t as difficult as it sounds; a for loop will help you:
for (var index = 0; index < myForm.radCpuSpeed.length; index++) {
myForm.radCpuSpeed[index].addEventListener("click", radCpuSpeedClick);
}
This for loop is fairly straightforward except for one thing: myForm.radCpuSpeed. What you are doing here is using the collection for the radCpuSpeed radio group. Each element in the collection actually contains an object, namely each of your three Radioobjects. Therefore, you’re looping over the Radio objects in the radCpuSpeed radio group, retrieving the Radio object at the given index, and calling its addEventListener() method.
Next, register the event listener for the form’s standard button:
myForm.btnCheck.addEventListener("click", btnCheckClick);
Now let’s look at the radCpuSpeedClick() function, the function that executes when the radio buttons are clicked. The first thing this function needs to do is to find the index of the event target in the radCpuSpeed radio group:
function radCpuSpeedClick(e) {
var radIndex = findIndexOfSpeed(e.target);
You do this by calling the findIndexOfSpeed() helper function. We’ll look at this function later, but for now, just know that it finds the index of the supplied Radio object in the myForm.radCpuSpeed collection.
The default action of clicking a radio button is to check the radio button. If you prevent the default action from occurring, the radio button will not be checked. As an example of this in action, you have an if statement on the next line. If the radio button’s index value is 1 (that is, if the user checked the box for a 3.7 GHz processor), you tell the user that it’s out of stock and cancel the clicking action by calling the Event object’s preventDefault() method:
if (radIndex == 1) {
e.preventDefault();
alert("Sorry that processor speed is currently unavailable");
As previously mentioned, canceling the clicking action results in the radio button not being checked. In such a situation, all browsers (except for IE) recheck the previously checked radio button. IE, however, removes all checks from the radio group. To rectify this, you reset the radio group:
// to fix an issue with IE
myForm.radCpuSpeed[0].checked = true;
}
}
You once again use the myForm.radCpuSpeed collection, retrieve the Radio object at index 0, and set its checked property to true. Let’s take a moment and look at the findIndexOfSpeed() helper method. It accepts a Radio object as an argument, and it searches the myForm.radCpuSpeed collection for the given Radio object.
The first line of the function creates a variable called radios, and it contains a reference to the myForm.radCpuSpeed collection. This is to make typing and reading a bit easier:
function findIndexOfSpeed(radio) {
var radios = myForm.radCpuSpeed;
Next, you want to loop through the radios collection and determine if each Radio object in the collection is the same Radio object in the radio variable:
for (var index = 0; index < radios.length; index++) {
if (radios[index] == radio) {
return index;
}
}
return -1;
}
If you find a match, you return the value of the index variable. If the loop exits without finding a match, you return -1. This behavior is consistent with the String object’s indexOf() method. Consistency is a very good thing!
The next function, btnCheckClick(), executes when the standard button’s click event fires. In a real e-commerce situation, this button would be the place where you’d check your form and then submit it to the server for processing. Here you use the form to show a message box confirming which boxes you have checked (as if you didn’t already know)!
At the top you declare two local variables to use in the function. The variable numberOfControls is set to the form’s length property, which is the number of elements on the form. The variable compSpec is used to build the string that you’ll display in a message box:
function btnCheckClick() {
var numberOfControls = myForm.length;
var compSpec = "Your chosen processor speed is ";
In the following line, you add the value of the radio button the user has selected to your message string:
compSpec = compSpec + findSelectedSpeedValue();
compSpec = compSpec + "\nWith the following additional components:\n";
You use yet another helper function called getSelectedSpeedValue(). As its name implies, it gets the value of the selected Radio object. You’ll look at its code later.
Next, you loop through the form’s elements:
for (var index = 0; index < numberOfControls; index++) {
var element = myForm[index];
if (element.type == "checkbox") {
if (element.checked) {
compSpec = compSpec + element.value + "\n";
}
}
}
alert(compSpec);
}
It’s here that you loop through each element on the form using myForm[controlIndex], which returns a reference to the element object stored at the controlIndex index position.
You’ll see that in this example the element variable is set to reference the object stored in the myForm collection at the index position stored in variable controlIndex. Again, this is for convenient shorthand purposes; now to use that particular object’s properties or methods, you just type element, a period, and then the method or property name, making your code easier to read and debug, which also saves on typing.
You only want to see which check boxes have been checked, so you use the type property, which every HTML form element object has, to see what element type you are dealing with. If the type is checkbox, you go ahead and see if it’s a checked check box. If so, you append its value to the message string in compSpec. If it is not a check box, it can be safely ignored.
Finally, you use the alert() method to display the contents of your message string.
The last function is getSelectedSpeedValue(). It doesn’t accept any arguments, although you could generalize this function to accept a collection of Radio objects. Doing so would allow you to reuse the function in multiple projects.
But to get back to the actual code, the first statement of the function creates a radios variable that contains a reference to the myForm.radCpuSpeed collection:
function getSelectedSpeedValue() {
var radios = myForm.radCpuSpeed;
Next, you want to find the selected Radio object and retrieve its value. You can do this with yet another for loop:
for (var index = 0; index < radios.length; index++) {
if (radios[index].checked) {
return radios[index].value;
}
}
return "";
}
The logic is straightforward: Loop through the radios collection and check each Radio object’s checked property. If it’s true, return the value of that Radio object, but if the loop exits without finding a checked Radio object, you return an empty string.
Selection Boxes
Although they look quite different, the drop-down list and the list boxes are actually both elements created with the <select> tag, and strictly speaking they are both select elements. The select element has one or more options in a list that you can select from; each of these options is defined by means of one or more <option/> elements inside the opening and closing <select> tags.
The size attribute of the <select/> element is used to specify how many of the options are visible to the user.
For example, to create a list box five rows deep and populate it with seven options, your HTML would look like this:
<select name="theDay" size="5">
<option value="0" selected="selected">Monday</option>
<option value="1">Tuesday</option>
<option value="2">Wednesday</option>
<option value="3">Thursday</option>
<option value="4">Friday</option>
<option value="5">Saturday</option>
<option value="6">Sunday</option>
</select>
Notice that the <option/> element for Monday also contains the attribute selected; this will make this option selected by default when the page is loaded. The values of the options have been defined as numbers, but text would be equally valid.
If you want this to be a drop-down list, you just need to change the size attribute in the <select/> element to 1, and presto, it’s a drop-down list.
If you want to let the user choose more than one item from a list at once, you simply need to add the multiple attribute to the <select/> definition.
The <select/> element creates an HTMLSelectElement object (hereby known as Select). This object has an options collection property, which is made up of HtmlOptionElement (hereby known as Option) objects, one for each <option/> element inside the <select/> element associated with the Select object. For instance, in the preceding example, if the <select/> element was contained in a form called theForm with the following:
document.theForm.theDay.options[0]
you would access the option created for Monday.
How can you tell which option has been selected by the user? Easy: you use the Select object’s selectedIndex property. You can use the index value returned by this property to access the selected option using the options collection.
The Option object also has index, text, and value properties. The index property returns the index position of that option in the options collection. The text property is what’s displayed in the list, and the value property is the value defined for the option, which would be posted to the server if the form were submitted.
If you want to find out how many options are in a select element, you can use the length property of either the Select object itself or of its options collection property.
Let’s see how you could loop through the options for the preceding select box:
var theDayElement = document.theForm.theDay;
document.write("There are " + theDayElement.length + "options<br />");
for (var index = 0; index < theDayElement.length; index++) {
document.write("Option text is " +
theDayElement.options[index].text);
document.write(" and its value is ");
document.write(theDayElement.options[index].value);
document.write("<br />");
}
First, you set the variable theDayElement to reference the Select object. Then you write the number of options to the page, in this case 7.
Next you use a for loop to loop through the options collection, displaying the text of each option, such as Monday, Tuesday, and so on, and its value, such as 0, 1, and so on. If you create a page based on this code, it must be placed after the <select/> element’s definition.
It’s also possible to add options to a select element after the page has finished loading. You look at how to do this next.
Adding and Removing Options
To add a new option to a select element, you simply create a new Option object using the new operator and then insert it into the options collection of the Select object at an empty index position.
When you create a new Option object, you have two parameters to pass. The first is the text you want to appear in the list, and the second is the value to be assigned to the option:
var myNewOption = new Option("TheText","TheValue");
You then simply assign this Option object to an empty array element. For example:
theDayElement.options[0] = myNewOption;
If you want to remove an option, you simply set that part of the options collection to null. For example, to remove the element you just inserted, you need the following:
theDayElement.options[0] = null;
When you remove an Option object from the options collection, the collection is reordered so that the array index value of each of the options above the removed one has its index value decremented by one.
When you insert a new option at a certain index position, be aware that it will overwrite any Option object that is already there.
TRY IT OUT Adding and Removing List Options
In this Try It Out, you use the list-of-days example you saw previously to demonstrate adding and removing list options.
<!DOCTYPE html>
<html lang="en">
<head>
<title>Chapter 11: Example 7</title>
</head>
<body>
<form action="" name="theForm">
<select name="theDay" size="5">
<option value="0" selected="selected">Monday</option>
<option value="1">Tuesday</option>
<option value="2">Wednesday</option>
<option value="3">Thursday</option>
<option value="4">Friday</option>
<option value="5">Saturday</option>
<option value="6">Sunday</option>
</select>
<br />
<input type="button" value="Remove Wednesday" name="btnRemoveWed" />
<input type="button" value="Add Wednesday" name="btnAddWed" />
<br />
</form>
<script>
var theForm = document.theForm;
function btnRemoveWedClick() {
var options = theForm.theDay.options;
if (options[2].text == "Wednesday") {
options[2] = null;
} else {
alert("There is no Wednesday here!");
}
}
function btnAddWedClick() {
var options = theForm.theDay.options;
if (options[2].text != "Wednesday") {
var lastOption = new Option();
options[options.length] = lastOption;
for (var index = options.length - 1; index > 2; index––) {
var currentOption = options[index];
var previousOption = options[index - 1];
currentOption.text = previousOption.text;
currentOption.value = previousOption.value;
}
var option = new Option("Wednesday", 2);
options[2] = option;
} else {
alert("Do you want to have TWO Wednesdays?");
}
}
theForm.btnRemoveWed.addEventListener("click", btnRemoveWedClick);
theForm.btnAddWed.addEventListener("click", btnAddWedClick);
</script>
</body>
</html>
Save this as ch11_example7.html. If you type the page in and load it into your browser, you should see the form shown in Figure 11.9. Click the Remove Wednesday button, and you’ll see Wednesday disappear from the list. Add it back by clicking the Add Wednesday button. If you try to add a second Wednesday or remove a nonexistent Wednesday, you’ll get a polite warning telling you that you can’t do that.
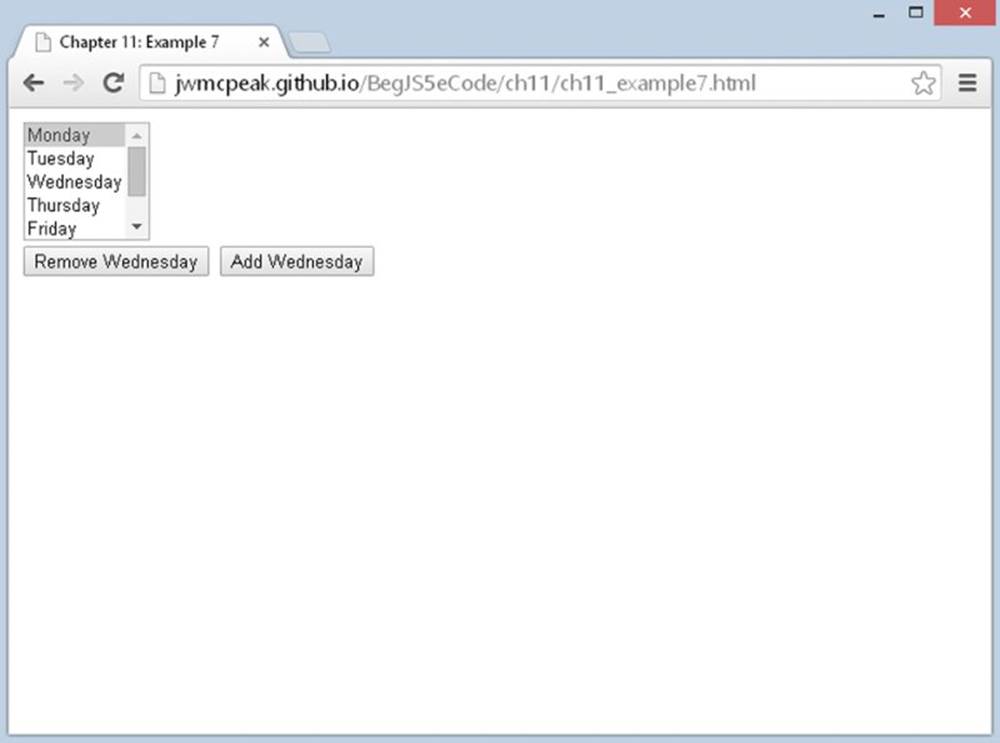
Figure 11.9
Within the body of the page, you define a form with the name theForm. This contains the <select/> element, which includes day-of-the-week options that you have seen previously. The form also contains two buttons, as shown here:
<input type="button" value="Remove Wednesday" name="btnRemoveWed" />
<input type="button" value="Add Wednesday" name="btnAddWed" />
You want to execute JavaScript code when these buttons are clicked; therefore, you want to register click event listeners for each of the buttons. To make this a bit easier, you first create a variable called theForm, which contains the <form/> element object:
var theForm = document.theForm;
You use this variable to access the individual buttons and register their click event listeners:
theForm.btnRemoveWed.addEventListener("click", btnRemoveWedClick);
theForm.btnAddWed.addEventListener("click", btnAddWedClick);
The “remove” button executes the btnRemoveWedClick() function, and the “add” button executes btnAddWedClick(). You take a look at each of these functions in turn.
The first function, btnRemoveWedClick(), removes the Wednesday option:
function btnRemoveWedClick() {
var options = theForm.theDay.options;
if (options[2].text == "Wednesday") {
options[2] = null;
} else {
alert("There is no Wednesday here!");
}
}
The first thing you do in the function is create a variable that contains the collection of Option elements. This lets you repeatedly reference the option collection without typing document.theForm.theDay.options, or any variation thereof.
Next, a sanity check: You must try to remove the Wednesday option only if it’s there in the first place! You make sure of this by seeing if the third option in the collection (with index 2 because arrays start at index 0) has the text "Wednesday". If it does, you can remove the Wednesday option by setting that particular option to null. If the third option in the array is not Wednesday, you alert the user to the fact that there is no Wednesday to remove. Although this code uses the text property in the ifstatement’s condition, you could just as easily have used the value property; it makes no difference.
Next you come to the btnAddWedClick() function, which, as the name suggests, adds the Wednesday option. This is slightly more complex than the code required to remove an option. First, you create another variable, called options, to contain the collection of Option objects. Then, you use an if statement to check that there is not already a Wednesday option:
function btnAddWedClick() {
var options = theForm.theDay.options;
if (options[2].text != "Wednesday") {
var lastOption = new Option();
options[options.length] = lastOption;
for (var index = options.length - 1; index > 2; index––) {
var currentOption = options[index];
var previousOption = options[index - 1];
currentOption.text = previousOption.text;
currentOption.value = previousOption.value;
}
If there is no Wednesday option, you then need to make space for the new Wednesday option to be inserted.
At this point, you have six options (the last element is as index 5), so next you create a new option with the variable name lastOption and assign it to the element at the end of the collection. This new element is assigned at index position 6 by using thelength property of the options collection, which previously had no contents. You next assign the text and value properties of each of the Option objects from Thursday to Sunday to the Option at an index value higher by one in the options array, leaving a space in the options array at position 2 to put Wednesday in. This is the task for the for loop within the if statement.
Next, you create a new Option object by passing the text "Wednesday" and the value 2 to the Option constructor. The Option object is then inserted into the options collection at position 2, and presto, it appears in your select box.
var option = new Option("Wednesday", 2);
options[2] = option;
}
You end the function by alerting the user to the fact that there is already a Wednesday option in the list, if the condition in the if statement is false:
else {
alert("Do you want to have TWO Wednesdays?");
}
}
This example works in every browser; however, all modern browsers provide additional methods to make adding and removing options easier.
Adding New Options with Standard Methods
In particular, the Select object you are interested in has additional add() and remove() methods, which add and remove options. These make life a little simpler.
Before you add an option, you need to create it. You do this just as before, using the new operator.
The Select object’s add() method enables you to insert an Option object that you have created and accepts two parameters. The first parameter is the Option object you want to add. The second parameter is the Option object you want to place the new Option object before. However, in IE7 (or IE8 non-standards mode), the second parameter is the index position at which you want to add the option. In all browsers, you can pass null as the second parameter, and the added Option object will be added at the end of the optionscollection.
The add() method won’t overwrite any Option object already at that position, but instead will simply move the Option objects up in the collection to make space. This is basically the same as what you had to code into the btnAddWedClick() function using your for loop.
Using the add() method, you can rewrite the btnAddWedClick() function in ch11_example7.html to look like this:
function btnAddWedClick() {
var days = theForm.theDay;
var options = days.options;
if (options[2].text != "Wednesday") {
var option = new Option("Wednesday", 2);
var thursdayOption = options[2];
try {
days.add(option, thursdayOption);
}
catch (error) {
days.add(option, 2);
}
} else {
alert("Do you want to have TWO Wednesdays?");
}
}
In IE7 (or IE8 in non-standards mode), the browser will throw an error if you pass an Option object as the second parameter. So use a try...catch statement to catch the error and pass a number to the second argument, as this code shows.
The Select object’s remove() method accepts just one parameter, namely the index of the option you want removed. When an option is removed, the options at higher index positions are moved down in the collection to fill the gap.
Using the remove() method, you can rewrite the btnRemoveWedClick() function in ch11_example7.html to look like this:
function btnRemoveWedClick() {
var days = theForm.theDay;
if (days.options[2].text == "Wednesday") {
days.remove(2);
} else {
alert("There is no Wednesday here!");
}
}
Modify the previous example and save it as ch11_example8.html before loading it into your browser. You’ll see that it works just as the previous version did.
Select Element Events
Select elements have three events: blur, focus, and change. You’ve seen all these events before. You saw the change event with the text box element, where it fired when focus was moved away from the text box and the value in the text box had changed. Here it fires when the user changes which option in the list is selected.
TRY IT OUT World Time Converter
Let’s take a look at an example that uses the change event. The World Time Converter lets you calculate the time in different countries:
<!DOCTYPE html>
<html lang="en">
<head>
<title>Chapter 11: Example 9</title>
</head>
<body>
<div>Local Time is <span id="spanLocalTime"></span></div>
<div id="divCityTime"></div>
<form name="form1">
<select size="5" name="lstCity">
<option value="60" selected>Berlin
<option value="330">Bombay
<option value="0">London
<option value="180">Moscow
<option value="-300">New York
<option value="60">Paris
<option value="-480">San Francisco
<option value="600">Sydney
</select>
<p>
<input type="checkbox" id="chkDst" name="chkDst" />
<label for="chkDst">Adjust city time for Daylight Savings</label>
</p>
</form>
<script>
var myForm = document.form1;
function updateTimeZone() {
var lstCity = myForm.lstCity;
var selectedOption = lstCity.options[lstCity.selectedIndex];
var offset = selectedOption.value;
var selectedCity = selectedOption.text;
var dstAdjust = 0;
if (myForm.chkDst.checked) {
dstAdjust = 60;
}
updateOutput(selectedCity, offset, dstAdjust);
}
function updateOutput(selectedCity, offset, dstAdjust) {
var now = new Date();
document.getElementById("spanLocalTime")
.innerHTML = now.toLocaleString();
now.setMinutes(now.getMinutes() + now.getTimezoneOffset() +
parseInt(offset, 10) + dstAdjust);
var resultsText = selectedCity + " time is " +
now.toLocaleString();
document.getElementById("divCityTime").innerHTML = resultsText;
}
myForm.lstCity.addEventListener("change", updateTimeZone);
myForm.chkDst.addEventListener("click", updateTimeZone);
updateTimeZone();
</script>
</body>
</html>
Save this as ch11_example9.html. Open the page in your browser.
The form layout looks something like the one shown in Figure 11.10. Whenever the user clicks a city in the list, her local time and the equivalent time in the selected city are shown. In the example shown in Figure 11.10, the local region is set to Central Standard Time in the U.S., and the selected city is Berlin, with the daylight savings box checked.
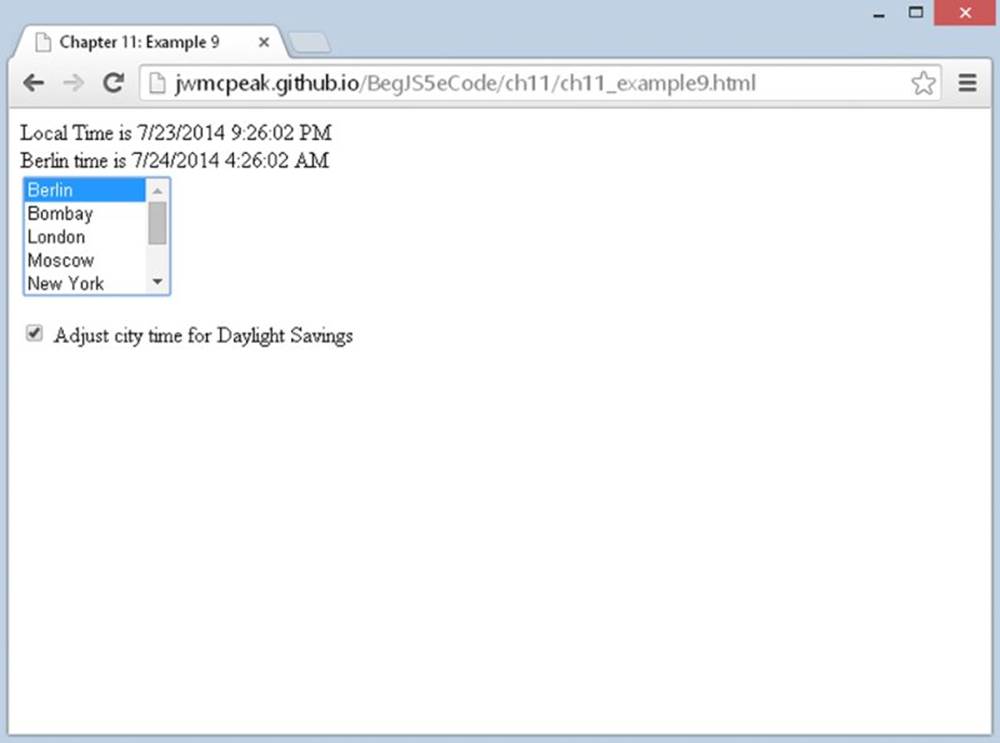
Figure 11.10
It’s worth pointing out that this is just an example and not a totally foolproof one, because of the problems presented by daylight savings. Some locations don’t have it, others do at fixed times of year, and yet others do but at varying times of the year. This makes it difficult to predict accurately when a country will have its daylight savings period. You have tried to solve this problem by adding a check box for the user to click if the city she chooses from the list is using daylight savings hours (which you assume will put the time in the city forward by one hour).
In addition, don’t forget that some users may not even have their regional settings set correctly—there’s no easy way around this problem.
In the body of this page is a pair of <div/> elements used for output:
<div>Local Time is <span id="spanLocalTime"></span></div>
<div id="divCityTime"></div>
There’s also a form in which you’ve defined a list box using a <select> element:
<select size="5" name="lstCity">
<option value="60" selected>Berlin
<option value="330">Bombay
<option value="0">London
<option value="180">Moscow
<option value="-300">New York
<option value="60">Paris
<option value="-480">San Francisco
<option value="600">Sydney
</select>
Each of the options displays the city’s name in the list box and has its value set to the difference in minutes between that city’s time zone (in winter) and UTC. So London, which uses UTC, has a value of 0. Paris, which is an hour ahead of UTC, has a value of 60 (that is, 60 minutes). New York, which is five hours behind UTC, has a value of -300.
There’s also a check box with an associated label:
<p>
<input type="checkbox" id="chkDst" name="chkDst" />
<label for="chkDst">Adjust city time for Daylight Savings</label>
</p>
Checking this check box will add an hour to a city’s calculated time.
You’ll register the change event listener of the <select/> element and the click event listener of the check box to call the updateTimeZone() function. As with previous versions, you create a global variable to provide easier access to the <form/> element object:
var myForm = document.form1;
Then you register the event listeners:
myForm.lstCity.addEventListener("change", updateTimeZone);
myForm.chkDst.addEventListener("click", updateTimeZone);
The function updateTimeZone() doesn’t really update anything, but it does gather information and kick off the update process:
function updateTimeZone() {
var lstCity = myForm.lstCity;
The first four statements of this function create four variables. The first, lstCity, contains a reference to the <select/> element object. You create this variable for convenience purposes—namely for the creation of the second variable: selectedOption:
var selectedOption = lstCity.options[lstCity.selectedIndex];
This selectedOption variable is retrieved by using the lstCity object’s options property in conjunction with its selectedIndex property, and now that you have the selectedOption, you can easily get the information attached to the option:
var offset = selectedOption.value;
var selectedCity = selectedOption.text;
Next, you want to determine if the user checked the daylight savings check box:
var dstAdjust = 0;
if (myForm.chkDst.checked) {
dstAdjust = 60;
}
You initialize the dstAdjust variable with 0. If the check box is checked, you modify dstAdjust to contain the value of 60. The value of 60 is for 60 minutes. As you have probably guessed, your time conversion calculation will be with minute values.
In the final part of updateTimeZone(), you call the updateTime() function, passing the values contained within the selectedCity, offset, and dstAdjust variables:
updateTime(selectedCity, offset, dstAdjust);
}
In the function updateTime(), you write the current local time and the equivalent time in the selected city to the output elements.
You start at the top of the function by creating a new Date object, which is stored in the variable now. The Date object will be initialized to the current local time:
function updateOutput(selectedCity, offset, dstAdjust) {
var now = new Date();
Next, you output the local time to the <span/> element with an id of spanLocalTime:
document.getElementById("spanLocalTime").innerHTML = now.toLocaleString();
You use the Date object’s toLocaleString() method to format the date and time in your region’s format.
You saw in Chapter 7 that if you set the value of a Date object’s individual parts (such as hours, minutes, and seconds) to a value beyond their normal range, JavaScript assumes you want to adjust the date, hours, or minutes to take this into account. For example, if you set the hours to 36, JavaScript simply changes the hours to 12 and adds one day to the date stored inside the Date object. You use this to your benefit in the following line:
now.setMinutes(now.getMinutes() + now.getTimezoneOffset() +
parseInt(offset, 10) + dstAdjust);
Let’s break down this line to see how it works. Suppose that you’re in New York, with the local summer time of 5:11, and you want to know what time it is in Berlin. How does your line of code calculate this?
First, you get the minutes of the current local time; it’s 5:11, so now.getMinutes() returns 11.
Then you get the difference, in minutes, between the user’s local time and UTC using now.getTimezoneOffset(). If you are in New York, which is different from UTC by 4 hours during the summer, this is 240 minutes.
Then you get the integer value of the time difference between the standard winter time in the selected city and UTC time, which is stored in offset. You’ve used parseInt() here because it’s one of the few situations where JavaScript gets confused and assumes you want to join two strings together rather than treat the values as numbers and add them together. Remember that you got offset from an HTML element’s value, and that an HTML element’s values are strings, even when they hold characters that are digits. Because you want the time in Berlin, which is 60 minutes different from UTC time, this value will be 60.
Finally, you add the value of dstAdjust. Because it’s summer where you are and Berlin uses daylight savings hours, this value is 60.
So you have the following:
11 + 240 + 60 + 60 = 371
Therefore, now.setMinutes() is setting the minutes to 371. Clearly, there’s no such thing as 371 minutes past the hour, so instead JavaScript assumes you mean 6 hours and 11 minutes after 5:00, that being 11:11—the time in Berlin that you wanted.
Finally, the updateTime() function creates the resultsText variable and then writes the results to the divCityTime:
var resultsText = selectedCity + " time is " +
now.toLocaleString();
document.getElementById("divCityTime").innerHTML = resultsText;
}
HTML5 FORM OBJECT PROPERTIES AND METHODS
HTML4 was finalized in 1997, and it wasn’t until 2012 that the web community saw a push for HTML5. Needless to say, HTML hadn’t seen a significant update until the introduction of HTML5. So for fifteen years, web developers have worked with form controls that grossly don’t meet developers’ and users’ needs. Thankfully, that changes with HTML5.
One thing you’ve done throughout this chapter is respond to various form controls’ change, click, focus, blur, and keypress events (among others). All of these events can be used in conjunction with one another so that you can respond to any user input, but that requires a lot of extra code.
A better solution would be to use the input event introduced in HTML5. This new event fires when the value of an element changes. That means you can listen for the input event on a <form/> object and process its data as any field is updated.
The target of the input event is the element that changed. You use the input event later in this chapter.
New Input Types
HTML5 introduces a slew of new types for <input/> elements, and the following table lists them, their descriptions, and a description of their output (the control’s value if known). In all cases, the value is a string object.
|
TYPE |
DESCRIPTION |
VALUE |
|
color |
A control for specifying a color. The value is the color in hexadecimal format. |
A hexadecimal value of the number (#ff00ff). |
|
date |
Used for entering the date (year, month, and day). |
The date in yyyy-mm-dd format (2014-07-14). |
|
datetime |
Allows for entering the date and time based on UTC. |
Not yet supported. |
|
|
A field for editing an e-mail address. The value is automatically validated. |
The text input into the field (even if invalid e-mail). |
|
month |
A control for entering month and year; no time zone. |
The date in yyyy-mm format (2014-07). |
|
number |
Creates a control for numeric input, but does not prohibit alpha-character input. |
The numeric data input into the field, or an empty string if not a number. |
|
range |
Creates a native slider for imprecise numeric input. |
The value of the slider. |
|
search |
A single-line text entry control. |
The text input into the field. Line breaks are removed. |
|
tel |
Creates a control for telephone entry. |
The text input into the field. Line breaks are removed. |
|
time |
Allows time input with no time zone. |
The time in 24-hour format (15:37 for 03:37PM). |
|
url |
A control for editing absolute URLs. |
The text input into the field. Line breaks and leading/trailing whitespace are removed. |
|
week |
Creates a control for entering a date consisting of a week-year number and a week number with no time zone. |
The year and week number (2014-W29). |
Unfortunately, some of the new input types are not supported by any browser, and some are only supported by a few. Many of the supported input types exhibit inconsistent behavior between browsers. In short, if you plan on using any of these new input types, be sure to test your page in all modern browsers.
HTML5 also brings several new attributes to <input/> elements, all of which are accessible as properties of the element object. The following table lists just some of these attributes.
|
TYPE |
DESCRIPTION |
|
autocomplete |
Specifies that the value of the control can be automatically completed by the browser. |
|
autofocus |
Determines if the control should have focus when the page loads. |
|
form |
The ID of the associated form. If specified, the control can be placed anywhere in the document. If not specified, the control can only reside within the form. |
|
maxLength |
Specifies the maximum number of characters the user can enter for text, email, search, password, tel, and url types. |
|
pattern |
A regular expression that the control’s value is checked against. |
|
placeholder |
Displays a hint to the user of what can be entered in the field. |
|
required |
Specifies that the user must fill in a value for the field before submitting the form. |
In addition to these properties, HTML5 specifies three unique properties/attributes for the range type:
· min: The minimum value of the slider
· max: The maximum value of the slider
· step: The increment between values
TRY IT OUT New Input Types
Let’s look at an example of the number and range input types, as well as the input event. Open your text editor and type the following:
<!DOCTYPE html>
<html lang="en">
<head>
<title>Chapter 11: Example 10</title>
</head>
<body>
<form name="form1">
<p>
<label for="minValue">Min: </label>
<input type="number" id="minValue" name="minValue" />
</p>
<p>
<label for="maxValue">Max: </label>
<input type="number" id="maxValue" name="maxValue" />
</p>
<p>
<label for="stepValue">Step: </label>
<input type="number" id="stepValue" name="stepValue" />
</p>
<p>
<input type="range" id="slider" name="slider" />
</p>
</form>
<div id="output"></div>
<script>
var myForm = document.form1;
var output = document.getElementById("output");
function formInputChange() {
var slider = myForm.slider;
slider.min = parseFloat(myForm.minValue.value);
slider.max = parseFloat(myForm.maxValue.value);
slider.step = parseFloat(myForm.stepValue.value);
output.innerHTML = slider.value;
}
myForm.addEventListener("input", formInputChange);
</script>
</body>
</html>
Save this as ch11_example10.html.
When you open this page in a modern browser, you will see three text boxes and one slider. The three text boxes enable you to edit the minimum, maximum, and step of the slider. Providing any input to any of the form fields updates the min, max, andstep properties of the slider, as well as displays the value of the slider in a <div/> element.
There is one exception: In IE, changing the value of the slider does not cause the input event to fire.
Let’s first look at the form’s HTML:
<form name="form1">
<p>
<label for="minValue">Min: </label>
<input type="number" id="minValue" name="minValue" />
</p>
<p>
<label for="maxValue">Max: </label>
<input type="number" id="maxValue" name="maxValue" />
</p>
<p>
<label for="stepValue">Step: </label>
<input type="number" id="stepValue" name="stepValue" />
</p>
You start with three <input/> elements of type number. Their purpose is to allow you to specify the minimum, maximum, and step values of the fourth <input/> element:
<p>
<input type="range" id="slider" name="slider" />
</p>
</form>
This is a range <input/> element, and there are no attributes other than type, id, and name.
Outside of the form is a <div/> element with an id of output:
<div id="output"></div>
As you input data in the form, the contents of this <div/> element change with the value of the range <input/> element.
Now for the JavaScript. The first two lines of JavaScript code reach into the DOM and grab references to two elements:
var myForm = document.form1;
var output = document.getElementById("output");
The first is a reference to the <form/> element, and the second is the <div id="output"/> element.
To make this example work, you listen for the myForm object’s input event. So, next you call myForm.addEventListener() to register the listener:
myForm.addEventListener("input", formInputChange);
The formInputChange() function executes when the input event fires, and in its first line of code, you create a variable called slider to contain the range <input/> element:
function formInputChange() {
var slider = myForm.slider;
This is for convenience purposes because every statement in this function will reference the slider element in some way.
Next, you want to modify the slider’s min, max, and step properties with the data entered into the form:
slider.min = parseFloat(myForm.minValue.value);
slider.max = parseFloat(myForm.maxValue.value);
slider.step = parseFloat(myForm.stepValue.value);
Remember that an <input/> element’s value is string data—even if that string contains a number. Therefore, you need to convert the string into a numeric value. The parseFloat() function should be used here because floating-point numbers are valid values for a range’s min, max, and step properties.
Finally, you display slider’s value.
output.innerHTML = slider.value;
}
New Elements
HTML5 also introduces three new form controls:
· <output/> is used to display the result of a calculation.
· <meter/> is a graphical display of a value.
· <progress/> represents the completion progress of a task.
The <output/> element is more of a traditional form control in that it has to be associated with a form; it can reside within a form or you can provide a form’s id as the value of its form attribute.
The <meter/> and <progress/> elements, however, have no such requirement. They can appear anywhere within the document without any form association.
The <output/> Element
The <output/> element represents the result of a particular calculation or user action. No graphics or styling are associated with the element; it simply displays text (although you can apply styling with CSS).
At the heart of the <output/> element is its value property. Like a typical form control, the value property lets you get and set the value of the control, and setting the value visually updates the control to display whatever value you assigned to the property. But unlike typical form controls, the <output/> element does not have a value attribute. The value of the element is instead represented by a text node between the opening and closing <ouput> tags. For example:
<output name="result" id="result" for="field1 field2">10</output>
IE11 and below do not officially support the <output/> element, and setting the value property will result in an error. You might work around this issue by still using the <output/> element and settings its “value” with innerHTML. However, this workaround is not standard and is not recommended.
Finally, the <output/> element should be associated with fields involved in the result of calculations that the <output/> displays. You do this with the familiar for attribute. In the previous HTML, the <output/> element is associated with field1 and field2.
TRY IT OUT sing the <output/> Element
In this exercise, you modify Example 10 and use the <output/> element to display the range’s value. Feel free to copy and paste Example 10 and modify the highlighted lines of code:
<!DOCTYPE html>
<html lang="en">
<head>
<title>Chapter 11: Example 11</title>
</head>
<body>
<form id="form1" name="form1">
<p>
<label for="minValue">Min: </label>
<input type="number" id="minValue" name="minValue" />
</p>
<p>
<label for="maxValue">Max: </label>
<input type="number" id="maxValue" name="maxValue" />
</p>
<p>
<label for="stepValue">Step: </label>
<input type="number" id="stepValue" name="stepValue" />
</p>
<p>
<input type="range" id="slider" name="slider" />
</p>
</form>
<output id="result" name="result" form="form1" for="slider"></output>
<script>
var myForm = document.form1;
var output = myForm.result;
function formInputChange() {
var slider = myForm.slider;
slider.min = parseFloat(myForm.minValue.value);
slider.max = parseFloat(myForm.maxValue.value);
slider.step = parseFloat(myForm.stepValue.value);
result.value = slider.value;
}
myForm.addEventListener("input", formInputChange);
</script>
</body>
</html>
Save this as ch11_example11.html.
Because you’re using standard <output/> code, you will need to open this page in Chrome, Firefox, or Opera.
Let’s focus only on the lines that changed. First, you add an id attribute to the <form/> element:
<form id="form1" name="form1">
This addition is only necessary because you define the <output/> element outside of the form:
<output id="result" name="result" form="form1" for="slider"></output>
You define the <output/> element by setting its id and name attributes to result, the form attribute to form1, and the for attribute to slider. The latter isn’t absolutely necessary for this example to work, but the for attribute exists so that you can write semantic markup. By setting for to slider, you (and readers of your code) know that the <output/> element displays the value related to the range field.
The next change is the second line of JavaScript code. Instead of retrieving a <div/> element, you grab a reference to your new <output/> element:
var output = myForm.result;
Notice the code: myForm.result. Even though the <output/> element is not inside the form, it is still associated with the form because of the for attribute. Therefore, you can walk the Form object hierarchy to reference the <output/> element.
The final change is the last statement of the formInputChange() function:
result.value = slider.value;
You set the <output/> element’s value property to the value of slider; thus, updating the information displayed in the page.
The <meter/> and <progress/> Elements
As mentioned earlier, the <meter/> and <progress/> form controls are rather unique in that they can be used anywhere within a page. It might seem strange to call them “form controls” when they don’t have to be used within a form—they don’t even accept user input! Nevertheless, they’re categorized as such.
At first glance, these elements look similar, but they, in fact, serve two different purposes and have a different set of attributes and properties.
The <meter/> element is used to graphically display an individual value within a particular range. For example, the RPMs of a vehicle’s engine, the heat of a CPU, or disk usage indicators are perfect examples of what the <meter/> element is used for.
The <meter/> element consists of an opening and closing tag, and you can specify the low, optimum, and high sections of the meter. These are ranges, mostly for semantic purposes, that affect the meter’s color. You can also set the min and max of possible values, as well as the value of the meter:
<meter min="0" max="150" low="40" optimum="75"
high="100" value="80">80 Units of Something</meter>
These six attributes map to properties of the same names. If a browser doesn’t support the <meter/> element, the text between the opening and closing tag is displayed in the browser.
NOTE IE9, IE10, and IE11 do not support the <meter/> element.
The <progress/> element represents the completion progress of a task, and as with the preceding new elements, it consists of an opening and closing tag:
<progress max="100" value="40">40% done with what you're doing</progress>
It also has a max attribute that maps to the element object’s max property, and the control’s value is contained within the value attribute/property. Like <meter/>, the text between the opening and closing tags is displayed if the browser doesn’t support the <progress/>element.
TRY IT OUT The <meter/> and <progress/> Elements
Let’s use the <meter/> and <progress/> elements in an example. Open your text editor and type the following:
<!DOCTYPE html>
<html lang="en">
<head>
<title>Chapter 11: Example 12</title>
</head>
<body>
<h2>Highway Speed Tracker</h2>
<form id="form1" name="form1">
<p>
<label for="driverName">Driver Name: </label>
<input type="text" id="driverName" name="driverName" />
</p>
<p>
<label for="speed">Speed (Miles/Hour): </label>
<input type="number" id="speed" name="speed" />
<meter id="speedMeter" value="0" low="55" optimum="75"
high="90" max="120"></meter>
</p>
<p>
<label for="vehicle">Vehicle Type: </label>
<input type="text" id="vehicle" name="vehicle" />
</p>
</form>
<p>
Form Completion Progress:
<progress id="completionProgress" max="3" value="0"></progress>
</p>
<script>
var myForm = document.form1;
var completionProgress = document.getElementById("completionProgress");
var speedMeter = document.getElementById("speedMeter");
function countFieldData() {
var count = 0;
for (var index = 0; index < myForm.length; index++) {
var element = myForm[index];
if (element.value) {
count++;
}
}
return count;
}
function formInputChange() {
completionProgress.value = countFieldData();
speedMeter.value = myForm.speed.value;
}
myForm.addEventListener("input", formInputChange);
</script>
</body>
</html>
Save this as ch11_example12.html. Open the page in your browser (including IE—this example mostly works in IE9, IE10, and IE11), and you’ll see a form with three fields: a driver’s name, the driver’s speed, and the type of vehicle the driver drove. As you fill out the form, you’ll notice a few things going on.
First, the progress bar below the form changes in value. This indicates your progress in filling out the form. When all fields have a value, you’re done! Second, you’ll notice the meter next to the Speed field updates to visually represent the data from that field.
Now let’s look at the HTML. In the body of the page, you define a form with three <input/> elements. The first is a normal text box for the driver’s name:
<form id="form1" name="form1">
<p>
<label for="driverName">Driver Name: </label>
<input type="text" id="driverName" name="driverName" />
</p>
The next field is a number field for inputting the driver’s speed:
<p>
<label for="speed">Speed (Miles/Hour): </label>
<input type="number" id="speed" name="speed" />
<meter id="speedMeter" value="0" low="55" optimum="75"
high="90" max="120"></meter>
</p>
Here, you also define a <meter/> element with an id of speedMeter. This meter is supposed to visually represent highway speed in miles per hour. In such cases, 55MPH is slow, 75MPH is optimum/standard, and 90MPH is high. The maximum value this meter can display is 120.
The last field is another text box for the driver’s vehicle:
<p>
<label for="vehicle">Vehicle Type: </label>
<input type="text" id="vehicle" name="vehicle" />
</p>
Then after the form, you define a <progress/> element:
<p>
Form Completion Progress:
<progress id="completionProgress" max="3" value="0"></progress>
</p>
This is to track the user’s progress in filling out the form. It has an id of completionProgress and has a maximum value of 3 because it contains three fields.
Of course, the HTML by itself isn’t very interesting; so, let’s look at the JavaScript. You first retrieve three elements from the document: the <form/>, <progress/>, and <meter/> elements.
var myForm = document.form1;
var completionProgress = document.getElementById("completionProgress");
var speedMeter = document.getElementById("speedMeter");
To retrieve the <progress/> and <meter/> elements, you use document.getElementById() because although these two elements are considered form controls, you cannot access them through the form hierarchy (which admittedly can be a little confusing).
Once again, the form’s input event provides the magic for this example; so, you register its listener:
myForm.addEventListener("input", formInputChange);
The formInputChange() function is rather simple; it updates the values of both the <progress/> and <meter/> elements:
function formInputChange() {
completionProgress.value = countFieldData();
speedMeter.value = myForm.speed.value;
}
The value for speedMeter comes from the speed field in the form, but a little more work is needed to set the value for completionProgress.
You create a helper function called countFieldData(). Its job is straightforward: Examine the elements within the form and determine if they have a value. It’s not a foolproof solution for determining if the user has completed the form, but it works for this example.
First, you define a counter variable to count how many fields have a value. You call this variable count:
function countFieldData() {
var count = 0;
Now you need to check the value property of every element in the form. You could write code explicitly for this form, or you can take a more generic approach and loop through the form’s elements. Let’s do the latter:
for (var index = 0; index < myForm.length; index++) {
var element = myForm[index];
if (element.value) {
count++;
}
}
Using a for loop, you iterate over the myForm object/collection to retrieve each form control and check if it has a value. If the element has a value, you increment the count variable.
After the loop exits, you return the value of the count variable:
return count;
}
SUMMARY
In this chapter, you looked at how to add a user interface onto your JavaScript so that you can interact with your users and acquire information from them. This chapter covered the following:
· The HTML form is where you place elements making up the interface in a page.
· Each HTML form groups together a set of HTML elements. When a form is submitted to a server for processing, all the data in that form is sent to the server. You can have multiple forms on a page, but only the information in one form can be sent to the server.
· A form is created with the opening tag <form> and ends with the close tag </form>. All the elements you want included in that form are placed in between the open and close <form> tags. The <form/> element has various attributes—for client-side scripting, the nameattribute is the important one. You can access forms with either their name attribute or their ID attribute.
· Each <form> element creates a Form object, which is contained within the document object. To access a form named myForm, you write document.myForm. The document object also has a forms property, which is a collection containing every form inside the document. The first form in the page is document.forms[0], the second is document.forms[1], and so on. The length property of the forms property (document.forms.length) tells you how many forms are on the page.
· Having discussed forms, we then went on to look at the different types of HTML elements that can be placed inside forms, how to create them, and how they are used in JavaScript.
· The objects associated with the form elements have a number of properties, methods, and events that are common to them all. They all have the name property, which you can use to reference them in your JavaScript. They also all have the form property, which provides a reference to the Form object in which that element is contained. The type property returns a text string telling you what type of element this is; types include text, button, and radio.
· You also saw that the methods focus() and blur(), and the events focus and blur, are available to every form element object. Such an element is said to receive the focus when it becomes the active element in the form, either because the user has selected that element or because you used the focus() method. However an element got the focus, its focus event will fire. When another element is set as the currently active element, the previous element is said to lose its focus, or to blur. Again, loss of focus can be the result of the user selecting another element or the use of the blur() method; either way, when it happens the blur event fires. You saw that the firing of focus and blur can, if used carefully, be a good place to check things like the validity of data entered by a user into an element.
· All elements return a value, which is the string data assigned to that element. The meaning of the value depends on the element; for a text box, it is the value inside the text box, and for a button, it’s the text displayed on its face.
· Having discussed the common features of elements, we then looked at each of the more commonly used elements in turn, starting with the button element.
· The button element’s purpose in life is to be clicked by the user, where that clicking fires some script you have written. You can capture the clicking by connecting to the button’s click event. A button is created by means of the <input/> element with the typeattribute set to button. The value attribute determines what text appears on the button’s face. Two variations on a button are the submit and reset buttons. In addition to acting as buttons, they also provide a special service not linked to code. The submit button automatically submits the form to the server; the reset button clears the form back to its default state when loaded in the page.
· The text element allows the user to enter a single line of plaintext. A text box is created by means of the <input/> element with the type attribute set to text. You can set how many characters the user can enter and how wide the text box is with the maxlength and sizeattributes, respectively, of the <input/> element. The text box has an associated object called Text, which has the additional events select and change. The select event fires when the user selects text in the box, and the more useful change event fires when the element loses focus and its contents have changed since the element gained the focus. The firing of the change event is a good place to do validation of what the user has just entered. If she entered illegal values, such as letters when you wanted numbers, you can let her know and send her back to correct her mistake. A variation on the text box is the password box, which is almost identical to the text box except that the values typed into it are hidden and shown as asterisks. Additionally, the text box also has the keydown,keypress, and keyup events.
· The next element you looked at was the text area, which is similar to the text box except that it allows multiple lines of text to be entered. This element is created with the open tag <textarea> and closed with the </textarea> tag, the width and height in characters of the text box being determined by the cols and rows attributes, respectively. The wrap attribute determines whether the text area wraps text that reaches the end of a line and whether that wrapping is sent when the contents are posted to the server. If this attribute is left out, or set to off, no wrapping occurs; if set to soft, it causes wrapping client-side, but is not sent to the server when the form is sent; if set to hard, it causes wrapping client-side and is sent to the server. The associated Textarea object has virtually the same properties, methods, and events as a Text object.
· You then looked at the check box and radio button elements together. Essentially they are the same type of element, except that the radio button is a grouped element, meaning that only one in a group can be checked at once. Checking another one causes the previously checked button to be unchecked. Both elements are created with the <input/> element, the type attribute being checkbox or radio. If checked is put inside the <input> tag, that element will be checked when the page is loaded. Creating radio buttons with the same name creates a radio button group. The name of a radio button actually refers to an array, and each element within that array is a radio button defined on the form to be within that group. These elements have associated objects called Checkbox and Radio. Using the checked property of these objects, you can find out whether a check box or radio button is currently checked. Both objects also have the click event in addition to the common events focus and blur.
· Next in your look at elements were the drop-down list and list boxes. Both, in fact, are the same select element, with the size attribute determining whether it’s a drop-down or list box. The <select> tag creates these elements, the size attribute determining how many list items are visible at once. If a size of 1 is given, a drop-down box rather than a list box is created. Each item in a select element is defined by the <option/> element, or added to later by means of the Select object’s options collection property, which is an array-like structure containing each Option object for that element. However, adding options after the page is loaded differs slightly between standards-compliant browsers and old-IE. The Select object’s selectedIndex property tells you which option is selected; you can then use that value to access the appropriate option in the options collection and use the Option object’s value property. The Option object also has the text and index properties, text being the displayed text in the list and index being its position in the Selectobject’s options collection property. You can loop through the options collection, finding out its length from the Select object’s length property. The Select object has the change event, which fires when the user selects another item from the list.
· You then looked at HTML5’s new elements and input types, as well as the input event. You learned how to write JavaScript code to manipulate the <output/>, <meter/>, and <progress/> elements and modify their output when users input data in a form.
In the next chapter, you look at JavaScript Object Notation (JSON), a data format that lets you store JavaScript objects and arrays as string data.
EXERCISES
You can find suggested solutions to these questions in Appendix A.
1. Using the code from the temperature converter example you saw in Chapter 2, create a user interface for it and connect it to the existing code so that the user can enter a value in degrees Fahrenheit and convert it to centigrade.
2. Create a user interface that allows users to pick the computer system of their dreams, similar in principle to the e-commerce sites selling computers over the Internet. For example, they could be given a choice of processor type, speed, memory, and hard drive size, and the option to add additional components like a DVD-ROM drive, a sound card, and so on. As the users change their selections, the price of the system should update automatically and notify them of the cost of the system as they specified it, either by using analert box or by updating the contents of a text box.
All materials on the site are licensed Creative Commons Attribution-Sharealike 3.0 Unported CC BY-SA 3.0 & GNU Free Documentation License (GFDL)
If you are the copyright holder of any material contained on our site and intend to remove it, please contact our site administrator for approval.
© 2016-2026 All site design rights belong to S.Y.A.