Wrox Press Beginning JavaScript 5th (2015)
Chapter 17. Other JavaScript Libraries
WHAT YOU WILL LEARN IN THIS CHAPTER:
· Using Modernizr to write feature-specific code
· Loading external resources for browsers that do not support certain features
· Using Prototype and MooTools to perform common tasks, such as DOM manipulation and Ajax requests
WROX.COM CODE DOWNLOADS FOR THIS CHAPTER
You can find the wrox.com code downloads for this chapter at http://www.wiley.com/go/BeginningJavaScript5E on the Download Code tab. You can also view all of the examples and related files at http://beginningjs.com.
jQuery is the most popular JavaScript library today. It’s used on hundreds of thousands of websites, and yet it’s not the only library JavaScript developers use. In fact, thousands of JavaScript libraries and utilities are available, and each one can typically be categorized into two groups: general and specialty.
The aim of general frameworks is to balance the differences between browsers by creating a new, unified API to perform general tasks like DOM manipulation and Ajax functionality (jQuery is a general framework). Specialty frameworks, on the other hand, focus on a specific ability, such as feature detection. So identify what it is you want to achieve and choose a framework based on that. For example, if you wanted to perform animations and only animations, the script.aculo.us framework (http://script.aculo.us/) could be a good choice for you.
This chapter looks at both general and specific frameworks. When deciding which framework to use, look at the framework’s browser support, documentation, and community involvement. The frameworks covered in this chapter are established, stable, popular, and compatible with every major modern browser (and even legacy versions of IE). You’ll learn about:
· Modernizr: A library designed to detect HTML5 and CSS features supported by the browser. (http://modernizr.com/)
· Prototype: A framework that provides a simple API to perform web tasks. Although it offers ways of manipulating the DOM, Prototype’s primary aim is to enhance the JavaScript language by providing class definition and inheritance. (http://www.prototypejs.org)
· MooTools: A framework that aims to be compact while offering a simple API to make common tasks easier. Like Prototype, MooTools also aims to enhance the JavaScript language—not just make DOM manipulation and Ajax easier. It also includes a lightweight effects component originally called moo.fx. (http://www.mootools.net)
These are just a tiny sampling of what is available for you to use in your web pages. Some other solutions not covered in this chapter are:
· Yahoo! User Interface Framework (YUI): A framework that ranges from basic JavaScript utilities to complete DHTML widgets. Yahoo! has a team devoted to developing YUI. (http://developer.yahoo.com/yui/)
· Ext JS: This framework started as an extension to the YUI. It offers customizable UI widgets for building rich Internet applications. (http://www.extjs.com)
· Dojo: A toolkit designed around a package system. The core functionality resembles that of any other framework (DOM manipulation, event normalization, DHTML widgets, and so on), but it provides and allows a way to add more functionality by adding more packages. (http://www.dojotoolkit.org)
· MochiKit: A framework that prides itself on its well-testedness (hundreds of tests according to the MochiKit site) and its compatibility with other JavaScript frameworks and libraries. (http://www.mochikit.com)
DIGGING INTO MODERNIZR
As you undoubtedly know from various previous chapters, JavaScript development is not utopia. It never has been, and realistically, it never will be simply due to the fact that multiple browsers exist (which is a good thing—don’t get us wrong), and there is a certain disparity between the features those browsers implement. This is especially true as new features are developed and introduced to the browser. For example, HTML5 and CSS3 introduce many new features that some browsers haven’t yet implemented. If you want to use any of these new features in your page or application, you have to ensure that the browser your visitor is using properly supports them. Otherwise, your page will break.
In Chapter 8, you learned how to write code that targets specific features through a process called feature detection, and although feature detection is a time-tested strategy, two problems exist:
· Some features can be difficult to detect.
· Different browsers may support what is essentially the same feature, but it may be implemented differently.
Modernizr fixes these problems by providing a unified API for detecting HTML5 and CSS features in the browser.
NOTE Even though Modernizr offers many CSS-based features, this chapter focuses on Modernizr’s JavaScript capabilities. If you are interested in its CSS capabilities, see http://modernizr.com/docs/ for more information.
Getting Modernizr
Just like every other JavaScript library and framework, Modernizr is nothing more than a JavaScript file that you include within your page. It comes in two different flavors: development (uncompressed) and production (minified). In most cases, the production version is what you want to use in your page or application because it is smaller in size, but the development version could prove useful in certain situations where you need to debug your code along with Modernizr’s (you learn about debugging in Chapter 18).
Modernizr also lets you pick and choose the tests you need to perform in your page or application (Figure 17.1). For example, if you only use localStorage or native drag and drop in your page, you can build a customized version of Modernizr that contains only the necessary code for testing the browser’s support for those features.
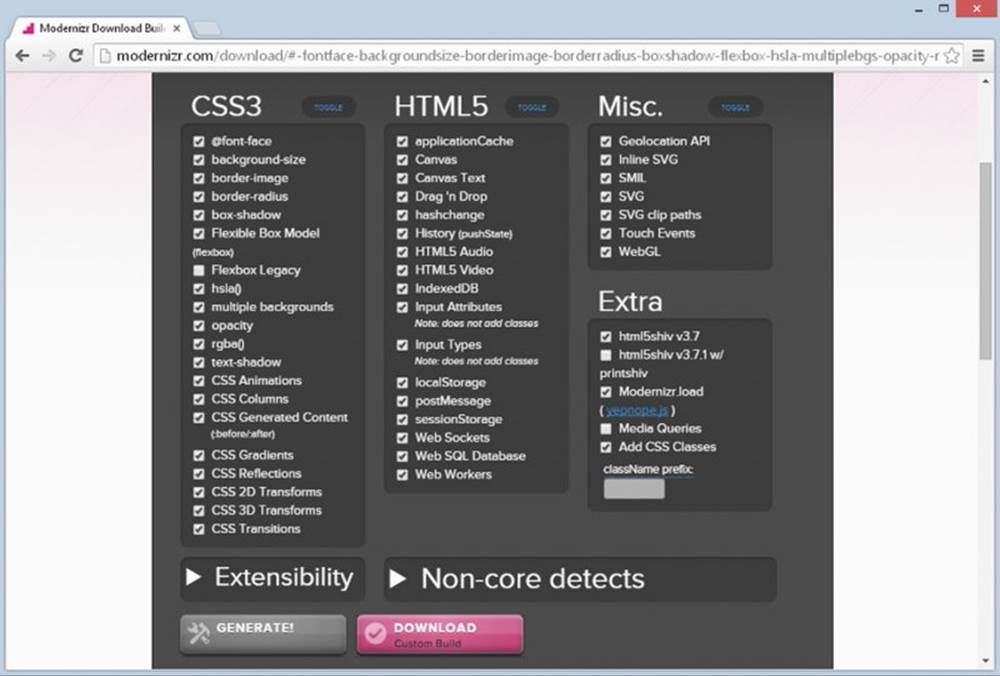
Figure 17.1
A feature that Modernizr includes by default is a utility called HTML5 Shiv. This utility is only for legacy versions of IE, and it enables you to style HTML5 elements that are not supported in versions prior to IE9. If you do not plan to target legacy IE, you can omit HTML5 Shiv in your customized build.
Modernizr’s download experience varies depending on the version you want to download. The development version includes most tests by default (you can still customize the build if that’s your thing), but the download page also has an easy-to-use Download button (as shown in Figure 17.1). Simply clicking the button downloads Modernizr to your computer, and you can save it wherever you need to.
The production version is just as simple to download. Most features are excluded by default, forcing you to pick the features that you need for your page or application. This is actually a good move by the Modernizr folks because you want a customized (and thus optimized) build for your specific needs. After you select your desired features and click the Generate button, the Download button appears.
NOTE For the sake of simplicity, you can find the full production version (v2.8.3) in the code download for this chapter. You can also download it at http://beginningjs.com/modernizr.js.
Modernizr’s developers suggest that, for best performance, you reference Modernizr’s <script/> element inside the <head/> and after your style sheet references.
Modernizr’s API
Modernizer has a straightforward API that revolves around a single object called Modernizr. It has a set of properties and methods that you use to determine if a browser supports a particular feature. For example, you can determine if a browser supports the geolocation API from Chapter 8 like this:
if (Modernizr.geolocation) {
// use geolocation
}
At first glance, it looks like you haven’t gained much by using Modernizr because in Chapter 8, you learned that you can do the same thing with the navigator object, like this:
if (navigator.geolocation) {
// use geolocation
}
But remember that Modernizr is a library for detecting many features, even those that require a bit more involvement to detect. For example, the code for determining support for native drag and drop is more complex. The elements in browsers that support native drag and drop have a draggable attribute, or they support events like dragstart and drop. That means the code needed to check for drag and drop support could look like this:
var el = document.createElement("span");
if (typeof el.draggable != "undefined" ||
(typeof el.ondragstart != "undefined" &&
typeof el.ondrop != "undefined")) {
// use native drag and drop
}
This code creates an arbitrary <span/> element and checks if it has a draggable property or ondragstart and ondrop properties. If any of these conditions are true, the browser supports drag and drop.
NOTE The aforementioned test is written to accommodate IE8 because it supports native drag and drop, but it doesn't support the draggable attribute/property.
This code, however, is cumbersome to write and read. Modernizr simplifies it to:
if (Modernizr.draganddrop) {
// use drag and drop
}
Here, you check the browser’s support for drag and drop with Modernizr’s draganddrop property, and you get the same results as the previous test.
Modernizr checks for a wide variety of HTML5 (and CSS3) features. The following table lists just a few:
|
HTML5 FEATURE |
MODERNIZR PROPERTY |
|
HTML5 Audio |
audio |
|
M4A Audio |
audio.m4a |
|
MP3 Audio |
audio.mp3 |
|
OGG Audio |
audio.ogg |
|
WAV Audio |
audio.wav |
|
HTML5 Video |
video |
|
H.264 Video |
video.h264 |
|
OGG Video |
video.ogg |
|
WebM Video |
video.webm |
|
Drag and Drop |
draganddrop |
|
Local Storage |
localstorage |
|
Geolocation |
geolocation |
In addition to the built-in tests, you can also extend Modernizr with your own tests.
Custom Tests
You can add your own tests to Modernizr with its addTest() method. The process is simple: simply call Modernizr.addTest(), pass it the name of your test, and pass the function that performs the test.
For example, it was mentioned earlier that although IE8 supports native drag and drop, it does not support the draggable attribute/property. You can extend Modernizr to test for this specific functionality like this:
Modernizr.addTest("draggable", function(){
var span = document.createElement("span");
return typeof span.draggable != "undefined"
});
This code adds a new test called "draggable". Its function creates an arbitrary <span/> element and checks if it has a draggable property. In modern browsers, the draggable property defaults to false, but it is undefined in IE8. Therefore, when you use the test like this:
if (!Modernizr.draggable) {
// code for IE8
}
you can run code for browsers that do not support the draggable attribute/property.
Sometimes, however, you don’t want to use an if statement to run code for a specific browser (or a set of browsers). Instead, wouldn’t it be nice if you could load an external JavaScript file for browsers that passed or failed a certain test? Modernizr can do that!
Loading Resources
Modernizr has an optional method called load() (you can omit it from your custom build), and it’s used to load external JavaScript and CSS files based on the result of a test.
The load() method’s basic usage is simple; you pass it an object that describes the test and resources you want to load. For example:
Modernizr.load({
test: Modernizr.geolocation,
nope: "geo-polyfill.js",
yep: "geo.js"
});
This code calls Modernizr.load() and passes an object that has test, nope, and yep as properties (we’ll call this a yepnope object). The test property contains the result of the test. If it passes, Modernizr loads the file assigned to the yep property (geo.js in this example). But if it fails, the file assigned to the nope property (geo-polyfill.js) is loaded instead.
NOTE A polyfill is a third-party JavaScript component that replicates the standard API for older browsers.
The yep and nope properties are optional, so you can load only one resource if you need to. For example, the following code loads a JavaScript file only for browsers that do not support the draggable attribute/property:
Modernizr.load({
test: Modernizr.draggable,
nope: "draggable-polyfill.js"
});
This type of behavior is ideal in these situations. You don’t want or need to load a polyfill for the draggable attribute/property for modern browsers, but you do for older browsers, like IE8, that do not support it.
Modernizr’s load() method also lets you run multiple tests. Instead of passing a single yepnope object, you can pass an array of them, like this:
Modernizr.load([{
test: Modernizr.draggable,
nope: "draggable-polyfill.js"
},
{
test: document.addEventListener,
nope: "event-polyfill.js"
}]);
This code passes an array of two yepnope objects to the load() method. The first object is the same custom draggable test from the previous example. The second object checks if the browser supports the document.addEventListener() method; if it doesn’t, Modernizr loads an event polyfill.
Modernizr loads external resources asynchronously. This means that the browser will continue to load the rest of the page while Modernizr downloads and executes the external resources. This can cause issues if your page relies on those resources; you have to ensure they are completely loaded before you attempt to use them.
You can avoid this type of issue by adding a complete property to your yepnope object. This property should contain a function, and it executes regardless of what happens when all (or even none) of the resources are finished loading. For example:
function init() {
alert("Page initialization goes here!");
}
Modernizr.load([{
test: Modernizr.draggable,
nope: "draggable-polyfill.js"
},
{
test: document.addEventListener,
nope: "event-polyfill.js",
complete: init
}]);
This new code adds two changes to the previous example. First, it defines a function called init(). This function would normally contain code to initialize the JavaScript used on the page (such as setting up event listeners).
The second change is the addition of the complete property to one of the yepnope objects. It’s set to the aforementioned init() function, and it always executes—either when the resources are completely loaded, or immediately for browsers that do not need the resources.
TRY IT OUT Revisiting Native Drag and Drop
As mentioned earlier in this section, IE8 supports native drag and drop, but it doesn’t support the draggable attribute/property. In this example, you revisit ch10_example21.html and use Modernizr to load two polyfills: one to support draggable, and another to support the standard DOM event model.
These polyfills are written by Jeremy and are provided in the code download. They are event-polyfill.js and draggable-polyfill.js. Both are open source. Loading these polyfills will make this example work with minimal modifications to the existing code.
Open your text editor and type the following:
<!DOCTYPE html>
<html lang="en">
<head>
<title>Chapter 17: Example 1</title>
<style>
[data-drop-target] {
height: 400px;
width: 200px;
margin: 2px;
background-color: gainsboro;
float: left;
}
.drag-enter {
border: 2px dashed #000;
}
.box {
width: 200px;
height: 200px;
}
.navy {
background-color: navy;
}
.red {
background-color: red;
}
</style>
<script src="modernizr.min.js"></script>
</head>
<body>
<div data-drop-target="true">
<div id="box1" draggable="true" class="box navy"></div>
<div id="box2" draggable="true" class="box red"></div>
</div>
<div data-drop-target="true"></div>
<script>
function handleDragStart(e) {
e.dataTransfer.setData("text", this.id);
}
function handleDragEnterLeave(e) {
if (e.type == "dragenter") {
this.className = "drag-enter";
} else {
this.className = "";
}
}
function handleOverDrop(e) {
e.preventDefault();
if (e.type != "drop") {
return;
}
var draggedId = e.dataTransfer.getData("text");
var draggedEl = document.getElementById(draggedId);
if (draggedEl.parentNode == this) {
this.className = "";
return;
}
draggedEl.parentNode.removeChild(draggedEl);
this.appendChild(draggedEl);
this.className = "";
}
function init() {
var draggable = document.querySelectorAll("[draggable]");
var targets = document.querySelectorAll("[data-drop-target]");
for (var i = 0; i < draggable.length; i++) {
draggable[i].addEventListener("dragstart", handleDragStart);
}
for (i = 0; i < targets.length; i++) {
targets[i].addEventListener("dragover", handleOverDrop);
targets[i].addEventListener("drop", handleOverDrop);
targets[i].addEventListener("dragenter", handleDragEnterLeave);
targets[i].addEventListener("dragleave", handleDragEnterLeave);
}
}
Modernizr.addTest('draggable', function () {
var span = document.createElement("span");
return typeof span.draggable != "undefined";
});
Modernizr.load([{
test: Modernizr.draggable,
nope: "draggable-polyfill.js"
},
{
test: document.addEventListener,
nope: "event-polyfill.js",
complete: init
}]);
</script>
</body>
</html>
Save this as ch17_example1.html and load it into any browser (you can also view it at http://beginningjs.com/examples/ch17_example1.html). You’ll see that it behaves exactly like ch10_example21.html, and if you can view it in IE8, you’ll see that it works there, too.
This code is almost identical to ch10_example21.html, so let’s just go over the new/changed code. First, you add a reference to Modernizr:
<script src="modernizr.min.js"></script>
As recommended by the folks at Modernizr, the <script/> element resides within the document’s <head/>.
The next change is the addition of the init() function. The function itself is new, but the code it executes is the same initialization code from ch10_example21.html:
function init() {
var draggable = document.querySelectorAll("[draggable]");
var targets = document.querySelectorAll("[data-drop-target]");
for (var i = 0; i < draggable.length; i++) {
draggable[i].addEventListener("dragstart", handleDragStart);
}
for (i = 0; i < targets.length; i++) {
targets[i].addEventListener("dragover", handleOverDrop);
targets[i].addEventListener("drop", handleOverDrop);
targets[i].addEventListener("dragenter", handleDragEnterLeave);
targets[i].addEventListener("dragleave", handleDragEnterLeave);
}
}
This code was wrapped within the init() function so that Modernizr can use it as the complete callback function, therefore setting up the event listeners after the event-polyfill.js file has been completely loaded. This is crucial because if the event polyfill isn’t ready, the page will not work in IE8.
The final two additions are familiar to you; the first creates a custom Modernizr test called draggable:
Modernizr.addTest('draggable', function () {
var span = document.createElement("span");
return typeof span.draggable != "undefined";
});
The second calls Modernizr’s load() method to load the necessary polyfills if they’re needed:
Modernizr.load([{
test: Modernizr.draggable,
nope: "draggable-polyfill.js"
},
{
test: document.addEventListener,
nope: "event-polyfill.js",
complete: init
}]);
We should admit that, in the case of this example, creating the custom draggable test is a bit overboard. You only use the test once, so it would be slightly more efficient to omit the custom test and write the first yepnope object like this:
{
test: typeof document.createElement("span").draggable != "undefined",
nope: "draggable-polyfill.js"
}
At the same time, this slightly more efficient version is a bit uglier. Ultimately, the choice is yours. In cases like this, however, many people create the custom test in a utility file because it could be reused in other projects.
DIVING INTO PROTOTYPE
jQuery is the most popular framework today, but that crown used to sit upon Prototype’s head. Unlike jQuery, Prototype’s focus is augmenting the way you program with JavaScript by providing classes and inheritance. It does, however, also provide a robust set of tools for working with the DOM and Ajax support.
Getting Prototype
Point your browser to Prototype’s download page at http://prototypejs.org/download. Here, you’ll be given the choice to download the latest stable version, or an older version. The examples in this book use the latest stable version at the time of this writing: v1.7.2.
NOTE The stable version of Prototype 1.7.2 is provided in the code download.
No compressed versions of Prototype exist.
Testing Your Prototype Installation
The largest portion of the Prototype library is its DOM extensions. Like jQuery, it provides a variety of helpful utility functions to make DOM programming a bit easier; it even has its own $() function (unlike jQuery, Prototype doesn’t have a special name for this function; it’s simply called the dollar function):
var buttonObj = $("theButton");
Prototype’s $() function only accepts element id attribute values or DOM element objects to select and add extra functionality to DOM objects. Prototype does have a function that allows you to use CSS selectors to select elements; you learn about that later.
Like jQuery, Prototype provides its own API for registering event listeners. It extends the Event object with a method called observe(), which is not unlike the evt.addListener() method you wrote in Chapter 10. For example:
function buttonClick() {
alert("Hello, Prototype World!");
}
Event.observe(buttonObj, "click", buttonClick);
The Event.observe() method accepts three arguments: The first is the DOM or BOM object you want to register an event listener for, the second is the event name, and the third is the function to call when the event fires. You can use Event.observe() to register an event listener to any DOM or BOM object. You look at this method, and other ways to listen for events, later in this chapter.
Like jQuery, you can chain method calls together on wrapper objects created with the $() function. Prototype’s method names, however, are a bit more verbose:
function buttonClick () {
$(document.body).writeAttribute("bgColor", "yellow")
.insert("<h1>Hello, Prototype!</h1>");
}
Event.observe(buttonObj, "click", buttonClick);
The buttonClick() function now modifies the <body/> element by changing the background color to yellow and adding content to the page. Let’s break down this statement.
First, you pass document.body to the $() function:
$(document.body)
This extends the standard <body/> element with Prototype’s extension methods—one of which is the writeAttribute() method. As its name implies, it “writes” or sets an attribute on the element:
writeAttribute("bgColor", "yellow")
This sets the body’s bgColor attribute to yellow. The writeAttribute() method returns the DOM object it was called on, the extended document.body object in this case. So you can call another extension method, called insert(), to set its content:
insert("<h1>Hello, Prototype!</h1>")
Let’s use this as the basis for a file to test your Prototype installation. Open your text editor and type the following:
<!DOCTYPE html>
<html lang="en">
<head>
<title>Chapter 17: Example 2</title>
</head>
<body>
<button id="theButton">Click Me!</button>
<script src="prototype.1.7.2.js"></script>
<script>
var buttonObj = $("theButton");
function buttonClick() {
$(document.body).writeAttribute("bgColor", "yellow")
.insert("<h1>Hello, Prototype!</h1>");
}
Event.observe(buttonObj, "click", buttonClick);
</script>
</body>
</html>
Save this as ch17_example2.html and open it in your browser (http://beginningjs.com/examples/ch17_example2.html). You should see something like Figure 17.2. If you don’t, make sure that the Prototype JavaScript file is in the same directory as the HTML file.
Figure 17.2
Retrieving Elements
Prototype’s $() function is very different from jQuery’s. If you remember from the previous chapter, jQuery’s $() function creates a jQuery object that wraps itself around one or multiple DOM element objects. In contrast, Prototype’s $() function returns the actual DOM object (much like document.getElementById()), but it also extends the element object with many new properties and methods:
var el = $("myDiv");
This code retrieves the element with an id of myDiv, and you can use this object just like you use any other element object. For example, the following code alerts the element’s tag name with the tagName property:
alert(el.tagName);
You can also extend an element by passing the element’s object to the dollar function. The following code passes the document.body object to the dollar function in order to extend it:
var body = $(document.body);
By doing this, you can use both native DOM methods and properties as well as Prototype’s methods.
NOTE Prototype’s dollar function returns null if the specified element cannot be found. This is unlike jQuery’s $() function because Prototype returns an extended DOM element object; even though it is extended, it is still a DOM element object.
Selecting Elements with CSS Selectors
As mentioned before, Prototype’s dollar function does not select elements based upon CSS selectors; it only accepts element id values and element objects. Prototype does, however, have another function that behaves similarly to the jQuery function: the $$()function.
You can use the $$() function to locate and retrieve elements that match the provided CSS selector. For example, the following code retrieves all <div/> elements in the page and returns them in an array:
var divEls = $$("div");
The $$() function always returns an array—even if you use an id selector. One downside to $$() is that it returns an array of extended elements; so if you want to perform an operation on every element in the array, you have to iterate over the array with either a loop or an iterative Array method (from Chapter 5).
Performing an Operation on Elements Selected with $$()
Because $$() returns an array, you can use the Array methods to perform iterative operations. For example, the following code uses the forEach() method to insert content into each element in the array:
function insertText(element) {
element.insert("This text inserted using the forEach() method.");
}
$$("div").forEach(insertText);
You can also use multiple CSS selectors to select elements with the $$() function. Instead of passing a single string that contains the multiple selectors, you pass each selector as an argument to the method, like this:
var elements = $$("#myDiv", "p > span, .class-one");
This code selects elements based upon two selectors: #myDiv and p > span, .class-one, and it returns an array that contains all of the extended element objects that match those selectors.
NOTE For more information on the CSS selectors supported in Prototype, see http://prototypejs.org/doc/latest/dom/dollar-dollar/.
Manipulating Style
Prototype gives you several methods you can use to change an element’s style. The most basic is the setStyle() method, which sets individual style properties. To use setStyle(), you create an object that contains the CSS properties and values that you want to set. For example, the following code sets an element’s foreground and background colors:
var styles = {
color: "red",
backgroundColor: "blue"
};
$("myDiv").setStyle(styles);
As you know from previous chapters, changing an element’s style in this manner is usually undesirable. A better solution is to manipulate the CSS classes applied to an element, and Prototype gives you four easy-to-use methods to do just that.
The first method, addClassName(), adds a CSS class to the element. The following code adds the class-one CSS class to the element:
$("myDiv").addClassName("class-one");
The second method, removeClassName(), removes the specified class from the element. The following code removes the class-two CSS class from the element:
$("myDiv").removeClassName("class-two");
Next is the toggleClassName() method, and it toggles the specified class. The following code toggles the class-three CSS class. If it is already applied to the element, the class is removed. Otherwise, it is applied to the element:
$("myDiv").toggleClassName("class-three");
The final method, hasClassName(), checks if the specified class is applied to the element:
$("myDiv").toggleClassName("class-three");
Naturally, if the class exists, the toggleClassName() method returns true. Otherwise, it returns false.
These CSS methods are very similar to jQuery’s CSS class manipulation methods, but Prototype’s methods for creating and inserting elements differ greatly from jQuery’s methods. Removing elements, however, is very similar to jQuery.
Creating, Inserting, and Removing Elements
Prototype makes it easy to manipulate the DOM because it extends the Element object. Let’s start by creating elements.
Creating an Element
Prototype adds a constructor for the Element object, and it accepts two arguments: the element’s tag name and an object containing attributes and their values. The following code creates an <a/> element and populates its id and href attributes:
var attributes = {
id = "myLink",
href = "http://prototypejs.org"
};
var a = new Element("a", attributes);
The first few lines of this code create an object called attributes and define its id and href properties. They then create an <a/> element by using the Element object’s constructor, passing "a" as the first argument and the attributes object as the second.
Adding Content
Prototype extends element objects with two methods for adding content: insert() and update(). The aptly named insert() method inserts new content at the end of the element. The following code inserts the a object from the previous example into the document’s body:
$(document.body).insert(a);
The update() method replaces all existing content within the element. The following code updates the document’s body with the a object, thereby replacing the existing content with the <a/> element:
$(document.body).update(a);
It’s important to remember the distinction between the two methods; otherwise, you may experience unexpected results in your web page.
Removing an Element
Prototype makes it easy to remove an element from the DOM; simply call the remove() method on the element object you want to remove, like this:
a.remove();
Using Events
When you extend an Element object with the $() function, you gain access to its observe() method. Like the native addEventListener() method, this registers an event listener for a DOM element, and it accepts two arguments: the event name and the function to call when the event fires. For example, the following code registers a click event listener that executes the divClick() function:
function divClick(event) {
// do something
}
$("myDiv").observe("click", divClick);
And as you saw earlier, you can also use the Event.observe() method. The following code achieves the same results using Event.observe():
function divClick(event) {
// do something
}
Event.observe("myDiv", "click", divClick);
This code is slightly different from the first time you saw Event.observe() because the first argument, in this case, is a string. You can pass the id of an element or a DOM/BOM object as the first argument to Event.observe(). This method is particularly useful for objects like window. You cannot call $(window).observe() because the browser will throw an error. Instead, you have to use Event.observe().
Prototype doesn’t emulate the W3C DOM event model. Instead, it extends the event objects of legacy-IE and standards-compliant browsers to give you a set of utility methods to work with event data.
For example, the element() method returns the event target (the srcElement property for legacy-IE, and the target property for W3C DOM browsers). The following code uses the element() method to retrieve the target of the click event and toggles the class-one CSS class:
function divClick(e) {
var target = e.element();
target.toggleClassName("class-one");
}
$("myDiv").observe("click", divClick);
The element returned by the element() method is already extended with Prototype’s methods; so, there’s no need to pass it to $() to get the extra functionality.
Rewriting the Tab Strip with Prototype
You now know how to retrieve and manipulate elements, add and remove elements, and register event listeners with Prototype. Let’s adapt the jQuery version of the tab strip from ch16_example2.html.
TRY IT OUT Revisiting the Toolbar with Prototype
Open your text editor and type the following:
<!DOCTYPE html>
<html lang="en">
<head>
<title>Chapter 17: Example 3</title>
<style>
.tabStrip {
background-color: #E4E2D5;
padding: 3px;
height: 22px;
}
.tabStrip div {
float: left;
font: 14px arial;
cursor: pointer;
}
.tabStrip-tab {
padding: 3px;
}
.tabStrip-tab-hover {
border: 1px solid #316AC5;
background-color: #C1D2EE;
padding: 2px;
}
.tabStrip-tab-click {
border: 1px solid #facc5a;
background-color: #f9e391;
padding: 2px;
}
</style>
</head>
<body>
<div class="tabStrip">
<div data-tab-number="1" class="tabStrip-tab">Tab 1</div>
<div data-tab-number="2" class="tabStrip-tab">Tab 2</div>
<div data-tab-number="3" class="tabStrip-tab">Tab 3</div>
</div>
<div id="descContainer"></div>
<script src="prototype.1.7.2.js"></script>
<script>
function handleEvent(e) {
var target = e.element();
var type = e.type;
if (type == "mouseover" || type == "mouseout") {
target.toggleClassName("tabStrip-tab-hover");
} else if (type == "click") {
target.addClassName("tabStrip-tab-click");
var num = target.getAttribute("data-tab-number");
showDescription(num);
}
}
function showDescription(num) {
var text = "Description for Tab " + num;
$("descContainer").update(text);
}
$$(".tabStrip > div").forEach(function(element) {
element.observe("mouseover", handleEvent);
element.observe("mouseout", handleEvent);
element.observe("click", handleEvent);
});
</script>
</body>
</html>
Save this file as ch17_example3.html and load it into your browser (http://beginningjs.com/examples/ch17_example3.html). You’ll notice it behaves the same as the other tab strip scripts.
Because the CSS and markup remains unchanged in the jQuery version, let’s focus on the JavaScript that changed—starting with the handleEvent() function:
function handleEvent(e) {
var target = e.element();
Here, you get the event target using the element() extension method and assign it to the target variable.
Next, you determine the type of event that took place. You first check for mouseover and mouseout events:
if (type == "mouseover" || type == "mouseout") {
target.toggleClassName("tabStrip-tab-hover");
If either of these events takes place, you want to toggle the tabStrip-tab-hover CSS class. For mouseover events, this CSS class is applied to the target element, and for mouseout, the class is removed.
Now you need to determine if the click event fired:
} else if (type == "click") {
target.addClassName("tabStrip-tab-click");
If so, you add the tabStrip-tab-click CSS class to the target element to change its style to that of a clicked tab. Then, you need to get the tab’s number from the element’s data-tab-number attribute:
var num = target.getAttribute("data-tab-number");
showDescription(num);
}
}
You use the native getAttribute() method to retrieve that attribute’s value and pass it to showDescription().
As you know, the showDescription() function adds the tab’s description to the page.
function showDescription(num) {
var text = "Description for Tab " + num;
$("descContainer").update(text);
}
Here, you select the element representing the description container and replace its contents with the update() method.
The final bit of code sets up the event listeners for the tab elements. Using the $$() function, you retrieve them using the .tabStrip > div selector:
$$(".tabStrip > div").forEach(function (element) {
element.observe("mouseover", handleEvent);
element.observe("mouseout", handleEvent);
element.observe("click", handleEvent);
});
You use the Array object’s forEach() method to iterate over the array returned by $$(). The function you pass to forEach() is responsible for registering the mouseover, mouseout, and click event listeners on each element, and you register those events using the observe() extension method.
Prototype isn’t just about DOM manipulation and language enhancement. It, too, provides you with Ajax capabilities that are easy to learn and use.
Using Ajax Support
Unfortunately, Prototype’s Ajax support isn’t as straightforward as jQuery’s. Prototype’s Ajax functionality centers on its Ajax object, which contains a variety of methods you can use to make Ajax calls. This object is much like the jQuery object in that you do not create an instance of Ajax; you use the methods made available by the object itself.
At the heart of the Ajax object is the Ajax.Request() constructor. It accepts two arguments: the URL and an object containing a set of options that the Ajax object uses when making a request. The options object can contain a variety of option properties to alter the behavior of Ajax.Request(). The following table describes just a few of them.
|
OPTION |
DESCRIPTION |
|
asynchronous |
Determines whether or not the XMLHttpRequest object makes the request in asynchronous mode. The default is true. |
|
method |
The HTTP method used for the request. The default is "post". "get" is another valid value. |
|
onSuccess |
A callback function invoked when the request completes successfully |
|
onFailure |
A callback function invoked when the request completes, but results in an error status code |
|
parameters |
Either a string containing the parameters to send with the request, or an object containing the parameters and their values |
NOTE For a complete list of options, visit the Prototype documentation at http://prototypejs.org/doc/latest/ajax/.
Making a request with Prototype looks something like the following code:
function requestSuccess(transport) {
alert(transport.responseText);
}
function requestFailed(transport) {
alert("An error occurred! HTTP status code is " + transport.status);
}
var options = {
method: "get",
onSuccess: requestSuccess,
onFailure: requestFailed
};
new Ajax.Request("someTextFile.txt", options);
The first few lines of code define the requestSuccess() and requestFailed() functions. These functions accept a parameter called transport—a special object that contains the server’s response (more on this later).
After the function definitions, you create an options object that contains properties for the HTTP method option, the onSuccess option, and the onFailure option. Then, you finally make the request for the someTextFile.txt file, passing the options object to theAjax.Request() constructor (don’t forget the new keyword!).
If you need to send parameters with your request, you’ll have to do a bit more preparation before calling new Ajax.Request(). Like jQuery, you can create an object to contain the parameter names and values. For example, if you need to send a parameter called usernamewith your request, you can do something like this:
var parms = {
username: "jmcpeak"
};
options.parameters = parms;
When you send the request by creating a new Ajax.Request object, the parameters are added to the URL before the request is sent to the server.
All callback functions are passed a parameter containing an Ajax.Response object, an object that wraps around the native XMLHttpRequest object. It contains a variety of useful properties for working with the server’s response. It emulates the basic properties ofXMLHttpRequest, such as readyState, responseText, responseXML, and status. But it also exposes a few convenience properties, as outlined in the following table.
|
PROPERTY NAME |
PURPOSE |
|
request |
The Ajax.Request object used to make the request |
|
responseJSON |
A parsed JSON structure if the response's Content-Type header is application/json |
|
statusText |
The HTTP status text sent by the server |
|
transport |
The native XMLHttpRequest object used to make the request |
Now that you’ve been given a crash course in Prototype’s Ajax functionality, let’s modify the Ajax Form Validator.
TRY IT OUT Revisiting the Form Validator with Prototype
Open your text editor and type the following:
<!DOCTYPE html>
<html lang="en">
<head>
<title>Chapter 17: Example 4</title>
<style>
.fieldname {
text-align: right;
}
.submit {
text-align: right;
}
</style>
</head>
<body>
<form>
<table>
<tr>
<td class="fieldname">
Username:
</td>
<td>
<input type="text" id="username" />
</td>
<td>
<a id="usernameAvailability" href="#">Check Availability</a>
</td>
</tr>
<tr>
<td class="fieldname">
Email:
</td>
<td>
<input type="text" id="email" />
</td>
<td>
<a id="emailAvailability" href="#">Check Availability</a>
</td>
</tr>
<tr>
<td class="fieldname">
Password:
</td>
<td>
<input type="text" id="password" />
</td>
<td />
</tr>
<tr>
<td class="fieldname">
Verify Password:
</td>
<td>
<input type="text" id="password2" />
</td>
<td />
</tr>
<tr>
<td colspan="2" class="submit">
<input type="submit" value="Submit" />
</td>
<td />
</tr>
</table>
</form>
<script src="prototype.1.7.2.js"></script>
<script>
function checkUsername(e) {
e.preventDefault();
var userValue = $("username").value;
if (!userValue) {
alert("Please enter a user name to check!");
return;
}
var options = {
method: "get",
onSuccess: handleResponse,
parameters: {
username: userValue
}
};
new Ajax.Request("ch14_formvalidator.php", options);
}
function checkEmail(e) {
e.preventDefault();
var emailValue = $("email").value;
if (!emailValue) {
alert("Please enter an email address to check!");
return;
}
var options = {
method: "get",
onSuccess: handleResponse,
parameters: {
email: emailValue
}
};
new Ajax.Request("ch14_formvalidator.php", options);
}
function handleResponse(transport) {
var response = transport.responseJSON;
if (response.available) {
alert(response.searchTerm + " is available!");
} else {
alert("We're sorry, but " + response.searchTerm +
" is not available.");
}
}
$("usernameAvailability").observe("click", checkUsername);
$("emailAvailability").observe("click", checkEmail);
</script>
</body>
</html>
Save this as ch17_example4.html in your web server’s root directory, because this file must be hosted on a web server to work correctly. Point your browser to http://yourserver/ch17_example4.html and test out the form.
This page works exactly like the previous versions. Let’s start examining this version with the checkUsername() function. As you know, this function is responsible for gathering the user input and sending it to the server.
To get the user’s input, you retrieve the appropriate <input/> element and get its value:
function checkUsername(e) {
e.preventDefault();
var userValue = $("username").value;
You could use the native document.getElementById() method to retrieve the <input/> element, but Prototype’s $() function is much easier to type. It returns an extended Element object, but you use the standard value property to retrieve the element’s value.
Next, you check the user input to ensure you have workable data:
if (!userValue) {
alert("Please enter a user name to check!");
return;
}
If the function makes it past this if statement, you need to assemble the options object that you pass to the Ajax.Request() constructor:
var options = {
method: "get",
onSuccess: handleResponse,
parameters: {
username: userValue
}
};
This options object has the required method and onSuccess properties, and you also include the parameters—setting username to the value obtained from the form.
Now you’re ready to send the request. So, you call the Ajax.Request() constructor and pass it the URL and options object.
As the last step in this function, you call the Ajax.Request() constructor, prepended by the new keyword, and pass the URL to formvalidator.php and the options object:
new Ajax.Request("ch14_formvalidator.php", options);
}
The checkEmail() function is almost identical to checkUsername(). First, you retrieve the e-mail address from the form and validate it:
function checkEmail(e) {
e.preventDefault();
var emailValue = $("email").value;
if (!emailValue) {
alert("Please enter an email address to check!");
return;
}
Next, you build the options object:
var options = {
method: "get",
onSuccess: handleResponse,
parameters: {
email: emailValue
}
};
Once again, you provide the obligatory method and onSuccess properties, as well as the parameters object. You set the email parameter property to the e-mail address from the form.
Then, you issue the request by calling the Ajax.Request() constructor:
new Ajax.Request("ch14_formvalidator.php", options);
}
The handleResponse() function is not left untouched, but the change is subtle:
function handleResponse(transport) {
var response = transport.responseJSON;
if (response.available) {
alert(response.searchTerm + " is available!");
} else {
alert("We're sorry, but " + response.searchTerm + " is not available.");
}
}
This new version uses Prototype’s responseJSON property to get the parsed JSON. You can use this property because ch14_formvalidator.php’s Content-Type header is set to application/json. If it was any other value, like text/plain, then responseJSON would benull, and you would have to use responseText in conjunction with JSON.parse(), like this:
var response = JSON.parse(transport.responseText);
The final two lines of code in this example register the click event listeners on the two <a/> elements:
$("usernameAvailability").observe("click", checkUsername);
$("emailAvailability").observe("click", checkEmail);
You retrieve the elements using Prototype’s $() function, and then you use observe() to register the event listeners.
Prototype is a powerful framework that provides a rich set of utilities to change the way you write JavaScript. But a simple section such as this is far too small to cover the framework adequately. For further information on Prototype and the utility it offers, see the API documentation at http://api.prototypejs.org/ and the tutorials at http://prototypejs.org/learn/.
DELVING INTO MOOTOOLS
At first glance, MooTools looks identical to Prototype, and rightly so. MooTools was first developed to work with Prototype, so you shouldn’t be surprised to see some striking similarities between the two.
However, MooTools is more of a cross between jQuery and Prototype as far as DOM manipulation is concerned. Like Prototype, MooTools’ goal is to augment the way you write JavaScript, providing tools to write classes and inherit from them. Also like Prototype, MooTools adds in a rich set of extensions to make DOM manipulation easier, and you’ll find that selecting DOM objects in MooTools is exactly the same as Prototype. But as you’ll see in the following sections, the extension method names and the way in which you use them is reminiscent of jQuery.
Getting MooTools
You can download MooTools in two ways: You can download the core, or you can customize your own build. The MooTools’ core contains everything you need to perform common DOM and Ajax operations, but if you don’t need the full power of core, you can pick and choose which pieces you need for your page or application.
Regardless of the version you want, you can download both at http://mootools.net/core/builder. Additionally, you can choose to download the compressed or uncompressed JavaScript file. The code download includes the compressed core of version 1.5.1.
Testing Your MooTools’ Installation
As we mentioned earlier, many similarities exist between MooTools and Prototype; so, testing your MooTools’ installation will look very similar to the Prototype test.
MooTools has a $() function, just like Prototype’s:
var buttonObj = $("theButton");
It accepts either a string containing an element’s id or a DOM element and returns the DOM object with an extended set of methods and properties. One such method is the addEvent() method which, as you probably deduced, registers an event listener.
The addEvent() method accepts two arguments: the event name and the function. So, you can register an event listener like this:
function buttonClick() {
alert("You clicked the button!");
}
buttonObj.addEvent("click", buttonClick);
MooTools’ extension methods provide a variety of methods and properties for manipulating elements in the page. Most of the methods are chainable, therefore allowing you to perform multiple operations with less code. For example:
function buttonClick() {
$(document.body).setProperty("bgColor", "yellow")
.appendHTML("<h1>Hello, MooTools!</h1>");
}
buttonObj.addEvent("click", buttonClick);
You can set an element’s attributes with the setProperty() method, as demonstrated in this code. This method returns the element object, so you can then immediately append content to the element by calling the appendHTML() method.
Use this code to test your MooTools’ installation. Open your text editor and type thefollowing:
<!DOCTYPE html>
<html lang="en">
<head>
<title>Chapter 17: Example 5</title>
</head>
<body>
<button id="theButton">Click Me!</button>
<script src="mootools-core-1.5.1-compressed.js"></script>
<script>
var buttonObj = $("theButton");
function buttonClick() {
$(document.body).setProperty("bgColor", "yellow")
.appendHTML("<h1>Hello, MooTools!</h1>");
}
buttonObj.addEvent("click", buttonClick);
</script>
</body>
</html>
Save this as ch17_example5.html and load it in your browser. When you click the button, the background color should change to yellow, and “Hello, MooTools!” should display in the page. If not, make sure the MooTools’ JavaScript file is located in the same directory as your HTML page.
Finding Elements
Earlier, we mentioned that MooTools’ $() function is similar to Prototype’s. Well, let’s clear it up now; they are exactly the same. They find the element object in the DOM and extend it, albeit with different methods that you’ll see in the following sections. For example, the following code finds an element with an id of myDiv, extends it with MooTools’ methods and properties, and returns it:
var element = $("myDiv");
With this object, you can use MooTools’ extension methods as well as the native DOM methods and properties:
var tagName = element.tagName; // standard DOM
element.appendHTML("New Content"); // extension
If an element with the given id does not exist, $() returns null.
You can also pass a DOM object to the $() function to extend it as well:
var body = $(document.body);
Selecting Elements with CSS Selectors
MooTools has the $$() function to select elements with CSS selectors, and you can pass multiple CSS selectors to retrieve a wide variety of elements. Like Prototype, you pass each selector as an argument to the function:
var classOne = $$(".class-one");
var multiple = $$("div", ".class-one", "p > div")
The $$() function returns an array of extended DOM element objects. This is where MooTools and Prototype start to differ because while both frameworks extend the Array object returned by $$(), MooTools adds extension methods that manipulate the elements within the array.
Performing Operations on Elements
MooTools’ $$() is a cross between jQuery’s $() and Prototype’s $$() in that it returns an array of extended element objects (like Prototype), but you can use a variety of methods to work with those elements without having to manually iterate the array. For example, you can change the style of all elements within an array by calling the setStyle() method, like this:
$$("div", ".class-one").setStyle("color", "red");
This code selects multiple types of elements and sets their text color to red. Contrast that with Prototype:
// Prototype
function changeColor(item) {
var styles {
color: "red"
};
item.setStyle(styles);
}
$$("div", ".class-one").forEach(changeColor);
Note that you could use this technique in MooTools. In fact, you want to do so when performing multiple operations to the same set of elements. Remember that methods like MooTools’ setStyle() and jQuery’s css() are iterative; they loop over the array. Chaining iterative methods together means you are executing multiple loops, which is inefficient.
Changing Style
The previous MooTools’ code example introduced you to the setStyle() method. It accepts two arguments: the first is the CSS property, and the second is its value. Like jQuery, you can use the CSS property used in a style sheet or the camel-case version used in script:
$("myDiv").setStyle("background-color", "red"); // valid
$("myDiv").setStyle("backgroundColor", "red"); // valid, too
Both lines of this code set the element’s background color to red; so you can use either property name to set individual style properties.
MooTools also has a setStyles() method for changing multiple CSS properties. To use this method, pass an object that contains the CSS properties and values, like this:
$("myDiv").setStyles({
backgroundColor: "red",
color: "blue"
});
This is, of course, not the ideal way to change an element’s style. So, MooTools adds the addClass(), removeClass(), toggleClass(), and hasClass() extension methods to DOM element objects.
The addClass() and removeClass() methods do just what their names imply. They add or remove the specified class to or from the element:
var div = $("myDiv");
div.addClass("class-one");
div.removeClass("class-two");
The toggleClass() method, naturally, toggles a class.
div.toggleClass("class-three");
This code toggles the class-three CSS class. If the element already has the class, it is removed from the element. Otherwise, it is added.
The hasClass() method returns true or false depending on whether or not the element has the CSS class:
div.hasClass("class-four");
This code returns false because the class-four CSS class isn’t applied to the element.
Of course, changing an element’s style isn’t the only DOM-related things MooTools can do; you can also create, insert, and remove elements from the DOM.
Creating, Inserting, and Removing Elements
Like Prototype, MooTools lets you create elements with the Element constructor:
var attributes = {
id: "myLink",
href: "mootools.net"
};
var a = new Element("a", attributes);
When you call the constructor, you pass the tag name and an object containing your desired attributes. The preceding code creates a new <a/> element and populates its id and href properties. You can then set its content with the appendText() or appendHTML() methods:
a.appendText("Go to MooTools' Website");
MooTools also adds a set() extension method that lets you set the value of a proprietary “property.” These are not properties in the sense of a JavaScript property using object.propertyName syntax; instead, they’re more of a virtual property. For example, there is anhtml property that sets the HTML of an element, and you set this property with the set() method, like this:
a.set("html", "Go to MooTool's Website");
This is essentially the same as using the native innerHTML property, and in most cases, you’d want to use innerHTML.
When you’re ready to add the element to the page, use the adopt() method:
$(document.body).adopt(a);
This code appends the newly created <a/> element to the page’s <body/> element with the adopt() method. Note that this doesn’t replace existing content; it simply adds new content to the page. If you need to empty an element of its children, call the empty() method:
$(document.body).empty();
You can also remove an individual element with the dispose() method:
a.dispose();
Using Events
As you know, the $() function returns an extended element object. One of the extension methods is the addEvent()method, which registers an event listener:
function divClick(e) {
alert("You clicked me!");
}
$("myDiv").addEvent("click", divClick);
The addEvent() method accepts two arguments: the event name and the function to execute when the event fires.
You can also register multiple event listeners with the addEvents() method. Instead of passing a single event name and function, you pass an object that contains the event names as properties and the functions as values. For example, the following code registers event handlers for the mouseover and mouseout events on an element:
function eventHandler(e) {
// do something with the event here
}
var handlers = {
mouseover: eventHandler,
mouseout: eventHandler
};
$("myDiv").addEvents(handlers);
When an event fires, MooTools passes its own event object (of type DOMEvent) to the event-handling function. This object has a hybrid set of properties and methods: Some are proprietary but most are standards-compliant. The following table lists some of the properties available with MooTools’ Event object.
|
PROPERTY |
DESCRIPTION |
|
page.x |
The horizontal position of the mouse relative to the browser window |
|
page.y |
The vertical position of the mouse relative to the browser window |
|
client.x |
The horizontal position of the mouse relative to the client area |
|
client.y |
The vertical position of the mouse relative to the client area |
|
target |
The extended event target |
|
relatedTarget |
The extended element related to the event target |
|
type |
The type of event that called the event handler |
NOTE Visit http://mootools.net/core/docs/1.5.1/Types/DOMEvent for a complete list of properties of MooTools' DOMEvent object.
For example, the following code registers a click event listener on an element with an id of myDiv:
function divClick(e) {
var target = e.target.addClass("class-one");
alert("You clicked at X:" + e.client.x + " Y:" + e.client.y);
}
$("myDiv").addEvent("click", divClick);
When the click event fires, MooTools passes its own event object to divClick(). The first line of the function calls the addClass() method, adding the class-one CSS class to the element.
The addClass() method returns an extended element object, letting you both add the CSS class and assign the target variable with the extended event target. You then use an alert box to display the mouse pointer’s coordinates by using the client.x and client.yproperties.
Rewriting the Tab Strip with MooTools
Now that you’ve had a crash course in MooTools, let’s rewrite the tab strip!
TRY IT OUT Revisiting the Toolbar with MooTools
Open your text editor and type the following:
<!DOCTYPE html>
<html lang="en">
<head>
<title>Chapter 17: Example 6</title>
<style>
.tabStrip {
background-color: #E4E2D5;
padding: 3px;
height: 22px;
}
.tabStrip div {
float: left;
font: 14px arial;
cursor: pointer;
}
.tabStrip-tab {
padding: 3px;
}
.tabStrip-tab-hover {
border: 1px solid #316AC5;
background-color: #C1D2EE;
padding: 2px;
}
.tabStrip-tab-click {
border: 1px solid #facc5a;
background-color: #f9e391;
padding: 2px;
}
</style>
</head>
<body>
<div class="tabStrip">
<div data-tab-number="1" class="tabStrip-tab">Tab 1</div>
<div data-tab-number="2" class="tabStrip-tab">Tab 2</div>
<div data-tab-number="3" class="tabStrip-tab">Tab 3</div>
</div>
<div id="descContainer"></div>
<script src="mootools-core-1.5.1-compressed.js"></script>
<script>
function handleEvent(e) {
var target = e.target;
var type = e.type;
if (type == "mouseover" || type == "mouseout") {
target.toggleClass("tabStrip-tab-hover");
} else if (type == "click") {
target.addClass("tabStrip-tab-click");
var num = target.getAttribute("data-tab-number");
showDescription(num);
}
}
function showDescription(num) {
var text = "Description for Tab " + num;
$("descContainer").set("html", text);
}
$$(".tabStrip > div").addEvents({
mouseover: handleEvent,
mouseout: handleEvent,
click: handleEvent
});
</script>
</body>
</html>
Save this file as ch17_example6.html, and open it in your browser (http://beginningjs.com/examples/ch17_example6.html is available, too). Notice that this page works just like all the other versions.
Let’s jump right into the code, starting with the handleEvent() function:
function handleEvent(e) {
var target = e.target;
var type = e.type;
Everything is standards-compliant code until you get to the if statement; that’s when you use MooTools’ toggleClass() method in the case of mouseover and mouseout events:
if (type == "mouseover" || type == "mouseout") {
target.toggleClass("tabStrip-tab-hover");
If it is one of these events, you add the tabStrip-tab-hover CSS class to the event target. But if the event is a click event, you need to do a few things. First, you add the tabStrip-tab-click CSS class to the element. Then, you get the value of the data-tab-number attribute because you’ll need to pass that to the showDescription() function:
} else if (type == "click") {
target.addClass("tabStrip-tab-click");
var num = target.getAttribute("data-tab-number");
showDescription(num);
}
}
The showDescription() function changed very slightly; in fact, just one statement needs your attention:
function showDescription(num) {
var text = "Description for Tab " + num;
$("descContainer").set("html", text);
}
You need to change the content of the description container element. Now, you can do that in a variety of ways, and as we mentioned earlier, the native innerHTML property would be ideal. However, for the sake of this example, you use MooTools’ set()method to set the virtual html property.
Finally, you register your listeners for the mouseover, mouseout, and click events:
$$(".tabStrip > div").addEvents({
mouseover: handleEvent,
mouseout: handleEvent,
click: handleEvent
});
Here, you use MooTools’ $$() method to select the <div/> elements within the tab strip. Then you use the addEvents() method to register the three event listeners. As an alternative, you could use the technique demonstrated in the Prototype example:
$$(".tabStrip > div").forEach(function(item) {
item.addEvents({
mouseover: handleEvent,
mouseout: handleEvent,
click: handleEvent
});
});
However, there’s no real need to do so in this example. But this would be the best way if you needed to perform other processes on each element. That way, you iterate over the elements once as opposed to multiple times.
Ajax Support in MooTools
MooTools has three objects for making HTTP requests, each targeting a specific purpose:
· Request: Used for general requests
· Request.HTML: Used specifically for receiving HTML
· Request.JSON: Specifically used for receiving JSON
Each of these objects is similar to Prototype’s Ajax.Request, in that you directly create them by calling their constructor functions with the new operator and passing an object that contains various options:
var request = new Request({
method: "get",
url: "someFile.txt",
onSuccess: requestSuccess
});
This code creates a Request object that makes a GET request for someFile.txt and calls the requestSuccess() function on a successful request.
You can pass many more options to the constructor; the following table lists some of them.
|
OPTION |
DESCRIPTION |
|
async |
Determines whether or not the XMLHttpRequest object makes the request in asynchronous mode. The default is true. |
|
data |
An object containing the key/value pairs to send with the request |
|
method |
The HTTP method used for the request. The default is "post". |
|
onSuccess |
A callback function invoked when the request completes successfully |
|
onFailure |
A callback function invoked when the request completes, but results in an error status code |
|
url |
The URL to send the request to |
NOTE Visit http://mootools.net/core/docs/1.5.1/Request/Request for a complete list of options and callback functions.
Unfortunately, creating a Request object doesn’t automatically send the request; you must explicitly send it with the send() method:
request.send();
But to save some typing, you can chain the send() method to the Request constructor, like this:
var request = new Request({
method: "get",
url: "someFile.txt",
onSuccess: requestSuccess
}).send();
You can also use one of the many aliases for send(). Their names mirror those of the different HTTP methods, and they send the request with the given method. For example, the get() method sends a GET request, post() sends POST, put() is a PUT request, and so on. Using an alias eliminates the need to specify the method option. For example:
var request = new Request({
url: "someFile.txt",
onSuccess: requestSuccess
});
request.get(); // sends the request as GET
request.post(); // sends as POST
You can send data with your request in two different ways. First, you can make it part of the Request object. This is useful if you need to send the same data with every request you make with a single Request object. To do this, you add a data property to the optionsobject you pass to the constructor. An example of this is:
var request = new Request({
url: "ch14_formvalidator.php",
data: {
username: userValue // assuming userValue is assigned a value
},
onSuccess: requestSuccess
});
The second approach decouples the data from the Request object so that you can reuse the same Request object for sending different data. To use this approach, you pass the data to the send(), or other alias, method like this:
var request = new Request({
url: "ch14_formvalidator.php",
onSuccess: requestSuccess
}).get({
data: {
username: userValue
}
});
The onSuccess callback function varies between the different types of requests. For ordinary Request objects, the onSuccess callback function is called with two arguments—the responseText and responseXML:
function requestSuccess(responseText, responseXML) {
// do something with either supplied value
}
The responseText is the plain textual representation of the server’s response. If the response is a valid XML document, the responseXML parameter is a DOM tree containing the parsed XML.
The onSuccess callback is a bit more complicated for Request.HTML objects:
function requestHTMLSuccess(responseTree, responseElements,
responseHTML, responseJavaScript) {
// do something with the data
}
The four parameters are:
· responseTree: The node list of the response
· responseElements: An array containing the elements of the response
· responseHTML: The string content of the response
· responseJavaScript: The JavaScript of the response
The onSuccess callback for Request.JSON objects is much simpler than Request.HTML’s:
function requestJSONSuccess(responseJSON, responseText) {
// do something with the provided data
}
The responseJSON parameter is an object—the parsed JSON structure. So you won’t need to call JSON.parse(). The responseText parameter is the plaintext JSON structure. Honestly, your authors don’t know why you would need the responseText with Request.JSON, but it’s there just in case you need it (we don’t think you will).
Let’s use MooTools’ Ajax utilities to modify the form validator from the previous chapter one last time!
TRY IT OUT Revisiting the Form Validator with MooTools
Open your text editor and type the following:
<!DOCTYPE html>
<html lang="en">
<head>
<title>Chapter 17: Example 7</title>
<style>
.fieldname {
text-align: right;
}
.submit {
text-align: right;
}
</style>
</head>
<body>
<form>
<table>
<tr>
<td class="fieldname">
Username:
</td>
<td>
<input type="text" id="username" />
</td>
<td>
<a id="usernameAvailability" href="#">Check Availability</a>
</td>
</tr>
<tr>
<td class="fieldname">
Email:
</td>
<td>
<input type="text" id="email" />
</td>
<td>
<a id="emailAvailability" href="#">Check Availability</a>
</td>
</tr>
<tr>
<td class="fieldname">
Password:
</td>
<td>
<input type="text" id="password" />
</td>
<td />
</tr>
<tr>
<td class="fieldname">
Verify Password:
</td>
<td>
<input type="text" id="password2" />
</td>
<td />
</tr>
<tr>
<td colspan="2" class="submit">
<input type="submit" value="Submit" />
</td>
<td />
</tr>
</table>
</form>
<script src="mootools-core-1.5.1-compressed.js"></script>
<script>
function checkUsername(e) {
e.preventDefault();
var userValue = $("username").value;
if (!userValue) {
alert("Please enter a user name to check!");
return;
}
var options = {
url: "ch14_formvalidator.php",
data: {
username: userValue
},
onSuccess: handleResponse
};
new Request.JSON(options).get();
}
function checkEmail(e) {
e.preventDefault();
var emailValue = $("email").value;
if (!emailValue) {
alert("Please enter an email address to check!");
return;
}
var options = {
url: "ch14_formvalidator.php",
data: {
email: emailValue
},
onSuccess: handleResponse
};
new Request.JSON(options).get();
}
function handleResponse(data, json) {
if (data.available) {
alert(data.searchTerm + " is available!");
} else {
alert("We're sorry, but " + data.searchTerm + " is not available.");
}
}
$("usernameAvailability").addEvent("click", checkUsername);
$("emailAvailability").addEvent("click", checkEmail);
</script>
</body>
</html>
Save this file as ch17_example7.html, and save it in your web server’s root directory. Open and point your browser to http://yourserver/ch17_example7.html and test it. You’ll find that it behaves just as all the previous versions did.
This version is very similar to Example 4—the Prototype version. In fact, checkUsername() and checkEmail() are identical to Example 4 except for the request code. So let’s just look at that, starting with checkUsername().
After you get and validate the user input for the username, you build your options object:
var options = {
url: "ch14_formvalidator.php",
data: {
username: userValue
},
onSuccess: handleResponse
};
You set the url, data, and onSuccess properties and pass the object to the Request.JSON() constructor:
new Request.JSON(options).get();
And to save some typing, you chain the get() call to the Request.JSON constructor.
The code inside checkEmail() is unsurprisingly similar (at this point, what is about this example?). First, you build your options object:
var options = {
url: "ch14_formvalidator.php",
data: {
email: emailValue
},
onSuccess: handleResponse
};
Then you send the request:
new Request.JSON(options).get();
The handleResponse() function also saw a few changes. Thanks to MooTools’ built-in support for JSON, the function has been simplified:
function handleResponse(data, json) {
if (data.available) {
alert(data.searchTerm + " is available!");
} else {
alert("We're sorry, but " + data.searchTerm + " is not available.");
}
}
The data passed to the first parameter, data, is already parsed into a JavaScript object. So you simply use it to check if the username or e-mail is available and display the correct information to the user.
Finally, you wire up the events:
$("usernameAvailability").addEvent("click", checkUsername);
$("emailAvailability").addEvent("click", checkEmail);
You find the <a/> elements in the document and register their click event listeners with MooTools’ addEvent() method.
MooTools is a popular framework because it offers you utility similar to jQuery while maintaining aspects of traditional DOM programming. MooTools also has an animation/effects component, making it a well-rounded framework. This section can hardly do the framework justice, so make sure to visit the API documentation at http://mootools.net/core/docs/.
SUMMARY
This chapter introduced you into the rather large world of JavaScript frameworks and libraries.
· You learned that two types of libraries and frameworks exist: general and specific. You were also given a short list of the popular solutions available today.
· You learned where to obtain the files needed to use Modernizr, Prototype, and MooTools.
· You learned how Modernizr helps you write feature-specific code, and how to load external resources, like polyfills, for browsers that don’t support certain features.
· You learned the basics of the Prototype framework—how to retrieve, create, and manipulate elements. You also learned how to register event listeners and send Ajax requests.
· You learned how to use MooTools to create, select, and modify elements, as well as wire up event listeners and make Ajax requests.
EXERCISES
You can find suggested solutions for these questions in Appendix A.
1. Modify the answer to Chapter 14’s Question 2 using Prototype. Also add error reporting for when an error occurs with the Ajax request.
2. If you guessed that this question would be: “Change the answer to Chapter 14’s Question 2 using MooTools, and add error reporting for when an error occurs with the Ajax request” then you won!! Your prize is… completing the exercise.