Wrox Press Beginning JavaScript 5th (2015)
Chapter 1. Introduction to JavaScript and the Web
WHAT YOU WILL LEARN IN THIS CHAPTER:
· Adding JavaScript to your web pages
· Referencing external JavaScript files
· Changing the background color of a web page
WROX.COM CODE DOWNLOADS FOR THIS CHAPTER
You can find the wrox.com code downloads for this chapter at http://www.wiley.com/go/BeginningJavaScript5E on the Download Code tab. You can also view all of the examples and related files at http://beginningjs.com.
In this introductory chapter, you look at what JavaScript is, what it can do for you, and what you need in order to use it. With these foundations in place, you will see throughout the rest of the book how JavaScript can help you to create powerful web applications for your website.
The easiest way to learn something is by actually doing it, so throughout the book you create a number of useful example programs using JavaScript. This process starts in this chapter, by the end of which you will have created your first piece of JavaScript code.
INTRODUCTION TO JAVASCRIPT
In this section you take a brief look at what JavaScript is, where it came from, how it works, and what sorts of useful things you can do with it.
What Is JavaScript?
Having bought this book, you are probably already well aware that JavaScript is some sort of computer language, but what is a computer language? Put simply, a computer language is a series of instructions that tell the computer to do something. That something can be one of a wide variety of things, including displaying text, moving an image, or asking the user for information. Normally, the instructions, or what is termed code, are processed from the top line downward. This simply means that the computer looks at the code you’ve written, works out what action you want it to take, and then takes that action. The act of processing the code is called running or executing it.
In natural English, here are instructions, or code, you might write to make a cup of instant coffee:
1. Put coffee crystals in cup.
2. Fill kettle with water.
3. Put kettle on to boil.
4. Has the kettle boiled? If so, then pour water into cup; otherwise, continue to wait.
5. Drink coffee.
You’d start running this code from the first line (instruction 1), and then continue to the next (instruction 2), then the next, and so on until you came to the end. This is pretty much how most computer languages work, JavaScript included. However, on some occasions you might change the flow of execution or even skip over some code, but you see more of this in Chapter 3.
JavaScript is an interpreted language rather than a compiled language. What is meant by the terms interpreted and compiled?
Well, to let you in on a secret, your computer doesn’t really understand JavaScript at all. It needs something to interpret the JavaScript code and convert it into something that it understands; hence it is an interpreted language. Computers understand only machine code, which is essentially a string of binary numbers (that is, a string of zeros and ones). As the browser goes through the JavaScript, it passes it to a special program called an interpreter, which converts the JavaScript to the machine code your computer understands. It’s a bit like having a translator translate English to Spanish, for example. The important point to note is that the conversion of the JavaScript happens at the time the code is run; it has to be repeated every time this happens. JavaScript is not the only interpreted language; others exist, including PHP and Ruby.
The alternative compiled language is one in which the program code is converted to machine code before it’s actually run, and this conversion has to be done only once. The programmer uses a compiler to convert the code that he wrote to machine code, and this machine code is run by the program’s user. Compiled languages include C#, Java, and many others. Using a real-world analogy, it’s a bit like having a Spanish translator verbally tell you in English what a Spanish document says. Unless you change the document, you can use it without retranslation as much as you like.
Perhaps this is a good place to dispel a widespread myth: JavaScript is not the script version of the Java language. In fact, although they share the same name, that’s virtually all they do share. Particularly good news is that JavaScript is much, much easier to learn and use than Java. In fact, languages like JavaScript are the easiest of all languages to learn, but they are still surprisingly powerful.
JavaScript and the Web
For most of this book you look at JavaScript code that runs inside a web page loaded into a browser. All you need to create these web pages is a text editor—for example, Windows Notepad—and a web browser, such as Chrome, Firefox, or Internet Explorer (IE), with which you can view your pages. These browsers come equipped with JavaScript interpreters (more commonly known as JavaScript engines).
NOTE Throughout this book, we use the terms “IE” and “Internet Explorer” interchangeably when referring to Microsoft’s Internet Explorer browser.
In fact, the JavaScript language first became available in Netscape’s Navigator 2. Initially, it was called LiveScript, but because Java was the hot technology of the time, Netscape decided that JavaScript sounded more exciting. When JavaScript really took off, Microsoft decided to add its own dialect of JavaScript, called JScript, to Internet Explorer 3.
In 1997, JavaScript was standardized by Ecma International, a membership-based non-profit organization, and renamed to ECMAScript. Today’s browser makers look to the ECMAScript standard to implement the JavaScript engines included in their respective browsers, but that doesn’t necessarily mean that all browsers support the same features. JavaScript support among today’s browsers is certainly more unified than it has ever been, but as you see in future chapters, developers still have to cope with older, and in many cases non-standard, JavaScript implementations.
The ECMAScript standard controls various aspects of the language and helps ensure that different versions of JavaScript are compatible. However, although Ecma sets standards for the actual language, it doesn’t specify how it’s used in particular hosts. By host, we mean hosting environment; in this book, that is the web browser. Other hosting environments include PDF files, web servers, and many, many other places. In this book, we discuss only its use within the web browser. The organization that sets the standards for web pages is the World Wide Web Consortium (W3C). It not only sets standards for HTML and CSS, but also for how JavaScript interacts with web pages inside a web browser. You learn much more about this in later chapters of the book. Initially, you’ll look at the essentials of JavaScript before the more advanced stuff. In the appendices of this book, you’ll find useful guides to the JavaScript language and how it interacts with the web browser.
The majority of the web pages containing JavaScript that you create in this book can be stored on your hard drive and loaded directly into your browser from the hard drive itself, just as you’d load any normal file (such as a text file). However, this is not how web pages are loaded when you browse websites on the Internet. The Internet is really just one great big network connecting computers. Access to websites is a special service provided by particular computers on the Internet; the computers providing this service are known as web servers.
Basically, the job of a web server is to hold lots of web pages on its hard drive. When a browser, usually on a different computer, requests a web page contained on that web server, the web server loads it from its own hard drive and then passes the page back to the requesting computer via a special communications protocol called Hypertext Transfer Protocol (HTTP). The computer running the web browser that makes the request is known as the client. Think of the client/server relationship as a bit like a customer/shopkeeper relationship. The customer goes into a shop and says, “Give me one of those.” The shopkeeper serves the customer by reaching for the item requested and passing it back to the customer. In a web situation, the client machine running the web browser is like the customer, and the web server providing the page requested is like the shopkeeper.
When you type an address into the web browser, how does it know which web server to get the page from? Well, just as shops have addresses, say, 45 Central Avenue, Sometownsville, so do web servers. Web servers don’t have street names; instead, they haveInternet protocol (IP) addresses, which uniquely identify them on the Internet. These consist of four sets of numbers, separated by dots (for example, 127.0.0.1).
If you’ve ever surfed the Net, you’re probably wondering what on earth we’re talking about. Surely web servers have nice www.somewebsite.com names, not IP addresses? In fact, the www.somewebsite.com name is the “friendly” name for the actual IP address; it’s a whole lot easier for us humans to remember. On the Internet, the friendly name is converted to the actual IP address by computers called domain name servers, which your Internet service provider will have set up for you.
What Can JavaScript Do for Me?
JavaScript is primarily used to interact with users. That’s a rather broad statement, so let’s break “interact with users” into two categories: user input validation and enhancement.
JavaScript was originally created for validating form input. For example, if you had a form that takes a user’s credit card details in preparation for on online purchase of goods, you’d want to make sure he had actually filled in those details before you sent the goods. You might also want to check that the data being entered is of the correct type, such as a number for his age rather than text.
Thanks to the advances made in today’s JavaScript engines, JavaScript is used for much, much more than input-related tasks. In fact, advanced JavaScript-driven applications can be created that rival the speed and functionality of conventional desktop applications. Examples of such applications include Google Maps, Google Calendar, and even full-fledged productivity software such as Microsoft’s Office Web Apps. These applications provide a real service. In most of these applications, JavaScript only powers the user interface, with the actual data processing being done on the server. But even then, JavaScript could be used on the server if used with a JavaScript-based processing engine (one such environment is called Node).
Tools Needed to Create JavaScript Web Applications
The great news is that learning JavaScript requires no expensive software purchases; you can learn JavaScript for free on any PC or Mac. This section discusses what tools are available and how to obtain them.
Development Tools
All that you need to get started writing JavaScript code for web applications is a simple text editor, such as Notepad for Windows or TextEdit for Mac OS X. You can also use one of the many advanced text editors that provide line numbering, color coding, search and replace, and so on. Here are just a few:
· Notepad2 (Windows): www.flos-freeware.ch/notepad2.html
· WebMatrix (Windows): www.microsoft.com/web/webmatrix/
· Brackets (Cross-Platform): brackets.io
· Sublime Text (Cross-Platform): www.sublimetext.com
Sublime Text is not free software, but it does have a time-limited evaluation. If you try it and like it, please support the developers of that application.
You might also prefer a proper HTML editor; you’ll need one that enables you to edit the HTML source code, because that’s where you need to add your JavaScript. A number of very good tools specifically aimed at developing web-based applications, such as Adobe’s Dreamweaver, are also available. However, this book concentrates on JavaScript rather than any specific development tool. When it comes to learning the basics, it’s often best to write the code by hand rather than rely on a tool to do it for you. This helps you understand the fundamentals of the language before you attempt the more advanced logic that is beyond a tool’s capability. When you have a good understanding of the basics, you can use tools as timesavers so that you can spend time on the more advanced and more interesting coding.
Once you become more proficient, you may find that a web page editor makes life easier by inclusion of features such as checking the validity of your code, color-coding important JavaScript words, and making it easier to view your pages before loading them into a web browser. Many other, equally good, free web page editors are available. A Google search on web editing software will bring back a long list of software you can use.
As you write web applications of increasing complexity, you’ll find useful tools that help you spot and solve errors. Errors in code are what programmers call bugs, though when our programs go wrong, we prefer to call them “unexpected additional features.” Very useful in solving bugs are development tools called debuggers. Debuggers let you monitor what is happening in your code as it’s running. In Chapter 18, you take an in-depth look at bugs and debugger development tools.
Web Browsers
In addition to software that lets you edit web pages, you’ll also need a browser to view your web pages. It’s best to develop your JavaScript code on the sorts of browsers you expect visitors to use to access your website. You see later in the chapter that although browsers are much more standards based, differences exist in how they view web pages and treat JavaScript code. All the examples provided in this book have been tested on Chrome, IE9-11, Firefox, Safari, and Opera. Wherever a piece of code does not work on any of these browsers, a note to this effect is made in the text.
If you’re running Windows, you’ll almost certainly have IE installed. If not, a trip to windows.microsoft.com/en-us/internet-explorer/download-ie will get you the latest version for your version of Windows.
You can find Chrome at www.google.com/chrome, and you can download Firefox at www.getfirefox.com.
By default, most browsers have JavaScript support enabled, but it is possible to disable this functionality in all browsers except Firefox. So before you start on your first JavaScript examples in the next section, you should check to make sure JavaScript is enabled in your browser.
To do this in Chrome, you want to modify the JavaScript settings in Content Settings, as shown in Figure 1.1. You can access these settings by navigating to chrome://settings/content or by following these instructions:
1. Go to the Settings option in the menu.
2. Click the “Show advanced settings…” link.
3. Under Privacy, click the “Content settings…” button.
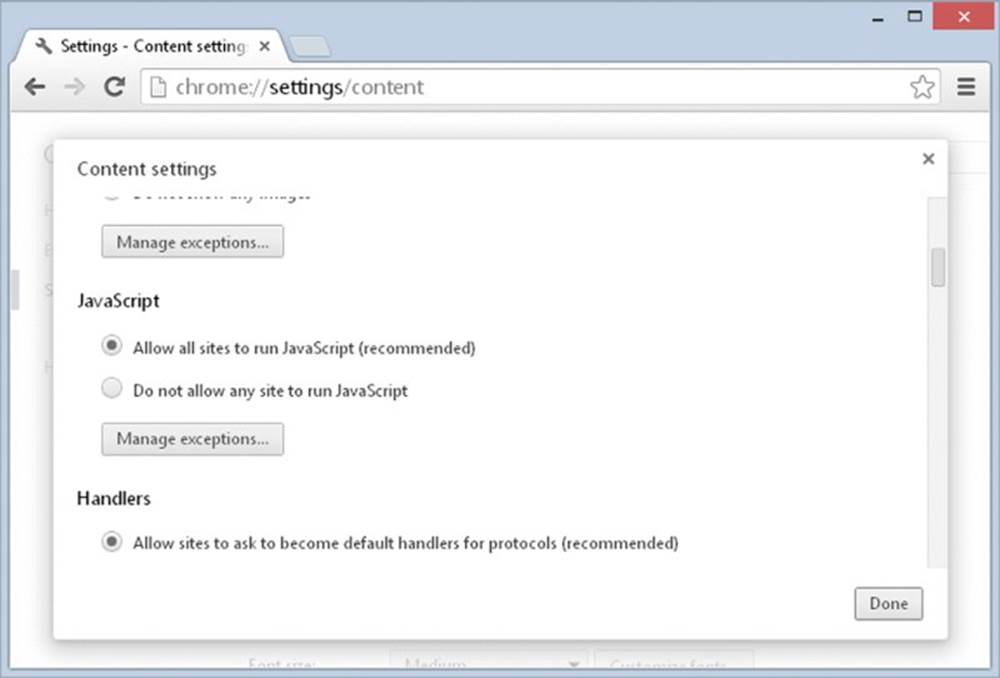
Figure 1.1
It is harder to turn off scripting in Internet Explorer. Choose Internet Options from the menu (the gear icon in the upper-right corner), click the Security tab, and check whether the Internet or Local intranet options have custom security settings. If either of them does, click the Custom Level button and scroll down to the Scripting section. Check that Active Scripting is set to Enable.
A final point to note is how to open the code examples in your browser. For this book, you simply need to open the file on your hard drive in which an example is stored. You can do this in a number of ways, but the easiest is to just double-click the file.
WHERE DO MY SCRIPTS GO?
Inserting JavaScript into a web page is much like inserting any other HTML content; you use tags to mark the start and end of your script code. The element you use to do this is <script/>. This tells the browser that the following chunk of text, bounded by the closing</script> tag, is not HTML to be displayed, but rather script code to be processed. The chunk of code surrounded by the <script> and </script> tags is called a script block. Here’s an example:
<script>
// JavaScript goes here
</script>
Basically, when the browser spots <script> tags, instead of trying to display the contained text to the user, it uses the browser’s JavaScript engine to run the code’s instructions. Of course, the code might give instructions about changes to the way the page is displayed or what is shown in the page, but the text of the code itself is never shown to the user.
You can put the <script/> element inside the header (between the <head> and </head> tags) or inside the body (between the <body> and </body> tags) of the HTML page. However, although you can put them outside these areas—for example, before the <html> tag or after the </html> tag—this is not permitted in the web standards and so is considered bad practice. Today’s JavaScript developers typically add their <script/> elements directly before the </body> tag.
The <script/> element has a type attribute that tells the browser what type of text is contained within the element. For JavaScript, the best practice is to omit the type attribute (browsers automatically assume that any <script/> element without a type attribute is JavaScript). We used to always set the type attribute to text/javascript, but with the introduction of the HTML5 specification, it is no longer considered good practice to do so. Only include the type attribute if the <script/> element contains something other than JavaScript.
NOTE The <script/> element can be used for more than just JavaScript. Some JavaScript-based templating engines use <script/> elements to contain snippets of HTML.
Linking to an External JavaScript File
The <script/> element has another arrow in its quiver: the capability to specify that the JavaScript code is not inside the web page, but inside a separate file. You should give any external files the file extension .js. Though it’s not compulsory, it does make it easier for you to work out what is contained in each of your files.
To link to an external JavaScript file, you need to create a <script/> element as described earlier and use its src attribute to specify the location of the external file. For example, imagine you’ve created a file called MyCommonFunctions.js to which you want to link, and the file is in the same directory as your web page. The <script/> element would look like this:
<script src="MyCommonFunctions.js"></script>
The web browser will read this code and include the file contents as part of your web page. When linking to external files, you must not put any code within the opening and closing <script> tags; for example, the following would be invalid:
<script src="MyCommonFunctions.js">
var myVariable;
if ( myVariable == 1 ) {
// do something
}
</script>
It’s important to note that an opening <script> tag must be accompanied by a closing </script> tag. You cannot use the self-closing syntax found in XML. Therefore, the following is invalid:
<script src="MyCommonFunctions.js" />
Generally, you use the <script/> element to load local files (those on the same computer as the web page itself). However, you can load external files from a web server by specifying the web address of the file. For example, if your file was called MyCommonFunctions.jsand was loaded on a web server with the domain name www.mysite.com, the <script/> element would look like this:
<script src="http://www.mysite.com/MyCommonFunctions.js"></script>
Linking to an external file is common when incorporating well-known JavaScript libraries into a web page. The servers hosting these libraries are referred to as Content Delivery Networks, or CDNs. CDNs are relatively safe, but beware of linking to external files if they are controlled by other people. It would give those people the ability to control and change your web page, so you need to be very sure you trust them!
Advantages of Using an External File
The biggest advantage of external files is code reuse. Say you write a complex bit of JavaScript that performs a general function you might need in lots of pages. If you include the code inline (within the web page rather than via an external file), you need to cut and paste the code into each web page that uses it. This is fine as long as you never need to change the code, but the reality is you probably will need to change or improve the code at some point. If you’ve cut and pasted the code to 30 different web pages, you’ll need to update it in 30 different places. Quite a headache! By using one external file and including it in all the pages that need it, you need to update the code only once and all the 30 pages are updated instantly. So much easier!
Another advantage of using external files is that the browser will cache them, much as it does with images shared between pages. If your files are large, this could save download time and also reduce bandwidth usage.
YOUR FIRST SIMPLE JAVASCRIPT PROGRAM
Enough talk about the subject of JavaScript; let’s write some! We’ll start with a simple example that changes the background color of the web page.
TRY IT OUT Painting the Page Red
This is a simple example of using JavaScript to change the background color of the browser. In your text editor, type the following:
<!DOCTYPE html>
<html lang="en">
<head>
<meta charset="utf-8" />
<title>Chapter 1, Example 1</title>
</head>
<body bgcolor="white">
<p>Paragraph 1</p>
<script>
document.bgColor = "red";
</script>
</body>
</html>
Save the page as ch1_example1.html to a convenient place on your hard drive, and load it into your web browser. You should see a red web page with the text Paragraph 1 in the top-left corner. But wait—don’t you set the <body> tag’s BGCOLOR attribute to white? Okay, let’s look at what’s going on here.
The page is contained within <html> and </html> tags. This block contains a <body> element. When you define the opening <body> tag, you use HTML to set the page’s background color to white:
<body bgcolor="white">
Then you let the browser know that your next lines of code are JavaScript code by using the <script> start tag:
<script>
Everything from here until the close tag, </script>, is JavaScript and is treated as such by the browser. Within this script block, you use JavaScript to set the document’s background color to red:
document.bgColor = "red";
What you might call the page is known as the document for the purpose of scripting in a web page. The document has lots of properties, including its background color, bgColor. You can reference properties of the document by writing document, followed by a dot, followed by the property name. Don’t worry about the use of document at the moment; you look at it in greater depth later in the book.
Note that the preceding line of code is an example of a JavaScript statement. Every line of code between the <script> and </script> tags is called a statement, although some statements may run on to more than one line.
You’ll also see that there’s a semicolon (;) at the end of the line. You use a semicolon in JavaScript to indicate the end of a statement. In practice, JavaScript is very relaxed about the need for semicolons, and when you start a new line, JavaScript will usually be able to work out whether you mean to start a new line of code. However, for good coding practice, you should use a semicolon at the end of statements of code, and a single JavaScript statement should fit onto one line rather than continue on to two or more lines. Moreover, you’ll find some situations in which you must include a semicolon, which you’ll come to later in the book.
Finally, to tell the browser to stop interpreting your text as JavaScript and start interpreting it as HTML, you use the script close tag:
</script>
You’ve now looked at how the code works, but you haven’t looked at the order in which it works. When the browser loads in the web page, the browser goes through it, rendering it tag by tag from top to bottom of the page. This process is called parsing. The web browser starts at the top of the page and works its way down to the bottom of the page. The browser comes to the <body> tag first and sets the document’s background to white. Then it continues parsing the page. When it comes to the JavaScript code, it is instructed to change the document’s background to red.
WRITING MORE JAVASCRIPT
The first example let you dip your toes into the JavaScript waters. We’ll write a few more JavaScript programs to demonstrate the web page flow and one of the many ways to display a result in the browser.
TRY IT OUT Way Things Flow
Let’s extend the previous example to demonstrate the parsing of a web page in action. Type the following into your text editor:
<!DOCTYPE html>
<html lang="en">
<head>
<meta charset="utf-8" />
<title>Chapter 1, Example 2</title>
</head>
<body bgcolor="white">
<p>Paragraph 1</p>
<script>
// script block 1
alert("First Script Block");
</script>
<p>Paragraph 2</p>
<script>
// script block 2
alert("Second Script Block");
</script>
<p>Paragraph 3</p>
</body>
</html>
Save the file to your hard drive as ch1_example2.html and then load it into your browser. When you load the page, you should see the first paragraph, Paragraph 1, followed by a message box displayed by the first script block. The browser halts its parsing until you click the OK button. As you see in Figure 1.2, the page background is white, as set in the <body> tag, and only the first paragraph is displayed.
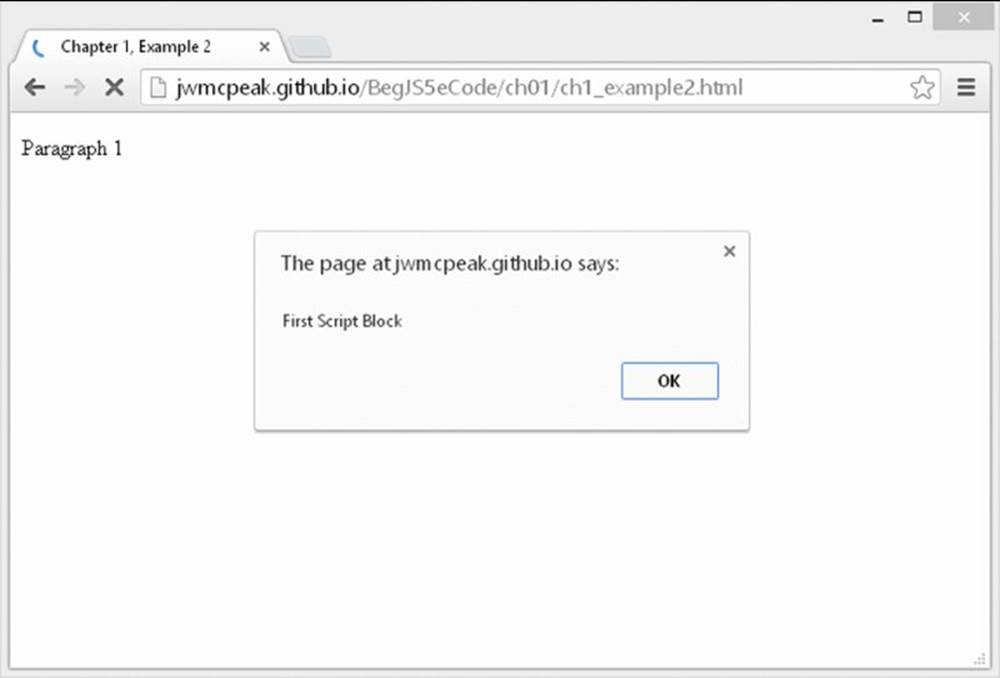
Figure 1.2
Click the OK button, and the parsing continues. The browser displays the second paragraph, and the second script block is reached, which changes the background color to red. Another message box is displayed by the second script block, as shown inFigure 1.3.
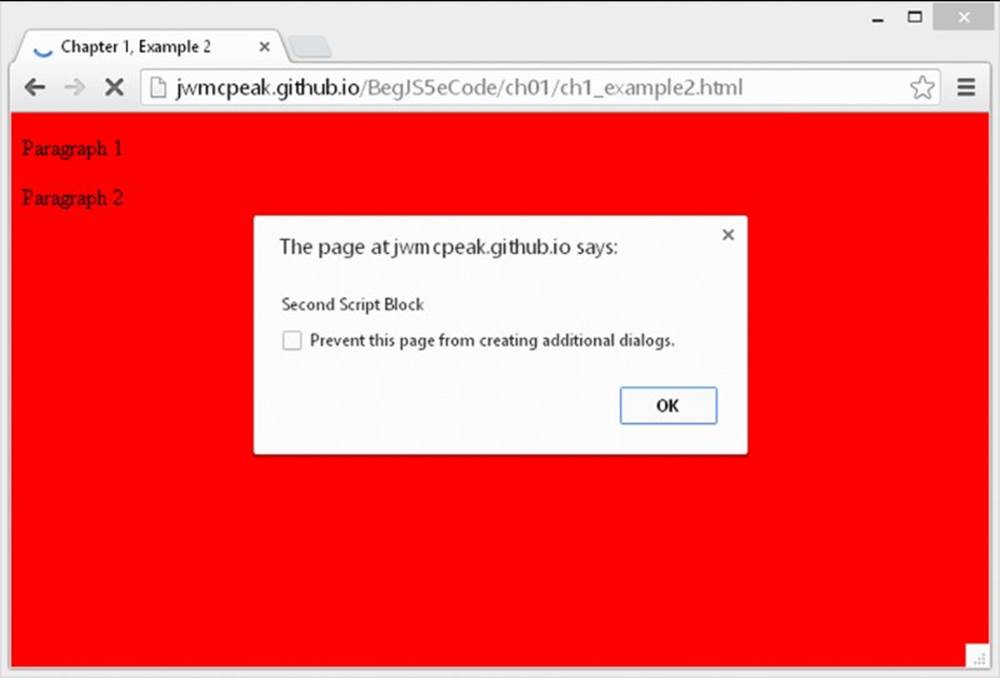
Figure 1.3
Click OK, and again the parsing continues, with the third paragraph, Paragraph 3, being displayed. The web page is complete, as shown in Figure 1.4.
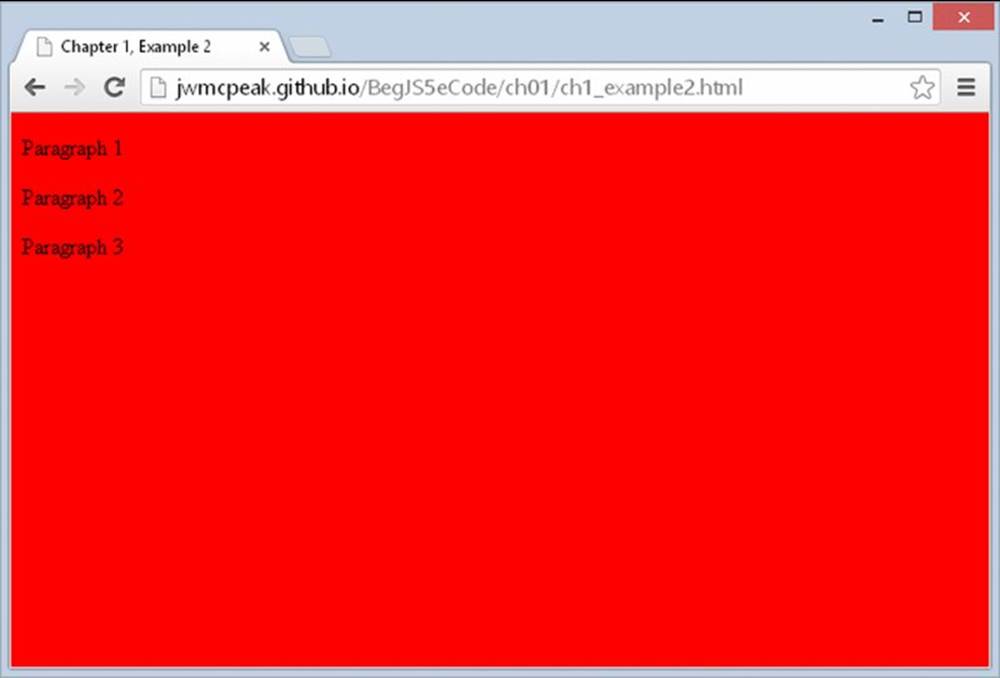
Figure 1.4
The first part of the page is the same as in our earlier example. The background color for the page is set to white in the definition of the <body> tag, and then a paragraph is written to the page:
<body bgcolor="white">
<p>Paragraph 1</p>
The first new section is contained in the first script block:
<script>
// script block 1
alert("First Script Block");
</script>
This script block contains two lines, both of which are new to you. The first line
// Script block 1
is just a comment, solely for your benefit. The browser recognizes anything on a line after a double forward slash (//) to be a comment and does not do anything with it. It is useful for you as a programmer because you can add explanations to your code that make it easier to remember what you were doing when you come back to your code later.
The alert() function in the second line of code is also new to you. Before learning what it does, you need to know what a function is.
Functions are defined more fully in Chapter 4, but for now you need only think of them as pieces of JavaScript code that you can use to do certain tasks. If you have a background in math, you may already have some idea of what a function is: it takes some information, processes it, and gives you a result. A function makes life easier for you as a programmer because you don’t have to think about how the function does the task—you can just concentrate on when you want the task done.
In particular, the alert() function enables you to alert or inform the user about something by displaying a message box. The message to be given in the message box is specified inside the parentheses of the alert() function and is known as the function’sparameter.
The message box displayed by the alert() function is modal. This is an important concept, which you’ll come across again. It simply means that the message box won’t go away until the user closes it by clicking the OK button. In fact, parsing of the page stops at the line where the alert() function is used and doesn’t restart until the user closes the message box. This is quite useful for this example, because it enables you to demonstrate the results of what has been parsed so far: The page color has been set to white, and the first paragraph has been displayed.
When you click OK, the browser carries on parsing down the page through the following lines:
<p>Paragraph 2</p>
<script>
// script block 2
document.bgColor = "red";
alert("Second Script Block");
</script>
The second paragraph is displayed, and the second block of JavaScript is run. The first line of the script block code is another comment, so the browser ignores this. You saw the second line of the script code in the previous example—it changes the background color of the page to red. The third line of code is the alert() function, which displays the second message box. Parsing is brought to a halt until you close the message box by clicking OK.
When you close the message box, the browser moves on to the next lines of code in the page, displaying the third paragraph and, finally, ending the web page:
<p>Paragraph 3</p>
</body>
</html>
Another important point raised by this example is the difference between setting properties of the page, such as background color, via HTML and doing the same thing using JavaScript. The method of setting properties using HTML is static: A value can be set only once and never changed again by means of HTML. Setting properties using JavaScript enables you to dynamically change their values. The term dynamic refers to something that can be changed and whose value or appearance is not set in stone.
This example is just that, an example. In practice, if you want the page’s background to be red, simply set the background color with CSS (don’t use the bgcolor attribute in practice). Where you want to use JavaScript is where you want to add some sort of intelligence or logic to the page. For example, if the user’s screen resolution is particularly low, you might want to change what’s displayed on the page, and you can do that with JavaScript.
TRY IT OUT Displaying Results in a Web Page
In this final example, you discover how to write information directly to a web page using JavaScript. This proves more useful when you’re writing the results of a calculation or text you’ve created using JavaScript, as you see in the next chapter. For now, you’ll just write “Hello World!” to a blank page using JavaScript:
<!DOCTYPE html>
<html lang="en">
<head>
<meta charset="utf-8" />
<title>Chapter 1, Example 3</title>
</head>
<body>
<p id="results"></p>
<script>
document.getElementById("results").innerHTML = "Hello World!";
</script>
</body>
</html>
Save the page as ch1_example3.html to a convenient place on your hard drive. Now load it into your web browser and you’ll see Hello World! in the page. Although it would be easier to use HTML to do the same thing, this technique will prove useful in later chapters.
The first part of the page is the same as in our earlier examples, but things start to change when you reach this line:
<p id="results"></p>
You’ll notice the <p/> element has been given an ID using the id attribute. This ID must be unique in the web page, because it is used by JavaScript to identify the specific HTML element in the following line:
document.getElementById("results").innerHTML = "Hello World!";
Don’t worry if this seems complex at the moment; you learn more about how this works in later chapters. Basically, the code is saying, “Get me the element with the ID of results and set the HTML inside that element to Hello World!”
It’s important in that the code accessing the paragraph is after the actual <p/> element. Otherwise, the code would be attempting to access a paragraph before it existed in the page and would throw an error.
A BRIEF LOOK AT BROWSERS AND COMPATIBILITY PROBLEMS
In the preceding example you saw that by using JavaScript you can change a web page’s document background color using the bgColor property of the document. The example worked regardless of what browser you used because they all support a document with a bgColorproperty. You can say that the example is cross-browser compatible. However, it’s not always the case that the property or language feature available in one browser will be available in another browser. This is even sometimes the case between versions of the same browser.
One of the main headaches involved in creating web-based JavaScript is the differences between different web browsers, the level of HTML and CSS they support, and the functionality their JavaScript engines can handle. Each new release of any browser sees new and exciting features added to its HTML, CSS, and JavaScript support. The good news is that to a much greater extent than ever before, browser creators are complying with standards set by organizations such as Ecma and the W3C.
Which browsers you want to support really comes down to the browsers you think the majority of your website’s visitors—that is, your user base—will be using. This book is aimed at standards-compliant browsers, such as Chrome, IE9+, Firefox, Safari, and Opera.
If you want your website to be professional, you need to somehow deal with older browsers. You could make sure your code is backward compatible—that is, it only uses features available in older browsers. However, you may decide that it’s simply not worth limiting yourself to the features of older browsers. In this case you need to make sure your pages degrade gracefully. In other words, make sure that although your pages won’t work in older browsers, they will fail in a way that means the user is either never aware of the failure or is alerted to the fact that certain features on the website are not compatible with his or her browser. The alternative to degrading gracefully is for your code to raise lots of error messages, cause strange results to be displayed on the page, and generally make you look like an idiot who doesn’t know what he’s doing!
So how do you make your web pages degrade gracefully? You can do this by using JavaScript to determine which browser the web page is running in after it has been partially or completely loaded. You can use this information to determine what scripts to run or even to redirect the user to another page written to make best use of her particular browser. In later chapters, you see how to find out what features the browser supports and take appropriate action so that your pages work acceptably on as many browsers as possible.
SUMMARY
At this point, you should have a feel for what JavaScript is and what it can do. In particular, this brief introduction covered the following:
· You looked into the process the browser follows when interpreting your web page. It goes through the page element by element (parsing) and acts upon your HTML tags and JavaScript code as it comes to them.
· Unlike many programming languages, JavaScript requires just a text editor to start creating code. Something like Windows Notepad is fine for getting started, though more extensive tools will prove valuable once you get more experience.
· JavaScript code is embedded into the web page itself, along with the HTML. Its existence is marked out by the use of <script/> elements. As with HTML, the script executes from the top of the page and works down to the bottom, interpreting and executing the code statement by statement.
All materials on the site are licensed Creative Commons Attribution-Sharealike 3.0 Unported CC BY-SA 3.0 & GNU Free Documentation License (GFDL)
If you are the copyright holder of any material contained on our site and intend to remove it, please contact our site administrator for approval.
© 2016-2026 All site design rights belong to S.Y.A.