Wiley Linux Command Line and Shell Scripting Bible 3rd (2015)
Part I. The Linux Command Line
In This Part
1. Chapter 1 Starting with Linux Shells
1. Chapter 2 Getting to the Shell
1. Chapter 3 Basic bash Shell Commands
1. Chapter 4 More bash Shell Commands
1. Chapter 5 Understanding the Shell
1. Chapter 6 Using Linux Environment Variables
1. Chapter 7 Understanding Linux File Permissions
1. Chapter 8 Managing Filesystems
1. Chapter 9 Installing Software
1. Chapter 10 Working with Editors
Chapter 1. Starting with Linux Shells
In This Chapter
1. What is Linux?
2. Parts of the Linux kernel
3. Exploring the Linux desktop
4. Visiting Linux distributions
Before you can dive into working with the Linux command line and shells, you should first understand what Linux is, where it came from, and how it works. This chapter walks you through what Linux is and explains where the shell and command line fit in the overall Linux picture.
What Is Linux?
If you've never worked with Linux before, you may be confused about why so many different versions are available. I'm sure you have been confused by various terms such as distribution, LiveCD, and GNU when looking at Linux packages. Wading through the world of Linux for the first time can be a tricky experience. This chapter takes some of the mystery out of the Linux system before you start working on commands and scripts.
First, four main parts make up a Linux system:
· The Linux kernel
· The GNU utilities
· A graphical desktop environment
· Application software
Each of these parts has a specific job in the Linux system. No part is very useful by itself. Figure 1.1 shows a basic diagram of how the parts fit together to create the overall Linux system.
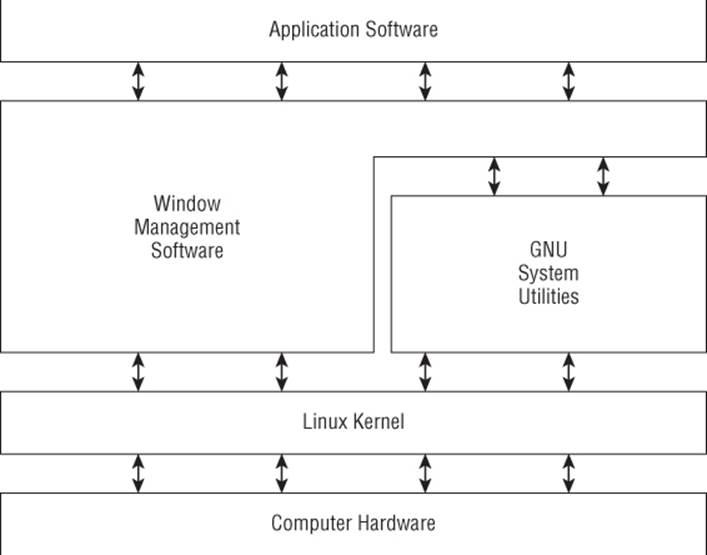
Figure 1.1 The Linux system
This section describes these four main parts in detail and gives you an overview of how they work together to create a complete Linux system.
Looking into the Linux Kernel
The core of the Linux system is the kernel. The kernel controls all the hardware and software on the computer system, allocating hardware when necessary and executing software when required.
If you've been following the Linux world at all, no doubt you've heard the name Linus Torvalds. Linus is the person responsible for creating the first Linux kernel software when he was a student at the University of Helsinki. He intended it to be a copy of the Unix system, at the time a popular operating system used at many universities.
After developing the Linux kernel, Linus released it to the Internet community and solicited suggestions for improving it. This simple process started a revolution in the world of computer operating systems. Soon Linus was receiving suggestions from students as well as professional programmers from around the world.
Allowing anyone to change programming code in the kernel would result in complete chaos. To simplify things, Linus acted as a central point for all improvement suggestions. It was ultimately Linus's decision whether or not to incorporate suggested code in the kernel. This same concept is still in place with the Linux kernel code, except that instead of just Linus controlling the kernel code, a team of developers has taken on the task.
The kernel is primarily responsible for four main functions:
· System memory management
· Software program management
· Hardware management
· Filesystem management
The following sections explore each of these functions in more detail.
System Memory Management
One of the primary functions of the operating system kernel is memory management. Not only does the kernel manage the physical memory available on the server, but it can also create and manage virtual memory, or memory that does not actually exist.
It does this by using space on the hard disk, called the swap space. The kernel swaps the contents of virtual memory locations back and forth from the swap space to the actual physical memory. This allows the system to think there is more memory available than what physically exists, as shown in Figure 1.2.
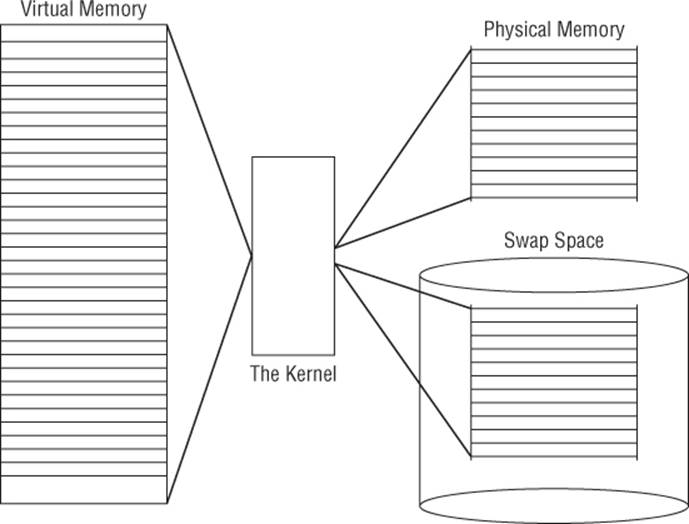
Figure 1.2 The Linux system memory map
The memory locations are grouped into blocks called pages. The kernel locates each page of memory either in the physical memory or the swap space. The kernel then maintains a table of the memory pages that indicates which pages are in physical memory and which pages are swapped out to disk.
The kernel keeps track of which memory pages are in use and automatically copies memory pages that have not been accessed for a period of time to the swap space area (called swapping out), even if there's other memory available. When a program wants to access a memory page that has been swapped out, the kernel must make room for it in physical memory by swapping out a different memory page and swapping in the required page from the swap space. Obviously, this process takes time and can slow down a running process. The process of swapping out memory pages for running applications continues for as long as the Linux system is running.
Software Program Management
The Linux operating system calls a running program a process. A process can run in the foreground, displaying output on a display, or it can run in the background, behind the scenes. The kernel controls how the Linux system manages all the processes running on the system.
The kernel creates the first process, called the init process, to start all other processes on the system. When the kernel starts, it loads the init process into virtual memory. As the kernel starts each additional process, it gives it a unique area in virtual memory to store the data and code that the process uses.
Some Linux implementations contain a table of processes to start automatically on bootup. On Linux systems, this table is usually located in the special file /etc/inittabs.
Other systems (such as the popular Ubuntu Linux distribution) utilize the /etc/init.d folder, which contains scripts for starting and stopping individual applications at boot time. The scripts are started via entries under the /etc/rcX.d folders, where X is a run level.
The Linux operating system uses an init system that utilizes run levels. A run level can be used to direct the init process to run only certain types of processes, as defined in the /etc/inittabs file or the /etc/rcX.d folders. There are five init run levels in the Linux operating system.
At run level 1, only the basic system processes are started, along with one console terminal process. This is called single-user mode. Single-user mode is most often used for emergency filesystem maintenance when something is broken. Obviously, in this mode, only one person (usually the administrator) can log in to the system to manipulate data.
The standard init run level is 3. At this run level, most application software, such as network support software, is started. Another popular run level in Linux is run level 5. This is the run level where the system starts the graphical X Window software and allows you to log in using a graphical desktop window.
The Linux system can control the overall system functionality by controlling the init run level. By changing the run level from 3 to 5, the system can change from a console-based system to an advanced, graphical X Window system.
In Chapter 4, you'll see how to use the ps command to view the processes currently running on the Linux system.
Hardware Management
Still another responsibility for the kernel is hardware management. Any device that the Linux system must communicate with needs driver code inserted inside the kernel code. The driver code allows the kernel to pass data back and forth to the device, acting as a middle man between applications and the hardware. Two methods are used for inserting device driver code in the Linux kernel:
· Drivers compiled in the kernel
· Driver modules added to the kernel
Previously, the only way to insert device driver code was to recompile the kernel. Each time you added a new device to the system, you had to recompile the kernel code. This process became even more inefficient as Linux kernels supported more hardware. Fortunately, Linux developers devised a better method to insert driver code into the running kernel.
Programmers developed the concept of kernel modules to allow you to insert driver code into a running kernel without having to recompile the kernel. Also, a kernel module could be removed from the kernel when the device was finished being used. This greatly simplified and expanded using hardware with Linux.
The Linux system identifies hardware devices as special files, called device files. There are three classifications of device files:
· Character
· Block
· Network
Character device files are for devices that can only handle data one character at a time. Most types of modems and terminals are created as character files. Block files are for devices that can handle data in large blocks at a time, such as disk drives.
The network file types are used for devices that use packets to send and receive data. This includes network cards and a special loopback device that allows the Linux system to communicate with itself using common network programming protocols.
Linux creates special files, called nodes, for each device on the system. All communication with the device is performed through the device node. Each node has a unique number pair that identifies it to the Linux kernel. The number pair includes a major and a minor device number. Similar devices are grouped into the same major device number. The minor device number is used to identify a specific device within the major device group.
Filesystem Management
Unlike some other operating systems, the Linux kernel can support different types of filesystems to read and write data to and from hard drives. Besides having over a dozen filesystems of its own, Linux can read and write to and from filesystems used by other operating systems, such as Microsoft Windows. The kernel must be compiled with support for all types of filesystems that the system will use. Table 1.1 lists the standard filesystems that a Linux system can use to read and write data.
Table 1.1 Linux Filesystems
|
Filesystem |
Description |
|
ext |
Linux Extended filesystem — the original Linux filesystem |
|
ext2 |
Second extended filesystem, provided advanced features over ext |
|
ext3 |
Third extended filesystem, supports journaling |
|
ext4 |
Fourth extended filesystem, supports advanced journaling |
|
hpfs |
OS/2 high-performance filesystem |
|
jfs |
IBM's journaling filesystem |
|
iso9660 |
ISO 9660 filesystem (CD-ROMs) |
|
minix |
MINIX filesystem |
|
msdos |
Microsoft FAT16 |
|
ncp |
Netware filesystem |
|
nfs |
Network File System |
|
ntfs |
Support for Microsoft NT filesystem |
|
proc |
Access to system information |
|
ReiserFS |
Advanced Linux filesystem for better performance and disk recovery |
|
smb |
Samba SMB filesystem for network access |
|
sysv |
Older Unix filesystem |
|
ufs |
BSD filesystem |
|
umsdos |
Unix-like filesystem that resides on top of msdos |
|
vfat |
Windows 95 filesystem (FAT32) |
|
XFS |
High-performance 64-bit journaling filesystem |
Any hard drive that a Linux server accesses must be formatted using one of the filesystem types listed in Table 1.1.
The Linux kernel interfaces with each filesystem using the Virtual File System (VFS). This provides a standard interface for the kernel to communicate with any type of filesystem. VFS caches information in memory as each filesystem is mounted and used.
The GNU Utilities
Besides having a kernel to control hardware devices, a computer operating system needs utilities to perform standard functions, such as controlling files and programs. While Linus created the Linux system kernel, he had no system utilities to run on it. Fortunately for him, at the same time he was working, a group of people were working together on the Internet trying to develop a standard set of computer system utilities that mimicked the popular Unix operating system.
The GNU organization (GNU stands for GNU's Not Unix) developed a complete set of Unix utilities, but had no kernel system to run them on. These utilities were developed under a software philosophy called open source software (OSS).
The concept of OSS allows programmers to develop software and then release it to the world with no licensing fees attached. Anyone can use the software, modify it, or incorporate it into his or her own system without having to pay a license fee. Uniting Linus's Linux kernel with the GNU operating system utilities created a complete, functional, free operating system.
While the bundling of the Linux kernel and GNU utilities is often just called Linux, you will see some Linux purists on the Internet refer to it as the GNU/Linux system to give credit to the GNU organization for its contributions to the cause.
The Core GNU Utilities
The GNU project was mainly designed for Unix system administrators to have a Unix-like environment available. This focus resulted in the project porting many common Unix system command line utilities. The core bundle of utilities supplied for Linux systems is called the coreutils package.
The GNU coreutils package consists of three parts:
· Utilities for handling files
· Utilities for manipulating text
· Utilities for managing processes
Each of these three main groups of utilities contains several utility programs that are invaluable to the Linux system administrator and programmer. This book covers each of the utilities contained in the GNU coreutils package in detail.
The Shell
The GNU/Linux shell is a special interactive utility. It provides a way for users to start programs, manage files on the filesystem, and manage processes running on the Linux system. The core of the shell is the command prompt. The command prompt is the interactive part of the shell. It allows you to enter text commands, and then it interprets the commands and executes them in the kernel.
The shell contains a set of internal commands that you use to control things such as copying files, moving files, renaming files, displaying the programs currently running on the system, and stopping programs running on the system. Besides the internal commands, the shell also allows you to enter the name of a program at the command prompt. The shell passes the program name off to the kernel to start it.
You can also group shell commands into files to execute as a program. Those files are called shell scripts. Any command that you can execute from the command line can be placed in a shell script and run as a group of commands. This provides great flexibility in creating utilities for commonly run commands, or processes that require several commands grouped together.
There are quite a few Linux shells available to use on a Linux system. Different shells have different characteristics, some being more useful for creating scripts and some being more useful for managing processes. The default shell used in all Linux distributions is the bash shell. The bash shell was developed by the GNU project as a replacement for the standard Unix shell, called the Bourne shell (after its creator). The bash shell name is a play on this wording, referred to as the “Bourne again shell.”
In addition to the bash shell, we will cover several other popular shells in this book. Table 1.2 lists the different shells we will examine.
Table 1.2 Linux Shells
|
Shell |
Description |
|
ash |
A simple, lightweight shell that runs in low-memory environments but has full compatibility with the bash shell |
|
korn |
A programming shell compatible with the Bourne shell but supporting advanced programming features like associative arrays and floating-point arithmetic |
|
tcsh |
A shell that incorporates elements from the C programming language into shell scripts |
|
zsh |
An advanced shell that incorporates features from bash, tcsh, and korn, providing advanced programming features, shared history files, and themed prompts |
Most Linux distributions include more than one shell, although usually they pick one of them to be the default. If your Linux distribution includes multiple shells, feel free to experiment with different shells and see which one fits your needs.
The Linux Desktop Environment
In the early days of Linux (the early 1990s) all that was available was a simple text interface to the Linux operating system. This text interface allowed administrators to start programs, control program operations, and move files around on the system.
With the popularity of Microsoft Windows, computer users expected more than the old text interface to work with. This spurred more development in the OSS community, and the Linux graphical desktops emerged.
Linux is famous for being able to do things in more than one way, and no place is this more relevant than in graphical desktops. There are a plethora of graphical desktops you can choose from in Linux. The following sections describe a few of the more popular ones.
The X Window System
Two basic elements control your video environment: the video card in your PC and your monitor. To display fancy graphics on your computer, the Linux software needs to know how to talk to both of them. The X Window software is the core element in presenting graphics.
The X Window software is a low-level program that works directly with the video card and monitor in the PC, and it controls how Linux applications can present fancy windows and graphics on your computer.
Linux isn't the only operating system that uses X Window; versions are written for many different operating systems. In the Linux world, several different software packages can implement it.
The most popular package is X.org. It provides an open source software implementation of the X Window system and supports many of the newer video cards used today.
Two other X Window packages are gaining in popularity. The Fedora Linux distribution is experimenting with the Wayland software, and the Ubuntu Linux distribution has developed the Mir display server for use with its desktop environment.
When you first install a Linux distribution, it attempts to detect your video card and monitor, and then it creates an X Window configuration file that contains the required information. During installation, you may notice a time when the installation program scans your monitor for supported video modes. Sometimes, this causes your monitor to go blank for a few seconds. Because there are lots of different types of video cards and monitors, this process can take a while to complete.
The core X Window software produces a graphical display environment, but nothing else. Although this is fine for running individual applications, it is not useful for day-to-day computer use. No desktop environment allows users to manipulate files or launch programs. To do that, you need a desktop environment on top of the X Window system software.
The KDE Desktop
The K Desktop Environment (KDE) was first released in 1996 as an open source project to produce a graphical desktop similar to the Microsoft Windows environment. The KDE desktop incorporates all the features you are probably familiar with if you are a Windows user. Figure 1.3 shows a sample KDE 4 desktop running in the openSUSE Linux distribution.
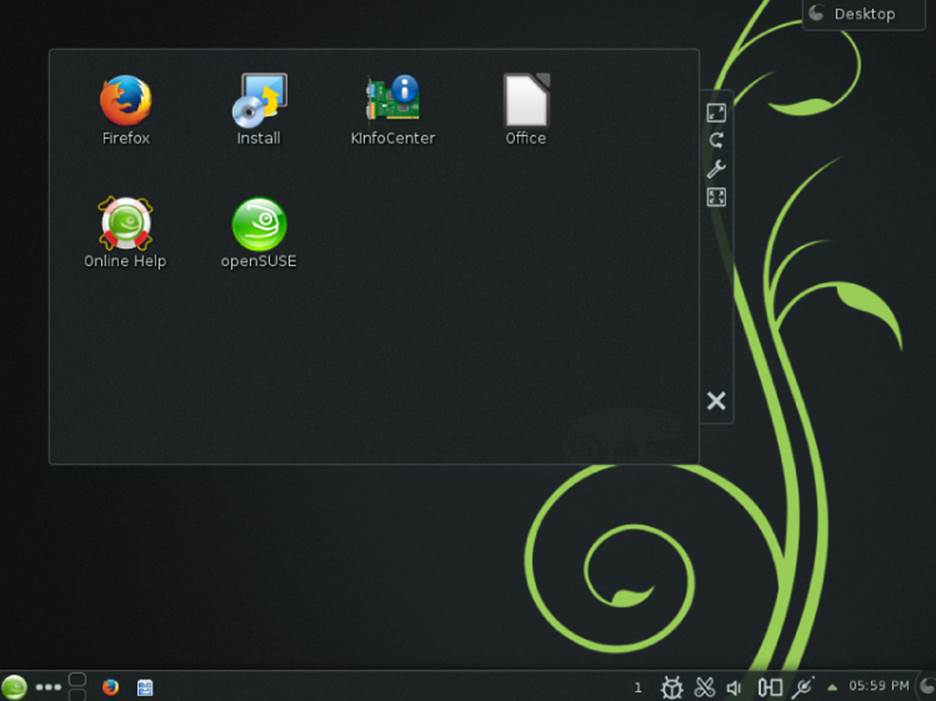
Figure 1.3 The KDE 4 desktop on an openSUSE Linux system
The KDE desktop allows you to place both application and file icons in a special area on the desktop. If you click an application icon, the Linux system starts the application. If you click a file icon, the KDE desktop attempts to determine what application to start to handle the file.
The bar at the bottom of the desktop is called the Panel. The Panel consists of four parts:
· The K menu: Much like the Windows Start menu, the K menu contains links to start installed applications.
· Program shortcuts: These are quick links to start applications directly from the Panel.
· The taskbar: The taskbar shows icons for applications currently running on the desktop.
· Applets: These are small applications that have an icon in the Panel that often can change depending on information from the application.
The Panel features are similar to what you would find in Windows. In addition to the desktop features, the KDE project has produced a wide assortment of applications that run in the KDE environment.
The GNOME Desktop
The GNU Network Object Model Environment (GNOME) is another popular Linux desktop environment. First released in 1999, GNOME has become the default desktop environment for many Linux distributions. (However, the most popular is Red Hat Linux.)
Although GNOME chose to depart from the standard Microsoft Windows look-and-feel, it incorporates many features that most Windows users are comfortable with:
· A desktop area for icons
· A panel area for showing running applications
· Drag-and-drop capabilities
Figure 1.4 shows the standard GNOME desktop used in the CentOS Linux distribution.
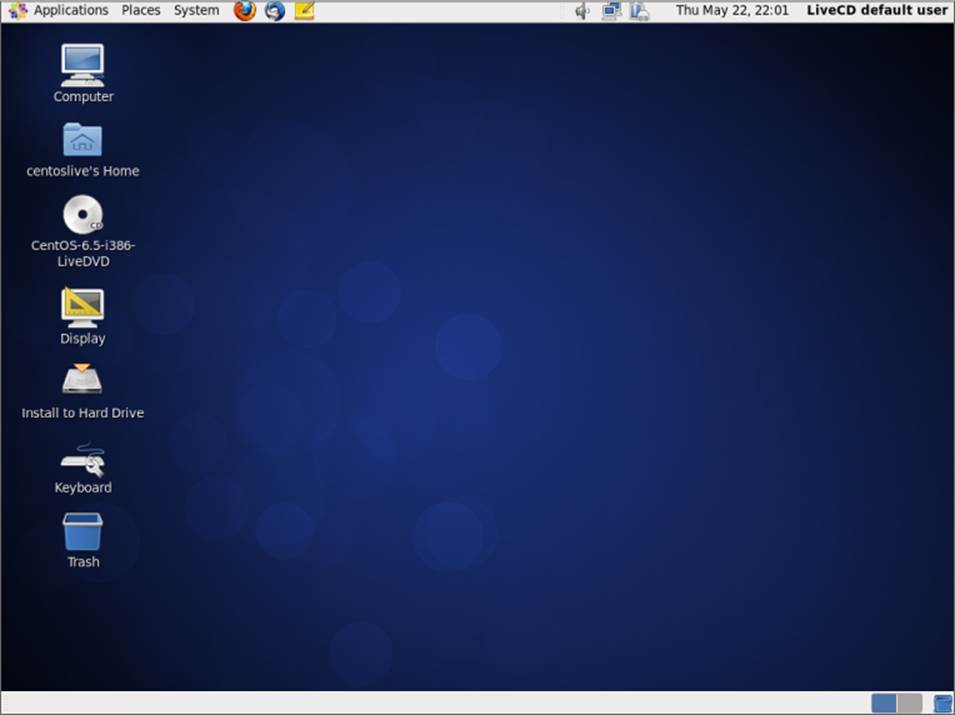
Figure 1.4 A GNOME desktop on a CentOS Linux system
Not to be outdone by KDE, the GNOME developers have also produced a host of graphical applications that integrate with the GNOME desktop.
The Unity Desktop
If you're using the Ubuntu Linux distribution, you'll notice that it's somewhat different from both the KDE and GNOME desktop environments. Canonical, the company responsible for developing Ubuntu, has decided to embark on its own Linux desktop environment, called Unity.
The Unity desktop gets its name from the goal of the project — to provide a single desktop experience for workstations, tablet devices, and mobile devices. The Unity desktop works the same whether you're running Ubuntu on a workstation or a mobile phone! Figure 1.5 shows an example of the Unity desktop in Ubuntu 14.04 LTS.
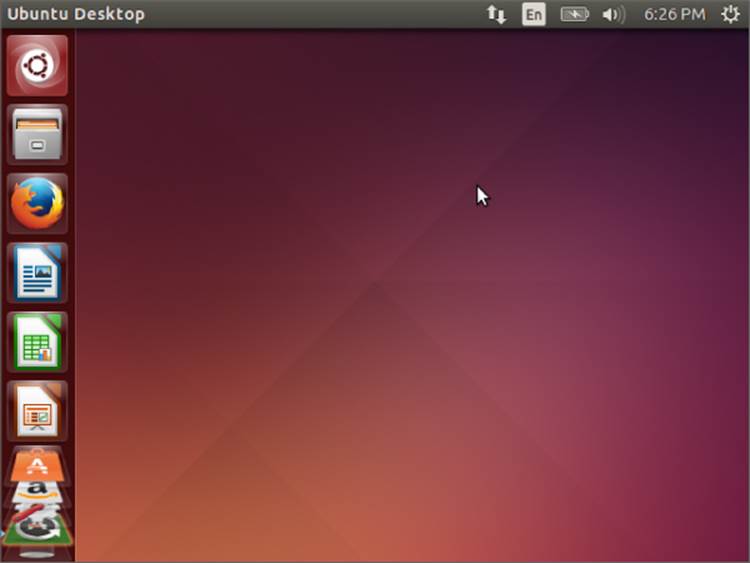
Figure 1.5 The Unity desktop on the Ubuntu Linux distribution
Other Desktops
The downside to a graphical desktop environment is that it requires a fair amount of system resources to operate properly. In the early days of Linux, a hallmark and selling feature of Linux was its ability to operate on older, less powerful PCs that the newer Microsoft desktop products couldn't run on. However, with the popularity of KDE and GNOME desktops, this has changed, because it takes just as much memory to run a KDE or GNOME desktop as the latest Microsoft desktop environment.
If you have an older PC, don't be discouraged. The Linux developers have banded together to take Linux back to its roots. They've created several low-memory–oriented graphical desktop applications that provide basic features that run perfectly fine on older PCs.
Although these graphical desktops don't have a plethora of applications designed around them, they still run many basic graphical applications that support features such as word processing, spreadsheets, databases, drawing, and, of course, multimedia support.
Table 1.3 shows some of the smaller Linux graphical desktop environments that can be used on lower-powered PCs and laptops.
Table 1.3 Other Linux Graphical Desktops
|
Desktop |
Description |
|
Fluxbox |
A bare-bones desktop that doesn't include a Panel, only a pop-up menu to launch applications |
|
Xfce |
A desktop that's similar to the KDE desktop, but with fewer graphics for low-memory environments |
|
JWM |
Joe's Window Manager, a very lightweight desktop ideal for low-memory and low-disk space environments |
|
Fvwm |
Supports some advanced desktop features such as virtual desktops and Panels, but runs in low-memory environments |
|
fvwm95 |
Derived from fvwm, but made to look like a Windows 95 desktop |
These graphical desktop environments are not as fancy as the KDE and GNOME desktops, but they provide basic graphical functionality just fine. Figure 1.6 shows what the JWM desktop used in the Puppy Linux antiX distribution looks like.
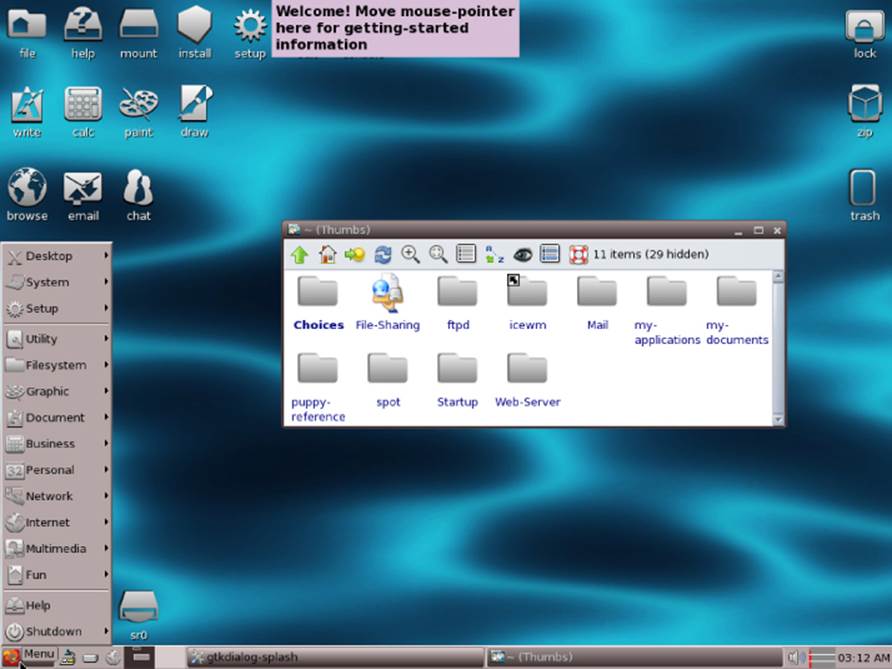
Figure 1.6 The JWM desktop as seen in the Puppy Linux distribution
If you are using an older PC, try a Linux distribution that uses one of these desktops and see what happens. You may be pleasantly surprised.
Linux Distributions
Now that you have seen the four main components required for a complete Linux system, you may be wondering how you are going to get them all put together to make a Linux system. Fortunately, other people have already done that for you.
A complete Linux system package is called a distribution. Many different Linux distributions are available to meet just about any computing requirement you could have. Most distributions are customized for a specific user group, such as business users, multimedia enthusiasts, software developers, or average home users. Each customized distribution includes the software packages required to support specialized functions, such as audio- and video-editing software for multimedia enthusiasts, or compilers and integrated development environments (IDEs) for software developers.
The different Linux distributions are often divided into three categories:
· Full core Linux distributions
· Specialized distributions
· LiveCD test distributions
The following sections describe these different types of Linux distributions and show some examples of Linux distributions in each category.
Core Linux Distributions
A core Linux distribution contains a kernel, one or more graphical desktop environments, and just about every Linux application that is available, precompiled for the kernel. It provides one-stop shopping for a complete Linux installation. Table 1.4 shows some of the more popular core Linux distributions.
Table 1.4 Core Linux Distributions
|
Distribution |
Description |
|
Slackware |
One of the original Linux distribution sets, popular with Linux geeks |
|
Red Hat |
A commercial business distribution used mainly for Internet servers |
|
Fedora |
A spin-off from Red Hat but designed for home use |
|
Gentoo |
A distribution designed for advanced Linux users, containing only Linux source code |
|
openSUSE |
Different distributions for business and home use |
|
Debian |
Popular with Linux experts and commercial Linux products |
In the early days of Linux, a distribution was released as a set of floppy disks. You had to download groups of files and then copy them onto disks. It would usually take 20 or more disks to make an entire distribution! Needless to say, this was a painful experience.
Nowadays, with home computers commonly having CD and DVD players built in, Linux distributions are released as either a CD set or a single DVD. This makes installing Linux much easier.
However, beginners still often run into problems when they install one of the core Linux distributions. To cover just about any situation in which someone might want to use Linux, a single distribution must include lots of application software. They include everything from high-end Internet database servers to common games. Because of the quantity of applications available for Linux, a complete distribution often takes four or more CDs.
Although having lots of options available in a distribution is great for Linux geeks, it can become a nightmare for beginning Linux users. Most distributions ask a series of questions during the installation process to determine which applications to load by default, what hardware is connected to the PC, and how to configure the hardware. Beginners often find these questions confusing. As a result, they often either load way too many programs on their computer or don't load enough and later discover that their computer won't do what they want it to.
Fortunately for beginners, there's a much simpler way to install Linux.
Specialized Linux Distributions
A new subgroup of Linux distributions has started to appear. These are typically based on one of the main distributions but contain only a subset of applications that would make sense for a specific area of use.
In addition to providing specialized software (such as only office products for business users), customized Linux distributions also attempt to help beginning Linux users by autodetecting and autoconfiguring common hardware devices. This makes installing Linux a much more enjoyable process.
Table 1.5 shows some of the specialized Linux distributions available and what they specialize in.
Table 1.5 Specialized Linux Distributions
|
Distribution |
Description |
|
CentOS |
A free distribution built from the Red Hat Enterprise Linux source code |
|
Ubuntu |
A free distribution for school and home use |
|
PCLinuxOS |
A free distribution for home and office use |
|
Mint |
A free distribution for home entertainment use |
|
dyne:bolic |
A free distribution designed for audio and MIDI applications |
|
Puppy Linux |
A free small distribution that runs well on older PCs |
That's just a small sampling of specialized Linux distributions. There are literally hundreds of specialized Linux distributions, and more are popping up all the time on the Internet. No matter what your specialty, you'll probably find a Linux distribution made for you.
Many of the specialized Linux distributions are based on the Debian Linux distribution. They use the same installation files as Debian but package only a small fraction of a full-blown Debian system.
The Linux LiveCD
A relatively new phenomenon in the Linux world is the bootable Linux CD distribution. This lets you see what a Linux system is like without actually installing it. Most modern PCs can boot from a CD instead of the standard hard drive. To take advantage of this, some Linux distributions create a bootable CD that contains a sample Linux system (called a Linux LiveCD). Because of the limitations of the single CD size, the sample can't contain a complete Linux system, but you'd be surprised at all the software they can cram in there. The result is that you can boot your PC from the CD and run a Linux distribution without having to install anything on your hard drive!
This is an excellent way to test various Linux distributions without having to mess with your PC. Just pop in a CD and boot! All the Linux software will run directly from the CD. You can download lots of Linux LiveCDs from the Internet and burn onto a CD to test drive.
Table 1.6 shows some popular Linux LiveCDs that are available.
Table 1.6 Linux LiveCD Distributions
|
Distribution |
Description |
|
Knoppix |
A German Linux, the first Linux LiveCD developed |
|
PCLinuxOS |
Full-blown Linux distribution on a LiveCD |
|
Ubuntu |
A worldwide Linux project, designed for many languages |
|
Slax |
A live Linux CD based on Slackware Linux |
|
Puppy Linux |
A full-featured Linux designed for older PCs |
You may notice a familiarity in this table. Many specialized Linux distributions also have a Linux LiveCD version. Some Linux LiveCD distributions, such as Ubuntu, allow you to install the Linux distribution directly from the LiveCD. This enables you to boot with the CD, test drive the Linux distribution, and then if you like it, install it on your hard drive. This feature is extremely handy and user-friendly.
As with all good things, Linux LiveCDs have a few drawbacks. Because you access everything from the CD, applications run more slowly, especially if you're using older, slower computers and CD drives. Also, because you can't write to the CD, any changes you make to the Linux system will be gone the next time you reboot.
But advances are being made in the Linux LiveCD world that will help to solve some of these problems. These advances include the ability to:
· Copy Linux system files from the CD to memory
· Copy system files to a file on the hard drive
· Store system settings on a USB memory stick
· Store user settings on a USB memory stick
Some Linux LiveCDs, such as Puppy Linux, are designed with a minimum number of Linux system files. The LiveCD boot scripts copy them directly into memory when the CD boots. This allows you to remove the CD from the computer as soon as Linux boots. Not only does this make your applications run much faster (because applications run faster from memory), but it also gives you a free CD tray to use for ripping audio CDs or playing video DVDs from the software included in Puppy Linux.
Other Linux LiveCDs use an alternative method that allows you to remove the CD from the tray after booting. It involves copying the core Linux files onto the Windows hard drive as a single file. After the CD boots, it looks for that file and reads the system files from it. The dyne:bolic Linux LiveCD uses this technique, which is called docking. Of course, you must copy the system file to your hard drive before you can boot from the CD.
A very popular technique for storing data from a live Linux CD session is to use a common USB memory stick (also called a flash drive or a thumb drive). Just about every Linux LiveCD can recognize a plugged-in USB memory stick (even if the stick is formatted for Windows) and read and write files to and from it. This allows you to boot a Linux LiveCD, use the Linux applications to create files, store those files on your memory stick, and then access them from your Windows applications later (or from a different computer). How cool is that?
Summary
This chapter discussed the Linux system and the basics of how it works. The Linux kernel is the core of the system, controlling how memory, programs, and hardware all interact with one another. The GNU utilities are also an important piece in the Linux system. The Linux shell, which is the main focus of this book, is part of the GNU core utilities. The chapter also discussed the final piece of a Linux system, the Linux desktop environment. Things have changed over the years, and Linux now supports several graphical desktop environments.
The chapter also discussed the various Linux distributions. A Linux distribution bundles the various parts of a Linux system into a simple package that you can easily install on your PC. The Linux distribution world consists of full-blown Linux distributions that include just about every application imaginable, as well as specialized Linux distributions that include applications focused only on a special function. The Linux LiveCD craze has created another group of Linux distributions that allow you to easily test-drive Linux without even having to install it on your hard drive.
In the next chapter, you look at what you need to start your command line and shell scripting experience. You'll see what you need to do to get to the Linux shell utility from your fancy graphical desktop environment. These days, that's not always an easy thing.
All materials on the site are licensed Creative Commons Attribution-Sharealike 3.0 Unported CC BY-SA 3.0 & GNU Free Documentation License (GFDL)
If you are the copyright holder of any material contained on our site and intend to remove it, please contact our site administrator for approval.
© 2016-2026 All site design rights belong to S.Y.A.