Wiley Linux Command Line and Shell Scripting Bible 3rd (2015)
Part IV. Creating Practical Scripts
In This Part
1. Chapter 24 Writing Simple Script Utilities
1. Chapter 25 Producing Scripts for Database, Web, and E-Mail
1. Chapter 26 Creating Fun Little Shell Scripts
Chapter 24. Writing Simple Script Utilities
In This Chapter
1. Automating backups
2. Managing user accounts
3. Watching disk space
Nowhere is shell script programming more useful than writing script utilities for the Linux system administrator. The typical Linux system administrator has many various jobs to do daily, from monitoring disk space to backing up important files to managing user accounts. Shell script utilities can make these tasks much easier! This chapter demonstrates some of the capabilities you have writing script utilities in the bash shell.
Performing Archives
Whether you're responsible for a Linux system in a business environment or just using it at home, the loss of data can be catastrophic. To help prevent bad things from happening, it's always a good idea to perform regular backups (or archives).
However, what's a good idea and what's practical are often two separate things. Trying to arrange a backup schedule to store important files can be a challenge. This is another place where shell scripts often come to the rescue.
This section demonstrates two methods for using shell scripts to archive data on your Linux system.
Archiving data files
If you're using your Linux system to work on an important project, you can create a shell script that automatically takes snapshots of specific directories. Designating these directories in a configuration file allows you to change them when a particular project changes. This helps avoid a time-consuming restore process from your main archive files.
This section shows you how to create an automated shell script that can take snapshots of specified directories and keep an archive of your data's past versions.
Obtaining the required functions
The workhorse for archiving data in the Linux world is the tar command (see Chapter 4). The tar command is used to archive entire directories into a single file. Here's an example of creating an archive file of a working directory using the tar command:
$ tar -cf archive.tar /home/Christine/Project/*.*
tar: Removing leading '/' from member names
$
$ ls -l archive.tar
-rw-rw-r--. 1 Christine Christine 51200 Aug 27 10:51 archive.tar
$
The tar command responds with a warning message that it's removing the leading forward slash from the pathname to convert it from an absolute pathname to a relative pathname (see Chapter 3). This allows you to extract the tar archived files anywhere you want in your filesystem. You'll probably want to get rid of that message in your script. You can accomplish this by redirecting STDERR to the /dev/null file (see Chapter 15):
$ tar -cf archive.tar /home/Christine/Project/*.* 2>/dev/null
$
$ ls -l archive.tar
-rw-rw-r--. 1 Christine Christine 51200 Aug 27 10:53 archive.tar
$
Because a tar archive file can consume lots of disk space, it's a good idea to compress the file. You can do this by simply adding the -z option. This compresses the tar archive file into a gzipped tar file, which is called a tarball. Be sure to use the proper file extensions to denote that the file is a tarball. Either .tar.gz or .tgz is fine. Here's an example of creating a tarball of the project directory:
$ tar -zcf archive.tar.gz /home/Christine/Project/*.* 2>/dev/null
$
$ ls -l archive.tar.gz
-rw-rw-r--. 1 Christine Christine 3331 Aug 27 10:53 archive.tar.gz
$
Now you have the main component for your archive script completed.
Instead of modifying or creating a new archive script for each new directory or file you want to back up, you can use a configuration file. The configuration file should contain each directory or file you want to be included in the archive.
$ cat Files_To_Backup
/home/Christine/Project
/home/Christine/Downloads
/home/Does_not_exist
/home/Christine/Documents
$
Note
If you're using a Linux distribution that includes a graphical desktop, be careful about archiving your entire $HOME directory. Although this may be tempting, the $HOME directory contains lots of configuration and temporary files related to the graphical desktop. It creates a much larger archive file than you probably intended. Pick a subdirectory in which to store your working files, and use that subdirectory in your archive configuration file.
You can have the script read through the configuration file and add the names of each directory to the archive list. To do this, use the simple read command (see Chapter 14) to read each record from the file. But instead of using the cat command piped into a whileloop (see Chapter 13), this script redirects standard input (STDIN) using the exec command (see Chapter 15). Here's how it looks:
exec < $CONFIG_FILE
read FILE_NAME
Notice that a variable is used for the archive configuration file, CONFIG_FILE. Each record is read in from the configuration file. As long as the read command finds a new configuration file record to read, it returns an exit value of 0 for success in the ? variable (see Chapter 11). You can use this as a test in a while loop in order to read all the records from the configuration file:
while [ $? -eq 0 ]
do
[...]
read FILE_NAME
done
When the read command hits the end of the configuration file, it returns a non-zero status. At that point, the while loop is exited.
In the while loop, two things need to happen. First, you must add the directory name to your archive list. Even more important is to check to see if that directory even exists! It would be very easy to remove a directory from the filesystem and forget to update the archive configuration file. You can check a directory's existence using a simple if statement (see Chapter 12). If the directory does exist, it is added to the list of directories to archive, FILE_LIST. Otherwise, a warning message is issued. Here is what this if statement looks like:
if [ -f $FILE_NAME -o -d $FILE_NAME ]
then
# If file exists, add its name to the list.
FILE_LIST=''$FILE_LIST $FILE_NAME''
else
# If file doesn't exist, issue warning
echo
echo ''$FILE_NAME, does not exist.''
echo ''Obviously, I will not include it in this archive.''
echo ''It is listed on line $FILE_NO of the config file.''
echo ''Continuing to build archive list...''
echo
fi
#
FILE_NO=$[$FILE_NO + 1] # Increase Line/File number by one.
Because a record in our archive configuration file can be a filename or a directory, the if statement tests for the existence of both, using the -f and the -d options. The or option, -o, allows for either the file's or the directory's existence test to return a non-zero status for the entire if statement to be treated as true.
To provide a little extra help in tracking down non-existent directories and files, the variable FILE_NO is added. Thus, the script can tell you exactly what line number in the archive configuration file contains the incorrect or missing file or directory.
Creating a daily archive location
If you are just backing up a few files, it's fine to keep the archive in your personal directory. However, if several directories are being backed up, it is best to create a central repository archive directory:
$ sudo mkdir /archive
[sudo] password for Christine:
$
$ ls -ld /archive
drwxr-xr-x. 2 root root 4096 Aug 27 14:10 /archive
$
After you have your central repository archive directory created, you need to grant access to it for certain users. If you do not do this, trying to create files in this directory fails, as shown here:
$ mv Files_To_Backup /archive/
mv: cannot move 'Files_To_Backup' to
'/archive/Files_To_Backup': Permission denied
$
You could grant the users needing to create files in this directory permission via sudo or create a user group. In this case, a special user group is created, Archivers:
$ sudo groupadd Archivers
$
$ sudo chgrp Archivers /archive
$
$ ls -ld /archive
drwxr-xr-x. 2 root Archivers 4096 Aug 27 14:10 /archive
$
$ sudo usermod -aG Archivers Christine
[sudo] password for Christine:
$
$ sudo chmod 775 /archive
$
$ ls -ld /archive
drwxrwxr-x. 2 root Archivers 4096 Aug 27 14:10 /archive
$
After a user has been added to the Archivers group, the user must log out and log back in for the group membership to take effect. Now files can be created by this group's members without the use of super-user privileges:
$ mv Files_To_Backup /archive/
$
$ ls /archive
Files_To_Backup
$
Keep in mind that all Archivers group members can add and delete files from this directory. It may be best to add the sticky bit (see Chapter 7) to the directory, in order to keep group members from deleting each other's archive tarballs.
You should now have enough information to start building the script. The next section walks you through creating the daily archive script.
Creating a daily archive script
The Daily_Archive.sh script automatically creates an archive to a designated location, using the current date to uniquely identify the file. Here's the code for that portion of the script:
DATE=$(date +%y%m%d)
#
# Set Archive File Name
#
FILE=archive$DATE.tar.gz
#
# Set Configuration and Destination File
#
CONFIG_FILE=/archive/Files_To_Backup
DESTINATION=/archive/$FILE
#
The DESTINATION variable appends the full pathname for the archived file. The CONFIG_FILE variable points to the archive configuration file containing the directories to be archived. These both can be easily changed to alternate directories and files if needed.
Tip
When you are new to script writing and are presented with an entire script (as shown nearby), make a habit of reading through the whole script. Try to follow the logic and script flow. Note any script syntax or sections you have trouble understanding, and reread the chapter that covers that topic. This reviewing habit helps you to build your script writing skills much more quickly.
The Daily_Archive.sh script, all put together, now looks like this:
#!/bin/bash
#
# Daily_Archive - Archive designated files & directories
########################################################
#
# Gather Current Date
#
DATE=$(date +%y%m%d)
#
# Set Archive File Name
#
FILE=archive$DATE.tar.gz
#
# Set Configuration and Destination File
#
CONFIG_FILE=/archive/Files_To_Backup
DESTINATION=/archive/$FILE
#
######### Main Script #########################
#
# Check Backup Config file exists
#
if [ -f $CONFIG_FILE ] # Make sure the config file still exists.
then # If it exists, do nothing but continue on.
echo
else # If it doesn't exist, issue error & exit script.
echo
echo "$CONFIG_FILE does not exist."
echo "Backup not completed due to missing Configuration File"
echo
exit
fi
#
# Build the names of all the files to backup
#
FILE_NO=1 # Start on Line 1 of Config File.
exec < $CONFIG_FILE # Redirect Std Input to name of Config File
#
read FILE_NAME # Read 1st record
#
while [ $? -eq 0 ] # Create list of files to backup.
do
# Make sure the file or directory exists.
if [ -f $FILE_NAME -o -d $FILE_NAME ]
then
# If file exists, add its name to the list.
FILE_LIST="$FILE_LIST $FILE_NAME"
else
# If file doesn't exist, issue warning
echo
echo "$FILE_NAME, does not exist."
echo "Obviously, I will not include it in this archive."
echo "It is listed on line $FILE_NO of the config file."
echo "Continuing to build archive list..."
echo
fi
#
FILE_NO=$[$FILE_NO + 1] # Increase Line/File number by one.
read FILE_NAME # Read next record.
done
#
#######################################
#
# Backup the files and Compress Archive
#
echo "Starting archive..."
echo
#
tar -czf $DESTINATION $FILE_LIST 2> /dev/null
#
echo "Archive completed"
echo "Resulting archive file is: $DESTINATION"
echo
#
exit
Running the daily archive script
Before you attempt to test the script, remember that you need to change permissions on the script file (see Chapter 11). The file's owner must be given execute (x) privilege before the script can be run:
$ ls -l Daily_Archive.sh
-rw-rw-r--. 1 Christine Christine 1994 Aug 28 15:58 Daily_Archive.sh
$
$ chmod u+x Daily_Archive.sh
$
$ ls -l Daily_Archive.sh
-rwxrw-r--. 1 Christine Christine 1994 Aug 28 15:58 Daily_Archive.sh
$
Testing the Daily_Archive.sh script is straightforward:
$ ./Daily_Archive.sh
/home/Does_not_exist, does not exist.
Obviously, I will not include it in this archive.
It is listed on line 3 of the config file.
Continuing to build archive list...
Starting archive...
Archive completed
Resulting archive file is: /archive/archive140828.tar.gz
$ ls /archive
archive140828.tar.gz Files_To_Backup
$
You can see that the script caught one directory that does not exist, /home/Does_not_exist. It lets you know what line number in the configuration file this erroneous directory is on and continues making a list and archiving the data. Your data is now safely archived in a tarball file.
Creating an hourly archive script
If you are in a high-volume production environment where files are changing rapidly, a daily archive might not be good enough. If you want to increase the archiving frequency to hourly, you need to take another item into consideration.
When backing up files hourly and trying to use the date command to timestamp each tarball, things can get pretty ugly pretty quickly. Sifting through a directory of tarballs with filenames looking like this is tedious:
archive010211110233.tar.gz
Instead of placing all the archive files in the same folder, you can create a directory hierarchy for your archived files. Figure 24.1 demonstrates this principle.
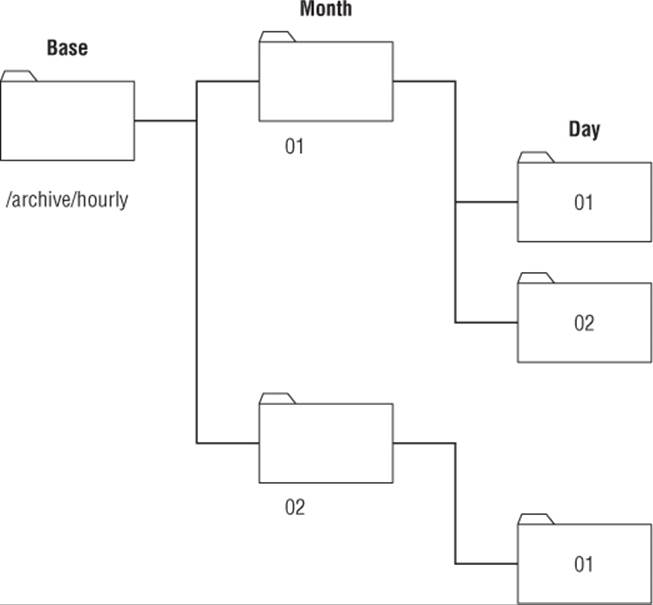
Figure 24.1 Creating an archive directory hierarchy
The archive directory contains directories for each month of the year, using the month number as the directory name. Each month's directory in turn contains folders for each day of the month (using the day's numerical value as the directory name). This allows you to just timestamp the individual tarballs and place them in the appropriate directory for the day and month.
First, the new directory /archive/hourly must be created, along with the appropriate permissions set upon it. Remember from early in this chapter that members of the Archivers group are granted permission to create archives in this directory area. Thus, the newly created directory must have its primary group and group permissions changed:
$ sudo mkdir /archive/hourly
[sudo] password for Christine:
$
$ sudo chgrp Archivers /archive/hourly
$
$ ls -ld /archive/hourly/
drwxr-xr-x. 2 root Archivers 4096 Sep 2 09:24 /archive/hourly/
$
$ sudo chmod 775 /archive/hourly
$
$ ls -ld /archive/hourly
drwxrwxr-x. 2 root Archivers 4096 Sep 2 09:24 /archive/hourly
$
After the new directory is set up, the Files_To_Backup configuration file for the hourly archives can be moved to the new directory:
$ cat Files_To_Backup
/usr/local/Production/Machine_Errors
/home/Development/Simulation_Logs
$
$ mv Files_To_Backup /archive/hourly/
$
Now, there is a new challenge to solve. The script must create the individual month and day directories automatically. If these directories already exist, and the script tries to create them, an error is generated. This is not a desirable outcome!
If you peruse the command line options for the mkdir command (see Chapter 3), you'll find the -p command line option. This option allows you to create directories and subdirectories in a single command; plus, the added benefit is that it doesn't produce an error message if the directory already exists. Perfect fit for what is needed in the script!
We're now ready to create the Hourly_Archive.sh script. Here is the top half of the script:
#!/bin/bash
#
# Hourly_Archive - Every hour create an archive
#########################################################
#
# Set Configuration File
#
CONFIG_FILE=/archive/hourly/Files_To_Backup
#
# Set Base Archive Destination Location
#
BASEDEST=/archive/hourly
#
# Gather Current Day, Month & Time
#
DAY=$(date +%d)
MONTH=$(date +%m)
TIME=$(date +%k%M)
#
# Create Archive Destination Directory
#
mkdir -p $BASEDEST/$MONTH/$DAY
#
# Build Archive Destination File Name
#
DESTINATION=$BASEDEST/$MONTH/$DAY/archive$TIME.tar.gz
#
########## Main Script ####################
[...]
After the script reaches the “Main Script” portion of Hourly_Archive.sh, the script is an exact duplicate of the Daily_Archive.sh script. Lots of the work has already been done!
Hourly_Archive.sh retrieves the day and month values from the date command, along with the timestamp used to uniquely identify the archive file. It then uses that information to create the archive directory for the day (or to silently exit if it already exists). Finally, the script uses the tar command to create the archive and compress it into a tarball.
Running the hourly archive script
As with the Daily_Archive.sh script, it's a good idea to test the Hourly_Archive.sh script before putting it in the cron table. Before the script is run, the permissions must be modified. Also, the hour and minute is checked via the date command. Having the current hour and minute allows the final archive filename to be verified for correctness:
$ chmod u+x Hourly_Archive.sh
$
$ date +%k%M
1011
$
$ ./Hourly_Archive.sh
Starting archive...
Archive completed
Resulting archive file is: /archive/hourly/09/02/archive1011.tar.gz
$
$ ls /archive/hourly/09/02/
archive1011.tar.gz
$
The script worked fine the first time, creating the appropriate month and day directories, and then creating the properly named archive file. Notice that the archive file has the appropriate hour (10) and minute (11) in its name, archive1011.tar.gz.
Note
If you run the Hourly_Archive.sh script during the day, when the hour is in single digits, your archive file's name will only have three digits. For example, if you run the script at 1:15am, the archive file's name is archive115.tar.gz. If you prefer to always have four digits in the archive file name, modify the script line, TIME=$(date +%k%M), to TIME=$(date +%k0%M). By adding a zero (0) after the %k, any single digit hours are padded to two digits with a leading zero. Thus, archive115.tar.gz is instead namedarchive0115 .tar.gz.
Just to test things out, the script was run a second time to see if it would have a problem with the existing directory, /archive,hourly/09/02:
$ date +%k%M
1017
$
$ ./Hourly_Archive.sh
Starting archive...
Archive completed
Resulting archive file is: /archive/hourly/09/02/archive1017.tar.gz
$ ls /archive/hourly/09/02/
archive1011.tar.gz archive1017.tar.gz
$
No problems with the existing directory! The script again ran fine and created a second archive file. It's now ready for the cron table.
Managing User Accounts
Managing user accounts is much more than just adding, modifying, and deleting accounts. You must also consider security issues, the need to preserve work, and the accurate management of the accounts. This can be a time-consuming task. Here is another instance when writing script utilities is a real timesaver!
Obtaining the required functions
Deleting an account is the more complicated accounts management task. When deleting an account, at least four separate actions are required:
1. Obtain the correct user account name to delete.
2. Kill any processes currently running on the system that belongs to that account.
3. Determine all files on the system belonging to the account.
4. Remove the user account.
It's easy to miss a step. The shell script utility in this section helps you avoid making such mistakes.
Getting the correct account name
The first step in the account deletion process is the most important: obtaining the correct user account name to delete. Because this is an interactive script, you can use the read command (see Chapter 14) to obtain the account name. If the script user walks away and leaves the question hanging, you can use the -t option on the read command and timeout after giving the script user 60 seconds to answer the question:
echo "Please enter the username of the user "
echo -e "account you wish to delete from system: \c"
read -t 60 ANSWER
Because interruptions are part of life, it's best to give users three chances to answer the question. This is accomplished by using a while loop (Chapter 13) with the -z option, to test whether the ANSWER variable is empty. The ANSWER variable is empty when the script first enters the while loop on purpose. The question to fill the ANSWER variable is at the end of the loop:
while [ -z "$ANSWER" ]
do
[...]
echo "Please enter the username of the user "
echo -e "account you wish to delete from system: \c"
read -t 60 ANSWER
done
A way to communicate with the script user is needed when the first question timeout occurs, when there is one more chance to answer the question, and so on. The case statement (see Chapter 12) is the structured command that works perfectly here. Using theincremented ASK_COUNT variable, different messages can be set up to communicate to the script user. The code for this section looks like this:
case $ASK_COUNT in
2)
echo
echo "Please answer the question."
echo
;;
3)
echo
echo "One last try...please answer the question."
echo
;;
4)
echo
echo "Since you refuse to answer the question..."
echo "exiting program."
echo
#
exit
;;
esac
#
Now the script has all the structure it needs to ask the user what account to delete. There are several more questions in this script to ask the user and asking just that one question was lots of code! Therefore, let's turn this piece of code into a function (see Chapter 17) in order to use it in multiple locations in your Delete_User.sh script.
Creating a function to get the correct account name
The first thing you need to do is declare the function's name, get_answer. Next, clear out any previous answers to questions your script user gave using the unset command (see Chapter 6). The code to do these two items looks like this:
function get_answer {
#
unset ANSWER
The other original code item you need to change is the question to the script user. The script doesn't ask the same question each time, so two new variables are created, LINE1 and LINE2, to handle question lines:
echo $LINE1
echo -e $LINE2" \c"
However, not every question has two lines to display. Some have only one line. An if statement (see Chapter 12) assists with this problem. The function tests if LINE2 is empty and only uses LINE1 if it is:
if [ -n "$LINE2" ]
then
echo $LINE1
echo -e $LINE2" \c"
else
echo -e $LINE1" \c"
fi
Finally, the function needs to clean up after itself by clearing out the LINE1 and LINE2 variables. Thus, the function now looks like this:
function get_answer {
#
unset ANSWER
ASK_COUNT=0
#
while [ -z "$ANSWER" ]
do
ASK_COUNT=$[ $ASK_COUNT + 1 ]
#
case $ASK_COUNT in
2)
echo
[...]
esac
#
echo
if [ -n "$LINE2" ]
then #Print 2 lines
echo $LINE1
echo -e $LINE2" \c"
else #Print 1 line
echo -e $LINE1" \c"
fi
#
read -t 60 ANSWER
done
#
unset LINE1
unset LINE2
#
} #End of get_answer function
To ask the script user what account to delete, a few variables must be set and the get_answer function should be called. Using the new function makes the script code much simpler:
LINE1="Please enter the username of the user "
LINE2="account you wish to delete from system:"
get_answer
USER_ACCOUNT=$ANSWER
Verifying the entered account name
Because of potential typographical errors, the user account name that was entered should be verified. This is easy because the code is already in place to handle asking a question:
LINE1="Is $USER_ACCOUNT the user account "
LINE2="you wish to delete from the system? [y/n]"
get_answer
After the question is asked, the script must process the answer. The variable ANSWER again carries the script user's answer to the question. If the user answered “yes,” the correct user account to delete has been entered and the script can continue. A case statement (see Chapter 12) processes the answer. The case statement must be coded so it checks for the multiple ways the answer “yes” can be entered.
case $ANSWER in
y|Y|YES|yes|Yes|yEs|yeS|YEs|yES )
#
;;
*)
echo
echo ''Because the account, $USER_ACCOUNT, is not ''
echo ''the one you wish to delete, we are leaving the script...''
echo
exit
;;
esac
Sometimes, this script needs to handle a yes/no answer from the user. Thus, again, it makes sense to create a function to handle this task. Only a few changes need to be made to the preceding code. The function's name must be declared and the variables EXIT_LINE1and EXIT_LINE2 added to the case statement. These changes, along with some variable cleanup at the end, result in the process_answer function:
function process_answer {
#
case $ANSWER in
y|Y|YES|yes|Yes|yEs|yeS|YEs|yES )
;;
*)
echo
echo $EXIT_LINE1
echo $EXIT_LINE2
echo
exit
;;
esac
#
unset EXIT_LINE1
unset EXIT_LINE2
#
} #End of process_answer function
A simple function call now processes the answer:
EXIT_LINE1=''Because the account, $USER_ACCOUNT, is not ''
EXIT_LINE2=''the one you wish to delete, we are leaving the script...''
process_answer
Determining whether the account exists
The user has given us the name of the account to delete and has verified it. Now is a good time to double-check that the user account really exists on the system. Also, it is a good idea to show the full account record to the script user to check one more time that this is the account to delete. To accomplish these items, a variable, USER_ACCOUNT_RECORD, is set to the outcome of a grep (see Chapter 4) search for the account through the /etc/passwd file. The -w option allows an exact word match for this particular user account:
USER_ACCOUNT_RECORD=$(cat /etc/passwd | grep -w $USER_ACCOUNT)
If no user account record is found in /etc/passwd, the account has already been deleted or never existed in the first place. In either case, the script user must be notified of this situation and the script exited. The exit status of the grep command helps here. If the account record is not found, the ? variable is set to 1:
if [ $? -eq 1 ]
then
echo
echo "Account, $USER_ACCOUNT, not found. "
echo "Leaving the script..."
echo
exit
fi
If the record was found, you still need to verify with the script user that this is the correct account. Here is where all the work to set up the functions really pays off! You just need to set the proper variables and call the functions:
echo ''I found this record:''
echo $USER_ACCOUNT_RECORD
echo
#
LINE1=''Is this the correct User Account? [y/n]''
get_answer
#
EXIT_LINE1=''Because the account, $USER_ACCOUNT, is not''
EXIT_LINE2=''the one you wish to delete, we are leaving the script...''
process_answer
Removing any account processes
So far, the script has obtained and verified the correct name of the user account to be deleted. In order to remove the user account from the system, the account cannot own any processes currently running. Thus, the next step is to find and kill off those processes. This is going to get a little complicated!
Finding the user processes is the easy part. Here the script can use the ps command (see Chapter 4) and the -u option to locate any running processes owned by the account. By redirecting the output to /dev/null, the user doesn't see any display. This is handy, because if there are no processes, the ps command only shows a header, which can be confusing to the script user:
ps -u $USER_ACCOUNT >/dev/null #Are user processes running?
The ps command's exit status and a case structure are used to determine the next step to take:
case $? in
1) # No processes running for this User Account
#
echo ''There are no processes for this account currently running.''
echo
;;
0) # Processes running for this User Account.
# Ask Script User if wants us to kill the processes.
#
echo ''$USER_ACCOUNT has the following processes running: ''
echo
ps -u $USER_ACCOUNT
#
LINE1=''Would you like me to kill the process(es)? [y/n]''
get_answer
#
[...]
esac
If the ps command's exit status returns a 1, there are no processes running on the system that belong to the user account. However, if the exit status returns a 0, processes owned by this account are running on the system. In this case, the script needs to ask the script user if he would like to have these processes killed. This task can be accomplished by using the get_answer function.
You might think that the next action the script does is to call the process_answer function. Unfortunately, the next item is too complicated for process_answer. Another case statement must be embedded to process the script user's answer. The first part of the casestatement looks very similar to the process_answer function:
case $ANSWER in
y|Y|YES|yes|Yes|yEs|yeS|YEs|yES ) # If user answers ''yes'',
#kill User Account processes.
[...]
;;
*) # If user answers anything but ''yes'', do not kill.
echo
echo ''Will not kill the process(es)''
echo
;;
esac
As you can see, there is nothing interesting in the case statement itself. Where things get interesting is within the “yes” section of the case statement. Here, the user account processes need to be killed. To build the command necessary to kill off one or more processes, three commands are needed. The first command is the ps command again. It is needed to gather up the process IDs (PIDs) of the currently running user account processes. The necessary ps command is assigned to the variable, COMMAND_1:
COMMAND_1="ps -u $USER_ACCOUNT --no-heading"
The second command strips off just the PIDs. This simple gawk command (see Chapter 19) strips off the first field from the ps command's output, which happens to be the PIDs:
gawk '{print $1}'
The third command, xargs, has not yet been introduced in this book. The xargs command builds and executes commands from standard input, STDIN (see Chapter 15). It is a great command to use at the end of a pipe, building and executing commands from each STDINitem produced. The xargs command is actually killing off each process via its PID:
COMMAND_3="xargs -d [[Backslash Backslash]]n /usr/bin/sudo /bin/kill -9"
The xargs command is assigned to variable COMMAND_3. It uses the -d option to denote what is considered a delimiter. In other words, because the xargs command can accept multiple items as input, what separates one item from another item? In this case, ∖n (newline) is used to set the delimiter. Thus, when each PID is sent to xargs, it treats the PID as a separate item to be processed. Because the xargs command is being assigned to a variable, the backslash (∖) in the ∖n must be escaped with an additional backslash (∖).
Notice that xargs needs the full pathname of the commands it is using on each PID. Both the sudo and kill (see Chapter 4) commands are used to kill any of the user account's running processes. Notice also that the kill signal -9 is used.
All three commands are hooked together via a pipe. The ps command produces a list of the user's running processes, which include the PID of each process. The ps command passes its standard output (STDOUT) as STDIN to the gawk command. The gawk command, in turn, strips off only the PIDs from the ps command's STDOUT (see Chapter 15). The xargs command takes each PID the gawk command produces as STDIN. It creates and executes a kill command for each PID to kill all the user's running processes. The command pipe looks like this:
$COMMAND_1 | gawk '{print $1}' | $COMMAND_3
Thus, the complete case statement for killing off any of the user account's running processes is as follows:
case $ANSWER in
y|Y|YES|yes|Yes|yEs|yeS|YEs|yES ) # If user answers "yes",
#kill User Account processes.
echo
echo "Killing off process(es)..."
#
# List user processes running code in variable, COMMAND_1
COMMAND_1="ps -u $USER_ACCOUNT --no-heading"
#
# Create command to kill proccess in variable, COMMAND_3
COMMAND_3="xargs -d [[Backslash Backslash]]n /usr/bin/sudo /bin/kill -9"
#
# Kill processes via piping commands together
$COMMAND_1 | gawk '{print $1}' | $COMMAND_3
#
echo
echo "Process(es) killed."
;;
By far, this is the most complicated piece of the script! However, now with any user account–owned processes killed, the script can move on to the next step: finding all the user account's files.
Finding account files
When a user account is deleted from the system, it is a good practice to archive all the files that belonged to that account. Along with that practice, it is also important to remove the files or assign their ownership to another account. If the account you delete has a User ID of 1003, and you don't remove or reassign those files, then the next account that is created with a User ID of 1003 owns those files! You can see the security disasters that can occur in this scenario.
The Delete_User.sh script doesn't do all that for you, but it creates a report that can be used in the Daily_Archive.sh script as an archive configuration file. And you can use the report to help you remove or reassign the files.
To find the user's files, you can use the find command. In this case, the find command searches the entire filesystem with the -u option, which pinpoints any user account–owned files. The command looks like the following:
find / -user $USER_ACCOUNT > $REPORT_FILE
That was pretty simple compared to dealing with the user account processes! It gets even easier in the next step of the Delete_User.sh script: actually removing the user account.
Removing the account
It's always a good idea to be a little paranoid about removing a user account from the system. Therefore, you should ask one more time if the script user really wants to remove the account.
LINE1=''Remove $User_Account's account from system? [y/n]''
get_answer
#
EXIT_LINE1=''Since you do not wish to remove the user account,''
EXIT_LINE2=''$USER_ACCOUNT at this time, exiting the script...''
process_answer
Finally, we get to the main purpose of our script, actually removing the user account from the system. Here the userdel command (see Chapter 7) is used:
userdel $USER_ACCOUNT
Now that we have all the pieces, we are ready to put them together into a whole, useful script utility.
Creating the script
Recall that the Delete_User.sh script is highly interactive with the script's user. Therefore, it is important to include lots of verbiage to keep the script user informed about what is going on during the script's execution.
At the top of the script, the two functions get_answer and process_answer are declared. The script then goes to the four steps of removing the user: obtaining and confirming the user account name, finding and killing the user's processes, creating a report of all files owned by the user account, and actually removing the user account.
Tip
When you are new to script writing and are presented with an entire script (as shown in the following code), you should make a habit of reading through the whole script to improve your script-writing skills!
Here's the entire Delete_User.sh script:
#!/bin/bash
#
#Delete_User - Automates the 4 steps to remove an account
#
###############################################################
# Define Functions
#
#####################################################
function get_answer {
#
unset ANSWER
ASK_COUNT=0
#
while [ -z ''$ANSWER'' ] #While no answer is given, keep asking.
do
ASK_COUNT=$[ $ASK_COUNT + 1 ]
#
case $ASK_COUNT in #If user gives no answer in time allotted
2)
echo
echo ''Please answer the question.''
echo
;;
3)
echo
echo ''One last try...please answer the question.''
echo
;;
4)
echo
echo ''Since you refuse to answer the question...''
echo ''exiting program.''
echo
#
exit
;;
esac
#
echo
#
if [ -n ''$LINE2'' ]
then #Print 2 lines
echo $LINE1
echo -e $LINE2'' \c''
else #Print 1 line
echo -e $LINE1'' \c''
fi
#
# Allow 60 seconds to answer before time-out
read -t 60 ANSWER
done
# Do a little variable clean-up
unset LINE1
unset LINE2
#
} #End of get_answer function
#
#####################################################
function process_answer {
#
case $ANSWER in
y|Y|YES|yes|Yes|yEs|yeS|YEs|yES )
# If user answers ''yes'', do nothing.
;;
*)
# If user answers anything but ''yes'', exit script
echo
echo $EXIT_LINE1
echo $EXIT_LINE2
echo
exit
;;
esac
#
# Do a little variable clean-up
#
unset EXIT_LINE1
unset EXIT_LINE2
#
} #End of process_answer function
#
##############################################
# End of Function Definitions
#
############# Main Script ####################
# Get name of User Account to check
#
echo ''Step #1 - Determine User Account name to Delete ''
echo
LINE1=''Please enter the username of the user ''
LINE2=''account you wish to delete from system:''
get_answer
USER_ACCOUNT=$ANSWER
#
# Double check with script user that this is the correct User Account
#
LINE1=''Is $USER_ACCOUNT the user account ''
LINE2=''you wish to delete from the system? [y/n]''
get_answer
#
# Call process_answer funtion:
# if user answers anything but ''yes'', exit script
#
EXIT_LINE1=''Because the account, $USER_ACCOUNT, is not ''
EXIT_LINE2=''the one you wish to delete, we are leaving the script...''
process_answer
#
################################################################
# Check that USER_ACCOUNT is really an account on the system
#
USER_ACCOUNT_RECORD=$(cat /etc/passwd | grep -w $USER_ACCOUNT)
#
if [ $? -eq 1 ] # If the account is not found, exit script
then
echo
echo ''Account, $USER_ACCOUNT, not found. ''
echo ''Leaving the script...''
echo
exit
fi
#
echo
echo ''I found this record:''
echo $USER_ACCOUNT_RECORD
#
LINE1=''Is this the correct User Account? [y/n]''
get_answer
#
#
# Call process_answer function:
# if user answers anything but ''yes'', exit script
#
EXIT_LINE1=''Because the account, $USER_ACCOUNT, is not ''
EXIT_LINE2=''the one you wish to delete, we are leaving the script...''
process_answer
#
##################################################################
# Search for any running processes that belong to the User Account
#
echo
echo ''Step #2 - Find process on system belonging to user account''
echo
#
ps -u $USER_ACCOUNT >/dev/null #Are user processes running?
#
case $? in
1) # No processes running for this User Account
#
echo ''There are no processes for this account currently running.''
echo
;;
0) # Processes running for this User Account.
# Ask Script User if wants us to kill the processes.
#
echo ''$USER_ACCOUNT has the following processes running: ''
echo
ps -u $USER_ACCOUNT
#
LINE1=''Would you like me to kill the process(es)? [y/n]''
get_answer
#
case $ANSWER in
y|Y|YES|yes|Yes|yEs|yeS|YEs|yES ) # If user answers ''yes'',
# kill User Account processes.
#
echo
echo ''Killing off process(es)...''
#
# List user processes running code in variable, COMMAND_1
COMMAND_1=''ps -u $USER_ACCOUNT --no-heading''
#
# Create command to kill proccess in variable, COMMAND_3
COMMAND_3=''xargs -d [[Backslash Backslash]]n /usr/bin/sudo /bin/kill -9''
#
# Kill processes via piping commands together
$COMMAND_1 | gawk '{print $1}' | $COMMAND_3
#
echo
echo ''Process(es) killed.''
;;
*) # If user answers anything but ''yes'', do not kill.
echo
echo ''Will not kill the process(es)''
echo
;;
esac
;;
esac
#################################################################
# Create a report of all files owned by User Account
#
echo
echo ''Step #3 - Find files on system belonging to user account''
echo
echo ''Creating a report of all files owned by $USER_ACCOUNT.''
echo
echo ''It is recommended that you backup/archive these files,''
echo ''and then do one of two things:''
echo '' 1) Delete the files''
echo '' 2) Change the files' ownership to a current user account.''
echo
echo ''Please wait. This may take a while...''
#
REPORT_DATE=$(date +%y%m%d)
REPORT_FILE=$USER_ACCOUNT''_Files_''$REPORT_DATE''.rpt''
#
find / -user $USER_ACCOUNT > $REPORT_FILE 2>/dev/null
#
echo
echo ''Report is complete.''
echo ''Name of report: $REPORT_FILE''
echo ''Location of report: $(pwd)''
echo
####################################
# Remove User Account
echo
echo ''Step #4 - Remove user account''
echo
#
LINE1=''Remove $USER_ACCOUNT's account from system? [y/n]''
get_answer
#
# Call process_answer function:
# if user answers anything but ''yes'', exit script
#
EXIT_LINE1=''Since you do not wish to remove the user account,''
EXIT_LINE2=''$USER_ACCOUNT at this time, exiting the script...''
process_answer
#
userdel $USER_ACCOUNT #delete user account
echo
echo ''User account, $USER_ACCOUNT, has been removed''
echo
#
exit
That was lots of work! However, the Delete_User.sh script is a great timesaver and helps you avoid lots of nasty problems when deleting user accounts.
Running the script
Because it is intended to be an interactive script, the Delete_User.sh script should not be placed in the cron table. However, it is still important to ensure that it works as expected.
Note
To run this type of script, you must either be logged in as the root user account or use the sudo command to run the script as the root user account.
Before the script is tested, the appropriate permissions are set on the script's file:
$ chmod u+x Delete_User.sh
$
$ ls -l Delete_User.sh
-rwxr--r--. 1 Christine Christine 6413 Sep 2 14:20 Delete_User.sh
$
The script is tested by removing an account, Consultant, that was set up for a temporary consultant on this system:
$ sudo ./Delete_User.sh
[sudo] password for Christine:
Step #1 - Determine User Account name to Delete
Please enter the username of the user
account you wish to delete from system: Consultant
Is Consultant the user account
you wish to delete from the system? [y/n]
Please answer the question.
Is Consultant the user account
you wish to delete from the system? [y/n] y
I found this record:
Consultant:x:504:506::/home/Consultant:/bin/bash
Is this the correct User Account? [y/n] yes
Step #2 - Find process on system belonging to user account
Consultant has the following processes running:
PID TTY TIME CMD
5443 pts/0 00:00:00 bash
5444 pts/0 00:00:00 sleep
Would you like me to kill the process(es)? [y/n] Yes
Killing off process(es)...
Process(es) killed.
Step #3 - Find files on system belonging to user account
Creating a report of all files owned by Consultant.
It is recommended that you backup/archive these files,
and then do one of two things:
1) Delete the files
2) Change the files' ownership to a current user account.
Please wait. This may take a while...
Report is complete.
Name of report: Consultant_Files_140902.rpt
Location of report: /home/Christine
Step #4 - Remove user account
Remove Consultant's account from system? [y/n] y
User account, Consultant, has been removed
$
$ ls Consultant*.rpt
Consultant_Files_140902.rpt
$
$ cat Consultant_Files_140902.rpt
/home/Consultant
/home/Consultant/Project_393
/home/Consultant/Project_393/393_revisionQ.py
/home/Consultant/Project_393/393_Final.py
[...]
/home/Consultant/.bashrc
/var/spool/mail/Consultant
$
$ grep Consultant /etc/passwd
$
That worked great! Notice the script was run using sudo, because super-user privileges are needed for deleting accounts. Also notice that the read timeout was tested, by delaying answering the following question:
Is Consultant the user account
you wish to delete from the system? [y/n]
Please answer the question.
Note that several different versions of “yes” answers were used for the various questions to ensure that the case statement test was working correctly. And finally, notice that the Consultant user's files were found and put into a report file, and the account was deleted.
Now you have a script utility that assists you when you need to delete user accounts. Even better, you can modify it to meet your organization's needs!
Monitoring Disk Space
One of the biggest problems with multi-user Linux systems is the amount of available disk space. In some situations, such as in a file-sharing server, disk space can fill up almost immediately just because of one careless user.
Tip
If you have a production Linux system, you should not depend upon disk space reports to protect your server from its disk space filling up. Instead, consider setting disk quotas. If the quota package is installed, you can find out more information about managing disk quotas by typing man -k quota at the shell prompt. If the quota package is not currently installed on your system, use your favorite search engine instead to locate further information.
This shell script utility helps you determine the top ten disk space consumers for designated directories. It produces a date-stamped report that allows disk space consumption trends to be monitored.
Obtaining the required functions
The first tool you need to use is the du command (see Chapter 4). This command displays the disk usage for individual files and directories. The -s option lets you summarize totals at the directory level. This comes in handy when calculating the total disk space used by an individual user. Here's what it looks like to use the du command to summarize each user's $HOME directory for the /home directory contents:
$ sudo du -s /home/*
[sudo] password for Christine:
4204 /home/Christine
56 /home/Consultant
52 /home/Development
4 /home/NoSuchUser
96 /home/Samantha
36 /home/Timothy
1024 /home/user1
$
The -s option works well for users' $HOME directories, but what if we wanted to view disk consumption in a system directory such as /var/log?
$ sudo du -s /var/log/*
4 /var/log/anaconda.ifcfg.log
20 /var/log/anaconda.log
32 /var/log/anaconda.program.log
108 /var/log/anaconda.storage.log
40 /var/log/anaconda.syslog
56 /var/log/anaconda.xlog
116 /var/log/anaconda.yum.log
4392 /var/log/audit
4 /var/log/boot.log
[...]
$
The listing quickly becomes too detailed. The -S (capital S) option works better for our purposes here, providing a total for each directory and subdirectory individually. This allows you to pinpoint problem areas quickly:
$ sudo du -S /var/log/
4 /var/log/ppp
4 /var/log/sssd
3020 /var/log/sa
80 /var/log/prelink
4 /var/log/samba/old
4 /var/log/samba
4 /var/log/ntpstats
4 /var/log/cups
4392 /var/log/audit
420 /var/log/gdm
4 /var/log/httpd
152 /var/log/ConsoleKit
2976 /var/log/
$
Because we are interested in the directories consuming the biggest chunks of disk space, the sort command (see Chapter 4) is used on the listing produced by du:
$ sudo du -S /var/log/ | sort -rn
4392 /var/log/audit
3020 /var/log/sa
2976 /var/log/
420 /var/log/gdm
152 /var/log/ConsoleKit
80 /var/log/prelink
4 /var/log/sssd
4 /var/log/samba/old
4 /var/log/samba
4 /var/log/ppp
4 /var/log/ntpstats
4 /var/log/httpd
4 /var/log/cups
$
The -n option allows you to sort numerically. The -r option lists the largest numbers first (reverse order). This is perfect for finding the largest disk consumers.
The sed editor brings more clarity to this listing. To focus on the top ten disk space consumers, when line 11 is reached, sed is set to delete the rest of the listing. The next step is to add a line number for each line in the listing. Chapter 19 shows you how to accomplish this by adding an equal sign (=) to the sed command. To get those line numbers on the same line as the disk space text, combine the text lines using the N command, as was shown in Chapter 21. The sed commands needed look like this:
sed '{11,$D; =}' |
sed 'N; s/\n/ /' |
Now the output can be cleaned up using the gawk command (see Chapter 22). The output from the sed editor is piped into the gawk command and printed using the printf function.
gawk '{printf $1 ":" "\t" $2 "\t" $3 "\n"}'
After the line number, a colon (:) is added, and tab (∖t) characters are put between the individual fields for each text line's output row. This produces a nicely formatted listing of the top ten disk space consumers.
$ sudo du -S /var/log/ |
> sort -rn |
> sed '{11,$D; =}' |
> sed 'N; s/\n/ /' |
> gawk '{printf $1 ":" "\t" $2 "\t" $3 "\n"}'
[sudo] password for Christine:
1: 4396 /var/log/audit
2: 3024 /var/log/sa
3: 2976 /var/log/
4: 420 /var/log/gdm
5: 152 /var/log/ConsoleKit
6: 80 /var/log/prelink
7: 4 /var/log/sssd
8: 4 /var/log/samba/old
9: 4 /var/log/samba
10: 4 /var/log/ppp
$
Now you're in business! The next step is to use this information to create the script.
Creating the script
To save time and effort, the script creates a report for multiple designated directories. A variable to accomplish this called CHECK_DIRECTORIES is used. For our purposes here, the variable is set to just two directories:
CHECK_DIRECTORIES=" /var/log /home"
The script contains a for loop to perform the du command on each directory listed in the variable. This technique is used (see Chapter 13) to read and process values in a list. Each time the for loop iterates through the list of values in the variable CHECK_DIRECTORIES, it assigns to the DIR_CHECK variable the next value in the list:
for DIR_CHECK in $CHECK_DIRECTORIES
do
[...]
du -S $DIR_CHECK
[...]
done
To allow quick identification, a date stamp is added to the report's filename, using the date command. Using the exec command (see Chapter 15) the script redirects its output to the date stamped report file:
DATE=$(date '+%m%d%y')
exec > disk_space_$DATE.rpt
Now to produce a nicely formatted report, the script uses the echo command to put in a few report titles:
echo "Top Ten Disk Space Usage"
echo "for $CHECK_DIRECTORIES Directories"
So let's see what this script looks like all put together:
#!/bin/bash
#
# Big_Users - Find big disk space users in various directories
###############################################################
# Parameters for Script
#
CHECK_DIRECTORIES='' /var/log /home'' #Directories to check
#
############## Main Script #################################
#
DATE=$(date '+%m%d%y') #Date for report file
#
exec > disk_space_$DATE.rpt #Make report file STDOUT
#
echo ''Top Ten Disk Space Usage'' #Report header
echo ''for $CHECK_DIRECTORIES Directories''
#
for DIR_CHECK in $CHECK_DIRECTORIES #Loop to du directories
do
echo ''''
echo ''The $DIR_CHECK Directory:'' #Directory header
#
# Create a listing of top ten disk space users in this dir
du -S $DIR_CHECK 2>/dev/null |
sort -rn |
sed '{11,$D; =}' |
sed 'N; s/\n/ /' |
gawk '{printf $1 '':'' ''\t'' $2 ''\t'' $3 ''\n''}'
#
done #End of loop
#
exit
And there you have it. This simple shell script creates a date stamped report of the top ten disk space consumers for each directory you choose.
Running the script
Before having the Big_Users script run automatically, you want to test it a few times manually to ensure that it does what you think it should do. And as you know by now, before you test it, you must set the proper permissions. However, in this case, the bash command was used, so the chmod u+x command was not needed prior to running the script:
$ ls -l Big_Users.sh
-rw-r--r--. 1 Christine Christine 910 Sep 3 08:43 Big_Users.sh
$
$ sudo bash Big_Users.sh
[sudo] password for Christine:
$
$ ls disk_space*.rpt
disk_space_090314.rpt
$
$ cat disk_space_090314.rpt
Top Ten Disk Space Usage
for /var/log /home Directories
The /var/log Directory:
1: 4496 /var/log/audit
2: 3056 /var/log
3: 3032 /var/log/sa
4: 480 /var/log/gdm
5: 152 /var/log/ConsoleKit
6: 80 /var/log/prelink
7: 4 /var/log/sssd
8: 4 /var/log/samba/old
9: 4 /var/log/samba
10: 4 /var/log/ppp
The /home Directory:
1: 34084 /home/Christine/Documents/temp/reports/archive
2: 14372 /home/Christine/Documents/temp/reports
3: 4440 /home/Timothy/Project__42/log/universe
4: 4440 /home/Timothy/Project_254/Old_Data/revision.56
5: 4440 /home/Christine/Documents/temp/reports/report.txt
6: 3012 /home/Timothy/Project__42/log
7: 3012 /home/Timothy/Project_254/Old_Data/data2039432
8: 2968 /home/Timothy/Project__42/log/answer
9: 2968 /home/Timothy/Project_254/Old_Data/data2039432/answer
10: 2968 /home/Christine/Documents/temp/reports/answer
$
It worked! Now you can set up the shell script to execute automatically as needed. You do this using the cron table (see Chapter 16). It's a good idea to have it run early Monday morning. If you do this, you can have your coffee and review your weekly disk consumption report first thing Monday morning!
Summary
This chapter put some of the shell-scripting information presented in the book to good use for creating Linux utilities. When you're responsible for a Linux system, whether it's a large multi-user system or your own system, you need to watch lots of things. Instead of manually running commands, you can create shell script utilities to do the work for you.
The first section walked you through using shell scripts for archiving and backing up data files on the Linux system. The tar command is a popular command for archiving data. The chapter showed you how to use it in shell scripts to create archive files and how to manage the archive files in an archive directory.
The next section covered using a shell script for the four steps needed to delete user accounts. Creating functions for shell code that is repeated within a script makes the code easier to read and modify. This script combined many of the different structured commands, such as the case and while commands. The chapter demonstrated the difference in script structure for a script destined for the cron tables versus an interactive script.
The chapter ended with how to use the du command to determine disk space consumption. The sed and gawk commands were then used to retrieve specific information from the data. Passing the output from a command to sed and gawk to parse data is a common function in shell scripts, so it's a good idea to know how to do it.
Next, more advanced shell scripts are covered. These scripts cover database, web, and e-mail topics.
All materials on the site are licensed Creative Commons Attribution-Sharealike 3.0 Unported CC BY-SA 3.0 & GNU Free Documentation License (GFDL)
If you are the copyright holder of any material contained on our site and intend to remove it, please contact our site administrator for approval.
© 2016-2026 All site design rights belong to S.Y.A.