Learning Ubuntu: A Beginners Guide to Using Linux (2016)
CHAPTER 8
UNDERSTANDING PERMISSIONS
To understand how to allocate permissions to users and groups, we must first understand how the Linux permissions work. It is much easier than determining Window’s Server permissions, once you establish an understanding for it.
On a Window’s Server there are a variety of permission types to allocate. See the figure below:
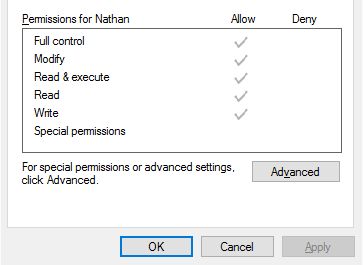
Ubuntu and other Linux systems have three basic permission groups and three basic permission types.
PERMISSION GROUPS
Owner – The owner permissions apply only to the owner of the file or directory.
Group – The group permissions apply only to the group that has been assigned to the file or directory.
All Users – The all user’s permissions apply to all users on the system. This is the permission group you will want to be the most careful of.
PERMISSION TYPES
Read – The read permission refers to a user’s capability to read the contents of the file, but does not allow them to write or save changes.
Write – The write permissions refer to a user’s capability to write or modify a file or directory.
Execute – The execute permission affects a user’s capability to execute a file or view the contents of a directory.
We can view the existing permissions and check them by using the CLI and our familiar ls command, with the –l flag.
|
List Files with Details |
|
|
Command |
ls -l |
|
Result |
Lists the files in the current directory with details |
|
CLI Display |
milo@ubuntu:~$ ls –l -rw-rw-r-- 1 milo milo 196 Feb 13 20:48 notes.txt |
Dissecting the output:
-rw-rw-r-- 1 milo milo 196 Feb 13 20:48 notes.txt
The first section that is displayed, -rw-rw-r--, shows the permissions for the file.
When we are viewing the permissions by using the ls –l command, we can understand them by using the following key.
|
Understanding File Permissions |
|
|
Read |
r |
|
Write |
w |
|
Execute |
x |
As we view the permission for our notes.txt file, we can make a few observations based on the output: -rw-rw-r--.
The first three characters –rw, tells us that the user milo has read and write permissions for the file notes.txt. The second set of characters shows us that the group milo, also has read and write permissions. The last, shows us the all users permissions. From looking at the output, all users can read the file, but not write to it.
USING BINARY REFERENCES TO SET PERMISSIONS
Noe what we understand the basics of permission groups and permission types, setting permissions using binary references, should be fairly simple. It is important to understand that when you set file permissions this way, it is done by three integers. An integer is a whole number (Example: 1, 2, and 4).
To set permissions, we must determine the binary representation of the rwx string. RWX String is the binary representation that allows us to set read, write, and execute permissions.
We must use the table below to calculate the permissions we want for a file or directory.
|
File Permissions: Binary Representation |
|
|
Read |
4 |
|
Write |
2 |
|
Execute |
1 |
We get the permission number by adding the integers together. We must do this for each of the three permission groups.
For example:
Read Access = 4
Read and Write Access = 6
Read, Write, and Execute Permission = 7
Each permission group needs a number. The number we make for setting permissions will be 3 digits. Remember, the order is user, group, and all users.
Exercise 1: What does a permission of 777 mean?
This means that the user, group, and all users have read, write, and execute access. Using 777 as a permission setting is not good for establishing strong security.
Exercise 2: What does a permission of 655 mean?
This means that the user has permission to read and write. The group has permission to read and execute. All users can also read and execute.
Exercise 3: What does a permission of 444 mean?
This means that both the user, group, and all users have only read access to a file.
Exercise 4: What does a permission of 755 mean?
This means that the user has read, write, and execute permission. The group and all users can only read and execute. This is often the permission setting recommended for the web directory for those using WordPress.
Before we go over the steps of applying permissions we should first learn how to transfer files. That process will open the door for applications in which we will learn to set permissions.
FTP TRANSFER
Assuming that you want to install WordPress, an easy way to do that is by using FTP. FTP stands for file transfer protocol and is used to transfer files between a client and server.
To connect and send files to our server we will use a program called FileZilla. FileZilla offers both a FTP client and server. For us to upload files, we need the client. You can download FileZilla from: https://filezilla-project.org/
Our DigitalOcean VPS already has FTP capability preloaded for SFTP, which is what we will be using. SFTP, uses SSH to transfer files using secure shell. There are other options available that you could install to your server for FTP, if you decide not to use the one that I recommend.
One that I have used and would recommend is VSFTPD, but we are not going to walk through the setup of that in this beginner’s book.
Let’s make a file on our computer to transfer. Open notepad and create a file named ftptest.txt. You can type whatever you like within the file, but we will use this to test file transfer.
Once you have that file created and have the FileZilla Client installed we can continue by launching the FileZilla Client.
To connect some information will need to be entered in the top of FileZilla: Host, Username, Password, and Port.
In the host field we will need to enter our IP address. In the username field and password field we will enter the user milo and his password. The port number for SFTP is 22. Once that is entered we can click Quickconnect.

Once you connect, you will see the home directory for milo on the right of FileZilla. On the left you will see your local computers file structure. Navigate to the folder on your PC that you made the ftptest.txt file and drag it over to milo’s home directory. In a few seconds you will see that the transfer was successful. Now if we log into our server with PuTTY and use the ls command, we will see the file.
If you wish to use your VPS for a web server, we will need to put files into the /var/www/html directory. In FileZilla, change the remote site directory to: /var/www/html. See below for reference:
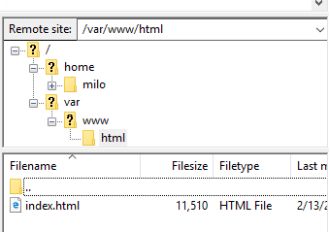
Now let’s try to upload our ftptest.txt file to this directory.
Your upload will fail as seen in the image below.
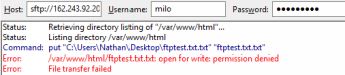
Why is that? Well, we do not have the permissions for milo to upload to that directory.
OVERVIEW: OWNERSHIP OF FILES AND DIRECTORIES
In the next few pages in this book we will allow milo to upload the files for WordPress and also learn more about changing file or directory ownership. We will do this by changing permissions and then modifying them to the recommended permission settings for WordPress.
Log into your VPS and when you are ready, run the command in the table below.
|
Changing the Owner of a Directory |
|
|
Command |
sudo chown milo -R /var/www |
|
Result |
System will make milo the owner of the directory, along with all subdirectories. |
|
CLI Display |
milo@ubuntu:~$ sudo chown milo -R /var/www [sudo] password for milo: milo@ubuntu:~$ |
To review the command above we must note that we need to use sudo. This elevates the permissions for milo. Without the use of sudo, we will get errors and the command will fail.
After sudo, we use chown which allows us to change the owner of the directory. The command chown, requires a user (milo) and a directory (/var/www). The flag –R will make milo the owner of all the subdirectories as well. By using this, milo also owns the html directory.
While we do not currently have an example to show the changing of what user owns a file, you can follow the table below. It is much similar to changing the owner of a directory. Experiment with this to practice.
|
Changing the Owner of a File |
|
|
Command |
sudo chown milo /home/milo/test.txt |
|
Result |
System will make milo the owner of the file. |
For the next steps in this example guide, we will need to download WordPress. You can download this at: https://wordpress.org/download/
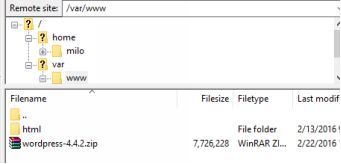
Once you have downloaded the .zip file with the WordPress files, then upload it to the /var/www/ directory using FileZilla. Remember, you can browse to it or drag and drop it into the interface.
When you finish your upload, it should look like the image below.
Important Note: WordPress updates constantly so your version may be different.
If you have this, then you can log into your VPS. We can now install a package to unzip the WordPress files if one is not already included.
UNZIPPING .ZIP FILES
|
Install the Unzip Package |
|
|
Command |
sudo apt-get install unzip |
|
Result |
System will install the unzip package |
The DigitalOcean VPS does not come with this, so we will need to install unzip. The installation process should begin to look familiar. Again, we use sudo to give milo extra access to install packages and make system changes.
Once the installation is complete, change to the /var/www directory.
|
Changing to /var/www Directory |
|
|
Command |
cd /var/www/ |
|
Result |
System will move to the www child directory under var. |
By now a lot of this should be getting easy with navigating and installing software.
Once we are in the /var/www directory, use the ls command. By using this we can see our WordPress zip file. Now let’s use unzip to extract those files.
|
Unzipping a Zip File |
|
|
Command |
unzip wordpress-4.4.2.zip |
|
Result |
System will unzip the file wordpress-4.4.2.zip |
Important Note Recap: WordPress updates constantly so your version may be different. Your .zip file name may vary.
Run ls again and you will notice that we now have a WordPress folder.
In the next several pages, by changing the Apache configuration file and continue the discussion on permissions for this practical use.
MODIFYING APACHE2 SITE CONFIGURATION
Since WordPress’s zip file creates a new directory in the www directory, we need to tell Apache to point to the new directory. You can host a variety of sites on your server by creating configuration files in the sites-available directory, which is located at /etc/apache2/sites-available.
Let’s change to this directory using cd and see what is in there using the ls command.
|
Moving to Site-Available and Listing Files |
|
|
Command |
cd /etc/apache2/sites-available; ls |
|
Result |
System will move milo to sites-available and list the site configuration files. |
|
CLI Display |
milo@ubuntu:~$ cd /etc/apache2/sites-available; ls 000-default.conf default-ssl.conf |
If you host multiple sites, you will need multiple configuration files. This book will explain how to enable and disable these configurations, but to understand them more in-depth, I would recommend finding a detailed guide on Apache configurations. That’s a book in itself, but I will try to cover the basics.
For what we are doing, we will want to modify the 000-default.conf file. Just as a point of reference, this is the default Apache site configuration file. Remember that to use nano to edit this file milo will need super user access by using sudo.
|
Using nano to Modify 000-default.conf |
|
|
Command |
sudo nano 000-default.conf |
|
Result |
System will launch nano to edit the 000-default.conf file. |
Below are the contents of the 000-default.conf file.
|
000-default.conf |
|
<VirtualHost *:80> # The ServerName directive sets the request scheme, hostname and port t$ # the server uses to identify itself. This is used when creating # redirection URLs. In the context of virtual hosts, the ServerName # specifies what hostname must appear in the request's Host: header to # match this virtual host. For the default virtual host (this file) this # value is not decisive as it is used as a last resort host regardless. # However, you must set it for any further virtual host explicitly. #ServerName www.example.com ServerAdmin webmaster@localhost DocumentRoot /var/www/html # Available loglevels: trace8, ..., trace1, debug, info, notice, # error, crit, alert, emerg. # It is also possible to configure the loglevel for particular # modules, e.g. LogLevel info ssl:warn ErrorLog ${APACHE_LOG_DIR}/error.log CustomLog ${APACHE_LOG_DIR}/access.log combined # For most configuration files from conf-available/, which are # enabled or disabled at a global level, it is possible to # include a line for only one particular virtual host. For example # the following line enables the CGI configuration for this host # only after it has been globally disabled with "a2disconf". #Include conf-available/serve-cgi-bin.conf </VirtualHost> |
As we look at this file it may appear overwhelming. What is important to know is that lines that start with the pound/hash sign (#) are comments used to help users understand how to use it.
If we omit the comments in this file, it is much easier to digest. Leave the comments in your file, you may need them for reference, but below you can see the substance of this configuration file without them.
|
000-default.conf |
|
<VirtualHost *:80> #ServerName www.example.com ServerAdmin webmaster@localhost DocumentRoot /var/www/html ErrorLog ${APACHE_LOG_DIR}/error.log CustomLog ${APACHE_LOG_DIR}/access.log combined </VirtualHost> |
This is the basic framework in the configuration that outlines: domain name, server admin, document root location, and the location for error logs.
I left the one comment “#ServerName www.example.com”. We will get back to this in a later chapter. It is commented out because we do not have a domain name pointing to this server yet.
What we need to update is the DocumentRoot line and the ServerAdmin line. You may enter your email address in the ServerAdmin line.
Change the DocumentRoot to the following: /var/www/wordpress
When you are done, the configuration (excluding comments) should look like the one on the next page.
|
000-default.conf (Updated) |
|
<VirtualHost *:80> #ServerName www.example.com ServerAdmin info@nathanneil.com DocumentRoot /var/www/wordpress ErrorLog ${APACHE_LOG_DIR}/error.log CustomLog ${APACHE_LOG_DIR}/access.log combined </VirtualHost> |
Once the changes have been made, use control and x to exit. Hit Y and Enter to save the changes.
Before we move back into talking about changing permissions, we should consider how to enable and disable site configurations.
|
Disable a Site Configuration |
|
|
Command |
sudo a2dissite 000-default.conf |
|
Result |
System will disable the site configuration for 000-default. |
|
CLI Display |
milo@ubuntu:/var/apache2/sites-available$ sudo a2dissite 000-default.conf Site 000-default disabled To activate the new configuration, you will need to run service apache2 reload. milo@ubuntu:/var/apache2/sites-available$ |
When you make changes to Apache2 configuration files, you will almost always need to restart apache. You can do so by using the following command: sudo service apache2 restart
When that is complete the new settings will take hold. Now since we want to use the 000-default.conf site configuration, we need to re-enable it. Follow the table below.
|
Enable a Site Configuration |
|
|
Command |
sudo a2ensite 000-default.conf |
|
Result |
System will enable the site configuration for 000-default. |
|
CLI Display |
milo@ubuntu:/var/apache2/sites-available$ sudo a2ensite 000-default.conf Enabling site 000-default. To activate the new configuration, you will need to run service apache2 reload. milo@ubuntu:/var/apache2/sites-available$ |
Once again, we need to restart apache with the following command: sudo service apache2 restart
Now if we load our IP address into the browser, we will see the WordPress installation landing page. Do not click “Let’s Go!” yet as we still have some permissions to update.

RECAP ON CHANGING OWNERSHIP AND PERMISSIONS
Now before we can continue, we need to make some ownership and permissions changes. This is a great way to pull the whole chapter together.
Once you are logged into the server, we must first change the owner of the folder to a non-privileged user, who is already built into the Apache2 install. This user is www-data.
|
Changing the Owner of a Directory |
|
|
Command |
sudo chown www-data -R /var/www |
|
Result |
System will make milo the owner of the directory, along with all subdirectories. |
|
CLI Display |
milo@ubuntu:~$ sudo chown www-data -R /var/www [sudo] password for milo: milo@ubuntu:~$ |
Now we need to set the permissions for the directories.
WordPress recommends using 755 as the permission binary.
This means that the user (www-data) has read, write, and execute permission. The group and all users can only read and execute. This allows www-data to make changes to the files in the directories, but other users can only read and execute. These permissions are needed for a user to load the website.
|
Changing Permissions of a Directory |
|
|
Command |
sudo chmod 755 -R /var/www/wordpress |
|
Result |
System will make change permissions for /var/www and all subdirectories. |
|
CLI Display |
milo@ubuntu:~$ sudo chown www-data -R /var/www/wordpress [sudo] password for milo: milo@ubuntu:~$ |
Remember using the –R flag makes the settings apply to all subdirectories as well. If we do not use this, we will not be giving the permissions to other subdirectories in the wordpress parent.
Now that the permissions are set, we can move forward in creating a database in MySQL.
CHAPTER 8
CREATING A DATABASE IN MYSQL
There are a multitude of books on MySQL. This chapter is going to be very short, but will cover how to make a database for installing almost any popular content management system or other web software that needs a database to use.
I typically use the CLI for managing MySQL, but since this is geared towards beginners, it may be easier for us to use phpMyAdmin to create the database.
From the web browser, enter your IP address/phpmyadmin (Example: http://162.243.92.xxx/phpmyadmin). Replace 162.243.92.xxx with your IP address. Then login to phpMyAdmin.
You should see a home dashboard like the one below: 
What we are going to do is create a special user for WordPress to use and a database that it is limited to. This is a good security practice.
In the top left, click on Users.

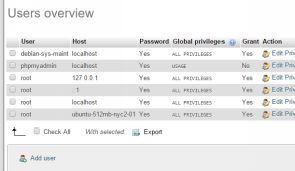 Now click on Add User.
From the new window enter a user name for the new user. I am going to use: website. Leave host listed as any host. After that skip down and click the “Generate” button to create a secure password. Be sure to note this password as we will need it for the WordPress installation.
Under the generate button is a field to “Create database with same name and grant all permissions.” Check that box. Leave “Global Permissions” all unchecked, since we only want WordPress to access this one database.
Scroll down and in the bottom right click the “Go” button. You will have a popup that the user has been added and on the right side of your screen you will see that the new database for the user has been added.
Again, this is just the basics, but it is an easy and secure way for beginners to add a database.
If you wish to learn more about MySQL and how it works from the CLI, there are a multitude of books out there to serve that need as you grow.
All materials on the site are licensed Creative Commons Attribution-Sharealike 3.0 Unported CC BY-SA 3.0 & GNU Free Documentation License (GFDL)
If you are the copyright holder of any material contained on our site and intend to remove it, please contact our site administrator for approval.
© 2016-2026 All site design rights belong to S.Y.A.