A practical guide to Fedora and Red Hat Enterprise Linux, 7th Edition (2014)
Part III: System Administration
Chapter 9 The Bourne Again Shell (bash)
Chapter 10 System Administration: Core Concepts
Chapter 11 Files, Directories, and Filesystems
Chapter 12 Finding, Downloading, and Installing Software
Chapter 13 Printing with CUPS
Chapter 14 Building a Linux Kernel
Chapter 15 Administration Tasks
Chapter 16 Configuring and Monitoring a LAN
Chapter 17 Setting Up Virtual Machines Locally and in the Cloud
Chapter 9. The Bourne Again Shell (bash)
In This Chapter
Startup Files
Redirecting Standard Error
Writing and Executing a Shell Script
Job Control
Manipulating the Directory Stack
Parameters and Variables
Locale
Processes
History
Reexecuting and Editing Commands
Aliases
Functions
Controlling bash: Features and Options
Processing the Command Line
Objectives
After reading this chapter you should be able to:
![]() Describe the purpose and history of bash
Describe the purpose and history of bash
![]() List the startup files bash runs
List the startup files bash runs
![]() Use three different methods to run a shell script
Use three different methods to run a shell script
![]() Understand the purpose of the PATH variable
Understand the purpose of the PATH variable
![]() Manage multiple processes using job control
Manage multiple processes using job control
![]() Redirect error messages to a file
Redirect error messages to a file
![]() Use control operators to separate and group commands
Use control operators to separate and group commands
![]() Create variables and display the values of variables and parameters
Create variables and display the values of variables and parameters
![]() List and describe common variables found on the system
List and describe common variables found on the system
![]() Reference, repeat, and modify previous commands using history
Reference, repeat, and modify previous commands using history
![]() Use control characters to edit the command line
Use control characters to edit the command line
![]() Create, display, and remove aliases and functions
Create, display, and remove aliases and functions
![]() Customize the bash environment using the set and shopt builtins
Customize the bash environment using the set and shopt builtins
![]() List the order of command-line expansion
List the order of command-line expansion
This chapter picks up where Chapter 5 left off. Chapter 27 expands on this chapter, exploring control flow commands and more advanced aspects of programming the Bourne Again Shell. The bash home page is at www.gnu.org/software/bash. The bash info page is a complete Bourne Again Shell reference.
The Bourne Again Shell is a command interpreter and high-level programming language. As a command interpreter, it processes commands you enter on the command line in response to a prompt. When you use the shell as a programming language, it processes commands stored in files called shell scripts. Like other languages, shells have variables and control flow commands (e.g., for loops and if statements).
When you use a shell as a command interpreter, you can customize the environment you work in. You can make the prompt display the name of the working directory, create a function or an alias for cp that keeps it from overwriting certain kinds of files, take advantage of keyword variables to change aspects of how the shell works, and so on. You can also write shell scripts that do your bidding—anything from a one-line script that stores a long, complex command to a longer script that runs a set of reports, prints them, and mails you a reminder when the job is done. More complex shell scripts are themselves programs; they do not just run other programs. Chapter 27 has some examples of these types of scripts.
Most system shell scripts are written to run under bash (or dash; next page). If you will ever work in single-user mode—when you boot the system or perform system maintenance, administration, or repair work, for example—it is a good idea to become familiar with this shell.
This chapter expands on the interactive features of the shell described in Chapter 5, explains how to create and run simple shell scripts, discusses job control, talks about locale, introduces the basic aspects of shell programming, talks about history and aliases, and describes command-line expansion. Chapter 27 presents some more challenging shell programming problems.
Background
bash Shell
The Bourne Again Shell is based on the Bourne Shell (an early UNIX shell; this book refers to it as the original Bourne Shell to avoid confusion), which was written by Steve Bourne of AT&T’s Bell Laboratories. Over the years the original Bourne Shell has been expanded, but it remains the basic shell provided with many commercial versions of UNIX.
![]() sh Shell
sh Shell
Because of its long and successful history, the original Bourne Shell has been used to write many of the shell scripts that help manage UNIX systems. Some of these scripts appear in Linux as Bourne Again Shell scripts. Although the Bourne Again Shell includes many extensions and features not found in the original Bourne Shell, bash maintains compatibility with the original Bourne Shell so you can run Bourne Shell scripts under bash. On UNIX systems the original Bourne Shell is named sh. On Fedora/RHEL systems sh is a symbolic link to bash, ensuring that scripts thatrequire the presence of the Bourne Shell still run. When called as sh, bash does its best to emulate the original Bourne Shell.
dash Shell
The bash executable file is almost 900 kilobytes, has many features, and is well suited as a user login shell. The dash (Debian Almquist) shell is about 100 kilobytes, offers Bourne Shell compatibility for shell scripts (noninteractive use), and because of its size, can load and execute shell scripts much more quickly than bash.
Korn Shell
The Korn Shell (ksh), written by David Korn, ran on System V UNIX. This shell extended many features of the original Bourne Shell and added many new features. Some features of the Bourne Again Shell, such as command aliases and command-line editing, are based on similar features from the Korn Shell.
POSIX
The POSIX (Portable Operating System Interface) family of related standards is being developed by PASC (IEEE’s Portable Application Standards Committee; www.pasc.org/plato). A comprehensive FAQ on POSIX, including many links, appears atwww.opengroup.org/austin/papers/posix_faq.html.
POSIX standard 1003.2 describes shell functionality. The Bourne Again Shell provides the features that match the requirements of this standard. Efforts are under way to make the Bourne Again Shell fully comply with the POSIX standard. In the meantime, if you invoke bash with the ––posix option, the behavior of the Bourne Again Shell will closely match the POSIX requirements.
Tip: chsh: changes your login shell
The person who sets up your account determines which shell you use when you first log in on the system or when you open a terminal emulator window in a GUI environment. Under Fedora/RHEL, bash is the default shell. You can run any shell you like after you are logged in. Enter the name of the shell you want to use (bash, tcsh, or another shell) and press RETURN; the next prompt will be that of the new shell. Give an exit command to return to the previous shell. Because shells you call in this manner are nested (one runs on top of the other), you will be able to log out only from your original shell. When you have nested several shells, keep giving exit commands until you reach your original shell. You will then be able to log out.
The chsh utility changes your login shell more permanently. First give the command chsh. In response to the prompts, enter your password and the absolute pathname of the shell you want to use (/bin/bash, /bin/tcsh, or the pathname of another shell). When you change your login shell in this manner using a terminal emulator (page 120) under a GUI, subsequent terminal emulator windows might not reflect the change until you log out of the system and log back in. See page 464 for an example of how to use chsh.
![]() Startup Files
Startup Files
When a shell starts, it runs startup files to initialize itself. Which files the shell runs depends on whether it is a login shell, an interactive shell that is not a login shell (give the command bash to run one of these shells), or a noninteractive shell (one used to execute a shell script). You must have read access to a startup file to execute the commands in it. Fedora/RHEL puts appropriate commands in some of these files. This section covers bash startup files.
Login Shells
A login shell is the first shell that displays a prompt when you log in on a system from the system console or a virtual console (page 121), remotely using ssh or another program (page 121), or by another means. When you are running a GUI and open a terminal emulator such as gnome-terminal (page 120), you are not logging in on the system (you do not provide your username and password), so the shell the emulator displays is (usually) not a login shell; it is an interactive nonlogin shell (below). Login shells are, by their nature, interactive. See “bash versus –bash” on page 1023 for a way to tell which type of shell you are running.
This section describes the startup files that are executed by login shells and shells that you start with the bash ––login option.
![]() /etc/profile
/etc/profile
The shell first executes the commands in /etc/profile, establishing systemwide default characteristics for users running bash. In addition to executing the commands it holds, profile executes the commands within each of the files with a .sh filename extension in the /etc/profile.d directory. This setup allows a user working with root privileges to modify the commands profile runs without changing the profile file itself. Because profile can be replaced when the system is updated, making changes to files in the profile.d directory ensures the changes will remain when the system is updated.
Tip: Set environment variables for all users in /etc/profile or in a *.sh file in /etc/profile.d
Setting and exporting a variable in /etc/profile or in a file with a .sh filename extension in the /etc/profile.d directory makes that variable available to every user’s login shell. Variables that are exported (placed in the environment) are also available to all interactive and noninteractive subshells of the login shell.
![]() .bash_profile, .bash_login, and .profile
.bash_profile, .bash_login, and .profile
Next the shell looks for ~/.bash_profile, ~/.bash_login, or ~/.profile (~/ is shorthand for your home directory), in that order, executing the commands in the first of these files it finds. You can put commands in one of these files to override the defaults set in /etc/profile.
By default, Fedora/RHEL sets up new accounts with ~/.bash_profile and ~/.bashrc files. The default ~/.bash_profile file calls ~/.bashrc, which calls /etc/bashrc.
![]() .bash_logout
.bash_logout
When you log out, bash executes commands in the ~/.bash_logout file. This file often holds commands that clean up after a session, such as those that remove temporary files.
Interactive Nonlogin Shells
The commands in the preceding startup files are not executed by interactive, nonlogin shells. However, these shells inherit from the login shell variables that are declared and exported in these startup files.
![]() .bashrc
.bashrc
An interactive nonlogin shell executes commands in the ~/.bashrc file. The default ~/.bashrc file calls /etc/bashrc.
/etc/bashrc
Although not called by bash directly, the Fedora/RHEL ~/.bashrc file calls /etc/bashrc.
Noninteractive Shells
The commands in the previously described startup files are not executed by noninteractive shells, such as those that run shell scripts. However, if these shells are forked by a login shell, they inherit variables that are declared and exported in these startup files. Specifically, crontab files (page607) do not inherit variables from startup files.
BASH_ENV
Noninteractive shells look for the environment variable BASH_ENV (or ENV if the shell is called as sh) and execute commands in the file named by this variable.
Setting Up Startup Files
Although many startup files and types of shells exist, usually all you need are the .bash_profile and .bashrc files in your home directory. Commands similar to the following in .bash_profile run commands from .bashrc for login shells (when .bashrc exists). With this setup, the commands in.bashrc are executed by login and nonlogin shells.
if [ -f ~/.bashrc ]; then . ~/.bashrc; fi
The [ –f ~/.bashrc ] tests whether the file named .bashrc in your home directory exists. See pages 983 and 986 for more information on test and its synonym [ ]. See page 332 for information on the . (dot) builtin.
Tip: ![]() Set PATH in .bash_profile
Set PATH in .bash_profile
Because commands in .bashrc might be executed many times, and because subshells inherit environment (exported) variables, it is a good idea to put commands that add to existing variables in the .bash_profile file. For example, the following command adds the binsubdirectory of the home directory to PATH (page 359) and should go in .bash_profile:
PATH=$PATH:$HOME/bin
When you put this command in .bash_profile and not in .bashrc, the string is added to the PATH variable only once, when you log in.
Modifying a variable in .bash_profile causes changes you make in an interactive session to propagate to subshells. In contrast, modifying a variable in .bashrc overrides changes inherited from a parent shell.
Sample .bash_profile and .bashrc files appear on the next page. Some commands used in these files are not covered until later in this chapter. In any startup file, you must place in the environment (export) those variables and functions that you want to be available to child processes. For more information refer to “Environment, Environment Variables, and Inheritance” on page 1032.
$ cat ~/.bash_profile
if [ -f ~/.bashrc ]; then
. ~/.bashrc # Read local startup file if it exists
fi
PATH=$PATH:/usr/local/bin # Add /usr/local/bin to PATH
export PS1='[\h \W \!]\$ ' # Set prompt
The first command in the preceding .bash_profile file executes the commands in the user’s .bashrc file if it exists. The next command adds to the PATH variable (page 359). Typically PATH is set and exported in /etc/profile, so it does not need to be exported in a user’s startup file. The final command sets and exports PS1 (page 361), which controls the user’s prompt.
The first command in the .bashrc file shown below executes the commands in the /etc/bashrc file if it exists. Next the file sets noclobber (page 156), unsets MAILCHECK (page 361), exports LANG (page 366) and VIMINIT (for vim initialization), and defines several aliases. The final command defines a function (page 396) that swaps the names of two files.
$ cat ~/.bashrc
if [ -f /etc/bashrc ]; then
source /etc/bashrc # read global startup file if it exists
fi
set -o noclobber # prevent overwriting files
unset MAILCHECK # turn off "you have new mail" notice
export LANG=C # set LANG variable
export VIMINIT='set ai aw' # set vim options
alias df='df -h' # set up aliases
alias rm='rm -i' # always do interactive rm's
alias lt='ls -ltrh | tail'
alias h='history | tail'
alias ch='chmod 755 '
function switch() { # a function to exchange
local tmp=$$switch # the names of two files
mv "$1" $tmp
mv "$2" "$1"
mv $tmp "$2"
}
![]() . (Dot) or source: Runs a Startup File in the Current Shell
. (Dot) or source: Runs a Startup File in the Current Shell
After you edit a startup file such as .bashrc, you do not have to log out and log in again to put the changes into effect. Instead, you can run the startup file using the . (dot) or source builtin (they are the same command). As with other commands, the . must be followed by a SPACE on the command line. Using . or source is similar to running a shell script, except these commands run the script as part of the current process. Consequently, when you use . or source to run a script, changes you make to variables from within the script affect the shell you run the script from. If you ran a startup file as a regular shell script and did not use the . or source builtin, the variables created in the startup file would remain in effect only in the subshell running the script—not in the shell you ran the script from. You can use the . or source command to run any shell script—not just a startup file—but undesirable side effects (such as changes in the values of shell variables you rely on) might occur. For more information refer to “Environment, Environment Variables, and Inheritance” on page 1032.
In the following example, .bashrc sets several variables and sets PS1, the bash prompt, to the name of the host. The . builtin puts the new values into effect.
$ cat ~/.bashrc
export TERM=xterm # set the terminal type
export PS1="$(hostname -f): " # set the prompt string
export CDPATH=:$HOME # add HOME to CDPATH string
stty kill '^u' # set kill line to control-u
$ . ~/.bashrc
guava:
Commands That Are Symbols
The Bourne Again Shell uses the symbols (, ), [, ], and $ in a variety of ways. To minimize confusion, Table 9-1 lists the most common use of each of these symbols and the page on which it is discussed.
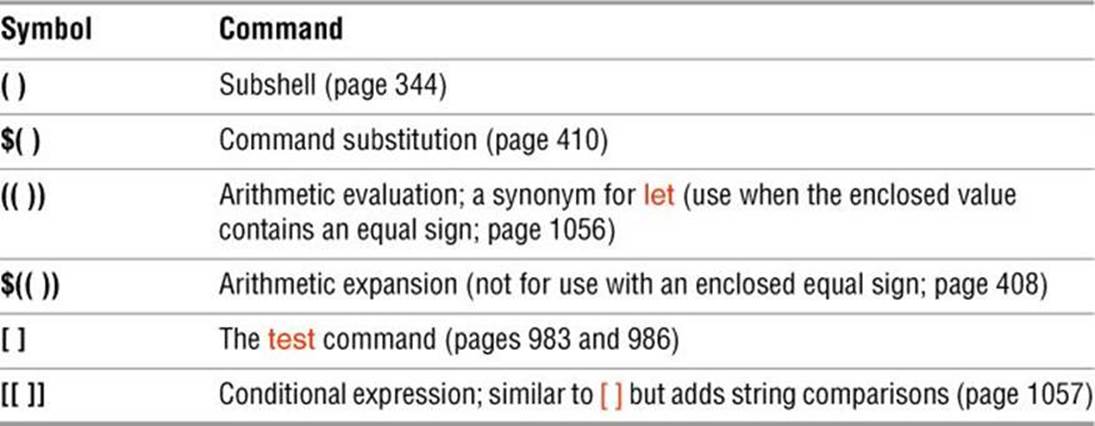
Table 9-1 Builtin commands that are symbols
![]() Redirecting Standard Error
Redirecting Standard Error
Chapter 5 covered the concept of standard output and explained how to redirect standard output of a command. In addition to standard output, commands can send output to standard error. A command might send error messages to standard error to keep them from getting mixed up with the information it sends to standard output.
Just as it does with standard output, by default the shell directs standard error to the screen. Unless you redirect one or the other, you might not know the difference between the output a command sends to standard output and the output it sends to standard error. One difference is that the system buffers standard output but does not buffer standard error. This section describes the syntax used by bash to redirect standard error and to distinguish between standard output and standard error.
File descriptors
A file descriptor is the place a program sends its output to and gets its input from. When you execute a program, the shell opens three file descriptors for the program: 0 (standard input), 1 (standard output), and 2 (standard error). The redirect output symbol (> [page 154]) is shorthand for 1>, which tells the shell to redirect standard output. Similarly < (page 155) is short for 0<, which redirects standard input. The symbols 2> redirect standard error. For more information refer to “File Descriptors” on page 1016.
The following examples demonstrate how to redirect standard output and standard error to different files and to the same file. When you run the cat utility with the name of a file that does not exist and the name of a file that does exist, cat sends an error message to standard error and copies the file that does exist to standard output. Unless you redirect them, both messages appear on the screen.
$ cat y
This is y.
$ cat x
cat: x: No such file or directory
$ cat x y
cat: x: No such file or directory
This is y.
When you redirect standard output of a command, output sent to standard error is not affected and still appears on the screen.
$ cat x y > hold
cat: x: No such file or directory
$ cat hold
This is y.
Similarly, when you send standard output through a pipeline, standard error is not affected. The following example sends standard output of cat through a pipeline to tr, which in this example converts lowercase characters to uppercase. (See the tr info page for more information.) The text thatcat sends to standard error is not translated because it goes directly to the screen rather than through the pipeline.
$ cat x y | tr "[a-z]" "[A-Z]"
cat: x: No such file or directory
THIS IS Y.
The following example redirects standard output and standard error to different files. The shell redirects standard output (file descriptor 1) to the filename following 1>.
You can specify > in place of 1>. The shell redirects standard error (file descriptor 2) to the filename following 2>.
$ cat x y 1> hold1 2> hold2
$ cat hold1
This is y.
$ cat hold2
cat: x: No such file or directory
Combining standard output and standard error
In the next example, the &> token redirects standard output and standard error to a single file:
$ cat x y &> hold
$ cat hold
cat: x: No such file or directory
This is y.
Duplicating a file descriptor
In the next example, first 1> redirects standard output to hold, and then 2>&1 declares file descriptor 2 to be a duplicate of file descriptor 1. As a result, both standard output and standard error are redirected to hold.
$ cat x y 1> hold 2>&1
$ cat hold
cat: x: No such file or directory
This is y.
In this case, 1> hold precedes 2>&1. If they had appeared in the opposite order, standard error would have been made a duplicate of standard output before standard output was redirected to hold. Only standard output would have been redirected to hold in that case.
Sending errors through a pipeline
The next example declares file descriptor 2 to be a duplicate of file descriptor 1 and sends the output for file descriptor 1 (as well as file descriptor 2) through a pipeline to the tr command.
$ cat x y 2>&1 | tr "[a-z]" "[A-Z]"
CAT: X: NO SUCH FILE OR DIRECTORY
THIS IS Y.
The token |& is shorthand for 2>&1 |:
$ cat x y |& tr "[a-z]" "[A-Z]"
CAT: X: NO SUCH FILE OR DIRECTORY
THIS IS Y.
Sending errors to standard error
You can use 1>&2 (or simply >&2; the 1 is not required) to redirect standard output of a command to standard error. Shell scripts use this technique to send the output of echo to standard error. In the following script, standard output of the first echo is redirected to standard error:
$ cat message_demo
echo This is an error message. 1>&2
echo This is not an error message.
If you redirect standard output of message_demo, error messages such as the one produced by the first echo appear on the screen because you have not redirected standard error. Because standard output of a shell script is frequently redirected to a file, you can use this technique to display on the screen any error messages generated by the script. The lnks script (page 991) uses this technique. You can use the exec builtin to create additional file descriptors and to redirect standard input, standard output, and standard error of a shell script from within the script (page 1046).
The Bourne Again Shell supports the redirection operators shown in Table 9-2.
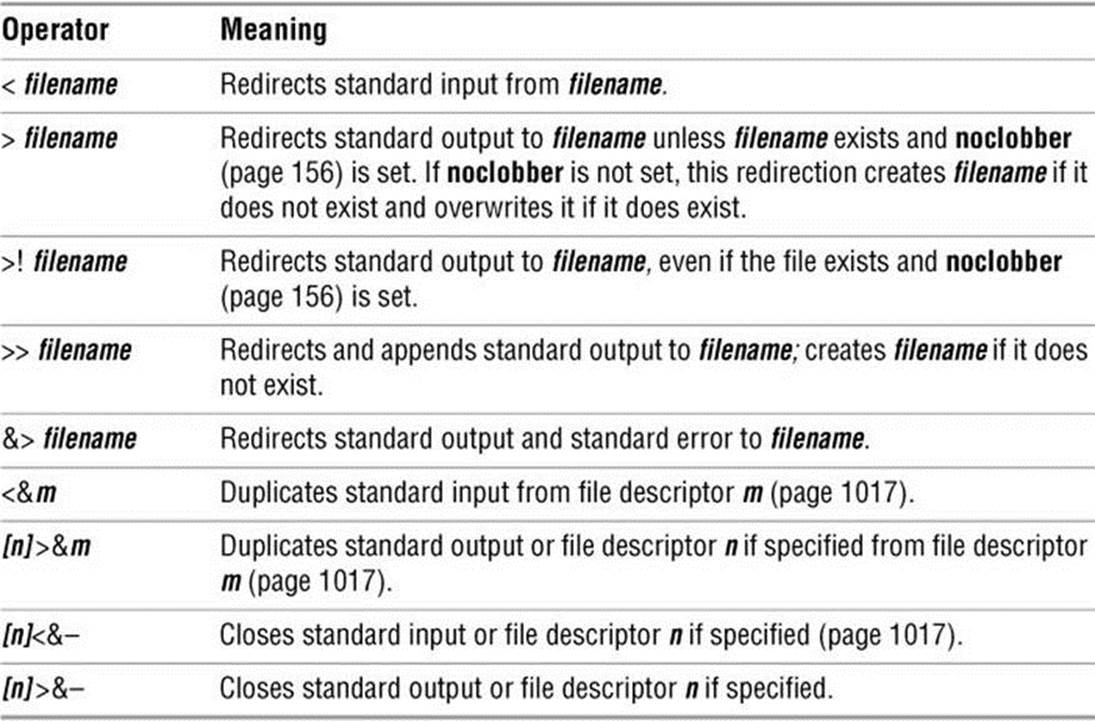
Table 9-2 Redirection operators
Writing and Executing a Shell Script
A shell script is a file that holds commands the shell can execute. The commands in a shell script can be any commands you can enter in response to a shell prompt. For example, a command in a shell script might run a utility, a compiled program, or another shell script. Like the commands you give on the command line, a command in a shell script can use ambiguous file references and can have its input or output redirected from or to a file or sent through a pipeline. You can also use pipelines and redirection with the input and output of the script itself.
In addition to the commands you would ordinarily use on the command line, control flow commands (also called control structures) find most of their use in shell scripts. This group of commands enables you to alter the order of execution of commands in a script in the same way you would alter the order of execution of statements using a structured programming language. Refer to “Control Structures” on page 982 for specifics.
The shell interprets and executes the commands in a shell script, one after another. Thus a shell script enables you to simply and quickly initiate a complex series of tasks or a repetitive procedure.
![]() chmod: Makes a File Executable
chmod: Makes a File Executable
To execute a shell script by giving its name as a command, you must have permission to read and execute the file that contains the script (refer to “Access Permissions” on page 191). Read permission enables you to read the file that holds the script. Execute permission tells the system that the owner, group, and/or public has permission to execute the file; it implies the content of the file is executable.
When you create a shell script using an editor, the file does not typically have its execute permission set. The following example shows a file named whoson that contains a shell script:
$ cat whoson
date
echo "Users Currently Logged In"
who
$ ./whoson
bash: ./whoson: Permission denied
You cannot execute whoson by giving its name as a command because you do not have execute permission for the file. The system does not recognize whoson as an executable file and issues the error message Permission denied when you try to execute it. (See the tip on the next page if the shell issues a command not found error message.) When you give the filename as an argument to bash (bash whoson), bash assumes the argument is a shell script and executes it. In this case bash is executable, and whoson is an argument that bash executes, so you do not need execute permission to whoson. You must have read permission.
The chmod utility changes the access privileges associated with a file. Figure 9-1 shows ls with the –l option displaying the access privileges of whoson before and after chmod gives execute permission to the file’s owner.
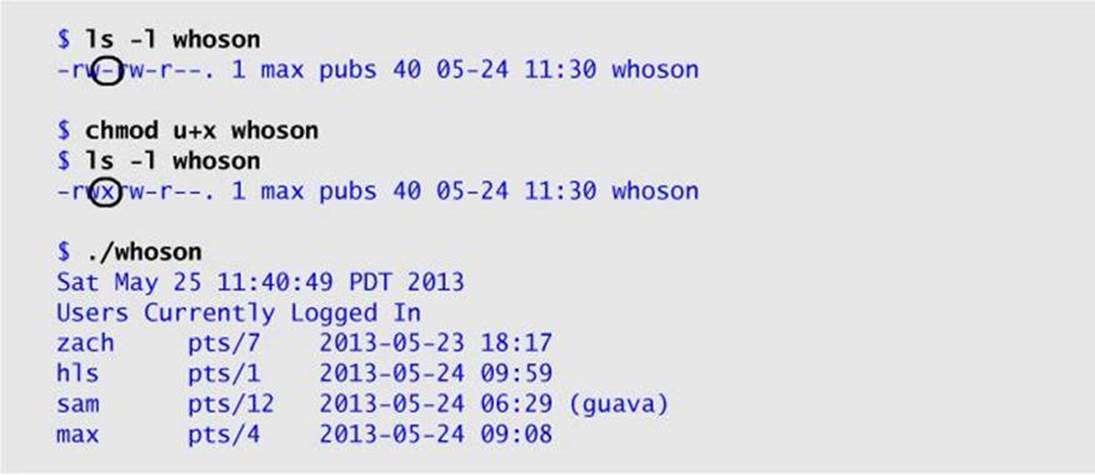
Figure 9-1 Using chmod to make a shell script executable
The first ls displays a hyphen (–) as the fourth character, indicating the owner does not have permission to execute the file. Next chmod gives the owner execute permission: u+x causes chmod to add (+) execute permission (x) for the owner (u). (The u stands for user, although it means the owner of the file.) The second argument is the name of the file. The second ls shows an x in the fourth position, indicating the owner has execute permission.
Tip: Command not found?
If you give the name of a shell script as a command without including the leading ./, the shell typically displays the following error message:
$ whoson
bash: whoson: command not found
This message indicates the shell is not set up to search for executable files in the working directory. Enter this command instead:
$ ./whoson
The ./ tells the shell explicitly to look for an executable file in the working directory. Although not recommended for security reasons, you can change the PATH variable so the shell searches the working directory automatically; see PATH on page 359.
If other users will execute the file, you must also change group and/or public access permissions for the file. Any user must have execute access to use the file’s name as a command. If the file is a shell script, the user trying to execute the file must have read access to the file as well. You do not need read access to execute a binary executable (compiled program).
The final command in Figure 9-1 (prevous page) shows the shell executing the file when its name is given as a command. For more information refer to “Access Permissions” on page 191 as well as the discussions of ls (page 191) and chmod (page 193).
![]() #! Specifies a Shell
#! Specifies a Shell
You can put a special sequence of characters on the first line of a shell script to tell the operating system which shell (or other program) should execute the file and which options you want to include. Because the operating system checks the initial characters of a program before attempting to execute it using exec, these characters save the system from making an unsuccessful attempt. If #! (sometimes said out loud as hashbang or shebang) are the first two characters of a script, the system interprets the characters that follow as the absolute pathname of the program that is to execute the script. This pathname can point to any program, not just a shell, and can be useful if you have a script you want to run with a shell other than the shell you are running the script from. The following example specifies that bash should run the script:
$ cat bash_script
#!/bin/bash
echo "This is a Bourne Again Shell script."
Tip: The bash –e and –u options can make your programs less fractious
The bash –e (errexit) option causes bash to exit when a simple command (e.g., not a control structure) fails. The bash –u (nounset) option causes bash to display a message and exit when it tries to expand an unset variable. See Table 9-13 on page 401 for details. It is easy to turn these options on in the #! line of a bash script:
#!/bin/bash -eu
These options can prevent disaster when you mistype lines like this in a script:
MYDIR=/tmp/$$
cd $MYDIr; rm -rf .
During development, you can also specify the –x option in the #! line to turn on debugging (page 994).
The next example runs under Perl and can be run directly from the shell without explicitly calling Perl on the command line:
$ cat ./perl_script.pl
#!/usr/bin/perl -w
print "This is a Perl script.\n";
$ ./perl_script.pl
This is a Perl script.
The next example shows a script that should be executed by tcsh (tcsh package):
$ cat tcsh_script
#!/bin/tcsh
echo "This is a tcsh script."
set person = zach
echo "person is $person"
Because of the #! line, the operating system ensures that tcsh executes the script no matter which shell you run it from.
You can use ps –f within a shell script to display the name of the program that is executing the script. The three lines that ps displays in the following example show the process running the parent bash shell, the process running the tcsh script, and the process running the ps command:
$ cat tcsh_script2
#!/bin/tcsh
ps -f
$ ./tcsh_script2
UID PID PPID C STIME TTY TIME CMD
max 3031 3030 0 Nov16 pts/4 00:00:00 -bash
max 9358 3031 0 21:13 pts/4 00:00:00 /bin/tcsh ./tcsh_script2
max 9375 9358 0 21:13 pts/4 00:00:00 ps -f
If you do not follow #! with the name of an executable program, the shell reports it cannot find the program you asked it to run. You can optionally follow #! with SPACEs before the name of the program. If you omit the #! line and try to run, for example, a tcsh script from bash, the script will run under bash and might generate error messages or not run properly.
# Begins a Comment
Comments make shell scripts and all code easier to read and maintain by you and others. If a hashmark (#) in the first character position of the first line of a script is not immediately followed by an exclamation point (!) or if a hashmark occurs in any other location in a script, the shell interprets it as the beginning of a comment. The shell then ignores everything between the hashmark and the end of the line (the next NEWLINE character).
Executing a Shell Script
fork and exec system calls
As discussed earlier, you can execute commands in a shell script file that you do not have execute permission for by using a bash command to exec a shell that runs the script directly. In the following example, bash creates a new shell that takes its input from the file named whoson:
$ bash whoson
Because the bash command expects to read a file containing commands, you do not need execute permission for whoson. (You do need read permission.) Even though bash reads and executes the commands in whoson, standard input, standard output, and standard error remain directed from/to the terminal. Alternately, you can supply commands to bash using standard input:
$ bash < whoson
Although you can use bash to execute a shell script, these techniques cause the script to run more slowly than if you give yourself execute permission and directly invoke the script. Users typically prefer to make the file executable and run the script by typing its name on the command line. It is also easier to type the name, and this practice is consistent with the way other kinds of programs are invoked (so you do not need to know whether you are running a shell script or an executable file). However, if bash is not your interactive shell or if you want to see how the script runs with different shells, you might want to run a script as an argument to bash or tcsh.
Caution: sh does not call the original Bourne Shell
The original Bourne Shell was invoked with the command sh. Although you can call bash with an sh command, it is not the original Bourne Shell. The sh command (/bin/sh) is a symbolic link to /bin/bash, so it is simply another name for the bash command. When you call bash using the command sh, bash tries to mimic the behavior of the original Bourne Shell as closely as possible—but it does not always succeed.
Control Operators: Separate and Group Commands
Whether you give the shell commands interactively or write a shell script, you must separate commands from one another. This section reviews the ways to separate commands that were covered in Chapter 5 and introduces a few new ones.
The tokens that separate, terminate, and group commands are called control operators. Each of the control operators implies line continuation as explained on page 1063. Following is a list of the control operators and the page each is discussed on.
• ; Command separator (below)
• NEWLINE Command initiator (below)
• & Background task (next page)
• | Pipeline (next page)
• |& Standard error pipeline (page 335)
• () Groups commands (page 344)
• || Boolean OR (page 343)
• && Boolean AND (page 343)
• ;; Case terminator (page 1006)
![]() ; and NEWLINE Separate Commands
; and NEWLINE Separate Commands
The NEWLINE character is a unique control operator because it initiates execution of the command preceding it. You have seen this behavior throughout this book each time you press the RETURN key at the end of a command line.
The semicolon (;) is a control operator that does not initiate execution of a command and does not change any aspect of how the command functions. You can execute a series of commands sequentially by entering them on a single command line and separating each from the next using a semicolon (;). You initiate execution of the sequence of commands by pressing RETURN:
$ x ; y ; z
If x, y, and z are commands, the preceding command line yields the same results as the next three commands. The difference is that in the next example the shell issues a prompt after each of the commands finishes executing, whereas the preceding command line causes the shell to issue a prompt only after z is complete:
$ x
$ y
$ z
Whitespace
Although the whitespace (SPACEs and/or TABs) around the semicolons in the previous example makes the command line easier to read, it is not necessary. None of the control operators needs to be surrounded by whitespace.
| and & Separate Commands and Do Something Else
The pipeline symbol (|) and the background task symbol (&) are also control operators. They do not start execution of a command but do change some aspect of how the command functions. The pipeline symbol alters the source of standard input or the destination of standard output. The background task symbol causes the shell to execute the task in the background and display a prompt immediately so you can continue working on other tasks.
Each of the following command lines initiates a pipeline (page 158) comprising three simple commands:
$ x | y | z
$ ls -l | grep tmp | less
In the first pipeline, the shell redirects standard output of x to standard input of y and redirects y’s standard output to z’s standard input. Because it runs the entire pipeline in the foreground, the shell does not display a prompt until task z runs to completion: z does not finish until y finishes, and y does not finish until x finishes. In the second pipeline, x is an ls –l command, y is grep tmp, and z is the pager less. The shell displays a long (wide) listing of the files in the working directory that contain the string tmp, sent via a pipeline through less.
The next command line executes a list (page 162) running the simple commands d and e in the background and the simple command f in the foreground:
$ d & e & f
[1] 14271
[2] 14272
The shell displays the job number between brackets and the PID number for each process running in the background. It displays a prompt as soon as f finishes, which might be before d or e finishes.
Before displaying a prompt for a new command, the shell checks whether any background jobs have completed. For each completed job, the shell displays its job number, the word Done, and the command line that invoked the job; the shell then displays a prompt. When the job numbers are listed, the number of the last job started is followed by a + character, and the job number of the previous job is followed by a – character. Other job numbers are followed by a SPACE character. After running the last command, the shell displays the following lines before issuing a prompt:
[1]- Done d
[2]+ Done e
The next command line executes a list that runs three commands as background jobs. The shell displays a shell prompt immediately:
$ d & e & f &
[1] 14290
[2] 14291
[3] 14292
The next example uses a pipeline symbol to send the output from one command to the next command and an ampersand (&) to run the entire pipeline in the background. Again the shell displays the prompt immediately. The shell commands that are part of a pipeline form a single job. That is, the shell treats a pipeline as a single job, no matter how many commands are connected using pipeline (|) symbols or how complex they are. The Bourne Again Shell reports only one process in the background (although there are three):
$ d | e | f &
[1] 14295
![]() && and || Boolean Control Operators
&& and || Boolean Control Operators
The && (AND) and || (OR) Boolean operators are called short-circuiting control operators. If the result of using one of these operators can be decided by looking only at the left operand, the right operand is not evaluated. The result of a Boolean operation is either 0 (true) or 1 (false).
&&
The && operator causes the shell to test the exit status of the command preceding it. If the command succeeds, bash executes the next command; otherwise, it skips the next command. You can use this construct to execute commands conditionally.
$ mkdir bkup && cp -r src bkup
This compound command creates the directory bkup. If mkdir succeeds, the content of directory src is copied recursively to bkup.
||
The || control operator also causes bash to test the exit status of the first command but has the opposite effect: The remaining command(s) are executed only if the first command failed (that is, exited with nonzero status).
$ mkdir bkup || echo "mkdir of bkup failed" >> /tmp/log
The exit status of a command list is the exit status of the last command in the list. You can group lists with parentheses. For example, you could combine the previous two examples as
$ (mkdir bkup && cp -r src bkup) || echo "mkdir failed" >> /tmp/log
In the absence of parentheses, && and || have equal precedence and are grouped from left to right. The following examples use the true and false utilities. These utilities do nothing and return true (0) and false (1) exit statuses, respectively:
$ false; echo $?
1
The $? variable holds the exit status of the preceding command (page 1029). The next two commands yield an exit status of 1 (false):
$ true || false && false
$ echo $?
1
$ (true || false) && false
$ echo $?
1
Similarly the next two commands yield an exit status of 0 (true):
$ false && false || true
$ echo $?
0
$ (false && false) || true
$ echo $?
0
See “Lists” on page 162 for more examples.
Optional
( ) Groups Commands
You can use the parentheses control operator to group commands. When you use this technique, the shell creates a copy of itself, called a subshell, for each group. It treats each group of commands as a list and creates a new process to execute each command (refer to “Process Structure” on page 373 for more information on creating sub-shells). Each subshell has its own environment, meaning it has its own set of variables whose values can differ from those in other subshells.
The following command line executes commands a and b sequentially in the background while executing c in the background. The shell displays a prompt immediately.
$ (a ; b) & c &
[1] 15520
[2] 15521
The preceding example differs from the earlier example d & e & f & in that tasks a and b are initiated sequentially, not concurrently.
Similarly the following command line executes a and b sequentially in the background and, at the same time, executes c and d sequentially in the background. The subshell running a and b and the subshell running c and d run concurrently. The shell displays a prompt immediately.
$ (a ; b) & (c ; d) &
[1] 15528
[2] 15529
The next script copies one directory to another. The second pair of parentheses creates a subshell to run the commands following the pipeline symbol. Because of these parentheses, the output of the first tar command is available for the second tar command, despite the intervening cd command. Without the parentheses, the output of the first tar command would be sent to cd and lost because cd does not process standard input. The shell variables $1 and $2 hold the first and second command-line arguments (page 1023), respectively. The first pair of parentheses, which creates a subshell to run the first two commands, allows users to call cpdir with relative pathnames. Without them, the first cd command would change the working directory of the script (and consequently the working directory of the secondcd command). With them, only the working directory of the subshell is changed.
$ cat cpdir
(cd $1 ; tar -cf - . ) | (cd $2 ; tar -xvf - )
$ ./cpdir /home/max/sources /home/max/memo/biblio
The cpdir command line copies the files and directories in the /home/max/sources directory to the directory named /home/max/memo/biblio. Running this shell script is the same as using cp with the –r option. Refer to the cp man page for more information.
\ Continues a Command
Although it is not a control operator, you can use a backslash (\) character in the middle of commands. When you enter a long command line and the cursor reaches the right side of the screen, you can use a backslash to continue the command on the next line. The backslash quotes, or escapes, the NEWLINE character that follows it so the shell does not treat the NEWLINE as a control operator. Enclosing a backslash within single quotation marks or preceding it with another backslash turns off the power of a backslash to quote special characters such as NEWLINE. Enclosing a backslash within double quotation marks has no effect on the power of the backslash.
Although you can break a line in the middle of a word (token), it is typically simpler, and makes code easier to read, if you break a line immediately before or after whitespace.
Optional
You can enter a RETURN in the middle of a quoted string on a command line without using a backslash. The NEWLINE (RETURN) you enter will then be part of the string:
$ echo "Please enter the three values
> required to complete the transaction."
Please enter the three values
required to complete the transaction.
In the three examples in this section, the shell does not interpret RETURN as a control operator because it occurs within a quoted string. The greater than sign (>) is a secondary prompt (PS2; page 362) indicating the shell is waiting for you to continue the unfinished command. In the next example, the first RETURN is quoted (escaped) so the shell treats it as a separator and does not interpret it literally.
$ echo "Please enter the three values \
> required to complete the transaction."
Please enter the three values required to complete the transaction.
Single quotation marks cause the shell to interpret a backslash literally:
$ echo 'Please enter the three values \
> required to complete the transaction.'
Please enter the three values \
required to complete the transaction.
Job Control
As explained on page 163, a job is another name for a process running a pipeline (which can be a simple command). You run one or more jobs whenever you give the shell a command. For example, if you type date on the command line and press RETURN, you have run a job. You can also create several jobs on a single command line by entering several simple commands separated by control operators (& in the following example):
$ find . -print | sort | lpr & grep -l max /tmp/* > maxfiles &
[1] 18839
[2] 18876
The portion of the command line up to the first & is one job—a pipeline comprising three simple commands connected by pipeline symbols: find, sort, and lpr. The second job is a pipeline that is a simple command (grep). The & characters following each pipeline put each job in the background, so bash does not wait for them to complete before displaying a prompt.
Using job control you can move jobs from the foreground to the background, and vice versa; temporarily stop jobs; and list jobs that are running in the background or stopped.
![]() jobs: Lists Jobs
jobs: Lists Jobs
The jobs builtin lists all background jobs. In the following example, the sleep command runs in the background and creates a background job that the jobs builtin reports on:
$ sleep 60 &
[1] 7809
$ jobs
[1] + Running sleep 60 &
![]() fg: Brings a Job to the Foreground
fg: Brings a Job to the Foreground
The shell assigns a job number to each job you run in the background. For each job run in the background, the shell lists the job number and PID number immediately, just before it issues a prompt:
$ gnome-calculator &
[1] 1246
$ date &
[2] 1247
$ Sat Dec 7 11:44:40 PST 2013
[2]+ Done date
$ find /usr -name ace -print > findout &
[2] 1269
$ jobs
[1]- Running gnome-calculator &
[2]+ Running find /usr -name ace -print > findout &
The shell discards job numbers when a job is finished and reuses discarded job numbers. When you start or put a job in the background, the shell assigns a job number that is one more than the highest job number in use.
In the preceding example, the jobs command lists the first job, gnome-calculator, as job 1. The date command does not appear in the jobs list because it finished before jobs was run. Because the date command was completed before find was run, the find command became job 2.
To move a background job to the foreground, use the fg builtin followed by the job number. Alternately, you can give a percent sign (%) followed by the job number as a command. Either of the following commands moves job 2 to the foreground. When you move a job to the foreground, the shell displays the command it is now executing in the foreground.
$ fg 2
find /usr -name ace -print > findout
or
$ %2
find /usr -name ace -print > findout
You can also refer to a job by following the percent sign with a string that uniquely identifies the beginning of the command line used to start the job. Instead of the preceding command, you could have used either fg %find or fg %f because both uniquely identify job 2. If you follow the percent sign with a question mark and a string, the string can match any part of the command line. In the preceding example, fg %?ace would also bring job 2 to the foreground.
Often the job you wish to bring to the foreground is the only job running in the background or is the job that jobs lists with a plus (+). In these cases, calling fg without an argument brings the job to the foreground.
Suspending a Job
Pressing the suspend key (usually CONTROL-Z) immediately suspends (temporarily stops) the job in the foreground and displays a message that includes the word Stopped.
CONTROL-Z
[2]+ Stopped find /usr -name ace -print > findout
For more information refer to “Moving a Job from the Foreground to the Background” on page 164.
![]() bg: Sends a Job to the Background
bg: Sends a Job to the Background
To move the foreground job to the background, you must first suspend the job (above). You can then use the bg builtin to resume execution of the job in the background.
$ bg
[2]+ find /usr -name ace -print > findout &
If a background job attempts to read from the terminal, the shell stops the job and displays a message saying the job has been stopped. You must then move the job to the foreground so it can read from the terminal.
$ (sleep 5; cat > mytext) &
[1] 1343
$ date
Sat Dec 7 11:58:20 PST 2013
[1]+ Stopped ( sleep 5; cat >mytext )
$ fg
( sleep 5; cat >mytext )
Remember to let the cat out!
CONTROL-D
$
In the preceding example, the shell displays the job number and PID number of the background job as soon as it starts, followed by a prompt. Demonstrating that you can give a command at this point, the user gives the command date, and its output appears on the screen. The shell waits until just before it issues a prompt (after date has finished) to notify you that job 1 is stopped. When you give an fg command, the shell puts the job in the foreground, and you can enter the data the command is waiting for. In this case the input needs to be terminated using CONTROL-D, which sends an EOF (end of file) signal to cat. The shell then displays another prompt.
The shell keeps you informed about changes in the status of a job, notifying you when a background job starts, completes, or stops, perhaps because it is waiting for input from the terminal. The shell also lets you know when a foreground job is suspended. Because notices about a job being run in the background can disrupt your work, the shell delays displaying these notices until just before it displays a prompt. You can set notify (page 402) to cause the shell to display these notices without delay.
If you try to exit from a nonlogin shell while jobs are stopped, the shell issues a warning and does not allow you to exit. If you then use jobs to review the list of jobs or you immediately try to exit from the shell again, the shell allows you to exit. If huponexit (page 402) is not set (it is not set by default), stopped jobs remain stopped and background jobs keep running in the background. If it is set, the shell terminates these jobs.
Manipulating the Directory Stack
The Bourne Again Shell allows you to store a list of directories you are working with, enabling you to move easily among them. This list is referred to as a stack. It is analogous to a stack of dinner plates: You typically add plates to and remove plates from the top of the stack, so this type of stack is named a LIFO (last in, first out) stack.
dirs: Displays the Stack
The dirs builtin displays the contents of the directory stack. If you call dirs when the directory stack is empty, it displays the name of the working directory:
$ dirs
~/literature
The dirs builtin uses a tilde (~) to represent the name of a user’s home directory. The examples in the next several sections assume you are referring to the directory structure shown in Figure 9-2.
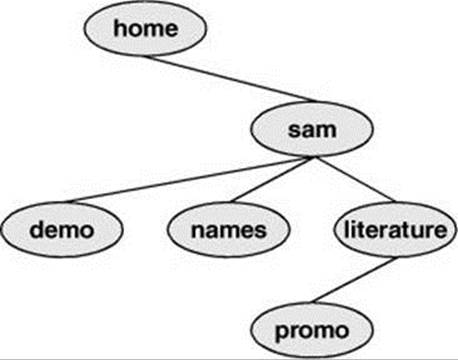
Figure 9-2 The directory structure used in the examples
pushd: Pushes a Directory on the Stack
When you supply the pushd (push directory) builtin with one argument, it pushes the directory specified by the argument on the stack, changes directories to the specified directory, and displays the stack. The following example is illustrated in Figure 9-3:
$ pushd ../demo
~/demo ~/literature
$ pwd
/home/sam/demo
$ pushd ../names
~/names ~/demo ~/literature
$ pwd
/home/sam/names
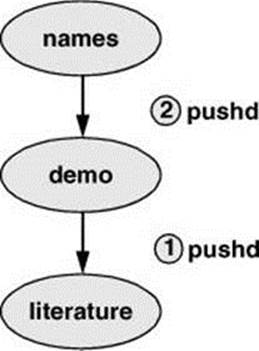
Figure 9-3 Creating a directory stack
When you call pushd without an argument, it swaps the top two directories on the stack, makes the new top directory (which was the second directory) the new working directory, and displays the stack (Figure 9-4).
$ pushd
~/demo ~/names ~/literature
$ pwd
/home/sam/demo
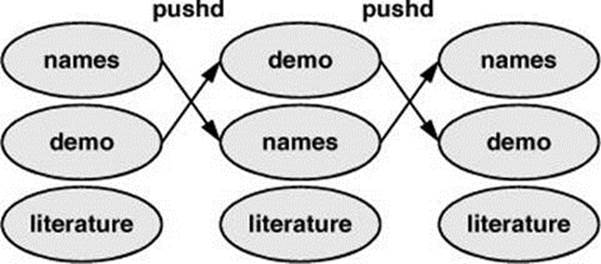
Figure 9-4 Using pushd to change working directories
Using pushd in this way, you can easily move back and forth between two directories. You can also use cd – to change to the previous directory, whether or not you have explicitly created a directory stack. To access another directory in the stack, call pushd with a numeric argument preceded by a plus sign. The directories in the stack are numbered starting with the top directory, which is number 0. The following pushd command continues with the previous example, changing the working directory to literature and moving literature to the top of the stack:
$ pushd +2
~/literature ~/demo ~/names
$ pwd
/home/sam/literature
popd: Pops a Directory off the Stack
To remove a directory from the stack, use the popd (pop directory) builtin. As the following example and Figure 9-5 show, without an argument, popd removes the top directory from the stack and changes the working directory to the new top directory:
$ dirs
~/literature ~/demo ~/names
$ popd
~/demo ~/names
$ pwd
/home/sam/demo
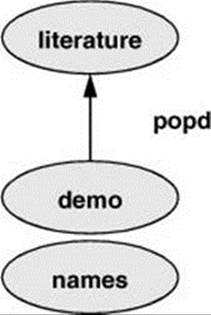
Figure 9-5 Using popd to remove a directory from the stack
To remove a directory other than the top one from the stack, use popd with a numeric argument preceded by a plus sign. The following example removes directory number 1, demo. Removing a directory other than directory number 0 does not change the working directory.
$ dirs
~/literature ~/demo ~/names
$ popd +1
~/literature ~/names
![]() Parameters and Variables
Parameters and Variables
Shell parameter
Within a shell, a shell parameter is associated with a value you or a shell script can access. This section introduces the following kinds of shell parameters: user-created variables, keyword variables, positional parameters, and special parameters.
Variables
Parameters whose names consist of letters, digits, and underscores are referred to as variables. A variable name must start with a letter or underscore, not with a number. Thus A76, MY_CAT, and ___X___ are valid variable names, whereas 69TH_STREET (starts with a digit) and MY-NAME (contains a hyphen) are not.
User-created variables
Variables that you name and assign values to are user-created variables. You can change the values of user-created variables at any time, or you can make them readonly so that their values cannot be changed.
Shell variables and environment variables
By default, a variable is available only in the shell it was created in (i.e., local); this type of variable is called a shell variable. You can use export to make a variable available in shells spawned from the shell it was created in (i.e., global); this type of variable is called an environment variable.One naming convention is to use mixed-case or lowercase letters for shell variables and only uppercase letters for environment variables. Refer to “Variables” on page 1031 for more information on shell variables and environment variables.
To declare and initialize a variable in bash, use the following syntax:
VARIABLE=value
There can be no whitespace on either side of the equal sign (=). An example follows:
$ myvar=abc
Declaring and initializing a variable for a script
The Bourne Again Shell permits you to put variable assignments at the beginning of a command line. This type of assignment places variables in the environment of the command shell—that is, the variable is accessible only from the program (and the children of the program) the command runs. It is not available from the shell running the command. The my_script shell script displays the value of TEMPDIR. The following command runs my_script with TEMPDIR set to /home/sam/temp. The echo builtin shows that the interactive shell has no value for TEMPDIR after running my_script. If TEMPDIR had been set in the interactive shell, running my_script in this manner would have had no effect on its value.
$ cat my_script
echo $TEMPDIR
$ TEMPDIR=/home/sam/temp ./my_script
/home/sam/temp
$ echo $TEMPDIR
$
![]() Keyword variables
Keyword variables
Keyword variables have special meaning to the shell and usually have short, mnemonic names. When you start a shell (by logging in, for example), the shell inherits several keyword variables from the environment. Among these variables are HOME, which identifies your home directory, and PATH, which determines which directories the shell searches and in which order to locate commands you give the shell. The shell creates and initializes (with default values) other keyword variables when you start it. Still other variables do not exist until you set them.
You can change the values of most keyword shell variables. It is usually not necessary to change the values of keyword variables initialized in the /etc/profile or /etc/csh.cshrc systemwide startup files. If you need to change the value of a bash key-word variable, do so in one of your startup files (page 329). Just as you can make user-created variables environment variables, so you can make keyword variables environment variables—a task usually done automatically in startup files. You can also make a keyword variable readonly. See page 358 for a discussion of keyword variables.
Positional and special parameters
The names of positional and special parameters do not resemble variable names. Most of these parameters have one-character names (for example, 1, ?, and #) and are referenced (as are all variables) by preceding the name with a dollar sign ($1, $?, and $#). The values of these parameters reflect different aspects of your ongoing interaction with the shell.
Whenever you run a command, each argument on the command line becomes the value of a positional parameter (page 1022). Positional parameters enable you to access command-line arguments, a capability you will often require when you write shell scripts. The set builtin (page 1024) enables you to assign values to positional parameters.
Other frequently needed shell script values, such as the name of the last command executed, the number of positional parameters, and the status of the most recently executed command, are available as special parameters (page 1027). You cannot assign values to special parameters.
User-Created Variables
The first line in the following example declares the variable named person and initializes it with the value max:
$ person=max
$ echo person
person
$ echo $person
max
Parameter substitution
Because the echo builtin copies its arguments to standard output, you can use it to display the values of variables. The second line of the preceding example shows that person does not represent max. Instead, the string person is echoed as person. The shell substitutes the value of a variable only when you precede the name of the variable with a dollar sign ($). Thus the command echo $person displays the value of the variable person; it does not display $person because the shell does not pass $person to echo as an argument. Because of the leading $, the shell recognizes that$person is the name of a variable, substitutes the value of the variable, and passes that value to echo. The echo builtin displays the value of the variable (not its name), never “knowing” you called it with the name of a variable.
![]() Quoting the $
Quoting the $
You can prevent the shell from substituting the value of a variable by quoting the leading $. Double quotation marks do not prevent the substitution; single quotation marks or a backslash (\) do.
$ echo $person
max
$ echo "$person"
max
$ echo '$person'
$person
$ echo \$person
$person
SPACES
Because they do not prevent variable substitution but do turn off the special meanings of most other characters, double quotation marks are useful when you assign values to variables and when you use those values. To assign a value that contains SPACEs or TABs to a variable, use double quotation marks around the value. Although double quotation marks are not required in all cases, using them is a good habit.
$ person="max and zach"
$ echo $person
max and zach
$ person=max and zach
bash: and: command not found
When you reference a variable whose value contains TABs or multiple adjacent SPACEs, you must use quotation marks to preserve the spacing. If you do not quote the variable, the shell collapses each string of blank characters into a single SPACE before passing the variable to the utility:
$ person="max and zach"
$ echo $person
max and zach
$ echo "$person"
max and zach
Pathname expansion in assignments
When you execute a command with a variable as an argument, the shell replaces the name of the variable with the value of the variable and passes that value to the program being executed. If the value of the variable contains a special character, such as * or ?, the shell might expand that variable.
The first line in the following sequence of commands assigns the string max* to the variable memo. All shells interpret special characters as special when you reference a variable that contains an unquoted special character. In the following example, the shell expands the value of the memovariable because it is not quoted:
$ memo=max*
$ ls
max.report
max.summary
$ echo $memo
max.report max.summary
Above, the shell expands the $memo variable to max*, expands max* to max.report and max.summary, and passes these two values to echo. In the next example, the Bourne Again Shell does not expand the string because bash does not perform pathname expansion (page 165) when it assigns a value to a variable.
$ echo "$memo"
max*
All shells process a command line in a specific order. Within this order bash expands variables before it interprets commands. In the preceding echo command line, the double quotation marks quote the asterisk (*) in the expanded value of $memo and prevent bash from performing pathname expansion on the expanded memo variable before passing its value to the echo command.
Optional
Braces around variables
The $VARIABLE syntax is a special case of the more general syntax ${VARIABLE}, in which the variable name is enclosed by ${}. The braces insulate the variable name from adjacent characters. Braces are necessary when catenating a variable value with a string:
$ PREF=counter
$ WAY=$PREFclockwise
$ FAKE=$PREFfeit
$ echo $WAY $FAKE
$
The preceding example does not work as expected. Only a blank line is output because although PREFclockwise and PREFfeit are valid variable names, they are not initialized. By default bash evaluates an unset variable as an empty (null) string and displays this value. To achieve the intent of these statements, refer to the PREF variable using braces:
$ PREF=counter
$ WAY=${PREF}clockwise
$ FAKE=${PREF}feit
$ echo $WAY $FAKE
counterclockwise counterfeit
The Bourne Again Shell refers to command-line arguments using the positional parameters $1, $2, $3, and so forth up to $9. You must use braces to refer to arguments past the ninth argument: ${10}. The name of the command is held in $0 (page 1022).
![]() unset: Removes a Variable
unset: Removes a Variable
Unless you remove a variable, it exists as long as the shell in which it was created exists. To remove the value of a variable but not the variable itself, assign a null value to the variable. In the following example, set (page 1024) displays a list of all variables and their values; grep extracts the line that shows the value of person.
$ echo $person
zach
$ person=
$ echo $person
$ set | grep person
person=
You can remove a variable using the unset builtin. The following command removes the variable person:
$ unset person
$ echo $person
$ set | grep person
$
Variable Attributes
This section discusses attributes and explains how to assign attributes to variables.
readonly: Makes the Value of a Variable Permanent
You can use the readonly builtin to ensure the value of a variable cannot be changed. The next example declares the variable person to be readonly. You must assign a value to a variable before you declare it to be readonly; you cannot change its value after the declaration. When you attempt to change the value of or unset a readonly variable, the shell displays an error message:
$ person=zach
$ echo $person
zach
$ readonly person
$ person=helen
bash: person: readonly variable
$ unset person
bash: unset: person: cannot unset: readonly variable
If you use the readonly builtin without an argument, it displays a list of all readonly shell variables. This list includes keyword variables that are automatically set as readonly as well as keyword or user-created variables that you have declared as readonly. See the next page for an example (readonly and declare –r produce the same output).
![]() declare: Lists and Assigns Attributes to Variables
declare: Lists and Assigns Attributes to Variables
The declare builtin lists and sets attributes and values for shell variables. The typeset builtin (another name for declare) performs the same function but is deprecated. Table 9-3 lists five of these attributes.
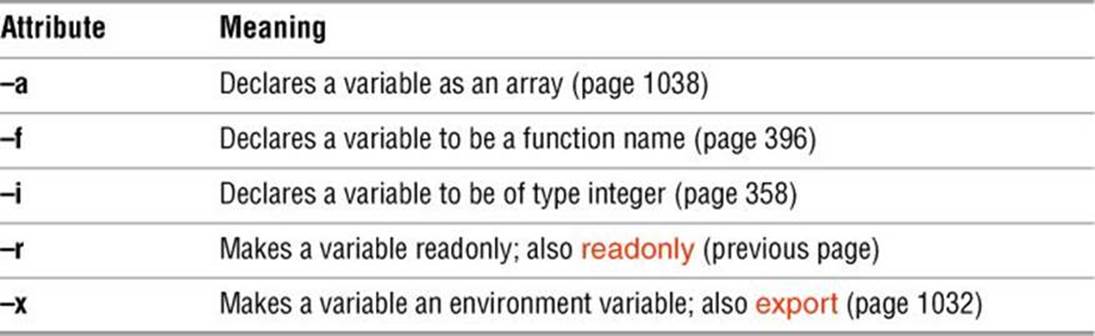
Table 9-3 Variable attributes (declare)
The following commands declare several variables and set some attributes. The first line declares person1 and initializes it to max. This command has the same effect with or without the word declare.
$ declare person1=max
$ declare -r person2=zach
$ declare -rx person3=helen
$ declare -x person4
![]() readonly and export
readonly and export
The readonly and export builtins are synonyms for the commands declare –r and declare –x, respectively. You can declare a variable without initializing it, as the preceding declaration of the variable person4 illustrates. This declaration makes person4 an environment variable so it is available to all subshells. Until person4 is initialized, it has a null value.
You can list the options to declare separately in any order. The following is equivalent to the preceding declaration of person3:
$ declare -x -r person3=helen
Use the + character in place of – when you want to remove an attribute from a variable. You cannot remove the readonly attribute. After the following command is given, the variable person3 is no longer exported, but it is still readonly:
$ declare +x person3
See page 1032 for more information on exporting variables.
Listing variable attributes
Without any arguments or options, declare lists all shell variables. The same list is output when you run set (page 1025) without any arguments.
If you call declare with options but no variable names, the command lists all shell variables that have the specified attributes set. For example, the command declare –r displays a list of all readonly variables. This list is the same as that produced by the readonly command without any arguments. After the declarations in the preceding example have been given, the results are as follows:
$ declare -r
declare -r BASHOPTS="checkwinsize:cmdhist:expand_aliases: ... "
declare -ir BASHPID
declare -ar BASH_VERSINFO='([0]="4" [1]="2" [2]="24" [3]="1" ... '
declare -ir EUID="500"
declare -ir PPID="1936"
declare -r SHELLOPTS="braceexpand:emacs:hashall:histexpand: ... "
declare -ir UID="500"
declare -r person2="zach"
declare -rx person3="helen"
The first seven entries are keyword variables that are automatically declared as readonly. Some of these variables are stored as integers (–i). The –a option indicates that BASH_VERSINFO is an array variable; the value of each element of the array is listed to the right of an equal sign.
Integer
By default, the values of variables are stored as strings. When you perform arithmetic on a string variable, the shell converts the variable into a number, manipulates it, and then converts it back to a string. A variable with the integer attribute is stored as an integer. Assign the integer attribute as follows:
$ declare -i COUNT
You can use declare to display integer variables:
$ declare -i
declare -ir BASHPID
declare -i COUNT
declare -ir EUID="1000"
declare -i HISTCMD
declare -i LINENO
declare -i MAILCHECK="60"
declare -i OPTIND="1"
...
![]() Keyword Variables
Keyword Variables
Keyword variables are either inherited or declared and initialized by the shell when it starts. You can assign values to these variables from the command line or from a startup file. Typically these variables are environment variables (exported) so they are available to subshells you start as well as your login shell.
HOME: Your Home Directory
By default, your home directory is the working directory when you log in. Your home directory is established when your account is set up; its name is stored in the /etc/passwd file.
$ grep sam /etc/passwd
sam:x:500:500:Sam the Great:/home/sam:/bin/bash
When you log in, the shell inherits the pathname of your home directory and assigns it to the environment variable HOME. When you give a cd command without an argument, cd makes the directory whose name is stored in HOME the working directory:
$ pwd
/home/max/laptop
$ echo $HOME
/home/max
$ cd
$ pwd
/home/max
This example shows the value of the HOME variable and the effect of the cd builtin. After you execute cd without an argument, the pathname of the working directory is the same as the value of HOME: your home directory.
![]() Tilde (~)
Tilde (~)
The shell uses the value of HOME to expand pathnames that use the shorthand tilde (~) notation (page 182) to denote a user’s home directory. The following example uses echo to display the value of this shortcut and then uses ls to list the files in Max’s laptop directory, which is a subdirectory of his home directory.
$ echo ~
/home/max
$ ls ~/laptop
tester count lineup
![]() PATH: Where the Shell Looks for Programs
PATH: Where the Shell Looks for Programs
When you give the shell an absolute or relative pathname as a command, it looks in the specified directory for an executable file with the specified filename. If the file with the pathname you specified does not exist, the shell reports No such file or directory. If the file exists as specified but you do not have execute permission for it, or in the case of a shell script you do not have read and execute permission for it, the shell reports Permission denied.
When you give a simple filename as a command, the shell searches through certain directories (your search path) for the program you want to execute. It looks in several directories for a file that has the same name as the command and that you have execute permission for (a compiled program) or read and execute permission for (a shell script). The PATH variable controls this search.
The default value of PATH is determined when bash is compiled. It is not set in a startup file, although it might be modified there. Normally the default specifies that the shell search several system directories used to hold common commands. These system directories include /usr/bin and/usr/sbin and other directories appropriate to the local system. When you give a command, if the shell does not find the executable—and, in the case of a shell script, readable—file named by the command in any of the directories listed in PATH, the shell generates one of the aforementioned error messages.
Working directory
The PATH variable specifies the directories in the order the shell should search them. Each directory must be separated from the next by a colon. The following command sets PATH so a search for an executable file starts with the /usr/local/bin directory. If it does not find the file in this directory, the shell looks next in /usr/bin. If the search fails in those directories, the shell looks in the ~/bin directory, a subdirectory of the user’s home directory. Finally the shell looks in the working directory. Exporting PATH makes sure it is an environment variable so it is available to subshells, although it is typically exported when it is declared so exporting it again is not necessary:
$ export PATH=/usr/local/bin:/usr/bin:~/bin:
A null value in the string indicates the working directory. In the preceding example, a null value (nothing between the colon and the end of the line) appears as the last element of the string. The working directory is represented by a leading colon (not recommended; see the following security tip), a trailing colon (as in the example), or two colons next to each other anywhere in the string. You can also represent the working directory explicitly using a period (.).
Because Linux stores many executable files in directories named bin (binary), users typically put their executable files in their own ~/bin directories. If you put your own bin directory toward the end of PATH, as in the preceding example, the shell looks there for any commands it cannot find in directories listed earlier in PATH.
If you want to add directories to PATH, you can reference the old value of the PATH variable in setting PATH to a new value (but see the following security tip). The following command adds /usr/local/bin to the beginning of the current PATH and the bin directory in the user’s home directory (~/bin) to the end:
$ PATH=/usr/local/bin:$PATH:~/bin
Set PATH in ~/.bash_profile; see the tip on page 331.
Security: PATH and security
Do not put the working directory first in PATH when security is a concern. If you are working as root, you should never put the working directory first in PATH. It is common for root’s PATH to omit the working directory entirely. You can always execute a file in the working directory by prepending ./ to the name: ./myprog.
Putting the working directory first in PATH can create a security hole. Most people type ls as the first command when entering a directory. If the owner of a directory places an executable file named ls in the directory, and the working directory appears first in a user’sPATH, the user giving an ls command from the directory executes the ls program in the working directory instead of the system ls utility, possibly with undesirable results.
MAIL: Where Your Mail Is Kept
The MAIL variable usually contains the pathname of the file that holds your mail (your mailbox, usually /var/mail/name, where name is your username). However, you can use MAIL to watch any file (including a directory): Set MAIL to the name of the file you want to watch.
If MAIL is set and MAILPATH (below) is not set, the shell informs you when the file specified by MAIL is modified (such as when mail arrives). In a graphical environment you can unset MAIL so the shell does not display mail reminders in a terminal emulator window (assuming you are using a graphical mail program).
The MAILPATH variable contains a list of filenames separated by colons. If this variable is set, the shell informs you when any one of the files is modified (for example, when mail arrives). You can follow any of the filenames in the list with a question mark (?) and a message. The message replaces the you have mail message when you receive mail while you are logged in.
The MAILCHECK variable specifies how often, in seconds, the shell checks the directories specified by MAIL or MAILPATH. The default is 60 seconds. If you set this variable to zero, the shell checks before it issues each prompt.
PS1: User Prompt (Primary)
The default Bourne Again Shell prompt is a dollar sign ($). When you run bash with root privileges, bash typically displays a hashmark (#) prompt. The PS1 variable holds the prompt string the shell uses to let you know it is waiting for a command. When you change the value of PS1, you change the appearance of your prompt.
You can customize the prompt displayed by PS1. For example, the assignment
$ PS1="[\u@\h \W \!]$ "
displays the following prompt:
[user@host directory event]$
where user is the username, host is the hostname up to the first period, directory is the basename of the working directory, and event is the event number (page 377) of the current command.
If you are working on more than one system, it can be helpful to incorporate the system name into your prompt. The first example that follows changes the prompt to the name of the local host, a SPACE, and a dollar sign (or, if the user is running with root privileges, a hashmark), followed by aSPACE. A SPACE at the end of the prompt makes commands you enter following the prompt easier to read. The second example changes the prompt to the time followed by the name of the user. The third example changes the prompt to the one used in this book (a hashmark for a user running with root privileges and a dollar sign otherwise):
$ PS1='\h \$ '
guava $
$ PS1='\@ \u $ '
09:44 PM max $
$ PS1='\$ '
$
Table 9-4 describes some of the symbols you can use in PS1. For a complete list of special characters you can use in the prompt strings, open the bash man page and search for the third occurrence of PROMPTING (enter the command /PROMPTING followed by a RETURN and then pressn two times).
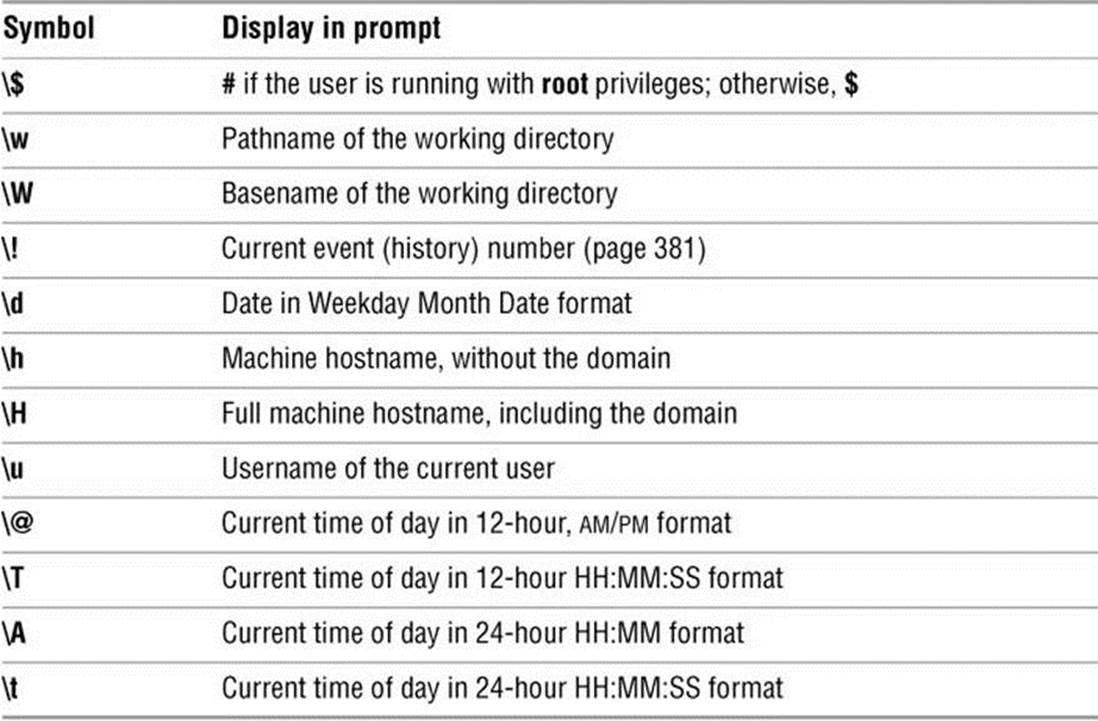
Table 9-4 PS1 symbols
PS2: User Prompt (Secondary)
The PS2 variable holds the secondary prompt. On the first line of the next example, an unclosed quoted string follows echo. The shell assumes the command is not finished and on the second line displays the default secondary prompt (>). This prompt indicates the shell is waiting for the user to continue the command line. The shell waits until it receives the quotation mark that closes the string and then executes the command:
$ echo "demonstration of prompt string
> 2"
demonstration of prompt string
2
The next command changes the secondary prompt to Input => followed by a SPACE. On the line with who, a pipeline symbol (|) implies the command line is continued (page 1063) and causes bash to display the new secondary prompt. The command grep sam (followed by a RETURN) completes the command; grep displays its output.
$ PS2="Input => "
$ who |
Input => grep sam
sam tty1 2012-05-01 10:37 (:0)
PS3: Menu Prompt
The PS3 variable holds the menu prompt for the select control structure (page 1013).
PS4: Debugging Prompt
The PS4 variable holds the bash debugging symbol (page 995).
IFS: Separates Input Fields (Word Splitting)
The IFS (Internal Field Separator) shell variable specifies the characters you can use to separate arguments on a command line. It has the default value of SPACE-TAB-NEWLINE. Regardless of the value of IFS, you can always use one or more SPACE or TAB characters to separate arguments on the command line, provided these characters are not quoted or escaped. When you assign character values to IFS, these characters can also separate fields—but only if they undergo expansion. This type of interpretation of the command line is called word splitting and is discussed on page 411.
Caution: Be careful when changing IFS
Changing IFS has a variety of side effects, so work cautiously. You might find it useful to save the value of IFS before changing it. You can then easily restore the original value if a change yields unexpected results. Alternately, you can fork a new shell using a bashcommand before experimenting with IFS; if you run into trouble, you can exit back to the old shell, where IFS is working properly.
The following example demonstrates how setting IFS can affect the interpretation of a command line:
$ a=w:x:y:z
$ cat $a
cat: w:x:y:z: No such file or directory
$ IFS=":"
$ cat $a
cat: w: No such file or directory
cat: x: No such file or directory
cat: y: No such file or directory
cat: z: No such file or directory
The first time cat is called, the shell expands the variable a, interpreting the string w:x:y:z as a single word to be used as the argument to cat. The cat utility cannot find a file named w:x:y:z and reports an error for that filename. After IFS is set to a colon (:), the shell expands the variable ainto four words, each of which is an argument to cat. Now cat reports errors for four files: w, x, y, and z. Word splitting based on the colon (:) takes place only after the variable a is expanded.
The shell splits all expanded words on a command line according to the separating characters found in IFS. When there is no expansion, there is no splitting. Consider the following commands:
$ IFS="p"
$ export VAR
Although IFS is set to p, the p on the export command line is not expanded, so the word export is not split.
The following example uses variable expansion in an attempt to produce an export command:
$ IFS="p"
$ aa=export
$ echo $aa
ex ort
This time expansion occurs, so the p in the token export is interpreted as a separator (as the echo command shows). Next, when you try to use the value of the aa variable to export the VAR variable, the shell parses the $aa VAR command line as ex ort VAR. The effect is that the command line starts the ex editor with two filenames: ort and VAR.
$ $aa VAR
2 files to edit
"ort" [New File]
Entering Ex mode. Type "visual" to go to Normal mode.
:q
E173: 1 more file to edit
:q
$
If IFS is unset, bash uses its default value (SPACE-TAB-NEWLINE). If IFS is null, bash does not split words.
Tip: Multiple separator characters
Although the shell treats sequences of multiple SPACE or TAB characters as a single separator, it treats each occurrence of another field-separator character as a separator.
CDPATH: Broadens the Scope of cd
The CDPATH variable allows you to use a simple filename as an argument to the cd builtin to change the working directory to a directory other than a child of the working directory. If you typically work in several directories, this variable can speed things up and save you the tedium of using cd with longer pathnames to switch among them.
When CDPATH is not set and you specify a simple filename as an argument to cd, cd searches the working directory for a subdirectory with the same name as the argument. If the subdirectory does not exist, cd displays an error message. When CDPATH is set, cd searches for an appropriately named subdirectory in the directories in the CDPATH list. If it finds one, that directory becomes the working directory. With CDPATH set, you can use cd and a simple filename to change the working directory to a child of any of the directories listed in CDPATH.
The CDPATH variable takes on the value of a colon-separated list of directory pathnames (similar to the PATH variable). It is usually set in the ~/.bash_profile startup file with a command line such as the following:
export CDPATH=$HOME:$HOME/literature
This command causes cd to search your home directory, the literature directory, and then the working directory when you give a cd command. If you do not include the working directory in CDPATH, cd searches the working directory if the search of all the other directories in CDPATHfails. If you want cd to search the working directory first, include a colon (:) as the first entry in CDPATH:
export CDPATH=:$HOME:$HOME/literature
If the argument to the cd builtin is anything other than a simple filename (i.e., if the argument contains a slash [/]), the shell does not consult CDPATH.
Keyword Variables: A Summary
Table 9-5 lists the bash keyword variables.
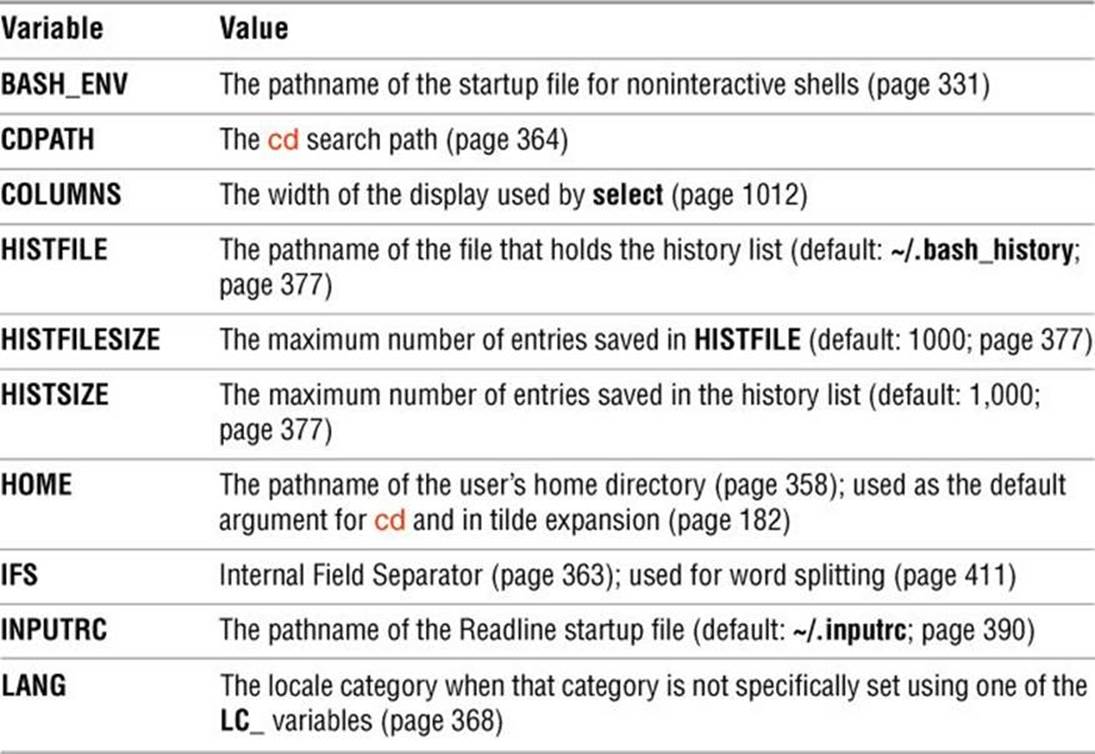
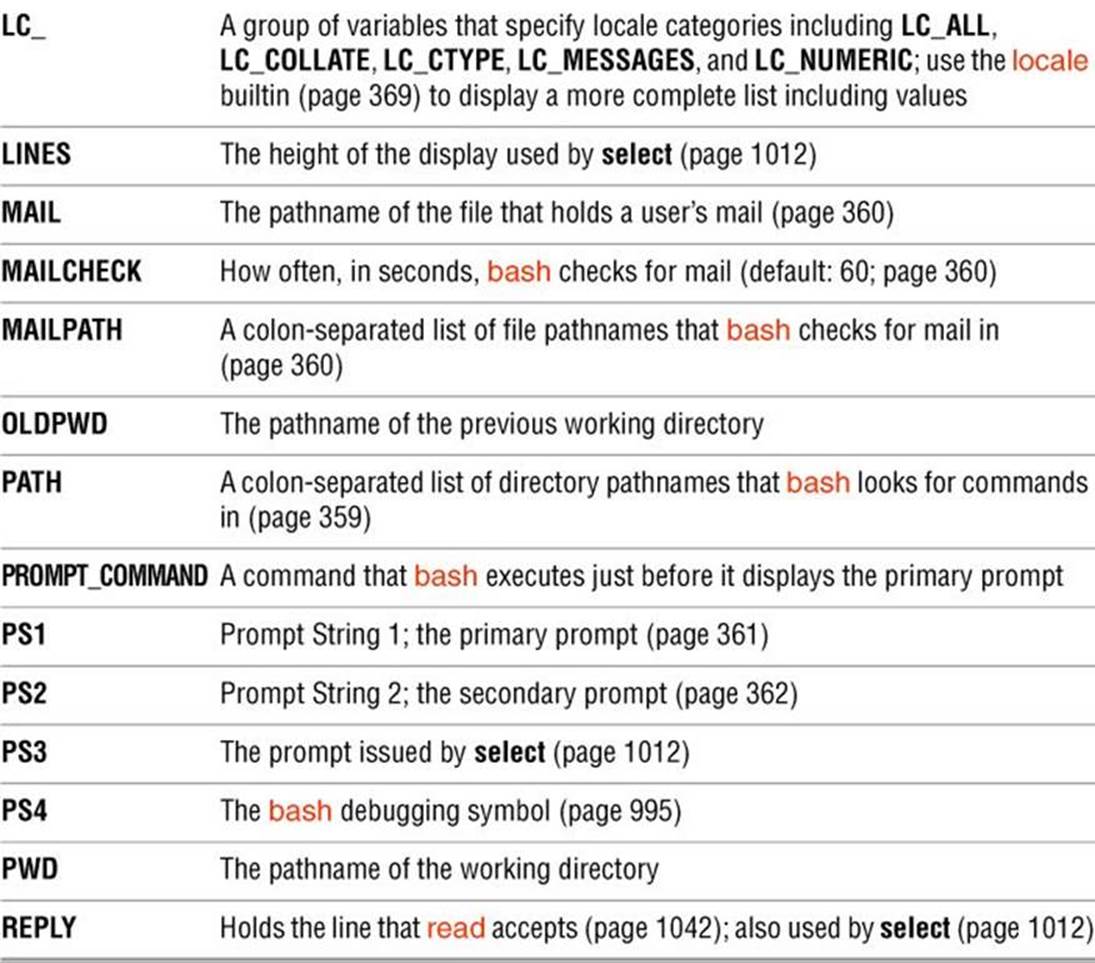
Table 9-5 bash keyword variables
Special Characters
Table 9-6 lists most of the characters that are special to the bash shell.
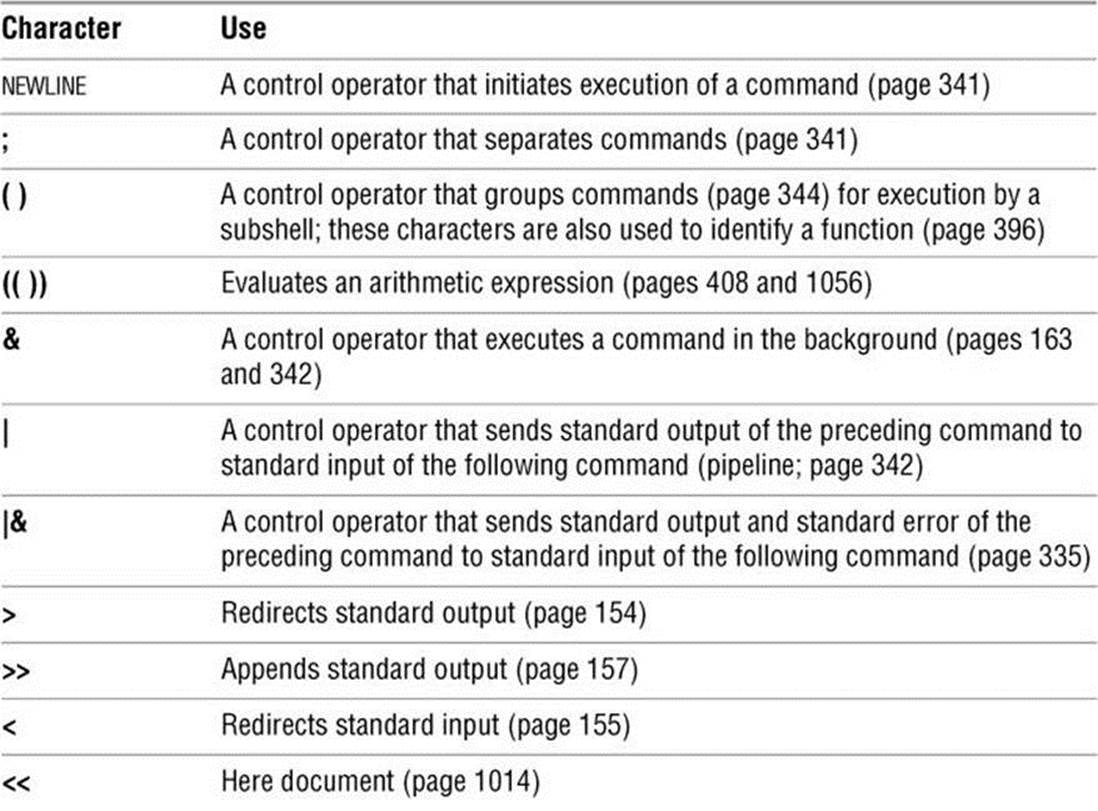
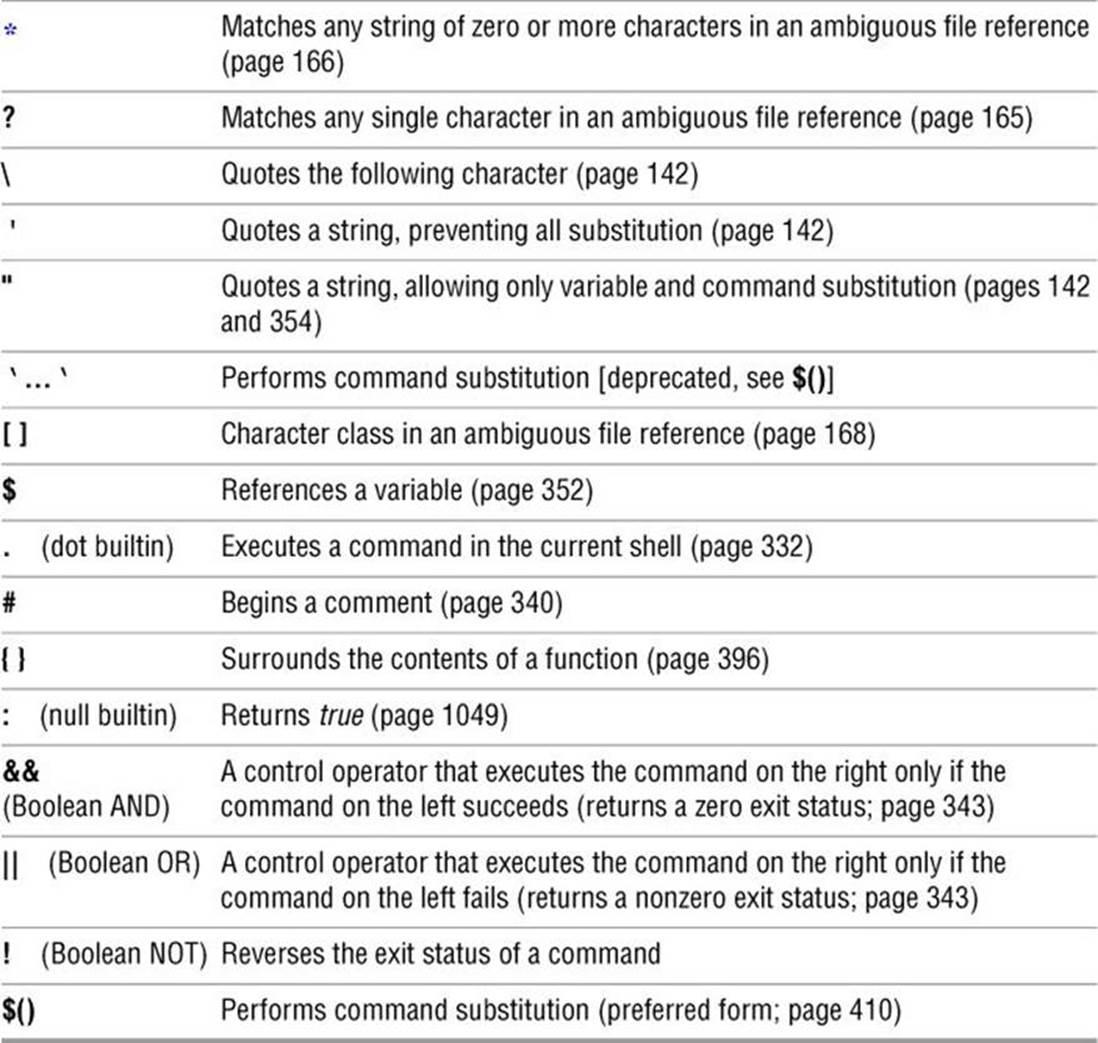
Table 9-6 Shell special characters
![]() Locale
Locale
In conversational English, a locale is a place or location. When working with Linux, a locale specifies the way locale-aware programs display certain kinds of data such as times and dates, money and other numeric values, telephone numbers, and measurements. It can also specify collating sequence and printer paper size.
Localization and internationalization
Localization and internationalization go hand in hand: Internationalization is the process of making software portable to multiple locales while localization is the process of adapting software so that it meets the language, cultural, and other requirements of a specific locale. Linux is well internationalized so you can easily specify a locale for a given system or user. Linux uses variables to specify a locale.
i18n
The term i18n is an abbreviation of the word internationalization: the letter i followed by 18 letters (nternationalizatio) followed by the letter n.
l10n
The term l10n is an abbreviation of the word localization: the letter l followed by 10 letters (ocalizatio) followed by the letter n.
![]() LC_: Locale Variables
LC_: Locale Variables
The bash man page lists the following locale variables; other programs use additional locale variables. See the locale man pages (sections 1, 5, and 7) or use the locale ––help option for more information.
• LANG—Specifies the locale category for categories not specified by an LC_ variable (except see LC_ALL). Many setups use only this locale variable and do not specify any of the LC_ variables.
• LC_ALL—Overrides the value of LANG and all other LC_ variables.
• LC_COLLATE—Specifies the collating sequence for the sort utility and for sorting the results of pathname expansion (page 354).
• LC_CTYPE—Specifies how characters are interpreted and how character classes within pathname expansion and pattern matching behave. Also affects the sort utility when you specify the –d (––dictionary-order) or –i (––ignore-nonprinting) options.
• LC_MESSAGES—Specifies how affirmative and negative answers appear and the language messages are displayed in.
• LC_NUMERIC—Specifies how numbers are formatted (e.g., are thousands separated by a comma or a period?).
You can set one or more of the LC_ variables to a value using the following syntax:
xx_YY.CHARSET
where xx is the ISO-639 language code (e.g., en = English, fr = French, zu = Zulu), YY is the ISO-3166 country code (e.g., FR = France, GF = French Guiana, PF = French Polynesia), and CHARSET is the name of the character set (e.g., UTF-8 [page 1279], ASCII [page 1237], ISO-8859-1 [Western Europe]; also called the character map or charmap). On some systems you can specify CHARSET using lowercase letters. For example, en_GB.UTF-8 can specify English as written in Great Britain, en_US.UTF-8 can specify English as written in the United States, andfr_FR.UTF-8 can specify French as written in France.
Tip: Internationalized C programs call setlocale()
Internationalized C programs call setlocale(). Other languages have analogous facilities. Shell scripts are typically internationalized to the degree that the routines they call are. Without a call to setlocale(), the hello, world program will always display hello, world, regardless of how you set LANG.
Tip: The C locale
Setting the locale to C forces a program to process and display strings as the program was written (i.e., without translating input or output), which frequently means the program works in English. Many system scripts set LANG to C so they run in a known environment. Some text processing utilities run slightly faster when you set LANG to C. Setting LANG to C before you run sort can help ensure you get the results you expect.
If you want to make sure your shell script will work properly, put the following line near the top of the file:
export LANG=C
Following is an example of a difference that setting LANG can cause. It shows that having LANG set to different values can cause commands to behave differently, especially with regard to sorting.
$ echo $LANG
en_US.UTF-8
$ ls
m666 Makefile merry
$ ls [l-n]*
m666 Makefile merry
$ export LANG=C
$ ls
Makefile m666 merry
$ ls [l-n]*
m666 merry
![]() locale: Displays Locale Information
locale: Displays Locale Information
The locale utility displays information about the current and available locales. Without options, locale displays the value of the locale variables. In the following example, only the LANG variable is set, although you cannot determine this fact from the output. Unless explicitly set, each of the LC_ variables derives its value from LANG.
$ locale
LANG=en_US.UTF-8
LC_CTYPE="en_US.UTF-8"
LC_NUMERIC="en_US.UTF-8"
LC_TIME="en_US.UTF-8"
LC_COLLATE="en_US.UTF-8"
LC_MONETARY="en_US.UTF-8"
LC_MESSAGES="en_US.UTF-8"
LC_PAPER="en_US.UTF-8"
LC_NAME="en_US.UTF-8"
LC_ADDRESS="en_US.UTF-8"
LC_TELEPHONE="en_US.UTF-8"
LC_MEASUREMENT="en_US.UTF-8"
LC_IDENTIFICATION="en_US.UTF-8"
LC_ALL=
Typically you will want all locale variables to have the same value. However, in some cases you might want to change the value of one or more locale variables. For example, if you are using paper size A4 but working in English, you could change the value of LC_PAPER to nl_NL.utf8.
The –a (all) option causes locale to display the names of available locales; –v (verbose) displays more complete information.
$ locale -av
locale: aa_DJ archive: /usr/lib/locale/locale-archive
--------------------------------------------------------------------
title | Afar language locale for Djibouti (CaduLaaqo Dialects).
source | Ge'ez Frontier Foundation
address | 7802 Solomon Seal Dr., Springfield, VA 22152, USA
email | locales@geez.org
language | aa
territory | DJ
revision | 0.20
date | 2003-07-05
codeset | ISO-8859-1
...
The –m (maps) option causes locale to display the names of available character maps. Locale definition files are kept in the /usr/share/i18n/locales directory.
Following are some examples of how some LC_ variables change displayed values. Each of these command lines sets an LC_ variable and places it in the environment of the utility it calls. The +%x format causes date to display the locale’s date representation.
$ LC_TIME=en_GB.UTF-8 date +%x
24/01/12
$ LC_TIME=en_US.UTF-8 date +%x
01/24/2012
$ ls xx
ls: impossible d'accéder à xx: Aucun fichier ou dossier de ce type
$ LC_MESSAGES=en_US.UTF-8 ls xx
ls: cannot access xx: No such file or directory
Setting the Locale
You might have to install a language package for a locale before you can specify a locale. Put locale variable assignments in ~/.profile or ~/.bash_profile to affect both GUI and bash command-line logins for a single user. Remember to export the variables. The following line in one of these files will set all LC_ variables for the given user to French as spoken in France:
export LANG=fr_FR.UTF-8
To change the locale for all users, put locale variable assignments (previous page) in /etc/profile.d/zlang.sh (you will need to create this file; the filename was chosen to be executed after lang.sh) to affect both GUI and command-line logins for all users.
![]() Time
Time
UTC
On networks with systems in different time zones it can be helpful to set all systems to the UTC (page 1279) time zone. Among other benefits, doing so can make it easier for an administrator to compare logged events on different systems over time. Each user account can be set to the local time for that user.
Time zone
The time zone for a user is specified by an environment variable or, if one is not set, by the time zone for the system.
TZ
The TZ variable gives a program access to information about the local time zone. This variable is typically set in a startup file (page 329) and placed in the environment (page 1032) so called programs have access to it. It has two syntaxes.
The first syntax of the TZ variable is
nam±val[nam2]
where nam is a string comprising three or more letters that typically name the time zone (e.g., PST; its value is not significant) and ±val is the offset of the time zone from UTC, with positive values indicating the local time zone is west of the prime meridian and negative values indicating the local time zone is east of the prime meridian. If the nam2 is present, it indicates the time zone observes daylight savings time; it is the name of the daylight savings time zone (e.g., PDT).
In the following example, date is called twice, once without setting the TZ variable and then with the TZ variable set in the environment in which date is called:
$ date
Thu May 3 10:08:06 PDT 2012
$ TZ=EST+5EDT date
Thu May 3 13:08:08 EDT 2012
The second syntax of the TZ variable is
continent/country
where continent is the name of the continent or ocean and country is the name of the country that includes the desired time zone. This syntax points to a file in the /usr/share/zoneinfo hierarchy (next page). See tzselect (next page) if you need help determining these values.
In the next example, date is called twice, once without setting the TZ variable and then with the TZ variable set in the environment in which date is called:
$ date
Thu May 3 10:09:27 PDT 2012
$ TZ=America/New_York date
Thu May 3 13:09:28 EDT 2012
See www.gnu.org/software/libc/manual/html_node/TZ-Variable.html for extensive documentation on the TZ variable.
![]() tzconfig
tzconfig
The tzconfig utility was available under Debian/Ubuntu and is now deprecated; use dpkg-reconfigure tzdata in its place.
![]() tzselect
tzselect
The tzselect utility can help you determine the name of a time zone by asking you first to name the continent or ocean and then the country the time zone is in. If necessary, it asks for a time zone region (e.g., Pacific Time). This utility does not change system settings but rather displays a line telling you the name of the time zone. In the following example, the time zone is named Europe/Paris. Newer releases keep time zone information in /usr/share/zoneinfo (below). Specifications such as Europe/Paris refer to the file in that directory (/usr/share/zoneinfo/Europe/Paris).
$ tzselect
Please identify a location so that time zone rules can be set correctly.
Please select a continent or ocean.
1) Africa
...
8) Europe
9) Indian Ocean
10) Pacific Ocean
11) none - I want to specify the time zone using the Posix TZ format.
#? 8
Please select a country.
1) Aaland Islands 18) Greece 35) Norway
...
15) France 32) Monaco 49) Vatican City
16) Germany 33) Montenegro
17) Gibraltar 34) Netherlands
#? 15
...
Here is that TZ value again, this time on standard output so that you
can use the /usr/bin/tzselect command in shell scripts:
Europe/Paris
![]() /etc/timezone
/etc/timezone
Under some distributions, including Debian/Ubuntu/Mint, the /etc/timezone file holds the name of the local time zone.
$ cat /etc/timezone
America/Los_Angeles
![]() /usr/share/zoneinfo
/usr/share/zoneinfo
The /usr/share/zoneinfo directory hierarchy holds time zone data files. Some time zones are held in regular files in the zoneinfo directory (e.g., Japan and GB) while others are held in subdirectories (e.g., Azores and Pacific). The following example shows a small part of the/usr/share/zoneinfo directory hierarchy and illustrates how file (page 229) reports on a time zone file.
$ find /usr/share/zoneinfo
/usr/share/zoneinfo
/usr/share/zoneinfo/Atlantic
/usr/share/zoneinfo/Atlantic/Azores
/usr/share/zoneinfo/Atlantic/Madeira
/usr/share/zoneinfo/Atlantic/Jan_Mayen
...
/usr/share/zoneinfo/Japan
/usr/share/zoneinfo/GB
/usr/share/zoneinfo/US
/usr/share/zoneinfo/US/Pacific
/usr/share/zoneinfo/US/Arizona
/usr/share/zoneinfo/US/Michigan
...
$ file /usr/share/zoneinfo/Atlantic/Azores
/usr/share/zoneinfo/Atlantic/Azores: timezone data, version 2, 12 gmt
time flags, 12 std time flags, no leap seconds, 220 transition times, 12
abbreviation chars
![]() /etc/localtime
/etc/localtime
Some Linux distributions use a link at /etc/localtime to a file in /usr/share/zoneinfo to specify the local time zone. Others copy the file from the zoneinfo directory to localtime. Following is an example of setting up this link; to create this link you must work with root privileges.
# date
Tue Jan 24 13:55:00 PST 2012
# cd /etc
# ln -sf /usr/share/zoneinfo/Europe/Paris localtime
# date
Tue Jan 24 22:55:38 CET 2012
On some of these systems, the /etc/systemconfig/clock file sets the ZONE variable to the name of the time zone:
$ cat /etc/sysconfig/clock
# The time zone of the system is defined by the contents of /etc/localtime.
# This file is only for evaluation by system-config-date, do not rely on its
# contents elsewhere.
ZONE="Europe/Paris"
![]() Processes
Processes
A process is the execution of a command by the Linux kernel. The shell that starts when you log in is a process, like any other. When you specify the name of a utility as a command, you initiate a process. When you run a shell script, another shell process is started, and additional processes are created for each command in the script. Depending on how you invoke the shell script, the script is run either by the current shell or, more typically, by a subshell (child) of the current shell. Running a shell builtin, such as cd, does not start a new process.
Process Structure
fork() system call
Like the file structure, the process structure is hierarchical, with parents, children, and a root. A parent process forks (or spawns) a child process, which in turn can fork other processes. The term fork indicates that, as with a fork in the road, one process turns into two. Initially the two forks are identical except that one is identified as the parent and one as the child. The operating system routine, or system call, that creates a new process is named fork().
![]() init daemon
init daemon
A Linux system begins execution by starting the init daemon, a single process called a spontaneous process, with PID number 1. This process holds the same position in the process structure as the root directory does in the file structure: It is the ancestor of all processes the system and users work with. When a command-line system is in multiuser mode, init runs getty or mingetty processes, which display login: prompts on terminals and virtual consoles. When a user responds to the prompt and presses RETURN, getty or mingetty passes control to a utility named login, which checks the user-name and password combination. After the user logs in, the login process becomes the user’s shell process.
When you enter the name of a program on the command line, the shell forks a new process, creating a duplicate of the shell process (a subshell). The new process attempts to exec (execute) the program. Like fork(), exec() is a system call. If the program is a binary executable, such as a compiled C program, exec() succeeds, and the system overlays the newly created subshell with the executable program. If the command is a shell script, exec() fails. When exec fails, the program is assumed to be a shell script, and the subshell runs the commands in the script. Unlike a login shell, which expects input from the command line, the subshell takes its input from a file—namely, the shell script.
![]() Process Identification
Process Identification
PID numbers
Linux assigns a unique PID (process identification) number at the inception of each process. As long as a process exists, it keeps the same PID number. During one session the same process is always executing the login shell (page 330). When you fork a new process—for example, when you use an editor—the PID number of the new (child) process is different from that of its parent process. When you return to the login shell, it is still being executed by the same process and has the same PID number as when you logged in.
![]() ps
ps
The following example shows that the process running the shell forked (is the parent of) the process running ps. When you call it with the –f option, ps displays a full listing of information about each process. The line of the ps display with bash in the CMD column refers to the process running the shell. The column headed by PID identifies the PID number. The column headed by PPID identifies the PID number of the parent of the process. From the PID and PPID columns you can see that the process running the shell (PID 21341) is the parent of the processes runningsleep (PID 22789) and ps (PID 22790).
$ sleep 10 &
[1] 22789
$ ps -f
UID PID PPID C STIME TTY TIME CMD
max 21341 21340 0 10:42 pts/16 00:00:00 bash
max 22789 21341 0 17:30 pts/16 00:00:00 sleep 10
max 22790 21341 0 17:30 pts/16 00:00:00 ps -f
Refer to the ps man page for more information on ps and the columns it displays when you specify the –f option. A second pair of sleep and ps –f commands shows that the shell is still being run by the same process but that it forked another process to run sleep:
$ sleep 10 &
[1] 22791
$ ps -f
UID PID PPID C STIME TTY TIME CMD
max 21341 21340 0 10:42 pts/16 00:00:00 bash
max 22791 21341 0 17:31 pts/16 00:00:00 sleep 10
max 22792 21341 0 17:31 pts/16 00:00:00 ps -f
You can also use pstree (or ps ––forest, with or without the –e option) to see the parent–child relationship of processes. The next example shows the –p option to pstree, which causes it to display PID numbers:
$ pstree -p
systemd(1)-+-NetworkManager(655)---{NetworkManager}(702)
|-abrtd(657)---abrt-dump-oops(696)
|-accounts-daemon(1204)---{accounts-daemo}(1206)
|-agetty(979)
...
|-login(984)---bash(2071)-+-pstree(2095)
| `-sleep(2094)
...
The preceding output is abbreviated. The first line shows the PID 1 (systemd init) and a few of the processes it is running. The line that starts with –login shows a textual user running sleep in the background and pstree in the foreground. The tree for a user running a GUI is much more complex. Refer to “$$: PID Number” on page 1028 for a description of how to instruct the shell to report on PID numbers.
Executing a Command
fork() and sleep()
When you give the shell a command, it usually forks [spawns using the fork() system call] a child process to execute the command. While the child process is executing the command, the parent process (running the shell) sleeps [implemented as the sleep() system call]. While a process is sleeping, it does not use any computer time; it remains inactive, waiting to wake up. When the child process finishes executing the command, it tells its parent of its success or failure via its exit status and then dies. The parent process (which is running the shell) wakes up and prompts for another command.
![]() Background process
Background process
When you run a process in the background by ending a command with the ampersand control operator (&), the shell forks a child process without going to sleep and without waiting for the child process to run to completion. The parent process, which is executing the shell, reports the job number and PID number of the child process and prompts for another command. The child process runs in the background, independent of its parent.
Builtins
Although the shell forks a process to run most commands, some commands are built into the shell (e.g., cd, alias, jobs, pwd). The shell does not fork a process to run builtins. For more information refer to “Builtins” on page 170.
Variables
Within a given process, such as a login shell or subshell, you can declare, initialize, read, and change variables. Some variables, called shell variables, are local to a process. Other variables, called environment variables, are available to child processes. For more information refer to “Variables” on page 1031.
Hash table
The first time you specify a command as a simple filename (and not a relative or absolute pathname), bash looks in the directories specified by the PATH (page 359) variable to find that file. When it finds the file, bash records the absolute pathname of the file in its hash table. When you give the command again, bash finds it in its hash table, saving the time needed to search through the directories in PATH. The shell deletes the hash table when you log out and starts a new hash table when you start a session.
When you call the hash builtin without any arguments, it displays the hash table. When you first log in, the hash table is empty:
$ hash
hash: hash table empty
$ who am i
sam pts/2 2013-03-09 14:24 (plum)
$ hash
hits command
1 /usr/bin/who
The hash –r option causes bash to empty the hash table, as though you had just logged in.
$ hash -r
$ hash
hash: hash table empty
Having bash empty its hash table is useful when you move a program to a different directory in PATH and bash cannot find the program in its new location, or when you have two programs with the same name and bash is calling the wrong one. Refer to the bash info page for more information on the hash builtin.
![]() History
History
The history mechanism, a feature adapted from the C Shell, maintains a list of recently issued command lines, called events, that provides a quick way to reexecute any events in the list. This mechanism also enables you to edit and then execute previous commands and to reuse arguments from them. You can use the history list to replicate complicated commands and arguments that you used previously and to enter a series of commands that differ from one another in minor ways. The history list also serves as a record of what you have done. It can prove helpful when you have made a mistake and are not sure what you did or when you want to keep a record of a procedure that involved a series of commands.
Tip: history can help track down mistakes
When you have made a mistake on a command line (not an error within a script or program) and are not sure what you did wrong, look at the history list to review your recent commands. Sometimes this list can help you figure out what went wrong and how to fix things.
The history builtin displays the history list. If it does not, read the next section, which describes the variables you might need to set.
Variables That Control History
The value of the HISTSIZE variable determines the number of events preserved in the history list during a session. A value in the range of 100 to 1,000 is normal.
When you exit from the shell, the most recently executed commands are saved in the file whose name is stored in the HISTFILE variable (default is ~/.bash_history). The next time you start the shell, this file initializes the history list. The value of the HISTFILESIZE variable determines the number of lines of history saved in HISTFILE (see Table 9-7).
Table 9-7 History variables
Event number
The Bourne Again Shell assigns a sequential event number to each command line. You can display this event number as part of the bash prompt by including \! in PS1 (page 361). Examples in this section show numbered prompts when they help to illustrate the behavior of a command.
Enter the following command manually to establish a history list of the 100 most recent events; place it in ~/.bash_profile to affect future sessions:
$ HISTSIZE=100
The following command causes bash to save the 100 most recent events across login sessions:
$ HISTFILESIZE=100
After you set HISTFILESIZE, you can log out and log in again, and the 100 most recent events from the previous login session will appear in your history list.
Enter the command history to display the events in the history list. This list is ordered with the oldest events at the top. The following history list includes a command to modify the bash prompt so it displays the history event number. The last event in the history list is the history command that displayed the list.
32 $ history | tail
23 PS1="\! bash$ "
24 ls -l
25 cat temp
26 rm temp
27 vim memo
28 lpr memo
29 vim memo
30 lpr memo
31 rm memo
32 history | tail
As you run commands and your history list becomes longer, it might run off the top of the screen when you use the history builtin. Send the output of history through a pipeline to less to browse through it or give the command history 10 or history | tail to look at the ten most recent commands.
Tip: Handy history aliases
Creating the following aliases makes working with history easier. The first allows you to give the command h to display the ten most recent events. The second alias causes the command hg string to display all events in the history list that contain string. Put these aliases in your ~/.bashrc file to make them available each time you log in. See page 392 for more information on aliases.
$ alias 'h=history | tail'
$ alias 'hg=history | grep'
Reexecuting and Editing Commands
You can reexecute any event in the history list. Not having to reenter long command lines allows you to reexecute events more easily, quickly, and accurately than you could if you had to retype the command line in its entirety. You can recall, modify, and reexecute previously executed events in three ways: You can use the fc builtin (next), the exclamation point commands (page 381), or the Readline Library, which uses a one-line vi- or emacs-like editor to edit and execute events (page 386).
Tip: Which method to use?
If you are more familiar with vi or emacs and less familiar with the C or TC Shell, use fc or the Readline Library. If you are more familiar with the C or TC Shell, use the exclamation point commands. If it is a toss-up, try the Readline Library; it will benefit you in other areas of Linux more than learning the exclamation point commands will.
fc: Displays, Edits, and Reexecutes Commands
The fc (fix command) builtin enables you to display the history list and to edit and reexecute previous commands. It provides many of the same capabilities as the command-line editors.
Viewing the History List
When you call fc with the –l option, it displays commands from the history list. Without any arguments, fc –l lists the 16 most recent commands in a list that includes event numbers, with the oldest appearing first:
$ fc -l
1024 cd
1025 view calendar
1026 vim letter.adams01
1027 aspell -c letter.adams01
1028 vim letter.adams01
1029 lpr letter.adams01
1030 cd ../memos
1031 ls
1032 rm *0405
1033 fc -l
1034 cd
1035 whereis aspell
1036 man aspell
1037 cd /usr/share/doc/*aspell*
1038 pwd
1039 ls
1040 ls man-html
The fc builtin can take zero, one, or two arguments with the –l option. The arguments specify the part of the history list to be displayed:
fc –l [first [last]]
The fc builtin lists commands beginning with the most recent event that matches first. The argument can be an event number, the first few characters of the command line, or a negative number, which specifies the nth previous command. Without last, fc displays events through the most recent. If you include last, fc displays commands from the most recent event that matches first through the most recent event that matches last.
The next command displays the history list from event 1030 through event 1035:
$ fc -l 1030 1035
1030 cd ../memos
1031 ls
1032 rm *0405
1033 fc -l
1034 cd
1035 whereis aspell
The command on the next page lists the most recent event that begins with view through the most recent command line that begins with whereis.
$ fc -l view whereis
1025 view calendar
1026 vim letter.adams01
1027 aspell -c letter.adams01
1028 vim letter.adams01
1029 lpr letter.adams01
1030 cd ../memos
1031 ls
1032 rm *0405
1033 fc -l
1034 cd
1035 whereis aspell
To list a single command from the history list, use the same identifier for the first and second arguments. The following command lists event 1027:
$ fc -l 1027 1027
1027 aspell -c letter.adams01
Editing and Reexecuting Previous Commands
You can use fc to edit and reexecute previous commands.
fc [–e editor] [first [last]]
When you call fc with the –e option followed by the name of an editor, fc calls the editor with event(s) in the Work buffer. By default, fc invokes the vi(m) editor. Without first and last, it defaults to the most recent command. The next example invokes the vim editor to edit the most recent command. When you exit from the editor, the shell executes the command.
$ fc -e vi
The fc builtin uses the stand-alone vim editor. If you set the EDITOR variable, you do not need to use the –e option to specify an editor on the command line. Because the value of EDITOR has been changed to /usr/bin/emacs and fc has no arguments, the following command edits the most recent command using the emacs editor (emacs package):
$ export EDITOR=/usr/bin/emacs
$ fc
Caution: Clean up the fc buffer
When you execute an fc command, the shell executes whatever you leave in the editor buffer, possibly with unwanted results. If you decide you do not want to execute a command, delete everything from the buffer before you exit from the editor.
If you call it with a single argument, fc invokes the editor on the specified command. The following example starts the editor with event 1029 in the Work buffer:
$ fc 1029
As described earlier, you can identify commands either by using numbers or by specifying the first few characters of the command name. The following example calls the editor to work on events from the most recent event that begins with the letters vim through event 1030:
$ fc vim 1030
Reexecuting Commands Without Calling the Editor
You can also reexecute previous commands without using an editor. If you call fc with the –s option, it skips the editing phase and reexecutes the command. The following example reexecutes event 1029:
$ fc -s 1029
lpr letter.adams01
The next example reexecutes the previous command:
$ fc -s
When you reexecute a command, you can tell fc to substitute one string for another. The next example substitutes the string john for the string adams in event 1029 and executes the modified event:
$ fc -s adams=john 1029
lpr letter.john01
Using an Exclamation Point (!) to Reference Events
The C Shell history mechanism uses an exclamation point to reference events. This technique, which is available under bash, is frequently more cumbersome to use than fc but nevertheless has some useful features. For example, the !! command reexecutes the previous event, and the shell replaces the !$ token with the last word from the previous command line.
You can reference an event by using its absolute event number, its relative event number, or the text it contains. All references to events, called event designators, begin with an exclamation point (!). One or more characters follow the exclamation point to specify an event.
You can put history events anywhere on a command line. To escape an exclamation point so the shell interprets it literally instead of as the start of a history event, precede it with a backslash (\) or enclose it within single quotation marks.
Event Designators
An event designator specifies a command in the history list. Table 9-8 (next page) lists event designators.
Table 9-8 Event designators
!! reexecutes the previous event
You can reexecute the previous event by giving a !! command. In the following example, event 45 reexecutes event 44:
44 $ ls -l text
-rw-rw-r--. 1 max pubs 45 04-30 14:53 text
45 $ !!
ls -l text
-rw-rw-r--. 1 max pubs 45 04-30 14:53 text
The !! command works whether or not your prompt displays an event number. As this example shows, when you use the history mechanism to reexecute an event, the shell displays the command it is reexecuting.
!n event number
A number following an exclamation point refers to an event. If that event is in the history list, the shell executes it. Otherwise, the shell displays an error message. A negative number following an exclamation point references an event relative to the current event. For example, the command!–3 refers to the third preceding event. After you issue a command, the relative event number of a given event changes (event –3 becomes event –4). Both of the following commands reexecute event 44:
51 $ !44
ls -l text
-rw-rw-r--. 1 max pubs 45 04-30 14:53 text
52 $ !-8
ls -l text
-rw-rw-r--. 1 max pubs 45 04-30 14:53 text
!string event text
When a string of text follows an exclamation point, the shell searches for and executes the most recent event that began with that string. If you enclose the string within question marks, the shell executes the most recent event that contained that string. The final question mark is optional if aRETURN would immediately follow it.
68 $ history 10
59 ls -l text*
60 tail text5
61 cat text1 text5 > letter
62 vim letter
63 cat letter
64 cat memo
65 lpr memo
66 pine zach
67 ls -l
68 history
69 $ !l
ls -l
...
70 $ !lpr
lpr memo
71 $ !?letter?
cat letter
...
Optional: Word Designators
A word designator specifies a word (token) or series of words from an event (a command line). Table 9-9 lists word designators. The words on a command line are numbered starting with 0 (the first word, usually the command), continuing with 1 (the first word following the command), and ending with n (the last word on the command line).
Table 9-9 Word designators
To specify a particular word from a previous event, follow the event designator (such as !14) with a colon and the number of the word in the previous event. For example, !14:3 specifies the third word following the command from event 14. You can specify the first word following the command (word number 1) using a caret (^) and the last word using a dollar sign ($). You can specify a range of words by separating two word designators with a hyphen.
72 $ echo apple grape orange pear
apple grape orange pear
73 $ echo !72:2
echo grape
grape
74 $ echo !72:^
echo apple
apple
75 $ !72:0 !72:$
echo pear
pear
76 $ echo !72:2-4
echo grape orange pear
grape orange pear
77 $ !72:0-$
echo apple grape orange pear
apple grape orange pear
As the next example shows, !$ refers to the last word of the previous event. You can use this shorthand to edit, for example, a file you just displayed using cat:
$ cat report.718
...
$ vim !$
vim report.718
...
If an event contains a single command, the word numbers correspond to the argument numbers. If an event contains more than one command, this correspondence does not hold for commands after the first. In the next example, event 78 contains two commands separated by a semicolon so the shell executes them sequentially; the semicolon is word number 5.
78 $ !72 ; echo helen zach barbara
echo apple grape orange pear ; echo helen zach barbara
apple grape orange pear
helen zach barbara
79 $ echo !78:7
echo helen
helen
80 $ echo !78:4-7
echo pear ; echo helen
pear
helen
Modifiers
On occasion you might want to change an aspect of an event you are reexecuting. Perhaps you entered a complex command line with a typo or incorrect pathname or you want to specify a different argument. You can modify an event or a word of an event by putting one or more modifiers after the word designator or after the event designator if there is no word designator. Each modifier must be preceded by a colon (:).
Substitute modifier
The following example shows the substitute modifier correcting a typo in the previous event:
$ car /home/zach/memo.0507 /home/max/letter.0507
bash: car: command not found
$ !!:s/car/cat
cat /home/zach/memo.0507 /home/max/letter.0507
...
The substitute modifier has the following syntax:
[g]s/old/new/
where old is the original string (not a regular expression) and new is the string that replaces old. The substitute modifier substitutes the first occurrence of old with new. Placing a g before the s causes a global substitution, replacing all occurrences of old. Although / is the delimiter in the examples, you can use any character that is not in either old or new. The final delimiter is optional if a RETURN would immediately follow it. As with the vim Substitute command, the history mechanism replaces an ampersand (&) in new with old. The shell replaces a null old string (s//new/) with the previous old string or the string within a command you searched for using ?string?.
Quick substitution
An abbreviated form of the substitute modifier is quick substitution. Use it to reexecute the most recent event while changing some of the event text. The quick substitution character is the caret (^). For example, the command
$ ^old^new^
produces the same results as
$ !!:s/old/new/
Thus substituting cat for car in the previous event could have been entered as
$ ^car^cat
cat /home/zach/memo.0507 /home/max/letter.0507
...
You can omit the final caret if it would be followed immediately by a RETURN. As with other command-line substitutions, the shell displays the command line as it appears after the substitution.
Other modifiers
Modifiers (other than the substitute modifier) perform simple edits on the part of the event that has been selected by the event designator and the optional word designators. You can use multiple modifiers, each preceded by a colon (:).
The following series of commands uses ls to list the name of a file, repeats the command without executing it (p modifier), and repeats the last command, removing the last part of the pathname (h modifier) again without executing it:
$ ls /etc/ssh/ssh_config
/etc/ssh/ssh_config
$ !!:p
ls /etc/ssh/ssh_config
$ !!:h:p
ls /etc/ssh
Table 9-10 lists event modifiers other than the substitute modifier.
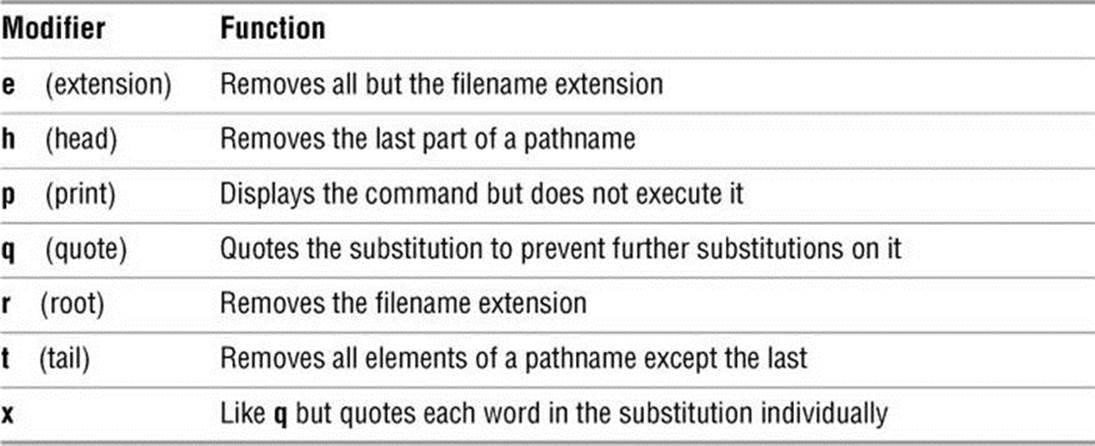
Table 9-10 Event modifiers
The Readline Library
Command-line editing under the Bourne Again Shell is implemented through the Readline Library, which is available to any application written in C. Any application that uses the Readline Library supports line editing that is consistent with that provided by bash. Programs that use the Readline Library, including bash, read ~/.inputrc (page 390) for key binding information and configuration settings. The ––noediting command-line option turns off command-line editing in bash.
vi mode
You can choose one of two editing modes when using the Readline Library in bash: emacs or vi(m). Both modes provide many of the commands available in the stand-alone versions of the emacs and vim editors. You can also use the ARROW keys to move around. Up and down movements move you backward and forward through the history list. In addition, Readline provides several types of interactive word completion (page 388). The default mode is emacs; you can switch to vi mode using the following command:
$ set -o vi
emacs mode
The next command switches back to emacs mode:
$ set -o emacs
vi Editing Mode
Before you start, make sure the shell is in vi mode.
When you enter bash commands while in vi editing mode, you are in Input mode (page 264). As you enter a command, if you discover an error before you press RETURN, you can press ESCAPE to switch to vim Command mode. This setup is different from the stand-alone vim editor’s initial mode. While in Command mode you can use many vim commands to edit the command line. It is as though you were using vim to edit a copy of the history file with a screen that has room for only one command. When you use the k command or the UP ARROW to move up a line, you access the previous command. If you then use the j command or the DOWN ARROW to move down a line, you return to the original command. To use the k and j keys to move between commands, you must be in Command mode; you can use the ARROW keys in both Command and Input modes.
Tip: The command-line vim editor starts in Input mode
The stand-alone vim editor starts in Command mode, whereas the command-line vim editor starts in Input mode. If commands display characters and do not work properly, you are in Input mode. Press ESCAPE and enter the command again.
In addition to cursor-positioning commands, you can use the search-backward (?) command followed by a search string to look back through the history list for the most recent command containing a string. If you have moved back in the history list, use a forward slash (/) to search forwardtoward the most recent command. Unlike the search strings in the stand-alone vim editor, these search strings cannot contain regular expressions. You can, however, start the search string with a caret (^) to force the shell to locate commands that start with the search string. As in vim, pressingn after a successful search looks for the next occurrence of the same string.
You can also use event numbers to access events in the history list. While you are in Command mode (press ESCAPE), enter the event number followed by a G to go to the command with that event number.
When you use /, ?, or G to move to a command line, you are in Command mode, not Input mode: You can edit the command or press RETURN to execute it.
When the command you want to edit is displayed, you can modify the command line using vim Command mode editing commands such as x (delete character), r (replace character), ~ (change case), and . (repeat last change). To switch to Input mode, use an Insert (i, I), Append (a, A), Replace (R), or Change (c, C) command. You do not have to return to Command mode to execute a command; simply press RETURN, even if the cursor is in the middle of the command line. For more information refer to the vim tutorial on page 262.
emacs Editing Mode
Unlike the vim editor, emacs is modeless. You need not switch between Command mode and Input mode because most emacs commands are control characters, allowing emacs to distinguish between input and commands. Like vim, the emacs command-line editor provides commands for moving the cursor on the command line and through the command history list and for modifying part or all of a command. However, in a few cases, the emacs command-line editor commands differ from those used in the stand-alone emacs editor.
In emacs you perform cursor movement by using both CONTROL and ESCAPE commands. To move the cursor one character backward on the command line, press CONTROL-B. Press CONTROL-F to move one character forward. As in vim, you can precede these movements with counts. To use a count you must first press ESCAPE; otherwise, the numbers you type will appear on the command line.
Like vim, emacs provides word and line movement commands. To move backward or forward one word on the command line, press ESCAPE b or ESCAPE f, respectively. To move several words using a count, press ESCAPE followed by the number and the appropriate escape sequence. To move to the beginning of the line, press CONTROL-A; to move to the end of the line, press CONTROL-E; and to move to the next instance of the character c, press CONTROL-X CONTROL-F followed by c.
You can add text to the command line by moving the cursor to the position you want to enter text and typing. To delete text, move the cursor just to the right of the characters you want to delete and press the erase key (page 123) once for each character you want to delete.
Caution: CONTROL-D can terminate your screen session
If you want to delete the character directly under the cursor, press CONTROL-D. If you enter CONTROL-D at the beginning of the line, it might terminate your shell session.
If you want to delete the entire command line, press the line kill key (page 123). You can press this key while the cursor is anywhere in the command line. Use CONTROL-K to delete from the cursor to the end of the line.
Readline Completion Commands
You can use the TAB key to complete words you are entering on the command line. This facility, called completion, works in both vi and emacs editing modes. Several types of completion are possible, and which one you use depends on which part of a command line you are typing when you press TAB.
Command Completion
If you are typing the name of a command, pressing TAB initiates command completion, in which bash looks for a command whose name starts with the part of the word you have typed. If no command starts with the characters you entered, bash beeps. If there is one such command, bashcompletes the command name. If there is more than one choice, bash does nothing in vi mode and beeps in emacs mode. Pressing TAB a second time causes bash to display a list of commands whose names start with the prefix you typed and allows you to continue typing the command name.
In the following example, the user types bz and presses TAB. The shell beeps (the user is in emacs mode) to indicate that several commands start with the letters bz. The user enters another TAB to cause the shell to display a list of commands that start with bz followed by the command line as the user has entered it so far:
$ bz ![]() TAB (beep)
TAB (beep) ![]() TAB
TAB
bzcat bzdiff bzip2 bzless
bzcmp bzgrep bzip2recover bzmore
$ bz![]()
Next the user types c and presses TAB twice. The shell displays the two commands that start with bzc. The user types a followed by TAB. At this point the shell completes the command because only one command starts with bzca.
$ bzc ![]() TAB (beep)
TAB (beep) ![]() TAB
TAB
bzcat bzcmp
$ bzca ![]() TAB
TAB ![]() t
t ![]()
Pathname Completion
Pathname completion, which also uses TABs, allows you to type a portion of a pathname and have bash supply the rest. If the portion of the pathname you have typed is sufficient to determine a unique pathname, bash displays that pathname. If more than one pathname would match it, bashcompletes the pathname up to the point where there are choices so that you can type more.
When you are entering a pathname, including a simple filename, and press TAB, the shell beeps (if the shell is in emacs mode—in vi mode there is no beep). It then extends the command line as far as it can.
$ cat films/dar ![]() TAB (beep) cat films/dark_
TAB (beep) cat films/dark_![]()
In the films directory every file that starts with dar has k_ as the next characters, so bash cannot extend the line further without making a choice among files. The shell leaves the cursor just past the _ character. At this point you can continue typing the pathname or press TAB twice. In the latter case bash beeps, displays the choices, redisplays the command line, and again leaves the cursor just after the _ character.
$ cat films/dark_ ![]() TAB (beep)
TAB (beep) ![]() TAB
TAB
dark_passage dark_victory
$ cat films/dark_![]()
When you add enough information to distinguish between the two possible files and press TAB, bash displays the unique pathname. If you enter p followed by TAB after the _ character, the shell completes the command line:
$ cat films/dark_p ![]() TAB
TAB ![]() assage
assage
Because there is no further ambiguity, the shell appends a SPACE so you can either finish typing the command line or press RETURN to execute the command. If the complete pathname is that of a directory, bash appends a slash (/) in place of a SPACE.
Variable Completion
When you are typing a variable name, pressing TAB results in variable completion, wherein bash attempts to complete the name of the variable. In case of an ambiguity, pressing TAB twice displays a list of choices:
$ echo $HO ![]() TAB (beep)
TAB (beep) ![]() TAB
TAB
$HOME $HOSTNAME $HOSTTYPE
$ echo $HOM ![]() TAB
TAB ![]() E
E
Caution: Pressing RETURN executes the command
Pressing RETURN causes the shell to execute the command regardless of where the cursor is on the command line.
.inputrc: Configuring the Readline Library
The Bourne Again Shell and other programs that use the Readline Library read the file specified by the INPUTRC environment variable to obtain initialization information. If INPUTRC is not set, these programs read the ~/.inputrc file. They ignore lines of .inputrc that are blank or that start with a hashmark (#).
Variables
You can set variables in .inputrc to control the behavior of the Readline Library using the following syntax:
set variable value
Table 9-11 lists some variables and values you can use. See “Readline Variables” in the bash man or info page for a complete list.
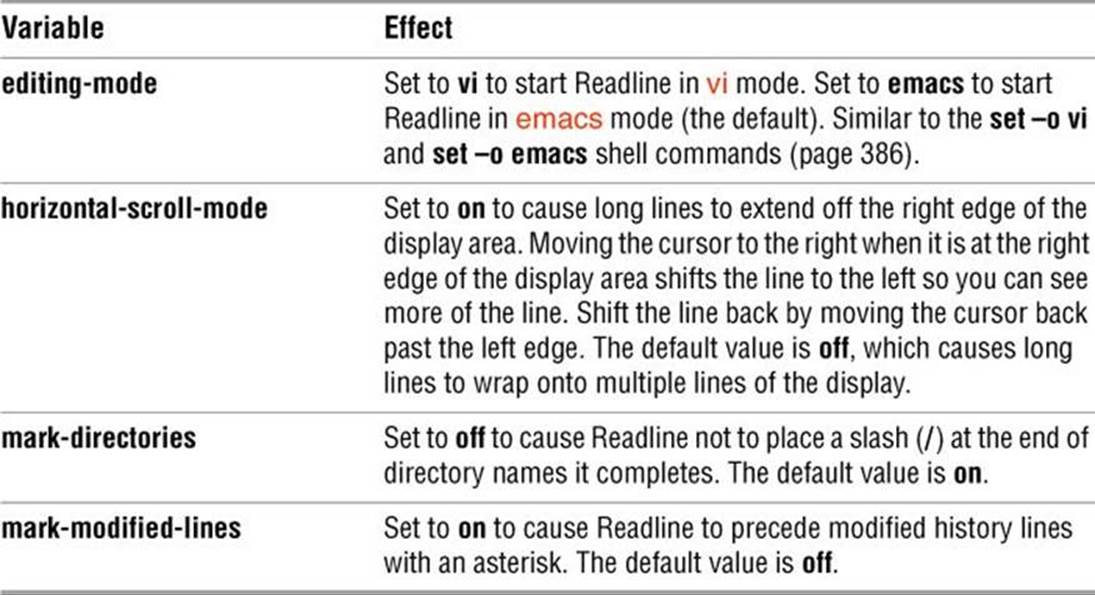
Table 9-11 Readline variables
Key Bindings
You can map keystroke sequences to Readline commands, changing or extending the default bindings. Like the emacs editor, the Readline Library includes many commands that are not bound to a keystroke sequence. To use an unbound command, you must map it using one of the following forms:
keyname: command_name
"keystroke_sequence": command_name
In the first form, you spell out the name for a single key. For example, CONTROL-U would be written as control-u. This form is useful for binding commands to single keys.
In the second form, you specify a string that describes a sequence of keys that will be bound to the command. You can use the emacs-style backslash escape sequences to represent the special keys CONTROL (\C), META (\M), and ESCAPE (\e). Specify a backslash by escaping it with another backslash: \\. Similarly a double or single quotation mark can be escaped with a backslash: \" or \'.
The kill-whole-line command, available in emacs mode only, deletes the current line. Put the following command in .inputrc to bind the kill-whole-line command (which is unbound by default) to the keystroke sequence CONTROL-R:
control-r: kill-whole-line
bind
Give the command bind –P to display a list of all Readline commands. If a command is bound to a key sequence, that sequence is shown. Commands you can use in vi mode start with vi. For example, vi-next-word and vi-prev-word move the cursor to the beginning of the next and previous words, respectively. Commands that do not begin with vi are generally available in emacs mode.
Use bind –q to determine which key sequence is bound to a command:
$ bind -q kill-whole-line
kill-whole-line can be invoked via "\C-r".
You can also bind text by enclosing it within double quotation marks (emacs mode only):
"QQ": "The Linux Operating System"
This command causes bash to insert the string The Linux Operating System when you type QQ on the command line.
Conditional Constructs
You can conditionally select parts of the .inputrc file using the $if directive. The syntax of the conditional construct is
$if test[=value]
commands
[$else
commands]
$endif
where test is mode, term, or a program name such as bash. If test equals value (or if test is true when value is not specified), this structure executes the first set of commands. If test does not equal value (or if test is false when value is not specified), it executes the second set of commands if they are present or exits from the structure if they are not present.
The power of the $if directive lies in the three types of tests it can perform.
1. You can test to see which mode is currently set.
$if mode=vi
The preceding test is true if the current Readline mode is vi and false otherwise. You can test for vi or emacs.
2. You can test the type of terminal.
$if term=xterm
The preceding test is true if the TERM variable is set to xterm. You can test for any value of TERM.
3. You can test the application name.
$if bash
The preceding test is true when you are running bash and not another program that uses the Readline Library. You can test for any application name.
These tests can customize the Readline Library based on the current mode, the type of terminal, and the application you are using. They give you a great deal of power and flexibility when you are using the Readline Library with bash and other programs.
The following commands in .inputrc cause CONTROL-Y to move the cursor to the beginning of the next word regardless of whether bash is in vi or emacs mode:
$ cat ~/.inputrc
set editing-mode vi
$if mode=vi
"\C-y": vi-next-word
$else
"\C-y": forward-word
$endif
Because bash reads the preceding conditional construct when it is started, you must set the editing mode in .inputrc. Changing modes interactively using set will not change the binding of CONTROL-Y.
For more information on the Readline Library, open the bash man page and give the command /^READLINE, which searches for the word READLINE at the beginning of a line.
Tip: If Readline commands do not work, log out and log in again
The Bourne Again Shell reads ~/.inputrc when you log in. After you make changes to this file, you must log out and log in again before the changes will take effect.
![]() Aliases
Aliases
An alias is a (usually short) name that the shell translates into another (usually longer) name or command. Aliases allow you to define new commands by substituting a string for the first token of a simple command. They are typically placed in the ~/.bashrc or ~/.bash_aliases startup file so that they are available to interactive subshells.
The syntax of the alias builtin is
alias [name[=value]]
No SPACEs are permitted around the equal sign. If value contains SPACEs or TABs, you must enclose value within quotation marks. An alias does not accept an argument from the command line in value. Use a function (page 396) when you need to use an argument.
An alias does not replace itself, which avoids the possibility of infinite recursion in handling an alias such as the following:
$ alias ls='ls -F'
You can nest aliases. Aliases are disabled for noninteractive shells (that is, shell scripts). Use the unalias builtin to remove an alias. When you give an alias builtin command without any arguments, the shell displays a list of all defined aliases:
$ alias
alias ll='ls -l'
alias l='ls -ltr'
alias ls='ls -F'
alias zap='rm -i'
To view the alias for a particular name, enter the command alias followed by the name of the alias. Fedora/RHEL defines some aliases. Enter an alias command to see which aliases are in effect. You can delete the aliases you do not want from the appropriate startup file.
Single Versus Double Quotation Marks in Aliases
The choice of single or double quotation marks is significant in the alias syntax when the alias includes variables. If you enclose value within double quotation marks, any variables that appear in value are expanded when the alias is created. If you enclose value within single quotation marks, variables are not expanded until the alias is used. The following example illustrates the difference.
The PWD keyword variable holds the pathname of the working directory. Max creates two aliases while he is working in his home directory. Because he uses double quotation marks when he creates the dirA alias, the shell substitutes the value of the working directory when he creates this alias. The alias dirA command displays the dirA alias and shows that the substitution has already taken place:
$ echo $PWD
/home/max
$ alias dirA="echo Working directory is $PWD"
$ alias dirA
alias dirA='echo Working directory is /home/max'
When Max creates the dirB alias, he uses single quotation marks, which prevent the shell from expanding the $PWD variable. The alias dirB command shows that the dirB alias still holds the unexpanded $PWD variable:
$ alias dirB='echo Working directory is $PWD'
$ alias dirB
alias dirB='echo Working directory is $PWD'
After creating the dirA and dirB aliases, Max uses cd to make cars his working directory and gives each of the aliases as a command. The alias he created using double quotation marks displays the name of the directory he created the alias in as the working directory (which is wrong). In contrast, the dirB alias displays the proper name of the working directory:
$ cd cars
$ dirA
Working directory is /home/max
$ dirB
Working directory is /home/max/cars
Tip: How to prevent the shell from invoking an alias
The shell checks only simple, unquoted commands to see if they are aliases. Commands given as relative or absolute pathnames and quoted commands are not checked. When you want to give a command that has an alias but do not want to use the alias, precede the command with a backslash, specify the command’s absolute pathname, or give the command as ./command.
Examples of Aliases
The following alias allows you to type r to repeat the previous command or r abc to repeat the last command line that began with abc:
$ alias r='fc -s'
If you use the command ls –ltr frequently, you can create an alias that substitutes ls –ltr when you give the command l:
$ alias l='ls -ltr'
$ l
-rw-r-----. 1 max pubs 3089 02-11 16:24 XTerm.ad
-rw-r--r--. 1 max pubs 30015 03-01 14:24 flute.ps
-rw-r--r--. 1 max pubs 641 04-01 08:12 fixtax.icn
-rw-r--r--. 1 max pubs 484 04-09 08:14 maptax.icn
drwxrwxr-x. 2 max pubs 1024 08-09 17:41 Tiger
drwxrwxr-x. 2 max pubs 1024 09-10 11:32 testdir
-rwxr-xr-x. 1 max pubs 485 09-21 08:03 floor
drwxrwxr-x. 2 max pubs 1024 09-27 20:19 Test_Emacs
Another common use of aliases is to protect yourself from mistakes. The following example substitutes the interactive version of the rm utility when you enter the command zap:
$ alias zap='rm -i'
$ zap f*
rm: remove 'fixtax.icn'? n
rm: remove 'flute.ps'? n
rm: remove 'floor'? n
The –i option causes rm to ask you to verify each file that would be deleted, thereby helping you avoid deleting the wrong file. You can also alias rm with the rm –i command: alias rm='rm –i'.
The aliases in the next example cause the shell to substitute ls –l each time you give an ll command and ls –F each time you use ls. The –F option causes ls to print a slash (/) at the end of directory names and an asterisk (*) at the end of the names of executable files.
$ alias ls='ls -F'
$ alias ll='ls -l'
$ ll
drwxrwxr-x. 2 max pubs 1024 09-27 20:19 Test_Emacs/
drwxrwxr-x. 2 max pubs 1024 08-09 17:41 Tiger/
-rw-r-----. 1 max pubs 3089 02-11 16:24 XTerm.ad
-rw-r--r--. 1 max pubs 641 04-01 08:12 fixtax.icn
-rw-r--r--. 1 max pubs 30015 03-01 14:24 flute.ps
-rwxr-xr-x. 1 max pubs 485 09-21 08:03 floor*
-rw-r--r--. 1 max pubs 484 04-09 08:14 maptax.icn
drwxrwxr-x. 2 max pubs 1024 09-10 11:32 testdir/
In this example, the string that replaces the alias ll (ls –l) itself contains an alias (ls). When it replaces an alias with its value, the shell looks at the first word of the replacement string to see whether it is an alias. In the preceding example, the replacement string contains the alias ls, so a second substitution occurs to produce the final command ls –F –l. (To avoid a recursive plunge, the ls in the replacement text, although an alias, is not expanded a second time.)
When given a list of aliases without the =value or value field, the alias builtin displays the value of each defined alias. The alias builtin reports an error if an alias has not been defined:
$ alias ll l ls zap wx
alias ll='ls -l'
alias l='ls -ltr'
alias ls='ls -F'
alias zap='rm -i'
bash: alias: wx: not found
You can avoid alias substitution by preceding the aliased command with a backslash (\):
$ \ls
Test_Emacs XTerm.ad flute.ps maptax.icn
Tiger fixtax.icn floor testdir
Because the replacement of an alias name with the alias value does not change the rest of the command line, any arguments are still received by the command that is executed:
$ ll f*
-rw-r--r--. 1 max pubs 641 04-01 08:12 fixtax.icn
-rw-r--r--. 1 max pubs 30015 03-01 14:24 flute.ps
-rwxr-xr-x. 1 max pubs 485 09-21 08:03 floor*
You can remove an alias using the unalias builtin. When the zap alias is removed, it is no longer displayed by the alias builtin, and its subsequent use results in an error message:
$ unalias zap
$ alias
alias ll='ls -l'
alias l='ls -ltr'
alias ls='ls -F'
$ zap maptax.icn
bash: zap: command not found
![]() Functions
Functions
A shell function is similar to a shell script in that it stores a series of commands for execution at a later time. However, because the shell stores a function in the computer’s main memory (RAM) instead of in a file on the disk, the shell can access it more quickly than the shell can access a script. The shell also preprocesses (parses) a function so it starts more quickly than a script. Finally the shell executes a shell function in the same shell that called it. If you define too many functions, the overhead of starting a subshell (as when you run a script) can become unacceptable.
You can declare a shell function in the ~/.bash_profile startup file, in the script that uses it, or directly from the command line. You can remove functions using the unset builtin. The shell does not retain functions after you log out.
Tip: Removing variables and functions that have the same name
If you have a shell variable and a function that have the same name, using unset removes the shell variable. If you then use unset again with the same name, it removes the function.
The syntax that declares a shell function is
[function] function-name () {
commands
}
where the word function is optional (and is frequently omitted; it is not portable), function-name is the name you use to call the function, and commands comprise the list of commands the function executes when you call it. The commands can be anything you would include in a shell script, including calls to other functions.
The opening brace ({) can appear on the line following the function name. Aliases and variables are expanded when a function is read, not when it is executed. You can use the break statement (page 1005) within a function to terminate its execution.
You can declare a function on a single line. Because the closing brace must appear as a separate command, you must place a semicolon before the closing brace when you use this syntax:
$ say_hi() { echo "hi" ; }
$ say_hi
hi
Shell functions are useful as a shorthand as well as to define special commands. The following function starts a process named process in the background, with the output normally displayed by process being saved in .process.out.
start_process() {
process > .process.out 2>&1 &
}
The next example creates a simple function that displays the date, a header, and a list of the people who are logged in on the system. This function runs the same commands as the whoson script described on page 337. In this example the function is being entered from the keyboard. The greater than (>) signs are secondary shell prompts (PS2); do not enter them.
$ function whoson () {
> date
> echo "Users Currently Logged On"
> who
> }
$ whoson
Fri Aug 9 15:44:58 PDT 2013
Users Currently Logged On
hls console 2013-08-08 08:59 (:0)
max pts/4 2013-08-08 09:33 (0.0)
zach pts/7 2013-08-08 09:23 (guava)
Function local variables
You can use the local builtin only within a function. This builtin causes its arguments to be local to the function it is called from and its children. Without local, variables declared in a function are available to the shell that called the function (functions are run in the shell they are called from). The following function demonstrates the use of local.
$ demo () {
> x=4
> local y=8
> echo "demo: $x $y"
> }
$ demo
demo: 4 8
$ echo $x
4
$ echo $y
$
The demo function, which is entered from the keyboard, declares two variables, x and y, and displays their values. The variable x is declared with a normal assignment statement while y is declared using local. After running the function, the shell that called the function has access to x but knows nothing of y. See page 1040 for another example of function local variables.
Export a function
An export –f command places the named function in the environment so it is available to child processes.
Functions in startup files
If you want the whoson function to be available without having to enter it each time you log in, put its definition in ~/.bash_profile. Then run .bash_profile, using the . (dot) command to put the changes into effect immediately:
$ cat ~/.bash_profile
export TERM=vt100
stty kill '^u'
whoson () {
date
echo "Users Currently Logged On"
who
}
$ . ~/.bash_profile
You can specify arguments when you call a function. Within the function these arguments are available as positional parameters (page 1022). The following example shows the arg1 function entered from the keyboard:
$ arg1 () { echo "$1" ; }
$ arg1 first_arg
first_arg
See the function switch () on page 332 for another example of a function.
Optional
The following function allows you to place variables in the environment (export them) using tcsh syntax. The env utility lists all environment variables and their values and verifies that setenv worked correctly:
$ cat .bash_profile
...
# setenv - keep tcsh users happy
setenv() {
if [ $# -eq 2 ]
then
eval $1=$2
export $1
else
echo "Usage: setenv NAME VALUE" 1>&2
fi
}
$ . ~/.bash_profile
$ setenv TCL_LIBRARY /usr/local/lib/tcl
$ env | grep TCL_LIBRARY
TCL_LIBRARY=/usr/local/lib/tcl
eval
The $# special parameter (page 1027) takes on the value of the number of command-line arguments. This function uses the eval builtin to force bash to scan the command $1=$2 twice. Because $1=$2 begins with a dollar sign ($), the shell treats the entire string as a single token—a command. With variable substitution performed, the command name becomes TCL_LIBRARY=/usr/local/lib/tcl, which results in an error. With eval, a second scanning splits the string into the three desired tokens, and the correct assignment occurs. See page1051 for more information on eval.
Controlling bash: Features and Options
This section explains how to control bash features and options using command-line options and the set and shopt builtins. The shell sets flags to indicate which options are set (on) and expands $– to a list of flags that are set; see page 1030 for more information.
bash Command-Line Options
You can specify short and long command-line options. Short options consist of a hyphen followed by a letter; long options have two hyphens followed by multiple characters. Long options must appear before short options on a command line that calls bash. Table 9-12 lists some commonly used command-line options.

Table 9-12 bash command-line options
Shell Features
You can control the behavior of the Bourne Again Shell by turning features on and off. Different methods turn different features on and off: The set builtin controls one group of features, and the shopt builtin controls another group. You can also control many features from the command line you use to call bash.
Tip: Features, options, variables, attributes?
To avoid confusing terminology, this book refers to the various shell behaviors that you can control as features. The bash info page refers to them as “options” and “values of variables controlling optional shell behavior.” In some places you might see them referred to asattributes.
![]() set ±o: Turns Shell Features On and Off
set ±o: Turns Shell Features On and Off
The set builtin, when used with the –o or +o option, enables, disables, and lists certain bash features. For example, the following command turns on the noclobber feature (page 156):
$ set -o noclobber
You can turn this feature off (the default) by giving this command:
$ set +o noclobber
The command set –o without an option lists each of the features controlled by set, followed by its state (on or off). The command set +o without an option lists the same features in a form you can use as input to the shell. Table 9-13 lists bash features. This table does not list the –i option because you cannot set it. The shell sets this option when it is invoked as an interactive shell. See page 1024 for a discussion of other uses of set.
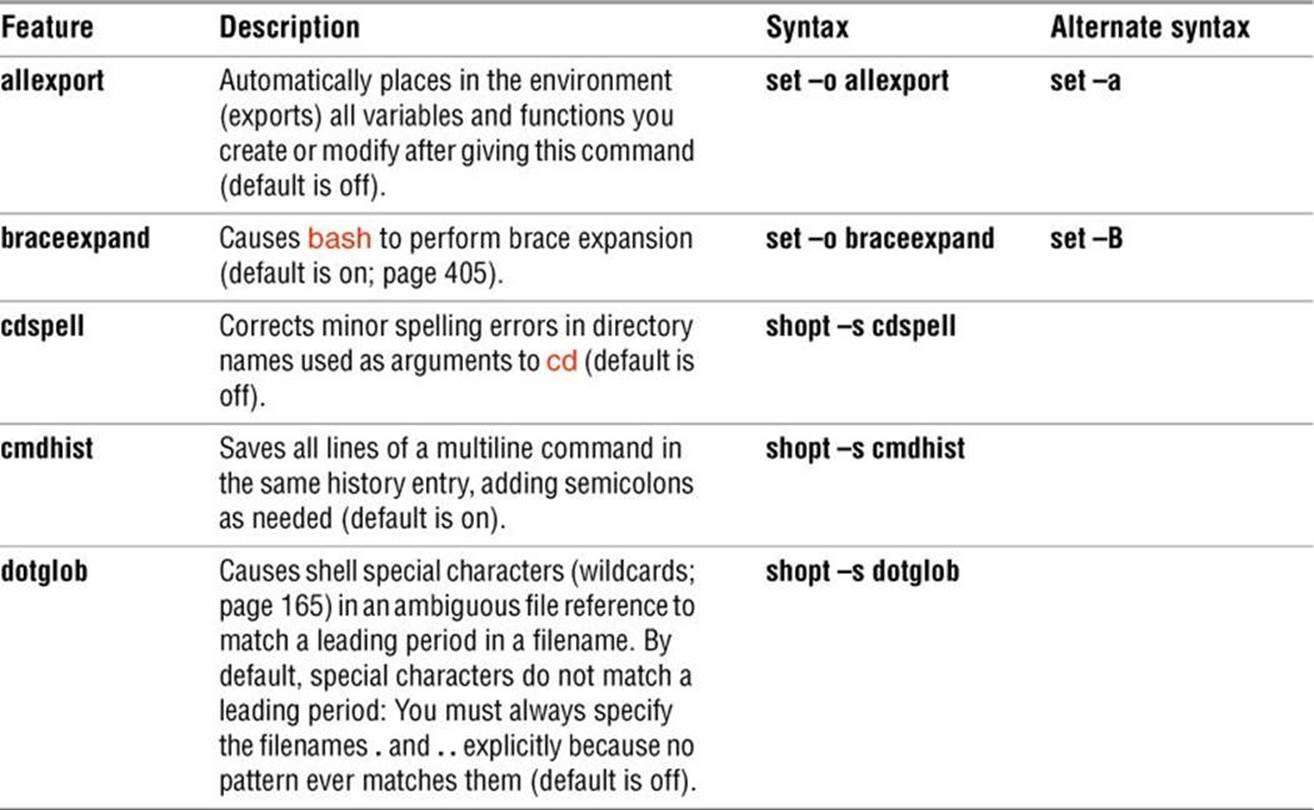

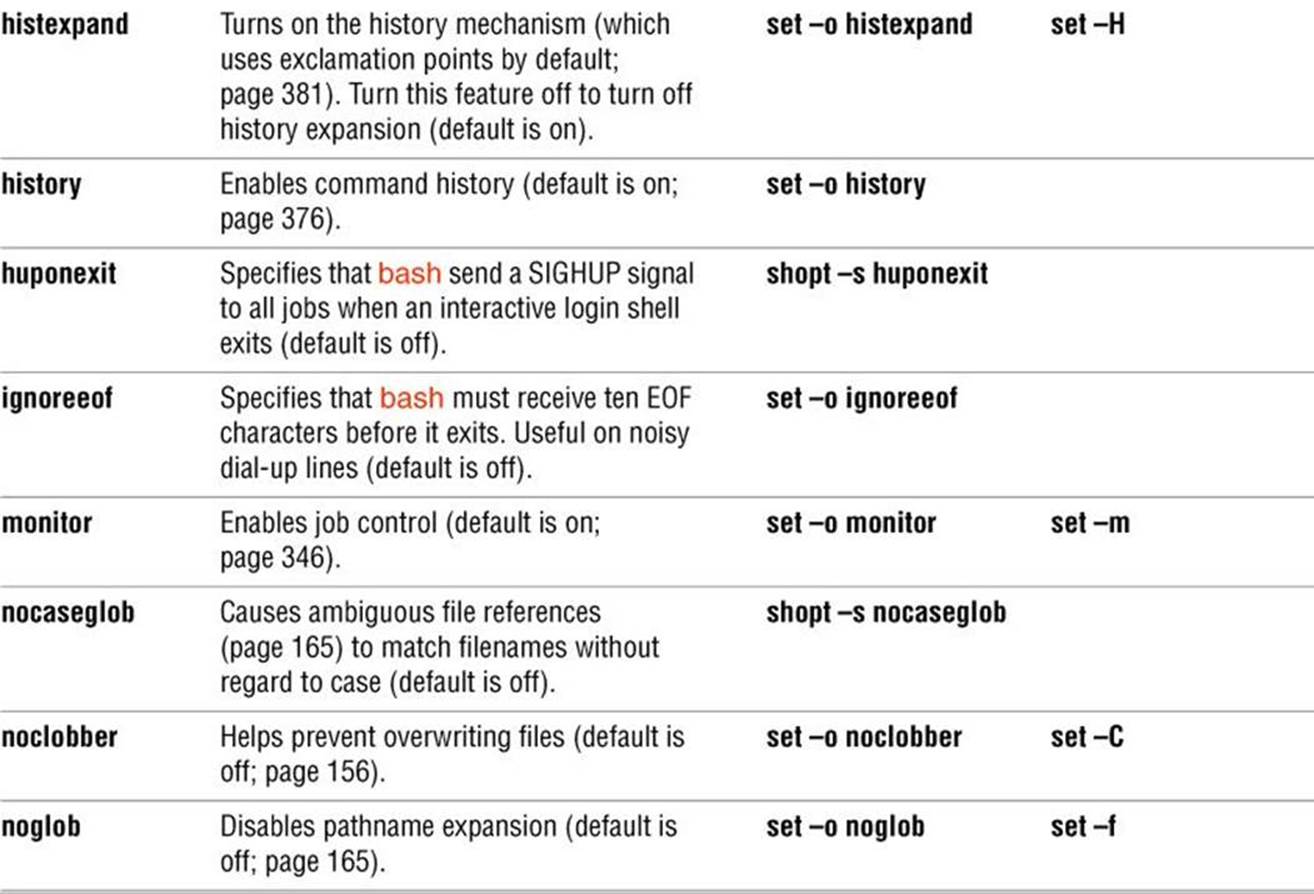

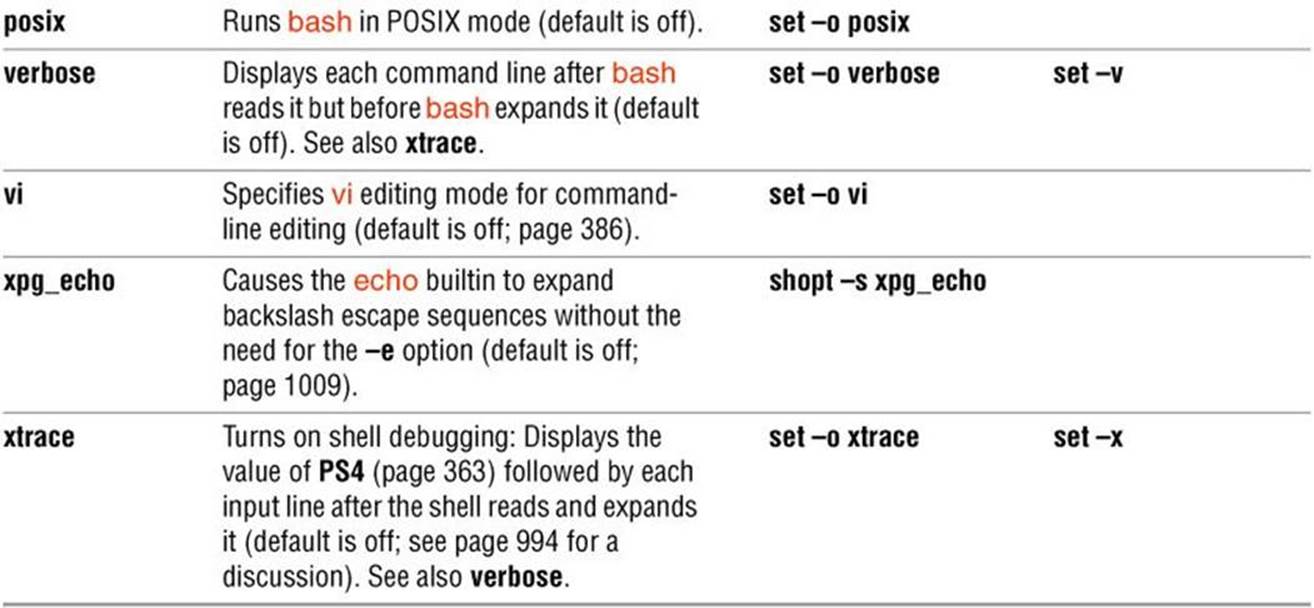
Table 9-13 bash features
shopt: Turns Shell Features On and Off
The shopt (shell option) builtin enables, disables, and lists certain bash features that control the behavior of the shell. For example, the following command causes bash to include filenames that begin with a period (.) when it expands ambiguous file references (the –s stands for set):
$ shopt -s dotglob
You can turn this feature off (the default) by giving the following command (the –u stands for unset):
$ shopt -u dotglob
The shell displays how a feature is set if you give the name of the feature as the only argument to shopt:
$ shopt dotglob
dotglob off
Without any options or arguments, shopt lists the features it controls and their states. The command shopt –s without an argument lists the features controlled by shopt that are set or on. The command shopt –u lists the features that are unset or off. Table 9-13 lists bash features.
Tip: Setting set ±o features using shopt
You can use shopt to set/unset features that are otherwise controlled by set ±o. Use the regular shopt syntax using –s or –u and include the –o option. For example, the following command turns on the noclobber feature:
$ shopt -o -s noclobber
Processing the Command Line
Whether you are working interactively or running a shell script, bash needs to read a command line before it can start processing it—bash always reads at least one line before processing a command. Some bash builtins, such as if and case, as well as functions and quoted strings, span multiple lines. When bash recognizes a command that covers more than one line, it reads the entire command before processing it. In interactive sessions, bash prompts with the secondary prompt (PS2, > by default; page 362) as you type each line of a multiline command until it recognizes the end of the command:
$ ps -ef |
> grep emacs
zach 26880 24579 1 14:42 pts/10 00:00:00 emacs notes
zach 26890 24579 0 14:42 pts/10 00:00:00 grep emacs
$ function hello () {
> echo hello there
> }
$
For more information refer to “Implicit Command-Line Continuation” on page 1063. After reading a command line, bash applies history expansion and alias substitution to the command line.
History Expansion
“Reexecuting and Editing Commands” on page 378 discusses the commands you can give to modify and reexecute command lines from the history list. History expansion is the process bash uses to turn a history command into an executable command line. For example, when you enter the command !!, history expansion changes that command line so it is the same as the previous one. History expansion is turned on by default for interactive shells; set +o histexpand turns it off. History expansion does not apply to noninteractive shells (shell scripts).
![]() Alias Substitution
Alias Substitution
Aliases (page 392) substitute a string for the first word of a simple command. By default, alias substitution is turned on for interactive shells and off for noninteractive shells; shopt –u expand_aliases turns it off.
Parsing and Scanning the Command Line
After processing history commands and aliases, bash does not execute the command immediately. One of the first things the shell does is to parse (isolate strings of characters in) the command line into tokens (words). After separating tokens and before executing the command, the shell scans the tokens and performs command-line expansion.
Command-Line Expansion
Both interactive and noninteractive shells transform the command line using command-line expansion before passing the command line to the program being called. You can use a shell without knowing much about command-line expansion, but you can use what a shell has to offer to a better advantage with an understanding of this topic. This section covers Bourne Again Shell command-line expansion.
The Bourne Again Shell scans each token for the various types of expansion and substitution in the following order. Most of these processes expand a word into a single word. Only brace expansion, word splitting, and pathname expansion can change the number of words in a command (except for the expansion of the variable "$@"—see page 1026).
1. Brace expansion (next page)
2. Tilde expansion (page 407)
3. Parameter and variable expansion (page 408)
4. Arithmetic expansion (page 408)
5. Command substitution (page 410)
6. Word splitting (page 411)
7. Pathname expansion (page 412)
8. Process substitution (page 413)
9. Quote removal (page 413)
Order of Expansion
The order in which bash carries out these steps affects the interpretation of commands. For example, if you set a variable to a value that looks like the instruction for output redirection and then enter a command that uses the variable’s value to perform redirection, you might expect bash to redirect the output.
$ SENDIT="> /tmp/saveit"
$ echo xxx $SENDIT
xxx > /tmp/saveit
$ cat /tmp/saveit
cat: /tmp/saveit: No such file or directory
In fact, the shell does not redirect the output—it recognizes input and output redirection before it evaluates variables. When it executes the command line, the shell checks for redirection and, finding none, evaluates the SENDIT variable. After replacing the variable with > /tmp/saveit, bashpasses the arguments to echo, which dutifully copies its arguments to standard output. No /tmp/saveit file is created.
Tip: Quotation marks can alter expansion
Double and single quotation marks cause the shell to behave differently when performing expansions. Double quotation marks permit parameter and variable expansion but suppress other types of expansion. Single quotation marks suppress all types of expansion.
Brace Expansion
Brace expansion, which originated in the C Shell, provides a convenient way to specify a series of strings or numbers. Although brace expansion is frequently used to specify filenames, the mechanism can be used to generate arbitrary strings; the shell does not attempt to match the brace notation with the names of existing files. Brace expansion is turned on in interactive and noninteractive shells by default; you can turn it off using set +o braceexpand. The shell also uses braces to isolate variable names (page 355).
The following example illustrates how brace expansion works. The ls command does not display any output because there are no files in the working directory. The echo builtin displays the strings the shell generates using brace expansion.
$ ls
$ echo chap_{one,two,three}.txt
chap_one.txt chap_two.txt chap_three.txt
The shell expands the comma-separated strings inside the braces on the command line into a SPACE-separated list of strings. Each string from the list is prepended with the string chap_, called the preamble, and appended with the string .txt, called the postscript. Both the preamble and the postscript are optional. The left-to-right order of the strings within the braces is preserved in the expansion. For the shell to treat the left and right braces specially and for brace expansion to occur, at least one comma must be inside the braces and no unquoted whitespace can appear inside the braces. You can nest brace expansions.
Brace expansion can match filenames. This feature is useful when there is a long preamble or postscript. The following example copies four files—main.c, f1.c, f2.c, and tmp.c—located in the /usr/local/src/C directory to the working directory:
$ cp /usr/local/src/C/{main,f1,f2,tmp}.c .
You can also use brace expansion to create directories with related names:
$ ls -F
file1 file2 file3
$ mkdir vrs{A,B,C,D,E}
$ ls -F
file1 file2 file3 vrsA/ vrsB/ vrsC/ vrsD/ vrsE/
The –F option causes ls to display a slash (/) after a directory and an asterisk (*) after an executable file. If you tried to use an ambiguous file reference instead of braces to specify the directories, the result would be different (and not what you wanted):
$ rmdir vrs*
$ mkdir vrs[A-E]
$ ls -F
file1 file2 file3 vrs[A-E]/
An ambiguous file reference matches the names of existing files. In the preceding example, because it found no filenames matching vrs[A–E], bash passed the ambiguous file reference to mkdir, which created a directory with that name. Brackets in ambiguous file references are discussed on page 168.
Sequence expression
Under newer versions of bash, brace expansion can include a sequence expression to generate a sequence of characters. It can generate a sequential series of numbers or letters using the following syntax:
{n1..n2[..incr]}
where n1 and n2 are numbers or single letters and incr is a number. This syntax works on bash version 4.0+; give the command echo $BASH_VERSION to see which version you are using. When you specify invalid arguments, bash copies the arguments to standard output. Following are some examples:
$ echo {4..8}
4 5 6 7 8
$ echo {8..16..2}
8 10 12 14 16
$ echo {a..m..3}
a d g j m
$ echo {a..m..b}
{a..m..b}
$ echo {2..m}
{2..m}
See page 1051 for a way to use variables to specify the values used by a sequence expression. Page 996 shows an example in which a sequence expression is used to specify step values in a for...in loop.
![]() seq
seq
Older versions of bash do not support sequence expressions. Although you can use the seq utility to perform a similar function, seq does not work with letters and displays an error when given invalid arguments. The seq utility uses the following syntax:
seq n1 [incr] n2
The –s option causes seq to use the specified character to separate its output. Following are some examples:
$ seq 4 8
4
5
6
7
8
$ seq -s\ 8 2 16
8 10 12 14 16
$ seq a d
seq: invalid floating point argument: a
Try 'seq --help' for more information.
![]() Tilde Expansion
Tilde Expansion
Chapter 6 introduced a shorthand notation to specify your home directory or the home directory of another user. This section provides a more detailed explanation of tilde expansion.
The tilde (~) is a special character when it appears at the start of a token on a command line. When it sees a tilde in this position, bash looks at the following string of characters—up to the first slash (/) or to the end of the word if there is no slash—as a possible username. If this possible username is null (that is, if the tilde appears as a word by itself or if it is immediately followed by a slash), the shell substitutes the value of the HOME variable for the tilde. The following example demonstrates this expansion, where the last command copies the file named letter from Max’s home directory to the working directory:
$ echo $HOME
/home/max
$ echo ~
/home/max
$ echo ~/letter
/home/max/letter
$ cp ~/letter .
If the string of characters following the tilde forms a valid username, the shell substitutes the path of the home directory associated with that username for the tilde and name. If the string is not null and not a valid username, the shell does not make any substitution:
$ echo ~zach
/home/zach
$ echo ~root
/root
$ echo ~xx
~xx
Tildes are also used in directory stack manipulation (page 349). In addition, ~+ is a synonym for PWD (the name of the working directory), and ~– is a synonym for OLDPWD (the name of the previous working directory).
Parameter and Variable Expansion
On a command line, a dollar sign ($) that is not followed by an open parenthesis introduces parameter or variable expansion. Parameters include both command-line, or positional, parameters (page 1022) and special parameters (page 1027). Variables include both user-created variables (page353) and keyword variables (page 358). The bash man and info pages do not make this distinction.
The shell does not expand parameters and variables that are enclosed within single quotation marks and those in which the leading dollar sign is escaped (i.e., preceded with a backslash). The shell does expand parameters and variables enclosed within double quotation marks.
Arithmetic Expansion
The shell performs arithmetic expansion by evaluating an arithmetic expression and replacing it with the result. Under bash the syntax for arithmetic expansion is
$((expression))
The shell evaluates expression and replaces $((expression)) with the result. This syntax is similar to the syntax used for command substitution [$(...)] and performs a parallel function. You can use $((expression)) as an argument to a command or in place of any numeric value on a command line.
The rules for forming expression are the same as those found in the C programming language; all standard C arithmetic operators are available (see Table 27-8 on page 1059). Arithmetic in bash is done using integers. Unless you use variables of type integer (page 358) or actual integers, however, the shell must convert string-valued variables to integers for the purpose of the arithmetic evaluation.
You do not need to precede variable names within expression with a dollar sign ($). In the following example, after read (page 1041) assigns the user’s response to age, an arithmetic expression determines how many years are left until age 100:
$ cat age_check
#!/bin/bash
read -p "How old are you? " age
echo "Wow, in $((100-age)) years, you'll be 100!"
$ ./age_check
How old are you? 55
Wow, in 45 years, you'll be 100!
You do not need to enclose the expression within quotation marks because bash does not perform pathname expansion until later. This feature makes it easier for you to use an asterisk (*) for multiplication, as the following example shows:
$ echo There are $((60*60*24*365)) seconds in a non-leap year.
There are 31536000 seconds in a non-leap year.
The next example uses wc, cut, arithmetic expansion, and command substitution (page 410) to estimate the number of pages required to print the contents of the file letter.txt. The output of the wc (word count) utility used with the –l option is the number of lines in the file, in columns (character positions) 1 through 4, followed by a SPACE and the name of the file (the first command following). The cut utility with the –c1–4 option extracts the first four columns.
$ wc -l letter.txt
351 letter.txt
$ wc -l letter.txt | cut -c1-4
351
The dollar sign and single parenthesis instruct the shell to perform command substitution; the dollar sign and double parentheses indicate arithmetic expansion:
$ echo $(( $(wc -l letter.txt | cut -c1-4)/66 + 1))
6
The preceding example sets up a pipeline that sends standard output from wc to standard input of cut. Because of command substitution, the output of both commands replaces the commands between the $( and the matching ) on the command line. Arithmetic expansion then divides this number by 66, the number of lines on a page. A 1 is added because integer division discards remainders.
Tip: Fewer dollar signs ($)
When you specify variables within $(( and )), the dollar signs that precede individual variable references are optional. This format also allows you to include whitespace around operators, making expressions easier to read.
$ x=23 y=37
$ echo $(( 2 * $x + 3 * $y ))
157
$ echo $(( 2 * x + 3 * y ))
157
Another way to get the same result without using cut is to redirect the input to wc instead of having wc get its input from a file you name on the command line. When you redirect its input, wc does not display the name of the file:
$ wc -l < letter.txt
351
It is common practice to assign the result of arithmetic expansion to a variable:
$ numpages=$(( $(wc -l < letter.txt)/66 + 1))
let builtin
The let builtin evaluates arithmetic expressions just as the $(( )) syntax does. The following command is equivalent to the preceding one:
$ let "numpages=$(wc -l < letter.txt)/66 + 1"
The double quotation marks keep the SPACEs (both those you can see and those that result from the command substitution) from separating the expression into separate arguments to let. The value of the last expression determines the exit status of let. If the value of the last expression is 0, the exit status of let is 1; otherwise, the exit status is 0.
You can supply let with multiple arguments on a single command line:
$ let a=5+3 b=7+2
$ echo $a $b
8 9
When you refer to variables when doing arithmetic expansion with let or $(( )), the shell does not require a variable name to begin with a dollar sign ($). Nevertheless, it is a good practice to do so for consistency, because in most places you must precede a variable name with a dollar sign.
![]() Command Substitution
Command Substitution
Command substitution replaces a command with the output of that command. The preferred syntax for command substitution under bash is
$(command)
Under bash you can also use the following, older syntax:
'command'
The shell executes command within a subshell and replaces command, along with the surrounding punctuation, with standard output of command. Standard error of command is not affected.
In the following example, the shell executes pwd and substitutes the output of the command for the command and surrounding punctuation. Then the shell passes the output of the command, which is now an argument, to echo, which displays it.
$ echo $(pwd)
/home/max
The next script assigns the output of the pwd builtin to the variable where and displays a message containing the value of this variable:
$ cat where
where=$(pwd)
echo "You are using the $where directory."
$ ./where
You are using the /home/zach directory.
Although it illustrates how to assign the output of a command to a variable, this example is not realistic. You can more directly display the output of pwd without using a variable:
$ cat where2
echo "You are using the $(pwd) directory."
$ ./where2
You are using the /home/zach directory.
The following command uses find to locate files with the name README in the directory tree rooted at the working directory. This list of files is standard output of find and becomes the list of arguments to ls.
$ ls -l $(find . -name README -print)
The next command line shows the older ‘command’ syntax:
$ ls -l ‘find . -name README -print‘
One advantage of the newer syntax is that it avoids the rather arcane rules for token handling, quotation mark handling, and escaped back ticks within the old syntax. Another advantage of the new syntax is that it can be nested, unlike the old syntax. For example, you can produce a long listing of all README files whose size exceeds the size of ./README using the following command:
$ ls -l $(find . -name README -size +$(echo $(cat ./README | wc -c)c ) -print )
Try giving this command after giving a set –x command (page 994) to see how bash expands it. If there is no README file, the command displays the output of ls –l.
For additional scripts that use command substitution, see pages 991, 1010, and 1050.
Tip: $(( versus $(
The symbols $(( constitute a single token. They introduce an arithmetic expression, not a command substitution. Thus, if you want to use a parenthesized subshell (page 344) within $(), you must put a SPACE between the $( and the following (.
Word Splitting
The results of parameter and variable expansion, command substitution, and arithmetic expansion are candidates for word splitting. Using each character of IFS (page 363) as a possible delimiter, bash splits these candidates into words or tokens. If IFS is unset, bash uses its default value (SPACE-TAB-NEWLINE). If IFS is null, bash does not split words.
![]() Pathname Expansion
Pathname Expansion
Pathname expansion (page 165), also called filename generation or globbing, is the process of interpreting ambiguous file references and substituting the appropriate list of filenames. Unless noglob (page 402) is set, the shell performs this function when it encounters an ambiguous file reference—a token containing any of the unquoted characters *, ?, [, or ]. If bash cannot locate any files that match the specified pattern, the token with the ambiguous file reference remains unchanged. The shell does not delete the token or replace it with a null string but rather passes it to the program as is (except see nullglob on page 402).
In the first echo command in the following example, the shell expands the ambiguous file reference tmp* and passes three tokens (tmp1, tmp2, and tmp3) to echo. The echo builtin displays the three filenames it was passed by the shell. After rm removes the three tmp* files, the shell finds no filenames that match tmp* when it tries to expand it. It then passes the unexpanded string to the echo builtin, which displays the string it was passed.
$ ls
tmp1 tmp2 tmp3
$ echo tmp*
tmp1 tmp2 tmp3
$ rm tmp*
$ echo tmp*
tmp*
A period that either starts a pathname or follows a slash (/) in a pathname must be matched explicitly unless you have set dotglob (page 401). The option nocaseglob (page 402) causes ambiguous file references to match filenames without regard to case.
![]() Quotation marks
Quotation marks
Putting double quotation marks around an argument causes the shell to suppress pathname and all other kinds of expansion except parameter and variable expansion. Putting single quotation marks around an argument suppresses all types of expansion. The second echo command in the following example shows the variable $max between double quotation marks, which allow variable expansion. As a result the shell expands the variable to its value: sonar. This expansion does not occur in the third echo command, which uses single quotation marks. Because neither single nor double quotation marks allow pathname expansion, the last two commands display the unexpanded argument tmp*.
$ echo tmp* $max
tmp1 tmp2 tmp3 sonar
$ echo "tmp* $max"
tmp* sonar
$ echo 'tmp* $max'
tmp* $max
The shell distinguishes between the value of a variable and a reference to the variable and does not expand ambiguous file references if they occur in the value of a variable. As a consequence you can assign to a variable a value that includes special characters, such as an asterisk (*).
Levels of expansion
In the next example, the working directory has three files whose names begin with letter. When you assign the value letter* to the variable var, the shell does not expand the ambiguous file reference because it occurs in the value of a variable (in the assignment statement for the variable). No quotation marks surround the string letter*; context alone prevents the expansion. After the assignment the set builtin (with the help of grep) shows the value of var to be letter*.
$ ls letter*
letter1 letter2 letter3
$ var=letter*
$ set | grep var
var='letter*'
$ echo '$var'
$var
$ echo "$var"
letter*
$ echo $var
letter1 letter2 letter3
The three echo commands demonstrate three levels of expansion. When $var is quoted with single quotation marks, the shell performs no expansion and passes the character string $var to echo, which displays it. With double quotation marks, the shell performs variable expansion only and substitutes the value of the var variable for its name, preceded by a dollar sign. No pathname expansion is performed on this command because double quotation marks suppress it. In the final command, the shell, without the limitations of quotation marks, performs variable substitution and then pathname expansion before passing the arguments to echo.
Process Substitution
The Bourne Again Shell can replace filename arguments with processes. An argument with the syntax <(command) causes command to be executed and the output to be written to a named pipe (FIFO). The shell replaces that argument with the name of the pipe. If that argument is then used as the name of an input file during processing, the output of command is read. Similarly an argument with the syntax >(command) is replaced by the name of a pipe that command reads as standard input.
The following example uses sort (page 239) with the –m (merge, which works correctly only if the input files are already sorted) option to combine two word lists into a single list. Each word list is generated by a pipeline that extracts words matching a pattern from a file and sorts the words in that list.
$ sort -m -f <(grep "[^A-Z]..$" memo1 | sort) <(grep ".*aba.*" memo2 |sort)
Quote Removal
After bash finishes with the preceding list, it performs quote removal. This process removes from the command line single quotation marks, double quotation marks, and backslashes that are not a result of an expansion.
Chapter Summary
The shell is both a command interpreter and a programming language. As a command interpreter, it executes commands you enter in response to its prompt. As a programming language, it executes commands from files called shell scripts. When you start a shell, it typically runs one or more startup files.
Running a shell script
When the file holding a shell script is in the working directory, there are three basic ways to execute the shell script from the command line.
1. Type the simple filename of the file that holds the script.
2. Type an absolute or relative pathname, including the simple filename preceded by ./.
3. Type bash followed by the name of the file.
Technique 1 requires the working directory to be in the PATH variable. Techniques 1 and 2 require you to have execute and read permission for the file holding the script. Technique 3 requires you to have read permission for the file holding the script.
Job control
A job is another name for a process running a pipeline (which can be a simple command). You can bring a job running in the background into the foreground using the fg builtin. You can put a foreground job into the background using the bg builtin, provided you first suspend the job by pressing the suspend key (typically CONTROL-Z). Use the jobs builtin to display the list of jobs that are running in the background or are suspended.
Variables
The shell allows you to define variables. You can declare and initialize a variable by assigning a value to it; you can remove a variable declaration using unset. Shell variables are local to the process they are defined in. Environment variables are global and are placed in the environment using the export builtin so they are available to child processes. Variables you declare are called user-created variables. The shell defines keyword variables. Within a shell script you can work with the positional (command-line) parameters the script was called with.
Locale
Locale specifies the way locale-aware programs display certain kinds of data, such as times and dates, money and other numeric values, telephone numbers, and measurements. It can also specify collating sequence and printer paper size.
Process
Each process is the execution of a single command and has a unique identification (PID) number. When you give the shell a command, it forks a new (child) process to execute the command (unless the command is built into the shell). While the child process is running, the shell is in a state called sleep. By ending a command line with an ampersand (&), you can run a child process in the background and bypass the sleep state so the shell prompt returns immediately after you press RETURN. Each command in a shell script forks a separate process, each of which might in turn fork other processes. When a process terminates, it returns its exit status to its parent process. An exit status of zero signifies success; a nonzero value signifies failure.
History
The history mechanism maintains a list of recently issued command lines called events, which provides a way to reexecute previous commands quickly. There are several ways to work with the history list; one of the easiest is to use a command-line editor.
Command-line editors
When using an interactive Bourne Again Shell, you can edit a command line and commands from the history list, using either of the Bourne Again Shell’s command-line editors (vim or emacs). When you use the vim command-line editor, you start in Input mode, unlike with the stand-alone version of vim. You can switch between Command and Input modes. The emacs editor is modeless and distinguishes commands from editor input by recognizing control characters as commands.
Aliases
An alias is a name the shell translates into another name or command. Aliases allow you to define new commands by substituting a string for the first token of a simple command.
Functions
A shell function is a series of commands that, unlike a shell script, is parsed prior to being stored in memory. As a consequence shell functions run faster than shell scripts. Shell scripts are parsed at runtime and are stored on disk. A function can be defined on the command line or within a shell script. If you want the function definition to remain in effect across login sessions, you can define it in a startup file. Like functions in many programming languages, a shell function is called by giving its name followed by any arguments.
Shell features
There are several ways to customize the shell’s behavior. You can use options on the command line when you call bash. You can also use the bash set and shopt builtins to turn features on and off.
Command-line expansion
When it processes a command line, the Bourne Again Shell replaces some words with expanded text. Most types of command-line expansion are invoked by the appearance of a special character within a word (for example, the leading dollar sign that denotes a variable). Table 9-6 on page366 lists these special characters. The expansions take place in a specific order. Following the history and alias expansions, the common expansions are parameter and variable expansion, command substitution, and pathname expansion. Surrounding a word with double quotation marks suppresses all types of expansion except parameter and variable expansion. Single quotation marks suppress all types of expansion, as does quoting (escaping) a special character by preceding it with a backslash.
Exercises
1. Explain the following unexpected result:
$ whereis date
date: /bin/date ...
$ echo $PATH
.:/usr/local/bin:/usr/bin:/bin
$ cat > date
echo "This is my own version of date."
$ ./date
Tue May 21 11:45:49 PDT 2013
2. What are two ways you can execute a shell script when you do not have execute permission for the file containing the script? Can you execute a shell script if you do not have read permission for the file containing the script?
3. What is the purpose of the PATH variable?
a. Set the PATH variable and place it in the environment so it causes the shell to search the following directories in order:
• /usr/local/bin
• /usr/bin
• /bin
• /usr/kerberos/bin
• The bin directory in your home directory
• The working directory
b. If there is an executable file named doit in /usr/bin and another file with the same name in your ~/bin directory, which one will be executed?
c. If your PATH variable is not set to search the working directory, how can you execute a program located there?
d. Which command can you use to add the directory /usr/games to the end of the list of directories in PATH?
4. Assume you have made the following assignment:
$ person=zach
Give the output of each of the following commands.
a. echo $person
b. echo '$person'
c. echo "$person"
5. The following shell script adds entries to a file named journal-file in your home directory. This script helps you keep track of phone conversations and meetings.
$ cat journal
# journal: add journal entries to the file
# $HOME/journal-file
file=$HOME/journal-file
date >> $file
echo -n "Enter name of person or group: "
read name
echo "$name" >> $file
echo >> $file
cat >> $file
echo "----------------------------------------------------" >>
$file
echo >> $file
a. What do you have to do to the script to be able to execute it?
b. Why does the script use the read builtin the first time it accepts input from the terminal and the cat utility the second time?
6. Assume the /home/zach/grants/biblios and /home/zach/biblios directories exist. Specify Zach’s working directory after he executes each sequence of commands. Explain what happens in each case.
a.
$ pwd
/home/zach/grants
$ CDPATH=$(pwd)
$ cd
$ cd biblios
b.
$ pwd
/home/zach/grants
$ CDPATH=$(pwd)
$ cd $HOME/biblios
7. Name two ways you can identify the PID number of the login shell.
8. Enter the following command:
$ sleep 30 | cat /etc/services
Is there any output from sleep? Where does cat get its input from? What has to happen before the shell will display a prompt?
Advanced Exercises
9. Write a sequence of commands or a script that demonstrates variable expansion occurs before pathname expansion.
10. Write a shell script that outputs the name of the shell executing it.
11. Explain the behavior of the following shell script:
$ cat quote_demo
twoliner="This is line 1.
This is line 2."
echo "$twoliner"
echo $twoliner
a. How many arguments does each echo command see in this script? Explain.
b. Redefine the IFS shell variable so the output of the second echo is the same as the first.
12. Add the exit status of the previous command to your prompt so it behaves similarly to the following:
$ [0] ls xxx
ls: xxx: No such file or directory
$ [1]
13. The dirname utility treats its argument as a pathname and writes to standard output the path prefix—that is, everything up to but not including the last component:
$ dirname a/b/c/d
a/b/c
If you give dirname a simple filename (no / characters) as an argument, dirname writes a . to standard output:
$ dirname simple
.
Implement dirname as a bash function. Make sure it behaves sensibly when given such arguments as /.
14. Implement the basename utility, which writes the last component of its pathname argument to standard output, as a bash function. For example, given the pathname a/b/c/d, basename writes d to standard output:
$ basename a/b/c/d
d
15. The Linux basename utility has an optional second argument. If you give the command basename path suffix, basename removes the suffix and the prefix from path:
$ basename src/shellfiles/prog.bash .bash
prog
$ basename src/shellfiles/prog.bash .c
prog.bash
Add this feature to the function you wrote for exercise 14.