A practical guide to Fedora and Red Hat Enterprise Linux, 7th Edition (2014)
Part III: System Administration
Chapter 15. Administration Tasks
In This Chapter
Configuring User and Group Accounts
Backing Up Files
Scheduling Tasks
System Reports
parted: Reports on and Partitions a Hard Disk
logrotate: Manages Log Files
rsyslogd: Logs System Messages
Solving Problems
Speeding Up the System
Keeping the System Secure
Disk Quota System
Objectives
After reading this chapter you should be able to:
![]() Add and manage user accounts using system-config-users
Add and manage user accounts using system-config-users
![]() Add and manage user accounts from the command line
Add and manage user accounts from the command line
![]() Back up files using tar and cpio
Back up files using tar and cpio
![]() Schedule tasks to be run in the future using crond, anacron, and at
Schedule tasks to be run in the future using crond, anacron, and at
![]() Monitor the system using various tools including vmstat and top
Monitor the system using various tools including vmstat and top
![]() Monitor and manage log files
Monitor and manage log files
![]() Manage disk partitions using parted
Manage disk partitions using parted
![]() Communicate with users
Communicate with users
The system administrator has many responsibilities. This chapter discusses tasks not covered in Chapter 10, including configuring user and group accounts, backing up files, scheduling tasks, general problem solving, and using the system log daemon, rsyslogd.
Configuring User and Group Accounts
More than a username is required for a user to be able to log in on and use a system: A user must have the necessary files, directories, permissions, and usually a password to log in. At a minimum a user must have an entry in the /etc/passwd and /etc/shadow files and a home directory. The Settings ![]() Users window (page 112) allows you to configure basic aspects of a user account. This section describes several additional ways you can work with user accounts. Refer to Chapter 21 if you want to run NIS to manage the passwd database.
Users window (page 112) allows you to configure basic aspects of a user account. This section describes several additional ways you can work with user accounts. Refer to Chapter 21 if you want to run NIS to manage the passwd database.
Tip: Administrators and the wheel group
A member of the wheel group, called an administrator, is able to use her password to authenticate using sudo and does not need to know or use the root password for most administration tasks. Refer to “Administrator and the wheel group” on page 429 for more information.
![]() system-config-users: Manages User Accounts
system-config-users: Manages User Accounts
The system-config-users utility (system-config-users package) displays the User Manager window and enables you to add, delete, and modify system users and groups. Open this window by giving the command system-config-users from an Enter a Command window (ALT-F2) or a terminal emulator. This window has two tabs: Users and Groups, where each tab displays information appropriate to its name. Figure 15-1 shows the Users tab.
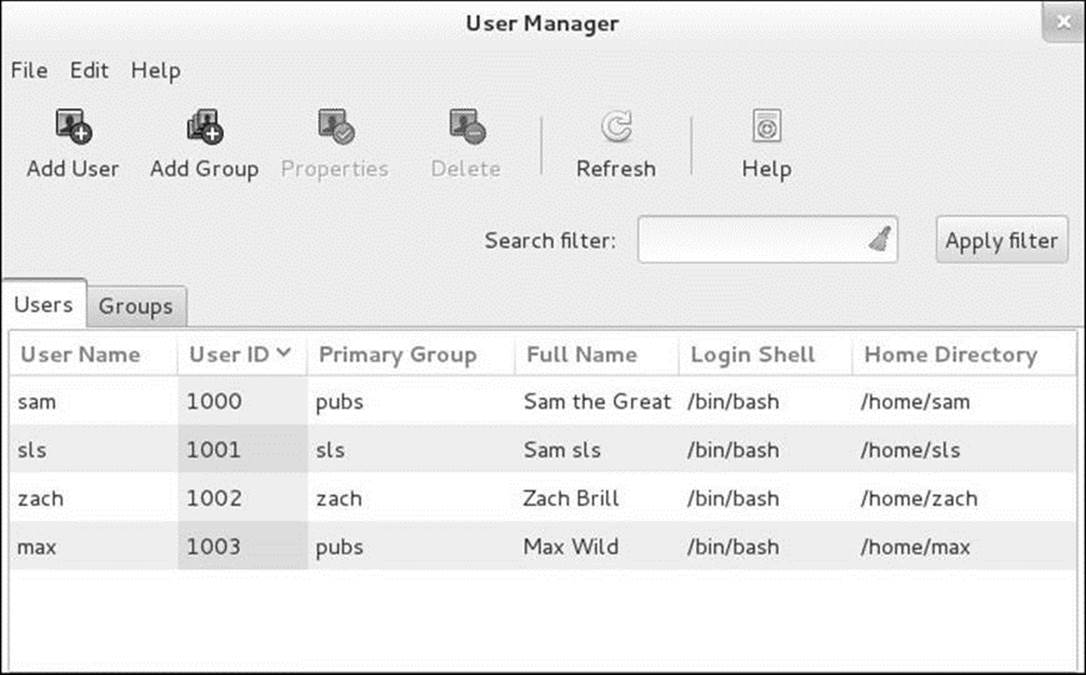
Figure 15-1 The User Manager window, Users tab
Tip: By default, system-config-users does not display system users and groups
By default, system-config-users does not display users with UIDs less than 1000 and groups with GIDs less than 1000. To display these users and groups, click menubar: Edit![]() Preferences and remove the tick from the check box labeled Hide system users and groups.
Preferences and remove the tick from the check box labeled Hide system users and groups.
Authentication
Because you can use system-config-users to make changes to the system that affect other users, this utility asks you to authenticate yourself.
Search filter
The Search filter, located just below the toolbar, selects users or groups whose names match the string you enter in the text box labeled Search filter. The string can include wildcards. The string matches the beginning of a name. For example, *nob matches nobody and nfsnobody, whereasnob matches only nobody. After you enter the string, click Apply filter or press RETURN. If you have only a few users, you will not need to use the Search filter.
Adding a User
To add a user to the system, click the button on the toolbar labeled Add User. The User Manager window displays the Add New User window, which gathers much of the same information as the User Data tab of the User Properties window (Figure 15-2). Enter the information for the new user and click OK. After you create a user, you can modify information related to that user.
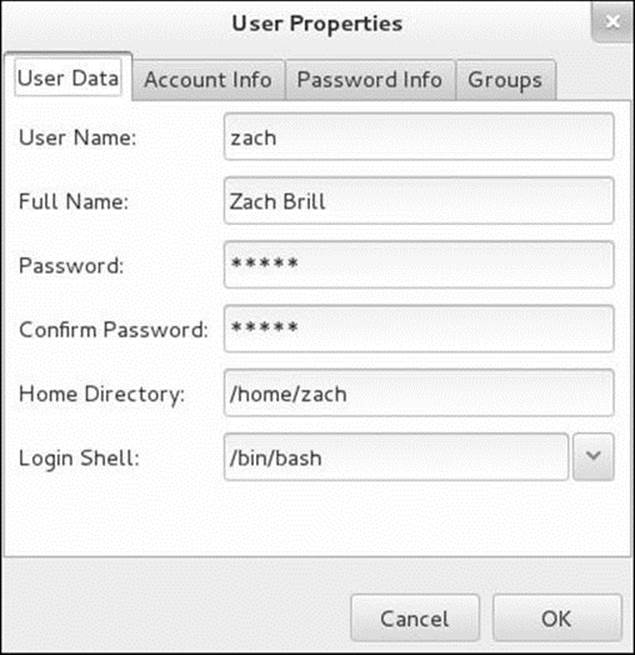
Figure 15-2 The User Properties window, User Data tab
![]() Modifying a User
Modifying a User
To modify a user, highlight the user in the User Manager window and click Properties on the toolbar; the utility displays the User Properties window (Figure 15-2), which has four tabs. The User Data tab holds basic user information such as name and password. The Account Info tab allows you to specify an expiration date for the account and to lock the account so the user cannot log in locally. The Password Info tab allows you to turn on password expiration and specify various related parameters. In the Groups tab, you can specify which groups the user is a member of. ClickOK when you are done making changes in this window.
![]() Working with Groups
Working with Groups
Click the Groups tab in the User Manager window to work with groups. To create a group, click Add Group on the toolbar and specify the name of the group. To change the name of a group or to add or remove users from a group, highlight the group and click Properties on the toolbar. Click the appropriate tab, make the changes you want, and click OK. See page 506 for more information on groups. Refer to “Administrator and the wheel group” on page 429 for information about how being a member of the wheel group allows a user to use sudo to authenticate using his password (not the root password).
Help
To obtain assistance, click Help on the toolbar.
When you are done working with users and groups, close the window.
![]() Managing User Accounts from the Command Line
Managing User Accounts from the Command Line
In addition to using the graphical User Manager window to manage user accounts, you can use the command-line tools described in this section.
![]() useradd: Adds a User Account
useradd: Adds a User Account
The useradd utility adds a user account to the system. By default, useradd assigns the next highest unused user ID to a new account and specifies bash as the user’s login shell. The following example adds entries to the /etc/passwd and /etc/shadow files, creates the user’s home directory (in /home), specifies the user’s group ID as 1105, and puts the user’s full name in the comment field in passwd. The group ID you specify must exist in /etc/group or the command will fail. Use groupadd (next page) to add a group.
# useradd -g 1105 -c "Max W." max
![]() /etc/skel
/etc/skel
The useradd utility puts a !! in the password field of the shadow file (page 511) to prevent the user from logging in until you use passwd to assign a password to that user (page 137). Based on the /etc/login.defs and /etc/default/useradd files, useradd creates a home directory for the new user. When doing so, it copies the contents of /etc/skel to that directory. For more information on adding user information, see the useradd man page.
![]() userdel: Removes a User Account
userdel: Removes a User Account
The userdel utility deletes a user account. If appropriate, back up the files belonging to the user before deleting them. The following command removes Max’s account. The –r (––remove) option causes the command to remove his home directory hierarchy:
# userdel --remove max
See the userdel man page for more information.
![]() usermod: Modifies a User Account
usermod: Modifies a User Account
To turn off a user’s account temporarily, you can use usermod to change the expiration date for the account. Because it specifies that his account expired in the past (December 31, 2010), the following command prevents Max from logging in:
# usermod -e "12/31/10" max
![]() chage
chage
You can also use chage to view and modify account expiry information. The –l (––list) option displays information about password expiration, and –E (––expiredate) changes the date an account expires. The following command has the same effect as the preceding one:
# chage -E "12/31/10" max
See the usermod and chage man pages for more information.
![]() groupadd: Adds a Group
groupadd: Adds a Group
Just as useradd adds a new user to the system, so groupadd adds a new group by adding an entry to /etc/group (page 506). The following example creates a group named pubs with a group ID of 1024:
# groupadd -g 1024 pubs
Unless you use the –g option to assign a group ID, the system picks the next available sequential number greater than 1000. The –o option allows the group ID to be non-unique, which allows you to assign multiple names to a group ID.
![]() groupdel and groupmod: Remove and Modify a Group
groupdel and groupmod: Remove and Modify a Group
The analogue of userdel for groups is groupdel, which takes a group name as an argument. You can also use groupmod to change the name or group ID of a group, as in the following examples:
# groupmod -g 1025 pubs
# groupmod -n manuals pubs
The first example changes the group ID number of the previously created pubs group. The second example renames the pubs group to manuals.
Caution: Changing group ID numbers
The groupmod utility does not change group numbers in /etc/passwd when you renumber a group. Instead, you must edit /etc/passwd and change the entries manually. If you change the number of a group, files that are associated with the group will no longer be associated with the group. Rather, they might be associated with no group or with another group with the old group ID number.
Backing Up Files
One of the most neglected tasks of system administration is making backup copies of files on a regular basis. The backup copies are vital in three instances: when the system malfunctions and files are lost, when a catastrophic disaster (fire, earthquake, and so on) occurs, and when a user or the system administrator deletes or corrupts a file by accident. Even when you set up RAID (page 42), you still need to back up files. Although RAID can provide fault tolerance (helpful in the event of disk failure), it does not help when a catastrophic disaster occurs or when a file is corrupted or removed accidentally. It is a good idea to have a written backup policy and to keep copies of backups offsite (in another building, at home, or at a different facility or campus) in a fireproof vault or safe.
The time to start thinking about backups is when you partition the disk. Refer to “Partitioning a Disk” on page 39. Make sure the capacity of the backup device and your partition sizes are comparable. Although you can back up a partition onto multiple volumes, it is easier not to—and it is much easier to restore data from a single volume.
You must back up filesystems regularly. Backup files are usually kept on magnetic tape, an external hard disk, or other removable media. Alternately, you can keep backup files on a remote system. How often and which files you back up depend on the system and your needs. Use this criterion when determining a backup schedule: If the system crashes, how much work are you willing to lose? Ideally you would back up all files on the system every few minutes so you would never lose more than a few minutes of work.
Of course, there is a tradeoff: How often are you willing to back up the files? The backup procedure typically slows the system for users, takes a certain amount of your time, and requires that you have and store the media holding the backup. Avoid backing up an active filesystem; the results might be inconsistent, and restoring from the backup might be impossible. This requirement is a function of the backup program and the filesystem you are backing up.
Another question is when to run the backup. Unless you plan to kick users off and bring the system down to single-user mode (not a user-friendly practice), you will want to perform this task when the machine is at its quietest. Depending on the use of the system, sometime in the middle of the night can work well. Then the backup is least likely to affect users, and the files are not likely to change as they are being read for backup.
A full backup makes copies of all files, regardless of when they were created or accessed. An incremental backup makes copies of those files that have been created or modified since the last (usually full) backup.
The more people using the system, the more often you should back up the filesystems. One popular schedule is to perform an incremental backup one or two times a day and a full backup one or two times a week.
Choosing a Backup Medium
If the local system is connected to a network, you can write backups to a drive on another system. This technique is often used with networked computers to avoid the cost of having a backup drive on each computer in the network and to simplify management of backing up many computers in a network. Although tapes are still used for backups, hard disks are being used more frequently. Backing up to a hard disk on a remote system is cost-effective, reliable, and practical. Because hard disks hold terabytes of data, using them simplifies the task of backing up the system, making it more likely that you will take care of this important task regularly. Other options for holding backups are writable CD/DVDs and USB flash drives. These devices, although not as cost-effective or able to store as much information as hard disk or tape systems, offer the benefit of convenience.
Backup Utilities
A number of utilities are available to help you back up a system, and most work with any media. Most Linux backup utilities are based on one of the archive programs—tar or cpio—and augment these basic programs with bookkeeping support for managing backups conveniently.
You can use any of the tar, cpio, or dump/restore utilities to construct full or partial backups of a system. Each utility constructs a large file that contains, or archives, other files. In addition to file contents, an archive includes header information for each file it holds. This header information can be used when extracting files from the archive to restore file permissions and modification dates. An archive file can be saved to disk, written to tape, or shipped across the network while it is being created.
In addition to helping you back up the system, these programs offer a convenient way to bundle files for distribution to other sites. The tar program is often used for this purpose, and some software packages available on the Internet are bundled as tar archive files.
amanda
The amanda (Advanced Maryland Automatic Network Disk Archiver) utility (www.amanda.org), which is one of the more popular backup systems, uses dump or tar and takes advantage of Samba to back up Windows systems. The amanda utility backs up a LAN of heterogeneous hosts to a hard disk or tape. Relevant software packages are amanda-client and amanda-server.
![]() tar: Archives Files
tar: Archives Files
The tar (tape archive) utility—see page 249 for an introduction—writes files to and retrieves files from an archive; it can compress this archive to conserve space. If you do not specify an archive device, tar writes to standard output and reads from standard input. With the –f (––file) option,tar uses the argument to –f as the name of the archive device. You can use this option to refer to a device on another system on the network. Although tar has many options, you need only a few in most situations. The following command displays a complete list of options:
$ tar ––help | less
Most options for tar can be given either in a short form (a single letter) or as a descriptive word. Descriptive-word options are preceded by two hyphens, as in ––help. Single-letter options can be combined into a single command-line argument and need not be preceded by a hyphen (for consistency with other utilities, it is good practice to use the hyphen anyway).
Although the following two commands look quite different, they specify the same tar options in the same order. The first version combines single-letter options into a single command-line argument; the second version uses descriptive words for the same options:
# tar –ztvf /dev/st0
# tar ––gzip ––list ––verbose ––file /dev/st0
Both commands tell tar to generate a (v, verbose) table of contents (t, list) from the tape on /dev/st0 (f, file), using gzip (z, gzip) to decompress the files.
Unlike the original UNIX tar utility, when you specify an absolute pathname when you archive a file, the GNU version strips the leading / from the file pathname. Also, when it extracts files from a compressed archive, it decompresses them automatically. The first of the following commands shows tar compressing (j causes tar to compress using bzip2; page 245) and archiving some files from the /etc directory; it displays a message telling you it is stripping the leading /s. The second command extracts the files to the working directory. Because tar strips the leading / from each pathname, the files are not restored to their original locations in the root directory (/). The third command shows the extracted files in the working directory.
$ tar -cvjf etc.gtk /etc/gtk*
tar: Removing leading '/' from member names
/etc/gtk-2.0/
/etc/gtk-2.0/x86_64-redhat-linux-gnu/
/etc/gtk-2.0/x86_64-redhat-linux-gnu/gtk.immodules
/etc/gtk-2.0/gtkrc
/etc/gtk-3.0/
/etc/gtk-3.0/settings.ini
$ tar -xvf etc.gtk
etc/gtk-2.0/
etc/gtk-2.0/x86_64-redhat-linux-gnu/
etc/gtk-2.0/x86_64-redhat-linux-gnu/gtk.immodules
etc/gtk-2.0/gtkrc
etc/gtk-3.0/
etc/gtk-3.0/settings.ini
$ ls etc
gtk-2.0 gtk-3.0
You can use the –C option to cause tar to extract files to a directory other than the working directory. The argument to this option specifies the directory tar extracts the files to.
The options in Table 15-1 tell the tar program what to do. You must include exactly one of these options in a tar command. The –c, –t, and –x options are used most frequently.
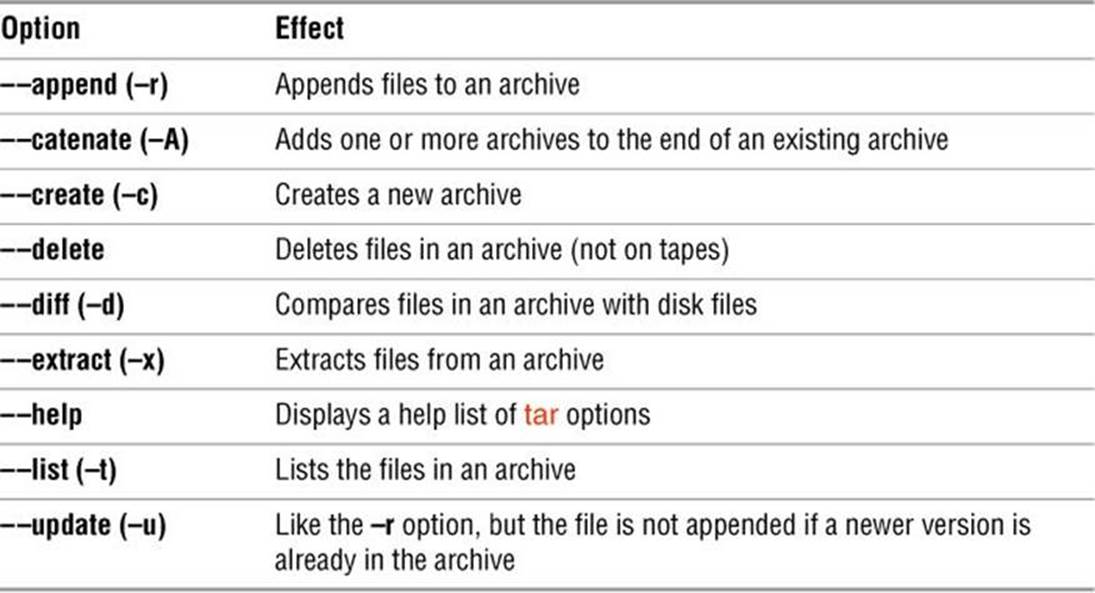
Table 15-1 tar options
![]() cpio: Archives Files
cpio: Archives Files
The cpio (copy in/out) program is similar to tar but can read and write archive files in various formats, including the one used by tar. Normally cpio reads the names of the files to add to the archive from standard input and produces the archive file as standard output. When extracting files from an archive, it reads the archive as standard input.
While tar takes the name of a directory as an argument and traverses the directory hierarchy recursively to archive the directory, cpio must be presented with each filename it is to archive. For example, the following commands each back up the /bin directory:
$ tar cf bin.tar.bak /bin
$ find /bin -print | cpio -o > bin.cpio.bak
In the second command, find (page 229) sends a list of files in the /bin directory hierarchy to standard output; cpio reads this list from standard input and creates an archive of these files.
Another difference between these two utilities is that cpio does not strip the leading / from each pathname when it creates an archive. Restoring the cpio archive created in the preceding example will attempt to overwrite the files in /bin; it fails because the files in /bin are the same age as the files in the archive. Even if the files in the archive were newer, it would fail because the user does not have permission to overwrite the files in /bin.
As with tar, some options can be given in both a short, single-letter form and a more descriptive word form. However, unlike with tar, the syntax of the two forms in cpio differs when the option must be followed by additional information. In the short form, you must include a SPACE between the option and the additional information; with the word form, you must separate the two with an equal sign and no SPACEs.
Running cpio with the ––help option displays a complete list of options. See the next section for more examples of cpio.
Performing a Simple Backup
When you prepare to make a major change to a system, such as replacing a disk drive, upgrading to a new release, or updating the Linux kernel, it is a good idea to archive some or all of the files so you can restore any that become damaged if something goes wrong. For this type of backup,tar or cpio works well. For example, if you have a SCSI tape drive as device /dev/st0 (or it could be a hard disk at /dev/sda) that is capable of holding all the files on a single tape, you can use the following commands to construct a backup tape of the entire filesystem:
# cd /
# tar –cf /dev/st0 .
All the commands in this section start by using cd to change to the root directory so you are sure to back up the entire filesystem. The tar command then creates an archive (c) on the device /dev/st0 (f). To compress the archive, replace the preceding tar command with the following command, which uses j to call bzip2:
# tar –cjf /dev/st0 .
You can back up a system with a combination of find and cpio. The following commands create an output file and set the I/O block size to 5120 bytes (the default is 512 bytes):
# cd /
# find . –depth | cpio –oB > /dev/st0
The next command restores the files in the /home directory from the preceding backup. The options extract files from an archive (–i) in verbose mode (–v), keeping the modification times (–m), and creating directories (–d) as needed. The asterisk is escaped (preceded by a backslash) so the shell does not expand it but rather passes it to cpio.
# cd /
# cpio –ivmd /home/\* < /dev/st0
Although all the archive programs work well for simple backups, utilities such as amanda (page 603) provide more sophisticated backup and restore systems. For example, to determine whether a file is in an archive, you must read the entire archive. If the archive is split across several tapes, this process is particularly tiresome. More sophisticated utilities, including amanda, assist you in several ways, including keeping a table of contents of the files in a backup.
dump, restore
The dump utility (dump package) first appeared in UNIX version 6. It backs up either an entire ext2, ext3, or ext4 filesystem or only those files that have changed since a recent dump. The restore utility can then restore an entire filesystem, a directory hierarchy, or an individual file. Although it is available, not many people use this utility. Refer to dump.sourceforge.net and the dump and restore man pages for more information.
Tip: Exclude some directories from a backup
In practice, you will likely want to exclude some directories from the backup process. For example, not backing up /tmp or /var/tmp (or its link, /usr/tmp) can save room in the archive. Also, do not back up the files in proc. Because the /proc pseudofilesystem is not a true disk filesystem but rather a way for the Linux kernel to provide information about the operating system and system memory, you need not back up /proc; you cannot restore it later. Similarly, you do not need to back up filesystems that are mounted from disks on other systems on the network. Do not back up FIFOs; the results are unpredictable.
Scheduling Tasks
It is a good practice to schedule certain routine tasks to run automatically. For example, you might want to remove old core files once a week, summarize accounting data daily, and rotate system log files monthly.
Tip: crond stops for no one; try anacron
The crond daemon assumes the system is always running. A similar utility, anacron, does not make that assumption and is well suited to portable and home computers that are frequently turned off. The anacron utility takes its instructions from the /etc/anacrontab file unless you specify otherwise. It is enabled by default and is set up to catch any missed cron.daily, cron.weekly, and cron.monthly run-parts commands as described in the following sections. Refer to the anacron and anacrontab man pages for more information.
![]() crond and anacron: Schedule Routine Tasks
crond and anacron: Schedule Routine Tasks
The crond daemon (service) executes scheduled commands periodically. This daemon can execute commands at specific times on systems that are always running. The anacron utility executes scheduled commands when it is called. It works well on laptops and other systems that are not on all the time. The 0anacron script (page 609), which calls anacron, will not run commands when a system is running on batteries (i.e., not on AC).
SELinux
When SELinux is set to use a targeted policy, it protects the crond daemon. You can disable this protection if necessary. For more information refer to “Setting the Targeted Policy with system-config-selinux” on page 475.
![]() Crontab Files
Crontab Files
The crond daemon reads the commands it is to execute from crontab files. System crontab files are kept in the /etc/cron.d directory and in /etc/crontab. Users can use the crontab utility to set up personal crontab files in /var/spool/cron. (The term crontab has three meanings: It refers to a text file in a specific format [a crontab file; crontab(5) man page], it is the name of a utility [crontab; crontab(1) man page], and it is the name of a file [/etc/crontab].)
By default, Fedora/RHEL is set up with no restrictions on which users can have crond run commands in their personal crontab files. See cron.allow and cron.deny on page 506 for ways of restricting this access.
System crontab files
Crontab files specify how often crond is to run a command. Within these files, comments begin with a hashmark (#). Crontab files frequently include assignments to several environment variables: The SHELL and PATH environment variables are described on page 359; MAILTOdetermines which user receives output (via email) from jobs run by the file.
A line describing a job in a system crontab file, such as /etc/crontab, has the following format:
minute hour day-of-month month day-of-week user command
The first five fields indicate when crond will execute the command. The minute is the number of minutes after the start of the hour, the hour is the hour of the day based on a 24-hour clock, the day-of-month is a number from 1 to 31, and the day-of-week is a number from 0 to 7, with 0 and 7 indicating Sunday. An asterisk (*) substitutes for any value in a field. The user is the username or user ID of the user that the command will run as. Specify command as an absolute pathname to ensure crond executes the correct command.
Following are some examples:
20 1 * * * root /usr/local/bin/checkit
25 9 17 * * root /usr/local/bin/monthly.check
40 23 * * 7 root /usr/local/bin/sunday.check
10/* * * * * root /usr/local/bin/tenmin.check
All four lines run their commands with root privileges. The first line runs checkit every day at 1:20 AM. The second line runs monthly.check at 9:25 AM on day 17 of every month. The third line runs sunday.check at 11:40 PM every Sunday. The fourth line uses the step syntax to runtenmin.check every ten minutes; the 10/* is equivalent to 0,10,20,30,40,50. Enter the command man 5 crontab to obtain more information on crontab files.
![]() User crontab files
User crontab files
A user crontab file has the same format as a system crontab file except it does not include the user field because it always runs as the user who is running it. Users can work with their own crontab files by giving the command crontab followed by –l to list the file, –r to remove the file, or –eto edit the file. The –e option uses the vi editor by default; if you prefer, export (page 1032) and set the VISUAL or EDITOR environment variable to the textual editor of your choice. See the crontab man page for more information.
![]() /etc/crontab
/etc/crontab
The crond daemon looks for crontab files at /etc/crontab and in the /etc/cron.d directory. Following is the default /etc/crontab file, which does not run any jobs:
$ cat /etc/crontab
SHELL=/bin/bash
PATH=/sbin:/bin:/usr/sbin:/usr/bin
MAILTO=root
# For details see man 4 crontabs
# Example of job definition:
# .---------------- minute (0 - 59)
# | .------------- hour (0 - 23)
# | | .---------- day of month (1 - 31)
# | | | .------- month (1 - 12) OR jan,feb,mar,apr ...
# | | | | .---- day of week (0 - 6) (Sunday=0 or 7) OR sun,mon,tue,wed,thu,fri,sat
# | | | | |
# * * * * * user-name command to be executed
/etc/cron.d/0hourly
Following is the default /etc/cron.d/0hourly crontab file:
$ cat /etc/cron.d/0hourly
# Run the hourly jobs
SHELL=/bin/bash
PATH=/sbin:/bin:/usr/sbin:/usr/bin
MAILTO=root
01 * * * * root run-parts /etc/cron.hourly
run-parts
After setting some variables, this script executes run-parts with root privileges. The 01 * * * * at the beginning of the line causes crond to run the job one minute past the start of every hour. The run-parts utility runs the executable files in the directory named by its argument (/etc/cron.hourly). Output from the execution of these files is sent to the user named by MAILTO (root).
/etc/cron.hourly/0anacron
Following is the default /etc/cron.hourly/0anacron shell script:
$ cat /etc/cron.hourly/0anacron
#!/bin/bash
# Check whether 0anacron was run today already
if test -r /var/spool/anacron/cron.daily; then
day=`cat /var/spool/anacron/cron.daily`
fi
if [ `date +%Y%m%d` = "$day" ]; then
exit 0;
fi
# Do not run jobs when on battery power
if test -x /usr/bin/on_ac_power; then
/usr/bin/on_ac_power &> /dev/null
if test $? -eq 1; then
exit 0
fi
fi
/usr/sbin/anacron -s
The anacron utility keeps track of the last time it ran each of its jobs so when it is called, it can tell which jobs need to be run. The /var/spool/anacron/cron.daily file holds the date anacron last ran the job with the jobID of cron.daily. The 0anacron script first tests to see if today’s date is the same as the one held by the cron.daily file. If it is, anacron has already run today, so the script exits. Next the script tests to see if the system is running on AC power. If it is not, the script exits. Thus, if the cron.daily job has not been run today and if the system is running on AC power, the script executes anacron. The –s option causes anacron to run its jobs serially (not all at once).
/etc/anacrontab
When anacron is run, it reads the commands it is to execute from the /etc/anacrontab file. This file is where the files in the /etc/cron.daily, /etc/cron.weekly, and /etc/cron.monthly directories get executed on a system running anacron. The anacrontab file specifies how often anacron is to run one or more jobs, but has a different syntax from a crontab file. Within the anacrontab file, comments begin with a hashmark (#). Several variables that establish the environment a job runs in can appear within the anacrontab file: The SHELL and PATH environment variables are described on page 359; MAILTO determines which user receives output (via email) from jobs; RANDOM_DELAY delays the start of jobs by a random number of minutes up to the value of this variable; and START_HOURS_RANGE specifies the hours during which anacron can start a job.
A job entry in the anacrontab file has the following format:
period delay jobID command
where the period is the frequency in days (how often) that anacron executes the command, the delay is the number of minutes after anacron starts that it executes the command, and the jobID is the name of the file in /var/spool/anacron that anacron uses to keep track of when it last executed the command.
Following is the default anacrontab file. Based on the value of the variable named START_HOURS_RANGE, anacron can start jobs in this file between 3 AM and 10 PM (3–22).
$ cat /etc/anacrontab
# /etc/anacrontab: configuration file for anacron
# See anacron(8) and anacrontab(5) for details.
SHELL=/bin/sh
PATH=/sbin:/bin:/usr/sbin:/usr/bin
MAILTO=root
# the maximal random delay added to the base delay of the jobs
RANDOM_DELAY=45
# the jobs will be started during the following hours only
START_HOURS_RANGE=3-22
#period in days delay in minutes job-identifier command
1 5 cron.daily nice run-parts /etc/cron.daily
7 25 cron.weekly nice run-parts /etc/cron.weekly
@monthly 45 cron.monthly nice run-parts /etc/cron.monthly
The line that begins with 1 specifies the job with the jobID of cron.daily. This job is run once a day with a delay of 5 minutes. It runs nice, which executes run-parts (page 609) with a low priority; the job passes run-parts an argument of /etc/cron.daily. Similarly, the next line runscron.weekly every seven days with a delay of 25 minutes. Because a month does not have a fixed number of days, the last line uses the @monthly macro to run cron.monthly once a month with a delay of 45 minutes.
As explained earlier, the crond daemon runs the shell scripts in the /etc/cron.hourly directory.
![]() at: Runs Occasional Tasks
at: Runs Occasional Tasks
Like the crond daemon, at runs a job sometime in the future. Unlike crond, at runs a job only once. For instance, you can schedule an at job that will reboot the system at 3:00 AM (when all users are probably logged off):
# at 3am
at> systemctl reboot
at> <EOT>
job 3 at Wed Jul 31 03:00:00 2013
It is also possible to run an at job from within an at job. For instance, an at job might check for new patches every 18 days—something that would be more difficult with crond. See the at man page for more information.
By default, Fedora/RHEL is not set up with restrictions that prevent users from running at. See at.allow and at.deny on page 506 for more information.
System Reports
Many utilities report on one thing or another. The who, finger, ls, ps, and other utilities, for example, generate simple end-user reports. In some cases, these reports can help with system administration. This section describes utilities that generate more in-depth reports that can provide greater assistance with system administration tasks. Linux has many other report utilities, including sar (system activity report), iostat (input/output and CPU statistics), and mpstat (processor statistics), all part of the sysstat package; netstat (network report; net-tools package); and nfsstat (NFS statistics; nfs-utils package).
vmstat: Reports Virtual Memory Statistics
The vmstat utility (virtual memory statistics; procps-ng package) generates virtual memory information along with (limited) disk and CPU activity data. The following example shows virtual memory statistics at three-second intervals for seven iterations (from the arguments 3 7). The first line covers the time since the system was booted; each subsequent line covers the period since the previous line.
$ vmstat 3 7
procs -----------memory---------- ---swap-- -----io---- --system-- ----cpu----
r b swpd free buff cache si so bi bo in cs us sy id wa
0 2 0 684328 33924 219916 0 0 430 105 1052 134 2 4 86 8
0 2 0 654632 34160 248840 0 0 4897 7683 1142 237 0 5 0 95
0 3 0 623528 34224 279080 0 0 5056 8237 1094 178 0 4 0 95
0 2 0 603176 34576 298936 0 0 3416 141 1161 255 0 4 0 96
0 2 0 575912 34792 325616 0 0 4516 7267 1147 231 0 4 0 96
1 2 0 549032 35164 351464 0 0 4429 77 1120 210 0 4 0 96
0 2 0 523432 35448 376376 0 0 4173 6577 1135 234 0 4 0 95
The following list explains the column heads displayed by vmstat:
• procs Process information
![]() r Number of waiting, runnable processes
r Number of waiting, runnable processes
![]() b Number of blocked processes (in uninterruptable sleep)
b Number of blocked processes (in uninterruptable sleep)
• memory Memory information (in kilobytes)
![]() swpd Used virtual memory
swpd Used virtual memory
![]() free Idle memory
free Idle memory
![]() buff Memory used as buffers
buff Memory used as buffers
![]() cache Memory used as cache
cache Memory used as cache
• swap System paging activity (in kilobytes per second)
![]() si Memory swapped in from disk
si Memory swapped in from disk
![]() so Memory swapped out to disk
so Memory swapped out to disk
• io System I/O activity (in blocks per second)
![]() bi Blocks received from a block device
bi Blocks received from a block device
![]() bo Blocks sent to a block device
bo Blocks sent to a block device
• system (Values are per second)
![]() in Interrupts (including the clock)
in Interrupts (including the clock)
![]() cs Context switches
cs Context switches
• cpu Percentage of total CPU time spent in each of these states
![]() us User (nonkernel)
us User (nonkernel)
![]() sy System (kernel)
sy System (kernel)
![]() id Idle
id Idle
![]() wa Waiting for I/O
wa Waiting for I/O
![]() st Stolen from a virtual machine (only on virtual machines)
st Stolen from a virtual machine (only on virtual machines)
![]() top: Lists Processes Using the Most Resources
top: Lists Processes Using the Most Resources
The top utility is a useful supplement to ps. At its simplest, top displays system information followed by the most CPU-intensive processes. The top utility updates itself periodically; type q to quit. Although you can use command-line options, the interactive commands are often more helpful. Refer to Table 15-2 and to the top man page for more information.
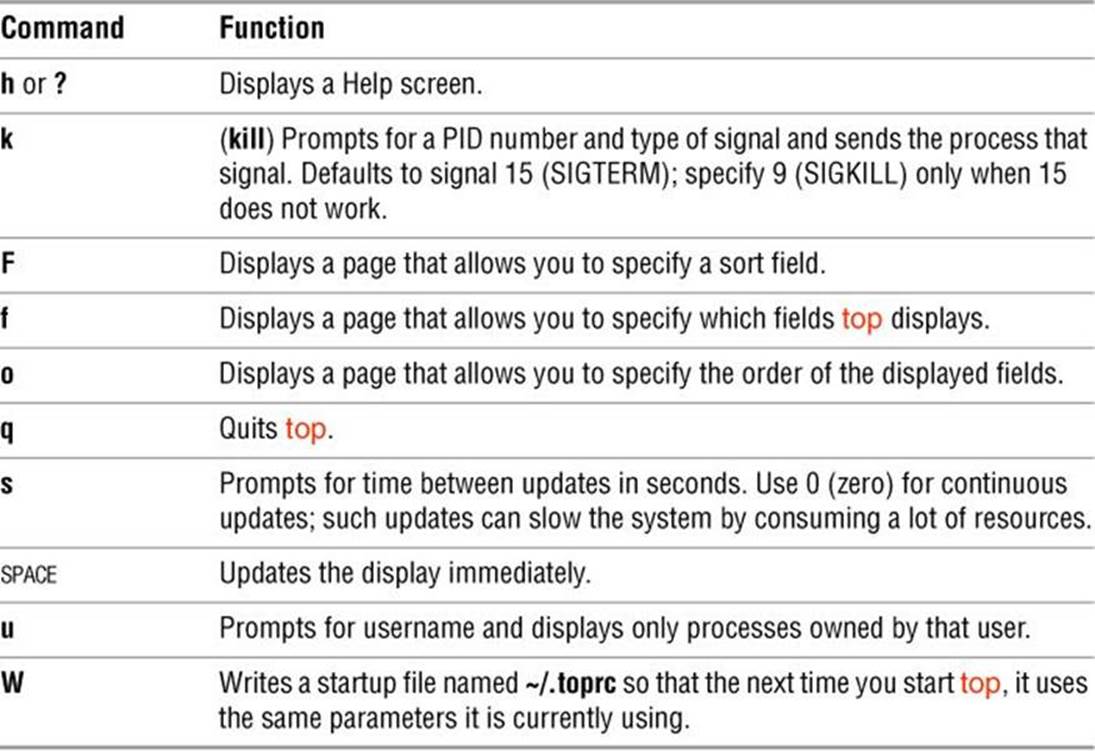
Table 15-2 top: interactive commands
$ top
top - 17:58:53 up 3 days, 4:20, 1 user, load average: 2.16, 1.61, 0.83
Tasks: 167 total, 5 running, 162 sleeping, 0 stopped, 0 zombie
Cpu(s): 1.5%us, 0.5%sy, 1.3%ni, 96.0%id, 0.2%wa, 0.6%hi, 0.0%si, 0.0%st
Mem: 2076092k total, 1990652k used, 85440k free, 18416k buffers
Swap: 7815580k total, 34908k used, 7780672k free, 1330008k cached
PID USER PR NI VIRT RES SHR S %CPU %MEM TIME+ COMMAND
31323 zach 25 0 9020 6960 396 R 63 0.3 0:17.58 bzip2
31327 zach 18 0 2092 596 492 R 57 0.0 0:00.92 cp
31311 root 15 0 0 0 0 S 16 0.0 0:00.38 pdflush
6870 zach 27 12 331m 190m 37m R 2 9.4 198:42.98 firefox-bin
31303 root 15 0 0 0 0 S 2 0.0 0:00.42 pdflush
1 root 15 0 2912 1808 488 S 0 0.1 0:01.55 systemd
...
The htop utility (htop package) is similar to top but it is pseudographical. Using htop, you can scroll vertically and horizontally, allowing you to view all processes and full command lines.
Maintaining the System
This section discusses several tools and concepts that are important to a system administrator. It covers setting the system clock, using parted to work with partitions on a hard disk, how to avoid creating problems, and how to solve system problems.
![]() timedatectl: Reports on and Sets the System Clock
timedatectl: Reports on and Sets the System Clock
The timedatectl utility, which is part of systemd (page 438), displays more information about the system clock than does date (page 218). You can also use it to set the system clock. Following, timedatectl sets the system clock and displays information about the system clock, time zone, NTP, and DST.
# timedatectl set-time "2014-02-14 18:17:16"
# timedatectl
Local time: Fri 2014-02-14 18:17:21 PST
Universal time: Sat 2014-02-15 02:17:21 UTC
RTC time: Sat 2014-02-15 02:17:21
Timezone: America/Los_Angeles (PST, -0800)
NTP enabled: n/a
NTP synchronized: no
RTC in local TZ: no
DST active: no
Last DST change: DST ended at
Sun 2013-11-03 01:59:59 PDT
Sun 2013-11-03 01:00:00 PST
Next DST change: DST begins (the clock jumps one hour forward) at
Sun 2014-03-09 01:59:59 PST
Sun 2014-03-09 03:00:00 PDT
![]() parted: Reports on and Partitions a Hard Disk
parted: Reports on and Partitions a Hard Disk
The parted (partition editor) utility reports on and manipulates hard disk partitions from the command line. The gnome-disks utility (page 78) allows you to perform the same tasks using a GUI. Following, the parted print command displays information about the partitions on the /dev/sdadrive:
# parted /dev/sda print
Model: ATA Hitachi HDS12345 (scsi)
Disk /dev/sda: 165GB
Sector size (logical/physical): 512B/512B
Partition Table: msdos
Disk Flags:
Number Start End Size Type File system Flags
1 32kB 1045MB 1045MB primary ext4 boot
2 1045MB 12GB 10GB primary ext4
3 12GB 22GB 10GB primary ext4
4 22GB 165GB 143GB extended
5 22GB 23GB 1045MB logical linux-swap(v1)
6 23GB 41GB 18GB logical ext4
7 41GB 82GB 41GB logical ext4
Figure 15-3 graphically depicts the partitions shown in this example. The first few lines that parted displays present the model name, device name, device capacity, and the type of partition table on the device. Following that information, the print command displays the these columns:
• Number—The minor device number (page 517) of the device holding the partition. This number is the same as the last number in the device name. In the example, 5 corresponds to /dev/sda5.
• Start—The location on the disk where the partition starts. The parted utility specifies a location on the disk as the distance (in bytes) from the start of the disk. Thus partition 3 starts 12 gigabytes from the start of the disk.
• End—The location on the disk where the partition stops. Although parted shows partition 2 ending 12 gigabytes from the start of the disk and partition 3 starting at the same location, parted takes care that the partitions do not overlap at this single byte.
• Size—The size of the partition in kilobytes (kB), megabytes (MB), or gigabytes (GB).
• Type—The partition type: primary, extended, or logical. See Figure 15-3 and page 37 for information on partitions.
• File system—The filesystem type: ext2, ext3, ext4, fat32, linux-swap, and so on. See Table 11-1 on page 519 for a list of filesystem types.
• Flags—The flags that are turned on for the partition, including boot, raid, and lvm. In the example, partition 1 is bootable.
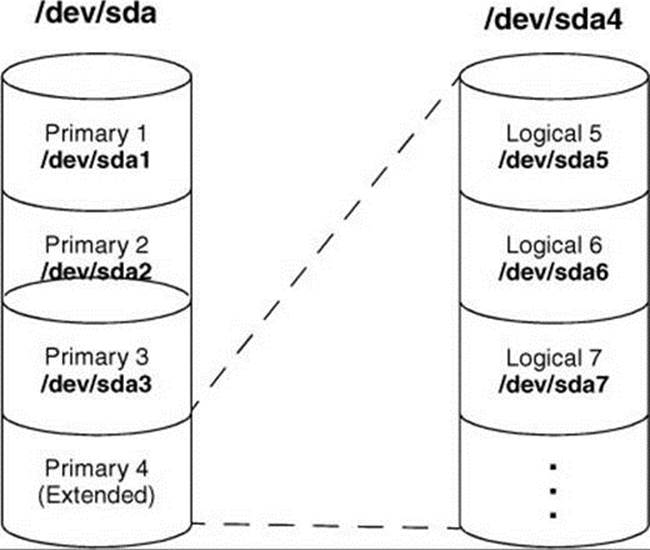
Figure 15-3 The primary and extended partitions from the example
In the preceding example, partition 4 defines an extended partition that includes 143 gigabytes of the 165-gigabyte disk (Figure 15-3). You cannot make changes to an extended partition without affecting all logical partitions within it.
Caution: parted can destroy everything
Be as careful with parted as you would be with a utility that formats a hard disk. Changes you make with parted can easily result in the loss of large amounts of data. If you are using parted and have any question about what you are doing, quit with a q command before making any changes. When you enter a command, parted immediately makes the change you requested.
In addition to reporting on the layout and size of a hard disk, you can use parted interactively to modify the disk layout. Be extremely careful when using parted in this manner and always back up the system before starting to work with this utility. Changing the partition information (thepartition table) on a disk can destroy the information on the disk. Read the parted info page before you attempt to modify a partition table.
To partition a disk, give the command parted followed by the name of the device you want to work with. In the following example, after starting parted, the user enters a help (or just h) command, which displays a list of parted commands:
# parted /dev/sda
GNU Parted 3.1
Using /dev/sda
Welcome to GNU Parted! Type 'help' to view a list of commands.
(parted) help
align-check TYPE N check partition N for TYPE(min|opt)
alignment
help [COMMAND] print general help, or help on COMMAND
mklabel,mktable LABEL-TYPE create a new disklabel (partition table)
mkpart PART-TYPE [FS-TYPE] START END make a partition
name NUMBER NAME name partition NUMBER as NAME
print [devices|free|list,all|NUMBER] display the partition table, available
devices, free space, all found partitions, or a particular partition
quit exit program
rescue START END rescue a lost partition near START and END
rm NUMBER delete partition NUMBER
select DEVICE choose the device to edit
disk_set FLAG STATE change the FLAG on selected device
disk_toggle [FLAG] toggle the state of FLAG on selected device
set NUMBER FLAG STATE change the FLAG on partition NUMBER
toggle [NUMBER [FLAG]] toggle the state of FLAG on partition NUMBER
unit UNIT set the default unit to UNIT
version display the version number and copyright information ...
(parted)
Follow the command help with the name of a parted command to display more information about that command. When you enter a print (or just p) command, parted displays current partition information, just as a print command on the command line does.
The parted utility will not allow you to set up overlapping partitions (except for logical partitions overlapping their containing extended partition). Similarly, it will not allow you to create a partition that starts at the very beginning of the disk (cylinder 0). Both of these situations can cause loss of data.
Following are guidelines to remember when defining a partition table for a disk. For more information refer to “Partitioning a Disk” on page 39.
• Do not delete or modify the partition that defines the extended partition unless you are willing to lose all data on all the logical partitions within the extended partition.
• If you put /boot on a separate partition, it is a good idea to put it at the beginning of the drive (partition 1) so there is no issue of Linux having to boot from a partition located too far into the drive. When you can afford the disk space, it is desirable to put each major filesystem on a separate partition. Many people choose to combine / (root), /var, and /usr into a single partition, which generally results in less wasted space but can on rare occasions cause problems. For more information refer to “Manual Partitioning: Planning Partitions” on page 39.
• Although parted can create some types of filesystems, it is typically easiest to use parted to create partitions and then use mkfs and mkswap to create filesystems on the partitions.
The following sequence of commands defines a 50-gigabyte, bootable, Linux partition as partition 1 on a clean disk:
# parted /dev/sdb
GNU Parted 3.1
Using /dev/sdb
Welcome to GNU Parted! Type 'help' to view a list of commands.
(parted) mkpart (create new partition)
Partition type? primary/extended? primary (select primary partition)
File system type? [ext2]? ext4 (set up an ext4 filesystem)
Start? 1 (start at the beginning of the disk)
End? 50g (specify a 50-gigabyte partition)
(parted) help set (use help to check the syntax of the set command)
set NUMBER FLAG STATE change the FLAG on partition NUMBER
NUMBER is the partition number used by Linux. On MS-DOS disk labels, the
primary partitions number from 1 to 4, logical partitions from 5 onwards.
FLAG is one of: boot, root, swap, hidden, raid, lvm, lba, hp-service, palo, prep,
msftres, bios_grub, atvrecv, diag, legacy_boot
STATE is one of: on, off
(parted) set 1 boot on (turn on the boot flag on partition 1)
(parted) print (verify that the partition is correct)
Model: VMware, VMware Virtual S (scsi)
Disk /dev/sdb: 215GB
Sector size (logical/physical): 512B/512B
Partition Table: msdos
Disk Flags:
Number Start End Size Type File system Flags
1 1049kB 50.0GB 50.0GB primary boot
(parted) quit
Information: You may need to update /etc/fstab.
When you specify a size within parted, you can use a suffix of k (kilobytes), m (megabytes), or g (gigabytes). After creating a partition, enter a print command to see where the partition ends. Perform this task before defining the next contiguous partition so you do not waste space. After setting up all the partitions, exit from parted using a quit command.
Next make a filesystem (mkfs, page 467) on each partition that is to hold a filesystem (not swap). Make all partitions, except swap, of type ext4, unless you have a reason to do otherwise. Use mkswap (page 513) to set up a swap area on a partition. You can use e2label (page 465) to label a partition.
logrotate: Manages Log Files
Rather than deleting or truncating log files, you might want to keep these files for a while in case you need to refer to them. The logrotate utility manages system log (and other) files automatically by rotating (page 1271), compressing, mailing, and removing each file as you specify. Thelogrotate utility is controlled by the /etc/logrotate.conf file, which sets default values and can optionally specify files to be rotated. Typically logrotate.conf has an include statement that points to utility-specific specification files in /etc/logrotate.d. Following is the default logrotate.conffile:
$ cat /etc/logrotate.conf
# see "man logrotate" for details
# rotate log files weekly
weekly
# keep 4 weeks worth of backlogs
rotate 4
# create new (empty) log files after rotating old ones
create
# use date as a suffix of the rotated file
dateext
# uncomment this if you want your log files compressed
#compress
# RPM packages drop log rotation information into this directory
include /etc/logrotate.d
# no packages own wtmp and btmp -- we'll rotate them here
/var/log/wtmp {
monthly
create 0664 root utmp
minsize 1M
rotate 1
}
/var/log/btmp {
missingok
monthly
create 0600 root utmp
rotate 1
}
# system-specific logs may be also be configured here.
The logrotate.conf file sets default values for common parameters. Whenever logrotate reads another value for one of these parameters, it resets the default value. You have a choice of rotating files daily, weekly, or monthly. The number following the rotate keyword specifies the number of rotated log files you want to keep. The create keyword causes logrotate to create a new log file with the same name and attributes as the newly rotated log file. The dateext keyword causes logrotate to use the date as a filename extension. The compress keyword (commented out in the default file) causes log files to be compressed using gzip. The include keyword specifies the standard /etc/logrotate.d directory for program-specific logrotate specification files. When you install a program using rpm (page 548) or an rpm-based utility such as yum (Chapter 12), rpm puts the logrotate specification file in this directory.
The last sets of instructions in logrotate.conf take care of the /var/log/wtmp and /var/log/btmp log files (wtmp holds login records and btmp holds records of failed [bad] login attempts); you can view these files using who). The keyword missingok overrides the implicit default value ofnomissingok for this file only. This keyword causes logrotate to continue without issuing an error message if the log file is missing. The keyword monthly overrides the default value of weekly for this file only. The create keyword is followed by the arguments establishing the permissions, owner, and group for the new file. Finally rotate establishes that one rotated log file should be kept.
The /etc/logrotate.d/httpd file is an example of a utility-specific logrotate specification file:
$ cat /etc/logrotate.d/httpd
/var/log/httpd/*log {
missingok
notifempty
sharedscripts
delaycompress
postrotate
/bin/systemctl reload httpd.service > /dev/null 2>/dev/null || true
endscript
}
This file, which is installed by the httpd package install script and incorporated in /etc/logrotate.d because of the include statement in logrotate.conf, works with each of the files in /var/log/httpd that has a filename ending in log (*log). The notifempty keyword causes logrotate not to rotate the log file if it is empty, overriding the default action of rotating empty log files. The sharedscripts keyword causes logrotate to execute the command(s) in the prerotate and postrotate sections one time only—not one time for each log that is rotated. The delaycompress keyword causes logrotate to delay compression for one cycle. Although it does not appear in this example, the copy-truncate keyword causes logrotate to truncate the original log file immediately after it copies it. This keyword is useful for programs that cannot be instructed to close and reopen their log files because they might continue writing to the original file even after it has been moved. The logrotate utility executes the commands between prerotate and endscript before the rotation begins. Similarly, commands between postrotate and endscript are executed after the rotation is complete.
The logrotate utility works with a variety of keywords, many of which take arguments and have side effects. Refer to the logrotate man page for details.
![]() rsyslogd: Logs System Messages
rsyslogd: Logs System Messages
Traditionally, UNIX programs sent log messages to standard error. If a more permanent log was required, the output was redirected to a file. Because of the limitations of this approach, 4.3BSD introduced the system log daemon (rsyslogd; www.rsyslog.com) now used by Linux. This daemon listens for log messages and stores them in the /var/log hierarchy. In addition to providing logging facilities, rsyslogd allows a single machine to serve as a log repository for a network and allows arbitrary programs to process specific log messages.
![]() rsyslog.conf
rsyslog.conf
The /etc/rsyslog.conf file stores configuration information for rsyslogd. Each line in this file contains one or more selectors and an action separated by whitespace. The selectors define the origin and type of the messages; the action specifies how rsyslogd processes the message. Sample lines from rsyslog.conf follow (a # begins a comment):
# Log all kernel messages to the console.
kern.* /dev/console
# Log all the mail messages in one place.
mail.* -/var/log/maillog
# Log cron stuff
cron.* /var/log/cron
# Everybody gets emergency messages
*.emerg :omusrmsg:*
# Save boot messages also to boot.log
local7.* /var/log/boot.log
![]() Selectors
Selectors
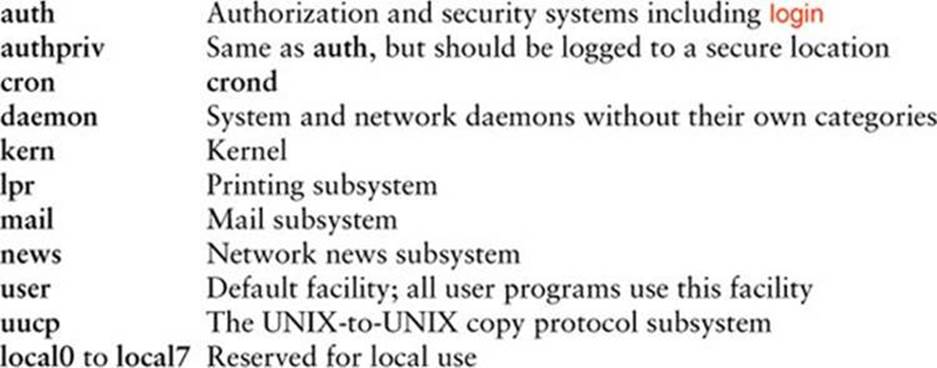
A selector is split into two parts, a facility and a priority, which are separated by a period. The facility indicates the origin of the message. For example, kern messages come from the kernel, and mail messages come from the mail subsystem. Following is a list of facility names used byrsyslogd and the systems that generate these messages:
![]() Facilities
Facilities
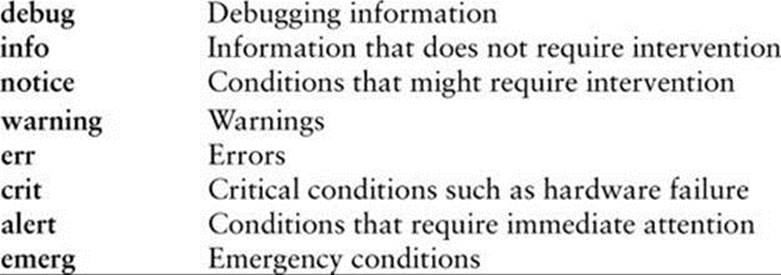
The priority indicates the severity of the message. The following list of the priority names and the conditions they represent appears in ascending priority order:
![]() Priorities
Priorities
A selector consisting of a single facility and priority, such as kern.info, causes the corresponding action to be applied to every message from that facility with that priority or higher (more urgent). Use .= to specify a single priority; for example, kern.=info applies the action to kernel messages of info priority. An exclamation point specifies that a priority is not matched. Thus kern.!info matches kernel messages with a priority lower than info, and kern.!=info matches kernel messages with a priority other than info.
A line with multiple selectors, separated by semicolons, applies the action if any of the selectors is matched. Each of the selectors on a line with multiple selectors constrains the match, with subsequent selectors frequently tightening the constraints. For example, the selectorsmail.info;mail.!err match mail subsystem messages with debug, info, notice, or warning priorities.
You can replace either part of the selector with an asterisk to match anything. The keyword none in either part of the selector indicates no match is possible. The selector *.crit;kern.none matches all critical or higher-priority messages, except those from the kernel.
![]() Actions
Actions
The action specifies how rsyslogd processes a message that matches the selector. The simplest actions are ordinary files, which are specified by their absolute pathnames; rsyslogd appends messages to these files. Specify /dev/console to send messages to the system console. If you want a hardcopy record of messages, specify a device file that represents a dedicated printer. Precede a filename with a hyphen (–) to keep rsyslogd from writing each message to the file as it is generated (syncing). Doing so might improve performance, but you might lose data if the system crashes after the message is generated but before it gets written to a file.
You can write important messages to users’ terminals by specifying one or more usernames separated by commas. Very important messages can be written to every logged-in terminal by using an asterisk.
To forward messages to rsyslogd on a remote system, specify the name or IP address of the system preceded by @ (sends messages to UDP port 514) or @@ (sends messages to TCP port 514). It is a good idea to forward critical messages from the kernel to another system because these messages often precede a system crash and might not be saved to the local disk. The following line from rsyslog.conf sends critical kernel messages to plum:
kern.crit @plum
On the remote system edit /etc/rsyslog.conf and one or both sets of the following lines depending on whether you want to use UDP or TCP. Do not remove the hash marks from the comments. After editing this file restart the rsyslogd daemon using rsyslog.service.
# Provides UDP syslog reception
#$ModLoad imudp
#$UDPServerRun 514
# Provides TCP syslog reception
#$ModLoad imtcp
#$InputTCPServerRun 514
Solving Problems
As the system administrator, it is your responsibility to keep the system secure and running smoothly. When a user is having a problem, it usually falls to the administrator to help the user get back on track. This section suggests ways to keep users happy and the system functioning at peak performance.
Helping When a User Cannot Log In
When a user has trouble logging in on the system, the source might be a user error or a problem with the system software or hardware. The following steps can help determine where the problem is:
![]()
• Check the log files in /var/log. The /var/log/messages file accumulates system errors, messages from daemon processes, and other important information. It might indicate the cause or more symptoms of a problem. Also check the system console. Occasionally messages about system problems that are not written to /var/log/messages (for instance, a full disk) are displayed on the system console.
• Determine whether only that one user or only that one user’s terminal/ workstation has a problem or if the problem is more widespread.
• Check that the user’s CAPS LOCK key is not on.
• Make sure the user’s home directory exists and corresponds to that user’s entry in the /etc/passwd file. Verify that the user owns her home directory and startup files and that they are readable (and, in the case of the user’s home directory, executable). Confirm that the entry for the user’s login shell in the /etc/passwd file is accurate and the shell exists as specified.
• Change the user’s password if there is a chance that he has forgotten it.
• Check the user’s startup files (.profile, .login, .bashrc, and so on). The user might have edited one of these files and introduced a syntax error that prevents login.
• Check the terminal or monitor data cable from where it plugs into the terminal to where it plugs into the computer (or as far as you can follow it). Try turning the terminal or monitor off and then turning it back on.
• When the problem appears to be widespread, check whether you can log in from the system console. Make sure the system is not in single-user mode. If you cannot log in, the system might have crashed; reboot it and perform any necessary recovery steps (the system usually does quite a bit automatically).
• Use df to check for full filesystems. If the /tmp filesystem or the user’s home directory is full, login sometimes fails in unexpected ways. In some cases you might be able to log in to a textual environment but not a graphical one. When applications that start when the user logs in cannot create temporary files or cannot update files in the user’s home directory, the login process itself might terminate.
• If the user is logging in over a network connection
![]() Restart the service the user is trying to use (e.g., ssh). See “Changing the Current State of a Daemon” on page 446.
Restart the service the user is trying to use (e.g., ssh). See “Changing the Current State of a Daemon” on page 446.
![]() Make sure the system clocks on the two systems are synchronized. Clocks set to different times can cause login failures when using encrypted login methods such as HTTPS, ssh, LDAP, and especially kerberos.
Make sure the system clocks on the two systems are synchronized. Clocks set to different times can cause login failures when using encrypted login methods such as HTTPS, ssh, LDAP, and especially kerberos.
![]() Make sure DNS is working properly. Some network services are particular about name resolution including reverse lookups (i.e., slow connections via ssh can be caused by a name resolution problem).
Make sure DNS is working properly. Some network services are particular about name resolution including reverse lookups (i.e., slow connections via ssh can be caused by a name resolution problem).
Speeding Up the System
When the system is running slowly for no apparent reason, perhaps a process did not exit when a user logged out. Symptoms of this problem include poor response time and a system load, as shown by w or uptime, greater than 1.0. Running top (page 612) is an excellent way to find rogue processes quickly. Use ps –ef to list all processes. One thing to look for in ps –ef output is a large number in the TIME column. For example, if a Firefox process has a TIME field greater than 100.0, this process has likely run amok. However, if the user is doing a lot of Java work and has not logged out for a long time, this value might be normal. Look at the STIME field to see when the process was started. If the process has been running for longer than the user has been logged in, it is a good candidate to be killed.
When a user gets stuck and leaves her terminal unattended without notifying anyone, it is convenient to kill (page 465) all processes owned by that user. If the user is running a GUI on the console, kill the process that started the desktop environment or the window manager itself. Processes to look for include gnome-session, startkde, or another process name that ends in wm. Usually the window manager is either the first or last thing to be run, and exiting from the window manager logs the user out. If killing the window manager does not work, try killing the X server process. This process is typically listed as /usr/bin/Xorg. If that fails, you can kill all processes owned by a user by giving the command kill –15 –1 or, equivalently, kill –TERM –1 while you are logged in as that user. Using –1 (one) in place of the process ID tells kill to send the signal to all processes that are owned by that user. For example, working as root you could enter the following command:
# su zach -c 'kill -TERM -1'
If this does not kill all processes (sometimes TERM does not kill a process), you can use the KILL signal (–9). The following line will definitely kill all processes owned by Zach and will not be friendly about it:
# su zach -c 'kill -KILL -1'
If you do not include su zach –c, this command brings the system down.
![]() lsof: Finds Open Files
lsof: Finds Open Files
The lsof (list open files) utility displays the names of open files. Its options display only certain processes, only certain file descriptors of a process, or only certain network connections (network connections use file descriptors just as normal files do and lsof can show these as well). After you have identified a suspect process using ps –ef, enter the following command:
# lsof -s -p pid
Replace pid with the process ID of the suspect process; lsof displays a list of file descriptors that process pid has open. The –s option displays the sizes of all open files, and the –p option allows you to specify the PID number of the process of interest (lsof does not work if you combine these options). This size information is helpful in determining whether the process has a very large file open. If it does, contact the owner of the process or, if necessary, kill the process. The –rn option redisplays the output of lsof every n seconds.
Keeping a Machine Log
A machine log that includes the information shown in Table 15-3 can help you find and fix system problems. It it useful to note the time and date of each entry in the log. Avoid the temptation to keep the log only on the computer—it will be most useful to you when the system is down. Also keep email that details user problems. One strategy is to save this mail to a separate file or folder as you read it. Another approach is to set up a mail alias that users can send mail to when they have problems. This alias can then forward mail to you and also store a copy in an archive file. Following is an example of an entry in the /etc/aliases file (page 746) that sets up this type of alias:
trouble: admin,/var/spool/mail/admin.archive
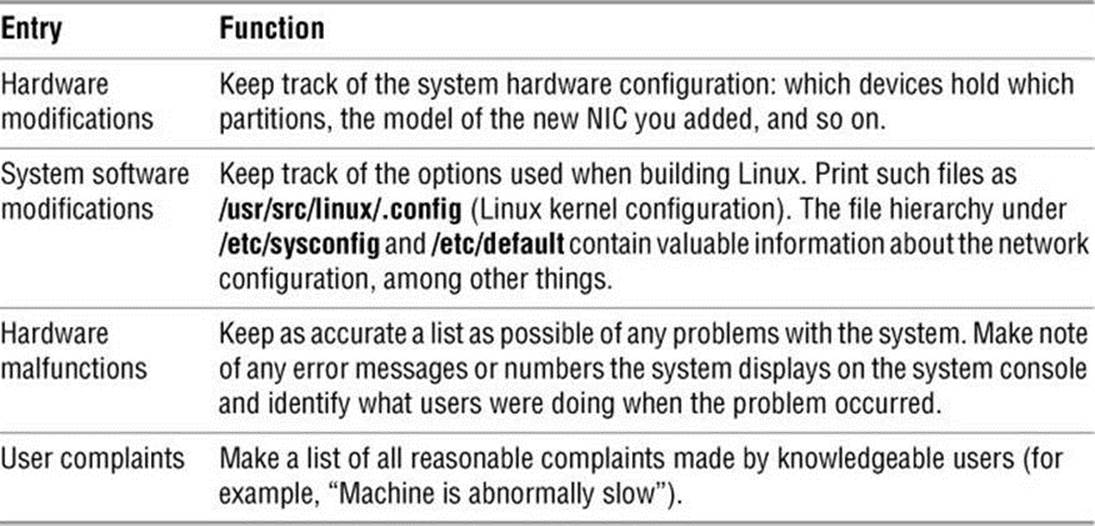
Table 15-3 Machine log
Email sent to the trouble alias will be forwarded to the admin user as well as stored in the file /var/spool/mail/admin.archive.
Keeping the System Secure
No system with dial-in lines or public access to terminals is absolutely secure. Nevertheless, you can make a system as secure as possible by changing the passwords of the root password frequently and by choosing passwords that are difficult to guess. Do not tell anyone who does notabsolutely need to know the root password. You can also encourage system users to choose difficult passwords and to change them periodically.
![]() Passwords
Passwords
This section contains a technical discussion of passwords; see “Password Security” on page 136 for a more practical discussion.
By default, passwords on Fedora/RHEL use MD5 (page 1260) hashing, which makes them more difficult to crack than passwords encrypted with DES (page 1159). Of course, it makes little difference how well encrypted your password is if you make it easy for someone to find out or guess what the password is. The system-config-authentication utility allows you to specify a local password hashing algorithm: Select the Advanced Options tab and make a selection from the drop-down box labeled Password Hashing Algorithm.
A password that is difficult to guess is one that someone else would not be likely to think you would have chosen. Do not use words from the dictionary (spelled forward or backward); names of relatives, pets, or friends; or words from a foreign language. A good strategy is to choose a couple of short words, include some punctuation (for example, put a ^ between them), mix the case, and replace some of the letters in the words with numbers. If it were not printed in this book, an example of a good password would be C&yGram5 (candygrams). Ideally you would use a random combination of ASCII characters, but that would be difficult to remember.
You can use one of several password-cracking programs to find users who have chosen poor passwords. These programs work by repeatedly hashing words from dictionaries, phrases, names, and other sources. If the hashed password matches the output of the program, then the program has found the password of the user. Two programs that crack passwords are crack (crack package) and john (John the Ripper; www.openwall.com/john; john package). These and many other programs and security tips are available from CERT (www.cert.org), which was originally called the Computer Emergency Response Team.
It takes a lot of computational power to crack a good password. Password-cracking programs generally start by looking at the character set comprising uppercase and lowercase letters and numbers. When you add symbols, they have to do more work to crack a password. Also, the longer the password, the more computational power it takes to crack. Make your password long enough so it will be harder to crack and short enough so you can remember it; 8–20 characters is usually a good length. Include a few symbols such as #, @, and %. If it takes too long to crack your password, the person or machine doing the dirty work might move on to easier accounts.
![]() Setuid files
Setuid files
Make sure no one except a user with root privileges can write to files containing programs that are owned by root and run in setuid mode (for example, passwd, su, and sudo; page 196). Also make sure users do not transfer programs that run in setuid mode and are owned by root onto the system by means of mounting tapes or disks. These programs can be used to circumvent system security. One technique that prevents users from having setuid files is to use the nosuid flag to mount, which you can set in the flags section in the fstab file. Refer to “Mount Options” on page522.
BIOS
The BIOS in many machines gives you some degree of protection from an unauthorized person who tries to modify the BIOS or reboot the system. When you set up the BIOS, look for a section named Security. You can probably add a BIOS password. If you depend on the BIOS password, lock the computer case—it is usually a simple matter to reset the BIOS password by using a jumper on the motherboard.
![]() Log Files and Mail for root
Log Files and Mail for root
Users frequently email root and postmaster to communicate with the system administrator. If you do not forward root’s mail to yourself (/etc/aliases on page 746), remember to check root’s mail periodically. You will not receive reminders about mail that arrives for root when you use su to perform system administration tasks. However, you can use the command su –c 'mail –u root' to look at root’s mail.
Review the system log files regularly for evidence of problems. Some important files are /var/log/messages, where the operating system and some applications record errors; /var/log/secure, which holds messages pertaining to system security; /var/log/maillog, which contains errors from the mail system; and /var/log/cron, which contains messages from crond.
The logwatch utility (logwatch package) is a report writer that is written in Perl and sends email reports about log files. Installing the logwatch package creates the /etc/cron.daily/0logwatch file that runs this script daily and emails its output to root. Refer to the logwatch man page and to the script itself for more information.
Monitoring Disk Usage
Sooner or later you will probably start to run out of disk space. Do not fill up a partition; Linux can write to files significantly faster if at least 5 to 30 percent of the space in a partition remains free. Using more than the maximum optimal disk space in a partition can degrade system performance.
Fragmentation
As a filesystem becomes full, it can become fragmented. This is similar to the DOS concept of fragmentation but is not nearly as pronounced and is typically rare on modern Linux filesystems; by design Linux filesystems are resistant to fragmentation. If you keep filesystems from running near full capacity, you might never need to worry about fragmentation. If there is no space on a filesystem, you cannot write to it at all.
To check for filesystem fragmentation, unmount the filesystem and run fsck (page 525) on it; use the –f option on ext2, ext3, and ext4 filesystems. The output of fsck includes a percent fragmentation figure for the filesystem. You can defragment a filesystem by backing it up; using mkfs(page 467) to make a clean, empty image; and then restoring the filesystem. Which utility you use to perform the backup and restore—dump/restore, tar, cpio, or a third-party backup program—is not important.
Reports
Linux provides several programs that report on who is using how much disk space on which filesystems. Refer to the du, quota, and df man pages and the –size option in the find utility man page. In addition to these utilities, you can use the disk quota system (page 629) to manage disk space.
Four strategies to increase the amount of free space on a filesystem are to compress files, delete files, grow LVM-based filesystems, and condense directories. This section contains some ideas on ways to maintain a filesystem so it does not become overloaded.
Files that grow quickly
Some files, such as log files and temporary files, inevitably grow over time. Core dump files, for example, take up substantial space and are rarely needed. Also, users occasionally run programs that accidentally generate huge files. As the system administrator, you must review these files periodically so they do not get out of hand.
If a filesystem is running out of space quickly (that is, over a period of an hour rather than weeks or months), first figure out why it is running out of space. Use a ps –ef command to determine if a user has created a runaway process that is creating a huge file. When evaluating the output ofps, look for a process that has consumed a large amount of CPU time. If such a process is running and creating a large file, the file will continue to grow as you free up space. If you remove the huge file, the space it occupied will not be freed until the process terminates, so you need to kill the process. Try to contact the user running the process and ask him to kill it. If you cannot contact the user, use root privileges to kill the process yourself. Refer to kill on page 465 for more information.
![]()
You can also truncate a large log file rather than remove it, although you can better deal with this recurring situation using logrotate (page 618). For example, if the /var/log/messages file has become very large because a system daemon is misconfigured, you can use /dev/null to truncate it:
# cp /dev/null /var/log/messages
or
# cat /dev/null > /var/log/messages
or, without spawning a new process,
# : > /var/log/messages
If you remove /var/log/messages, you have to restart the rsyslogd daemon. If you do not restart rsyslogd, the space on the filesystem will not be released.
When no single process is consuming the disk space but capacity has instead been used up gradually, locate unneeded files and delete them. You can archive these files by using cpio, dump, or tar before you delete them. You can safely remove most files named core that have not been accessed for several days. The following command line performs this function without removing necessary files named core (such as /dev/core):
# find / -type f -name core | xargs file | grep 'B core file' | sed 's/:ELF.*//g' | xargs rm -f
The find command lists all ordinary files named core and sends its output to xargs (page 260), which runs file on each of the files in the list. The file utility displays a string that includes B core file for files created as the result of a core dump. These files need to be removed. The grepcommand filters out from file any lines that do not contain this string. Finally sed removes everything following the colon so that all that is left on the line is the pathname of the core file; xargs then removes the file.
To free up more disk space, look through the /tmp and /var/tmp directories for old temporary files and remove them. Keep track of disk usage in /var/mail, /var/spool, and /var/log.
Removing Unused Space from Directories
A directory that contains too many filenames is inefficient. The point at which a directory on an ext2, ext3, or ext4 filesystem becomes inefficient varies, depending partly on the length of the filenames it contains. Best practice is to keep directories relatively small. Having fewer than several hundred files (or directories) in a directory is generally a good idea, and having more than several thousand is generally a bad idea. Additionally, Linux uses a caching mechanism for frequently accessed files that speeds the process of locating an inode from a filename. This caching mechanism works only on filenames of up to 30 characters in length, so avoid giving frequently accessed files extremely long filenames.
When a directory becomes too large, you can usually break it into several smaller directories by moving its contents to those new directories. Make sure you remove the original directory after you have moved its contents.
Because Linux directories do not shrink automatically, removing a file from a directory does not shrink the directory, even though it frees up space on the disk. To remove unused space and make a directory smaller, you must copy or move all the files to a new directory and remove the original directory.
The following procedure removes unused directory space. First remove all unneeded files from the large directory. Then create a new, empty directory. Next move or copy all remaining files from the old large directory to the new empty directory. Remember to copy hidden files. Finally delete the old directory and rename the new directory.
# mkdir /home/max/new
# mv /home/max/large/* /home/max/large/.[A-z]* /home/max/new
# rmdir /home/max/large
# mv /home/max/new /home/max/large
Optional
![]() Disk Quota System
Disk Quota System
The disk quota system (quota package) limits the disk space and number of files owned by individual users. You can choose to limit each user’s disk space, the number of files each user can own, or both. Each resource that is limited has a lower limit and an upper limit. The user can exceed the lower limit, or quota, although a warning is given each time the user logs in when he is above the quota. After a certain number of warnings (one warning per day; the number of days is set by the system administrator), the system behaves as if the user had reached the upper limit. When the upper limit is reached or the user has received the specified number of warnings, the user will not be allowed to create any more files or use any more disk space. The user’s only recourse at that point is to remove files.
![]() quota and repquota
quota and repquota
Users can review their usage and limits with the quota utility. A user running with root privileges can use repquota to display quota information on multiple users. You can turn on quotas only if the filesystem is mounted with the usrquota and/or grpquota options (ext3and ext4 filesystems).
![]() edquota and quotaon
edquota and quotaon
First you must decide which filesystems to limit and how to allocate space among users. Typically only filesystems that contain users’ home directories, such as /home, are limited. Use the edquota utility to set the quotas and then use quotaon to start the quota system. You will probably want to put a quotaon command in a startup file so the quota system will be enabled when you bring up the system (page 448). Unmounting a filesystem automatically disables the quota system for that filesystem.
Chapter Summary
The system-config-users utility adds new users and groups to the system and modifies existing users’ accounts. You can also use the equivalent command-line tools (useradd, usermod, userdel, chage, groupadd, and groupmod) to work with user accounts.
Backing up files on the system is a critical but often-overlooked part of system administration. Linux includes the tar, cpio, dump, and restore utilities to back up and restore files. You can also use more sophisticated packages such as amanda and various commercial products.
The system scheduling daemon, crond, periodically executes scheduled tasks. You can schedule tasks using crontab, anacrontab, and at.
System reports present information on the health of the system. Two useful tools that generate these reports are vmstat, which details virtual memory, I/O, and CPU usage, and top, which reports on how the system is performing from moment to moment and can help you figure out what might be slowing it down.
Another aspect of system administration is solving problems. Linux includes several tools that can help track down system problems. One of the most important of these tools is rsyslogd, the system log daemon. Using /etc/rsyslog.conf, you can control which error messages appear on the console or a user’s terminal, which are sent to a remote system, and which go to one of several log files.
Exercises
1. How would you list all the processes running vi?
2. How would you use kill to log Max off the system?
3. From the command line, how would you create a user named John Doe who has the username jd and who belongs to group 65535?
4. Which problem does logrotate solve? Which is the primary configuration file for logrotate?
5. Give a command that creates a gzip compressed tar backup of the /usr filesystem on /dev/sdg. Which command would you use to make the same backup using bzip2? Using cpio?
Advanced Exercises
6. If the system is less responsive than normal, what is a good first step in figuring out where the problem is?
7. A process stores its PID number in a file named process.pid. Write a command line that terminates this process.
8. Working with root privileges, you are planning to delete some files but want to make sure that the wildcard expression you use is correct. Suggest two ways you could make sure you delete the correct files.