A practical guide to Fedora and Red Hat Enterprise Linux, 7th Edition (2014)
Part IV: Using Clients and Setting Up Servers
Chapter 24. DNS/BIND: Tracking Domain Names and Addresses
In This Chapter
Introduction to DNS
JumpStart I: Setting Up a DNS Cache
JumpStart II: Setting Up a Domain Using system-config-bind (Fedora)
Configuring a DNS Server
Running BIND in a chroot Jail
Troubleshooting
A Full-Functioned Nameserver
A Slave Server
A Split Horizon (DMZ) Server
Objectives
After reading this chapter you should be able to:
![]() Explain what DNS does, how it is structured, and why it is necessary
Explain what DNS does, how it is structured, and why it is necessary
![]() Describe the purpose of a resolver, forward and reverse name resolution, and an FQDN
Describe the purpose of a resolver, forward and reverse name resolution, and an FQDN
![]() Describe the differences between an iterative query and a recursive query
Describe the differences between an iterative query and a recursive query
![]() Use dig to determine the IP address and mail server address for a domain
Use dig to determine the IP address and mail server address for a domain
![]() Describe each of the three types of DNS servers
Describe each of the three types of DNS servers
![]() List the components of the named.conf configuration files and explain their purpose
List the components of the named.conf configuration files and explain their purpose
![]() Describe the use and required components of a zone file
Describe the use and required components of a zone file
![]() Explain the use of several types of resource records
Explain the use of several types of resource records
![]() Configure a DNS cache server
Configure a DNS cache server
![]() Discuss security options within DNS including allow-transfer directives, views, chroot jails, and dnssec keys
Discuss security options within DNS including allow-transfer directives, views, chroot jails, and dnssec keys
DNS (Domain Name System) maps domain names to IP addresses, and vice versa. It reduces the need for humans to work with IP addresses, which, with the introduction of IPv6, are complex. The DNS specification defines a secure, general-purpose database that holds Internet host information. It also specifies a protocol that is used to exchange this information. Further, DNS defines library routines that implement the protocol. Finally, DNS provides a means for routing email. Under DNS, nameservers work with clients, called resolvers, to distribute host information in the form of resource records in a timely manner as needed.
This chapter describes BIND (Berkeley Internet Name Domain) version 9, a popular open-source implementation of DNS. Part of Fedora/RHEL, BIND includes the DNS server daemon (named), a DNS resolver library, and tools for working with DNS. Although DNS can be used for private networks, this chapter covers DNS as used by the Internet.
Introduction to DNS
You typically use DNS when you display a Web page. For example, to display Red Hat’s home page, you enter its name, www.redhat.com, in a browser; the browser then displays the page you want. You never enter or see the IP address for the displayed page. However, without the IP address, the browser could not display the page. DNS works behind the scenes to find the IP address when you enter the name in the browser. The DNS database is
• Hierarchical, so it provides quick responses to queries. DNS has a root, branches, and nodes.
• Distributed, so it offers fast access to servers. The DNS database is spread across thousands of systems worldwide; each system is referred to as a DNS server (or a domain server or nameserver).
• Replicated, to enhance reliability. Because many systems hold the same information, when some systems fail, DNS does not stop functioning.
As implemented, DNS is
• Secure, so your browser or email is directed to the correct location.
• Flexible, so it can adapt to new names, deleted names, and names whose information changes.
• Fast, so Internet connections are not delayed by slow DNS lookups.
History
The mapping that DNS does was originally handled statically in a /etc/hosts file (page 507) on each system on a network. Small LANs still make use of this file. As networks—specifically the Internet—grew, a dynamic mapping system was required. DNS was specified in 1983 and BIND became part of BSD in 1985. Today BIND is by far the most popular implementation of DNS.
Security
Historically BIND has not been very secure. Recently, however, developers have focused on improving the security of BIND. You might want to run BIND inside a chroot jail (page 883) or under SELinux (page 472) and use transaction signatures (TSIG, page 881) to improve security.
host and dig
The host and dig utilities (page 307) query DNS servers. When called without any options, the host utility is simpler, is easier to use, and returns less information than dig. The –v option causes host to display full RFC-format output. This chapter uses both tools to explore DNS.
Nodes, Domains, and Subdomains
Node
Each node in the hierarchical DNS database is called a domain and is labeled with a (domain) name. As with the Linux file structure, the node at the top of the DNS hierarchy is called the root node or root domain. While the Linux file structure separates the nodes (directory and ordinary files) with slashes (/) and labels the root node (directory) with a slash, the DNS structure uses periods in place of the file structure’s slashes (Figure 24-1).
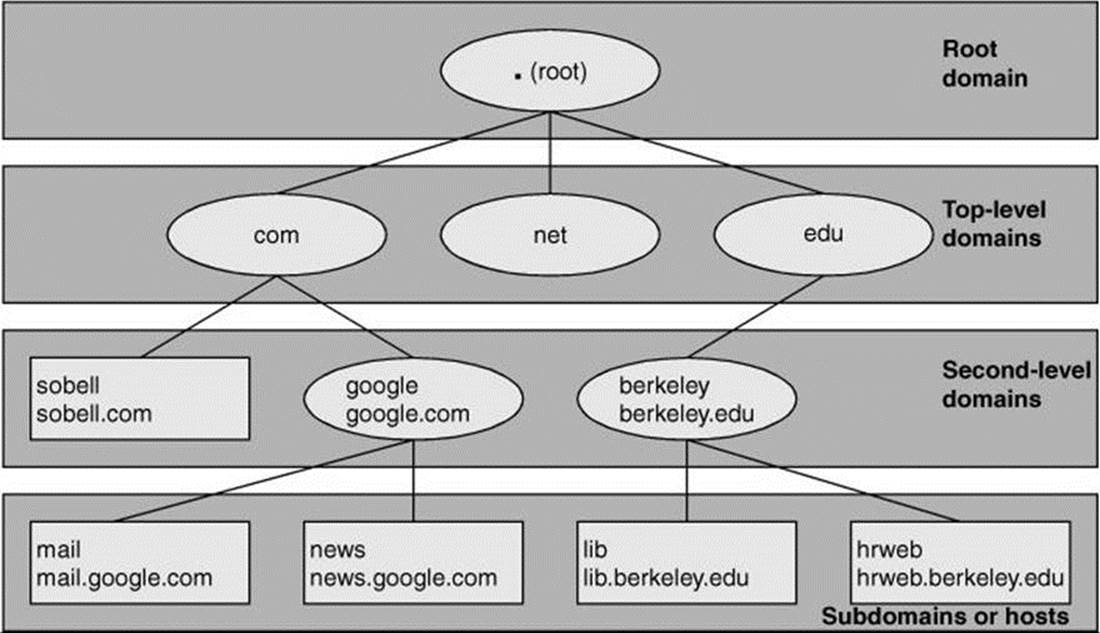
Figure 24-1 The DNS domain structure (FQDNs are shown below hostnames.)
You read an absolute pathname in a Linux filesystem from left to right: It starts with the root directory (represented by /) at the left and, as you read to the right, describes the path to the file being identified (for example, /var/spool/cups). Unlike a Linux pathname, you read a DNS domain name from right to left: It starts with the root domain at the right (represented by a period [.]) and, as you read to the left, works its way down through the top-level and second-level domains to a subdomain or host. Frequently the name of the root domain (the period at the right) is omitted from a domain name.
Domain
The term domain refers both to a single node in the DNS domain structure and to a catenated, period-separated list (path) of domain names that describes the location of a domain.
FQDN
A fully qualified domain name (FQDN) is the DNS equivalent of a filesystem’s absolute pathname: It is a pointer that positively locates a domain on the Internet. Just as you (and Linux) can identify an absolute pathname by its leading slash (/) that represents the root directory, so an FQDN can be identified by its trailing period (.) that names the root domain (Figure 24-2).
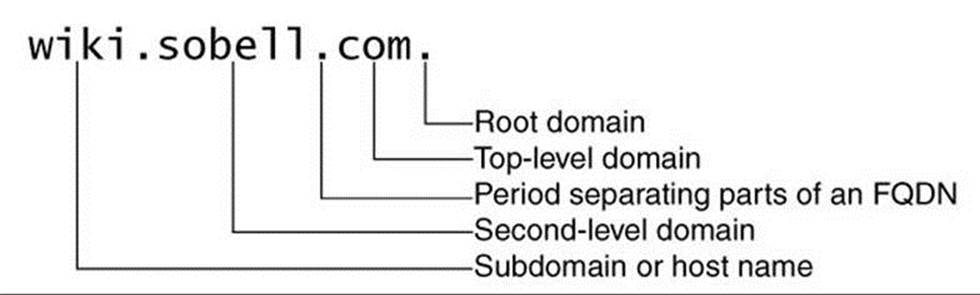
Figure 24-2 A fully qualified domain name (FQDN)
![]() Resolver
Resolver
The resolver comprises the routines that turn an unqualified domain name into an FQDN that is passed to DNS to be mapped to an IP address. The resolver can append several domains, one at a time, to an unqualified domain name, producing several FQDNs that it then passes, one at a time, to DNS. For each FQDN, DNS reports success (it found the FQDN and is returning the corresponding IP address) or failure (the FQDN does not exist).
The resolver always appends the root domain (.) to an unqualified domain name first, thereby allowing you to type www.sobell.com instead of www.sobell.com. (including the trailing period) in a browser. You can specify other domains for the resolver to try if the root domain fails. Put the domain names, in the order you want them tried, after the search keyword in /etc/resolv.conf (page 510). For example, if your search domains include sobell.com., then the domains wiki and wiki.sobell.com. will resolve to the same address.
Subdomains
Each node in the domain hierarchy is a domain. Each domain that has a parent (that is, every domain except the root domain) is also a subdomain, regardless of whether it has children. All subdomains can resolve to hosts—even those with children. For example, the sobell.com. domain resolves to the host that serves the Sobell Web site, without preventing its children—domains such as wiki.sobell.com—from resolving. The leftmost part of an FQDN is often called the hostname.
Hostnames
In the past, hostnames could contain only characters from the set a–z, A–Z, 0–9, and –. As of March 2004, however, hostnames can include various accents, umlauts, and so on (www.switch.ch/id/idn). DNS considers uppercase and lowercase letters to be the same (it is not case sensitive), so www.sobell.com is the same as WWW.sObEll.coM.
Zones
For administrative purposes, domains are grouped into zones that extend downward from a domain (Figure 24-3). A single DNS server is responsible for (holds the information required to resolve) all domains within a zone. The DNS server for a zone also holds pointers to DNS servers that are responsible for the zones immediately below the zone it is responsible for. Information about zones originates in zone files, one zone per file.
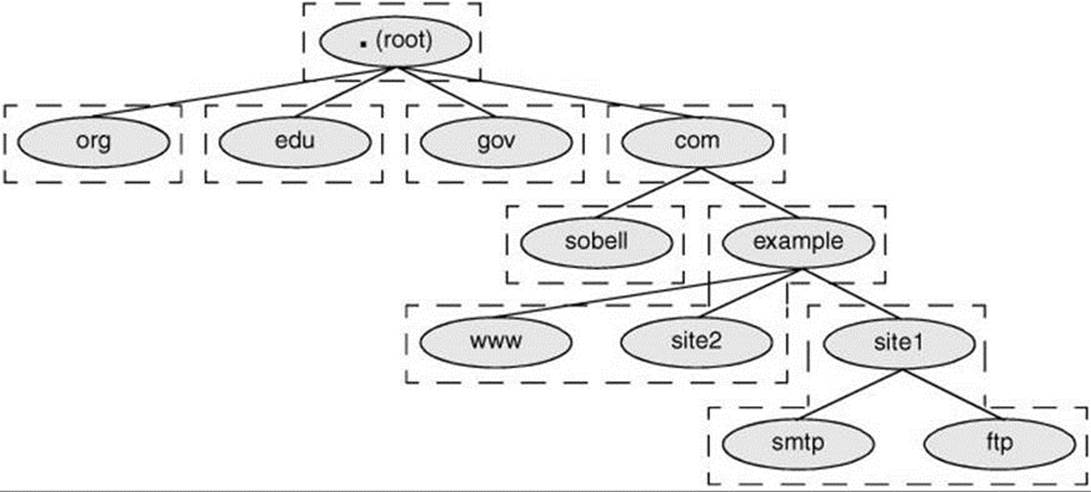
Figure 24-3 DNS structure showing zones
Root domain
The highest zone—the one containing the root domain—does not contain any hosts. Instead, this domain delegates to the DNS servers for the top-level domains (Figure 24-1, page 853).
Authority
Each zone has at least one authoritative DNS server. This server holds all information about the zone. A DNS query returns information about a domain and specifies which DNS server is authoritative for that domain.
DNS employs a hierarchical structure to keep track of names and authority. At the top or root of the structure is the root domain, which employs 13 authoritative nameservers. These are the only servers that are authoritative for the root and top-level domains.
Delegation of authority
When referring to DNS, the term delegation means delegation of authority. ICANN (Internet Corporation for Assigned Names and Numbers, www.icann.org) delegates authority to the root and top-level domains. In other words, ICANN says which servers are authoritative for these domains. Authority is delegated to each domain below the top-level domains by the authoritative server at the next-higher-level domain. ICANN is not authoritative for most second-level domains. For example, Sobell Associates is authoritative for the sobell.com domain. This scheme of delegating authority allows for local control over segments of the DNS database while making all segments available to the public.
Queries
There are two types of DNS queries: iterative and recursive.1
1. A third type of query is not covered in this book: inverse. An inverse query provides a domain name given a resource record. Reverse name resolution (page 862), not an inverse query, is used to query for a domain name given an IP address.
Iterative queries
An iterative query sends a domain name to a DNS server and asks the server to return either the IP address of the domain or the name of the DNS server that is authoritative for the domain or one of its parents: The server does not query other servers when seeking an answer. Nameservers typically send each other iterative queries.
Recursive queries
A recursive query sends a domain name to a DNS server and asks the server to return the IP address of the domain. The server might need to query other servers to get the answer.
Both iterative and recursive queries can fail. In case of failure, the server returns a message saying it is unable to locate the domain.
When a client, such as a browser, needs the IP address that corresponds to a domain name, the client queries a resolver. Most resolvers are quite simple and require a DNS server to do most of the work—that is, they send recursive queries. The resolver communicates with a single DNS server, which can perform multiple iterative queries in response to the resolver’s recursive query.
All DNS servers must answer iterative queries. DNS servers can also be set up to answer recursive queries. A DNS server that is not set up to answer recursive queries treats a recursive query as though it is an iterative query.
In Figure 24-4, the resolver on a client system is trying to discover the IP address of the server ftp.site1.example.com. on the network with the DNS layout shown in Figure 24-3 on page 855. The resolver on the client sends a recursive query to its primary DNS server. This server interrogates the root server and one additional server for each zone until it receives an answer, which it returns to the resolver on the client. In practice, the query would not start with the root server because most servers have the location of the authoritative nameserver for the com. domain stored in cache (memory).

Figure 24-4 A recursive query that starts several iterative queries to find the answer
Servers
There are three main types of DNS servers: primary (master), secondary (slave), and caching-only.
• A primary master server, also called a primary server or master server, is the authoritative server that holds the master copy of zone data. It copies information from the zone or master file, a local file that the server administrator maintains. For security and efficiency, a primary master server should provide iterative answers only. A primary master server that provides recursive answers is more easily subverted by a DoS attack (page 1248) than one that provides iterative answers only.
• Slave servers, also called secondary servers, are authoritative and copy zone information from the primary master server or another slave server. On some systems, when information on the primary master server changes, the primary master server notifies the slave servers. When a slave receives such a message, it uses a process called zone transfer to copy the new zone information from the master server to itself.
• DNS caches, also called caching-only servers, are not authoritative. These servers store answers to previous queries in cache (memory). When a DNS cache receives a query, it answers it from cache if it can. If the DNS cache does not have the answer in cache, it forwards the query to an authoritative server.
Security: Do not make a primary server also function as a DNS cache
It is possible—but for security reasons not recommended—for the same server to be the primary master server (authoritative) for some zones and a DNS cache for others. When the same server acts as both a DNS cache and a master server, if a malicious local user or malfunctioning resolver on the local network floods the DNS cache with more traffic than it can handle (a DoS attack), users might be prevented from accessing the public servers handled by the primary master server. Conversely, if the authoritative server is compromised, the attacker can subvert all traffic leaving the network.
Resource Records
Resource records store information about nodes (domains) in the DNS database and are kept in zone files (page 874). The zone that a resource record pertains to is defined by the zone file that contains the resource record. The zone is named in the named.conf file (page 872) that references the zone file.
A resource record has the following fields:
• Name—The domain name or IP address
• TTL—Time to live (not in all resource records; see page 1278)
• Class—Always IN for Internet (the only class supported by DNS)
• Type—Record type (discussed in the next section)
• Data—Varies with record type
If the Name field is missing, the resource record inherits the name from the previous resource record in the same file. If the Name field ends in a period (.), it specifies an FQDN; otherwise it is relative to the zone named in named.conf.
Cached resource records become out-of-date when the information in the record changes on the authoritative server. The TTL field indicates the maximum amount of time a server might keep a record in cache before checking whether a newer one is available. Typically the TTL is on the order of days. A TTL of 0 (zero) means that the resource record should not be cached.
More than 30 types of resource records exist, ranging from common types, such as address records that store the address of a host, to those that contain geographical information. The following paragraphs describe the types of resource records you are most likely to encounter.
A
IPv4 Address Maps a domain name to the IPv4 address of a host. There must be at least one address record for each domain; multiple address records can point to the same IP address. The Name field holds the domain name, which is assumed to be in the same zone as the domain. The Data field holds the IP address associated with the name. The following address resource record maps the ns domain in the zone to 192.168.0.1:
ns IN A 192.168.0.1
AAAA
IPv6 Address Maps a domain name to the IPv6 address of a host. The following address resource record maps the ns domain in the zone to an IPv6 address:
ns IN AAAA 2001:630:d0:131:a00:20ff:feb5:ef1e
CNAME
Canonical Name Maps an alias or nickname to a domain name. The Name field holds the alias or nickname; the Data field holds the official or canonical name. CNAME is useful for specifying an easy-to-remember name or multiple names for the same domain. It is also useful when a system changes names or IP addresses. In this case the alias can point to the real name that must resolve to an IP address.
When a query returns a CNAME, a client or DNS tool performs a DNS lookup on the domain name returned with the CNAME. It is acceptable to provide multiple CNAME records all pointing to the name that has the A record. The following resource record maps ftp in the zone towww.sam.net.:
ftp IN CNAME www.sam.net.
MX
Mail Exchange Specifies a destination for mail addressed to the domain. MX records must always point to A (or AAAA) records. The Name field holds the domain name, which is assumed to be in the zone; the Data field holds the name of a mail server preceded by its priority. Unlike A records, MX records contain a priority number that allows mail delivery agents to fall back to a backup server if the primary server is down. Several mail servers can be ranked in priority order, where the lowest number has the highest priority. DNS selects randomly from among mail servers with the same priority. The following resource records forward mail sent to speedy in the zone first to mail in the zone and then, if that attempt fails, to mail.sam.net.. The value of speedy in the Name field on the second line is implicit.
speedy IN MX 10 mail
IN MX 20 mail.sam.net.
NS
Nameserver Specifies the name of the system that provides domain service (DNS records) for the domain. The Name field holds the domain name; the Data field holds the name of the DNS server. Each domain must have at least one NS record. DNS servers do not need to reside in the domain, and in fact, it is better if at least one does not. The system name ns is frequently used to specify a nameserver, but this name is not required and does not have any significance beyond assisting humans in identifying a nameserver. The following resource record specifies ns.max.net.as a nameserver for peach in the zone:
peach IN NS ns.max.net.
PTR
Pointer Maps an IP address to a domain name and is used for reverse name resolution. The Name field holds the IP address; the Data field holds the domain name. Do not use PTR resource records with aliases. The following resource record maps 3 in a reverse zone (for example, 3 in the 0.168.192.in-addr.arpa zone is 192.168.0.3) to peach in the zone:
3 IN PTR peach
For more information refer to “Reverse Name Resolution” on page 862.
SOA
Start of Authority Designates the start of a zone. Each zone must have exactly one SOA record. An authoritative server maintains the SOA record for the zone it is authoritative for.
All zone files must have one SOA resource record, which must be the first resource record in the file. The Name field holds the name of the domain at the start of the zone. The Data field holds the name of the host the data was created on, the email address of the person responsible for the zone, and the following information, which must be enclosed within parentheses if the record does not fit on one line. If this information is enclosed within parentheses (and it usually is), the opening parenthesis must appear on the first physical line of the SOA record:
serial A value in the range 1 to 2,147,483,647. A change in this number indicates the zone data has changed. By convention, this field is set to the string yyyymmddnn (year, month, day, change number). Along with the date, the final two digits—that is, the change number—should be incremented each time you change the SOA record.
refresh The elapsed time after which the primary master server notifies slave (secondary) servers to refresh the record; the amount of time between updates.
retry The time to wait after a refresh fails before trying to refresh again.
expiry The elapsed time after which the zone is no longer authoritative and the root servers must be queried. The expiry applies to slave servers only.
minimum The negative caching (page 1262) TTL, which is the amount of time that a nonexistent domain error (NXDOMAIN) can be held in a slave server’s cache. A negative caching TTL is the same as a normal TTL except that it applies to domains that do not exist rather than to domains that do exist.
The $TTL directive (page 875) specifies the default zone TTL (the maximum amount of time data stays in a slave server’s cache). Jointly, the default zone TTL and the negative caching TTL encompass all types of replies the server can generate. If you will be adding subdomains or modifying existing domains frequently, set the negative caching TTL to a low number. A short TTL increases traffic to DNS for clients requesting domains that do not exist, but allows new domains to propagate quickly, albeit at the expense of increased traffic.
The following two SOA resource records are equivalent (the parentheses in the first record are optional because the record fits on one physical line):
@ IN SOA ns.zach.net. mgs@sobell.com. ( 2013111247 8H 2H 4W 1D )
@ IN SOA ns.zach.net. mgs@sobell.com. (
2013111247 ; serial
8H ; refresh
2H ; retry
4W ; expire
1D ) ; minimum
The second format is more readable because of its layout and the comments. The at symbol (@) at the start of the SOA resource record stands for the zone name (also called the origin) as specified in the named.conf file. Because the named.conf file specifies the zone name to be zach.net, you could rewrite the first line as follows:
zach.net. IN SOA ns.zach.net. mgs@sobell.com. (
The host utility returns something closer to the first format with each of the times specified in seconds:
$ host -t soa zach.net
zach.net. SOA ns.zach.net. mgs\@sobell.com. 03111 28800 7200 2419200 86400
TXT
Text Associates a character string with a domain. The Name field holds the domain name. The Data field can contain up to 256 characters and must be enclosed within quotation marks. TXT records can contain any arbitrary text value. As well as general information, they can be used for things such as public key distribution. Following is a TXT resource record that specifies a company name:
zach.net. IN TXT "Sobell Associates Inc."
DNS Queries and Responses
Queries
A DNS query has three parts:
1. Name—Domain name, FQDN, or, for reverse name resolution, IP address
2. Type—Type of record requested (page 857)
3. Class—Always IN for Internet class
Cache
Most DNS servers store in cache memory the query responses from other DNS servers. When a DNS server receives a query, it first tries to resolve the query from its cache. If that attempt fails, the server might query other servers to get an answer. Because DNS uses cache, when you make a change to a DNS record, the change takes time—sometimes a matter of days—to propagate throughout the DNS hierarchy.
Responses
A DNS message sent in response to a query can hold the following records:
• Header record—Information about this message
• Query record—Repeats the query
• Answer records—Resource records that answer the query
• Authority records—Resource records for servers that have authority for the answers
• Additional records—Additional resource records, such as NS records
![]() dig
dig
The dig and host utilities do not consult /etc/nsswitch.conf (page 495) to determine which server to query. The following example uses dig to query a DNS server. The +all option causes dig to query for all records.
$ dig +all google.com
...
;; QUESTION SECTION:
;google.com. IN A
;; ANSWER SECTION:
google.com. 5 IN A 74.125.19.147
google.com. 5 IN A 74.125.19.99
google.com. 5 IN A 74.125.19.103
google.com. 5 IN A 74.125.19.104
;; AUTHORITY SECTION:
google.com. 5 IN NS ns3.google.com.
google.com. 5 IN NS ns4.google.com.
google.com. 5 IN NS ns1.google.com.
google.com. 5 IN NS ns2.google.com.
;; ADDITIONAL SECTION:
ns1.google.com. 5 IN A 216.239.32.10
ns2.google.com. 5 IN A 216.239.34.10
...
Reverse Name Resolution
In addition to normal or forward name resolution, DNS provides reverse name resolution (also referred to as inverse mapping or reverse mapping) so you can look up domain names given an IP address. Because resource records in the forward DNS database are indexed hierarchically by domain name, DNS cannot perform an efficient search by IP address on this database.
DNS implements reverse name resolution by means of special domains named in-addr.arpa (IPv4) and ip6.int (IPv6). Resource records in these domains have Name fields that hold IP addresses; the records are indexed hierarchically by IP address. The Data fields hold the FQDNs that correspond to these IP addresses.
Reverse name resolution can verify that someone is who he says he is or at least is from the domain he says he is from. In general, it allows a server to retrieve and record the domain names of the clients it provides services to. For example, legitimate mail contains the domain of the sender and the IP address of the sending machine. A mail server can verify the stated domain of a sender by checking the domain associated with the IP address. Reverse name resolution can also be used by anonymous FTP servers to verify that a domain specified in an email address used as a password is legitimate.
For example, to determine the domain name that corresponds to the IP address 209.132.183.42 in Figure 24-5, a resolver would query DNS for information about the domain named 42.183.132.209.in-addr.arpa.
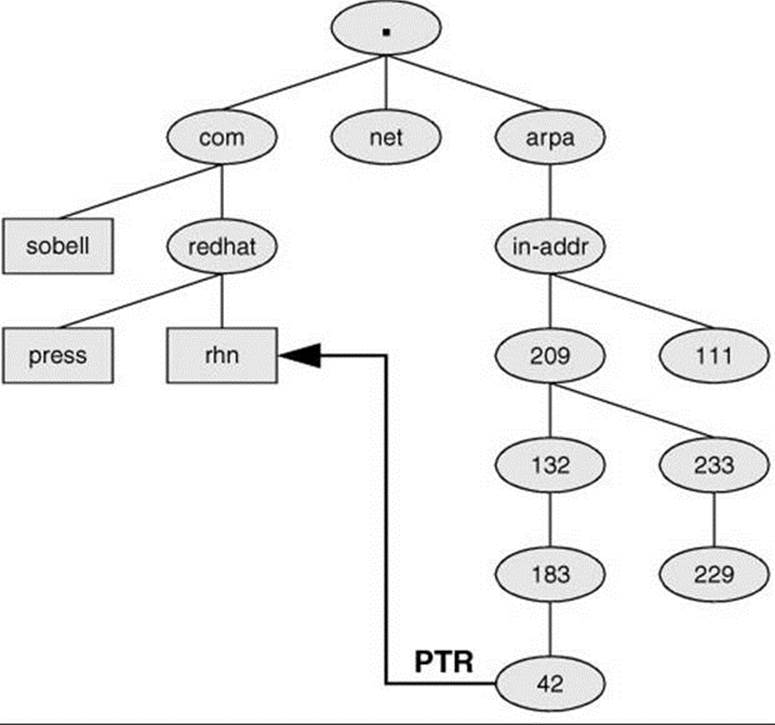
Figure 24-5 Reverse name resolution and the in-addr.arpa domain
![]() dig
dig
The following example uses dig to query DNS for the IP address that corresponds to www.sobell.com, which is 209.157.128.22. The second command line uses the dig utility to query the same IP address, reversed and appended with .in-addr.arpa (22.128.157.209.in-addr.arpa) to display a PTR resource record (page 859). The data portion of the resultant resource record is the domain name from the original query: www.sobell.com.
$ dig www.sobell.com
...
;; QUESTION SECTION:
;www.sobell.com. IN A
;; ANSWER SECTION:
www.sobell.com. 2274 IN A 209.157.128.22
...
$ dig 22.128.157.209.in-addr.arpa PTR
...
;; QUESTION SECTION:
;22.128.157.209.in-addr.arpa. IN PTR
;; ANSWER SECTION:
22.128.157.209.in-addr.arpa. 2244 IN PTR www.sobell.com.
...
Instead of reformatting the IP address as in the preceding example, you can use the –x option to dig to perform a reverse query:
$ dig -x 209.157.128.22
...
;; QUESTION SECTION:
;22.128.157.209.in-addr.arpa. IN PTR
;; ANSWER SECTION:
22.128.157.209.in-addr.arpa. 2204 IN PTR www.sobell.com.
...
Alternately, you can just use host:
$ host 209.157.128.22
22.128.157.209.in-addr.arpa domain name pointer www.sobell.com.
How DNS Works
Application programs do not issue DNS queries directly but rather use the gethostbyname() system call. How the system comes up with the corresponding IP address is transparent to the calling program. The gethostbyname() call examines the hosts line in /etc/nsswitch.conf (page 495) to determine which files it should examine and/or which services it should query and in what order to obtain the IP address corresponding to a domain name. When it needs to query DNS, the local system (i.e., the DNS client) queries the DNS database by calling the resolver library on the local system. This call returns the required information to the application program.
More Information
DNS for Rocket Scientists is an excellent site that makes good use of links to present information on DNS in a very digestible form. The same information is available in the Pro DNS and BIND book.
Local
Bind Administrator Reference Manual: /usr/share/doc/bind*/Bv9ARM.html or see “Using this JumpStart” on page 868.
Web
DNS for Rocket Scientists: www.zytrax.com/books/dns
BIND: www.isc.org/downloads/BIND
DNS security: www.sans.org/reading_room/whitepapers/dns/security-issues-dns_1069 (downloadable PDF file)
HOWTO
DNS HOWTO
Book
DNS & BIND, fifth edition, by Albitz & Liu, O’Reilly & Associates (June 2006)
Pro DNS and BIND, first edition, by Ron Aitchison, Apress (August 2005)
Setting Up a DNS Server
This section explains how to set up the simplest type of DNS server, a DNS cache. See page 885 for information on setting up other types of DNS servers.
Prerequisites
Install the following packages:
• bind
• bind-utils (installed by default)
• system-config-bind (Fedora), optional, page 867)
• named-chroot (optional, used to set up BIND to run in a chroot jail, page 883)
Tip: Before you set up a BIND server
Before you configure a BIND server, set up a static IP address for the server system. See “Configuring a Static IP Address for a Wired NIC” on page 641 for instructions.
Enable and start named
Run systemctl to cause the named service (named daemon) to start each time the system enters multiuser mode and then start the named service. Use the systemctl status command to make sure the service is running.
# systemctl enable named.service
# systemctl start named.service
After changing the BIND configuration on an active server, you can use reload in place of start to reload named configuration files without disturbing clients connected to the server. Although it will interrupt clients, restart generates better error messages than reload: After giving the command systemctl restart named, look in /var/log/messages for information about loading zone files, updated serial numbers, and so on.
Enable and start named-chroot
If you want to run named in a chroot jail as explained on page 883, run systemctl to cause the named-chroot service to start each time the system enters multiuser mode and then start the named-chroot service. Use the systemctl status command to make sure the service is running.
# systemctl enable named-chroot.service
# systemctl start named-chroot.service
Notes
Terms: DNS and named
The name of the DNS server is named. This chapter uses “DNS” and “named” interchangeably.
Firewall
A named server normally accepts queries on TCP and UDP port 53. If the server is running a firewall or is behind a firewall, you need to open these ports. Give the following commands to open the ports each time the system boots (permanently) and on the running system; see page 906 for information on firewall-cmd.
# firewall-cmd --add-port=53/tcp
# firewall-cmd --permanent --add-port=53/tcp
# firewall-cmd --add-port=53/udp
# firewall-cmd --permanent --add-port=53/udp
SELinux
According to the Fedora/RHEL named man page, the default Fedora/RHEL SELinux policy for named is very secure and prevents known BIND security vulnerabilities from being exploited. This setup has some limitations, however. Refer to the named man page for more information.
If the system is running SELinux with a targeted policy and you want to modify the SELinux named settings, you must turn on one or more of the SELinux settings under the Name Service clause as displayed by system-config-selinux (page 475).
chroot jail
The named-chroot package sets up named to run in a chroot jail. With this package installed, all files that control BIND are located within this jail.
named options
See the comments in the /etc/sysconfig/named file for information about named options that you can set there. One of the most important of these options sets the value of the ROOTDIR variable that controls the location of the chroot jail (page 883) that BIND runs in.
named.conf
The Fedora/RHEL named daemon obtains configuration information from the file named /etc/named.conf (page 875).
Error messages
In some situations named generates error messages regarding files it cannot find. These messages generally appear in /var/log/messages. To eliminate these messages, you can try creating an empty file with the name specified in the log. For example, if named generates the message
managed-keys.bind failed: file not found
give these commands to create the file and make named the owner of the file:
# touch /var/named/managed-keys.bind
# chown named:named /var/named/managed-keys.bind
Restart named and see if it still generates the error. You can safely ignore the working directory is not writable error message.
![]() JumpStart I: Setting Up a DNS Cache
JumpStart I: Setting Up a DNS Cache
As explained earlier, a DNS cache is a bridge between a resolver and authoritative DNS servers: It is not authoritative but simply stores the results of its queries in memory. Most ISPs provide a DNS cache for the use of their customers. Setting up a local cache can reduce the traffic between the LAN and the outside world, thereby improving response times. While it is possible to set up a DNS cache on each system on a LAN, setting up a single DNS cache on a LAN prevents multiple systems on the LAN from having to query a remote server for the same information.
After installing BIND (the bind package), you have most of a caching-only nameserver ready to run. Refer to “Setting Up a DNS Cache” on page 875 for an explanation of which files this nameserver uses and how it works.
ifcfg-eth0 and resolv.conf
Before you start the DNS cache, set up a static IP address for the server system; see page 641 for instructions.
Next, modifty the /etc/sysconfig/network-scripts/ifcfg-eth0 file, or whichever ifcfg-* file the server uses, to make localhost (127.0.0.1) the primary nameserver. To do so, change the current primary nameserver to be the secondary nameserver. This change makes room for the local DNS cache to be the primary nameserver. To make this change, change the 1 to a 2 in the existing line that starts with DNS1 in the ifcfg-* file. If the file specifies additional nameservers, demote each (change DNS2 to DNS3, etc.) For example, if the ifcfg-eth0 file has the line DNS1=192.0.32.10, change it to DNS2=192.0.32.10. Then add the following line to the same file:
DNS1=127.0.0.1
This line tells the resolver to use the local system (localhost or 127.0.0.1) as the primary nameserver. To experiment with using the local system as the only nameserver, comment out other DNS lines in the ifcfg-* file by preceding each with a hashmark (#).
In some cases you might need to comment out the three lines that start with dnssec (put a hash mark [#] at the left end of the line) and add a forwarders line (page 873) that points to a remote DNS server in the options clause.
The last step is to start or restart the named service using systemctl (page 864). Restarting this service overwrites the /etc/resolv.conf file (page 510) with the new nameserver information.
Once you have started or restarted named, you can see the effect of the local cache by using dig to look up the IP address of a remote system:
$ dig www.sobell.com
...
;; QUESTION SECTION:
;www.sobell.com. IN A
;; ANSWER SECTION:
www.sobell.com. 14400 IN CNAME sobell.com.
sobell.com. 14400 IN A 216.38.53.176
...
;; Query time: 84 msec
;; SERVER: 216.38.53.176#53(216.38.53.176)
;; WHEN: Fri Oct 18 13:36:21 2013
;; MSG SIZE rcvd: 141
The fourth line from the bottom of the preceding example shows this query took 84 milliseconds (a little less than one-tenth of a second). The third line from the bottom of the same example shows the IP address of the DNS server that dig queried. When you run the same query again, it runs more quickly because the DNS cache has saved the information locally in memory. This time dig shows the time of the query as 1 millisecond and the DNS server as 127.0.0.1:
$ dig www.sobell.com
...
;; Query time: 1 msec
;; SERVER: 127.0.0.1#53(127.0.0.1)
;; WHEN: Fri Oct 18 13:36:23 2013
...
Tip: If the DNS cache does not improve the query time
If the DNS cache does not improve the query time, you might already be using a DNS cache provided by your ISP. Try specifying a different secondary nameserver in ifcfg-*. Alternately, you can try using a public DNS server; see the lists of servers atcode.google.com/speed/public-dns, www.tech-faq.com/public-dns-servers.html, and www.opennicproject.org/publictier2servers.
JumpStart II: Setting Up a Domain Using system-config-bind (Fedora)
The BIND Configuration GUI window (Figure 24-6) enables you to set up a DNS server. To display this window, give the command system-config-bind from a terminal emulator or an Enter a Command window (ALT-F2).
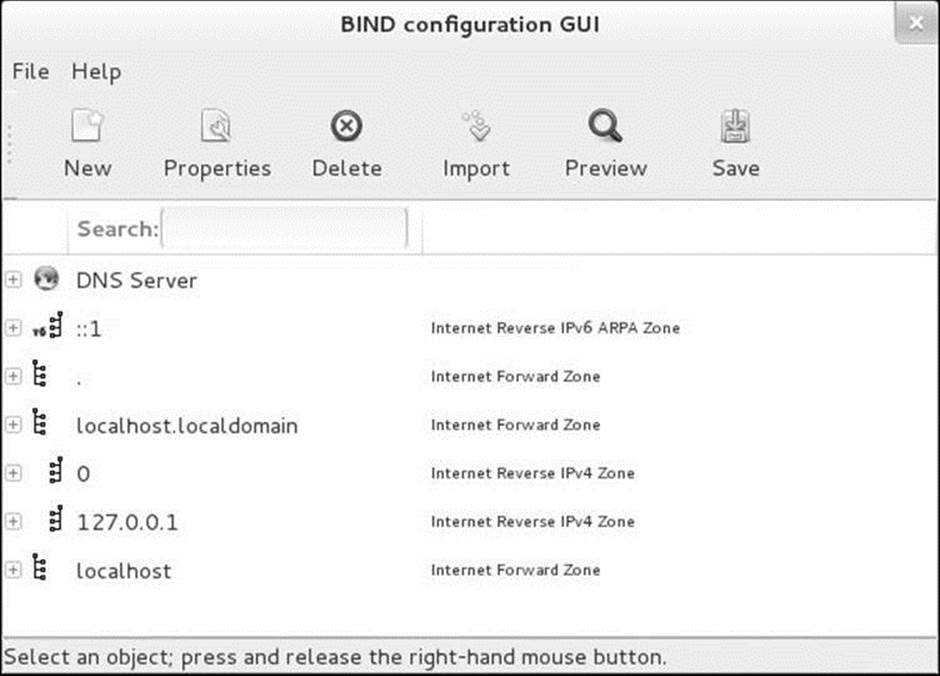
Figure 24-6 The BIND Configuration GUI window
If /etc/named.conf does not exist, system-config-bind displays a dialog box that informs you it is installing a default configuration. Click OK.
Tip: Using this JumpStart
The system-config-bind utility is a complex tool you might find helpful for setting up BIND. Run this utility and click Help![]() Manual on the menubar to display the Fedora/RHEL manual for this utility. Click Help
Manual on the menubar to display the Fedora/RHEL manual for this utility. Click Help![]() ISC ARM to display the BIND 9 Administrator Reference Manual. You might want to experiment with this utility after you have set up one of the servers described at the end of this chapter, as its configuration information might make more sense after you go through the process of manually configuring BIND.
ISC ARM to display the BIND 9 Administrator Reference Manual. You might want to experiment with this utility after you have set up one of the servers described at the end of this chapter, as its configuration information might make more sense after you go through the process of manually configuring BIND.
This section explains how to use system-config-bind but does not go into detail about what each of the files and settings does; that information is covered elsewhere in this chapter.
Notes
Each zone file that system-config-bind creates has a filename extension of .db.
Because the windows displayed by system-config-bind contain a lot of information, you might find it helpful to expand or maximize these windows so that you can view the information more easily.
Using the BIND Configuration GUI Window
Right-click an object (line) in the BIND Configuration GUI window to display a pop-up context menu. This menu always has an Edit selection, which displays a window in which you can edit information pertaining to the object you clicked. You can display the same window by double-clicking the object or by highlighting the object and clicking Properties on the toolbar. This pop-up menu also always has an Add selection that displays a submenu with choices appropriate to the object you are working with. Figure 24-7 shows the pop-up menu for the DNS Server object along with the Add submenu.
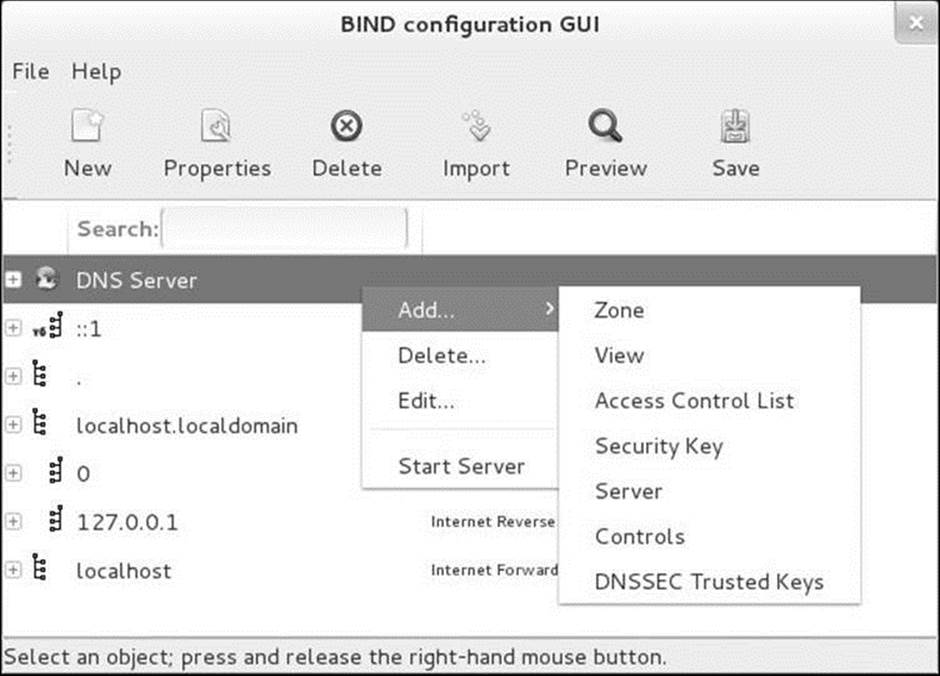
Figure 24-7 The BIND Configuration GUI window with a right-click menu
In the BIND Configuration GUI window, a plus sign (+) at the left end of a line indicates that the object holds other objects. Click a plus sign so that it turns into a minus sign (–) to expand an entry. Click a minus sign to collapse an entry.
Setting Up a Domain Server
Highlight DNS Server in the BIND Configuration GUI window and click New![]() Zone on the toolbar (or right-click and select Add
Zone on the toolbar (or right-click and select Add![]() Zone) to add a new zone (page 855) and its associated nameserver. In response, system-config-bind displays the first New Zone window (Figure 24-8), which allows you to specify information about the zone you are setting up. With the Class combo box displaying IN Internet, click OK under this box.
Zone) to add a new zone (page 855) and its associated nameserver. In response, system-config-bind displays the first New Zone window (Figure 24-8), which allows you to specify information about the zone you are setting up. With the Class combo box displaying IN Internet, click OK under this box.
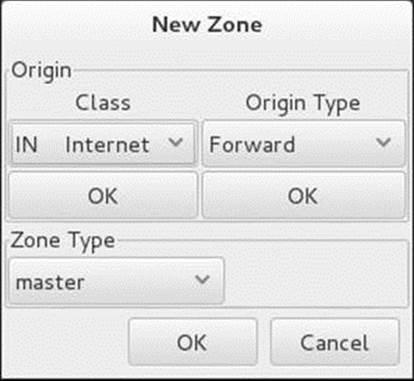
Figure 24-8 The first New Zone window
Next select the origin type from the combo box under Origin Type. The most common choices are Forward or IPV4 Reverse. Click OK under this box. Assuming you selected a forward zone, the Forward Zone Origin text box replaces the origin type information. Enter the domain name of the zone, including a trailing period, in the text box.
Finally select the type of zone you want to set up by clicking the combo box in the Zone Type frame. You can select from master, slave, forward, hint, and other types of zones. Refer to “Servers” on page 856 and type on page 874 for information on types of zones.
After you make your selections and click OK, system-config-bind displays the second New Zone window (Figure 24-9 on the next page). This window enables you to set up SOA information for the zone. Refer to “SOA” on page 859 for information about the fields in the SOA record, including the serial number and the various times (refresh intervals). In this window, the authoritative (primary) nameserver (page 856) defaults to the local system and the email address of the person responsible for the zone defaults to root on the local system. If you enter names that do not end with a period in these text boxes, system-config-bind appends the domain name of the zone to the name you have entered. Change the values in this window as necessary. All zone files that system-config-bind creates have a filename extension of .db by default. The default filename for the zone file is the name of the domain you are setting up with an extension of .db. Click OK to close the window when you are done making changes.

Figure 24-9 The second New Zone window
After you add a new zone, the information about this zone appears in the BIND Configuration GUI window (Figure 24-6, page 867). Click Save on the toolbar to save the changes you made before you close the window.
To view information about the new zone, you can expand the object that holds the name of the new zone. You can further expand the Zone Authority Information and Name Server objects that appear when you expand the new zone object. Right-click any object to add to or modify the information in the object or to delete the object.
Adding Resource Records
You can add any of an extensive list of resource records to a domain. Right-click the object representing the domain you just added to display a pop-up menu. Slide the mouse pointer over Add to display the domain Add menu (Figure 24-10). The uppercase letters at the left end of each selection specify the type of resource record (page 857) the selection adds to the domain. Following are some of the choices available on this menu:

Figure 24-10 The domain Add drop-down menu
• A IPv4 Address record (page 858)
• CNAME Alias record (page 858)
• MX Mail Exchange record (page 859)
• NS Nameserver record (page 859)
• TXT Text record (page 860)
To add a reverse zone (a PTR record [page 859]), add a new zone as before, but this time select IPv4 (or IPv6) Reverse as the origin type. For more information refer to “Reverse Name Resolution” on page 862.
Click Save when you are done, close the BIND Configuration GUI window, and start or restart the named daemon as explained on page 864.
Configuring a DNS Server
This section discusses the /etc/bind/named.conf file, zone files, implementation of a DNS cache, DNS glue records, transaction signatures (TSIGs), and running BIND in a chroot jail.
named.conf: The named Configuration File
Configuration information for named is kept in /etc/named.conf. By default, the zone files reside in /var/named. If you are running named in a chroot jail (page 883), these files are also available as /var/named/chroot/etc/named.conf and /var/named/chroot/var/named.
IP-list
In the descriptions in this section, IP-list is a semicolon-separated list of IP addresses, where each IP address is optionally followed by a slash and a network mask length (page 483). Prefix an IP-list with an exclamation point (!) to negate it. Builtin names you can use in IP-list include any,none, and localhost; these names must be enclosed within double quotation marks. The localhost builtin name refers to all IP addresses on the local system, not just 127.0.0.1.
Comments
Within named.conf, specify a comment by preceding it with a hashmark (#) as in a Perl or shell program, preceding it with a double slash (//) as in a C++ program, or enclosing it between /* and */ as in a C program. Within a zone file, a comment starts with a semicolon (;).
Included Files
An include statement within the named.conf file includes the file named as its argument as though its contents appeared inline in the named.conf file. The default named.conf file includes the /etc/named.rfc1912.zones and /etc/named.root.key files.
Options Clause
Option statements can appear in two sections of named.conf: Options and Zone. Option statements within the Options clause apply globally. When an option statement appears in a Zone clause, the option applies to the zone and, within that zone, overrides a corresponding global option.
An Options clause starts with the keyword options and continues with a pair of braces surrounding one or more statements. Following is a list of some option statements. Statements that can appear only in an Options clause and statements that cannot appear in a View clause (page 890) are so noted.
allow-query {IP-list}
Allows queries from IP-list only. Without this option, the server responds to all queries.
allow-recursion {IP-list}
Specifies systems for which this server will perform recursive queries (page 856). For systems not in IP-list, the server performs iterative queries only. Without this option, the server performs recursive queries for any system. This statement might be overridden by the recursion statement.
allow-transfer {IP-list}
Specifies systems that are allowed to perform zone transfers from this server. Specify an IP-list of "none" (include the quotation marks) to prevent zone transfers. For a more secure network, include only trusted systems in IP-list because systems on the list can obtain a list of all systems on the network.
directory path
Specifies the absolute pathname of the directory containing the zone files. Under Fedora/RHEL, this directory is initially /var/named. Relative pathnames specified in named.conf are relative to this directory. Options clause only; not in View clause.
forward ONLY|FIRST
ONLY forwards all queries and fails if it does not receive an answer. FIRST forwards all queries and, if a query does not receive an answer, attempts to find an answer using additional queries. Valid with the forwarders statement only.
forwarders {IP [port] [; ...]}
Specifies IP addresses and optionally port numbers that queries are forwarded to. See the forward statement.
notify YES|NO
YES sends a message to slave servers for the zone when zone information changes. Master servers only. See page 890.
recursion YES|NO
YES (default) provides recursive queries (page 856) if the client requests. NO provides iterative queries only (page 856). An answer is always returned if it appears in the server’s cache. This statement overrides allow-recursion statements. Options clause only.
Zone Clause
A Zone clause defines a zone and can include any of the statements listed for the Options clause except as noted. A Zone clause is introduced by the keyword zone, the name of the zone enclosed within double quotation marks, and the class (always IN). The body of the Zone clause consists of a pair of braces surrounding one or more Zone statements. See the listing of named.rfc1912.zones on page 877 for examples of Zone clauses. Following is a list of some Zone statements.
allow-update {IP-list}
Specifies systems that are allowed to update this zone dynamically. This statement might be useful when hosting a master DNS server for a domain owned by someone other than the local administrator because it allows a remote user to update the DNS entry without granting the user access to the server.
file filename
Specifies the zone file—the file that specifies the characteristics of the zone. The filename is relative to the directory specified by the directory statement in the Options clause. The file statement is mandatory for master and hint zones. Including it for slave zones is a good idea (see type).
masters (IP-list)
Specifies systems that a slave zone can use to update zone files. Slave zones only.
type ztype
Specifies the type of zone defined by this clause. Choose ztype from the following list:
• forward—Specifies a forward zone, which forwards queries directed to this zone. See the forward and/or forwarders statements in the Options clause.
• hint—Specifies a hint zone. A hint zone lists root servers that the local server queries when it starts and when it cannot find an answer in its cache.
• master—Specifies the local system as a primary master server (page 856) for this zone.
• slave—Specifies the local system as a slave server (page 856) for this zone.
Zone Files
Zone files define zone characteristics. The name of the zone is typically specified in named.conf. In contrast to named.conf, zone files use periods at the ends of domain names. See page 878 for example zone files. To improve security, master and hint zone files should be kept in/var/named, which is owned by root and is not writable by processes running with a UID of named. Slave zone files should be kept in /var/named/slaves, which is owned by named and is writable by processes running with a UID of named. This configuration enables SELinux to offer better security. When you set up a chroot jail, the slaves directory is not put in the jail. Both of these setups ensure that master and hint zone files cannot be updated by dynamic DNS updates or by zone transfers. See the named man page for more information.
Time Formats
All times in BIND files are given in seconds, unless they are followed by one of these letters (uppercase or lowercase): S (seconds), M (minutes), H (hours), D (days), or W (weeks). You can combine formats. For example, the time 2h25m30s means 2 hours, 25 minutes, and 30 seconds and is the same as 8,730 seconds.
Domain Qualification
An unqualified domain in a zone file is assumed to be in the current zone (the zone defined by the zone file and named by the named.conf file that refers to the zone file). The name zach in the zone file for myzone.com, for example, would be expanded to the FQDN zach.myzone.com.. Use an FQDN (include the trailing period) to specify a domain that is not in the current zone. Any name that does not end with a period is regarded as a subdomain of the current zone.
Zone Name
Within a zone file, an at sign (@) is replaced with the zone name specified by the $ORIGIN directive (next). If there is no $ORIGIN directive in the zone file, an at sign is replaced with the zone name specified by the Zone clause in the named.conf file that refers to the zone file. For documentation and clarity, it is common practice to put an $ORIGIN directive near the top of all zone files, even if the $ORIGIN matches the zone name in named.conf. The zone name is also referred to as the origin.
Zone File Directives
The following directives can appear within a zone file. Each directive is identified by a leading dollar sign. The $TTL directive is mandatory and must be the first entry in a zone file.
$TTL
Defines the default time to live for all resource records in the zone. This directive must appear in a zone file before any resource records it applies to. Any resource record can include a TTL value that overrides this value, except for the resource record in the root zone (.).
$ORIGIN
Changes the zone name from that specified in the named.conf file. This name, or the zone name if this directive does not appear in the zone file, replaces an @ sign in the Name field of a resource record.
$INCLUDE
Includes a file as though it were part of the zone file. The scope of an $ORIGIN directive within an included file is the included file. That is, an $ORIGIN directive within an included file does not affect the file that holds the $INCLUDE directive.
Setting Up a DNS Cache
You install a DNS cache (also called a resolving, caching nameserver) when you install the bind package. The section “JumpStart I: Setting Up a DNS Cache” (page 866) explains how to run this server. This section describes how the files provided by Fedora/RHEL implement this server.
named.conf: The named Configuration File
The default /etc/named.conf file follows.
# cat /etc/named.conf//
// named.conf
//
// Provided by Red Hat bind package to configure the ISC BIND named(8) DNS
// server as a caching only nameserver (as a localhost DNS resolver only).
//
// See /usr/share/doc/bind*/sample/ for example named configuration files.
//
options {
listen-on port 53 { 127.0.0.1; };
listen-on-v6 port 53 { ::1; };
directory "/var/named";
dump-file "/var/named/data/cache_dump.db";
statistics-file "/var/named/data/named_stats.txt";
memstatistics-file "/var/named/data/named_mem_stats.txt";
allow-query { localhost; };
recursion yes;
dnssec-enable yes;
dnssec-validation yes;
dnssec-lookaside auto;
/* Path to ISC DLV key */
bindkeys-file "/etc/named.iscdlv.key";
managed-keys-directory "/var/named/dynamic";
};
logging {
channel default_debug {
file "data/named.run";
severity dynamic;
};
};
zone "." IN {
type hint;
file "named.ca";
};
include "/etc/named.rfc1912.zones";
include "/etc/named.root.key";
Options clause
The first two lines of the Options clause instruct named to listen on port 53 (the default named port) on the local system for incoming queries. The directory statement specifies the directory that all relative pathnames in this file are relative to. Specifically, the files named in the Zone clauses (of the included named.rfc1912.zones file) are in the /var/named directory. If you are running named in a chroot jail, this directory is located under /var/named/chroot (page 883). The file also specifies the locations of the dump-file (cache dump), statistics-file (statistics file), andmemstatistics-file (memory statistics file). The allow-query statement specifies the IP addresses that are allowed to query the server. This file specifies that only localhost can query the server. The recursion statement specifies that this server perform recursive queries. The dnssecstatements implement DNSSEC (DNS Security Extensions), which adds security to DNS.
Logging section
The Logging section causes debugging messages to be sent to data/named.run. For more information refer to “Logging” on page 887.
Zone clause
The Zone clause specifies the hint zone, whose name is a period. This zone specifies that when the server starts or when it does not know which server to query, it should look in the /var/named/named.ca (ca stands for cache) file to find the addresses of authoritative servers for the root domain.
Include statement
The include statements incorporate /etc/named.rfc1912.zones (specifies additional zones; next section) and /etc/named.root.key (provides the DNS key for the root zone) as though they were present in this file.
named.rfc1912.zones: The Zone Configuration File
The /etc/named.rfc1912.zones file, which the named.conf file incorporates with an include statement, holds five Zone clauses. The comments in this file are out-of-date.
# cat /etc/named.rfc1912.zones
// named.rfc1912.zones:
//
// Provided by Red Hat caching-nameserver package
//
// ISC BIND named zone configuration for zones recommended by
// RFC 1912 section 4.1 : localhost TLDs and address zones
// and http://www.ietf.org/internet-drafts/draft-ietf-dnsop-default-local-zones-02.txt
// (c)2007 R W Franks
//
// See /usr/share/doc/bind*/sample/ for example named configuration files.
//
zone "localhost.localdomain" IN {
type master;
file "named.localhost";
allow-update { none; };
};
zone "localhost" IN {
type master;
file "named.localhost";
allow-update { none; };
};
zone "1.0.0.0.0.0.0.0.0.0.0.0.0.0.0.0.0.0.0.0.0.0.0.0.0.0.0.0.0.0.0.0.ip6.arpa" IN {
type master;
file "named.loopback";
allow-update { none; };
};
zone "1.0.0.127.in-addr.arpa" IN {
type master;
file "named.loopback";
allow-update { none; };
};
zone "0.in-addr.arpa" IN {
type master;
file "named.empty";
allow-update { none; };
};
Zone clauses
Each of the five Zone clauses has an allow-update statement that specifies dynamic updates of the zone are not allowed. All filenames in the named.rfc1912.zones file are relative to /var/named, the directory specified by the directory statement in the Options section of named.conf.
• localhost.localdomain—Specifies that localhost.localdomain points to 127.0.0.1, preventing the local server from looking upstream for this information.
• localhost—Sets up the normal server on the local system.
• 1.0 ... 0.0.ip6.arpa—Sets up IPv6 reverse name resolution.
• 1.0.0.127.in-addr.arpa—Sets up IPv4 reverse name resolution.
• 0.in-addr.arpa—Specifies that IP addresses that start with 0 have their reverse lookup handled by the local server, preventing the local server from looking upstream for this information.
Zone Files
There are four zone files in /var/named:
The root zone: named.ca
The hint zone file, named.ca (named cache), is an edited copy of the output of a query of the root domain (dig +bufsize=1200 +norec @a.root-servers.net). This information does not change frequently. See ftp://ftp.internic.net/domain/named.cache for more information. The named.ca file specifies authoritative servers for the root domain. The DNS server initializes its cache from this file and can determine an authoritative server for any domain from this information.
The root zone is required only for servers that answer recursive queries: If a server responds to recursive queries, it needs to perform a series of iterative queries starting at the root domain. Without the root domain hint file, it would not know where to find the root domain servers.
# cat /var/named/named.ca
; <<>> DiG 9.9.2-P1-RedHat-9.9.2-6.P1.fc18 <<>> +bufsize=1200 +norec @a.root-servers.net
; (2 servers found)
;; global options: +cmd
;; Got answer:
;; ->>HEADER<<- opcode: QUERY, status: NOERROR, id: 25828
;; flags: qr aa; QUERY: 1, ANSWER: 13, AUTHORITY: 0, ADDITIONAL: 23
;; OPT PSEUDOSECTION:
; EDNS: version: 0, flags:; udp: 512
;; QUESTION SECTION:
;. IN NS
;; ANSWER SECTION:
. 518400 IN NS a.root-servers.net.
. 518400 IN NS b.root-servers.net.
. 518400 IN NS d.root-servers.net.
...
;; ADDITIONAL SECTION:
a.root-servers.net. 3600000 IN A 198.41.0.4
a.root-servers.net. 3600000 IN AAAA 2001:503:ba3e::2:30
b.root-servers.net. 3600000 IN A 192.228.79.201
c.root-servers.net. 3600000 IN A 192.33.4.12
d.root-servers.net. 3600000 IN A 199.7.91.13
...
;; Query time: 78 msec
;; SERVER: 198.41.0.4#53(198.41.0.4)
;; WHEN: Mon Jan 28 15:33:31 2013
;; MSG SIZE rcvd: 699
named.empty
# cat /var/named/named.empty
$TTL 3H
@ IN SOA @ rname.invalid. (
0 ; serial
1D ; refresh
1H ; retry
1W ; expire
3H ) ; minimum
NS @
A 127.0.0.1
AAAA ::1
named.localhost
The named.localhost zone file defines the localhost zone, the normal server on the local system. It starts with a $TTL directive and holds four resource records: SOA, NS, A, and AAAA. The $TTL directive in the following file specifies that the default time to live for the resource records specified in this file is one day (1D):
# cat /var/named/named.localhost
$TTL 1D
@ IN SOA @ rname.invalid. (
0 ; serial
1D ; refresh
1H ; retry
1W ; expire
3H ) ; minimum
NS @
A 127.0.0.1
AAAA ::1
As explained earlier, the @ stands for the origin (the name of the zone), which is localhost, as specified in named.rfc1912.zones. The last three lines are the NS resource record that specifies the nameserver for the zone as localhost (@), the A resource record that specifies the IPv4 address of the host as 127.0.0.1, and the AAAA resource record that specifies the IPv6 address of the host as ::1. Because these three records have blank Name fields, each inherits this value from the preceding resource record—in this case, @.
named.loopback
The named.loopback zone file provides information about the 1.0.0.127.in-addr.arpa reverse lookup zone and the equivalent IPv6 zone. It follows the same pattern as the localhost zone file, with one exception: In addition to the A resource record, this file has a PTR record that provides the name the zone associates with the IP address (localhost):
# cat /var/named/named.loopback
$TTL 1D
@ IN SOA @ rname.invalid. (
0 ; serial
1D ; refresh
1H ; retry
1W ; expire
3H ) ; minimum
NS @
A 127.0.0.1
AAAA ::1
PTR localhost.
Once named is started (page 864), you can use the tests described under “Troubleshooting” on page 884 to make sure the server is working.
DNS Glue Records
It is common practice to put the nameserver for a zone inside the zone it serves. For example, you might put the nameserver for the zone starting at site1.example.com (Figure 24-3, page 855) in ns.site1.example.com. When a DNS cache tries to resolve www.site1.example.com, the authoritative server for example.com gives it the NS record pointing to ns.site1.example.com. In an attempt to resolve ns.site1.example.com, the DNS cache again queries the authoritative server for example.com, which points back to ns.site1.example.com. This loop does not allow ns.site1.example.com to be resolved.
The simplest solution to this problem is to prohibit any nameserver from residing inside the zone it points to. Because every zone is a child of the root zone, this solution means every domain would be served by the root server and would not scale at all.
A better solution is to use glue records. A glue record is an A record for a nameserver that is returned in addition to the NS record when an NS query is performed. Because the A record provides an IP address for the nameserver, it does not need to be resolved and does not create the problematic loop.
The nameserver setup for google.com illustrates the use of glue records. When you query for NS records for google.com, DNS returns four NS records. In addition, it returns four A records that provide the IP addresses for hosts that the NS records point to:
$ dig -t NS google.com
...
;; QUESTION SECTION:
;google.com. IN NS
;; ANSWER SECTION:
google.com. 5 IN NS ns4.google.com.
google.com. 5 IN NS ns1.google.com.
google.com. 5 IN NS ns2.google.com.
google.com. 5 IN NS ns3.google.com.
;; ADDITIONAL SECTION:
ns4.google.com. 5 IN A 216.239.38.10
ns1.google.com. 5 IN A 216.239.32.10
ns2.google.com. 5 IN A 216.239.34.10
ns3.google.com. 5 IN A 216.239.36.10
...
You can create a glue record by providing an A record for the nameserver inside the delegating domain’s zone file:
site1.example.com IN NS ns.site1.example.com
ns.site1.example.com IN A 1.2.3.4
TSIGs: Transaction Signatures
Interaction between DNS components is based on the query–response model: One part queries another and receives a reply. Traditionally a server determines whether and how to reply to a query based on the client’s IP address. IP spoofing (page 1256) is relatively easy to carry out, making this situation less than ideal. Recent versions of BIND support transaction signatures (TSIGs), which allow two systems to establish a trust relationship by using a shared secret key.
TSIGs provide an additional layer of authentication between master and slave servers for a zone. When a slave server is located at a different site than the master server (as it should be), a malicious person operating a router between the sites can spoof the IP address of the master server and change the DNS data on the slave (a man-in-the-middle scenario). With TSIGs, this person would need to know the secret key to change the DNS data on the slave.
Creating a Secret Key
Tip: If dnssec-keygen hangs
Running dnssec-keygen can cause the system to hang for a long time if there is not enough entropy. This problem is common on virtual systems. You can create entropy and free the system by moving the mouse, typing on the keyboard, or copying files. Alternately, you can read from /dev/urandom (page 504):
$ dnssec-keygen -r /dev/urandom -a hmac-md5 -b 512 -n HOST keyname
A secret key is an encoded string of up to 512 bits. The dnssec-keygen utility, which is included with BIND, generates this key. The following command, which might take a while to run, generates a 512-bit random key using MD5, a one-way hash function (page 1264):
$ dnssec-keygen -a hmac-md5 -b 512 -n HOST keyname
Kkeyname.+157+47586
In the preceding command, replace keyname with a string that is unique yet meaningful. This command creates a key in a file whose name is similar to the string Kkeyname.+157+47586.private, where keyname is replaced by the name of the key, +157 indicates the algorithm used, and+47586 is a hash of the key. If you run the same command again, the hash part will be different.
The key file is not used directly. Use cat with an argument of the private filename to display the algorithm and key information you will need in the next step:
$ cat Kkeyname.+157+47586.private
Private-key-format: v1.3
Algorithm: 157 (HMAC_MD5)
Key: uNPDouqVwR7fvo/zFyjkqKbQhcTd6Prm...
...
Using the Shared Secret
The next step is to tell the nameservers about the shared secret by inserting the following code in the /etc/named.conf file on both servers. This code is a top-level clause in named.conf; insert it following the Options clause:
key keyname {
algorithm "hmac-md5";
secret "uNPDouqVwR7fvo/zFyjkqKbQhcTd6Prm...";
};
The keyname is the name of the key you created. The algorithm is the string that appears within parentheses in the output of cat, above. The secret is the string that follows Key: in the output of cat. You must enclose each string within double quotation marks. Be careful when you copy the key; although it is long, you must not break it into multiple lines.
Because key names are unique, you can insert any number of Key clauses into named.conf. To keep the key a secret, make sure users other than root cannot read it: Either give named.conf permissions such that no one except root has access to it or put the key in a file that only root can read and incorporate it in named.conf using an include statement.
Once both servers know about the key, use a server statement in named.conf to tell them when to use it:
server 1.2.3.4 {
# 1.2.3.4 is the IP address of the other server using this key
keys {
"keyname";
};
};
Each server must have a Server clause, each containing the IP address of the other server. The servers will now communicate with each other only if they first authenticate each other using the secret key.
Running BIND in a chroot Jail
To increase security, you can run BIND in a chroot jail. See page 487 for information about the security advantages of, and ways to set up, a chroot jail. See also the note about SELinux on page 865 and the named man page for information about BIND, SELinux, and chroot jails. When you start the named-chroot service (page 865; part of the named-chroot package), it sets up BIND to run in a chroot jail, creating a directory named /var/named/chroot that takes the place of the root directory (/) for all BIND files.
While named-chroot and named are running, all files that control BIND are mounted (available) in two places. For example, the /var/named directory is also mounted at /var/named/chroot/var/named:
# ls -li /var/named /var/named/chroot/var/named
2102980 drwxr-x---. 7 root named 4096 06-28 16:08 chroot
2102072 drwxrwx---. 2 named named 4096 06-28 16:17 data
2102968 drwxrwx---. 2 named named 4096 06-28 16:22 dynamic
2102971 -rw-r-----. 1 root named 2076 01-28 06:38 named.ca
2102972 -rw-r-----. 1 root named 152 2009-12-15 named.empty
2102973 -rw-r-----. 1 root named 152 2007-06-21 named.localhost
2102974 -rw-r-----. 1 root named 168 2009-12-15 named.loopback
2102975 drwxrwx---. 2 named named 4096 06-05 01:31 slaves
/var/named/chroot/var/named:
2102980 drwxr-x---. 7 root named 4096 06-28 16:08 chroot
2102072 drwxrwx---. 2 named named 4096 06-28 16:17 data
2102968 drwxrwx---. 2 named named 4096 06-28 16:22 dynamic
2102971 -rw-r-----. 1 root named 2076 01-28 06:38 named.ca
2102972 -rw-r-----. 1 root named 152 2009-12-15 named.empty
2102973 -rw-r-----. 1 root named 152 2007-06-21 named.localhost
2102974 -rw-r-----. 1 root named 168 2009-12-15 named.loopback
2102975 drwxrwx---. 2 named named 4096 06-05 01:31 slaves
Similarly, /etc/named.conf is also mounted at /var/named/chroot/etc/named.conf:
# ls -li /etc/named.conf /var/named/chroot/etc/named.conf
1969014 -rw-r-----. 1 root named 1540 05-03 03:26 /etc/named.conf
1969014 -rw-r-----. 1 root named 1540 05-03 03:26 /var/named/chroot/etc/named.conf
When you stop the named-chroot service, it unmounts the second copy of the files:
# systemctl stop named-chroot.service
# ls -li /etc/named.conf /var/named/chroot/etc/named.conf
ls: cannot access /var/named/chroot/etc/named.conf: No such file or directory
1969014 -rw-r-----. 1 root named 1540 05-03 03:26 /etc/named.conf
Optional
The named-chroot service uses the mount ––bind option to remount part of a directory hierarchy (which can be a single file) in another location. This option allows you to do what you cannot do with hard links: access a directory hierarchy from another location in a filesystem. It also bypasses some of the limitations of symbolic links, including permissions issues. However, it does not create another link to a file—see the preceding listing for named.conf: The links count (page 192) to each file is 1. See the mount man page for more information.
Troubleshooting
When you start a DNS cache, the /var/log/messages file contains lines similar to the following:
# cat /var/log/messages
...
17:00:51 guava systemd[1]: Starting Berkeley Internet Name Domain (DNS)...
17:00:52 guava named-checkconf[2003]: zone localhost.localdomain/IN: loaded serial 0
17:00:52 guava named-checkconf[2003]: zone localhost/IN: loaded serial 0
17:00:52 guava named-checkconf[2003]: zone 1.0.0.127.in-addr.arpa/IN: loaded serial 0
17:00:52 guava named-checkconf[2003]: zone 0.in-addr.arpa/IN: loaded serial 0
17:00:52 guava named[2008]: starting BIND 9.9.3-rl.156.01-P1-RedHat-...P1.fc19 -u named
17:00:52 guava named[2008]: adjusted limit on open files from 4096 to 1048576
17:00:52 guava named[2008]: found 1 CPU, using 1 worker thread
17:00:52 guava named[2008]: using 1 UDP listener per interface
17:00:52 guava named[2008]: using up to 4096 sockets
17:00:52 guava named[2008]: loading configuration from '/etc/named.conf'
17:00:52 guava named[2008]: reading built-in trusted keys from '/etc/named.iscdlv.key'
17:00:52 guava named[2008]: using default UDP/IPv4 port range: [1024, 65535]
17:00:52 guava named[2008]: using default UDP/IPv6 port range: [1024, 65535]
17:00:52 guava named[2008]: listening on IPv4 interface lo, 127.0.0.1#53
17:00:52 guava named[2008]: listening on IPv6 interface lo, ::1#53
17:00:52 guava named[2008]: generating session key for dynamic DNS
17:00:52 guava named[2008]: sizing zone task pool based on 6 zones
17:00:52 guava named[2008]: using built-in DLV key for view _default
17:00:52 guava named[2008]: automatic empty zone: 125.100.IN-ADDR.ARPA
17:00:52 guava named[2008]: automatic empty zone: 126.100.IN-ADDR.ARPA
17:00:52 guava named[2008]: automatic empty zone: 255.255.255.255.IN-ADDR.ARPA
17:00:52 guava named[2008]: automatic empty zone: D.F.IP6.ARPA
17:00:52 guava named[2008]: automatic empty zone: 8.E.F.IP6.ARPA
17:00:52 guava named[2008]: automatic empty zone: 9.E.F.IP6.ARPA
17:00:52 guava named[2008]: automatic empty zone: A.E.F.IP6.ARPA
17:00:52 guava named[2008]: automatic empty zone: B.E.F.IP6.ARPA
17:00:52 guava named[2008]: automatic empty zone: 8.B.D.0.1.0.0.2.IP6.ARPA
17:00:52 guava named[2008]: command channel listening on 127.0.0.1#953
17:00:52 guava named[2008]: command channel listening on ::1#953
17:00:52 guava named[2008]: managed-keys-zone: journal is out of date: removing journal
17:00:52 guava named[2008]: managed-keys-zone: loaded serial 3
17:00:52 guava named[2008]: zone 0.in-addr.arpa/IN: loaded serial 0
17:00:52 guava named[2008]: zone 1.0.0.127.in-addr.arpa/IN: loaded serial 0
17:00:52 guava named[2008]: zone localhost.localdomain/IN: loaded serial 0
17:00:52 guava named[2008]: zone localhost/IN: loaded serial 0
17:00:52 guava named[2008]: all zones loaded
17:00:52 guava systemd[1]: Started Berkeley Internet Name Domain (DNS).
17:00:52 guava named[2008]: running
When you create or update DNS information, you can use dig or host to test whether the server works as planned. The most useful part of the output from dig is usually the answer section, which gives the nameserver’s reply to your query:
$ dig example.com
...
;; ANSWER SECTION:
example.com. 172800 IN A 192.0.32.10
...
The preceding output shows that the example.com domain has a single A record that points to 192.0.32.10. The TTL of this record, which tells you how long the record can be held in cache, is 172,800 seconds (two days). You can also use dig to query other record types by using the –toption followed by the type of record you want to query for (–t works with host, too):
$ dig -t MX tldp.com
...
;; ANSWER SECTION:
tldp.com. 5 IN MX 0 mx1.sub5.homie.mail.dreamhost.com.
tldp.com. 5 IN MX 0 mx2.sub5.homie.mail.dreamhost.com.
...
If you query for a domain that does not exist, dig returns the SOA record for the authority section of the highest-level domain in your query that does exist:
$ dig domaindoesnotexist.info
...
;; AUTHORITY SECTION:
info. 900 IN SOA a0.info.afilias-nst.info. noc.afilias-nst.info. ...
...
Because it tells you the last zone that was queried correctly, this information can be useful in tracing faults.
TSIGs
If two servers using TSIGs (page 881) fail to communicate, confirm the system clock is set to the same time on both servers. The TSIG authentication mechanism is dependent on the current time. If the clocks on the two servers are not synchronized, TSIG will fail. Consider setting up NTP(page 1264) on the servers to prevent this problem.
Setting Up Different Types of DNS Servers
This section describes how to set up a full-functioned nameserver, a slave server, and a split-horizon server.
A Full-Functioned Nameserver
Because the IP addresses used in this example are part of the private address space (page 1267), you can copy the example and run the server without affecting global DNS. Also, to prevent contamination of the global DNS, each zone has the notify option set to NO. When you build a nameserver that is integrated with the Internet, you will want to use IP addresses that are unique to your installation. You might want to change the settings of the notify statements.
named.conf
The named.conf file in this example limits the IP addresses that named answers queries from and sets up logging.
$ cat /etc/named.conf
options {
directory "/var/named";
allow-query {127.0.0.1; 192.168.0.0/24;};};
zone "." IN {
type hint;
file "named.ca";};
zone "0.168.192.in-addr.arpa" IN {
type master;
file "named.local";
notify NO;
};
zone "sam.net" IN {
type master;
file "sam.net";
notify NO;
};
logging{
channel "misc" {
file "/var/log/bind/misc.log" versions 4 size 4m;
print-time YES;
print-severity YES;
print-category YES;
};
channel "query" {
file "/var/log/bind/query.log" versions 4 size 4m;
print-time YES;
print-severity NO;
print-category NO;
};
category default {
"misc";
};
category queries {
"query";
};
};
The allow-query statement in the Options clause specifies the IP addresses of systems the server answers queries from. You must include the local system as 127.0.0.1 if it will be querying the server. The server is authoritative for the zone sam.net; the zone file for sam.net is/var/named/sam.net.
Logging
Logging is turned on by the Logging clause. Logging is separate from named messages, which go to syslogd. The Logging clause in the preceding example opens two logging channels: one that logs information to /var/log/bind/misc.log and one that logs information to/var/log/bind/query.log. When either of these logs grows to 4 megabytes (size 4m in the file statement), it is renamed by appending .1 to its filename and a new log is started. The numbers at the ends of other, similarly named logs are incremented. Any log that would have a larger number than that specified by the versions keyword (4 in the example) is removed. See logrotate (page 618) for another way to maintain log files.
The print statements determine whether the time, severity, and category of the information are sent to the log; specify each as YES or NO. The category determines what information is logged to the channel. In the previous example, default information is sent to the misc channel and queries are sent to the query channel. Refer to the named.conf man page for more choices.
named.local
The origin for the reverse zone file (named.local) is 0.168.192.in-addr.arpa (as specified in the Zone clause that refers to this file in named.). Following the SOA and NS resource records, the first three PTR resource records equate address 1 in the subnet 0.168.192.in-addr.arpa (192.168.0.1) with the names gw.sam.net., www.sam.net., and ftp.sam.net., respectively. The next three PTR records equate 192.168.0.3 with mark.sam.net., 192.168.0.4 with mail.sam.net., and 192.168.0.6 with ns.sam.net..
$ cat named.local
; zone "0.168.192.in-addr.arpa"
;
$TTL 3D
@ IN SOA ns.sam.net. mgs@sobell.com. (
2005110501 ; serial
8H ; refresh
2H ; retry
4W ; expire
1D) ; minimum
IN NS ns.sam.net.
1 IN PTR gw.sam.net.
3 IN PTR mark.sam.net.
4 IN PTR mail.sam.net.
6 IN PTR ns.sam.net.
sam.net
The zone file for sam.net takes advantage of many BIND features and includes TXT (page 860), CNAME (page 858), and MX (page 859) resource records. When you query for resource records, named returns the TXT resource record along with the records you requested. The first of the two NS records specifies an unqualified name (ns) to which BIND appends the zone name (sam.net), yielding an FQDN of ns.sam.net. The second nameserver is specified with an FQDN name that BIND does not alter. The MX records specify mail servers in a similar manner and include a priority number at the start of the Data field, where lower numbers indicate preferred servers.
$ cat sam.net
; zone "sam.net"
;
$TTL 3D
@ IN SOA ns.sam.net. mgs@sobell.com. (
2013110501 ; serial
8H ; refresh
2H ; retry
4W ; expire
1D ) ; minimum
TXT "Sobell Associates Inc."
NS ns ; Nameserver address (unqualified)
NS ns.max.net.; Nameserver address (qualified)
MX 10 mail ; Mail exchange (primary/unqualified)
MX 20 mail.max.net.; Mail exchange (2nd/qualified)
localhost IN A 127.0.0.1
www IN CNAME ns
ftp IN CNAME ns
gw IN A 192.168.0.1
TXT "Router"
ns IN A 192.168.0.6
MX 10 mail
MX 20 mail.max.net.
mark IN A 192.168.0.3
MX 10 mail
MX 20 mail.max.net.
TXT "MGS"
mail IN A 192.168.0.4
MX 10 mail
MX 20 mail.max.net.
Some resource records have a value in the Name field; those without a name inherit the name from the previous resource record. In a similar manner, the previous resource record might have an inherited name value, and so on. The five resource records following the SOA resource record inherit the @, or zone name, from the SOA resource record. These resource records pertain to the zone as a whole. In the preceding example, the first TXT resource record inherits its name from the SOA resource record; it is the TXT resource record for the sam.net zone (give the commandhost –t TXT sam.net to display the TXT resource record).
Following these five resource records are resource records that pertain to a domain within the zone. For example, the MX resource records that follow the A resource record with the Name field set to mark are resource records for the mark.sam.net. domain.
The A resource record for localhost is followed by two CNAME resource records that specify www(.sam.net.) and ftp(.sam.net.) as aliases for the nameserver ns.sam.net.. For example, a user connecting to ftp.sam.net will connect to 192.168.0.6. The resource records named gw, ns, mark, and mail are resource records for domains within the sam.net zone.
Log files
Before restarting named, create the directory for the log files and give it permissions and ownership as shown below. If you are running named in a chroot jail, create the bind directory in /var/named/chroot/var/log.
# mkdir /var/log/bind
# chmod 744 /var/log/bind
# chown named /var/log/bind
# ls -ld /var/log/bind
drwxr--r--. 2 named root 4096 10-19 14:43 /var/log/bind
With the log directory in place, named.conf in /etc (or in /var/named/chroot/etc if you are running named in a chroot jail), named.ca, named.local, and sam.net zone files in /var/named (or in /var/named/chroot/var/named if you are running named in a chroot jail), restart named and check the log files. The file /var/log/messages should show something like the following:
# cat /var/log/messages
...
15:11:40 guava named[9824]: starting BIND 9.9.3-rl.156.01-P1-RedHat-...P1.fc19 -u named
...
15:11:40 guava named[9824]: loading configuration from '/etc/named.conf'
15:11:40 guava named[9824]: using default UDP/IPv4 port range: [1024, 65535]
15:11:40 guava named[9824]: using default UDP/IPv6 port range: [1024, 65535]
15:11:40 guava named[9824]: listening on IPv4 interface lo, 127.0.0.1#53
...
15:11:40 guava named[9824]: command channel listening on 127.0.0.1#953
15:11:40 guava named[9824]: command channel listening on ::1#953
15:11:40 guava named[9824]: the working directory is not writable
You can safely ignore the working directory is not writable error message. The misc.log file might show errors that do not appear in the messages file:
# cat /var/log/bind/misc.log
15:11:40.594 general: info: zone 0.168.192.in-addr.arpa/IN: loaded serial 2013110501
15:11:40.596 general: info: zone sam.net/IN: loaded serial 2013110501
15:11:40.596 general: info: managed-keys-zone ./IN: loaded serial 0
15:11:40.600 general: notice: running
See “Error messages” on page 865 if named generates an error message.
A Slave Server
To set up a slave server, copy the /etc/named.conf file from the master server to the slave server, replacing the type master statement with type slave and adding a masters { 1.2.3.4; }; directive. Remove any zones the slave server will not be acting as a slave for, including the root (.) zone, if the slave server will not respond to recursive queries. If necessary, create the /var/log/bind directory for log files as explained at the end of the previous section.
notify statement
Slave servers copy zone information from the primary master server or another slave server. The notify statement specifies whether you want a master server to notify slave servers when information on the master server changes. Set the (global) value of notify in the Options clause or set it within a Zone clause, which overrides a global setting for a given zone. The format is
notify YES | NO | EXPLICIT
YES causes the master server to notify all slaves listed in NS resource records for the zone as well as servers at IP addresses listed in an also-notify statement. When you set notify to EXPLICIT, the server notifies servers listed in the also-notify statement only. NO turns off notification.
When you start named, it copies the zone files to /var/named. If you specify notify YES on the master server, the zone files on the slave server will be updated each time you change the serial field of the SOA resource record in a zone. You must manually distribute changes to/etc/named.conf and included files.
A Split Horizon (DMZ) Server
Assume you want to set up a LAN that provides all of its systems and services to local users on internal systems, which might be behind a firewall, but only certain public services—such as Web, FTP, and mail—to Internet (public) users. A split horizon (also called DMZ) DNS server takes care of this situation by treating queries from internal systems differently from queries from public systems (systems on the Internet).
View clauses
BIND 9 introduced View clauses in named.conf. View clauses facilitate the implementation of a split DNS server. Each view provides a different perspective of the DNS namespace to a group of clients. When there is no View clause, all zones specified in named.conf are part of the implicit default view.
Assume an office has several systems on a LAN and public Web, FTP, DNS, and mail servers. The single connection to the Internet is NATed (page 1262), so it is shared by the local systems and the servers. The system connected directly to the Internet is a router, firewall, and server. This scenario takes advantage of the View clauses in named.conf and supports separate secondary nameservers for local and public users. Although public users need access to the DNS server as the authority on the domain that supports the servers, they do not require the DNS server to support recursive queries. Not supporting recursion for public users limits the load on the DNS server and the Internet connection. For security reasons, public users must not have access to information about local systems other than the servers. Local users should have access to information about local systems and should be able to use the DNS server recursively.
Figure 24-11 shows that the server responds differently to queries from the LAN and from the Internet.
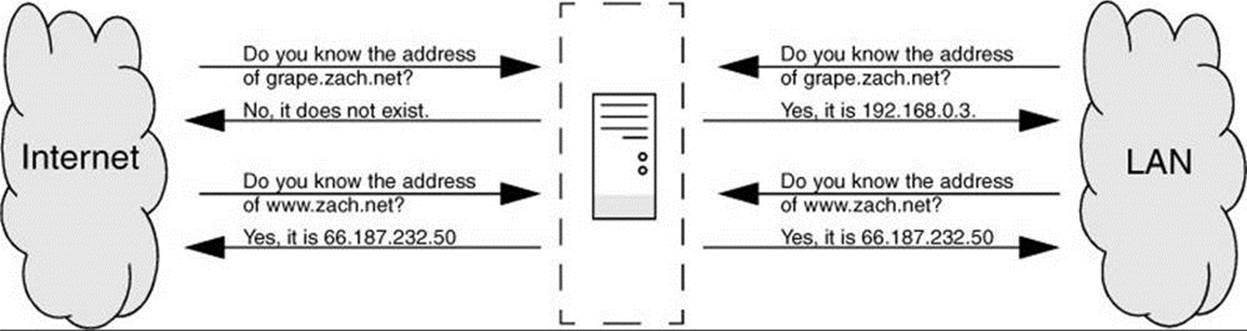
Figure 24-11 A split horizon DNS server
The firewall-config (page 900) or firewall-cmd utility (page 906) controls which ports on which systems users on internal and external systems can access. DNS controls which systems are advertised to which users.
The named.conf file has four clauses: an Options clause, two View clauses, and a Logging clause. The Options clause specifies that the zone files be located in the /var/named directory. The View clauses specify the characteristics and zones that a resolver is given access to, which depend on the resolver’s address. One zone is for use by the LAN/local users; the other is used by Internet/public users. The Logging clause sets up the misc2.log file for default messages; you must create a /var/log/bind directory as explained under “Log files” (page 889).
There are several ways to specify which clients see a view. The following named.conf file uses match-clients statements:
$ cat /etc/named.conf
options {
directory "/var/named";
}; //end options
view "local" IN { // start local view
match-clients { 127.0.0.1; 192.168.0.0/24;};
recursion YES;
zone"zach.net" IN {
type master;
file "local.net";
notify YES;
};
zone "0.168.192.in-addr.arpa" IN {
type master;
file "named.local";
notify YES;
};
zone "." IN {
type hint;
file "named.ca";
};
}; // end local view
view "public" IN { // start public view
match-clients { "any";};
recursion NO;
zone"zach.net" IN {
type master;
file "public.net";
notify YES;
};
zone "0.168.192.in-addr.arpa" IN {
type master;
file "named.public";
notify YES;
};
zone "." IN {
type hint;
file "named.ca";
};
}; // end public view
logging{
channel "misc" {
file "/var/log/bind/misc2.log" versions 2 size 1m;
print-time YES;
print-severity YES;
print-category YES;
};
category default {
"misc";
};
}; //end logging
The ordering of View clauses within named.conf is critical because the view that is presented to a client is the first view that the client matches. The preceding named.conf file holds two View clauses: one for local users and one for public users, in that order. Local users are defined to be those on the 192.168.0.0/24 subnet or localhost (127.0.0.1); public users are defined to be any users. If you reversed the order of the View clauses, all users—including local users—would get the view intended for the public and no users would see the local view.
Many statements from the Options clause can be used within View clauses, where they override statements in the (global) Options clause. The recursion statement, which can appear within an Options clause, appears in each View clause. This named.conf file sets up a server that provides recursive answers to queries that originate locally and iterative answers to queries from the public. This setup provides quick, complete answers to local users, limiting the network and processor bandwidth that is devoted to other users while continuing to provide authoritative name service for the local servers.
To make named.conf easier to understand and maintain, zones in different View clauses can have the same name but different zone files. Both the local and public View clauses in the example have zones named zach.net: The public zach.net zone file is named public.net and the local one is named local.net.
The Logging clause is described on page 887.
The zone files defining zach.net are similar to the ones in the previous examples; the public file is a subset of the local one. Following the SOA resource record in both files is a TXT, two NS, and two MX resource records. Next are three CNAME resource records that direct queries addressed to www.zach.net, ftp.zach.net, and mail.zach.net to the system named ns.zach.net. The next four resource records specify two nameserver addresses and two mail servers for the ns.zach.net domain.
The final four resource records appear in the local zach.net zone file and not in the public zone file; they are address (A) resource records for local systems. Instead of keeping this information in /etc/hosts files on each system, you can keep it on the DNS server, where it can be updated easily. When you use DNS instead of /etc/hosts, you must change the hosts line in /etc/nsswitch.conf (page 495) accordingly.
$ cat local.net
; zach.net local zone file
;
$TTL 3D
@ IN SOA ns.zach.net. mgs@sobell.com. (
201311118 ; serial
8H ; refresh
2H ; retry
4W ; expire
1D ) ; minimum
IN TXT “Sobell Associates Inc.”
IN NS ns ; Nameserver address (unqualified)
IN NS ns.speedy.net.; Nameserver address (qualified)
IN MX 10 mail ; Mail exchange (primary/unqualified)
IN MX 20 mail.max.net.; Mail exchange (2nd/qualified)
ns IN A 192.168.0.1
mail IN A 192.168.0.2
www IN CNAME mail
ftp IN CNAME mail
gw IN CNAME ns
speedy IN A 192.168.0.5
grape IN A 192.168.0.3
potato IN A 192.168.0.4
peach IN A 192.168.0.6
The public version of the zach.net zone file follows:
$ cat public.net
; zach.net public zone file
;
$TTL 3D
@ IN SOA ns.zach.net. mgs@sobell.com. (
201311118 ; serial
8H ; refresh
2H ; retry
4W ; expire
1D ) ; minimum
IN TXT “Sobell Associates Inc.”
IN NS ns ; Nameserver address (unqualified)
IN NS ns.speedy.net.; Nameserver address (qualified)
IN MX 10 mail; Mail exchange (primary/unqualified)
IN MX 20 mail.max.net. ; Mail exchange (2nd/qualified)
www IN CNAME mail
ftp IN CNAME mail
gw IN CNAME ns
ns IN A 192.168.0.1
mail IN A 192.168.0.2
Here there are two reverse zone files, each of which starts with SOA and NS resource records, followed by PTR resource records for each of the names of the servers. The local version of this file also lists the names of the local systems:
$ cat named.local
;"0.168.192.in-addr.arpa" reverse zone file
;
$TTL 3D
@ IN SOA ns.zach.net. mgs@sobell.com. (
2013110501 ; serial
8H ; refresh
2H ; retry
4W ; expire
1D) ; minimum
IN NS ns.zach.net.
IN NS ns.speedy.net.
1 IN PTR ns.zach.net.
2 IN PTR mail.zach.net.
3 IN PTR grape.zach.net.
4 IN PTR potato.zach.net.
5 IN PTR speedy.zach.net.
6 IN PTR peach.zach.net.
$ cat named.public
;"0.168.192.in-addr.arpa" reverse zone file
;
$TTL 3D
@ IN SOA ns.zach.net. mgs@sobell.com. (
2013110501 ; serial
8H ; refresh
2H ; retry
4W ; expire
1D) ; minimum
IN NS ns.zach.net.
IN NS ns.speedy.net.
1 IN PTR ns.zach.net.
2 IN PTR mail.zach.net.
Chapter Summary
DNS maps domain names to IP addresses, and vice versa. It is implemented as a hierarchical, distributed, and replicated database on the Internet. You can improve the security of BIND, which implements DNS, by running it inside a chroot jail and using transaction signatures (TSIGs) and SELinux.
When a program on the local system needs to look up an IP address that corresponds to a domain name, it calls the resolver. The resolver queries the local DNS cache, if available, and then queries DNS servers on the LAN or Internet. There are two types of queries: iterative and recursive. When a server responds to an iterative query, it returns whatever information it has at hand; it does not query other servers. Recursive queries cause a server to query other servers if necessary to respond with an answer.
There are three types of servers. Master servers, which hold the master copy of zone data, are authoritative for a zone. Slave servers are also authoritative and copy their data from a master server or other slave servers. DNS caches are not authoritative and either answer queries from cache or forward queries to another server.
The DNS database holds resource records for domains. Many types of resource records exist, including A (address), MX (mail exchange), NS (nameserver), PTR (pointer for performing reverse name resolution), and SOA (start of authority, which describes the zone).
Exercises
1. What kind of server responds to recursive queries? How does this server work?
2. What kind of DNS record is likely to be returned when a Web browser tries to resolve the domain part of a URI?
3. What are MX resource records for?
4. How would you find the IP address of example.com from the command line?
5. How would you instruct a Linux system to use the local network’s DNS cache, located at 192.168.1.254, or the ISP’s DNS cache, located at 1.2.3.4, if the LAN nameserver is unavailable?
6. How would you instruct a DNS server to respond only to queries from the 137.44.* IP range?
7. How might a resolver attempt to find the IP address of the example domain?
Advanced Exercises
8. How would you set up a private domain name hierarchy that does not include any of the official InterNIC-assigned domain names?
9. Which part of DNS is most vulnerable to an attack from a malicious user and why?
10. It is often irritating to have to wait for DNS records to update around the world when you change DNS entries. You could prevent this delay by setting the TTL to a small number. Why is setting the TTL to a small number a bad idea?
11. Outline a method by which DNS could be used to support encryption.