A practical guide to Fedora and Red Hat Enterprise Linux, 7th Edition (2014)
Part IV: Using Clients and Setting Up Servers
Chapter 25. Firewalld and iptables: Setting Up a Firewall
In This Chapter
The firewalld Service
JumpStart: Building a Firewall Using firewall-config
firewall-config: The Firewall Configuration Window
firewall-cmd: Controlling firewalld from the Command Line
Introduction to iptables
Anatomy of an iptables Command
Building a Set of Rules Using iptables
Copying Rules to and from the Kernel
system-config-firewall: Generates a Set of Rules
Sharing an Internet Connection Using NAT
Objectives
After reading this chapter you should be able to:
![]() Explain how the firewalld and iptables services differ
Explain how the firewalld and iptables services differ
![]() Configure a basic firewall using firewall-config
Configure a basic firewall using firewall-config
![]() Configure a basic firewall using firewall-cmd
Configure a basic firewall using firewall-cmd
![]() Describe the purpose of firewalld zones
Describe the purpose of firewalld zones
![]() Explain the difference between the runtime and permanent configurations
Explain the difference between the runtime and permanent configurations
![]() Configure NAT so several clients on a LAN can use a single Internet connection
Configure NAT so several clients on a LAN can use a single Internet connection
The firewalld Service
iptables
The firewalld service (which uses the firewalld daemon) is replacing the iptables service. As contrasted with the iptables service, the firewalld service does not need to be reloaded with every change; it accepts changes to the firewall while it is running. Reloading the iptables service frequently breaks established connections. Nowhere is this problem more evident than with virtualization because the firewall changes each time a VM is brought up or down. The libvirt library (page 662) now uses firewalld to adjust the firewall as needed.
A firewall set up under firewalld must be managed directly by the firewalld daemon so that the state in the daemon and the state in the kernel remain in sync. Thus you cannot use iptables commands to add rules to a firewall controlled by firewalld.
The firewalld daemon introduces a level of abstraction that makes setting up a firewall simpler and more intuitive. Instead of writing firewall rules as iptables requires, with firewalld you use firewall-config (GUI) or firewall-cmd (CLI) to set up a firewall.
The firewalld daemon is managed by systemd (page 438) using the firewalld.service unit. It is started before networking so that it can immediately protect the network when the network is brought up.
netfilter
Running in kernelspace (page 1257), netfilter is a set of tables that hold rules the kernel uses to control network packet filtering. To be useful, netfilter requires a front end. The firewalld front end runs in userspace (page 1279) and enables an administrator to set up a firewall (just as iptablesdoes).
![]() D-BUS
D-BUS
D-BUS (www.freedesktop.org/wiki/Software/dbus) is an IPC (interprocess communication system), also called a message bus system, that allows applications and processes to talk with one another and request services over a bus. The dbus service (which runs dbus-daemon) notifies processes of events (e.g., when a new device is added or when a user logs in).
The firewalld daemon has a D-BUS interface that allows it to communicate with processes. Applications, daemons, and administrators can enable/disable a firewalld feature using D-BUS. These features can include opening ports, forwarding ports or packets, and performing more advanced tasks.
firewalld Configuration
This section describes some aspects of the firewalld configuration.
Runtime Versus Permanent Configuration
When you set up or change a firewall feature, you can do so in the runtime configuration, which causes the change to be made immediately on the running system. Or you can make the change in the permanent (persistent) configuration, which takes effect when the firewall is reloaded or when the system is rebooted.
Zones
A (network) zone defines a level of trust for a network connection. For example, you might have one zone for a LAN and one for the Internet. On a laptop the zone might change depending on whether the computer is using a public Wi-Fi network or a wired connection at work. Table 25-1lists the default set of zones.
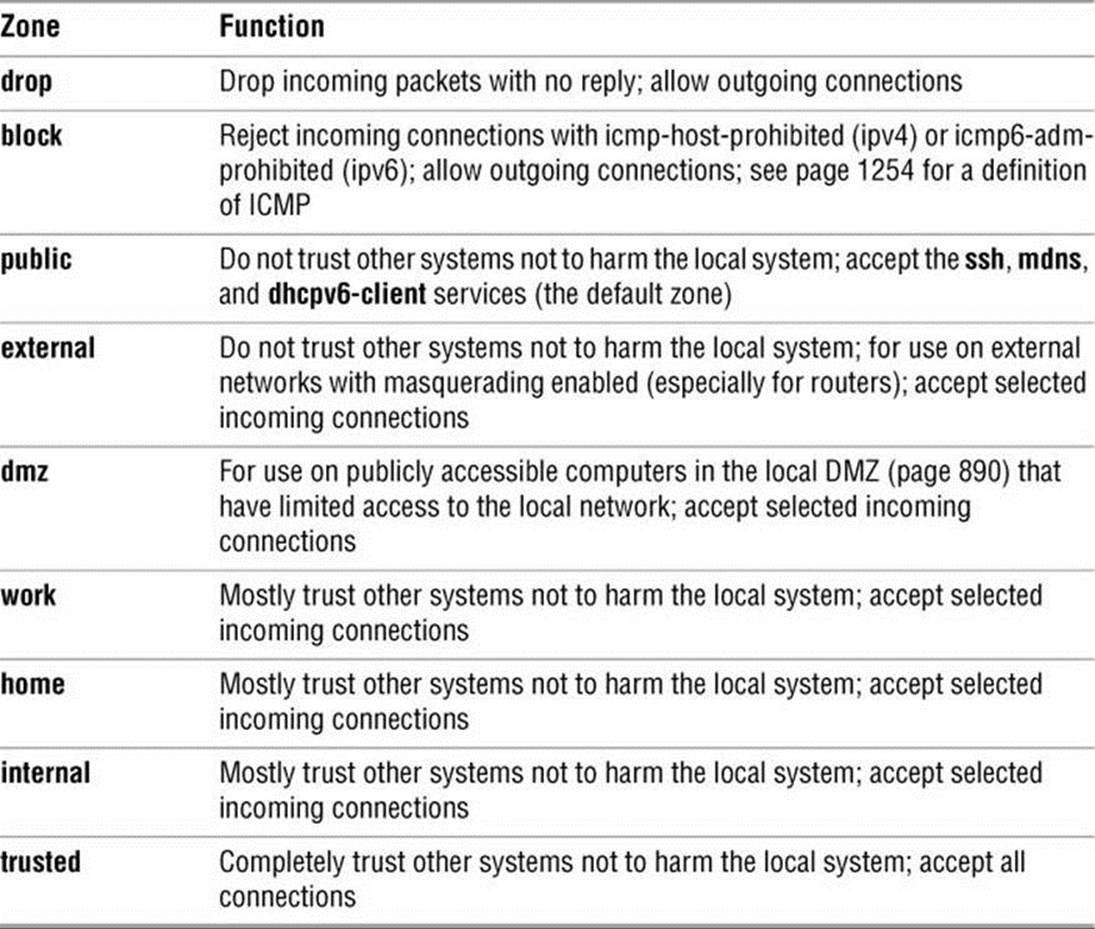
Table 25-1 The firewalld zones
public zone
The default zone is public and is the only zone this chapter discusses.
Services
A service is a combination of one or more ports and protocols (TCP or UDP). For example, the SSH service uses TCP port 22. Optionally, a service can include a destination address.
Lockdown Whitelist
The primary authentication mechanism that firewalld uses is called polkit (www.freedesktop.org/wiki/Software/polkit). By default, the firewalld lockdown whitelist is off and does not affect what or who can modify the firewall. When it is on, firewalld uses this whitelist in addition to polkit and only applications running with a (SELinux) context specified in the lockdown whitelist, and commands and users specified in this list, are permitted to modify the firewall. As initially set up, only NetworkManager (page 637), libvirt (page 662), and a user/process running with rootprivileges are on this whitelist.
User Interfaces
You can use one of two interfaces to set up firewalld: the firewall-config GUI (next) or the firewall-cmd CLI (page 906). Other processes communicate with firewalld using D-BUS. Some desktops also display the firewall-applet (firewall-applet package) that you can use to work withfirewalld. As of this writing, GNOME 3 does not display this applet properly so you cannot use firewall-applet with GNOME 3.
Prerequisites
Install the following packages (both are installed by default):
• firewalld
• firewall-config
Check firewalld is running
A new Fedora/RHEL system boots with firewalld installed and running. Use the systemctl status command to make sure the service is running. The following output shows firewalld running normally. If firewalld is not running, the Active line will show inactive (dead).
$ systemctl status firewalld.service
firewalld.service - firewalld - dynamic firewall daemon
Loaded: loaded (/usr/lib/systemd/system/firewalld.service; enabled)
Active: active (running) since Thu 2013-08-15 14:33:00 PDT; 6 days ago
Main PID: 374 (firewalld)
CGroup: name=systemd:/system/firewalld.service
+-374 /usr/bin/python /usr/sbin/firewalld --nofork --nopid
Aug 15 14:33 guava.example.com systemd[1]: Started firewalld - dynamic firewall daemon
Reloading and stopping firewalld
While working with root privileges, you can give the preceding command, replacing status with reload to cause firewalld to reread its configuration files, with stop to stop firewalld, or with start to start it when it is stopped.
Panic mode
If the system is under attack, give the following command to shut down the network immediately. See the caution tip on page 902.
$ su -c "firewall-cmd --panic-on"
Use the ––panic-off option to restore the firewall to its previous state.
JumpStart: Building a Firewall Using firewall-config
This section explains how to trust a service (open a port) using the graphical firewall-config utility. Follow these instructions to open the port in both the running system (runtime configuration) and in the system after it is rebooted (permanent configuration). See “firewall-config: The Firewall Configuration Window” on the next page for more information. For more complex firewalls see firewall-cmd (page 906) or iptables (page 908).
Tip: The firewall is enabled by default
When you install Fedora/RHEL, firewalld is installed on the system. The firewall is running and blocks most inbound traffic. However, firewalld accepts inbound traffic on TCP port 22, allowing remote systems to connect to the sshd daemon on the local system. See page700 for information on setting up an OpenSSH server. In addition, firewalld accepts mDNS (multicast DNS; www.multicastdns.org; Fedora only) and dhcpv6 client traffic.
The Firewall Configuration window (Figure 25-1) allows you to build a simple firewall or, in an emergency, put the firewall in panic mode, which cuts off all network communication. Open this window by giving the command firewall-config from an Enter a Command window (ALT-F2) or a terminal emulator. If you do not run firewall-config with root privileges, it displays an authentication window; enter the requested password and click Authenticate.
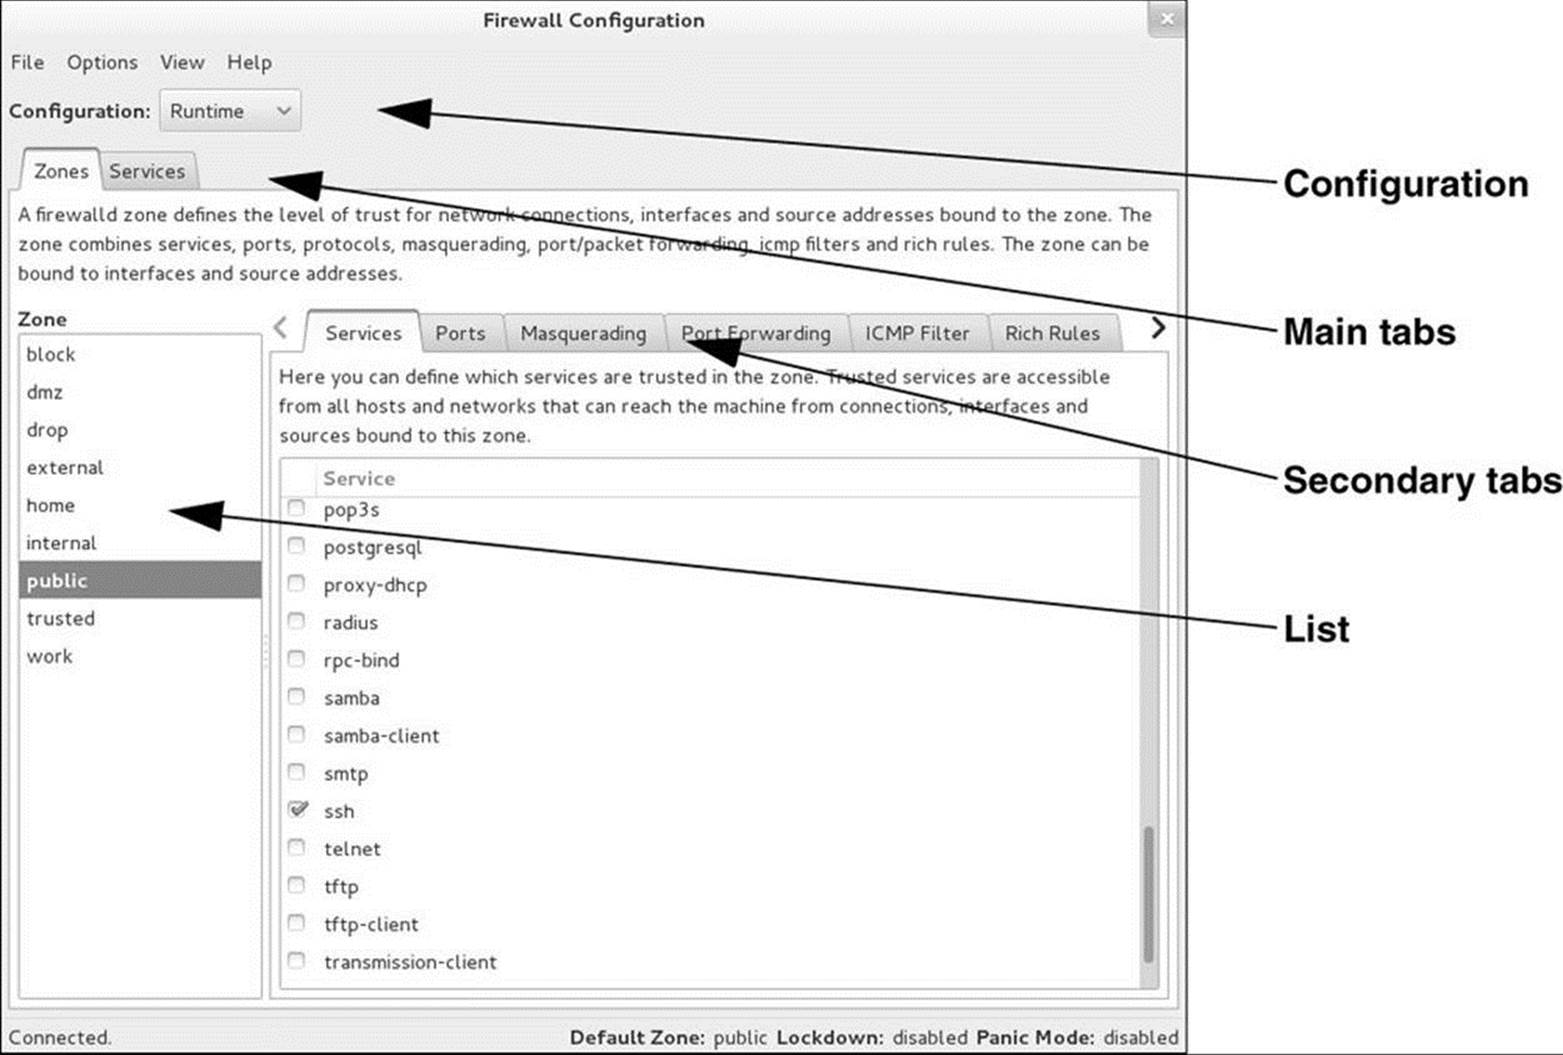
Figure 25-1 Firewall Configuration window
Putting firewalld in Panic Mode
In an emergency, such as when the system is being attacked, you can block all network communication by putting firewalld in panic mode. In panic mode, firewalld drops all incoming and outgoing packets and allows active connections to expire. Panic mode affects the firewalld runtime configuration only: The firewall will revert to its permanent configuration when the system reboots.
Put firewalld in panic mode by selecting Firewall Configuration menubar: Options![]() Panic Mode. A tick appears next to the selection. Repeat the selection to remove the tick and revert to the runtime configuration.
Panic Mode. A tick appears next to the selection. Repeat the selection to remove the tick and revert to the runtime configuration.
Caution: Panic mode can disconnect you from the system
Putting the firewall in panic mode cuts off all network communication. If you are logged in remotely (e.g., using ssh), when you put the system in panic mode you will be disconnected. Put the system in panic mode only when you are working from the console.
Trusting a Service (Opening a Port) in the Runtime and Permanent Configurations
In its simplest form, a firewalld service is defined by a port and protocol (e.g., the HTTP service uses TCP port 80). More complex services can include multiple or ranges of ports, netfilter helper modules, and destination addresses. You can set up firewalld to trust a service in the runtime configuration, the permanent configuration, or both. A trusted service is accessible from all hosts and networks that can reach the local system using any active network connection or interface (called the active zone; the public zone is the active zone by default).
Assume the local system is running Apache and you want to open the firewall to allow HTTP traffic. If the public zone is active, which it is by default, follow these steps to set up this zone to allow HTTP traffic.
1. Select Permanent in the drop-down list labeled Configuration.
2. Select Zones from the main tabs.
3. Select public from the list on the left labeled Zone.
4. Select Services from the secondary tabs.
5. Put a tick in the check box adjacent to the service you want to trust (http in this case).
6. Select Runtime in the drop-down list labeled Configuration.
7. Repeat steps 2–5; you are done.
After following these steps the HTTP service will be trusted immediately and will be trusted when the system boots.
firewall-config: The Firewall Configuration Window
The Firewall Configuration window (Figure 25-1, page 901) includes many instructions and descriptions. This section continues from the preceding section and describes a few of the changes you can make using this window. After experimenting with the examples in this section, try working with other parts of this window. You can always return an entry in the list on the left to its default value: With the Configuration set to Permanent, highlight the entry and click the rightmost button (the one with the yellow arrow) below the list. This action returns the highlighted zone to its default setup.
Tip: Routers have firewalls, too
Many systems are already protected by a firewall located in a router. If you use a router that has a firewall, you might need to open ports on the router firewall in addition to opening ports on any firewall you set up on the local system.
If several systems are connected to the router, you might want to set up different, more restrictive rules on the systems than you set up on the router.
Window Features
Open the Firewall Configuration window by giving the command firewall-config from an Enter a Command window (ALT-F2) or a terminal emulator. Authenticate as necessary. The Firewall Configuration window displays the Zones/Services tabs of the public (default) zone for the runtime configuration.
Configuration
At the top of the Firewall Configuration window is a drop-down list labeled Configuration. This list allows you to select Runtime or Permanent (page 898). All the work you do in the window applies to the selected configuration.
The main tabs
Immediately below the word Configuration is a set of tabs that this chapter refers to as the main tabs. Selecting one of these tabs changes what appears in the rest of the window. Each tab allows you to work with a different aspect of the firewall. For example, if you select the Zones tab, the information in the window pertains to zones. See “The Main Tabs,” below.
The explanation of the selected main tab appears immediately below the set of main tabs. For example, with the Zones tab selected, the definition explains what a zone is and which aspects of the firewall it encompasses.
The secondary tabs
Below the explanation, a list appears on the left and the secondary tabs appear on the right. The list has a label that is similar to the selected tab in the main tabs: With the Zones tab selected the list is labeled Zone, and the list holds the names of each of the zones.
The secondary tabs hold items that pertain to the list on the left. See “The Secondary Tabs for Zones” and “The Secondary Tabs for Services” (both on the next page).
The Main Tabs
The two tabs listed on the next page appear near the top of the Firewall Configuration window.
• Zones—Define levels of trust for connections and interfaces (page 899)
• Services—Define combinations of ports and protocols (page 899)
When highlighted, each of the main tabs presents a different set of secondary tabs.
The Secondary Tabs for Zones
Figure 25-1 on page 901 shows six tabs in the secondary tabs. Click the arrow at the right end of the tabs to select the next tab to the right and, when the last tab is highlighted, to scroll the tabs and display additional tabs. Click the arrow at the left end to work in the other direction. With Zones selected in the main tabs, the secondary tabs define the highlighted zone. The secondary tabs comprise
• Services—Selects trusted services.
• Ports—Selects trusted ports and protocols.
• Masquerading—Maps the local, private network to a public IP address; the local network is not visible from outside the network. Masquerading is a form of NAT (page 1262). For more information refer to “Connecting Several Clients to a Single Internet Connection” on page 926.
• Port Forwarding—Maps a port to another port on the local system or a remote system.
• ICMP Filter—By default the firewall allows inbound ICMP (page 1254) packets, such as those sent by ping (page 305), through. You can use the selections in this tab to block these packets. Put ticks in the check boxes adjacent to the types of packets you want the firewall to block. To block ping packets, put a tick in the check box labeled Echo Request.
• Rich Rules—Specifies complex firewall rules using an abstract representation of iptables rules; see the firewalld.richlanguage man page for more information.
• Interfaces—Specifies an interface to bind to the selected zone.
• Sources—Specifies a source address to bind to the selected zone.
The Secondary Tabs for Services
The secondary tabs for Services allow you to define or modify services that you can trust when you select Services in the main tabs. The secondary tabs for Services comprise
• Ports and Protocols—Specifies ports and a protocol (TCP or UDP) for a service (see “Modifying an Existing Service” on the next page)
• Modules—Specifies netfilter helper modules
• Destination—Specifies an address that limits the service to packets bound for that address
Defining a New Service
If no predefined service meets your needs, you can modify an existing service or define a new one in the Firewall Configuration window (Figure 25-1, page 901). After you define a new service, you set up the service by modifying it (next).
Define a new service by selecting Permanent from the drop-down list labeled Configuration. You cannot define a new service or modify an existing service in the running configuration. Select Services from the main tabs. Click the plus sign (+) at the bottom of the list labeled Service at the left of the window; firewall-config displays the Base Service Settings window (Figure 25-2). Fill in the text box labeled Name with an appropriate name; all other information is optional. Click OK and continue with the next section.

Figure 25-2 The Base Service Settings window
Modifying an Existing Service
Modify an existing service, including one you just defined, by selecting Permanent from the drop-down list labeled Configuration in the Firewall Configuration window (Figure 25-1, page 901). Select Services from the main tabs. In the list on the left labeled Service, highlight the service you want to modify. Select Ports and Protocols from the secondary tabs. Three buttons at the bottom right of the window allow you to work with the highlighted service. Highlight a port and protocol to edit (click Edit) or remove (click Remove) it. Click Add to add a port and protocol. These actions open the Port and/or Protocol window (Figure 25-3).
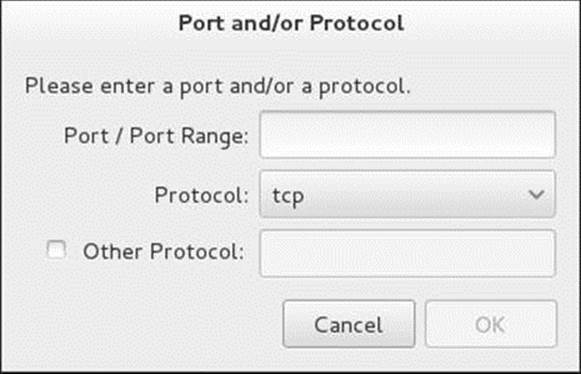
Figure 25-3 The Port and/or Protocol window
In the Port and/or Protocol window enter or change a port number or a range of port numbers (two numbers separated by a hyphen) in the text box labeled Port/Port Range and select tcp or udp from the drop-down list labeled Protocol. Entering information in the text box labeled Other Protocol is usually not necessary. Click OK.
After creating or modifying a service, you can add the service so it is trusted in a zone (page 902).
firewall-cmd: Controlling firewalld from the Command Line
The firewall-cmd utility is the command-line interface to the firewalld daemon. You can use it to set up and modify firewalls. Using direct options it can invoke iptables commands (page 908). This section describes just a few firewall-cmd options; see the firewall-cmd man page for a complete list.
Status Commands
The firewall-cmd ––state option tells you whether firewalld is running:
$ firewall-cmd --state
running
This chapter assumes the zone named public is the default zone (it is by default) and that public is the active zone:
$ firewall-cmd --get-default-zone
public
$ firewall-cmd --get-active-zones
public
interfaces: ens33
You must work with root privileges to make all but the most basic queries of and changes to the firewall. The first of the following commands uses the ––list-services option to list the services that the running system trusts (has ports open for). The second command adds the ––permanentoption to ––list-services to list the services that the permanent configuration trusts. In this case the lists are the same.
# firewall-cmd --list-services
mdns dhcpv6-client ssh
# firewall-cmd --permanent --list-services
ssh mdns dhcpv6-client
Trusting a Service
The following example shows how to turn on the HTTP and HTTPS services in the running and permanent configurations. First, use the ––add-service option to turn on the services in the running configuration:
# firewall-cmd --add-service=http
success
# firewall-cmd --add-service=https
success
The following commands show HTTP and HTTPS are trusted in the running configuration, but not in the permanent configuration:
# firewall-cmd --list-services
mdns http dhcpv6-client https ssh
# firewall-cmd --permanent --list-services
mdns dhcpv6-client ssh
Next, use the ––permanent and ––add-service options to turn on the services in the permanent configuration. The ––list-services option shows that HTTP and HTTPS are now trusted in the permanent configuration.
# firewall-cmd --permanent --add-service=http
success
# firewall-cmd --permanent --add-service=https
success
# firewall-cmd --permanent --list-services
mdns http dhcpv6-client https ssh
You can use the ––remove-service option to remove a service from the list of trusted services:
# firewall-cmd --permanent --remove-service=http
success
# firewall-cmd --permanent --remove-service=https
success
# firewall-cmd --permanent --list-services
mdns dhcpv6-client ssh
Opening a Port
Use the ––add-port and ––remove-port options to work with port numbers and protocols in place of services. The following example shows how to open TCP port 80 (HTTP) and TCP port 443 (HTTPS) in both configurations.
# firewall-cmd --add-port=80/tcp
success
# firewall-cmd --permanent --add-port=80/tcp
success
# firewall-cmd --add-port=443/tcp
success
# firewall-cmd --permanent --add-port=443/tcp
success
# firewall-cmd --permanent --list-ports
443/tcp 80/tcp
# firewall-cmd --list-ports
443/tcp 80/tcp
The firewalld daemon keeps track of ports and services separately so ––list-ports does not show trusted services and ––list-services does not show open ports.
Direct Options
The direct options allow you to give firewall-cmd commands that are similar to iptables commands. This chapter covers iptables starting below. When you use the ––direct and ––passthrough options together, you can use exact iptables syntax in a firewall-cmd command. The format of this type of command is
firewall-cmd ––direct ––passthrough ipv4|ipv6 iptables-command
where ipv4 or ipv6 specifies that an iptables or ip6tables command follows and iptables-command is an iptables command without the iptables at the beginning. For example, the following iptables command opens port 22:
# iptables -I INPUT -p tcp -m state --state NEW -m tcp --dport 22 -j ACCEPT
Using the ––direct and ––passthrough options, you can wrap the iptables command and give it as a firewall-cmd command:
# firewall-cmd --direct --passthrough ipv4 -I INPUT -p tcp -m state --state NEW -m tcp --dport 22 -j ACCEPT
Caution: The system is running iptables or firewalld
When the system is running firewalld, as it is by default, you can give only firewall-cmd commands, not iptables commands. Similarly, when it is running iptables, you can give only iptables commands. The firewall-cmd ––direct option wraps iptables commands so you can give them to a system running firewalld.
Introduction to iptables
The iptables utility is flexible and extensible, allowing you to set up both simple and complex network packet filtering solutions. It builds and manipulates network packet filtering (page 1265) rules in the Linux kernel.
The iptables utility also provides connection tracking (stateful packet filtering), allowing you to handle packets (page 1265) based on the state of their connection. For example, you can set up rules that reject inbound packets trying to open a new connection and accept inbound packets that are responses to a locally initiated connection. Many features not included in the base iptables package are available as patches via the patch-o-matic program.
The system-config-firewall utility (system-config-firewall package) is a user-friendly, graphical front end for iptables and ip6tables (both referred to in this chapter as iptables). You can use system-config-firewall or iptables directly to create a firewall that protects a system from malicious users and to set up NAT (Network Address Translation, page 1262), which can allow several systems to share a single Internet connection.
Some of the concepts required to fully understand iptables are beyond the scope of this book. You can use iptables at different levels; this chapter presents the fundamentals. Some sections of this chapter, however, delve into areas that might require additional understanding or explanation. If a concept is not clear, refer to one of the resources in “More Information” on page 911.
netfilter and iptables
The functionality referred to as iptables and ip6tables is composed of two components: netfilter and iptables. Running in kernelspace (page 1257), the netfilter component is a set of tables that hold rules the kernel uses to control network packet filtering. Running in userspace (page 1279), the iptables utility sets up, maintains, and displays the rules stored by netfilter.
Rules, matches, targets, and chains
A rule comprises one or more criteria (matches or classifiers) and a single action (a target). If, when a rule is applied to a network packet, the packet matches all the criteria, the action is applied to the packet. Rules are stored in chains. Each rule in a chain is applied, in order, to a packet until a match is found. If there is no match, the chain’s policy, or default action, is applied to the packet (page 917).
History
In the kernel, iptables replaces the earlier ipchains as a method of filtering network packets. It provides multiple chains for increased filtration flexibility. The iptables utility also provides stateful packet inspection (page 911).
Example rules
As an example of how rules work, assume a chain has two rules (Figure 25-4). The first rule tests whether a packet’s destination is port 23 (TELNET) and drops the packet if it is. The second rule tests whether a packet was received from the IP address 192.168.1.1 and alters the packet’s destination if it was. When a packet is processed by the example chain, the kernel applies the first rule in the chain to see whether the packet arrived on port 23. If the answer is yes, the packet is dropped and that is the end of processing for that packet. If the answer is no, the kernel applies the second rule in the chain to see whether the packet came from the specified IP address. If the answer is yes, the destination in the packet’s header is changed and the modified packet is sent on its way. If the answer is no, the packet is sent on without being changed.
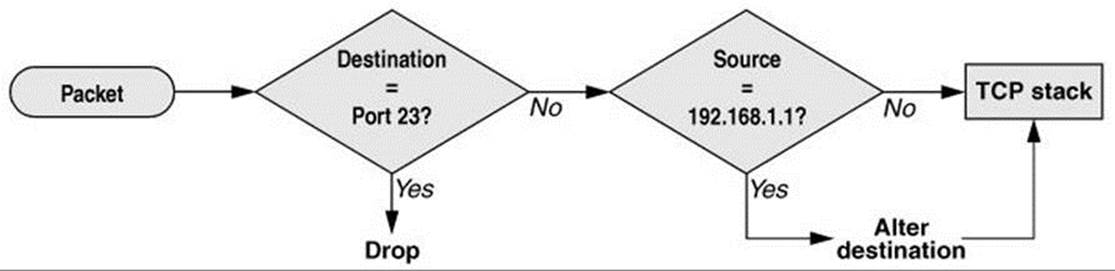
Figure 25-4 Example of how rules in a chain work
Chains are collected in three tables: Filter, NAT, and Mangle. Each of these tables has builtin chains (described next). You can create additional, user-defined chains in Filter, the default table.
Filter table
The default table. This table is mostly used to DROP, ACCEPT, or REJECT packets based on their content; it does not alter packets. Builtin chains are INPUT, FORWARD, and OUTPUT.
NAT table
The Network Address Translation table. Packets that create new connections are routed through this table, which is used exclusively to translate the source or destination fields of packets. Builtin chains are PREROUTING, OUTPUT, and POSTROUTING. Use this table with DNAT, SNAT, and MASQUERADE targets only.
• DNAT (destination NAT) alters the destination IP address of the first inbound packet in a connection so it is rerouted to another host. Subsequent packets in the connection are automatically DNATed. DNAT is useful for redirecting packets from the Internet that are bound for a firewall or a NATed server (page 928).
• SNAT (source NAT) alters the source IP address of the first outbound packet in a connection so it appears to come from a fixed IP address—for example, a firewall or router. Subsequent packets in the connection are automatically SNATed. Replies to SNATed packets are automatically de-SNATed so they go back to the original sender. SNAT is useful for hiding LAN addresses from systems outside the LAN and using a single IP address to serve multiple local hosts.
• MASQUERADE differs from SNAT only in that it checks for an IP address to apply to each outbound packet, making it suitable for use with dynamic IP addresses such as those provided by DHCP (page 491). MASQUERADE is slightly slower than SNAT.
Mangle table
Used exclusively to alter the TOS (type of service), TTL (time to live), and MARK fields in a packet. Builtin chains are PREROUTING and OUTPUT.
Network packets
When a packet from the network enters the kernel’s network protocol stack, it is given some basic sanity tests, including checksum verification. After passing these tests, the packet goes through the PREROUTING chain, where its destination address can be changed (Figure 25-5).
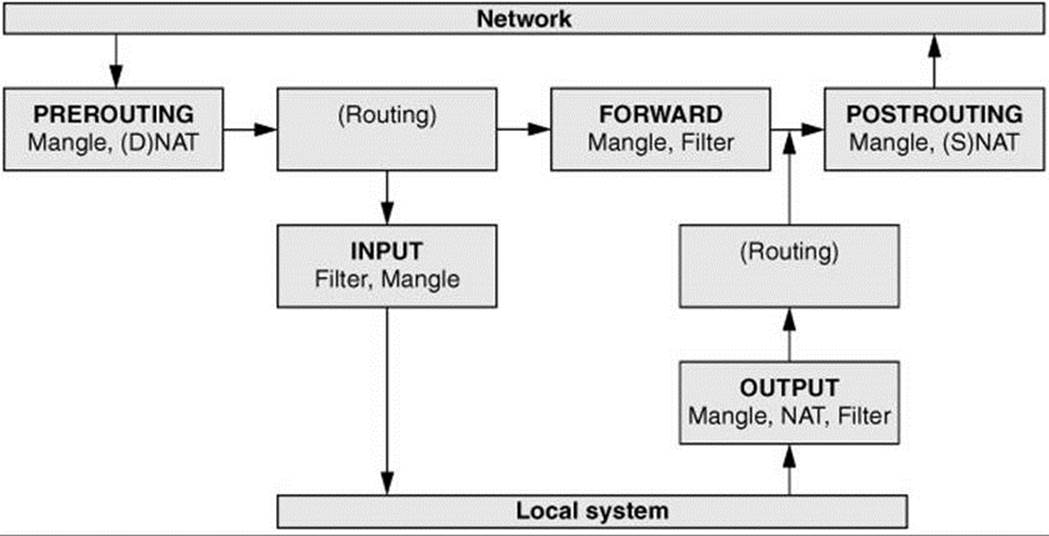
Figure 25-5 Filtering a packet in the kernel
Next the packet is routed based on its destination address. If it is bound for the local system, it first goes through the INPUT chain, where it can be filtered (accepted, dropped, or sent to another chain) or altered. If the packet is not addressed to the local system (the local system is forwarding the packet), it goes through the FORWARD and POSTROUTING chains, where it can again be filtered or altered.
Packets created locally pass through the OUTPUT and POSTROUTING chains, where they can be filtered or altered before being sent to the network.
State
The connection tracking machine (also called the state machine) provides information on the state of a packet, allowing you to define rules that match criteria based on the state of the connection the packet is part of. For example, when a connection is opened, the first packet is part of a NEW connection, whereas subsequent packets are part of an ESTABLISHED connection. Connection tracking is handled by the conntrack module.
The OUTPUT chain handles connection tracking for locally generated packets. The PREROUTING chain handles connection tracking for all other packets. For more information refer to “State” on page 920.
Before the advent of connection tracking, it was sometimes necessary to open many or all nonprivileged ports to make sure that the system accepted all RETURN and RELATED traffic. Because connection tracking allows you to identify these kinds of traffic, you can keep many more ports closed to general traffic, thereby increasing system security.
Jumps and targets
A jump or target (page 921) specifies the action the kernel takes if a network packet matches all the match criteria (page 915) for the rule being processed.
More Information
Web
Documentation, HOWTOs, FAQs, patch-o-matic, security information: www.netfilter.org
Tutorial: www.faqs.org/docs/iptables
Scripts and more: www.yourwebexperts.com/viewforum.php?f=35
HOWTO
KernelAnalysis-HOWTO
IP-Masquerade-HOWTO (contains useful scripts)
Netfilter Extensions HOWTO: www.netfilter.org
Netfilter Hacking-HOWTO: www.netfilter.org
Book
TCP/IP Illustrated by W. Richard Stevens, Addison-Wesley, January 2002
Tip: You can use system-config-firewall to create iptables rules
The iptables and iptables-services packages do not provide firewall rules. You can use the instructions in this section to configure iptables from the command line. Alternately, you can use system-config-firewall (system-config-firewall package), a GUI configuration tool for iptables rules.
Prerequisites
You can run the iptables service or the firewalld service, but not both at the same time. To run iptables, make sure the following packages are installed:
• iptables
• iptables-services
Disable firewalld
Disable the firewalld service. The mask command is similar to disable, but it makes it impossible to start the service.
# systemctl mask firewalld.service
ln -s '/dev/null' '/etc/systemd/system/firewalld.service'
Enable iptables and ip6tables
Run systemctl to cause the iptables and ip6tables services to start each time the system enters multiuser mode:
# systemctl enable iptables.service
# systemctl enable ip6tables.service
The systemctl utility will not start the iptables.service unit unless there is a set of rules for it to load from the /etc/sysconfig/iptables file. See “system-config-firewall: Generates a Set of Rules” on page 923 for more information about this file. The following file sets up a basic firewall that allows outbound traffic and rejects all incoming traffic except that which is in response to outbound traffic. Copy this sample file to the file named iptables to get started.
# cat /etc/sysconfig/iptables
*filter
:INPUT ACCEPT [0:0]
:FORWARD ACCEPT [0:0]
:OUTPUT ACCEPT [0:0]
-A INPUT -m state --state ESTABLISHED,RELATED -j ACCEPT
-A INPUT -p icmp -j ACCEPT
-A INPUT -i lo -j ACCEPT
-A INPUT -j REJECT --reject-with icmp-host-prohibited
-A FORWARD -j REJECT --reject-with icmp-host-prohibited
COMMIT
You can save and reload iptables rules as explained in “Saving rules” on page 914.
Stop firewalld
Stop the firewalld service.
# systemctl stop firewalld.service
Start iptables and ip6tables
Next, run systemctl to start the iptables and ip6tables services.
# systemctl start iptables.service
# systemctl start ip6tables.service
After starting these services, use the systemctl status command to make sure the services are running. If you do not create the iptables file shown on the previous page, or if the service did not start for another reason, the output of this command will include the line Active: inactive (dead).
With the iptables file shown above installed and the iptables.service unit started, the iptables –L option produces the following output:
# iptables -L
Chain INPUT (policy ACCEPT)
target prot opt source destination
ACCEPT all -- anywhere anywhere state RELATED,ESTABLISHED
ACCEPT icmp -- anywhere anywhere
ACCEPT all -- anywhere anywhere
REJECT all -- anywhere anywhere reject-with icmp-host-prohibited
Chain FORWARD (policy ACCEPT)
target prot opt source destination
REJECT all -- anywhere anywhere reject-with icmp-host-prohibited
Chain OUTPUT (policy ACCEPT)
target prot opt source destination
You can use systemctl to turn off the iptables service:
# systemctl stop iptables.service
With the iptables service turned off, the –L option shows that no rules are in effect (and the system accepts all traffic):
# iptables -L
Chain INPUT (policy ACCEPT)
target prot opt source destination
Chain FORWARD (policy ACCEPT)
target prot opt source destination
Chain OUTPUT (policy ACCEPT)
target prot opt source destination
Give the command service iptables save to save the rules iptables is running. See the next section for more information.
Emergency disconnect
An argument of panic severs all connections with the network. This command unloads all iptables modules from the kernel and sets a policy of DROP for all tables. It locks down the local system so no traffic can get in or out of it. Use this command if the system is under attack and you want to stop all network traffic in and out of the system immediately. Make sure you have backed up firewall rules you want to save before giving this command. See the caution tip on page 902.
# /usr/libexec/iptables/iptables.init panic
iptables: Flushing firewall rules: [ OK ]
iptables: Setting chains to policy DROP: filter [ OK ]
Notes
Startup
The iptables utility is a tool that manipulates rules in the kernel. It differs from daemons (servers) in its setup and use. Whereas Linux daemons such as Apache, vsftpd, and sshd read the data that controls their operation from a configuration file, you must provide iptables with a series of commands that build a set of packet filtering rules that are kept in the kernel.
Displaying rules
Give the command iptables –L or service iptables status to display the rules iptables is running.
Saving rules
There are two ways to set up the same set of rules each time you bring the system up. First, you can put iptables commands in a script and run that script each time the system boots. You can call this script from /etc/rc.d/rc.local.
Second, you can put the arguments to the iptables commands you want to execute in /etc/sysconfig/iptables. The system-config-firewall utility (page 923) and the Anaconda installer (page 62) both use this technique, building sets of rules and storing the corresponding iptables command arguments in /etc/sysconfig/iptables. These rules are read into the kernel when the system boots. If you use the /etc/sysconfig/iptables file in this manner, be aware that system-config-firewall overwrites this file.
See page 922 for information on copying packet filtering rules to and from the kernel.
iptables-config
The iptables service executes the /etc/sysconfig/iptables-config file. Refer to the comments in this file for options you can set.
Resetting iptables
If you encounter problems related to the firewall rules, you can return the packet processing rules in the kernel to their default state without rebooting by giving the following commands:
# iptables --flush
# iptables --delete-chain
These commands delete all rules from all chains and delete any user-defined chains; they do not change policy. Therefore, if the policy is ACCEPT (–P ACCEPT), flushing opens the firewall so that it accepts all packets; if the policy is DROP (–P DROP), flushing causes the firewall to drop all packets.
See “Emergency disconnect” on page 913 if you need to lock down the system quickly.
Anatomy of an iptables Command
Command line
This section describes the components of an iptables command line that follow the name of the utility, iptables. Except as noted, the iptables utility is not sensitive to the positions of arguments on the command line. The examples in this chapter reflect a generally accepted syntax that allows commands to be easily read, understood, and maintained. Not all commands have all components.
Many tokens on an iptables command line have two forms: a short form, consisting of a single letter preceded by a single hyphen, and a long form, consisting of a word preceded by two hyphens. Most scripts use the short forms for brevity; lines using the long forms can get unwieldy. The following iptables command lines are equivalent and are used as examples in this section:
# iptables --append FORWARD --in-interface eth1 --out-interface eth0 --jump ACCEPT
# iptables -A FORWARD -i eth1 -o eth0 -j ACCEPT
Table
The table specifies the name of the table the command operates on: Filter, NAT, or Mangle. You can specify a table name in any iptables command. When you do not specify a table name, the command operates on the Filter table. Most examples in this chapter do not specify table names and, therefore, work on the Filter table. Specify a table as –t tablename or ––table tablename.
Command
The command tells iptables what to do with the rest of the command line—for example, add or delete a rule, display rules, or add a chain. The example commands, –A and ––append, append the rule specified by the command line to the specified table (defaults to Filter table) and chain. See page 916 for information on commands.
Chain
The chain specifies the name of the chain that this rule belongs to or that this command works on. The chain is INPUT, OUTPUT, FORWARD, PREROUTING, POSTROUTING, or the name of a user-defined chain. Specify a chain by putting the name of the chain on the command line without any preceding hyphens. The examples at the beginning of this section work with the FORWARD chain.
Match criteria
There are two kinds of match criteria: packet match criteria, which match a network packet, and rule match criteria, which match an existing rule.
Packet match criteria/rule specifications
Packet match criteria identify network packets and implement rules that take action on packets that match the criteria. The combination of packet match criteria and an action is called a rule specification. Rule specifications form the basis for packet filtering. The first example at the beginning of this section uses the ––in-interface eth1 ––out-interface eth0 rule match criteria. The second example uses the short form of the same criteria: –i eth1 –o eth0. Both of these rules forward packets that come in on device eth1 and go out on device eth0.
Rule match criteria
Rule match criteria identify existing rules. An iptables command can modify, remove, or position a new rule adjacent to a rule specified by a rule match criterion. There are two ways to identify an existing rule: You can use the same rule specification that was used to create the rule or you can use the rule’s ordinal number, called a rule number. Rule numbers begin with 1, signifying the first rule in a chain, and can be displayed using iptables –L ––line-numbers. The first command below deletes the rule listed at the beginning of this section; the second command replaces (–R) INPUT chain rule number 3 with a rule that rejects all packets from IP address 192.168.0.10:
# iptables --delete -A FORWARD -i eth1 -o eth0 -j ACCEPT
# iptables -R INPUT 3 --source 192.168.0.10 --jump REJECT
A jump or target specifies what action the kernel takes on packets that match all match criteria for a rule. Specify a jump or target as –j target or ––jump target. The examples at the beginning of this section specify the ACCEPT target using the following commands: ––jump ACCEPT and –j ACCEPT.
Jumps
A jump transfers control to a different chain within the same table. The following command adds (––append) a rule to the INPUT chain that transfers packets that use the TCP protocol (––protocol tcp) to a user-defined chain named tcp_rules (––jump tcp_rules):
# iptables --append INPUT --protocol tcp --jump tcp_rules
When the packet finishes traversing the tcp_rules chain, assuming it has not been dropped or rejected, it continues traversing the INPUT chain from the rule following the one it jumped from.
Targets
A target specifies an action the kernel takes on the packet; the simplest actions are ACCEPT, DROP, and REJECT. The following command adds a rule to the FORWARD chain that rejects TCP packets coming from the FTP port (/etc/services, the file iptables consults to determine which port to use, shows that FTP uses port 21):
# iptables --append FORWARD -p tcp --sport ftp --jump REJECT
Some targets, such as LOG, are nonterminating: Control passes to the next rule after the target is executed. See page 921 for information on how to use targets.
Building a Set of Rules Using iptables
This section describes the specifics that compose an iptables rule. It starts with iptables commands; continues with packet match criteria, display criteria, and match extensions; and concludes with targets.
To specify a table, it is common practice to put the table declaration on the command line immediately following iptables. For example, the following command flushes (deletes all the rules from) the NAT table:
# iptables -t NAT -F
Commands
Following is a list of iptables commands:
––append
–A Adds rule(s) specified by rule-specifications to the end of chain. When a packet matches all of the rule-specifications, target processes it.
iptables –A chain rule-specifications ––jump target
––delete
–D Removes one or more rules from chain, as specified by the rule-numbers or rule-specifications.
iptables –D chain rule-numbers | rule-specifications
––insert
–I Adds rule(s) specified by rule-specifications and target to the location in chain specified by rule-number. If you do not specify rule-number, it defaults to 1, the head of the chain.
iptables –I chain rule-number | rule-specifications ––jump target
––replace
–R Replaces rule number rule-number in chain with rule-specification and target. The command fails if rule-number or rule-specification resolves to more than one address.
iptables –R chain rule-number | rule-specification ––jump target
––list
–L Displays the rules in chain. Omit chain to display the rules for all chains. Use ––line-numbers to display rule numbers or select other display criteria from the list on the next page.
iptables –L [chain] display-criteria
––flush
–F Deletes all rules from chain. Omit chain to delete all rules from all chains. This command does not change policy; see “Resetting iptables” on page 914 for more information.
iptables –F [chain]
––zero
–Z Changes to zero the value of all packet and byte counters in chain or in all chains when you do not specify chain. Use with –L to display the counters before clearing them.
iptables –Z [–L] [chain]
––delete-chain
–X Removes the user-defined chain named chain. If you do not specify chain, removes all user-defined chains. You cannot delete a chain that a target points to.
iptables –X chain
––policy
–P Sets the default target or policy builtin-target for the builtin chain builtin-chain. This policy is applied to packets that do not match any rule in the chain. If a chain does not have a policy, unmatched packets are ACCEPTed.
iptables –P builtin-chain builtin-target
––rename-chain
–E Changes the name of the chain old to new.
iptables –E old new
––help
–h Displays a summary of the iptables command syntax.
iptables –h
Follow a match extension protocol with –h to display options you can use with that protocol. For more information refer to “Help with extensions” on the next page.
Packet Match Criteria
The following criteria match network packets. When you precede a criterion with an exclamation point (!), the rule matches packets that do not match the criterion.
[!] ––protocol proto
–p Matches if the packet uses the proto protocol. This criterion is a match extension (next page).
[!] ––source address[/mask]
–s or ––src Matches if the packet came from address. The address should be an IP address and not a name because, when the system boots, iptables starts before the network and will not be able to resolve a name. See page 483 for formats of the optional mask (only with an IP address).
[!] ––destination address[/mask]
–d or ––dst Matches if the packet is going to address. The address should be an IP address and not a name because, when the system boots, iptables starts before the network and will not be able to resolve a name. See page 483 for formats of the optional mask (only with an IP address).
[!] ––in-interface iface[+]
–i For the INPUT, FORWARD, and PREROUTING chains, matches if iface is the name of the interface the packet was received from. Append a plus sign (+) to iface to match any interface whose name begins with iface. When you do not specify in-interface, the rule matches packets coming from any interface.
[!] ––out-interface iface[+]
–o For the OUTPUT, FORWARD, and POSTROUTING chains, matches if iface is the interface the packet will be sent to. Append a plus sign (+) to iface to match any interface whose name begins with iface. When you do not specify out-interface, the rule matches packets going to any interface.
[!] –fragment
–f Matches the second and subsequent fragments of fragmented packets. Because these packets do not contain source or destination information, they do not match any other rules.
Display Criteria
The following criteria display information. All packets match these criteria.
––verbose
–v Displays additional output.
––numeric
–n Displays IP addresses and port numbers as numbers, not names.
––exact
–x When used with –L, displays exact packet and byte counts instead of rounded values.
––line-numbers
Displays line numbers when listing rules. These line numbers are also the rule numbers that you can use in rule match criteria (page 915).
Match Extensions
Rule specification (packet match criteria) extensions, called match extensions, add matches based on protocols and state to the matches described previously. Each of the protocol extensions is kept in a module that must be loaded before that match extension can be used. The command that loads the module must appear in the same rule specification as, and to the left of, the command that uses the module. There are two types of match extensions: implicit and explicit.
Implicit Match Extensions
Help with extensions
Implicit extensions are loaded (somewhat) automatically when you use a ––protocol command (described on the next page). Each protocol has its own extensions. Follow the protocol with –h to display extensions you can use with that protocol. For example, the following command displays TCP extensions at the end of the Help output:
$ iptables -p tcp -h
...
tcp match options:
--tcp-flags [!] mask comp match when TCP flags & mask == comp
(Flags: SYN ACK FIN RST URG PSH ALL NONE)
[!] --syn match when only SYN flag set
(equivalent to --tcp-flags SYN,RST,ACK SYN)
--source-port [!] port[:port]
--sport ...
match source port(s)
--destination-port [!] port[:port]
--dport ...
match destination port(s)
--tcp-option [!] number match if TCP option set
This section does not describe all extensions. Use –h, as in the preceding example, to display a complete list.
––protocol [!] proto
–p Loads the proto module and matches if the packet uses the proto protocol. The proto can be a name or number from /etc/protocols, including tcp, udp, and icmp (page 1254). Specifying all or 0 (zero) matches all protocols and is the same as not including this match in a rule.
The following criteria load the TCP module and match TCP protocol packets coming from port 22 (ssh packets):
--protocol tcp --source-port 22
The following command expands the preceding match to cause the kernel to drop all incoming ssh packets. This command uses ssh, which iptables looks up in /etc/services, in place of 22:
# iptables -A --protocol tcp --source-port ssh --jump DROP
TCP
The extensions in this section are loaded when you specify ––protocol tcp.
––destination-port [!] [port[:port]] | port: | :port
––dport Matches a destination port number or service name (see /etc/services). You can also specify a range of port numbers. Specifically, :port specifies ports 0 through port, and port: specifies ports port through 65535.
––source-port [!] [port[:port]] | port: | :port
––sport Matches a source port number or service name (see /etc/services). You can also specify a range of port numbers. Specifically, :port specifies ports 0 through port, and port: specifies ports port through 65535.
[!] ––syn
Matches packets with the SYN bit set and the ACK and FIN bits cleared. This match extension is shorthand for ––tcp-flags SYN,RST,ACK SYN.
––tcp-flags [!] mask comp
Defines which TCP flag settings constitute a match. Valid flags are SYN, ACK, FIN, RST, URG, PSH, ALL, and NONE. The mask is a comma-separated list of flags to be examined; comp is a comma-separated subset of mask that specifies the flags that must be set for a match to occur. Flags not specified in mask must be unset.
––tcp-option [!] n
Matches a TCP option with a decimal value of n.
UDP
When you specify ––protocol udp, you can specify a source and/or destination port in the same manner as described under “TCP” on the preceding page.
ICMP
The extension in this section is loaded when you specify ––protocol icmp. ICMP (page 1254) packets carry messages only.
––icmp-type [!] name
Matches when the packet is an ICMP packet of type name. The name can be a numeric ICMP type or one of the names returned by
$ iptables -p icmp -h
Explicit Match Extensions
Explicit match extensions differ from implicit match extensions in that you must use a –m or ––match option to specify a module before you can use the extension. Many explicit match extension modules are available; this section covers state, one of the most important.
State
The state extension matches criteria based on the state of the connection the packet is part of (page 911).
––state state
Matches a packet whose state is defined by state, a comma-separated list of states from the following list:
• ESTABLISHED—Any packet, within a specific connection, following the exchange of packets in both directions for that connection.
• INVALID—A stateless or unidentifiable packet.
• NEW—The first packet within a specific connection, typically a SYN packet.
• RELATED—Any packets exchanged in a connection spawned from an ESTABLISHED connection. For example, an FTP data connection might be related to the FTP control connection. (The ip_conntrack_ftp module is required for FTP connection tracking.)
The following command loads the state extension and establishes a rule that matches and drops both invalid packets and packets from new connections:
# iptables --match state --state INVALID,NEW --jump DROP
Targets
All targets are built in; there are no user-defined targets. This section lists some of the targets available with iptables. Applicable target options are listed following each target.
ACCEPT
Causes the packet to leave the chain. The packet can then be processed by another chain or be up the TCP stack.
DNAT
Destination Network Address Translation Rewrites the destination address of the packet (page 910).
––to-destination ip[-ip][:port-port]
Same as SNAT (next page) with to-source, except it changes the destination addresses of packets to the specified addresses and ports and is valid only in the PREROUTING or OUTPUT chains of the NAT table and any user-defined chains called from those chains. The following command adds to the PREROUTING chain of the NAT table a rule that changes the destination in the headers of TCP packets with a destination of 66.187.232.50 to 192.168.0.10:
# iptables -t NAT -A PREROUTING -p tcp -d 66.187.232.50 -j DNAT --to-destination 192.168.0.10
DROP
Ends the packet’s life without notice.
LOG
Turns on logging for the packet being processed. The kernel uses syslogd (page 620) to process output generated by this target. LOG is a nonterminating target, so processing continues with the next rule. Use two rules to LOG packets that you REJECT or DROP, one each with the targets LOG and REJECT or DROP, with the same matching criteria.
––log-level n
Specifies logging level n as per syslog.conf (page 620).
––log-prefix string
Prefixes log entries with string, which can be a maximum of 14 characters long.
––log-tcp-options
Logs options from the TCP packet header.
––log-ip-options
Logs options from the IP packet header.
MASQUERADE
Similar to SNAT (next page) with ––to-source, except that it grabs the IP information from the interface on the specified port. For use on systems with dynamically assigned IP addresses, such as those using DHCP, including most dial-up lines. Valid only in rules in the POSTROUTING chain of the NAT table.
––to-ports port[-port]
Specifies the port for the interface you want to masquerade. Forgets connections when the interface goes down, as is appropriate for dial-up lines. You must specify the TCP or UDP protocol (––protocol tcp or udp) with this target.
REJECT
Similar to DROP, except it notifies the sending system that the packet was blocked.
––reject-with type
Returns the error type to the originating system. The type can be any of the following, all of which return the appropriate ICMP (page 1254) error: icmp-net-unreachable, icmp-host-unreachable, icmp-port-unreachable, icmp-proto-unreachable, icmp-net-prohibited, or icmp-host-prohibited. You can specify type as echo-reply from rules that require an ICMP ping (page 305) packet to return a ping reply. You can specify tcp-reset from rules in or called from the INPUT chain to return a TCP RST packet. This parameter is valid in the INPUT, FORWARD, and OUTPUT chains and user-defined chains called from these chains.
RETURN
Stops traversing this chain and returns the packet to the calling chain.
SNAT
Source Network Address Translation Rewrites the source address of the packet. Appropriate for hosts on a LAN that share an Internet connection.
––to-source ip[-ip][:port-port]
Alters the source IP address of an outbound packet, and the source IP addresses of all future packets in this connection, to ip. Skips additional rules, if any exist. Returning packets are automatically de-SNATed so they return to the originating host. Valid only in the POSTROUTING chain of the NAT table.
When you specify a range of IP addresses (ip-ip) or use multiple to-source targets, iptables assigns the addresses in a round-robin fashion, cycling through the addresses, one for each new connection.
When the rule specifies the TCP or UDP protocol (–p tcp or –p udp), you can specify a range of ports. When you do not specify a range of ports, the rule matches all ports. Every connection on a NATed subnet must have a unique IP address and port combination. If two systems on a NATed subnet try to use the same port, the kernel maps one of the ports to another (unused) port. Ports less than 512 are mapped to other ports less than 512, ports from 512 to 1024 are mapped to other ports from 512 to 1024, and ports above 1024 are mapped to other ports above 1024.
Copying Rules to and from the Kernel
The iptables-save utility copies packet filtering rules from the kernel to standard output; you can redirect the output to a file. The iptables-restore utility copies rules from standard input, as written by iptables-save, to the kernel. Following is the output from iptables-save as the system is installed (system-config-firewall has not been run):
# iptables-save
# Generated by iptables-save v1.4.9 on Tue Nov 5 14:57:10 2013
*filter
:INPUT ACCEPT [0:0]
:FORWARD ACCEPT [0:0]
:OUTPUT ACCEPT [78:7254]
-A INPUT -m state --state RELATED,ESTABLISHED -j ACCEPT
-A INPUT -p icmp -j ACCEPT
-A INPUT -i lo -j ACCEPT
-A INPUT -d 224.0.0.251/32 -p udp -m state --state NEW -m udp --dport 5353 -j ACCEPT
-A INPUT -j REJECT --reject-with icmp-host-prohibited
-A FORWARD -j REJECT --reject-with icmp-host-prohibited
COMMIT
# Completed on Tue Nov 5 14:57:10 2013
Most lines that iptables-save writes are iptables command lines without the iptables at the beginning. Lines that begin with a hashmark (#) are comments. Lines that begin with an asterisk (*) are names of tables that the following commands work on; the commands in the preceding example work on the Filter table. The COMMIT line must appear at the end of all commands for a table; it executes the preceding commands. Lines that begin with colons specify chains in the following format:
:chain policy [packets:bytes]
where chain is the name of the chain, policy is the policy (default target) for the chain, and packets and bytes are the packet and byte counters, respectively. The square brackets must appear in the line; they do not indicate optional parameters.
Refer to the next section and visit www.faqs.org/docs/iptables/iptables-save.html for more information.
system-config-firewall: Generates a Set of Rules
This section describes the set of rules generated by system-config-firewall (page 900) when you ask it to create a firewall with only ssh (TCP port 22) running as a trusted service and no other ports specified. The system-config-firewall utility writes the rules in the format used by iptables-save (see the preceding section) to the /etc/sysconfig/iptables file, which is read by the iptables service so that the firewall is implemented each time the system boots.
In the following listing, *filter indicates that the commands appearing after it work on the Filter table. The first line that begins with a colon specifies that the policy for the INPUT chain in the Filter table is ACCEPT. FORWARD and OUTPUT chains are specified similarly. Because the counters for all the chains are zero, the counters will be reset to zero each time the system boots and initializes iptables from this file. The system-config-firewall utility works mostly with the INPUT chain.
# cat /etc/sysconfig/iptables
# Firewall configuration written by system-config-firewall
# Manual customization of this file is not recommended.
*filter
:INPUT ACCEPT [0:0]
:FORWARD ACCEPT [0:0]
:OUTPUT ACCEPT [0:0]
-A INPUT -m state --state ESTABLISHED,RELATED -j ACCEPT
-A INPUT -p icmp -j ACCEPT
-A INPUT -i lo -j ACCEPT
-A INPUT -m state --state NEW -m tcp -p tcp --dport 22 -j ACCEPT
-A INPUT -j REJECT --reject-with icmp-host-prohibited
-A FORWARD -j REJECT --reject-with icmp-host-prohibited
COMMIT
Most of the lines append rules to the INPUT chain. Following is a description of what these lines do.
The first line that works with the INPUT chain uses –m to specify the state module and accepts ESTABLISHED and RELATED packets:
-A INPUT -m state --state ESTABLISHED,RELATED -j ACCEPT
The next line accepts all ICMP packets:
-A INPUT -p icmp -j ACCEPT
This line accepts packets from the local interface:
-A INPUT -i lo -j ACCEPT
This line allows new TCP connections on port 22 (ssh):
-A INPUT -m state --state NEW -m tcp -p tcp --dport 22 -j ACCEPT
These lines reject all packets that have not been accepted and return ICMP error icmp-host-prohibited to the system that sent the packet:
-A INPUT -j REJECT --reject-with icmp-host-prohibited
-A FORWARD -j REJECT --reject-with icmp-host-prohibited
mDNS
Running system-config-firewall (see the previous section), added the rule that accepts TCP packets on port 22 and removed the default rule that accepts multicast DNS (mDNS; www.multicastdns.org) packets:
-A INPUT -d 224.0.0.251/32 -p udp -m state --state NEW -m udp --dport 5353 -j ACCEPT
COMMIT executes the preceding commands. With the preceding rules loaded, you can use iptables to list the rules and see the defaults that iptables puts in place:
# iptables -L
Chain INPUT (policy ACCEPT)
target prot opt source destination
ACCEPT all -- anywhere anywhere state RELATED,ESTABLISHED
ACCEPT icmp -- anywhere anywhere
ACCEPT all -- anywhere anywhere
ACCEPT tcp -- anywhere anywhere state NEW tcp dpt:ssh
REJECT all -- anywhere anywhere reject-with icmp-host-prohibited
Chain FORWARD (policy ACCEPT)
target prot opt source destination
REJECT all -- anywhere anywhere reject-with icmp-host-prohibited
Chain OUTPUT (policy ACCEPT)
target prot opt source destination
Sharing an Internet Connection Using NAT
Many scripts that set up Internet connection sharing using iptables are available on the Internet. Each of these scripts boils down to the same few basic iptables commands, albeit with minor differences. This section discusses those few statements to explain how a connection can be shared. You can use the statements presented in this section or refer to the Linux IP Masquerade HOWTO for complete scripts. The tldp.org/HOWTO/IP-Masquerade-HOWTO/firewall-examples.html Web page holds the simplest of these scripts.
There are two ways you can share a single connection to the Internet (one IP address), both of which involve setting up NAT to alter addresses in packets and then forward them. The first allows clients (browsers, mail readers, and so on) on several systems on a LAN to share a single IP address to connect to servers on the Internet. The second allows servers (mail, Web, FTP, and so on) on different systems on a LAN to provide their services over a single connection to the Internet. You can use iptables to set up one or both of these configurations. In both cases, you need to set up a system that is a router: It must have two network connections—one connected to the Internet and the other to the LAN.
For optimal security, use a dedicated system as a router. Because data transmission over a connection to the Internet—even over a broadband connection—is relatively slow, using a slower, older system as a router does not generally slow down a LAN. This setup also offers some defense against intrusion from the Internet. A workstation on the LAN can function as a router as well, but this setup means that you maintain data on a system that is directly connected to the Internet. The following sections discuss the security of each setup.
The examples in this section assume the device named eth0 connects to the Internet on 10.255.255.255 and that eth1 connects to the LAN on 192.168.0.1. Substitute the devices and IP addresses that the local systems use. If you use a modem to connect to the Internet, you need to substituteppp0 (or another device) for eth0 in the examples.
For the examples in this section to work, you must turn on IP forwarding. First give the following command and make sure everything is working:
# sysctl -w net.ipv4.ip_forward=1
net.ipv4.ip_forward = 1
If you want to forward IPv6 packets, give this command instead:
# sysctl -w net.ipv6.conf.all.forwarding=1
net.ipv6.conf.all.forwarding = 1
Once you know that iptables is working correctly, change the 0 to a 1 in the following line in /etc/sysctl.conf to make the kernel always perform IP forwarding:
net.ipv4.ip_forward = 0
After making this change, give the command /sbin/sysctl –e –p to apply the change and to make sure that there are no typographical errors in the configuration file.
Connecting Several Clients to a Single Internet Connection
Configuring the kernel of the router system to allow clients on multiple local systems on the LAN to connect to the Internet requires you to set up IP masquerading, or SNAT (source NAT). IP masquerading translates the source and destination addresses in the headers of network packets that originate on local systems and the packets that remote servers send in response to those packets. These packets are part of connections that originate on a local system. The example in this section does nothing to packets that are part of connections that originate on the remote systems (on the Internet): These packets cannot get past the router system, which provides some degree of security.
The point of rewriting the packet headers is to allow systems with different local IP addresses to share a single IP address on the Internet. The router system translates the source or origin address of packets from the local systems to that of the Internet connection, so all packets passing from the router to the Internet appear to come from a single system—10.255.255.255 in the example. All packets sent in response by remote systems on the Internet to the router system have the address of the Internet connection—10.255.255.255 in the example—as their destination address. The router system remembers each connection and alters the destination address of each response packet to that of the local, originating system.
The router system is established by four iptables commands, one of which sets up a log of masqueraded connections. The first command puts the first rule in the FORWARD chain of the Filter (default) table (–A FORWARD):
# iptables -A FORWARD -i eth0 -o eth1 -m state --state ESTABLISHED,RELATED -j ACCEPT
To match this rule, a packet must be
1. Received on eth0 (coming in from the Internet): –i eth0
2. Going to be sent out on eth1 (going out to the LAN): –o eth1
3. Part of an established connection or a connection that is related to an established connection: ––state ESTABLISHED,RELATED
The kernel accepts (–j ACCEPT) packets that meet these three criteria. Accepted packets pass to the next appropriate chain or table. Packets from the Internet that attempt to create a new connection are not matched and, therefore, are not accepted by this rule. Packets that are not accepted pass to the next rule in the FORWARD chain.
The second command puts the second rule in the FORWARD chain of the Filter table:
# iptables -A FORWARD -i eth1 -o eth0 -j ACCEPT
To match this rule, a packet must be
1. Received on eth1 (coming in from the LAN): –i eth1
2. Going to be sent out on eth0 (going out to the Internet): –o eth0
The kernel accepts packets that meet these two criteria, which means all packets that originate locally and are going to the Internet are accepted. Accepted packets pass to the next appropriate chain/table; packets that are not accepted pass to the next rule in the FORWARD chain.
The third command puts the third rule in the FORWARD chain of the Filter table:
# iptables -A FORWARD -j LOG
Because this rule has no match criteria, it acts on all packets it processes. This rule’s action is to log packets—that is, it logs packets from the Internet that attempt to create a new connection.
Packets that reach the end of the FORWARD chain of the Filter table are done with the rules set up by iptables and are handled by the local TCP stack. Packets from the Internet that attempt to create a new connection on the router system are accepted or returned, depending on whether the service they are trying to connect to is available on the router system.
The fourth command puts the first rule in the POSTROUTING chain of the NAT table. Only packets that are establishing a new connection are passed to the NAT table. Once a connection has been set up for SNAT or MASQUERADE, the headers on all subsequent ESTABLISHED and RELATED packets are altered the same way as the header of the first packet. Packets sent in response to these packets automatically have their headers adjusted so they return to the originating local system.
# iptables -t NAT -A POSTROUTING -o eth0 -j MASQUERADE
To match this rule, a packet must be
1. Establishing a new connection (otherwise it would not have come to the NAT table)
2. Going to be sent out on eth0 (going out to the Internet): –o eth0
The kernel MASQUERADEs all packets that meet these criteria. In other words, all locally originating packets that are establishing new connections have their source address changed to the address that is associated with eth0 (10.255.255.255 in the example). If the local system has a static IP address, substitute SNAT for MASQUERADE.
The following example shows all four commands together:
# iptables -A FORWARD -i eth0 -o eth1 -m state --state ESTABLISHED,RELATED -j ACCEPT
# iptables -A FORWARD -i eth1 -o eth0 -j ACCEPT
# iptables -A FORWARD -j LOG
# iptables -t NAT -A POSTROUTING -o eth0 -j MASQUERADE
See page 914 for instructions on how to save these rules so the firewall comes up each time the system boots. To limit the local systems that can connect to the Internet, you can add a –s (source) match criterion to the last command:
# iptables -t NAT -A POSTROUTING -o eth0 -s 192.168.0.0-192.168.0.32 -j MASQUERADE
In the preceding command, –s 192.168.0.0-192.168.0.32 causes only packets from an IP address in the specified range to be MASQUERADEd.
Connecting Several Servers to a Single Internet Connection
DNAT (destination NAT) can set up rules that allow clients from the Internet to send packets to servers on the LAN. This example sets up an SMTP mail server on 192.168.1.33 and an HTTP (Web) server on 192.168.1.34. Both protocols use TCP. SMTP uses port 25 and HTTP uses port 80, so the rules match TCP packets with destination ports of 25 and 80. The example assumes the mail server does not make outgoing connections and uses another server on the LAN for DNS and mail relaying. Both commands put rules in the PREROUTING chain of the NAT table (–A PREROUTING –t NAT):
# iptables -A PREROUTING -t NAT -p tcp --dport 25 -j DNAT --to-destination 192.168.0.33:25
# iptables -A PREROUTING -t NAT -p tcp --dport 80 -j DNAT --to-destination 192.168.0.34:80
To match these rules, the packet must use the TCP protocol (–p tcp) and have a destination port of either 25 (first rule, ––dport 25) or 80 (second rule, ––dport 80).
The ––to-destination is a target specific to the PREROUTING and OUTPUT chains of the NAT table; it alters the destination address and port of matched packets as specified. As with MASQUERADE and SNAT, subsequent packets in the same and related connections are altered the same way.
The fact that the servers cannot originate connections means that neither server can be exploited to participate in a DDoS attack (page 1246) on systems on the Internet, nor can they send private data from the local system back to a malicious user’s system.
Chapter Summary
A firewall, as implemented by firewalld, is designed to prevent unauthorized access to a system or network. Such a firewall can protect just the single system it runs on or can protect the system it runs on plus other systems on a LAN that connect to the Internet through the system running the firewall. The firewalld service is replacing the older iptables service. The firewalld daemon accepts changes to the firewall while it is running. The firewalld daemon (which runs in userspace) works with netfilter (which runs in kernelspace) to filter network packets. A firewalld firewall allows you to configure the runtime configuration and the permanent configuration.
The firewalld daemon has a D-BUS interface that allows it to communicate with processes, including allowing authenticated processes to reconfigure the firewall as they run. It also has a GUI (firewall-config) and a CLI (firewall-cmd). The firewall-cmd utility has direct commands that allow you to give iptables commands to firewalld. In an emergency you can put the firewall in panic mode, in which it drops all packets.
An iptables command sets up or maintains in the kernel rules that control the flow of network packets; rules are stored in chains. Each rule includes a criteria part and an action part, called a target. When the criteria part matches a network packet, the kernel applies the action from the rule to the packet.
Chains are collected in three tables: Filter, NAT, and Mangle. Filter (the default table) DROPs or ACCEPTs packets based on their content. NAT (the Network Address Translation table) translates the source or destination field in packet headers. Mangle is used exclusively to alter the TOS (type of service), TTL (time to live), and MARK fields in a packet. The connection tracking machine, which is handled by the conntrack module, defines rules that match criteria based on the state of the connection a packet is part of.
Exercises
1. How would you put a firewalld firewall in panic mode from firewall-config? From firewall-cmd?
2. How can you tell whether firewalld is running?
3. Which firewall-cmd command would you use to cause the runtime configuration of the firewall to trust the FTP service? Which command would cause the permanent configuration to trust the FTP service?
4. Which firewall-cmd command would verify that the FTP service was trusted in the runtime configuration? In the permanent configuration?
5. How would you use firewall-cmd to open ports for SMTP packets (TCP and UDP port 25) in the permanent configuration? Verify that these ports are open.
Advanced Exercises
6. Define an iptables rule that will reject incoming connections on the TELNET port.
7. Which iptables command would list all rules including line numbers that specify each rule’s position in the chain?
8. Write an iptables (IPv4) rule that silently blocks incoming SMTP connections from 10.10.0.10.
9. Run the rule from exercise 8 using the direct option of firewall-cmd.