RHCSA & RHCE Red Hat Enterprise Linux 7: Training and Exam Preparation Guide (EX200 and EX300), Third Edition (2015)
Part II. RHCE Section
Chapter 22. Hosting Websites with Apache
This chapter describes the following major topics:
· Overview of HTTP protocol and Apache web service
· Apache features, daemon, commands, configuration file, log files, and software packages
· Examine Apache configuration file
· Describe Apache access control
· Configure and test Apache web servers with varying configuration
· Overview of Apache virtual host and use benefits
· Configure and test Apache virtual hosts
· Understand Apache web servers over SSL/TLS layers
· Configure and test Apache secure virtual hosts
· Overview of CGI scripts
· Add CGI scripts to web servers
RHCE Objectives:
66. Configure a virtual host
67. Configure private directories
68. Deploy a basic CGI application
69. Configure group-managed content
70. Configure TLS security
Web servers are computer systems that run special programs to host websites for business, government, and personal use. These special programs use the HTTP protocol, or its secure cousin, HTTPS, to transfer and exchange information with remote clients. There are millions of web servers in use today that run a variety of these programs to serve clients. Apache is one such program, and it is more popular and widely deployed than its counterparts.
HTTP and the Apache Web Server
The HyperText Transfer Protocol (HTTP) is a networking protocol that provides clients with access to web content over the Internet and the corporate network. The term hypertext refers to structured text that uses hyperlinks to allow non-sequential access to information hosted on a web server via the HTTP protocol. A web server is also referred to as an HTTP server. A web client is usually a web browser, such as Firefox, Internet Explorer, and Google Chrome, that fully understands the HTTP protocol to be able to talk to the web server. This client/server arrangement built on the HTTP protocol forms the basis for the World Wide Web.
Apache is the most popular program that provides web services to clients using the HTTP and HTTPS protocols. It is more secure, scalable, and modular than most of its counterparts. Apache is supported on virtually every computer operating system. Since its inception in 1995, Apache has grown to be the world’s most widely used web server software. Apache is an open-source program that is developed and maintained under the supervision of the Apache Software Foundation, a not-for-profit organization enacted to coordinate Apache software project activities.
RHEL7 includes the support for version 2.4.6 of the Apache HTTP Server software.
Apache Features
Apache is a feature-rich web server software. Some of its common features are:
· Support for hosting multiple websites with different names on a single system.
· Access control at the host, user, and group levels.
· Dynamic loading of modules when needed.
· Integration of common configuration settings as the default in the source code for easier management.
· Support for various authentication methods, including password authentication and digital certificate authentication.
· Support for compression methods for faster transfers and lower bandwidth utilization.
· Support for intrusion detection and prevention.
· Works over SSL (Secure Sockets Layer) and TLS (Transport Layer Security) protocols to provide secure web service.
· Support for separate configuration files for separate services stored in separate locations.
· Support for proxy load balancing.
Apache Daemon
The Apache HTTP server is a client/server application that relies on the httpd daemon running on the server to allow the transfer of web content. This daemon process uses TCP port 80 for non-secure and TCP port 443 for secure operations, by default. The software can be configured to listen on any other port number as long as it is available and appropriate permissions are enabled in firewalld and SELinux.
Apache Commands
There are a few commands available to control the Apache daemon and perform certain configuration tasks on the web server. A proper understanding of the usage of these commands is essential for smooth administration. Table 22-1 lists and explains them.
|
Command |
Description |
|
apachectl |
Starts, stops, restarts, and checks the status of, the httpd process (the systemctl command may be used instead). Tests the syntax of Apache configuration files (the httpd command may also be used instead). |
|
htpasswd |
Creates and updates files to store usernames and passwords for basic authentication of Apache users. Specify the –c option to create a file and –m to use MD5 encryption for passwords. |
|
httpd |
Server program for the Apache web service. With the –t option, it checks for any syntax errors in the Apache configuration files. |
Table 22-1 Apache Commands
There are additional commands available; however, their discussion is beyond the scope.
Apache Configuration Files
By default, all Apache web server configuration and supporting files are stored under the /etc/httpd directory. The primary configuration file, httpd.conf, is under the conf sub-directory. Additional configuration files are under conf.d, and the configuration files that load modules are placed under theconf.modules.d sub-directory. An ll on the /etc/httpd directory produces the following output:
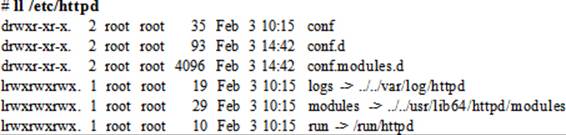
The output also indicates the presence of three directories: /var/log/httpd, /usr/lib64/httpd/modules, and /run/httpd. These directories store Apache log files, additional modules, and runtime information for Apache, respectively.
At Apache server startup, the module files are processed first to load necessary modules, followed by the httpd.conf file and then any additional configuration files from the /etc/httpd/conf.d directory.
EXAM TIP: Understanding of the directives in httpd.conf and ssl.conf files is important. Refer to log files when attempting to test a web page.
Analysis of the httpd.conf File
The httpd.conf file contains numerous directives that can be set as per requirements. Table 22-2 describes general directives that affect the overall operation of the Apache web server.
|
Directive |
Description |
|
Group |
Default is apache. Specifies the owning group for the httpd daemon. |
|
Include |
Default is conf.modules.d/*.conf with respect to ServerRoot. Specifies the location of module configuration files to be loaded at Apache startup. |
|
Listen |
Default is 80. Specifies a port number to listen for client requests. Specify an IP address and a port if you wish to limit the web server access to a specific address. |
|
ServerRoot |
Default is /etc/httpd. Directory location to store configuration, error, and log files. |
|
User |
Default is apache. Specifies the owner for the httpd daemon. |
Table 22-2 General Directives
There are several directives defined under “Main server configuration” in the file. These directives set up the default web server, which responds to client requests that are not handled by virtual hosts. The values of these directives are also valid for any configured virtual hosts, unless they are overridden. Some key directives are explained in Table 22-3.
|
Directive |
Description |
|
AddHandler |
Maps a file extension to the specified handler. |
|
AccessFileName |
Default is .htaccess. Specifies the file to be used for access control information. See AllowOverride and Require directives, and Table 22-6 and 22-7. |
|
Alias |
Defines a directory location to store files outside of DocumentRoot. |
|
AllowOverride |
Default is None. Defines types of directives that can be defined in AccessFileName files. These directives are used to control user or group access to private directories, as well as to control host access. Some other common options are: All: Allows the use of all AccessFileName-supported directives. AuthConfig: Allows the use of authorization directives, such as AuthName, AuthType, AuthUserFile, AuthGroupFile, and Require, in AccessFileName. |
|
CustomLog |
Default is combined and stored in logs/httpd/access_log with respect to ServerRoot. Specifies the custom log file and identifies its format. |
|
DirectoryIndex |
Default is index.html. Specifies the web page to be served when a client requests an index of a directory. |
|
DocumentRoot |
Default is /var/www/html. Specifies the directory location for website files. |
|
ErrorLog |
Default is logs/error_log with respect to ServerRoot. Specifies the location to log error messages. |
|
IncludeOptional |
Default is conf.d/*.conf with respect to ServerRoot. Specifies the location of additional configuration files to be processed at Apache startup. |
|
LogFormat |
Sets the format for logging messages. |
|
LogLevel |
Default is warn. Specifies the level of verbosity at which messages are logged. Other options are debug, info, notice, error, crit, alert, and emerg. |
|
Options |
Default is FollowSymLinks. Sets features associated with web directories. Some common features are: ExecCGI: Allows the execution of CGI scripts. FollowSymLinks: Allows directories external to DocumentRoot to have symlinks. Indexes: Displays a list of files on the web server if no index.html file is available in the stated directory. Includes: Allows server-side includes. MultiViews: Allows substitution of file extensions. All: Allows all options besides MultiViews. None: Disables all extra features. |
|
Require |
Allows or denies access to the specified user, group, host, network, or domain. See Table 22-6 for details and usage examples. |
|
ScriptAlias |
Specifies a directory location to store CGI (Common Gateway Interface) scripts. |
|
ServerAdmin |
Default is root@localhost. Specifies the email address of the webmaster. |
|
ServerName |
Default is www.example.com:80. Specifies the web server name (or IP address) and port number. |
Table 22-3 Main Server Directives
A lot of information is defined within containers in the httpd.conf file. There are four types of containers: Directory, IfModule, Files, and VirtualHost, and each of them marks its beginning and ending as listed in Table 22-4.
|
Container Begins |
Container Ends |
|
<Directory ……… > |
</Directory> |
|
<Files …………. > |
</Files> |
|
<IfModule ……. > |
</IfModule> |
|
<VirtualHost …. > |
</VirtualHost> |
Table 22-4 Container Beginning and Ending
The default httpd.conf file does not include examples for virtual host containers; however, an exercise later in this chapter will show you how to define it.
Apache Log Files
Apache log files are located in the /var/log/httpd directory, which is symbolically linked from the /etc/httpd/logs directory. An ll on this directory is shown below. The access_log and error_log files log access to the web server and error messages, respectively.

It is recommended that separate log files be used for each website.
Apache Software Packages
There are several software packages that need to be installed on the system to set up standard and secure HTTP web servers. The yum command below produces a list of these packages:
|
# yum list installed | grep httpd |
||
|
httpd.x86_64 |
2.4.6-17.el7 |
@ftprepo |
|
httpd-tools.x86_64 |
2.4.6-17.el7 |
@ftprepo |
Table 22-5 describes these packages:
|
Package |
Description |
|
httpd |
Provides Apache HTTP server software for building non-secure websites. |
|
httpd-tools |
Contains tools for use with the Apache web server. |
Table 22-5 HTTP Software Packages
Access Control
There are several directives available that can be used to control access to the web server for specific users, groups, or hosts. We will cover the directives that are of our interest.
Controlling Access for Users and Groups
Limiting access to private directories to specific users and groups is managed through a set of directives that are defined in a .htaccess file or directly in the directory container in the httpd.conf file. These users are assigned passwords that may be different from their RHEL passwords. The key directives to control access at user and group levels are described in Table 22-6.
|
Directive |
Description |
|
AuthType |
Sets basic authentication. |
|
AuthName |
Adds general comments. |
|
AuthBasicProvider |
Default is file. Specifies the type of authentication to be used. |
|
AuthUserFile |
Specifies the file that contains authorized user passwords. |
|
AuthGroupFile |
Specifies the file that contains authorized group passwords. |
|
Require |
See Table 22-7 for details and usage examples. |
Table 22-6 Directives for Access Control to Private Directories
Controlling Access at the Host Level
The Apache web server can be configured to limit access from a specific host, network, or domain. This level of control lets you permit or deny access requests based on the settings of the Require directive. Table 22-7 provides examples to describe the usage of this directive for host-level, as well as user- and group-level access controls.
|
Require Directive |
Effect |
|
Require user <username or UID> |
Access is granted to the specified user only (used to grant access to private directories). |
|
Require not user <username or UID> |
Access is denied to the specified user. |
|
Require group <group name or GID> |
Access is granted to the specified group members only (used to grant access to group-managed contents). |
|
Require not group <group name or GID> |
Access is denied to members of the specified group. |
|
Require valid-user |
Access is granted to all valid users. |
|
Require ip 192.168.0 15.2 |
Access is granted from 192.168.0 and 15.2 networks only. |
|
Require not ip 192.168.0 15.2 |
Access is denied from 192.168.0 and 15.2 networks. |
|
Require host server2 |
Access is granted from server2. |
|
Require not host server2 |
Access is denied from server2. |
|
Require host example.com |
Access is granted from example.com domain. |
|
Require not host .example.com |
Access is denied from example.com domain. |
|
Require all granted |
Access is granted from everywhere. |
|
Require all denied |
Access is denied from everywhere. |
Table 22-7 Access Control with Require Directive
A few examples are presented below with different combinations of user, group, and host level access control.
Example 1: To allow user1, user2, and dba group members to access the contents of /var/www/example with no password authentication required:
<Directory /var/www/example>
AllowOverride None
Require user user1 user2
Require group dba
</Directory>
Example 2: To allow user1, user2, and dba group members to access the contents of /var/www/example from domain example.net, network 192.168.0, and host server2.example.com, and disallow access from domain example.org. No password authentication is required.
<Directory /var/www/example>
AllowOverride None
Require user user1 user2
Require group dba
Require host example.net server2.example.com
Require ip 192.168.0
Require not host example.org
</Directory>
Example 3: To allow user1, user2, and dba group members to access the contents of /var/www/example from domain example.net, network 192.168.0, and host server2.example.com, and disallow access from domain example.org. Both users and group members must enter their passwords to access the following directory contents:
<Directory /var/www/example>
AllowOverride AuthConfig
AccessFileName conf/.htaccess
</Directory>
The .htaccess file will have the following:
|
AuthType |
Basic |
|
AuthName |
“This site is password-protected.” |
|
AuthBasicProvider |
file |
|
AuthUserFile |
/etc/httpd/conf/.userdb |
|
AuthGroupFile |
/etc/httpd/conf/.groupdb |
|
Require |
user user1 user2 |
|
Require |
group dba |
|
Require |
host example.net server2.example.com |
|
Require |
ip 192.168.0 |
|
Require |
not host example.org |
Configuring Apache Web Servers
Having gone through the material provided in this chapter so far and the knowledge and understanding developed based on that, you should now be able to perform the exercises provided in this section. You might need to adjust settings presented in these exercises to make them work on your systems.
SELinux Requirements for Apache Operation
There are a number of booleans associated with the Apache service. Run the SELinux Configuration tool system-config-selinux, go to Boolean, and then filter out “httpd”. This will list all associated booleans. Some of the common booleans that affect Apache are described in Table 22-8.
|
Boolean |
Description |
|
httpd_anon_write |
Allows/disallows Apache to write to directories labeled with the public_content_rw_t type, such as public directories. |
|
httpd_sys_script_anon_write |
Allows/disallows Apache scripts to write to directories labeled with the public_content_rw_t type, such as public directories. |
|
httpd_enable_cgi |
Enables/disables execution of CGI scripts labeled with the httpd_sys_script_exec_t type. |
|
httpd_enable_ftp_server |
Allows/disallows Apache to act as a FTP server and listen on port 21. |
|
httpd_enable_homedirs |
Enables/disables Apache’s access to user home directories. |
|
httpd_use_cifs |
Allows/disallows Apache to use mounted Samba shares with cifs_t type. |
|
httpd_use_nfs |
Allows/disallows Apache to use mounted NFS shares with nfs_t type. |
Table 22-8 Common SELinux Booleans for Apache
In addition to the booleans, having proper SELinux file context on Apache files and directories is mandatory for Apache to operate smoothly. There are three key directories where the Apache information is typically stored: /etc/httpd, /var/www, and /var/log/httpd. Run the ll command with the –Zd options on these directories to check the current SELinux context:
# ll –Zd /etc/httpd
drwxr-xr-x. root root system_u:object_r:httpd_config_t:s0 /etc/httpd
# ll –Zd /var/www
drwxr-xr-x. root root system_u:object_r:httpd_sys_content_t:s0 /var/www
# ll –Zd /var/log/httpd
drwx------. root root system_u:object_r:httpd_log_t:s0 /var/log/httpd
The output indicates that SELinux labels httpd_config_t, httpd_sys_content_t, and httpd_log_t are set on directories containing Apache configuration, web content, and log files, respectively. Files beneath these directories inherit their parent directory’s context. If you wish to store this information at different directory locations, ensure that appropriate SELinux file contexts are applied to the directories to ensure a smooth operation.
Exercise 22-1: Configure the Default Apache Web Server
This exercise should be done on server1 and server2.
In this exercise, you will set up an Apache web server for basic operation using the default settings in the httpd.conf file. You will install the Apache web server software and the elinks text browser. You will ensure that appropriate firewall rules are in place to allow the HTTP traffic to pass through. You will enable the HTTP service to autostart at system reboots and start the service. You will test the web server’s functionality by accessing the default page from the elinks web browser. You will install the elinks web browser on server2 and access the default web server from there.
On server1 (web server):
1. Install the software packages for Apache and elinks (browser):
# yum –y install httpd elinks
…… . .
Installed:
elinks.x86_64 0:0.12-0.36.pre6.el7
httpd.x86_64 0:2.4.6-17.el7
Complete!
2. Add the http service to firewalld persistently and reload the rules to allow traffic on HTTP port 80:
# firewall-cmd --permanent --add-service=http ; firewall-cmd --reload
success
success
3. Set the Apache service to autostart at system reboots:
# systemctl enable httpd
ln -s '/usr/lib/systemd/system/httpd.service' '/etc/systemd/system/multi-user.target.wants/httpd.service'
4. Start the Apache service and check the running status:
# systemctl start httpd
# systemctl status httpd
httpd.service - The Apache HTTP Server
Loaded: loaded (/usr/lib/systemd/system/httpd.service; enabled)
Active: active (running) since Tue 2015-02-03 10:26:00 EST; 3s ago
Main PID: 26836 (httpd)
Status: "Processing requests…"
CGroup: /system.slice/httpd.service
├─26836 /usr/sbin/httpd -DFOREGROUND
├─26837 /usr/sbin/httpd -DFOREGROUND
├─26838 /usr/sbin/httpd -DFOREGROUND
├─26839 /usr/sbin/httpd -DFOREGROUND
├─26840 /usr/sbin/httpd -DFOREGROUND
└─26841 /usr/sbin/httpd -DFOREGROUND
5. Verify access to the default web page using the following:
# elinks http://localhost
To exit out of the elinks browser window, press the ESC key and then Enter to view the File menu. Press x and then Enter again to quit.
Run the tail command on the error_log and access_log files located in the /var/log/httpd directory to view any error and access messages generated.
On server2 (web client):
6. Install the elinks browser software:
# yum –y install elinks
7. Access the web server using the elinks browser:
# elinks http://server1.example.com
You should be able to see the default web page.
Exercise 22-2: Modify the Default Web Server to Use a Different Home Page and Hostname
This exercise should be done on server1 and server2.
In this exercise, you will modify the web server configured in the previous exercise and use webserver1.example.com as its hostname with alias webserver1. You will create a new home page in the default DocumentRoot directory. You will test the web server’s functionality by accessing it using the new hostname from both systems.
1. Create a web page in the default DocumentRoot directory /var/www/html:
# cd /var/www/html ; vi index.html
This is webserver1 (exercise 22-2).
2. Modify the entry for server1 in the /etc/hosts file to look like the following:
192.168.0.110 server1.example.com server1 webserver1.example.com webserver1
EXAM TIP: You do not have to worry about updating the /etc/hosts file. DNS will be in place with all hostnames resolvable.
3. Open the /etc/httpd/conf/httpd.conf file and modify the following directives:
ServerAdmin root@webserver1.example.com
ServerName webserver1.example.com
4. Check the syntax of the httpd.conf file for any errors:
# httpd –t
Syntax OK
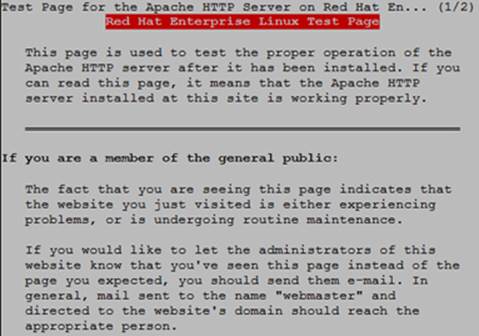
5. Verify access to the new web page using the following:
# elinks http://webserver1.example.com
![]()
To exit out of the elinks browser window, press the ESC key and then Enter to view the File menu. Press x and then Enter again to quit.
Run the tail command on the error_log and access_log files located in the /var/log/httpd directory to view any error and access messages generated.
Log on to server2 and update the entry for server1 in the /etc/hosts file as it was done on server1. Now execute the following to access the new web page:
# elinks http://webserver1.example.com
You should be able to see the default web page.
Exercise 22-3: Extend the Web Server to Provide Access to a Private Directory
This exercise should be done on server1.
In this exercise, you will extend the functionality of the web server configured and updated in the previous two exercises to provide access to a private directory called privusr located under a different DocumentRoot called /var. You will restrict access to this private directory for user1 only.
1. Create the private directory in DocumentRoot:
# mkdir /var/privusr
2. Change the ownership and owning group to user1, and permissions to 0711 on the directory:
# chown user1:user1 /var/privusr ; chmod 0711 /var/privusr
3. Create an index.html file in the private directory:
# vi /var/privusr/index.html
This is webserver1 (exercise 22-3) providing user1 access to a private directory.
4. Add SELinux file context with type httpd_sys_content_t on the /var/privusr directory to the SELinux policy:
# semanage fcontext –at httpd_sys_content_t “/var/privusr(/.*)?”
5. Apply the new rule to the directory:
# restorecon –Rv /var/privusr
restorecon reset /var/privusr context unconfined_u:object_r:var_t:s0->unconfined_u:object_r:httpd_sys_content_t:s0
EXAM TIP: Add a new file context to the SELinux policy first, and then apply it. This will prevent the context to reset to the original value should SELinux relabeling happens.
6. Open the httpd.conf file and modify the following directives:
ServerAdmin root@webserver1.example.com
ServerName webserver1.example.com
DocumentRoot “/var”
<Directory /var/privusr>
AllowOverride AuthConfig
</Directory>
7. Check the syntax of the httpd.conf file for any errors:
# httpd –t
Syntax OK
8. Create the .htaccess file in the /var/privusr directory and add the following to it:
# cd /var/privusr ; vi .htaccess
AuthType Basic
AuthName “Password-protected User Contents. Enter your credentials to log in:”
AuthUserFile “/etc/httpd/conf/.userdb”
Require user user1
9. Set password for user1 and store it in the AuthUserFile (/etc/httpd/conf/.userdb) using the htpasswd command. This password can be different from the user’s Linux password. Display the contents of the AuthUserFile.
# cd /etc/httpd/conf ; htpasswd –c .userdb user1
New password:
Re-type new password:
Adding password for user user1
# cat .userdb
user1:$apr1$CMmJ4ru9$yMiBitQNS5hjOQDJPSIrx.
10. Change owning group on the AuthUserFile file to apache, and permissions to 0640:
# chgrp apache .userdb ; chmod 0640 .userdb
11. Restart the Apache web service:
# systemctl restart httpd
12. Test the configuration for user1 from local and remote systems using the Firefox browser:
http://webserver1.example.com/privusr
Run the tail command on the error_log and access_log files located in the /var/log/httpd directory to view error and access logs.
At this point, check the access to the web page set up in the previous exercises.
Exercise 22-4: Modify the Web Server to Provide Access to Group-Managed Contents
This exercise should be done on server1.
In this exercise, you will modify the functionality of the web server configured and updated in the previous exercises to provide access to a directory called privgrp for group collaboration. You will restrict access to this directory for dba group members only. Do not change what was done in the previous three exercises.
1. Create the directory for group-managed contents in DocumentRoot:
# mkdir /var/privgrp
2. Create group dba (if it does not exist) and add user10 and user11 as its members:
# groupadd dba ; usermod –G dba user10 ; usermod –G dba user11
3. Change the owning group to dba and permissions to 0771 on the directory:
# chgrp dba /var/privgrp ; chmod 0771 /var/privgrp
4. Create an index.html file in the directory:
# vi /var/privgrp/index.html
This is webserver1 (exercise 22-4) providing dba group members access to a directory.
5. Add SELinux file context with type httpd_sys_content_t on the /var/privgrp directory to the SELinux policy:
# semanage fcontext –at httpd_sys_content_t “/var/privgrp(/.*)?”
6. Apply the new rule to the directory:
# restorecon –Rv /var/privgrp
restorecon reset /var/privgrp context unconfined_u:object_r:var_t:s0->unconfined_u:object_r:httpd_sys_content_t:s0
7. Open the /etc/httpd/conf/httpd.conf file and modify the following directives:
ServerAdmin root@webserver1.example.com
ServerName webserver1.example.com
DocumentRoot “/var”
<Directory /var/privusr>
AllowOverride AuthConfig
</Directory>
<Directory /var/privgrp>
AllowOverride AuthConfig
</Directory>
8. Check the syntax of the httpd.conf file for any errors:
# httpd –t
Syntax OK
9. Create the .htaccess file in the /var/privgrp directory and add the following to it:
# cd /var/privgrp ; vi .htaccess
AuthType Basic
AuthName “Password-protected Group Contents. Enter your credentials to log in:”
AuthUserFile “/etc/httpd/conf/.grouppassworddb”
AuthGroupFile “/etc/httpd/conf/.groupdb”
Require group dba
10. Create AuthGroupFile (/etc/httpd/conf/.userdb) and add group information:
# cd /etc/httpd/conf ; vi .groupdb
dba: user10 user11
11. Change the owning group on the AuthGroupFile file to apache, and permissions to 0640:
# chgrp apache .groupdb ; chmod 0640 .groupdb
12. Set passwords for group members user10 and user11, and store them in the AuthUserFile (/etc/httpd/conf/.grouppassworddb) using the htpasswd command:
# htpasswd –c .grouppassworddb user10
New password:
Re-type new password:
Adding password for user user10
# htpasswd .grouppassworddb user11
New password:
Re-type new password:
Adding password for user user11
13. Restart the Apache web service:
# systemctl restart httpd
14. Test the configuration for user10 and user11 from local and remote systems using the Firefox browser:
http://webserver1.example.com/privgrp
Run the tail command on the error_log and access_log files located in the /var/log/httpd directory to view error and access logs.
At this point, check the access to the web pages set up in the previous exercises.
Exercise 22-5: Modify the Web Server to Limit Access to Select Hosts on a Non-Default Port
This exercise should be done on server1.
In this exercise, you will modify the functionality of the web server configured and updated in the previous exercises to allow access from systems in the example.com domain and 192.168.1 network only, and via port 8989. Do not make any other changes.
1. Modify the previous /etc/httpd/conf/httpd.conf file contents as follows:
ServerAdmin root@webserver1.example.com
ServerName webserver1.example.com:8989
DocumentRoot “/var”
<Directory /var/privusr>
AllowOverride AuthConfig
Require host example.com
Require ip 192.168.1.0/24
</Directory>
<Directory /var/privgrp>
AllowOverride AuthConfig
Require host example.com
Require ip 192.168.1.0/24
</Directory>
![]() You can add the .htaccess file contents set up in the previous exercises for user and group access to private contents directly to the httpd.conf file in their respective directory containers. This method is preferred.
You can add the .htaccess file contents set up in the previous exercises for user and group access to private contents directly to the httpd.conf file in their respective directory containers. This method is preferred.
2. Check the syntax of the httpd.conf file for any errors:
# httpd –t
3. Restart the Apache web service.
4. Add TCP port 8989 to the default firewalld zone:
# firewall-cmd --permanent --add-port 8989/tcp ; firewall-cmd --reload
5. Add TCP port 8989 with SELinux type http_port_t to the SELinux policy, and confirm:
# semanage port –at http_port_t –p tcp 8989
# semanage port –l | grep ^http_port_t
http_port_t tcp 8989, 80, 81, 443, 488, 8008, 8009, 8443, 9000
6. Test the configuration from systems in the example.com domain and on 192.168.1.0/24 network by typing the following URLs in the Firefox browser:
http://webserver1.example.com:8989/privusr
http://webserver1.example.com:8989/privgrp
You can run the tail command on the error_log and access_log files located in the /var/log/httpd directory to view error and access logs.
Understanding and Configuring Apache Virtual Hosts
Apache allows us to run multiple virtual hosts on a single system for shared hosting of several distinct websites. This technique offers a low-cost hosting solution for customers. Each hosted website can either share a common IP address or be configured with a unique IP. Both mechanisms direct the inbound web traffic to an appropriate virtual host.
Virtual Host Configuration File
The primary configuration file for defining virtual hosts is httpd.conf; however, a preferred approach is to have a separate file for each virtual host stored in the /etc/httpd/conf.d directory to avoid cluttering httpd.conf. Common directives used within a virtual host container are ServerAdmin, ServerName, DocumentRoot, ErrorLog, CustomLog, and are explained in Table 22-3 earlier in this chapter. In addition, the Require directive may also be used for access control.
A sample container for a virtual host is provided below to understand its syntax:
<VirtualHost *:80>
DocumentRoot /var/www/html/vh1.example.com
ServerAdmin admin@vh1.example.com
ServerName vh1.example.com
ErrorLog logs/vh1.example.com-error_log
CustomLog logs/vh1.example.com-access_log common
</VirtualHost>
As you can visualize, the syntax of a virtual host container is identical to that of the Apache web servers that were configured in the previous section with the exception of the enclosure name. If you store this container in a file, such as vh1.example.com.conf, and place it in the /etc/httpd/conf.ddirectory, you should be able to use it as an additional web server running on your system after making some necessary changes on the system.
Virtual host configuration files are checked for syntax errors with the httpd command as follows:
# httpd –D DUMP_VHOSTS
AH00112: Warning: DocumentRoot [/var/www/html/vh1.example.com] does not exist
VirtualHost configuration:
*:80 is a NameVirtualHost
default server vh1.example.com (/etc/httpd/conf.d/vh1.example.com.conf:1)
port 80 namevhost vh1.example.com (/etc/httpd/conf.d/vh1.example.com.conf:1)
port 80 namevhost vh1.example.com (/etc/httpd/conf.d/vh1.example.com.conf:1)
Exercise 22-6: Configure a Simple Virtual Host
This exercise should be done on server1.
For this exercise, it is assumed that httpd and elinks software packages are already installed, the http service is enabled in the firewall, and it is configured to autostart at system reboots.
In this exercise, you will configure a virtual host called vhost1.example.com with alias vhost1. You will test the virtual host’s functionality by accessing it from the elinks web browser.
1. Create a file in the /etc/httpd/conf.d directory called vhost1.conf containing the following text:
# vi /etc/httpd/conf.d/vhost1.conf
<VirtualHost *:80>
ServerAdmin admin@vhost1.example.com
DocumentRoot /var/www/html/vhost1
ServerName vhost1.example.com
ErrorLog logs/vhost1-error_log
CustomLog logs/vhost1-access_log combined
</VirtualHost>
2. Create DocumentRoot for storing web contents:
# mkdir /var/www/html/vhost1
3. Create an index.html file in DocumentRoot with some text:
# vi /var/www/html/vhost1/index.html
This web page is to test virtual host for Exercise 22-6.
4. Check the syntax of the virtual host configuration for any errors:
# httpd –D DUMP_VHOSTS
VirtualHost configuration:
*:80 is a NameVirtualHost
default server vhost1.example.com (/etc/httpd/conf.d/vhost1.conf:1)
port 80 namevhost vhost1.example.com (/etc/httpd/conf.d/vhost1.conf:1)
port 80 namevhost vhost1.example.com (/etc/httpd/conf.d/vhost1.conf:1)
5. Open the /etc/hosts file and modify the server1 entry to look like:
192.168.0.110 server1.example.com server1 webserver1.example.com webserver1 \ vhost1.example.com vhost1
Make the above change to the hosts file on server2 and host1 as well, so that you can test access to this virtual host from there.
6. Restart the Apache server process:
# systemctl restart httpd
7. Test access from both local and remote systems using elinks:
# elinks http://vhost1.example.com
Run the tail command on vhost1-access_log file in the /var/log/httpd directory to view messages.
Exercise 22-7: Configure a More Complex Virtual Host
This exercise should be done on server1.
For this exercise, it is assumed that httpd and elinks software packages are already installed, and the http service is configured to autostart at system reboots.
In this exercise, you will configure a virtual host called vhost2.example.com with alias vhost2, DocumentRoot /var/vhost2, and port 8900. You will make necessary adjustments in firewalld and SELinux configuration. You will test the virtual host’s functionality by accessing it from the elinks web browser.
1. Create a file in the /etc/httpd/conf.d directory called vhost2.conf containing the following text:
# vi /etc/httpd/conf.d/vhost2.conf
<VirtualHost *:8900>
ServerAdmin admin@vhost2.example.com
DocumentRoot /var/vhost2
ServerName vhost2.example.com
ErrorLog logs/vhost2-error_log
CustomLog logs/vhost2-access_log combined
</VirtualHost>
2. Create DocumentRoot for storing web contents:
# mkdir /var/vhost2
3. Create an index.html file in DocumentRoot with some text:
# vi /var/vhost2/index.html
This web page is to test a more complex virtual host setup for Exercise 22-7.
4. Check the syntax of the virtual host configuration for any errors:
# httpd –D DUMP_VHOSTS
VirtualHost configuration:
*:8900 is a NameVirtualHost
default server vhost2.example.com (/etc/httpd/conf.d/vhost2.conf:1)
port 8900 namevhost vhost2.example.com (/etc/httpd/conf.d/vhost2.conf:1)
port 8900 namevhost vhost2.example.com (/etc/httpd/conf.d/vhost2.conf:1)
5. Open the /etc/hosts file and modify the server1ipv4 entry to look like:
192.168.0.111 server1ipv4.example.com server1ipv4 vhost2.example.com vhost2
Make the above change to the hosts file on server2 and host1 as well, so that you can test access to this virtual host from there.
6. Add SELinux file context with type httpd_sys_content_t on the /var/vhost2 directory to the SELinux policy:
# semanage fcontext –at httpd_sys_content_t “/var/vhost2(/.*)?”
7. Apply the new rule to DocumentRoot recursively:
# restorecon –Rv /var/vhost2
restorecon reset /var/vhost2 context unconfined_u:object_r:var_t:s0->unconfined_u:object_r:httpd_sys_content_t:s0
restorecon reset /var/vhost2/index.html context unconfined_u:object_r:var_t:s0->unconfined_u:object_r:httpd_sys_content_t:s0
8. Add TCP port 8900 with SELinux type http_port_t to the SELinux policy and confirm:
# semanage port –at http_port_t 8900 –p tcp
# semanage port –l | grep 8900
http_port_t tcp 8900, 8989, 80, 81, 443, 488, 8008, 8009, 8443, 9000
9. Add TCP port 8900 to the default firewalld zone:
# firewall-cmd --permanent --add-port 8900/tcp ; firewall-cmd --reload
10. Restart the Apache server process:
# systemctl restart httpd
11. Test access from both local and remote systems using elinks:
# elinks http://vhost2.example.com
Run the tail command on vhost2-access_log file in the /var/log/httpd directory to view messages.
EXAM TIP: The standard web server as well as all standard and secure virtual hosts that you will configure during the exam, must be operational and accessible via a web browser.
Understanding and Configuring Apache Web Servers over SSL/TLS
Secure Sockets Layer (SSL) is a cryptographic protocol that allows networked systems to communicate securely. SSL can be used with the Transport Layer Security (TLS) protocol to add data integrity, privacy, and secure authentication. With a combination of both protocols, in-transit data is safeguarded against eavesdropping, unauthorized access, and data tampering. Apache web servers that operate on top of SSL and TLS layers may be referred to as HTTPS (HyperText Transfer Protocol Secure) or SSL web servers. An HTTPS server uses a digital identity certificate in order to prove its authenticity to clients when they attempt to form a connection, and to establish a two-way encrypted communication channel for exchange of data with them. A trusted digital identity certificate is signed and issued by a Certificate Authority (CA). To obtain one, the applicant generates a private/public encryption key pair and a Certificate Signing Request (CSR) on the server for which the certificate is desired. The CSR contains applicant identity, such as company details and contact information, as well as the public key and the hostname of the system. The CSR is encoded before it is transmitted to the CA. The CA reviews the CSR and issues a signed certificate after validating the data provided in the CSR.
Another type of digital certificates is referred to as a self-signed certificate. A self-signed certificate is produced locally on the system, and it is primarily used for testing purposes. During its creation, you can skip answering most identity questions.
HTTPS/SSL Software Packages
There are two software packages that need to be installed on the system to set up an HTTPS web server. These packages add necessary support to the kernel, and bring the tools and configuration files that are used for setting up secure web services. These packages are described in Table 22-9.
|
Package |
Description |
|
mod_ssl |
Provides configuration files necessary to configure a secure web server over SSL and TLS layers. |
|
openssl |
Manages certificates, and supports secure communication between systems. |
Table 22-9 HTTPS/SSL Software Packages
The installation of mod_ssl installs the ssl.conf file in the /etc/httpd/conf.d directory, which is the configuration file for setting up a secure web server. This file is equivalent to the httpd.conf file that is used for non-secure Apache web servers. The openssl package loads the openssl command and a directory tree with some templates under /etc/pki. You may use the yum command as demonstrated below to check the install status of these packages:

The OpenSSL Toolkit
The openssl toolkit offers a variety of subcommands to create and manage encryption keys, CSRs, and digital certificates, test HTTPS server and client connections, and so on. If called without any arguments, openssl enters the interactive mode with an OpenSSL> prompt, allowing us to run the subcommands directly from this prompt. There are some 110 subcommands and are divided into three sets: standard, cipher (encoding and encryption), and message-digest (detection of and protection against data corruption). You can list subcommands for each set by running the openssl command as follows:
# openssl list-standard-commands
# openssl list-cipher-commands
# openssl list-message-digest-comands
The OpenSSL Configuration File and its Analysis
By default, the SSL configuration file, ssl.conf, is stored in the /etc/httpd/conf.d directory. An ll on the file produces the following output:
# ll /etc/httpd/conf.d/ssl.conf
-rw-r--r--. 1 root root 9426 Mar 20 2014 ssl.conf
This file is processed after the httpd.conf file completes its processing at Apache service startup or reload. This file sets directives necessary to run secure web servers. It is divided into two sections: SSL Global Context and SSL Virtual Host Context. One directive, “Listen 443 https”, that is defined at the beginning of the file is not part of either section. It indicates the default port that the secure web server listens on.
The SSL Global Context section includes directives that apply to the default secure server and to all secure virtual hosts. These directives are not typically modified, as their default values are sufficient for most implementations.
The SSL Virtual Host Context section contains plenty of directives. Some of them are presented below with their default values:
## SSL Virtual Host Context
<VirtualHost _default_:443>
#DocumentRoot "/var/www/html"
#ServerName www.example.com:443
ErrorLog logs/ssl_error_log
TransferLog logs/ssl_access_log
LogLevel warn
SSLEngine on
SSLProtocol all -SSLv2
SSLCertificateFile /etc/pki/tls/certs/host1.crt
SSLCertificateKeyFile /etc/pki/tls/private/host1.key
<Files ∼ "\.(cgi|shtml|phtml|php3?)$">
SSLOptions +StdEnvVars
</Files>
<Directory "/var/www/cgi-bin">
SSLOptions +StdEnvVars
</Directory>
CustomLog logs/ssl_request_log \
"%t %h %{SSL_PROTOCOL}x %{SSL_CIPHER}x \"%r\" %b"
</VirtualHost>
The <VirtualHost _default_:443> directive identifies the port number with an IP address or *. The next five directives—DocumentRoot, ServerName, ErrorLog, TransferLog, and LogLevel—and the CustomLog directive before the end of the file, have the same meaning that was provided under the httpd.conf file analysis earlier in this chapter. The SSLEngine directive must be set to on if you intend to use SSL. The next three directives—SSLProtocol, SSLCertificateFile, and SSLCertificateKeyFile—specify the SSL version to use, the location of the SSL certificate, and the location of the SSL key. The <Files> and <Directory> sub-containers specify the file types containing dynamic contents and their location.
OpenSSL Log Files
OpenSSL log files are located in the /var/log/httpd directory, which is symbolically linked from the /etc/httpd/logs directory. An ll on this directory for ssl logs is shown below. The ssl_access_log, ssl_error_log, and ssl_request_log files capture access to the web server, error messages, and request messages, respectively.

It is recommended to use separate log files for each website.
Exercise 22-8: Generate a Key Pair and Self-Signed Certificate
This exercise should be done on server1.
In this exercise, you will generate encryption keys and a self-signed certificate for use in the next exercise using the openssl command. You will move the key file to the default location.
1. Install mod_ssl and openssl software packages:
# yum –y install mod_ssl openssl
…… . .
Installed:
mod_ssl.x86_64 1:2.4.6-17.el7
openssl.x86_64 1:1.0.1e-34.el7
Complete!
2. Change into the /etc/pki/tls/certs directory and generate a private key of size 2048 bits using the RSA algorithm. Save the key in a file called server1.example.com.key.
# cd /etc/pki/tls/certs
# openssl genpkey –algorithm rsa –pkeyopt rsa_keygen_bits:2048 \
–out server1.example.com.key
……………………….+++
………………………………………………………………………………+++
You can view the man pages of the openssl command for details, and run ”openssl genpkey” to obtain help on the options used.
3. Create a certificate signing request using the private key generated in the previous step and store it in a file called server1.example.com.csr. Enter data as indicated in the output below:
# openssl req –new –key server1.example.com.key –out server1.example.com.csr
You are about to be asked to enter information that will be incorporated into your certificate request.
What you are about to enter is what is called a Distinguished Name or a DN.
There are quite a few fields but you can leave some blank
For some fields there will be a default value, If you enter '.', the field will be left blank.
-----
Country Name (2 letter code) [XX]:CA
State or Province Name (full name) []:Ontario
Locality Name (eg, city) [Default City]:Toronto
Organization Name (eg, company) [Default Company Ltd]:example
Organizational Unit Name (eg, section) []:example
Common Name (eg, your name or your server's hostname) []:server1.example.com
Email Address []:info@server1.example.com
Please enter the following 'extra' attributes
to be sent with your certificate request
A challenge password []:
An optional company name []:
4. Generate a self-signed certificate (server1.example.com.crt) with a validity of 120 days (–days) using the private key (server1.example.com.key) and certificate signing request (server1.example.com.csr) created in previous steps:
# openssl x509 –req –days 120 –signkey server1.example.com.key \
–in server1.example.com.csr –out server1.example.com.crt
Signature ok
subject=/C=CA/ST=Ontario/L=Toronto/O=example/OU=example/CN=server1.example.com/emailAddress=info@server1.example.com
Getting Private key
5. List the three files generated as a result:

6. Protect the private key with permissions 0600 and store it in the /etc/pki/tls/private directory:
# chmod 0600 server1.example.com.key ; mv server1.example.com.key ../private
7. Check the validity and status of the certificate using the openssl command:
# openssl s_client –connect localhost:443 –state
CONNECTED(00000003)
SSL_connect:before/connect initialization
SSL_connect:SSLv2/v3 write client hello A
SSL_connect:SSLv3 read server hello A
depth=0 C = --, ST = SomeState, L = SomeCity, O = SomeOrganization, OU = SomeOrganizationalUnit, CN = server1.example.com, emailAddress = root@server1.example.com
…… . .
Certificate chain
0 s:/C=--/ST=SomeState/L=SomeCity/O=SomeOrganization/OU=SomeOrganizationalUnit/CN=server1.example.com/emailAddress=root@server1.example.com
i:/C=--/ST=SomeState/L=SomeCity/O=SomeOrganization/OU=SomeOrganizationalUnit/CN=server1.example.com/emailAddress=root@server1.example.com
Server certificate
-----BEGIN CERTIFICATE-----
MIIEBjCCAu6gAwIBAgICGeIwDQYJKoZIhvcNAQELBQAwgbcxCzAJBgNVBAYTAi0t
MRIwEAYDVQQIDAlTb21lU3RhdGUxETAPBgNVBAcMCFNvbWVDaXR5MRkwFwYDVQQK
…… . .
This key and the certificate will be used in our next exercise.
Exercise 22-9: Configure a Secure Virtual Host
This exercise should be done on server1.
In this exercise, you will configure a secure virtual host on default port 443 using the encryption key and certificate generated in the previous exercise. You will make necessary adjustments in firewalld and SELinux configurations. You will test the web server’s functionality by accessing it from the elinks web browser.
1. Create DocumentRoot:
# mkdir /var/www/html/secure
2. Open the /etc/httpd/conf.d/ssl.conf file and modify the directives as per below. Leave other settings intact.
<VirtualHost *:443>
DocumentRoot “/var/www/html/secure”
ServerName server1.example.com:443
SSLCertificateFile /etc/pki/tls/certs/server1.example.com.crt
SSLCertificateKeyFile /etc/pki/tls/private/server1.example.com.key
</VirtualHost>
3. Check the syntax of the virtual host configuration for any errors:
# httpd –D DUMP_VHOSTS
VirtualHost configuration:
*:443 is a NameVirtualHost
default server server1.example.com (/etc/httpd/conf.d/ssl.conf:8)
port 443 namevhost server1.example.com (/etc/httpd/conf.d/ssl.conf:8)
port 443 namevhost server1.example.com (/etc/httpd/conf.d/ssl.conf:8)
4. Create index.html in DocumentRoot with some text:
# vi /var/www/html/secure/index.html
This web page is to test a more complex virtual host setup for Exercise 22-9.
5. Apply the default SELinux file context on the /var/www/html directory:
# restorecon –Rv /var/www/html
6. Add the https service to firewalld persistently and reload the rules to allow traffic on HTTP port 443:
# firewall-cmd --permanent --add-service=https ; firewall-cmd --reload
7. Restart the Apache service:
# systemctl restart httpd
8. Test access from both local and remote systems using elinks:
# elinks https://server1.example.com
Run the tail command on the server1-ssl_access_log file in /var/log/httpd to view what is going on.
Overview of CGI and CGI Scripts
So far, we have talked about web servers that show static web content in a browser window. These web servers read index.html files (and other data files with static information), and simply display that information as-is on the screen.
Apache allows us to add dynamic content to our websites. With this functionality added to a website, a program is executed in the background and its output is displayed on the screen when the website is accessed, rather than showing the program content itself. This interfacing between a program and web server can be implemented using the Common Gateway Interface (CGI) method. CGI presents a standard technique of generating dynamic content on websites using these programs, which are referred to as CGI Scripts. CGI scripts may be written in Perl, Ruby, Python, C, shell, or some other programing language. In fact, any program can be used as a CGI script. Some of the common uses of CGI scripts are to obtain user input, query or update backend databases, email input data, monitor web traffic, etc.
A very basic CGI script sets the type of content to process, such as text or text/html, followed by what to execute.
This section briefly describes the setup of a non-secure web server that executes a CGI script and display the output on the screen. The ScriptAlias directive in the httpd.conf file defines the location of storing CGI files.
Exercise 22-10: Deploy a Basic CGI Script
This exercise should be done on server1.
For this exercise, it is assumed that httpd and elinks software packages are already installed, the http service is enabled in the firewall, and it is configured to autostart at system reboots.
In this exercise, you will configure a web server to execute a CGI script and display its output in a browser window. You will configure appropriate SELinux settings.
1. Create a script called systime.sh in the /var/www/cgi-bin directory and add the following text to it:
# vi /var/www/cgi-bin/systime.sh
#!/bin/bash
echo “Content-type: text”
echo
echo “The current system time is `date`”
2. Add the execute permission to this script for everyone:
# chmod +x /var/www/cgi-bin/systime.sh
3. Activate the SELinux boolean httpd_enable_cgi:
# setsebool –P httpd_enable_cgi 1
4. Restart the Apache service:
# systemctl restart httpd
5. Test access from both local and remote systems using elinks:
# elinks http://server1/cgi-bin/systime.sh
Run the tail command on the server1-ssl_access_log file in /var/log/httpd to view what is going on. You can use the –lrt options with the ll command on the /var/log/httpd directory to see which log files have been recently updated.
Exercise 22-11: Run a Basic CGI Script from a non-default location
This exercise should be done on server1.
For this exercise, it is assumed that httpd and elinks software packages are already installed, the http service is enabled in the firewall, and it is configured to autostart at system reboots.
In this exercise, you will configure a web server to execute a CGI script and display its output in a browser window. You will store the CGI script in /var/dynpage directory. You will configure appropriate SELinux settings.
1. Create /var/dynpage directory to store CGI scripts:
# mkdir /var/dynpage
2. Create a script called sysmem.sh in the /var/dynpage directory with some text:
# vi /var/dynpage/sysmem.sh
#!/bin/bash
echo –e “Content-type: text\n”
echo
echo “The system memory usage is $(free –m) ”
3. Add the execute permission to this script for everyone:
# chmod +x /var/dynpage/sysmem.sh
4. Activate the SELinux boolean httpd_enable_cgi:
# setsebool –P httpd_enable_cgi 1
5. Add SELinux file context with type httpd_sys_script_exec_t on the /var/dynpage directory to the SELinux policy:
# semanage fcontext –at httpd_sys_script_exec_t “/var/dynpage(/.*)?”
6. Apply the new rule to the directory recursively:
# restorecon –Rv /var/dynpage
7. Open the httpd.conf file and modify the ScriptAlias directive and the location of the CGI scripts as follows:
ScriptAlias /cgi-bin/ “/var/dynpage/”
<Directory "/var/dynpage">
AllowOverride None
Options None
Require all granted
</Directory>
8. Restart the Apache service:
# systemctl restart httpd
9. Test access from both local and remote systems using elinks:
# elinks http://server1/cgi-bin/sysmem.sh
Run the tail command on the server1-ssl_access_log file in /var/log/httpd to view what is going on.
Chapter Summary
This chapter discussed Apache standard and secure web servers. It started with an overview of the HTTP protocol and standard Apache web service. The chapter presented Apache features, its daemon, commands, configuration files, log files, software packages, and access control, and provided an examination of the configuration file. After grasping the basics, the chapter presented a series of exercises with varying requirements to configure standard web services on the system to strengthen the concepts learned. The chapter’s focus shifted to virtual web hosting, an Apache feature that supports the hosting of multiple secure and non-secure websites on a single system, and presented a demonstration of setting up two virtual hosts.
The following topic covered another Apache feature that allows the configuration of secure websites. Under this topic, a discussion of the SSL toolkit and secure web server configuration file was provided, followed by an exercise on how to generate a self-signed certificate and another one on how to configure a secure website using that certificate were offered.
Finally, the chapter explained the role of CGI scripts in building dynamic web pages and demonstrated their use.
Chapter Review Questions
1. What would the directive setting “Require user user2 user3” do?
2. Why do we run the httpd command with the –t switch?
3. Where would you define the user-level security for Apache?
4. What is the significance of the ScriptAlias directive?
5. What are the ServerAdmin and ServerName directives used for?
6. What would the directive setting “Require not host host1” do?
7. How does a virtual host container begin and end? Provide the syntax.
8. List three features of the Apache web server.
9. What would the SELinux boolean httpd_enable_cgi imply?
10. Can the apachectl command be used to start, restart, or stop the Apache web server daemon? Yes or no.
11. What is the use of the htpasswd command?
12. What is the use of the AuthUserFile directive?
13. What is the name and location of the standard web server configuration file?
14. What kind of a programming language is CGI?
15. What are the default ports used for standard and secure web servers?
16. What is a CSR?
17. What should be the SELinux type set on web content files?
18. Describe the use of ServerRoot and DocumentRoot directives.
19. What is the primary command in openssl software package?
20. Write the difference between a regular web server and a virtual host.
21. What is the default location for Apache log files?
22. What is the name and location of the secure web server’s configuration file?
23. What is the command “httpd –D DUMP_VHOSTS” used for?
24. What is the default name for the directive AccessFileName?
Answers to Chapter Review Questions
1. This directive setting would restrict the access to user2 and user3.
2. The httpd command with –t checks the syntax of the Apache configuration file, and reports errors if found.
3. The user-level security can be defined in the httpd.conf or .htaccess file.
4. The ScriptAlias directive defines the directory location for CGI scripts.
5. The ServerAdmin directive defines the administrator’s email address and the ServerName directive specifies the hostname of the web server.
6. This directive setting would disallow host1 from accessing the website.
7. <VirtualHost> marks the beginning and </VirtualHost> marks the ending of a virtual host container.
8. Three features of Apache include its ability to share a single IP address amongst multiple virtual hosts, support for LDAP authentication, and support to run on virtually every hardware platform and operating system software.
9. The httpd_enable_cgi directive enables or disables the use of CGI scripts.
10. Yes, the apachectl command can be used to perform these operations.
11. The htpasswd command creates and manages the files that store credentials for authorized users.
12. The AuthUserFile directive points to the file that stores authorized user passwords.
13. The standard configuration file is called httpd.conf and it is located in the /etc/httpd/conf directory.
14. CGI is not a programming language; it is an interface between the web server and a program.
15. The default ports used for standard and secure web servers are 80 and 443, respectively.
16. A CSR is a certificate signing request that is submitted to a CA to obtain a signed digital certificate.
17. The SELinux type httpd_sys_content_t should be set on web content files.
18. The ServerRoot directive specifies the directory location to store configuration, error, and log files, and the DocumentRoot directive defines the location to store website files.
19. The main tool provided in the openssl software package is called openssl.
20. A regular web server runs a single website, whereas, you can run as many virtual hosts on a single system as the hardware capacity of the system supports.
21. The Apache log files are located in the /var/log/httpd directory.
22. The secure web server’s configuration file is called ssl.conf and it is located in the /etc/httpd/conf.d directory.
23. The httpd command with –D DUMP_VHOSTS checks virtual host configuration information for errors.
24. The AccessFileName sets the file name where access control information is stored.
DIY Challenge Labs
The following labs are useful to strengthen the concepts and topics learned in this chapter. It is expected that you perform these labs without any additional help. A step-by-step guide is not provided, as the implementation of these labs requires the knowledge that has been presented in this chapter. Use defaults or your own thinking for missing information.
Lab 22-1: Configure a Web Server with User-Based and Host-Based Security
Establish the web service on port 80 to provide both user-based and host-based security. Create DocumentRoot /usr/local/webcnts and store index.html in it. Disallow user1 and members of dba group from example.com.
Lab 22-2: Configure a Web Server to Host Two Websites
Configure the web service to host two virtual hosts www.website1.com and www.website2.com to listen on ports 1001 and 1002, respectively.
Lab 22-3: Configure a Secure Virtual Host
Configure a secure virtual host on port 10101.
Lab 22-4: Deploy a CGI Script
Configure the web service to execute the for_do_done.sh script created in Chapter 14 “Writing Shell Scripts”.
All materials on the site are licensed Creative Commons Attribution-Sharealike 3.0 Unported CC BY-SA 3.0 & GNU Free Documentation License (GFDL)
If you are the copyright holder of any material contained on our site and intend to remove it, please contact our site administrator for approval.
© 2016-2026 All site design rights belong to S.Y.A.