RHCSA & RHCE Red Hat Enterprise Linux 7: Training and Exam Preparation Guide (EX200 and EX300), Third Edition (2015)
Part I. RHCSA Section
Chapter 2. Using Basic Linux Tools
This chapter describes the following major topics:
· Access the system remotely using ssh
· Access the command prompt
· General Linux commands and how to execute them
· Search text within files and command outputs
· Use basic compression and archiving tools
· Introduction to the vi editor
· Obtain Linux online help
RHCSA Objectives:
01. Access a shell prompt and issue commands with correct syntax
06. Archive, compress, unpack, uncompress files using tar, star, gzip, and bzip2
07. Create and edit text files
11. Locate, read, and use system documentation including man, info, and files in /usr/share/doc
RHEL systems can be accessed over the network using multiple ways. The most common of these methods is the use of the secure shell tool. This program is widely available and it is native on every UNIX and Linux system. It may be executed on Windows, UNIX, another RHEL, or systems with other Linux distributions running.
Linux offers a variety of commands for both privileged and non-privileged use. Privileged commands are for system management and intended solely for privileged users. Non-privileged commands do not require extra rights for execution and can be run with regular user rights. Knowledge of these commands is essential in order to work productively and administer the system efficiently. Normal and application users, and database and system administrators all need to edit text files on a regular basis as part of their job. This is normally done with a popular tool called vi. A sound working knowledge of this tool is essential for all these roles.
The availability of native help on the system makes life easier for both regular and privileged users. This assistance is available on commands and configuration files via locally installed searchable manual pages and documentation for installed packages.
Accessing a RHEL System Remotely
A user must log in to the Linux system in order to use it. The login process identifies the user to the system. Logging in and out at the console was demonstrated towards the end of Chapter 01 “Installing RHEL7 on Physical Computer Using Local DVD”. For accessing a RHEL system remotely, the most common tool is the ssh (secure shell) command. Secure shell software (both client and server packages) is loaded by default during RHEL7 installation, and is covered in detail in Chapter 13 “Securing Access with SSH and TCP Wrappers”. A graphical equivalent for the ssh client may be downloaded and run on MS Windows to access a RHEL system. The following sub-section provides basic information on how to use the ssh client from another Linux system, and from a Windows system to access host1.
Accessing from Another Linux System
The ssh command can be invoked on another Linux system with the hostname or IP address of the remote RHEL system specified. For example, if you are logged in as user1 on a Linux system and wish to access host1 as user1, run the command by specifying the IP address of host1 as follows:
$ ssh 192.168.0.100
The authenticity of host ‘192.168.0.100’ can’t be established.
RSA key fingerprint is 12:78:84:2a:38:47:12:0a:4b:e0:ec:67:b1:00:f6:85.
Are you sure you want to continue connecting (yes/no)? yes
Warning: Permanently added ‘192.168.0.100’ (RSA) to the list of known hosts.
user1@192.168.0.100’s password:
[user1@host1 ∼]$
Answer yes to the question and press Enter. This adds the system’s IP address to a file in user1’s home directory on the client. This message will not re-appear for this user on subsequent login attempts to host1 from this client. Enter user1’s valid password to be allowed in. After you are done, use either the exit or the logout command to log out. You may alternatively press Ctrl+d to log off.
If you wish to log on as a different user such as user2 (assuming user2 exists on host1), you may run ssh in either of the following ways:
$ ssh –l user1 192.168.0.100
$ ssh user1@192.168.0.100
In order to run graphical tools on host1 and have the output redirected to the local Linux system where you are issuing the command from, run ssh with the –X option to connect to host1 and execute a graphical application such as gnome-calculator.
$ ssh –X 192.168.0.100
Accessing from Windows
On the Windows side, several ssh client programs, such as puTTY, are available. puTTY may be downloaded free of charge from the Internet. Figure 2-1 shows the puTTY interface.
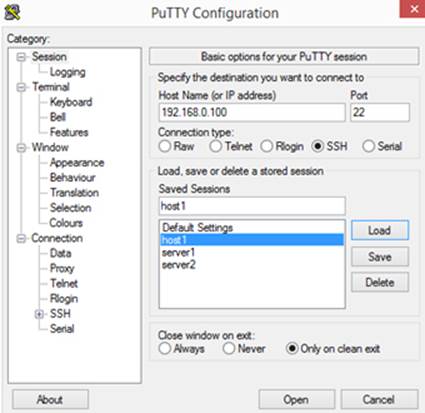
Figure 2-1 puTTY Interface
Enter the IP address of host1 and select the radio button next to SSH under the Connection Type heading. The ssh protocol uses port 22, which is exhibited in the Port field. Assign a name to this session (typically a hostname) in the Saved Sessions field and click Save to store this information so as to avoid retyping in the future. Now click Open to attempt a connection.
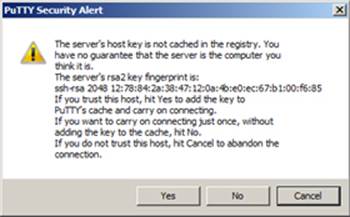
Figure 2-2 puTTY Security Alert
Click yes to the security alert question to get a login prompt. This alert will not re-appear on subsequent attempts. Enter a valid username and password to log in.
Common Linux Commands
There are hundreds of commands available in RHEL7. These commands range from simple to complicated ones. Some of them offer a few options, while others have as many as 70 or more, which we can use to produce outputs of our choice. This section provides an understanding of how commands are formed and then demonstrates the use of some of the commands commonly used in routine system administration.
Understanding the Command Syntax
To practice the commands provided in this chapter, you can log in as user1, run the commands, and observe their outputs. However, as you are learning system administration topics and have a desire to build your system administration skills, you need to feel comfortable working as root right from the beginning. host1 is your test system anyway, and can be rebuilt if something breaks.
Sign in as root either at the console or using ssh. At the same time, you should also have another window open as user1.
The basic syntax of a command is:
command option argument
You can specify zero or more options and arguments with a command. Some commands have default options and arguments that they use when executed, and you do not have to specify them. Other commands do require at least one option or argument in order to work. An option, a.k.a. a switchor flag, modifies the behavior of the command, and an argument supplies a target on which to perform the command action. The following examples show some command structures with the text on the right state the number of options and arguments supplied:
|
$ ls |
(no option, no argument; the default argument is the current directory name) |
|
$ ls –l |
(one option, no argument; the default argument is the current directory name) |
|
$ ls directory_name |
(no option, one argument) |
|
$ ls –l directory_name |
(one option, one argument) |
EXAM TIP: Use the available online help on the usage of a command if needed.
Listing Files and Directories
The ls (list) command produces a list of files and directories and displays it on the screen. It supports several options, some of which are listed in Table 2-1 along with a short description.
|
Option |
Description |
|
–a |
Lists hidden files also. If a file or directory name starts with a dot, it is considered hidden. |
|
–lh |
Displays long listing with file sizes in human readable format. |
|
–l |
Displays long listing with detailed file information including the file type, permissions, link count, owner, group, size, date and time of last modification, and name of the file. |
|
–ld |
Displays long listing of the specified directory, but hides its contents. |
|
–R |
Lists contents of the specified directory and all its sub-directories (recursive listing). |
|
–lt |
Lists all files sorted by date and time with the newest file first. |
|
–ltr |
Lists all files sorted by date and time with the oldest file first. |
Table 2-1 ls Command Options
The following examples will help you understand the impact of options used with the ls command. Log in as root to run these examples.
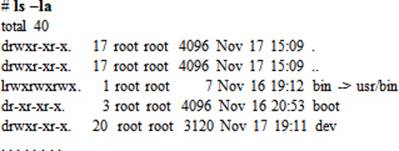
To list files in the current directory with an assumption that you are in the / directory:

To list files in the current directory with detailed information, use one of the following:
To list all files in the current directory with detailed information and sorted by date and time with the newest file first:
To display all files in the current directory with their sizes in human readable format:
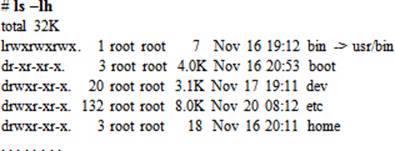
To list all files, including the hidden files, in the current directory with detailed information:
To list contents of the /etc directory recursively:
# ls –R /etc
< a very lengthy output will be generated >
Printing Working Directory
The pwd (print working directory) command displays a user’s current location in the directory tree. The following example shows that user1 is presently in the /home/user1 directory. Run it as user1.
$ pwd
/home/user1
Changing Directories
The cd (change directory) command is used to navigate the directory tree. Run the following commands as user1.
To change directory to /usr/bin:
$ cd /usr/bin
To go back to the home directory, issue either of the following:
$ cd
$ cd ∼
To go directly from /etc to a sub-directory dir1 under user1’s home directory, create dir1, as it does not currently exist:
$ mkdir –v dir1
mkdir: created directory ‘dir1’
$ cd ∼/dir1
![]() tilde ( ∼ ) is used as an abbreviation for the absolute pathname to a user’s home directory. Refer to Chapter 03 “Working with Files and File Permissions” to understand what an absolute path is.
tilde ( ∼ ) is used as an abbreviation for the absolute pathname to a user’s home directory. Refer to Chapter 03 “Working with Files and File Permissions” to understand what an absolute path is.
To go to the home directory of user1 from anywhere in the directory structure, use the ∼ character and specify the login name. Note that there is no space between ∼ and user1. This command is only successful if user1 has the execute permission bit set on their home directory at the public level. Refer to Chapter 03 “Working with Files and File Permissions” for details on file permissions.
$ cd ∼user1
Usage of the ∼ character as demonstrated, is called tilde substitution. Refer to Chapter 04 “Dealing with the Bash Shell, Processes, and Scheduling” for more information on tilde substitution.
To go to the root directory, use the forward slash character:
$ cd /
To switch between current and previous directories, issue the cd command with the dash character:
$ cd –
To go one directory up to the parent directory, use period twice:
$ cd ..
Showing the Terminal File
This command displays the terminal name we are currently logged on to:
$ tty
/dev/pts/0
Listing Currently Logged-In Users
The who command consults the /var/run/utmp file and presents a list of users currently logged on to the system:

The first column displays the username, the second column shows the terminal session name, the third and fourth columns show the date and time the user logged in, and the fifth column indicates if the terminal session is graphical (:0) or remote (IP address).
The who command shows information only about the user running it if executed with the “am i” arguments:
![]()
The w (what) command displays information similar to the who command, but in more detail. It also tells the length of time the user has been idle for, along with CPU utilization and current activity. On the first line, it shows the current system time, the length of time the system has been up for, number of users currently logged in, and the current average load on the system over the past 1, 5, and 15 minutes.

Inspecting System’s Uptime
The uptime command shows the system’s current time, how long it has been up for, number of users currently logged in, and average number of processes over the past 1, 5, and 15 minutes:
![]()
The output above shows that the current system time is 9:42 am, the system has been up for 7 days, 18 hours, and 32 minutes, there are three users currently logged in, and the system load averages over the past 1, 5, and 15 minutes are 0.00, 0.01, and 0.05, respectively.
Viewing User Login Name
The whoami (who am i) command displays the effective username of the person executing this command:
$ whoami
user1
The logname (login name) command shows the name of the real user who originally logged in to the system. If that user uses the su command to switch identity, the logname command, unlike the whoami command, still shows the real username.
$ logname
root
Examining User and Group Information
The id (identifier) command displays a user’s UID (user identifier), username, GID (group identifier), group name, all secondary groups the user is a member of, and SELinux security context:
$ id
uid=1000(user1) gid=1000(user1) groups=1000(user1),10(wheel) context=unconfined_u:unconfined_r:unconfined_t:s0-s0:c0.c1023
![]() Each user and group has a corresponding number (called UID and GID) for identification purposes. See Chapter 08 “Managing Users and Groups” for more information. For SELinux, see Chapter 11 “Controlling Access through Firewall and SELinux”.
Each user and group has a corresponding number (called UID and GID) for identification purposes. See Chapter 08 “Managing Users and Groups” for more information. For SELinux, see Chapter 11 “Controlling Access through Firewall and SELinux”.
The groups command lists all groups a user is a member of:
$ groups
user1 wheel
The first group listed is the primary group for the user who executed this command; all others are secondary (or supplementary) groups. Consult Chapter 08 “Managing Users and Groups” for further details.
Viewing History of Successful User Login Attempts
The last command reports the history of successful user login attempts and system reboots by reading the /var/log/wtmp file. This file keeps a record of all login and logout activities, including the login time, duration a user stayed logged in, and tty (where the user session took place). Consider the following examples.
To list all user login, logout, and system reboot occurrences, type the last command without any arguments:
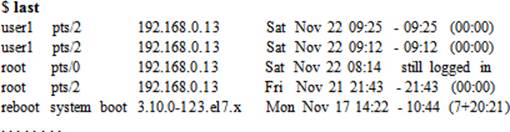
To list only system reboot details:

Viewing History of Failed User Login Attempts
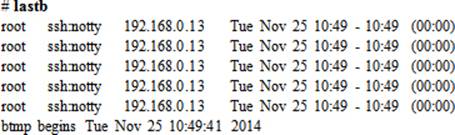
The lastb command reports the history of unsuccessful user login attempts by reading the /var/log/btmp file. This file keeps a record of all unsuccessful login attempts, including the login name, time, and tty (where the attempt was made). Consider the following examples.
To list all unsuccessful login attempts, type the lastb command without any arguments. You must be root to run this command.
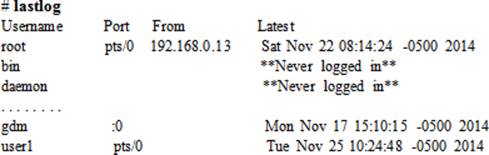
Displaying Recent User Logins
The lastlog command displays the recent user logins by reading the /var/log/lastlog file. This file keeps track of recent user login attempts. It also shows the users that have never logged in.
Viewing System Information
The uname command produces basic information about the system. Without any options, this command displays the operating system name only. You can use the –a option to get details.
# uname
Linux
# uname –a
Linux host1.example.com 3.10.0-123.el7.x86_64 #1 SMP Mon May 5 11:16:57 EDT 2014 x86_64 x86_64 x86_64 GNU/Linux
The information returned by the second command is:
|
Linux |
Kernel name |
|
host1.example.com |
Hostname of this system |
|
3.10.0-123.el7.x86_64 |
Kernel release |
|
#1 SMP Mon May 5 11:16:57 EDT 2014 |
Date and time of this kernel built |
|
x86_64 |
Machine hardware name |
|
x86_64 |
Processor type |
|
x86_64 |
Hardware platform |
|
GNU/Linux |
Operating system name |
Try running the uname command with the –s (kernel name), –n (node name), –r (kernel release), –v (kernel build date), –m (hardware name), –p (processor type), –i (hardware platform), and –o (OS name) options separately to view specific information.
Displaying and Setting Hostname
The hostnamectl command can be used to view or set the system hostname. Run this command without any options to view the hostname as well as the hardware information of the system it is running on:
# hostnamectl
Static hostname: host1.example.com
Icon name: computer-laptop
Chassis: laptop
Machine ID: 03858cff4a7b482e8b70a7cea28585b5
Boot ID: d451b5a5f1494ac1a371d859593e3a90
Operating System: Red Hat Enterprise Linux Server 7.0 (Maipo)
CPE OS Name: cpe:/o:redhat:enterprise_linux:7.0:GA:server
Kernel: Linux 3.10.0-123.el7.x86_64
Architecture: x86_64
To change the hostname to hostx.example.com:
# hostnamectl set-hostname hostx.example.com
To change the hostname back to host1.example.com:
# hostnamectl set-hostname host1.example.com
You can also use the hostname command to display the system name:
# hostname
host1.example.com
Clearing the Screen
The clear command clears the terminal screen and places the cursor at the beginning of the screen. We can alternatively use Ctrl+l for this purpose.
# clear
Displaying and Setting System Date and Time
The timedatectl command can be used to display and set the system date and time. Without any options, this command shows the current date and time:
|
# timedatectl |
|
|
Local time: |
Tue 2014-11-25 11:06:56 EST |
|
Universal time: |
Tue 2014-11-25 16:06:56 UTC |
|
RTC time: |
Tue 2014-11-25 16:06:56 |
|
Timezone: |
America/Toronto (EST, -0500) |
|
NTP enabled: |
yes |
|
NTP synchronized: |
yes |
|
RTC in local TZ: |
no |
|
DST active: |
no |
|
Last |
DST change: DST ended at |
|
Sun 2014-11-02 01:59:59 EDT |
|
|
Sun 2014-11-02 01:00:00 EST |
|
|
Next DST change: |
DST begins (the clock jumps one hour forward) at |
|
Sun 2015-03-08 01:59:59 EST |
|
|
Sun 2015-03-08 03:00:00 EDT |
|
To modify the current date to August 12, 2015:
# timedatectl set-time 2015-08-12
To change the time to 11am:
# timedatectl set-time 11:00
Alternatively, we can use the date command to view or modify the system date and time. To view the date and time:
# date
Wed Aug 12 11:00:03 EDT 2015
To modify the system date and time back to November 25, 2014 11:15, for instance, run the date command as follows:
# date --set “2014-11-25 11:15:00”
Tue Nov 25 11:15:00 EST 2014
Listing and Modifying System Timezone
The timedatectl command can also be used to list and modify the system timezone setting. To list all available timezones, run the command with list-timezones option:
# timedatectl list-timezones
Africa/Abidjan
Africa/Accra
Africa/Addis_Ababa
Africa/Algiers
Africa/Asmara
Africa/Bamako
…… . .
To change the time zone to America/Toronto, run the command as follows:
# timedatectl set-timezone America/Toronto
Confirm the new timezone value with the timedatectl command.
Displaying Command Path
The which command shows the path to the command that will execute if it is run without using its absolute path:
# which cat
/usr/bin/cat
The output means that the cat command will be executed from the /usr/bin directory if you run it without specifying its full path.
Counting Words, Lines, and Characters
The wc (word count) command displays number of lines, words, and characters (or bytes) contained in a text file or input supplied. For example, when you run this command on the /etc/profile file, you will see output similar to the following:
# wc /etc/profile
76 252 1750 /etc/profile
The first column indicates the number of lines (76) followed by the number of words (252), number of characters (or bytes) (1750), and file name (/etc/profile) in subsequent columns.
We can use the options listed in Table 2-2 to obtain the desired output.
|
Option |
Action |
|
–l |
Prints line count. |
|
–w |
Prints word count. |
|
–c |
Prints byte count. |
|
–m |
Prints character count. |
Table 2-2 wc Command Options
The following example displays only the number of lines in /etc/profile:
# wc –l /etc/profile
76 /etc/profile
Try running wc with the other options and review the results.
Listing PCI, USB, and CPU Device Information
Information about PCI, USB, and CPU devices can be gathered and displayed using commands such as lspci, lsusb, and lscpu.
The lspci command displays information about PCI buses and the devices attached to them. Specify –v, –vv, or –vvv for detailed output. With the –m option, this command produces more legible output.
# lspci –m
00:00.0 "Host bridge" "Intel Corporation" "2nd Generation Core Processor Family DRAM Controller" -r09 "Dell" "Device 0494"
00:01.0 "PCI bridge" "Intel Corporation" "Xeon E3-1200/2nd Generation Core Processor Family PCI Express Root Port" -r09 "" ""
00:02.0 "VGA compatible controller" "Intel Corporation" "2nd Generation Core Processor Family Integrated Graphics Controller" -r09 "Dell" "Device 0494"
…… . .
The lsusb command displays information about USB buses and the devices connected to them:
# lsusb
Bus 001 Device 002: ID 8087:0024 Intel Corp. Integrated Rate Matching Hub
Bus 002 Device 002: ID 8087:0024 Intel Corp. Integrated Rate Matching Hub
Bus 001 Device 001: ID 1d6b:0002 Linux Foundation 2.0 root hub
Bus 002 Device 001: ID 1d6b:0002 Linux Foundation 2.0 root hub
Bus 001 Device 003: ID 1bcf:2802 Sunplus Innovation Technology Inc.
Bus 002 Device 003: ID 0a5c:5800 Broadcom Corp. BCM5880 Secure Applications Processor
The lscpu command shows information about the processor, including its architecture, operating modes, count, vendor, family, model, speed, and the presence of virtualization support:
|
# lscpu |
|
|
Architecture: |
x86_64 |
|
CPU op-mode(s): |
32-bit, 64-bit |
|
Byte Order: |
Little Endian |
|
CPU(s): |
8 |
|
On-line CPU(s) list: |
0-7 |
|
Thread(s) per core: |
2 |
|
Core(s) per socket: |
4 |
|
Socket(s): |
1 |
|
NUMA node(s): |
1 |
|
Vendor ID: |
GenuineIntel |
|
CPU family: |
6 |
|
Model: |
42 |
|
Model name: |
Intel(R) Core(TM) i7-2760QM CPU @ 2.40GHz |
|
Stepping: |
7 |
|
CPU MHz: |
2901.187 |
|
BogoMIPS: |
4789.14 |
|
Virtualization: |
VT-x |
|
L1d cache: |
32K |
|
L1i cache: |
32K |
|
L2 cache: |
256K |
|
L3 cache: |
6144K |
|
NUMA node0 CPU(s): |
0-7 |
Compression Tools
Compression tools are used to compress one or more files or an archive to save space. Once a compressed archive is created, it can be copied to a remote system faster than a non-compressed archive. Compression tools may be used with archive commands, such as tar, to create a single compressed archive of hundreds of files and directories. RHEL provides a number of compression tools, such as bzip2 (bunzip2) and gzip (gunzip), that can be used for this purpose.
Using gzip and gunzip
The gzip command creates a compressed file of each of the files specified at the command line and adds the .gz extension to each one of them.
To compress files anaconda-ks.cfg and initial-setup-ks.cfg in the /root directory, issue the following gzip command, and then list them:

To uncompress the files, run either of the following commands on each file:
# gunzip /root/anaconda-ks.cfg.gz
# gzip –d /root/initial-setup-ks.cfg.gz
Check the files after the decompression using the ll command.
Using bzip2 and bunzip2
The bzip2 command creates a compressed file of each of the files specified at the command line and adds the .bz2 extension to each one of them.
To compress files anaconda-ks.cfg and initial-setup-ks.cfg in the /root directory, issue the following bzip2 command, and then list them:

To uncompress the files, run either of the following commands on each file:
# bunzip2 /root/anaconda-ks.cfg.bz2
# bzip2 –d /root/initial-setup-ks.bz2
Check the files after the decompression using the ll command.
Archiving Tools
RHEL offers many native tools that can be utilized to archive files for storage or distribution. These tools include tar and star, both of which have the ability to preserve general file attributes, such as ownership, group membership, and timestamp. The following sub-sections discuss these tools in detail.
Using tar
The tar (tape archive) command creates, appends, updates, lists, and extracts files to and from a single file, which is called a tar file (also a tarball). This command has the ability to archive SELinux file contexts as well as any extended attributes set on files. It can also be instructed to compress an archive while it is being created.
tar supports several options, some of which are summarized in Table 2-3.
|
Switch |
Definition |
|
–c |
Creates a tarball. |
|
–f |
Specifies a tarball name. |
|
–j |
Compresses a tarball with bzip2 command. |
|
–r |
Appends files to the end of an existing tarball. Does not append to compressed tarballs. |
|
–t |
Lists contents of a tarball. |
|
–u |
Appends files to the end of an existing tarball if the specified files are newer. Does not append to compressed tarballs. |
|
–v |
Verbose mode. |
|
–x |
Extracts from a tarball. |
|
–z |
Compresses a tarball with gzip command. |
|
--selinux |
Includes (excludes) SELinux file contexts in archives. |
|
--xattrs |
Includes (excludes) extended file attributes in archives. |
Table 2-3 tar Command Options
A few examples have been provided below to elucidate the usage of tar. Note that the use of the – character is optional.
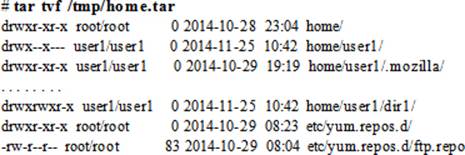
To create a tarball called /tmp/home.tar of the entire /home directory tree:
# tar cvf /tmp/home.tar /home
tar: Removing leading `/' from member names
/home/
/home/user1/
/home/user1/.mozilla/
/home/user1/.mozilla/extensions/
…… . .
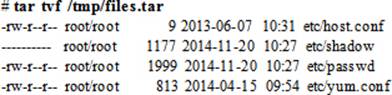
To create a tarball called /tmp/files.tar containing multiple files from the /etc directory:
# tar cvf /tmp/files.tar /etc/host.conf /etc/shadow /etc/passwd /etc/yum.conf
To append files located in the /etc/yum.repos.d directory to home.tar:
# tar rvf /tmp/home.tar /etc/yum.repos.d
To list the contents of home.tar:
To list the contents of files.tar:
To restore /home from home.tar:
# tar xvf /tmp/home.tar
To extract files from files.tar in the /tmp directory:
# cd /tmp
# tar xvf /tmp/files.tar
To create a tarball called /tmp/home.tar.gz of the /home directory and compress it with gzip:
# tar cvzf /tmp/home.tar.gz /home
To create a tarball called /tmp/home.tar.bz2 of the /home directory and compress it with bzip2:
# tar cvjf /tmp/home.tar.bz2 /home
EXAM TIP: Archiving and compression are tasks done together to produce smaller archive files.
To list both compressed archives and check which of the two is smaller:

To create a tarball called /tmp/extattr.tar.bz2 of the files in /home directory and include their extended attributes as well as SELinux contexts, and compress the archive with bzip2:
# tar cvj --selinux --xattrs –f /tmp/extattr.tar.bz2 /home
Using star
The star (standard tar) command is an enhanced version of tar. It also supports SELinux security contexts and extended file attributes. Options for creating, listing, appending, updating, and extracting tarballs are the same as the tar command’s. This utility is not installed by default; however, we can install the star package to install it.
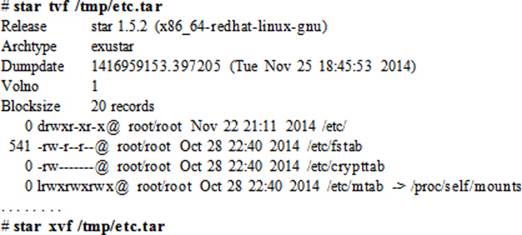
To create a tarball /tmp/etc.tar containing the entire /etc directory with all extended file attributes and SELinux file contexts, run this command:
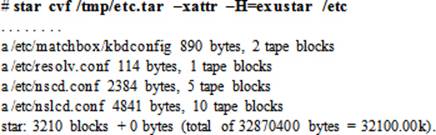
To list and extract, run the following respectively:
The vi (vim) Editor
The vi editor is an interactive, full-screen visual text editing tool that allows you to create and modify text files. This tool is available as a standard editor in all vendor UNIX versions and Linux distributions, and it does not require the graphical capability to run and be used. All text editing within vi takes place in a buffer (a small chunk of memory used to hold updates being done to the file). Changes can either be written to the disk or discarded. A graphical version of the vim editor, called gvim, is available on the RHEL7 installation DVD and can be installed.
It is essential for you as a system administrator to master the vi editor skills. The following sub-sections provide details on how to use and interact with this tool.
Modes of Operation
The vi editor essentially has three modes of operation: the Command mode, the Edit mode, and the Last Line mode.
The command mode is the default mode of vi. The vi editor places you into this mode when you start it. While in the command mode, you can carry out tasks such as copy, cut, paste, move, remove, replace, change, and search on text, in addition to performing navigational operations. This mode is also known as the escape mode because the Esc key is pressed to enter it.
In the input mode, anything you type at the keyboard is entered into the file as text. Commands cannot be run in this mode. The input mode is also called the edit mode or the insert mode. To return to the command mode, press the Esc key.
While in the command mode, you may carry out advanced editing tasks on text by pressing the colon (:) character, which places the cursor at the beginning of the last line of the screen, and hence it is referred to as the last line mode. This mode is considered a special type of command mode.
Starting vi
The vi editor may be started in one of the ways described in Table 2-4. Use the vimtutor command to view the man pages of vi.
|
Method |
Description |
|
vi |
Starts vi and opens up an empty screen to enter text. We can save or discard the entered text at a later time. |
|
vi existing_file |
Starts vi and loads the specified file for editing or viewing. |
|
vi new_file |
Starts vi and creates the specified file when saved. |
Table 2-4 Starting vi
Inserting text
To enter text, issue one of the commands described in Table 2-5 from the command mode to switch into the edit mode.
|
Command |
Action |
|
i |
Inserts text before the current cursor position. |
|
I |
Inserts text at the beginning of the current line. |
|
a |
Appends text after the current cursor position. |
|
A |
Appends text at the end of the current line. |
|
o |
Opens up a new line below the current line. |
|
O |
Opens up a new line above the current line. |
Table 2-5 Inserting Text
Press the Esc key when done to return to the command mode.
Navigating within vi
Table 2-6 elaborates key sequences that control the cursor movement while in vi.
|
Command |
Action |
|
h / left arrow / Ctrl+h |
Moves left (backward) one character. We may type a number before this command to move that many characters. For example, 2h would move two characters to the left. |
|
j / down arrow |
Moves down one line. We may type a number before this command to move down that many lines. For example, 2j would move down two lines. |
|
k / up arrow |
Moves up one line. We may type a number before this command to move up that many lines. For example, 2k would move up two lines. |
|
l / right arrow / Spacebar |
Moves right (forward) one character. We may type a number before this command to move that many characters. For example, 2l would move two characters to the right. |
|
w |
Moves forward one word. |
|
b |
Moves backward one word. |
|
e |
Moves forward to the last character of the next word. |
|
$ |
Moves to the end of the current line. |
|
0 |
Moves to the beginning of the current line. |
|
Enter |
Moves down to the beginning of the next line. |
|
Ctrl+f / Page Down |
Moves forward (scrolls down) to the next page. |
|
Ctrl+b / Page Up |
Moves backward (scrolls up) to the previous page. |
|
]] |
Moves to the last line of the file. |
|
[[ |
Moves to the first line of the file. |
Table 2-6 Navigating within vi
Deleting Text
Commands listed in Table 2-7 carry out delete operations while in the command mode.
|
Command |
Action |
|
x |
Deletes the character at the current cursor position. We may type a number before this command to delete that many characters. For example, 2x would remove two characters. |
|
X |
Deletes the character before the current cursor location. We may type a number before this command to delete that many characters. For example, 2X would remove two characters. |
|
dw |
Deletes the word or part of the word to the right of the current cursor location. We may type a number before this command to delete that many words. For example, 2dw would remove two words. |
|
dd |
Deletes the current line. We may type a number before this command to delete that many lines. For example, 2dd would remove two lines (current line plus next line). |
|
D |
Deletes at the current cursor position to the end of the current line. |
|
:6,12d |
Deletes lines 6 through 12. |
Table 2-7 Deleting Text
Undoing and Repeating
Table 2-8 explicates the commands that undo the last change made and repeat the last command run.
|
Command |
Action |
|
u |
Undoes the last command. |
|
U |
Undoes all the changes done on the current line. |
|
:u |
Undoes the previous last line mode command. |
|
. (dot) |
Repeats the last command run. |
|
Ctrl+r |
Repeats the last undone command. |
Table 2-8 Undoing and Repeating
Searching and Replacing Text
Search and replace text functions are performed using the commands mentioned in Table 2-9.
|
Command |
Action |
|
/string |
Searches forward for a string. |
|
?string |
Searches backward for a string. |
|
n |
Finds the next occurrence of a string. This would only work if we have run either a forward or a backward string search. |
|
N |
Finds the previous occurrence of a string. This would only work if we have run either a forward or a backward string search. |
|
:%s/old/new |
Searches and replaces the first occurrence of old with new. For example, to replace the first occurrence of profile with Profile, we would use :%s/profile/Profile. |
|
:%s/old/new/g |
Searches and replaces all occurrences of old with new. For example, to replace all the occurrences of profile with Profile in a file, we would use :%s/profile/Profile/g. |
Table 2-9 Searching and Replacing Text
Copying, Moving, and Pasting Text
Table 2-10 describes the vi commands to perform copy, move, and paste functions.
|
Command |
Action |
|
yl |
Yanks the current letter into the buffer. We may specify a number before this command to yank that many letters. For example, 2yl would yank two characters. |
|
yw |
Yanks the current word into the buffer. We may specify a number before this command to yank that many words. For example, 2yw would yank two words. |
|
yy |
Yanks the current line into the buffer. We may specify a number before this command to yank that many lines. For example, 2yy would yank two lines. |
|
p |
Pastes yanked data below the current line. |
|
P |
Pastes yanked data above the current line. |
|
:1,3co5 |
Copies lines 1 through 3 and pastes them after line 5. |
|
:4,6m8 |
Moves lines 4 through 6 after line 8. |
Table 2-10 Copying, Moving, and Pasting Text
Changing Text
Use the commands given in Table 2-11 to change text. Some of these commands will switch you into the edit mode. To return to the command mode, press the Esc key.
|
Command |
Action |
|
cl |
Changes the letter at the current cursor location. |
|
cw |
Changes the word (or part of the word) at the current cursor location to the end of the current word. |
|
C |
Changes text at the current cursor position to the end of the current line. |
|
r |
Replaces the character at the current cursor location with the character entered following this command. |
|
R |
Overwrites or replaces the text on the current line. |
|
J |
Joins the current line and the line below it. |
|
xp |
Switches the position of the character at the current cursor position with the character to the right of it. |
|
∼ |
Changes the letter case (uppercase to lowercase, and vice versa) at the current cursor location. |
Table 2-11 Changing Text
Saving and Quitting vi
When you are done with modifications, you will want to save or discard them. Commands listed in Table 2-12 will help.
|
Command |
Action |
|
:w |
Writes changes into the file without quitting vi. |
|
:w file2 |
Writes changes into a new file called file2 without quitting vi. |
|
:w! |
Writes changes to the file even if the file owner does not have write permission on the file. |
|
:wq |
Writes changes to the file and quits vi. |
|
:wq! |
Writes changes to the file and quits vi even if the file owner does not have write permission on the file. |
|
:q |
Quits vi if no modifications were made. |
|
:q! |
Quits vi if modifications were made, but we do not wish to save them. |
Table 2-12 Saving and Quitting vi
Online Help
While working on the system, you may require help to obtain information about a command, its usage, and available options. RHEL offers online help via man (manual) pages. Manual pages are installed as part of the package installation, and provide detailed information on commands andconfiguration files including short and long description, usage, options, bugs, additional references, and the author. In addition to the man pages, apropos, whatis, and info commands, as well as documentation located in the /usr/share/doc directory, are also available. These are also discussed in this section.
EXAM TIP: If you need help with a command or configuration file, do not hesitate to use the man pages or refer to the documentation available in the /usr/share/doc directory.
Using man
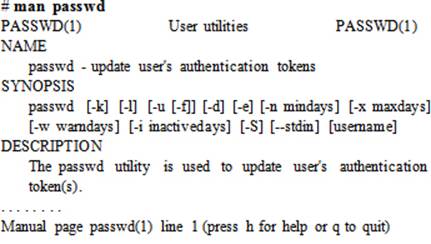
Use the man command to view help for a command. The following example shows how to check man pages for the passwd command:
While we are in man pages, some common keys listed in Table 2-13 help us navigate efficiently.
|
Key |
Action |
|
Enter / Down arrow |
Moves forward one line. |
|
Up arrow |
Moves backward one line. |
|
f / Spacebar / Page down |
Moves forward one page. |
|
b / Page up |
Moves backward one page. |
|
d / u |
Moves down / up half a page. |
|
g / G |
Moves to the beginning / end of the man pages. |
|
:f |
Displays line number and bytes being viewed. |
|
q |
Quits the man pages. |
|
/pattern |
Searches forward for the specified pattern. |
|
?pattern |
Searches backward for the specified pattern. |
|
n / N |
Finds the next / previous occurrence of a pattern. |
|
H |
Gives help on navigational keys. |
Table 2-13 Navigating within man Pages
Open man pages for a command and navigate using the keys provided in Table 2-13 for practice.
man Sections
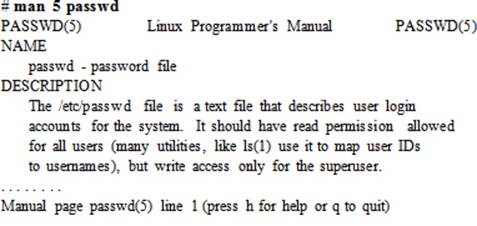
There are several sections within man pages. For example, section 1 refers to user commands, section 4 contains special files, section 5 describes system configuration files, section 8 includes system administration commands, and so on.
To search for help on file /etc/passwd, issue the following:
Searching by Keyword
Sometimes we need to use a command but do not know its name. Linux allows a keyword search on installed manual pages using the man command with the –k option, or the apropos command. This command searches for the keyword in manual page names and descriptions. For instance, if we want to search the string “password”, we run either of the following:
|
# man –k password |
|
|
# apropos password |
|
|
chage (1) |
- change user password expiry information |
|
chpasswd (8) |
- update passwords in batch mode |
|
cracklib-check (8) |
- Check passwords using libcrack2 |
|
…… . . |
|
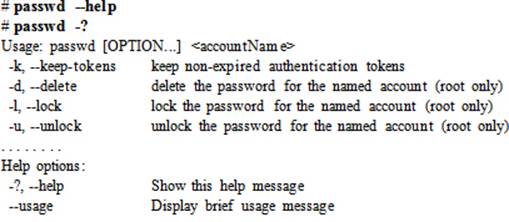
Once we identify the command we were looking for, we can either check that command’s man pages for usage or specify the --help or -? option with the command. For example, to get quick help on the passwd command, run either of the following:
The man database that stores all this information needs to be built with the mandb utility:
# mandb
Purging old database entries in /usr/share/man…
mandb: warning: /usr/share/man/man8/fsck.fat.8.manpage-fix.gz: ignoring bogus filename
Processing manual pages under /usr/share/man…
Purging old database entries in /usr/share/man/hu…
…… . .
0 man subdirectories contained newer manual pages.
0 manual pages were added.
0 stray cats were added.
0 old database entries were purged.
You should run this command after adding packages to your system to ensure that the man database is updated with new information.
Displaying Short Description
The whatis command provides a quick method for searching the specified command or file in the man database for a short description. For instance, the following shows outputs of the command when run on yum.conf and passwd files:
|
# whatis yum.conf |
|
|
yum.conf (5) |
- Configuration file for yum(8). |
|
# whatis passwd |
|
|
passwd (1) |
- update user's authentication tokens |
|
sslpasswd (1ssl) |
- compute password hashes |
|
passwd (5) |
- password file |
The first output indicates that the specified file is a configuration file associated with the yum command, and the second output points to three entries for the passwd file (two commands and one password file).
We may alternatively run the man command with the –f option to get identical results:
# man –f yum.conf
# man –f passwd
The info Command
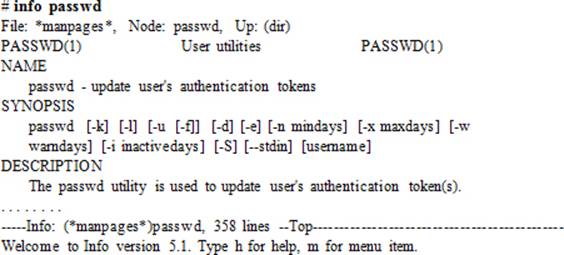
The info command is available as part of the info package to allow users to read command documentation as distributed by the GNU Project. It provides more detailed information than the man command. Documentation is divided into sections called nodes. The header is at the top of the screen and shows the name of the file being displayed, names of the current, next, and previous nodes, and the name of the node prior to the current node. The following example shows the first screen exhibited when this command is executed on the command passwd:
While viewing help with the info command, some common keys listed in Table 2-14 will help you navigate efficiently.
|
Key |
Action |
|
Down arrow |
Moves forward one line. |
|
Up arrow |
Moves backward one line. |
|
Spacebar |
Moves forward one page. |
|
Del |
Moves backward one page. |
|
q |
Quits the info tutorial. |
|
[ |
Goes to the previous node in the document. |
|
] |
Goes to the next node in the document. |
|
t |
Goes to the top node of this document. |
|
s |
Searches forward for the specified string. |
|
{ |
Searches for the previous occurrence of the string. |
|
} |
Searches for the next occurrence of the string. |
Table 2-14 Navigating within info Documentation
Open info for a command and navigate using the keys provided in Table 2-14 for practice.
Documentation in the /usr/share/doc Directory
The /usr/share/doc directory stores documentation for all installed packages under sub-directories that match package names followed by their -<version>. For example, the entry for the gzip package looks like:
![]()
In this example, gzip is the name of the package followed by a dash and the package version 1.5. Now re-run the ll command but without –d to see what documentation is available for gzip:
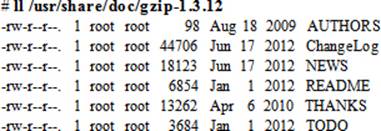
These files contain a huge amount of information about the gzip package.
Red Hat Enterprise Linux 7 Documentation
The Red Hat’s documentation website at docs.redhat.com contains product documentation on RHEL7 in HTML, PDF, and EPUB formats. This set of documentation includes release and technical notes, and guides on installation, deployment, virtualization, Logical Volume Manager, storage administration, security, and SELinux. You can download any of these guides for reference at no charge.
Chapter Summary
We covered several topics in this chapter. We started by looking at the ssh command usage for accessing a remote RHEL system. We then looked at a variety of commands, most of which were intended for use by both privileged and non-privileged users. These commands included basic viewing tools, compression utilities, and archiving utilities. We learned about vi, one of the most common text editing tools used in the UNIX/Linux world, in sufficient detail.
We learned how to access online help on commands and configuration files. We saw how to search through the man pages for desired text. We know where to look for help when needed.
Chapter Review Questions
1. The ssh tool provides a non-secure tunnel over a network for accessing a RHEL system. True or False?
2. Name the file that the who command consults to display logged-in users.
3. A file compressed with bzip2 can be uncompressed using gunzip command. True or False?
4. What is the use of the apropos command?
5. What does the lastlog command do?
6. What are the –R and –a options used for with the ls command?
7. Linux commands may be divided into privileged and non-privileged commands. True or False?
8. Which other command besides uptime can be used to display system load averages?
9. How can we display the line number and word count in a given file?
10. The id and groups commands are useful for listing a user identification. True or False.
11. Which file does the last command consult to display reports?
12. What type of information does section 5 in manual pages contain?
13. What information does the lastb command provide?
14. What is the function of the pwd command?
15. The who command may be used to view logged out users. True or False?
16. The tar command can be used to archive files with their SELinux contexts. True or False?
17. Which command can we use to display the tutorial of a command?
18. What are the three ls* commands to view pci, usb, and cpu information?
19. The star command does not have the ability to include extended file attributes in archives. True or False?
Answers to Chapter Review Questions
1. False. The ssh command provides a secure tunnel over a network.
2. The who command consults the /var/run/utmp file to list loggedin users.
3. False. The file will have to be uncompressed with either bzip2 or bunzip2.
4. The apropos command can be used to perform a keyword search in the manual pages.
5. The lastlog command provides information about recent user logins.
6. The –R option is used for recursive directory listing and the –a option for listing hidden files.
7. True.
8. The w command may be used to display system load averages instead of the uptime command.
9. We can use the wc command to display line and word counts.
10. False. Only the id command is used for this purpose.
11. The last command consults the /var/log/wtmp file to display reports.
12. Section 5 of the manual pages contain information on configuration files.
13. The lastb command reports the history of unsuccessful user login attempts.
14. The pwd command shows the absolute path of the current working directory.
15. False. The who command shows currently logged-in users only.
16. True. The tar command has the --selinux switch that provides this support.
17. We can use the info command to display the tutorial of a command.
18. The three commands are lspci, lsusb, and lscpu.
19. False. The star command does have the ability to include extended attributes in archives.
DIY Challenge Labs
The following labs are useful to strengthen most of the concepts and topics learned in this chapter. It is expected that you perform these labs without any additional help. A step-by-step guide is not provided, as the implementation of these labs requires the knowledge that has been presented in this chapter. Use defaults or your own thinking for missing information.
Lab 2-1: Navigate Linux Directory Tree
Log on to host1 as user1 and execute the pwd command to check your location in the directory tree. Run the ls command with appropriate switches to show files in the current directory along with all hidden files. Change directory into /etc and run pwd again to confirm the directory change. Switch back to the directory where you were before and run pwd again to verify.
Lab 2-2: Verify User and Group Identity
Log on to host1 as user1 and execute the logname, whoami, who, and w commands one at a time. Verify the identity of user1 by comparing the output of these commands. The output should show user1 as the user logged on and running these commands. Execute the id and groups commands and verify the identity of user1 by comparing the output of these commands. Identify the additional information that the id command provides but not the groups command. Record your results in a text file created with the vi editor in user1’s home directory.
Lab 2-3: Check User Login Attempts
Log on to host1 as root, execute the last and lastb commands, and record in a file which users have recently logged in to and out of the system successfully and unsuccessfully. Also list the timestamp when the system was last rebooted. Use the vi editor to record your results.
Lab 2-4: Identify the System and Kernel
Log on to host1 as root and execute the hostname and uname commands. Identify the system’s name, kernel version, RHEL release, and the hardware architecture of this system. Record your results in a file using the vi editor.
Lab 2-5: Check and Modify System Date and Time
Log on to host1 as root and execute the date and timedatectl commands to check the current system date and time. Identify the differences between the two outputs. Use timedatectl and change the system date to a date in January of the following year. Issue the date command and change the system time to one hour ahead of the current time. Observe the new date and time with both commands. Reset the date and time back to the current actual time using either the date or the timedatectl command.
Lab 2-6: Check System Uptime and Count Lines
Log on to host1 as root and execute the uptime command. Identify the amount of time the system has been up for and the number of users currently logged on. Run the wc command and show how many lines, words, and bytes are in the /etc/profile file.
Lab 2-7: Archive, List, and Restore Files
Log on to host1 as root and execute the tar command to archive the contents of the entire /etc directory tree. Run the star command and archive the /etc directory contents again. Compare the file sizes of the two archives. Run the gzip and bzip2 commands on these archives to produce compressed files, and compare their sizes. Run the commands to uncompress (gunzip and bunzip2) the files and then use the archiving tools to restore the contents of the /etc directory.
Lab 2-8: Practice the vi Editor
Log on to host1 as user1 and create a file called vipractice in the home directory using the vi editor. Type (do not copy and paste) the first four sentences from Lab 2-2 in such a way that each sentence occupies one line (do not worry about line wrapping). Save the file and quit the editor. Openvipractice in the vi editor again and show line numbering. Copy the second and third lines to the end of the file to make the total number of lines in the file to six. Move the third line to make it the very first line. Go to the last line and append the contents of the .bash_profile. Substitute all occurrences of the string “Profile” with “Pro File” and all occurrences of the string “profile” with “pro file”. Remove lines five to eight. Save the file and quit vi. Provide a count of lines, words, and characters in the vipractice file using the wc command.
All materials on the site are licensed Creative Commons Attribution-Sharealike 3.0 Unported CC BY-SA 3.0 & GNU Free Documentation License (GFDL)
If you are the copyright holder of any material contained on our site and intend to remove it, please contact our site administrator for approval.
© 2016-2026 All site design rights belong to S.Y.A.