Running Linux, 5th Edition (2009)
Part II. System Administration
Chapter 12. Installing, Updating, and Compiling Programs
In this chapter, we show you how to upgrade software on your system. Although most Linux distributions provide some automated means to install, remove, and upgrade specific software packages on your system, it is sometimes necessary to install software by hand.
Non-expert users will find it easiest to install and upgrade software by using a package system, which most distributions provide. If you don't use a package system, installations and upgrades are more complicated than with most commercial operating systems. Even though precompiled binaries are available, you may have to uncompress them and unpack them from an archive file. You may also have to create symbolic links or set environment variables so that the binaries know where to look for the resources they use. In other cases, you'll need to compile the software yourself from sources.
Upgrading Software
Linux is a fast-moving target. Because of the cooperative nature of the project, new software is always becoming available, and programs are constantly being updated with newer versions.
With this constant development, how can you possibly hope to stay on top of the most recent versions of your system software? The short answer is, you can't. In this section, we talk about why and when to upgrade and show you how to upgrade several important parts of the system.
When should you upgrade? In general, you should consider upgrading a portion of your system only when you have a demonstrated need to upgrade. For example, if you hear of a new release of some application that fixes important bugs (that is, those bugs that actually affect your personal use of the application), you might want to consider upgrading that application. If the new version of the program provides new features you might find useful, or has a performance boost over your present version, it's also a good idea to upgrade. When your machine is somehow connected to the Internet, another good reason for upgrading would be plugging a security hole that has been recently reported. However, upgrading just for the sake of having the newest version of a particular program is probably silly. In some, luckily rare, cases, newer versions are even regressions, that is, they introduce bugs or performance hits compared with the previous version.
Upgrading can sometimes be a painful thing to do. For example, you might want to upgrade a program that requires the newest versions of the compiler, libraries, and other software in order to run. Upgrading this program will also require you to upgrade several other parts of the system, which can be a time-consuming process. On the other hand, this can be seen as an argument for keeping your software up to date; if your compiler and libraries are current, upgrading the program in question won't be a problem.
How can you find out about new versions of Linux software? The best way is to watch the Usenet newsgroup comp.os.linux.announce (see the section "Usenet Newsgroups" in Chapter 1), where announcements of new software releases and other important information are posted. If you have Internet access, you can then download the software via FTP and install it on your system. Another good source to learn about new Linux software is the web site http://www.freshmeat.net. Many individual packages have mailing lists that update you about new versions of just that particular package.
If you don't have access to Usenet or the Internet, the best way to keep in touch with recent developments is to pay for a CD-ROM subscription. Here you receive an updated copy of the various Linux FTP sites, on CD-ROM, every couple of months. This service is available from a number of Linux vendors. It's a good thing to have, even if you have Internet access.
This brings us to another issue: what's the best upgrade method? Some people feel it's easier to completely upgrade the system by reinstalling everything from scratch whenever a new version of their favorite distribution is released. This way you don't have to worry about various versions of the software working together. For those without Internet access, this may indeed be the easiest method; if you receive a new CD-ROM only once every two months, a great deal of your software may be out of date.
It's our opinion, however, that reinstallation is not a good upgrade plan at all. Most of the current Linux distributions are not meant to be upgraded in this way, and a complete reinstallation may be complex or time-consuming. Also, if you plan to upgrade in this manner, you generally lose all your modifications and customizations to the system, and you'll have to make backups of your user's home directories and any other important files that would be deleted (or at least endangered) during a reinstallation. Finally, adapting a drastic approach to upgrading means that, in practice, you probably will wait longer than you should to upgrade software when critical security flaws are announced. In actuality, not much changes from release to release, so a complete reinstallation is usually unnecessary and can be avoided with a little upgrading know-how.
General Upgrade Procedure
As discussed in the previous section, it's usually easier and best to upgrade only those applications you need to upgrade. For example, if you never use Emacs on your system, why bother keeping up-to-date with the most recent version of Emacs? For that matter, you may not need to stay completely current with oft-used applications. If something works for you, there's little need to upgrade.
Modern Linux systems provide various ways of upgrading software, some manual (which ultimately are the most flexible, but also the most difficult), others quite automated. In this section, we look at three different techniques: using the RPM package system, using the Debian package system, and doing things manually.
We'd like to stress here that using packages and package systems is convenient, and even if you are a power user, you might want to use these techniques because they save you time for other, more fun stuff. Here is a short summary of the advantages:
§ You have everything that belongs to a software package in one downloadable file.
§ You can remove a software package entirely, without endangering other packages.
§ Package systems keep a dependency database and can thus automatically track dependencies. For example, they can tell you if you need to install a newer version of a library in order to run a certain application you are about to install (and will refuse to remove a library package as long as packages are installed that use the libraries this package provides).
Of course, package systems also have a few disadvantages, some of which we discuss when we talk about RPM and the Debian package system. A generic problem is that once you start using a package system (which is a requirement if you use the distributions' automated installation interfaces) you ought to really install everything through packages. Otherwise, you can't keep track of the dependencies. For the same reason, mixing different package systems is a bad idea.
Every day some program you use is likely to be updated—all too often because of an important security flaw, unfortunately. Some grizzled system administrators insist on checking security reports regularly and upgrading every package manually, using the means shown in this section, so they can control every aspect of their systems and make sure no change breaks existing functionality. That's a noble cause to dedicate yourself to, and one that's feasible on systems with dedicated purposes (such as mail servers or routers) and a limited set of software.
For more general-purpose systems, though, keeping everything you use regularly up-to-date becomes a major part-time job. For this reason, all major distributions provide automated update services. We explore a few of them later in this chapter, but you'll want to understand general package management first. It shows what the update services are doing, and is important when you want to install new software or do something else that isn't offered by those services.
Using RPM
RPM, which originally expanded to Red Hat Package Manager but now just stands as a name on its own, is a tool that automates the installation of software binaries and remembers what files are needed so that you can be assured the software will run properly. Despite the name, RPM is not Red Hat-specific, but is used in many other distributions nowadays, including SUSE. Using RPM makes installing and uninstalling software a lot easier.
The basic idea of RPM is that you have a database of packages and the files that belong to a package. When you install a new package, the information about this package is recorded in the database. Then, when you want to uninstall the package for every file of the package, RPM checks whether other installed packages are using this file too. If this is the case, the file in question is not deleted.
In addition, RPM tracks dependencies. Each package can be dependent on one or more other packages. When you install a package, RPM checks whether the packages the new package is dependent on are already installed. If not, it informs you about the dependency and refuses to install the package.
The dependencies are also used for removing packages: when you want to uninstall a package that other packages are still dependent upon, RPM tells you about this, too, and refuses to execute the task.
The increased convenience of using RPM packages comes at a price, however: first, as a developer, it is significantly more difficult to make an RPM package than to simply pack everything in a tar archive. And second, it is not possible to retrieve just one file from an RPM package; you have to install everything or nothing.
If you already have an RPM system, installing RPM packages is very easy. Let's say that you have an RPM package called SuperFrob-4.i386.rpm (RPM packages always have the extension .rpm; the i386 indicates that this is a binary package compiled for Intel x86 machines). You could then install it with:
tigger # rpm -i SuperFrob-4.i386.rpm
Instead of -i, you can also use the long-named version of this option; choose whatever you like better:
tigger # rpm --install SuperFrob-4.i386.rpm
If everything goes well, there will be no output. If you want RPM to be more verbose, you can try:
tigger # rpm -ivh SuperFrob-4.i386.rpm
This prints the name of the package plus a number of hash marks so that you can see how the installation progresses.
If the package you want to install needs another package that is not yet installed, you will get something like the following:
tigger # rpm -i SuperFrob-4.i386.rpm
failed dependencies:
frobnik-2 is needed by SuperFrob-4
If you see this, you have to hunt for the package frobnik-2 and install this first. Of course, this package can itself be dependent on other packages.
If you want to update a package that is already installed, use the -U or --update option (which is just the -i option combined with a few more implied options):
tigger # rpm -U SuperFrob-5.i386.rpm
Uninstalling a package is done with the -e or --erase option. In this case, you do not specify the package file (you might not have that around any longer), but rather, the package name and version number:
tigger # rpm -e SuperFrob-5
Besides the options described so far that alter the state of your system, the -q option provides various kinds of information about everything that is recorded in the RPM database as well as package files. Here are some useful things you can do with -q:
§ Find out the version number of an installed package:
§ tigger# rpm -q SuperFrob
SuperFrob-5
§ Get a list of all installed packages:
§ tigger# rpm -qa
§ SuperFrob-5
§ OmniFrob-3
§ ...
glibc-2.3.4-23.4
§ Find out to which package a file belongs:
§ tigger# rpm -qf /usr/bin/dothefrob
§ SuperFrob-5
§ tigger# rpm -qf /home/kalle/.xinitrc
file /home/kalle/.xinitrc is not owned by any package
§ Display information about the specified package:
§ tigger# rpm -qi rpm
§ Name : rpm Relocations: (not relocatable)
§ Version : 4.1.1 Vendor: SUSE LINUX Products GmbH,
§ Nuernberg, Germany
§ Release : 208.2 Build Date: Sat 11 Jun 2005 01:53:04
§ AM CEST
§ Install date: Tue 28 Jun 2005 10:02:18 AM CEST Build Host: purcell.suse.de
§ Group : System/Packages Source RPM: rpm-4.1.1-208.2.src.rpm
§ Size : 5970541 License: GPL
§ Signature : DSA/SHA1, Sat 11 Jun 2005 01:58:41 AM CEST, Key ID a84edae89c800aca
§ Packager : http://www.suse.de/feedback
§ Summary : The RPM Package Manager
§ Description :
§ RPM Package Manager is the main tool for managing the software packages
§ of the SuSE Linux distribution.
§ ...
Distribution: SuSE Linux 9.3 (i586)
§ Show the files that will be installed for the specified package file:
§ tigger# rpm -qpl SuperFrob-5.i386.rpm
§ /usr/bin/dothefrob
§ /usr/bin/frobhelper
§ /usr/doc/SuperFrob/Installation
§ /usr/doc/SuperFrob/README
/usr/man/man1/dothefrob.1
What we've just finished showing are the basic modes of operation, which are supplemented by a large number of additional options. You can check those in the manual page for the rpm(8) command.
If you are faced with an RPM package that you want to install, but have a system such as Slackware or Debian that is not based on RPM, things get a little bit more difficult.
You can either use the fairly self-explanatory command alien that can convert between various package formats and comes with most distributions, or you can build the RPM database from scratch.
The first thing you have to do in this latter case is to get the rpm program itself. You can download it from http://www.rpm.org. Follow the installation instructions to build and install it; if you have the C compiler gcc installed on your system, there should be no problems with this. It should be mentioned that some newer versions of rpm have experienced stability problems, so if you do not use the rpm version that your distribution provides, you should be a bit careful and look out for unexpected results. Version 4.1.1 seems to be reasonably stable, though.
The next task is to initialize the RPM database. Distributions that come with RPM do the initialization automatically, but on other systems you will have to issue the following command:
tigger # rpm --initdb
This command creates several files in the directory /var/lib/rpm. The directory /var/lib should already exist; if it doesn't, create it with the mkdir command first.
Now you can install RPM packages the normal way, but because you have not installed the basic parts of the system, such as the C library with RPM, you will get errors like the following:
tigger # rpm -i SuperFrob-4.i386.rpm
failed dependencies:
libm.so.5 is needed by SuperFrob-4
libdl.so.1 is needed by SuperFrob-4
libc.so.5 is needed by SuperFrob-4
because those files are not recorded in the RPM database. Of course, you really do have those files on your system; otherwise most programs wouldn't run. For RPM to work, you must tell it not to care about any dependencies. You do this by specifying the command-line option --nodeps:
tigger # rpm -i --nodeps SuperFrob-4.i386.rpm
Now, RPM will install the package without complaining. Of course, it will run only if the libraries it needs are installed. The mere fact that you use --nodeps doesn't save you when the "dependent" library or software is not installed on your system.
With this information, you should be able to administer your RPM-based system. If you want to know more, read the manual page for the rpm command, or check out http://www.rpm.org.
Some commercial companies sell automated upgrade services based on RPM. As a subscriber to these services, you can have your system upgraded automatically; the service finds out which new packages are available and installs them for you. If you use the SUSE distribution, SUSE provides such a service (called "YOU") for free. Even the Debian distribution (whose package system is described in the next section) has an automated upgrade system (described there). However, some security experts consider these automated upgrades a security risk.
Using dpkg and apt
After rpm, the most popular package manager for Linux distributions is dpkg, which is used to manage .deb archives. As the name implies, the .deb format is tied to the Debian distribution, so it is also used by distributions based on Debian, such as Ubuntu and Kubuntu, Libranet, and Xandros. Like the RPM format, the .deb format keeps track of dependencies and files to help ensure your system is consistent.
The technical differences between the two formats are actually fairly small; although the RPM and .deb formats are incompatible (for example, you can't install a Debian package directly on Red Hat), you can use alien to translate .deb packages for other distributions (and vice versa). The main difference between the formats is that .deb packages are built using tools that help make sure they have a consistent layout and generally conform to policies (most notably, the Debian Policy Manual, provided in the debian-policy package) that help developers create high-quality packages.
While dpkg is the low-level interface to the Debian package manager, most functions are usually handled through either the apt suite of programs or frontends such as dselect, aptitude, gnome-apt, synaptic, or KPackage.
Installing .deb packages on a Debian system is quite easy. For example, if you have a package named superfrob_4-1_i386.deb, you can install it with:
tigger # dpkg -i superfrob_4-1_i386.deb
Selecting previously deselected package superfrob.
(Reading database ... 159540 files and directories currently installed.)
Unpacking superfrob (from superfrob_4-1_i386.deb) ...
Setting up superfrob (4-1) ...
If the superfrob package is missing a dependency, dpkg will issue a warning message:
tigger # dpkg -i superfrob_4-1_i386.deb
Selecting previously deselected package superfrob.
(Reading database ... 159540 files and directories currently installed.)
Unpacking superfrob (from superfrob_4-1_i386.deb) ...
dpkg: dependency problems prevent configuration of superfrob:
superfrob depends on frobnik (>> 2); however:
Package frobnik is not installed.
dpkg: error processing superfrob (--install):
dependency problems - leaving unconfigured
Errors were encountered while processing:
superfrob
The output indicates that you would need frobnik Version 2 or later for the package to install completely. (The files in the package are installed, but they may not work until frobnik is installed too.)
Unlike RPM, dpkg doesn't make a distinction between installing a new package and upgrading an existing one; the -i (or --install) option is used in both cases. For example, if we want to upgrade superfrob using a newly downloaded package superfrob_5-1_i386.deb, we'd simply type:
tigger # dpkg -i superfrob_5-1_i386.deb
(Reading database ... 159546 files and directories currently installed.)
Preparing to replace superfrob 4-1 (using superfrob_5-1_i386.deb) ...
Unpacking replacement superfrob ...
Setting up superfrob (5-1) ...
To uninstall a package, you can use either the -r (--remove) or -P (--purge) options. The --remove option will remove most of the package, but will retain any configuration files, while --purge will remove the system-wide configuration files as well. For example, to completely removesuperfrob:
tigger # dpkg -P superfrob
(Reading database ... 159547 files and directories currently installed.)
Removing superfrob ...
dpkg can also be used to find out what packages are installed on a system, using the -l (--list) option:
tigger $ dpkg -l
Desired=Unknown/Install/Remove/Purge/Hold
| Status=Not/Installed/Config-files/Unpacked/Failed-config/Half-installed
|/ Err?=(none)/Hold/Reinst-required/X=both-problems (Status,Err: uppercase=bad)
||/ Name Version Description
+++-= == == == == == == =-= == == == == == == =-= == == == == == ==
== == == == == == == == == == == == == == == =
ii a2ps 4.13b-15 GNU a2ps 'Anything to PostScript' converter
ii aalib1 1.4p5-10 ascii art library
ii abcde 2.0.3-1 A Better CD Encoder
...
ii zlib1g-dev 1.1.3-19 compression library - development
The first three lines of the output are designed to tell you what the first three columns before each package's name mean. Most of the time, they should read ii, which means the package is correctly installed. If they don't, you should type dpkg --audit for an explanation of what is wrong with your system and how to fix it.
You can also use the -l option with a package name or glob-style pattern; for example, you could find out what version of superfrob is installed using the following:
tigger $ dpkg -l superfrob
Desired=Unknown/Install/Remove/Purge/Hold
| Status=Not/Installed/Config-files/Unpacked/Failed-config/Half-installed
|/ Err?=(none)/Hold/Reinst-required/X=both-problems (Status,Err: uppercase=bad)
||/ Name Version Description
+++-= == == == == == == =-= == == == == == == =-= == == == == == ==
== == == == == == == == == == == == == == == =
ii superfrob 4-1 The superfrobulator
dpkg can also be used to find out the package to which a particular file belongs:
tigger $ dpkg --search /bin/false
shellutils: /bin/false
tigger $ dpkg --search /home/kalle/.xinitrc
dpkg: /home/kalle/.xinitrc not found.
You can also display information about an installed package or .deb archive:
tigger $ dpkg --statusdpkg
Package: dpkg
Essential: yes
Status: install ok installed
Priority: required
Section: base
Installed-Size: 3156
Origin: debian
Maintainer: Dpkg Development <debian-dpkg@lists.debian.org>
Bugs: debbugs://bugs.debian.org
Version: 1.9.19
Replaces: dpkg-doc-ja
Pre-Depends: libc6 (>= 2.2.4-4), libncurses5 (>= 5.2.20020112a-1), libstdc++2.10-
glibc2.2 (>= 1:2.95.4-0.010810)
Conflicts: sysvinit (<< 2.80)
Conffiles:
/etc/alternatives/README 69c4ba7f08363e998e0f2e244a04f881
/etc/dpkg/dpkg.cfg 1db461ac9a1d4f4c8b47f5061078f5ee
/etc/dpkg/dselect.cfg 190f7cf843556324495ef12759b752e3
/etc/dpkg/origins/debian 24926c0576edec3e316fd9f6072b8118
Description: Package maintenance system for Debian
This package contains the programs which handle the installation and
removal of packages on your system.
.
The primary interface for the dpkg suite is the 'dselect' program;
a more low-level and less user-friendly interface is available in
the form of the 'dpkg' command.
.
In order to unpack and build Debian source packages you will need to
install the developers' package 'dpkg-dev' as well as this one.
tigger $ dpkg --inforeportbug_1.43_all.deb
new debian package, version 2.0.
size 66008 bytes: control archive= 1893 bytes.
40 bytes, 2 lines conffiles
1000 bytes, 24 lines control
986 bytes, 15 lines md5sums
1014 bytes, 41 lines * postinst #!/bin/sh
147 bytes, 5 lines * postrm #!/bin/sh
416 bytes, 19 lines * prerm #!/bin/sh
Package: reportbug
Version: 1.43
Section: utils
Priority: standard
Architecture: all
Depends: python
Recommends: python-newt
Suggests: postfix | mail-transport-agent, gnupg | pgp, python-ldap (>= 1.8-1)
Conflicts: python (>> 2.3), python-newt (= 0.50.17-7.1)
Installed-Size: 195
Maintainer: Chris Lawrence <lawrencc@debian.org>
Description: Reports bugs in the Debian distribution.
reportbug is a tool designed to make the reporting of bugs in Debian
and derived distributions relatively painless. Its features include:
.
* Integration with the mutt, af, and mh/nmh mail readers.
* Access to outstanding bug reports to make it easier to identify
whether problems have already been reported.
* Support for following-up on outstanding reports.
* Optional PGP/GnuPG integration.
.
reportbug is designed to be used on systems with an installed mail
transport agent, like exim or sendmail; however, you can edit the
configuration file and send reports using any available mail server.
dpkg can also list the files and directories included in a .deb archive:
tigger $ dpkg --contents superfrob_4-1_i386.deb
-rwxr-xr-x root/root 44951 2002-02-10 12:16:48 ./usr/bin/dothefrob
-rwxr-xr-x root/root 10262 2002-02-10 12:16:48 ./usr/bin/frobhelper
...
dpkg, like rpm, has numerous other options; for more details, refer to the manual pages for dpkg and dpkg-deb.
In addition to dpkg, Debian and other Debian-based distributions provide the apt suite of programs.[*] apt stands for "advanced package tool," and is designed as an archive-independent system that can handle multiple package formats. Perhaps the most important feature of apt is its ability to resolve dependencies automatically; if, for example, superfrob requires Version 2 or later of frobnik, apt will try to find frobnik from the sources that are available to it (including CD-ROMs, local mirrors, and the Internet).
The most useful interface to apt is the apt-get command. apt-get manages the list of available packages (the "package cache") and can be used to resolve dependencies and install packages. A typical session would start with an update of the apt cache:
tigger # apt-get update
Get:1 http://http.us.debian.org stable/main Packages [808kB]
Get:2 http://http.us.debian.org stable/main Release [88B]
Hit http://non-us.debian.org stable/non-US/main Packages
Hit http://non-us.debian.org stable/non-US/main Release
Get:3 http://security.debian.org stable/updates/main Packages [62.1kB]
Get:4 http://security.debian.org stable/updates/main Release [93B]
Fetched 870kB in 23s (37kB/s)
Reading Package Lists... Done
Building Dependency Tree... Done
The output indicates that there have been updates to the stable distribution, so we may want to upgrade the packages already installed on the system. To do this automatically, we can use apt-get's upgrade option:
tigger # apt-get upgrade
The following packages have been kept back:
gnumeric
17 packages upgraded, 0 newly installed, 0 to remove and 1 not upgraded.
Need to get 16.3MB of archives. After unpacking 5kB will be freed.
Do you want to continue? [Y/n] y
Get:1 http://http.us.debian.org stable/main base-passwd 3.4.6 [17.2kB]
Get:2 http://security.debian.org stable/updates/main ssh 1:3.1.6p4-1 [600kB]
...
(Reading database ... 159546 files and directories currently installed.)
Preparing to replace ssh 1:3.0.3p2-6 (using .../ssh_1%3a3.1.6p4-1_i386.deb) ...
Unpacking replacement ssh ...
...
One thing you will notice is that unlike most Linux commands, the actions taken by apt commands are specified without dashes. apt-get does allow some options, but they are used only to change the behavior of the main action specified.[†]
Note that gnumeric was not automatically upgraded, probably because it would have required additional packages to be installed. To upgrade it and resolve dependencies, we can use apt-get's install option, with the names of one or more packages: [*]
tigger # apt-get installgnumeric
The following extra packages will be installed:
libgal36 libglade3
The following NEW packages will be installed:
libgal36
2 packages upgraded, 1 newly installed, 0 to remove and 0 not upgraded.
Need to get 8.3MB of archives. After unpacking 503kB will be used.
Do you want to continue? [Y/n] y
...
Another useful feature of apt is its ability to find information about packages in the repository. The apt-cache command is used to look up information about packages that are available for installation. One common use of apt-cache is to find packages based on keywords in the package's description, by using words, complete phrases (in quotes), or regular expressions. For example, if you want to find a package that allows you to play Ogg Vorbis-encoded music files, you can use the search option to find appropriate packages:
tigger $ apt-cache search"ogg vorbis"
audacity - A fast, cross-platform audio editor
bitcollider-plugins - bitcollider plugins
cplay - A front-end for various audio players
gqmpeg - a GTK+ front end to mpg321/mpg123 and ogg123
libapache-mod-mp3 - turns Apache into a streaming audio server
libvorbis0 - The Vorbis General Audio Compression Codec
mp3blaster - Full-screen console mp3 and ogg vorbis player
mp3burn - burn audio CDs directly from MP3s or Ogg Vorbis files
oggtst - Read comments in ogg vorbis files
python-pyvorbis - A Python interface to the Ogg Vorbis library
vorbis-tools - Several Ogg Vorbis Tools
xmms - Versatile X audio player that looks like Winamp
xmms-dev - XMMS development static library and header files
mq3 - a mp3/ogg audio player written in Qt.
Now, if we are interested in one of these packages, we can find out more about it using the show option of apt-cache:
tigger $ apt-cache showxmms
Package: xmms
Priority: optional
Section: sound
Installed-Size: 4035
Maintainer: Josip Rodin <jrodin@jagor.srce.hr>
...
Description: Versatile X audio player that looks like Winamp
XMMS (formerly known as X11Amp) is an X/GTK+ based audio player
for various audio formats.
.
It's able to read and play:
* Audio MPEG layer 1, 2, and 3 (with mpg123 plug-in),
* WAV, RAW, AU (with internal wav plug-in and MikMod plug-in),
* MOD, XM, S3M, and other module formats (with MikMod plug-in),
* CD Audio (with CDAudio plug-in), with CDDB support,
* .cin files, id Software,
* Ogg Vorbis files.
It has eSound, OSS, and disk writer support for outputting sound.
.
It looks almost the same as famous Winamp, and includes those neat
features like general purpose, visualization and effect plug-ins,
several of which come bundled, then spectrum analyzer, oscilloscope,
skins support, and of course, a playlist window.
Although a full exploration of apt's features is beyond the scope of this chapter, the apt manual page (and the manual pages it references) along with the APT HOWTO (available in the apt-howto-en package) should answer any questions you may have.
In addition to the command-line tools, a number of easy-to-use text-based and graphical frontends have been developed. One of the most mature frontends is KPackage , which is part of the KDE Desktop Environment, but can be used with other desktops, such as GNOME. KPackage can be run from the command line or found in the System menu of KDE. Figure 12-1 shows a sample screen from KPackage.
The main window of KPackage displays a list of all the packages available for your system on the left, with a box to the right; when you choose a package in the list, the box to the right includes information about the package you selected. You can install or uninstall packages by selecting them and choosing Install or Uninstall from the Packages menu, or by clicking the column labeled Mark to place a check mark next to them and then clicking the "Install marked" or "Uninstall marked" buttons. You can also install .deb packages directly by clicking the Open button on the toolbar to the left of the screen and selecting the file, or dragging .deb icons from KDE file manager windows into KPackage's window. KPackage also has tools for finding packages with particular names. Like all KDE applications, KPackage has help available by pressing F1 or using the Help menu.
[*] Some RPM-based distributions now include apt as well because apt was designed to work with any packaging format.
[†] Some other Linux commands, such as cvs, also act this way.
[*] Note that apt-get does not install packages directly from .deb archives; dpkg's --install option should be used instead for an archive that you have in a .deb archive on disk or have downloaded directly from the Internet. When using dpkg, you will need to resolve the dependencies yourself.
Automated and Bulk Upgrades
Nearly every distribution now includes a convenient update mechanism. SUSE ships one as part of YaST, and Red Hat uses an application called up2date that connects to the Red Hat Network. Debian, of course, has the apt-get utility described in the previous section. There are other tools out there, but you'll have to install them first. Usually there's no reason to go to all that trouble.

Figure 12-1. KPackage package manager
The update systems are designed to be ultra-simple and therefore are mostly intuitive to use. We will briefly introduce two here: YOU, which comes from the SUSE world, and ZENworks, which comes from the Red Hat world.
YaST Online Update: Automated Updates
YOU ("YaST Online Update") is SUSE's automated update tool. The service is free to use (i.e., it is not a subscription-based service). You run it whenever you feel like it (but doing it regularly might be a good idea if you plan to use such a tool at all). YOU is integrated into the YaST system administration tool; in the Software section, you'll find the Online Update icon. Click this, and the online update screen will appear. At first it is empty, because it needs to load the list of available servers. This can change dynamically over time. You can browse the drop-down list "Installation source" to choose a location that is close to you network-wise.
If you check the checkbox Manually Select Patches and click Next, you will, after a period of time during which the list of updated packages is loaded, be taken to another page (see Figure 12-2) where you can select the packages to update. Those updates that are relevant to you (in other words, that apply to packages you have installed) are already checked. It might still be a good idea to browse down the list, though, because YOU even gets you some packages that are, for legal reasons, not on the installation media. For example, the package fetchmsttfonts lets you download and install TrueType fonts provided by Microsoft (isn't that ironic?). Drivers for various WLAN cards are another example of packages that are only available via the online update. Because these do not update existing packages, they are never checked by default initially, so you may want to choose the manual update selection at least once and check them.
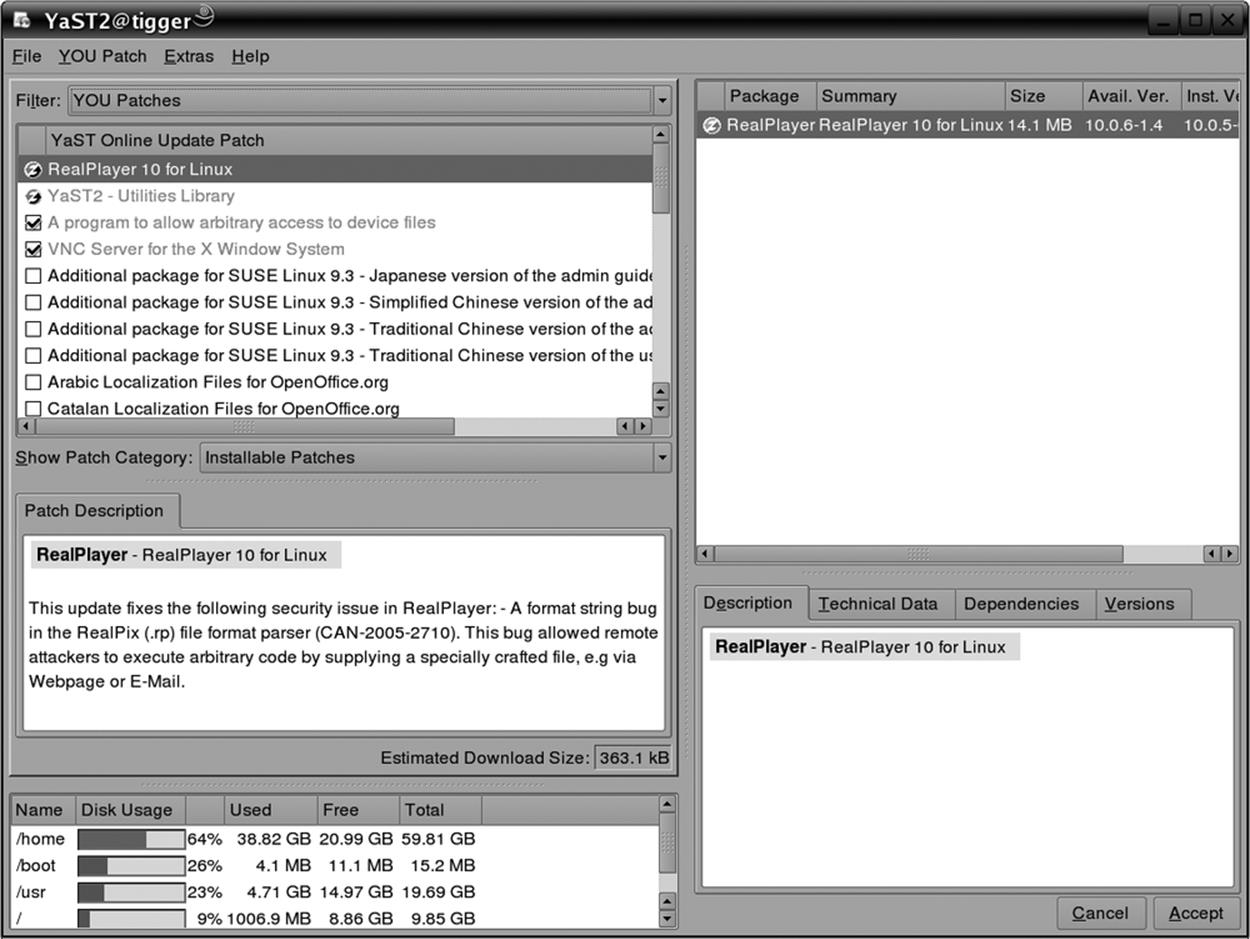
Figure 12-2. Manual package selection in YOU
If you do not check the Manually Select Patches box, the update selection step will be skipped, and the update will be performed immediately.
Another nice little gadget that comes with YOU is the SUSE Watcher. This is a panel applet for your KDE desktop that monitors the package update sites and alerts you when security patches are available by switching into a red ball (see Figure 12-3). Right-clicking that ball opens a context menu that lets you start the online update.

Figure 12-3. SUSE Watcher indicates available security patches
Red Carpet and ZENworks Linux Management: Alternative Package Management Tools
This section looks at another tool for automated update management, called Red Carpet (now part of the ZENworks Linux Management tools from Novell), and explains some of the advantages of different approaches to package management.
Originally developed as an updater for GNOME desktop software, Red Carpet is currently distributed by Novell as part of SUSE Linux distributions and is also available from other sources as a standalone system updater. It can install updates from a variety of servers, including apt repositories and ZENworks servers. Administrators of several flavors of Linux will appreciate having the Red Carpet tools on all their systems, because they provide a consistent interface and command set that abstracts away the package management quirks of individual distributions.
The client side of the package system consists of a daemon (rcd, soon to be changed to zmd), a command-line interface (rug), and a graphical interface. All three of these pieces are free software, although Novell sells a proprietary server application as part of its overall software management suite. The server side is designed for very large, complex organizations and won't be covered here, but we will cover a free alternative for software distribution, Open Carpet.
The ZENworks system distributes Linux software divided into channels, like television shows. Each channel contains a group of individual RPM packages that are related in some way: core operating system, for example, or games. Each package is also assigned a section, such as Productivity or Multimedia, to help you find applications that perform a particular task. You can subscribe to channels the way you would with cable television, so that they can show only software you are interested in. This is particularly useful when there are multiple channels offering different versions of the same application, such as one for the stable branch of Evolution, and one for unstable developer snapshots.
Red Carpet, like other tools, will handle all dependency checking for you: if you try to install a new version of Evolution, and it requires that you upgrade gtkhtml, the program will offer to upgrade that as well. Similarly, if you try to remove software that is required, Red Carpet will warn you that, to keep a clean package database, it will be removing everything upstream from that. For example, if you try to remove the gtk+ package, you'll also have to tear out most of your GNOME desktop tools, which almost universally require that library.
Installing Red Carpet
You can download Red Carpet RPM packages from ftp://ftp.novell.com or from your Linux distribution's web site. You may also wish to check http://rpmfind.net or http://open-carpet.org for additional sources. You will need the daemon package rcd or zmd and at least one of the rug(command-line) or Red Carpet (GUI) interface tools. The packages have few dependencies, so you should be able to install them no trouble using the command rpm -Uvh.
Using the Red Carpet GUI
The Red Carpet graphical update tool can be invoked either from a menu or with the red-carpet command. When you first start it, it will tell you that there are no updates available, because you have not subscribed to any channels. To change your channel subscriptions, click the Channels button and select the items you want.
Once you have subscribed to channels, the start screen of Red Carpet will display new versions of packages you already have installed, if any are available. Each update is displayed with its name, the version you have and the version of the updated package, plus a recommendation as to how important that update is, ranging from "minor" for small enhancements to "urgent" and "necessary" for more important bugs such as security problems.
To install updates, select the packages you want to update and click the Mark for Installation button, or just click Update All. Then, click the Run Now button. Red Carpet will ask you to confirm the operation, and then perform it.
Near the top of the Red Carpet window is a set of tabs—Installed Software, Available Software, and Search—that let you see longer lists of software. The first one lists software you already have, the second lists software you don't have, and the third displays all the software that the system knows about whether it's installed or not. In all three cases, you can filter out software by channels and sections, search for specific words in the package name and description, or just show the whole list.
You can mark any package for installation or removal in any of the first four tabs. Actions you have decided to take are listed in the left side of the screen and, in greater detail, in the Pending Actions tab. Only when you click Run Now and confirm all the actions you want to perform will the application remove or install software.
Once you've run a transaction or two, click the History tab to see them listed. This can be very useful if something breaks after a particular software change, and you want to know what you need to undo.
If you're not satisfied with the download performance you get, or with the software available to you, select Edit → Services and add or remove servers. You can even use several services at once, for the maximum variety of software. You'll find a list of additional services at http://open-carpet.org.
Using the rug command
Once you understand the general zmd concepts, you may find it more convenient to run updates at the command line with rug. Each command consists of rug followed by an action and any option flags or arguments. All actions also have convenient shorthand notations, which we won't use here, but which you can find in the manpages.
Note that, as with all package management systems, most rug actions will require root privileges.
The first action you'll want to use is rug list-updates, which displays a list of available updates. If you want to install them, you can then run rug update. To search for software, use rug search followed by a package name or name fragment. For these and all other rug actions, you can get detailed help by running the command rug action --help. A complete list of actions is available in the manpage and as the output of the command rug help.
More advanced commands for rug include package locking , which lets you mark certain packages as not upgradeable. To add a lock, use rug lock-add packagename. Locks are listed numerically with the rug lock-list command, and deleted using the rug lock-delete locknumber command.
Other actions let you check dependencies. For example, rug what-requires item tells you what software requires a particular piece of software. You can check dependencies on entire packages, on libraries, commands, or almost anything else. For example:
system:/root # rug what-requires libusb
S | Channel | Package | Version | libusb Version
--+--------------+-------------------+------------------+----------------
| suse-92-i586 | ctapi-cyberjack | 1.0.0-173.1 | (any)
i | suse-92-i586 | pcsc-cyberjack | 1.1.1-245.1 | (any)
v | suse-92-i586 | pcsc-etoken | 1.1.1-245.1 | (any)
In this example, we see what packages make use of the libusb library. The first column, S, represents the status of the packages in the list. The i next to pcsc-cyberjack denotes that the package is installed. The spaces next to the other packages let us know that they are not installed, and av indicates that a different version of the package is installed. The second column notes the channel from which the package comes, the third and fourth the package and its version, and the last shows which version of the library is required by the package. In this case, all three packages are content with any version of libusb.
One side effect of being able to check dependencies at a finer level than packages is that you can use the rug solvedeps command to install a library without having to worry about versions or packages. For example, if an application you are trying to install demands libfoo greater than 1.5, you can ask it to solve the problem for you with the command rug solvedeps "libfoo > 1.5". You can also tell solvedeps to avoid a package, library, or binary by placing an exclamation point in front of it: rug solvedeps "!libfoo" "frob > 2.3". If it is possible to install frob Version 2.3 or greater without installing libfoo, it will do so.
Finally, you can access multiple services through rug just like you can with the GUI. Use the rug service-add command, followed by the URL for the service. Several services are listed at http://open-carpet.org.
Multiple users
Imagine that you are a system administrator and want to update several systems, but that you don't have root access to all of them. How can you do it? During your system install, install zmd and configure it to recognize you as a remote user. Then, even when the root password changes, you can still install security updates.
To add a user, use the command rug user-add username or, in the GUI, select Edit → Users. You will need to enter a password and select privileges for the user you are creating. Note that these usernames and passwords are totally distinct from system logins.
You can grant the following privileges:
Install
User can install new software.
Lock
User can add or delete package locks.
Remove
User can remove software.
Subscribe
User can alter channel subscriptions.
Superuser
User has all access granted to the local root user.
Trusted
User can install unsigned packages.
Upgrade
User can upgrade existing software.
View
User can see what software is installed, and check updates. This is the only privilege that is turned on by default.
Once you have created a user account with the daemon, you can let that user update the system and maintain its software without having to grant them full access to the data on the machine.
To disable remote user connections, use the command rug set-prefs remote-enabled false.
To access a remote daemon using the Red Carpet GUI, select File → Connect to Daemon and enter the address of the remote server. To access a remote daemon using rug, use the --host flag to set the host. Note that the default port for listening is 505.
Operating an update server
Large businesses often want to keep software updates within their firewalls and completely under their control. To do that, they use enterprise-class upgrade servers with sophisticated interfaces and multiple levels of administrator privileges. That's not the kind of update server we're covering here. If you're shipping a few updates to a few systems, or if you're a developer shipping software and want to make it easy to install and update, you don't need a really complicated system. You just want to make sure that the beta testers have the latest version.
Open Carpet is a free server for HTTP, FTP, and Red Carpet access to packages and package metadata. That means that anyone with a web browser can also download the files and install them by hand, just like with a regular file server, but in addition, Red Carpet users can update and resolve dependencies automatically. In some places it's a little rough around the edges, but it works nicely for those willing to fiddle with configuration files a little bit.
To set up your own server, install open-carpet and libredcarpet-python, available at http://open-carpet.org—and of course through the site's own official Open Carpet service. The packages provided contain sample configuration files, normally installed to /usr/share/doc/packages/open-carpet/sample/. Edit the server.conf file first. It's simple enough: enter a name for the server, your email address, and so forth. At the end, it points to a channel directory. Create that directory, put packages in it, and run the open-carpet command. If all goes well, you've got a server. To ship updates, just copy them to the channel directories and run the script again.
Upgrading Software Not Provided in Packages
A lot of interesting software is offered outside the package systems, although as it becomes popular, the developers tend to provide Linux packages. In order to install or upgrade applications that don't yet exist as packages, you'll have to obtain the newest release of the software. This is usually available as a gzipped or compressed tar file. Such a package could come in several forms. The most common are binary distributions, in which the binaries and related files are archived and ready to unpack on your system, and source distributions, in which the source code (or portions of the source code) for the software is provided, and you have to issue commands to compile and install it on your system.
Shared libraries make distributing software in binary form easy; as long as you have a version of the libraries installed that is compatible with the library stubs used to build the program, you're set. However, in many cases, it is easier (and a good idea) to release a program as source . Not only does this make the source code available to you for inspection and further development, but it also allows you to build the application specifically for your system, with your own libraries. Many programs allow you to specify certain options at compile time, such as selectively including various features in the program when built. This kind of customization isn't possible if you get prebuilt binaries.
There's also a security issue at play when installing binaries without source code. Although on Unix systems viruses are nearly unheard of, it's not difficult to write a Trojan Horse, a program that appears to do something useful but, in actuality, causes damage to the system.[*] For example, someone could write an application that includes the "feature" of deleting all files in the home directory of the user executing the program. Because the program would be running with the permissions of the user executing it, the program itself would have the ability to do this kind of damage. (Of course, the Unix security mechanism prevents damage being done to other users' files or to any important system files owned by root.)
Although having source code won't necessarily prevent this from happening (do you read the source code for every program you compile on your system?), at least it gives you a way to verify what the program is really doing. Also, if source code is available, it is likely that some people will peruse it, so that using source is a bit safer; however, you can't count on that.
There are techniques for verifying binary packages as well, namely signed packages. The packager can sign a package with his PGP key, and package tools such as RPM have means of verifying such a signature. However, you will still have to rely on the packager having packaged correctly and without bad intentions. All the signature tells you is that the package really comes from who it says it comes from, and that it hasn't been tampered with on its way from the packager to your hard disk.
At any rate, dealing with source and binary distributions of software is quite simple. If the package is released as a tar file, first use the tar t option to determine how the files have been archived. In the case of binary distributions, you may be able to unpack the tar file directly on your system—say, from / or /usr. When doing this, be sure to delete any old versions of the program and its support files (those that aren't overwritten by the new tar file). If the old executable comes before the new one on your path, you'll continue to run the old version unless you remove it.
Source distributions are a bit trickier. First, you must unpack the sources into a directory of their own. Most systems use /usr/src for just this. Because you usually don't have to be root to build a software package (although you will usually require root permissions to install the program once compiled!), it might be a good idea to make /usr/src writable by all users, with the command:
chmod 1777 /usr/src
This allows any user to create subdirectories in /usr/src and place files there. The first 1 in the mode is the "sticky" bit, which prevents users from deleting each other's subdirectories.
You can now create a subdirectory under /usr/src and unpack the tar file there, or you can unpack the tar file directly from /usr/src if the archive contains a subdirectory of its own.
Once the sources are available, the next step is to read any README and INSTALL files or installation notes included with the sources. Nearly all packages include such documentation. The basic method used to build most programs is as follows:
1. Check the Makefile. This file contains instructions for make, which controls the compiler to build programs. Many applications require you to edit minor aspects of the Makefile for your own system; this should be self-explanatory. The installation notes will tell you if you have to do this. If there is no Makefile in the package, you might have to generate it first. See item 3 for how to do this.
2. Possibly edit other files associated with the program. Some applications require you to edit a file named config.h; again, this will be explained in the installation instructions.
3. Possibly run a configuration script. Such a script is used to determine what facilities are available on your system, which is necessary to build more complex applications.
Specifically, when the sources do not contain a Makefile in the top-level directory, but instead a file called Makefile.in and a file called configure, the package has been built with the Autoconf system. In this (more and more common) case, you run the configuration script like this:
./configure
The ./ should be used so that the local configure is run, and not another configure program that might accidentally be in your path. Some packages let you pass options to configure that often enable or disable specific features of the package. (You can find out what these options are withconfigure --help.) Once the configure script has run, you can proceed with the next step.
4. Run make. Generally, this executes the appropriate compilation commands as given in the Makefile. In many cases you'll have to give a "target" to make, as in make all or make install. These are two common targets; the former is usually not necessary but can be used to build all targets listed in a Makefile (e.g., if the package includes several programs, but only one is compiled by default); the latter is often used to install the executables and support files on the system after compilation. For this reason, make install is usually run as root.
Even after the installation, there is often one major difference between programs installed from source or from a binary package. Programs installed from source are often installed below /usr/local by default, which is rarely the case with binary packages.
You might have problems compiling or installing new software on your system, especially if the program in question hasn't been tested under Linux, or depends on other software you don't have installed. In Chapter 21, we talk about the compiler, make, and related tools in detail.
Most software packages include manual pages and other files, in addition to the source and executables. The installation script (if there is one) will place these files in the appropriate location. In the case of manual pages, you'll find files with names such as foobar.1 or foobar.man. These files are usually nroff source files, which are formatted to produce the human-readable pages displayed by the man command. If the manual page source has a numeric extension, such as .1, copy it to the directory /usr/man/man1, where 1 is the number used in the filename extension. (This corresponds to the manual "section" number; for most user programs, it is 1.) If the file has an extension such as .man, it usually suffices to copy the file to /usr/man/man1, renaming the .man extension to .1.
Upgrading Libraries
Most of the programs on a Linux system are compiled to use shared libraries . These libraries contain useful functions common to many programs. Instead of storing a copy of these routines in each program that calls them, the libraries are contained in files on the system that are read by all programs at runtime. That is, when a program is executed, the code from the program file itself is read, followed by any routines from the shared library files. This saves a great deal of disk space—only one copy of the library routines is stored on disk.
If you're lucky, using the package system means that the right versions of the libraries each program needs are installed along with the programs. The package system is supposed to be aware of dependencies on shared libraries. But because different programs may depend on different versions of libraries, or because you might install a program without using the package system, you occasionally have to understand the conventions for libraries explained in this section.
In some instances, it's necessary to compile a program to have its own copy of the library routines (usually for debugging) instead of using the routines from the shared libraries. We say that programs built in this way are statically linked, whereas programs built to use shared libraries aredynamically linked.
Therefore, dynamically linked executables depend upon the presence of the shared libraries on disk. Shared libraries are implemented in such a way that the programs compiled to use them generally don't depend on the version of the available libraries. This means that you can upgrade your shared libraries, and all programs that are built to use those libraries will automatically use the new routines. (There is an exception: if major changes are made to a library, the old programs won't work with the new library. You'll know this is the case because the major version number is different; we explain more later. In this case, you keep both the old and new libraries around. All your old executables will continue to use the old libraries, and any new programs that are compiled will use the new libraries.)
When you build a program to use shared libraries, a piece of code is added to the program that causes it to execute ld.so, the dynamic linker, when the program is started. ld.so is responsible for finding the shared libraries the program needs and loading the routines into memory. Dynamically linked programs are also linked against "stub" routines, which simply take the place of the actual shared library routines in the executable. ld.so replaces the stub routine with the code from the libraries when the program is executed.
The ldd command can be used to list the shared libraries on which a given executable depends. For example:
rutabaga$ ldd /usr/bin/X11/xterm
linux-gate.so.1 => (0xffffe000)
libXft.so.2 => /usr/X11R6/lib/libXft.so.2 (0x40037000)
libfontconfig.so.1 => /usr/lib/libfontconfig.so.1 (0x4004b000)
libfreetype.so.6 => /usr/lib/libfreetype.so.6 (0x40079000)
libexpat.so.0 => /usr/lib/libexpat.so.0 (0x400e8000)
libXrender.so.1 => /usr/X11R6/lib/libXrender.so.1 (0x40107000)
libXaw.so.8 => /usr/X11R6/lib/libXaw.so.8 (0x4010f000)
libXmu.so.6 => /usr/X11R6/lib/libXmu.so.6 (0x4016b000)
libXt.so.6 => /usr/X11R6/lib/libXt.so.6 (0x40182000)
libSM.so.6 => /usr/X11R6/lib/libSM.so.6 (0x401d5000)
libICE.so.6 => /usr/X11R6/lib/libICE.so.6 (0x401dd000)
libXpm.so.4 => /usr/X11R6/lib/libXpm.so.4 (0x401f5000)
libXp.so.6 => /usr/X11R6/lib/libXp.so.6 (0x40205000)
libXext.so.6 => /usr/X11R6/lib/libXext.so.6 (0x4020d000)
libX11.so.6 => /usr/X11R6/lib/libX11.so.6 (0x4021c000)
libncurses.so.5 => /lib/libncurses.so.5 (0x40318000)
libutempter.so.0 => /usr/lib/libutempter.so.0 (0x4035d000)
libc.so.6 => /lib/tls/libc.so.6 (0x4035f000)
libdl.so.2 => /lib/libdl.so.2 (0x40478000)
/lib/ld-linux.so.2 (0x40000000)
Here, we see that the xterm program depends on a number of shared libraries, including libXaw, libXt, libX11, and libc. (The libraries starting with libX as well as libSM and libICE are all related to the X Window System; libc is the standard C library.) We also see the version numbers of the libraries for which the program was compiled (that is, the version of the stub routines used), and the name of the file that contains each shared library. This is the file that ld.so will find when the program is executed. The first file in the list, by the way, linux-gate.so.1, is not a real shared library, but rather a so-called dynamic shared object provided by the kernel, a technicality that speeds up system calls into the kernel and provides other useful low-level things.
To use a shared library, the version of the stub routines (in the executable) must be compatible with the version of the shared libraries. Basically, a library is compatible if its major version number matches that of the stub routines. The major version number is the part right after the .so. In this case, libX11 (the most basic library used by the X Window System) is used with the major Version 6. The library file libX11.so.6 (which usually resides in /usr/X11R6/lib) might very well just be a symbolic link—for example, to libX11.so.6.2. This means that the library has the major version number 6 and the minor version number 2. Library versions with the same major version number are supposed to be interchangeable. This way, if a program was compiled with Version 6.0 of the stub routines, shared library Versions 6.1, 6.2, and so forth could be used by the executable. If a new version with the major version number 6 and the minor version number 3 were released (and thus had the filename libX11.so.6.3), all you would need to do to use this new version is change the symbolic link libX11.so.6 to point to the new version. The xterm executable would then automatically benefit from any bug fixes or similar that are included in the new version. In "More Fun with Libraries" in Chapter 21, we describe how to use shared libraries with your own programs.
The file /etc/ld.so.conf contains a list of directories that ld.so searches to find shared library files. An example of such a file is:
/usr/lib
/usr/local/lib
/usr/X11R6/lib
/opt/kde3/lib
ld.so always looks in /lib and /usr/lib, regardless of the contents of ld.so.conf. Usually, there's no reason to modify this file, and the environment variable LD_LIBRARY_PATH can add additional directories to this search path (e.g., if you have your own private shared libraries that shouldn't be used system-wide). However, if you do add entries to /etc/ld.so.conf or upgrade or install additional libraries on your system, be sure to use the ldconfig command, which will regenerate the shared library cache in /etc/ld.so.cache from the ld.so search path. This cache is used by ld.so to find libraries quickly at runtime without actually having to search the directories on its path. For more information, check the manual pages for ld.so and ldconfig.
Now that you understand how shared libraries are used, let's move on to upgrading them. The two libraries that are most commonly updated are libc (the standard C library) and libm (the math library). Because naming is a little bit special for these, we will look at another library here, namelylibncurses, which "emulates" a graphical windowing system on the text console.
For each shared library, there are two separate files:
<library>.a
This is the static version of the library. When a program is statically linked, routines are copied from this file directly into the executable, so the executable contains its own copy of the library routines.[*]
< library>.so.<version>
This is the shared library image itself. When a program is dynamically linked, the stub routines from this file are copied into the executable, allowing ld.so to locate the shared library at runtime. When the program is executed, ld.so copies routines from the shared library into memory for use by the program. If a program is dynamically linked, the <library>.a file is not used for this library.
For the libncurses library, you'll have files such as libncurses.a and libncurses.so.5.4. The .a files are generally kept in /usr/lib, and .so files are kept in /lib. When you compile a program, either the .a or the .so file is used for linking, and the compiler looks in /lib and /usr/lib (as well as a variety of other places) by default. If you have your own libraries, you can keep these files anywhere, and control where the linker looks with the -L option to the compiler. See "More Fun with Libraries" in Chapter 21 for details.
The shared library image, <library>.so.version, is kept in /lib for most system-wide libraries. Shared library images can be found in any of the directories that ld.so searches at runtime; these include /lib, /usr/lib, and the files listed in ld.so.conf. See the ld.so manual page for details.
If you look in /lib, you'll see a collection of files such as the following:
lrwxrwxrwx 1 root root 17 Jul 11 06:45 /lib/libncurses.so.5 \
-> libncurses.so.5.4
-rwxr-xr-x 1 root root 319472 Jul 11 06:45 /lib/libncurses.so.5.4
lrwxrwxrwx 1 root root 13 Jul 11 06:45 libz.so.1 -> libz.so.1.2.2
-rwxr-xr-x 1 root root 62606 Jul 11 06:45 libz.so.1.2.2
Here, we see the shared library images for two libraries -- libncurses and libz. Note that each image has a symbolic link to it, named <library>.so.<major>, where <major> is the major version number of the library. The minor number is omitted because ld.so searches for a library only by its major version number. When ld.so sees a program that has been compiled with the stubs for Version 5.4 of libncurses, it looks for a file called libncurses.so.5 in its search path. Here, /lib/libncurses.so.5 is a symbolic link to /lib/libncurses.so.5.4, the actual version of the library we have installed.
When you upgrade a library, you must replace the .a and .so.<version> files corresponding to the library. Replacing the .a file is easy: just copy over it with the new versions. However, you must use some caution when replacing the shared library image, .so.<version>; many of the text-based programs on the system depend on shared library images, so you can't simply delete them or rename them. To put this another way, the symbolic link <library>.so.<major> must always point to a valid library image. To accomplish this, first copy the new image file to /lib, and then change the symbolic link to point to the new file in one step, using ln -sf. This is demonstrated in the following example.
Let's say you're upgrading from Version 5.4 of the libncurses library to Version 5.5. You should have the files libncurses.a and libncurses.so.5.5. First, copy the .a file to the appropriate location, overwriting the old version:
rutabaga# cp libncurses.a /usr/lib
Now, copy the new image file to /lib (or wherever the library image should be):
rutabaga# cp libncurses.so.5.5 /lib
Now, if you use the command ls -l /lib/libncurses, you should see something like the following:
lrwxrwxrwx 1 root root 17 Dec 10 1999 /lib/libncurses.so.5 ->
libncurses.so.5.4
-rwxr-xr-x 1 root root 319472 May 11 2001 /lib/libncurses.so.5.4
-rwxr-xr-x 1 root root 321042 May 11 2001 /lib/libncurses.so.5.5
To update the symbolic link to point to the new library, use the command:
rutabaga# ln -sf /lib/libncurses.so.5.5 /lib/libncurses.so.5
This gives you:
lrwxrwxrwx 1 root root 14 Oct 23 13:25 libncurses.so.5 ->\
/lib/libncurses.so.5.4
-rwxr-xr-x 1 root root 623620 Oct 23 13:24 libncurses.so.5.4
-rwxr-xr-x 1 root root 720310 Nov 16 11:02 libncurses.so.5.5
Now you can safely remove the old image file, libncurses.so.5.4. You must use ln -sf to replace the symbolic link in one step, especially when updating crucial libraries, such as libc. If you were to remove the symbolic link first, and then attempt to use ln -s to add it again, more than likely lnwould not be able to execute because the symbolic link is gone, and as far as ld.so is concerned, the libc library can't be found. Once the link is gone, nearly all the programs on your system will be unable to execute. Be very careful when updating shared library images. For libncurses, things are less critical because you will always have command-line programs left to clean up any mess you have made, but if you are used to using ncurses-based programs, such as Midnight Commander, this might still be an inconvenience for you.
Whenever you upgrade or add a library to the system, it's not a bad idea to run ldconfig to regenerate the library cache used by ld.so. In some cases, a new library may not be recognized by ld.so until you run ldconfig.
One question remains: where can you obtain the new versions of libraries? Several of the basic system libraries (libc, libm, and so on) can be downloaded from the directory ftp://ftp.gnu.org/pub/gnu/glibc. This contains source versions of libc and related libraries. Other libraries are maintained and archived separately. At any rate, all libraries you install should include the .so.version files and possibly the .a files, as well as a set of include files for use with the compiler.
Upgrading the Compiler
One other important part of the system to keep up to date is the C compiler and related utilities. These include gcc (the GNU C and C++ compiler itself), the linker, the assembler, the C preprocessor, and various include files and libraries used by the compiler itself. All are included in the Linux gcc distribution. Usually, a new version of gcc is released along with new versions of the libc library and include files, and each requires the other.
You can find the current gcc release on the various FTP archives, including ftp://ftp.gnu.org/pub/gnu/gcc. The release notes there should tell you what to do. If you don't have Internet access, you can obtain the newest compiler from CD-ROM archives of the FTP sites, as described earlier.
To find out what version of gcc you have, use the command:
gcc -v
This should tell you something like:
Reading specs from /usr/lib/gcc-lib/i586-suse-linux/3.3.5/specs
Configured with: ../configure --enable-threads=posix --prefix=/usr --with-local-
prefix=/usr/local --infodir=/usr/share/info --mandir=/usr/share/man --enable-
languages=c,c++,f77,objc,java,ada --disable-checking --libdir=/usr/lib --enable-
libgcj --with-slibdir=/lib --with-system-zlib --enable-shared --enable-_ _cxa_atexit
i586-suse-linux
Thread model: posix
gcc version 3.3.5 20050117 (prerelease) (SUSE Linux)
The last line is the interesting one, telling you the version number of gcc and when it was released. Note that gcc itself is just a frontend to the actual compiler and code-generation tools found under
/usr/lib/gcc-lib/machine/version
gcc (usually in /usr/bin) can be used with multiple versions of the compiler proper, with the -V option. In "Programming with gcc" in Chapter 21, we describe the use of gcc in detail.
We would at this point like to warn you not to try newer compilers without knowing exactly what you are doing. Newer compilers might generate object files that are incompatible with the older ones; this can lead to all kinds of trouble. Version 3.3.x of gcc is, at the time of this writing, considered the standard compiler for Linux that everybody expects to find available, even though Versions 3.4.0 and even 4.0.0 are already available. Earlier, when one distributor (Red Hat) started to ship a newer version instead (and even that newer version was not officially released), users ran into lots of trouble. Of course, by the time you read this, another compiler version might be considered the standard. And if you feel adventurous, by all means try newer versions, just be prepared for some serious tweaking.
[*] A virus in the classic sense is a program that attaches to a "host" and runs when the host is executed. On Unix systems, this usually requires root privileges to do any harm, and if programmers could obtain such privileges, they probably wouldn't bother with a virus.
[*] On some distributions, the static versions of the libraries are moved into a separate package and not necessarily installed by default. If this is the case, you won't find the .a files unless you install them.
Archive and Compression Utilities
When installing or upgrading software on Unix systems, the first things you need to be familiar with are the tools used for compressing and archiving files. Dozens of such utilities are available. Some of these (such as tar and compress) date back to the earliest days of Unix; others (such asgzip and the even newer bzip2) are relative newcomers. The main goal of these utilities is to archive files (that is, to pack many files together into a single file for easy transportation or backup) and to compress files (to reduce the amount of disk space required to store a particular file or set of files).
In this section, we're going to discuss the most common file formats and utilities you're likely to run into. For instance, a near-universal convention in the Unix world is to transport files or software as a tar archive, compressed using compress, gzip, or bzip2. In order to create or unpack these files yourself, you'll need to know the tools of the trade. The tools are most often used when installing new software or creating backups—the subject of the following two sections in this chapter. Packages coming from other worlds, such as the Windows or Java world, are often archived and compressed using the zip utility; you can unpack these with the unzip command, which should be available in most Linux installations.[*]
Using gzip and bzip2
gzip is a fast and efficient compression program distributed by the GNU project. The basic function of gzip is to take a file, compress it, save the compressed version as filename.gz, and remove the original, uncompressed file. The original file is removed only if gzip is successful; it is very difficult to accidentally delete a file in this manner. Of course, being GNU software, gzip has more options than you want to think about, and many aspects of its behavior can be modified using command-line options.
First, let's say that we have a large file named garbage.txt:
rutabaga$ ls -l garbage.txt
-rw-r--r-- 1 mdw hack 312996 Nov 17 21:44 garbage.txt
To compress this file using gzip, we simply use the command:
gzip garbage.txt
This replaces garbage.txt with the compressed file garbage.txt.gz. What we end up with is the following:
rutabaga$ gzip garbage.txt
rutabaga$ ls -l garbage.txt.gz
-rw-r--r-- 1 mdw hack 103441 Nov 17 21:44 garbage.txt.gz
Note that garbage.txt is removed when gzip completes.
You can give gzip a list of filenames; it compresses each file in the list, storing each with a .gz extension. (Unlike the zip program for Unix and MS-DOS systems, gzip will not, by default, compress several files into a single .gz archive. That's what tar is for; see the next section.)
How efficiently a file is compressed depends on its format and contents. For example, many graphics file formats (such as PNG and JPEG) are already well compressed, and gzip will have little or no effect upon such files. Files that compress well usually include plain-text files and binary files, such as executables and libraries. You can get information on a gzipped file using gzip -l. For example:
rutabaga$ gzip -l garbage.txt.gz
compressed uncompr. ratio uncompressed_name
103115 312996 67.0% garbage.txt
To get our original file back from the compressed version, we use gunzip, as in the following:
gunzip garbage.txt.gz
After doing this, we get:
rutabaga$ gunzip garbage.txt.gz
rutabaga$ ls -l garbage.txt
-rw-r--r-- 1 mdw hack 312996 Nov 17 21:44 garbage.txt
which is identical to the original file. Note that when you gunzip a file, the compressed version is removed once the uncompression is complete. Instead of using gunzip, you can also use gzip -d (e.g., if gunzip happens not to be installed).
gzip stores the name of the original, uncompressed file in the compressed version. This way, if the compressed filename (including the .gz extension) is too long for the filesystem type (say, you're compressing a file on an MS-DOS filesystem with 8.3 filenames), the original filename can be restored using gunzip even if the compressed file had a truncated name. To uncompress a file to its original filename, use the -N option with gunzip. To see the value of this option, consider the following sequence of commands:
rutabaga$ gzip garbage.txt
rutabaga$mv garbage.txt.gz rubbish.txt.gz
If we were to gunzip rubbish.txt.gz at this point, the uncompressed file would be named rubbish.txt, after the new (compressed) filename. However, with the -N option, we get the following:
rutabaga$ gunzip -N rubbish.txt.gz
rutabaga$ ls -l garbage.txt
-rw-r--r-- 1 mdw hack 312996 Nov 17 21:44 garbage.txt
gzip and gunzip can also compress or uncompress data from standard input and output. If gzip is given no filenames to compress, it attempts to compress data read from standard input. Likewise, if you use the -c option with gunzip, it writes uncompressed data to standard output. For example, you could pipe the output of a command to gzip to compress the output stream and save it to a file in one step:
rutabaga$ ls -laR $HOME | gzip > filelist.gz
This will produce a recursive directory listing of your home directory and save it in the compressed file filelist.gz. You can display the contents of this file with the command:
rutabaga$ gunzip -c filelist.gz | more
This will uncompress filelist.gz and pipe the output to the more command. When you use gunzip -c, the file on disk remains compressed.
The zcat command is identical to gunzip -c. You can think of this as a version of cat for compressed files. Linux even has a version of the pager less for compressed files, called zless.
When compressing files, you can use one of the options -1 through -9 to specify the speed and quality of the compression used. -1 (also --fast) specifies the fastest method, which compresses the files less compactly, and -9 (also -- --best) uses the slowest, but best compression method. If you don't specify one of these options, the default is -6. None of these options has any bearing on how you use gunzip; gunzip will be able to uncompress the file no matter what speed option you use.
Compared with the more than three decades long history of Unix, gzip is relatively new in the Unix world. The compression programs used on most Unix systems are compress and uncompress, which were included in the original Berkeley versions of Unix. compress and uncompress are very much like gzip and gunzip, respectively; compress saves compressed files as filename.Z as opposed to filename.gz, and uses a slightly less efficient compression algorithm.
However, the free software community has been moving to gzip for several reasons. First of all, gzip works better. Second, there has been a patent dispute over the compression algorithm used by compress—the results of which could prevent third parties from implementing the compressalgorithm on their own. Because of this, the Free Software Foundation urged a move to gzip, which at least the Linux community has embraced. gzip has been ported to many architectures, and many others are following suit. Happily, gunzip is able to uncompress the .Z format files produced by compress.
Another compression/decompression program has also emerged to take the lead from gzip. bzip2 is the newest kid on the block and sports even better compression (on the average about 10% to 20% better than gzip), at the expense of longer compression times. You cannot use bunzip2 to uncompress files compressed with gzip and vice versa, and because you cannot expect everybody to have bunzip2 installed on their machine, you might want to confine yourself to gzip for the time being if you want to send the compressed file to somebody else. However, it pays to have bzip2installed because more and more FTP servers now provide bzip2-compressed packages in order to conserve disk space and bandwidth. It is not unlikely that in a few years from now, gzip will be as uncommon in the Linux world as compress is today. You can recognize bzip2-compressed files by their .bz2 filename extension.
Although the command-line options of bzip2 are not exactly the same as those of gzip, those that have been described in this section are. For more information, see the bzip2(1) manual page.
The bottom line is that you should use gzip/gunzip or bzip2/bunzip2 for your compression needs. If you encounter a file with the extension .Z, it was probably produced by compress, and gunzip can uncompress it for you.
Earlier versions of gzip used .z (lowercase) instead of .gz as the compressed-filename extension. Because of the potential confusion with .Z, this was changed. At any rate, gunzip retains backward compatibility with a number of filename extensions and file types.
Using tar
tar is a general-purpose archiving utility capable of packing many files into a single archive file, while retaining information needed to restore the files fully, such as file permissions and ownership. The name tar stands for tape archive because the tool was originally used to archive files as backups on tape. However, use of tar is not at all restricted to making tape backups, as we'll see.
The format of the tar command is:
tar functionoptions files...
where function is a single letter indicating the operation to perform, options is a list of (single-letter) options to that function, and files is the list of files to pack or unpack in an archive. (Note that function is not separated from options by any space.)
function can be one of the following:
c
To create a new archive
x
To extract files from an archive
t
To list the contents of an archive
r
To append files to the end of an archive
u
To update files that are newer than those in the archive
d
To compare files in the archive to those in the filesystem
You'll rarely use most of these functions; the more commonly used are c, x, and t.
The most common options are
k
To keep any existing files when extracting—that is, to not overwrite any existing files that are contained within the tar file.
f filename
To specify that the tar file to be read or written is filename.
z
To specify that the data to be written to the tar file should be compressed or that the data in the tar file is compressed with gzip.
j
Like z, but uses bzip2 instead of gzip; works only with newer versions of tar. Some intermediate versions of tar used I instead; older ones don't support bzip2 at all.
v
To make tar show the files it is archiving or restoring. It is good practice to use this so that you can see what actually happens (unless, of course, you are writing shell scripts).
There are others, which we cover later in this section.
Although the tar syntax might appear complex at first, in practice it's quite simple. For example, say we have a directory named mt, containing these files:
rutabaga$ ls -l mt
total 37
-rw-r--r-- 1 root root 24 Sep 21 2004 Makefile
-rw-r--r-- 1 root root 847 Sep 21 2004 README
-rwxr-xr-x 1 root root 9220 Nov 16 19:03 mt
-rw-r--r-- 1 root root 2775 Aug 7 2004 mt.1
-rw-r--r-- 1 root root 6421 Aug 7 2004 mt.c
-rw-r--r-- 1 root root 3948 Nov 16 19:02 mt.o
-rw-r--r-- 1 root root 11204 Sep 5 2004 st_info.txt
We wish to pack the contents of this directory into a single tar archive. To do this, we use the command:
tar cf mt.tar mt
The first argument to tar is the function (here, c, for create) followed by any options. Here, we use the option f mt.tar to specify that the resulting tar archive be named mt.tar. The last argument is the name of the file or files to archive; in this case, we give the name of a directory, so tarpacks all files in that directory into the archive.
Note that the first argument to tar must be the function letter and options. Because of this, there's no reason to use a hyphen (-) to precede the options as many Unix commands require. tar allows you to use a hyphen, as in:
tar -cf mt.tar mt
but it's really not necessary. In some versions of tar, the first letter must be the function, as in c, t, or x. In other versions, the order of letters does not matter.
The function letters as described here follow the so-called "old option style." There is also a newer "short option style" in which you precede the function options with a hyphen, and a "long option style" in which you use long option names with two hyphens. See the Info page for tar for more details if you are interested.
Be careful to remember the filename if you use the cf function letters. Otherwise tar will overwrite the first file in your list of files to pack because it will mistake that for the filename!
It is often a good idea to use the v option with tar; this lists each file as it is archived. For example:
rutabaga$ tar cvf mt.tar mt
mt/
mt/st_info.txt
mt/README
mt/mt.1
mt/Makefile
mt/mt.c
mt/mt.o
mt/mt
If you use v multiple times, additional information will be printed:
rutabaga$ tar cvvf mt.tar mt
drwxr-xr-x root/root 0 Nov 16 19:03 2004 mt/
-rw-r--r-- root/root 11204 Sep 5 13:10 2004 mt/st_info.txt
-rw-r--r-- root/root 847 Sep 21 16:37 2004 mt/README
-rw-r--r-- root/root 2775 Aug 7 09:50 2004 mt/mt.1
-rw-r--r-- root/root 24 Sep 21 16:03 2004 mt/Makefile
-rw-r--r-- root/root 6421 Aug 7 09:50 2004 mt/mt.c
-rw-r--r-- root/root 3948 Nov 16 19:02 2004 mt/mt.o
-rwxr-xr-x root/root 9220 Nov 16 19:03 2004 mt/mt
This is especially useful because it lets you verify that tar is doing the right thing.
In some versions of tar, f must be the last letter in the list of options. This is because tar expects the f option to be followed by a filename—the name of the tar file to read from or write to. If you don't specify f filename at all, tar assumes for historical reasons that it should use the device/dev/rmt0 (that is, the first tape drive). In "Making Backups," in Chapter 27, we talk about using tar in conjunction with a tape drive to make backups.
Now, we can give the file mt.tar to other people, and they can extract it on their own system. To do this, they would use the following command:
tar xvf mt.tar
This creates the subdirectory mt and places all the original files into it, with the same permissions as found on the original system. The new files will be owned by the user running the tar xvf (you) unless you are running as root, in which case the original owner is preserved. The x option stands for "extract." The v option is used again here to list each file as it is extracted. This produces:
courgette% tar xvf mt.tar
mt/
mt/st_info.txt
mt/README
mt/mt.1
mt/Makefile
mt/mt.c
mt/mt.o
mt/mt
We can see that tar saves the pathname of each file relative to the location where the tar file was originally created. That is, when we created the archive using tar cf mt.tar mt, the only input filename we specified was mt, the name of the directory containing the files. Therefore, tar stores the directory itself and all the files below that directory in the tar file. When we extract the tar file, the directory mt is created and the files placed into it, which is the exact inverse of what was done to create the archive.
By default, tar extracts all tar files relative to the current directory where you execute tar. For example, if you were to pack up the contents of your /bin directory with the command:
tar cvf bin.tar /bin
tar would give the warning:
tar: Removing leading / from absolute pathnames in the archive.
What this means is that the files are stored in the archive within the subdirectory bin. When this tar file is extracted, the directory bin is created in the working directory of tar—not as /bin on the system where the extraction is being done. This is very important and is meant to prevent terrible mistakes when extracting tar files. Otherwise, extracting a tar file packed as, say, /bin would trash the contents of your /bin directory when you extracted it.[*] If you really wanted to extract such a tar file into /bin, you would extract it from the root directory, /. You can override this behavior using the P option when packing tar files, but it's not recommended you do so.
Another way to create the tar file mt.tar would have been to cd into the mt directory itself, and use a command such as:
tar cvf mt.tar *
This way the mt subdirectory would not be stored in the tar file; when extracted, the files would be placed directly in your current working directory. One fine point of tar etiquette is to always pack tar files so that they have a subdirectory at the top level, as we did in the first example with tar cvf mt.tar mt. Therefore, when the archive is extracted, the subdirectory is also created and any files placed there. This way you can ensure that the files won't be placed directly in your current working directory; they will be tucked out of the way and prevent confusion. This also saves the person doing the extraction the trouble of having to create a separate directory (should they wish to do so) to unpack the tar file. Of course, there are plenty of situations where you wouldn't want to do this. So much for etiquette.
When creating archives, you can, of course, give tar a list of files or directories to pack into the archive. In the first example, we have given tar the single directory mt, but in the previous paragraph we used the wildcard *, which the shell expands into the list of filenames in the current directory.
Before extracting a tar file, it's usually a good idea to take a look at its table of contents to determine how it was packed. This way you can determine whether you do need to create a subdirectory yourself where you can unpack the archive. A command such as:
tar tvf tarfile
lists the table of contents for the named tarfile. Note that when using the t function, only one v is required to get the long file listing, as in this example:
courgette% tar tvf mt.tar
drwxr-xr-x root/root 0 Nov 16 19:03 2004 mt/
-rw-r--r-- root/root 11204 Sep 5 13:10 2004 mt/st_info.txt
-rw-r--r-- root/root 847 Sep 21 16:37 2004 mt/README
-rw-r--r-- root/root 2775 Aug 7 09:50 2004 mt/mt.1
-rw-r--r-- root/root 24 Sep 21 16:03 2004 mt/Makefile
-rw-r--r-- root/root 6421 Aug 7 09:50 2004 mt/mt.c
-rw-r--r-- root/root 3948 Nov 16 19:02 2004 mt/mt.o
-rwxr-xr-x root/root 9220 Nov 16 19:03 2004 mt/mt
No extraction is being done here; we're just displaying the archive's table of contents. We can see from the filenames that this file was packed with all files in the subdirectory mt, so that when we extract the tar file, the directory mt will be created and the files placed there.
You can also extract individual files from a tar archive. To do this, use the command:
tar xvf tarfile files
where files is the list of files to extract. As we've seen, if you don't specify any files, tar extracts the entire archive.
When specifying individual files to extract, you must give the full pathname as it is stored in the tar file. For example, if we wanted to grab just the file mt.c from the previous archive mt.tar, we'd use the command:
tar xvf mt.tar mt/mt.c
This would create the subdirectory mt and place the file mt.c within it.
tar has many more options than those mentioned here. These are the features that you're likely to use most of the time, but GNU tar, in particular, has extensions that make it ideal for creating backups and the like. See the tar manual page and the following section for more information.
Using tar with gzip and bzip2
tar does not compress the data stored in its archives in any way. If you are creating a tar file from three 200 K files, you'll end up with an archive of about 600 K. It is common practice to compress tar archives with gzip (or the older compress program). You could create a gzipped tar file using the commands:
tar cvf tarfile files...
gzip -9tarfile
But that's so cumbersome, and requires you to have enough space to store the uncompressed tar file before you gzip it.
A much trickier way to accomplish the same task is to use an interesting feature of tar that allows you to write an archive to standard output. If you specify - as the tar file to read or write, the data will be read from or written to standard input or output. For example, we can create a gzippedtar file using the command:
tar cvf - files... | gzip -9 > tarfile.tar.gz
Here, tar creates an archive from the named files and writes it to standard output; next, gzip reads the data from standard input, compresses it, and writes the result to its own standard output; finally, we redirect the gzipped tar file to tarfile.tar.gz.
We could extract such a tar file using the command:
gunzip -c tarfile.tar.gz | tar xvf -
gunzip uncompresses the named archive file and writes the result to standard output, which is read by tar on standard input and extracted. Isn't Unix fun?
Of course, both commands are rather cumbersome to type. Luckily, the GNU version of tar provides the z option, which automatically creates or extracts gzipped archives. (We saved the discussion of this option until now, so you'd truly appreciate its convenience.) For example, we could use the commands:
tar cvzf tarfile.tar.gzfiles...
and
tar xvzf tarfile.tar.gz
to create and extract gzipped tar files. Note that you should name the files created in this way with the .tar.gz filename extensions (or the equally often used .tgz, which also works on systems with limited filename capabilities) to make their format obvious. The z option works just as well with other tar functions, such as t.
Only the GNU version of tar supports the z option; if you are using tar on another Unix system, you may have to use one of the longer commands to accomplish the same tasks. Nearly all Linux systems use GNU tar.
When you want to use tar in conjunction with bzip2, you need to tell tar about your compression program preferences, like this:
tar cvf tarfile.tar.bz2 --use-compress-program=bzip2files...
Or, shorter:
tar cvf tarfile.tar.bz2 --use-compress-program=bzip2files...
Or, shorter still:
tar cvjf tarfile.tar.bz2 files
The last version works only with newer versions of GNU tar that support the j option.
Keeping this in mind, you could write short shell scripts or aliases to handle cookbook tar file creation and extraction for you. Under bash, you could include the following functions in your .bashrc:
tarc () { tar czvf $1.tar.gz $1 }
tarx () { tar xzvf $1 }
tart () { tar tzvf $1 }
With these functions, to create a gzipped tar file from a single directory, you could use the command:
tarc directory
The resulting archive file would be named directory.tar.gz. (Be sure that there's no trailing slash on the directory name; otherwise, the archive will be created as .tar.gz within the given directory.) To list the table of contents of a gzipped tar file, just use
tart file.tar.gz
Or, to extract such an archive, use:
tarx file.tar.gz
As a final note, we would like to mention that files created with gzip and/or tar can be unpacked with the well-known WinZip utility on Windows systems. WinZip doesn't have support for bzip2 yet, though. If you, on the other hand, get a file in .zip format, you can unpack it on your Linux system using the unzip command.
tar Tricks
Because tar saves the ownership and permissions of files in the archive and retains the full directory structure, as well as symbolic and hard links, using tar is an excellent way to copy or move an entire directory tree from one place to another on the same system (or even between different systems, as we'll see). Using the - syntax described earlier, you can write a tar file to standard output, which is read and extracted on standard input elsewhere.
For example, say that we have a directory containing two subdirectories: from-stuff and to-stuff. from-stuff contains an entire tree of files, symbolic links, and so forth—something that is difficult to mirror precisely using a recursive cp. To mirror the entire tree beneath from-stuff to to-stuff, we could use the commands:
cd from-stuff
tar cf - . | (cd ../to-stuff; tar xvf -)
Simple and elegant, right? We start in the directory from-stuff and create a tar file of the current directory, which is written to standard output. This archive is read by a subshell (the commands contained within parentheses); the subshell does a cd to the target directory, ../to-stuff (relative tofrom-stuff, that is), and then runs tar xvf, reading from standard input. No tar file is ever written to disk; the data is sent entirely via pipe from one tar process to another. The second tar process has the v option that prints each file as it's extracted; in this way, we can verify that the command is working as expected.
In fact, you could transfer directory trees from one machine to another (via the network) using this trick—just include an appropriate rsh (or ssh) command within the subshell on the right side of the pipe. The remote shell would execute tar to read the archive on its standard input. (Actually,GNU tar has facilities to read or write tar files automatically from other machines over the network; see the tar(1) manual page for details.)
[*] Notice that despite the similarity in names, zip on the one hand and gzip and bzip2 on the other hand do not have much in common. zip is both a packaging and compression tool, whereas gzip/bzip2 are for compression only—they typically rely on tar for the actual packaging. Their formats are incompatible; you need to use the correct program for unpacking a certain package.
[*] Some (older) implementations of Unix (e.g., Sinix and Solaris) do just that.
All materials on the site are licensed Creative Commons Attribution-Sharealike 3.0 Unported CC BY-SA 3.0 & GNU Free Documentation License (GFDL)
If you are the copyright holder of any material contained on our site and intend to remove it, please contact our site administrator for approval.
© 2016-2026 All site design rights belong to S.Y.A.