Running Linux, 5th Edition (2009)
Part II. System Administration
Chapter 11. Managing Users, Groups, and Permissions
Managing User Accounts
Even if you're the only actual human being who uses your Linux system, understanding how to manage user accounts is important—even more so if your system hosts multiple users.
User accounts serve a number of purposes on Unix systems. Most prominently, they give the system a way to distinguish between different people who use the system for reasons of identification and security. Each user has a personal account with a separate username and password. As discussed in "File Ownership and Permissions," later in this chapter, users may set permissions on their files, allowing or restricting access to them by other users. Each file on the system is "owned" by a particular user, who may set the permissions for that file. User accounts are used to authenticate access to the system; only those people with accounts may access the machine. Also, accounts are used to identify users, keep system logs, tag electronic mail messages with the name of the sender, and so forth.
Apart from personal accounts, there are users on the system who provide administrative functions. As we've seen, the system administrator uses the root account to perform maintenance—but usually not for personal system use. Such accounts are accessed using the su command, allowing another account to be accessed after logging in through a personal account.
Other accounts on the system may not involve human interaction at all. These accounts are generally used by system daemons , which must access files on the system through a specific user ID other than root or one of the personal user accounts. For example, if you configure your system to receive a newsfeed from another site, the news daemon must store news articles in a spool directory that anyone can access but only one user (the news daemon) can write to. No human being is associated with the news account; it is an "imaginary" user set aside for the news daemon only.
One of the permission bits that can be set on executables is the setuid bit, which causes the program to be executed with the permissions of the owner of that file. For example, if the news daemon were owned by the user news, and the setuid bit were set on the executable, it would run as if by the user news. news would have write access to the news spool directory, and all other users would have read access to the articles stored there. This is a security feature. News programs can give users just the right amount of access to the news spool directory, but no one can just play around there.
As the system administrator, it is your job to create and manage accounts for all users (real and virtual) on your machine. This is actually a painless, hands-off task in most cases, but it's important to understand how it works.
The passwd File
Every account on the system has an entry in the file /etc/passwd. This file contains entries, one line per user, that specify several attributes for each account, such as the username, real name, and so forth.
Each entry in this file is of the following format:
username:password:uid:gid:gecos:homedir:shell
The following list explains each field:
username
A unique character string, identifying the account. For personal accounts, this is the name the user logs in with. On most systems it is limited to eight alphanumeric characters—for example, larry or kirsten.
password
An encrypted representation of the user's password. This field is set using the passwd program to set the account's password; it uses a one-way encryption scheme that is difficult (but not impossible) to break. You don't set this by hand; the passwd program does it for you. Note, however, that if the first character of the password field is * (an asterisk), the account is "disabled"; the system will not allow logins as this user. See "Creating Accounts," later in this chapter.
uid
The user ID, a unique integer the system uses to identify the account. The system uses the uid field internally when dealing with process and file permissions; it's easier and more compact to deal with integers than byte strings. Therefore, both the user ID and the username identify a particular account: the user ID is more important to the system, whereas the username is more convenient for humans.
gid
The group ID, an integer referring to the user's default group, found in the file /etc/group. See "The Group File," later in this chapter.
gecos
Miscellaneous information about the user, such as the user's real name, and optional "location information" such as the user's office address or phone number. Such programs as mail and finger use this information to identify users on the system; we'll talk more about it later. By the way,gecos is a historical name dating back to the 1970s; it stands for General Electric Comprehensive Operating System. GECOS has nothing to do with Unix, except that this field was originally added to /etc/passwd to provide compatibility with some of its services.
homedir
The user's home directory , for the user's personal use; more on this later. When the user first logs in, the shell finds its current working directory in the named home directory.
shell
The name of the program to run when the user logs in; in most cases, this is the full pathname of a shell, such as /bin/bash or /bin/tcsh.
Many of these fields are optional; the only required fields are username, uid, gid, and homedir. Most user accounts have all fields filled in, but "imaginary" or administrative accounts may use only a few.
Here are two sample entries you might find in /etc/passwd:
root:ZxPsI9ZjiVd9Y:0:0:The root of all evil:/root:/bin/bash
aclark:BjDf5hBysDsii:104:50:Anna Clark:/home/aclark:/bin/bash
The first entry is for the root account. First of all, notice that the user ID of root is 0. This is what makes root root: the system knows that uid 0 is "special" and that it does not have the usual security restrictions. The gid of root is also 0, which is mostly a convention. Many of the files on the system are owned by root and the root group, which have a uid and gid of 0, respectively. More on groups in a minute.
On many systems, root uses the home directory /root, or just /. This is not usually relevant because you most often use su to access root from your own account. Also, it is traditional to use a Bourne-shell variant (in this case /bin/bash) for the root account, although you can use the C shell if you like. (Shells are discussed in Chapter 4.) Be careful, though: Bourne shells and C shells have differing syntax, and switching between them when using root can be confusing and lead to mistakes.
The second entry is for an actual human being, username aclark. In this case, the uid is 104. The uid field can technically be any unique integer; on many systems, it's customary to have user accounts numbered 100 and above and administrative accounts in the sub-100 range. The gid is 50, which just means that aclark is in whatever group is numbered 50 in the /etc/group file. Hang on to your hats; groups are covered in "The Group File," later in this chapter.
Home directories are often found in /home , and named for the username of their owner. This is, for the most part, a useful convention that avoids confusion when finding a particular user's home directory. You can technically place a home directory anywhere, but it must exist for you to be able to log into the system. You should, however, observe the directory layout used on your system.
Note that as the system administrator, it's not usually necessary to modify the /etc/passwd file directly. Several programs are available that can help you create and maintain user accounts; see "Creating Accounts," later in this chapter. If you really want to edit the raw /etc/passwd data, consider using a command such as vipw that protects the password file against corruption from simultaneous editing.
Shadow Passwords
To some extent, it is a security risk to let everybody with access to the system view the encrypted passwords in /etc/passwd. Special crack programs are available that try a huge number of possible passwords and check whether the encrypted version of those passwords is equal to a specified one.
To overcome this potential security risk, shadow passwords have been invented. When shadow passwords are used, the password field in /etc/passwd contains only an x or a *, which can never occur in the encrypted version of a password. Instead, a second file called /etc/shadow is used. This file contains entries that look very similar to those in /etc/passwd, but contain the real encrypted password in the password field. /etc/shadow is readable only by root, so normal users do not have access to the encrypted passwords. The other fields in /etc/shadow, except the username and the password, are present as well, but normally contain bogus values or are empty.
Note that in order to use shadow passwords, you need special versions of the programs that access or modify user information, such as passwd or login. Nowadays, most distributions come with shadow passwords already set up, so this should not be a problem for you. Debian users should use "shadowconfig on" instead to ensure that shadow passwords are enabled on their systems.
There are two tools for converting "normal" user entries to shadow entries and back. pwconv takes the /etc/passwd file, looks for entries that are not yet present in /etc/shadow, generates shadow entries for those, and merges them with the entries already present in /etc/shadow.
pwunconv is rarely used because it gives you less security instead of more. It works like pwconv, but generates traditional /etc/passwd entries that work without /etc/shadow counterparts.
Modern Linux systems also provide something called password aging. This is sort of an expiry date for a password; if it approaches, a warning is issued, a configurable number of days before the password expires, and the user is asked to change his password. If he fails to do so, his account will be locked after a while. It is also possible to set a minimum number of days before a changed or created password can be changed again.
All these settings are configured with the passwd command. The -n option sets the minimum number of days between changes, -x the maximum number of days between changes, -w the number of days a warning is issued before a password expires, and -i the number of days of inactivity between the expiry of a password and the time the account is locked.
Most distributions provide graphical tools to change these settings, often hidden on an Advanced Settings page or similar.
PAM and Other Authentication Methods
You might think that having two means of user authentication, /etc/passwd and /etc/shadow, is already enough choice, but you are wrong. There are a number of other authentication methods with strange names, such as Kerberos authentication (so named after the dog from Greek mythology that guards the entrance to Hell). Although we think that shadow passwords provide enough security for almost all cases, it all depends on how much security you really need and how paranoid you want to be.
The problem with all those authentication methods is that you cannot simply switch from one to another because you always need a set of programs, such as login and passwd, that go with those tools. To overcome this problem, the Pluggable Authentication Methods (PAM) system has been invented. Once you have a PAM-enabled set of tools, you can change the authentication method of your system by reconfiguring PAM. The tools will automatically get the code necessary to perform the required authentication procedures from dynamically loaded shared libraries.
Setting up and using PAM is beyond the scope of this book, but you can get all the information you need from http://www.kernel.org/pub/linux/libs/pam/. Most modern distributions will set up PAM for you as well.
The Group File
User groups are a convenient way to logically organize sets of user accounts and allow users to share files within their group or groups. Each file on the system has both a user and a group owner associated with it. Using ls -l, you can see the owner and group for a particular file, as in the following example:
rutabaga$ ls -l boiler.tex
-rwxrw-r-- 1 mdw megabozo 10316 Oct 6 20:19 boiler.tex
rutabaga$
This file is owned by the user mdw and belongs to the megabozo group. We can see from the file permissions that mdw has read, write, and execute access to the file; that anyone in the megabozo group has read and write access; and that all other users have read access only.
This doesn't mean that mdw is in the megabozo group; it simply means the file may be accessed, as shown by the permission bits, by anyone in the megabozo group (which may or may not include mdw).
This way, files can be shared among groups of users, and permissions can be specified separately for the owner of the file, the group to which the file belongs, and everyone else. An introduction to permissions appears in "File Ownership and Permissions," later in this chapter.
Every user is assigned to at least one group, which you specify in the gid field of the /etc/passwd file. However, a user can be a member of multiple groups. The file /etc/group contains a one-line entry for each group on the system, very similar in nature to /etc/passwd. The format of this file is
groupname:password:gid:members
Here, groupname is a character string identifying the group; it is the group name printed when using commands such as ls -l.
password is an optional encrypted password associated with the group, which allows users not in this group to access the group with the newgrp command. Read on for information on this.
gid is the group ID used by the system to refer to the group; it is the number used in the gid field of /etc/passwd to specify a user's default group.
members is a comma-separated list of usernames (with no whitespace in between), identifying those users who are members of this group but who have a different gid in /etc/passwd. That is, this list need not contain those users who have this group set as their "default" group in /etc/passwd; it's only for users who are additional members of the group.
For example, /etc/group might contain the following entries:
root:*:0:
bin:*:1:root,daemon
users:*:50:
bozo:*:51:linus,mdw
megabozo:*:52:kibo
The first entries, for the groups root and bin, are administrative groups, similar in nature to the "imaginary" accounts used on the system. Many files are owned by groups, such as root and bin. The other groups are for user accounts. Like user IDs, the group ID values for user groups are often placed in ranges above 50 or 100.
The password field of the group file is something of a curiosity. It isn't used much, but in conjunction with the newgrp program it allows users who aren't members of a particular group to assume that group ID if they have the password. For example, using the command
rutabaga$ newgrp bozo
Password: password for group bozo
rutabaga$
starts a new shell with the group ID of bozo. If the password field is blank, or the first character is an asterisk, you receive a permission denied error if you attempt to newgrp to that group.
However, the password field of the group file is seldom used and is really not necessary. (In fact, most systems don't provide tools to set the password for a group; you could use passwd to set the password for a dummy user with the same name as the group in /etc/passwd and copy the encrypted password field to /etc/group.) Instead, you can make a user a member of multiple groups simply by including the username in the members field for each additional group. In the previous example, the users linus and mdw are members of the bozo group, as well as whatever group they are assigned to in the /etc/passwd file. If we wanted to add linus to the megabozo group as well, we'd change the last line of the previous example to:
megabozo:*:52:kibo,linus
The command groups tells you which groups you belong to:
rutabaga$ groups
users bozo
Giving a list of usernames to groups lists the groups to which each user in the list belongs.
When you log in, you are automatically assigned to the group ID given in /etc/passwd, as well as any additional groups for which you're listed in /etc/group. This means you have "group access" to any files on the system with a group ID contained in your list of groups. In this case, the group permission bits (set with chmod g+...) for those files apply to you (unless you're the owner, in which case the owner permission bits apply instead).
Now that you know the ins and outs of groups, how should you assign groups on your system? This is really a matter of style and depends on how your system will be used. For systems with just one or a handful of users, it's easiest to have a single group (called, say, users) to which all personal user accounts belong. Note that all the system groups—those groups contained within /etc/group when the system is first installed—should probably be left alone. Various daemons and programs may depend upon them.
If you have a number of users on your machine, there are several ways to organize groups. For example, an educational institution might have separate groups for students, faculty, and staff. A software company might have different groups for each design team. On other systems, each user is placed into a separate group, named identically to the username. This keeps each pigeon in its own hole, so to speak. Files can also be assigned to special groups; many users create new groups and place files into them for sharing the files between users. However, this requires adding users to the additional groups, a task that usually requires the system administrator to intervene (by editing /etc/group or using utilities, such as gpasswd on Debian systems). It's really up to you.
Another situation in which groups are often used is special hardware groups. Let's say that you have a scanner that is accessed via /dev/scanner. If you do not want to give everybody access to the scanner, you could create a special group called scanner, assign /dev/scanner to this group, make this special file readable for the group and nonreadable for everybody else, and add everybody who is allowed to use the scanner to the scanner group in the /etc/groups file.
Creating Accounts
Creating a user account requires several steps: adding an entry to /etc/passwd, creating the user's home directory, and setting up the user's default configuration files (such as .bashrc) in her home directory. Luckily, you don't have to perform these steps manually; nearly all Linux systems include a program called adduser to do this for you. Some Linux systems, such as Red Hat or SUSE, use a different set of tools for account creation and deletion. If the sequence of inputs in this section does not work for you, check the documentation for your distribution. (Red Hat allows accounts to be managed through the control-panel tool, and SUSE does it via yast2; Debian includes an adduser script (interactive in some versions and noninteractive on others) that automatically sets up users based on the configuration file /etc/adduser.conf). In addition, there are graphical user management programs, such as KUser from KDE and the GNOME System Tools.
Running adduser as root should work as follows. Just enter the requested information at the prompts; many of the prompts have reasonable defaults you can select by pressing Enter:
Adding a new user. The username should not exceed 8 characters
in length, or you many run into problems later.
Enter login name for new account (^C to quit): norbert
Editing information for new user [norbert]
Full Name: Norbert Ebersol
GID [100]: 117
Checking for an available UID after 500
First unused uid is 501
UID [501]: (enter)
Home Directory [/home/norbert]: (enter)
Shell [/bin/bash]: (enter)
Password [norbert]: (norbert's password)
Information for new user [norbert]:
Home directory: [/home/norbert] Shell: [/bin/bash]
Password: [(norbert's password)] uid: [501] gid: [117]
Is this correct? [y/N]: y
Adding login [norbert] and making directory [/home/norbert]
Adding the files from the /etc/skel directory:
./.emacs -> /home/norbert/./.emacs
./.kermrc -> /home/norbert/./.kermrc
./.bashrc -> /home/norbert/./.bashrc
... more files ...
There should be no surprises here; just enter the information as requested or choose the defaults. Note that adduser uses 100 as the default group ID, and looks for the first unused user ID after 500 (500 is used as the minimum on SUSE and Red Hat; Debian uses 1000). It should be safe to go along with these defaults; in the previous example, we used a group ID of 117 because we designated that to be the group for the user, as well as the default user ID of 501.
After the account is created, the files from /etc/skel are copied to the user's home directory. /etc/skel contains the "skeleton" files for a new account; they are the default configuration files (such as .emacs and .bashrc) for the new user. Feel free to place other files here if your new user accounts should have them.
After this is done, the new account is ready to roll; norbert can log in, using the password set using adduser. To guarantee security, new users should always change their own passwords, using passwd, immediately after logging in for the first time.
root can set the password for any user on the system. For example, the command:
passwd norbert
prompts for a new password for norbert, without asking for the original password. Note, however, that you must know the root password in order to change it. If you forget the root password entirely, you can boot Linux from an emergency disk (as discussed previously), and clear thepassword field of the /etc/passwd entry for root. See "What to Do in an Emergency" in Chapter 27.
Some Linux systems provide the command-line-driven useradd instead of adduser. (And, to make things even more confusing, on some other systems, the two commands are synonyms.) This program requires you to provide all relevant information as command-line arguments. If you can't locate adduser and are stuck with useradd, see the manual pages, which should help you out.
Deleting and Disabling Accounts
Deleting a user account is much easier than creating one; this is the well-known concept of entropy at work. To delete an account, you must remove the user's entry in /etc/passwd, remove any references to the user in /etc/group, and delete the user's home directory, as well as any additional files created or owned by the user. For example, if the user has an incoming mailbox in /var/spool/mail, it must be deleted as well.
The command userdel (the yin to useradd's yang) deletes an account and the account's home directory. For example:
userdel -r norbert
will remove the recently created account for norbert. The -r option forces the home directory to be removed as well. Other files associated with the user—for example, the incoming mailbox, crontab files, and so forth—must be removed by hand. Usually these are quite insignificant and can be left around. By the end of this chapter, you should know where these files are, if they exist. A simple way to find the files associated with a particular user is through the following command:
find / -user username -ls
This will give an ls -l listing of each file owned by username. Of course, to use this, the account associated with username must still have an entry in /etc/passwd. If you deleted the account, use the -uid num argument instead, where num is the numeric user ID of the dearly departed user.
Temporarily (or not so temporarily) disabling a user account, for whatever reason, is even simpler. You can either remove the user's entry in /etc/passwd (leaving the home directory and other files intact) or add an asterisk to the first character of the password field of the /etc/passwd entry, as follows:
aclark:*BjDf5hBysDsii:104:50:Anna Clark:/home/aclark:/bin/bash
This will disallow logins to the account in question. Note that if you use shadow passwords, you need to do the same thing in /etc/shadow. But why would you want to do that? Well, imagine that an employee is leaving the company, and you want to prevent him from logging in any more, but you still want to keep his files around in case there is anything his colleagues still need. In this case, it is convenient to be able to disable the account without actually deleting the home directory (and other related files such as the mail spool).
Modifying User Accounts
Modifying attributes of user accounts and groups is usually a simple matter of editing /etc/passwd and /etc/group. Many systems provide commands such as usermod and groupmod to do just this; it's often easier to edit the files by hand.
To change a user's password, use the passwd command, which will prompt for a password, encrypt it, and store the encrypted password in the /etc/passwd file.
If you need to change the user ID of an existing account, you can do this by editing the uid field of /etc/passwd directly. However, you should also chown the files owned by the user to that of the new user ID. For example:
chown -R aclark /home/aclark
will set the ownership for all files in the home directory used by aclark back to aclark, if you changed the uid for this account. If ls -l prints a numeric user ID, instead of a username, this means there is no username associated with the uid owning the files. Use chown to fix this.
File Ownership and Permissions
Ownership and permissions are central to security. It's important to get them right, even when you're the only user, because odd things can happen if you don't. For the files that users create and use daily, these things usually work without much thought (although it's still useful to know the concepts). For system administration, matters are not so easy. Assign the wrong ownership or permission, and you might get into a frustrating bind such as being unable to read your mail. In general, the message:
Permission denied
means that someone has assigned an ownership or permission that restricts access more than you want.
What Permissions Mean
Permissions refer to the ways in which someone can use a file. There are three such permissions under Unix:
§ Read permission means you can look at the file's contents.
§ Write permission means you can change or delete the file.
§ Execute permission means you can run the file as a program.
When each file is created, the system assigns some default permissions that work most of the time. For instance, it gives you both read and write permission , but most of the world has only read permission . If you have a reason to be paranoid, you can set things up so that other people have no permissions at all.
Additionally, most utilities know how to assign permissions . For instance, when the compiler creates an executable program, it automatically assigns execute permission.
There are times when defaults don't work, though. For instance, if you create a shell script or Perl program, you'll have to assign execute permission yourself so that you can run it. We show how to do that later in this section, after we get through the basic concepts.
Permissions have different meanings for a directory:
§ Read permission means you can list the contents of that directory.
§ Write permission means you can add or remove files in that directory.
§ Execute permission means you can list information about the files in that directory.
Don't worry about the difference between read and execute permission for directories; basically, they go together. Assign both or neither.
Note that if you allow people to add files to a directory, you are also letting them remove files. The two privileges go together when you assign write permission. However, there is a way you can let users share a directory and keep them from deleting each other's files. See "Upgrading Software Not Provided in Packages" in Chapter 12.
There are more files on Unix systems than the plain files and directories we've talked about so far. These are special files (devices), sockets, symbolic links, and so forth—each type observing its own rules regarding permissions. But you don't need to know the details on each type.
Owners and Groups
Now, who gets these permissions? To allow people to work together, Unix has three levels of permission: owner, group, and other. The "other" level covers everybody who has access to the system and who isn't the owner or a member of the group.
The idea behind having groups is to give a set of users, such as a team of programmers, access to a file. For instance, a programmer creating source code may reserve write permission to herself, but allow members of her group to have read access through a group permission. As for "other," it might have no permission at all so that people outside the team can't snoop around. (You think your source code is that good?)
Each file has an owner and a group. The owner is generally the user who created the file. Each user also belongs to a default group, and that group is assigned to every file the user creates. You can create many groups, though, and assign each user to multiple groups. By changing the group assigned to a file, you can give access to any collection of people you want. We discussed groups earlier in "The Group File."
Now we have all the elements of our security system: three permissions (read, write, execute) and three levels (user, group, other). Let's look at some typical files and see what permissions are assigned.
Figure 11-1 shows a typical executable program. We generated this output by executing ls with the -l option.
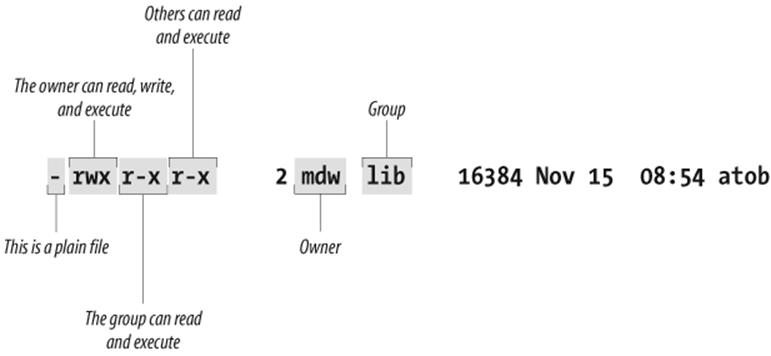
Figure 11-1. Displaying ownership and permissions
Two useful facts stand right out: the owner of the file is an author of this book and your faithful guide, mdw, and the group is lib (perhaps a group created for programmers working on libraries). But the key information about permissions is encrypted in the set of letters on the left side of the display.
The first character is a hyphen, indicating a plain file. The next three bits apply to the owner; as we would expect, mdw has all three permissions. The next three bits apply to members of the group: they can read the file (not too useful for a binary file) and execute it, but they can't write to it because the field that should contain a w contains a hyphen instead. And the last three bits apply to "other"; they have the same permissions in this case as the group.
Here is another example. If you asked for a long listing of a C source file, it would look something like this:
$ ls -l
-rw-rw-r-- 1 kalle kalle 12577 Apr 30 13:13 simc.c
The listing shows that the owner has read and write (rw) privileges, and so does the group. Everyone else on the system has only read privileges.
Now suppose we compile the file to create an executable program. The file simc is created by the gcc compiler:
$ gcc -osimc simc.c
$ ls -l
total 36
-rwxrwxr-x 1 kalle kalle 19365 Apr 30 13:14 simc
-rw-rw-r-- 1 kalle kalle 12577 Apr 30 13:13 simc.c
In addition to the read and write bits, gcc has set the executable (x) bit for owner, group, and other on the executable file. This is the appropriate thing to do so that the file can be run:
$ ./simc(output here)
One more example—a typical directory:
drwxr-xr-x 2 mdw lib 512 Jul 17 18:23 perl
The leftmost bit is now a d to show that this is a directory. The executable bits are back because you want people to see the contents of the directory.
Files can be in some obscure states that aren't covered here; see the ls manual page for gory details. But now it's time to see how you can change ownership and permissions.
Changing the Owner, Group, and Permissions
As we said, most of the time you can get by with the default security the system gives you. But there are always exceptions, particularly for system administrators. To take a simple example, suppose you are creating a directory under /home for a new user. You have to create everything asroot, but when you're done you have to change the ownership to the user; otherwise, that user won't be able to use the files! (Fortunately, if you use the adduser command discussed earlier in "Creating Accounts," it takes care of ownership for you.)
Similarly, certain utilities and programs such as the MySQL database and News have their own users. No one ever logs in as mysql or News, but those users and groups must exist so that the utilities can do their job in a secure manner. In general, the last step when installing software is usually to change the owner, group, and permissions as the documentation tells you to do.
The chown command changes the owner of a file, and the chgrp command changes the group. On Linux, only root can use chown for changing ownership of a file, but any user can change the group to another group to which he belongs.
So after installing some software named sampsoft, you might change both the owner and the group to bin by executing:
# chown bin sampsoft
#chgrp bin sampsoft
You could also do this in one step by using the dot notation:
# chown bin.bin sampsoft
The syntax for changing permissions is more complicated. The permissions can also be called the file's "mode," and the command that changes permissions is chmod. Let's start our exploration of this command through a simple example. Say you've written a neat program in Perl or Tcl namedheader, and you want to be able to execute it. You would type the following command:
$ chmod +x header
The plus sign means "add a permission," and the x indicates which permission to add.
If you want to remove execute permission, use a minus sign in place of a plus:
$ chmod -x header
This command assigns permissions to all levels: user, group, and other. Let's say that you are secretly into software hoarding and don't want anybody to use the command but yourself. No, that's too cruel—let's say instead that you think the script is buggy and want to protect other people from hurting themselves until you've exercised it. You can assign execute permission just to yourself through the command:
$ chmod u+x header
Whatever goes before the plus sign is the level of permission, and whatever goes after is the type of permission. User permission (for yourself) is u, group permission is g, and other is o. So to assign permission to both yourself and the file's group, enter:
$ chmod ug+x header
You can also assign multiple types of permissions:
$ chmod ug+rwx header
You can learn a few more shortcuts from the chmod manual page in order to impress someone looking over your shoulder, but they don't offer any functionality besides what we've shown you.
As arcane as the syntax of the mode argument may seem, there's another syntax that is even more complicated. We have to describe it, though, for several reasons. First of all, there are several situations that cannot be covered by the syntax, called symbolic mode , that we've just shown. Second, people often use the other syntax, called absolute mode , in their documentation. Third, there are times you may actually find the absolute mode more convenient.
To understand absolute mode, you have to think in terms of bits and octal notation. Don't worry, it's not too hard. A typical mode contains three characters, corresponding to the three levels of permission (user, group, and other). These levels are illustrated in Figure 11-2. Within each level, there are three bits corresponding to read, write, and execute permission.
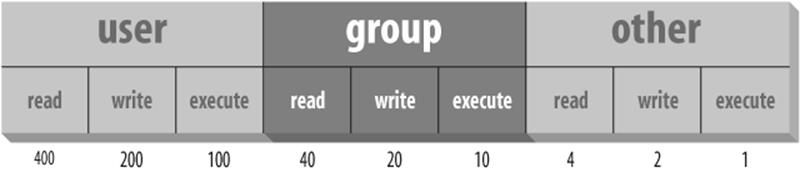
Figure 11-2. Bits in absolute mode
Let's say you want to give yourself read permission and no permission to anybody else. You want to specify just the bit represented by the number 400. So the chmod command would be:
$ chmod 400 header
To give read permission to everybody, choose the correct bit from each level: 400 for yourself, 40 for your group, and 4 for other. The full command is:
$ chmod 444 header
This is like using a mode +r, except that it simultaneously removes any write or execute permission. (To be precise, it's just like a mode of =r, which we didn't mention earlier. The equal sign means "assign these rights and no others.")
To give read and execute permission to everybody, you have to add up the read and execute bits: 400 plus 100 is 500, for instance. So the corresponding command is:
$ chmod 555 header
which is the same as =rx. To give someone full access, you would specify that digit as a 7: the sum of 4, 2, and 1.
One final trick: how to set the default mode that is assigned to each file you create (with a text editor, the > redirection operator, and so on). You do so by executing a umask command, or putting one in your shell's startup file. This file could be called .bashrc, .cshrc, or something else depending on the shell you use (we discussed startup files in Chapter 4).
The umask command takes an argument like the absolute mode in chmod, but the meaning of the bits is inverted. You have to determine the access you want to grant for user, group, and other, and subtract each digit from 7. That gives you a three-digit mask.
For instance, say you want yourself to have all permissions (7), your group to have read and execute permissions (5), and others to have no permissions (0). Subtract each bit from 7 and you get 0 for yourself, 2 for your group, and 7 for other. So the command to put in your startup file is
umask 027
A strange technique, but it works. The chmod command looks at the mask when it interprets your mode; for instance, if you assign execute mode to a file at creation time, it will assign execute permission for you and your group, but will exclude others because the mask doesn't permit them to have any access.