Running Linux, 5th Edition (2009)
Part I. Enjoying and Being Productive on Linux
Chapter 3. Desktop Environments
If you installed one of the popular Linux distributions, it came up with a rather attractive graphical interface. This chapter tells you how to use this interface to get work done more quickly and pleasantly. Most Linux systems with graphical interfaces offer a comprehensive graphical environment called a desktop.
This chapter covers both of the popular Linux desktops, the K Desktop Environment (KDE) and GNOME. Readers who have trouble getting their graphical interfaces to work at all, or who want to delve deeper into the guts of Linux graphics, can find help in Chapter 16.
Why Use a Graphical Desktop?
If you plan to run your Linux machine as a server, there is no need to install any of the packages described in this chapter (unless you want to use graphical administration tools). X and the desktop systems require significant memory, CPU time, and disk space, and if your system never has a monitor attached to it, installing them is a waste of time and resources. Similarly, if you will just be doing programming and have no interest in viewing results graphically or using graphical integrated development environments (IDEs), you could well get by without these conveniences.
But for all other systems, KDE and GNOME make Linux appropriate for mass use. They do the kinds of things the average user expects his computer to do for him, such as the following:
§ Display many different kinds of content automatically when their icons are clicked, without the user having to specify the program used for display
§ Cut and paste both text and pictures from one window to another, even when these windows run different applications that store data in different formats
§ Save and restore sessions, so the user can log back in and pick up as much as possible just where she left off
§ Aid the user with hints as to where he is, such as thumbnail images and tool tips
§ Offer a wealth of beautiful backgrounds, screen savers, and themes
§ Allow a dizzying extent of customization—but in a subtle way that allows most users to feel happy with defaults
To offer all these features, both KDE and GNOME require hefty computing power and memory. Modern hardware can handle them comfortably (and they're both getting trimmer over time), but some users prefer to use more lightweight graphical systems that lack some of the power. If you want something partway between a plain command-line console and the resource-intensive environments of KDE or GNOME, try the xfce window manager. It comes with many distributions and can be downloaded from http://www.xfce.org, along with its documentation. With a much smaller footprint than KDE or GNOME, it offers a surprisingly rich range of features.
Because KDE and GNOME were designed to be intuitive and borrowed many ideas from other popular graphical environments, their basic use is intuitive for most computer users. In this chapter we'll explore some of the neat things that they and their key applications offer, but which you might not have found out through everyday experimentation.
The K Desktop Environment
KDE is an open source software project that aims at providing a consistent, user-friendly, contemporary desktop for Unix, and hence, Linux systems. Since its inception in October 1996, it has made great progress. This is partly due to the choice of a very high-quality GUI toolkit, Qt, as well as the consequent choice of using C++ and its object-oriented features for the implementation.
KDE employs a component technology called KParts that makes it possible to embed one application into another transparently, such that, for example, the web browser Konqueror can display PDF documents in its own browser window by means of the PDF display program KPDF , without Konqueror having to have a PDF display component of its own. The same goes for the KOffice suite (see http://koffice.kde.org), discussed in Chapter 8, where, for example, the word processor KWord can embed tables from the spreadsheet application KSpread seamlessly.
KDE is in ever-continuing development, but every few months the KDE team puts out a so-called official release that is considered very stable and suitable for end users. The KDE team makes these available in source form, and most distributions provide easy-to-install binary packages within days of a source release. If you don't mind fiddling around with KDE and can stand an occasional bug, you can also live on the bleeding edge and download daily snapshots of KDE, but this is not for the fainthearted. At the time of this writing, the current stable release was 3.4.2. To stay current with KDE development, visit http://www.kde.org, the official web site of the KDE project, often.
General Features
One of the goals of the KDE team is to make everything in KDE configurable by GUI dialogs. Underneath the configuration system lies a set of text files in a fairly simple parameter=value format; you can edit these if you prefer, but you never need to. Even the most experienced users usually admit that in order to do simple things, such as change the background color of the desktop, it's faster to click a few buttons than to read the manual page, find the syntax for specifying the background color, open the configuration file, edit it, and restart the window manager.
Besides easy configuration, KDE sports a few other features that were previously unheard of on Linux. For example, it integrates Internet access fully into the desktop. It comes with a file manager that doubles as a web browser (or the other way around), and browsing files on some FTP sites is just the same as browsing your local hard disk. You can drag and drop icons that represent Internet locations to your desktop and thus easily find them again later. KDE integrates search engines and other Internet resources into your desktop and even lets you define your own favorite search engines and Internet links with ease. In addition, almost all KDE application are able to open and save files in remote locations, not just via FTP or HTTP, but also to and from a digital camera, or using SSH encryption, or in other ways.
Drag-and-drop, commonplace on Windows or the Macintosh, is also widely used in KDE. For example, to open a file in the text editor, you just grab its icon in the file manager window and drop it onto the editor window. This works no matter where the file is located; if it is on a remote server, KDE automatically downloads the file for you before opening it in the text editor or whichever application you choose to open it with. The same goes for multimedia files. Just by clicking an icon for an MP3 file on a remote server, you can download it in the background and play it locally.
Although manual pages are designed well to give programmers instant access to terse information about system libraries, they are not really very well suited for end-user documentation. KDE therefore uses standard HTML files (which are generated from XML files in the background) and comes with a fast help viewer, the KDE Help Center. The viewer also knows how to display manual page and Info files so that you can access all the documentation on your system from one application. In addition, most KDE applications support context-sensitive help.
For the past few releases, the X Window System has supported a feature called session management . When you leave your X environment, log off, or reboot, an application that understands session management will reappear at the same positions and in the same configuration. Unfortunately, this very user-friendly feature was rarely supported by X applications. KDE uses it extensively. KDE provides a session manager that handles session management, and all KDE applications are written to behave properly with that feature. KDE will also support other modern X11 features such as anti-aliasing if your X server supports them (most X servers do, by means of the so-called RENDER extension).
KDE contains a window manager, kwin, and an excellent one at that, but that is only one part of KDE. Some of the others are the file manager, the web browser, the panel, a pager, the control center for configuring your desktop, and many, many more. If you want to, you can even run KDE with another window manager, but you might lose some of the integration features. Also, KDE comes with tons of applications, from a full office productivity suite to PostScript and PDF viewers to multimedia software to games.
You might be thinking, "Well, this all sounds very nice, but I have a couple of normal X applications that I want to run." In this case, you will be delighted to hear that you can continue to do that. Yes, you can run all X applications on a KDE desktop, and KDE even provides some means of integrating them as far as possible into the overall desktop. For example, if you desire, KDE can try to reconfigure your other X applications to use the same colors as the overall desktop so that you get a nice consistent environment. Of course, non-KDE applications will not support some of KDE's advanced features such as drag-and-drop or session management, but you can continue to use the programs you have grown accustomed to until someone releases KDE applications that address the same needs (or perhaps KDE versions of your favorite programs themselves).
Installing KDE
Most Linux distributions come with KDE nowadays, but if yours doesn't, or you want to use a newer version of KDE, you can download it from the Internet. http://www.kde.org is your one-stop shop for everything KDE related, including documentation, screenshots, and download locations.ftp://ftp.kde.org is the KDE project's FTP site, but it is often overloaded, so you might be better off trying a mirror instead. http://www.kde.org/mirrors/ gives you a list of mirrors.
KDE consists of a number of packages. These include the following:
aRts
aRts is short for "a real-time sequencer" and forms the base of most of the multimedia capabilities of KDE.
kdelibs
The KDE libraries. They contain the basic application frame, a number of GUI widgets, the configuration system, the HTML display system, and many other things. Without this package, nothing in KDE will run.
kdebase
In this package, you will find the basic KDE applications that make a desktop a KDE desktop, including the file manager/web browser, the window manager, and the panel. You definitely need this package if you want to use KDE.
kdegames
A number of games, including card games, action games, and strategy games. Everybody will probably want to install these, but only to get acquainted with the system, of course.
kdegraphics
A number of graphics-related programs such as a dvi viewer, a PostScript viewer, and an icon editor.
kdeutils
Some productivity tools, such as text editors, a calculator, printer managers, and so on.
kdemultimedia
As the name implies, this package contains multimedia programs, including a CD player, a MIDI player, an MP3 player, and—of all things—a Karaoke player.
kdenetwork
Here, you will find programs for use with the Internet, including a news reader, and some network management tools. The KDE mail program is not contained in this package, but rather in the package kdepim (see below).
kdeadmin
This package contains some programs for the system administrator, including a user manager, a run-level editor, and a backup program.
kdepim
Considered by many the centerpiece of KDE these days, kdepim contains software for personal information management, most notably the Kontact integration package that unites under a common surface the time planner and task tracker KOrganizer, the KDE email package KMail, an address book, PDA synchronization software, and many other useful tools.
kdeedu
As the name implies, this package contains a set of educational programs, ranging from vocabulary trainers to programs teaching you the movements of the planets and stars.
kaccessibility
This package contains tools that make it possible, or easier, for people with disabilities to use computers, such as screen magnifiers. The goal of the KDE project is to fully comply with the Americans with Disabilities Act.
kartwork
This package contains graphics artwork for KDE, including different sets of icons, wallpapers, and so forth.
kde-i18n
There are a large number of packages starting with kde-i18n-. Each of these contains translations for one particular language. (American) English is the default, even in the KDE world, so if that's the language you want to use, you do not need any of the kde-i18n- packages. But if you are British and frown at the spelling, there even is a UK English package.
kdetoys
This package contains a number of smaller programs that do not really have a very useful purpose, but are often funny or interesting to use or to look at. Try, for example, AMOR, the Amusing Misuse of Resources.
kdewebdev
If you are developing web pages, you may want to install this package. It contains tools such as the Quanta HTML editor.
koffice
KOffice is no less than a complete feature-rich office productivity suite. It may have a few rough edges here and there, but many people use it already for their daily work.
The release cycle of KOffice is today decoupled from KDE's release cycle. At the time of this writing, the current version was 1.3.5. You can read all about KOffice at http://koffice.kde.org.
Developer tools
There are a number of packages for developers of KDE applications. kdesdk contains tools, scripts, and information for developers of KDE programs (if you plan to develop your own KDE programs, you may also want to see http://developer.kde.org), kdebindings contains bindings for developing KDE programs in programming languages other than the default C++, and finally, KDevelop is a complete integrated development environment, not only for developing KDE applications, but for developing all kinds of applications.
In addition to the packages mentioned here, which are officially provided by the KDE team, literally hundreds of other KDE programs have been developed. See http://www.kde.org/applications.html for a list of applications that are currently available.
Once you have selected which packages to install, your procedure for the actual installation depends on which Linux distribution you use and whether you install a binary package or compile KDE yourself from the source code. If your distribution contains KDE, you will also be able to install KDE during your system installation.
Once the software is loaded onto your hard disk, there are only a few steps left to take. First, you have to make sure that the directory containing the KDE applications is in your PATH environment variable. The default location of the executable KDE programs is /opt/kde3/bin, but if you have chosen to install KDE to another location, you will have to insert your path here.[*] You can add this directory to your PATH variable by issuing:
export PATH=/opt/kde3/bin:$PATH
To make this permanent, add this line to either the .bashrc configuration file in your home directory, or the system-wide configuration file, /etc/profile.
Next, do the same with the directory containing the KDE libraries (by default /opt/kde3/lib) and the environment variable LD_LIBRARY_PATH:
export LD_LIBRARY_PATH=/opt/kde3/lib:$LD_LIBRARY_PATH
Now you are almost done, but you still need to tell X that you want to run the KDE desktop when X starts. This is done in the file .xinitrc in your home directory. Make a backup copy first. Then remove everything in this file and insert the following single line:
exec startkde
startkde is a shell script provided with KDE that simply starts up the KDE window manager kwin and a number of system services. Distributions will usually install a somewhat more complex .xinitrc file that may even start non-KDE applications and services.
If, for some reason, you plan to install KDE packages in more than one directory tree, you will also need to set the environment variable KDEDIRS to contain the path to all the trees. Normally, this is not necessary.
Using KDE
Using KDE is quite easy. Most things are very intuitive, so you can often simply guess what to do. We will, however, give you some hints for what you can do with KDE here, to encourage you to explore your KDE desktop further.
The KDE panel and the K menu
When you start KDE for the first time, it looks like Figure 3-1. Along the lower border of the screen, you see the so-called panel. The panel serves several purposes, including fast access to installed applications and the currently opened windows. KDE also opens a configuration program that lets you configure the initial settings when started for the first time.
KDE provides a number of workspaces that are accessible via the buttons in the middle of the panel, labeled One to Eight by default. Try clicking those buttons. You can see that windows that you have opened are visible only while you are in workspace One, whereas the panel and the taskbar are always visible. Now go to workspace Two and start a terminal window by clicking the terminal icon on the panel. When the panel appears, change workspaces again. You will see that the terminal window is visible only while you are in workspace Two, but its label is visible on the taskbar that appears in all workspaces. When you are in any other workspace, click the terminal label in the taskbar. This will immediately bring you back to the workspace where your terminal is shown.
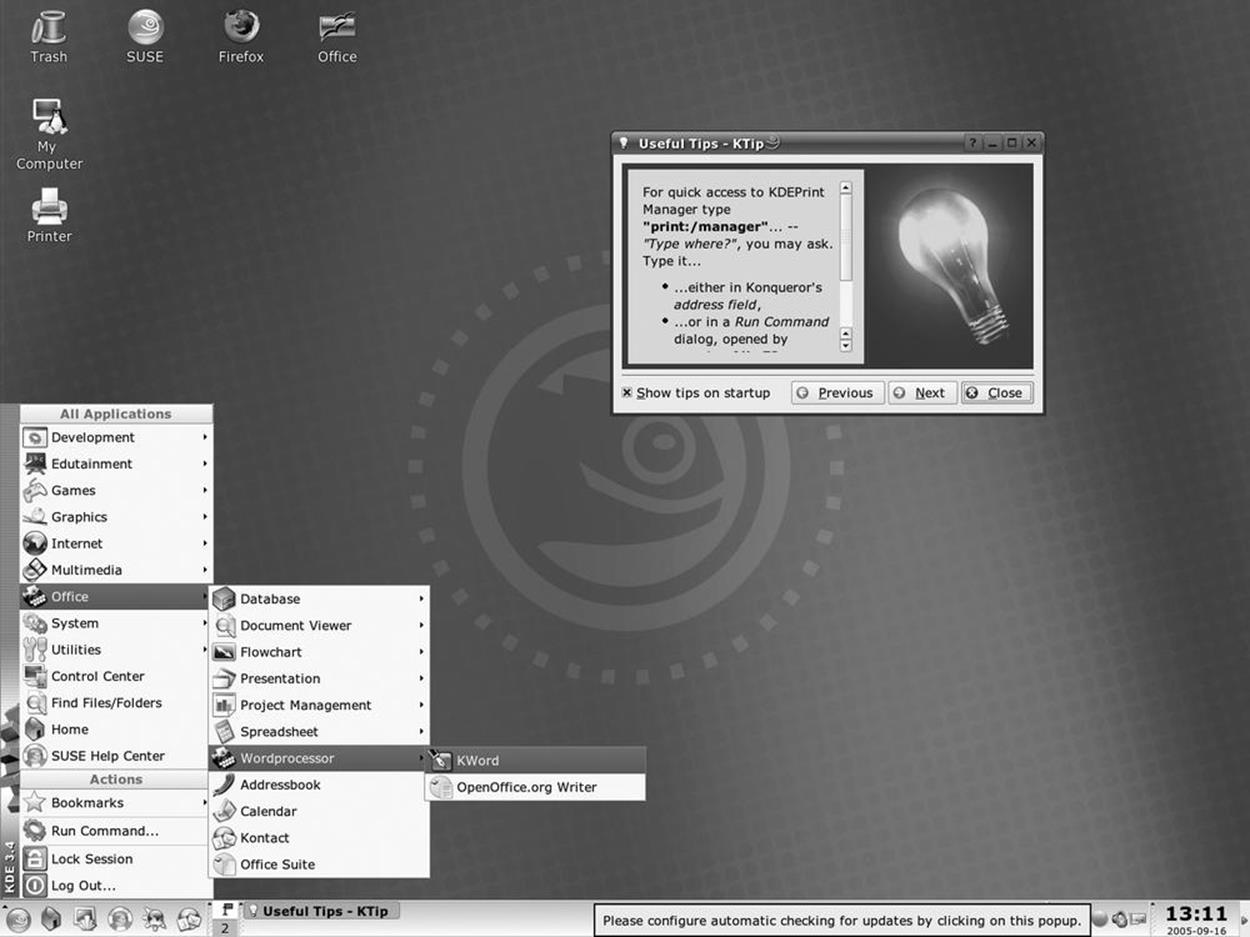
Figure 3-1. The KDE desktop at startup
To try another nifty feature, push the small button that looks like a pushpin in the titlebar of the terminal window. Now change workspaces again. You will see that the terminal window is now visible on every workspace—it has been "pinned down" to the background of the desktop, so to speak.
If you grow tired of seeing the terminal window in every workspace, simply click the pin again. If you want to get rid of the window as a whole, click the button with the little x on it in the upper-right corner.
KDE can be configured in many different ways, and the window decorations are just one thing. It might therefore be that you do not have the little pushpin button, because your configuration does not include it. In that case, you can left-click on the application in the left corner of the title frame and select To Desktop → All Desktops instead.
There are lots of things that you can do with windows in KDE, but we'll switch now to a short exploration of the so-called K menu . You open the K menu by clicking the icon with the gear-and-K symbol to the far left of the panel. Besides some options for configuring the K menu and the panel itself, you will find all installed KDE applications here, grouped into submenus. To start one of those applications, select the menu entry.
We have promised that you can run old X applications on your KDE desktop. You can do that either by opening a terminal window and typing the application name on the command line or by pressing Alt-F2 and entering the application name in the small command line that appears in the middle of the screen. But, with a little more work, you can also integrate non-KDE applications into the K menu and the panel, which then displays icons that you can click to run the associated programs.
Depending on how you have installed KDE, it may well be that there is already a submenu of non-KDE programs in your K menu that contains a number of non-KDE applications. If you don't have this, run the application KAppfinder, which you can either find in the System submenu or start from the command line with kappfinder. This searches your system for a number of applications that it has in its database and integrates each one into the KDE desktop by generating a so-called .desktop file for it. If the program that you want to integrate into KDE is not included in the Appfinder's database, you will have to write such a .desktop file yourself. But as always in KDE, there are dialogs for doing this where you just have to fill in the required information. See the KDE documentation at http://www.kde.org/documentation/index.html.
By default, the panel already contains a number of icons to start the most often used programs, but you can easily add your own. To do this, right-click somewhere on the panel where it does not contain any items and select Add to Panel → Application from the menu that pops up. A copy of the whole K menu pops up. Find the application whose icon you want to add to the panel and select it, just as if you wanted to start it. KDE will then add the icon for this application to the panel. You can even add submenus to the panel by selecting the first menu entry (Add This Menu) in a submenu in the Add → Button tree. The icon will then have a small black arrow in it, which indicates that clicking the icon opens a menu instead of starting an application.
There are other things besides application starter buttons that you can add to the panel as well: for example, panel applets, small programs that are designed to run inside the panel and cannot run as standalones. Just explore the Add to Panel submenus, and you will find many interesting things.
There is only limited space on the panel, so you might need to remove some icons of programs that you do not often use. Just click with the right mouse button on the icon and select the Remove menu item (they will be called different things depending on what you are trying to remove). This does not remove the program, just its icon. In general, you can get at a lot of functionality in KDE by clicking the right mouse button!
The KDE Control Center
Next, we will show you how to configure your KDE desktop to your tastes. As promised, we will not edit any configuration files to do this.
Configuration is done in the KDE Control Center, which you can start from the K menu. (On some distributions, the Control Center is at the top level of the K menu; in others, such as Debian, it is in a submenu such as Settings.) Configuration options are grouped into different types of operations. When you start up the Control Center, you will see the top-level groups. By clicking the plus signs, you can open a group to see the entries in this group.
Configuring the background. As an example, we will now change the background color to something else. To do this, open the Appearance & Themes group and choose Background. The configuration window for configuring the background will appear (see Figure 3-2).
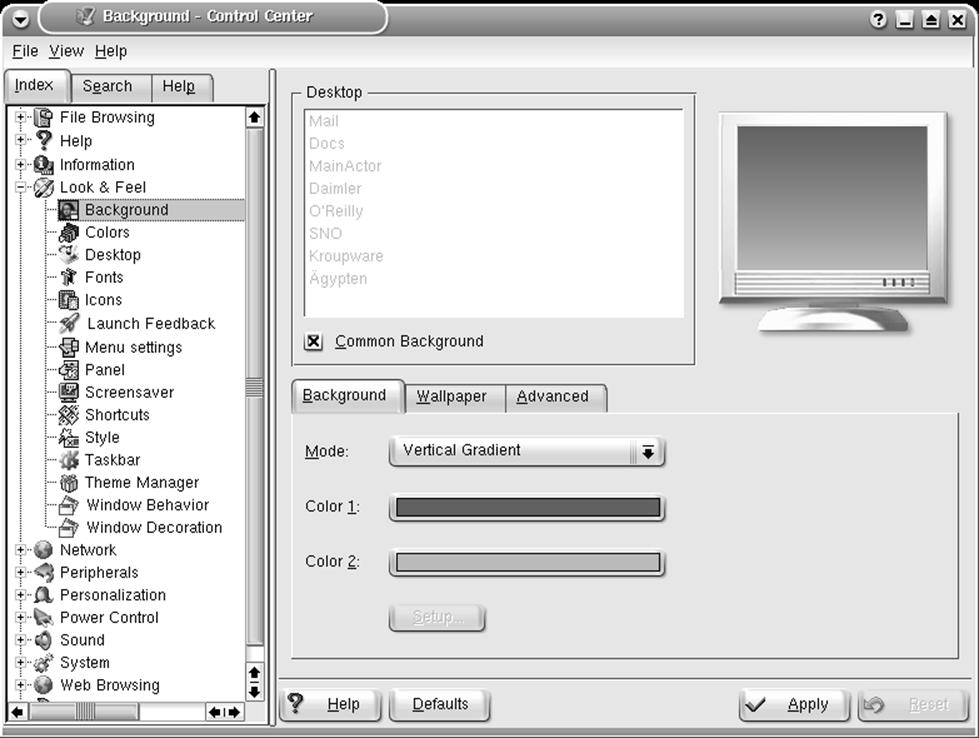
Figure 3-2. Configuring the background of the KDE desktop
You can select a single-colored background, a two-colored background with a number of gradients where one color is slowly morphed into another, a wallpaper (predefined or an image of your own choice), or a blending effect that combines various choices. To select colors, click on either of the two color buttons; a color selection dialog pops up where you can select a color to your taste. When you close the color selection dialog, the new color is displayed in the monitor in the upper-right corner of the configuration window. When you configure KDE, you often see such monitors that allow you to preview your choice. However, you also have the option to see what your choice looks like when in full use. Simply click the Apply button at the lower border of the configuration window, and your change is automatically applied. There is no need to restart the desktop. If you do not see any changes in the monitor, check whether the Picture option is checked. If that is the case, the selected picture will overlay your background color selection in some modes (such as Scaled, which resizes the selected picture to fill the whole background). But try selecting a picture and then experiment with the blending effects to get a combination of background colors (possibly with gradients) and your picture.
If all you want is a monocolored background, select "No picture" in the Background group, and Colors: Single Color in the Options group. You will see that the second color button is grayed out then. Select the color you want with the first color button.
If you want a background picture, but cannot find a suitable one among either your own or the ones provided with your distribution, click the Get New Wallpapers button and you will get a huge list of wallpapers that have been contributed by KDE users; there surely is something for every taste!
You can do more things with the background, but we'll leave it at that for now and look at something else: configuring the styles and colors of the windows .
Configuring window styles and colors. With normal window managers, you can configure the color of the window decorations, but not the window contents. KDE is different. Because KDE is an integrated desktop, color and other settings apply to both the window decorations painted by the window manager and the window contents painted by the applications. We'll now set off to configure a little bit of the appearance.
In the Control Center, open the Appearance & Themes group, and choose Colors. You'll see a preview window and a selection list where you can pick a color scheme. KDE works not by configuring individual colors but by defining so-called color schemes. This is because it does not make sense to change only one color; all colors must fit together to achieve a pleasing and eye-friendly look.
Although KDE lets you create your own color schemes, doing so is a task that requires some knowledge about color psychology and human vision. We therefore suggest that you pick one of the predefined color schemes. Check in the preview monitor whether you like what you see. Now comes the fun part: click the Apply button and watch how all running applications flicker a bit and suddenly change colors — without you having to restart them. Although Windows users tend to take this for granted, it was never seen on Unix before KDE.
The same feature applies to other settings. For example, open the Appearance & Themes group and choose Style. Here, you can select among a large number of so-called styles. The styles determine how the user interface elements are drawn—for example, as in Windows (style MS Windows 9x), as in Motif (style Motif), as on an SGI workstation (style SGI), or even something original such as the "Light" styles or the all-time KDE favorites "Plastik" and "Keramik."[*] You can change this setting by clicking Apply and watch your running applications change their style. The same goes, by the way, for the fonts that you can select on the Font page.
Internationalization. There are many more things to configure in KDE, but we cannot go through all the options here. Otherwise there would not be much space left for other topics in this book. But there's one more thing that we'd like to show you. You will especially like this if English is not your native language or if you frequently converse in another language.
Go to the Country → Region & Language page in the Regional & Accessibility group (see Figure 3-3). Here, you can select the country settings and the language in which your KDE desktop and the KDE applications should be running. Currently, KDE lets you choose from more than 80 country settings and languages. Note that you need to have a language module installed in order to be able to select a particular language. You can either download those from the KDE FTP server (as explained earlier) or install them from your distribution medium.
You might be wondering why you can select more than one language. The reason is that the KDE programs are translated by volunteers, and not all the applications are translated at the same time. Thus, a particular application might not be available in the language that you have chosen as your first language (the topmost one in the Language list). In this case, the next language is chosen automatically for that application, and if no translation is available for this application in that language either, the next language is chosen, and so on. If all else fails, KDE uses U.S. English, which always is present.
While speaking about different languages, it might also be worthwhile to briefly go into keyboard layouts. Most European languages, even those based on the Latin alphabet, have special characters that are either not available on other keyboards or are just awkward to type. KDE comes with a nifty little program that lets you quickly change keyboard layouts. Of course, it cannot change the labeling on your keys, but quickly changing layouts may already be helpful if you are regularly moving in different worlds such as some of the authors of this book do. To turn on this feature, go to the Keyboard Layout page in the Regional & Accessibility group and check the Enable keyboard layouts box. Then select the Active layouts that you plan to use among the Available layouts. Once you click on Apply, a little flag button will appear on the right-hand side of the panel (in the so-called system tray); clicking on this flag lets you change keyboard layouts on the fly.
There is much more to say about using the KDE desktop, but we'll let you explore it yourself. Besides the obvious and intuitive features, there are also some that are not so obvious but are very useful nevertheless, so be sure to check the documentation athttp://www.kde.org/documentation/index.html.
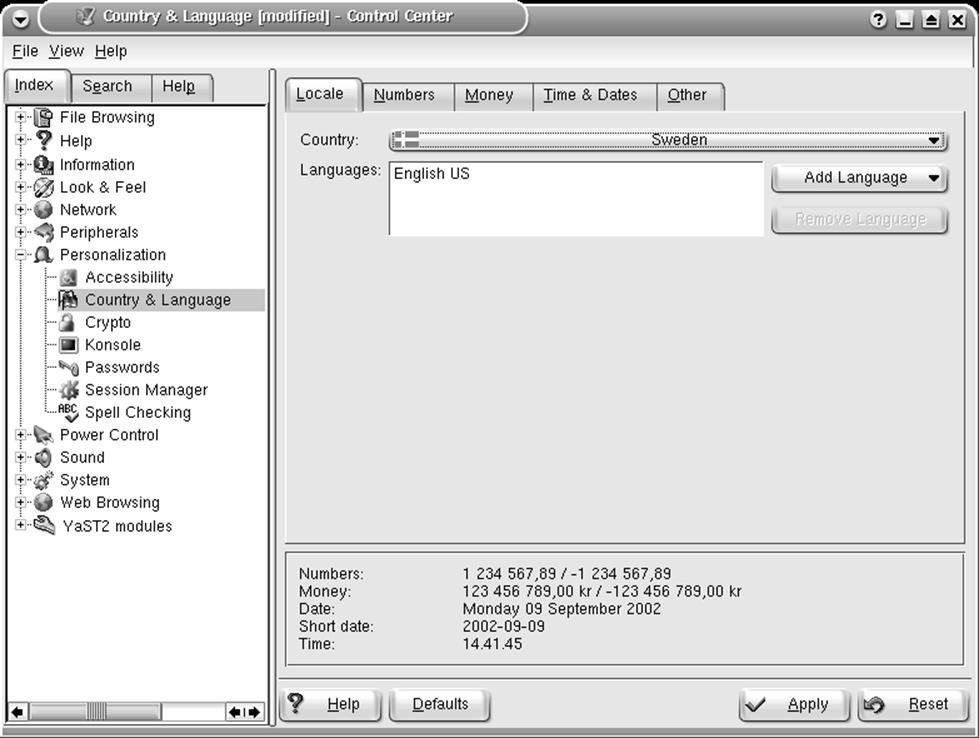
Figure 3-3. Configuring the language of the KDE desktop
[*] Some distributions might put the KDE programs elsewhere, such as in /usr/bin.
[*] If by now you are wondering about the strange spelling of many terms in KDE, think about the first letter of the desktop's name.
KDE Applications
Thousands of programs are available for KDE. They range from basic utilities (such as konsole, the terminal emulator, and OClock, a rudimentary clock) to editors, programming aids, games, and multimedia applications . The most we can provide here is a tiny slice of the software available for KDE. In this section, we'll present those applications that all KDE users should know how to use. These aren't necessarily the most exciting programs out there, but they should certainly be part of your toolbox.
There are many, many more KDE applications than the few we can list here. You will make the acquaintance of some of them, such as KWord, the word processor, and Kontact, the personal information manager and mail user agent (and much else), elsewhere in this book. But others haven't found space in this book, so you should search through your favorite Linux archive for more exciting KDE programs; there are thousands of them to discover.
Also remember that if there really is no KDE program for a task you have to solve, you can always resort to one of the classic X applications, if available. These do not look as nice and integrate as well, but they still work on a KDE desktop.
konsole: Your Home Base
Let's start our exploration of X applications with the workhorse that you might be spending a lot of your time with in the terminal. This is simply a window that contains a Unix shell. It displays a prompt, accepts commands, and scrolls like a terminal.
Tip
Traditionally, xterm was the classic Unix terminal emulator. It has been superseded by konsole in the KDE desktop environment.
Perhaps you are struck by the irony of buying a high-resolution color monitor, installing many megabytes of graphics software, and then being confronted by an emulation of an old VT100 terminal. But Linux is much more than a point-and-click operating system. There are plenty of nice graphical applications, but a lot of the time you'll want to do administrative tasks, and a command-line interface still offers the most powerful tool for doing that. You'll get a glimpse of these tasks in Chapter 4.
So let's take look at a konsole window. Figure 3-4 shows one containing a few commands.
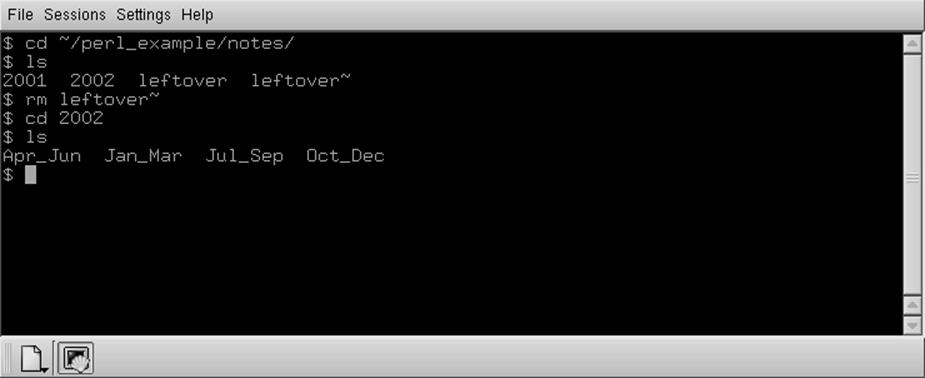
Figure 3-4. konsole window
Starting up konsole
You can start konsole in one of several ways, as with all KDE programs:
§ Start it from the panel, if you have a konsole icon there. This will be the default setup with most distributions.
§ Select it from the K menu, where konsole can be found in Utilities → System → Konsole.
§ Type Alt-F2, and then type konsole in the small command window that opens.
§ If you already have a konsole open, type konsole there and press Enter in order to get a whole new window running the program, or pull down the Session → New Shell screen.
When you open a konsole window, a "Tip of the Day" window will open that gives you useful hints about using konsole. You can turn this off, but we suggest keeping it on for a while, as you will learn many useful things this way. You can also read through all the tips by clicking the Next button in that window repeatedly. Many KDE applications have such a Tip of the Day.
konsole allows you to run several sessions in one konsole window. You can simply open a new session by selecting a session type from the Session menu or by clicking the New tab button. The tab bar or the View menu lets you then switch between sessions. If you don't see any tab bar, select Settings → Tab Bar (and then either Top or Bottom) from the menu to make it visible.
Cutting and pasting selections
Actually, konsole offers a good deal more than a VT100 terminal. One of its features is a powerful cut-and-paste capability.
Take another look at Figure 3-4. Let's say we didn't really want the notes directory; we wanted to look at ~/perl_example/for_web_site instead.
First, we'll choose the part of the cd command that interests us. Put the mouse just to the left of the c in cd. Press the left mouse button, and drag the mouse until it highlights the slash following example. The result is shown in Figure 3-5.
When the highlighted area covers just the right number of characters, click the middle button.[*] konsole pastes in what you've selected on the next command line. See the result in Figure 3-6. Now you can type in the remainder of the directory name for_website and press the Enter key to execute the command.
You can select anything you want in the window—output as well as input. To select whole words instead of characters, double-click the left mouse button. To select whole lines, triple-click it. You can select multiple lines too. Selecting multiple lines is not useful when you're entering commands but is convenient if you're using the vi editor and want to cut and paste a lot of text between windows.
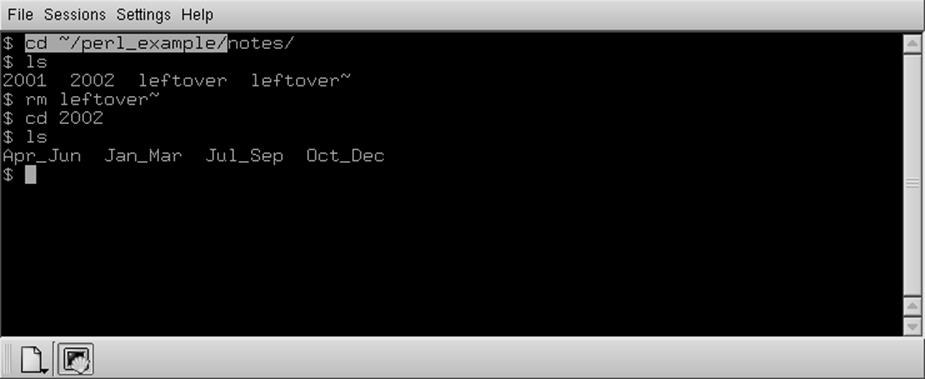
Figure 3-5. Selected text in konsole
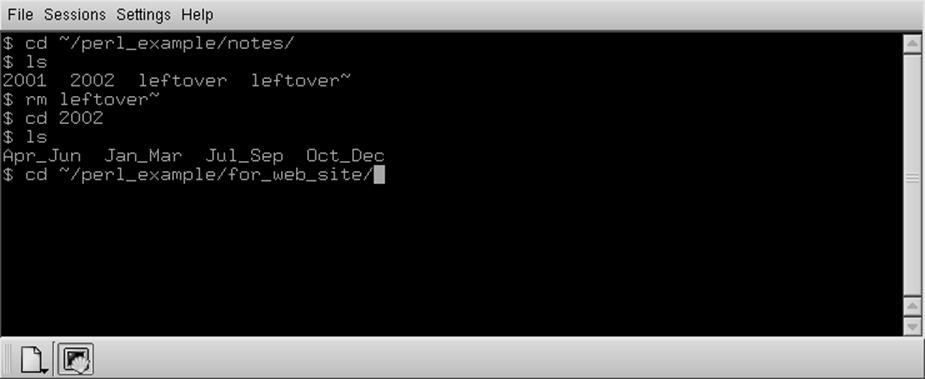
Figure 3-6. konsole window after text is pasted
Note that if you are more used to the drag-and-drop style of copying text, konsole supports that as well.
Copying and pasting of text is even integrated between konsole and the graphical KDE applications. For example, if you are viewing a directory with the Konqueror file manager/web browser, you can just drag those icons to a konsole window. konsole will either offer to paste the filenames as they are or prepend them with a cd, cp, mv, or ln command.
More konsole tricks
There are lots of things you can configure in konsole. You can select fonts, color schemes, whether the scrollbar should be shown to the left, to the right, or not at all, and so on. The most often used settings are available in the Settings menu, and if you can't find what you are looking for, go to Settings → Configure Konsole. There you can select the line spacing, whether the cursor should blink, and so on.
A particularly useful feature in konsole is the ability to watch for output or silence in one of the sessions.
What is this feature good for? Imagine that you are working on a large program that takes a long time to compile. Nonprogrammers can imagine that you download a large file in a terminal window with wget or that you are computing a complex POVRAY image. While the compilation is running, you want to do something else (why do you have a multitasking operating system, after all?) and start composing an email message to a friend in your KDE mail client. Normally, you would have to check the console window every so often to see whether compilation is finished and then continue to work on your program. With the watcher, you can get a visual or audible notification when compilation completes. In order to set this up, simply switch to the session you want to watch and select View → Monitor for Silence. You will get a notification as soon as your compiler doesn't output any more messages for a while and can divert your attention from your mail client back to your konsole window. Of course, you can also watch for output instead of silence, which might be useful in long-running network operations that don't show any progress indicators.
Clocks
How can your screen be complete if it is unadorned by a little clock that tells you how much time you are wasting on customizing the screen's appearance? You can have a clock just the way you want it, square or round, analog or digital, big or small. You can even make it chime.
KDE contains a number of clocks , but usually you will want to run the small panel applet, as screen real estate is always at a premium, regardless of your screen resolution. The clock should appear by default at the bottom-right corner of your screen, in the confines of the panel (this is called a panel applet, or a small application that runs within the panel). If your distribution hasn't set up things this way, you can also right-click anywhere on the panel background and select Add to Panel → Applet → Clock from the menu, which will make the clock appear on the panel. If you'd rather have it somewhere else on the panel, you can right-click the small striped handle to the left of the clock, select Move from the context menu that appears, and move the clock with the mouse to the desired position. Other panel objects will automatically make room for the clock.
The panel clock applet has a number of different modes that you can select by right-clicking the clock itself and selecting Type as well as the desired mode from the context menu. There is a plain, a digital, an analog, and, most noteworthy, a fuzzy clock. The fuzzy clock is for everybody who doesn't like being pushed around by his clock. For example, if you run the fuzzy clock, it will show Middle of the week. If that is a bit too fuzzy for you, you can select Configure Clock → Appearance from the clock's context menu and select the degree of fuzziness here. For example, I am typing this at 9:53 A.M. on a Thursday, and the four degrees of fuzziness are Five to ten, Ten o' clock, Almost noon, and the aforementioned Middle of the week.
The clock applet also lets you configure the date and time format and the time zone to be used, as well as set the system clock (you need root permissions to do that; if you are logged in as a normal user, a dialog will pop up and ask you for the root password). You can even copy the current date and time in a number of formats into the system clipboard.
KGhostview: Displaying PostScript and PDF
Adobe PostScript, as a standard in its own right, has become one of the most popular formats for exchanging documents in the computer world. Many academics distribute papers in PostScript format. The Linux Documentation Project offers its manuals in PostScript form, among others. This format is useful for people who lack the time to format input, or who have sufficient network bandwidth for transferring the enormous files. When you create documents of your own using groff or TEX you'll want to view them on a screen before you use up precious paper resources by printing them.
KGhostview, a KDE application, offers a pleasant environment for viewing PostScript on the X Window System that, besides PostScript files, can also view files in Adobe's Portable Document Format (PDF). However, there is another application that is specific for viewing PDF files in KDE as well, kpdf. KGhostview is really mostly a more convenient frontend to an older application, Ghostview, so you can also get the functionality described here with Ghostview. The user experience is much better with KGhostview, however, so that's what we describe here.
Using KGhostview is very simple: invoke it with the name of the file to be displayed — for instance:
eggplant$ kghostview article.ps
or simply click the icon of any PostScript or PDF file anywhere in KDE.
Since we are interested only with viewing existing files here, we do not need to concern ourselves much with the benefits of PostScript and PDF. Both can be considered standards to the extent that many programs write them (and a few can read them), but both have been defined by one company, Adobe Systems. PDF is a bit more portable and self-contained, as it can even contain the fonts necessary to display the document. Also, PDF is better known on Microsoft Windows and the Macintosh, so you are more likely to come across PDF files than PostScript files on the Internet. And finally, whereas PostScript is really meant for printing, PDF has some features for interactive viewing, such as page icons, hyperlinks, and the like.
KGhostview is not a perfect PDF viewer, even though it is sufficient for most documents. If you have problems with a particular document, you may want to try either Adobe's own Acrobat Reader (which is not free software, but can be downloaded at no cost from http://www.adobe.com), or the KDE program kpdf, which comes in the same package as KGhostview.
The Ghostview window is huge; it can easily take up most of your screen. The first page of the document is displayed with scrollbars, if necessary. There is a menu bar and a toolbar, as in most KDE programs, as well as a page scroller and a page list on the left side of the window.
Like most X applications, KGhostview offers both menu options and keys (accelerators) for common functions. Thus, to view the next page, you can pull down the View menu and choose the Next Page option. Or you can just press the PgDn key (or the Space key, if you don't have a PgDn key, such as on a laptop).[*]
To go back to the previous page, choose Previous Page from the View menu. To go to any page you want, press the left mouse button on its number in the Page Number column. To exit, choose Quit from the File menu, or just press Ctrl-Q.
Documents from different countries often use different page sizes. The Ghostview default is the standard U.S. letter size (but it can be overridden by comments in the PostScript file, and this is often done by PostScript tools set up on Linux distributions that are configured for European customs). You can select a different size from the Paper Size submenu in the View menu.
Ghostview lets you enlarge or reduce the size of the page, a useful feature for checking the details of your formatting work. (But be warned that fonts on the screen are different from the fonts on a printer, and therefore the exact layout of characters in Ghostview will not be the same as that in the hard copy.) To zoom in on a small part of the page, press Ctrl-+; to zoom out, use Ctrl- -. You can also use the toolbar buttons or the Zoom In → Zoom Out menu entries in the View menu.
You can also adjust the window size to exactly fit the document's page width by selecting Fit To Page Width from the View menu.
To print a page, choose Print from the File menu or press Ctrl-P anywhere in the window. The standard KDE printer dialog will appear that lets you—among other things—choose the printer to use.
You can also print only the current page or a range of pages; just specify your selection in the printer dialog. This can also be combined with the PageMarks feature. The PageMarks menu lets you mark and unmark individual or groups of pages. Marked pages are displayed with a little red flag in the page list. If you mark some pages and select the printing functionality, the dialog will pop up with the marked pages already filled in as the selection of pages to print. Of course, you can override this setting before finally sending the document to the printer.
Reading Documentation with Konqueror
Konqueror is not only a high-class web browser and file manager but also serves as a documentation reader, besides the Help Center built into KDE and described previously. KDE's documentation is displayed using HTML format, but Konqueror is capable of displaying other documentation formats, such as Info and manpages, that you will learn about later in this book. For example, in order to show the manpage for the ls command, just open a mini command-line window by pressing Alt-F2 and typing the following in that window:
man:ls
KDE will recognize that you want to read the manpage of the ls command, open a Konqueror window, and display the manpage. The result is also much more nicely formatted than how the original man command (or its X11 replacement, xman) would do it.
This works similarly for Info pages. For example, the documentation of the GNU C compiler, gcc, comes in info format. Just type:
info:gcc
either in a mini command line or in the Konqueror URL entry line, and the requested Info page will pop up (assuming it is installed, of course). If you have cursed at the really user-unfriendly command-line info program and weren't too happy with programs such as xinfo either, this feature may be a boon for you.
But Konqueror doesn't stop here when it comes to getting information. Want to use a search engine on the Internet? To find pages about Tux (the Linux mascot) on, let's say, the AltaVista search engine, simply type the following in a mini command line or the Konqueror URL entry line:
av:tux
and a Konqueror window with (at the time of this writing) 3,360,000 search results pops up. This works with many other search engines as well. See Table 3-1 for some of the most popular search engines together with their prefixes.
Table 3-1. Popular search engines and their prefixes
|
Search Engine |
Prefix |
|
AltaVista |
av: |
|
SourceForge |
sf: |
|
Excite |
ex: |
|
|
gg: |
|
Merriam-Webster Dictionary |
dict: |
If your favorite search engine is not configured (which is quite unlikely, actually), you can configure it yourself by opening a Konqueror window and selecting Settings, Configure Konqueror, and then Web Shortcuts. The list contains all the preconfigured search engines and even lets you add your own.
Burning CDs with K3b
KDE comes with a very user-friendly and popular application for burning CDs and DVDs, K3b. If you insert an empty CD-R or DVD-R, KDE will offer to start K3b automatically; otherwise, you can start it from the command line with k3b; your distribution may even have it preconfigured in the K menu.
K3b usually detects your CD and DVD drives automatically, but if it should not do so in your case, select Settings → Configure K3b → Devices. Here you can see a list of recognized CD and DVD drives, sorted into readers and writers. If you are missing devices here, try clicking the Refresh button first; if that does not work, click on Add Device and enter your device manually. K3b expects the device file here; many distributions use symbolic links with telling names such as /dev/cdrom or /dev/cdrecorder. If you have specified the correct device file, K3b is usually able to detect all parameters, such as read and write speeds, automatically.
The K3b screen is separated into two halves. In the upper half, you see a view of your filesystem; in the lower half, you see project icons for common tasks such as creating a new data DVD or copying a CD. Other, less common, tasks such as burning a previously created ISO image on CD can be found in the Tools and File → New Project menu.
As an example, let's look into how you create a data CD with a backup of your digital pictures from your last holiday. Click on the New Data CD Project icon. You get an empty list of files and can now drag files from the filesystem view above (or from any Konqueror window) into this list. Just grab the directory that contains your holiday pictures and drag it into the list — that's all you need to do. You will see a green bar at the bottom of the K3b window that tells you how much space the currently selected files will occupy on the CD so that you know whether you can add another batch.
Once you are done selecting the files, click on the Burn button that is a bit hidden in the lower-right corner. A dialog with a lot of settings pops up; you should quickly check these settings, but you can leave most of them as they are. We usually suggest to select the "Verify written data" box on the Writing page so that you can be sure that the CD was written correctly (this will double the time for creating the CD, though). You may also want to change the Volume name (the name of the CD) and add yourself as the Publisher on the Volume Desc page. If you plan to read the CD on both Windows and Linux, it is a good idea to check that both the "Generate Rock Ridge extensions" and "Generate Joliet extensions" are selected on the Filesystem page. Once you are satisfied with all your settings, hit the Burn button in the upper right, lean back, and watch the progress bar move on until your CD is finished.
[*] If the middle mouse button does not work for you, or you have a two-button mouse, please see "Configuring X.org" in Chapter 16 for how to set up your mouse.
[*] There is a subtle difference between the Space key and the PgDn key: the PgDn key will always take you to the next page, while the Space key will first take you to the bottom of the current page if the window is too small to display the whole page on the screen at once. A second press of the Space key will then take you to the next page.
The GNOME Desktop Environment
The GNOME desktop environment, like KDE, is a complete desktop suite, from the desktop background up to a set of applications. As with KDE, GNOME can run any X application, and both KDE and GNOME rely on standards set by the Freedesktop.org group. In fact, the distinction between the two desktops is, in many ways, of interest more to developers choosing toolkits than to users, who in most cases mix and match applications without having to worry about the underpinnings.
The primary goals of the GNOME project are simplicity and ease of use. Applications must comply with extensive human interface guidelines to become part of the official GNOME desktop. Because GNOME makes an excellent platform for development in C, C++, Python, Java, and C#, unofficial and third-party applications are numerous. In some cases (notably the XML system), GNOME libraries appear in command-line and server-based applications.
Of course, for our purposes, the interesting parts are the core desktop and its associated applications. In the following sections, we go over the GNOME look and feel, talk a little bit about the customization options it offers to you, and then give a quick tour of major applications, such as Evolution and Nautilus.
Most Linux distributions include GNOME, but if you haven't installed it yourself, or if you want a newer version, you can visit http://gnome.org or your distribution's web page for downloads.
Core Desktop Interface
The GNOME desktop is designed to be familiar to anyone who has used a computer before. Although you can change the settings in almost any way, a typical installation will have a desktop with icons on it and a panel along the top and bottom. The panels are among the most important GNOME tools because they are so versatile and they allow a wide range of interactions with your system. Panels can exist along one edge of your screen, like the Windows control panel; along a portion of it, like the Macintosh Dock, and more. They can contain buttons to launch applications and small applications called applets such as clocks, system monitors, and even tiny games.
Basic GNOME tasks
Here is a quick explanation of how to perform the most common tasks . Once you get the hang of these, you can probably guess how to do anything else.
Open or activate an item in the panel
Click once with the left button.
Start a program
Buttons known as launchers cause a program to open when left-clicked; GNOME desktops typically have such buttons both in panels and on the desktop. Furthermore, when you click on a file, an appropriate program opens that file, as described shortly.
Move items around on the desktop
Click and drag with the left mouse button.
Move items in the panel
Clicking and dragging with the left mouse button works for launchers, but for some applets, the left mouse button is used to control the applet. In that case, middle-click and drag. This is also the case for moving windows by their borders—left-click will expand the window, but middle-click lets you move it.
Organize items on the desktop
Right-click the desktop background and select Clean Up by Name. Items will be arranged in alphabetical order, with two exceptions: the first item, in the upper left, is always your home directory, and the last item in the list is always the Trash folder.
Open or activate an item on the desktop
Double-click it. If you double-click a folder icon, it opens the folder in the Nautilus file management tool. If you double-click a spreadsheet document, the Gnumeric spreadsheet starts up and opens the document. If you have a window open and Shift-click or middle-click a folder in it, the current folder will close as a new one opens in its place.
Get a list of options or set preferences for any object
Click with the right mouse button to get a menu of available options for any object. For example, you can change the desktop background by right-clicking the background and choosing Change Desktop Background. More general preferences are available in the GNOME Control Center, which you can access by choosing System → Personal Settings or Applications → Desktop Preferences, or by typing gnome-control-center at the command line. The exact menu arrangements may vary slightly depending on your distribution and version.
Paste text into any text area
As with other operating systems, Ctrl-C copies, Ctrl-X cuts, and Ctrl-V pastes in every application except Emacs and XChat. You can also use the more traditional Unix mode pasting by selecting any text and then middle-clicking.
The panel
The preset configuration for many systems has a thin panel along the top and bottom of the screen. The top panel has a set of menus along the upper left, and a few buttons and a clock at the right. The bottom panel contains the window list applet, which should feel familiar to Microsoft Windows users; it displays a list of all open windows so you can switch applications easily.
To create a new panel, click any blank space in an existing panel, and choose Panel → Create New Panel, then select the type of panel you would like. To change a panel's properties, such as its size and color, right-click it and choose Properties (the menu panel at the top of the screen has no available properties; it is preconfigured for one position and size). Experiment with different kinds of panels and with different sizes to see which ones you like best. If you use a smaller screen, such as a laptop screen, you will want to choose a smaller panel size than if you have plenty of screen real estate to use.
To add application launcher buttons to your panels, you can drag them from menus, or right-click the panel and choose Panel → Add to Panel Launcher. Then, enter the name of the application you want to run, and choose an icon. You may also choose a description of the launcher that will display as a tool tip when you hover the mouse over the icon in your panel. If you want to launch the application from a terminal, check the "Run in Terminal" box.
For more information on the panel, right-click any empty spot in the panel and select Panel → Panel Manual.
Panel applets are small applications that run inside the panel. You can add them to the panel from the Add to Panel menu or just run them by clicking Applications → Applets. Panel applets come in a bewildering variety of flavors, from games to utilities. Some of the most common are the following:
Notification Area
The notification area is similar to the Windows system tray and holds a variety of system status displays. Applications such as the Gaim instant messenger tool (described in "Instant Messaging" in Chapter 5) and the Rhythmbox music player use it as a control area that allows users to access them without keeping any windows open. System alerts and print queues will also display in this area. Both KDE and GNOME make use of the same notification area system, so applets that use the notification area will work in both desktops.
Netapplet
Netapplet runs in the notification area and allows you to browse and choose available wired and wireless network connections. This is particularly useful for laptop users who need to use Wi-Fi (802.11x) connections. To run Netapplet, you must also be running netdaemon.
System Monitor
A graph that displays the load on your system resources for the past few seconds. To get a more detailed system report, including a list of all running processes and applications, right-click on the applet and select Open System Monitor.
Workspace Switcher
In most installations, this applet will already be running when you log in, and is typically set to four workspaces. Each workspace is the equivalent of a new screenful of desktop space, and you can have as many as you like. The workspace switcher displays all the virtual workspaces you have created, and displays each window on the desktop as a tiny box. You can use the left mouse button to drag a window from one workspace to another. Right-click and select the Properties menu item to change the number or arrangement of workspaces.
Window List
Like the workspace applet, the Window List is included in most default configurations. It displays the windows that you have open so that you can switch easily among them, even when they are minimized. If you have multiple windows for a single application, they will be grouped under a single entry. To turn this feature off, or to set other options for the applet, right-click the Window List and select Properties.
Battery Charge Monitor
The Battery Charge Monitor displays the remaining battery life for laptop systems. You can also use the Battery Charge Monitor to put your system into "sleep" or "suspend" mode by right-clicking on the applet and selecting Suspend Computer. Resuming operation from suspend mode is faster than rebooting, but the mechanism for operation will vary depending on your hardware and distribution. Older systems with the Advanced Power Management system use the command apm -s. Newer systems with ACPI support need to be sure that they have ACPI events configured properly in /etc/acpi/events/default, although your distribution will probably have a convenient GUI for this task. For both ACPI and APM, SUSE Linux uses powersaved, and the sleep command is powersave --suspend.
Nautilus: your desktop and file manager
Nautilus is the name of the GNOME desktop and file manager. It controls the display of your background image and the files on your desktop, allows you to interact with files without using a terminal, and keeps track of your trash for you. In other words, it's the GNOME equivalent of Windows Explorer, the Macintosh Finder, and KDE's Konqueror. Like those other applications, Nautilus lets you drag items from one place to another. You can also copy files using Ctrl-C, cut with Ctrl-X, and paste with Ctrl-V.
Tip
In most cases, Nautilus will be running when you log in. If you don't want to run Nautilus at all, you can remove it from your session with the Session Properties tool in the Control Center. If you change your mind and want to start it, the command is nautilus.
The quickest way to get started with Nautilus is to double-click the home icon in the upper-left corner of your desktop, labeled as your home. This will open your home directory. Nautilus varies from other file management systems in that a window not only displays a folder, but is the folder: if you open a folder, then double-click it to open it again, it will merely raise the first window. For that reason, the location bar you may expect at the top of a window is not present. Instead, press Ctrl-L to enter a file location.
Tip
Experts and those familiar with other file management systems will appreciate that Nautilus, although simple at first look, has a variety of conveniences and shortcuts that make advanced use much quicker. The first is Ctrl-L, which works not only in Nautilus but in all GNOME-related file selection dialogs to allow you to type a filename instead of clicking to choose a file. In web browsers, you can also use Ctrl-L to enter a web page instead of selecting the location bar with the mouse.
Opening windows: To avoid opening several windows at once, Shift-click or middle-click to close the current window when opening a new one.
Shortcuts for places: The combination Alt-Up opens the parent of the current folder, and Alt-Home opens your home directory.
If you prefer a more complex file display, right-click on any directory and choose Browse Folder . Browse mode includes the location bar absent from the normal Nautilus display mode, and also includes the left-side pane. At the top of the left pane is a selector for different information displays:
Information
Displays basic information about the current folder.
Emblems
Displays a list of available emblems, small badges you can add to any file's icon. Drag them from the side pane onto any file to mark it. For example, if you have several similar images in a folder, you might want to drag the "Cool" or "Favorite" emblem to remind you which one you like best. You can also set emblems by selecting Edit → Background and Emblems.
History
Shows a list of previous locations you have displayed in Nautilus. Double-click any folder to return to it.
Notes
Allows a note to be kept on a particular folder. Each folder has a different page of notes.
Tree
Perhaps the most useful of the side-pane tools, this allows you to navigate a complex folder hierarchy with convenient spin-down triangles. Each folder in the tree is displayed with a triangle next to it; click the folder to open it, or click the triangle to display any subfolders without actually visiting the folder itself.
Some neat Nautilus features include the following:
§ Instead of a generic image icon for graphics files, Nautilus uses scaled-down thumbnails of the image itself. This makes it easy to organize directories full of images, such as those pulled from a digital camera.
§ If you hover your mouse over a music file, the file will begin to play.
§ For text files, the plain document icon is decorated by the actual text contents of the file. That way, you can remember how the file starts without having to open it, even if you didn't give it the most descriptive name.
§ You can stretch icons by right-clicking them and choosing Stretch Icon. If you stretch a text icon enough, you can see the entire contents of the file, and use it as a desktop notepad.
§ Select Edit → Backgrounds and Emblems to choose different emblems to decorate icons. You can also drag colors and patterns from this area to set your desktop and panel background. To set an image as the desktop background, right-click on the desktop and choose Change Desktop Background.
All in all, Nautilus is a versatile tool that you can learn to use just by poking around a little. For additional help, just choose Help and then Nautilus User Manual from any Nautilus window.
Expert Settings: GConf
GConf is a centralized, XML-based configuration system for desktop applications. It allows applications to share keyboard shortcuts, themes, and other preferences, and uses a daemon to notify applications when preferences change, so you don't have to restart the application to see a change take effect.
GConf can also be used to lock down a desktop system with a finer degree of granularity than traditional Unix file locking. An administrator might wish to lock GConf settings to permit some, but not all, behavior for a given application, and allow some, but not all, changes in preferences. Administrators of kiosks, public computer labs, and other security- and support-conscious deployments find system lockdown to be indispensable. Therefore, most applications provide a lockdown section in their GConf files. If you have users you want to keep out of trouble, explore these options in greater detail. One good resource is the GNOME System Administrator's Guide, available at http://www.gnome.org.
In this book, we assume that you're not interested in locking preferences down, but in opening things up and tweaking them to your taste. That's where gconf-editor comes in handy. You can, of course, edit the XML files in ~/.gconf yourself, but the gconf-editor application makes things a little more convenient.
To get started, run the command gconf-editor. On the left side of the window is the GConf hierarchy, arranged like a file tree starting at /. The tree corresponds to actual settings files stored in the ~/.gconf directory, so changing something in the /applications tree alters files stored in~/.gconf/applications. On the right side of the window is the list of available settings, called keys, and a place for documentation about the selected key.
We're mostly interested in items under the /apps tree. The /desktop and /GNOME trees hold information not tied to a specific application, such as session data and desktop-wide lockdown settings. Systemwide configuration is stored in /system, and information about the way GConf stores settings is kept in /schemas. Avoid changing anything in the /schemas tree.
For now, let's try adjusting an application setting, to give you a feel for what can be done. Normally, the files on your desktop come from the ~/Desktop folder. However, you can force Nautilus to display your home directory on the desktop instead. Select/apps/nautilus/preferences/desktop_is_home_dir and check the box. Now, Nautilus will display the contents of your home directory on your desktop.
Other applications have similar "hidden" preferences you can change. Try the following:
§ Metacity window manager: Check the box in /apps/metacity/reduced_resources to make Metacity use as few system resources as possible. This will make it look less attractive, but may improve system performance.
§ Epiphany web browser: Normally, a middle click in the Epiphany web browser turns on the vertical scroll feature familiar to users of Internet Explorer. However, users of traditional UNIX browsers may prefer to check the box for /apps/epiphany/general/middle_click_open_url and turn on the "paste URL" feature. Select a URL in any application, then middle-click in a non-text-entry area of a web page, and Epiphany will load the text you have selected.
GNOME Applications
Now that you have a feel for the desktop and how to get around it, let's take a look at some of the applications that are built to go with it. Note that these applications aren't restricted to the GNOME desktop, and they aren't the only applications you can run on the GNOME desktop—they're just built from the same materials and work particularly well together.
Evolution: Mail, Calendar, and Contacts
Evolution is what's known as a groupware suite; it combines email with a calendar and an address book so that communication and scheduling tasks all fall into one convenient package. We don't have room to go into depth regarding all three, but a complete manual is included in the Help menu and is available online at http://gnome.org/projects/evolution.
You can start Evolution by selecting Evolution from your Applications menu, or by typing evolution at the command line. A screen like the one in Figure 3-7 should come up.

Figure 3-7. Evolution on the GNOME desktop
The first time you run Evolution, you'll be asked to create an email account by entering information about yourself and your email access. You can copy this information from your existing mail program, or ask your system administrator or ISP.
Evolution works with standard mail server protocols and can be used in almost any network environment. It lets you leave your mail on the server (if it's running the IMAP protocol), download mail to your local system (if it runs either the IMAP or the POP protocol), or use mail spools on your local system (if you're running your own mail server). In addition, Evolution supports Microsoft Exchange 2000 and later and Novell GroupWise 6.5 and later for mail, calendar, and address functions.
Once you've created an account, you will be presented with the main Evolution window. On the left side of the Evolution window is a shortcut bar, with a list of available tools at the bottom and a list of available sources of data at the top. Click the buttons at the bottom to switch among email, calendar, task list, contacts, and Microsoft Exchange tools.
The following sections describe Evolution's major features.
Evolution mail
To start using Evolution mail, click the Inbox button in the shortcut bar. The mail view is divided into two portions: in the top half, a list of messages, and in the bottom half, the display of your selected message. You can change the proportions by dragging the gray bar between them, or hide the message preview area entirely by selecting View → Preview Pane or pressing Ctrl - '.
In general, the mail features are fairly simple: click the Send and Receive button to check for new mail and send mail you've queued for later delivery, and click the New Message button to compose a new message.
What distinguishes Evolution from other mail programs are the speed of its searches, the power and simplicity of its filters, and its unique vFolders, a sort of combination of searches and filters.
The search bar is located at the top of the message list. To search your mail, go to any mail folder, select a portion of the message to search (just the message body, the sender, the entire message, and so forth), enter a word into the text box, and press Enter. Evolution pre-indexes your mail, so the results are returned to you faster than with other tools.
Filters add an action to the end of a search: every time you get mail, Evolution performs a search that you specify on the new messages, and then takes actions based on those results. The most common uses of filters are to automatically file messages based on the senders, and to delete messages that are flagged as spam.
To create a filter, go to any mail view and open your list of filters by selecting Tools → Filters. Then
§ Click the Add button to add a filter.
§ In the top half of the dialog, select a set of criteria you'll use to pick messages for the filter. For example, if you select Sender Contains in the first drop-down item, and enter gnome.org in the text box that appears next to it, your filter will act on mail that comes to you from allgnome.org email addresses.
§ In the bottom half of the window, select one or more actions for your messages. For example, if you select Move to Folder, you'll be offered a button labeled Click to Select Folder. Click that, select a destination folder, and your filter will file all mail from gnome.org addresses in your GNOME email folder.
§ Click OK in the filter creation box, and OK in the filter list. You're done.
If you find that you need more flexibility than filters offer you, you can use vFolders. A vFolder, or virtual folder, is essentially a complex saved search that looks like a folder. That also means that although an email message can exist only in a single standard folder, you can find it in several vFolders.
When you create a vFolder, you select criteria just as you would for a filter, but instead of choosing what to do with them, you specify where you want to look for these messages. Once you've created a vFolder, it appears in a list of vFolders at the bottom of your folder tree. Then, every time you open it, it searches your mail folders for messages that match the criteria you chose when you created it. So if you create your filters to file mail depending on its sender, you can create a vFolder that holds mail with a given subject, no matter who sent it.
Mail on GroupWise and Exchange servers works in a similar way, with only a few exceptions. On GroupWise servers , event notifications are delivered directly to the Calendar folder rather than to your inbox or to the calendar itself. Once you have accepted a meeting, it appears in your calendar. For Exchange servers, your folder tree contains shared or public folders available to you. To subscribe to shared and public folders, click the Exchange button in the shortcut bar and select Actions → Subscribe to Other User's Folder.
Evolution calendar
The Evolution calendar allows you great flexibility in creating and viewing your schedule. To get started, click the Calendar button in the shortcut bar. You'll be presented with an empty work-week spread out before you, devoid of appointments. On the left side of the window is a list of available calendars , and on the right side is your calendar view. You can check the boxes next to the calendar names in the shortcut bar to show or hide the events for each calendar. Each set of events is color-coded to prevent confusion, and the overlay helps you reduce clutter when you want to see only one type of event, while allowing you to compare schedules if you need to coordinate or avoid conflicts.
Calendars are listed in several categories: On this Computer, On the Web, Contacts, and, depending on your groupware server, Exchange or GroupWise. When you start, you will have at least two calendars. The first, your default personal calendar, is empty. The second, Birthdays and Anniversaries, shows any dates you have entered into address cards in the contacts tool.
To add a new calendar, select New → Calendar and choose the type of calendar you'll be creating: On this Computer or On the Web. The first type of calendar requires only that you pick a name and a color and click OK. For subscription-only web calendars, you'll need to enter that information, plus the URL of the calendar file and the frequency with which Evolution will check for changes as well.
The GroupWise and Contacts calendars are created automatically, and you can have only one of each. To create a new Exchange calendar, use the Exchange tool to subscribe to a calendar folder on the Exchange server.
To show a different range of time in the calendar display, select a range of days in the small calendar in the upper-right side of the window or click one of the prebuilt ranges of days in the toolbar: today, one day, five days, a week, or a month.
Once you have a feel for how to page through your datebook, you'll want to start scheduling events. To schedule an event, click the New Appointment button. Pick which calendar you want it to go in, enter a summary of the event, choose a time, and (optionally) enter a longer description. Note that you can't add events to every calendar: web calendars and your contact calendar, for example, are read-only.
At the lower right, you can select from a list of categories for this event. Events with categories, recurrences, or reminders are displayed with small icons in the calendar view: an alarm clock for reminders, arrows moving in a circle for recurrences, a birthday cake for birthdays, and so forth.
You can also schedule reminders and recurrences. For example, if you have an important meeting next week, you can schedule a reminder to pop up 15 minutes beforehand so that you have time to prepare. Just click the Reminder tab and choose a time and type of reminder, then click Add to add it to the list. Recurrences are similar: click the Recurrence tab, and choose how often you'd like to repeat the event. Is it just this Thursday and next Tuesday? Is it every Wednesday from now until Christmas? Is it a holiday that happens every year? Choose the recurrence rules, click Save and Close, and you've added the event to your calendar.
All that's left is to coordinate this event with other people. Select Actions, and then Forward as iCalendar to create an email message that has the event attached to it. When the recipients receive the message, they can click a single button to add the event to their calendars and send a note to you letting you know whether they'll attend.
Evolution contacts
The Evolution contact manager, or address book, is perhaps the least glamorous tool in the suite. However, it is interwoven with the email tools quite thoroughly. You can create contact cards by clicking the New Contact button in the contacts view, but you can also create a card by right-clicking any email address in an email someone has sent you.
Tip
If you enter birthday and anniversary information for your contacts, the dates will show up in a special calendar dedicated to your contacts.
If you're looking at your address book for someone's email address, you can right-click his card and have the option to send him a message, or to send his card to someone else, with just two clicks.
To have a look at the contact manager, click the Contacts button in the shortcut bar, or select any contact folder from the folder bar. You'll see a simple list of cards. If you prefer to have your contacts arranged as a phone list, select View, Current View, and then Phone List. You can also choose to display the list by organization rather than just by name.
GNOME and Office Software
GNOME integrates with the OpenOffice suite to allow users a consistent experience for word processing, spreadsheets, and presentations. OpenOffice has excellent file compatibility with Microsoft Office and offers the vast majority of features necessary for day to day use.
Other options are also available, however. The Gnumeric spreadsheet application handles certain files more capably than OpenOffice does, and has more complex financial calculations, although its graphics capabilities are not as strong. AbiWord is an excellent word processor for most tasks, and simpler than OpenOffice. Both take up far less disk space and run faster, and are suitable for low-resource situations.
For more information about office suites, see Chapter 8.
Movies and Music: Totem and Rhythmbox
The discussion of video and music playback inevitably involves the discussion of licensing. Because the group that defines the MP3 format has patented the encoding and decoding algorithms and requires that every distributor keep track of, and pay for, each copy of MP3 playing or recording software, there are no free, legal MP3 playback or recording devices. Similar license restrictions from the DVD Copy Control Association (dvdcca.org) have prevented the development of a free application that will display the DVD movies you can buy in a store.
Unlicensed MP3 and DVD applications are easy enough to build, as anyone with a search engine can find out quickly enough, but they also aren't necessary. You can still record and play music CDs with the free Ogg Vorbis format, and you can still record and play movies stored in MPEG and MOV formats—including unencrypted DVDs such as those made by home DVD recorders.
To play those songs, start up Rhythmbox, a music player modeled after features from Apple's iTunes. Rhythmbox will require a few moments to index your music collection before you use it. If it doesn't index your music library immediately, or if it doesn't find all your songs, select Music →Import Folder.
Once your files are indexed by the Rhythmbox library, you'll see a strikingly familiar interface: a list of music sources on the left, including Library, Radio, and any playlists you have created. To the right of the music sources is a list of artists and albums you can use to browse your collection, and below that is a list of individual songs that match the artist and album you've selected. You can also search for items in the artist, album, and song title categories in the Search bar at the top.
Select a song and press Play. As you listen, right-click on a song and select Properties. The first tab, Basic, shows you a little information about the track, but the second tab, Details, shows you how often you've played the song, where it's stored, and the exact length; it also lets you rate the song on a scale of 0 to 5. If you don't rate the song yourself, Rhythmbox will guess at ratings based on how often you play a song.
The other major feature in Rhythmbox is its playlists. To create a playlist, select Music → Playlist → New Playlist. Enter a name for your playlist, and it will appear in your list of available sources. Then, drag songs from the library to the list, and you've got a playlist.
To import a song into Rhythmbox, you must have an application known as Sound Juicer installed, which is often included with Rythmbox, but not always. Select File → Import CD to start ripping. Sound Juicer will check the CD title and track listings online with the MusicBrainz service, and ask you to confirm them before it proceeds. It will record in the Ogg Vorbis format unless you specify otherwise by selecting Edit → Preferences.
For movie playback, Totem makes things as easy as hitting Ctrl-O to open a file (or Ctrl-L to open a video stream on the Web). Totem provides a very clean interface to the extremely complex world of video encoding algorithms, but it is not always possible to hide from the sometimes bewildering array of file types. Totem supports several video formats by default, including the formats used by most video cameras.
Tip
You don't need to mount a DVD or video disc: just press Play. You do, however, need to be sure that the /dev/dvd or /media/dvd device exists on your system.
Tinkerers will note that Totem uses the Xine backend, which is as configurable as Totem is simple. For example, not all QuickTime video subformats (there are several) are supported, but users of most recent x86-based hardware can copy the QuickTime DLLs from a Windows installation into /usr/lib/win32 and access their system's hardware support. In addition, if you have RealPlayer for Linux installed, Totem is able to display the RealVideo format using RealPlayer's own binary codecs. For more information about media playback on Linux, including performance tuning hints, updates to the Xine libraries, and links to other media playback systems, visit http://www.xinehq.de.
Additional Applications and Resources
There are dozens, if not hundreds, of other GNOME applications, from software development tools to games to flowcharting and diagramming tools. The best ways to explore them are to visit the http://gnome.org web site and browse the software map or to try installing a few from your update system, whether it's Red Carpet, up2date, apt-get, or YaST.
If you get stuck, there are several places to turn for help. In addition to the Nautilus help system and the gnome.org web site, try looking for help in chat systems. Developers can be found on irc.gnome.org in #gnome, so if you have software development questions, go there. A web search on the text of an error message can often turn up the solution to a problem. Searching Google for an error message you've seen can turn up postings to public forums from people who have seen (and hopefully solved) the same error.