Running Linux, 5th Edition (2009)
Part I. Enjoying and Being Productive on Linux
Chapter 4. Basic Unix Commands and Concepts
If you've come to Linux from Windows or another non-Unix operating system, you have a steep learning curve ahead of you. We might as well be candid on this point. Unix is a world all its own, even though it has become a lot more user-friendly over the last few years.
In this chapter, we introduce the rudiments of Unix for those readers who have never had exposure to this operating system. If you are coming from Microsoft Windows or other environments, the information in this chapter will be absolutely vital to you. Unlike other operating systems, Unix is not at all intuitive. Many of the commands have seemingly odd names or syntax, the reasons for which usually date back many years to the early days of this system. And, although many of the commands may appear to be similar to their counterparts in the Windows command-line interpreter, there are important differences.
Instead of getting into the dark mesh of text processing, shell syntax, and other issues, in this chapter we strive to cover the basic commands needed to get you up to speed with the system if you're coming from a non-Unix environment. This chapter is far from complete; a real beginner's Unix tutorial would take an entire book. It's our hope that this chapter will give you enough to keep you going in your adventures with Linux, and that you'll invest in some more advanced books once you have a need to do so. We'll give you enough background to make your terminal usable, keep track of jobs, and enter essential commands.
Part 2 of this book contains material on system administration and maintenance. This is by far the most important part of the book for anyone running his own Linux system. If you are completely new to Unix, the material found in Part II should be easy to follow once you've completed the tutorial here.
One big job we merely touch on in this chapter is how to edit files. It's one of the first things you need to learn on any operating system. The two most popular editors for Linux, vi and Emacs, are discussed in Chapter 19.
Logging In
Let's assume that your installation went completely smoothly, and you are facing the following prompt on your screen:
Linux login
:
Some Linux users are not so lucky; they have to perform some heavy tinkering when the system is still in a raw state or in single-user mode. But for now, we'll talk about logging into a functioning Linux system.
Logging in, of course, distinguishes one user from another. It lets several people work on the same system at once and makes sure that you are the only person to have access to your files.
You may have installed Linux at home and are thinking right now, "Big deal. No one else shares this system with me, and I'd just as soon not have to log in." But logging in under your personal account also provides a certain degree of protection: your account won't have the ability to destroy or remove important system files. The system administration account (covered in the next chapter) is used for such touchy matters.
If you connect your computer to the Internet, even via a modem, make sure you set nontrivial passwords on all your accounts. Use punctuation and strings that don't represent real words or names. Although Unix systems are not as susceptible to random brute-force attacks from the outside world as Windows systems are (according to some sources, it takes about 20 minutes from connecting a Windows box to the Internet until that computer is attacked, whereas it takes about 40 minutes to download the security fixes from Microsoft), you certainly do not want anybody to snoop around in your files.
Note that some distributions install a so-called graphical login manager right away, so you might not be greeted by the somewhat arcane login: prompt in white letters on black background, but with a fancy graphical login screen, possibly even presenting you with the user accounts available on your system (maybe even with a little picture for each user) as well as different modes to log into. The basic login procedure is the same as described here, however: you still type your username and password.
You were probably asked to set up a login account for yourself when you installed Linux. If you have such an account, type the name you chose at the Linux login: prompt. If you don't have an account yet, type root because that account is certain to exist. Some distributions may also set up an account called install or some other name for fooling around when you first install the system.
After you choose your account, you see:
Password:
and you need to enter the correct password. The terminal turns off the normal echoing of characters you enter for this operation so that people looking at the screen cannot read your password. If the prompt does not appear, you should add a password to protect yourself from other people's tampering; we'll go into this later.
By the way, both the name and the password are case-sensitive. Make sure the Caps Lock key is not set because typing ROOT instead of root will not work.
When you have successfully logged in, you will see a prompt. If you're root, this may be a simple:
#
For other users, the prompt is usually a dollar sign ($). The prompt may also contain the name you assigned to your system or the directory you're in currently. Whatever appears here, you are now ready to enter commands. We say that you are at the "shell level" here and that the prompt you see is the "shell prompt." This is because you are running a program called the shell that handles your commands. Right now we can ignore the shell, but later in this chapter we'll find that it does a number of useful things for us.
As we show commands in this chapter, we'll show the prompt simply as $. So if you see:
$ pwd
it means that the shell prints $ and that pwd is what you're supposed to enter.
Setting a Password
If you don't already have a password, we recommend you set one. Just enter the command passwd. The command will prompt you for a password and then ask you to enter it a second time to make sure you enter it without typos.
There are standard guidelines for choosing passwords so that they're hard for other people to guess. Some systems even check your password and reject any that don't meet the minimal criteria. For instance, it is often said that you should have at least six characters in the password. Furthermore, you should mix uppercase and lowercase characters or include characters other than letters and digits.
If you think it is a good idea to pick an ordinary, but rarely used word as your password, think again. There are password attack programs available that come with an English dictionary and just try all words in that dictionary in order to find the correct one so that the account can be compromised. Also, never use the account name for the password. This is sometimes called a "joe," and is likely to be the first thing a password attacker is going to try.
A good trick for choosing a good password is to take a full phrase that you can remember (maybe a line from your favorite song), and then just take the first letters. Then blend in a digit and maybe a special character. For example, if your line is I'd really like to go fishing now, your password could be Irl2gfn!. But do not use exactly this one; the fact that it has been published in this book makes it a bad password. There are even programs available (not unlikely integrated into the graphical user management tools of your distribution) that generate a random password from random characters, but of course these passwords are difficult to remember—if you have to write the password down in order to remember it, it is a bad password as well.
To change your password, just enter the passwd command again. It prompts you for your old password (to make sure you're you) and then lets you change it.
Virtual Consoles
As a multiprocessing system, Linux gives you a number of interesting ways to do several things at once. You can start a long software installation and then switch to reading mail or compiling a program simultaneously.
Most Linux users, when they want this asynchronous access, will employ the X Window System (see Chapter 16). But before you get X running, you can do something similar through virtual consoles. This feature appears on a few other versions of Unix, but is not universally available.
To try out virtual consoles , hold down the left Alt key and press one of the function keys, F1 through F8. As you press each function key, you see a totally new screen complete with a login prompt. You can log in to different virtual consoles just as if you were two different people, and you can switch between them to carry out different activities. You can even run a complete X session in each console. The X Window System will use virtual console 7 by default. So if you start X and then switch to one of the text-based virtual consoles, you can go back again to X by typing Alt-F7. If you discover that the Alt-+ function key combination brings up an X menu or some other function instead of switching virtual consoles, use Ctrl + Alt + function key. You can even have two X servers running the X Window System; the second one would then be on virtual console 8.
Popular Commands
The number of commands on a typical Unix system is enough to fill a few hundred reference pages. And you can add new commands too. The commands we'll tell you about here are just enough to navigate and to see what you have on the system.
Directories
As with Windows and virtually every modern computer system, Unix files are organized into a hierarchical directory structure. Unix imposes no rules about where files have to be, but conventions have grown up over the years. Thus, on Linux you'll find a directory called /home where each user's files are placed. Each user has a subdirectory under /home. So if your login name is mdw, your personal files are located in /home/mdw. This is called your home directory. You can, of course, create more subdirectories under it.
If you come from a Windows system, the slash (/) as a path separator may look odd to you because you are used to the backslash (\). There is nothing tricky about the slash. Slashes were actually used as path separators long before people even started to think about MS-DOS or Windows. The backslash has a different meaning on Unix (turning off the special meaning of the next character, if any).
As you can see, the components of a directory are separated by slashes. The term pathname is often used to refer to this slash-separated list.
What directory is /home in? The directory named /, of course. This is called the root directory. We have already mentioned it when setting up filesystems.
When you log in, the system puts you in your home directory. To verify this, use the "print working directory," or pwd , command:
$ pwd
/home/mdw
The system confirms that you're in /home/mdw.
You certainly won't have much fun if you have to stay in one directory all the time. Now try using another command, cd , to move to another directory:
$ cd /usr/bin
$ pwd
/usr/bin
$ cd
Where are we now? A cd with no arguments returns us to our home directory. By the way, the home directory is often represented by a tilde (~). So the string ~/programs means that programs is located right under your home directory.
While we're thinking about it, let's make a directory called ~/programs. From your home directory, you can enter either:
$ mkdir programs
or the full pathname:
$ mkdir /home/mdw/programs
Now change to that directory:
$ cd programs
$ pwd
/home/mdw/programs
The special character sequence .. refers to the directory just above the current one. So you can move back up to your home directory by typing the following:
$ cd ..
You can also always go back to your home directory by just typing:
$ cd
no matter where in the directory hierarchy you are.
The opposite of mkdir is rmdir, which removes directories :
$ rmdir programs
Similarly, the rm command deletes files . We won't show it here because we haven't yet shown how to create a file. You generally use the vi or Emacs editor for that (see Chapter 19), but some of the commands later in this chapter will create files too. With the -r (recursive) option, rm deletes a whole directory and all its contents. (Use with care!)
At this point, we should note that the graphical desktop environments for Linux, such as KDE and GNOME, come with their own file managers that can perform most of the operations described in this chapter, such as listing and deleting files, creating directories, and so forth. Some of them, like Konqueror (shipped with KDE) and the web browser in that environment, are quite feature-rich. However, when you want to perform a command on many files, which perhaps follow a certain specification, the command line is hard to beat in efficiency, even it takes a while to learn. For example, if you wanted to delete all files in the current directory and all directories beneath that which start with an r and end in .txt, the so-called Z shell (zsh) would allow you to do that with one line:
$ rm **/r*.txt
More about these techniques later.
Listing Files
Enter ls to see what is in a directory. Issued without an argument, the ls command shows the contents of the current directory. You can include an argument to see a different directory:
$ ls /home
Some systems have a fancy ls that displays special files—such as directories and executable files—in bold, or even in different colors. If you want to change the default colors, edit the file /etc/DIR_COLORS, or create a copy of it in your home directory named .dir_colors and edit that.
Like most Unix commands, ls can be controlled with options that start with a hyphen (-). Make sure you type a space before the hyphen. One useful option for ls is -a for "all," which will reveal to you riches that you never imagined in your home directory:
$ cd
$ ls -a
. .bashrc .fvwmrc
.. .emacs .xinitrc
.bash_history .exrc
The single dot refers to the current directory, and the double dot refers to the directory right above it. But what are those other files beginning with a dot? They are called hidden files. Putting a dot in front of their names keeps them from being shown during a normal ls command. Many programs employ hidden files for user options—things about their default behavior that you want to change. For instance, you can put commands in the file .Xdefaults to alter how programs using the X Window System operate. Most of the time you can forget these files exist, but when you're configuring your system you'll find them very important. We list some of them later.
Another useful ls option is -l for "long." It shows extra information about the files. Figure 4-1 shows typical output and what each field means. Adding the -h ("human" option) shows the file sizes rounded to something more easily readable.
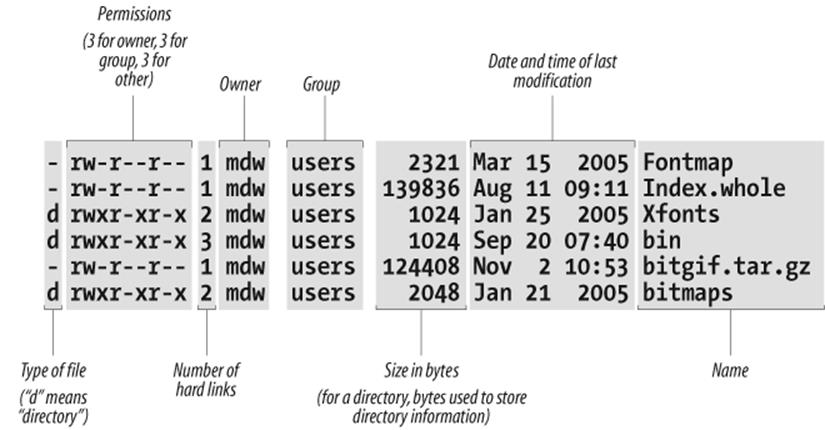
Figure 4-1. Output of ls -l
We discuss the permissions, owner, and group fields in a later chapter, Chapter 11. The ls command also shows the size of each file and when it was last modified.
Viewing Files, More or Less
One way to look at a file is to invoke an editor, such as:
$ xemacs .bashrc
But if you just want to scan a file quickly, rather than edit it, other commands are quicker. The simplest is the strangely named cat command (named after the verb concatenate because you can also use it to concatenate several files into one):
$ cat .bashrc
But a long file will scroll by too fast for you to see it, so most people use the more command instead:
$ more .bashrc
This prints a screenful at a time and waits for you to press the spacebar before printing more. more has a lot of powerful options. For instance, you can search for a string in the file: press the slash key (/), type the string, and press Return.
A popular variation on the more command is called less . It has even more powerful features; for instance, you can mark a particular place in a file and return there later.
Symbolic Links
Sometimes you want to keep a file in one place and pretend it is in another. This is done most often by a system administrator, not a user. For instance, you might keep several versions of a program around, called prog.0.9, prog.1.1, and so on, but use the name prog to refer to the version you're currently using. Or you may have a file installed in one partition because you have disk space for it there, but the program that uses the file needs it to be in a different partition because the pathname is hard-coded into the program.
Unix provides links to handle these situations. In this section, we'll examine the symbolic link, which is the most flexible and popular type. A symbolic link is a kind of dummy file that just points to another file. If you edit or read or execute the symbolic link, the system is smart enough to give you the real file instead. Symbolic links work a lot like shortcuts under MS-Windows, but are much more powerful.
Let's take the prog example. You want to create a link named prog that points to the actual file, which is named prog.1.1. Enter the following command:
$ ln -s prog.1.1 prog
Now you've created a new file named prog that is kind of a dummy file; if you run it, you're really running prog.1.1. Let's look at what ls -l has to say about the file:
$ ls -l prog
lrwxrwxrwx 2 mdw users 8 Nov 17 14:35 prog -> prog.1.1
The l at the beginning of the output line shows that the file is a link, and the little -> indicates the real file to which the link points.
Symbolic links are really simple, once you get used to the idea of one file pointing to another. You'll encounter links all the time when installing software packages.
Shells
As we said before, logging into the system in console mode puts you into a shell. If your system is configured with a graphical login, logging in brings you to the graphical interface where you can open an xterm (or similar) window in order to get a shell. The shell interprets and executes all your commands. Let's look a bit at different shells before we keep going, because they're going to affect some of the material coming up.
If it seems confusing that Unix offers many different shells, just accept it as an effect of evolution. Believe us, you wouldn't want to be stuck using the very first shell developed for Unix, the Bourne shell. Although it was a very powerful user interface for its day (the mid-1970s), it lacked a lot of useful features for interactive use—including the ones shown in this section. So other shells have been developed over time, and you can now choose the one that best suits your way of working.
Some of the shells available on Linux are as follows:
bash
Bourne Again shell. The most commonly used (and most powerful) shell on Linux. POSIX-compliant, compatible with the Bourne shell, created and distributed by the GNU project (Free Software Foundation). Offers command-line editing, history substitution, and Bourne shell compatibility.
csh
C shell. Developed at Berkeley. Mostly compatible with the Bourne shell for interactive use, but has a very different interface for programming. Does not offer command-line editing, although it does have a sophisticated alternative called history substitution. On Linux, csh is just another name for the newer tcsh.
ksh
Korn shell. Perhaps the most popular on Unix systems generally, and the first to introduce modern shell techniques (including some borrowed from the C shell) into the Bourne shell. Compatible with the Bourne shell. Offers command-line editing.
sh
Bourne shell. The original shell. Does not offer command-line editing.
tcsh
Enhanced C shell. Offers command-line editing.
zsh
Z shell. The newest of the shells. Compatible with the Bourne shell. Offers command-line editing. Has very powerful completion features. If you do not know any shell yet, and your Linux distribution carries zsh, go with that choice from the start.
Try the following command to find out what your shell is. It prints out the full pathname where the shell is located. Don't forget to type the dollar sign:
$ echo
$SHELL
You are probably running bash, the Bourne Again shell, because that is the most popular one on Linux. If you're running something else, this might be a good time to change to bash or zsh. They are both powerful, POSIX compliant, well supported, and very popular on Linux. Use the chshcommand to change your shell:
$ chsh
Enter password: Type your password here — this is for security's sake
Changing the login shell for mdw
Enter the new value, or press return for the default
Login Shell [/bin/sh]:/bin/bash
(Use /usr/bin/zsh or /bin/zsh, depending on your distribution, for zsh.)
Before a user can choose a particular shell as a login shell, that shell must be installed and the system administrator must make it available by entering it in /etc/shells.
There are a couple of ways to conceptualize the differences between shells. One is to distinguish Bourne-compatible shells from csh-compatible shells. This will be of interest to you when you start to program with the shell, also known as writing shell scripts. The Bourne shell and C shell have different programming constructs. Most people now agree that Bourne-compatible shells are better, and there are many Unix utilities that recognize only the Bourne shell.
Another way to categorize shells is to identify those that offer command-line editing (all the newer ones) versus those that do not. sh and csh lack this useful feature.
When you combine the two criteria—being compatible with the Bourne shell and offering command-line editing—your best choice comes down to bash, ksh, or zsh. Try out several shells before you make your choice; it helps to know more than one, in case someday you find yourself on a system that limits your choice of shells.
Useful Keys and How to Get Them to Work
When you type a command, pressing the Backspace key should remove the last character. Ctrl-U should delete the line from the cursor to the beginning of the line; thus, this key combination will delete the whole line if the cursor is at the end of the line. When you have finished entering a command, and it is executing, Ctrl-C should abort it, and Ctrl-Z should suspend it. (When you want to resume the suspended program, enter fg for "foreground.")
Ctrl-S stops the terminal output until you turn it off again with Ctrl-Q. This is probably less useful today, as most terminal emulations provide scrolling facilities anyway, but it's important to know if you have hit Ctrl-S by accident and the terminal all of a sudden "becomes unresponsive." Just hit Ctrl-Q to make it respond again; it was just waiting for you.
If any of these keys fail to work, your terminal is not configured correctly for some reason. You can fix it through the stty command. Use the syntax:
stty function key
where function is what you want to do, and key is the key that you press. Specify a control key by putting a circumflex (^) in front of the key.
Here is a set of sample commands to set up the functions described earlier:
$ stty erase ^H
$ stty kill ^U
$ stty intr ^C
$ stty susp ^Z
The first control key shown, ^H, represents the ASCII code generated by the Backspace key.
By the way, you can generate a listing of your current terminal settings by entering stty -a. But that doesn't mean you can understand the output: stty is a complicated command with many uses, some of which require a lot of knowledge about terminals.
Here is another use of stty that can prove useful quite often: if your shell gets confused (as can often happen if you output binary data to it), and does not react as you are used to, try entering:
$ stty sane
That will usually succeed in bringing the shell to reason and making it operate as expected again.
Typing Shortcuts
If you've been following along with this tutorial at your terminal, you may be tired of typing the same things over and over. It can be particularly annoying when you make a mistake and have to start again. Here is where the shell really makes life easier. It doesn't make Unix as simple as a point-and-click interface, but it can help you work really fast in a command environment.
This section discusses command-line editing. The tips here work if your shell is bash, ksh, tcsh, or zsh. Command-line editing treats the last 50 or so lines you typed as a buffer in an editor (this is also called the command history). You can move around within these lines and change them the way you'd edit a document. Every time you press the Return key, the shell executes the current line.
Word Completion
First, let's try something simple that can save you a lot of time. Type the following, without pressing the Return key:
$ cd /usr/inc
Now press the Tab key. The shell will add lude to complete the name of the directory /usr/include. Now you can press the Return key, and the command will execute.
The criterion for specifying a filename is "minimal completion." Type just enough characters to distinguish a name from all the others in that directory. The shell can find the name and complete it—up to and including a slash, if the name is a directory.
You can use completion on commands too. For instance, if you type:
$ ema
and press the Tab key, the shell will add the cs to make emacs (unless some other command in your path begins with ema).
What if multiple files match what you've typed? If they all start with the same characters, the shell completes the word up to the point where names differ. Beyond that, most shells do nothing. bash has a neat enhancement: if you press the Tab key twice, it displays all the possible completions. For instance, if you enter:
$ cd /usr/l
and press the Tab key twice, bash prints something like the following:
lib local
zsh even goes a step further: if you press the Tab key yet another time, the first of the possible choices will be selected; if you press it yet again, the second is selected, and so on. This way, you can keep your finger on the Tab key and don't have to supply additional characters in order to disambiguate your entry.
Moving Around Among Commands
Press the up arrow, and the command you typed previously appears. The up arrow takes you back through the command history, and the down arrow takes you forward. If you want to change a character on the current line, use the left or right arrow keys.
As an example, suppose you tried to execute:
$ mroe .bashrc
bash: mroe: command not found
Of course, you typed mroe instead of more. To correct the command, call it back by pressing the up arrow. Then press the left arrow until the cursor lies over the o in mroe. You could use the Backspace key to remove the o and r and retype them correctly. But here's an even neater shortcut: just press Ctrl-T. It will reverse o and r, and you can then press the Return key to execute the command.
Some shells even go a step further: if you type in a nonexistent command such as mroe, but there is a similar existing one, such as more, the shell will offer to correct your typing mistake and select this other option. Of course, before accepting this generous offer, you should first check what you are getting so that it is not a dangerous command that, for example, deletes your files.
Many other key combinations exist for command-line editing. But the basics shown here will help you quite a bit. If you learn the Emacs editor, you will find that most keys work the same way in the shell. And if you're a vi fan, you can set up your shell so that it uses vi key bindings instead of Emacs bindings. To do this in bash, ksh, or zsh, enter the command:
$ export VISUAL=vi
In tcsh, enter:
$ setenv VISUAL vi
Filename Expansion
Another way to save time in your commands is to use special characters to abbreviate filenames. You can specify many files at once by using these characters. This feature of the shell is sometimes called "globbing ."
The Windows command-line interpreter offers a few crude features of this type. You can use a question mark to mean "any character" and an asterisk to mean "any string of characters." Unix provides these wildcards too, but in a more robust and rigorous way.
Let's say you have a directory containing the following C source files:
$ ls
inv1jig.c inv2jig.c inv3jig.c invinitjig.c invpar.c
To list the three files containing digits in their names, you could enter:
$ ls inv?jig.c
inv1jig.c inv2jig.c inv3jig.c
The shell looks for a single character to replace the question mark. Thus, it displays inv1jig.c, inv2jig.c, and inv3jig.c, but not invinitjig.c because that name contains too many characters.
If you're not interested in the second file, you can specify the ones you want using brackets:
$ ls inv[13]jig.c
inv1jig.c inv3jig.c
If any single character within the brackets matches a file, that file is displayed. You can also put a range of characters in the brackets:
$ ls inv[1-3]jig.c
inv1jig.c inv2jig.c inv3jig.c
Now we're back to displaying all three files. The hyphen means "match any character from 1 through 3, inclusive." You could ask for any numeric character by specifying 0-9, and any alphabetic character by specifying [a-zA-Z]. In the latter case, two ranges are required because the shell is case-sensitive. The order used, by the way, is that of the ASCII character set.
Suppose you want to see the init file, too. Now you can use an asterisk because you want to match any number of characters between the inv and the jig:
$ ls inv*jig.c
inv1jig.c inv2jig.c inv3jig.c invinitjig.c
The asterisk actually means "zero or more characters," so if a file named invjig.c existed, it would be shown too.
Unlike the Windows command-line interpreter, the Unix shells let you combine special characters and normal characters any way you want. Let's say you want to look for any source (.c) or object (.o) file that contains a digit. The resulting pattern combines all the expansions we've studied in this section:
$ ls *[0-9]*.[co]
Filename expansion is very useful in shell scripts (programs), where you don't always know exactly how many files exist. For instance, you might want to process multiple log files named log001, log002, and so on. No matter how many there are, the expression log* will match them all.
Again, zsh goes a bit further than the other shells. With zsh, you can look for certain files in the current directory and all subdirectories thereof, using ** as the directory specification. If we repeat the previous example of searching for certain C source files, but this time want to find them in the whole tree, the command would look like this:
$ ls **/inv?jig.c
inv1jig.c inv2jig.c inv3jig.c old/inv1jig.c
old/veryold/inv1jig.c
Tip
Filename expansions are not the same as regular expressions, which are used by many utilities to specify groups of strings. Regular expressions are beyond the scope of this book, but are described by many books that explain Unix utilities. A taste of regular expressions appears in Chapter 19.
Saving Your Output
System administrators (and other human beings too) see a lot of critical messages fly by on the computer screen. It's often important to save these messages so that you can scrutinize them later, or (all too often) send them to a friend who can figure out what went wrong. So, in this section, we'll explain a little bit about redirection, a powerful feature provided by Unix shells. If you come from Windows, you have probably seen a similar, but more limited, type of redirection in the command-line interpreter there.
If you put a greater-than sign (>) and a filename after any command, the output of the command will be sent to that file. For instance, to capture the output of ls, you can enter:
$ ls /usr/bin > ~/Binaries
A listing of /usr/bin will be stored in your home directory in a file named Binaries. If Binaries had already existed, the > would wipe out what was there and replace it with the output of the ls command. Overwriting a current file is a common user error. If your shell is csh or tcsh, you can prevent overwriting with the command:
$ set noclobber
In bash, you can achieve the same effect by entering:
$ noclobber=1 It doesn't have to be 1; any value will have the same effect.
Another (and perhaps more useful) way to prevent overwriting is to append new output. For instance, having saved a listing of /usr/bin, suppose we now want to add the contents of /bin to that file. We can append it to the end of the Binaries file by specifying two greater-than signs:
$ ls /bin >> ~/Binaries
You will find the technique of output redirection very useful when you are running a utility many times and saving the output for troubleshooting.
Most Unix programs have two output streams . One is called the standard output, and the other is the standard error. If you're a C programmer you'll recognize these: the standard error is the file pointer named stderr to which you print messages.
The > character does not redirect the standard error. It's useful when you want to save legitimate output without mucking up a file with error messages . But what if the error messages are what you want to save? This is quite common during troubleshooting. The solution is to use a greater-than sign followed by an ampersand. (This construct works in almost every modern Unix shell.) It redirects both the standard output and the standard error. For instance:
$ gcc invinitjig.c >& error-msg
This command saves all the messages from the gcc compiler in a file named error-msg. On the Bourne shell and bash you can also say it slightly differently:
$ gcc invinitjig.c &> error-msg
Now let's get really fancy. Suppose you want to save the error messages but not the regular output—the standard error but not the standard output. In the Bourne-compatible shells you can do this by entering the following:
$ gcc invinitjig.c 2> error-msg
The shell arbitrarily assigns the number 1 to the standard output and the number 2 to the standard error. So the preceding command saves only the standard error.
Finally, suppose you want to throw away the standard output—keep it from appearing on your screen. The solution is to redirect it to a special file called /dev/null. (Have you heard people say things like "Send your criticisms to /dev/null"? Well, this is where the phrase came from.) The /devdirectory is where Unix systems store special files that refer to terminals, tape drives, and other devices. But /dev/null is unique; it's a place you can send things so that they disappear into a black hole. For example, the following command saves the standard error and throws away the standard output:
$ gcc invinitjig.c 2>error-msg >/dev/null
So now you should be able to isolate exactly the output you want.
In case you've wondered whether the less-than sign (<) means anything to the shell: yes, it does. It causes commands to take their input from a file. But most commands allow you to specify input files on their command lines anyway, so this "input redirection" is rarely necessary.
Sometimes you want one utility to operate on the output of another utility. For instance, you can use the sort command to put the output of other commands into a more useful order. A crude way to do this would be to save output from one command in a file and then run sort on it. For instance:
$ du
> du_output
$ sort -nr du_output
Unix provides a much more succinct and efficient way to do this using a pipe. Just place a vertical bar between the first and second commands:
$ du | sort -nr
The shell sends all the output from the du program to the sort program.
In the previous example, du stands for "disk usage" and shows how many blocks each file occupies under the current directory. Normally, its output is in a somewhat random order:
$ du
10 ./zoneinfo/Australia
13 ./zoneinfo/US
9 ./zoneinfo/Canada
4 ./zoneinfo/Mexico
5 ./zoneinfo/Brazil
3 ./zoneinfo/Chile
20 ./zoneinfo/SystemV
118 ./zoneinfo
298 ./ghostscript/doc
183 ./ghostscript/examples
3289 ./ghostscript/fonts
.
.
.
So we have decided to run it through sort with the -n and -r options. The -n option means "sort in numerical order" instead of the default ASCII sort, and the -r option means "reverse the usual order" so that the highest number appears first. The result is output that quickly shows you which directories and files hog the most space:
$ du | sort -rn
34368 .
16005 ./emacs
16003 ./emacs/20.4
13326 ./emacs/20.4/lisp
4039 ./ghostscript
3289 ./ghostscript/fonts
.
.
.
Because there are so many files, we had better use a second pipe to send output through the more command (one of the more common uses of pipes):
$ du | sort -rn | more
34368 .
16005 ./emacs
16003 ./emacs/20.4
13326 ./emacs/20.4/lisp
4039 ./ghostscript
3289 ./ghostscript/fonts
.
.
.
An alternative to more could be using the head command here, which only shows the first few lines (10 by default). Of course, if there is a head command, there also needs to be a tail command, which just shows the last few lines.
You may have noticed that when using du alone, the output starts appearing fairly quickly and is then added to as the command finishes more computations, whereas when the output is piped to sort, it will take quite a while (if your hard disk is large and well filled) until the output appears. That is because the sort command needs all the data first in order to be able to sort, and not because the piping would delay things.
What Is a Command?
We've said that Unix offers a huge number of commands and that you can add new ones. This makes it radically different from most operating systems, which contain a strictly limited table of commands. So what are Unix commands, and how are they stored? On Unix, a command is simply a file. For instance, the ls command is a binary file located in the directory bin. So, instead of ls, you could enter the full pathname, also known as the absolute pathname:
$ /bin/ls
This makes Unix very flexible and powerful. To provide a new utility, a system administrator can simply install it in a standard directory where commands are located. There can also be different versions of a command—for instance, you can offer a new version of a utility for testing in one place while leaving the old version in another place, and users can choose the one they want.
Here's a common problem: sometimes you enter a command that you expect to be on the system, but you receive a message such as "Not found." The problem may be that the command is located in a directory that your shell is not searching. The list of directories where your shell looks for commands is called your path. Enter the following to see what your path is (remember the dollar sign; otherwise, you won't see the contents of the environment variable, but only its name, which you know anyway!):
$ echo $PATH
/usr/local/bin:/usr/bin:/usr/X11R6/bin:/bin:/usr/lib/java/bin:\
/usr/games:/usr/bin/TeX:.
This takes a little careful eyeballing. First, the word PATH is specially recognized by the shell and is called an environment variable. It's a short moniker for useful information—in this case, a list of directories where the shell should search for commands. There are lots of environment variables; we saw another one called SHELL in the section "Shells." When you specify an environment variable, include a dollar sign before the name.
The output of our echo command is a series of pathnames separated by colons. The first pathname, for this particular user, is /usr/local/bin. The second is /usr/bin, and so on. So if two versions of a command exist, one in /usr/local/bin and the other in /usr/bin, the one in /usr/local/bin will execute. The last pathname in this example is simply a dot; it refers to the current directory. Unlike the Windows command-line interpreter, Unix does not look automatically in your current directory. You have to tell it to explicitly, as shown here. Some people think it's a bad idea to look in the current directory, for security reasons. (An intruder who gets into your account might copy a malicious program to one of your working directories.) However, this mostly applies to root, so normal users generally do not need to worry about this.
If a command is not found, you have to figure out where it is on the system and add that directory to your path. The manual page should tell you where it is. Let's say you find it in /usr/sbin, where a number of system administration commands are installed. You realize you need access to these system administration commands, so you enter the following (note that the first PATH doesn't have a dollar sign, but the second one does):
$ export PATH=$PATH:/usr/sbin
This command adds /usr/sbin, but makes it the last directory that is searched. The command is saying, "Make my path equal to the old path plus /usr/sbin."
The previous command works for some shells but not others. It's fine for most Linux users who are working in a Bourne-compatible shell like bash. But if you use csh or tcsh, you need to issue the following command instead:
set path = ( $PATH /usr/sbin )
Finally, there are a few commands that are not files; cd is one. Most of these commands affect the shell itself and therefore have to be understood and executed by the shell. Because they are part of the shell, they are called built-in commands.
Putting a Command in the Background
No matter whether you are using the X Window System (described later) or virtual consoles, you may at times still want to run several commands simultaneously from the same shell, if only in order to avoid having to switch between windows or consoles all the time. You can take advantage of Unix's multitasking features and achieve this by simply putting an ampersand at the end of commands, as shown in this example:
$ gcc invinitjig.c &
[1] 21457
The ampersand puts the command into the background, meaning that the shell prompt comes back and you can continue to execute other commands while the gcc command is compiling your program. The [1] is a job number that is assigned to your command. The 21457 is a process ID, which we'll discuss later. Job numbers are assigned to background commands in order and therefore are easier to remember and type than process IDs.
Of course, multitasking does not come for free. The more commands you put into the background, the slower your system runs as it tries to interleave their execution.
You wouldn't want to put a command in the background if it required user input. If you do so, you see an error message, such as:
Stopped (tty input)
You can solve this problem by bringing the job back into the foreground through the fg command. If you have many commands in the background, you can choose one of them by its job number or its process ID. For our long-lived gcc command, the following commands are equivalent:
$ fg %1
$ fg 21457
Don't forget the percent sign on the job number; that's what distinguishes job numbers from process IDs.
To get rid of a command in the background, issue a kill command:
$ kill %1
If you have started a program in the foreground, but want to put in the background later, most shells allow you to type Ctrl-Z. That key combination temporarily suspends the current foreground program. You can then type either fg as described before, to put it back in the foreground, or bg, to put it in the background.
Remote Logins and Command Execution
You are probably connected to a network, either within your own home or office, or through dial-up to the Internet. Sometimes you want to log in to another system, or copy a file to or from another system.
If you need help setting up networking, check Chapter 13 and the following chapters. In this section we assume you are on the network already. If you can view a web page in a browser, you're connected and can carry out the commands in this section. We'll use a package called SSH that's installed on most, if not all, Linux distributions.
SSH stands for Secure Shell, and denotes the project developers' focus on protecting your communications from snooping and hijacking. SSH has become an extremely respected and popular protocol for communicating between systems, and is supported on many different types of systems, such as the Putty graphical interface for Windows (http://www.chiark.greenend.org.uk/~sgtatham/putty).
Linux uses OpenSSH, a free software implementation (http://www.openssh.com). It rarely has bugs (although one will turn up once in a while, so for security reasons you should keep up with your distribution's updates), and it supports the latest standard, SSH protocol version 2. If you decide to do some heavy internetworking with SSH, you can get quite deep into it through SSH, The Secure Shell: The Definitive Guide (O'Reilly).
This section lays out the four or five commands you'll use most often. Suppose you have an account named mdw on a remote system called eggplant. You can log in as follows:
$ ssh -l mdw eggplant
The -l specifies the account on the remote system. Another syntax with identical effects is:
$ ssh mdw@eggplant
If your account name is the same on the local and remote systems, you can omit the name and just enter:
$ ssh eggplant
Each time you start an ssh session, it prompts for the password of the account on the remote system.
During the session, if you have to do something on your local machine, you don't have to log out or switch windows. Suspend the remote login session by entering a tilde character (~) followed by Ctrl-Z. (Sometimes the tilde is not caught by SSH; if it isn't, try again. You're successful if the tilde is not displayed.) To pick up the session you suspended, use fg as for local programs you suspend.
You might want to run a single command instead of starting up a shell on the remote system; if so, just enter the command after the hostname:
$ ssh -l mdw eggplant rm logfiles/temp_junk
Or, if you can omit your name:
$ ssh eggplant rm logfiles/temp_junk
Filenames such as logfiles/temp_junk are interpreted as if you were located in your home directory (the directory you'd be in if you logged in). Use absolute pathnames (such as /home/mdw/logfiles/temp_junk) if you want to make sure you're naming the right file in the right location.
The manpage for ssh can fill in interesting details, such as how to run X Window System graphical programs over SSH, and how to eliminate the annoyance of having to enter your password at each invocation of the command. (To be really robust, though, you may have to play around with configuration files beyond what the manpage tells you.)
You can copy files using another command from the SSH suite, scp. The following copies a file from your local system to eggplant:
$ scp logfiles/temp_junk mdw@eggplant:
Once again, the username and @ can be omitted if it's the same on both systems. (But the -l syntax doesn't work on scp; it uses a different -l option for a different purpose.)
Be sure to include the final colon; without it, you simply copy the file to a new file named eggplant on your local system. On eggplant, the default directory is your home directory (as with ssh). You can specify that the file be copied to any directory you have access to, with a path relative to the home directory or with an absolute pathname.
To do the reverse operation—copy a file from the remote system to your own—enter:
$ scp mdw@eggplant:logfiles/temp_junk .
We used a single dot here to denote the local directory where you're executing the command. Any relative or absolute pathname could be specified instead.
To copy a directory, add the -r option:
$ scp -r mdw@eggplant:logfiles .
Manual Pages
The most empowering information you can get is how to conduct your own research. Following this precept, we'll now tell you about the online help system that comes built into Unix systems. It is called manual pages , or manpages for short.
Actually, manual pages are not quite the boon they ought to be. This is because they are short and take a lot of Unix background for granted. Each one focuses on a particular command and rarely helps you decide why you should use that command. Still, they are critical. Commands can vary slightly on different Unix systems, and the manual pages are the most reliable way to find out what your system does. (The Linux Documentation Project deserves a lot of credit for the incredible number of hours they have put into creating manual pages.) To find out about a command, enter a command, such as the following:
$ man ls
Manual pages are divided into different sections depending on their purpose. User commands are in section 1, Unix system calls in section 2, and so on. The sections that will interest you most are 1, 5 (file formats), and 8 (system administration commands). When you view manpages online, the section numbers are conceptual; you can optionally specify them when searching for a command:
$ man 1 ls
But if you consult a hardcopy manual, you'll find it divided into actual sections according to the numbering scheme. Sometimes an entry in two different sections can have the same name. (For instance, chmod is both a command and a system call.) So you will sometimes see the name of a manual page followed by the section number in parentheses, as in ls(1).
There is one situation in which you will need the section number on the command line: when there are several manual pages for the same keyword (e.g., one for a command with that name and one for a system function with the same name). Suppose you want to look up a library call, but theman command shows you the command because its default search order looks for the command first. In order to see the manual page for the library call, you need to give its section number.
Look near the top of a manual page. The first heading is NAME. Under it is a brief one-line description of the item. These descriptions can be valuable if you're not quite sure what you're looking for. Think of a word related to what you want, and specify it in an apropos command:
$ apropos edit
The previous command shows all the manual pages that have something to do with editing. It's a very simple algorithm: apropos simply prints out all the NAME lines that contain the string you request.
Many other utilities, particularly those offered by the desktops discussed in Chapter 3, present manual pages attractively.
Like commands, manual pages are sometimes installed in strange places. For instance, you may install some site-specific programs in the directory /usr/local, and put their manual pages in /usr/local/man. The man command will not automatically look in /usr/local/man, so when you ask for a manual page you may get the message "No manual entry." Fix this by specifying all the top man directories in a variable called MANPATH. For example (you have to put in the actual directories where the manual pages are on your system):
$ export MANPATH=/usr/man:/usr/local/man
The syntax is like PATH, described earlier in this chapter. Each pair of directories is separated by a colon. If your shell is csh or tcsh, you need to say:
$ setenv MANPATH /usr/man:/usr/local/man
Another environment variable that you may want to set is MANSECT. It determines the order in which the sections of the manual pages are searched for an entry. For example:
$ export MANSECT="2:3:1:5:4:6:7:8:n:9"
searches in section 2 first.
Have you read some manual pages and still found yourself confused? They're not meant to be introductions to new topics. Get yourself a good beginner's book about Unix, and come back to manual pages gradually as you become more comfortable on the system; then they'll be irreplaceable.
Manual pages are not the only source of information on Unix systems. Programs from the GNU project often have Info pages that you read with the program info. For example, to read the Info pages for the command find, you would enter:
info find
The info program is arcane and has lots of navigation features; to learn it, your best bet is to type Ctrl-H in the info program and read through the Help screen. Fortunately, there are also programs that let you read Info pages more easily, notably tkinfo and kdehelp. These commands use the X Window System to present a graphical interface. You can also read Info pages from Emacs (see "Tutorial and Online Help" in Chapter 19) or can use the command pinfo, available on some Linux distributions, which works more like the Lynx web browser.
In recent times, more and more documentation has been provided in the form of HTML pages. You can read those with any web browser (see Chapter 5). For example, in the Konqueror web browser, you select Open Location from the Location menu and press the button with the folder symbol, which opens an ordinary file selection dialog where you can select your documentation file. Some documentation may also come in PDF files ; these can be read with either the proprietary Acrobat Reader, which comes with many Linux distributions and can otherwise be downloaded from http://www.adobe.com, or with xpdf and the KDE program KGhostview.
Startup Files
Configuration is a strong element of Unix. This probably stems from two traits commonly found in hackers: they want total control over their environment, and they strive to minimize the number of keystrokes and other hand movements they have to perform. So all the major utilities on Unix—editors, mailers, debuggers, X Window System clients—provide files that let you override their default behaviors in a bewildering number of ways. Many of these files have names ending in rc, which means resource configuration.
Startup files are usually in your home directory. Their names begin with a period, which keeps the ls command from displaying them under normal circumstances. None of the files is required; all the affected programs are smart enough to use defaults when the file does not exist. But everyone finds it useful to have the startup files . Here are some common ones:
.bashrc
For the bash shell. The file is a shell script, which means it can contain commands and other programming constructs. Here's a very short startup file that might have been placed in your home directory by the tool that created your account:
PS1='\u$' # The prompt contains the user's login name.
HISTSIZE=50 # Save 50 commands for when the user presses the up arrow.
# All the directories to search for commands.
PATH=/usr/local/bin:/usr/bin:/bin:/usr/bin/X11
# To prevent the user from accidentally ending a login session,
# disable Ctrl-D as a way to exit.
IGNOREEOF=1
stty erase "^H" # Make sure the backspace key erases.
.bash_profile
For the bash shell. Another shell script. The difference between this script and .bashrc is that .bash_profile runs only when you log in. It was originally designed so that you could separate interactive shells from those run by background processors such as cron (discussed in Chapter 10). But it is not very useful on modern computers with the X Window System because when you open a new terminal window, only .bashrc runs. If you start up a window with the command xterm -ls, it will run .bash_profile too.
.zshrc
Like .bashrc, but for zsh.
.zprofile
Like .bash_profile, but for zsh.
.cshrc
For the C shell or tcsh. The file is a shell script using C shell constructs.
.login
For the C shell or tcsh. The file is a shell script using C shell constructs. Like .bash_profile in the bash shell, this runs only when you log in. Here are some commands you might find in .cshrc or .login:
set prompt='$ ' # Simple $ for prompt.
set history=50 # Save 50 commands for when the user presses the up arrow.
# All the directories to search for commands.
set path=(/usr/local/bin /usr/bin /bin /usr/bin/X11)
# To prevent the user from accidentally ending a login session,
# disable Ctrl-D as a way to exit.
set ignoreeof
stty erase "^H" # Make sure the backspace key erases.
.emacs
For the Emacs editor. Consists of LISP functions. See "Tailoring Emacs" in Chapter 19.
.exrc
For the vi editor (a visual editor that incorporates the older ex editor). Each line is an editor command. See "Extending vi" in Chapter 19.
.newsrc
For news readers. Contains a list of all newsgroups offered at the site.
.xinitrc
For the X Window System. Consists of shell commands that run whenever you log in to an X session. See "Running X" in Chapter 16 for details on using this file.
.kde/share/config
This is actually a whole directory with configuration files for the K Desktop Environment (KDE). You will find a lot of files here, all starting with the name of the program they configure and ending in rc. Note that you should normally not need to edit these files manually; the respective programs all come with their own configuration dialogs. Depending on the KDE version, this path might start with .kde2 or .kde3.
.gnome
Like the previous entry, a whole directory of configuration files , this time for the GNOME graphical desktop.
Important Directories
You already know about /home, where user files are stored. As a system administrator and programmer, several other directories will be important to you. Here are a few, along with their contents:
/bin
The most essential Unix commands, such as ls.
/usr/bin
Other commands. The distinction between /bin and /usr/bin is arbitrary; it was a convenient way to split up commands on early Unix systems that had small disks.
/sbin
Very common commands used by the superuser for system administration.
/usr/sbin
Commands used less often by the superuser for system administration.
/boot
Location where the kernel and other files used during booting are sometimes stored.
/etc
Files used by subsystems such as networking, NFS, and mail. Typically, these contain tables of network services, disks to mount, and so on. Many of the files here are used for booting the system or individual services of it and will be discussed elsewhere in this book.
/var
Administrative files, such as log files, used by various utilities.
/var/spool
Temporary storage for files being printed, sent by UUCP, and so on.
/usr/lib
Standard libraries, such as libc.a. When you link a program, the linker always searches here for the libraries specified in -l options.
/usr/lib/X11
The X Window System distribution. Contains the libraries used by X clients, as well as fonts, sample resources files, and other important parts of the X package. This directory is usually a symbolic link to /usr/X11R6/lib/X11.
/usr/include
Standard location of include files used in C programs, such as <stdio.h>.
/usr/src
Location of sources to programs built on the system.
/usr/local
Programs and datafiles that have been added locally by the system administrator.
/etc/skel
Sample startup files you can place in home directories for new users.
/dev
This directory contains the so-called device files, the interface between the filesystem and the hardware (e.g., /dev/modem represents your modem in the system).
/proc
Just as /dev is the interface between the filesystem and the hardware devices, /proc is the interface between the filesystem and the running processes, the CPU, and memory. The files here (which are not real files, but rather virtual files generated on the fly when you view them) can give you information about the environment of a certain process, the state and configuration of the CPU, how your I/O ports are configured, and so forth.
/opt
The /opt directory is often used for larger software packages. For example, it is quite likely that you will find the KDE Desktop Environment in /opt/kde3 (or /opt/kde4, once version 4 is out), the office productivity suite OpenOffice in /opt/OpenOffice.org, and the Firefox web browser in/opt/firefox.
Basic Text Editing
Now that you have come across configuration files, we want to give you at least a small head start on how to edit them. We save the real discussion of various text editors for Chapter 19.
We use the Emacs editor as an example here because it is both widely available and fairly user-friendly. Other editors, such as vi, are even more widely available, but not very user-friendly for a beginner. Again, others are more user-friendly, but may not be available on your Linux installation. We talk more about vi and the other editors later.
Emacs comes in two different incarnations: GNU Emacs and XEmacs . GNU Emacs is started by issuing:
$ emacs filename
and XEmacs is started with:
$ xemacs filename
If you are not running from a graphical environment, add the -nw option (for "no windows"):
$ xemacs -nw filename
It is very likely that either GNU Emacs or XEmacs is available on your installation, and for the simple things we are going to do now, the differences do not matter. If you have both at your disposal, we would personally recommend XEmacs.
At this point, there are only very few things you need to know: how to enter and edit text, how to save your edits, and how to terminate the editor. Of course, Emacs can do many more advanced things, but we'll save those for later.
When you have started Emacs, you will see the file you specified on the command line loaded into its buffer. You can freely type away, edit, enter new text, delete existing text using the Backspace key, and move around with the cursor keys. When you want to save your file, you use the key combination C-x C-s. This is Emacs jargon for "hold down the Control key, press the X key, release both, hold down the Control key, press the S key, release both." This may sound arcane to you, but when you have done this a couple of times, you will have the combination "in your fingers" and will not even think about it. Some Emacs installations even come with graphical menus like you may be used to from other operating systems, but these are not universally available, so we stick to what is guaranteed to be there for now.
When you are done with your edits and have saved your file, you will probably want to leave Emacs. This is done with the key combination C-x C-c. You can probably guess it by now: this means "hold down the Control key, press the X key, release both, hold down the Control key, press the C key, release both." This will get you back to the command line.
Advanced Shells and Shell Scripting
In this section, we will look at some of the more advanced things you can do with your trusty shell, the Linux command-line interpreters.
Setting Terminal Attributes
setterm is a command that sets various characteristics of your terminal (say, each virtual console), such as the keyboard repeat rate, tab stops, and text colors.
Most people use this command to change the colors for each virtual console. In this way, you can tell which virtual console you're currently looking at based on the text color. (Notice that this only applies to the virtual consoles in text mode. X11 windows with shells in them are configured differently.)
For example, to change the color of the current terminal to white text on a blue background, use the command:
$ setterm -foreground white -background blue
Some programs and actions cause the terminal attributes to be reset to their default values. In order to store the current set of attributes as the default, use:
$ setterm -store
setterm provides many options (most of which you will probably never use). See the setterm(1) manual page or use setterm -help for more information.
If your terminal settings get really messed up (as happens, for example, if you try to look at the contents of a binary file with cat), you can try typing setterm -reset blindly, which should reset your terminal to reasonable settings.
Shell Programming
In "Shells," earlier in this chapter, we discussed the various shells available for Linux, but shells can also be powerful and consummately flexible programming tools. The differences come through most clearly when it comes to writing shell scripts . The Bourne shell and C shell command languages are slightly different, but the distinction is not obvious with most normal interactive use. The Z shell command language is a superset of the Bourne shell. Many of the distinctions arise only when you attempt to use bizarre, little-known features of either shell, such as word substitution or some of the more oblique parameter expansion functions.
The most notable difference between Bourne and C shells is the form of the various flow-control structures, including if ...then and while loops. In the Bourne shell, an if ...then takes the following form:
if list
then
commands
elif list
then
commands
else
commands
fi
where list is just a sequence of commands to be used as the conditional expression for the if and elif (short for "else if") commands. The conditional is considered to be true if the exit status of the list is zero (unlike Boolean expressions in C, in shell terminology an exit status of zero indicates successful completion). The commands enclosed in the conditionals are simply commands to execute if the appropriate list is true. The then after each list must be on a new line to distinguish it from the list itself; alternately, you can terminate the list with a ;. The same holds true for the commands.
An example is:
if [ "$PS1" ]; then
PS1="\h:\w% "
fi
This sequence checks to see whether the shell is a login shell (that is, whether the prompt variable PS1 is set), and if so, it resets the prompt to \h:\w%, which is a prompt expansion standing for the hostname followed by the current working directory. For example:
loomer:/home/loomer/mdw%
The [...] conditional appearing after the if is a bash built-in command, shorthand for test. The test command and its abbreviated equivalent provide a convenient mechanism for testing values of shell variables, string equivalence, and so forth. Instead of using [...], you could call any set of commands after the if, as long as the last command's exit value indicates the value of the conditional.
Under tcsh, an if ...then compound statement looks like the following:
if (expression) then
commands
else if (expression) then
commands
else
commands
endif
The difference here is that the expression after the if is an arithmetic or logical expression evaluated internally by tcsh, whereas with bash the conditional expression is a command, and the expression returns true or false based on the command's exit status. Within bash, using test or[...] is similar to an arithmetic expression as used in tcsh.
With tcsh, however, if you wish to run external commands within the expression, you must enclose the command in braces: {command}.
The equivalent of the previous bash sequence in tcsh is:
if ($?prompt) then
set prompt="%m:%/%% "
endif
where tcsh's own prompt special characters have been used. As you can see, tcsh boasts a command syntax similar to the C language, and expressions are arithmetically and logically oriented. In bash, however, almost everything is an actual command, and expressions are evaluated in terms of exit-status values. There are analogous features in either shell, but the approach is slightly different.
A similar change exists with the while loop. In bash, this takes the following form:
while list
do
commands
done
You can negate the effect by replacing the word while with until. Again, list is just a command sequence to be executed, and the exit status determines the result (zero for success and nonzero for failure). Under tcsh the loop looks like this:
while (expression)
commands
end
where expression is a logical expression to be evaluated within tcsh.
This example should be enough to get a head start on understanding the overall differences of shell scripts under bash and tcsh. We encourage you to read the bash(1) and tcsh(1) manual pages (although they serve more as a reference than a tutorial) and Info pages, if you have them available. Various books and tutorials on using these two shells are available as well; in fact, any book on shell programming will do, and you can interpolate the advanced features of bash and tcsh into the standard Bourne and C shells using the manual pages. Learning the bash Shell by Cameron Newham and Bill Rosenblatt and Using csh and tcsh by Paul DuBois (both from O'Reilly) are also good investments.
Being More Efficient with the Z Shell
The Z shell (zsh) is particularly appreciated for its many features that make you more efficient on the command line. To start with, zsh does not have one command prompt, but rather two: one for the lefthand side, and one for the righthand side. The lefthand one is set as usual by assigning to the environment variable PROMPT; for the righthand side, the environment variable RPROMPT is used. For example:
export PROMPT="%n@%m"
export RPROMPT="%~%"
gives you your username and hostname to the left of the entry line, and the current directory to the right. The smart thing about the right prompt is that it disappears when you "need the space"; that is, it gets out of the way when your typing comes close.
An interesting thing about zsh is the many, many options that you can set with the setopt command. The manual page zshoptions will list all of them, but we'd like to mention at least one very useful one here, the ALL_EXPORT option. By specifying:
setopt ALL_EXPORT
any environment variable that you set will automatically be exported. This is very useful if you, like us, keep setting environment variables for processes other than the shell and then forget to export them, and wonder why they are not picked up by the processes started from the shell. You can turn this off with setopt noALL_EXPORT.
You have already seen how to use the cd command. Of course, zsh knows about cd as well, but it does some other interesting stuff. For example, if you specify -- (a dash) as the argument, you will be returned to the working directory that was your working directory before the last cdcommand (for the following example, we have moved the display of the current directory back to the lefthand side):
~%> cd kdesvn/kdelibs/kdecore
~/kdesvn/kdelibs/kdecore> pwd
/home/kalle/kdesvn/kdelibs/kdecore
~/kdesvn/kdelibs/kdecore> cd /usr/local
/usr/local> cd -
~/kdesvn/kdelibs/kdecore
~/kdesvn/kdelibs/kdecore>
Also, if you type in a command that zsh does not recognize (i.e., it is neither an executable in your PATH nor a built-in command), but there is a directory with the name of that command, zsh will interpret that as a request to change the working directory to that directory:
~> Documents
~/Documents>
Another neat feature is the autocorrection of commands. If you, like us, keep typing mroe instead of more, turn on the autocorrection by issuing:
setopt CORRECT
Now zsh will come up with suggestions if it cannot understand your command:
~/Documents> mroe /etc/motd
zsh: correct 'mroe' to 'more' [nyae]? y
Welcome to tigger...
Even when it comes to completion, zsh has a number of features that sets it apart from other shells. There are few things that it does not attempt completion on. You know already that you can press the Tab key half way during typing a command or filename, and most shells will attempt to complete what you have started. But zsh also has the following features:
rpm --erase <TAB> # shows installed packages
rpm -q<TAB> # shows suboptions of the 'q' option
fg % <TAB> # shows the names of background processes that could be
promoted to foreground processes
cvs checkout <TAB> # shows possible modules to check out
make -f Makefile <TAB> # shows the targets in Makefile
cd <TAB> # shows directories only
There are many, many more completions built into zsh, and you can even program your own. The manual page zshcompctl tells you all about this.