Running Linux, 5th Edition (2009)
Part I. Enjoying and Being Productive on Linux
Chapter 6. Electronic Mail Clients
Modern email readers have graphical interfaces and tend to offer similar features in a similar manner. In addition to delivering your electronic mail, most allow you to maintain contact lists and many include calendars. Email readers usually also let you read newsgroups, which are one of the oldest features in computer networking and still offer valuable communities and quick sources of information (if you can find groups untainted by scads of unsolicited commercial postings).
One of the most popular email readers and contact managers, Evolution, was described in Chapter 3. In this chapter, we show you some interesting ways to use other graphical email readers productively, and give you the background you need to carry out some more advanced tasks, such as delivering mail from a server to a local system using fetchmail, and protecting your mail with encryption.
Linux supports older, text-based tools for doing these things too. Elm and Pine are fast text-based readers that have managed to keep up pretty well with changes in modern email conventions, such as displaying files of different types and following URLs. A few people like the tried-and-truemail program, but it's generally used more in scripts to send mail automatically. These older tools are not discussed in this book.
At this point, it may be worthwhile to point out the difference between a Mail User Agent (MUA) and a Mail Transport Agent (MTA). The program that you interact with when reading or writing email messages is the Mail User Agent, like the ones described in this chapter. Mail Transport Agents are the software that then relays the messages across the Internet to the receiving party, which gets the message delivered into the inbox of his or her Mail User Agent. An example of a Mail Transport Agent is Postfix, which we describe in "The Postfix MTA" in Chapter 23.
Using KMail
KMail is a very user-friendly, feature-rich mailer that comes with KDE and integrates mail smoothly with other utilities. For example, if an email message you receive contains a link to a web page, you can click this link in the message, and the KDE web browser Konqueror will pop up and display the web page. Or, if the email contains an MP3 file as an attachment, you can click it to play the file with one of KDE's MP3 players. Figure 6-1 shows a screenshot of KMail at work.
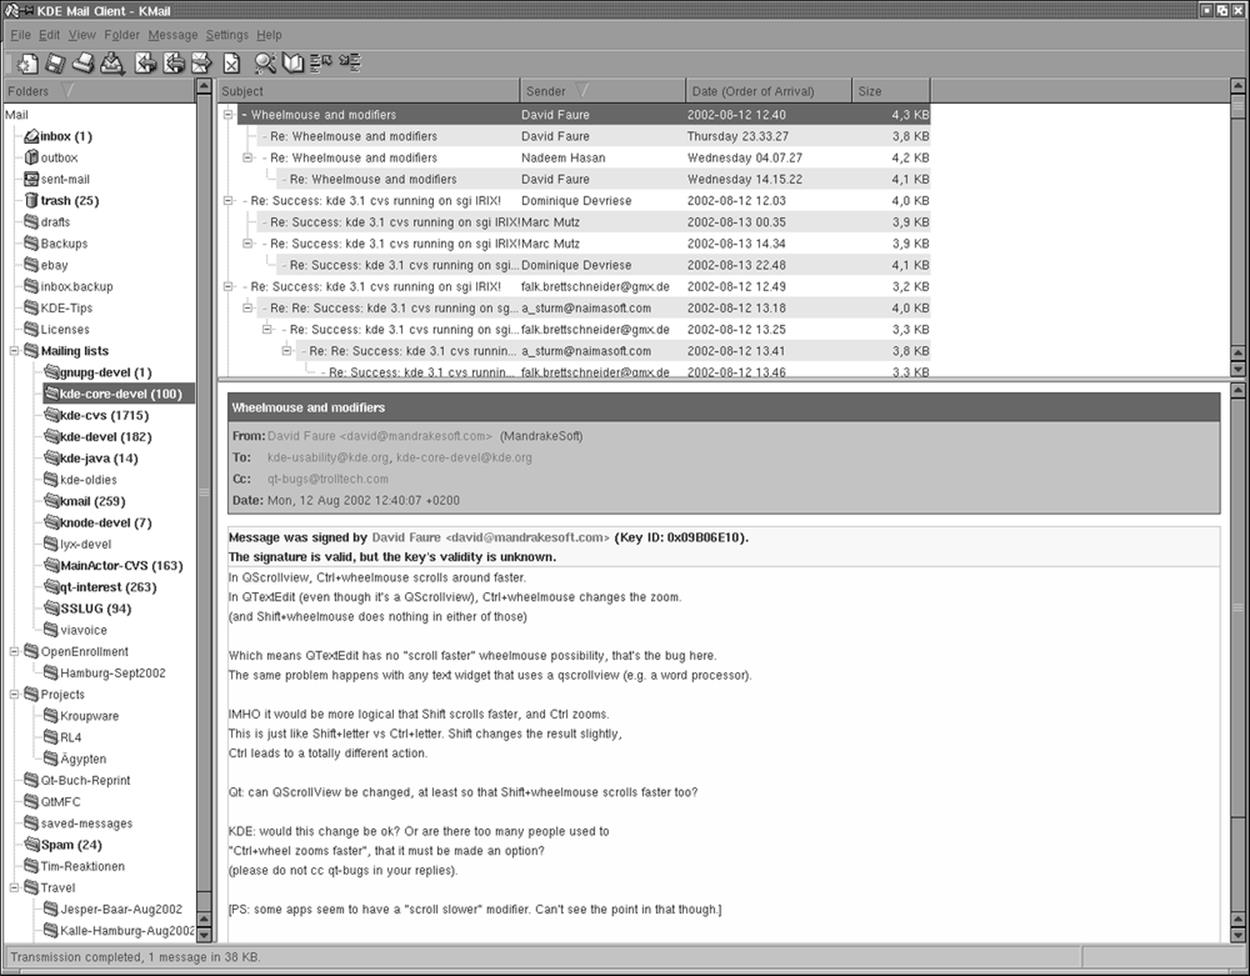
Figure 6-1. KMail mailer
KMail has a lot of features and settings, but we'll just cover some that get you started quickly and leave it to you to explore KMail further. As you can see in Figure 6-1, the KMail window is divided by default into three parts. On the left, you see a tree of your folders (at first startup, you will have only the default folders, of course). The upper part of the right side shows a listing of messages in the currently selected folder, and the lower part of the right side shows the currently selected message. You can change how the space is distributed between these parts by dragging the separator lines between them. The latest KMail versions even have a fourth part that lets you drill further into the structure of an individual message by displaying the MIME parts the message is composed of. However, this display is turned off by default, as most people do not need it.
Before you can use KMail, you have to set up some information in it. Select Configure KMail from the Settings menu and then open the configuration group Identities by clicking its icon. You can create a number of different identities here; for example, you may want to use different return addresses when emailing as an employee of your company or as a private person. Click Add to create a new entity; a subsequent dialog lets you choose between starting from scratch, using the settings from the KDE Control Center (useful only if you have configured your email settings there), and copying the values from an existing identity (which of course is possible only if you already have one and only makes sense if you intend to edit the copy afterwards). If you are setting up KMail, you will want to select creating an entirely new identity here. Give the identity a name, such as "Work" or "Home," and click OK. For starters, it is sufficient to fill in the Name and Email Address fields on the General tab (see Figure 6-2) of the identity editor.
Next, go to the Accounts configuration group. Here, you need to create at least one account for outgoing mail and one for incoming mail.
Let's start with the outgoing mail, which you will find on the Sending tab of the Configure dialog box (see Figure 6-3.) Click the Add button. You will be asked whether you want to use SMTP or talk to a Sendmail installation directly. In almost all cases, if you have an MTA installed locally, you will want to select SMTP. Then, on the General tab of the SMTP transport configuration, give the transport a name (which you can choose arbitrarily because it exists only for you to recognize the settings later and will not be used in any network communication). In any case, you need to enter the hostname of the port. The port is almost always 25; the hostname should be given to you by your provider. If you have a local MTA installed and want to use it, simply enter localhost. If your mail server requires authentication (check with your provider if you are unsure), check the appropriate checkbox and fill in the login name and password. This is less common than you would think, however; most ISPs protect themselves against being used as spam relays either by only accepting outgoing mail from IP addresses that they have provided themselves, or by asking you to fetch your email (which always requires a login) first, and then sending outgoing email within a certain amount of time.
This should be enough to let you send outgoing email, but we recommend that you take a few additional steps to make this as secure as possible. KMail makes this easy for you by autodetecting the security settings of the SMTP server you are using. Go to the Security tab and click the button labeled "Check what the server supports." KMail will check the connection to the server and use the settings with the highest supported security and encryption. Alas, many providers run their mail servers without any encryption at all.
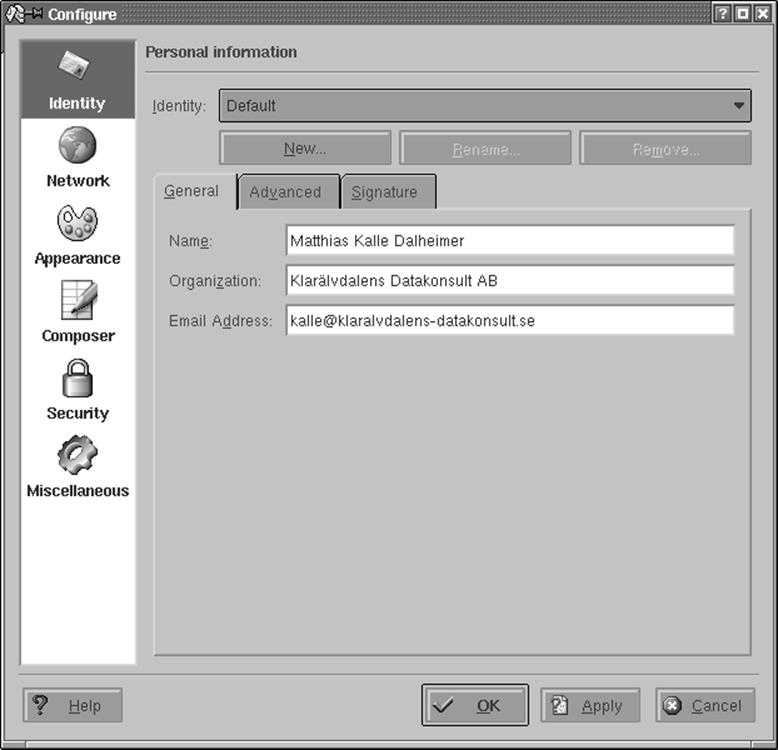
Figure 6-2. KMail identity configuration
Now let's continue by configuring the receiving end. Close all subdialogs until you are back at the Network configuration group, and select the Receiving tab. Here you can set up a number of accounts to be queried. This can be useful if you have more than one provider that stores email for you. Click the Add button and select the type of mail server. If you run your own MTA locally, you need to select Local Mailbox. Usually, you can then accept the defaults on the next page (but change the name to something more appropriate than "Default").
If you retrieve your messages directly from your provider's server, you need to select either POP3 or IMAP, depending on what your provider supports. In the dialog that appears again enter a name of your own choice, then specify your login name, your password, the name of the host that stores your email, and the port (usually 110 for POP3 and 143 for IMAP). All this information should be given to you by your provider or system administrator. You can leave all other options as they are for now, and experiment later with them.
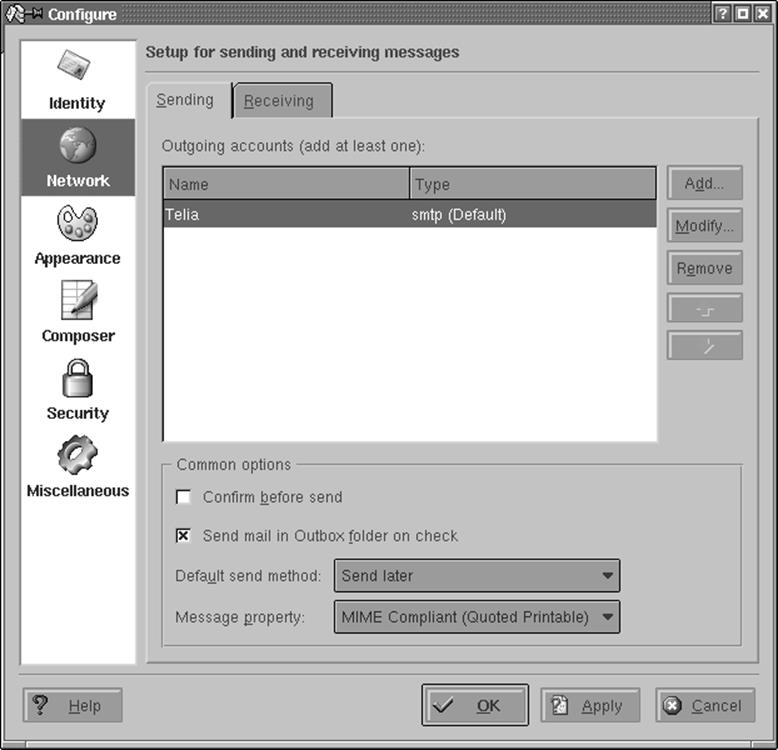
Figure 6-3. KMail identity for outgoing mail
As an aside, recent KMail versions have a feature for retrieving your messages that make it stand apart from many other email clients. Traditionally, the IMAP protocol required an online connection to the IMAP server that is storing your messages because no messages are stored locally. KMail, however, also sports a mode called disconnected IMAP that caches your messages locally so that you can both use the benefits of IMAP, such as having the same view on your mailbox from different computers (e.g., your workstation and your laptop), and still work offline when the need arises. Intelligent synchronization mechanisms make sure that all computers always have the same view of your mailbox (of course, only after you have performed synchronizations).
Close all dialogs with the OK button. You should now be ready to retrieve your email. To do so, select File → Check Mail from the menu. This will retrieve all messages from all incoming mailboxes that you have specified. If it does not work or you get any error messages, check all the values you entered on the various configuration pages again and compare them to the information given to you by your provider or system administrator. The most typical error is a typo in the hostname, username, or password.
If you are using disconnected IMAP, the Check Mail menu item does a lot more than checking the server mailbox for new messages: it ensures that the server and your local mailbox are in the same state, which may include deleting messages from the server, changing flags, and so forth.
To send a message, press Ctrl-N or select Message → New Message. A composer window opens where you can type in the recipient's address, the subject, and the actual message body. An intelligent autocompletion will come up with suggestions as you type; these suggestions are pulled both from your address book (if you keep one) and from mails you have sent and received recently.
If you have configured more than one identity, you can also select the one to be used for this message. When you are done composing your message, press Ctrl-N. Depending on how you have configured your outgoing mail transport, the message will either be put into the output folder and wait there for further handling (this is the default) or be transmitted directly. If you want to override your setting for a particular email, just select Message → Queue or Message → Send Now from the menu bar of the composer window.
Messages put into the output folder are by default not sent automatically. (You can, however, configure KMail to always send messages in the outbox when it checks for incoming messages.) To send all messages in your outbox, select File → Send Queued from the menu bar of the main KMail menu. We have made it a habit never to send any message automatically and always review our outbox before sending the messages therein, which saves a lot of embarrassment that could result from sending email to the wrong people. Reviewing complaint mails that you have written in anger after your anger has cooled down may also keep you a few more friends and business contacts.
If you have problems sending your messages, check the settings you have made for typos. As mentioned earlier, to prevent the relaying of unsolicited commercial email (so-called spam) via their servers, some providers require that you check your mailbox on the server (providing your username and password as you go) in order to identify yourself before you can send any email via that server. After you have checked your incoming email, you have a certain period of time (often 15 minutes) to send your outgoing email.
You should now know enough about how to use KMail in order to continue exploring the mailer on your own. One of the first things you may want to do (especially if you have a large number of messages to handle everyday) is to create folders by selecting Folder → New Folder and then set up filters by selecting Settings → Configure Filters. This lets you redirect messages with certain characteristics (e.g., certain senders or subjects) to predefined folders. For example, you may want to gate all messages from a mailing list to a folder dedicated to that purpose. If all you want to do is file messages sent to a certain mailing list, recipient, or with a certain subject, you can also right-click on that message header and select Create Filter from the context menu that pops up; a submenu lets you select what to filter on. After selecting this, the filter configuration dialog will pop up with the criteria already filled in correctly; all you have to do is to specify what should happen to that message, such as moving it to a folder or deleting it right away.
If you find you are not only using KMail regularly but also the address book and calendaring components that come with the KDE desktop, KAddressbook and KOrganizer, and if you would like those applications to be integrated into a common main window, you should take a look at Kontact. It is a wrapper application that "swallows" the individual application components using the KParts technology and presents them with a common interface, as shown in Figure 6-4.
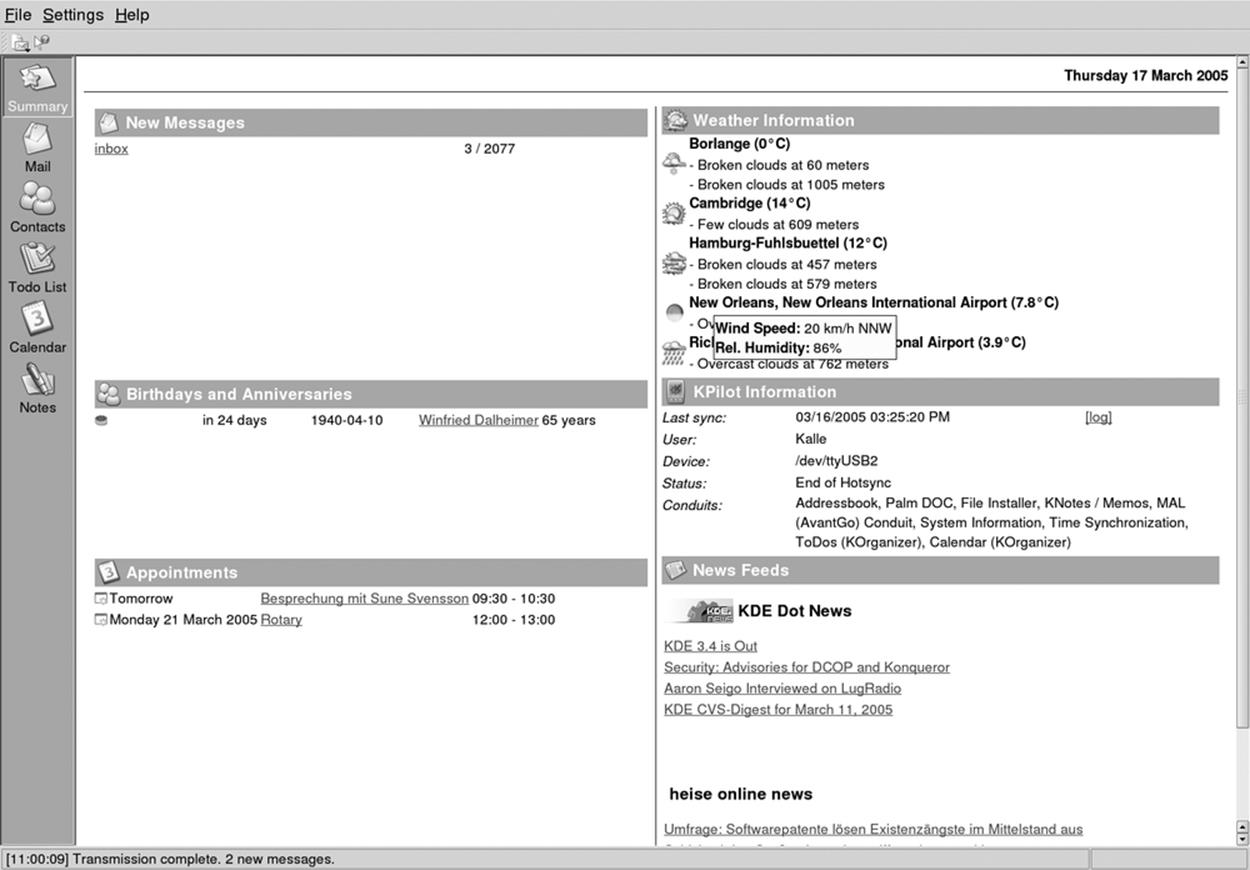
Figure 6-4. The Kontact overview window
All the individual components that are available appear on the button bar on the left side of the window, where you can click on them to bring the respective component to the front. In most of the Kontact applications, these buttons also act as targets for drag-and-drop operations, which means you can, for example, drag an email message on to the Todo view button to create a new task based on that email. Experiment with dragging things onto the different buttons and see what happens.
It should be noted that the components available inside Kontact are exactly the same applications that are available standalone, such as KMail or KAddressbook. This means that you can start one of them individually, whenever you do not want to start Kontact for some reason, and keep working with the same data and settings. All of the functionality available in Kontact is also available with the standalone applications. Since Kontact uses KParts, it can be extended with other components, not just the ones that are shipped with it; several third-party components already exist, such as a news feed reader component. To find out which components are currently installed and available, use Select Components from the Settings menu.
One of the most prominent integrative features of Kontact is the summary view. Click the Summary button on the sidebar to activate it. The page that appears is filled with information from each of the application components. The mail part shows a configurable summary of folders with unread mail. Clicking one of the listed folders will take you directly into that folder in the mail part. Similarly, the calendaring component shows any upcoming events, birthdays of people in your address book, and currently open tasks. To configure the summary view in detail, select Configure Summary View from the Settings menu. The individual areas of the summary view can be rearranged by dragging them by the header area in recent versions of Kontact.
Using Mozilla Mail & News
Mozilla Mail & News is the mail client that comes with the Mozilla web browser if you install more than the minimal installation (which only contains the browser and the composer itself). Chances are that your distribution already carries Mozilla, but if it doesn't, or you'd rather have a newer version, you can download it from http://www.mozilla.org. A freestanding version of Mozilla Mail & News is Thunderbird , which you can find at http://www.mozilla.org/products/thunderbird/. Thunderbird is particularly good at filtering junk mail and preventing email viruses from entering your system.
The concepts for setting up and using Mozilla Mail are quite similar to those for KMail, so we will cover only the differences here. To open the mail client, start Mozilla and select Windows → Mail and Newsgroups from the menu. If you are starting the mailer for the first time, a wizard will pop up that lets you configure your email. Check "Email account" on the first page, and your identity information on the second page (Mozilla's account handling is slightly less flexible than KMail's because it ties identities to accounts, whereas you can change identities at will with KMail).
On the third page, select whether you get your incoming mail via POP or IMAP (it's not possible to retrieve your email locally with Mozilla Mail & News, a big drawback), and specify the incoming and outgoing server name (specify localhost both times if you are running your own MTA). Complete the remaining information on the next pages, and you are ready to run Mozilla Mail & News. The screen layout is by default the same as that of KMail.
As when using KMail, one of the first things you probably want to set up when using Mozilla Mail & News is additional folders and filters that sort your incoming messages into these folders. You can create new folders by right-clicking the folder list and selecting New Folder in the context menu that appears. You can configure the filter rules by selecting Tools → Message Filters.
This concludes our discussion of email clients on Linux. As you can see, many options, from simple to sophisticated, are available to help you administer and digest the daily flood of email messages.
Getting the Mail to Your Computer with fetchmail
If your provider stores your mail for you until you fetch it, and you do not want to use your mailer to download the mail, you need a program that retrieves the mail from your provider's computer. There are a lot of programs for doing this; we will discuss fetchmail here briefly because it is both robust and flexible and can handle both POP3 and IMAP.
You can get fetchmail from your friendly Linux archive; chances are that your distribution carries it, too. If you download a source distribution of fetchmail, unpack, build, and install it according to the installation instructions. At the time of this writing, the current version was 6.2.5. The official home page for fetchmail is http://www.catb.org/~esr/fetchmail/.
You can control fetchmail's behavior via both command-line options and a configuration file. It is a good idea to first try to fetch your mail by passing the necessary information on the command line, and when this works, to write the configuration file.
As an example, let's assume that my provider is running the POP3 protocol, that my username there is joeuser, and that my password is secret. The hostname of the machine where the POP3 server is running is mail.isp.com. I can then retrieve my mail with the following command:
fetchmail --protocol POP3 --username joeuser mail.isp.com
fetchmail then asks me for my password and, after I specify it correctly, retrieves the mail waiting for me and passes it on to my MTA for further delivery. This assumes that an SMTP server is running on port 25 of my machine, but this should be the case if I have set up my MTA correctly.
While you are experimenting with fetchmail , it might be a good idea to also specify the option --keep. This prevents fetchmail from deleting the messages from your POP3 account. Normally, all messages are deleted from your provider's hard disk once they are safely stored on your own machine. This is a good thing because most providers limit the amount of mail you can store on their machines before retrieving them, and if you don't delete the messages after fetching them, you might reach this limit quite quickly. On the other hand, while testing, it is a good idea to be on the safe side and use --keep so as not to lose any mail.
With the aforementioned options to fetchmail, you should be able to get your mail in most cases. For example, if your provider uses the newer IMAP protocol, simply specify IMAP in the command line instead of POP3. If your provider has some unusual setup, you might need one of the other options that the fetchmail(1) manual page tells you about.
Once you are satisfied with the download process, you can write a fetchmail configuration file in order not to have to enter all the options each time you use the command. This configuration file is called .fetchmailrc and should reside in your home directory. Once you are done editing it, make sure it has the permission value 0600 so that nobody except yourself can read it because this file might contain your password:
chmod 0600 ~/.fetchmailrc
The full syntax of the configuration file is detailed in the fetchmail manpage, but in general you need only very simple lines that start with poll. To specify the same data as on the command line in the previous example, but this time include the password, put the following line into your configuration file:
poll mail.isp.com with proto pop3 username joeuser password secret
Now you can run fetchmail without any parameters. Because fetchmail already knows about your password from the configuration file, it will not prompt you for it this time. If you want to play it safe while testing, add the word keep to the poll line.
Using fetchmail with a configuration file has one additional advantage: you can fetch mail from as many mailboxes as you want. Just add more poll lines to your .fetchmailrc file, and fetchmail happily retrieves your mail from one server after the other.
When and how you run fetchmail depends on your connection to the Internet. If you have a permanent connection or a cheap, flat rate, you might want to have fetchmail invoked by cron at a suitable interval (such as once an hour). However, if your Internet connection is nonpermanent (dial-up) and costly, you might want to choose to run fetchmail by hand whenever you actually want to fetch and read your mail so as to minimize your Internet connection time. Finally, if you are using PPP for dialing in to your Internet service provider, you might want to invoke fetchmail from the ip-up script, which is invoked as soon as an Internet connection is made. With this setup, when you browse a web page and your computer dials up your provider, your mail is fetched automatically.
So what happens to your email messages once fetchmail has pulled them from your account? We have said previously that it passes them on to your MTA. Your MTA then usually puts the messages into a so-called local spool file, often /var/spool/mail/<username>. You can then set up yourMUA to pull in the messages from this spool file. Each MUA should have such a setting; in KMail, for example, you create a "local receiving account."
OpenPGP Encryption with GnuPG
Using the GNU Privacy Guard, or GnuPG for short, you can encrypt individual files and emails, and digitally sign them. The main command-line tool of GnuPG is gpg, thus called because it started out as a replacement for PGP, which was the first encryption tool available to everyone that had strong cryptography built into it. PGP, which stands for Pretty Good Privacy, was written by Phil Zimmermann in the early 1990s. OpenPGP is the standard that describes the file format of PGP version 5.0 and later. GnuPG and PGP both implement this standard, and hence are able to read each other's files.
Symmetric Encryption
The simplest way to encrypt a file with GnuPG is to encrypt it with a passphrase.[*] This method is called symmetric encryption. The actual cryptography underlying this is beyond the scope of this book. Suffice it to say that the passphrase is used as the encryption key to the file. Everyone knowing the passphrase will be able to decrypt and read the file.[*]
To encrypt the file music.ogg, you simply type gpg --symmetric music.ogg. GnuPG will prompt you for a passphrase, and then again to confirm the passphrase in order to avoid typos. The encrypted file is written to music.ogg.gpg. If you prefer another output file name, use --outputoutfile, like this:
gpg --output music.gpg -c music.ogg
Here, we used the -c and -o shortcuts for --symmetric and --output, respectively.
To decrypt the file, simply call gpg file. For instance, to continue the previous example:
gpg music.ogg.gpg
As with encryption, you can request the output to be written to a file other than the default one by using -o outfile.
Public-Key Cryptography
Although symmetric encryption works well for short-term and casual use, you will run into problems managing the plethora of passphrases accumulated when you encrypt lots of files. The obvious solution of using the same passphrase over and over again poses much the same problems as using the same lock for all your doors. Among others, losing one key locks you out of everything, and if one key is stolen, everything is open to the thief. This can be described as the problem of "Everyone who knows the passphrase can read the contents."
Another problem is that of "Everybody who needs to read the contents also needs to know the passphrase." If you encrypt files not for archiving but for sharing with friends, collegues, or business partners, you run into this problem. You cannot reuse passphrases because it's insecure, as already mentioned, and because each new file might target another set of recipients. For instance, if you reuse a passphrase that was used to encrypt a message to Alice and Bob to now encrypt another message, this time to Alice and Charlie, then Alice, Bob, and Charlie can all read both messages, even though only Alice was intended to be able to read both messages.
You cannot create a new passphrase for each new message, because your recipients will not know the passphrase. And if you have a secret channel to tell them the new passphrase, why would you need to use encryption in the first place?
The only solution using simple encryption, then, is to negotiate a passphrase with each recipient separately, and encrypt the message to each of the recipients separately. But this, too, becomes prohibitively complex, because there must be a passphrase (or another shared secret) for each pair of people wishing to exchange messages; the problem is said to be of O(n2) complexity.
These problems haunted cryptography until the mid-1970s, when Whitfield Diffie and Martin Hellman invented a new method of key exchange that no longer required a shared secret. They used asymmetrical encryption, where the encryption key is public, but the decryption key is secret. In this scheme, everyone can encrypt a message to, say, Alice, but only Alice can decrypt it with her secret key.
This makes it easy to address the situation described earlier: encrypt the message to each recipient using that recipient's public keys. Only the intended recipients can read the message. In addition, there is only one key for each person, instead of one per pair of persons; the problem is said to be reduced to O(n) complexity. Glossing over the new problem of ensuring that a public key marked as belonging to Alice actually does belong to her, encrypting a message to another person is as easy as downloading her public key from a keyserver, and then encrypting the message to that key. (We discuss the problem we glossed over here in "The Web of Trust" later in this chapter.)
Creating a New Key Pair
To be able to send and receive messages using public-key encryption, you have to own a secret and a public key—that is, a key pair. They can be created using the command gpg --gen-key. In this mode, GnuPG will prompt you with a series of questions, at the end of which it has generated a new key pair. The following shows a screen capture of the procedure for GnuPG 1.4.0. GnuPG asks for a passphrase that is used to protect (lock away) your secret key. It is not used to encrypt any messages later on.
$ gpg --gen-key
gpg (GnuPG) 1.4.0; Copyright (C) 2004 Free Software Foundation, Inc.
This program comes with ABSOLUTELY NO WARRANTY.
This is free software, and you are welcome to redistribute it
under certain conditions. See the file COPYING for details.
Please select what kind of key you want:
(1) DSA and Elgamal (default)
(2) DSA (sign only)
(5) RSA (sign only)
Your selection? 1
DSA keypair will have 1024 bits.
ELG-E keys may be between 1024 and 4096 bits long.
What keysize do you want? (2048) 2048
Requested keysize is 2048 bits
Please specify how long the key should be valid.
0 = key does not expire
<n> = key expires in n days
<n>w = key expires in n weeks
<n>m = key expires in n months
<n>y = key expires in n years
Key is valid for? (0) 5y
Key expires at Tue Mar 2 10:33:35 2010 CET
Is this correct? (y/N) y
You need a user ID to identify your key; the software constructs the user ID
from the Real Name, Comment and Email Address in this form:
"Heinrich Heine (Der Dichter) <heinrichh@duesseldorf.de>;"
Real name: John Doe
Email address: john@doe.example.net
Comment: work
You selected this USER-ID:
"John Doe (work) <john@doe.example.net>;"
Change (N)ame, (C)omment, (E)mail or (O)kay/(Q)uit? o
You need a Passphrase to protect your secret key.
Enter passphrase:
Re-enter passphrase:
We need to generate a lot of random bytes. It is a good idea to perform
some other action (type on the keyboard, move the mouse, utilize the
disks) during the prime generation; this gives the random number
generator a better chance to gain enough entropy.
+++++.+++++++++++++++++++++++++++++++++++.++++++++++.++++++++++.++++++++++++
++++++++...+++++.++++++++++++++++++++..+++++...++++++++++++++++++++>+++++.++
+++..+++++
++++++++++++++++++++++++++++++++++++++++++++++++++++++++++++.++++++++++.++++
+.+++++..+++++++++++++++.+++++.+++++.++++++++++++++++++++..+++++++++++++++..
.+++++>++++++++++.....>+++++................................>+++++..........
.........<+++++...........+++++^^^^
gpg: key 461BA2AB marked as ultimately trusted
public and secret key created and signed.
gpg: please do a --check-trustdb
pub 1024D/461BA2AB 2005-03-03 [expires: 2010-03-02]
Key fingerprint = E880 E195 62A8 9EFD ED83 3CD7 0B38 4F5D 461B A2AB
uid John Doe (work) <john@doe.example.net>;
sub 2048g/6D18BF84 2005-03-03 [expires: 2010-03-02]
After creating the key pair, GnuPG stores it in the local key ring, usually in ~/.gnupg. You can check that the key has been properly added using the commands gpg --list-keys, which lists all keys in your public keyring, and gpg --list-secret-keys, which lists all keys in your secret keyring.
To make this key available for others to encrypt messages to you using it, you have to upload it to a keyserver using
gpg --keyserver wwwkeys.pgp.net --send key-id
where key-id is the ID of the key (461BA2AB in the case of the key created above). The keyserver can be hardcoded into ~/.gnupg/gpg.conf so you do not need to give it on the command line every time you upload or download keys. You do not need to upload a key to more than one server, because the pgp.net servers synchronize new and changed keys among each other.
It is important at this point to take precautions for the case of a lost passphrase: If the key gets compromised, or you simply forget the passphrase, you want other people to know that this key should no longer be used. This is the purpose of a revocation certificate. A revoked key can no longer be used as an encryption target. To create a revocation certificate, however, you need to know the passphrase to unlock your secret key. So in order to have a revocation certificate ready for publishing in the case of emergency, you have to create one while you still remember the passphrase, and then store it somewhere safe.
To create such a revocation certificate, you can use the command gpg --armour --output rev-cert.gpg --gen-revoke key-id. This will create a revocation certificate and save it in rev-cert.gpg. The --armour option tells GnuPG to create a printable version instead of a binary file. This way, you can print the certificate and store it on paper as backup in case of hard disk failures.
To apply the revocation certificate, simply import it by using gpg < rev-cert.gpg, and then upload the changed key using gpg --send key-id, as shown earlier.
Warning
Keys uploaded to a keyserver cannot be removed. Furthermore, they can only be added to; no data will ever be removed from them. This includes additional user IDs and third-party signatures (discussed shortly), as well as revocations.
Encrypting with Public Keys
As mentioned earlier, when doing public-key encryption, you need to have the recipient's public keys. For GnuPG, this means they need to be downloaded from a keyserver, and that there should be a trust path (see "The Web of Trust," later in this chapter) from your key to the recipient's key.
For now, we can make do with a speciality of GnuPG: encrypting to untrusted keys.
First you need to find the key on the keysever. You can use the GnuPG search interface for this: gpg --search name-or-email. GnuPG will list all matching keys (which can be hundreds) in a list, from which you can choose one to import.
If you already know the key ID of the recipient's key, then you can download it directly using gpg --recv key-id.
Next, you can encrypt a file using one or more keys. Be aware that GnuPG does not necessarily encrypt using your key, too (this is an option in the config file), so you might not be able to decrypt the message any more. The command to use is:
gpg --encrypt --recipient recip_1 --recipient recip_2 ... file
A shortcut notation for this is:
gpg -e -r recip_1 -r recip_2 ... file
Both versions create the encrypted message in a file called file.gpg, unless the --output (-o) option is used to redirect the output to a non-standard file. No matter to how many recipients you encrypt, there will always be only one output file — it will just be generated such that all the recipients are able to decrypt it.
To decrypt a file, simply run GnuPG on it: gpg file.gpg. GnuPG asks for your passphrase and then saves the decrypted file into file (i.e., the name of the input file stripped of the .gpg extension).
If you want to encrypt a lot of files in one go, consider using --multifile, like this:
gpg --multifile -e -r recip_1 ... file1 file2 ...
Digital Signatures
Public-key cryptography is valuable not only for encryption, but for authentication. Digital signatures are a way to ascertain that a given file has not been modified since it was signed. Very simply put, the system encrypts a checksum of the data with your secret key. This works because, on the other end, the public key can decrypt data encrypted with the secret key.
So to verify the signature, the recipient calculates the same checksum of the data, and then compares the value with the value stored in the signature. If they match, two things have been proved: first, that the data has not been changed since it was signed, and second, that the message was signed using your secret key. If the data was changed, the checksum would not come out the same. Likewise, if the original checksum was encrypted with some other key than yours, the decryption result when using your public key would be gibberish, and the checksums would also fail to compare.
OpenPGP allows two different types of signatures: clearsigned and detached. In clearsigning, the original message is modified to include the data and the signature of the data in one file. Detached signatures, on the other hand, do not modify the original file, but write the signature to a second file, usually with .gpg or .asc appended. You should use only detached signatures, becuase they work for all types of files, while clearsigning works only with (plain) text files.
To sign a file, you need only your secret key. Use the following command to create a detached signature of a file named music.ogg:
gpg --sign music.ogg
The signature file will be named music.ogg.gpg. As usual, you can redirect the data to another file by using the --output (-o) option. The shortcut for --sign is -s.
It will not come as a surprise to you to learn that verifying a signature works by just running GnuPG on the signature file: gpg music.ogg.gpg.
Signing and encrypting can be combined into a single operation. Indeed, this is the usual mode of operation:
gpg -es -r recip_1 -r recip_2 ... file
Note that in this case of combined operation, the signature is encrypted together with the signed data, so that there is no third file containing the signature. It is all nicely packaged into the .gpg file.
Note that as of this writing, signing does not yet work with --multifile. You have to revert to using a shell for loop:
for i in *.ogg; do gpg --sign $i ; done
The Web of Trust
We have noted earlier that for public-key cryptography to work, one needs to be certain that the public key obtained from the keyserver is actually authentic and has not been changed or created by an impersonator.
To this end, OpenPGP uses the concept of a Web of Trust, in which keys known to belong to the person described by a user ID can in turn certify that another key is authentic. This is done using signatures on the key material, that is, the public key and the associated user ID.
As an example, consider the scenario where Alice wants to send an encrypted message to Bob, the ex of her friend Carol. She does not know Bob personally, and so she cannot be certain that the public key she finds when searching for Bob on the keyservers indeed belongs to Bob.
However, she knows Carol personally, and they have in the past cross-certified their keys. This means that Carol's key now contains a signature by Alice stating more or less, "I, Alice, confirm that this key does belong to the owner listed in the user ID—that is, Carol."
Carol, in turn, knows Bob, of course.[*] From their time together, they still have their keys cross-signed, although it has been a long while since they were used to send secret love letters.
If Alice trusts Carol to not be careless about certifying other people's keys, she can use Carol's key to create a trust path from herself to Bob: her own signature on Carol's key makes that key valid. She trusts the owner of the key to certify other keys, and has indicated this to GnuPG by specifying a corresponding ownertrust value for Carol's key. Because Bob's key carries Carol's signature of certification, Bob's key is also valid from Alice's point of view.
This example illustrates two fundamental points:
§ The validity of a given key is not an absolute. It is always relative to another key and to that key's owner's trust in other people, as expressed by the assigned ownertrust values . If Alice did not trust Carol to certify other keys, she could not ascertain Bob's key's validity.
§ The Web of Trust model works incredibly well in your own socioecological vicinity. However, it is hard or downright impossible to make it work across more than one or two hops (i.e., intermediate keys).
In recent years, however, the global Web of Trust has exploded, so the latter point becomes less and less of a problem. Thanks to the analysis tools implemented and run fortnightly by Drew M. Streib and Jason Harris, we now know that the global Web of Trust contains one large strongly connected set, a set of keys with the property that each key from the set has a trust path to any other key from the set. This big set currently encompasses 28,418 keys, and its diameter is on the order of 15 hops. Another 60,000 keys can be reached from any key in this set with up to 30 hops. Usually, around 10,000 keys are reachable with no more than three hops. The mean square distance to the best-connected key from any key in the cluster is currently about 3.6 hops. In contrast to the big set, the next biggest sets have only 147, 117, and 79 keys in turn.
In order to enter the strongly connected set, all you need is to cross-sign your keys with at least one of its members. If you live in North America or Europe, this is usually not much of a problem. Visiting a conference or fair with Debian or KDE developers lets you take part in one of the numerous key signing parties that are often held during these events. In other parts of the world, however, it can be very hard.
The commands to sign other keys and change the ownertrust are all available using gpg --edit key-id. This enters a GnuPG shell where commands such as sign and trust are available to perform key maintainance.
Using gPG-agent
After using GnuPG for a while, you will notice that you need to type in your passphrase quite often. But do not let this fool you into choosing a short passphrase! Instead, consider using the gpg-agent tool.
Much like ssh-agent, gpg-agent can be configured to maintain a cache of recently entered passphrases and reuse them instead of prompting the user. gpg-agent is part of the GnuPG 2, the next-generation GnuPG. You can download GnuPG 2 from ftp://ftp.gnupg.org/gcrypt/alpha/gnupg; its packages are called gnupg-1.9.n. Even though gpg-agent is packaged alongside GnuPG 2, it works just fine with GnuPG Version 1.2.6 or higher. Note that gpg-agent uses the pinentry package to prompt the user for a passphrase. Versions of pinentry are currently available for Qt (KDE), GTK (GNOME), and ncurses (text terminal).
To make GnuPG use the agent, you first have to start it: eval `gpg-agent --daemon`. The eval feeds back the output of the command in the backticks into the current shell; that is important because the gpg-agent command outputs environment variable assignments that are necessary forGnuPG to use the agent; in this case, the environment variable GPG_AGENT_INFO will be set. If you start GnuPG from this shell (or any other shell spawned from it), and pass it the --use-agent option (either on the command line or in ~/.gnupg/gpg.conf), then GnuPG will contact gpg-agentto obtain the passphrase instead of prompting the user directly.
To make gpg-agent cache the passphrase instead of asking each time anew, create ~/.gnupg/gpg-agent.conf with the following contents:
default-cache-ttl
3600
This instructs gpg-agent to cache the passphrase for 3,600 seconds — that is, one hour.
[*] A passphrase is just a long password, usually a sentence.
[*] Of course, you can encrypt any kind of file, not just text files, so when we talk about "reading a file," you could just as well substitute "listen to audio files" or "watch movie files."
[*] Although she sometimes wished she didn't.