Running Linux, 5th Edition (2009)
Part I. Enjoying and Being Productive on Linux
Chapter 7. Games
Gaming
Gaming under Linux has long had a bad reputation. Even very experienced Linux users often keep a Windows partition around to dual boot into only for games. In many ways this problem is due to a chicken-or-egg approach from game developers: games aren't ported to Linux because not enough people game on the platform, and not enough people game on the platform because there aren't enough games ported to it.
The fact is, though, that gaming under Linux continues to improve every year. Not only are the major video card manufacturers making sure their cards have full 3D acceleration support under X, but a number of software companies, such as Id Software and Epic Games, have consistently released Linux ports of their titles either on the same CD as the Windows software or as separate downloads released a bit after the initial launch date. Of course, some of this good will toward the community keeps in mind the strength of Linux as a server platform. The idea is that if the companies promote Linux clients, the community will be more likely to run the Linux servers for the game.
When you examine the different commercial games that have been ported to Linux, you will notice that many if not most of them are in the FPS (first-person shooter) genre. Doom, the full Quake series, the Unreal Tournament series, Return to Castle Wolfenstein, Tribes 2, and many other FPSs have Linux ports. This doesn't mean that other genres are unrepresented — for instance, games such as Railroad Tycoon and Neverwinter Nights have been ported to Linux — just that the FPS games seem to get ported more readily.
Even if your favorite game hasn't been ported to Linux, there's still a chance that the Windows binary can install and run in a Wine or Cedega environment. These environments translate the Windows system calls to Linux system calls, and many games play very well. Cedega is a commercial product released by Transgaming that is based on Wine and focused on getting all of the latest games running under Linux. There is an extensive list of games that Cedega supports, rated by how well they perform under Linux, that you can browse on their site. The list includes games such as Warcraft III, Max Payne II, and Battlefield 1942. If you decide to use Cedega, you can sign up on a subscription basis at www.transgaming.com for $5 a month. The site contains a number of FAQs for the different games it supports to help you through the installation process.
A number of true game emulators also exist for Linux. If you have ROM images for arcade or console cartridges, you can use arcade emulators such as Xmame or console emulators such as Nestra and Snes9x to play those games directly on your Linux system. Some people have developed their own personal arcade cabinet, complete with a large collection of games and arcade-style joysticks, on a Linux platform.
Gaming under Linux isn't limited to commercial titles; Linux also has a large number of free software titles. These games range from simple card games to board games such as chess and backgammon and from arcade games such as xgalaga to adventure games such as rogue and nethack. There has also been development of free 3D games, such as Tux Racer. Most distributions include a number of these games on the CD, so you aren't limited simply to Solitaire, Freecell, and Minesweeper. The KDE Desktop Environment comes with more than 30 basic games, including Solitaire, Backgammon, a Minesweeper clone, a Tetris-like game, and video poker.
So if you like games, you will find plenty to keep you amused under Linux, and maybe even some reasons to get rid of that dual-boot gaming platform you keep around. In this chapter are introductions to a few Linux-native games including instructions to install, play, and if applicable, run a game server.
Quake III
The Quake series has long been a favorite among FPS fans for its addictive yet simple gameplay and its graphics, which have always pushed the envelope for the time. Although Quake and Quake 2 were initially single-player games, both became very popular for multiplayer deathmatch games over a network. With Quake III, Id Software took the Quake universe and created a game strictly aimed at multiplayer gaming. In Quake III there is a single-player mode, but it revolves around playing a series of deathmatch games against one or more computer opponents in an arena style. As you progress in the game the opponents get more difficult to defeat; in the final round, you are one-on-one with an incredibly accurate opponent. In many ways the single-player mode is practice for multiplayer games on the network.
The entire Quake series has Linux binaries available for download from ftp.idsoftware.com. When Quake III was first released, Linux binaries weren't available; however, a special tin box edition of the game containing Linux binaries was released in stores some time after the initial Windows version. Even if you didn't get the special tin box edition, you can still use your Windows CD and download the Linux installer.
Installation
To install Quake III under Linux, download the latest version of the installer from the ftp.idsoftware.com/idstuff/quake3/linux directory. Once you have downloaded the file, use chmod +x filename to make it executable and then run the installer from a console as root. Accept the licensing agreement to then see the main installer window (Figure 7-1). The installer will default to putting the game files into /usr/local/games/quake3. The installer from the Linux retail CD will copy the .pk3 data files from the CD-ROM, but the installer that you download will not. Therefore, if you used the downloaded installer, mount the Linux or Windows Quake III CD and copy pak0.pk3 from the Quake3/baseq3 directory on the CD to /usr/local/games/quake3/baseq3. If you also have the Team Arena CD-ROM, you can mount that CD and copy pak0.pk3 from the Setup/missionpackdirectory to /usr/local/games/quake3/missionpack/.

Figure 7-1. Quake III Installer
Once Quake III is installed, click the corresponding icon in your KDE or GNOME menu, or type quake3 in a console. Quake III relies on OpenGL as its graphics library, so make sure that you have 3D hardware acceleration with OpenGL support. Unlike with the Windows version, the Linux version of Quake III does not require you to have the CD-ROM in the drive to start the game. Once the game begins for the first time, a .q3a directory is created in your home directory to store settings and saved games. You can edit the configuration files directly if you wish, or you can change game options through the Setup menu on the main screen.
Single Player
In single-player mode you can either start with the first arena match and move map by map through the game, or you can immediately get to the action and click the skirmish button inside the single-player screen. A skirmish is a quick match that doesn't count toward the standard single-player game. You can choose any map and also how many and which bots to play against on the map, along with their difficulty. Skirmish mode is very useful to hone your skills on a particular map, especially before you move to a multiplayer game.
The rules for a standard deathmatch are pretty simple—kill everyone else. When a match starts, your player is spawned in one of the many spawn points on the map. Once the match starts the object is to have the most frags, or kills, before the time limit lapses. Scattered across the map are weapons; items such as health, ammo, and armor, and your opponents. You start off with a simple machine gun and your gauntlet, so you will want to find more powerful weapons, especially before your opponents do (Figure 7-2). Your player starts out with 100 hit points, which decrease as you take on damage. If you reach zero or fall into one of the bottomless pits on the map, your character dies and you "respawn" at a random spawn point on the map. Any opponents you kill also respawn in this way. There are no limits to the number of times you can respawn, but keep in mind that you lose any weapons and armor you previously had, so try to keep respawning to a minimum.
The Quake series is known for supplying a basic set of weapons to choose from, and Quake III continues in that tradition by including many favorite weapons from previous games without having too much overlap in weapon functions. It is worthwhile to get familiar with all of the different weapons because each can be useful in different types of combat.
Gauntlet
This is the standard melee weapon of the game and a weapon that you always have with you. This electrified fist does not do much damage and requires you to be very close to your enemy to use, but does not run out of ammo. If you do manage to kill an enemy with the gauntlet the announcer will yell "humiliation" to alert all of the players to your opponent's shame at being killed by such a weak weapon.
Machine gun
This is the default weapon that a player starts with. It does a minimum amount of damage but has a lot of ammo and can be an effective weapon if used accurately.
Shotgun
Like most shotguns in FPSs, this shotgun causes a lot of damage when used at close range, and the damage tapers off the farther away you are from your enemy.
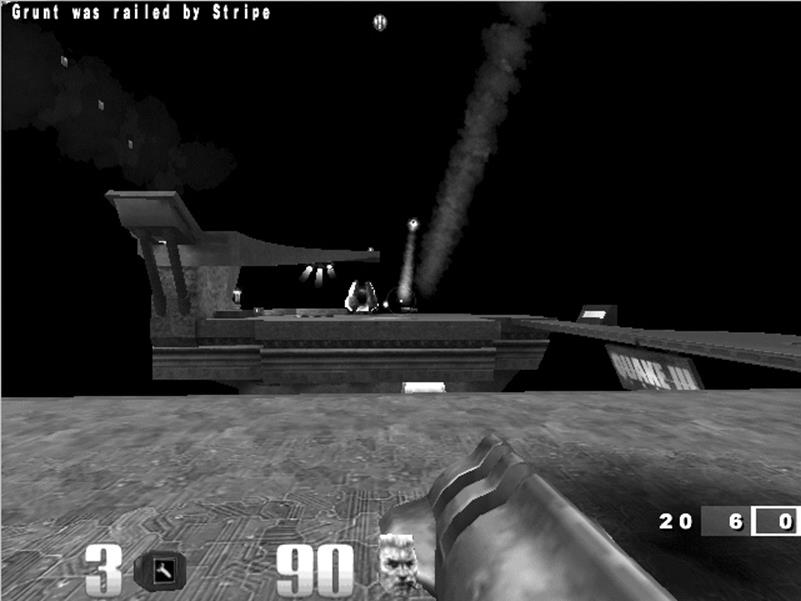
Figure 7-2. Quake III game
Grenade launcher
Very effective as a defensive weapon, the grenade launcher fires grenades that either explode upon direct contact with an enemy or after a short delay. The grenade launcher is a useful weapon when running away from a pursuing enemy backwards.
Rocket launcher
A powerful weapon, the rocket launcher not only is useful for mid- to long-range combat, but the rockets can damage opponents (and you) just by being near them when they explode. Thus, you can fire at walls and the floor near an opponent and still damage him.
Lightning gun
The lightning gun fires a stream of lightning at your opponent. This is a better weapon at shorter ranges, and is useful to encourage an aggressive opponent to keep his distance.
Railgun
The popular sniper weapon, the railgun fires a depleted uranium slug quickly at your opponent. The railgun has a weakness in that it needs to charge for a second between firing, so keep that in mind if you are using it in the middle of fast-paced combat.
Plasma gun
This weapon fires balls of plasma at an enemy in rapid succession. This weapon also has some "splash damage" like the rocket launcher so you can inflict damage on an opponent even if you just miss him.
BFG
The BFG in Quake III is somewhat different from the weapon in Quake II. This BFG is more like a souped-up plasma gun. It fires green balls of plasma that cause large amounts of damage, and is the most powerful weapon in the game.
Along with weapons, there are a few other items you will find in the maps, some of which give you extra abilities. There are the normal health and ammo packs that regenerate across the map, and on some maps there is a Quad Damage item. If a player picks up this item, the announcer says "Quad Damage" and the player shines a bright blue that makes him easy to see from a distance. If you pick up Quad Damage, all of your weapons inflict four times their damage for a limited time, useful for racking up quick kills. Be careful, though: if you are killed with time remaining, the Quad Damage will be left behind, so other players have an incentive to kill you.
Multiplayer
Quake III was primarily designed to be played in multiplayer mode . The multiplayer mode is not much different from single-player mode except that you are fighting other people instead of computer-controlled bots. When you click the Multiplayer option from the main menu, you are taken to the Quake III server browser. Here you can see a list of available game servers you can connect to, along with the map and game type currently in progress and the number of players on the server. You can also specify a particular server to connect to by IP address.
If you want to create your own server, click Create and select a map and number of bots for your own server and click Fight to launch the server. If you change the Dedicated option before you launch the server, the server will launch in the background. Otherwise, the server will start and you will immediately be connected to it. If you want to create your own customized dedicated server, particularly one that runs without the client from the command line, check out some of the great Quake III server HOWTOs on the Internet. A good place to start ishttp://www.planetquake.com/quake3/q3aguide/server-setup_a.shtml.
There are a number of multiplayer game types, and many of them require special mods or maps to be installed on your system. The basic game types are baseq3, which is the standard multiplayer deathmatch, and CTF, which is a standard two-team capture-the-flag match. Once you find a game you wish to join, click on the server and then click the Fight button at the bottom of the screen to connect.
Mods
Like the previous versions of Quake, Quake III has a large number of community-created mods for it. Some of these mods are simplistic and add a new weapon or new basic game type, whereas other mods are very extensive and change maps, weapons, and even the major rules of the game. To find mods, skins, and maps to add to your Quake III install, visit www.planetquake.com.
Among the many mods and files hosted on that site is a popular mod called Rocket Arena 3 (RA3 ) at http://www.planetquake.com/servers/arena/. Rocket Arena 3 is the continuation of the Rocket Arena mods that were available for Quake and Quake II; it takes deathmatch play and changes a few of the rules to result in a unique style of game play. First, by default in Rocket Arena 3, you start with all of the weapons fully loaded. This means no longer running around a map trying to find the more powerful weapons — you can get right to fragging. Second, your player is not hurt by his own splash damage. This means you can do manuevers like rocket jumps (firing a rocket below you as you jump, launching you high into the air) without any damage. These two changes in the rules, combined with a completely new set of maps result in a very different deathmatch game. On RA3 servers, you can select to play directly against another player one-one-one or in a team deathmatch. Unlike in standard deathmatch, you only have one life, so when you die you must wait until the current match ends before you can get back in the game.
Installing RA3 takes only a few steps. First go to the RA3 site and find the Linux/Mac installer on the downloads page, a 135Mb .zip file. Then unzip the file into /usr/local/games/quake3/ where it should create an arena directory. To play RA3 start Quake III from the command line withquake3 +set fs_game arena or select "arena" from the Mods menu in Quake III. If you want to host your own RA3 server, a sample server script has already been created for you called ra3server in the arena directory. Launch it to start a dedicated RA3 server. Read the readsrv.txt file in the arena directory for more information on how to customize the RA3 server.
Return to Castle Wolfenstein
For many gamers, Wolfenstein 3D was their first exposure to a 3D first-person shooter. In the game you are a captured American soldier inside a Nazi prison. Your goal is to escape the prison and shoot any guards who get in your way. Id Software has released an updated version of the classic called Return to Castle Wolfenstein (RTCW) that shares the same basic objectives but expands the game play and provides updated graphics and sounds.
Unfortunately the native Linux client is not included with the Return to Castle Wolfenstein CD, so you will need to download the latest version of the installer from ftp://ftp.idsoftware.com/idstuff/wolf/linux. Updates are also provided in the directory, so be sure to download the full installer (it will be a larger file and not have the word update in the filename).
Installation
To install RTCW, become root, add executable permissions to the installer with chmod +x filename, and run the installer script. The installer provides a basic GUI that lets you configure a few installation settings, including where to install the binaries (Figure 7-3). By default the installer will put files in /usr/local/games/wolfenstein.
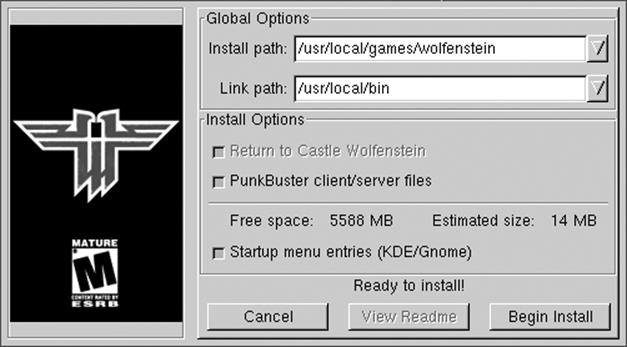
Figure 7-3. RTCW installer
Unlike some Linux game installers, the Wolfenstein installer will not install the compressed game files that are on your CD. The README file that comes with the installer instructs you to copy seven files from your Windows install of the game to the /usr/local/games/wolfenstein/maindirectory. These files are mp_pak0.pk3, mp_pak1.pk3, mp_pak2.pk3, pak0.pk3, sp_pak1.pk3, and sp_pak2.pk3. If you have not installed the game under Windows, your other option is to run the CD installer under Wine and then copy the files. If you have trouble with the installer, you can check out the official FAQ for the Linux client, found at zerowing.idsoftware.com/linux.
Single Player
Once you launch RTCW, you will probably want to click on Options and familiarize yourself with and change the default key bindings and other settings to suit you. In the Options section you can also launch various mods you have downloaded and installed for the game. Click Play to start a game. The default mode for RTCW is a single-player game that puts you into a similar situation as the first Wolfenstein 3D — you are freed from your Nazi prison cell when you attack and kill a guard (Figure 7-4). Your goal is to advance through enemy lines and escape prison.
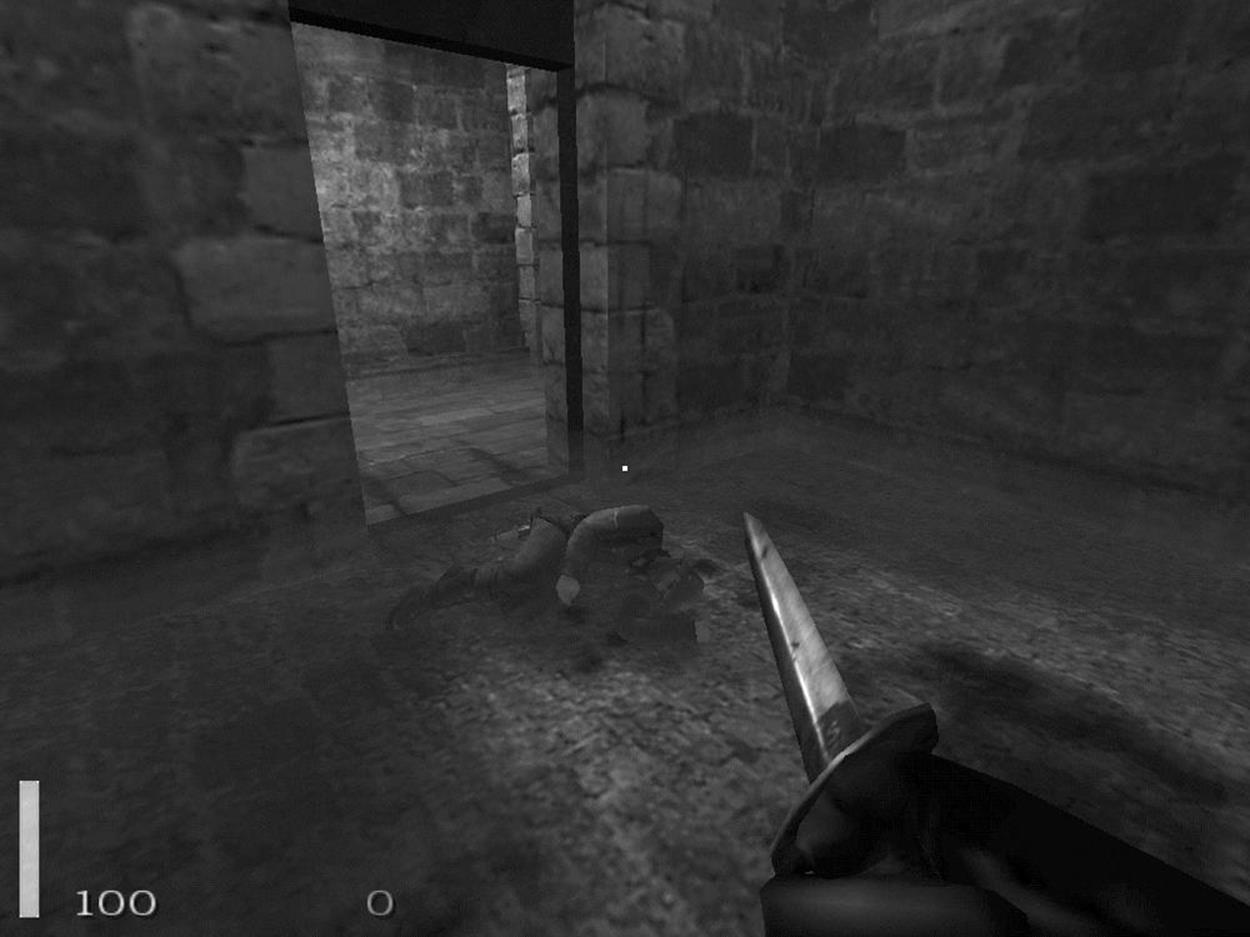
Figure 7-4. RTCW start
As you move through the game, at different times you will want to employ stealth by walking slowly (hit the Caps Lock key) and peeking around corners (Q and E lean to the left and to the right, respectively), or react quickly without regard to noise and sprint through an area (hold down the Shift key when you move) and kick in doors (the X key) and jump over obstacles (spacebar). When you find items such as weapons or supplies, you can pick them up just by walking over them. Some objects in the game, such as alarms, can be activated and deactivated with the Enter key. Of course, you can also deactivate an alarm by shooting at it.
There are a number of weapons in the game to help you fight the enemy. You start with a basic knife and quickly pick up the guard's pistol. As you progress in the game you get more powerful weapons, such as submachine guns, rifles, grenades, and rockets. Some of the weapons share ammunition, so be aware of your ammo counts. Also, some of the autofire guns overheat if fired too much in a short time, so be sure to fire them only in short bursts. Certain levels contain mounted machine guns. To use these weapons, step up to them until the hand icon appears on the screen and then press F or Enter to mount or dismount from the machine gun. When mounted, you view through the machine gun's crosshairs and can aim and fire at your enemies.
Multiplayer
RTCW also has a multiplayer mode that is rather different from the single-player game. In multiplayer mode there are two teams—the Axis and the Allies. In the default multiplayer mode both teams have one or more objectives they must accomplish within a time limit. The first team that completes the objective wins the round. In stopwatch mode the game changes a bit. After each round of play, the teams switch sides and must beat the other team's time for completing the objective. Checkpoint mode is somewhat like capture the flag. There are a number of checkpoint flags scattered across the map. The first team that controls all of the different checkpoints simultaneously wins. If time runs out, the team that controls the most checkpoints wins the round.
Multiplayer mode also differs from single player in that there are four different character classes to choose from, each with different abilities and roles in the game. A successful team will have members from each of the roles working together.
Soldier
This is a standard fighting role. The soldier can use all of the two-handed weapons, such as the sniper rifle. This is a good default role to pick if you are starting out and aren't sure what to do.
Engineer
The engineer's primary focus is demolitions, and the engineer is the only player who can use dynamite to destroy objectives. In addition, the engineer can repair stationary guns and disarm dynamite that enemies lay.
Medic
A medic is an important team member. Medics can help heal and even revive dead team members on the battlefield. Medics also are equipped with health packs that they can drop for other teammates to pick up. If you have a medic on the team, then all players will spawn with an additional 10 hits points. Also, the health of a medic slowly regenerates over time.
Lieutenant
A lieutenant's primary duties are back a bit from the main battle and involve tactical decisions. A lieutenant can drop a smoke grenade on an area to signal an airstrike. Also, lieutenants can use binoculars to call in artillery attacks on a location. Lieutenants can drop ammo packs for other teammates, much in the way medics drop health packs.
Unlike in some other tactical multiplayer FPSs, in RTCW players have multiple lives and respawn, but with a twist. When a player dies, he is placed in "limbo" and must wait until the next reinforcement period occurs to respawn. During this period he can change character classes and weapons, and even switch teams. You can also choose to wait for a medic to revive you instead of waiting in limbo. In that case, you can get back into the game immediately once a medic revives you.
You can play multiplayer games either locally on a LAN or on servers on the Internet. The multiplayer interface provides a server browser that will scan for currently open servers to connect to, otherwise you can directly enter the IP address of a server. You can also host your own server. Included in the Linux binary is a file called QUICKSTART that goes through the basics of running a dedicated server.
The dedicated server is called wolfded and game options are changed through arguments on the command line or by specifying a config file to execute. To get a basic server up, run:
$ wolfded +set com_hunkmegs 64 +set sv_maxrate 9000 +set com_zonemegs 32 +set \
dedicated 2 +set sv_hostname "my server" +set g_motd "my motd" +map mp_villiage
Included with the install is a basic map rotation script in main/rotate.cfg. You can specify this on the command line to start a basic server that will cycle through the different maps:
$ wolfded +set com_hunkmegs 64 +set sv_maxrate 9000 +set com_zonemegs 32 +set \
dedicated 2 +set sv_hostname "my server" +set g_motd "my motd" +exec rotate.cfg \
+vstr m_rotate1
Unlike with standard single-player or multiplayer mode, you do not have to have a valid CD key to host a dedicated server.
To update to the latest version of RTCW, download the latest version of the installer (or to save bandwidth, the -update file of the same version) from ftp.idsoftware.com and execute it as root. You will see an interface just like that of the original installer, and updated files will overwrite the old versions once you click Install.
Unreal Tournament 2004
Some FPS games attempt to shun the stereotype that FPS games lack depth and generally rely more on quick reflexes than thinking or strategy by adding a basic storyline along with a single-person mode. The storyline usually puts the character in some sort of hostile environment as a pretense to fire at anything that moves. The fact is, however, that while some players might play through the single-person mode now and then, the majority spend their time in a head-to-head deathmatch with other players.
The Unreal Tournament (UT) series has no such pretense, and instead focuses completely on arena-style play. Because of this focus, UT has become the favorite for many players over the Net, as it includes many different arena maps and styles of network play, from basic deathmatch and capture the flag to bombing runs and other games that start to blur the line between an FPS and the sports genre.
Installation
Like its predecessors Unreal Tournament and Unreal Tournament 2003, Unreal Tournament 2004 (or UT2K4) has native Linux support both for the client and the server. Unlike many other Linux-native FPSs from other companies, however, UT2K4 ships with the Linux binaries and installer in the same box as the Windows binaries. This means you don't have to search for a fast mirror and download a large .sh file, much less wait for weeks or months for a Linux port—you can get to gaming immediately.
UT2K4 chooses its installation directory based on what user runs the installer. If a regular user starts the installer, UT2K4 creates a ut2004 directory under the user's home directory. Although the game will run fine for a single user either way, if you do have root privileges on a machine, it is better to install it for every user in case you decide to switch users. If you run linux-installer.sh as root, it will install to /usr/local/games/ut2004/ by default and be made available to all users on the system.
To install UT2K4, mount CD1, also labeled the Install Disc, on your Linux system and execute the file called linux-installer.sh. Most file managers will execute the file if you click on it; otherwise, you can open a terminal and type:
# /mnt/cdrom/linux-installer.sh &
After you accept the licensing agreement, you will see the primary screen for the Linux installer, as shown in Figure 7-5.
In this primary screen you can change many of the installation settings, including where to install, what language to use, and whether to add menu entries for KDE and GNOME. The install uses about 5 GB of space, so make sure you have enough free space cleared up; otherwise, the Begin Install button will be disabled. Once you click Begin Install, the installer will prompt you for your CD key and then start copying files from the CD-ROM to the hard drive. If you purchased the default CD edition of UT2K4, you will be prompted to switch CDs throughout the process. If you purchased the DVD special edition, you can install the full game without swapping discs.
Once the install finishes, you can click the Start button in the final window to start the game, you can select it from your KDE or GNOME menu, or you can simply type ut2004 in a terminal. Unlike in Windows, you do not need to have the play disc mounted in the CD-ROM drive to play.
Play
One of the first things you will want to do when you start UT2K4 for the first time is go over all of the configuration settings and key bindings and make sure they are to your liking. All of these settings can be configured in the Settings menu on the main screen. All of the game options, from screen resolution to special visual effects and your player's skin and name, can be configured here. Your options and saved games are then stored in the ~/.ut2004 directory. You can even tweak the text configuration files (they end in .ini) under ~/.ut2004/System/ by hand if you so choose.
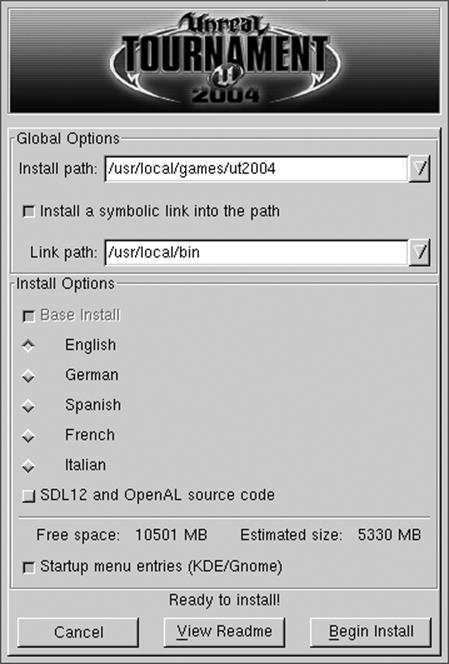
Figure 7-5. Primary UT2K4 install screen
UT2K4 has a variety of play options. The first is to play in single-player mode, which places you as the captain of a team of arena fighters you choose. Your team then moves up the ranks playing different types of team games:
Capture the Flag
Like traditional capture the flag in other FPSs, your team attempts to penetrate the opposing team's base, grab its flag, and return it to your flag while preventing them from doing the same to you. You score points for each flag you capture.
Bombing Run
This game is a bit like basketball. A ball is placed in the middle of the map, and each team has a goal on its side. Points are scored when a player picks up the ball and fires it through the opposing team's goal. If you kill the player with the ball, the ball is dropped and you can pick it up.
Double Domination
A variant on capture the flag, in this game the map has two "domination points" that are initially set to neutral. The object is to run over both domination points, which sets them to your side, and keep both domination points set for 10 seconds to score.
Assault
This game operates with a series of rounds. Each round-one team takes the role of attacker and the other takes the role of defender. The attacker team has a series of goals to accomplish within a time limit, such as reaching a certain location on the map, and the defender team tries to stop them. Once the round is over, the roles reverse.
Single-player mode is useful to get acquainted with the different maps and game types, as the game slowly increases in difficulty. Your progress is saved at each point in the game, so you can pick up where you left off last time. If you want to get right to the action instead, try Instant Action. This lets you choose the type of game and map to play on, along with the number of bots and their difficulty. Instant Action is useful to hone skills on a certain map or to practice without applying wins or losses to your single-player record.
Be sure to become acquainted with each of the different weapons and their alternate firing modes. Also, some weapons offer combos, such as the shock rifle. Fire the alternate fire on the shock rifle to send a plasma charge, and then fire on that charge with the primary fire to create a large explosion that causes a great deal of damage (Figure 7-6). The most successful players are those who have mastered multiple weapons and can quickly switch between them as necessary.
If you are ready to play against others on the Internet or at a LAN party, click Join Game. You can then choose whether to search for LAN or Internet games, and UT2K4 will search and list all the available games. Joining in is as simple as selecting a game and clicking Join, but keep in mind that the lower your ping to a server, the more responsive game play will be.
Game Server
You can also host your own UT2K4 server as the Host Game option. This lets you configure your own game scenario much like with Instant Action, so you can choose maps, number of players, number of bots, and other settings, and then start your own custom server that others can join whether on the local LAN or on the Internet. Once you have configured your server, you can either click Listen or Dedicated to start the server. Listen starts the server and immediately connects you to it. Dedicated starts the server in the background and exits, which is ideal if you want to host a server but not play yourself. You can also start a dedicated server directly from the command line. Change to the ut2004/System directory, and then run ucc with the server argument, and then the name of the map to use:
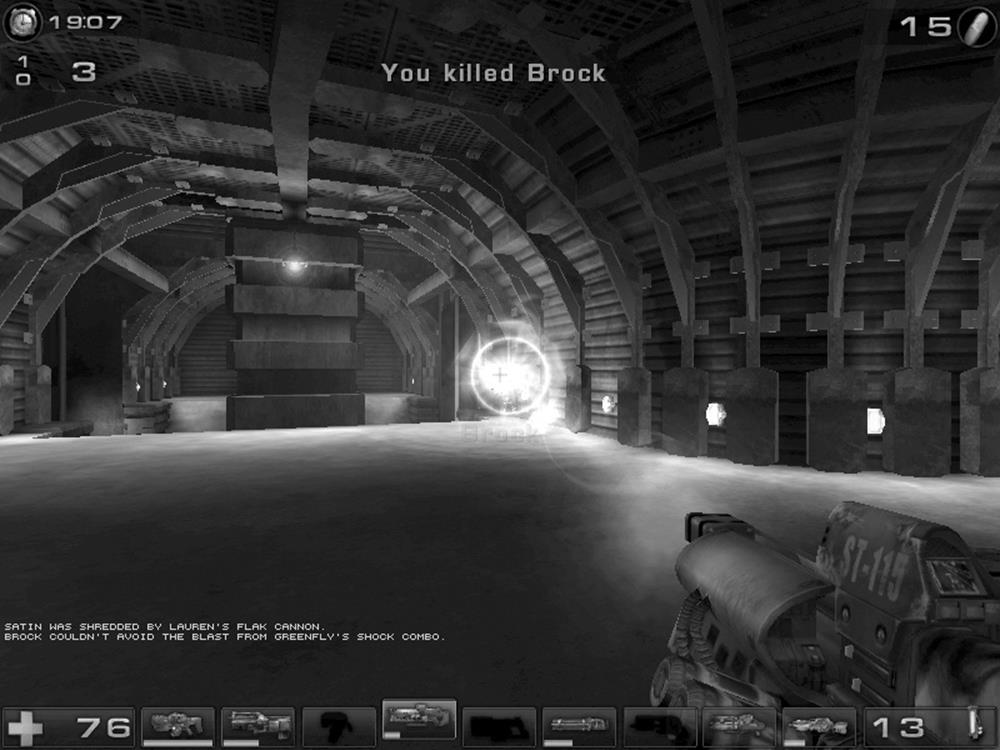
Figure 7-6. UT2K4 shock combo
# cd /usr/local/games/ut2004/System
# ./ucc server DOM-SunTemple
Another advantage to starting the server this way is that you can run servers on machines with no 3D acceleration or graphics support at all. All of the options you can change inside the GUI can be changed on the command line as well, and there are a number of tutorials on the Internet that cover the different command-line options. If you have configured previous Unreal Tournament servers, you will find that many of the options are the same in UT2K4.
Updates
If you intend on playing UT2K4 on the Internet, you will want to keep up with your patches. Sometimes patches fix more than bugs — they prevent cheats, so in that case you will need the latest patch to connect to a server. Patches are announced on the official Unreal Tournament site atwww.unrealtournament.com, but check sites such as www.icculus.org and www.linuxgames.com for links to the Linux patches. Click Join Game and you will see your current version in the upper right-hand corner.
These patches come in .tar.bz2 format, and to apply them you will want to first extract the patch directory and then overwite your current files with the patched version:
# tar -xjf ut2004-lnxpatchversion.tar.bz2
# cd UT2004-Patch
# /bin/cp -a * /usr/local/games/ut2004/
Emulators
Modern games with detailed graphics, sophisticated soundtracks, and fast-paced network play are certainly fun, but sometimes you want to hearken back to a simpler time — a time with 8- or 16-bit graphics when arguably gameplay was more important than fancy graphics. Linux has a number of emulators so you can take a trip back to the days of plunking quarters into Pacman — only, as with Linux, the arcade is free. These emulators work from ROM images that have been extracted from the arcade or console game, and emulate the environment necessary for the ROM to function, so you can use your keyboard or even a joystick and play the games directly from your computer.
MAME
Probably the most famous and popular console emulator is MAME (Multiple Arcade Machine Emulator) . The focus of the MAME project (www.mame.net) is to create an emulator for the various different arcade platforms that have been in use over the years. In this respect the MAME project is much more complicated than many of the other console emulation projects because it supports many different platforms. Currently MAME supports thousands of arcade titles and the list continues to grow. You can view the list of currently supported titles onwww.mame.net/gamelist.html.
MAME was originally a project for the Windows platform only; however, a Linux port, called Xmame , has been created. Xmame is based directly on the MAME source code, with changes being made only when necessary to run under Linux. Because of this you can treat Xmame under Linux like MAME under Windows, and ROMS that work on one will work on the other.
Xmame is a popular program and should already be packaged for your particular distribution, but if it isn't you can download the latest source from the project's site at x.mame.net. There are a number of different display options for Xmame , and some distributions package the different display options separately:
X11
The standard Xmame display option is output to a window under X.
SVGAlib
Xmame can also use SVGAlib to display to the console, allowing you to use Xmame without running X.
GL
Xmame can output to an X11 display using OpenGL libraries to take advantage of hardware acceleration on your video card.
SDL
Xmame can also use SDL libraries for output under an X11 environment. Similar to the OpenGL libraries, SDL lets Xmame take advantage of hardware acceleration where available.
Glide
As with OpenGL, Xmame can use the Glide libraries for hardware acceleration both under X and with SVGAlib for 3DFX cards.
To start, you will want to use the X11 display method because it is the default and is most likely to work with your system. The first time, just run xmame from the command line without any arguments. Xmame will search /etc/xmame/xmamerc for system-wide defaults and will create a local configuration directory under ~/.xmame. Copy the /etc/xmame/xmamerc file to ~/.xmame so you can tweak settings specific to your user. This file contains all the different settings for Xmame, but the first setting you will probably want to change is rompath. This setting controls in what directory Xmame looks for ROMs, so if your user has a local folder for MAME ROMs, put it here and save the file. Now you will be able to play any game you have a ROM for simply by passing the name of the ROM as an argument to Xmame. ROMs generally come in .zip files that contain a number of different files the emulator needs all in one package. To play your pacman.zip ROM, you would simply run:
$ xmame pacman
on the command line (Figure 7-7).
Now that the game is running, what do you do? Xmame uses the same keybindings as the DOS version of MAME. Table 7-1 lists some of the primary key bindings you will find yourself using.
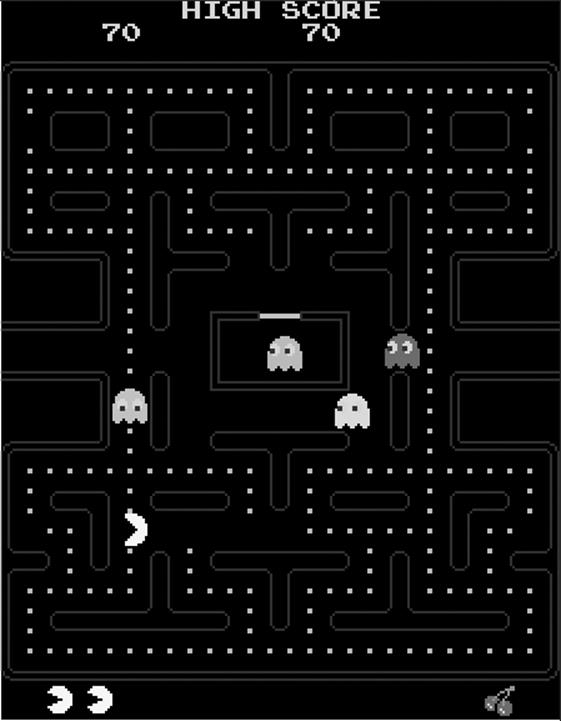
Figure 7-7. Xmame with Pacman
Table 7-1. Xmame key bindings
|
Key |
Action |
|
P |
Pause the game |
|
F3 |
Reset the game |
|
F8 |
Reduce frame skip |
|
F9 |
Increase frame skip (useful to speed up games on slower machines) |
|
ESC |
Exit emulator |
|
left-Shift + Pgup |
Increase scale (makes game larger for higher-resolution displays) |
|
left-Shift + Pgdn |
Decrease scale |
|
left-Shift + Insert |
Normal window |
|
left-Shift + Home |
DGA fullscreen mode |
In addition, individual games have their own key bindings. These vary from game to game, but there are some standard key bindings most games use for common buttons (Table 7-2).
Table 7-2. Common button bindings
|
Key |
Action |
|
Arrow keys |
Move left, right, up, and down |
|
1 |
Select one player |
|
2 |
Select two players |
|
5 |
Insert a coin |
|
Ctrl |
Button 1 |
|
Alt |
Button 2 |
Because some arcade games just have a joystick, and others have six or more buttons, the button mappings to a keyboard will sometimes vary. For basic games, Ctrl and Alt work as the first and second buttons but more complicated games will require some experimentation to discover the key bindings. By default, Xmame will play a game in its original resolution, so on a high-resolution computer screen you might want to increase the scale of the game once or twice with left-Shift and PageUp.
Xmame can use your mouse for applicable games as well. A good example of using a mouse in an arcade game is Centipede , which by default uses a large trackball mouse. You can either use your mouse or the arrow keys for movement.
Xmame also supports use of a joystick, although this isn't turned on by default. Either change the joytype option in your xmamerc file or pass -joytype number on the command line. The number corresponds to the type of joystick you use (Table 7-3).
Table 7-3. Joystick mapping
|
Number |
Joystick type |
|
0 |
No joystick |
|
1 |
i386 joystick driver |
|
2 |
Fm Town Pad support |
|
3 |
X11 input extensions joystick |
|
4 |
New i386 Linux joystick driver |
|
5 |
NetBSD USB joystick driver |
|
6 |
PS2-Linux native pad |
|
7 |
SDL joystick driver |
Nestra
Arcade games are incredibly fun, but there are some games that seem to only exist on certain game consoles, such as the original Nintendo Entertainment System (NES) . As with the MAME project, there is software you can use to emulate the NES hardware and play ROMs directly on your computer. Under Linux, the software is Nestra .
Nestra will already be packaged for you depending on your distribution, but if it isn't, you can download and build the source directly from nestra.linuxgames.com. Once installed, using Nestra is as simple as running nestra with the path to the ROM you want to play as an argument. So, to play the original Metroid , you would type:
$ nestra Metroid.nes
See Figure 7-8.
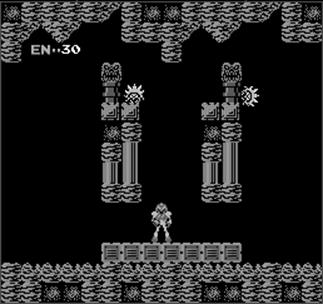
Figure 7-8. Metroid under Nestra
Nestra key bindings are the same across games and correspond to the standard NES controller (Table 7-4).
Table 7-4. Nestra key mappings
|
Key |
Function |
|
Arrow keys |
Arrow pad |
|
Spacebar |
Button A |
|
z, x |
Button B |
|
Enter |
Start |
|
Tab |
Select |
|
Pause, Break |
Reset |
|
Esc |
Exit Nestra |
|
1-9 |
Adjust the emulation speed. 1 is the normal speed, 2 is double speed, etc. |
|
- |
Run at half speed |
|
0 |
Pause the emulator |
Some games, such as Zelda, save games on the game cartridge itself. Since you are dealing with ROMs here, Nestra will place saved games in a file in the directory containing the ROM you are running, or will put the saved games in ~/.nestra if the directory exists.
SNES9x
The NES definitely had a lot of fun games, and when the next generation of Nintendo's consoles was released — the Super Nintendo Entertainment System, or SNES — many of the classics, such as Super Mario Bros, Zelda, and Metroid, found their way onto the new platform. You can play all of your favorite SNES ROMs under Linux using the Snes9x program.
Snes9x is an SNES emulator that runs on Windows, Linux, Mac OSX, and other platforms. The Linux port is packaged by most distributions, or you can download and build the source from the official Snes9x page at www.snes9x.com.
Once installed, running Snes9x is similar to Nestra — simply type snes9x followed by the path to the SNES ROM as an argument. To run Zelda 3, for example, you would type
$ snes9x zelda3.smc
Unlike Nestra, Snes9x has a large number of options you can pass on the command line. For instance, the -y option enables "TV mode," which scales the image by two and inserts an extra blended pixel between each scan line. The end result of TV mode is a larger, easier-to-read screen that looks more like a regular television screen.
Snes9x uses a standard set of key bindings to correspond to the buttons on an SNES controller. The standard key bindings are shown in Table 7-5.
Table 7-5. Snes9x key mappings
|
Key |
Function |
|
Escape |
Quit the emulator |
|
Pause, Scroll Lock |
Pause the emulator |
|
Up arrow, u |
Up direction |
|
Down arrow, j, n |
Down direction |
|
Left arrow, h |
Left direction |
|
Right arrow, k |
Right direction |
|
a, v, q |
TL button |
|
z, b, w |
TR button |
|
s, m, e |
X button |
|
x, ',', r |
Y button |
|
d, '.', t |
A button |
|
c, y |
B button |
|
Enter |
Start button |
|
Spacebar |
Select button |
|
Shift F1-F9 |
Save the game in one of nine different slots |
|
F1-F9 |
Restore the saved game in the specified slot |
Snes9x has support for joysticks, and by default will scan for /dev/js0, or you can specify the joystick device to use with the -joydev1 argument. You can also control the mapping for the eight different SNES buttons with the -joymap1 and -joymap2 options (for joystick 1 and joystick 2, respectively) followed by the eight different buttons in order. For instance, the default is 0 1 2 3 4 5 6 7, which corresponds to A B X Y TL TR Start Select.
There are so many different options to Snes9x, in fact, that a couple of graphical frontends have been created to make the process of configuring Snes9x easier. Snes9express is an easy-to-use frontend that makes it easy to organize your SNES ROMs and experiment with different settings. You can download the latest version from www.linuxgames.com/snes9express or use the package that comes with your distribution. Snes9express supports skinning and even includes a skin that makes it look like the original SNES console (Figure 7-9).
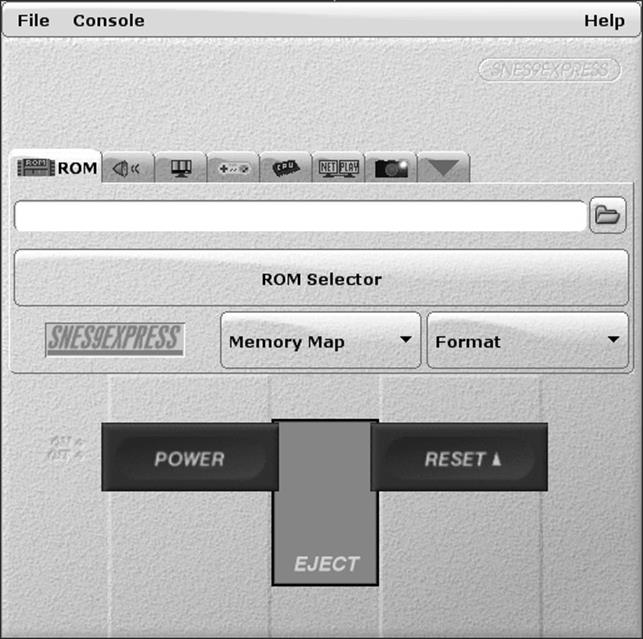
Figure 7-9. Snes9express
Click Console → Preferences and give snes9express the path to your SNES ROM directory, and then you can click the ROM Selector button for a window to pop up with a full list of available games to run. Select the game you want to play and then click Power to start. The Snes9express window will disappear while the game is running, and reappear once you exit the game.
To change Snes9x settings from within Snes9express, click on the different settings tabs in the the main window. Sound, video, controller, and other settings can be configured in these tabs and the GUI makes it easy to toggle an option, or to change your joystick settings quickly.
Frozen Bubble
Some of the most fun games, the games that have the highest replay value, are often the simplest ones. Frozen Bubble is a puzzle game similar to Puzzle Bobble or Bust-a-Move. The object of Frozen Bubble is to remove all of the different colored bubbles that are arranged on the top of the screen (Figure 7-10). Your player is given a single colored bubble, and you aim from the bottom of the screen and attempt to hit a bubble at the top of the screen that has a matching color. If you hit a bubble with a matching color, it and all of the bubbles connected below it will disappear. If you don't hit a match, your bubble becomes another bubble to eliminate. You beat a level by eliminating all of the bubbles from the level. If you don't remove bubbles fast enough, the board shifts down closer to the bottom. Once a bubble hits the bottom of the board, you lose.
Frozen Bubble is a common game and should be packaged by your distribution. Otherwise, you can download and compile the source from the official site at www.frozen-bubble.org. Start Frozen Bubble from a menu or type frozen-bubble on the command line. You can choose one- or two-player games, and can even create your own levels from the included level editor.
The single-player game pits you against the clock. The controls are basic and easy to pick up. Left and right arrows adjust your aim to the left and right, respectively, and the up arrow launches your bubble. Take advantage of the fact that bubbles bounce from the side walls to get bubbles to hard-to-reach places. If your aim is good you can sometimes complete a level with a single well-placed bubble.
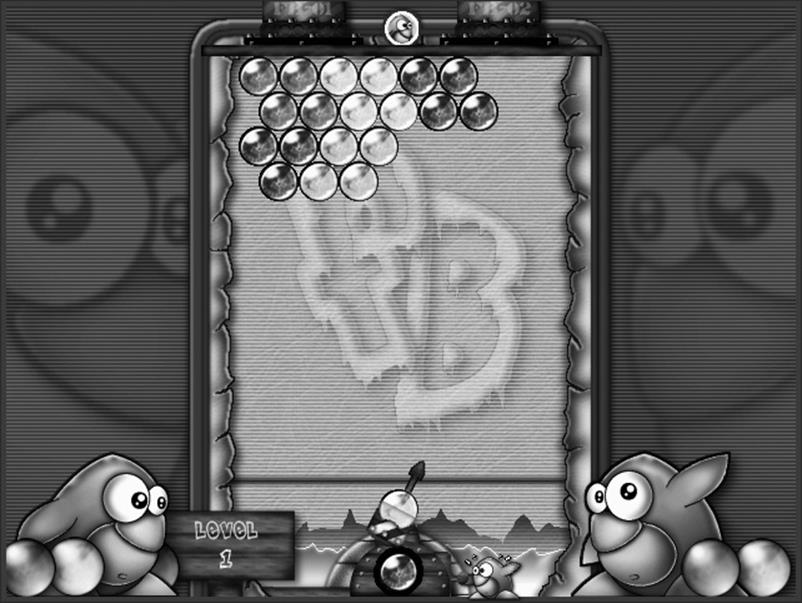
Figure 7-1. Frozen Bubble
The double-player games pits you head-to-head against another player (Figure 7-11). Both players use the keyboard, so player 1 aims left with X, right with V, and launches with the C key. The second player uses the standard arrow keys. In two-player mode both players are playing side by side at the same time with their own puzzle. The first player to complete the level wins that round.
The included level editor allows you to customize your own levels so you can arrange the number, color, and location of bubbles however you choose. Right-click on a bubble to remove it, and click on the colored bubbles on the side of the screen to choose the color to use. You can change any of the 100 included levels with the level editor.
Tux Racer
What would a chapter on Linux games be without a game featuring the Linux mascot Tux? Tux Racer is a 3D racing game, but instead of a car or other vehicle, you race Tux the penguin down an ice hill on his stomach. Success depends on how quickly you complete the race and the number of herrings you eat along the way.
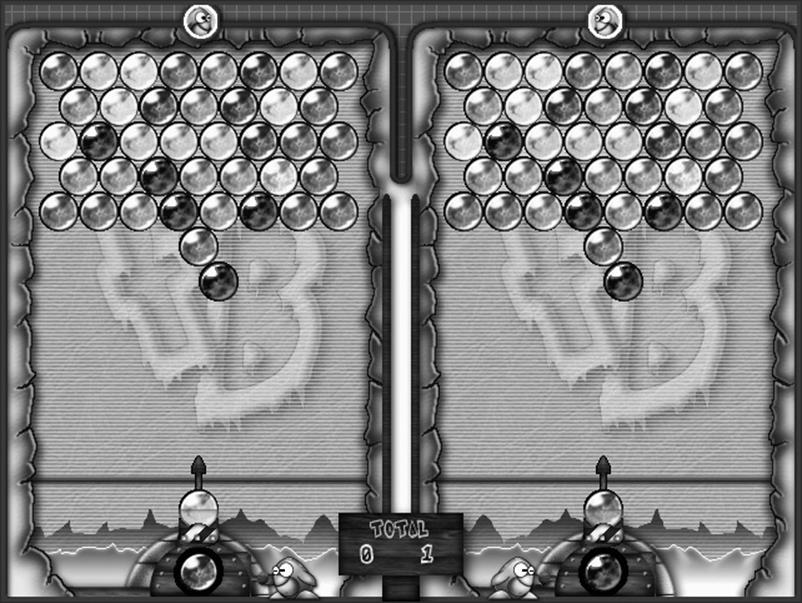
Figure 7-11. Frozen Bubble two-player mode
Tux Racer began as a completely open source project up through Version 0.61. With the increased success and improvements to the game, Tux Racer 1.0 was released as a boxed commercial product from Sunspire Studios. Although you could purchase Tux Racer 1.0 from the official site atwww.tuxracer.com, the open source 0.61 release was still available for download at tuxracer.sourceforge.net. This release is what is commonly included with most distributions.
Start Tux Racer either through your menu or by typing tuxracer on the command line. The opening menu gives you the option to enter an event or practice. The events are a series of races, and each race requires that you complete the previous races to advance. As you select from the available races, you can see the maximum time and number of herrings needed to advance. If either of those requirements aren't met, you will have to try the race again.
The controls in Tux Racer are fairly simple to learn, but the finer points of controlling Tux can take time to master. The left and right arrow keys steer Tux through the race. The up arrow causes Tux to flap his fins, which does different things depending on where you are in a race. If you are moving slowly (particularly when you start a race), flap the fins to increase Tux's speed. Once your speed reaches the yellow area, flapping the fins actually slows Tux down. Also, when you jump in the air, flapping his fins allows Tux to stay in the air longer, and lets you adjust his direction while flying. The down arrow serves as a brake and slows Tux down. You can combine the down arrow with the left and right arrows to perform a hard turn in the game.
Tux can also jump in the game with the E key. Holding down this key charges Tux's "Energometer"; the fuller the Energometer, the higher Tux will jump. If Tux gets stuck in some area of the map, you can use the Backspace key to reset Tux's position, or, if you want to completely give up, you can press the Q key to quit.
Tux Racer saves its files in the ~/.tuxracer directory. You can edit Tux Racer options such as whether to run in full-screen mode, by editing the ~/.tuxracer/options file. You can also use the options file to change the keyboard and joystick bindings that Tux Racer uses.
The practice levels provide quick access to the different levels in Tux Racer without requiring you to beat any levels or even meet any requirements. This lets you pick out your favorite level and play a quick game without worrying about the time or whether you picked up enough herring. A favorite is the "Who said penguins can't fly" level, which is designed like a bobsled run to get Tux moving as quickly as possible (Figure 7-12).
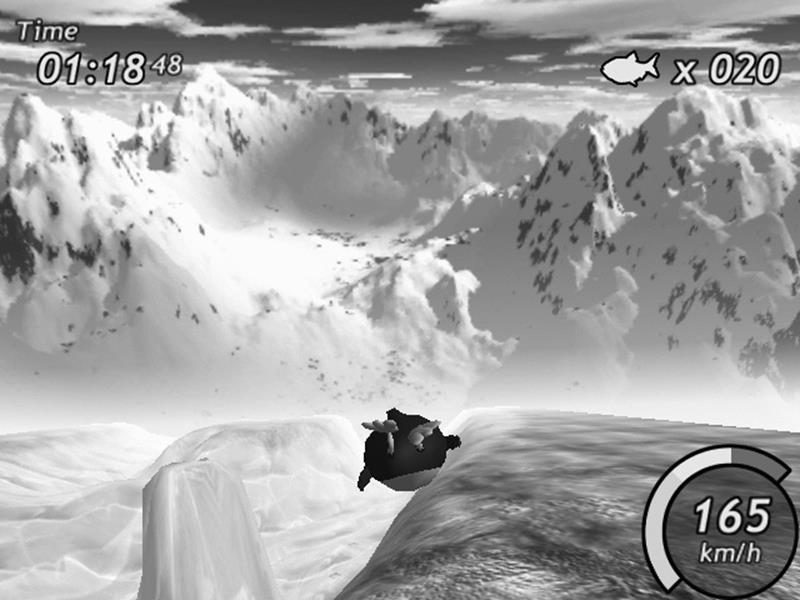
Figure 7-12. Who said penguins can't fly?
There are some strategies that you can use to get better times in the races. For one, not all surfaces are the same to Tux's stomach. The fastest surface is the slick ice, the second fastest is the snow, and the slowest is the rough ground. The latter will actually slow you down when you slide over it, so try to avoid it. Also, be sure to flap Tux's fins only when you are below the yellow line in speed; otherwise, you will be slowed down. You can also pick up a great deal of speed by flying through the air. You can use angled sections of the race track as ramps to propel Tux through the air. Upon his descent Tux picks up a great deal of speed and also avoids obstacles on the track that might slow him down. Of course, keep in mind that flying too much might mean missing valuable herring you need to pick up along the course.