How Linux Works: What Every Superuser Should Know (2015)
Chapter 6. How User Space Starts
The point where the kernel starts its first user-space process, init, is significant—not just because that’s where the memory and CPU are finally ready for normal system operation, but because that’s where you can see how the rest of the system builds up as a whole. Prior to this point, the kernel executes a well-controlled path of execution defined by a relatively small number of software developers. User space is far more modular. It’s much easier to see what goes into the user space startup and operation. For the adventurous, it’s also relatively easy to change the user space startup because doing so requires no low-level programming.
User space starts in roughly this order:
1. init
2. Essential low-level services such as udevd and syslogd
3. Network configuration
4. Mid- and high-level services (cron, printing, and so on)
5. Login prompts, GUIs, and other high-level applications
6.1 Introduction to init
The init program is a user-space program like any other program on the Linux system, and you’ll find it in /sbin along with many of the other system binaries. Its main purpose is to start and stop the essential service processes on the system, but newer versions have more responsibilities.
There are three major implementations of init in Linux distributions:
§ System V init. A traditional sequenced init (Sys V, usually pronounced “sys-five”). Red Hat Enterprise Linux and several other distributions use this version.
§ systemd. The emerging standard for init. Many distributions have moved to systemd, and most that have not yet done so are planning to move to it.
§ Upstart. The init on Ubuntu installations. However, as of this writing, Ubuntu has also planned to migrate to systemd.
There are various other versions of init as well, especially on embedded platforms. For example, Android has its own init. The BSDs also have their version of init, but you are unlikely to see them on a modern Linux machine. (Some distributions have also modified the System V init configuration to resemble the BSD style.)
There are many different implementations of init because System V init and other older versions relied on a sequence that performed only one startup task at a time. Under this scheme, it is relatively easy to resolve dependencies. However, performance isn’t terribly good, because two parts of the boot sequence cannot normally run at once. Another limitation is that you can only start a fixed set of services as defined by the boot sequence: When you plug in new hardware or need a service that isn’t already running, there is no standardized way to coordinate the new components with init. systemd and Upstart attempt to remedy the performance issue by allowing many services to start in parallel thereby speeding up the boot process. Their implementations are quite different, though:
§ systemd is goal oriented. You define a target that you want to achieve, along with its dependencies, and when you want to reach the target. systemd satisfies the dependencies and resolves the target. systemd can also defer the start of a service until it is absolutely needed.
§ Upstart is reactionary. It receives events and, based on those events, runs jobs that can in turn produce more events, causing Upstart to run more jobs, and so on.
The systemd and Upstart init systems also offer a more advanced way to start and track services. In traditional init systems, service daemons are expected to start themselves from scripts. A script runs a daemon program, which detaches itself from the script and runs autonomously. To find the PID of a service daemon, you need to use ps or some other mechanism specific to the service. In contrast, Upstart and systemd can manage individual service daemons from the beginning, giving the user more power and insight into exactly what is running on the system.
Because the new init systems are not script-centric, configuring services for them also tends to be easier. In particular, System V init scripts tend to contain many similar commands designed to start, stop, and restart services. You don’t need all of this redundancy with systemd and Upstart, which allow you to concentrate on the services themselves, rather than their scripts.
Finally, systemd and Upstart both offer some level of on-demand services. Rather than trying to start all the services that may be necessary at boot time (as the System V init would do), they start some services only when needed. This idea is not really new; this was done with the traditionalinetd daemon, but the new implementations are more sophisticated.
Both systemd and Upstart offer some System V backward compatibility. For example, both support the concept of runlevels.
6.2 System V Runlevels
At any given time on a Linux system, a certain base set of processes (such as crond and udevd) is running. In System V init, this state of the machine is called its runlevel, which is denoted by a number from 0 through 6. A system spends most of its time in a single runlevel, but when you shut the machine down, init switches to a different runlevel in order to terminate the system services in an orderly fashion and to tell the kernel to stop.
You can check your system’s runlevel with the who -r command. A system running Upstart responds with something like this:
$ who -r
run-level 2 2015-09-06 08:37
This output tells us that the current runlevel is 2, as well as the date and time that the runlevel was established.
Runlevels serve various purposes, but the most common one is to distinguish between system startup, shutdown, single-user mode, and console mode states. For example, Fedora-based systems traditionally used runlevels 2 through 4 for the text console; a runlevel of 5 means that the system will start a GUI login.
But runlevels are becoming a thing of the past. Even though all three init versions in this book support them, systemd and Upstart consider runlevels obsolete as end states for the system. To systemd and Upstart, runlevels exist primarily to start services that support only the System V init scripts, and the implementations are so different that even if you’re familiar with one type of init, you won’t necessarily know what to do with another.
6.3 Identifying Your init
Before proceeding, you need to determine your system’s version of init. If you’re not sure, check your system as follows:
§ If your system has /usr/lib/systemd and /etc/systemd directories, you have systemd. Go to 6.4 systemd.
§ If you have an /etc/init directory that contains several .conf files, you’re probably running Upstart (unless you’re running Debian 7, in which case you probably have System V init). Go to 6.5 Upstart.
§ If neither of the above is true, but you have an /etc/inittab file, you’re probably running System V init. Go to 6.6 System V init.
If your system has manual pages installed, viewing the init(8) manual page should help identify your version.
6.4 systemd
The systemd init is one of the newest init implementations on Linux. In addition to handling the regular boot process, systemd aims to incorporate a number of standard Unix services such as cron and inetd. As such, it takes some inspiration from Apple’s launchd. One of its most significant features is its ability to defer the start of services and operating system features until they are necessary.
There are so many systemd features that it can be very difficult to know where to start learning the basics. Let’s outline what happens when systemd runs at boot time:
1. systemd loads its configuration.
2. systemd determines its boot goal, which is usually named default.target.
3. systemd determines all of the dependencies of the default boot goal, dependencies of these dependencies, and so on.
4. systemd activates the dependencies and the boot goal.
5. After boot, systemd can react to system events (such as uevents) and activate additional components.
When starting services, systemd does not follow a rigid sequence. As with other modern init systems, there is a considerable amount of flexibility in the systemd bootup process. Most systemd configurations deliberately try to avoid any kind of startup sequence, preferring to use other methods to resolve strict dependencies.
6.4.1 Units and Unit Types
One of the most interesting things about systemd is that it does not just operate processes and services; it can also mount filesystems, monitor network sockets, run timers, and more. Each type of capability is called a unit type, and each specific capability is called a unit. When you turn on a unit, you activate it.
Rather than describe all of the unit types (you’ll find them in the systemd(1) manual page), here’s a look at a few of the unit types that perform the boot-time tasks required in any Unix system:
§ Service units. Control the traditional service daemons on a Unix system.
§ Mount units. Control the attachment of filesystems to the system.
§ Target units. Control other units, usually by grouping them.
The default boot goal is usually a target unit that groups together a number of service and mount units as dependencies. As a result, it’s easy to get a partial picture of what’s going to happen when you boot, and you can even create a dependency tree diagram with the systemctl dotcommand. You’ll find the tree to be quite large on a typical system, because many units don’t run by default.
Figure 6-1 shows a part of the dependency tree for the default.target unit found on a Fedora system. When you activate that unit, all of the units below it on the tree also activate.
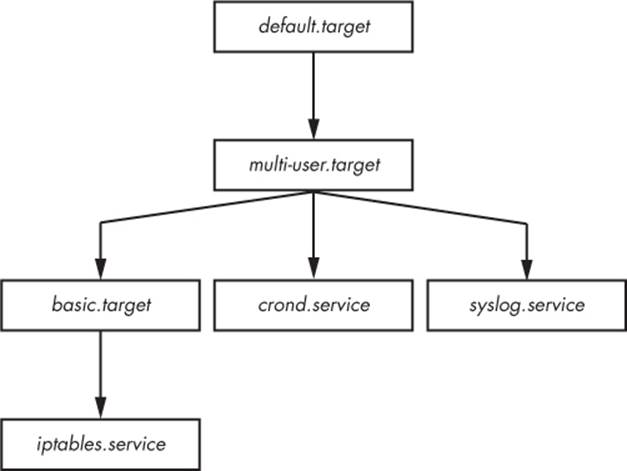
Figure 6-1. Unit dependency tree
6.4.2 systemd Dependencies
Boot-time and operational dependencies are more complicated than they may seem at first because strict dependencies are too inflexible. For example, imagine a scenario in which you want to display a login prompt after starting a database server, so you define a dependency from the login prompt to the database server. However, if the database server fails, the login prompt will also fail due to that dependency, and you won’t even be able to log in to your machine to fix it.
Unix boot-time tasks are fairly fault tolerant and can often fail without causing serious problems for standard services. For example, if a data disk for a system was removed but its /etc/fstab entry remained, the initial file-system mount would fail. However, that failure typically wouldn’t seriously affect standard operating system operation.
To accommodate the need for flexibility and fault tolerance, systemd offers a myriad of dependency types and styles. We’ll label them by their keyword syntax, and but we won’t go into details about configuration syntax until 6.4.3 systemd Configuration. Let’s first look at the basic types:
§ Requires Strict dependencies. When activating a unit with a Requires dependency unit, systemd attempts to activate the dependency unit. If the dependency unit fails, systemd deactivates the dependent unit.
§ Wants. Dependencies for activation only. Upon activating a unit, systemd activates the unit’s Wants dependencies, but it doesn’t care if those dependencies fail.
§ Requisite. Units that must already be active. Before activating a unit with a Requisite dependency, systemd first checks the status of the dependency. If the dependency has not been activated, systemd fails on activation of the unit with the dependency.
§ Conflicts. Negative dependencies. When activating a unit with a Conflict dependency, systemd automatically deactivates the dependency if it is active. Simultaneous activation of two conflicting units fails.
NOTE
The Wants dependency type is especially significant because it does not propagate failures to other units. The systemd documentation states that this is the way you should specify dependencies if possible, and it’s easy to see why. This behavior produces a much more robust system, similar to that of a traditional init.
You can also attach dependencies “in reverse.” For example, in order to add Unit A as a Wants dependency to Unit B, you don’t have to add the Wants in Unit B’s configuration. Instead, you can install it as a WantedBy in Unit A’s configuration. The same is true of the RequiredBy dependency. The configuration for (and result of) a “By” dependency is slightly more involved than just editing a configuration file; see Enabling Units and the [Install] Section
You can view a unit’s dependencies with the systemctl command, as long as you specify a type of dependency, such as Wants or Requires:
# systemctl show -p type unit
Ordering
None of the dependency syntax that you’ve seen so far explicitly specifies order. By default, activating a unit with a Requires or Wants causes systemd to activate all of these dependencies at the same time as the first unit. This is optimal, because you want to start as many services as possible as quickly as possible to reduce boot time. However, there are situations when one unit must start after another. For instance, in the system that Figure 6-1 is based on, the default.target unit is set to start after multi-user.service (this order distinction is not shown in the figure).
To activate units in a particular order, you can use the following dependency modifiers:
§ Before. The current unit will activate before the listed unit(s). For example, if Before=bar.target appears in foo.target, systemd activates foo.target before bar.target.
§ After. The current unit activates after the listed unit(s).
Conditional Dependencies
Several dependency condition keywords operate on various operation system states rather than systemd units. For example:
§ ConditionPathExists=p: True if the (file) path p exists in the system.
§ ConditionPathIsDirectory=p: True if p is a directory.
§ ConditionFileNotEmpty=p: True if p is a file and it’s not zero-length.
If a conditional dependency in a unit is false when systemd tries to activate the unit, the unit does not activate, though this applies only to the unit in which it appears. Therefore, if you activate a unit that has a condition dependency as well as some other unit dependencies, systemd attempts to activate the unit dependencies regardless of whether the condition is true or false.
Other dependencies are primarily variations on the preceding. For example, the RequiresOverridable dependency is just like Requires when running normally, but it acts like a Wants dependency if a unit is manually activated. (For a full list, see the systemd.unit(5) manual page.)
Now that you’ve seen some of the a few pieces of the systemd configuration, let’s look at some actual unit files and how to work with them.
6.4.3 systemd Configuration
The systemd configuration files are spread among many directories across the system, so you typically won’t find the files for all of the units on a system in one place. That said, there are two main directories for systemd configuration: the system unit directory (globally configured, usually/usr/lib/systemd/system) and a system configuration directory (local definitions, usually /etc/systemd/system).
To prevent confusion, stick to this rule: Avoid making changes to the system unit directory because your distribution will maintain it for you. Make your local changes to the system configuration directory. So when given the choice between modifying something in /usr and /etc, always change /etc.
NOTE
You can check the current systemd configuration search path (including precedence) with this command:
# systemctl -p UnitPath show
However, this particular setting comes from a third source: pkg-config settings. To see the system unit and configuration directories on your system, use the following commands:
$ pkg-config systemd –-variable=systemdsystemunitdir
$ pkg-config systemd --variable=systemdsystemconfdir
Unit Files
Unit files are derived from the XDG Desktop Entry Specification (for .desktop files, which are very similar to .ini files on Microsoft systems), with section names in brackets ([]) and variable and value assignments (options) in each section.
Consider the example unit file media.mount in /usr/lib/systemd/system, which is standard on Fedora installations. This file represents the /media tmpfs filesystem, which is a container directory for mounting removable media.
[Unit]
Description=Media Directory
Before=local-fs.target
[Mount]
What=tmpfs
Where=/media
Type=tmpfs
Options=mode=755,nosuid,nodev,noexec
There are two sections here. The [Unit] section gives some details about the unit and contains description and dependency information. In particular, this unit is set to activate before the local-fs.target unit.
The [Mount] section details the unit as being a mount unit, and it gives the details on the mount point, the type of filesystem, and the mount options as described in 4.2.6 Filesystem Mount Options. The What= variable identifies the device or UUID of the device to mount. Here, it’s set to tmpfs because this filesystem does not have a device. (For a full list of mount unit options, see the systemd.mount(5) manual page.)
Many other unit configuration files are similarly straightforward. For example, the service unit file sshd.service enables secure shell logins:
[Unit]
Description=OpenSSH server daemon
After=syslog.target network.target auditd.service
[Service]
EnvironmentFile=/etc/sysconfig/sshd
ExecStartPre=/usr/sbin/sshd-keygen
ExecStart=/usr/sbin/sshd -D $OPTIONS
ExecReload=/bin/kill -HUP $MAINPID
[Install]
WantedBy=multi-user.target
Because this is a service target, you’ll find the details about the service in the [Service] section, including how to prepare, start, and reload the service. You’ll find a complete listing in the systemd.service(5) manual page (and in systemd.exec(5)), as well as in the discussion of process tracking in 6.4.6 systemd Process Tracking and Synchronization.
Enabling Units and the [Install] Section
The [Install] section in the sshd.service unit file is important because it helps us to understand how to use systemd’s WantedBy and RequiredBy dependency options. It’s actually a mechanism for enabling units without modifying any configuration files. During normal operation, systemd ignores the [Install] section. However, consider the case when sshd.service is disabled on your system and you would like to turn it on. When you enable a unit, systemd reads the [Install] section; in this case, enabling the sshd.service unit causes systemd to see the WantedBy dependency for multi-user.target. In response, systemd creates a symbolic link to sshd.service in the system configuration directory as follows:
ln -s '/usr/lib/systemd/system/sshd.service' '/etc/systemd/system/multi-user.
target.wants/sshd.service'
Notice that the symbolic link is placed into a subdirectory corresponding to the dependent unit (multi-user.target in this case).
The [Install] section is usually responsible for the the .wants and .requires directories in the system configuration directory (/etc/systemd/system). However, there are also .wants directories in the unit configuration directory (/usr/lib/systemd/system), and you may also add links that don’t correspond to [Install] sections in the unit files. These manual additions are a simple way to add a dependency without modifying a unit file that may be overwritten in the future (by a software upgrade, for instance).
NOTE
Enabling a unit is different from activating a unit. When you enable a unit, you are installing it into systemd’s configuration, making semipermanent changes that will survive a reboot. But you don’t always need to explicitly enable a unit. If the unit file has an [Install] section, you must enable it with systemctl enable; otherwise, the existence of the file is enough to enable it. When you activate a unit with systemctl start, you’re just turning it on in the current runtime environment. In addition, enabling a unit does not activate it.
Variables and Specifiers
The sshd.service unit file also shows use of variables—specifically, the $OPTIONS and $MAINPID environment variables that are passed in by systemd. $OPTIONS are options that you can pass to sshd when you activate the unit with systemctl, and $MAINPID is the tracked process of the service (see 6.4.6 systemd Process Tracking and Synchronization).
A specifier is another variable-like feature often found in unit files. Specifiers start with a percent (%). For example, the %n specifier is the current unit name, and the %H specifier is the current hostname.
NOTE
The unit name can contain some interesting specifiers. You can parameterize a single unit file in order to spawn multiple copies of a service, such as getty processes running on tty1, tty2, and so on. To use these specifiers, add the @ symbol to the end of the unit name. For getty, create a unit file named getty@.service, which allows you to refer to units such as getty@tty1 andgetty@tty2. Anything after the @ is called the instance, and when processing the unit file, systemd expands the %I specifier to the instance. You can see this in action with the getty@.service unit files that come with most distributions running systemd.
6.4.4 systemd Operation
You’ll interact with systemd primarily through the systemctl command, which allows you to activate and deactivate services, list status, reload the configuration, and much more.
The most essential basic commands deal with obtaining unit information. For example, to view a list of active units on your system, issue a list-units command. (This is actually the default command for systemctl, so you don’t really need the list-units part.):
$ systemctl list-units
The output format is typical of a Unix information-listing command. For example, the header and the line for media.mount would look like this:
UNIT LOAD ACTIVE SUB JOB DESCRIPTION
media.mount loaded active mounted Media Directory
This command produces a lot of output, because a typical system has numerous active units, but it will still be abridged because systemctl truncates any really large unit names. To see the full names of the units, use the --full option, and to see all units (not just active), use the --alloption.
A particularly useful systemctl operation is getting the status of a unit. For example, here is a typical status command and its output:
$ systemctl status media.mount
media.mount - Media Directory
Loaded: loaded (/usr/lib/systemd/system/media.mount; static)
Active: active (mounted) since Wed, 13 May 2015 11:14:55 -0800;
37min ago
Where: /media
What: tmpfs
Process: 331 ExecMount=/bin/mount tmpfs /media -t tmpfs -o
mode=755,nosuid,nodev,noexec (code=exited, status=0/SUCCESS)
CGroup: name=systemd:/system/media.mount
Notice that there is much more information output here than you would see on any traditional init system. You get not only the state of the unit but also the exact command used to perform the mount, its PID, and its exit status.
One of the most interesting pieces of the output is the control group name. In the preceding example, the control group doesn’t include any information other than the name systemd:/system/media.mount because the unit’s processes have already terminated. However, if you get the status of a service unit such as NetworkManager.service, you’ll also see the process tree of the control group. You can view control groups without the rest of the unit status with the systemd-cgls command. You’ll learn more about control groups in 6.4.6 systemd Process Tracking and Synchronization.
The status command also displays recent information from the unit’s journal (a log that records diagnostic information for each unit). You can view a unit’s entire journal with this command:
$ journalctl _SYSTEMD_UNIT=unit
(This syntax is a bit odd because journalctl can access the logs of more than just a systemd unit.)
To activate, deactivate, and restart units, use the systemd start, stop, and restart commands. However, if you’ve changed a unit configuration file, you can tell systemd to reload the file in one of two ways:
|
systemctl reloadunit |
Reloads just the configuration for unit. |
|
systemctl daemon-reload |
Reloads all unit configurations. |
Requests to activate, reactivate, and restart units are known as jobs in systemd, and they are essentially unit state changes. You can check the current jobs on a system with
$ systemctl list-jobs
If a system has been running for some time, you can reasonably expect there to be no active jobs on it because all of the activations should be complete. However, at boot time, you can sometimes log in fast enough to see some units start so slowly that they are not yet fully active. For example:
JOB UNIT TYPE STATE
1 graphical.target start waiting
2 multi-user.target start waiting
71 systemd-...nlevel.service start waiting
75 sm-client.service start waiting
76 sendmail.service start running
120 systemd-...ead-done.timer start waiting
In this case, job 76, the sendmail.service unit startup, is taking a really long time. The other listed jobs are in a waiting state, most likely because they’re all waiting for job 76. When sendmail.service finishes starting and becomes fully active, job 76 will complete, the rest of the jobs will also complete, and the job list will be empty.
NOTE
The term job can be confusing, especially because Upstart, another init system described in this chapter, uses the word job to (roughly) refer to what systemd calls a unit. It’s important to remember that although a systemd job associated with a unit will terminate, the unit itself can be active and running afterwards, especially in the case of service units.
See 6.7 Shutting Down Your System for how to shut down and reboot the system.
6.4.5 Adding Units to systemd
Adding units to systemd is primarily a matter of creating, then activating and possibly enabling, unit files. You should normally put your own unit files in the system configuration directory /etc/systemd/system so that you won’t confuse them with anything that came with your distribution and so that the distribution won’t overwrite them when you upgrade.
Because it’s easy to create target units that don’t do anything and don’t interfere with anything, you should try it. Here’s how to create two targets, one with a dependency on the other:
1. Create a unit file named test1.target:
2. [Unit]
Description=test 1
3. Create a test2.target file with a dependency on test1.target:
4. [Unit]
5. Description=test 2
Wants=test1.target
6. Activate the test2.target unit (remember that the dependency in test2.target causes systemd to activate test1.target when you do this):
# systemctl start test2.target
7. Verify that both units are active:
8. # systemctl status test1.target test2.target
9. test1.target - test 1
10. Loaded: loaded (/etc/systemd/system/test1.target; static)
11. Active: active since Thu, 12 Nov 2015 15:42:34 -0800; 10s ago
12.
13.test2.target - test 2
14. Loaded: loaded (/etc/systemd/system/test2.target; static)
Active: active since Thu, 12 Nov 2015 15:42:34 -0800; 10s ago
NOTE
If your unit file has an [Install] section, “enable” the unit before activating it:
# systemctl enable unit
Try this with the preceding example. Remove the dependency from test2.target and add an [Install] section to test1.target containing WantedBy=test2.target.
Removing Units
To remove a unit, follow these steps:
1. Deactivate the unit if necessary:
# systemctl stop unit
2. If the unit has an [Install] section, disable the unit to remove any dependent symbolic links:
# systemctl disable unit
3. Remove the unit file, if you like.
6.4.6 systemd Process Tracking and Synchronization
systemd wants a reasonable amount of information and control over every process that it starts. The main problem that it faces is that a service can start in different ways; it may fork new instances of itself or even daemonize and detach itself from the original process.
To minimize the work that a package developer or administrator needs to do in order to create a working unit file, systemd uses control groups (cgroups), an optional Linux kernel feature that allows for finer tracking of a process hierarchy. If you’ve worked with Upstart before, you know that you have to do a little extra work to figure out what the main process is for a service. In systemd, you don’t have to worry about how many times a process forks—just whether it forks. Use the Type option in your service unit file to indicate its startup behavior. There are two basic startup styles:
§ Type=simple The service process doesn’t fork.
§ Type=forking The service forks, and systemd expects the original service process to terminate. Upon termination, systemd assumes that the service is ready.
The Type=simple option doesn’t account for the fact that a service may take some time to set up, and systemd doesn’t know when to start any dependencies that absolutely require such a service to be ready. One way to deal with this is to use delayed startup (see 6.4.7 systemd On-Demand and Resource-Parallelized Startup). However, some Type startup styles can indicate that the service itself will notify systemd when it is ready:
§ Type=notify The service sends a notification specific to systemd (with the sd_notify() function call) when it’s ready.
§ Type=dbus The service registers itself on the D-bus (Desktop Bus) when it’s ready.
Another service startup style is specified with Type=oneshot; here the service process actually terminates completely when it’s finished. With such a service, you will almost certainly need to add a RemainAfterExit=yes option so that systemd will still regard the service as active even after its processes terminate.
Finally, there’s one last style: Type=idle. This simply instructs systemd not to start the service until there are no active jobs. The idea here is just to delay a service start until other services have started to keep the system load down, or to keep services from stepping on one another’s output. (Remember, once a service has started, the systemd job that started the service terminates.)
6.4.7 systemd On-Demand and Resource-Parallelized Startup
One of systemd’s most significant features is its ability to delay a unit startup until it is absolutely needed. The setup typically works like this:
1. You create a systemd unit (call it Unit A) for the system service that you’d like to provide, as normal.
2. You identify a system resource such as a network port/socket, file, or device that Unit A uses to offer its services.
3. You create another systemd unit, Unit R, to represent that resource. These units have special types such as socket units, path units, and device units.
Operationally, it goes like this:
1. Upon activation of Unit R, systemd monitors the resource.
2. When anything tries to access the resource, systemd blocks the resource, and the input to the resource is buffered.
3. systemd activates Unit A.
4. When the service from Unit A is ready, it takes control of the resource, reads the buffered input, and runs normally.
There are a few concerns:
§ You must make sure that your resource unit covers every resource that the service provides. This normally isn’t a problem, as most services have just one point of access.
§ You need to make sure your resource unit is tied to the service unit that it represents. This can be implicit or explicit, and in some cases, many options represent different ways for systemd to perform the handoff to the service unit.
§ Not all servers know how to interface with the units that systemd can provide.
If you already know what utilities like inetd, xinetd, and automount do, you’ll see that there are a lot of similarities. Indeed, the concept is nothing new (and in fact, systemd includes support for automount units). We’ll go over an example of a socket unit in An Example Socket Unit and Service. But let’s first take a look at how these resource units help you at boot time.
Boot Optimization with Auxiliary Units
A common style of unit activation in systemd attempts to simplify dependency order and speed up boot time. It’s similar to on-demand startup in that a service unit and an auxiliary unit represent the service unit’s offered resource, except that in this case systemd starts the service unit as soon as it activates the auxiliary unit.
The reasoning behind this scheme is that essential boot-time service units such as syslog and dbus take some time to start, and many other units depend on them. However, systemd can offer a unit’s essential resource (such as a socket unit) very quickly, and then it can immediately activate not only the essential unit but also any units that depend on the essential resource. Once the essential unit is ready, it takes control of the resource.
Figure 6-2 shows how this might work in a traditional system. In this boot timeline, Service E provides an essential Resource R. Services A, B, and C depend on this resource and must wait until Service E has started. When booting, the system takes quite a long time to get around to starting Service C.
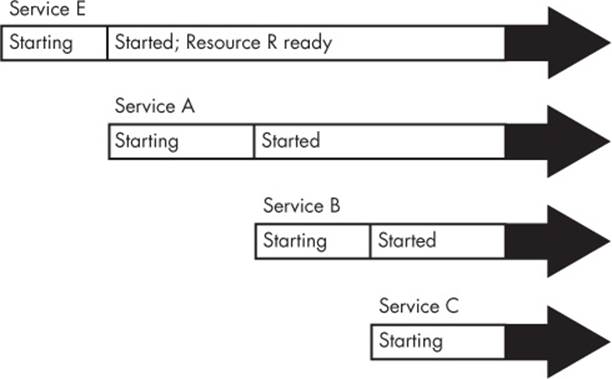
Figure 6-2. Sequential boot timeline with a resource dependency
Figure 6-3 shows an equivalent systemd boot configuration. The services are represented by Units A, B, C, and E, and a new Unit R represents the resource that Unit E provides. Because systemd can provide an interface for Unit R while Unit E starts, Units A, B, C, and E can all be started at the same time. Unit E takes over for Unit R when ready. (An interesting point here is that Units A, B, and C may not need to explicitly access Unit R before they finish their startup, as Unit B in the figure demonstrates.)
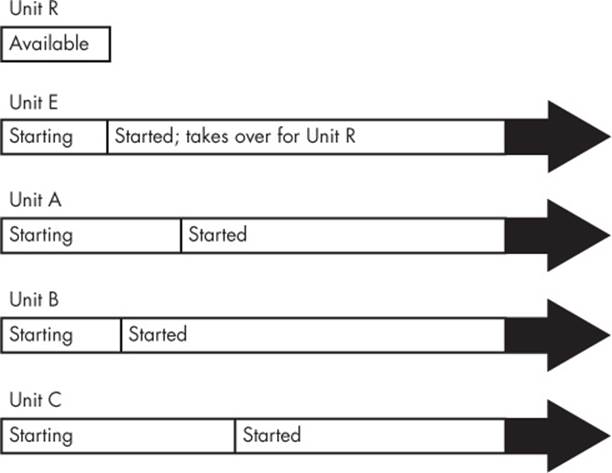
Figure 6-3. systemd boot timeline with a resource unit
NOTE
When parallelizing startup like this, there is a chance that your system may slow down temporarily due to a large number of units starting at once.
The takeaway is that, although you’re not creating an on-demand unit startup in this case, you’re using the same features that make on-demand startup possible. For common real-life examples, see the syslog and D-Bus configuration units on a machine running systemd; they’re very likely to be parallelized in this way.
An Example Socket Unit and Service
We’ll now look at an example, a simple network echo service that uses a socket unit. This is somewhat advanced material, and you may not really understand it until you’ve read the discussion of TCP, ports, and listening in Chapter 9 and sockets in Chapter 10, so feel free to skip this and come back later.
The idea behind this service is that when a network client connects to the service, the service repeats anything that the client sends back to the client. The unit will listen on TCP port 22222. We’ll call it the echo service and start with a socket unit, represented by the following echo.socket unit file:
[Unit]
Description=echo socket
[Socket]
ListenStream=22222
Accept=yes
Note that there’s no mention of the service unit that this socket supports inside the unit file. So what is the corresponding service unit file?
Its name is echo@.service. The link is done by naming convention; if a service unit file has the same prefix as a .socket file (in this case, echo), systemd knows to activate that service unit when there’s activity on the socket unit. In this case, systemd creates an instance of echo@.service when there’s activity on echo.socket.
Here is the echo@.service unit file:
[Unit]
Description=echo service
[Service]
ExecStart=-/bin/cat
StandardInput=socket
NOTE
If you don’t like the implicit activation of units based on the prefixes, or you need to create an activation mechanism between two units with different prefixes, you can use an explicit option in the unit defining your resource. For example, use Socket=bar.socket inside foo.service to have bar.socket hand its socket to foo.service.
To get this example service unit running, you need to start the echo.socket unit behind it, like this:
# systemctl start echo.socket
Now you can test the service by connecting to your local port 22222. When the following telnet command connects, type anything and press ENTER. The service repeats what you typed back to you:
$ telnet localhost 22222
Trying 127.0.0.1...
Connected to localhost.
Escape character is '^]'.
Hi there.
Hi there.
When you’re bored with this, press CTRL-] on a line by itself, and then CTRL-D. To stop the service, stop the socket unit:
# systemctl stop echo.socket
Instances and Handoff
Because the echo@.service unit supports multiple simultaneous instances, there’s an @ in the name (recall from Note that @ signifies parameterization). Why would you want multiple instances? The reason is that you may have more than one network client connecting to the service at the same time, and each connection should have its own instance.
In this case, the service unit must support multiple instances because of the Accept option in echo.socket. That option instructs systemd not only to listen on the port, but also to accept incoming connections and pass the incoming connections on to the service unit, with each connection a separate instance. Each instance reads data from the connection as standard input, but it doesn’t necessarily need to know that the data is coming from a network connection.
NOTE
Most network connections require more flexibility than just a simple gateway to standard input and output, so don’t expect to be able to create network services with a service unit file like the echo@.service unit file shown here.
Although the service unit could do all of the work of accepting the connection, it wouldn’t have the @ in its name if it did. In that case, it would take complete control of the socket, and systemd wouldn’t attempt to listen on the network port again until the service unit has finished.
The many different resources and options for handoff to service units make it difficult to provide a categorical summary. Also, the documentation for the options is spread out over several manual pages. The ones to check for the resource-oriented units are systemd.socket(5), systemd.path(5), and systemd.device(5). One document that’s often overlooked for service units is systemd.exec(5), which contains information about how the service unit can expect to receive a resource upon activation.
6.4.8 systemd System V Compatibility
One feature that sets systemd apart from other newer-generation init systems is that it tries to do a more complete job of tracking services started by System V–compatible init scripts. It works like this:
1. First, systemd activates runlevel<N>.target, where N is the runlevel.
2. For each symbolic link in /etc/rc<N>.d, systemd identifies the script in /etc/init.d.
3. systemd associates the script name with a service unit (for example, /etc/init.d/foo would be foo.service).
4. systemd activates the service unit and runs the script with either a start or stop argument, based on its name in rc<N>.d.
5. systemd attempts to associate any processes from the script with the service unit.
Because systemd makes the association with a service unit name, you can use systemctl to restart the service or view its status. But don’t expect any miracles from System V compatibility mode; it still must run the init scripts serially, for example.
6.4.9 systemd Auxiliary Programs
When starting out with systemd, you may notice the exceptionally large number of programs in /lib/systemd. These are primarily support programs for units. For example, udevd is part of systemd, and you’ll find it there as systemd-udevd. Another, the systemd-fsck program, works as a middleman between systemd and fsck.
Many of these programs exist because they contain notification mechanisms that the standard system utilities lack. Often, they simply run the standard system utilities and notify systemd of the results. (After all, it would be silly to try to reimplement all of fsck inside systemd.)
NOTE
One other interesting aspect of these programs is that they are written in C, because one goal of systemd is to reduce the number of shell scripts on a system. There is some debate as to whether it’s a good idea to do so (after all, many of these programs could probably be written as shell scripts), but as long as everything works and does so reliably, securely, and reasonably quickly, there’s little reason to bother taking sides.
When you see a program in /lib/systemd that you can’t identify, see the manual page. There’s a good chance that the manual page will not only describe the utility but also describe the type of unit that it’s meant to augment.
If you’re not running (or interested in) Upstart, skip ahead to 6.6 System V init for an overview of the System V init process.
6.5 Upstart
The Upstart version of init revolves around jobs and events. Jobs are startup and runtime actions for Upstart to perform (such as system services and configuration), and events are messages that Upstart receives from itself or other processes (such as udevd). Upstart works by starting jobs in response to events.
To get an idea of how this works, consider the udev job for starting the udevd daemon. Its configuration file is typically /etc/init/udev.conf, which includes the following:
start on virtual-filesystems
stop on runlevel [06]
These lines mean that Upstart starts the udev job upon receiving the virtual-filesystems event, and it stops the job upon receiving a runlevel event with an argument of 0 or 6.
There are many variations on events and their arguments. For example, Upstart can react to events emitted in response to job status, such as the started udev event emitted by the udev job above. But before explaining jobs in detail, here’s a high-level overview of how Upstart works.
6.5.1 Upstart Initialization Procedure
Upon startup, Upstart does the following:
1. Loads its configuration and the job configuration files in /etc/init.
2. Emits the startup event.
3. Runs jobs configured to start upon receiving the startup event.
4. These initial jobs emit their own events, triggering more jobs and events.
Upon finishing all jobs associated with a normal startup, Upstart continues to monitor and react to events during the entire system uptime.
Most Upstart installations run like this:
1. The most significant job that Upstart runs in response to the startup event is mountall. This job attaches all necessary local and virtual filesystems to the currently running system so that everything else can run.
2. The mountall job emits a number of events, including filesystem, virtual-filesystems, local-filesystems, remote-filesystems, and all-swaps, among others. These events indicate that the important filesystems on the system are now attached and ready.
3. In response to these events, Upstart starts a number of essential service jobs. For example, udev starts in response to the virtual-filesystems event, and dbus starts in response to the local-filesystems event.
4. Among the essential service jobs, Upstart starts the network-interfaces job, usually in response to the local-filesystems event and udevd being ready.
5. The network-interfaces job emits the static-network-up event.
6. Upstart runs the rc-sysinit job in response to the filesystem and static-network-up events. This job is responsible for maintaining the system’s current runlevel, and when started for the first time without a runlevel, it switches the system to the default runlevel by emitting arunlevel event.
7. Upstart runs most of the other startup jobs on the system in response to the runlevel event and the new runlevel.
The process can become complicated because it’s not always clear where events originate. Upstart emits only a few events, and the rest come from jobs. Job configuration files usually declare the events that they will emit, but the details of how the job emits the events are usually not in the Upstart job configuration files.
To get to the bottom of things, you’ll often have to dig. For example, consider the static-network-up event. The network-interface.conf job configuration file says that it emits this event, but it doesn’t say where. It turns out that the event stems from the ifup command, which this job runs when initializing a network interface in the /etc/network/if-up.d/upstart script.
NOTE
Though all of this is documented (the ifup.d directory is in the interfaces(5) manual page referenced by the ifup(8) manual page), it can be challenging to find out how this all works just by reading the documentation. It’s usually faster to grep the event name in a lot of configuration files to see what comes up, then to try to piece everything back together from there.
One issue with Upstart is that there’s currently no clear way to view events. You can turn its log priority to debug, which will cause it to log everything that comes in (typically to /var/log/syslog), but the copious amount of extraneous information in this file makes it difficult to determine an event’s context.
6.5.2 Upstart Jobs
Each file in the Upstart /etc/init configuration directory corresponds to a job, and the main configuration file for each job has a .conf extension. For example, /etc/init/mountall.conf defines the mountall job.
There are two primary kinds of Upstart jobs:
§ Task jobs. These are jobs with a clear end. For example, mountall is a task job because it terminates when finished mounting filesystems.
§ Service jobs. These jobs have no defined stop. Servers (daemons) such as udevd, database servers, and web servers are all service jobs.
A third kind of job is an abstract job. Think of this as a kind of virtual service job. Abstract jobs exist only in Upstart and start nothing by themselves, but they are sometimes used as management tools for other jobs because other jobs can start and stop based on the events coming from an abstract job.
Viewing Jobs
You can view Upstart jobs and job status with the initctl command. To get an overview of what’s happening on your system, run:
$ initctl list
You’ll get a lot of output, so let’s just look at two sample jobs that might appear in a typical listing. Here’s a simple example of a task job status:
mountall stop/waiting
This indicates that the mountall task job has a status of stop/waiting, meaning that it’s not running. (Unfortunately, as of this writing, you can’t use the status to determine whether a job already ran or not because stop/waiting also applies to jobs that have never run.)
Service jobs that have associated processes appear in the status listing as follows:
tty1 start/running, process 1634
This line shows that the tty1 job is running and that process ID 1634 is performing the job. (Not all service jobs have associated processes.)
NOTE
If you know a job’s name, you can view its status directly with initctl status job.
The status portion of the initctl output (e.g., stop/waiting) can be confusing. The left-hand side (before the /) is the goal, or what the job is supposed to be working toward, such as start or stop. The right-hand side is the current job state, or what the job is doing right now, such as waiting or running. For example, in the preceding listing, the tty1 job has the status start/running, meaning that its goal is to start. The state of running indicates that it has started successfully. (For service jobs, the running state is nominal.)
The mountall case is a bit different because task jobs don’t remain running. The stop/waiting status usually indicates that the job started and completed its task. Upon completing its task, it moved from a start to a stop goal, and it is now waiting for further commands from Upstart.
Unfortunately, as mentioned earlier, because jobs that have never started also have an Upstart stop/waiting status, you can’t really tell whether a job has run or never started unless you enable debugging and look at the logs, as described in 6.5.5 Upstart Logs.
NOTE
You won’t see jobs running on your system that were started with Upstart’s System V compatibility feature.
Job State Transitions
There are many job states, but there’s a set way to move between them. For example, here’s how a typical job starts:
1. All jobs begin in the stop/waiting status.
2. When a user or a system event starts a job, the job’s goal changes from stop to start.
3. Upstart changes the job’s state from waiting to starting, so the status is now start/starting.
4. Upstart emits a starting job event.
5. The job performs whatever it needs to do for the starting state.
6. Upstart changes the job’s state from starting to pre-start and emits the pre-start job event.
7. The job works its way through several more states until it hits the running state.
8. Upstart emits a started job event.
Task termination involves a similar set of state changes and events. (See the upstart-events(7) manual page for details on all of the states and transitions in both goals.)
6.5.3 Upstart Configuration
Let’s examine the two configuration files: one for the task job mountall and the other for the service job tty1. Like all Upstart configuration files, the configuration files are in /etc/init, and they are named mountall.conf and tty1.conf. The configuration files are organized into smaller pieces called stanzas. Each stanza starts with a leading keyword, such as description or start.
To get started, open the mountall.conf file on your system. Look for a line like this in the first stanza:
description "Mount filesystems on boot"
This stanza gives a short text description of the job.
Next you’ll see a few stanzas describing how the mountall job starts:
start on startup
stop on starting rcS
Here, the first line tells Upstart to start the job upon receiving the startup event (the initial event that Upstart emits). The second line tells Upstart to terminate the job upon receiving the rcS event, when the system goes into single-user mode.
The next two lines tell Upstart how the mountall job behaves:
expect daemon
task
The task stanza tells Upstart that this is a task job, so the job should complete at some point. The expect stanza is tricky. It means that the mountall job will spawn a daemon that will operate independently of the original job script. Upstart needs to know this because it must know when the daemon terminates in order to correctly signal that the mountall job has terminated. (We’ll discuss this in more detail in Process Tracking and the Upstart expect Stanza.)
The mountall.conf file continues with several emits stanzas, indicating events that the jobs produce:
emits virtual-filesystems
emits local-filesystems
emits remote-filesystems
emits all-swaps
emits filesystem
emits mounting
emits mounted
NOTE
As mentioned in 6.5.1 Upstart Initialization Procedure, even though these lines are present, this is not the actual source of the events. You’ll need to hunt through the job script to find them.
You may also see a console stanza stating where Upstart should send the output:
console output
With the output parameter, Upstart sends the mountall job’s output to the system’s console.
Now you’ll see the details of the job itself—in this case, with a script stanza:
script
. /etc/default/rcS
[ -f /forcefsck ] && force_fsck="--force-fsck"
[ "$FSCKFIX" = "yes" ] && fsck_fix="-fsck-fix"
# set $LANG so that messages appearing in plymouth are translated
if [ -r /etc/default/locale ]; then
. /etc/default/locale
export LANG LANGUAGE LC_MESSAGES LC_ALL
fi
exec mountall --daemon $force_fsck $fsck_fix
end script
This is a shell script (see Chapter 11), most of which is preparatory— setting locale and determining whether an fsck is necessary. The exec mountall command near the bottom of this script is where the real action happens. This command mounts the filesystems and emits the job’s events when finished.
A Service Job: tty1
The service job tty1 is much simpler; it controls a virtual console login prompt. Its entire configuration file, tty1.conf, looks like this:
start on stopped rc RUNLEVEL=[2345] and (
not-container or
container CONTAINER=lxc or
container CONTAINER=lxc-libvirt)
stop on runlevel [!2345]
respawn
exec /sbin/getty -8 38400 tty1
The most complicated part of this job is actually when it starts, but for now, ignore the container lines and concentrate on this portion:
start on stopped rc RUNLEVEL=[2345]
This part tells Upstart to activate the job upon receiving a stopped rc event from Upstart when the rc task job has run and terminated. To make the condition true, the rc job must also set the RUNLEVEL environment variable to a value from 2 through 5 (see 6.5.6 Upstart Runlevels and System V Compatibility).
NOTE
Other jobs that start on runlevels aren’t so picky. For example, you might see this instead:
start on runlevel [2345]
The only real difference between these last two start stanzas is timing; this example activates the job as soon as the runlevel is set, while the prior one waits until the System V stuff finishes.
The container configuration is there because Upstart not only runs directly on top of the Linux kernel on real hardware, but it can also run in virtual environments or containers. Some of these environments do not have virtual consoles, and you don’t want to run getty on a console that doesn’t exist.
Stopping the tty1 job is straightforward:
stop on runlevel [!2345]
This stop stanza tells Upstart to terminate the job whenever the run-level is not 2 through 5 (for example, during system shutdown).
The exec stanza at the bottom is the command to run:
exec /sbin/getty -8 38400 tty1
This stanza is much like the script stanza that you saw for the mountall job, except that the tty1 job has no complicated setup to perform—it’s easy to start with a single line. In this case, we’re running the login prompt program getty on /dev/tty1, which is the first virtual console (the one you get when you press CTRL-ALT-F1 in graphics mode).
The respawn stanza instructs Upstart to restart the tty1 job if the job terminates. In this case, Upstart runs a new getty for a new login prompt when you log out of the virtual console.
Those are the basics of Upstart configuration. You’ll find much more detail in the init(5) manual page and online resources, but one stanza requires special attention. The expect stanza is discussed next.
Process Tracking and the Upstart expect Stanza
Because Upstart tracks processes in jobs once they’ve started (so that it can terminate and restart them efficiently), it wants to know which processes are relevant to each job. This can be a difficult task, because in the traditional Unix startup scheme, processes fork from others during startup to become daemons, and the main process for a job may start after one or two forks. Without proper process tracking, Upstart won’t be able to finalize its job startup, or it may track the incorrect PID for the job.
You tell Upstart how a job behaves with the expect stanza. There are four basic possibilities:
§ Noexpectstanza The main job process does not fork. Track the main process.
§ expect fork The process forks once. Track the forked process.
§ expect daemon The process forks twice. Track the second fork.
§ expect stop The job’s main process will raise a SIGSTOP signal to indicate that it is ready. (This is rare.)
For Upstart and other modern versions of init, such as systemd, the ideal case is the first one (no expect stanza), because the main job process doesn’t have to include any of its own startup and shutdown mechanics. In other words, it doesn’t need to bother with forking or detaching itself from a current terminal—nuisances that Unix systems developers have had to deal with for years.
Many traditional service daemons already include debugging-style options that tell the main process to not fork. Examples include the Secure Shell daemon, sshd, and its -D option. A look at the /etc/init/ssh.conf startup stanzas reveals a simple configuration to start sshd, prevent rapid respawning, and eliminate spurious output to stderr:
respawn
respawn limit 10 5
umask 022
# 'sshd -D' leaks stderr and confuses things in conjunction with 'console log'
console none
--snip--
exec /usr/sbin/sshd -D
Among jobs that require an expect stanza, expect fork is the most common. For example, here’s the startup portion of the /etc/init/cron.conf file:
expect fork
respawn
exec cron
A simple job startup like this usually indicates a well-behaved, stable daemon.
NOTE
It’s worth reading more about the expect stanza on the upstart.ubuntu.com site because it relates directly to process life span. For example, you can trace the life of a process and its system calls, including fork(), with the strace command.
6.5.4 Upstart Operation
In addition to the list and status commands described in 6.5.2 Upstart Jobs, you can also use the initctl utility to control Upstart and its jobs. You should read the initctl(8) manual page at some point, but for now let’s look at the essentials.
To start an Upstart job, use initctl start:
# initctl start job
To stop a job, use initctl stop:
# initctl stop job
To restart a job:
# initctl restart job
If you need to emit an event to Upstart, you can do it manually with:
# initctl emit event
You can also add environment variables to the emitted event by adding key=value parameters after event.
NOTE
You can’t start and stop individual services that started via Upstart’s System V compatibility feature. See 6.6.1 System V init: Startup Command Sequence for more on how to do this in a System V init script.
There are many ways to disable an Upstart job so that it will not start at boot time, but the most maintainable one is to determine the name of the job’s configuration file (usually /etc/init/<job>.conf ) and then create a new file called /etc/init/<job>.override containing only the line:
manual
Now the only way that the job will start is by running initctl start job.
The primary advantage to this method is that it’s easily reversible. To reenable the job at boot, remove the .override file.
6.5.5 Upstart Logs
There are two basic kinds of logs in Upstart: service job logs, and diagnostic messages that Upstart itself produces. Service job logs record the standard output and standard error of the scripts and daemons that run the services. These messages, recorded in /var/log/upstart, are in addition to the standard syslog messages that a service may produce. (You’ll learn more about syslog in Chapter 7.) It’s hard to categorize what goes into these logs because there are no standards, but the most common contents are startup and shutdown messages, as well as emergency error messages. Many services produce no messages at all because they send everything to syslog or their own logging facility.
Upstart’s own diagnostic log can contain information about when it starts and reloads, as well as certain information about jobs and events. This diagnostic log goes to the kernel syslog utility. On Ubuntu, you’ll usually find this log in the /var/log/kern.log file and the catchall /var/log/syslogfile.
That said, by default, Upstart logs little to nothing, so to see anything at all in the logs, you must change the Upstart log priority. The name of the default priority is message. To log events and job changes on a running system, change the log priority to info:
# initctl log-priority info
Keep in mind that this won’t be permanent and the priority will reset after a reboot. To have Upstart log everything when it starts, add a --verbose parameter as a boot parameter, as described in 5.5 GRUB Introduction.
6.5.6 Upstart Runlevels and System V Compatibility
So far, we’ve touched upon a few places where Upstart supports the idea of System V runlevels and mentioned that it has the ability to run System V startup scripts as a job. Here’s a more detailed overview of how it works on Ubuntu systems:
1. The rc-sysinit job runs, usually after getting the filesystem and static-network-up events. Before it runs, there is no runlevel.
2. The rc-sysinit job determines which runlevel to enter. Usually, the run-level is the default, but it can also parse an older /etc/inittab file or take the runlevel from a kernel parameter (in /proc/cmdline).
3. The rc-sysinit job runs telinit to switch the runlevel. The command emits a runlevel event, specifying the runlevel in the RUNLEVEL environment variable.
4. Upstart receives the runlevel event. A number of jobs are configured to start on the runlevel event paired with a certain runlevel, and Upstart sets these in motion.
5. One of the runlevel-activated task jobs, rc, is responsible for running the System V start. In order to do so, the rc job runs /etc/init.d/rc, just as System V init would (see 6.6 System V init).
6. Once the rc job terminates, Upstart can start a number of other jobs upon receiving the stopped rc event (such as the tty1 job in A Service Job: tty1).
Notice that although Upstart treats the runlevel no differently than any other event, many of the job configuration files on most Upstart systems refer to the runlevel.
In any case, there is a critical point during boot when the filesystems are mounted and when most of the important system initialization is done. At this point, the system is ready to start higher-level system services such as graphical display managers and database servers. A runlevel event is handy for marking this point. You could configure Upstart to use any event as a trigger, though. One challenge comes when trying to determine which services start as Upstart jobs and which ones start in System V compatibility mode. The easiest way to find out is to look in your runlevel’s System V link farm (see 6.6.2 The System V init Link Farm). For example, if your runlevel is 2, look in /etc/rc2.d; anything there is likely running in System V compatibility mode.
NOTE
One stumbling block may be the presence of dummy scripts in /etc/init.d. For any Upstart service job, there may also be a System V–style script for that service in /etc/init.d, but that script won’t do anything other than tell you that the service has been converted to an Upstart job. There also won’t be a link to the script in the System V link directory. If you run into a dummy script, find out the Upstart job name, and use initctl to control the job.
6.6 System V init
The System V init implementation on Linux dates to the early days of Linux; its core idea is to support an orderly bootup to different runlevels with a carefully sequenced process startup. Though System V is now uncommon on most desktop installations, you may encounter System V init in Red Hat Enterprise Linux, as well as in embedded Linux environments such as routers and phones.
There are two major components to a typical System V init installation: a central configuration file and a large set of boot scripts augmented by a symbolic link farm. The configuration file /etc/inittab is where it all starts. If you have System V init, look for a line like the following in yourinittab file:
id:5:initdefault:
This indicates that the default runlevel is 5.
All lines in inittab take the following form, with four fields separated by colons in this order:
§ A unique identifier (a short string, such as id in the previous example)
§ The applicable runlevel number(s)
§ The action that init should take (default runlevel to 5 in the previous example)
§ A command to execute (optional)
To see how commands work in an inittab file, consider this line:
l5:5:wait:/etc/rc.d/rc 5
This particular line is important because it triggers most of the system configuration and services. Here, the wait action determines when and how System V init runs the command: Run /etc/rc.d/rc 5 once when entering runlevel 5, then wait for this command to finish before doing anything else. To make a long story short, the rc 5 command executes anything in /etc/rc5.d that starts with a number (in the order of the numbers).
The following are some of the most common inittab actions in addition to initdefault and wait.
respawn
The respawn action tells init to run the command that follows and, if the command finishes executing, to run it again. You’re likely to see something like this in an inittab file:
1:2345:respawn:/sbin/mingetty tty1
The getty programs provide login prompts. The line above is used for the first virtual console (/dev/tty1), which is the one you see when you press ALT-F1 or CTRL-ALT-F1 (see 3.4.4 Terminals: /dev/tty*, /dev/pts/*, and /dev/tty). The respawn action brings the login prompt back after you log out.
ctrlaltdel
The ctrlaltdel action controls what the system does when you press CTRLALT-DEL on a virtual console. On most systems, this is some sort of reboot command, using the shutdown command (discussed in 6.7 Shutting Down Your System).
sysinit
The sysinit action is the first thing that init should run when starting, before entering any runlevels.
NOTE
For more available actions, see the inittab(5) manual page.
6.6.1 System V init: Startup Command Sequence
You are now ready to learn how System V init starts system services, just before it lets you log in. Recall this inittab line from earlier:
l5:5:wait:/etc/rc.d/rc 5
This small line triggers many other programs. In fact, rc stands for run commands, which many people refer to as scripts, programs, or services. But where are these commands?
The 5 in this line tells us that we’re talking about runlevel 5. The commands are probably either in /etc/rc.d/rc5.d or /etc/rc5.d. (Runlevel 1 uses rc1.d, runlevel 2 uses rc2.d, and so on.) For example, you might find the following items in the rc5.d directory:
S10sysklogd S20ppp S99gpm
S12kerneld S25netstd_nfs S99httpd
S15netstd_init S30netstd_misc S99rmnologin
S18netbase S45pcmcia S99sshd
S20acct S89atd
S20logoutd S89cron
The rc 5 command starts programs in the rc5.d directory by executing the following commands in this sequence:
S10sysklogd start
S12kerneld start
S15netstd_init start
S18netbase start
--snip--
S99sshd start
Notice the start argument in each command. The capital S in a command name means that the command should run in start mode, and the number (00 through 99) determines where in the sequence rc starts the command. The rc*.d commands are usually shell scripts that start programs in/sbin or /usr/sbin.
Normally, you can figure out what a particular command does by viewing the script with less or another pager program.
NOTE
Some rc*.d directories contain commands that start with K (for “kill,” or stop mode). In this case, rc runs the command with the stop argument instead of start. You will most likely encounter K commands in runlevels that shut down the system.
You can run these commands by hand. However, you normally want to do so through the init.d directory instead of the rc*.d directories, which we’ll now describe.
6.6.2 The System V init Link Farm
The contents of the rc*.d directories are actually symbolic links to files in yet another directory, init.d. If your goal is to interact with, add, delete, or modify services in the rc*.d directories, you need to understand these symbolic links. A long listing of a directory such as rc5.d reveals a structure like this:
lrwxrwxrwx . . . S10sysklogd -> ../init.d/sysklogd
lrwxrwxrwx . . . S12kerneld -> ../init.d/kerneld
lrwxrwxrwx . . . S15netstd_init -> ../init.d/netstd_init
lrwxrwxrwx . . . S18netbase -> ../init.d/netbase
--snip--
lrwxrwxrwx . . . S99httpd -> ../init.d/httpd
--snip--
A large number of symbolic links across several subdirectories such as this is called a link farm. Linux distributions contain these links so that they can use the same startup scripts for all runlevels. This convention is not a requirement, but it simplifies organization.
Starting and Stopping Services
To start and stop services by hand, use the script in the init.d directory. For example, one way to start the httpd web server program manually is to run init.d/httpd start. Similarly, to kill a running service, you can use the stop argument (httpd stop, for instance).
Modifying the Boot Sequence
Changing the boot sequence in System V init is normally done by modifying the link farm. The most common change is to prevent one of the commands in the init.d directory from running in a particular runlevel. You have to be careful about how you do this. For example, you might consider removing the symbolic link in the appropriate rc*.d directory. But beware: If you ever need to put the link back, you might have trouble remembering the exact name of the link. One of the best ways to do it is to add an underscore (_) at the beginning of the link name, like this:
# mv S99httpd _S99httpd
This change causes rc to ignore _S99httpd because the filename no longer starts with S or K, but the original name is still obvious.
To add a service, create a script like those in the init.d directory and then create a symbolic link in the correct rc*.d directory. The easiest way is to copy and modify one of the scripts already in init.d that you understand (see Chapter 11 for more information on shell scripts).
When adding a service, choose an appropriate place in the boot sequence to start it. If the service starts too soon, it may not work, due to a dependency on some other service. For nonessential services, most systems administrators prefer numbers in the 90s, which puts the services after most of the services that came with the system.
6.6.3 run-parts
The mechanism that System V init uses to run the init.d scripts has found its way into many Linux systems, regardless of whether they use System V init. It’s a utility called run-parts, and the only thing it does is run a bunch of executable programs in a given directory, in some kind of predictable order. You can think of it as almost like a person who runs the ls command in some directory and then just runs whatever programs they see in the output.
The default behavior is to run all programs in a directory, but you often have the option to select certain programs and ignore others. In some distributions, you don’t need much control over the programs that run. For example, Fedora ships with a very simple run-parts utility.
Other distributions, such as Debian and Ubuntu, have a more complicated run-parts program. Their features include the ability to run programs based on a regular expression (for example, using the S[0-9]{2} expression for running all “start” scripts in an /etc/init.d runlevel directory) and to pass arguments to the programs. These capabilities allow you to start and stop System V runlevels with a single command.
You don’t really need to understand the details of how to use run-parts; in fact, most people don’t know that run-parts even exists. The main things to remember are that it shows up in scripts from time to time and that it exists solely to run the programs in a given directory.
6.6.4 Controlling System V init
Occasionally, you’ll need to give init a little kick to tell it to switch runlevels, to reread its configuration, or to shut down the system. To control System V init, use telinit. For example, to switch to runlevel 3, enter:
# telinit 3
When switching runlevels, init tries to kill off any processes not in the inittab file for the new runlevel, so be careful when changing runlevels.
When you need to add or remove jobs, or make any other change to the inittab file, you must tell init about the change and cause it to reload the file. The telinit command for this is:
# telinit q
You can also use telinit s to switch to single-user mode (see 6.9 Emergency Booting and Single-User Mode).
6.7 Shutting Down Your System
init controls how the system shuts down and reboots. The commands to shut down the system are the same regardless of which version of init you run. The proper way to shut down a Linux machine is to use the shutdown command.
There are two basic ways to use shutdown. If you halt the system, it shuts the machine down and keeps it down. To make the machine halt immediately, run this:
# shutdown -h now
On most machines and versions of Linux, a halt cuts the power to the machine. You can also reboot the machine. For a reboot, use -r instead of -h.
The shutdown process takes several seconds. You should never reset or power off a machine during this stage.
In the preceding example, now is the time to shut down. This argument is mandatory, but there are many ways to specify the time. For example, if you want the machine to shut down sometime in the future, you can use +n, where n is the number of minutes shutdown should wait before doing its work. (For other options, see the shutdown(8) manual page.)
To make the system reboot in 10 minutes, enter:
# shutdown -r +10
On Linux, shutdown notifies anyone logged on that the machine is going down, but it does little real work. If you specify a time other than now, the shutdown command creates a file called /etc/nologin. When this file is present, the system prohibits logins by anyone except the superuser.
When system shutdown time finally arrives, shutdown tells init to begin the shutdown process. On systemd, it means activating the shutdown units; on Upstart, it means emitting the shutdown events; and on System V init, it means changing the runlevel to 0 or 6. Regardless of the init implementation or configuration, the procedure generally goes like this:
1. init asks every process to shut down cleanly.
2. If a process doesn’t respond after a while, init kills it, first trying a TERM signal.
3. If the TERM signal doesn’t work, init uses the KILL signal on any stragglers.
4. The system locks system files into place and makes other preparations for shutdown.
5. The system unmounts all filesystems other than the root.
6. The system remounts the root filesystem read-only.
7. The system writes all buffered data out to the filesystem with the sync program.
8. The final step is to tell the kernel to reboot or stop with the reboot(2) system call. This can be done by init or an auxiliary program such as reboot, halt, or poweroff.
The reboot and halt programs behave differently depending on how they’re called, which may cause confusion. By default, these programs call shutdown with the -r or -h options. However, if the system is already at a halt or reboot runlevel, the programs tell the kernel to shut itself off immediately. If you really want to shut your machine down in a hurry, regardless of any potential damage from a disorderly shutdown, use the -f (force) option.
6.8 The Initial RAM Filesystem
The Linux boot process is, for the most part, fairly straightforward. However, one component has always been somewhat confounding: initramfs, or the intitial RAM filesystem. Think of this as a little user-space wedge that goes in front of the normal user mode start. But first, let’s talk about why it exists.
The problem stems from the availability of many different kinds of storage hardware. Remember, the Linux kernel does not talk to the PC BIOS or EFI interfaces to get data from disks, so in order to mount its root file-system, it needs driver support for the underlying storage mechanism. For example, if the root is on a RAID array connected to a third-party controller, the kernel needs the driver for that controller first. Unfortunately, there are so many storage controller drivers that distributions can’t include all of them in their kernels, so many drivers are shipped as loadable modules. But loadable modules are files, and if your kernel doesn’t have a filesystem mounted in the first place, it can’t load the driver modules that it needs.
The workaround is to gather a small collection of kernel driver modules along with a few other utilities into an archive. The boot loader loads this archive into memory before running the kernel. Upon start, the kernel reads the contents of the archive into a temporary RAM filesystem (the initramfs), mounts it at /, and performs the user-mode handoff to the init on the initramfs. Then, the utilities included in the initramfs allow the kernel to load the necessary driver modules for the real root filesystem. Finally, the utilities mount the real root filesystem and start true init.
Implementations vary and are ever evolving. On some distributions, the init on the initramfs is a fairly simple shell script that starts a udevd to load drivers, then mounts the real root and executes the init there. On distributions that use systemd, you’ll typically see an entire systemd installation there with no unit configuration files and just a few udevd configuration files.
One basic characteristic of the initial RAM filesystem that has (so far) remained unchanged since its inception is the ability to bypass it if you don’t need it. That is, if your kernel has all the drivers it needs to mount your root filesystem, you can omit the initial RAM filesystem in your boot loader configuration. When successful, eliminating the initial RAM file-system shortens boot time, usually by a couple of seconds. Try it yourself at boot time by using the GRUB menu editor to remove the initrd line. (It’s best not to experiment by changing the GRUB configuration file, as you can make a mistake that will be difficult to repair.) Recently, it has been a little more difficult to bypass the initial RAM filesystem because features such as mount-by-UUID may not be available with generic distribution kernels.
It’s easy to see the contents of your initial RAM filesystem because, on most modern systems, they are simple gzip-compressed cpio archives (see the cpio(1) manual page). First, find the archive file by looking at your boot loader configuration (for example, grep for initrd lines in yourgrub.cfg configuration file). Then use cpio to dump the contents of the archive into a temporary directory somewhere and peruse the results. For example:
$ mkdir /tmp/myinitrd
$ cd /tmp/myinitrd
$ zcat /boot/initrd.img-3.2.0-34 | cpio -i --no-absolute-filenames
--snip--
One particular piece of interest is the “pivot” near the very end of the init process on the initial RAM filesystem. This part is responsible for removing the contents of the temporary filesystem (to save memory) and permanently switch to the real root.
You won’t typically create your own initial RAM filesystem, as this is a painstaking process. There are a number of utilities for creating initial RAM filesystem images, and your distribution likely comes with one. Two of the most common are dracut and mkinitramfs.
NOTE
The term initial RAM filesystem (initramfs) refers to the implementation that uses the cpio archive as the source of the temporary filesystem. There is an older version called the initial RAM disk, or initrd, that uses a disk image as the basis of the temporary filesystem. This has fallen into disuse because it’s much easier to maintain a cpio archive. However, you’ll often see the term initrdused to refer to a cpio-based initial RAM filesystem. Often, as in the preceding example, the filenames and configuration files will still contain initrd.
6.9 Emergency Booting and Single-User Mode
When something goes wrong with the system, the first recourse is usually to boot the system with a distribution’s “live” image (most distributions’ installation images double as live images) or with a dedicated rescue image such as SystemRescueCd that you can put on removable media. Common tasks for fixing a system include the following:
§ Checking filesystems after a system crash
§ Resetting a forgotten root password
§ Fixing problems in critical files, such as /etc/fstab and /etc/passwd
§ Restoring from backups after a system crash
Another option for booting quickly to a usable state is single-user mode. The idea is that the system quickly boots to a root shell instead of going through the whole mess of services. In the System V init, single-user mode is usually runlevel 1, and you can also enter the mode with an -sparameter to the boot loader. You may need to type the root password to enter single-user mode.
The biggest problem with single-user mode is that it doesn’t offer many amenities. The network almost certainly won’t be available (and if it is, it will be hard to use), you won’t have a GUI, and your terminal may not even work correctly. For this reason, live images are nearly always considered preferable.
All materials on the site are licensed Creative Commons Attribution-Sharealike 3.0 Unported CC BY-SA 3.0 & GNU Free Documentation License (GFDL)
If you are the copyright holder of any material contained on our site and intend to remove it, please contact our site administrator for approval.
© 2016-2026 All site design rights belong to S.Y.A.