How Linux Works: What Every Superuser Should Know (2015)
Chapter 5. How the Linux Kernel Boots
You now know the physical and logical structure of a Linux system, what the kernel is, and how to work with processes. This chapter will teach you how the kernel starts— or boots. In other words, you’ll learn how the kernel moves into memory up to the point where the first user process starts.
A simplified view of the boot process looks like this:
1. The machine’s BIOS or boot firmware loads and runs a boot loader.
2. The boot loader finds the kernel image on disk, loads it into memory, and starts it.
3. The kernel initializes the devices and its drivers.
4. The kernel mounts the root filesystem.
5. The kernel starts a program called init with a process ID of 1. This point is the user space start.
6. init sets the rest of the system processes in motion.
7. At some point, init starts a process allowing you to log in, usually at the end or near the end of the boot.
This chapter covers the first four stages, focusing on the kernel and boot loaders. Chapter 6 continues with the user space start.
Your ability to identify each stage of the boot process will prove invaluable in fixing boot problems and understanding the system as a whole. However, the default behavior in many Linux distributions often makes it difficult, if not impossible, to identify the first few boot stages as they proceed, so you’ll probably be able to get a good look only after they’ve completed and you log in.
5.1 Startup Messages
Traditional Unix systems produce many diagnostic messages upon boot that tell you about the boot process. The messages come first from the kernel and then from processes and initialization procedures that init starts. However, these messages aren’t pretty or consistent, and in some cases they aren’t even very informative. Most current Linux distributions do their best to hide them with splash screens, filler, and boot options. In addition, hardware improvements have caused the kernel to start much faster than before; the messages flash by so quickly, it can be difficult to see what is happening.
There are two ways to view the kernel’s boot and runtime diagnostic messages. You can:
§ Look at the kernel system log file. You’ll often find this in /var/log/ kern.log, but depending on how your system is configured, it might also be lumped together with a lot of other system logs in /var/log/messages or elsewhere.
§ Use the dmesg command, but be sure to pipe the output to less because there will be much more than a screen’s worth. The dmesg command uses the kernel ring buffer, which is of limited size, but most newer kernels have a large enough buffer to hold boot messages for a long time.
Here’s a sample of what you can expect to see from the dmesg command:
$ dmesg
[ 0.000000] Initializing cgroup subsys cpu
[ 0.000000] Linux version 3.2.0-67-generic-pae (buildd@toyol) (gcc version 4.
6.3 (Ubuntu/Linaro 4.6.3-1ubuntu5) ) #101-Ubuntu SMP Tue Jul 15 18:04:54 UTC 2014
(Ubuntu 3.2.0-67.101-generic-pae 3.2.60)
[ 0.000000] KERNEL supported cpus:
--snip--
[ 2.986148] sr0: scsi3-mmc drive: 24x/8x writer dvd-ram cd/rw xa/form2 cdda tray
[ 2.986153] cdrom: Uniform CD-ROM driver Revision: 3.20
[ 2.986316] sr 1:0:0:0: Attached scsi CD-ROM sr0
[ 2.986416] sr 1:0:0:0: Attached scsi generic sg1 type 5
[ 3.007862] sda: sda1 sda2 < sda5 >
[ 3.008658] sd 0:0:0:0: [sda] Attached SCSI disk
--snip--
After the kernel has started, the user-space startup procedure often generates messages. These messages will likely be more difficult to view and review because on most systems you won’t find them in a single log file. Startup scripts usually print the messages to the console and they’re erased after the boot process finishes. However, this usually isn’t a problem because each script typically writes its own log. Some versions of init, such as Upstart and systemd, can capture diagnostic messages from startup and runtime that would normally go to the console.
5.2 Kernel Initialization and Boot Options
Upon startup, the Linux kernel initializes in this general order:
1. CPU inspection
2. Memory inspection
3. Device bus discovery
4. Device discovery
5. Auxiliary kernel subsystem setup (networking, and so on)
6. Root filesystem mount
7. User space start
The first steps aren’t too remarkable, but when the kernel gets to devices, a question of dependencies arises. For example, the disk device drivers may depend on bus support and SCSI subsystem support.
Later in the initialization process, the kernel must mount a root file-system before starting init. In general, you won’t have to worry about any of this, except that some necessary components may be loadable kernel modules rather than part of the main kernel. On some machines, you may need to load these kernel modules before the true root filesystem is mounted. We’ll cover this problem and its initial RAM filesystem workaround solutions in 6.8 The Initial RAM Filesystem.
As of this writing, the kernel does not emit specific messages when it’s about to start its first user process. However, the following memory management messages are a good indication that the user-space handoff is about to happen because this is where the kernel protects its own memory from user-space processes:
Freeing unused kernel memory: 740k freed
Write protecting the kernel text: 5820k
Write protecting the kernel read-only data: 2376k
NX-protecting the kernel data: 4420k
You may also see a message about the root filesystem being mounted at this point.
NOTE
Feel free to skip ahead to Chapter 6 to learn the specifics of user space start and the init program that the kernel runs as its first process. The remainder of this chapter details how the kernel starts.
5.3 Kernel Parameters
When running the Linux kernel, the boot loader passes in a set of text-based kernel parameters that tell the kernel how it should start. The parameters specify many different types of behavior, such as the amount of diagnostic output the kernel should produce and device driver–specific options.
You can view the kernel parameters from your system’s boot by looking at the /proc/cmdline file:
$ cat /proc/cmdline
BOOT_IMAGE=/boot/vmlinuz-3.2.0-67-generic-pae root=UUID=70ccd6e7-6ae6-44f6-
812c-51aab8036d29 ro quiet splash vt.handoff=7
The parameters are either simple one-word flags, such as ro and quiet, or key=value pairs, such as vt.handoff=7. Many of the parameters are unimportant, such as the splash flag for displaying a splash screen, but one that is critical is the root parameter. This is the location of the root filesystem; without it, the kernel cannot find init and therefore cannot perform the user space start.
The root filesystem can be specified as a device file, such as in this example:
root=/dev/sda1
However, on most modern desktop systems, a UUID is more common (see 4.2.4 Filesystem UUID):
root=UUID=70ccd6e7-6ae6-44f6-812c-51aab8036d29
The ro parameter is normal; it instructs the kernel to mount the root filesystem in read-only mode upon user space start. (Read-only mode ensures that fsck can check the root filesystem safely; after the check, the bootup process remounts the root filesystem in read-write mode.)
Upon encountering a parameter that it does not understand, the Linux kernel saves the parameter. The kernel later passes the parameter to init when performing the user space start. For example, if you add -s to the kernel parameters, the kernel passes the -s to the init program to indicate that it should start in single-user mode.
Now let’s look at the mechanics of how boot loaders start the kernel.
5.4 Boot Loaders
At the start of the boot process, before the kernel and init start, a boot loader starts the kernel. The task of a boot loader sounds simple: It loads the kernel into memory, and then starts the kernel with a set of kernel parameters. But consider the questions that the boot loader must answer:
§ Where is the kernel?
§ What kernel parameters should be passed to the kernel when it starts?
The answers are (typically) that the kernel and its parameters are usually somewhere on the root filesystem. It sounds like the kernel parameters should be easy to find, except that the kernel is not yet running, so it can’t traverse a filesystem to find the necessary files. Worse, the kernel device drivers normally used to access the disk are also unavailable. Think of this as a kind of “chicken or egg” problem.
Let’s start with the driver concern. On PCs, boot loaders use the Basic Input/Output System (BIOS) or Unified Extensible Firmware Interface (UEFI) to access disks. Nearly all disk hardware has firmware that allows the BIOS to access attached storage hardware with Linear Block Addressing (LBA). Although it exhibits poor performance, this mode of access does allow universal access to disks. Boot loaders are often the only programs to use the BIOS for disk access; the kernel uses its own high-performance drivers.
The filesystem question is trickier. Most modern boot loaders can read partition tables and have built-in support for read-only access to filesystems. Thus, they can find and read files. This capability makes it far easier to dynamically configure and enhance the boot loader. Linux boot loaders have not always had this capability; without it, configuring the boot loader was more difficult.
5.4.1 Boot Loader Tasks
A Linux boot loader’s core functionality includes the ability to do the following:
§ Select among multiple kernels.
§ Switch between sets of kernel parameters.
§ Allow the user to manually override and edit kernel image names and parameters (for example, to enter single-user mode).
§ Provide support for booting other operating systems.
Boot loaders have become considerably more advanced since the inception of the Linux kernel, with features such as history and menu systems, but the basic need has always been flexibility in kernel image and parameter selection. One interesting phenomenon is that certain needs have diminished. For example, because you can now perform an emergency or recovery boot partially or entirely from a USB storage device, you probably won’t have to worry about manually entering kernel parameters or going into single-user mode. But modern boot loaders offer more power than ever, which can be particularly handy if you’re building custom kernels or just want to tweak parameters.
5.4.2 Boot Loader Overview
Here are the main boot loaders that you may encounter, in order of popularity:
§ GRUB. A near-universal standard on Linux systems
§ LILO. One of the first Linux boot loaders. ELILO is a UEFI version
§ SYSLINUX. Can be configured to run from many different kinds of filesystems
§ LOADLIN. Boots a kernel from MS-DOS
§ efilinux. A UEFI boot loader intended to serve as a model and reference for other UEFI boot loaders
§ coreboot (formerly LinuxBIOS). A high-performance replacement for the PC BIOS that can include a kernel
§ Linux Kernel EFISTUB. A kernel plugin for loading the kernel directly from the EFI/UEFI System Partition (ESP) found on recent systems
This book deals exclusively with GRUB. The rationale behind using other boot loaders is either that they are simpler to configure than GRUB or that they are faster.
To enter a kernel name and parameters, you first need to know how to get to a boot prompt. Unfortunately, this can sometimes be difficult to figure out because Linux distributions customize boot loader behavior and appearance to their hearts’ content.
The next sections tell you how to get to a boot prompt in order to enter a kernel name and parameters. Once you’re comfortable with that, you’ll see how to configure and install a boot loader.
5.5 GRUB Introduction
GRUB stands for Grand Unified Boot Loader. We’ll cover GRUB 2; there is also an older version now called GRUB Legacy that is slowing falling out of use.
One of GRUB’s most important capabilities is filesystem navigation that allows for much easier kernel image and configuration selection. One of the best ways to see this in action and to learn about GRUB in general is to look at its menu. The interface is easy to navigate, but there’s a good chance that you’ve never seen it. Linux distributions often do their best to hide the boot loader from you.
To access the GRUB menu, press and hold SHIFT when your BIOS or firmware startup screen first appears. Otherwise, the boot loader configuration may not pause before loading the kernel. Figure 5-1 shows the GRUB menu. Press ESC to temporarily disable the automatic boot timeout after the GRUB menu appears.
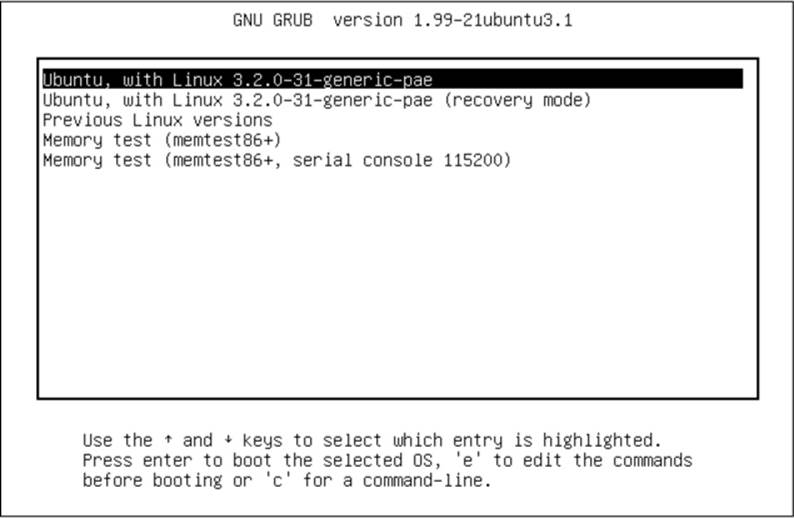
Figure 5-1. GRUB menu
Try the following to explore the boot loader:
1. Reboot or power on your Linux system.
2. Hold down SHIFT during the BIOS/Firmware self-test and/or splash screen to get the GRUB menu.
3. Press e to view the boot loader configuration commands for the default boot option. You should see something like Figure 5-2.

Figure 5-2. GRUB configuration editor
This screen tells us that for this configuration, the root is set with a UUID, the kernel image is /boot/vmlinuz-3.2.0-31-generic-pae, and the kernel parameters include ro, quiet, and splash. The initial RAM filesystem is /boot/initrd.img-3.2.0-31-generic-pae. But if you’ve never seen this sort of configuration before, you may find it somewhat confusing. Why are there multiple references to root, and why are they different? Why is insmod here? Isn’t that a Linux kernel feature normally run by udevd?
The double-takes are warranted, because GRUB doesn’t really use the Linux kernel—it starts it. The configuration you see consists wholly of GRUB internal commands. GRUB really is an entirely separate world.
The confusion stems from the fact that GRUB borrows terminology from many sources. GRUB has its own “kernel” and its own insmod command to dynamically load GRUB modules, completely independent of the Linux kernel. Many GRUB commands are similar to Unix shell commands; there’s even an ls command to list files.
But the most confusion comes from the use of the word root. To clear it up, there is one simple rule to follow when you’re looking for your system’s root filesystem: Only the root kernel parameter will be the root filesystem when you boot your system.
In the GRUB configuration, that kernel parameter is somewhere after the image name of the linux command. Every other reference to root in the configuration is to the GRUB root, which exists only inside of GRUB. The GRUB “root” is the filesystem where GRUB searches for kernel and RAM filesystem image files.
In Figure 5-2, the GRUB root is first set to a GRUB-specific device (hd0,msdos1). Then in the following command, GRUB searches for a particular UUID on a partition. If it finds that UUID, it sets the GRUB root to that partition.
To wrap things up, the linux command’s first argument (/boot/vmlinuz-...) is the location of the Linux kernel image file. GRUB loads this file from the GRUB root. The initrd command is similar, specifying the file for the initial RAM filesystem.
You can edit this configuration inside GRUB; doing so is usually the easiest way to temporarily fix an erroneous boot. To permanently fix a boot problem, you’ll need to change the configuration (see 5.5.2 GRUB Configuration), but for now, let’s go one step deeper and examine some GRUB internals with the command-line interface.
5.5.1 Exploring Devices and Partitions with the GRUB Command Line
As you can see in Figure 5-2, GRUB has its own device-addressing scheme. For example, the first hard disk found is hd0, followed by hd1, and so on. But device assignments are subject to change. Fortunately, GRUB can search all partitions for a UUID in order to find the one where the kernel resides, as you just saw with the search command.
Listing Devices
To get a feel for how GRUB refers to the devices on your system, access the GRUB command line by pressing C at the boot menu or configuration editor. You should get the GRUB prompt:
grub>
You can enter any command here that you see in a configuration, but to get started, try a diagnostic command instead: ls. With no arguments, the output is a list of devices known to GRUB:
grub> ls
(hd0) (hd0,msdos1) (hd0,msdos5)
In this case, there is one main disk device denoted by (hd0) and the partitions (hd0,msdos1) and (hd0,msdos5). The msdos prefix on the partitions tells you that the disk contains an MBR partition table; it would begin with gpt for GPT. (You will find even deeper combinations with a third identifier, where a BSD disklabel map resides inside a partition, but you won’t normally have to worry about this unless you’re running multiple operating systems on one machine.)
To get more detailed information, use ls -l. This command can be particularly useful because it displays any UUIDs of the partitions on the disk. For example:
grub> ls -l
Device hd0: Not a known filesystem - Total size 426743808 sectors
Partition hd0,msdos1: Filesystem type ext2 – Last modification time
2015-09-18 20:45:00 Friday, UUID 4898e145-b064-45bd-b7b4-7326b00273b7 -
Partition start at 2048 - Total size 424644608 sectors
Partition hd0,msdos5: Not a known filesystem - Partition start at
424648704 - Total size 2093056 sectors
This particular disk has a Linux ext2/3/4 filesystem on the first MBR partition and a Linux swap signature on partition 5, which is a fairly common configuration. (You can’t tell that (hd0,msdos5) is a swap partition from this output, though.)
File Navigation
Now let’s look at GRUB’s filesystem navigation capabilities. Determine the GRUB root with the echo command (recall that this is where GRUB expects to find the kernel):
grub> echo $root
hd0,msdos1
To use GRUB’s ls command to list the files and directories in that root, you can append a forward slash to the end of the partition:
grub> ls (hd0,msdos1)/
But it’s a pain to remember and type the actual root partition, so use the root variable to save yourself some time:
grub> ls ($root)/
The output is a short list of file and directory names on that partition’s filesystem, such as etc/, bin/, and dev/. You should realize that this is now a completely different function of the GRUB ls: Before, you were listing devices, partition tables, and perhaps some filesystem header information. Now you’re actually looking at the contents of filesystems.
You can take a deeper look into the files and directories on a partition in a similar manner. For example, to inspect the /boot directory, start with the following:
grub> ls ($root)/boot
NOTE
Use the up and down arrow keys to flip through GRUB command history and the left and right arrows to edit the current command line. The standard readline keys (CTRL-N, CTRL-P, and so on) also work.
You can also view all currently set GRUB variables with the set command:
grub> set
?=0
color_highlight=black/white
color_normal=white/black
--snip--
prefix=(hd0,msdos1)/boot/grub
root=hd0,msdos1
One of the most important of these variables is $prefix, the filesystem and directory where GRUB expects to find its configuration and auxiliary support. We’ll explore this in the next section.
Once you’ve finished with the GRUB command-line interface, enter the boot command to boot your current configuration or just press ESC to return to the GRUB menu. In any case, boot your system; we’re going to explore the GRUB configuration, and that’s best done when you have your full system available.
5.5.2 GRUB Configuration
The GRUB configuration directory contains the central configuration file (grub.cfg) and numerous loadable modules with a .mod suffix. (As GRUB versions progress, these modules will move into subdirectories such as i386-pc.) The directory is usually /boot/grub or /boot/grub2. We won’t modify grub.cfg directly; instead, we’ll use the grub-mkconfig command (or grub2-mkconfig on Fedora).
Reviewing Grub.cfg
First, take a quick look at grub.cfg to see how GRUB initializes its menu and kernel options. You’ll see that the grub.cfg file consists of GRUB commands, which usually begin with a number of initialization steps followed by a series of menu entries for different kernel and boot configurations. The initialization isn’t complicated; it’s a bunch of function definitions and video setup commands like this:
if loadfont /usr/share/grub/unicode.pf2 ; then
set gfxmode=auto
load_video
insmod gfxterm
--snip--
Later in this file you should see the available boot configurations, each beginning with the menuentry command. You should be able to read and understand this example based on what you learned in the preceding section:
menuentry 'Ubuntu, with Linux 3.2.0-34-generic-pae' --class ubuntu --class gnu-linux --class gnu
--class os {
recordfail
gfxmode $linux_gfx_mode
insmod gzio
insmod part_msdos
insmod ext2
set root='(hd0,msdos1)'
search --no-floppy --fs-uuid --set=root 70ccd6e7-6ae6-44f6-812c-51aab8036d29
linux /boot/vmlinuz-3.2.0-34-generic-pae root=UUID=70ccd6e7-6ae6-44f6-812c-51aab8036d29
ro quiet splash $vt_handoff
initrd /boot/initrd.img-3.2.0-34-generic-pae
}
Watch for submenu commands. If your grub.cfg file contains numerous menuentry commands, most of them are probably wrapped up inside a submenu command for older versions of the kernel so that they don’t crowd the GRUB menu.
Generating a New Configuration File
If you want to make changes to your GRUB configuration, you won’t edit your grub.cfg file directly because it’s automatically generated and the system occasionally overwrites it. You’ll add your new configuration elsewhere, then run grub-mkconfig to generate the new configuration.
To see how the configuration generation works, look at the very beginning of grub.cfg. There should be comment lines such as this:
### BEGIN /etc/grub.d/00_header ###
Upon further inspection, you’ll find that every file in /etc/grub.d is a shell script that produces a piece of the grub.cfg file. The grub-mkconfig command itself is a shell script that runs everything in /etc/grub.d.
Try it yourself as root. (Don’t worry about overwriting your current configuration. This command by itself simply prints the configuration to the standard output.)
# grub-mkconfig
What if you want to add menu entries and other commands to the GRUB configuration? The short answer is that you should put your customizations into a new custom.cfg file in your GRUB configuration directory, such as /boot/grub/custom.cfg.
The long answer is a little more complicated. The /etc/grub.d configuration directory gives you two options: 40_custom and 41_custom. The first, 40_custom, is a script that you can edit yourself, but it’s probably the least stable; a package upgrade is likely to destroy any changes you make. The 41_custom script is simpler; it’s just a series of commands that load custom.cfg when GRUB starts. (Keep in mind that if you choose this second option, your changes won’t appear when you generate your configuration file.)
The two options for custom configuration files aren’t particularly extensive. You’ll see additions in your particular distribution’s /etc/grub.d directory. For example, Ubuntu adds memory tester boot options (memtest86+) to the configuration.
To write and install a newly generated GRUB configuration file, you can write the configuration to your GRUB directory with the -o option to grub-mkconfig, like this:
# grub-mkconfig -o /boot/grub/grub.cfg
Or if you’re an Ubuntu user, just run install-grub. In any case, back up your old configuration, make sure that you’re installing to the correct directory, and so on.
Now we’re going to get into some of the more technical details of GRUB and boot loaders. If you’re tired of hearing about boot loaders and the kernel, feel free to skip to Chapter 6.
5.5.3 GRUB Installation
Installing GRUB is more involved than configuring it. Fortunately, you won’t normally have to worry about installation because your distribution should handle it for you. However, if you’re trying to duplicate or restore a bootable disk, or preparing your own boot sequence, you might need to install it on your own.
Before proceeding, read 5.8.3 How GRUB Works to get an idea of how PCs boot and determine whether you’re using MBR or EFI boot. Next, build the GRUB software set and determine where your GRUB directory will be; the default is /boot/grub. You may not need to build GRUB if your distribution does it for you, but if you do, see Chapter 16 for how to build software from source code. Make sure that you build the correct target: It’s different for MBR or UEFI boot (and there are even differences between 32-bit and 64-bit EFI).
Installing GRUB on Your System
Installing the boot loader requires that you or an installer determine the following:
§ The target GRUB directory as seen by your currently running system. That’s usually /boot/grub, but it might be different if you’re installing GRUB on another disk for use on another system.
§ The current device of the GRUB target disk.
§ For UEFI booting, the current mount point of the UEFI boot partition.
Remember that GRUB is a modular system, but in order to load modules, it must read the filesystem that contains the GRUB directory. Your task is to construct a version of GRUB capable of reading that filesystem so that it can load the rest of its configuration (grub.cfg) and any required modules. On Linux, this usually means building a version of GRUB with its ext2.mod module preloaded. Once you have this version, all you need to do is place it on the bootable part of the disk and place the rest of the required files into /boot/grub.
Fortunately, GRUB comes with a utility called grub-install (not to be confused with Ubuntu’s install-grub), which performs most of the work of installing the GRUB files and configuration for you. For example, if your current disk is at /dev/sda and you want to install GRUB on that disk with your current /boot/grub directory, use this command to install GRUB on the MBR:
# grub-install /dev/sda
WARNING
Incorrectly installing GRUB may break the bootup sequence on your system, so don’t take this command lightly. If you’re concerned, read up on how to back up your MBR with dd, back up any other currently installed GRUB directory, and make sure that you have an emergency bootup plan.
Installing GRUB on an External Storage Device
To install GRUB on a storage device outside the current system, you must manually specify the GRUB directory on that device as your current system now sees it. For example, say that you have a target device of /dev/sdc and that device’s root/boot filesystem (for example, /dev/sdc1) is mounted on /mnt of your current system. This implies that when you install GRUB, your current system will see the GRUB files in /mnt/boot/grub. When running grub-install, tell it where those files should go as follows:
# grub-install --boot-directory=/mnt/boot /dev/sdc
Installing GRUB with UEFI
UEFI installation is supposed to be easier, because you all you need to do is copy the boot loader into place. But you also need to “announce” the boot loader to the firmware with the efibootmgr command. The grub-install command runs this if it’s available, so in theory all you need to do to install on an UEFI partition is the following:
# grub-install --efi-directory=efi_dir –-bootloader-id=name
Here, efi_dir is where the UEFI directory appears on your current system (usually /boot/efi/efi, because the UEFI partition is often mounted at /boot/efi) and name is an identifier for the boot loader, as described in 5.8.2 UEFI Boot.
Unfortunately, many problems can crop up when installing a UEFI boot loader. For example, if you’re installing to a disk that will eventually end up in another system, you have to figure out how to announce that boot loader to the new system’s firmware. And there are differences in the install procedure for removable media.
But one of the biggest problems is UEFI secure boot.
5.6 UEFI Secure Boot Problems
One of the newest problems affecting Linux installations is the secure boot feature found on recent PCs. When active, this mechanism in UEFI requires boot loaders to be digitally signed by a trusted authority in order to run. Microsoft has required vendors shipping Windows 8 to use secure boot. The result is that if you try to install an unsigned boot loader (which is most current Linux distributions), it will not load.
The easiest way around this for anyone with no interest in Windows is to disable secure boot in the EFI settings. However, this won’t work cleanly for dual-boot systems and may not be an option for all users. Therefore, Linux distributions are offering signed boot loaders. Some solutions are just front-ends to GRUB, some offer a fully signed loading sequence (from the boot loader to the kernel), and others are entirely new boot loaders (some based on efilinux).
5.7 Chainloading Other Operating Systems
UEFI makes it relatively easy to support loading other operating systems because you can install multiple boot loaders in the EFI partition. However, the older MBR style doesn’t support it, and even if you do have UEFI, you may still have an individual partition with an MBR-style boot loader that you want to use. You can get GRUB to load and run a different boot loader on a specific partition on your disk by chainloading.
To chainload, create a new menu entry in your GRUB configuration (using one of the methods in Reviewing Grub.cfg). Here’s an example for a Windows installation on the third partition of a disk:
menuentry "Windows" {
insmod chain
insmod ntfs
set root=(hd0,3)
chainloader +1
}
The +1 option to chainloader tells it to load whatever is at the first sector of a partition. You can also get it to directly load a file by using a line like this to load the io.sys MS-DOS loader:
menuentry "DOS" {
insmod chain
insmod fat
set root=(hd0,3)
chainloader /io.sys
}
5.8 Boot Loader Details
Now we’ll look quickly at some boot loader internals. Feel free to skip to the next chapter if this material doesn’t interest you.
To understand how boot loaders like GRUB work, let’s first survey how a PC boots when you turn it on. Due to the repeated inadequacies of traditional PC boot mechanisms, there are several variations, but there are two main schemes: MBR and UEFI.
5.8.1 MBR Boot
In addition to the partition information described in 4.1 Partitioning Disk Devices, the Master Boot Record (MBR) includes a small area (441 bytes) that the PC BIOS loads and executes after its Power-On Self-Test (POST). Unfortunately, this is too little storage to house almost any boot loader, so additional space is necessary, resulting in what is sometimes called a multi-stage boot loader. In this case the initial piece of code in the MBR does nothing other than load the rest of the boot loader code. The remaining pieces of the boot loader are usually stuffed into the space between the MBR and the first partition on the disk.
Of course, this isn’t terribly secure because anything can overwrite the code there, but most boot loaders do it, including most GRUB installations. In addition, this scheme won’t work with a GPT-partitioned disk using the BIOS to boot because the GPT table information resides in the area after the MBR. (GPT leaves the traditional MBR alone for backward compatibility.)
The workaround for GPT is to create a small partition called a BIOS boot partition with a special UUID to give the full boot loader code a place to reside. But GPT is normally used with UEFI, not the traditional BIOS, which leads us to the UEFI boot scheme.
5.8.2 UEFI Boot
PC manufacturers and software companies realized that the traditional PC BIOS is severely limited, so they decided to develop a replacement called Extensible Firmware Interface (EFI). EFI took a while to catch on for most PCs, but now it’s fairly common. The current standard is Unified EFI (UEFI), which includes features such as a built-in shell and the ability to read partition tables and navigate filesystems. The GPT partitioning scheme is part of the UEFI standard.
Booting is radically different on UEFI systems and, for the most part, much easier to understand. Rather than executable boot code residing outside of a filesystem, there is always a special filesystem called the EFI System Partition (ESP), which contains a directory named efi. Each boot loader has its own identifier and a corresponding subdirectory, such as efi/microsoft, efi/apple, or efi/grub. A boot loader file has an .efi extension and resides in one of these subdirectories, along with other supporting files.
NOTE
The ESP differs from the BIOS boot partition described in 5.8.1 MBR Boot and has a different UUID.
There’s a wrinkle, though: You can’t just put old boot loader code into the ESP because that code was written for the BIOS interface. Instead, you must provide a boot loader written for UEFI. For example, when using GRUB, you have to install the UEFI version of GRUB rather than the BIOS version. In addition, you must “announce” new boot loaders to the firmware.
And, as mentioned in 5.6 UEFI Secure Boot Problems, we have the “secure boot” issue.
5.8.3 How GRUB Works
Let’s wrap up our discussion of GRUB by looking at how it does its work:
1. The PC BIOS or firmware initializes the hardware and searches its boot-order storage devices for boot code.
2. Upon finding the boot code, the BIOS/firmware loads and executes it. This is where GRUB begins.
3. The GRUB core loads.
4. The core initializes. At this point, GRUB can now access disks and filesystems.
5. GRUB identifies its boot partition and loads a configuration there.
6. GRUB gives the user a chance to change the configuration.
7. After a timeout or user action, GRUB executes the configuration (the sequence of commands outlined in 5.5.2 GRUB Configuration).
8. In the course of executing the configuration, GRUB may load additional code (modules) in the boot partition.
9. GRUB executes a boot command to load and execute the kernel as specified by the configuration’s linux command.
Steps 3 and 4 of the preceding sequence, where the GRUB core loads, can be complicated due to the repeated inadequacies of traditional PC boot mechanisms. The biggest question is “Where is the GRUB core?” There are three basic possibilities:
§ Partially stuffed between the MBR and the beginning of the first partition
§ In a regular partition
§ In a special boot partition: a GPT boot partition, EFI System Partition (ESP), or elsewhere
In all cases except where you have an ESP, the PC BIOS loads 512 bytes from the MBR, and that is where GRUB starts. This little piece (derived from boot.img in the GRUB directory) isn’t yet the core, but it contains the start location of the core and loads the core from this point.
However, if you have an ESP, the GRUB core goes there as a file. The firmware can navigate the ESP and directly execute the GRUB core or any other operating system loader located there.
Still, on most systems, this is not the complete picture. The boot loader might also need to load an initial RAM filesystem image into memory before loading and executing the kernel. That’s what the initrd configuration parameter in 6.8 The Initial RAM Filesystem specifies. But before you learn about the initial RAM filesystem, you should learn about the user space start—that’s where the next chapter begins.
All materials on the site are licensed Creative Commons Attribution-Sharealike 3.0 Unported CC BY-SA 3.0 & GNU Free Documentation License (GFDL)
If you are the copyright holder of any material contained on our site and intend to remove it, please contact our site administrator for approval.
© 2016-2026 All site design rights belong to S.Y.A.