Linux Web Server Development (2015)
Chapter 3 Operating System Configuration
Assigning a Private, Static IP Address to the Server
You must now assign a static IP address for your Web server. Let’s use as an example the IP address 192.168.1.101. This is a private IP address. An IP address that is private is an IP address that is valid only for your LAN. The previous address is a random IP address from the private network 192.168.1.0. Routers by convention use this address to reference a private network of Class C, which is the most common IP (Internet Protocol) network class. Another private network commonly used is network 192.168.0.0. IP addresses can also be static, which means that the IP address will not change until it is manually changed by the system administrator.
A home router typically uses DHCP (Dynamic Host Configuration Protocol) to dynamically assign IP addresses that change after a set period of time, typically in the order of days. However, a static IP address for the server is necessary for the Web server. With a static IP address, you can configure the Cherokee server remotely and be able to test the server from the other nodes of the LAN. In addition to this and certainly more importantly, you can designate in the router’s configuration the static IP address of the server in as the server responsible for handling HTTP requests (HTTP stands for Hyper Text Transfer Protocol, the protocol for the World Wide Web).
In order for the server to be visible from clients across the Internet, the server must have an associated public IP address. This associated IP address is the public IP address, the IP address of the Internet-facing interface of the router of the server’s LAN. By using the router’s Virtual Server service (which is discussed in Chapter 5), every HTTP request destined for the router is forwarded by the router to the Cherokee server.
In the following image, the Web server is a host of LAN 192.168.1.0 and has been assigned the private IP address 192.168.1.101. The Web server will be accessible in the Internet by using the public IP address of the router, IP address 94.69.219.68. The router has the private IP address 102.168.1.1, which allows the router to be reachable from inside the LAN.

In order to designate a computer on your LAN as the Web server (as explained in chapter 5), this computer must use a static private IP address. You must therefore disable DHCP for your Cherokee server and must manually configure the server’s static IP address, along with the Netmask, Gateway, and DNS servers parameters.
For Lubuntu Linux, click on the Start button and select Preferences and then Network Connections. Click the Add button to add a new connection. At the dialogue window that appears, select Ethernet in the Connection Type drop-down menu. Click next at the Create button.
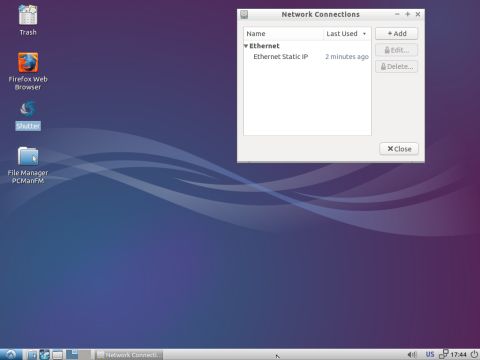
In the dialogue window that appears, enter the connection name, e.g. Ethernet Static IP in the Connection name text box and click on the IPv4 Settings tab. In the Method drop-down menu, select Manual (by default, the option is set as DHCP).
Click the Add button to edit the Address, Netmask and Gateway fields.
Enter the following values:
Address: 192.168.1.101
This is the IP address that we wish to assign to the Cherokee server.
Netmask: 255.255.255.0
The Netmask (Network mask) field, indicates how the IP address is divided into a network portion and a host portion. A netmask value of 255.255.255.0 indicates that the first three bytes of the IP address specify the network and the fourth byte specifies the host.
Gateway: 192.168.1.1
Gateway is another name for your router. Enter the private IP address of the router, the IP address of the router on its internal interface. Certainly the router also has a public IP which is valid for the whole Internet. In this example, the router’s private IP is 192.168.1.1.
Enter the private IP address of the router again to the DNS servers (Domain Name System servers) field:
DNS servers: 192.168.1.1
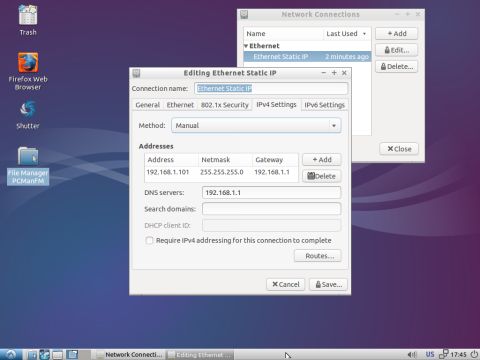
Click on the Save button to confirm the changes.
For Ubuntu, click on the Network Manager Indicator (the double arrow) icon in the Notification area in the upper-right corner of the desktop panel. In the pop-up menu, select Edit Connections.
The Network Connections window appears:
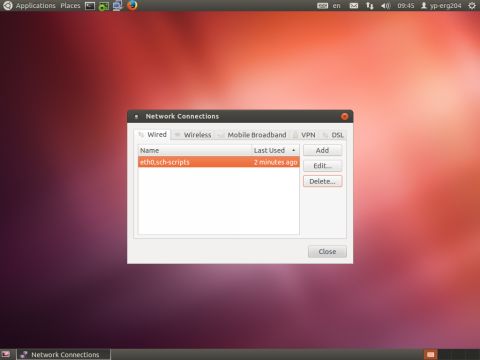
Click the Add button to create a new connection. Another window appears. At the Connection name textbox enter a name, e.g. Static IP. This name is included in the caption of the new window, e.g. Editing Static IP. At the Method drop-down menu select Manual.
Click the Add button to edit the Address, Netmask, Gateway, and DNS Servers fields. To assign the Web server the IP address 192.168.1.101, enter this value in the Address field. Also enter the value 255.255.255.0 in the Netmask field. Finally, enter the private IP address of the router, (e.g., 192.168.1.1) in the Gateway and DNS servers fields.
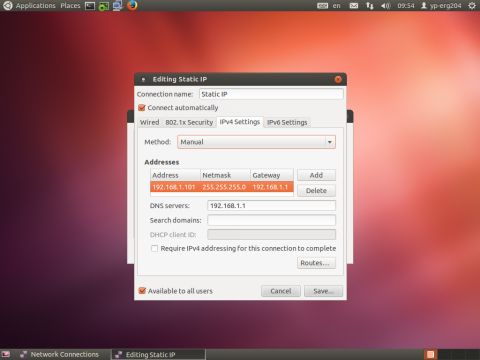
Click the Save button to confirm the changes and close the Network connections window.
Requesting Port Numbers from the OS
The TCP port numbers in the range 0 to 1023 are the well-known ports and are sometimes referred to as system ports. On Unix-like operating systems (e.g., Linux), a process must execute with super user privileges to be able to bind a network socket to an IP address using one of the well-known ports.
A Web server can use port 80, the default port for HTTP, or any other port above the range of well-known ports. Ports 8080 and 8181 are two ports that will be used in this book.
On some Linux systems (e.g., Fedora), you must configure the firewall to allow the use of any specific port. (A firewall restricts access to IP addresses and ports).
The appendix has more information on the Fedora firewall and other differences between Fedora Linux and Ubuntu. For Ubuntu, no further configuration is required for using a specific port.
Testing the Server from another Computer of your LAN
You can now check the Cherokee test page from another computer on your LAN. If you previously configured your Cherokee server to use IP address 192.168.1.101, use the following address in a browser:
http://192.168.1.101
Provided that the Cherokee server is running, the Cherokee test page should appear:

In chapter 5, you will go a step further by allowing the Web server to be visible from outside of the LAN and thus be available from the entire Internet.