Excel 2016 Power Programming with VBA (2016)
Part IV. Developing Excel Applications
Chapter 18. Working with Shortcut Menus
In This Chapter
· Identifying shortcut menus
· Customizing the shortcut menus
· Disabling shortcut menus
· Using events with shortcut menus
· Creating a new shortcut menu
CommandBar Overview
A CommandBar object is used for three Excel user interface elements:
· Custom toolbars
· Custom menus
· Customs shortcut (right-click) menus
Beginning with Excel 2007, the CommandBar object is in an odd position. If you write VBA code to customize a menu or a toolbar, Excel intercepts that code and ignores many of your commands. Menu and toolbar customizations performed with the CommandBar object appear in the Add-Ins ➜ Menu Commands group or the Add-Ins ➜ Custom Toolbars group. So, for all practical purposes, the CommandBar object in Excel is now limited to shortcut menu operations.
In this section, I provide some background information about CommandBars.
CommandBar types
Excel supports three types of CommandBars, differentiated by their Type property. The Type property can be any of these three values:
· msoBarTypeNormal: A toolbar (Type = 0)
· msoBarTypeMenuBar: A menu bar (Type = 1)
· msoBarTypePopUp: A shortcut menu (Type = 2)
Even though toolbars and menu bars aren’t used in Excel 2007 and later, these UI elements are still included in the object model for compatibility with older applications. However, attempting to display a CommandBar of Type 0 or 1 has no effect in Excel versions after Excel 2003. In Excel 2003, for example, the following statement displays the Standard toolbar:
CommandBars("Standard").Visible = True
In later versions of Excel, that statement is ignored.
This chapter focuses exclusively on Type 2 CommandBars (shortcut menus).
Listing shortcut menus
Excel 2016 has 67 shortcut menus. How do I know that? I ran the ShowShortcutMenuNames procedure that follows, which loops through all CommandBars. If the Type property is msoBarTypePopUp (a built-in constant that has a value of 2), it displays the shortcut menu’s index, name, and the number of menu items it contains.
Sub ShowShortcutMenuNames()
Dim Row As Long
Dim cbar As CommandBar
Row = 1
For Each cbar In CommandBars
If cbar.Type = msoBarTypePopUp Then
Cells(Row, 1) = cbar.Index
Cells(Row, 2) = cbar.Name
Cells(Row, 3) = cbar.Controls.Count
Row = Row + 1
End If
Next cbar
End Sub
Figure 18.1 shows part of the output from this procedure. The shortcut menu index values range from 22 to 156. Also, note that not all the names are unique. For example, CommandBar 36 and CommandBar 39 both have a Name of Cell because right-clicking a cell gives a different shortcut menu when the worksheet is in page break preview mode.
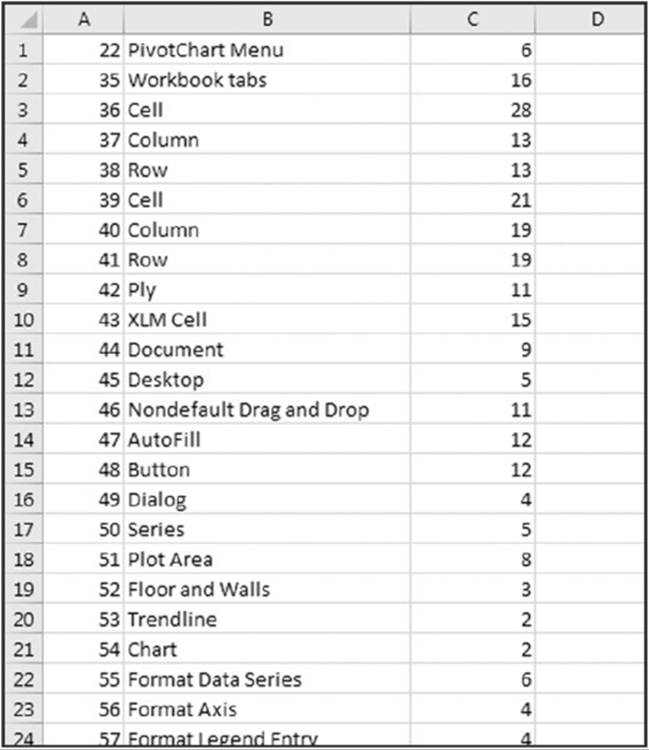
Figure 18.1 A simple macro generates a list of all shortcut menus.
 On the Web
This example is available on the book’s website in the show shortcut menu names.xlsm file.
Referring to CommandBars
You can reference a particular CommandBar object by its Index or Name property. For example, the expressions that follow both refer to the shortcut menu that is displayed when you right-click a column letter in Excel 2016:
Application.CommandBars(37)
Application.CommandBars("Column")
The CommandBars collection is a member of the Application object. When you reference this collection in a regular VBA module or in a module for a sheet, you can omit the reference to the Application object. For example, the following statement (contained in a standard VBA module) displays the name of the object in the CommandBars collection that has an index of 42:
MsgBox CommandBars(42).Name
When you reference the CommandBars collection from a code module for a ThisWorkbook object, you must precede it with a reference to the Application object, like this:
MsgBox Application.CommandBars(42).Name
 Caution
Unfortunately, the Index numbers for CommandBars have not always remained constant across the different Excel versions. For example, In Excel 2016, CommandBar 36 has the Name of Cell. In Excel 2013, CommandBar 36 had the Name of Workbook tabs. Therefore, using names rather than index numbers is more reliable.
Referring to controls in a CommandBar
A CommandBar object contains Control objects, which are buttons or menus. You can refer to a control by its Index property or by its Caption property. Here’s a simple procedure that displays the caption of the first menu item on the Cell shortcut menu:
Sub ShowCaption()
MsgBox CommandBars("Cell").Controls(1).Caption
End Sub
The following procedure displays the Caption property for each control in the shortcut menu that appears when you right-click a sheet tab (that shortcut menu is named Ply):
Sub ShowCaptions()
Dim txt As String
Dim ctl As CommandBarControl
For Each ctl In CommandBars("Ply").Controls
txt = txt & ctl.Caption & vbNewLine
Next ctl
MsgBox txt
End Sub
When you execute this procedure, you see the message box shown in Figure 18.2. The ampersand is used to indicate the underlined letter in the text — the keystroke that will execute the menu item.
Figure 18.2 Displaying the Caption property for controls.
In some cases, Control objects on a shortcut menu contain other Control objects. For example, the Filter control on the Cell right-click menu contains other controls. The Filter control is a submenu, and the additional items are submenu items.
The statement that follows displays the first submenu item in the Filter submenu:
MsgBox CommandBars("Cell").Controls("Filter").Controls(1).Caption
 Finding a control
If you’re writing code that will be used by a different language version of Excel, avoid using the Caption property to access a particular shortcut menu item. The Caption property is language-specific, so your code will fail if the user has a different language version of Excel.
Instead, use the FindControl method with the ID of the control (which is language-independent). For example, assume that you want to disable the Cut menu on the shortcut menu that appears when you right-click a column letter. If your workbook will be used only by people who have the English version of Excel, this statement will do the job:
CommandBars("Column").Controls("Cut").Enabled = False
To ensure that the command will work with non-English versions, you need to know the ID of the control. The following statement will tell you that the ID is 21:
MsgBox CommandBars("Column").Controls("Cut").ID
Then, to disable that control, use this statement:
CommandBars("Column").FindControl(ID:=21).Enabled = False
The CommandBar names are not internationalized, so a reference to CommandBars("Column") will always work. If two more command bars have the same name, the first one is used.
Properties of CommandBar controls
CommandBar controls have a number of properties that determine how the controls look and work. This list contains some of the more useful properties for CommandBar controls:
· Caption: The text displayed for the control. If the control shows only an image, the Caption appears when you move the mouse pointer over the control.
· ID: A unique numeric identifier for the control.
· FaceID: A number that represents a built-in graphic image displayed next to the control’s text.
· Type: A value that determines whether a control is a button (msoControlButton) or a submenu (msoControlPopup).
· Picture: A graphics image displayed next to the control’s text. This property is useful if you want to display a graphic from the Ribbon.
· BeginGroup: True if a separator bar appears before the control.
· OnAction: The name of a VBA macro that executes when the user clicks the control.
· BuiltIn: True if the control is an Excel built-in control.
· Enabled: True if the control can be clicked.
· Visible: True if the control is visible. Many of the shortcut menus contain hidden controls.
· ToolTipText: Text that appears when the user moves the mouse pointer over the control. (Not applicable for shortcut menus.)
Displaying all shortcut menu items
The ShowShortcutMenuItems procedure that follows creates a table that lists all the first-level controls on every shortcut menu. For each control, the table includes the shortcut menu’s Index and Name, plus the ID, Caption , Type, Enabled, and Visible property values.
Sub ShowShortcutMenuItems()
Dim Row As Long
Dim Cbar As CommandBar
Dim ctl As CommandBarControl
Range("A1:G1") = Array("Index","Name","ID","Caption", _
"Type","Enabled","Visible")
Row = 2
Application.ScreenUpdating = False
For Each Cbar In Application.CommandBars
If Cbar.Type = 2 Then
For Each ctl In Cbar.Controls
Cells(Row, 1) = Cbar.Index
Cells(Row, 2) = Cbar.Name
Cells(Row, 3) = ctl.ID
Cells(Row, 4) = ctl.Caption
If ctl.Type = 1 Then
Cells(Row, 5) ="Button"
Else
Cells(Row, 5) ="Submenu"
End If
Cells(Row, 6) = ctl.Enabled
Cells(Row, 7) = ctl.Visible
Row = Row + 1
Next ctl
End If
Next Cbar
ActiveSheet.ListObjects.Add(xlSrcRange, _
Range("A1").CurrentRegion, , xlYes).Name ="Table1"
End Sub
Figure 18.3 shows a portion of the output.
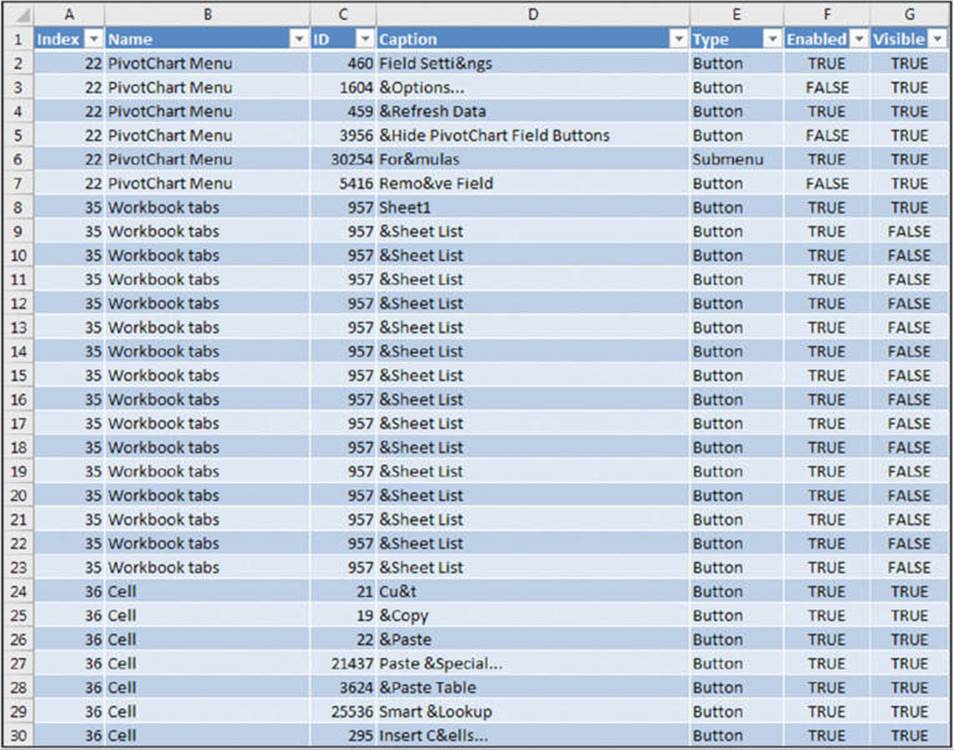
Figure 18.3 Listing the items in all shortcut menus.
On the Web
This example, named show shortcut menu items.xlsm, is available on the book’s website.
Displaying Excel 2003 menus
One of the built-in shortcut menus is named Built-In Menus, and it contains the menu items used in Excel 2003 (the final pre-Ribbon version of Excel). This shortcut menu isn’t attached to an object, but you can display it using this VBA command:
Application.CommandBars("Built-in Menus").ShowPopup
This book’s website has an example (named make xl 2003 menus.xlsm) that contains code to copy those shortcut menus to a toolbar. The toolbar is displayed on the Ribbon when the Add-Ins tab is active. As a result, you can use the Excel 2003 menus with Excel 2016.
The accompanying figure shows how the Excel 2003 menu looks in Excel 2016.
Some commands no longer function and (of course) newer features are not in the menus, so displaying Excel 2003 menus is more of a curiosity than a useful tool.
Using VBA to Customize Shortcut Menus
In this section, I present some practical examples of VBA code that manipulates Excel’s shortcut menus. These examples, which can be modified to suit your needs, will give you an idea of the types of things you can do with shortcut menus.
Shortcut menu and the single-document interface
In Excel versions prior to 2013, if your code modified a shortcut menu, that modification was in effect for all workbooks. For example, if you added a new item to the Cell right-click menu, that new item would appear when you right-clicked a cell in any workbook (and other workbooks that you open). In other words, shortcut menu modifications were at the application level.
Beginning in Excel 2013, Excel uses a single-document interface, which affects shortcut menus. Changes that you make to shortcut menus affect only the active workbook window. When you execute the code that modifies the shortcut menu, the shortcut menu for windows other than the active window will not be changed. This behavior is a radical departure from how things worked in previous versions of Excel.
And another twist: If the user opens a workbook (or creates a new workbook) when the active window displays the modified shortcut menu, the new workbook will also display the modified shortcut menu. In other words, new windows display the same shortcut menus as the window that was active when the new window was opened. If you write code to delete the shortcut menus, they are deleted only in the original workbook.
Even if a shortcut menu modification is intended to be used only in a single workbook, there’s still a potential problem: If the user opens a new workbook, that new workbook will display the customized shortcut menus. Therefore, you might need to modify your code so the macros executed by the shortcut menus work only in the workbook for which they were designed.
If you want to use a custom shortcut menu as a way to execute a macro in an add-in, that menu item will be available only in workbooks that are opened after the add-in is opened.
Bottom line: In the past, if you opened a workbook or add-in that modified shortcut menus, you could be assured that the modified shortcut menus would be available in all workbooks. With Excel 2013 and later versions, you no longer have that assurance.
Customizing shortcut menus with RibbonX code
You can also use RibbonX code to customize shortcut menus. When a workbook is opened that contains such code, the shortcut menu changes affect only that workbook. To make shortcut menu modifications in all workbooks, place the RibbonX code in an add-in.
Here’s a simple example of RibbonX code that modifies the Cell right-click menu. As shown in the accompanying figure, the code adds a shortcut menu item after the Hyperlink menu item.
<customUI>
<contextMenus>
<contextMenu idMso="ContextMenuCell">
<button id="FileName_MyMenuItem"
label="Run My Macro..."
insertAfterMso="HyperlinkInsert"
onAction="MyMacro"
imageMso="AdvancedFileProperties"/>
</contextMenu>
</contextMenus>
</customUI>
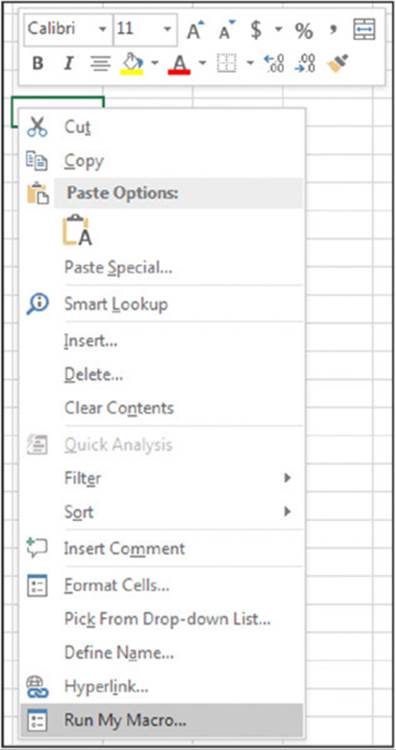
Using RibbonX to modify shortcut menus was introduced in Excel 2010, so this technique doesn’t work with Excel 2007.
As I explain in Chapter 17, you need to use a separate program to add RibbonX code.
Resetting a shortcut menu
The Reset method restores a shortcut menu to its original, default condition. The following procedure resets the Cell shortcut menu to its normal state:
Sub ResetCellMenu()
CommandBars("Cell").Reset
End Sub
In Excel 2016, the Reset method affects the Cell shortcut menu only in the active window.
As I noted previously, Excel has two shortcut menus named Cell. The preceding code resets only the first one (index of 36). To reset the second Cell shortcut menu, you can use its index number (39) instead of its name. But remember, the index numbers aren’t consistent across Excel versions. Here’s a better procedure to reset both instances of the Cell shortcut menu in the active window:
Sub ResetCellMenu()
Dim cbar As CommandBar
For Each cbar In Application.CommandBars
If cbar.Name ="Cell" Then cbar.Reset
Next cbar
End Sub
The following procedure resets all built-in shortcut menus to their original states:
Sub ResetAllShortcutMenus()
Dim cbar As CommandBar
For Each cbar In Application.CommandBars
If cbar.Type = msoBarTypePopup Then
cbar.Reset
cbar.Enabled = True
End If
Next cbar
End Sub
In Excel 2016, the ResetAllShortcutMenus procedure works only with the active window. To reset the shortcut menus in all open windows, the code gets a bit more complex:
Sub ResetAllShortcutMenus2()
' Works with all windows
Dim cbar As CommandBar
Dim activeWin As Window
Dim win As Window
' Remember current active window
Set activeWin = ActiveWindow
' Loop through each visible window
Application.ScreenUpdating = False
For Each win In Windows
If win.Visible Then
win.Activate
For Each cbar In Application.CommandBars
If cbar.Type = msoBarTypePopup Then
cbar.Reset
cbar.Enabled = True
End If
Next cbar
End If
Next win
' Activate original window
activeWin.Activate
Application.ScreenUpdating = True
End Sub
The code starts by keeping track of the active window and storing it as an object variable (activeWin). The code then loops through all open windows and activates each one — but skips hidden windows because activating a hidden window makes it visible. For each active window, it loops through each CommandBar and resets those that are shortcut menus. Finally, the code reactivates the original window.
On the Web
Both versions of the ResetAllShortcutMenus procedure are available on the book’s website in the reset all shortcut menus.xlsm file.
Disabling a shortcut menu
The Enabled property lets you disable an entire shortcut menu. For example, you can set this property so that right-clicking a cell does not display the normal shortcut menu. The following statement disables the Cell shortcut menu for the workbook in the active window:
Application.CommandBars("Cell").Enabled = False
To reenable the shortcut menu, set its Enabled property to True. Resetting a shortcut menu does not enable it.
If you want to disable all shortcut menus in the active window, use the following procedure:
Sub DisableAllShortcutMenus()
Dim cb As CommandBar
For Each cb In CommandBars
If cb.Type = msoBarTypePopup Then _
cb.Enabled = False
Next cb
End Sub
Disabling shortcut menu items
You may want to disable one or more items on certain shortcut menus while your application is running. When an item is disabled, its text appears in light gray, and clicking it has no effect. The following procedure disables the Hide menu item from the Row and Column shortcut menus in the active window:
Sub DisableHideMenuItems()
CommandBars("Column").Controls("Hide").Enabled = False
CommandBars("Row").Controls("Hide").Enabled = False
End Sub
This procedure doesn’t prevent a user from using other methods to hide rows or columns, such as the Format command in the Home ➜ Cells group.
Adding a new item to the Cell shortcut menu
The AddToShortcut procedure that follows adds a new menu item to the Cell shortcut menu: Toggle Wrap Text. Recall that Excel has two Cell shortcut menus. This procedure modifies the normal right-click menu but not the right-click menu that appears in page break preview mode.
Sub AddToShortCut()
' Adds a menu item to the Cell shortcut menu
Dim Bar As CommandBar
Dim NewControl As CommandBarButton
DeleteFromShortcut
Set Bar = CommandBars("Cell")
Set NewControl = Bar.Controls.Add _
(Type:=msoControlButton)
With NewControl
.Caption ="Toggle &Wrap Text"
.OnAction ="ToggleWrapText"
.Picture = Application.CommandBars.GetImageMso _
("WrapText", 16, 16)
.Style = msoButtonIconAndCaption
End With
End Sub
Figure 18.4 shows the new menu item displayed after right-clicking a cell.

Figure 18.4 The Cell shortcut menu with a custom menu item.
The first command, after the declaration of a couple of variables, calls the DeleteFromShortcut procedure (listed later in this section). This statement ensures that only one Toggle Wrap Text menu item appears on the shortcut Cell menu. Note that the underlined hot key for this menu item is W, not T, because T is already used by the Cut menu item.
The Picture property is set by referencing the image used on the Ribbon for the Wrap Text command. Refer to Chapter 17 for more information about images used in Ribbon commands.
The macro executed when the menu item is selected is specified by the OnAction property. In this case, the macro is named ToggleWrapText:
Sub ToggleWrapText()
On Error Resume Next
CommandBars.ExecuteMso"WrapText"
If Err.Number <> 0 Then MsgBox"Could not toggle Wrap Text"
End Sub
This procedure simply executes the WrapText Ribbon command. If an error occurs (for example, the worksheet is protected), the user gets a message.
The DeleteFromShortcut procedure removes the new menu item from the Cell shortcut menu:
Sub DeleteFromShortcut()
On Error Resume Next
CommandBars("Cell").Controls ("Toggle &Wrap Text").Delete
End Sub
In most cases, you want to add and remove the shortcut menu additions automatically: Add the shortcut menu item when the workbook is opened and delete the menu item when the workbook is closed. Just add these two event procedures to the ThisWorkbook code module:
Private Sub Workbook_Open()
AddToShortCut
End Sub
Private Sub Workbook_BeforeClose(Cancel As Boolean)
DeleteFromShortcut
End Sub
The Workbook_Open procedure is executed when the workbook is opened, and the Workbook_BeforeClose procedure is executed before the workbook is closed. Just what the doctor ordered.
By the way, if shortcut menus are used only in Excel 2016, you don’t need to remove them when the workbook closes because the shortcut menu modifications are applied only to the active workbook window.
On the Web
The workbook described in this section is available on the book’s website in the add to cell shortcut.xlsm file. The file also includes a version of the macro that adds the new shortcut menu item to all open windows.
Adding a submenu to a shortcut menu
The example in this section adds a submenu with three options to the Cells shortcut menu of the active window. Figure 18.5 shows the worksheet after right-clicking a cell. Each submenu item executes a macro that changes the case of text in the selected cells.
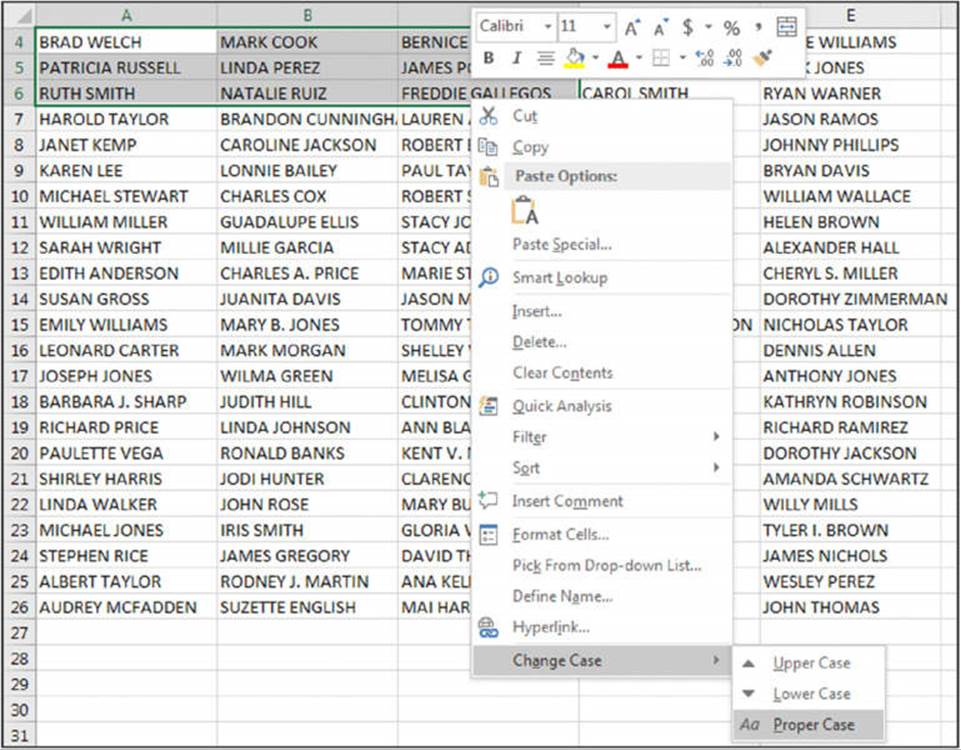
Figure 18.5 This shortcut menu has a submenu with three submenu items.
The code that creates the submenu and submenu items is as follows:
Sub AddSubmenu()
Dim Bar As CommandBar
Dim NewMenu As CommandBarControl
Dim NewSubmenu As CommandBarButton
DeleteSubmenu
Set Bar = CommandBars("Cell")
' Add submenu
Set NewMenu = Bar.Controls.Add _
(Type:=msoControlPopup)
NewMenu.Caption ="Ch&ange Case"
NewMenu.BeginGroup = True
' Add first submenu item
Set NewSubmenu = NewMenu.Controls.Add _
(Type:=msoControlButton)
With NewSubmenu
.FaceId = 38
.Caption ="&Upper Case"
.OnAction ="MakeUpperCase"
End With
' Add second submenu item
Set NewSubmenu = NewMenu.Controls.Add _
(Type:=msoControlButton)
With NewSubmenu
.FaceId = 40
.Caption ="&Lower Case"
.OnAction ="MakeLowerCase"
End With
' Add third submenu item
Set NewSubmenu = NewMenu.Controls.Add _
(Type:=msoControlButton)
With NewSubmenu
.FaceId = 476
.Caption ="&Proper Case"
.OnAction ="MakeProperCase"
End With
End Sub
The submenu is added first, and its Type property is msoControlPopup. Then the three submenu items are added, and each has a different OnAction property.
The code to delete the submenu is much simpler:
Sub DeleteSubmenu()
On Error Resume Next
CommandBars("Cell").Controls("Cha&nge Case").Delete
End Sub
On the Web
The workbook described in this section is available on the book’s website in the shortcut with submenu.xlsm file.
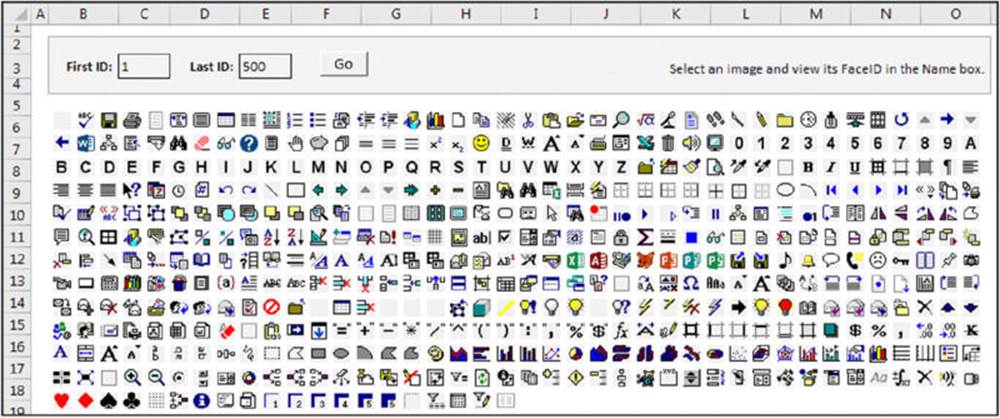
Finding FaceID images
The icon that’s displayed on a shortcut menu item is determined by one of two property settings:
· Picture: This option lets you use an imageMso from the Ribbon. For an example, see “Adding a new item to the Cell shortcut menu,” earlier in this chapter.
· FaceID: This option is the easiest because the FaceID property is just a numeric value that represents one of hundreds of images.
But how do you find out which number corresponds to a particular FaceID image? Excel doesn’t provide a way, so I created an application that lets you enter beginning and ending FaceID numbers. Click a button, and the images are displayed in the worksheet. Each image has a name that corresponds to its FaceID value. See the accompanying figure, which shows FaceID values from 1 to 500. This workbook, named show faceids.xlsm, is available on the book’s website.
Limiting a shortcut menu to a single workbook
As I’ve noted, in Excel 2016, shortcut menu modifications are applied only to the active workbook window (workbook A). For example, you might add a new item to the Cell right-click menu in workbook A. But if the user opens a new workbook when workbook A is active, the new workbook will also display the modified shortcut menu. If you want the shortcut menu to work only when workbook A is active, you can add some code to the macro that’s executed by the shortcut menu.
Assume that you wrote code that adds a shortcut menu that, when clicked, executes the MyMacro procedure. To limit this procedure to only the workbook in which it’s defined, use code like this:
Sub MyMacro()
If Not ActiveWorkbook Is ThisWorkbook Then
MsgBox"This shortcut menu doesn't work here."
Else
' [Macro code goes here]
End If
End Sub
Shortcut Menus and Events
The examples in this section demonstrate various shortcut menu programming techniques used with events.
 Cross-Ref
I discuss event programming in Chapter 6.
Adding and deleting menus automatically
If you need to modify a shortcut menu when a workbook is opened, use the Workbook_Open event. The following code, stored in the code module for the ThisWorkbook object, executes the ModifyShortcut procedure (not shown here):
Private Sub Workbook_Open()
ModifyShortcut
End Sub
To return the shortcut back to its state before the modification, use a procedure such as the following. This procedure, which is executed before the workbook closes, calls the RestoreShortcut procedure (not shown here):
Private Sub Workbook_BeforeClose(Cancel As Boolean)
RestoreShortcut
End Sub
If this code is used exclusively in Excel 2013 and Excel 2016, it’s not necessary to restore the shortcut menus when the workbook is closed because the modifications are applied only to the active workbook and disappear when the workbook is closed.
Disabling or hiding shortcut menu items
When a shortcut menu item is disabled, its text appears in a faint shade of gray, and clicking it has no effect. When a menu item is hidden, it doesn’t appear on the shortcut menu. You can, of course, write VBA code to enable or disable shortcut menu items. Similarly, you can write code to hide shortcut menu items. The key is tapping into the correct event.
The following code, for example, disables the Change Case shortcut menu item (which was added to the Cells menu) when Sheet2 is activated. This procedure is located in the code module for Sheet2:
Private Sub Worksheet_Activate()
CommandBars("Cell").Controls("Change Case").Enabled = False
End Sub
To enable the menu item when Sheet2 is deactivated, add the following procedure to its code module. The net effect is that the Change Case menu item is available at all times except when Sheet2 is active.
Private Sub Worksheet_Deactivate()
CommandBars("Cell").Controls("Change Case").Enabled = True
End Sub
To hide the menu item rather than disable it, simply access the Visible property instead of the Enabled property.
Creating a context-sensitive shortcut menu
You can create a new shortcut menu and display it in response to a particular event. The code that follows creates a shortcut menu named MyShortcut and adds six menu items to it. These menu items have their OnAction property set to execute a simple procedure that displays one of the tabs in the Format Cells dialog box (see Figure 18.6).
Figure 18.6 A new shortcut menu appears only when the user right-clicks a cell in the shaded area of the worksheet.
Sub CreateShortcut()
Set myBar = CommandBars.Add _
(Name:="MyShortcut", Position:=msoBarPopup)
' Add a menu item
Set myItem = myBar.Controls.Add(Type:=msoControlButton)
With myItem
.Caption ="&Number Format..."
.OnAction ="ShowFormatNumber"
.FaceId = 1554
End With
' Add a menu item
Set myItem = myBar.Controls.Add(Type:=msoControlButton)
With myItem
.Caption ="&Alignment..."
.OnAction ="ShowFormatAlignment"
.FaceId = 217
End With
' Add a menu item
Set myItem = myBar.Controls.Add(Type:=msoControlButton)
With myItem
.Caption ="&Font..."
.OnAction ="ShowFormatFont"
.FaceId = 291
End With
' Add a menu item
Set myItem = myBar.Controls.Add(Type:=msoControlButton)
With myItem
.Caption ="&Borders..."
.OnAction ="ShowFormatBorder"
.FaceId = 149
.BeginGroup = True
End With
' Add a menu item
Set myItem = myBar.Controls.Add(Type:=msoControlButton)
With myItem
.Caption ="&Patterns..."
.OnAction ="ShowFormatPatterns"
.FaceId = 1550
End With
' Add a menu item
Set myItem = myBar.Controls.Add(Type:=msoControlButton)
With myItem
.Caption ="Pr&otection..."
.OnAction ="ShowFormatProtection"
.FaceId = 2654
End With
End Sub
After the shortcut menu is created, you can display it by using the ShowPopup method. The following procedure, located in the code module for a Worksheet object, is executed when the user right-clicks in a cell within the range named “data”:
Private Sub Worksheet_BeforeRightClick _
(ByVal Target As Excel.Range, Cancel As Boolean)
If Union(Target.Range("A1"), Range("data")).Address = _
Range("data").Address Then
CommandBars("MyShortcut").ShowPopup
Cancel = True
End If
End Sub
If the active cell is within a range named data when the user right-clicks, the MyShortcut menu appears. Setting the Cancel argument to True ensures that the normal shortcut menu isn’t displayed. Note that the mini toolbar isn’t displayed.
You can also display this shortcut menu without even using the mouse. Create a simple procedure and assign a shortcut key by using the Options button in the Macro dialog box.
Sub ShowMyShortcutMenu()
' Ctrl+Shift+M shortcut key
CommandBars("MyShortcut").ShowPopup
End Sub
On the Web
The book’s website contains an example (named context-sensitive shortcut menu.xlsm) that creates a new shortcut menu and displays it in place of the normal Cell shortcut menu.
All materials on the site are licensed Creative Commons Attribution-Sharealike 3.0 Unported CC BY-SA 3.0 & GNU Free Documentation License (GFDL)
If you are the copyright holder of any material contained on our site and intend to remove it, please contact our site administrator for approval.
© 2016-2026 All site design rights belong to S.Y.A.