Exam Ref 70-342 Advanced Solutions of Microsoft Exchange Server 2013 (2015)
Chapter 3. Design, configure, and manage advanced security
This chapter looks at the various security features of both Exchange Server and the underlying operating system. You will look at these security features from the viewpoint of the IT professional and consider the impact of them to the user. It is a well-known adage that if security is difficult to implement, the user will not use it, or will work around it. You will also see how some of these security features can be implemented on behalf of the user so that Exchange Server, for example, encrypts messages automatically.
In this chapter you look at how to implement these different security features, looking at the best designs for them first, and then how to manage them in a live Exchange Server 2013 environment.
Objectives in this chapter:
![]() Objective 3.1: Select an appropriate security strategy
Objective 3.1: Select an appropriate security strategy
![]() Objective 3.2: Deploy and manage IRM with Active Directory Rights Management Services (AD RMS)
Objective 3.2: Deploy and manage IRM with Active Directory Rights Management Services (AD RMS)
![]() Objective 3.3: Configure and interpret mailbox and administrative auditing
Objective 3.3: Configure and interpret mailbox and administrative auditing
![]() Objective 3.4: Troubleshoot security-related issues
Objective 3.4: Troubleshoot security-related issues
Objective 3.1: Select an appropriate security strategy
The first and most important thing to consider when selecting a security feature from either Exchange Server or the operating system is to pick the right one for your needs, and then to select it at the right time. This objective looks at the features of each of the different security features in the following list, discuss its pros and cons, what it can do and cannot do (or should not be used for), and when is the best time to consider implementing the feature.
Understanding security and related options is a key requirement in designing Exchange Server solutions, so it is a key objective of this exam.
This objective covers how to:
![]() Evaluate role-based access control (RBAC)
Evaluate role-based access control (RBAC)
![]() Evaluate BitLocker
Evaluate BitLocker
![]() Evaluate smart cards
Evaluate smart cards
![]() Evaluate Information Rights Management (IRM)
Evaluate Information Rights Management (IRM)
![]() Evaluate S/MIME
Evaluate S/MIME
![]() Evaluate Domain Secure/TLS
Evaluate Domain Secure/TLS
Evaluating role-based access control (RBAC)
Role-based access control (RBAC) is the method of granting or removing access to various parts of Exchange Server for administrators and users. RBAC was introduced in Exchange Server 2010 and works the same way in Exchange Server 2013, however, the user interface to allow manipulation of RBAC has been improved in the latest version.
A good introduction to RBAC can be found at http://blogs.technet.com/b/exchange/archive/2009/11/16/3408825.aspx, which discusses the RBAC triangle of power. Even though this is an Exchange Server 2010 document, it is still valid for Exchange Server 2013. The concept with RBAC is that you want to change permissions on where someone can administer, what -someone can administer, and who that someone is. This is the “where”, “what,” and “who,” and this comprises the three parts of RBAC. Figure 3-1 shows this “triangle of power.”

FIGURE 3-1 The RBAC “triangle of power”
The “where” is where you want your permissions to apply. This can be an OU, or a database, or a group of servers. By default, new RBAC roles apply to the parent scope, which is all objects. If you want to apply a role to a subset of the objects, you either define the scope as part of the role, or you create a new scope first with New-ManagementScope, and then use this scope against multiple roles.
The “what” is what your role is able to do. This is, at its simplest level, a list of the Exchange Management Shell cmdlets and the parameters of those cmdlets that you are allowed to run. From the Exchange Management Shell, if you are restricted by RBAC so that a cmdlet is not available to you, the cmdlet does not appear in the shell. If you are using Exchange Control Panel, the areas that you cannot modify are not shown, or they are shown as read only.
The “who” is who will be able to perform the operation. This is either a user or a group. It is best practice to assume that even though you might want to grant the permissions to a single user now, you should apply the permissions to a group that contains that one member, and then adjust the group membership later rather than creating a second RBAC configuration for an additional user. A group for RBAC is known as a role group, and a role group is just a standard universal security group flagged for use by RBAC.
Finally, once you have the where, what, and who, you need to glue them all together. This is the Management Role Assignment. A Management Role Assignment is a one-to-one mapping of each where, what, and who. Once you have an assignment in place, the users affected by that assignment receive those permissions. RBAC permissions are cumulative, that is they are not the most restrictive takes precedence like in Active Directory and file shares. If you don’t want someone to have permission, do not add them.
RBAC “where”
Where you can work with an RBAC permission is the target that you are going to apply the permission to. In terms of RBAC language, this is the ManagementScope. To look up existing scopes, use Get-ManagementScope. To create new ones, use New-ManagementScope.
An example of a management scope is to give the users in the Birmingham office help desk the rights to modify only the users in the Birmingham OU. An Exchange Management Shell cmdlet such as the following could be used to create this scope.
New-ManagementScope -Name "Birmingham Users" -RecipientRoot "contoso.com\Birmingham"
For a scope, you can use the following to control the “where”:
![]() ServerList A list of servers, for example New-ManagementScope <name> -ServerList “MBX1,MBX2.”
ServerList A list of servers, for example New-ManagementScope <name> -ServerList “MBX1,MBX2.”
![]() RecipientRoot An OU and all objects under that OU, for example New-
RecipientRoot An OU and all objects under that OU, for example New-
ManagementScope <name> -RecipientRoot “domain.local\ParentOU\ChildOU.”
![]() DatabaseList A list of mailbox databases such as New-ManagementScope <name> -DatabaseList “DB01,DB02,DB03.”
DatabaseList A list of mailbox databases such as New-ManagementScope <name> -DatabaseList “DB01,DB02,DB03.”
For more advanced control and to avoid having to update lists in the scope all of the time, you can create queries. If the object you need to administer is covered by the query result you get to do the administration. Some example filters are:
![]() ServerRestrictionFilter Servers that meet a given criteria such as partial name or AD site location, for example New-ManagementScope <name> -ServerRestrictionFilter {ServerSite-eq “CN=Redmond,CN=Sites,CN=Configuration,DC=contoso,DC=com”}.
ServerRestrictionFilter Servers that meet a given criteria such as partial name or AD site location, for example New-ManagementScope <name> -ServerRestrictionFilter {ServerSite-eq “CN=Redmond,CN=Sites,CN=Configuration,DC=contoso,DC=com”}.
![]() RecipientRestrictionFilter Users who meet a given criteria such as an Active Directory property or other description. An example is New-ManagementScope <name> -RecipientRestrictionFilter { Title -Like “*VP*” }.
RecipientRestrictionFilter Users who meet a given criteria such as an Active Directory property or other description. An example is New-ManagementScope <name> -RecipientRestrictionFilter { Title -Like “*VP*” }.
![]() DatabaseRestrictionFilter Databases that match a criteria such as the database name, for example New-ManagementScope <name> -DatabaseRestrictionFilter {Name -Like “SEA*” }.
DatabaseRestrictionFilter Databases that match a criteria such as the database name, for example New-ManagementScope <name> -DatabaseRestrictionFilter {Name -Like “SEA*” }.
Finally, for the scope, or the “where,” there can be exclusive scopes. If you have an exclusive scope set (using -Exclusive on the cmdlet), only users assigned to your scope or other exclusive scopes can administer the covered object. It cannot be administered by any other standard RBAC scope. Exclusive scopes allow you to lock down permission assignment to selected users or databases, for example to a given discrete group of administrators.
RBAC “what”
The ManagementRole is the “what” in RBAC. All ManagementRoles that you create are based on an existing management role. This means that you take an existing management role (Get-ManagementRole) and make it work for you. For example, if you find a management role that does close to but more than what you need to do, you can remove any extra cmdlets and parameters that you do not want this ManagementRole to have. Always leave the Get- cmdlets for any Set- cmdlets that you are planning on keeping; you will always want to be able to get the current values before you change them with a Set- cmdlet.
Here is an example of a new management role.
New-ManagementRole -Name "VIP Editor" -Parent "Mail Recipients"
This creates a new management role called VIP Editor. Notice that the name describes what it will do. You can immediately see that it is going to have something to do with mail recipients because the parent management role is Mail Recipients.
Once the role is created, you need to remove the permissions that are in excess on this role. Remember that you cannot add cmdlets that do not exist on the parent role. An example here that would allow VIP Editors to modify just a few settings on the target user would be to remove all of the cmdlets except for one (you have to leave at least one).
Get-ManagementRoleEntry "VIP Editor\*" | Where {$_.name -ne "Get-User"} | Remove-
ManagementRoleEntry
The above removed all of the cmdlets from the VIP Editor management role except for Get-User. Get-User is a useful one to leave because it will get user information that the role holder will need.
Finally, we need to add back in the cmdlets and parameters that the role holder will be able to call. We can do this with the following example.
Add-ManagementRoleEntry "VIP Editor\Set-User" -Parameters Office,Phone,Mobilephone,
Department,Manager
This adds in the Set-User cmdlet, and only the listed parameters. Now that you have the “where,” and the “what,” it is time for the “who.”
RBAC “who”
The “who” is the users or group that get designated these rights. The “who” is the RoleGroup, and behind the scenes the ManagementRoleAssignment. Once you create a RoleGroup, you say who, what, and the where, and join them together. The three pieces that you created are glued together and this is why you make the ManagementRoleEntry (the “what”) and the ManagementScope (the “where”) before you create the RoleGroup.
For example, if you are creating a group of administrators to have only the ability to modify some settings for the VIP users of Contoso, you would create something like the following.
New-RoleGroup "VIP Editors" -Roles "VIP Editor" -CustomRecipientWriteScope "VIP Users"
If you take all of the examples here that made the ManagementRoleEntry and the ManagementScope, you have the following Exchange Management Shell cmdlets.
Restricting permissions for VIP Users
New-ManagementScope -name "VIP Users" -RecipientRestrictionFilter {memberofgroup -eq "cn
=VIPs,ou=VIP,dc=domain,dc=com"}
New-ManagementRole -Name "VIP Editor" -Parent "Mail Recipients"
Get-ManagementRoleEntry "VIP Editor\*" | Where {$_.name -ne "Get-User"} | Remove-
ManagementRoleEntry
Add-ManagementRoleEntry "VIP Editor\Set-User" -Parameters Office,Phone,Mobilephone,
Department,Manager
New-RoleGroup "VIP Editors" -Roles "VIP Editor" -CustomRecipientWriteScope "VIP Users"
Before running these cmdlets in your test lab, ensure that this OU actually exists in your environment and that it has users in it. Then change the New-ManagementScope line so that the dc= values are correct. If you make the scope without making these changes, you need to use Set-ManagementScope to correct the filter.
Finally, add a user to the VIP Editor group (located in Microsoft Exchange Security Groups OU) and log in as that user to Exchange Control Panel, or run Exchange Management Shell as that user. In ECP you should be able to modify only the Office, Phone, Mobilephone, Department, or Manager properties. The effect this has on ECP can be seen in Figure 3-2 where the Phone property and the Mobilephone property can be set but the other values in this dialog box cannot be set.
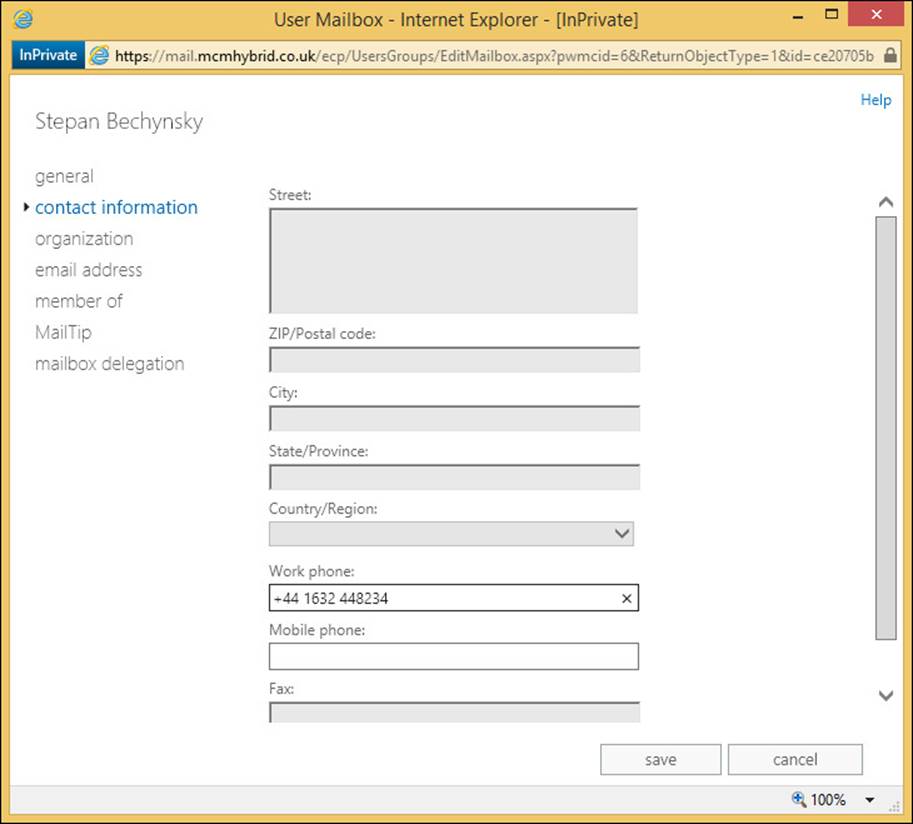
FIGURE 3-2 Restricted rights applied via RBAC and seen in Exchange Control Panel
Evaluating BitLocker
Some Microsoft Windows editions since Windows Vista have shipped with a product called BitLocker Drive Encryption. It is commonly known as BitLocker. It was available in Windows Vista, Windows 7 Enterprise and Ultimate editions, and in Windows 8 it is available in the Pro and Enterprise editions. It is available on all editions of Windows 8.1, though the feature BitLocker and its ability to modify and configure it is only available in the Pro and Enterprise editions. RT and home editions support a device encryption feature based on BitLocker. The matching Windows Server editions since Windows Server 2008 also support BitLocker.
BitLocker is a logical disk encryption system that can encrypt both the system and data partitions, and in Windows 7 and Windows Server 2008 R2 and later also supports removable drives with BitLocker To Go. Because it is a logical disk encryption system, you can protect volumes that are part of a physical disk or volumes that span multiple disks. It is supported with Exchange Server and because the BitLocker encryption/decryption process has an overhead of only a single digit percentage, it does not add additional disk I/O.
BitLocker requires two NTFS formatted volumes to allow for encryption of the operating system, a boot volume of at least 100 MB, and then the operating system volume, which is usually the C drive . Since Windows 7, the installation program has made these partitions for you automatically so that you do not need to rebuild the operating system if should you want to turn on BitLocker at a later date. Therefore, from an Exchange Server viewpoint, it can be enabled later in the life of the server, though the best time to enable it is before any data is written to the server’s disks because the encryption process is a background task that encrypts every sector of the volume. Once the volume is protected, the encryption keys are protected and then all future writes to the volume and reads from the volume pass through a low level encryption/decryption device driver. To the higher level drivers and applications such as Exchange Server, the disk does not appear to be encrypted and the data appears to be unmodified in any way from what the application would have expected.
To allow for encryption of any data volume, you do not require the 100 MB volume that the operating system requires. This 100 MB volume contains the operating system boot code that needs to be unencrypted to allow for the loading of the operating system from a protected volume. Therefore for Exchange Server, you could choose to protect your Exchange databases and transaction logs only if you wanted, but remember that the default installation location for Exchange Server is the operating system partition. It is to the installation location that the initial mailbox database is created, as well as considerable amounts of log files, the binaries, and the transport databases.
In addition to encrypting the entire volume, BitLocker uses a variety of combinations of authentication mechanisms. These ensure that the disk cannot be read when it is outside the server in which it was created unless a recovery key is available. Therefore BitLocker can be used to protect data stored to the disk, should the risk of the disk ever falling into the wrong hands be considered a possibility. For example, even though the security of the Office 365 data centers is considerable, the Exchange Online service uses BitLocker on the servers that they use for their customers’ data.
The options that exist for BitLocker authentication include both on server and off server choices. Any off server choice means that the authentication key, either manually entered (a PIN) or by the use of a removable hardware device (a USB key), will need to be present when the server is rebooted. Therefore, it is likely that any Exchange Server implementation that uses BitLocker will require a Trusted Platform Module (or TPM) chip as part of the hardware. The TPM can hold the BitLocker key in its secure cryptographic store and provide it as needed during the boot process. The TPM can be combined with off server authentication systems such as PIN entry or USB key as mentioned earlier, but again this would require operator intervention at reboot. The use of a DAG allows you to have an Exchange Server running and holding your active databases while potentially another copy of those databases is on an Exchange Server that has rebooted and is waiting authentication for BitLocker. This requires additional management and personal access to the physical location where the servers are stored. Therefore, you would typically not use a DAG unless the site security conditions so required it and the impact to Exchange Server operations has been planned well in advance.
Note: Network Unlock
BitLocker Network Unlock is a feature that was introduced in Windows 8 and Windows Server 2012 as a way to unlock operating system volumes protected with BitLocker. Network Unlock enables easier management for BitLocker enabled desktops and servers in a domain environment by providing automatic unlock of operating system volumes at system reboot when connected to a wired corporate network. This feature requires the client hardware to have a DHCP driver implemented in its UEFI firmware.
Computers that incorporate a TPM can also create a key that has not only been wrapped, but also tied to specific hardware or software conditions. This is called sealing a key. When a sealed key is first created, the TPM records a snapshot of the configuration values and file hashes. A sealed key is only unsealed or released when those current system values match the ones in the snapshot. BitLocker uses sealed keys to detect attacks against the integrity of the Windows operating system.
When BitLocker is used without a TPM, the required encryption keys are stored on a USB flash drive that must be presented to unlock the data stored on a volume. When BitLocker is used with just a TPM chip, the drives cannot be read if they become separated from their host server.
Microsoft does not support BitLocker in a virtual machine, but does support BitLocker on Hyper-V on the host operating system.
When implementing BitLocker, the operating system will go through the checks required to make sure the system can be protected. This means that it will look for a TPM chip or the Allow BitLocker With A Compatible TPM Group Policy option. If the system cannot support BitLocker because it does not have a TPM chip you can choose the alternative key options as appropriate.
To enable BitLocker on Windows Server, you need to install the BitLocker Drive Encryption feature as shown in Figure 3-3.
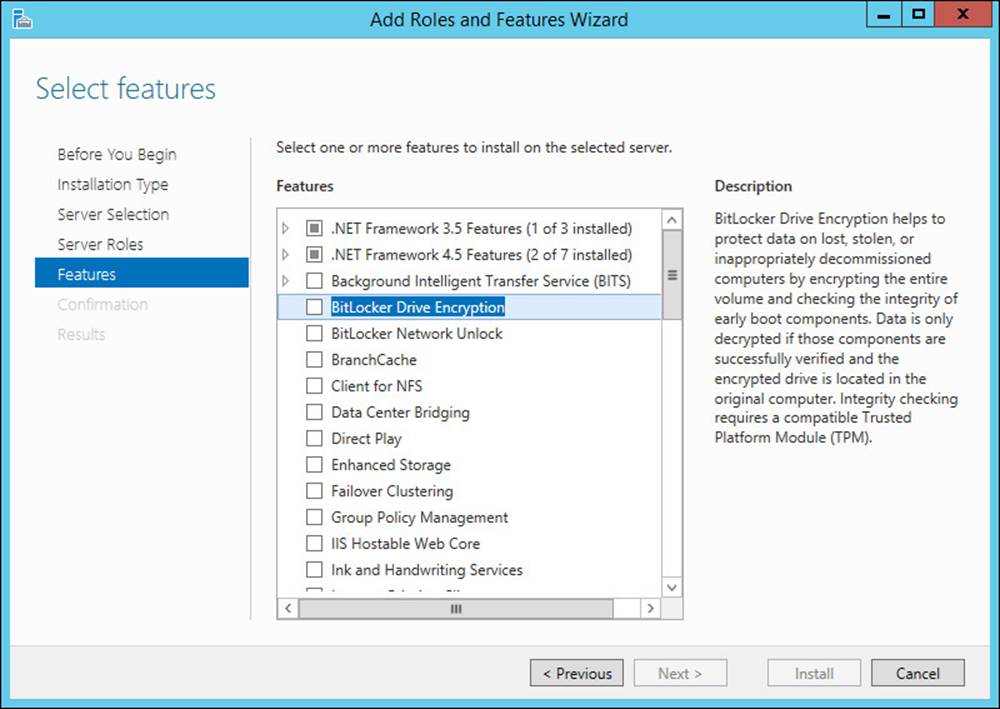
FIGURE 3-3 Adding the BitLocker feature to Windows Server 2012 R2
Once the feature is installed, BitLocker can be enabled (Figure 3-4) on either the system volume or any data volume as required. The installation will make recommendations to the storing of a recovery key. If the operating system is being protected, this defaults to the TPM chip that would need to be present in the server and enabled in the BIOS. If a data partition is being protected, you can use the TPM, apassword, or a smart card to store the encryption key.
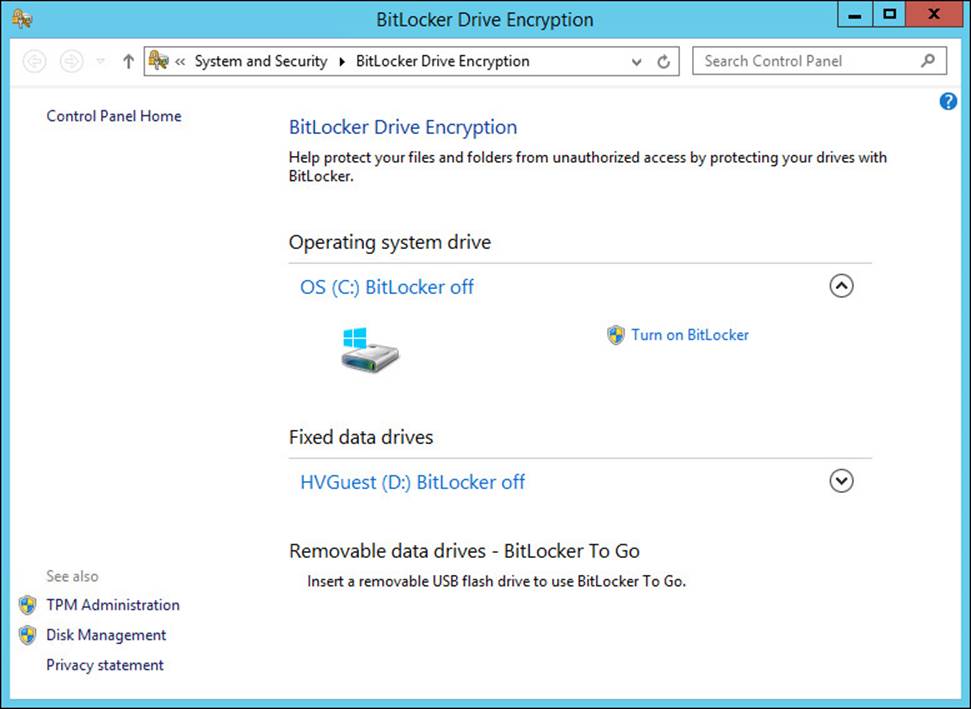
FIGURE 3-4 Choosing the volume to protect
In addition to the TPM, smartcard, or removable USB device you can also add additional protection of a password, but for Exchange Servers and especially those stored in remote data centers from the administrators, this option would prove problematic.
Finally, you get to save a recovery key. This can be printed out or saved to a file or USB key. This recovery key should be saved somewhere safe and far away from the server to which it belongs. In Windows Server 2012 and 2012 R2, it can be saved to your Microsoft Account where you can access the key later from https://onedrive.live.com/recoverykey.
Important: BitLocker and Windows Server 2008 R2
When the operating system is Windows Server 2008 R2, a security patch is required to enable BitLocker on the Exchange Server mailbox role server that is part of a DAG. BitLocker incorrectly identifies the non-shared disks that would be used in a DAG as being shared disks, and shared disks are not supported for BitLocker.
Evaluating smart cards
Smart cards are typically credit card sized cryptographic devices that are easy to carry and can additionally be integrated with door entry and photo identification systems. From the viewpoint of the Exchange Server administrator, smart cards have two purposes:
1. Storing encryption keys for the purposes of S/MIME by users.
2. Storing login information for the purposes of authenticating administrator login to servers.
You will note that both of these features are actually operating system features that Exchange Server, or in the case of S/MIME, the Outlook client, make use of. That is also true for the preceding BitLocker discussion and all of the remaining items in this objective.
Smart cards store cryptographic information in such a way that it can be written to the chip on the card, but cannot be read from the chip. Any cryptographic function that the computer needs to do, such as encrypting an email or logging into a server, requires that the smart card is present or the computer will not be able to access the cryptographic information.
Specifically, the smart cards used by Windows store the private key from a public and private key encryption system on them. Public and private keys are covered in the “Evaluating S/MIME” section later in this chapter. Because the private key should only be held by the key holder, placing the private key on a write-only media such as a smart card ensures that even if the private key is lost, the actual key cannot be read. Also it is probable to assume the PIN number needed to access the smart card, and which is needed to use the key, is probably not lost as well. Additionally, when cryptographic functions need to take place, the microprocessor on the card does the encryption and decryption. The keys to do this work are never given to the host computer, but the host computer will hand the encrypted data to the card and get back the clear text data.
Smart cards are tamper proof, and it is impossible to read the private key and other information from the card. The disadvantage of a smart card, apart from having to have it with you wherever you need to use the keys on the card (which is of course an advantage as well), is that you also need the correct hardware to read the card. Over time different smart card hardware has been available, and over the last fifteen or so years, these have included serial connected hardware, smart card readers inside laptops, USB readers, and keyboards with smart card readers included. Figure 3-5 shows a current smart card reader and a card inside the reader.
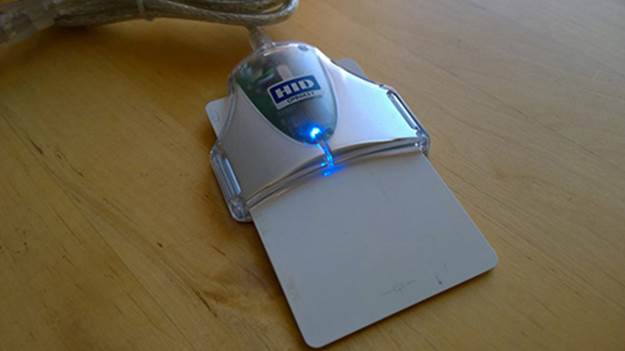
FIGURE 3-5 A USB smart card reader and a smart card
For login to the Exchange Server for administrative purposes, it is possible to significantly increase the protection of these elevated network credentials because the login details do not cross the network. The PIN used to authorize use of the smart card is used on the device with the smart card reader and no further. If the user enters the correct PIN, and the stored credentials on the card are valid, the user has logged in.
With password based authentication, the security is based on the complexity of the password. The shorter or more predictable the password, the easier it is to determine. Passwords can be learned by way of social engineering, however, the PIN is typically of no use without the card. Passwords are also susceptible to brute force attacks, where repeated attempts are made to guess the password or to read that data from the network packets that contain the password as it is sent across the wire. If a smart card is obtained from the user, a brute force attack might be used in an attempt to learn the PIN,, but the device will stop working and lock the card after a low number of invalid PINs are used. Meanwhile, the user requests that the card be invalidated and a new one issued.
For Exchange Server 2013 it is important to remember that you can use Exchange Control Panel and login to do administration using a web browser or Remote PowerShell. Both of these can be started from a session that is not smart card protected and so other means need to be used to either limit administration to certain controlled workstations, or the servers themselves, where a smart card must be used. An example of using a smart card to login to Remote PowerShell is shown in Figure 3-6.
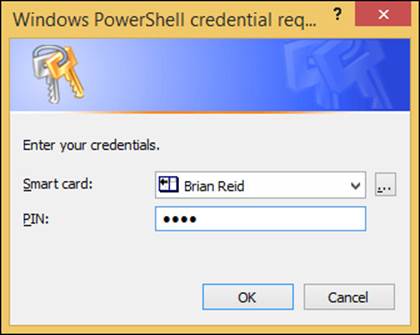
FIGURE 3-6 Using a smart card to login to Windows PowerShell
New to Windows 8 and Windows Server 2012 R2 are virtual smart cards. These get around the infrastructure requirements of typical smart cards by using the TPM chip on some laptops, tablets, and phones to replace the smart card and the reader. Virtual smart cards appear in Windows as a smart card that is always inserted. More information on virtual smart cards can be found at http://technet.microsoft.com/en-gb/library/dn593708.aspx.
Evaluating Information Rights Management (IRM)
Information Rights Management (IRM) (or sometimes referred to in the context of Windows as RMS after the server role, Rights Management Services) is a way to ensure that the rights to use a document or email remain with the document or email for its life. Rights Management is used in a lot of digital media, most notably in the protection of music and videos that have been downloaded where a license needs to be acquired to play the media on every device that you would use.
From the viewpoint of the Exchange administrator, IRM is an optional feature that requires the use of both the Exchange Enterprise CAL and the RMS CAL for Windows. These CALs can be assigned to the users who would encrypt or view the documents, and emails that are protected with the RMS server.
Microsoft released Azure RMS in Office 365 in early 2014 and has added functionality to that product since its release. For Azure RMS licensing, you need an Office 365 E3 or E4 license to create content, and you do not need a license to consume protected content. Azure RMS can be added to some other Office 365 licenses as an additional license if E3 or E4 licenses are not used.
Because RMS protection stays with the document or email, it is used to set policy on the document or email that is being protected. From the viewpoint of the user, when they protect any document, they choose the policy. From the viewpoint of the Exchange administrator, they can set up transport rules to protect emails that meet certain criteria.
The next objective in this book looks at the steps to deploy and manage RMS. In brief, you need to install an AD RMS cluster, which is one or more servers running the AD RMS role and configured as a group of servers that work with the same key. You do not install failover clustering to make this cluster, although as AD RMS is a web service, it is a good candidate for a load balancer if you have more than one server. Once the AD RMS server is in place, you then configure Exchange Server to use AD RMS to protect emails and the attachments inside emails (if they can be protected as an individual document). This protection can happen in Outlook Web App and Outlook if you have installed an Office ProPlus edition. Protection can also happen when using transport rules, journaling rules and the evaluation of protected documents as they travel through the Exchange Server.
The disadvantage of RMS is that it is complex to share this protection outside of the boundary of your Active Directory forest. Therefore, it has typically been used in large companies to protect internal-only content.
The aim of Azure RMS is to make the sharing of protected content outside of your company via shared storage and any device a reality.
More Info: Azure RMS
For your information, there is a series of articles starting at http://www.c7solutions.com/2013/11/the-new-rights-management-service, which cover Exchange Server, SharePoint, and the Azure RMS product. The Azure RMS product is not included on the exam, but it is important to know as the technology develops in this direction.
Evaluating S/MIME
Secure/Multipurpose Internet Mail Extensions (S/MIME) is a protocol for the sending of signed and encrypted messages by email. It requires a digital certificate per user, and it also requires that the certificate have the email address of the sender as its subject name. The holder of the digital certificate needs the private key for that certificate to be available as well.
The benefit of S/MIME is that the recipient can be certain that what they receive is what the sender sent, and that the sender really was the sender who sent it. S/MIME also allows for the message to be encrypted so that it is readable only to the recipients and not anyone else.
The disadvantage of S/MIME is that the onus on the use of the certificate and the interpretation of the received message is on the user. Exchange Server 2013 Service Pack 1 and later can make use of certificates stored in the Active Directory so that Outlook Web App can send and receive S/MIME protected emails. The user needs to have the certificate (although this can be centrally issued from an internal certificate authority) and the user needs to decide which emails to sign and encrypt.
Important: S/MIME and different versions of OWA
S/MIME is only available in Outlook Web Access with Exchange Server 2013 SP1 or later. It is not available in the original release of Exchange Server 2013 though it was available in later service packs for Exchange Server 2010.
S/MIME comes with a series of terminologies that are important to understand. They also make for good exam questions! The first of the two terminologies previously introduced is digital signing. This is analogous to signing a letter. Your signature authenticates the letter as being from you, and indicates that the words of the letter are your words. The second term mentioned previously is message encryption, and from an S/MIME viewpoint this is taking a clear text email and encrypting it in such a way that only the recipient can view it. To understand these terms, you need to look at how digital certificates are used for digital signing and encryption.
How digital certificates are used for security
To be able to understand S/MIME and evaluate it well, you need a good understanding of the PKI. A PKI, or Private Key Infrastructure, is the system in place for the creation validation, distribution, and evaluation of digital certificates. If you are going to use S/MIME to sign and encrypt emails sent outside your organization, you need to use an external PKI that both the sender and the recipient trust. This external PKI has a certificate authority at its root that both the sender and the recipient will use to validate the certificates used for signing or encrypting the messages. If you only use S/MIME for internal recipients, you can use a PKI that has a certificate authority at its root that is available internal to your company only.
A certificate authority is a fundamental element of message security. Messages are secured using keys and though these keys are created on the users own computer, they are validated as belonging to the user by the certificate authority. If the user loses their keys, the certificate authority marks them as revoked, and so any emails received from the sender with those keys after that revocation date are to be considered suspect. Therefore it is very important to trust the certificate authority at the heart of the PKI.
To sign or encrypt messages, the user will use a certificate. The exact certificate used will vary, and this is covered more in later sections of this chapter, but the certificate contains a key, the certificate has an owner, and the certificate has been validated as belonging to that owner by the certificate authority.
In S/MIME, as with technologies such as smart cards, TLS, and SSL, there are two keys. These are known as the public key and the private key. The key pair is mathematically related, but if you hold only one of the keys, you cannot calculate the other key. It is theoretically possible to use brute force to guess a key and so when you are looking at S/MIME and the keys you will see reference to key length. The longer the key the harder it will be to guess the other key in the pair, and the longer it takes to sign and encrypt data with these keys.
S/MIME uses these two keys to allow for the following two features, each of which has some benefits associated with them:
![]() Signing Emails:
Signing Emails:
![]() Authentication You know who the sender is.
Authentication You know who the sender is.
![]() Message integrity The message has not changed since it was sent.
Message integrity The message has not changed since it was sent.
![]() Non-repudiation The sender cannot claim they did not send it.
Non-repudiation The sender cannot claim they did not send it.
![]() Encrypting Emails:
Encrypting Emails:
![]() Privacy The message can only be read by the recipient.
Privacy The message can only be read by the recipient.
![]() Message integrity The message has not changed since it was sent.
Message integrity The message has not changed since it was sent.
You will look at these terms and how they work with S/MIME in the next section.
S/MIME terminology
Private key Of the two keys that are used in S/MIME, one is designated the private key. The user keeps the private key. Smart cards can be used to further protect the storage of the private key off of the user’s computer, but typically it is stored in the user’s profile and accessible only via the Microsoft Crypto API. If this key falls into the wrong hands, or can be used by anyone other than the key holder, the key should be revoked at the certificate authority. If the private key encrypts anything, it can only be decrypted by the user’s public key. The same key cannot be used to encrypt and decrypt the same message.
Public key This is the other related, but asymmetric, key created at the same time as the private key. Unlike the private key that never leaves the computer, the public key is distributed and can be stored in a central area for access such as in the Active Directory or via a website that the certificate authority manages. The public key is stored with the user’s digital certificate. If the public key encrypts anything, it can only be decrypted by the user’s private key. The same key cannot be used to encrypt and decrypt the same message.
Digital certificate This is the user’s public key that is validated as belonging to the user by the certificate authority. The certificate contains information pertaining to the user and the public key. The certificate is generated by the user’s computer and then sent to a certificate authority. The certificate authority takes a hash of the data in the certificate and signs it with the certificate authority’s private key. This signed hash is stored with the certificate and returned to the user. When a recipient wants to validate that the certificate comes from the user and has not been tampered with, they too hash the certificate as did the certificate authority, and then they compare the hash they generated with the hash the certificate authority signed and placed on the certificate. The signed hash cannot be modified without breaking the signature. Therefore, if the hashes match the certificate, the certificate is unmodified and therefore came from the user who claims to have sent it.
Hash A mathematical function that takes a given input and generates a unique number from that input. There should be no possibility of two different inputs generating the same hash. Common hash algorithms are MD5, SHA1, and SHA256. Of these, the recommendation at the time of writing is to use SHA256 for digital certificates.
Authentication The digital signature validates the identity of the user. Because only the sender holds the key used to sign the email, it must have been the sender who sent that email. By default, there is no authentication of email and so there is no way to know if a user really sent that email. S/MIME authentication in the digital signature solves this issue because there is only one person who holds the private key.
Non-repudiation Because the signature used to sign the message is unique, the sender cannot say that their signature was not used. As S/MIME provides authentication so that you know whom the sender is, it can then additionally provide non-repudiation. Without authentication, non-repudiation is impossible to provide.
Message integrity When a message is digitally signed the data that makes up the message body is hashed and the sender signs that hash with their private key. The hash is attached to the message and the message sent. On receipt, a S/MIME aware client will take the signed hash and generate a hash from the message body. If both hashes are the same, the message must be the same as it was at the time the sender sent it. Note that the message envelope is not included in the hash, The message envelope can change throughout the transfer of the message by, most commonly, the addition of multiple received headers as the message is transferred through different SMTP servers. Both digital signatures and data encryption provide message integrity.
Privacy This is where the message is encrypted by the recipient’s public key. As the message is now protected with the public key that belongs to the intended recipient, it can only be read by someone holding the recipient’s private key, which should be the recipient.
Note: Privacy and Digital Signatures
Though digital signatures provide message integrity, they do not provide privacy. Messages with only a digital signature on them still contain a clear text copy of the message, as do normal SMTP messages. They can be read by anyone with access to the network or storage where the email travels through or ends up on. Some S/MIME clients provide for opaque-signed, where Base 64 encodes the clear text message to obfuscate it, but because Base 64 is not an encryption method, it can easily be decoded and read.
S/MIME digital signing
Now that you have looked at the terminology, take a look at how it works so that you can evaluate S/MIME for your Exchange Server mailboxes.
First, you need to obtain an S/MIME digital certificate either from your internal company certificate authority or from a trusted third-party certificate authority. A trusted certificate authority, either internal or external, is one whose public key is stored in the certificate store on your computer and on all of your recipients’ computers. The S/MIME certificate needs to be valid for your email address. In the Outlook Trust Center, there is a Get A Digital ID button that will give you a list of current S/MIME certificate providers.
The exact process for getting your certificate will vary depending on the provider. After you have downloaded your digital certificate to your computer, you need to configure Outlook to use that certificate for S/MIME. This is done (in Outlook 2013) by clicking File, Options, Trust Center, Trust Center Settings, E-mail Security, Settings. This can be seen in Figure 3-7.
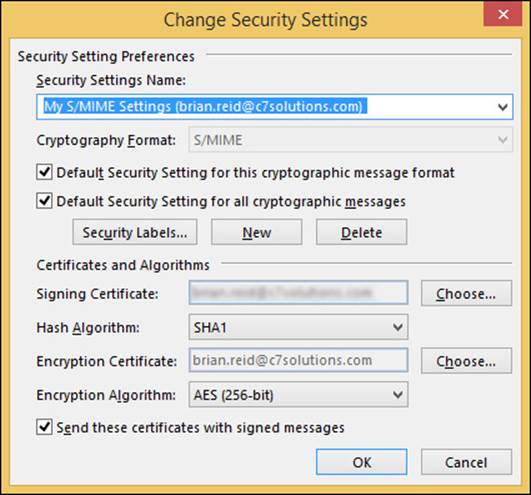
FIGURE 3-7 S/MIME Settings in Outlook
In the Change Security Settings dialog box, click each of the Choose buttons to select your signing certificate and then your encryption certificate. You might have one certificate that does both signing and encryption, or you might have two. If you have one certificate you would select the same one for both choices. If you have multiple email accounts in Outlook and have different certificates in both, you create a new Security Settings Name for each, then when you are sending emails you can pick which S/MIME profile to use.
On the E-Mail Security tab in the Trust Center, shown in Figure 3-8, you can select whether you want to encrypt or sign all of your outgoing emails, or both, and if you would like an S/MIME read receipt for each. You can also choose to opaque-sign messages. To enable this setting, clear the Send Clear Text Signed Message When Sending Signed Messages check box.
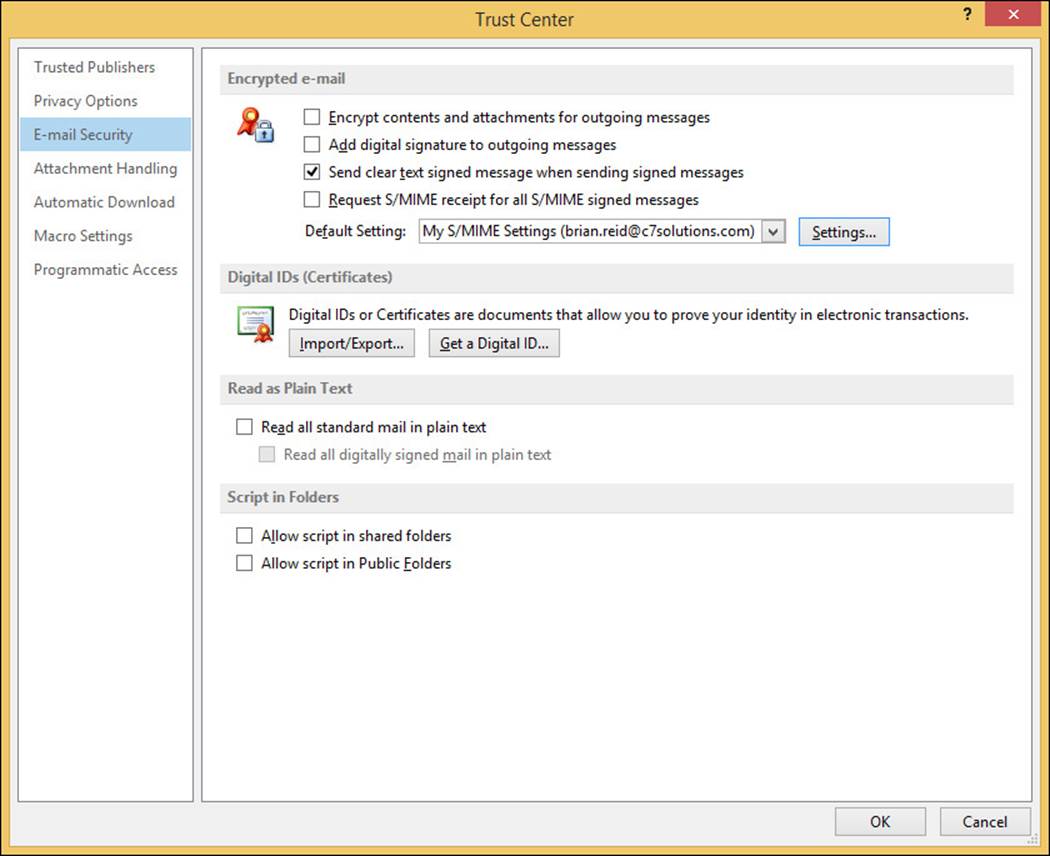
FIGURE 3-8 Encrypted email options in the Outlook 2013 Trust Center
When you have your certificate configured in Outlook, you can send and receive signed and also encrypted emails (which is covered in the next section). To sign an email, start by composing a new email, clicking the Sign button on the Permissions area of the Options tab, and then clicking Send when ready. This can be seen in Figure 3-9. If you have any certificate issues, such as not having a certificate for the sending email address you are using, you will be prompted and given an opportunity to go to the Trust Center to fix the issue.
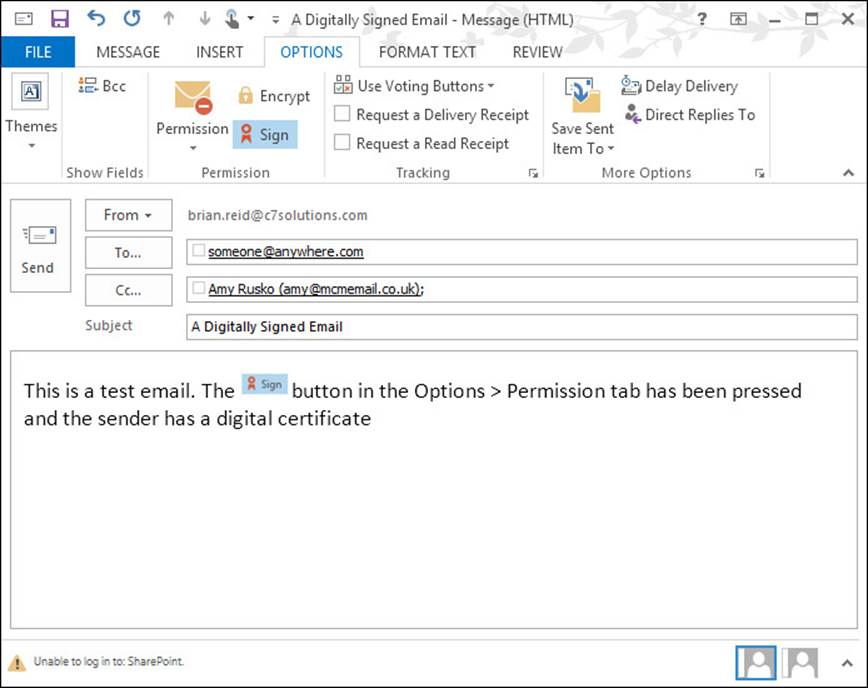
FIGURE 3-9 The Sign button is selected in an Outlook 2013 email
When you click Send, Outlook will take the message and run it through the hash algorithm that is selected for the certificate in the Trust Center. This generates a unique hash for the email, and this hash is then encrypted with the sender’s private key. Note the hash is encrypted here and not the email body. This hash is typically smaller than the email body and therefore it is quicker to encrypt the hash than the entire email. The encrypted hash and the email body in clear text are sent to the recipient. Typically the sender’s public key is also sent with the message.
On receipt, the recipient’s client will validate the encrypted hash by generating a new hash of the email body as received. The client also takes the sender’s public key and uses that to decrypt the encrypted hash that came with the email. This gives the client two hash values to compare.
If the two hashes match, the email has not been tampered with (message integrity). It must have been signed by the sender (non-repudiation) and it must have come from that sender (authentication).
S/MIME message encryption
To encrypt a message, you need to have the recipient’s public key. Note that this is different from signing, where you do not need anything from the recipient. When you encrypt a message you need to encrypt it with the recipient’s public key so that the recipient, with his or her own private key, can decrypt it.
The easiest way to get the recipient’s public key is for them to send you a signed email. You can then reply with an encrypted email or you can save the public key for the user with their contact information in your address book for future use. You can also publish keys to the Active Directory, which can then be retrieved automatically by Outlook for users inside your organization, or contacts outside that have been added to the Active Directory.
Because each user has a different public/private key pair, when you encrypt emails to more than one user you need to have the public key for each user. Also, odd though it seems, you also need to have your own public/private key pair. The reason for this is that Outlook encrypts the message using your own keys and saves it to Sent Items. The copy in Sent Items is not the one you actually send to the recipient, as you could never open that again, but instead is a copy effectively sent to yourself. Therefore, to encrypt emails in Outlook you need your own public/private key as well.
Once you have the public key from the recipient and your keys configured for encryption, you can click the Encrypt button on the Options tab. This can be seen in Figure 3-10. If you do not have the recipient’s public key, you will get the error shown in Figure 3-11.
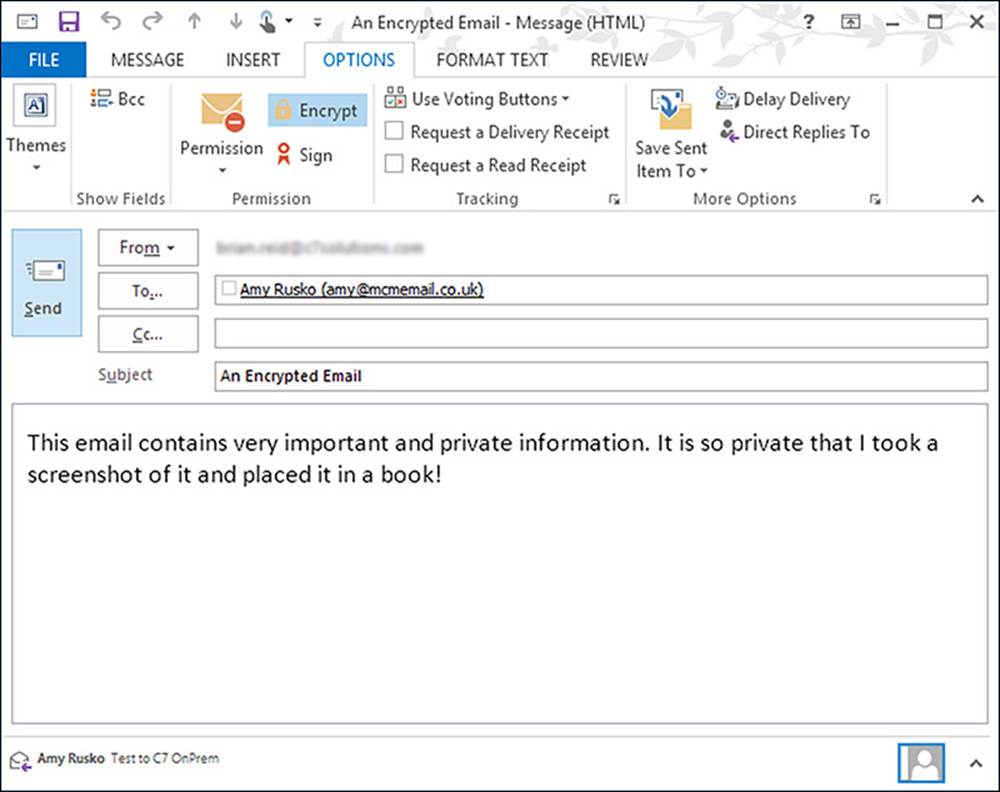
FIGURE 3-10 An email with the encrypt button pressed and ready to send

FIGURE 3-11 Encryption Problems dialog box when sending to users whose public key you do not have
The dialog box shown in Figure 3-12 contains the message you receive if you do not have your own encryption certificate. Outlook when it sends an encrypted message to someone else will store a copy of the message in the Send Items folder. This copy needs to be encrypted so that only the sender can read it. To encrypt a message to yourself, the sender, Outlook needs to encrypt the message using the senders public key so that it can be opened only by the sender from the Sent Items folder.
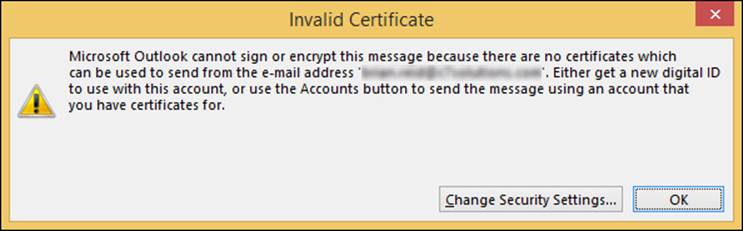
FIGURE 3-12 The Invalid Certificate error when you do not have your own encryption certificate
Finally, note that only message integrity is available with signed or encrypted emails. Therefore if you want an encrypted but authenticated email, an encrypted email that can be nonrepudiated, you need to sign and encrypt the email which means clicking both buttons in Outlook.
When you send the email, the client generates a session key. This is a key that will encrypt the email quickly because public/private keys take a long time to do this. The session key is used to encrypt the message body, and then the client takes the session key and the public key of the recipient and encrypts the session key so that only the recipient can read it. This process is repeated for each recipient and a copy that contains the encrypted message body and the encrypted session key for that recipient is sent to each recipient.
Upon receipt of the encrypted email, the client decrypts the session key using their private key and once they have the session key they can decrypt the message body. If the message is also signed, validation of the signature can also happen as previously described. Upon opening the email, the client will see the encryption icon, which can be clicked to show the certificate and sender information. An example dialog box showing the message’s security properties can be seen in Figure 3-13.
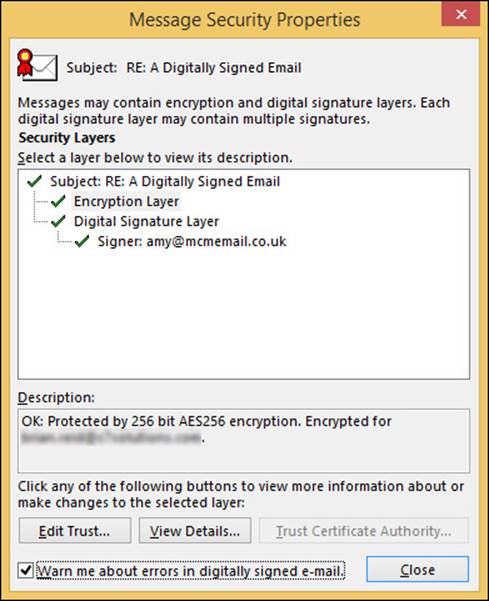
FIGURE 3-13 Message Security Properties dialog, reached by clicking the Encrypted or Signed icon in the recipients email
More Info: S/MIME
Further information on S/MIME can be found on TechNet at http://technet.microsoft.com/en-us/library/aa995740.aspx.
S/MIME and Outlook Web App
To use S/MIME with Outlook Web App, you need two things in addition to Exchange Server 2013 Service Pack 1 or later. To read signed or encrypted emails, you need the S/MIME control running in Internet Explorer and the digital certificate needs to be available to the server via the Active Directory, or if you are using Exchange Online, via Azure Active Directory DirSync. More information on S/MIME in OWA can be read from the Office Blogs site at http://blogs.office.com/2014/02/26/smime-encryption-now-in-office-365/. Though the title says Office 365, it is valid for both on-premises Exchange 2013 Service Pack 1 and Exchange Online.
To configure Exchange Server 2013 to support S/MIME in OWA, you use the Set-SmimeConfig Exchange Management Shell cmdlet. With this cmdlet, you can let users choose their signing certificate if they have more than one, set the encryption algorithms, and set timeout values to retrieve certificates from the Active Directory.
Evaluating Domain Secure/TLS
Domain Secure is a feature of Exchange Server 2010 that shows users when a message was guaranteed encrypted from end-to-end between two organizations. In Exchange Server 2013, you can still use Domain Secure, but the icon that appears in Outlook does not appear. Therefore, although the user does not get confirmation of the fact that the message was secure for the entire network session, the concept can still be used because messages will not flow between the configured domains if any of the domain secure configuration is not working.
Domain Secure is also known as mutual TLS. TLS, or Transport Layer Security, is the encryption protocol used to protect messages as they travel between Exchange Servers in your organization and optionally when traveling outside your organization. For email transport, Exchange Server 2013 will always use TLS between Exchange Servers within the organization unless it has been actively turned off. It is usually only turned off when a WAN optimizer device is used between two sites and the WAN optimization cannot take place because the traffic is encrypted. Therefore, for most organizations, the mail flow within an Exchange organization is encrypted on the network with TLS.
Between Exchange organizations, or between Exchange and any other SMTP system, TLS is negotiated during the SMTP communication. Exchange will default to using Enhanced SMTP, and will issue the EHLO SMTP verb on connection (rather than the HELO verb). If the SMTP server that is being connected to supports Enhanced SMTP, it will respond to the EHLO with 250-XXX where XXX is a list of the verbs that the server supports. If the receiving server has a digital certificate installed and the private key is available to that server, it will offer the STARTTLS verb. If Exchange Server receives 250-STARTTLS, it will swap certificates and then encrypt all communication to the other server using the public key received from that server. The other server will encrypt all communication to the sending server with the sending server’s public key. Only the respective holders of the private key can decrypt this traffic.
Important: Session Keys
In reality, the public and private keys are not actually used to encrypt and decrypt the entire message, though it is easier to describe it that way as is have done in the preceding paragraph. In reality, the public and private keys are used to encrypt a uniquely generated key, known as the session key, and the session key is used to encrypt and decrypt the message content. Each SMTP session will use a different session key.
If the receiving SMTP server does not offer to start a TLS session, Exchange will automatically send the content in clear text. This means that if TLS is possible it will be used, but if not, it will not generate an error. This is known as opportunistic TLS. Opportunistic TLS will also not care if the certificate that is presented that contains the public key is valid. As long as the receiving server has the private key for the offered public key, Exchange Server will encrypt the data. That is, if the certificate is invalid because it does not contain the SMTP domain in the certificate subject, or if the expiry dates on the certificate are in the past, or the valid from date is in the future, or the certificate is revoked, it will still be used by Exchange. All Exchange Server is doing is using the key pair to do encryption.
If you want to guarantee that email is going to a valid server, you can. This is where Domain Secure was useful in Exchange Server 2010, and a range of settings are valid in Exchange Server 2013. Domain Secure will guarantee that the presented certificate was valid and matched the SMTP domain name of the recipient, as well as ensuring that your certificate was valid for your domain name and the issuing date is before the current date and time, and the expiry date is after the current date and time. Typically if anything is wrong with your certificate, Domain Secure will fail, and unlike opportunistic TLS, it will not fail over to clear text but instead queue the message for sending later.
In Exchange Server 2013, there are new options that are easier to use than Domain Secure. They are easier to implement because they do not have the requirement that the certificate must contain the SMTP domain as its subject name. These options are based around configuring the send connector or writing transport rules.
Mutual TLS with Domain Secure
The steps needed to configure mutual TLS with Domain Secure between two Exchange Server organizations are as follows. Note that there can be no other SMTP server between the two servers that are involved in the inter-organization communication because this would break the mutual TLS negotiation. Therefore, Domain Secure only works for domains where the MX record is published direct to the Exchange Server mailbox server or Edge server, and not to an intermediary smarthost or anti-spam filtering service. This scenario is not common and, therefore, it is not common to find Domain Secure actually in use between two companies. You might see this scenario if the two companies host alternative DNS zones rather than the public DNS zone so that they can deliver via MX delivery but not to the same smarthost server that all other Internet senders would connect to.
To configure Domain Secure, you need the following:
![]() End-to-end connection between the send connector you will create and the receive connector your partner organization will create.
End-to-end connection between the send connector you will create and the receive connector your partner organization will create.
![]() Create a send connector for the address space of the domain. This connector must not use the CAS server nor must it use any smarthost. It must reach the target domain using MX or DNS lookup. The CAS server or smarthost is not the endpoint that the message is going to. Domain Secure is end-to-end encryption, and the message cannot be viewed or processed by any intermediate server.
Create a send connector for the address space of the domain. This connector must not use the CAS server nor must it use any smarthost. It must reach the target domain using MX or DNS lookup. The CAS server or smarthost is not the endpoint that the message is going to. Domain Secure is end-to-end encryption, and the message cannot be viewed or processed by any intermediate server.
![]() Ensure that you can send emails at this time to the target domain. If you cannot, you need to resolve the issues now. Domain Secure settings will make it harder to resolve simple issues so, before you turn on Domain Secure, ensure that mail flow is working.
Ensure that you can send emails at this time to the target domain. If you cannot, you need to resolve the issues now. Domain Secure settings will make it harder to resolve simple issues so, before you turn on Domain Secure, ensure that mail flow is working.
![]() Run Get-TransportConfig and look for the TLSReceiveDomainSecureList and the TLSSendDomainSecureList. Set both of these values to all of the domains that you will do Domain Secure to. Each domain will be listed on both parameters. Your own domain is not listed here. This can be seen in Figure 3-14.
Run Get-TransportConfig and look for the TLSReceiveDomainSecureList and the TLSSendDomainSecureList. Set both of these values to all of the domains that you will do Domain Secure to. Each domain will be listed on both parameters. Your own domain is not listed here. This can be seen in Figure 3-14.
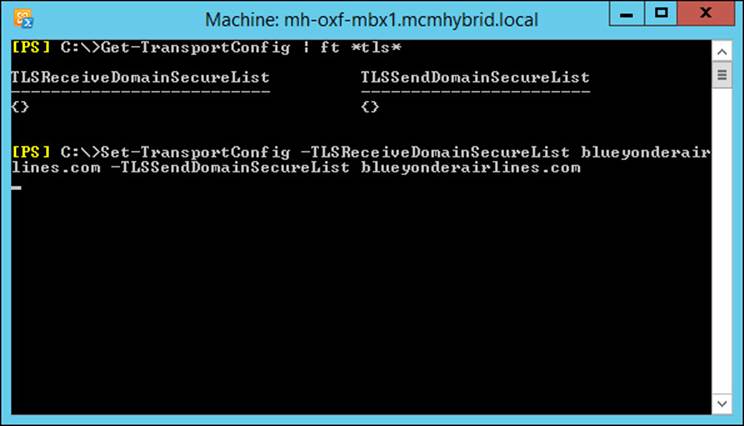
FIGURE 3-14 Setting TLSReceiveDomainSecureList and TLSSendDomainSecureList
![]() Mutual Auth TLS must be enabled for the send connector you created previously. This can be done in ECP or with Set-SendConnector <name> –DomainSecureEnabled $true as seen in Figure 3-15.
Mutual Auth TLS must be enabled for the send connector you created previously. This can be done in ECP or with Set-SendConnector <name> –DomainSecureEnabled $true as seen in Figure 3-15.
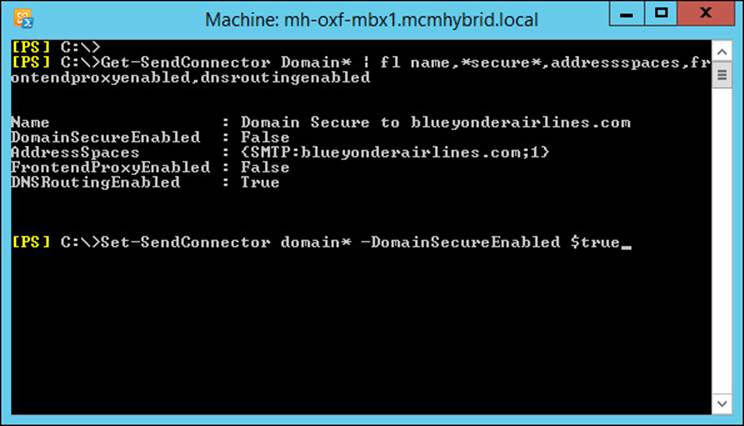
FIGURE 3-15 Viewing and setting DomainSecureEnabled
![]() Ensure that Domain Secure (mutual TLS) is enabled on the default receive connector at the recipient organization.
Ensure that Domain Secure (mutual TLS) is enabled on the default receive connector at the recipient organization.
![]() Ensure that you have a certificate that contains your SMTP domain as a valid subject of the certificate and that the receiving Exchange Server has the same for their domain. Ensure these certificates are installed in the Local Computer store so that Exchange can use them.
Ensure that you have a certificate that contains your SMTP domain as a valid subject of the certificate and that the receiving Exchange Server has the same for their domain. Ensure these certificates are installed in the Local Computer store so that Exchange can use them.
![]() Send emails and ensure they are received. If they queue, use Get-Queue | FL LastError to see what the error is. Figure 3-16 shows the Certificate Validation Failure error when the recipient is not configured with the required certificate. Another common reason for a failure is the inability to lookup the Certificate Revocation List (CRL) from the certificate authority (over TCP port 80) due to proxies or firewalls blocking Internet access from this server.
Send emails and ensure they are received. If they queue, use Get-Queue | FL LastError to see what the error is. Figure 3-16 shows the Certificate Validation Failure error when the recipient is not configured with the required certificate. Another common reason for a failure is the inability to lookup the Certificate Revocation List (CRL) from the certificate authority (over TCP port 80) due to proxies or firewalls blocking Internet access from this server.
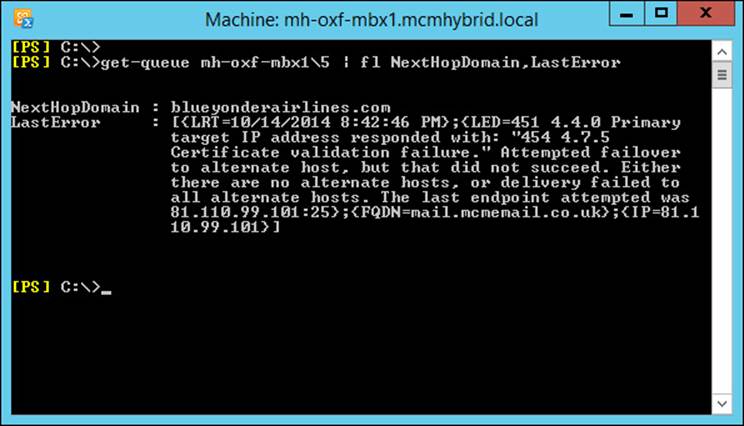
FIGURE 3-16 Domain Secure errors exposed in with Get-Queue
![]() Unlike Exchange 2010 you will not see the green tick icon that you used to get with Domain Secure in Outlook 2010 when using Domain Secure with Exchange Server 2013.
Unlike Exchange 2010 you will not see the green tick icon that you used to get with Domain Secure in Outlook 2010 when using Domain Secure with Exchange Server 2013.
TLS with Send Connectors
With Exchange Server 2010 Service Pack 1 and later, you can override the default behavior of Exchange using any certificate for TLS and then not doing TLS if no certificate is presented. In other words, you can override opportunistic TLS and require a certificate or a certificate with certain values to be in place or the email will queue and not get delivered.
To configure a send connector to ensure that it will only send if TLS is used, you need to set the TlsAuthLevel parameter and then the TlsCertificateName and TlsDomain if the TlsAuthLevel requires it. TlsAuthLevel is used for hybrid mail flow with Office 365.
TlsAuthLevel has three values that it can be set to. These are EncryptionOnly, CertificateValidation, or DomainValidation. EncryptionOnly tells the sending Exchange Server to use TLS and not to downgrade to clear text but not to consider the validity of the certificate that is used by the receiving server. EncryptionOnly will allow the use of any certificate, expired or not, self signed or issued by a non-trusted certificate authority, with any subject name. The detail on the certificate does not matter for EncryptionOnly, all that is used is the public key that is part of the certificate for encrypting email to the recipient server.
CertificateValidation is one level higher than EncryptionOnly. Here the certificate must be a valid and trusted certificate that is in date and not revoked. A trusted certificate authority must issue it, but it does not need to have the SMTP domain on the certificate.
Finally, DomainValidation allows you to tell the send connector the subject name of the certificate that it will receive from the recipient system. If no domain is specified in the TlsDomain parameter, the subject on the certificate is compared with the recipient’s domain. If the subject name does not match the domain specified in the TlsDomain parameter (or if blank, the recipient’s domain), the message will queue until the issue is resolved. DomainValidation is useful when sending to a company that has a smarthost in front of it. Setting the TlsAuthLevel to DomainValidation can be seen in Figure 3-17. Unlike Domain Secure that does not work with smarthosts, TlsAuthLevel = DomainValidation means you can set values such as mail.spamfiltercompany.com for the TlsDomain when you are really sending to contoso.com.
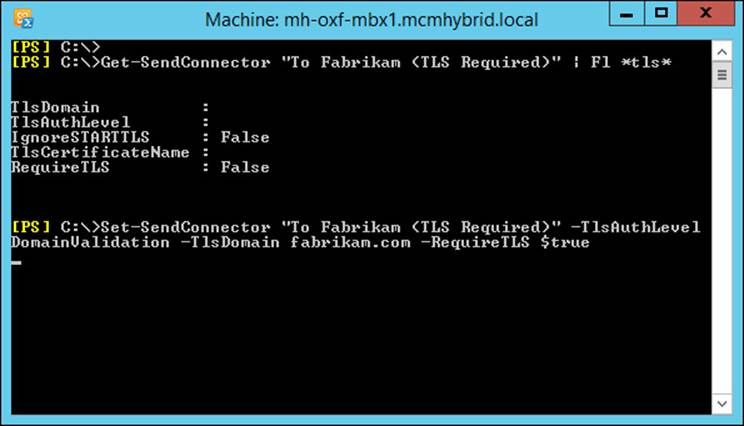
FIGURE 3-17 Setting the TlsAuthLevel and TlsDomain parameters on a send connector
DomainValidation is the highest level of protection for the TlsAuthLevel parameter. Like CertificateValidation, DomainValidation requires the certificate to be valid.
For any of the three TlsAuthLevel settings, if the receiving server is unable to do TLS, the message will queue and will never be sent clear text.
To enable a send connector to require TLS follow these steps:
![]() Create a send connector for the address space that you want to ensure TLS is used with. The recipient server for this address space must have a digital certificate bound to SMTP and if you “telnet <their_server> 25” and type EHLO they must respond 250-STARTTLS. This can be seen in Figure 3-18.
Create a send connector for the address space that you want to ensure TLS is used with. The recipient server for this address space must have a digital certificate bound to SMTP and if you “telnet <their_server> 25” and type EHLO they must respond 250-STARTTLS. This can be seen in Figure 3-18.
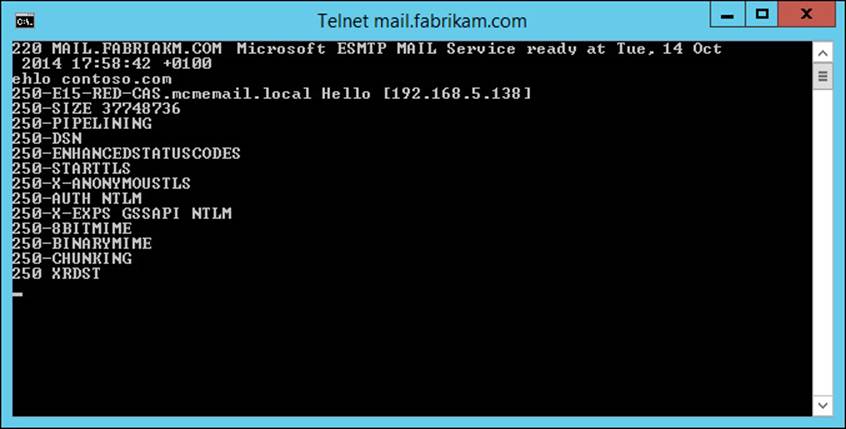
FIGURE 3-18 Testing a send connector target for the STARTTLS verb
![]() In Exchange Management Shell use Set-SendConnector <name> -TlsAuthLevel <EncryptionOnly | CertificateValidation | DomainValidation>.
In Exchange Management Shell use Set-SendConnector <name> -TlsAuthLevel <EncryptionOnly | CertificateValidation | DomainValidation>.
![]() If you choose EncryptionOnly for TlsAuthLevel, the recipient’s server needs a digital certificate and private key installed, but it does not need to be trusted or valid.
If you choose EncryptionOnly for TlsAuthLevel, the recipient’s server needs a digital certificate and private key installed, but it does not need to be trusted or valid.
![]() If you choose DomainValidation for TlsAuthLevel, also use -TlsDomain <subject_name_of_recipients_certificate>. This certificate subject name does not need to match the SMTP domain you are sending to, but it must be on the certificate and the certificate must be valid and trusted.
If you choose DomainValidation for TlsAuthLevel, also use -TlsDomain <subject_name_of_recipients_certificate>. This certificate subject name does not need to match the SMTP domain you are sending to, but it must be on the certificate and the certificate must be valid and trusted.
![]() Send an email to that domain and check the queues for errors if it does not arrive. You can view the queues for errors with Get-Queue <queue_id> | FL LastError. Figure 3-19 shows an example error when the wrong smarthost has been used, so the email could end up going to the wrong organization, but is queued because the intended recipient server does not have the correct certificate.
Send an email to that domain and check the queues for errors if it does not arrive. You can view the queues for errors with Get-Queue <queue_id> | FL LastError. Figure 3-19 shows an example error when the wrong smarthost has been used, so the email could end up going to the wrong organization, but is queued because the intended recipient server does not have the correct certificate.
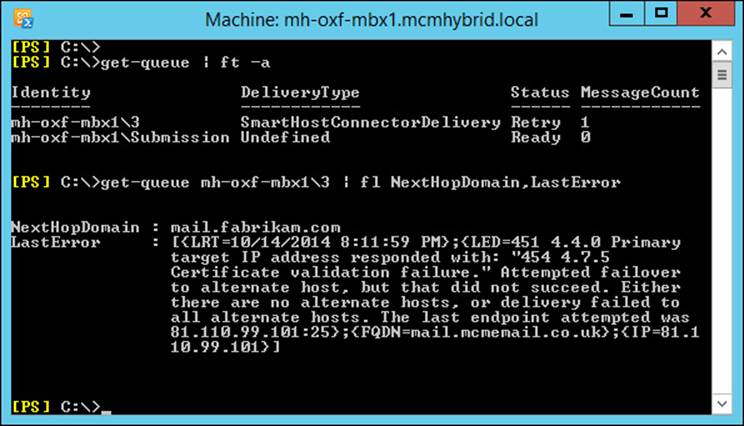
FIGURE 3-19 Viewing the transport queues for TLS sending errors
TLS with Transport Rules
New to Exchange Server 2013 is the RouteMessageOutboundRequireTls transport rule action. If a transport rule is created with this action it will require the message to use TLS for its onward communication from that server.
This action can be set using the Exchange Management Shell with New-TransportRule <name> -RouteMessageOutboundRequireTls $true (as well as the other conditions, actions, and exceptions you want the rule to enforce). If you are using ECP to set the rule, you need to click the More Options link and choose Modify The Message Security and Require TLS Encryption, as shown in Figure 3-20.
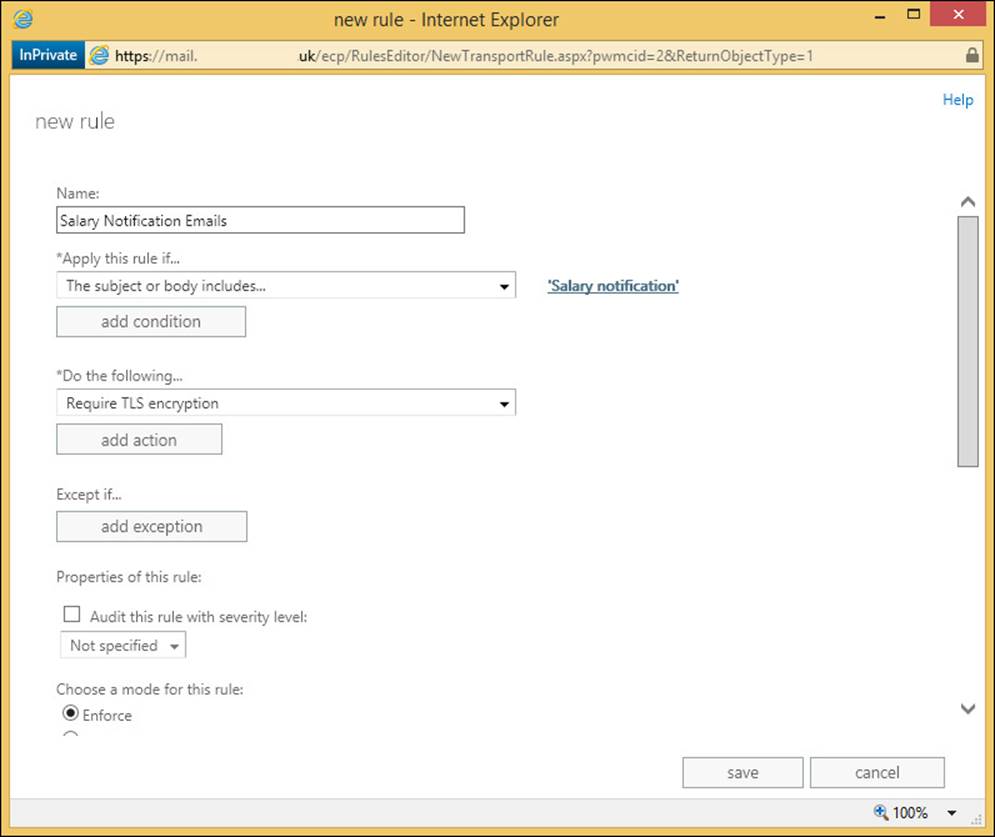
FIGURE 3-20 Setting the Require TLS Encryption transport rule
Then, when any message falls into the scope of this rule, the message will get a flag set on it internal to Exchange Server 2013 that means when it leaves this server it must use TLS. Note that for an external message to reach the recipient it must leave Exchange Server via a send connector. If that send connector is not hosted on the same machine that processes the rule, the message is sent to the site or server that hosts the send connector over TLS because it is first an internal server-to-server delivery. This first delivery meets the criteria of TLS delivery and so the action of the rule is met. Therefore every server needs to have a send connector hosted on it for this rule to work.
Using Transport Rules for TLS allows you to set conditions that are not based on the domain. For example, you could ensure that all emails with the subject “Salary notification” are protected regardless of the recipient.
 Thought experiment: Consistent security configuration
In this thought experiment, apply what you’ve learned about this objective. You can find answers to these questions in the “Answers” section at the end of this chapter.
You manage a wide variety of servers for Contoso Pharmaceuticals. You need to ensure a consistent security configuration for your data both at rest on the server and in transit.
1. What different options could you evaluate that are already included with your Windows Server license?
2. You want to ensure that the servers on which you host Exchange Server, which are stored in a private cloud at your hosting company are physically secure. What steps could you take to make sure this happens?
3. You communicate frequently with Fabrikam Packaging Ltd who makes your boxes and other packaging materials for your products. How can you ensure that email communications to this company are enforced?
Objective summary
![]() RBAC is the only way in Exchange Server 2013 to assign both user and administrator rights that are not in the product by default.
RBAC is the only way in Exchange Server 2013 to assign both user and administrator rights that are not in the product by default.
![]() BitLocker is full volume encryption that is built into the Windows product. The encryption key is best stored in a TPM chip on the motherboard of the PC/Server so that disks separated from their host are unreadable.
BitLocker is full volume encryption that is built into the Windows product. The encryption key is best stored in a TPM chip on the motherboard of the PC/Server so that disks separated from their host are unreadable.
![]() Smart cards are removable credit card sized devices that are able to store a user’s private key on the cryptographic chip on the card. The use of the card requires a PIN number, so the private key cannot be used without both the card and the knowledge of the PIN. Therefore it is something you know and something you have, which is two-factor authentication compared to password-based authentication, which is just something you know.
Smart cards are removable credit card sized devices that are able to store a user’s private key on the cryptographic chip on the card. The use of the card requires a PIN number, so the private key cannot be used without both the card and the knowledge of the PIN. Therefore it is something you know and something you have, which is two-factor authentication compared to password-based authentication, which is just something you know.
![]() Protection of data at rest is encryption of the data when it is kept on its storage medium. Some protection methods do not travel with the data and so once the data is moved from its location its protection level changes. IRM is a protection and policy method that stays with the data for the life of the data.
Protection of data at rest is encryption of the data when it is kept on its storage medium. Some protection methods do not travel with the data and so once the data is moved from its location its protection level changes. IRM is a protection and policy method that stays with the data for the life of the data.
![]() S/MIME is a feature of email that allows the message to be signed, to prove who sent it, and encrypted, so that only the intended recipient can view it.
S/MIME is a feature of email that allows the message to be signed, to prove who sent it, and encrypted, so that only the intended recipient can view it.
![]() Transport Layer Security is encryption of data in transit. It is based on the HTTPS/SSL protocol but is used for more than just HTTP. For Exchange, the option to do encryption exists but can do clear text though options exist to stop communications if this is forbidden at the send or receive connector.
Transport Layer Security is encryption of data in transit. It is based on the HTTPS/SSL protocol but is used for more than just HTTP. For Exchange, the option to do encryption exists but can do clear text though options exist to stop communications if this is forbidden at the send or receive connector.
Objective review
Answer the following questions to test your knowledge of the information in this objective. You can find the answers to these questions and explanations of why each answer choice is correct or incorrect in the “Answers” section at the end of this chapter.
1. Over a period of time you have sent a number of S/MIME protected messages using Outlook. You did not keep a backup of your digital certificate and you have accidently deleted this certificate. Which of the following will you not be able to do going forward? (Choose all that apply.)
A. You will not be able to sign emails.
B. You will not be able to encrypt emails.
C. You will not be able to read signed emails from others.
D. You will not be able to read encrypted emails from others.
E. You will not be able to read signed emails you have sent that are in your Sent Items folder.
F. You will not be able to read encrypted emails you have sent to others that are in your Sent Items folder.
2. Over a period of time you have sent a number of S/MIME protected messages. Your private key is stored on a smart card and you have forgotten the PIN number. You do not have a backup of the private key. Your IT department has issued you a new certificate and updated your smart card to use the new certificate. Which of the following will you not be able to do going forward? (Choose two.)
A. You will not be able to sign emails.
B. You will not be able to encrypt emails.
C. You will not be able to read signed emails from others.
D. You will not be able to read encrypted emails from others that use your previous public key.
E. You will not be able to read signed emails you have sent that are in your Sent Items folder.
F. You will not be able to read encrypted emails you have sent to others that are in your Sent Items folder.
3. You need to ensure that emails to Fabrikam Bank are guaranteed to be encrypted to and from that organization. You know that the bank uses a cloud hosted anti-spam filtering product and so direct access to their Exchange Servers is not available. What option do you need to look at first?
A. S/MIME
B. Domain Secure
C. Opportunistic TLS
D. Send connectors with TlsAuthLevel set to DomainValidation
Objective 3.2: Deploy and manage IRM with Active Directory Rights Management Services (AD RMS)
As mentioned in the previous objective on evaluating Information Rights Management, the Microsoft Active Directory Rights Management Service (or AD RMS) is the software used to configure IRM within Exchange Server and also within SharePoint, Office, and Windows File Servers. Here we will concentrate on configuring an AD RMS cluster to work with Exchange Server 2013 and configuring Exchange Server 2013 to use the AD RMS service.
For a series of videos on installing the AD RMS product and then configuring it for Exchange Server see http://www.c7solutions.com/2012/09/installing-and-configuring-ad-rms-and-html. This video series comes from a session at the Microsoft Exchange Conference in 2012 and looks at RMS on Windows Server 2008 R2. AD RMS on Windows Server 2012 and 2012 R2 are also compatible with Exchange Server 2013 and are configured in an almost identical way to that shown in the video. Linking Exchange Server 2013 to AD RMS is slightly different than with Exchange Server 2010, but not with any significant differences.
Figure 3-21 shows the Specify Cryptographic Mode configuration dialog box that is new to the installation since Windows Server 2008 R2 Service Pack 1, and added to the AD RMS initial configuration wizard in Windows Server 2012 and Windows Server 2012 R2. If you are creating a new cluster, you should choose Cryptographic Mode 2, though you should check the server and client requirements before doing this as Windows Vista and earlier will not support this mode and updates are required for Windows 7 and Exchange Server 2010. See more on this athttp://technet.microsoft.com/en-us/library/hh867439(v=ws.10).aspx.
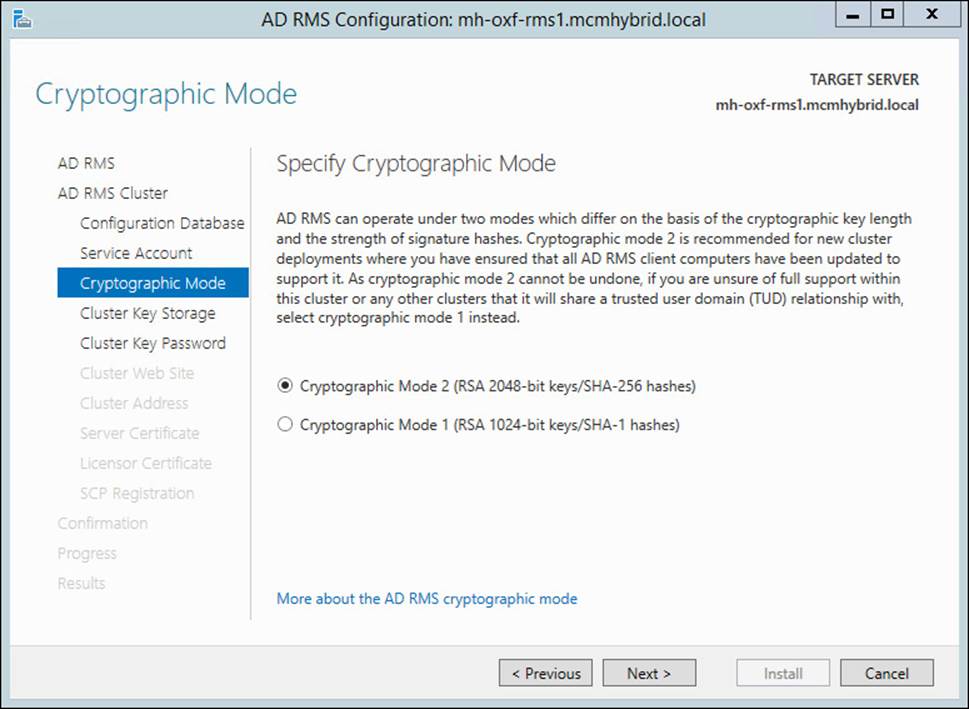
FIGURE 3-21 Enabling Cryptographic Mode 2 during AD RMS installation
Once you have AD RMS configured and Exchange Server 2013 able to use AD RMS then the following objectives can be studied in advance of completing the exam.
This objective covers how to:
![]() Create an AD RMS template
Create an AD RMS template
![]() Create transport protection rules
Create transport protection rules
![]() Create Outlook protection rules
Create Outlook protection rules
![]() Configure transport decryption
Configure transport decryption
![]() Configure IRM for discovery
Configure IRM for discovery
![]() Configure pre-licensing for client access
Configure pre-licensing for client access
Creating an AD RMS template
An AD RMS template is the configuration created on the RMS server that users or Exchange Servers select when they are protecting content. For example, imagine your CEO wanted to send a confidential email to all the staff of the company and ensure that no one outside of the company’s staff could read the email, and that the email was read only and could not be edited or printed.
To do this the CEO has two options. The first is using Outlook and when composing the email to set the recipients and the rights granted to the email. The second is to choose a pre-created set of rights. This pre-created set of rights is the template. For any email or other document protected by rights management, the template allows repeated and consistent use of the same settings. Note though that because the client displays the templates, it is recommended not to have more than 10 of them to select from.
To create RMS templates you need to login to the AD RMS console. You do not create RMS templates in Exchange, but Exchange Server will use them when creating rules, etc., or when users are protecting content in Outlook.
From the AD RMS console (shown in Figure 3-22) expand the server name and click Rights Policy Templates. From here you can create a distributed rights policy template or manage archived policy templates. Distributed rights policy templates are those that are in use and can have content actively protected with them. Archived templates are those that existing protected content can be opened with (they were protected with the template when the template was a distributed template), but as they are now archived they cannot be used to create new protected content. Never delete a template because you will not be able to open content protected with that template again (unless that is your intention to protect some content).
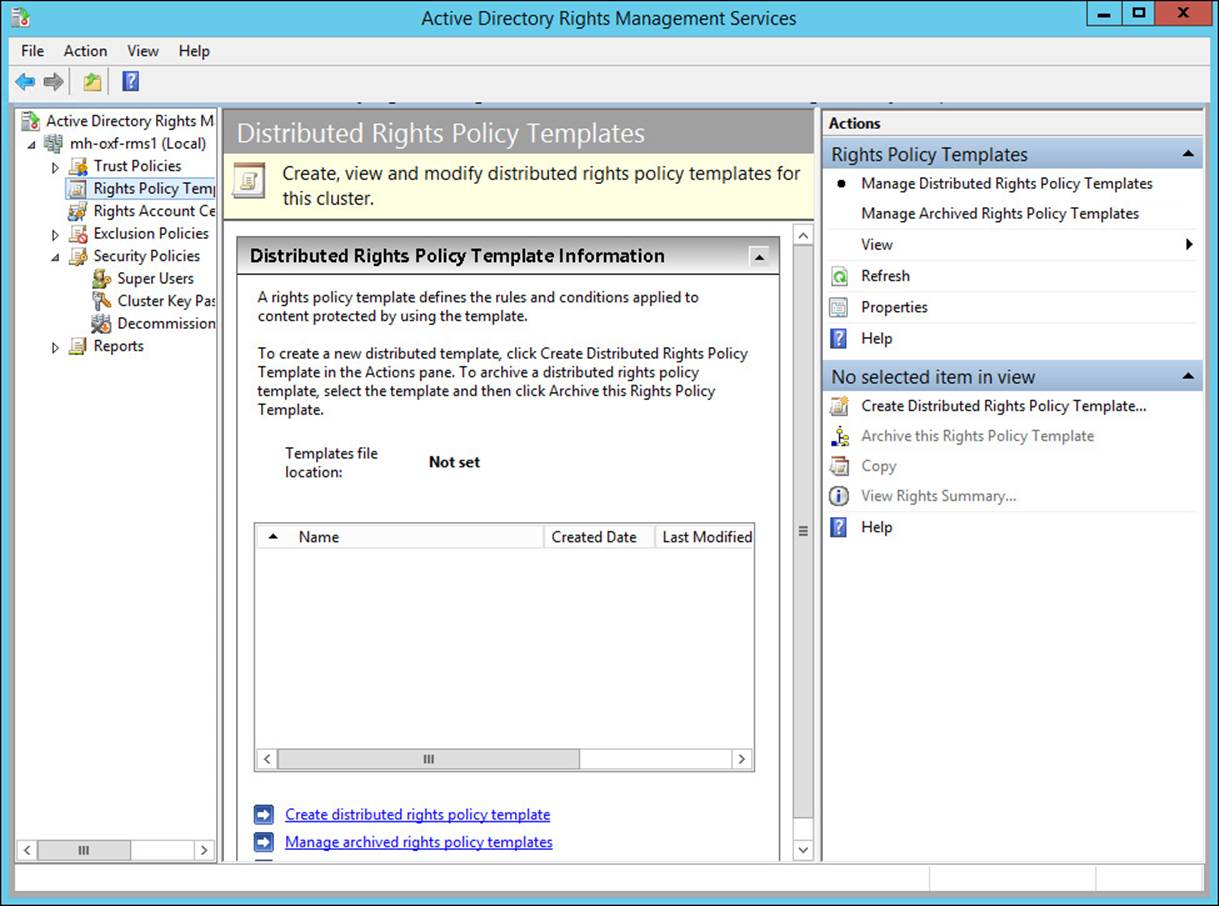
FIGURE 3-22 The AD RMS console open to the templates area
From the Rights Policy Template node of the AD RMS console click the Create Distributed Rights Policy Template link at the bottom of the screen. Add at least one language and give the template a name and a description. If you add multiple languages, the RMS client will show the template name and description that matches their application’s language or Windows installation language.
Once you have given a name and description, click Next, and then click Add to add either anyone or specific users who can access the protected content. The creator of the content can always access his or her own content though this can be disabled in the template policy. Finally and optionally, enter a URL that users can click that will show them the template rights. This URL needs to be created and is not automatically made. This can be seen in Figure 3-23.
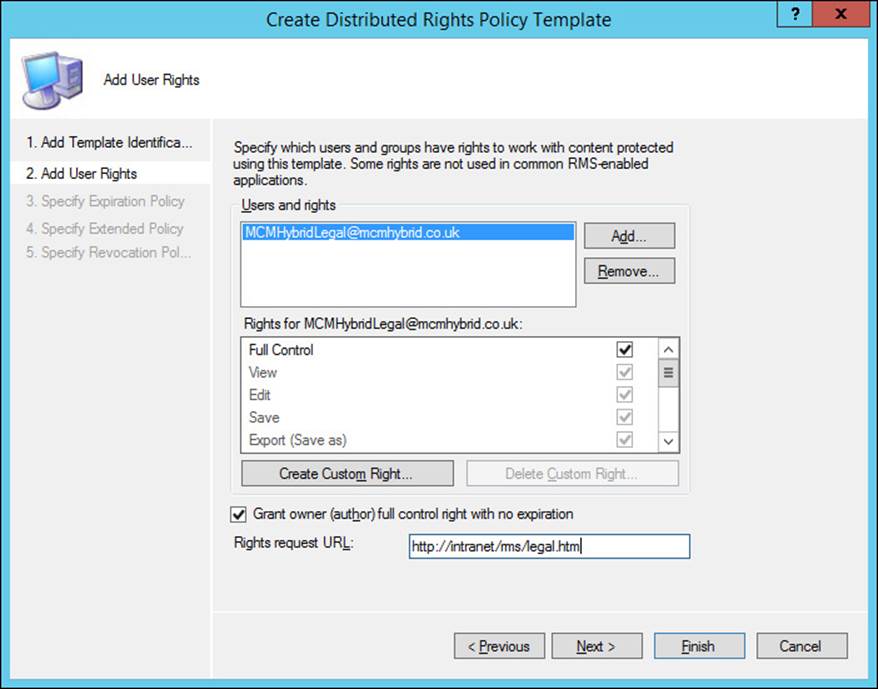
FIGURE 3-23 Creating a distributed rights policy template
When content is protected with a template, the consumer of the content needs to connect to the RMS server to get a license to access the content. The template settings, on the second page of the rights creation process, control the expiration policy. A template can be set to never expire, or to expire all content on a given date or after a certain duration from when the content was created. After this time the content cannot be accessed unless the owner updates the content with a new template, or with the same template again for a new expiry time.
Additionally, the user on retrieving the license from the RMS server is allowed to access the content without returning to the RMS server for that license again for 365 days. During the template creation process this caching of the license can be limited so that the user needs to return to the server to get a new license on a regular basis.
Real World: Implementing Rights Management
The author has worked with a client that implemented Rights Management to protect commercially sensitive documents that are not allowed on devices outside of the organization. This was achieved with a template that required a new license every day (on the second screen of the template dialog box) and required that license caching be disabled (on the third screen of the creation dialog). Finally, the RMS server was secured so that it was not accessible to the VPN network and so users outside of the company could not get a license nor make use of a previously cached license and therefore not open content protected with this template when off the network.
Note that if the RMS server went offline in this example, no content could be opened. So it was important that the AD RMS server was highly available and protected with a load balancer and that the key was securely backed up and stored.
The rights that can be assigned to content from a template by default are as follows:
![]() Full Control (selects all the following rights)
Full Control (selects all the following rights)
![]() View
View
![]() Edit
Edit
![]() Save
Save
![]() Export (Save As)
Export (Save As)
![]() Print
Print
![]() Forward
Forward
![]() Reply
Reply
![]() Reply All
Reply All
![]() Extract
Extract
![]() Allow Macros
Allow Macros
![]() View Rights
View Rights
![]() Edit Rights
Edit Rights
Finally, if you have a template that you want to stop it being used to protect content, you need to archive it. In the Rights Policy Template screen for AD RMS you can right-click a template and archive it. If you delete it, users will not be able to get a license to access content that was created with that template and so unless they already have a cached license (if that is allowed by the template) they will not be able to access the content.
The default cache period of one year can be changed globally from the Rights Account Certificate Policies screen.
Creating transport protection rules
Once you have templates created in AD RMS you can login to an Exchange Server and ensure that Exchange can communicate with the AD RMS cluster. This is a pre-requisite to configuring any of the following Exchange IRM pieces.
To configure Exchange Server 2013 to speak to AD RMS you need to have the AD RMS URL, or if you have published the AD RMS server to Active Directory and created its SCP in the Active Directory, Exchange can look up that value and connect directly to the RMS server. You can set and change the SCP value from the Properties dialog box of the RMS server as shown in Figure 3-24. Once the SCP is set and the correct permissions granted in RMS for Exchange Server, you need to enable IRM in Exchange.
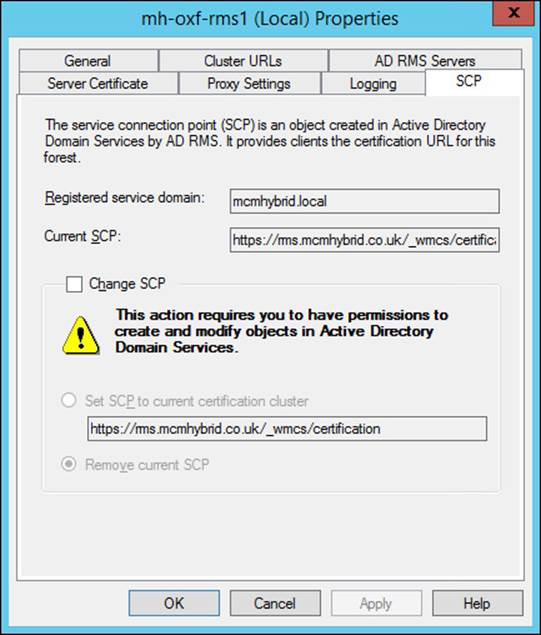
FIGURE 3-24 Changing the SCP for RMS from the RMS server properties dialog
You run the Set-IRMConfiguration cmdlet to turn on Exchange IRM. This is the full cmdlet.
//Enable IRM in Exchange Server
Set-IRMConfiguration -InternalLicensingEnabled $true
Exchange will look up the SCP endpoint, or you can use the Set-IRMConfiguration cmdlet to specify this manually if RMS is only going to be used by Exchange Server. Once found, the Exchange Server uses the value in the SCP to connect to the RMS server and then to download the licenses and certificates it needs to be able to use RMS. This cmdlet, and the enabling of the Super Users group as an Exchange Server distribution group (to give it an email address as required by RMS) can be seen in Figure 3-25.
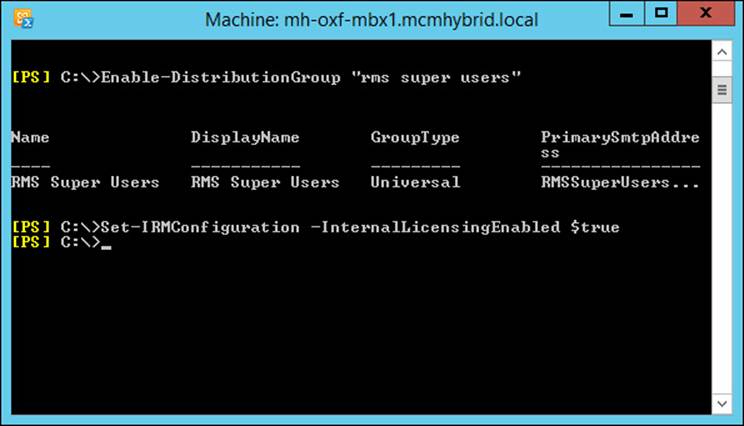
FIGURE 3-25 Set-IrmConfiguration
Once IRM is configured it is always worth checking that it is working and that the Exchange Server is able to reach the RMS server cluster. It is also worth checking that it can obtain licenses for the users and that the templates are available to download. To test that IRM is working use Test-IRMConfiguration -Sender <email@address> where the email address is an internal user with a mailbox in your Exchange organization. Running Test-IRMConfiguration should show a long list of passes. See Figure 3-26 for the working results.
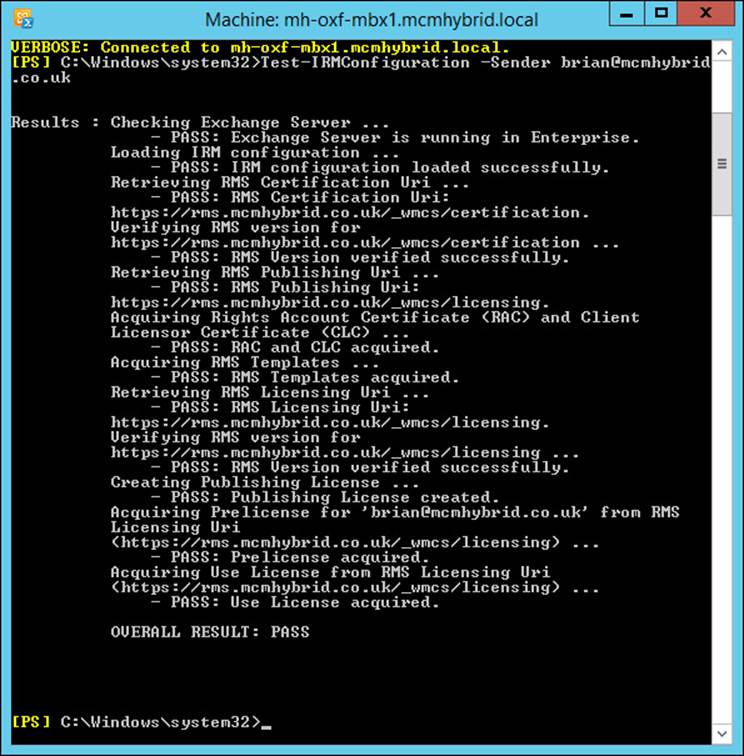
FIGURE 3-26 Test-IRMConfiguration showing a full bill of health
The Sender parameter of Test-IRMConfiguration specifies the SMTP address of the sender to be tested. The cmdlet tests prelicensing and journal report decryption for the sender. The Recipient parameter specifies the SMTP address of one or more recipients. The cmdlet tests prelicensing for the specified recipients. You can specify multiple recipient addresses separated by commas. If no recipient is specified, the sender address is used as the recipient.
To obtain a list of valid templates you can use Get-RMSTemplate. Again, this will not work if the Exchange Server is not configured to connect to the RMS server.
Once the Exchange Server is able to connect to the RMS server cluster you can start to create rules to protect content. Transport rules, if you have an Exchange Enterprise CAL, can be configured to protect content based on whatever predicates you look for in the rule. Protection with an RMS template will be done as long as the template is distributed (not archived) and as long as the Exchange Server can reach the RMS server to get the licenses to create the content (or it already has the licenses cached).
To create a transport rule to protect content, login to ECP, and under Rules click the plus icon and choose Apply Rights Protection To Messages. Figure 3-27 shows a rule being created called Protect Legal Sensitive Emails. This rule will apply the Legal Department Only template to any message that is marked as having the Legal Sensitive classification. This classification was made with the New-MessageClassification cmdlet.
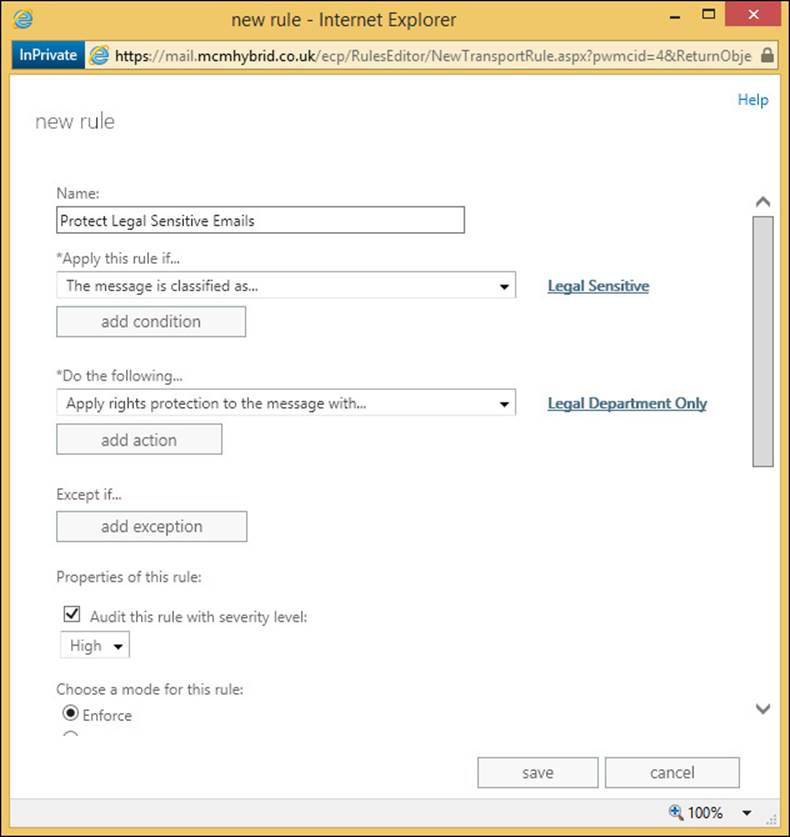
FIGURE 3-27 Creating a transport rule for RMS protection
Once this message classification and then transport rule are created the user can go into Outlook Web App and compose a new email selecting the Legal Sensitive message classification from the message properties ellipsis in OWA, as shown in Figure 3-28.
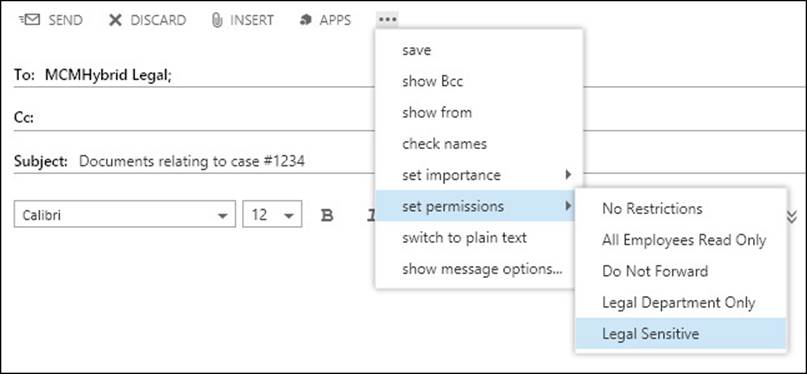
FIGURE 3-28 Setting a message classification on an email in OWA
Upon receipt of this email you should see that it has been protected with the selected RMS template as set in the transport rule. Figure 3-29 shows the email in the message pane in OWA.

FIGURE 3-29 A protected email in OWA
Creating Outlook protection rules
Though the templates in RMS allow users to protect their own content using the Office ProPlus application, this requires the user to remember to protect the content themselves before sending it. And though transport rules can protect content as seen above, the content is not protected until it arrives at the transport service of Exchange Server. The email that remains in the Sent Items folder is not protected with the template. Therefore a way needs to exist for messages to be protected from the time of leaving Outlook. The way to do this is to use Outlook Protection Rules.
Outlook Protection Rules are created on the Exchange Server, not the Outlook client, and are downloaded to the client via Exchange Web Services (EWS). The Outlook client therefore needs AutoDiscover working to reach a valid EWS endpoint so that Outlook can see there are protection rules to download, and to download them.
Once you have AutoDiscover working and have tested your EWS endpoint, which is best done by verifying that you can turn on or off an out of office notification in Outlook, you can create a protection rule which will be downloaded to Outlook the next time it starts up.
To create a protection rule you need to use the New-OutlookProtectionRule cmdlet. Figure 3-30 shows an example that sets of emails are sent to a group to get RMS protection automatically.
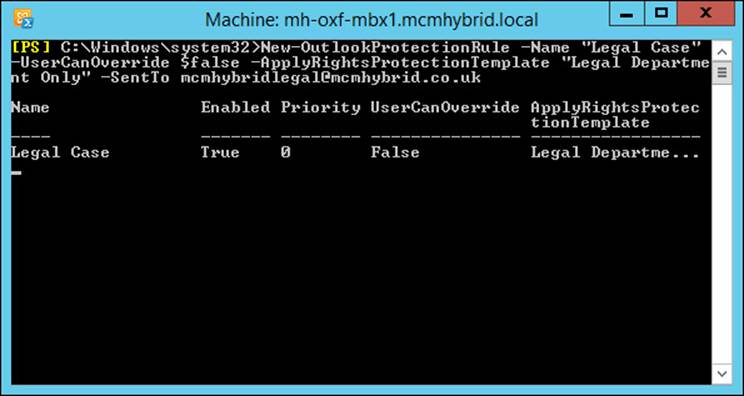
FIGURE 3-30 Setting an Outlook Protection Rule
Outlook Protection Rules are limited on the predicates that you can set on the rules. You can only use this type of rule to protect messages that come from a user with a given department value in the Active Directory (the FromDepartment predicate), are sent to a given email address (the SentTo predicate), or are sent inside the organization or everyone (the SentToScope). You can use more than one of these predicates on a single rule, for example you could protect all messages sent from the Compliance department to users internal to the company. An example of this rule could be as follows.
# Outlook Protection Rule - Compliance Department
New-OutlookProtectionRule "Sent By Compliance Dept." -FromDepartment Compliance
-SentToScope InOrganization -ApplyRightsProtectionTemplate "Do Not Forward"
-UserCanOverride $True
The Outlook Protection Rules are downloaded via Exchange Web Services once every 24 hours. Changes to the rules can therefore take time to appear on client machines. To speed up the process in a lab or test environment you need to delete the PB4S-Configuration-user@domain.com.xml file that you can find in the %appdata%\Microsoft\Outlook folder and then restart Outlook. The rules will be downloaded shortly after restarting Outlook and as long as Outlook is in the same forest, or a trusted forest as the RMS Server, it will be able to download the RMS templates and apply them.
Once Outlook Protection Rules are downloaded, the message is protected as soon as the conditions for the protection are met. In the case of SentTo for example, as soon as the valid recipient’s address is added to any of the recipient fields in Outlook the message gets protected and a banner confirming that is shown. This can be seen in Figure 3-31, where just the recipient was added and nothing else.
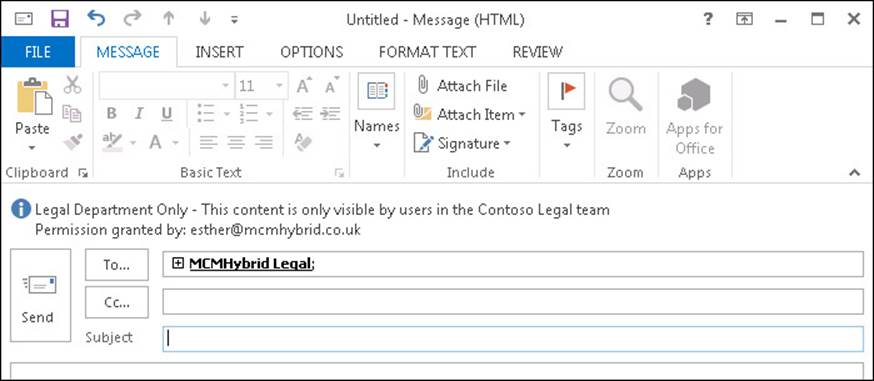
FIGURE 3-31 Outlook Protection Rules taking effect on the predicate being met
Configuring transport decryption
When you run Get-IRMConfiguration you will see a number of different settings. The only one we have set so far is InternalLicensingEnabled to turn on RMS inside the organization. To implement AD RMS (not Azure RMS) in Exchange Online and part of Office 365 you would use ExternalLicensingEnabled and a few other settings. But the remaining settings that are valid for Exchange Server 2013 on-premises are as described below:
![]() JournalReportDecryptionEnabled This is set to True by default. It ensures that if you journal a rights-protected message, a second copy of the message, with the rights removed, is added to the journal report.
JournalReportDecryptionEnabled This is set to True by default. It ensures that if you journal a rights-protected message, a second copy of the message, with the rights removed, is added to the journal report.
![]() ClientAccessServerEnabled This setting, which is True by default, enabled RMS in Outlook Web App. To enable IRM in Outlook Web App, you must add the Federation mailbox, a system mailbox created by Exchange 2013 Setup, to the super users group in AD RMS.
ClientAccessServerEnabled This setting, which is True by default, enabled RMS in Outlook Web App. To enable IRM in Outlook Web App, you must add the Federation mailbox, a system mailbox created by Exchange 2013 Setup, to the super users group in AD RMS.
![]() SearchEnabled This allows users to search for RMS protected content using Outlook Web App or Outlook in online mode. It is True by default and requires RMS Super User rights for the Exchange Server federation account.
SearchEnabled This allows users to search for RMS protected content using Outlook Web App or Outlook in online mode. It is True by default and requires RMS Super User rights for the Exchange Server federation account.
![]() TransportDecryptionSetting This is the main point of this section of the book. If Transport Decryption should fail, what happens? By default the setting is Optional, which means the message is processed through transport even though it is not readable. Other options are Disabled, so that transport decryption does not happen or Mandatory so that it does, and if it fails, an NDR is generated.
TransportDecryptionSetting This is the main point of this section of the book. If Transport Decryption should fail, what happens? By default the setting is Optional, which means the message is processed through transport even though it is not readable. Other options are Disabled, so that transport decryption does not happen or Mandatory so that it does, and if it fails, an NDR is generated.
![]() EDiscoverySuperUserEnabled This setting is True by default. It allows members of the Discovery Management role group to view IRM protected messages when they are in a discovery mailbox. Super User rights for Exchange Server federation account are needed for this feature to work.
EDiscoverySuperUserEnabled This setting is True by default. It allows members of the Discovery Management role group to view IRM protected messages when they are in a discovery mailbox. Super User rights for Exchange Server federation account are needed for this feature to work.
![]() ServiceLocation If the Exchange Server does not use the SCP to lookup the RMS server’s endpoint, it can be hardcoded here. If this value is blank, the SCP in the Active Directory will be used.
ServiceLocation If the Exchange Server does not use the SCP to lookup the RMS server’s endpoint, it can be hardcoded here. If this value is blank, the SCP in the Active Directory will be used.
![]() LicensingLocation This is an optional array of RMS licensing URLs that are needed if you have a cross-forest RMS deployment on-premises.
LicensingLocation This is an optional array of RMS licensing URLs that are needed if you have a cross-forest RMS deployment on-premises.
The setting of TransportDecryptionSetting in the preceding list is set to Optional by default. This setting controls whether or not the transport service can decrypt and re-encrypt messages as they go through the transport service.
If you consider some of the purposes of the transport service you will see why decryption of protected content, and then encrypting it again at the end of the transport service, can be desirable. For example, in Exchange Server 2013 there is a built in anti-malware engine as well as transport rules engine, journaling, pipeline tracing, and the Data Loss Prevention feature. Each of these items has the possibility of scanning and maybe modifying the message body. If the message body is encrypted they cannot be scanned (and modified if needed). Take the anti-malware agent. If you had an Outlook Protection Rule that protected all messages sent to the Legal Team and someone picked up a computer virus and emailed that to a member of that team. The malware agent in Exchange would not see this virus and not remove it. Or take for example a more common scenario of adding disclaimers. If the message is encrypted, the disclaimer cannot be added.
Transport Decryption occurs at the start of the transport pipeline and everything in the pipeline can then process a message that is in the clear and not encrypted. As the message leaves the transport pipeline it is encrypted again as it was before, but with the modifications made to the message.
You can see the Transport Pipeline using Get-TransportPipeline, and the output from an Exchange Server 2013 Cumulative Update 5 server can be seen in Figure 3-32.
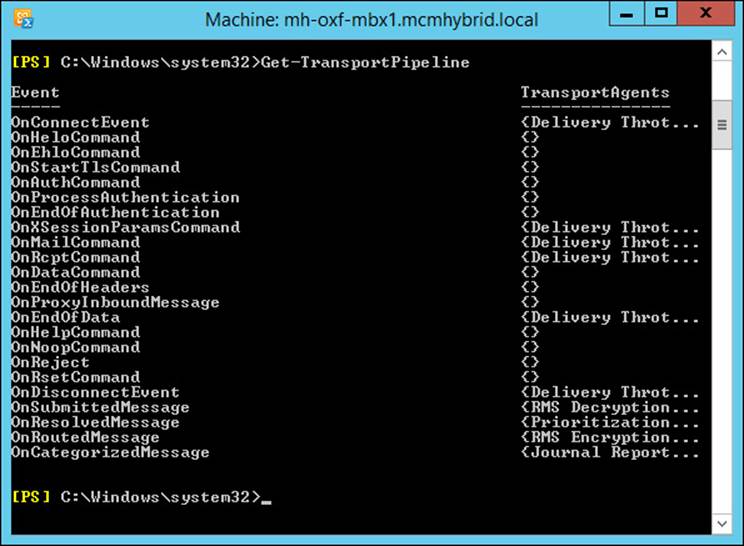
FIGURE 3-32 Get-TransportPipeline
In the pipeline output you can see the different transport agents that run at different parts of the SMTP configuration and transport routing feature. Not every transport agent is listed, but the RMS ones are. Here you can see that the RMS Decryption Agent runs in OnSubmitttedMessage and the RMS Encryption Agent at OnRoutedMessage. This means that agents such as the transport rules agent (at OnResolvedMessage) will see a message in clear text and so be able to query and modify it if needed.
Configuring IRM for discovery
When discovery managers issue searches across mailboxes they might come across content that is protected with IRM. The content would be found by the search because by default the SearchEnabled property of Get-IRMConfiguration is set to true, though this also requires Exchange Server to have RMS Super User rights to work. Therefore if Exchange Server has Super User rights and SearchEnabled is at its default position of True, the discovery managers may find content in the results that the search feature was able to see inside (as it was able to decrypt it with Super User rights) but that the discovery manager is unable to see inside. Therefore in the event of a compliance search issue where content needs to be found and studied, the Discovery Management role group members will find that there are matching results, but they can view them no further as they are not Super User themselves.
Therefore to avoid this issue an additional feature was added in Exchange Server 2010 Service Pack 1 and it carries forward to Exchange Server 2013 which, if enabled, allows Discovery Managers to view the contents of IRM protected messages that they would not normally have the rights to view when they are viewing the contents of the discovery mailbox via Outlook Web App. If they export the search results to another mailbox or PST file, the right to view the IRM content does not follow. By default the EDiscoverySuperUserEnabled property is set to True.
Figure 3-33 shows the OWA search preview open for a member of the Discovery Management role group. To grant a user Discovery Management rights, add them to the Discovery Management group in the Microsoft Exchange Security Groups OU. The protected message shown inFigure 3-33 is the same as the one sent in Figure 3-28. The results preview shows that the message is protected and marked with a classification and who sent it, but it is readable by the discovery manager during eDiscovery.
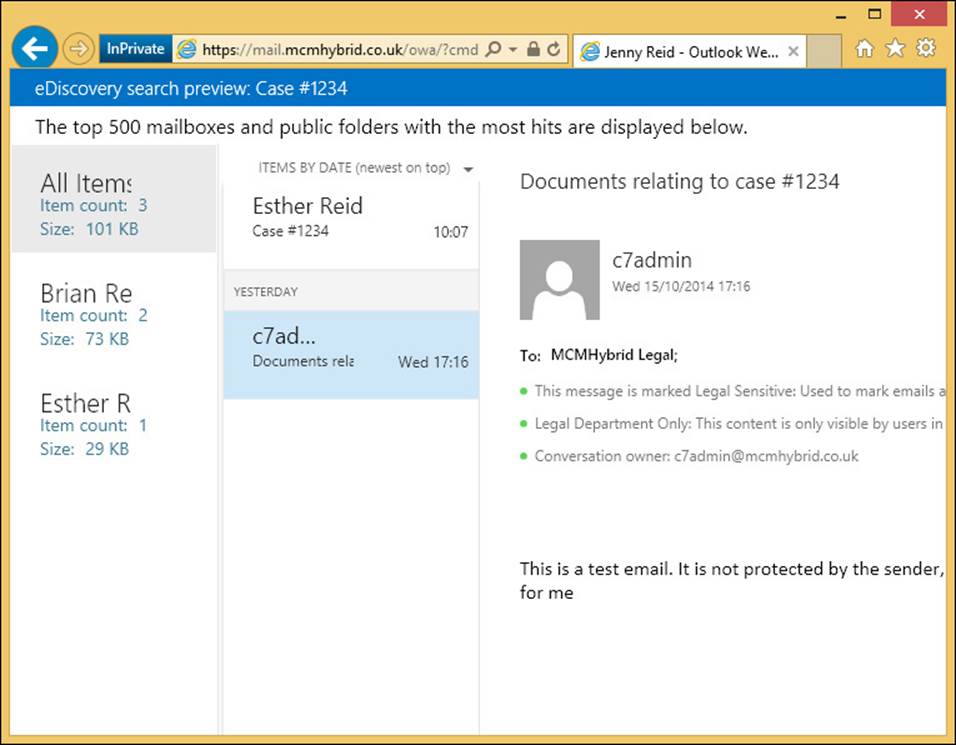
FIGURE 3-33 Search results in the discovery mailbox showing IRM protected content
Configuring pre-licensing for client access
Pre-licensing is the process whereby the client access server gets a license on behalf of the user from the RMS server and associates the license with the message. This means that users in OWA who are just viewing their email rendered in HTML are able to read RMS protected content because the client access server obtains the license for them and opens the protected message and renders the message in the web browser for them. The user, who could be remote from the RMS server and without a VPN open to the RMS server does not need to be able to reach the RMS server because Exchange will get licenses for the content on behalf of the user.
Pre-licensing is enabled by default and its current setting can be determined with Get-IRMConfiguration and looking at the ClientAccessServerEnabled setting. Prelicensing allows for offline use of RMS because the user’s license is provided with the message rather than the user needing to have access to RMS server directly. This means that as well as OWA clients consuming protected content, so can RPC/HTTP or MAPI/HTTP (Outlook Anywhere) clients, and ActiveSync clients. For ActiveSync clients, the mobile phone device needs to be able to process RMS content and use the license, and most ActiveSync devices do not do this.
Thought experiment: Securing business content
In this thought experiment, apply what you’ve learned about this objective. You can find answers to these questions in the “Answers” section at the end of this chapter.
You work for a national football team as their IT administrator. Discussions happen frequently regarding the potential purchase and sale of players from and to competitive clubs. The team management saw in the news the other day rumors about the potential sale of a player between two other clubs and wants to ensure their email discussions are private.
1. What options would you suggest to assist with this business requirement?
2. Assuming that Microsoft AD RMS appears on the list of possible solutions, how would you ensure that your anti-virus product installed with Exchange Server and your transport rules remained working?
3. Given a choice between S/MIME and AD RMS, which would you think would be best for your business?
Objective summary
![]() AD RMS is the Microsoft on-premises server for IRM protection of files, SharePoint libraries, and emails. Azure RMS is the Microsoft cloud-based IRM product.
AD RMS is the Microsoft on-premises server for IRM protection of files, SharePoint libraries, and emails. Azure RMS is the Microsoft cloud-based IRM product.
![]() RMS templates are created to allow users to easily pick permissions to apply to their content or for Exchange Server to easily protect content with Outlook Protection Rules or Transport Rules.
RMS templates are created to allow users to easily pick permissions to apply to their content or for Exchange Server to easily protect content with Outlook Protection Rules or Transport Rules.
![]() Distributed templates are available for users to use. Archived templates are available for viewing existing protected content. Never delete a template unless you want to lock out all access to all of the content created with it.
Distributed templates are available for users to use. Archived templates are available for viewing existing protected content. Never delete a template unless you want to lock out all access to all of the content created with it.
![]() Exchange Server determines the location of the RMS cluster by querying a Service Connection Point (SCP) from the Active Directory that is placed there during RMS installation.
Exchange Server determines the location of the RMS cluster by querying a Service Connection Point (SCP) from the Active Directory that is placed there during RMS installation.
![]() Outlook Protection Rules use Exchange Web Services to download rules to the Outlook client to ensure that messages are RMS protected at the point of sending.
Outlook Protection Rules use Exchange Web Services to download rules to the Outlook client to ensure that messages are RMS protected at the point of sending.
![]() Exchange Server can act as a RMS Super User. This means it has the rights to decrypt content that it is not the owner of, or have rights to open, and to protect content as if someone else protected it. The Exchange Server uses this right to do RMS on behalf of the user in Transport Rules, and to open content up so it can be indexed, modified, scanned, and pre-licensed.
Exchange Server can act as a RMS Super User. This means it has the rights to decrypt content that it is not the owner of, or have rights to open, and to protect content as if someone else protected it. The Exchange Server uses this right to do RMS on behalf of the user in Transport Rules, and to open content up so it can be indexed, modified, scanned, and pre-licensed.
Objective review
Answer the following questions to test your knowledge of the information in this objective. You can find the answers to these questions and explanations of why each answer choice is correct or incorrect in the “Answers” section at the end of this chapter.
1. You have installed AD RMS and have integrated it with Exchange Server. Which of the following cmdlets would you use to check that the integration with the IRM service is working? (Choose two.)
A. Get-RMSConfiguration
B. Get-IRMConfiguration
C. Test-RMSConfiguration -Sender dean@contoso.com
D. Test-IRMConfiguration -Sender dean@contoso.com
E. .Test-RMSConfiguration -Mailbox “Halstead, Dean”
F. Test-IRMConfiguration -Mailbox “Halstead, Dean”
2. Which of the following cmdlets will create a valid Outlook Protection Rule?
A. New-OutlookProtectionRule “Sent By Compliance Dept.” -FromDepartment Compliance -SentToScope Internal -ApplyRightsProtectionTemplate “Do Not Forward” -UserCanOverride $True
B. New-RMSProtectionRule “Sent By Compliance Dept.” -FromDepartment Compliance -SentToScope Internal -ApplyRightsProtectionTemplate “Do Not Forward” -UserCanOverride $True
C. New-RMSProtectionRule “Sent By Compliance Dept.” -FromDepartment Compliance -SentToScope InOrganization -ApplyRightsProtectionTemplate “Do Not Forward” -UserCanOverride $True
D. New-OutlookProtectionRule “Sent By Compliance Dept.” -FromDepartment Compliance -SentToScope InOrganization -ApplyRightsProtectionTemplate “Do Not Forward” -UserCanOverride $True
3. Which of the following Exchange mailboxes needs to be added to the RMS Super Users group?
A. SystemMailbox{1f05a927-ee95-41ba-b053-4623ffd69772}
B. SystemMailbox{e0dc1c29-89c3-4034-b678-e6c29d823ed9}
C. FederatedEmail.4c1f4d8b-8179-4148-93bf-00a95fa1e042
D. Migration.8f3e7716-2011-43e4-96b1-aba62d229136
Objective 3.3: Configure and interpret mailbox and administrative auditing
Exchange Server 2013 contains a number of features to record the activity of both administrators and users. The type of activity that can be recorded are actions performed by an administrator in Exchange Management Shell, or ECP, which just runs shell cmdlets for you as well as access requests to mailboxes that are not by the owner.
Both of these features will ensure that you can meet security and compliance requirements that require you to show the activity on a mailbox by users other than the mailbox owner themselves, and what and who made changes to the Exchange Servers or Exchange Online.
This objective covers how to:
![]() Configure mailbox audit logging
Configure mailbox audit logging
![]() Configure administrative audit logging
Configure administrative audit logging
![]() Interpret all audit logs
Interpret all audit logs
 Exam Tip
The Objective Domain for the exam includes “Configure mailbox access logging,” which is apparently a mistake and you shouldn’t expect any questions on it on the exam because this is not a feature of Exchange Server.
Configuring mailbox audit logging
Mailbox audit logging allows the administrator or anyone with permission to view them to see the non-owner activity reports on the mailbox. By default mailbox audit logging is disabled and if a report is run against a mailbox that does not have audit logging enabled, a blank report will be returned.
When a mailbox is enabled for audit logging, all activity that is done by a user who is not the owner of the mailbox is stored in a hidden folder in the mailbox. This information stores who accessed the mailbox and when they accessed it. Because this information is stored in the mailbox, mailbox moves will result in the audit log staying with the mailbox. By default, audit logs are kept for 90 days. Entries older than 90 days are deleted. It is possible to change this duration in Exchange Server on-premises but not in Exchange Online.
When you search for entries in a mailbox audit log, Microsoft Exchange queries the mailbox audit log and exports the information. These results are then collated as an XML file and attached to an email message that is sent to the person requesting the audit log report.
To enable audit logging on a mailbox, you need to run the Set-Mailbox <Identity> -AuditEnabled $true.
Important: When to audit a mailbox
Auditing of mailbox owner actions can generate a large number of mailbox audit log entries and is therefore disabled by default. We recommend that you only enable auditing of specific owner actions needed to meet business or security requirements.
By default the Update, Move, MoveToDeletedItems, SoftDelete, HardDelete, FolderBind, SendAs, and SendOnBehalf actions performed by those with rights to the target mailbox are logged. It is possible to change these audit actions and also include Update, Copy, Move, SendOnBehalf, and MessageBind actions as well as to remove some or all of the default actions. You need to use the AuditAdmin property to control these actions, and the None action is used to turn them all off again. Note that you need AuditEnabled set to $true before any of the previous activities are logged.
Figure 3-34 shows setting the mailbox audit on Brian’s mailbox. It also shows that the permissions have been granted to Jenny to open this mailbox.
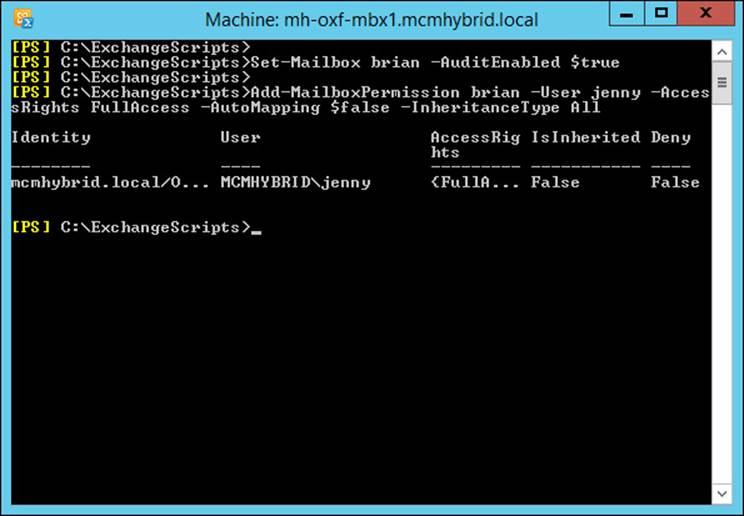
FIGURE 3-34 Enabling mailbox audit logging and full access permissions to the same mailbox.
Configuring administrative audit logging
This type of audit logging is automatically enabled. The data is stored in Exchange Server arbitration mailbox known as SystemMailbox{e0dc1c29-89c3-4034-b678-e6c29d823ed9}. This mailbox is made on the first Exchange Server 2010 database created in an organization, or if there was no Exchange Server 2010 installation on the first Exchange Server 2013 database in an organization.
In the event of upgrading from Exchange Server 2010 to 2013, one of the first things to do once your newly installed environment is stable is to move this system mailbox. This mailbox needs to be on Exchange Server 2013 to be able to record the audit logs for Exchange Server 2013 and 2010. If the mailbox still resides on Exchange Server 2010, activities on Exchange Server 2013 will not be recorded.
To check the location of all the system, or arbitration, mailboxes use the following cmdlet.
Get-Mailbox -Arbitration | FL Name,DisplayName,ServerName,Database,AdminDisplayVersion
You are looking for the AdminDisplayVersion property of the SystemMailbox{e0dc1c29-89c3-4034-b678-e6c29d823ed9} mailbox. If the version is 15.x, the mailbox has been moved to Exchange Server 2013. If the mailbox is less than version 15.0 it remains on Exchange Server 2010 and needs to be moved. You can move it with this.
Get-Mailbox "SystemMailbox{e0dc1c29*" -Arbitration | New-MoveRequest
By default, audit log entries are kept for 90 days. When an entry is older than 90 days, it’s deleted. This setting can’t be changed in a cloud-based organization. However, it can be changed in an on-premises Exchange organization by using the Set-AdminAuditLog cmdlet.
Cmdlets that are run in Exchange Management Shell that make changes to Exchange Server are audited. Cmdlets that query or read settings are not audited. The Exchange Control Panel runs PowerShell cmdlets for you when you make changes in ECP; therefore these changes are also audited by way of the cmdlet that is run. The work of auditing the cmdlets is done with the Admin Audit Log Agent. This is an extensibility agent that is bound to all cmdlets in Exchange 2010 and 2013 that make changes. If changes are made in any other tool and do not call an Exchange Management Shell cmdlet they are not audited, as are cmdlets run in Exchange 2007. Test- cmdlets are also not logged, though you can enable the logging of these cmdlets, it is recommended that you only do Test- cmdlets for a short period of time only due to the amount of Test- cmdlets that run in the background.
Exam Tip
A command may take up to 15 minutes after it’s run to appear in audit log search results. This is because audit log entries must be indexed before they can be searched. If a command doesn’t appear in the administrator audit log, wait a few minutes and run the search again.
If you do not want every cmdlet that modifies Exchange Server logged, you can use the Set-AdminAuditLogConfig cmdlet to make changes on what to include. Any changes that affect Set-AdminAuditLogConfig are always logged regardless of other settings. We recommend that you grant permissions to configure the audit log age limit only to highly trusted users.
Interpreting all audit logs
This section looks at understanding and reading the two different audit logs that Exchange Server stores.
Mailbox audit logs
In the previous section about mailbox auditing, Jenny was granted the ability to have full access to Brian’s mailbox. To search the logs or run reports to get this information, you access Exchange Control Panel (Figure 3-35).
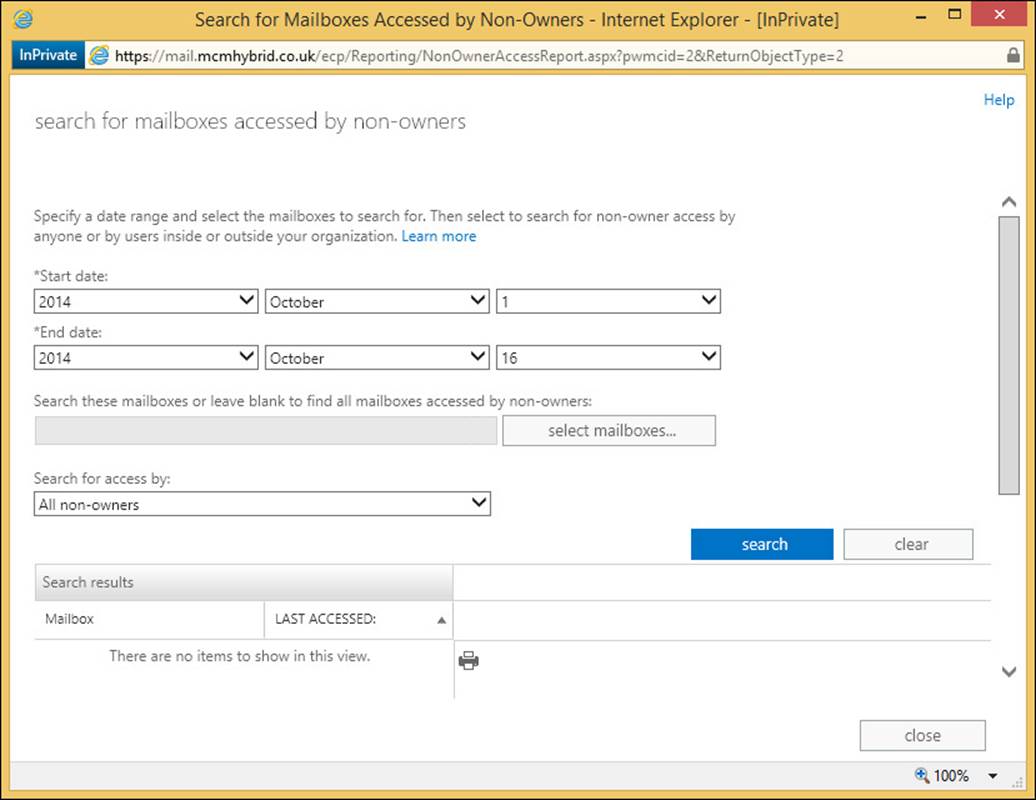
FIGURE 3-35 The ECP search for a non-owner audit log
The audit log will show this activity. To request the audit log, you need either to be an Exchange administrator or have been given access to one of two role groups. The two role groups are:
![]() Audit Logs
Audit Logs
![]() View Only Audit Logs
View Only Audit Logs
The second of these two roles allows the log to be viewed in Exchange Control Panel, but not exported.
To add a user to view audit logs, you need to run the following cmdlet using the View Only Audit Logs role if you want that right instead.
New-ManagementRoleAssignment -Role "Audit Logs" -User <Identity>
Audit logs can be viewed in Exchange Control Panel via the Compliance Management section and the Auditing tab. To view an audit log report, run the Run A Non-Owner Mailbox Access Report.3-36.
If you have the Audit Logs role, you can export an audit log. Exporting audit logs will get them emailed to a selected person as an XML file. If you are using Outlook Web App, you will not be able to view XML attachments unless you configure OWA to support XML files. This can be done with the following cmdlets.
//These cmdlets remove the .xml file extension and MIME type from the block lists and add it to the allow list:
Get-OwaMailboxPolicy | Set-OwaMailboxPolicy -BlockedFileTypes @{Remove = ".xml"}
Get-OwaMailboxPolicy | Set-OwaMailboxPolicy -AllowedFileTypes @{Add = ".xml"}
Get-OwaMailboxPolicy | Set-OwaMailboxPolicy -BlockedMimeTypes @{Remove = "text/xml",
"application/xml"}
Get-OwaMailboxPolicy | Set-OwaMailboxPolicy -AllowedMimeTypes @{Add = "text/xml",
"application/xml"}
Note that this cmdlet resets the AllowedFileTypes for the Default OWA mailbox policy. If you have multiple policies, you need to change each. If you have already modified the extensions on this list, you need to ensure that you add the .xml file type. You can do this using the following syntax.
@{Add="<value1>","<value2>"...; Remove="<value1>","<value2>"...}
Audit logs are generated by a background process, and can take up to 24 hours to arrive in the target mailbox or appear on the results pane in the search window.
Administrator audit logs
To query the actions of the administrators on the Exchange Server, you can use the Exchange Control Panel as previously discussed with the mailbox auditing, or you can run the Search-AdminAuditLog cmdlet, as shown in Figure 3-36
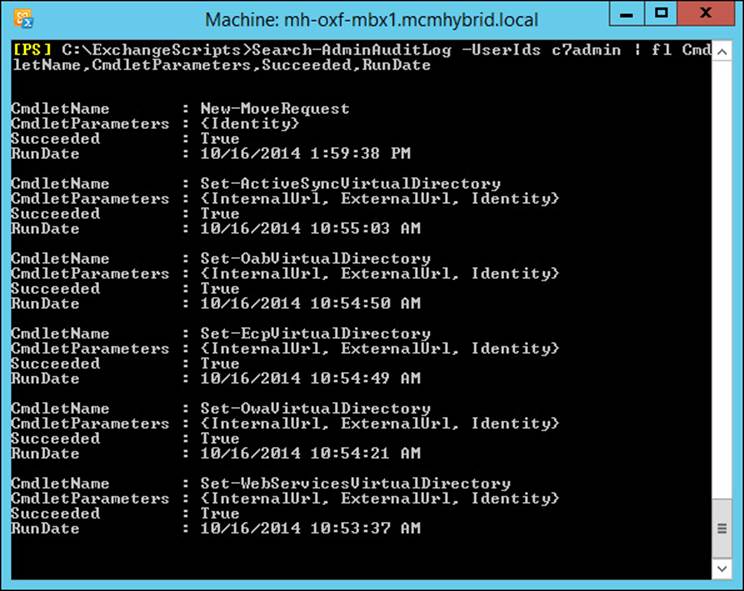
FIGURE 3-36 Running Search-AdminAuditLog to get information on a particular administrator
By default, only the first 1,000 log entries that match the criteria you specify are returned. However, you can override this default and return more or fewer entries using the ResultSize parameter. You can specify a value of Unlimited with the ResultSize parameter to return all log entries that match the specified criteria.
To email an admin audit report, you can use New-AdminAuditLogSearch rather than Search-AdminAuditLog. The following example uses this cmdlet to get the same results as the example shown in Figure 3-36:
New-AdminAuditLogSearch -UserId c7admin -StatusMailRecipients jenny@mcmhybrid.co.uk
-StartDate 10/1/14 -EndDate 10/16/14
Results can take up to 15 minutes to arrive and will not exceed 10 MB. The structure of the returned XML is described at http://technet.microsoft.com/en-us/library/ff459251.aspx.
 Thought experiment: Searching for admin changes
In this thought experiment, apply what you’ve learned about this objective. You can find answers to these questions in the “Answers” section at the end of this chapter.
You are an external consultant to Tailspin Toys. Your client is seeing non-deliverable email messages being attached to suspect outbound spam messages. The issue is that these suspect spam messages are getting sent to eop@tailspin.com. Exchange Online Protection allows suspect spam to be sent to a mailbox so that it can be evaluated; however, there is no mailbox with the address eop@tailspin.com. Users are starting to get non-deliverable messages for a mailbox they did not address the email to. This problem only started in the last week and Tailspin Toys has called you to help work out the cause of the issue.
Using admin auditing, how would you go about solving the issue?
Objective summary
![]() Exchange Server includes administrator cmdlet auditing by default. All cmdlets that change content are audited by default.
Exchange Server includes administrator cmdlet auditing by default. All cmdlets that change content are audited by default.
![]() Mailbox auditing is disabled by default and can be enabled on selected or all mailboxes as your business needs require.
Mailbox auditing is disabled by default and can be enabled on selected or all mailboxes as your business needs require.
![]() Auditing stores 90 days of data by default, though this can be changed with the Set-AdminAuditLog cmdlet.
Auditing stores 90 days of data by default, though this can be changed with the Set-AdminAuditLog cmdlet.
![]() To view the XML files in OWA you need to remove the .xml block and MIME type block and add it to the allowed file types list.
To view the XML files in OWA you need to remove the .xml block and MIME type block and add it to the allowed file types list.
![]() You need to be an administrator to view audit logs unless the Audit Logs or View Only Audit Logs roles are granted to your mailbox.
You need to be an administrator to view audit logs unless the Audit Logs or View Only Audit Logs roles are granted to your mailbox.
Objective review
Answer the following questions to test your knowledge of the information in this objective. You can find the answers to these questions and explanations of why each answer choice is correct or incorrect in the “Answers” section at the end of this chapter.
1. You configure exporting of audit logs to your compliance manager but she reports back that she is having difficulty viewing them in OWA. What do you need to do? (Choose two.)
A. Create a new OWA mailbox policy.
B. Remove the compliance officer from the Default OWA mailbox policy.
C. Add the .xml file type to the allowed file types and the text/xml and application/xml MIME types to allowed MIME types on the mailbox policy used by the compliance officer.
D. Remove the .xml file type from the blocked file types and the text/xml and application/xml MIME types from the blocked MIME types parameter on the mailbox policy used by the compliance officer.
2. After upgrading Exchange Server 2010 to 2013, you notice that admin audit logs are returning empty search results. Which of the following arbitration mailboxes needs to be moved to an Exchange Server 2013 database?
A. SystemMailbox{1f05a927-ee95-41ba-b053-4623ffd69772}
B. SystemMailbox{e0dc1c29-89c3-4034-b678-e6c29d823ed9}
C. FederatedEmail.4c1f4d8b-8179-4148-93bf-00a95fa1e042
D. Migration.8f3e7716-2011-43e4-96b1-aba62d229136
Objective 3.4: Troubleshoot security-related issues
The final objective of the Advanced Security topic of the 70-342 Exchange Server 2013 Microsoft IT Pro exam is troubleshooting the items that you have looked at in this chapter. Apart from the troubleshooting items mentioned with respect to installing a feature, in this section you’ll look at some of the more common and exam worthy issues that can occur with security in Windows Server as it relates to Exchange Server.
This objective covers how to:
![]() Determine certificate validity
Determine certificate validity
![]() Ensure proper Certificate Revocation List (CRL) access and placement
Ensure proper Certificate Revocation List (CRL) access and placement
![]() Ensure private key availability
Ensure private key availability
![]() Troubleshoot failed IRM protection
Troubleshoot failed IRM protection
![]() Troubleshoot RBAC
Troubleshoot RBAC
Determining certificate validity
Certificates must be trusted by both you and the recipient to be valid. In addition to validity dates, you should be able to trust the issuer and the subject name such match the server name or email address of the owner of the certificate.
Each certificate is valid for a range of time. This range can be seen in the certificate’s properties. Of course this date range is compared to both the date and time on the sender’s computer and the date and time on any recipient’s computer. Therefore it is important to ensure that both the sending party and the receiving party in a signing or an encryption transfer are both using a range of time on the client that are the same or very close to being the same.
The best way to achieve this is to ensure that non-domain joined PCs or computing devices get their time from a reliable Network Time Protocol (NTP) server and that as domain joined Windows PCs get their time from a domain controller in their domain, and the domain controllers ultimately get time from the PDC emulator domain controller in the root domain. It is important to ensure that the PDC emulator domain controller in the root domain is able to get time from a reliable time source.
There are generally two time sources that are considered useful. One is a radio beacon that is available in some countries. A device that gets time from this beacon is connected to the PDC emulator domain controller in the root domain or you allow UDP port 123 outbound to your choice of a reliable time source. How reliable you need to be depends on the data that you are encrypting. Financial markets for example need to be very reliable due to the speed of the trades, but for most organizations, an Internet time source such as pool.ntp.org is sufficient. The Windows default timeserver of time.windows.com is typically not reliable enough.
To see the dates of a certificate, open the certificate from whichever application presents it to you, or open Internet Explorer, Internet Options, and the Content tab. Click Certificates to see your certificates and those you hold from other people (for example sent to you via an S/MIME conversation). This can be seen in Figure 3-37.
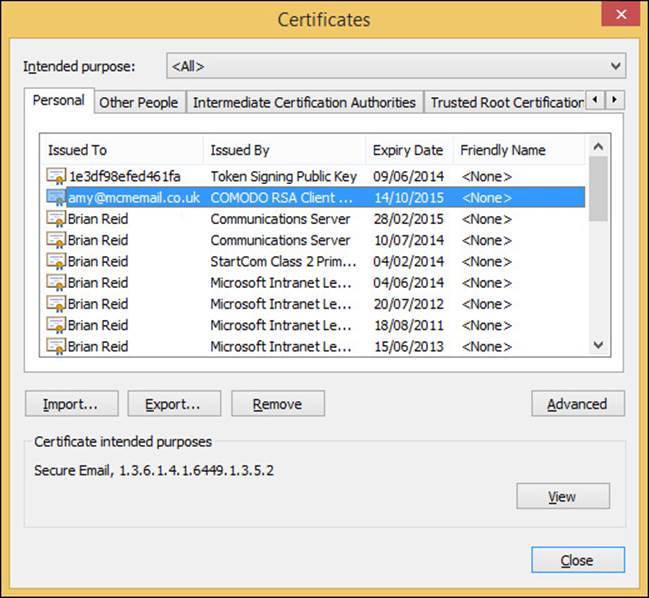
FIGURE 3-37 Personal certificates viewed via Internet Explorer
The expiry date of a certificate can be seen in the dialog box shown in Figure 3-37. Double-click any certificate to see the Valid From date as well (Figure 3-38). If you have a certificate that is not yet valid, you will not trust it either. Because certificates are considered secure until they expire or have been revoked, it is becoming called for that certificates have short validation periods. For example during the writing of this book (Oct 2014), Google announced that they would stop supporting the SHA1 hash used in SSL communications in their web browser. Microsoft has already announced that they will stop support for SHA1 in 2017. To that end, if you visit https://www.google.com during this time period, they have SSL certificates with a three-month validity period. This is so that by the time their web browser starts generating alerts for SHA1 hashed certificates with long validation periods, they will not be affected by it. It may well be that in a few years’ time, a one-year certificate is considered too long!
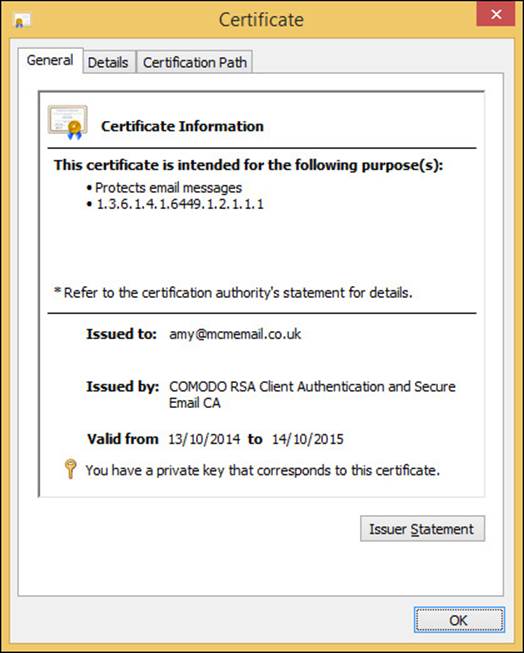
FIGURE 3-38 A certificate showing the validation dates and other information
Ensuring proper Certificate Revocation List (CRL) access and placement
In addition to validating the validity dates of a certificate, be sure that Certificate Revocation Checking is enabled in Internet Explorer, This ensures that even though the certificate is valid for its dates, it is not invalid because it has been revoked.
Important: Configuring Revocation Settings
Though you configure revocation checking in Internet Explorer, it is the Internet Settings dialog box that you are viewing, which affects most applications and not just Internet Explorer. You can access the Internet Settings dialog box from Control Panel as well.
Figure 3-39 shows the Internet Settings dialog box with the revocation settings option highlighted. Notice that changes here require a restart of the operating system as they are affecting more than just the web browser.
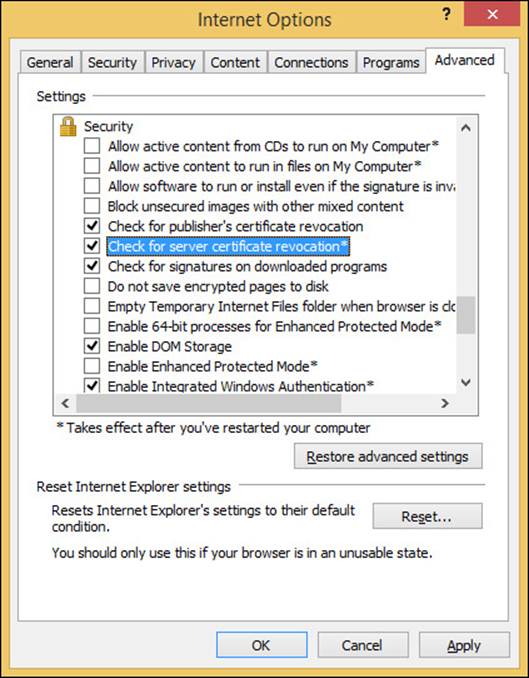
FIGURE 3-39 Internet security settings in Windows showing revocation settings
When certificate revocation checking is enabled, Windows will check with the certificate issuer that the certificate was not cancelled, or revoked, since it was issued.
Revocation checking is a process that runs over the HTTP protocol and requires a connection to the certificate authority’s certificate revocation list, or CRL, location. Each certificate has the CRL location stored as part of the certificate.
To view the CRL publishing location of a certificate, you need to view the certificate properties and change to the Details tab. On the Details tab, locate the CRL Distribution Points value. This can be seen in Figure 3-40 as an example from an internally issued certificate. Notice from the figure that the URL for the certificate revocation list is via LDAP as it is stored in the Active Directory. If you have an internal certificate authority that is used by non-domain joined members, you typically ensure that it is also reachable via a HTTP endpoint as well.
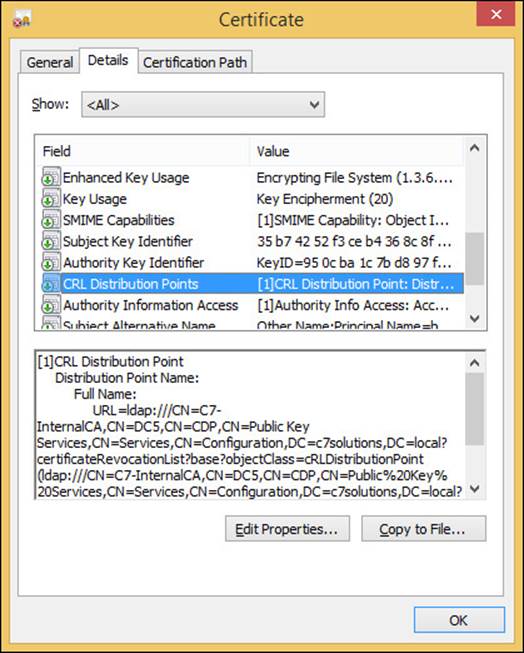
FIGURE 3-40 Viewing the CRL location on a certificate
To see the contents of a CRL you can copy the HTTP URL and paste it into a browser. The CRL will have a cache property and so may be stored in your web browsers cache for a while, but as long as you have HTTP Internet access (direct or via a proxy server) you should be able to see the CRL.
For example the CRL for a Comodo free digital certificate that is used for S/MIME is http://crl.comodoca.com/COMODORSAClientAuthenticationandSecureEmailCA.crl. This is always reached over HTTP and never HTTPS, because you would need to check the CRL for the SSL feature of the encrypted connection to get the CRL and so could end up in loop, so all CRL lookups are over HTTP.
CRLs typically have a short lifespan. For example the one seen in Figure 3-41 is four days. If the CRL that you download is past its update period, it is considered invalid and the source certificate that you are trying to validate will fail validation. Therefore it is important that any proxy server between the client or server and the CRL distribution point either does not cache CRL files, or caches them for as small a time as possible. Exchange Server requires access to the listed CRL of any certificate that it uses and so it requires either unauthenticated Internet access through a proxy server, or direct access via a router or firewall to the CRL endpoint. When opening OWA or Exchange Control Panel, a delay of 30 seconds is a typical indicator that the CRL is not reachable.
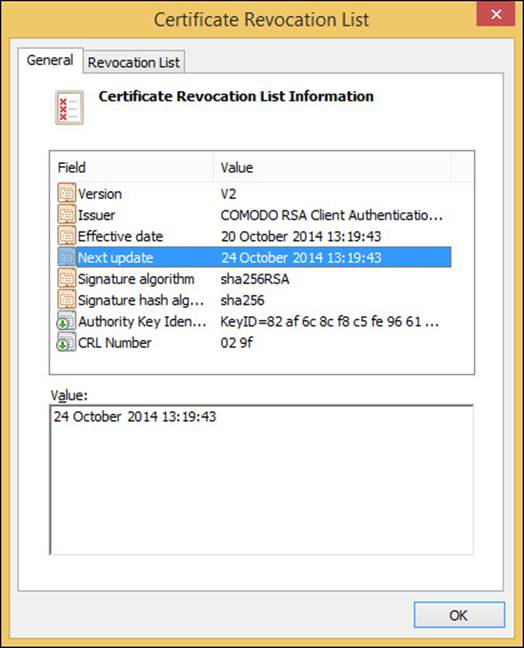
FIGURE 3-41 A certificate revocation list
To troubleshoot CRL lookup issues, use the CRLUtil tool from Microsoft. This tool will run in the context of the current user, which is important for checking the content of services and the computer itself. Microsoft has a wiki on how to check revocation athttp://social.technet.microsoft.com/wiki/contents/articles/certificate-status-and-revocation-checking.aspx. Though this article applies to Windows XP, there is a link on this page for later Windows versions and a plan to merge the content to this page.
Ensuring private key availability
If you lose your private key, you cannot sign content for other users and you cannot read anything that has been sent to you that was encrypted with your key, even if you had previously opened it. Therefore, it is important to have a backup of your key, which you can password protect to keep it secure. When your key expires, it is also import to keep your key around so that you can decrypt data sent to you when the key was valid.
When you backup a certificate, you get the option to back up the private key. You must select this option to enable it; it is not the default. Depending on how you installed the certificate, the private key might not be exportable. This is the case if the private key was not marked as exportable when the certificate was imported to that computer. Therefore it is important that, as you copy certificates between machines, you keep a note of which computer you can export the private key from.
Figure 3-42 shows the Certificate Export Wizard on Windows 8.1. The exact look of the wizard differs in different versions of Windows.
FIGURE 3-42 Exporting a digital certificate with the private key
Following the wizard, you can choose to export all of the certificates in the path that this digital certificate requires. Each certificate, unless self-signed, is signed by a parent certificate authority, which in and of itself might be signed by a grandparent certificate authority, and so on. To trust the certificate you are exporting, should you import it to another computer, this chain of certificate authorities will be needed. Therefore, exporting with the chain makes it easier to import a certificate in the future and get the full trust working immediately. Also, during export you have the option to delete the private key andto set a password. This password will be needed during later import processes. If you are exporting the certificate using Windows 8.1/Windows Server 2012 R2, you can allocate a group that you need to be a member of to open the certificate in the future rather than or in addition to setting a password. The use of groups makes it easier for management purposes when you are exporting and importing certificates across servers within a team, for example, within the IT department. If you export with a password and restricted to specific group membership, you need to know the password as well as be a member of the group before the digital certificate and private key can be imported.
If you have used Active Directory Certificate Services (AD CS) as your certificate authority, you can configure the certificate authority to archive the private key during the issuing process. This allows the AD CS administrators to recover keys in the event the user loses them or they need to recover protected data. It is not possible to archive private keys for certificates that you have already issued, so this should be part of the planning for the certificate authority when you are planning for its installation.
To be able to archive keys for users, you need to enable the key recovery agent on the Recovery Agents tab of the properties of the certificate authority. When key recovery is enabled, you need to add the certificate of the administrators allowed to do key recovery. This is because these administrators will need to be available during the recovery process. You can set how many key recovery agents you want to use for key recovery. For example, if this is set to two, and you add four key recovery agent certificates to the authority, then two of those four certificates holders are needed to recover a private key. Adding more than one key recovery agent means that private key recovery can be protected by a policy rather than reliant on one individual. Figure 3-43 shows the enabling of the recovery agent and key archival in AD CS.
FIGURE 3-43 Enabling key archival in Windows Active Directory Certificate Services
Troubleshooting failed IRM protection
If you have set up RMS protection with AD RMS server and configured Exchange Server to communicate with the RMS server, there are a number of things that you might need to check over to ensure that it is working.
First, ensure that when you set the Super Users group that it already contains the Federation system mailbox as a member of that group. When you add the group to the RMS server, the group membership is checked once every 24 hours; therefore, if you have not added the user at the time of creating the Super Users group, you will need to wait a whole day. This is true even if you add and then remove and re-add the group again.
If you have set up RMS before, maybe for a test environment, and then remove it and add it back again, Exchange Server will have cached certificates. If they are the wrong certificates, you will not be able to encrypt and decrypt content on behalf of your users. Use Set-IRMConfiguration -RefreshServerCertificates to refresh the certificates that the server has cached.
Finally, the output from Test-IRMConfiguration should be checked for any clue to why RMS is not working.
Microsoft has published a troubleshooting guide for AD RMS that can be downloaded from http://social.technet.microsoft.com/wiki/contents/articles/13130.ad-rms-troubleshooting-guide.aspx.
This guide ensures that you can do the following:
![]() Verify that you can get to the pipeline URLs from an AD RMS client computer.
Verify that you can get to the pipeline URLs from an AD RMS client computer.
![]() Make sure that the user at the AD RMS client computer has an email address configured in Active Directory.
Make sure that the user at the AD RMS client computer has an email address configured in Active Directory.
![]() Make sure that the SCP for AD RMS does not have a port specified for it.
Make sure that the SCP for AD RMS does not have a port specified for it.
![]() Verify that when using SSL the certificate is trusted by the AD RMS client.
Verify that when using SSL the certificate is trusted by the AD RMS client.
![]() Verify that the DRM cache is cleared of any failed installation or configuration changes.
Verify that the DRM cache is cleared of any failed installation or configuration changes.
![]() Verify that there are not multiple .GIC or .CLC files installed on the AD RMS client.
Verify that there are not multiple .GIC or .CLC files installed on the AD RMS client.
![]() Verify that the IIS application pool is started.
Verify that the IIS application pool is started.
Troubleshooting RBAC
The best way to troubleshoot RBAC issues is to have an account that is not affected by any change you are about to do. You want to ensure that after any change, that same account has the same rights it had before the change.
Remember that RBAC allows both granular and broad control to all aspects of Exchange Server administration and what users can do. If you change an RBAC setting for some users or administrators, it should not affect others and so you always have a way into Exchange to reverse the changes if you need to. (The exception is in the case of exclusive scope settings which require you to be in the group or the user with the exclusive settings applied.) Also, for role groups, these are expressed through actual security groups created in the Microsoft Exchange Security Groups OU. If a role group (also known as a security group) is configured to the point where it does not work, you can always remove users from this group or delete the group in the Active Directory tools to resolve the issue. Be careful not to delete the built-in role groups!
 Exam Tip
Get to know the names of the built-in role groups. These built-in role groups are listed at http://technet.microsoft.com/en-us/library/dd351266.aspx.
Apart from troubleshooting RBAC permissions, the other consideration is to ensure that you have a good understanding of the RBAC permission model and that there is no requirement to modify access control lists (ACLs) on the Active Directory. In fact, modifying the ACL will not solve any issues because all Exchange and Active Directory interaction happens under the Exchange Trusted Subsystem account and not the user account that is logged in. Exchange Server determines the user’s permissions based on the RBAC settings that would be applied to them. Therefore, to troubleshoot RBAC you need to determine three things: the where, the what, and the who. To troubleshoot, make sure you know the what, where, and who that you are expecting RBAC to work with and check the cmdlets, target object, and source user against these settings.
In addition to ensuring the correct permissions, if permissions have been applied, they can be removed by taking away the role assignment. The role assignment is the one-to-one mapping between the scope, the role entry, and the role group. Therefore, there will be assignments for every unique combination of roles; in Exchange Server 2013 CU5, this count was at 195 different role assignments out of the box.
Thought experiment: Granting human resources staff mailbox rights
In this thought experiment, apply what you’ve learned about this objective. You can find answers to these questions in the “Answers” section at the end of this chapter.
You are the network administrator of Coho Vineyard and your HR department needs to update personal information on users in Active Directory that is also visible in Exchange Control Panel. Because the HR department has mailboxes on Exchange Server 2013, you decide it will be easier to give them access to the attributes they need to change via RBAC.
1. What will your general plan for configuring this requirement be?
2. How will you tell the HR department to make the required changes?
3. Who else could make the same changes?
Objective summary
![]() Certificates are considered valid if the receiver of the certificate trusts the issuer (that is, has the issuer’s public key in their trusted issuer’s store), that the current date and time is within the range of the valid dates, that the certificate is not revoked, and that the name on the certificate (subject or alternative subject name) matches the name of the sender.
Certificates are considered valid if the receiver of the certificate trusts the issuer (that is, has the issuer’s public key in their trusted issuer’s store), that the current date and time is within the range of the valid dates, that the certificate is not revoked, and that the name on the certificate (subject or alternative subject name) matches the name of the sender.
![]() Exchange Server uses opportunistic TLS by default and this uses only the certificate public key. It ignores the issuer, date, and subject, and even the revocation status of the certificate.
Exchange Server uses opportunistic TLS by default and this uses only the certificate public key. It ignores the issuer, date, and subject, and even the revocation status of the certificate.
![]() CRLs contain the thumbprint of certificates that have been cancelled, or revoked, before their validity period. Each certificate should be checked against a current copy of a CRL.
CRLs contain the thumbprint of certificates that have been cancelled, or revoked, before their validity period. Each certificate should be checked against a current copy of a CRL.
![]() Private keys are required to read data encrypted by the public key and to sign data that will be read using your public key. Therefore loss of private key means these two things cannot be done. Therefore having a backup of your digital certificate containing your private key is very important.
Private keys are required to read data encrypted by the public key and to sign data that will be read using your public key. Therefore loss of private key means these two things cannot be done. Therefore having a backup of your digital certificate containing your private key is very important.
![]() Rights Management Protection is more than NTFS and S/MIME, etc. encryption as it is encryption and policy. It controls whether or not you can see the data you have and what you can do with it.
Rights Management Protection is more than NTFS and S/MIME, etc. encryption as it is encryption and policy. It controls whether or not you can see the data you have and what you can do with it.
![]() RBAC controls the user and administrator’s rights within Exchange Server 2010 and later, and unlike access control lists used in Exchange 2007 and earlier, the rights are valid across objects and versions that an ACL may not be.
RBAC controls the user and administrator’s rights within Exchange Server 2010 and later, and unlike access control lists used in Exchange 2007 and earlier, the rights are valid across objects and versions that an ACL may not be.
Objective review
Answer the following questions to test your knowledge of the information in this objective. You can find the answers to these questions and explanations of why each answer choice is correct or incorrect in the “Answers” section at the end of this chapter.
1. You need to restore a certificate to a server and you have the PFX file but do not have a copy of the password. What do you need to do?
A. You need to export the certificate again from any server that holds the private key and this time set a password and or group membership that can import the certificate.
B. You can do this by being a member of the local administrators group without requiring the password.
C. You can do this by being a member of the domain Enterprise Admins group without requiring the password.
D. You need to export the certificate again from any server that holds the private key and where exports are allowed of that key. This time set a password and or group membership that can import the certificate.
2. You enable AD RMS and integrate it with Exchange Server. You find that running Test-IRMConfiguration fails. You suspect that it is down to it previously working on this server but against a different RMS installation. What should you do?
A. Run the Super User Wizard on the RMS server and ensure the Exchange Servers group is added here.
B. Run Test-IRMConfiguration -RefreshServerCertificates
C. Run Set-IRMConfiguration -RefreshServerCertificates
D. Run the Super User Wizard on the RMS server and ensure the Federation arbitration mailbox is added here.
3. In what order do you need to create a new RBAC policy and apply it to a user or group?
A. Remove-ManagementRoleEntry
B. Add-ManagementRoleEntry
C. New-ManagementScope
D. New-RoleGroup
E. New-ManagementRole
Answers
This section contains the solutions to the thought experiments and answers to the objective review questions in this chapter.
Objective 3.1: Thought experiment
1. The different options that you could evaluate include BitLocker, smart cards, IRM for File Shares.
2. To ensure your Exchange Servers are physically secure you would enable BitLocker using the TPM chip on the motherboard to store the keys. You would also enable AD key recovery should you need to recover keys in the event of disks moving servers and needing to be recovered. You would also want to ensure physical security of the site and visit the hosting company often to ensure this is taking place.
3. You can ensure that your communications with the packaging company are secure by using TlsAuthLevel on a send connector for their domain. Use DomainValidation for TlsAuthLevel. Ensure that they have a send connector back to you that is the same, or a receive connector that requires TLS so that if they start to do clear text communications this would cause the messages to queue.
Objective 3.1: Review
1. Correct answers: A, B, D, and F
A. Correct: You need the private key to sign emails.
B. Correct: You need the private key to encrypt a copy of the email that is placed in Sent Items by Outlook, therefore if you do not have a private key you cannot encrypt messages to others as the copy to yourself cannot be created.
C. Incorrect: To read a signed email you need the sender’s public key.
D. Correct: You need your private key, which is part of your certificate, to read encrypted emails sent to you by others.
E. Incorrect: You will be able to read signed emails because they are not encrypted.
F. Correct: To open previously encrypted emails that you have sent to others, you need your private key.
2. Correct answers: D and F
A. Incorrect: You will be able to sign emails using the new certificate.
B. Incorrect: You will be able to encrypt emails using the new certificate.
C. Incorrect: You will be able to read signed emails from others that use the new certificate.
D. Correct: You do not have your previous private key and so cannot open encrypted emails that use your previous public key.
E. Incorrect: Signed emails are not encrypted and so can still be read.
F. Correct: You need the previous private key to decrypt emails that you previously sent using it. Since you do not have this, you cannot read these emails.
3. Correct answer: D
A. Incorrect: S/MIME is user driven and so is not guaranteed to encrypt all communications to the bank.
B. Incorrect: Domain Secure requires direct Exchange Server mailbox role to Exchange Server mailbox role access using MX records and this does not exist in this case.
C. Incorrect: Opportunistic TLS will encrypt if a certificate is available, but if it is not it will go in clear text. Therefore this answer is not going to guarantee encryption.
D. Correct: Setting TlsAuthLevel to DomainValidation and TlsDomain to the name of the certificate that the hosting company is using.
Objective 3.2: Thought experiment
1. To secure email between known individuals you should use RMS and optionally Outlook Protection Rules. You could use transport rules to protect content automatically based on the keywords and the sender and recipient as well as educating the users about how to protect messages in Outlook and OWA. Other options include:
![]() S/MIME and third-party encryption options (not covered in this book) such as PGP
S/MIME and third-party encryption options (not covered in this book) such as PGP
![]() If any communications go offsite, HTTPS for user connectivity along with complex (un-guessable) passwords and maybe remote access to email via a VPN with two factor authentication
If any communications go offsite, HTTPS for user connectivity along with complex (un-guessable) passwords and maybe remote access to email via a VPN with two factor authentication
![]() If email is sent offsite to other servers outside the Exchange organization, to require TLS on communications to these domains and cross-forest RMS or Azure RMS to protect the content at the end point
If email is sent offsite to other servers outside the Exchange organization, to require TLS on communications to these domains and cross-forest RMS or Azure RMS to protect the content at the end point
2. You would ensure that the RMS transport decryption option is enabled.
3. You know your business better than we do. Each has a place and it is your role as the messaging administrator to provide the best of service for your company’s messaging requirements.
Objective 3.2: Review
1. Correct answers: B and D
A. Incorrect: This is not the name of the cmdlet. The cmdlet for getting RMS configuration is Get-IRMConfiguration.
B. Correct: This cmdlet will tell you the IRM configuration in your Exchange organization.
C. Incorrect: The cmdlet is not correct. The cmdlet for testing RMS is Test-IRMConfiguration.
D. Correct: This is a valid cmdlet and answer for testing IRM.
E. Incorrect: The RMS cmdlet is not the correct name.
F. Incorrect: The IRM cmdlet uses -Sender for testing and not –Mailbox.
2. Correct answer: D
A. Incorrect: The SentToScope parameter is invalid on this answer.
B. Incorrect: This is an invalid cmdlet.
C. Incorrect: The cmdlet name here is invalid.
D. Correct: This cmdlet is correct.
3. Correct answer: B
A. Incorrect: This is a valid arbitration mailbox but is not the Federation mailbox.
B. Correct: This is the federation mailbox and so is the one needed for RMS super user rights. Full details of the steps to configure RMS for Exchange Server 2013 can be found at http://technet.microsoft.com/en-us/library/dd351212(v=exchg.150).aspx.
C. Incorrect: This is a valid arbitration mailbox but is not the Federation mailbox.
D. Incorrect: This is a valid arbitration mailbox but is not the Federation mailbox.
Objective 3.3: Thought experiment
1. To audit the possible changes in configuration, you would use administrator audit reports to view for who removed the eop@ mailbox on the assumption that it existed and now does not. If the mailbox was deleted in Active Directory, by the deletion of the user account, it would not be audited. You would use the same technique to view the audit log of Exchange Online Protection (EOP) via Remote PowerShell to EOP.
Objective 3.3: Review
1. Correct answers: C and D
A. Incorrect: You can receive audit reports in OWA without changing your mailbox policy. You will not be able to view XML files though, and the policy for XML files would need to be set for this policy, and that is covered in a different answer.
B. Incorrect: This is not a valid thing to do.
C. Correct: This change allows the OWA policy used by the compliance offer to view XML files in OWA if used in conjunction with answer D.
D. Correct: This change allows the OWA policy used by the compliance offer to view XML files in OWA if used in conjunction with answer C.
2. Correct answer: B
A. Incorrect: This is a valid arbitration mailbox but is not the mailbox audit reports are stored in.
B. Correct: This is the mailbox used for administrator audit reports and so is the one that must be migrated to Exchange 2013.
C. Incorrect: This is a valid arbitration mailbox but is not the mailbox audit reports are stored in.
D. Incorrect: This is a valid arbitration mailbox but is not the mailbox audit reports are stored in.
Objective 3.4: Thought experiment
1. In general, you would create a management scope for all mailboxes or a subset if that were required. Then, you would create a management role based on the Mail Recipients existing role, from which you would remove the cmdlets not needed and leave any in that are still required. Finally, you would create a role group and add the HR staff to it.
2. You would get them to use OWA and then change to ECP using the cog icon or directly to the ECP URL.
3. The users will have the rights to make the same changes, as would anyone else in the role group or with rights allocated via other management role assignments.
Objective 3.4: Review
1. Correct answer: D
A. Incorrect: You will need to export the certificate and private key again, but this can only be done from servers where the key is exportable.
B. Incorrect: You will need the password or this PFX file is not readable.
C. Incorrect: You will need the password or this PFX file is not readable.
D. Correct: You can only export the key from a server where it was marked as exportable from when it was imported.
2. Correct answer: C
A. Incorrect: Checking super user will not fix this.
B. Incorrect: This is not a valid cmdlet.
C. Correct: This cmdlet will refresh the certificates on the Exchange Server and should replace older certificates.
D. Incorrect: Checking super user will not fix this.
3. Correct answer: The correct sequence for these steps is C, E, A, B, and then D.
All materials on the site are licensed Creative Commons Attribution-Sharealike 3.0 Unported CC BY-SA 3.0 & GNU Free Documentation License (GFDL)
If you are the copyright holder of any material contained on our site and intend to remove it, please contact our site administrator for approval.
© 2016-2026 All site design rights belong to S.Y.A.