Mastering Hyper-V 2012 R2 with System Center and Windows Azure (2014)
Chapter 5. Managing Hyper-V
The previous chapters explained the key building blocks of virtualization, and this chapter shows how to begin bringing together those separate blocks through consolidated management. While basic management can be performed using Hyper-V Manager, for most enterprise deployments it will be necessary to use System Center Virtual Machine Manager (SCVMM) and also automation solutions such as PowerShell and System Center Orchestrator.
This chapter looks at installing and securing Hyper-V before looking at details around virtual machine deployments and converting physical servers into a virtual machine.
In this chapter, you will learn to
· Identify the different ways to deploy Hyper-V
· Explain why using Server Core is beneficial to deployments
· Create and use virtual machine templates
Installing Hyper-V
Hyper-V is a role of Windows Server 2008 and above that is enabled after the installation of the Windows Server operating system, and it's simple to enable it. Remember from Chapter 2, “Introduction to Virtualization and Microsoft Solutions,” that the Hyper-V role is available in both the Standard and Datacenter SKUs of Windows Server 2012 R2. It's also the only role available in the free Microsoft Hyper-V Server offering that is aimed at VDI and Linux workloads that don't need the Windows Server guest licenses that are part of Standard and Datacenter licenses. The capabilities and scalability are the same for all three versions, and the version you choose will depend on your exact requirements, but typically you'll choose the version based on the following:
· Windows Server Datacenter: Used when you have a large number of virtual machines running Windows Server operating systems, especially when clustering hosts to provide maximum mobility for virtual machines. Datacenter allows an unlimited number of licenses for Windows Server virtual machines (known as virtual operating environments in Microsoft parlance).
· Microsoft Hyper-V Server: Used when not running Windows Server guest operating systems, which means virtual instance rights that are provided with Standard and Datacenter are not needed. Primarily aimed at environments where VMs do not require Windows Server licenses, such as VDI environments that run Windows client operating systems in virtual machines and also Linux environments. Both scenarios require their own separate licensing of the operating systems in the virtual machines.
· Windows Server Standard: Not typically used in virtualization environments because Standard provides only two virtual OS instance rights running Windows Server that cannot be moved between servers. May be used in very lightly virtualized environments where clustering is typically not used.
Whether you use Standard or Datacenter, there is no difference in any operational activities; they are the same operating system. When you use the free Microsoft Hyper-V Server, the Hyper-V role is automatically enabled, removing the manual role additional action.
I should also note that Hyper-V is available as a feature in Windows 8 and Windows 8.1. It's the same Hyper-V code that is running in Windows Server; it is just missing some of the features that make no sense on a client operating system, such as Virtual Fibre Channel, SR-IOV, Live Migration, and Hyper-V Replica. It's the same hypervisor using the same virtual hard disk formats, which means you can take a virtual machine running on Windows 8.1 Hyper-V and run it on Windows Server 2012 R2 Hyper-V with no changes required. You can even move in the opposite direction.
On the server side, you should make sure servers are sized accordingly based on the desired usage and also that they have the required network and storage connectivity. Processors are required to support hardware-assisted virtualization (Intel VT or AMD-V) and data execution prevention in the form of Intel XD bit (execute disable bit) or AMD NX bit (no execute bit). The good news is that any server processor released within the last five years should definitely have these capabilities and likely even older processors.
It's nice to have Second Level Address Translation (SLAT) for improved performance. It allows the processor to handle mapping of physical memory to virtual machine memory, which otherwise has to be handled by the hypervisor, increasing resource usage of the hypervisor. Intel calls this technology Extended Page Tables (EPT) and AMD calls it Rapid Virtualization Indexing (RVI).
To check your server processors' capabilities, download coreinfo.exe from
http://technet.microsoft.com/en-us/sysinternals/cc835722.aspx
and execute with the -v switch, which shows virtualization-related processor features. A * means the feature is present, a - means it is missing.
PS C:\temp> .\Coreinfo.exe -v
Coreinfo v3.2 - Dump information on system CPU and memory topology
Copyright (C) 2008-2012 Mark Russinovich
Sysinternals - www.sysinternals.com
Intel(R) Xeon(R) CPU E5-2680 0 @ 2.70GHz
Intel64 Family 6 Model 45 Stepping 7, GenuineIntel
HYPERVISOR - Hypervisor is present
VMX * Supports Intel hardware-assisted virtualization
EPT * Supports Intel extended page tables (SLAT)
Providing you see a * for the hardware-assisted virtualization, your system is capable of running Hyper-V.
Using Configuration Levels
Before discussing enabling the Hyper-V role, I want to cover configuration levels, which is a new concept in Windows Server 2012 that was built on Server Core and introduced in Windows Server 2008. Server Core was a minimal installation of the Windows Server operating system with no graphical shell, no management tools, no .NET, and no PowerShell and was designed to run certain Windows Server roles such as Active Directory Domain Controller, Hyper-V, and File Server. The goals behind Server Core were to have an operating system with fewer components that really were not required for many server roles and therefore to cut down on patches needed, reduce possible vulnerabilities, and reduce the number of reboots associated with patches. There was also a small resource overhead reduction. This goal was a good one, but the problem was that Server Core was hard to manage and could not be used with Server Manager remotely and people largely ignored it. Windows Server 2008 R2 improved on this with remote management via Server Manager and PowerShell support, but the hard choice at installation time made using Server Core scary and it's still avoided by most IT organizations.
Windows Server 2012 changed this inflexible choice at installation, making the graphic shell and management tools features that can be added and removed like any other feature, which made it easy to switch a server from being in Server Core mode to being a full server with a graphical interface. Additionally, more granularity was introduced to allow different configuration levels, which are shown in Figure 5.1. Notice that with configuration levels it is possible to remove the graphical shell but still have the management tools available locally to the server. The default installation option for Windows Server 2012 and above is now Server Core, which shows the shift to Server Core being “the norm” for a Windows server, with nearly every Windows role and feature supported on Server Core in Windows Server 2012 R2. In addition, for applications to receive Microsoft's Gold Certification, which is the highest level of application certification, the application must run without the graphical shell installed. The Windows Server 2012 R2 Server Core base footprint is actually about 1 GB smaller than Windows Server 2012 Server Core thanks to new optimizations and compression of optional features, which are not actually installed.
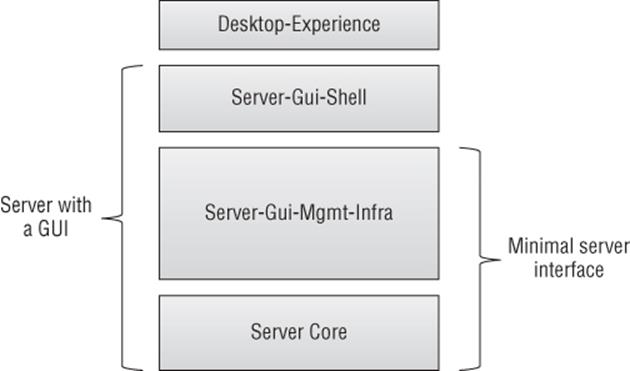
Figure 5.1 Configuration levels available in Windows Server 2012 R2
Consider a Hyper-V host. The host operating system is the management partition for the virtual machine, providing critical services and connectivity, which means if the host operating system must be restarted then every virtual machine also has to be restarted. For this reason it's critical that the maintenance and reboots required are as minimal as possible, and that means running all Hyper-V servers at the Server Core configuration level and managing them remotely. I should point out that in a production environment, the Hyper-V hosts should be clustered, which means a host can be patched and rebooted with no impact to virtual machine availability because virtual machines can be moved between hosts with no downtime. However, it is still desirable to minimize maintenance and reboots as much as possible.
Server Core Still Seems to Have a Lot of Patches in Windows Server 2012
In the Windows Server 2008 time frame, there were about 50 percent fewer patches that applied to Server Core compared to a full installation (Server with a GUI), enabling servers to go many months without a reboot. For Windows Server 2012, many organizations found that there were many patches required for Server Core, which meant similar reboots for Server Core and a Server with a GUI deployment.
There are a number of binaries present on Server Core that are used, but vulnerabilities that may get patched in the binary do not always apply to Server Core. The problem is that Windows Update will see the binary present and patch it and therefore require a reboot, but if you read the security bulletin related to the patch, it will say whether it actually applies to Server Core or not. For example, in the past year there have been around 10 critical patches with bulletins, but you would find that fewer than half of these were actually needed on Server Core if you read the bulletin. If you just ran Windows Update, though, they would have all been applied.
This means that if you want the most optimal Server Core patching with the least possible reboots, you cannot just run Windows Update and instead need to verify the security bulletins for critical updates to check if they actually apply to Server Core or not. On the plus side, this does show even without the patching that Server Core is inherently less susceptible to vulnerabilities.
While all management can be done remotely, if you ever experienced a problem where the management tools would aid the resolution or even the graphical shell, simply add the components using Server Manager or PowerShell. Once the problem is resolved, remove them again. Likewise, if you have not automated the deployment of servers and like to perform initial configuration using graphical tools, then you can install servers in the Server with a GUI mode, and then once the server is fully configured, the management tools and graphical shell can be removed to run in Server Core mode.
For example, to move from Server with a GUI to Server Core, I just need to remove Server-Gui-Mgmt-Infra (which also removes Server-Gui-Shell since Server-Gui-Shell is dependent on Server-Gui-Mgmt-Infra):
Uninstall-WindowsFeature Server-Gui-Mgmt-Infra –Restart
To take Server Core and make it a full server with a GUI, use this command:
Install-WindowsFeature Server-Gui-Mgmt-Infra,Server-Gui-Shell –Restart
Enabling the Hyper-V Role
When the operating system has been installed on a server and has been patched, the next step is to enable the Hyper-V role. Because your server will be running in Server Core configuration level, there is no local way to graphically install the Hyper-V role; instead, PowerShell can be leveraged:
Install-WindowsFeature -Name Hyper-V -Restart
Notice that I am not including the -IncludeManagementTools switch because the management tools cannot install on Server Core and would require a change in the configuration level. The server will reboot and the Hyper-V hypervisor will be loaded on the bare-metal hardware and ready for use. The next step would be to start managing through SCVMM, creating virtual switches, virtual machines, and so on.
The Hyper-V role can also be enabled using Server Manager from a remote Windows 8.1 machine that has the Remote Server Administration Tools (RSAT) installed or from another Windows Server 2012 R2 server that has the management tools installed. The process to enable using Server Manager is as follows:
1. Launch Server Manager.
2. From the Manage menu, select Add Roles And Features.
3. Click Next on the wizard introduction screen.
4. For the installation type, select the Role-based Or Feature-based installation.
5. From the list, select the server that will have the Hyper-V role installed. If your target server is not shown, you must first add it as a managed server via the Manage ⇒ Add Servers action in the main Server Manager interface.
6. In the Server Roles screen, select the Hyper-V role.
7. As shown in Figure 5.2, a dialog appears from which you can also install the management tools and PowerShell module. Uncheck the Include Management Tools check box and click Continue (the Add Features button changes to a Continue button). Click Next on the Server Roles screen.
8. Click Next on the Features screen.
9. There are a number of optional configurations that can be performed during the Hyper-V role installation from Server Manager, specifically creating a virtual switch, configuring migration options, and choosing the default locations for virtual machines. Click Next on the introduction screen for these options.
10.In the Create Virtual Switches page do not select any network adapters. It is better to create the virtual switches post deployment as discussed in Chapter 3, “Virtual Networking.” Click Next.
11.On the Virtual Machine Manager screen, you can enable Live Migration and choose the authentication protocol to use. This can be changed at any time in the future, but for now, do not configure this. Just click Next again.
12.The Default Stores page allows you to specify the default location for virtual hard disks and virtual machine configuration files. These locations can be changed in the future and also will be overridden by SCVMM. Click Next.
13.On the Configuration page, check the Restart The Destination Server Automatically If Required check box (click Yes when you are prompted to verify that you are sure you want the server to automatically reboot). Then click Install to complete the Hyper-V role installation. Once the reboot is complete, Hyper-V is installed.
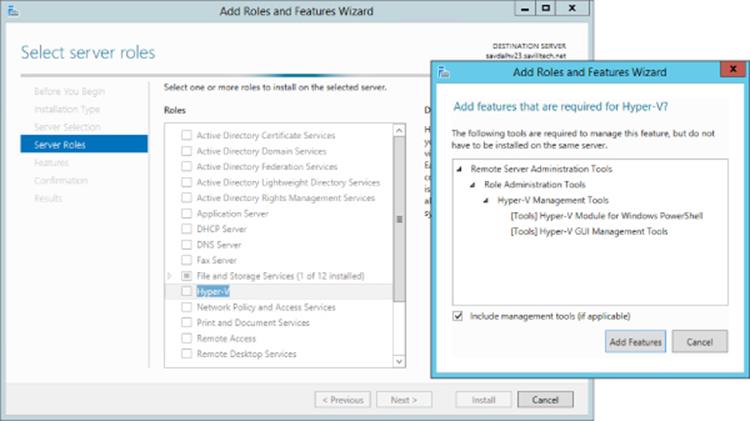
Figure 5.2 Local management tools are not wanted on a Hyper-V server that should be Server Core configuration level.
Actions after Installation of Hyper-V
Once the Hyper-V role is enabled on a server, there are a number of important steps and processes that need to be in place. There are obvious actions, such as actually creating virtual machines, that are covered later in this section and throughout the book. There are some other items, though, that you need to ensure are implemented or at least considered:
· Add the server to SCVMM. This should be the first action before you create NIC teams, configure fibre channel, create virtual switches, join clusters, or anything else because all of these items can be configured and managed through SCVMM in a centralized fashion. Once the SCVMM agent is installed on the host and is being managed by SCVMM, you should add to clusters, deploy logical switches, and so on to make the server ready to host workloads.
· If you are not using SCVMM, you should create NIC teams and virtual switches according to the guidelines discussed in Chapter 3. Remember to use a consistent naming scheme for your switches to ensure that there is no network connectivity interruption when you're live migrating virtual machines between hosts.
· Add the server to a cluster or create a new cluster and add cluster disks to Cluster Shared Volumes to enable simultaneous access to the storage across the cluster.
· If you are running antivirus software on the Hyper-V hosts, ensure that you have the proper exclusions configured or problems can arise due to locking by the malware solution. The key exclusions for files and processes, documented athttp://support.microsoft.com/kb/961804/en-us, are essentially blocking everywhere virtual machines are stored and the vmms.exe and wmwp.exe processes. Another option is to just not run malware protection, but most security departments would not be OK with this. If you consider that the Hyper-V server is running Server Core, with no one ever logging on to the box or running other applications, its vulnerability level would be very low. However, I don't advocate having no malware protection and instead I recommend running a supported malware solution with the exclusions just mentioned.
· Ensure that you have a patching strategy in place but also remember that a reboot will bring down all virtual machines unless they are live migrated to another server prior to reboot. Patching options range from using Microsoft Update to using Windows Server Update Services or System Center Configuration Manager, which both include a local patch repository of approved patches that can be deployed in a controlled manner, even adhering to configured maintenance windows. When you're using clusters of Hyper-V hosts, there are built-in capabilities (which will be discussed in the Chapter 7, “Failover Clustering and Migration Technologies”) that allow an entire cluster to be patched with a single click without any virtual machine downtime. The important point is to have a patching strategy that will be adhered to and that ensures that patches are tested prior to implementation in production.
· As workloads are running in virtual machines on the Hyper-V host, it is important that they are backed up. This backup may be performed at the Hyper-V host level or potentially from within the virtual machine. The decision will depend on the workload being protected and the desired granularity of restoration. This decision will be discussed later in the book, but it's important that there is some backup solution running.
· Virtualization is moving many operating system instances on to a reduced number of physical hosts, which means it's critical that those physical boxes are healthy and available. Monitoring is a critical element to ensure that you have insight into the environment. Monitoring should be in place for all the various critical components, such as the physical server, operating system, networking, storage, and services within virtual machines. Additionally, a monitoring solution that proactively notifies you of problems and nonoptimal configurations is preferred over a solution that just notifies you once something has failed. Users will notify you of failures for free.
Importance of a Production-Equivalent Test Environment
There are many moving parts to a Hyper-V solution, including the servers, operating system, additional management components, drivers for hardware (such as fibre-channel cards and network cards), firmware on servers and cards, and software versions on other components, such as storage area networks. It's important to test any changes you want to make to your production Hyper-V environment before you make them. That requires a testing/development environment that accurately reflects the production environment; otherwise, you will not have the required assurance that when you implement a change in production, it will be successful and not cause problems. This means you need to have servers with the same hardware, the same firmware versions, the same management, and so on in your testing environment. The closer it is to the production environment, the more confidence you'll have that a successful test process will result in success in production.
I heard of a company that tested an implementation in the test environment and then moved to production and within a few days, started suffering blue screens and huge service outages. It was caused by a mismatch of driver and firmware in production that was not present in the test environment. There are many similar stories, unfortunately.
This does not mean the testing environments needs to be on the same scale as the production environment. I may have 200 servers in production and 2 in development, and that's generally OK (unless you are performing scalability testing). What is important is that the components are the same.
This list is not definitive, and your organization may have other processes, such as adding to change control systems, but certainly these actions should be considered the minimum actions to take.
Deploying Hyper-V Servers with SCVMM
You already have a method to deploy operating systems to your physical servers. This could be over the network from a solution like System Center Configuration Manager or Windows Deployments Services, installation locally from a USB device or CD, or even some other process. That process may be well understood and tested and should be maintained for your Hyper-V hosts as much as possible. Minimizing the number of different ways an action is performed reduces complexity and the chance of errors. If your process is not optimal, there is a solution to deploy Hyper-V hosts (and even file servers in the 2012 R2 release) included as part of SCVMM.
Rather than document the complete process to deploy a Hyper-V server with SCVMM, I will instead refer you to the Microsoft step-by-step detailed documentation available at the following location:
http://technet.microsoft.com/en-us/library/gg610634.aspx
I do, however, want to cover the high-level process and specifically what a Hyper-V host deployed using SCVMM will look like once deployed because SCVMM uses a feature, Boot from VHD, that allows a physical server (or desktop) to boot from a VHD file.
At a very high level, the following actions are performed:
1. Windows Deployment Services is deployed to the same subnet as the servers are being deployed to (or an IP helper-address is configured on the switch in the subnet with the servers and points to the WDS server) and is configured inside SCVMM as a PXE server (which allows SCVMM to configure and add required images to WDS).
2. You must have a sysprep'd VHDX file containing Windows Server 2012 R2. This could be the same VHDX file you use to deploy virtual machines, but it must match the type of system. For example, if the server is BIOS based, the VHDX should be from a generation 1 type VM.
3. A physical computer profile is created in SCVMM that SCVMM 2012 R2 allows you to configure if it will be used for a Hyper-V host or a Windows file server. In this profile, the VHDX file to be used is configured along with items such as domain membership, naming, product key, specific actions, and configurations. This profile will be used when deploying the physical host.
4. The physical server to be deployed is added to SCVMM via the Fabric workspace. The physical server must support one of the SCVMM-supported out-of-band management protocols such as IPMI or SMASH. You must have the address and credentials for the connection. Add the server to SCVMM (as shown in Figure 5.3), which will then deploy the new server by copying the VHDX file to the target server and configuring the host to boot from the VHDX file.
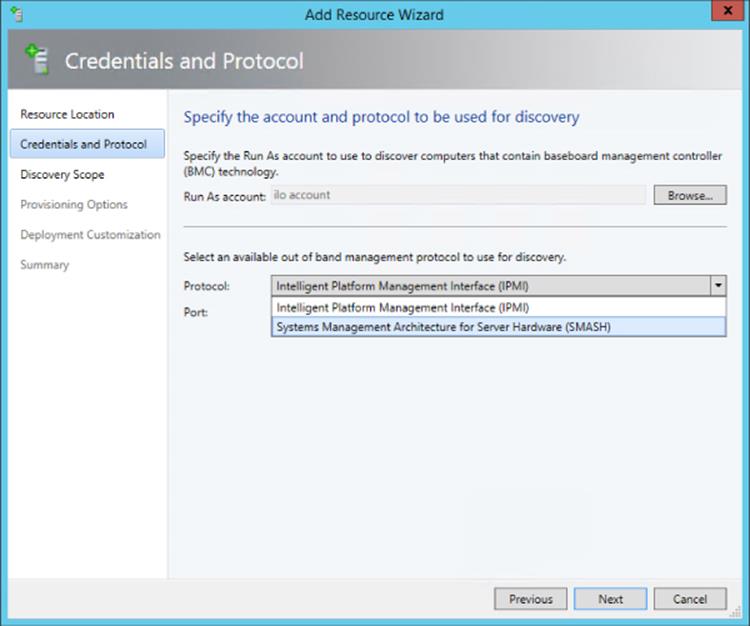
Figure 5.3 Selecting the protocol to be used for the new server to be provisioned
If you run into problems using the SCVMM host deployment, a great resource, which is a troubleshooting flow chart that can help identify problems, is available at the following location:
http://blogs.technet.com/b/scvmm/archive/2011/04/20/troubleshooting-os-deployment-of-hyper-v-through-sc-vmm-2012.aspx
Manually Configuring Boot from VHD
The option to use Boot from VHD simplifies the process used by SCVMM, but it can be used as part of a normal OS deployment with a few extra steps. I walk through the process at the following location (which also includes a video):
http://windowsitpro.com/virtualization/q-how-can-i-install-windows-7-or-windows-server-2008-r2-virtual-hard-disk-vhd-file
The process is the same for Windows Server 2012, as described in the article.
Hyper-V Management Tools
Based on the assumption that your Hyper-V servers are all running Server Core, all graphical management tools will be run remotely, typically from a Windows 8.1 client operating system. There are three primary Hyper-V management environments. Additionally, remember that there are management functions that aren't specific to Hyper-V, such as management via Server Manager. Windows Server 2012 and above have remote management enabled by default, which means no configurations are required to be able to remotely manage a server instance.
The first management environment is the built-in Hyper-V Manager. Typically for a client operating system to manage server operating systems remotely, Remote Server Administration Tools must be installed. They are available from the following location:
www.microsoft.com/en-us/download/details.aspx?id=39296
This would include management tools such as Server Manager, but because Hyper-V is actually built into Windows 8.1, the Hyper-V graphical management tool and the PowerShell cmdlets are also built in and just need to be enabled as follows:
1. From the Desktop, open the charms (Windows key + C) menu, select Settings, and select Control Panel.
2. Launch the Programs And Features applet.
3. Click the Turn Windows Features On Or Off link.
4. Enable Hyper-V Management Tools, as shown in Figure 5.4. Do not select Hyper-V Platform because this will install the actual Hyper-V hypervisor on your Windows 8.1 machine.
5. Click OK. The Hyper-V tools will be available.
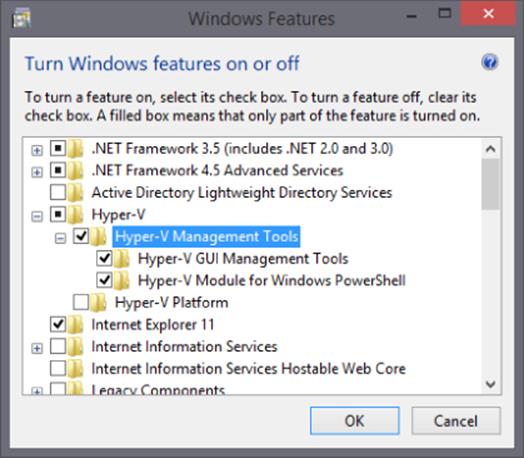
Figure 5.4 Enabling the Hyper-V management tools that are built into Windows 8.1
The second environment is PowerShell, which contains a large number of cmdlets that are specific to Hyper-V and are available by loading the Hyper-V PowerShell module:
Import-Module Hyper-V
The preceding command manually loads the Hyper-V module, which is always the best practice. However, PowerShell version 3 and above features a module auto-load capability that automatically loads modules as needed if cmdlets are used from modules not yet available.
The third environment is the SCVMM graphical tools (and strictly speaking, SCVMM also has its own PowerShell module, making it a forth environment). The SCVMM graphical tools will be covered in detail in the SCVMM chapter, but they can easily be installed on a Windows 8.1 client:
1. Launch the SCVMM setup routine.
2. Click Install.
3. On the Select Features To Install page, check the VMM Console option, as shown in Figure 5.5.
4. Complete all the other dialogs, which prompt you to accept the license agreement and configure update settings, and finally, click Install.
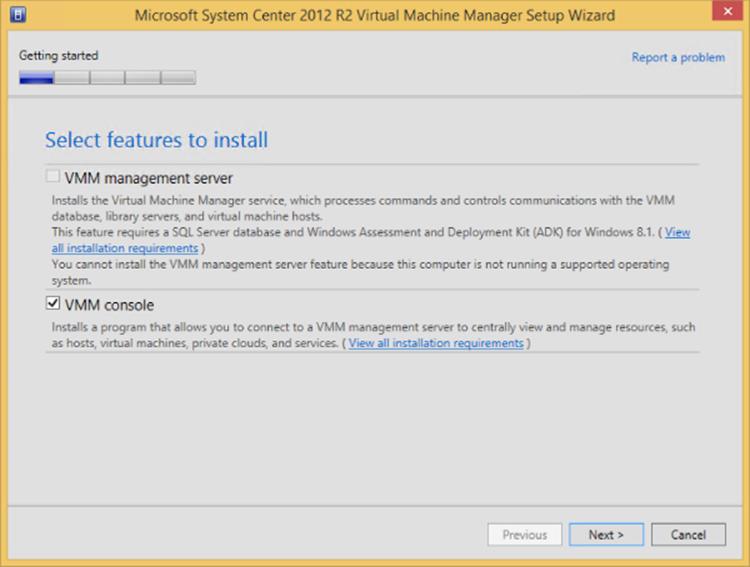
Figure 5.5 Selecting to install only the VMM console on a client operating system
Figure 5.6 shows a Windows 8.1 client that has the Hyper-V Manager, Hyper-V PowerShell module, and SCVMM console running at the same time. The only requirement is that the user has the correct privileges on the Hyper-V hosts and SCVMM. The SCVMM 2012 R2 console is actually supported back to Windows 7 SP1, as documented at
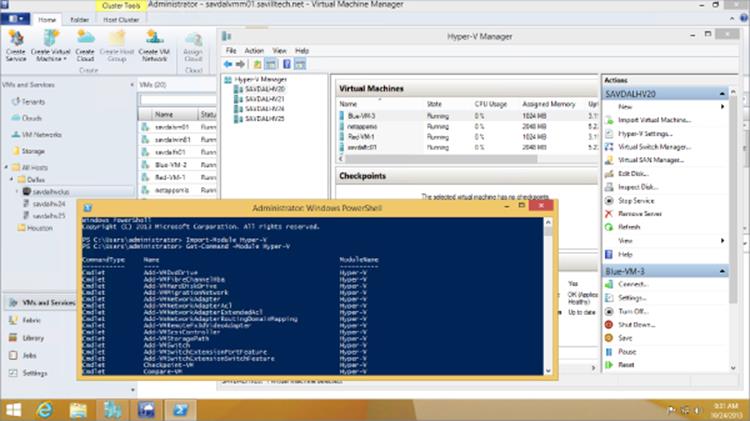
Figure 5.6 All key Hyper-V management environments running on a Windows 8.1 client
http://technet.microsoft.com/en-us/library/gg610640.aspx
However, the Windows Server 2012 R2 Hyper-V Manager is only part of Windows 8.1, and the RSAT for Windows Server 2012 R2 will install only on Windows 8.1. If you really need to manage Windows 2012 R2 servers from an older client, there are some workarounds. I walk through a solution in a video at http://youtu.be/_dkxyr03Er4. The solution is to configure a Remote Desktop Session Host, which has the administration tools installed, and then publish them to other client operating systems. It's not ideal, but it does work.
Using Hyper-V Manager
Many aspects of Hyper-V Manager are covered throughout this book. For example, virtual switches are covered in Chapter 3, virtual SANs are covered in Chapter 4, “Storage Configurations,” and migration and replication settings will be covered in future chapters. In this section, I will cover the main components of Hyper-V Manager and some core configurations. If I don't cover a feature, it means it's covered elsewhere in the book in a section that's more specific to the topic.
Figure 5.7 shows the Hyper-V Manager interface with the five main panes of information and capabilities exposed. Notice in the far-left server inventory pane that it is possible to add multiple Hyper-V servers to Hyper-V Manager. It is not possible to specify alternate credentials, which means only Hyper-V servers in trusting domains can be added where your current credentials have administrative rights. To add a new Hyper-V server to Hyper-V Manager, select the Connect To Server action available on the Hyper-V Manager navigation menu root in the navigation pane. You will need to perform this when managing from a Windows 8.1 client because by default, no Hyper-V servers will be shown. In previous versions of Windows there were various manual tasks to perform on the Hyper-V server to enable remote management, but this is no longer necessary; all configurations for remote management are enabled by default.
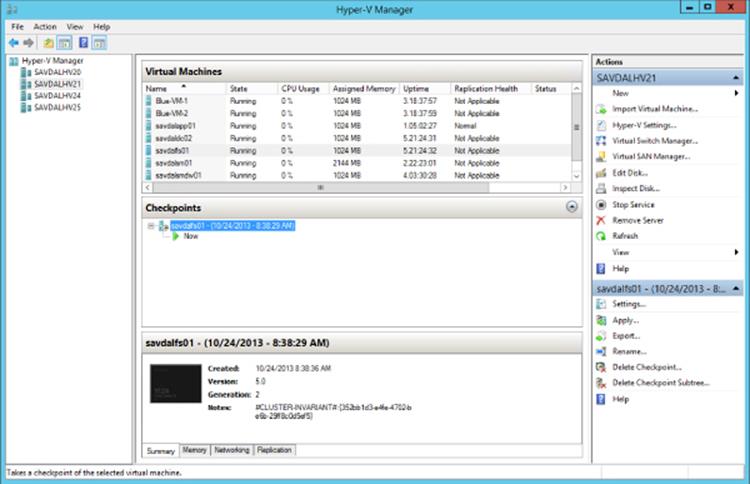
Figure 5.7 The Hyper-V Manager interface
The Virtual Machines pane at the top center shows the virtual machines that are hosted by the currently selected Hyper-V server. Note that it is not possible to select multiple servers to see virtual machines from them. Only one server's virtual machine inventory can be shown. By default, a number of pieces of information are shown in the virtual machine's view, specifically its name, current state (such as Running, Paused, Saved, or Off), the CPU usage, assigned memory, uptime, and status. It's also possible to add a Replication Health column by right-clicking the column headings and selecting Add/Remove Columns, which also allows columns to be removed and the order rearranged. This view is useful to get a very high-level view of the virtual machines on a host. If a node is clustered, only the virtual machines running on the node will be shown and not all virtual machines in the cluster.
Note that the CPU Usage value shown is the percentage of resources used of the entire Hyper-V host and not the resource usage of the virtual processors within the virtual machine. For example, a virtual machine with a single vCPU may be running at 100 percent, but if a server has 24 logical processors in total, then 100 percent would only be around 4 percent of the total system resources, which is the number that would be visible in Hyper-V Manager. This is why on large systems it is common for virtual machines to show a value of 0 for CPU usage. Figure 5.8 shows an example of this with a virtual machine running a CPU stress test tool with its single processor running at 100 percent while Hyper-V Manager shows it using only 3 percent. SCVMM shows the actual CPU utilization of the virtual machine's allocated resources rather than the utilization as a percentage of the entire system, which means in my test it would have shown 100 percent processor utilization.
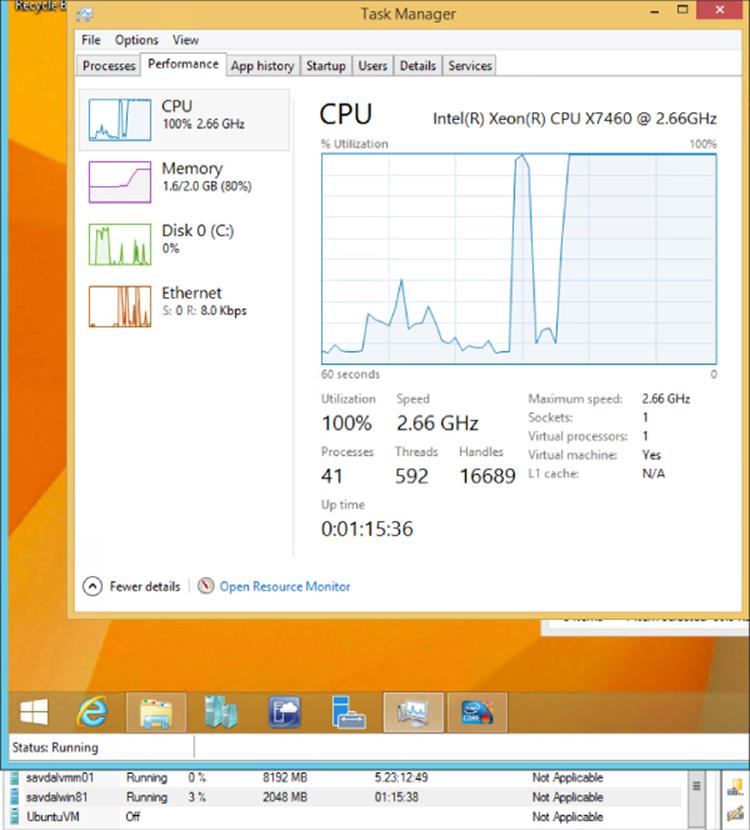
Figure 5.8 A virtual machine running at 100 percent processor utilization showing only 3 percent usage of a 24-core Hyper-V host
The next pane in Hyper-V Manager is Checkpoints, which is the new name for Snapshots. Checkpoints enable a point-in-time view of a virtual machine to be saved and used in the future. The view includes disk, memory, and device status. This will be covered in detail later in the book.
The bottom center pane shows some detailed information about the selected virtual machine, including a thumbnail of the console and basic information such as VM version, generation, notes, and a basic health status. There are also additional tabs related to memory, networking and Hyper-V Replica replication:
· Memory: For statically configured virtual machines, this tab offers no additional information beyond the assigned memory value shown already. For dynamically configured virtual machines, the minimum, startup, and maximum values are shown in addition to the currently assigned amount of memory, the actual memory demand of the VM, and the status of the memory, as shown in Figure 5.9. Remember that the Assigned Memory value is the actual memory currently allocated to the virtual machine from the physical memory of the host.
· Networking: Shows all adapters for a virtual machine, including IP address and status.
· Replication: Shows the status of replication when Hyper-V Replica is used.
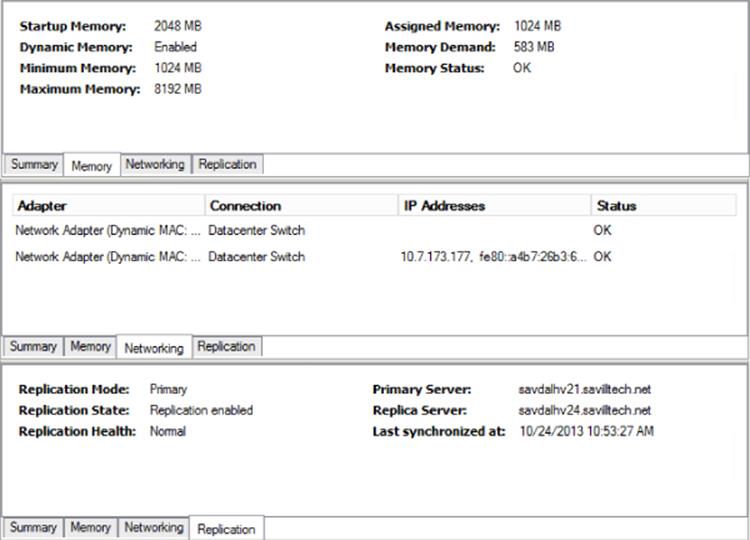
Figure 5.9 Detail tabs for a virtual machine
The Actions pane shows contextual actions depending on the currently selected item. Typically, a host and virtual machine are selected, which provides host-level configurations at the top of the pane and actions specific to virtual machines in the bottom half.
While there are numerous actions for the server, such as creating new virtual machines and disks, the key configuration for the Hyper-V host is via the Hyper-V Settings action, which opens up the key configurations for the server. The Server options, such as the default path for virtual hard disks, and configurations can be changed in addition to specifying which GPU can be used for RemoteFX, NUMA spanning, and other configurations (all covered throughout the book). In the User portion of the configurations, shown inFigure 5.10, I often like to change the Keyboard option to always send the special key combinations to the virtual machine, even when it's not running full screen.
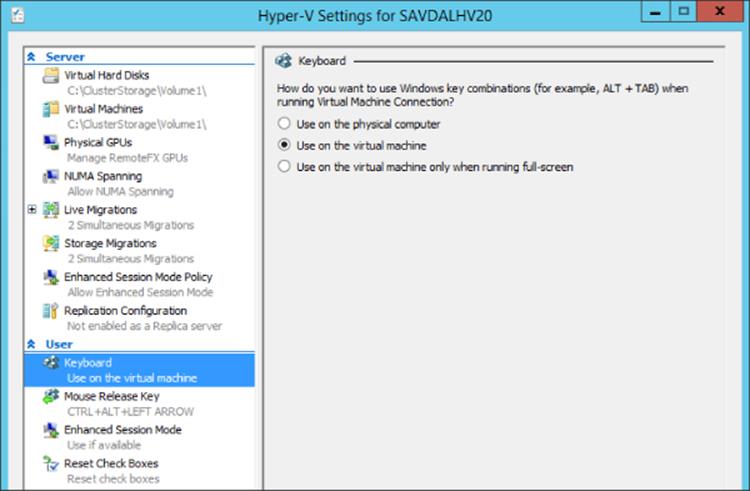
Figure 5.10 Changing the keyboard behavior when the keyboard is connected to a virtual machine
For virtual machines, the exact actions available will depend on the current state of the virtual machine. For example, the following actions are available for the Running state: Turn Off (doesn't gracefully shut down the guest operating system but is the same as just powering off a physical machine), Shut Down (sends a request to the guest operating system to perform a controlled shutdown, which is the same as selecting Shutdown within the guest operating system), Save (saves the current state, such as the memory and device state, to disk, allowing it to be resumed at a later time), Pause (suspends activity in the VM), and Reset (which is like powering off the VM and then starting it again). Options to connect to, move, export, checkpoint, rename, and enable replication are all available.
While Hyper-V Manager exposes many capabilities and configurations, it is suited only for a single host or a very small number of hosts because it does not allow configurations of multiple hosts in a single action. SCVMM provides the enterprise management solution, which is covered in Chapter 9, “Implementing the Private Cloud and SCVMM.”
A common question related to Hyper-V Manager is whether it gives you the ability to control management of specific activities using role-based access control (RBAC). The original versions of Hyper-V enabled granular control of the actions available to different groups of users by utilizing the Windows Authorization Manager (AzMan) component. This authorization management approach was deprecated in Windows Server 2012 (although it still works) in favor of a new, simple authorization scheme that utilizes a new local group on each Hyper-V Server, Hyper-V Administrators. Any user who is in the Hyper-V Administrators group on a server has complete access and management rights for the Hyper-V server and the virtual machines. If you have a group of people who should be administrators for all Hyper-V servers, the best practice is to create a group in Active Directory, add the Hyper-V administrators into that group, and then add the Active Directory group into each server's local Hyper-V Administrators group. That way, as administrators change, only the single Active Directory group membership has to be updated. The true RBAC solution for Hyper-V is through SCVMM, which has full RBAC capabilities with very granular options for assigning different rights through the use of custom user roles that can be created and assigned the required configuration targeting specific resources. Figure 5.11 shows some of the actions that can be granularly assigned within SCVMM to user roles, which users are then made part of.
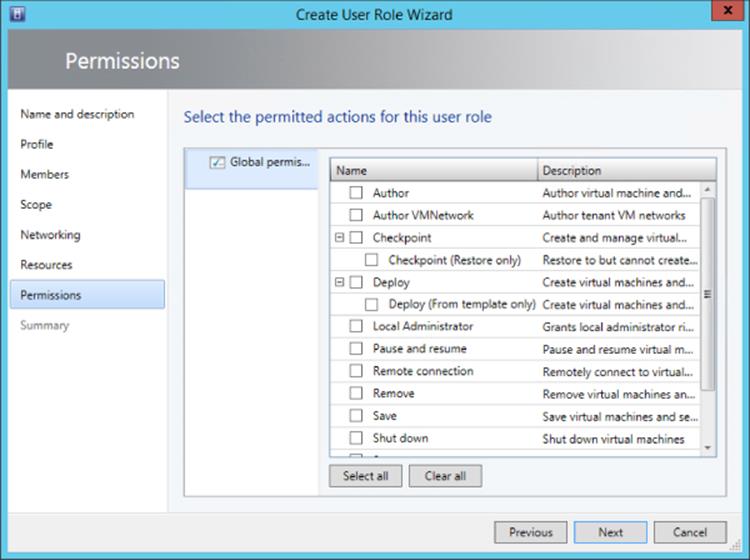
Figure 5.11 Configuring actions for a specific new user role
Core Actions Using PowerShell
The Hyper-V PowerShell module enables complete management of Hyper-V. If an action is possible in the graphical shell, then it is possible using PowerShell. If the number of cmdlets in the Hyper-V module are counted, you see that there are 178 in Windows Server 2012 R2:
PS C:\> (Get-Command -Module Hyper-V).Count
178
If you are unfamiliar with PowerShell, I cannot stress enough how important PowerShell is to any Microsoft environment. At a high level, a PowerShell cmdlet (command) takes the form of <verb>-<noun>, where the verb is a specific type of action such as new, get, orstart, while the noun is a particular type of object. They are many types of objects related to Hyper-V that can be acted upon:
PS C:\> Get-Command -Module Hyper-V | Select -Unique Noun | Sort Noun
Noun
----
VFD
VHD
VM
VMBios
VMComPort
VMConnectAccess
VMDvdDrive
VMEventing
VMFailover
VMFibreChannelHba
VMFile
VMFirmware
VMFloppyDiskDrive
VMHardDiskDrive
VMHost
VMHostNumaNode
VMHostNumaNodeStatus
VMIdeController
VMInitialReplication
VMIntegrationService
VMMemory
VMMigration
VMMigrationNetwork
VMNetworkAdapter
VMNetworkAdapterAcl
VMNetworkAdapterExtendedAcl
VMNetworkAdapterFailoverConfiguration
VmNetworkAdapterIsolation
VMNetworkAdapterRoutingDomainMapping
VmNetworkAdapterRoutingDomainMapping
VMNetworkAdapterVlan
VMProcessor
VMRemoteFx3dVideoAdapter
VMRemoteFXPhysicalVideoAdapter
VMReplication
VMReplicationAuthorizationEntry
VMReplicationConnection
VMReplicationServer
VMReplicationStatistics
VMResourceMetering
VMResourcePool
VMSan
VMSavedState
VMScsiController
VMSnapshot
VMStorage
VMStoragePath
VMSwitch
VMSwitchExtension
VMSwitchExtensionPortData
VMSwitchExtensionPortFeature
VMSwitchExtensionSwitchData
VMSwitchExtensionSwitchFeature
VMSystemSwitchExtension
VMSystemSwitchExtensionPortFeature
VMSystemSwitchExtensionSwitchFeature
Most of these various nouns are self-explanatory, and once you understand the noun you wish to act on, it is possible to see the verbs (actions) available. For example, to understand the actions available for a VM, I can use the following command:
PS C:\> Get-Command -Module Hyper-V -Noun VM
CommandType Name ModuleName
----------- ---- ----------
Cmdlet Checkpoint-VM Hyper-V
Cmdlet Compare-VM Hyper-V
Cmdlet Debug-VM Hyper-V
Cmdlet Export-VM Hyper-V
Cmdlet Get-VM Hyper-V
Cmdlet Import-VM Hyper-V
Cmdlet Measure-VM Hyper-V
Cmdlet Move-VM Hyper-V
Cmdlet New-VM Hyper-V
Cmdlet Remove-VM Hyper-V
Cmdlet Rename-VM Hyper-V
Cmdlet Repair-VM Hyper-V
Cmdlet Restart-VM Hyper-V
Cmdlet Resume-VM Hyper-V
Cmdlet Save-VM Hyper-V
Cmdlet Set-VM Hyper-V
Cmdlet Start-VM Hyper-V
Cmdlet Stop-VM Hyper-V
Cmdlet Suspend-VM Hyper-V
I cover many of these cmdlets throughout the book related to specific types of activity. Here I want to cover some commands that are useful to quickly get a view of your Hyper-V environment.
To view the basic information about a Hyper-V host, use Get-VMHost -ComputerName server | Format-List, and most attributes returned can be modified using the Set-VMHost cmdlet.
To view all virtual machines running on a Hyper-V host, use the Get-VM cmdlet. A key feature of PowerShell is the ability to pipe information from one cmdlet to another. This enables comprehensive feedback and also intelligent, automated sets of actions, which is why PowerShell management is a much better option for performing actions across multiple servers with virtual machines. For example, I may want to export all virtual machines that are currently turned off. The first cmdlet gets all virtual machines, the second part identifies the VMs in the Off state, and then only those VMs are passed to the final cmdlet, which exports them.
Get-VM | where-object {$_.State -EQ "Off"} | Export-VM -Path D:\Backups
Likewise, I had a folder full of virtual machines I wanted to import into a Hyper-V server. This is very easy with PowerShell. The following code just looks for XML files (which is the format for virtual machine configurations) and then imports:
Get-ChildItem e:\virtuals\*.xml -recurse | Import-VM
In another case, I wanted to configure all virtual machines that were set to automatically start to not start if they were running when the Hyper-V server shut down. That's easy with PowerShell:
Get-VM | Where-Object {$_.AutomaticStartAction -eq "StartIfRunning"} |´
Set-VM -AutomaticStartAction Nothing -AutomaticStopAction ShutDown
SCVMM also has its own PowerShell module. Provided it's installed, it can be loaded using this command:
Import-Module virtualmachinemanager
The virtualmachinemanager module has 619 cmdlets! This is where using the same commands to view all the nouns available in the module is useful. There is, however, an even better way to learn how to use the SCVMM PowerShell cmdlets. Every action performed using the SCVMM graphical interface actually translates to PowerShell, and as each action is performed using SCVMM, there is an option to view the PowerShell, as shown in Figure 5.12, by clicking the View Script button. You can use the PowerShell that is displayed in your own scripts.
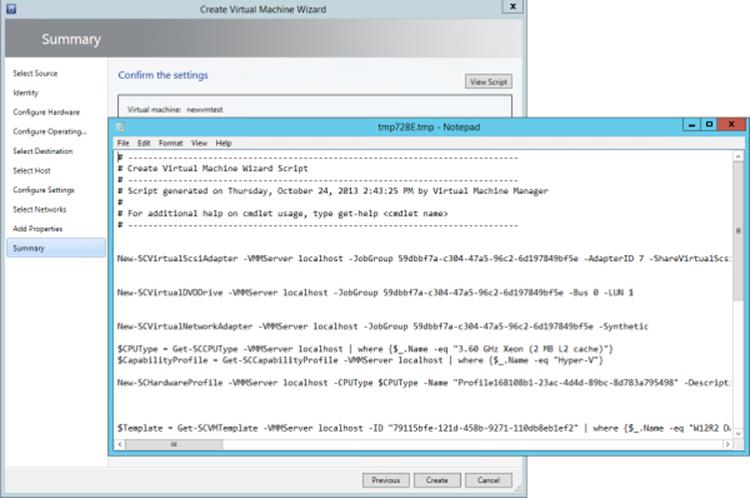
Figure 5.12 Viewing the PowerShell used by SCVMM
Securing the Hyper-V Server
Your Hyper-V servers are running the majority of your server operating system instances and potentially your desktops if you're using VDI solutions. While an administrator on a Hyper-V server cannot bypass the regular logon to an operating system in a virtual machine, if you have access to the Hyper-V server, then you have access to the virtual machine storage. The storage could then be mounted and the content could be accessed.
The normal security best practices for servers should apply:
· Ensure that servers are physically secure.
· Ensure that the firewall is enabled.
· Patch servers.
· Run malware protection (with the required exclusions configured).
· Restrict who is an administrator (and by extension, domain administrators should be limited as well).
· Run Server Core on Hyper-V servers.
· Do not run other applications or browse the Web on Hyper-V servers. Running Server Core will help stop this.
· Use BitLocker to encrypt volumes containing virtual machines; it can also be used on Cluster Shared Volumes.
· Make sure administrators are well trained and understand their actions.
· Use Group Policy to ensure that policies are set as required.
· Have a monitoring solution in place, and also ensure that security logs are checked to detect any attack attempts.
The best Microsoft resource to help with security is the Microsoft Security Compliance Manager, which is available at the following location:
www.microsoft.com/en-us/download/details.aspx?id=16776
It is a large download at over 100 MB, but it provides not only documentation to help secure your entire environment but also tools and templates to ensure security.
Creating and Managing a Virtual Machine
Ultimately you deploy Hyper-V to host virtual machines, and in this section I will walk through creating a basic virtual machine using Hyper-V Manager and PowerShell. Once the virtual machine is created, the next step is to actually deploy an operating system to it. That typically means attaching to the virtual machine an ISO containing an operating system installation or even booting the virtual machine over the network using a legacy network adapter for a generation 1 virtual machine or booting from the synthetic network adapter for a generation 2 virtual machine. This type of virtual machine creation is manually intensive and time consuming and is not taking advantage of the fact the virtual machine storage is essentially a file that could just be copied, which is why using templates is a much better option and is covered in the next section.
To create a virtual machine using Hyper-V Manager, perform the following steps:
1. Select the New ⇒ Virtual Machine action.
2. Click Next on the introduction wizard screen.
3. Enter a name for the new virtual machine and optionally an alternate path for the virtual machine instead of the default location configured for the host. Click Next. There is a difference in behavior if the option to store the virtual machine in a different location is selected, even if the actual path is the same as the default. When Store Virtual Machine In A Different Location is selected, a folder is created under the specified location with the name of the new virtual machine, and that's where all its files and virtual hard disks are created. Without this setting enabled, the virtual machine configurations and disks are stored in the root of the default location in a standard structure.
4. Select the generation for the virtual machine. Remember, generation 2 virtual machines work only on Hyper-V 2012 R2, and only Windows Server 2012/Windows 8 64-bit and above is supported within the virtual machine. If you need compatibility with versions of Hyper-V prior to Windows Server 2012 or, at time of this writing, Windows Azure IaaS, you should use generation 1. You cannot change the generation of a virtual machine post creation. Click Next.
5. Select the amount of startup memory for the virtual machine. Note that the default value of 512 is insufficient for the latest generation of Windows client operating systems, which require 1 GB for 32-bit versions and 2 GB for 64-bit versions. Additionally, the option to use dynamic memory can be selected, and the values can be tweaked post creation. Click Next.
6. By default, virtual machines have a single network adapter, and the switch to connect it to should be selected. Click Next.
7. The virtual hard disk for the virtual machine is selected by default. This can be a new virtual hard disk, an existing virtual hard disk, or the option of choosing if a disk should be added later. Click Next.
8. If the option to create a new virtual hard disk was selected, the method to install the operating system is requested, as shown in Figure 5.13. You can choose to install the operating system later, install it from a bootable ISO, or install it from a network location. Note that if the virtual machine is generation 1 and you select to install from a network location, the network adapter created for the virtual machine will be a legacy network adapter. Once the operating system is installed from the network, you will want to add a normal network adapter and remove the legacy network adapter to get the best performance. Click Next.
9. View the configurations in the Summary screen and click Finish to create the virtual machine.
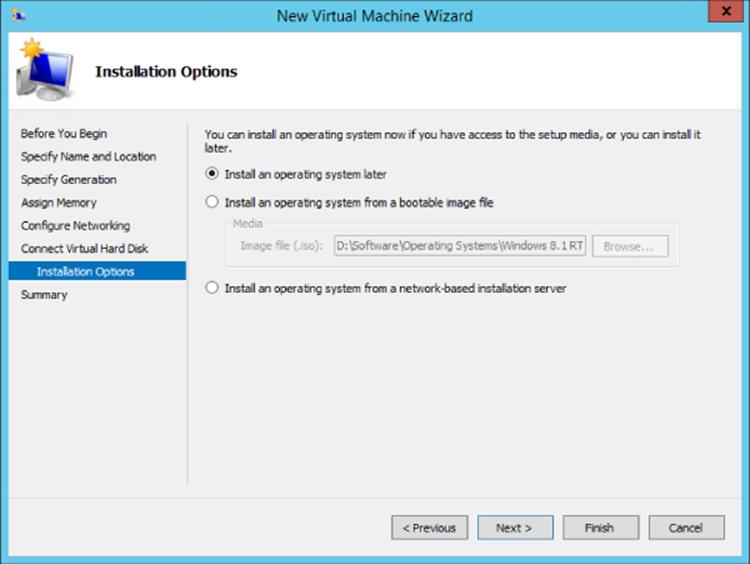
Figure 5.13 Selecting the method to install the operating system into the virtual machine
When the virtual machine is turned on, it will install the operating system from the ISO or over the network, and the standard operating system installation configurations will need to be performed within the guest operating system. If the operating system is not Windows Server 2012 R2, once the operating system is installed, the first action should be to install the 2012 R2 Hyper-V Integration Services, covered later in this chapter.
To actually connect to a virtual machine, use the Connect action for the virtual machine within Hyper-V Manager, which launches a connection that is connected to the virtual console of the virtual machine, allowing operating system installation. Make sure you click the mouse within the Virtual Machine Connection window when you first turn on the VM to be able to press a key to launch the boot from ISO or the network. The rest of the OS installation is the same as for a physical system. Note that if you are installing Windows 8/Windows Server 2012 into a generation 2 virtual machine, the physical keyboard will not work because the keyboard driver required is not part of the Windows 8 PE environment. Either use the onscreen keyboard during OS installation, or if you really want to fix the problem, follow my instructions at the following location:
http://windowsitpro.com/hyper-v/fix-vm-keyboard-problems-generation-2-virtual-machine
Activating the Guest Operating System
There are numerous types of product keys available for operating systems, and your guest operating systems are still just operating systems that need to be activated. The product key specified during installation could be a Multiple Activation Key (MAK) key that enables multiple activations, or you may have a Key Management Server (KMS) in your organization, which provides the ability to locally activate operating systems. Windows Server 2012 introduces a new activation option, Active Directory Based Activation (ADBA), that automatically activates Windows Server 2012 and Windows 8 operating systems (physical or virtual) when they join the domain.
Windows Server 2012 R2 introduces a new option for Windows Server 2012 R2 virtual machines, Automatic Virtual Machine Activation (AVMA). With the AVMA technology, if the Hyper-V host is running Windows Server 2012 R2 Datacenter and is activated, then any virtual machine running Windows Server 2012 R2 (Essentials, Standard, or Datacenter) is automatically activated, provided the AVMA key is used during the guest OS installation. These keys are as follows:
1. Server Standard: DBGBW-NPF86-BJVTX-K3WKJ-MTB6V
2. Server Datacenter: Y4TGP-NPTV9-HTC2H-7MGQ3-DV4TW
3. Server Essentials: K2XGM-NMBT3-2R6Q8-WF2FK-P36R2
They are documented at the following location:
http://technet.microsoft.com/en-us/library/dn303421.aspx
The benefit of AVMA is that the virtual machine is activated only while running on an activated Windows Server 2012 R2 Hyper-V host. If the virtual machine was given to another organization or moved, it would be unactivated unless the target host was also Windows Server 2012 R2 Datacenter and activated. The Hyper-V host must be the Datacenter SKU because only Datacenter allows an unlimited number of guests VMs running Windows Server.
The actual virtual machine connection is enabled through the vmconnect.exe image, which is automatically launched through the Connect action with the target virtual machine specified for you. Vmconnect.exe can also be manually launched, which brings up the dialog shown in Figure 5.14, which allows a Hyper-V host to be selected and then a list of all the virtual machines on the selected Hyper-V host to be displayed.
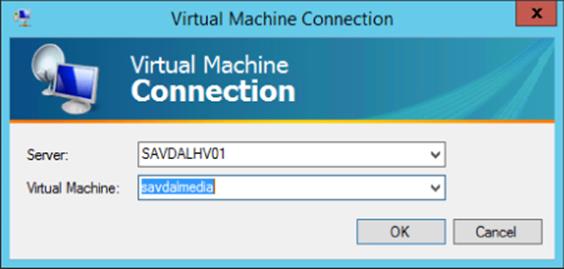
Figure 5.14 Manually launching vmconnect.exe allows you to select the host and virtual machine
Windows Server 2012 R2 introduces a new set of capabilities related to the vmconnect; it's known as Enhanced Session Mode (ESM). Windows 8.1 and Windows Server 2012 R2, the only operating systems that work with Enhanced Session Mode, were enhanced so that the terminal services stack was tightly integrated with the Hyper-V VMBus.
This enables VM connections (via Hyper-V Manager or via VMConnect.exe) to leverage the following functionality traditionally associated with RDP connections:
· Rich display
· Audio
· Printers
· Clipboard
· USB devices
· Drives
· Plug and Play devices
· Smart cards
The requirements that need to be met are as follows:
· Guest OS in the VM supports Remote Desktop Services (e.g., Windows 8.1 Pro/Enterprise/Windows Server 2012 R2).
· The server policy in the Hyper-V Manager server settings for Enhanced Session Mode is enabled (the Server, Enhanced Session Mode Policy, Allow Enhanced Session Mode check box is selected). It's disabled by default.
· The user policy in the Hyper-V Manager server settings is enabled (User ⇒ Enhanced Session Mode ⇒ Use Enhanced Session Mode).
· The Remote Desktop Services service is running in the guest (but the Allow remote connections to this computer in System configuration doesn't need to be enabled).
· User logging on is as a member of local administrators or remote desktop users groups in the guest operating system.
· The Out Of Box Experience (OOBE) Wizard has been completed.
When you connect to a VM that supports ESM, an initial dialog allows the configuration of the display and local resources that are redirected in addition to letting you save the configuration, as shown in Figure 5.15. Any saved configurations are written to%APPDATA%\Roaming\Microsoft\Windows\Hyper-V\Client\1.0 with a name format of vmconnect.rdp.<GUID of VM>.config.
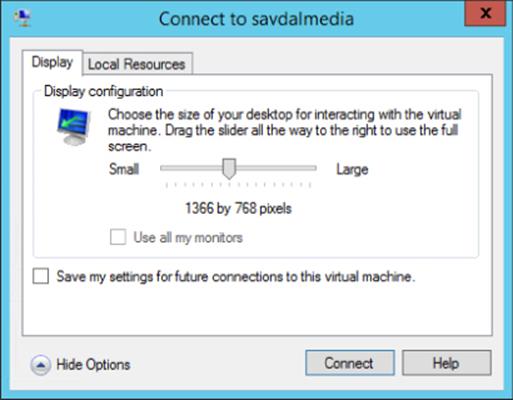
Figure 5.15 The connection dialog when connecting using Enhanced Session Mode
Finally, outside of the Hyper-V technologies is regular Remote Desktop Protocol (RDP). Windows natively supports RDP, and providing Remote Desktop is enabled (which it is not by default; only remote management is enabled by default) within the guest operating system, the guest operating system can be connected to via RDP, which would be the normal way for users of virtual machines to connect.
Creating and Using Hyper-V Templates
In the previous section, a virtual machine was manually created, and all the attributes such as memory, CPU, network, and storage had to be configured. Then the operating system had to be manually installed. While PowerShell can help automate this process, a much better option is to use a template, which is a virtual machine configuration and virtual hard disk with a duplication-ready operating system installed that can be easily deployed just by copying the VHDX file and assigning it to a new virtual machine that is created from a template VM configuration.
The first step is to create the VHDX file containing the operating system that is suitable for duplication. Any readers who have ever deployed desktops will be used to the idea of building out one “gold” desktop and then preparing it for duplication so it could then be captured and deployed to many desktops very quickly. Windows has actually been using this method since Windows 2008, when the WIM format was introduced as the method of installing Windows. Inside the WIM file is an actual deployed operating system that has been prepared for duplication. All Windows installation actually does is deploy the content of the WIM file, which is why installation actually got faster between Windows 2003 and Windows 2008. When Windows is installed, there are a number of specializations performed, such as creating the Security ID, creating the Globally Unique ID, and other items. Many problems arise if different systems have the same SID, GUID, and other items. For this reason, sysprep is a utility built into the operating system that removes this unique information (the process is known as generalization), and once it is removed, the operating system can be duplicated and started on the target. When that happens, a specialization phase creates the required unique values and also runs certain critical processes to ready the copied operating system for usage. Once you have deployed the operating system to a virtual machine and tailored it, run the command at the end of this paragraph. This will generalize the operating system and shut it down. You can then copy the VHDX file to a template area and use that template for new virtual machines, essentially just copying the template to a new location for each new virtual machine that should run the same operating system. It's also possible to just launch sysprep.exeand a dialog will allow you to select the same options. However, when you are using the full command line, the /mode:VM parameter can be specified (covered in detail in Chapter 10, “Remote Desktop Services”) but it enables sysprep to run in a mode that is optimized for virtualized hardware.
Sysprep.exe /generalize /oobe /shutdown /mode:VM
When a new virtual machine starts from a copy of your template, it will go through a very basic out-of-box-experience that will ask minimal questions regarding country, language, keyboard layout, accepting the EULA, and a new local administrator password. Those questions can be answered through the use of an unattended installation answer file, which is how SCVMM actually automates deployments.
Once you have the template VHDX file, there is a challenge to keep it updated, such as having the latest patches applied. You can only generalize an operating system so many times, so it is not an option to take a template, start it with a VM, patch it, then generalize it again with sysprep, and keep repeating this process. There are several options that I think are good and I have written instructions for the first two and even recorded a video for each:
1. Inject patches into the VHDX file directly using the Deployment Image Servicing and Management (DISM) tool. I created a script to do this, which is available at
2. http://windowsitpro.com/windows/add-updates-offline-vhd-or-wim-file
A video walk-through is available at
3. http://www.youtube.com/watch?v=cOUlW2bJnK0
4. Use a virtual machine and utilize checkpoints to create a point-in-time capture of the VM before sysprep'ing, applying updates, and sysprep'ing again, and then export the updated image and revert back to the pre-sysprep'd checkpoint ready for the next set of updates. I detail this at
5. http://windowsitpro.com/hyper-v/easily-maintain-hyper-v-template-image
There is a video walkthrough at
6. http://www.youtube.com/watch?v=1dddszeRHpM
7. In the past, Microsoft had the Virtual Machine Servicing Tool (VMST), which allowed the patching of Hyper-V virtual machines. However, the last supported version only worked up to SCVMM 2012. Microsoft has now released an updated solution based on Orchestrator SMA that can patch virtual machines stored in a SCVMM library from updates available in WSUS. The solution is available at
8. http://blogs.technet.com/b/privatecloud/archive/2013/12/07/orchestrated-vm-patching.aspxThe solution comes in the form of the SMA runbook and instructions on its actual usage.
One option with the template VHDX would be to write some basic PowerShell that creates a new folder for the new VM, copies the template VHDX into that folder, creates a new VM, and attaches the copied VHDX file to the new VM. It would even be possible to mount the VHDX file and inject a sysprep answer file into it to specify name, domain join instructions, and even network configuration so that when the virtual machine is turned on, it is fully configured (which is exactly what SCVMM does).
A better option is to leverage SCVMM, which has full template support and can even take an existing virtual machine and turn it into a template, including generalizing the guest operating system:
· The guest virtual machine must be a supported operating system, and the operating system in the guest must be known to SCVMM. When you are looking at the virtual machine in the VMs And Services workspace, it should show the operating system version. If it does not, right-click the VM and select Refresh while the virtual machine is running.
· The virtual machine must be shut down.
· The virtual machine must not have any checkpoints (to save the VM, create a clone of it first).
· The virtual machine administrator password does not need to be blank.
This allows you to create a virtual machine, customize as required, shut it down, and simply right-click it in SCVMM and select the Create VM Template option. Remember that this will generalize the operating system, and so if you wish to keep the state of the virtual machine, you should create a clone of it prior to using it as the source for a template creation. A warning is displayed that the template creation process will remove the state of the VM. When creating a VM template, the virtual hardware will copy the configuration of the source VM, but this can be changed in the Library post-template creation. The Operating System template properties can be modified, such as name, administrator password, time zone, and domain membership, and you can even install roles, features, and other software. A SCVMM library server must be selected as the target to store the new template, along with a location within the library. Once the template is created, the original virtual machine will be deleted. You can track the status of the template creation using the Jobs workspace in SCVMM, as shown in Figure 5.16. Note that the longest part of the process was copying the VHDX file to the library.
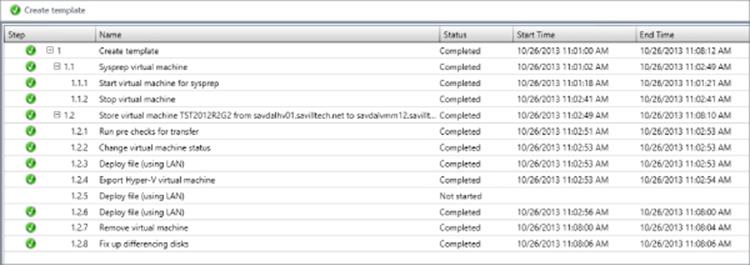
Figure 5.16 The full detail of a template creation using SCVMM
SCVMM 2012 SP1 introduced the ability to also create Linux-based virtual machine templates that could then be deployed. There is an additional step because Linux does not have a built-in sysprep, which means a SCVMM agent must be installed into the Linux VM prior to using it for a template that allows SCVMM to customize the OS during deployment. The process for Linux is as follows:
1. Create a new virtual machine (VM) and install a SCVMM-supported Linux distribution into it (at the time of this writing, this includes Red Hat Enterprise Linux, [RHEL], CentOS, Ubuntu, and SUSE, with others coming in the future).
2. Install the latest version of Hyper-V Integration Services if needed (the Linux kernel 3.4 includes the Windows 2012 version of Hyper-V Integration Services).
3. Next, install the SCVMM Linux agent. This is found in the C:\Program Files\Microsoft System Center 2012 R2\Virtual Machine Manager\agents\Linux folder on the SCVMM server. How you get the content of the folder to the Linux distribution will vary.
One option, if the Linux distribution supports SMB, is to just connect to the C$ share on the SCVMM server. Or you could create an NFS share for Linux to connect to, although I found it easier to just create an ISO with the Linux agent in it and then map the ISO to the Linux VM, which will be available as the local CD. I found the easiest way to create the ISO is to use a software package such as MagicISO. Once the files are available, you must install the Linux agent by running the install script and pick the 32-bit or 64-bit version. To run the install script, you first need to set the install script to be executable:
chmod +x install
Then execute (I use sudo because I'm not logged on as administrator): sudo ./install scvmmguestagent.1.0.2.1014.x64.tar
The agent is needed because it performs the customization of the Linux environment when a template is deployed. Once the Linux template is deployed, the SCVMM agent is automatically removed.
4. Shut down the Linux VM, and then save its VHDX file to the SCVMM library.
5. Now create a Linux template, and make sure you set the correct operating system, which will allow you to configure automatic naming (* is a complete random name, while ### specifies an automatically incrementing number) for the hostnames along with a password for the root account, the time zone, and any scripts you want to run. Save the Template.
6. You can now create new Linux VMs from the template. You will notice that when you deploy a Linux VM from the template, at one point an ISO is connected to the VM temporarily. This carries a customization file that contains the personalization data in thelinuxosconfiguration.xml file in addition to the latest version of the SCVMM Linux agent (in case it's been updated).
Templates are visible through the Library workspace and shown in the Templates ⇒ VM Templates area. Figure 5.17 shows the main configuration areas for a template. Notice that all the virtual hardware can be changed in addition to adding new hardware to the template hardware profile. If you will be creating many different types of templates rather than configuring the same hardware or operating system configurations each time, a good option is to navigate to Profiles within the Libraries workspace and create separate hardware profiles and guest OS profiles, which can then be used in templates you create, avoiding the need to perform the same configurations repeatedly. VM templates can also be exported and imported, allowing portability between SCVMM environments.
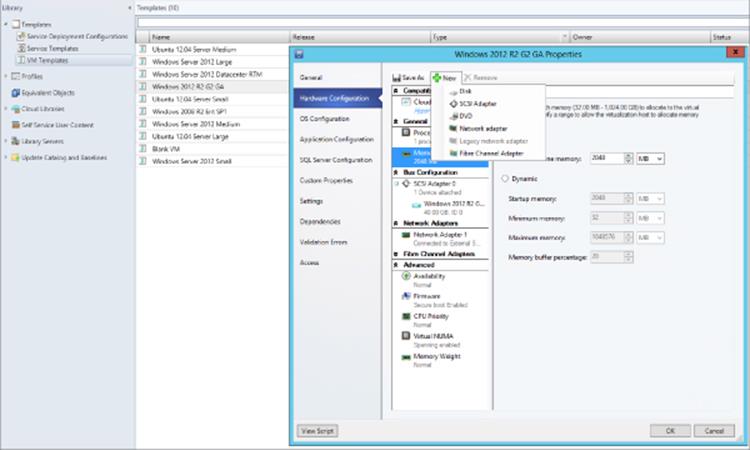
Figure 5.17 Modifying a template within SCVMM
Using Application, SQL, Role, and Feature Template Configurations
You will notice that in the VM templates there are sections related to application configurations, SQL configuration, roles, and features. While it may seem that all of these configurations will be used when deploying the template, this is not the case. These components are used only when the VM template is deployed a part of a service template, which I will cover in Chapter 9. When you're deploying a template-based virtual machine, configurations related to application, SQL, roles, and features are ignored and not available. If you require this type of deployment, either use service templates or manage these configurations using PowerShell or System Center Orchestrator as an add-on to the VM deployment.
In most environments you will have a very few number of template VHDX files but many different templates that use the same VHDX and apply different configurations and applications. You do not want a large number of VHDX files with different configurations and applications installed. This is hard to maintain and patch. The goal is to have a plain, sometimes called vanilla, VHDX template with just the operating system and then deploy all other customizations using the template options.
A Linux OS configuration has far fewer options than a Windows OS configuration, and most customizations beyond root credentials and name will need to be performed using the RunOnce Commands option.
Deploying a virtual machine using a template is simple:
1. Within the VMs And Services workspace, select the Create Virtual Machine action, which has an option to create based on an existing virtual machine, VM template, or virtual hard disk in the library, as shown in Figure 5.18. Click Next.
2. Enter a name and optional description and click Next.
3. The virtual hardware profile can be customized from the profile in the template or even a completely separate hardware profile can be loaded. If this virtual machine needs to be highly available, in the Advanced ⇒Availability section, ensure that the Make This Virtual Machine Highly Available box is checked, as shown in Figure 5.19. Click Next.
4. Customizations for the operating system can be performed, such as identity, answer file, and RunOnce commands. Notice that all the defaults from the template are populated automatically. Click Next.
5. Select the location for the deployment. This can be to a cloud or to a host group. When you have made your selection, click Next.
6. An evaluation against all hosts is performed and each available host is given a rating, as shown in Figure 5.20, based on its suitability. The rating is explained in the Details section. The first two are good matches, but the third and fourth are not because the VM needs to be clustered and these nodes are not clustered, which is shown in the Rating Explanation section. Select a host and click Next.
7. The Configure Settings dialog allows changes to configurations such as the computer name and location. Make changes as required and click Next.
8. In the Select Networks dialog, select the VM network and click Next.
9. Set the automatic actions for startup and shutdown and choose whether the new VM should be excluded from placement optimizations. (This will be covered in Chapter 7, “Failover Clustering and Migration Technologies,” but it's a technology that moves VMs between hosts if necessary for optimal resource utilization. This should be left enabled for most virtual machines.) Click Next.
10.A summary screen is displayed (along with the View Script button should you wish to capture the PowerShell). Click Create to create the virtual machine.
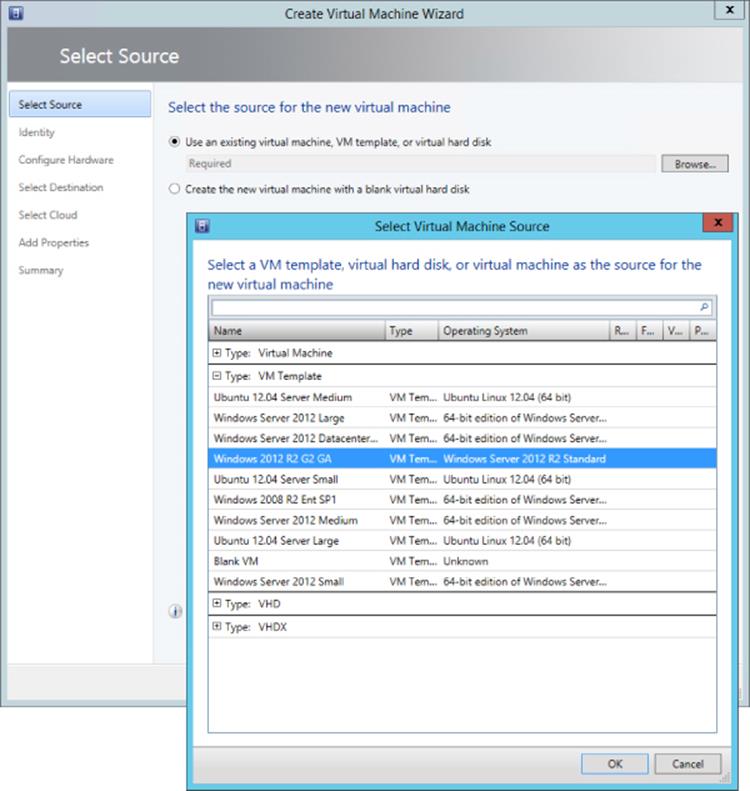
Figure 5.18 Selecting a template as the source for a new virtual machine
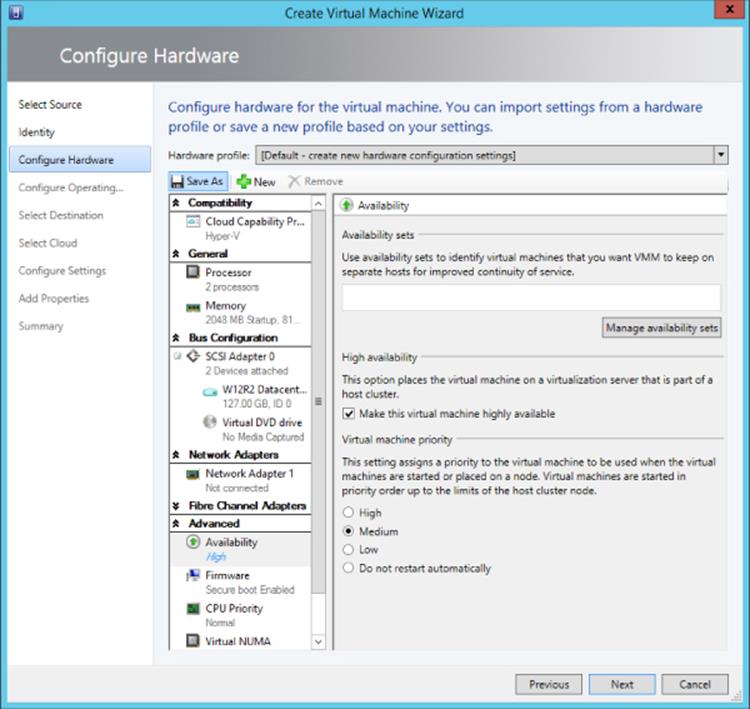
Figure 5.19 Setting a virtual machine to be highly available and therefore requiring deployment to a cluster
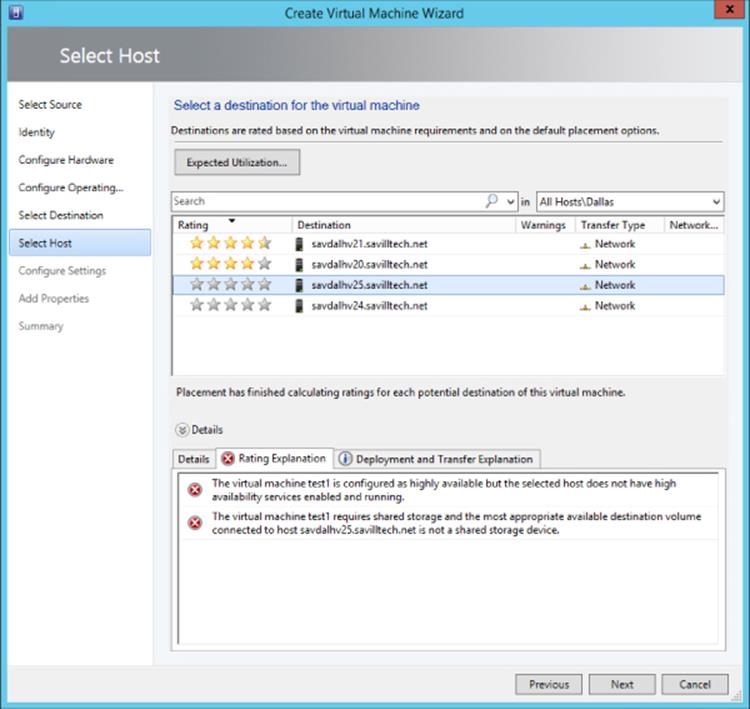
Figure 5.20 The ratings for possible hosts
Deploying a template is the single circumstance in which SCVMM 2012 R2 leverages ODX if possible, which needs to be a capability of the SAN, and the LUN containing the template VHDX file must be on the same volume as the LUN that is the target for the VM deployment for most SANs. If it's not possible to leverage ODX, SCVMM will try a regular Fast File Copy, and if that fails, it will resort to using BITS. Figure 5.21 shows the complete deployment of a VM from a template. Notice the various steps. First a virtual machine is created, and then the template VHDX file is copied to the target storage. Step 1.8.2 creates a temporary ISO that contains the answer file that performs all the configuration of the guest OS. This ISO is created in the root of the new virtual machine folder that has the name of the VM. For example, my test1 VM ISO would be called C:\ClusterStorage\Volume1\test1\test1.iso. This ISO is deleted once the VM is created, as are the additional virtual DVD drives that are added during deployment to attach the answer file ISO to as well as the VMM additions.
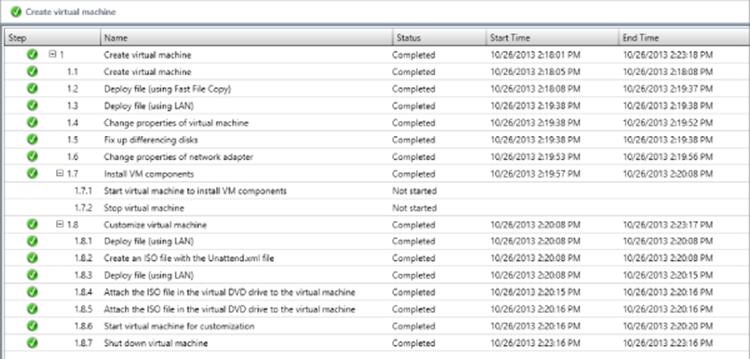
Figure 5.21 A complete SCVMM VM deployment from a template
If you are quick enough, you can see the temporary ISO file created and could even copy it to another location. It contains a single file, unattend.xml, which contains all the guest OS customizations specified in the template and the selections during VM deployment. The following code is the content of my unattend.xml file that SCVMM created for the deployment shown in Figure 5.21. This is useful for your own education and understanding of how your OS customizations actually are implemented to the virtual machine.
<?xml version="1.0" encoding="US-ASCII" standalone="no"?><!DOCTYPE component PUBLIC "-//JWS//DTD WileyML 20110801 Vers 3Gv2.0//EN" "Wileyml3gv20-flat.dtd"><component name="Microsoft-Windows-Shell-Setup"
processorArchitecture="amd64" publicKeyToken="31bf3856ad364e35"
language="neutral" versionScope="nonSxS" xmlns:wcm="http://schemas.microsoft.com/WMIConfig/2002/State"
xmlns:xsi="http://www.w3.org/2001/XMLSchema-instance">
<RegisteredOwner/>
<RegisteredOrganization/>
<ComputerName>test1</ComputerName>
<ProductKey>Y4TGP-NPTV9-HTC2H-7MGQ3-DV4TW</ProductKey>
</component>
<component name="Microsoft-Windows-UnattendedJoin"
processorArchitecture="amd64" publicKeyToken="31bf3856ad364e35"
language="neutral" versionScope="nonSxS"
xmlns:wcm="http://schemas.microsoft.com/WMIConfig/2002/State"
xmlns:xsi="http://www.w3.org/2001/XMLSchema-instance">
<Identification>
<JoinDomain>savilltech</JoinDomain>
<Credentials>
<Domain>savilltech</Domain>
<Username>administrator</Username>
<Password>passwordinplaintext</Password>
</Credentials>
</Identification>
</component>
<component name="Microsoft-Windows-Deployment"
processorArchitecture="amd64" publicKeyToken="31bf3856ad364e35"
language="neutral" versionScope="nonSxS"
xmlns:wcm="http://schemas.microsoft.com/WMIConfig/2002/State"
xmlns:xsi="http://www.w3.org/2001/XMLSchema-instance">
<RunSynchronous>
<RunSynchronousCommand wcm:action="add">
<Order>1</Order>
<Description>Install Guest agent</Description>
<Path>cmd.exe /c (for %1 in
(z y x w v u t s r q p o n m l k j i h g f e d c b a) do
@(if exist %1:\VMMGuestAgent.exe (sc create scvmmadditions binpath=%1:\VMMGuestAgent.exe type=own start=auto &
sc start scvmmadditions )))</Path>
<WillReboot>OnRequest</WillReboot>
</RunSynchronousCommand>
</RunSynchronous>
</component>
</settings>
<settings pass="oobeSystem">
<component name="Microsoft-Windows-Shell-Setup"
processorArchitecture="amd64" publicKeyToken="31bf3856ad364e35"
language="neutral" versionScope="nonSxS" xmlns:wcm="http://schemas.microsoft.com/WMIConfig/2002/State"
xmlns:xsi="http://www.w3.org/2001/XMLSchema-instance">
<UserAccounts>
<AdministratorPassword>
<Value>localadminpasswordplaintext</Value>
<PlainText>true</PlainText>
</AdministratorPassword>
</UserAccounts>
<TimeZone>Central Standard Time</TimeZone>
<OOBE>
<HideEULAPage>true</HideEULAPage>
<SkipUserOOBE>true</SkipUserOOBE>
<HideOEMRegistrationScreen>true</HideOEMRegistrationScreen>
<HideOnlineAccountScreens>true</HideOnlineAccountScreens>
<HideWirelessSetupInOOBE>true</HideWirelessSetupInOOBE>
<NetworkLocation>Work</NetworkLocation>
<ProtectYourPC>1</ProtectYourPC>
<HideLocalAccountScreen>true</HideLocalAccountScreen>
</OOBE>
</component>
<component name="Microsoft-Windows-International-Core"
processorArchitecture="amd64" publicKeyToken="31bf3856ad364e35"
language="neutral" versionScope="nonSxS" xmlns:wcm="http://schemas.microsoft.com/WMIConfig/2002/State" xmlns:xsi="http://www.w3.org/2001/XMLSchema-instance">
<UserLocale>en-US</UserLocale>
<SystemLocale>en-US</SystemLocale>
<InputLocale>0409:00000409</InputLocale>
<UILanguage>en-US</UILanguage>
</component>
</settings>
<cpi:offlineImage cpi:source="" xmlns:cpi="urn:schemas-microsoft-com:cpi"/>
</unattend>
Hyper-V Integration Services and Supported Operating Systems
When talking about the guest operating system running inside a virtual machine, I mentioned enlightened operating systems, which are guest operating systems that are aware they are running in a virtual environment and can leverage specific virtual features such as synthetic hardware via the VMBus through special drivers. Additionally, there are a number of services between the virtual machine and the Hyper-V host that are enabled when the guest has Hyper-V Integration Services installed. Hyper-V Integration Services is built into the Windows operating systems for the respective version of Hyper-V. For example, Windows Server 2012 R2 and Windows 8.1 have Hyper-V 2012 R2 Integration Services built in, and Windows Server 2012 and Windows 8 had the Hyper-V 2012 Integration Services built in. This means that if the guest operating system is running a version of an operating system older that the Hyper-V host, you will need to upgrade its version of Integration Services. This is the first action you should perform when deploying an operating system, and when creating a VM template, make sure you update Integration Services prior to capturing the VHDX for use with the template.
Each Hyper-V host has the latest version of Integration Services stored at C:\Windows\System32\vmguest.iso. When vmconnect is used to connect to a virtual machine, an action, Insert Integration Services Setup Disk, is available in the Action menu that attachesvmguest.iso to the virtual DVD for the virtual machine. The vmguest.iso file will then launch within the VM and update Integration Services, which will require a reboot for the guest operating system. While the version of Integration Services always increased between Windows Server versions, it may also increment as part of the updates. For example, an update related to backup operations was made to the Hyper-V Integration Services for Windows Server 2012 and Windows 8, which incremented Integration Services from 6.2.9200.16384 (the RTM) to 6.2.9200.16433. This was part of update rollup KB 2770917 (http://support.microsoft.com/kb/2770917). When the Hyper-V host reboots, it updates its vmguest.iso file with the latest integration services.
It is therefore important to track whether Hyper-V Integration Services is updated and whether you need to upgrade it inside virtual machines. Within the guest OS, Integration Services can be confirmed by looking at the VM's Registry at HKEY_LOCAL_MACHINE\SOFTWARE\Microsoft\Virtual Machine\Auto\IntegrationServicesVersion for the IC version or from the host using the following command:
Get-VM | ft Name, IntegrationServicesVersion
Additionally, the Summary tab for a virtual machine will show whether an update is required in the Integration Services section, as shown in Figure 5.22.
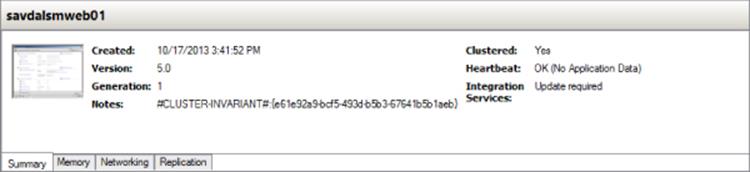
Figure 5.22 A VM that requires an Integration Services upgrade
To update, the easiest way is to extract the contents of C:\Windows\System32\vmguest.iso from the Hyper-V host to a folder and then launch setup.exe from the relevant support\<architecture> folder on each VM, as in this example:
\\savdalhv01\HIS\support\amd64\setup.exe /quiet /norestart
Note that this will require a reboot of the VM at some point, but the /norestart suppresses the automatic reboot.
In addition to providing the drivers and components required for the most optimal utilization of resources between the guest and the hypervisor, there are a number of other integration services, which are described in the following list. Note that each service can be disabled if required through the settings of the virtual machine in the Management ⇒ Integration Services section. Unless there is a specific reason not to, you should leave Integration Services enabled.
1. Operating system shutdown Enables the guest operating system to be cleanly shut down from the Hyper-V manager or the management interfaces Hyper-V provides, such as PowerShell and Windows Management Instrumentation (WMI).
2. Time synchronization Keeps the time of the guest OS synchronized with the host operating system.
3. Data exchange Allows the exchange of specific Registry location values between a guest and the parent partition, known as key-value pairs. The Hyper-V host writes to location HKEY_LOCAL_MACHINE\SOFTWARE\Microsoft\Virtual Machine\Guest\Parameters within the VM, and the OS in the guest can then read from this location to gather information about the host. This information includes the Hyper-V host name (which is the cluster name if it's a cluster node), version information, its fully qualified name, and the actual VM's name and ID, as shown in Figure 5.23. This can easily be read using PowerShell. For example, within a virtual machine, to find which Hyper-V host it is on I use the following PowerShell command:
$regPath = "HKLM:\SOFTWARE\Microsoft\Virtual Machine\Guest\Parameters"
(Get-ItemProperty -Path $regPath).HostName
1. Conversely, the Hyper-V host reads information from HKEY_LOCAL_MACHINE\SOFTWARE\Microsoft\Virtual Machine\Auto in the guest, which is populated by the guest OS, giving Hyper-V a lot of information about the OS, including version, naming, and IP configuration. This type of information exchange can be useful for many types of management operations, automation, and inventory. The complete list of values can be found at the following location, which documents the Msvm_KvpExchangeDataItem class:
http://msdn.microsoft.com/en-us/library/cc136850(v=vs.85).aspx
You can actually create your own custom values within the VM that can be read by the Hyper-V host by adding string values under HKEY_LOCAL_MACHINE\SOFTWARE\Microsoft\Virtual Machine\Guest. This would be useful to, for example, populate the type of server in the guest using a custom process, such as SQLServer or IISServer, which could then be read from the host to ascertain the type of server running in the VM. There is no PowerShell cmdlet available to read values set in the guest from the Hyper-V host. Instead, you use WMI. The following PowerShell script reads the fully qualified domain name from within the guest OS from the Hyper-V host for VM savdaldc02:
$vmName = "savdaldc02"
$vm = Get-WmiObject -Namespace root\virtualization\v2 ´
-Class Msvm_ComputerSystem ´
-Filter "ElementName='$vmName'"
$vm.GetRelated("Msvm_KvpExchangeComponent").GuestIntrinsicExchangeItems | % {
$GuestExchangeItemXml = ([XML]$_).SelectSingleNode(´
"/INSTANCE/PROPERTY[@NAME='Name']/VALUE[child::text()='FullyQualifiedDomainName']")
if ($GuestExchangeItemXml -ne $null)
{
$GuestExchangeItemXml.SelectSingleNode( ´
"/INSTANCE/PROPERTY[@NAME='Data']/VALUE/child::text()").Value
}
}
1. Heartbeat Allows Hyper-V to check the responsiveness of the guest operating system by a heartbeat check.
2. Backup (volume snapshot) A very powerful feature I will cover in Chapter 6, “Maintaining a Hyper-V Environment,” this allows backup requests at the host level to be passed to the guest operating system, in turn allowing consistent file and application backups to be taken from the host.
3. Guest services This is a new Integration Services component introduced in Windows Server 2012 R2 that is disabled by default. Guest services enables the copying of files to a virtual machine using WMI APIs or using the new Copy-VMFile PowerShell cmdlet.
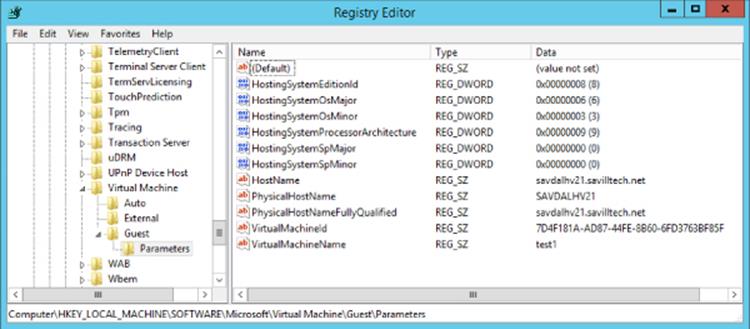
Figure 5.23 Registry within a virtual machine showing information about the host
Microsoft provides Integration Services for the supported operating systems unless it is already part of the operating system; for example, many modern Linux distributions have the Hyper-V integration services built in (although Microsoft still releases updated Linux Integration Services, which are then integrated into newer distributions of Linux). The full list of the supported guest operating systems can be found at http://technet.microsoft.com/library/hh831531, but the primary supported operating systems for 2012 R2 Hyper-V are as follows:
· Windows Server 2012 R2
· Windows Server 2012
· Windows Server 2008 R2 SP1
· Windows Server 2008 SP2
· Windows Server 2003 [R2] SP2
· Windows 8.1
· Windows 8
· Windows 7
· Windows Vista SP2
· Windows XP SP3
· Windows XP x64 SP2
· CentOS 5.7-6.4
· Red Hat Enterprise Linux 5.7-6.4
· SUSE Linux Enterprise Server 11 SP2 and SP3
· Open SUSE 12.1
· Ubuntu 12.04, 12.10, 13.04 and 13.10
· Oracle Linux 6.4
Most of the Linux distributions have Integration Services built in. However, the previously mentioned article documents which ones need the Linux Integration Services downloaded and installed manually. At the time of this writing, the latest Linux Integration Services version is 3.4 and is available from the following location:
www.microsoft.com/en-us/download/details.aspx?id=34603
This is a large list that covers pretty much every operating system that is used in organizations today, but what if a company has another operating system? If it's not on this list of supported operating systems, will it not work? Remember that what Hyper-V provides in a generation 1 virtual machine is a virtual environment that does not require the guest operating system to be enlightened. To the guest it appears the virtual hardware being presented is a physical system that includes items such as the IDE controller and the emulated legacy network adapter. Even in the 2012 R2 version of Hyper-V, the processor compatibility for older operating systems (-CompatibilityForOlderOperatingSystemsEnabled), which was aimed at NT 4.0 systems, is still configurable using PowerShell. These nonenlightened systems that do not understand VMBus will have a higher overhead and see poorer performance because of the emulated nature of the storage and networking, but most likely they will work. There is a difference between what is supported and what will work. Microsoft supports only operating systems on Hyper-V that are themselves supported by the vendor. For example, Microsoft no longer supports Windows Server 2000, which means Hyper-V can no longer support it as a guest operating system, but it will run a single processor virtual machine. In a production environment you typically should be running only operating systems supported by the vendor to ensure that patches are received and that in the event of a problem you can get help from the vendor, but if you have a Windows Server 2000 application, it most likely would run on Hyper-V just fine.
Migrating Physical Servers and Virtual Machines to Hyper-V Virtual Machines
For most organizations today, virtualization is a technology that is established in the environment and the number of operating systems deployed to bare-metal hardware (physical servers) is decreasing. It's more likely today that you have operating systems virtualized on another hypervisor, such as VMware ESX or Citrix XenServer. Moving from either a physical server or another hypervisor requires a migration known as physical to virtual (P2V) or virtual to virtual (V2V).
In the previous version of SCVMM, SCVMM 2012, the P2V feature was built into the product and allowed a physical server operating system to be captured and converted to a virtual machine. This worked in an online or offline mode depending on the operating system running on the server. Online P2V is used for operating systems that support the Microsoft Volume Shadow Copy Service (VSS) and works by deploying an agent to the physical computer operating system (although this could also be an operating system running inside a VM). A capture of the hardware configuration is performed and mapped to a virtual machine configuration, and then the content of the hard drives is captured using a VSS backup, which ensures the integrity of the backup, and is written to a VHD on the Hyper-V host. It is important that the application is stopped during this process because otherwise, once the backup is used with a virtual machine on Hyper-V, any subsequent changes on the physical host would be lost. This is not a problem if the application does not store application data or state locally. Because of the VSS requirement, the online P2V is available for Windows XP SP2 and Windows 2003 SP1 and above.
For those Windows 2000 SP4 machines that don't support VSS or for the other operating systems that perhaps you don't want to use online P2V because a VSS writer for the application is not available, an offline P2V is performed. With the offline P2V, a Windows PE OS is temporarily installed on the source server and the computer is rebooted into the Windows PE environment through a modification to the boot record. The VMM agent in the Windows PE environment captures the disk content and streams to the Hyper-V server, and once that's complete, the machine boots back into the regular operating system, the final P2V processes are completed, and the actual VM is created on the Hyper-V host.
This feature has been removed in SCVMM 2012 R2, which does leave a gap in the ability to perform P2V. The Microsoft recommended solution at this time is to deploy an instance of SCVMM 2012 as well and use that for the P2V migrations, as documented at the following location:
http://blogs.technet.com/b/scvmm/archive/2013/10/03/how-to-perform-a-p2v-in-a-scvmm-2012-r2-environment.aspx
I believe, though, that they are working on a better solution, but the number of P2V migrations is decreasing because most organizations are virtualized and its mainly new workloads that are now being virtualized. There are third parties that offer P2V solutions, such as Double-Take, Quest, and PlateSpin. One manual approach is to use the SysInternals tool Disk2Vhd from the following location:
http://technet.microsoft.com/en-us/sysinternals/ee656415.aspx
It can be run on any system supporting VSS and creates a VHD of the system's content. The created VHD file could then be used when creating a new virtual machine.
The other migration type, V2V, is most commonly from VMware ESX to Hyper-V, and there are a number of different solutions. Many partners have V2V solutions, but Microsoft also provides a number of options for VMware migrations to Hyper-V.
SCVMM 2012 R2 still has built-in V2V supported from VMware and can convert either a VMware virtual machine running on an ESX host or a VMware virtual machine in the library. The major conversion task for VMware is converting the virtual hard disks because VMware uses the VMDK format, which needs to be converted to VHD. Additionally, VMware has its own version of Integration Services, called Integration Components, that is installed into guest operating systems. It must be removed from the operating system prior to starting on Hyper-V or the OS will most likely crash. Note that this does not happen with Hyper-V Integration Services if a Hyper-V VM is started on a different hypervisor. On startup, Hyper-V Integration Services is triggered via the BIOS in the virtual machine, which controls the starting of the VMBus. If the hypervisor is not Hyper-V, then the assertion to start VMBus will not occur and Integration Services is not started or used.
While SCVMM 2012 R2 does have V2V, Microsoft has, in my opinion, a better solution available, the Microsoft Virtual Machine Converter (MVMC) Solution Accelerator, which is available from the following location:
http://www.microsoft.com/en-us/download/details.aspx?id=34591
This solution seems to be where most of the engineering effort is—to provide the best VMware conversion experience. I would not be surprised if P2V was added to this in the future. In addition to the tool, the solution has complete documentation and even an add-on for the VMware vSphere client to expose the conversion functionality of MVMC. The MVMC converts the storage of the VM and removes VMware Integration Components. MVMC supports conversion of VMs on VMware vSphere 4.1 and 5.0.
While the MVMC converts virtual machines in an interactive fashion, it also provides scriptable command-line interfaces for providing automated conversions of large numbers of virtual machines. There are a number of solutions available that leverage MVMC. For example, there is a CodePlex solution to convert VMware to Windows Azure IaaS VMs at http://vmware2windowsazure.codeplex.com/, and most useful is the Migration Automation Kit (MAT) available in the TechNet Gallery at
http://gallery.technet.microsoft.com/Automation-Toolkit-for-d0822a53
It provides a complete bulk migration solution from VMware that leverages MVMC for the conversion but provides a SQL database–backed solution that comprises three phases:
· Collection: Collects information about the VMware environment
· List Management: Select the VMs that you wish to be converted based on those found during the Collection phase
· Conversion: Automated conversion of all the virtual machines selected during the List Management phase
If you need to perform bulk migrations from VMware, I recommend using the MAT with MVMC. Another option is to leverage a partner who may have access to other tools to help with conversions. Microsoft Consulting Services (MCS) has its own migration solutions and offerings, including Datacenter Consolidation and Migration with some information available at the following location:
http://download.microsoft.com/download/9/4/1/9418922B-4E0D-4E8A-AAFE-445A2B86E883/Datacenter%20Consolidation%20and%20Migration.pdf
When thinking about any migration, it's important to understand the workloads you currently have and the resources they are using. Microsoft provides a free tool, Microsoft Assessment and Planning Toolkit (MAP), which is available fromhttp://technet.microsoft.com/en-us/library/bb977556.aspx. MAP can be used for a very large number of scenarios, such as desktop migration, Office planning, and cloud migrations. However, one key capability is that it can inventory and scan the utilization of operating systems and then create reports on the findings to help identify good virtualization and consolidation targets. It is highly recommended to run MAP for a period of time before performing any migration project to ensure that you have a good knowledge of the current systems and their real resource utilization.
In Chapter 2 I talked about differences in how Hyper-V handles processor allocation compared to a hypervisor such as ESX. This can make a difference to how you allocate resources. When converting from ESX, you can match the hardware exactly or you can take the migration as a chance to optimize the resource allocation or increase it if required. With Hyper-V, there is not really a penalty to having additional virtual processors in a virtual machine and therefore you may choose to be more generous than with ESX. While it's important to be accurate in your planning for migrations to ensure that the right hardware is procured, there is quite a lot of flexibility available even for a running virtual machine:
· Processor: While processors cannot be hot-added to a virtual machine, the limits and weightings can be changed while the virtual machine is running. This is why potentially having additional virtual processors is a good idea, and the limits can be changed while the VM is running.
· Memory: With Dynamic Memory, a virtual machine can have additional memory added as required, and the settings for the memory can be changed while the VM is running, allowing the maximum to be increased.
· Network: If bandwidth management is used, the minimum and maximum bandwidth limits can be modified, and at the host level, it's possible to add additional network adapters to a team to increase available bandwidth.
· Storage: Additional virtual hard disks can be added to the SCSI controller, and with 2012 R2, a VHDX file attached to the SCSI controller can also be dynamically expanded.
Upgrading and Migrating from Previous Versions
For an organization that is already using Hyper-V, the adoption of Windows Server 2012 R2 Hyper-V is actually a very simple process. For both stand-alone and clustered hosts Microsoft supports an n-2 upgrade support policy. This means upgrading from Windows Server 2008 R2 and Windows Server 2012 is supported.
It's important when upgrading your Hyper-V infrastructure that the upgrade is as transparent to the end users as possible, so minimizing downtime is very important. When thinking of your upgrade, make sure you consider the following:
· Can your hardware run the new version of Windows Server 2012 R2 (likely yes if you are running Windows Server 2008 R2), and even if it can, would this be a good time for a hardware refresh? I have seen big performance differences when running Hyper-V on newer processor generations.
· Is your management infrastructure compatible with Windows Server 2012 R2? Can it provide malware protection, monitoring, backup, and so on? It needs to!
· Have you upgraded System Center to the 2012 R2 version for full Windows Server 2012 R2 support?
· Are the administrators trained in Windows Server 2012 R2? Ensure that administrators can properly manager 2012 R2, especially if they are used to Windows 2008 R2.
· Are administrators using Windows 8.1? Only 8.1 can run the Windows Server 2012 R2 Remote Server Administration Tools to remotely manage Windows Server 2012 R2 servers.
· If you are migrating/upgrading from 2008 R2, you need to delete snapshots/checkpoints from the virtual machines and delete any Saved state. This is not required if you're upgrading from Windows Server 2012.
· Once you upgrade Hyper-V hosts, make sure you upgrade Integration Services on all the virtual machines with the Windows Server 2012 R2 version.
Stand-Alone Hosts
For a stand-alone Hyper-V host, it is possible to perform an in-place upgrade. This means launching the Windows Server 2012 R2 setup process and selecting the option to perform an in-place upgrade. This will maintain all the server configurations but will mean a period of unavailability to the virtual machines because the virtual machines will all be shut down during the upgrade of the host operating system. Once the upgrade is complete, the virtual machines will start and then you can continue your management and post-upgrade actions.
Another option, if you have additional hardware available and are migrating from Windows Server 2012, is to create a new Windows Server 2012 R2 Hyper-V host and then perform a Shared Nothing Live Migration of the virtual machine from the Windows Server 2012 host to the Windows Server 2012 R2 host. For the first time it's possible to perform a cross-version live migration. This allows you to move the virtual machines to Windows Server 2012 R2 with no downtime to the virtual machine at all. Many companies use a type of rolling upgrade approach, providing they have one spare server available to use, and this is shown in Figure 5.24. In this process, a new box is stood up with Windows Server 2012 R2 (step 2) and the virtual machines from a host are migrated to this new box. The host that is now emptied is then reinstalled with Windows Server 2012 R2 (step 3), and the VMs from another host are then moved to this newly installed host (step 4) and the process continues (step 5). Note that while this process is targeted for Windows Server 2012 to Windows Server 2012 R2 with no downtime, you could use the same process from Windows Server 2008 R2, except there would be some downtime as part of the virtual machine migration and a storage migration or an export/import would be performed between hosts. If the stand-alone hosts were using SAN storage, it would be possible to just unmask the LUNs used by the source host to the target host and then import the virtual machines.
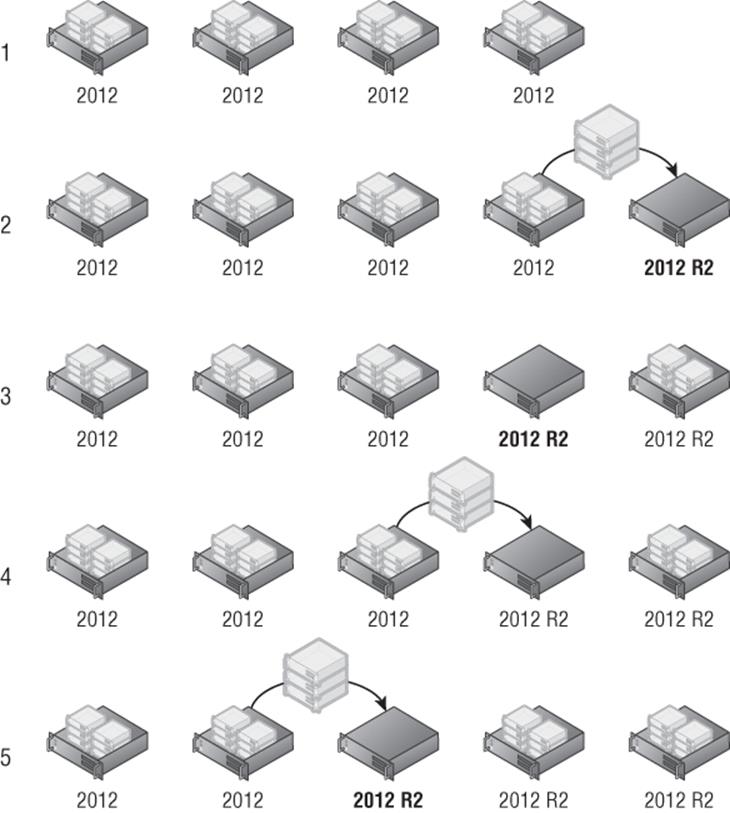
Figure 5.24 Rolling upgrade for stand-alone hosts
Clusters
Most production Hyper-V environments will not be stand-alone hosts but rather have clusters of Hyper-V hosts, which means an in-place upgrade is not possible because it is not possible to have a cluster with a mix of operating system versions. This means a migration of virtual machines between clusters is required, with the exact approach differing depending on if you have new hardware for your Hyper-V 2012 R2 infrastructure.
Failover clustering provides the ability to migrate workloads between a source and target cluster, and Hyper-V virtual machines are a supported workload that can be migrated. The way the Cluster Migration Wizard works is that you tell the wizard that runs on the target Windows Serve 2012 R2 cluster that you wish to migrate roles and then point the wizard to the old Windows Server 2008 R2 or Windows Server 2012 cluster. The wizard will then show the roles running on specific storage volumes and will disconnect the storage from the old cluster, activate on the new cluster, migrate the roles (virtual machines) that are hosted on that storage. It's important to ensure that the switches have been zoned correctly so that the target cluster has rights to access the migrated LUNs and the old cluster has its access removed once the storage is migrated. This process is detailed by Microsoft at the following location and at a high level shown in Figure 5.25:
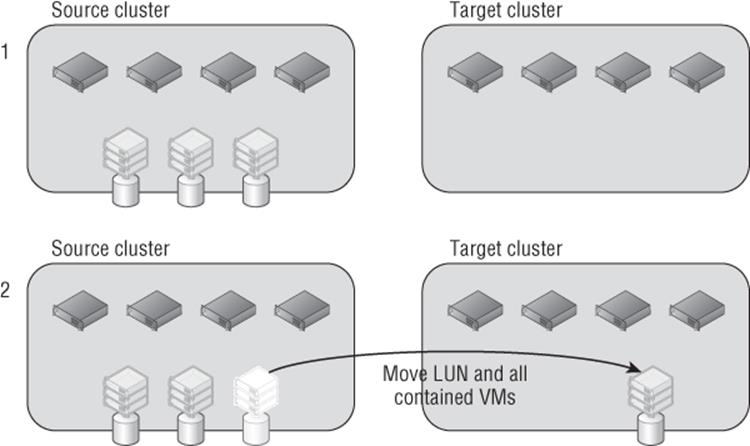
Figure 5.25 Using the cluster migration wizard between clusters
http://blogs.msdn.com/b/clustering/archive/2012/06/25/10323434.aspx
This is a great process but it requires a new cluster to migrate to. If you do not have spare hardware, then another approach is to evict nodes from your existing cluster, rebuild them with Windows Server 2012 R2, create a new cluster on those nodes (known as a seed cluster), and then move resources between clusters. As you move more resources, you evict more nodes from the source cluster. You rebuild a node and add it to the new cluster, move resources, then move another node until all nodes have been rebuilt and are part of the Windows Server 2012 R2 cluster. This approach does mean that there may be some reduction in resilience because the number of nodes in each cluster is reduced, but with careful planning it is still possible to maintain protection from a node failure. Just be sure you don't migrate more resources than can be hosted on the target if a node failed. Likewise, don't leave more resources on the source cluster than can be handled if a node failed on the source cluster. If you have a highly utilized cluster, this may be difficult and may require some additional hardware during the migration process. This approach is shown in Figure 5.26. Notice that I evict two nodes initially, so there is protection from a node failure. You never want fewer than two nodes in the source or target cluster.
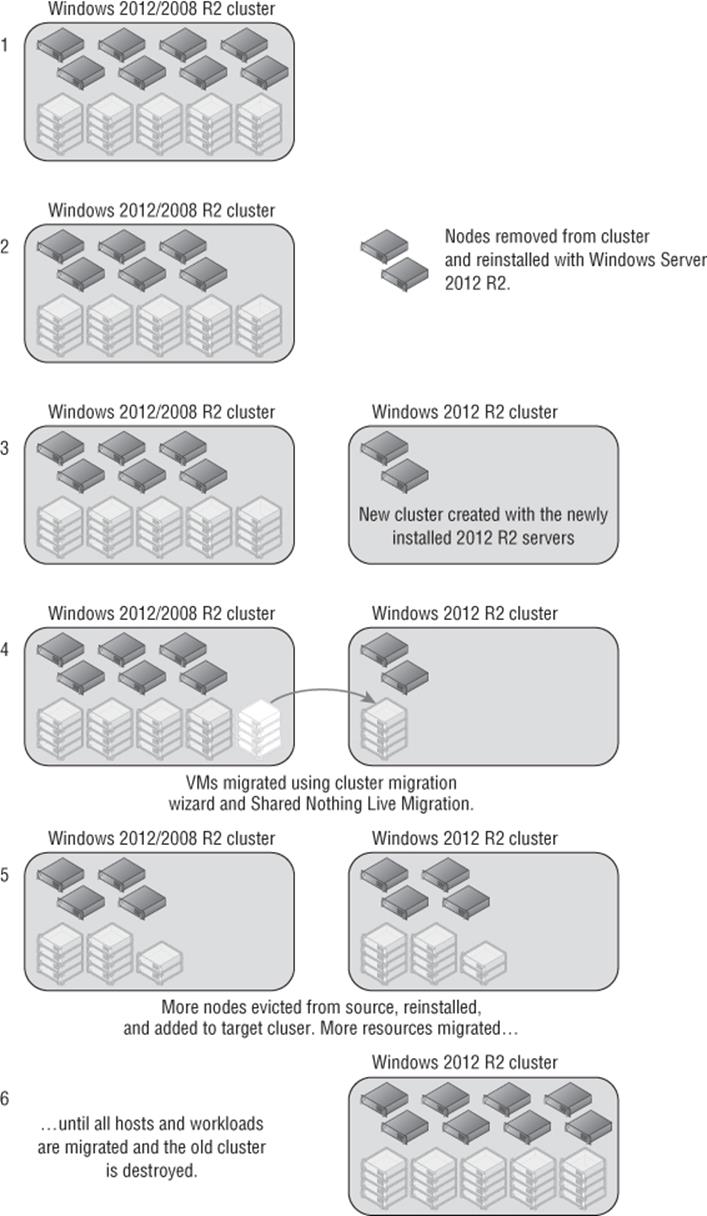
Figure 5.26 Using a seed cluster and node migration approach
I should note that you could take a different approach if you have sufficient spare storage that would perform a Shared Nothing Live Migration between a Windows Server 2012 cluster and a Windows Server 2012 R2 cluster. Using this method instead of using the cluster migration wizard, you would simply perform a Shared Nothing Live Migration of each virtual machine. The benefit over the cluster migration wizard is that the virtual machines do not have to be stopped during the migration and therefore there is no downtime. Once again, you could essentially move the VMs from one node at a time and then once each node is empty, remove it from the source cluster, rebuild it with Windows Server 2012 R2, and add to the new target cluster. If you are using a scale-out file server (SoFS) to host the virtual machines over SMB, then no extra storage would be required; you just need to ensure that the cluster and hosts have access to the file share and file system.
When you're moving from Windows Server 2012 to Windows Server 2012 R2, the key point is that whether the host is stand-alone or in a cluster, a migration with no downtime to the virtual machines is now possible.
The Bottom Line
1. Identify the different ways to deploy Hyper-V. Windows Server 2012 R2 Hyper-V can be deployed using a number of methods. The traditional approach is to install a server from setup media, which could be a DVD, USB device, or even files obtained over the network. Enterprise systems management solutions such as System Center Configuration Manager and Windows Deployment Services can be used to customize deployments. System Center Virtual Machine Manager can also be deployed to deploy Hyper-V hosts using Boot to VHD technology, providing a single management solution for deployment of hosts and virtual machines.
1. Master It What other types of server can SCVMM 2012 R2 deploy?
2. Explain why using Server Core is beneficial to deployments. Windows Server and Windows client operating systems share a lot of common code, and a typical Windows Server deployment has a graphical interface, Internet browser, and many graphical tools. These components all take up space, require patching, and may have vulnerabilities. For many types of server roles, these graphical elements are not required. Server Core provides a minimal server footprint that is managed remotely, which means less patching and therefore fewer reboots in addition to a smaller attack surface. Because a host reboot requires all virtual machines to also be rebooted, using Server Core is a big benefit for Hyper-V environments to remove as many reboots as possible.
1. Master It What was the big change to Server Core between Windows Server 2008 R2 and Windows Server 2012?
3. Explain how to create and use virtual machine templates. While it is possible to manually create the virtual machine environment and install the operating system for each new virtual machine, it's inefficient considering the virtual machine uses a file for its virtual storage. A far more efficient and expedient approach is to create a generalized operating system template VHDX file, which can then be deployed to new virtual machines very quickly. A virtual machine template allows the virtual hardware configuration of a virtual machine to be configured, including OS properties such as domain join instructions, local administrator password, and more. The configuration is then linked to a template VHDX file. When the template is deployed, minimal interaction is required by the requesting user, typically just an optional name, and within minutes, the new virtual environment with a configured guest operating system is available.
All materials on the site are licensed Creative Commons Attribution-Sharealike 3.0 Unported CC BY-SA 3.0 & GNU Free Documentation License (GFDL)
If you are the copyright holder of any material contained on our site and intend to remove it, please contact our site administrator for approval.
© 2016-2026 All site design rights belong to S.Y.A.