Microsoft Office for iPad Step by Step (2015)
Part 1: Get started with Microsoft Office for iPad
3. Create and manage files
In this chapter
![]() Create, open, and save files
Create, open, and save files
![]() Use common Office interface features
Use common Office interface features
![]() Search file content
Search file content
![]() Print file content
Print file content
![]() Distribute files
Distribute files
The elements that control the appearance of an iPad app or computer program and the way we interact with it are collectively referred to as the user interface. Some user interface elements, such as the color scheme, are cosmetic. Others, such as toolbars, menus, and buttons, are functional. Many apps and programs allow users to modify cosmetic and functional user interface elements (the “look and feel” of the app) to accommodate individual preferences.
The Office for iPad apps—Word, Excel, and PowerPoint—share many common user interface features and functions. The ways in which you interact with each app to perform standard tasks such as opening, saving, sharing, searching, and printing files are standardized across the apps so that you can concentrate your learning efforts on the skills and features that are specific to the app or to the document, workbook, or presentation you’re creating.
Practice files
For this chapter, use the practice files from the iPadOfficeSBS\Ch03 folder. For practice file download instructions, see the Introduction.
This chapter guides you through procedures that are common to Word for iPad, Excel for iPad, and PowerPoint for iPad. It includes procedures related to opening and creating files, saving files, sharing files, searching file content, and printing documents, workbooks, worksheets, or specific portions thereof.
Create, open, and save files
When you start an Office app from the Home Screen, it displays the Backstage view. From the File bar on the left side of the window, you can create new files, open files that you worked with previously, or browse through your connected storage locations to find and open a file.
Create files
When creating a file in an Office app, you can create a blank file of the default file type or create a file based on one of the templates provided with each app. Each template incorporates specific design elements such as fonts and colors. Many templates also include typical information that you can modify or build on to create a useful document, workbook, or presentation.
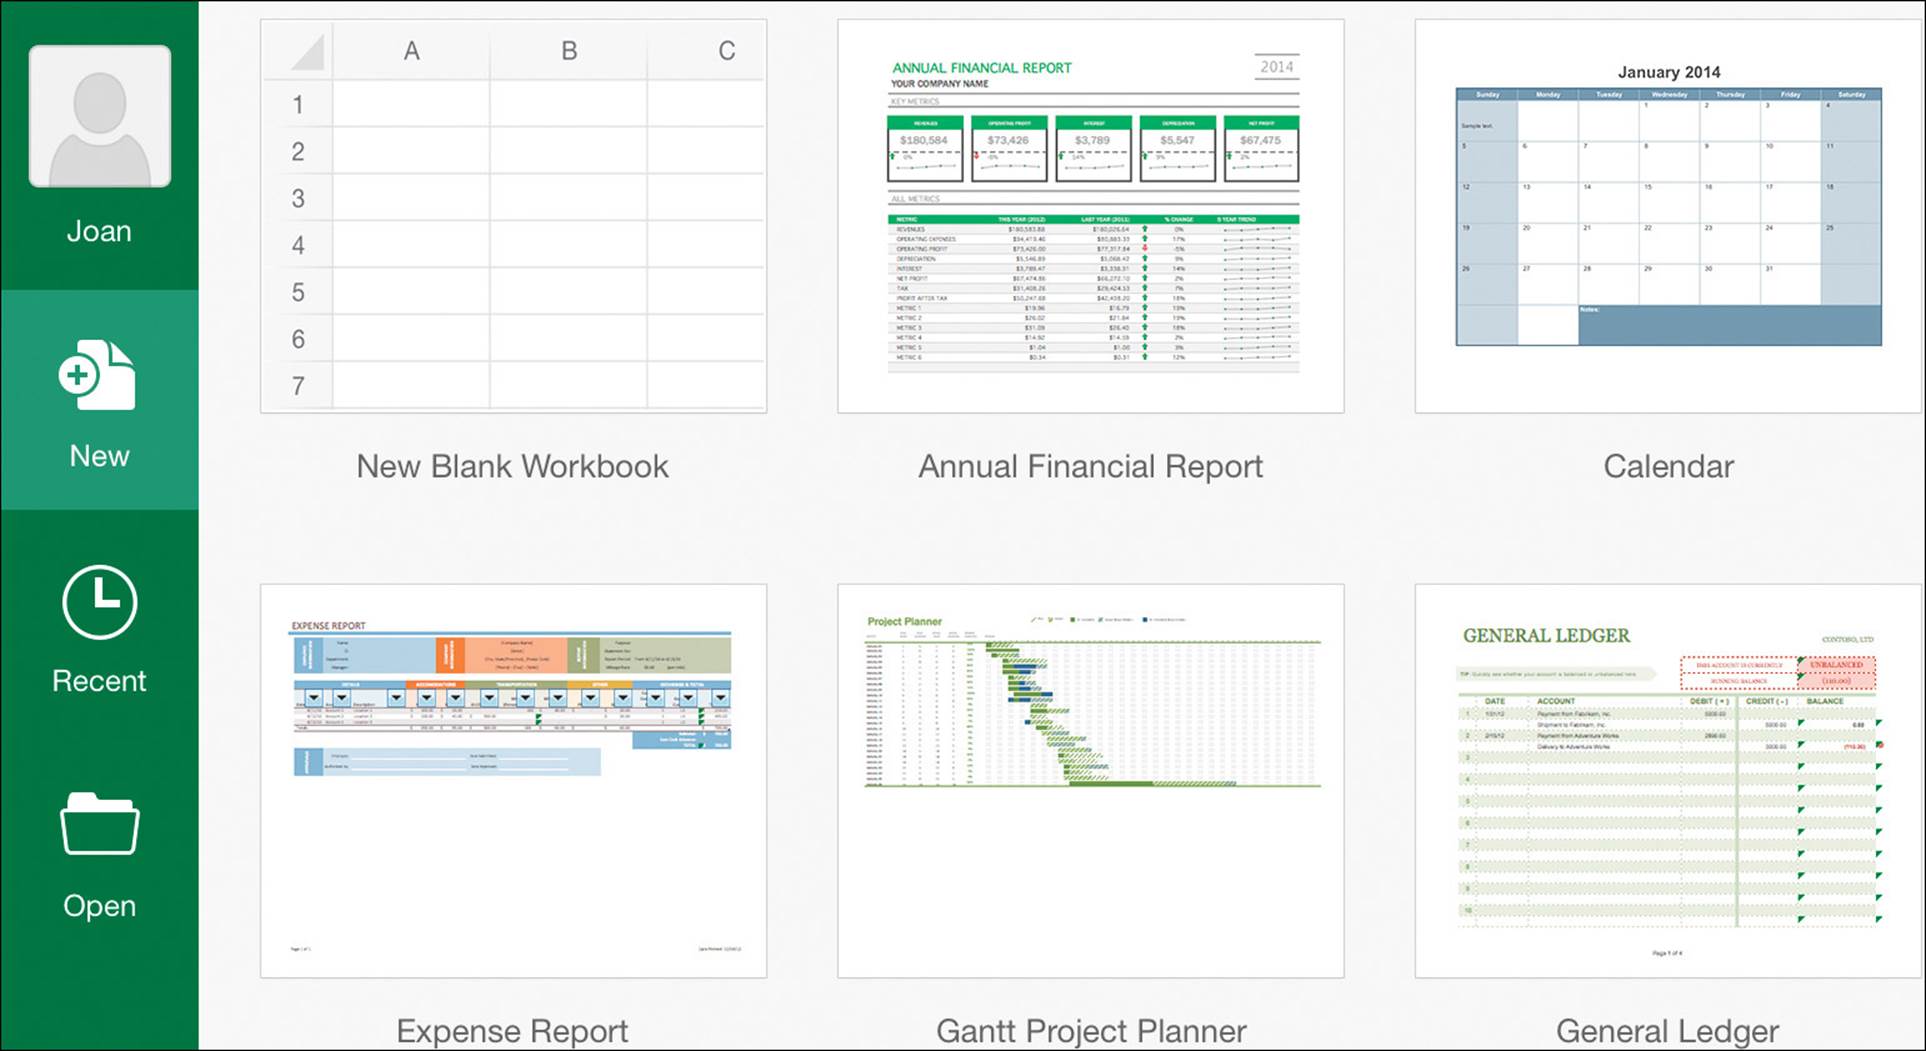
Some of the available Excel workbook templates
 Tip
Tip
You can’t open online or custom templates from the New page of an iPad app. To use a template other than those that are available by default from the New page, save the template to one of your connected storage locations and open it from that location.
If you create a file that contains content (either from a template or content that you enter) and display the Backstage view before naming and saving the file, the app prompts you to save or delete the file.
 See Also
For information about creating files in Word for iPad, see Chapter 4, “Create professional documents”; in Excel for iPad, see Chapter 7, “Store and retrieve data”; and in PowerPoint for iPad, see Chapter 9, “Create compelling presentations.”
You can open an existing file from within the corresponding Office app, from its storage location, or from an email message. If the file is stored remotely, the app downloads a copy of the file before opening it.
If you no longer need a file that you’ve stored on your iPad or a connected storage location, you can delete files from the Open page of the Backstage view.
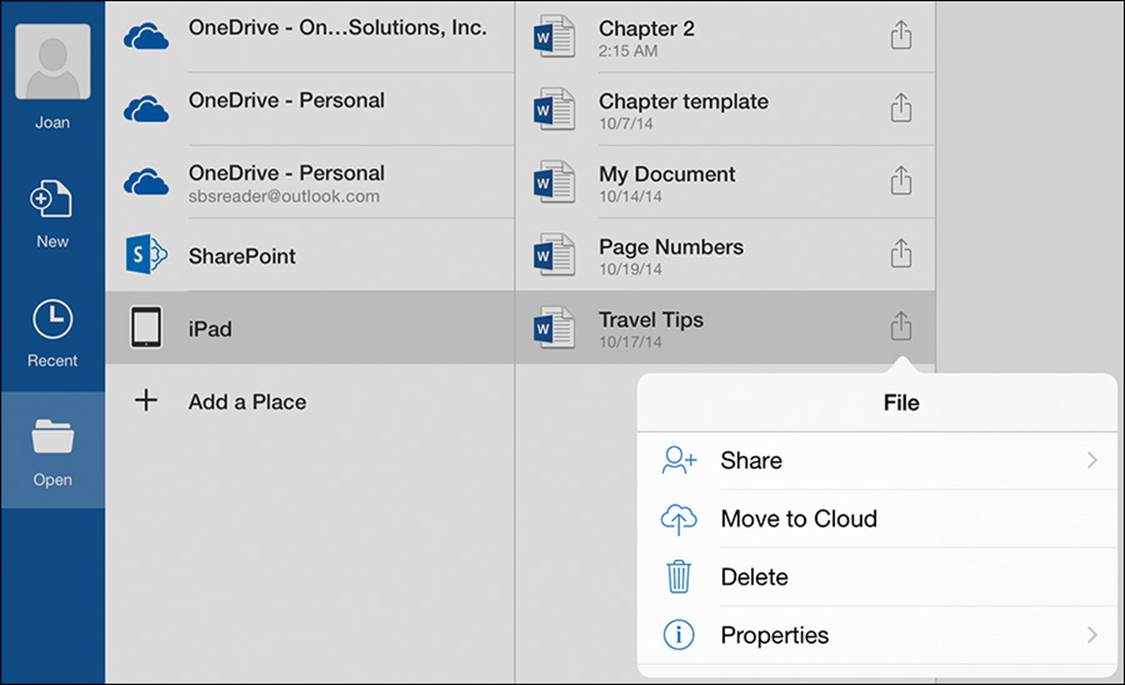
You can perform several tasks on files from the Open page
Tip
It can take a short time for files that you post to a SharePoint or OneDrive site to appear in a folder structure that you’ve previously opened. If you don’t want to wait, you can manually refresh the display of the folder contents by swiping the folder structure down the Open page.
To create a new document, workbook, or presentation
1. Start the app or, if you’re already working in a document, tap the Back button to display the Backstage view.
2. On the File bar, tap New.
3. On the New page of the Backstage view, tap the type of file you want to create.
To delete a new file instead of saving it for the first time
1. At the left end of the ribbon, tap the Back button.
If you haven’t yet named the file and selected a file storage location, the Save As window opens.
2. In the upper-left corner of the Save As window, tap Delete to delete the current file and display the New page of the Backstage view.
 Important
The Delete command is available only in the Save As dialog box that appears when you tap the Back button in an unsaved file. It is not available when you are using the Name or Duplicate function.
To delete a file that has already been saved
1. Display the Backstage view.
2. On the File bar, tap Open.
3. On the Open page of the Backstage view, navigate to the folder that contains the file you want to delete.
4. Tap the File Actions button to the right of the file name, and then tap Delete.
5. In the confirmation message box, tap Delete.
Open files
From the Open page of the Backstage view, you can navigate to files stored locally on your iPad or on a remote storage resource such as a OneDrive site or a SharePoint site. Each app displays only the files that can be opened by that app.
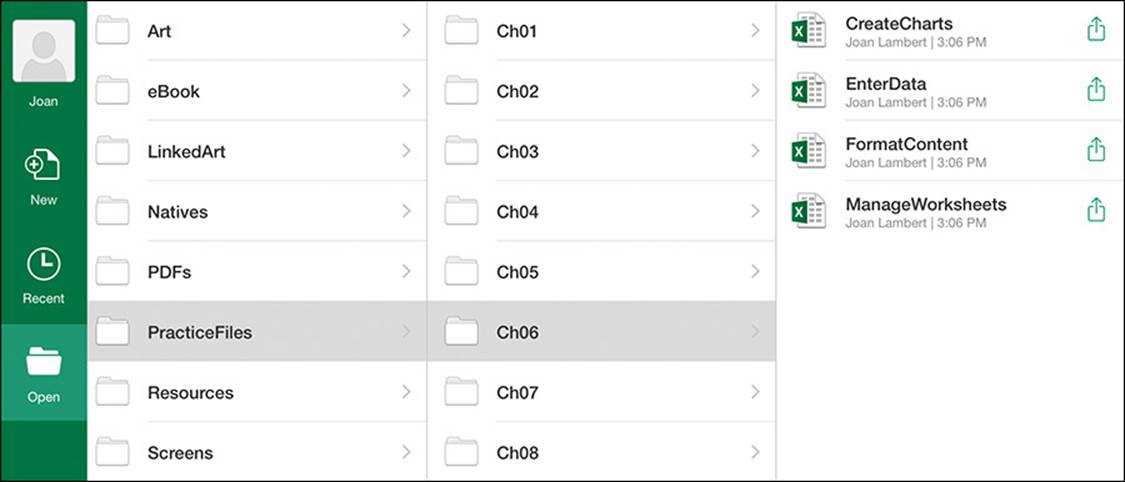
The Open page displays only the app-specific files in the selected location
The Open page displays up to three levels of the storage structure in columns. Initially, the Place is in the leftmost column and subsequent sites or folders are in adjacent columns. Each column represents one level of the storage structure and displays the folders and files at that level in alphabetical order. When you navigate through a deep folder structure, the columns move to the left. You can scroll the page left and right to display the entire storage path.
If you want to access files that are stored on a OneDrive site directly from your iPad (rather than through the apps), you can install the OneDrive or OneDrive for Business app on your iPad. These apps allow you to browse through the folders on your storage site and manage the files that are stored there.
Tip
When you open a file that is stored in a remote storage location, the words read-only appear in parentheses to the right of the file name on the title bar, and a yellow banner at the top of the content pane provides an Edit button that you must tap before you can make changes to the file. If you don’t intend to modify the file content, you can hide the banner by tapping the × at its right end.
Office keeps track of the files that you work with on any device and makes the list available from any other device. (The data is linked to your user account.) This is one of the tremendous benefits of the Office 365 subscription model and the cloud storage that comes with it—you can be up and running on a new computer in minutes, without having to move files or configure settings and preferences.
Switch among files
When you’re working in an Office program on a desktop computer, you can have multiple files open at the same time and easily switch among them. When you’re working in an Office app on your iPad, however, you can have only one file open at a time in each app. To switch to another file, you must open the file from the Backstage view.
After you create a new, blank file and add content to it, you can’t open a different file in the same app until you name and save the new file or delete it. The Open page of the Backstage view displays the files and folders stored in connected storage locations, but the files are dimmed so you can’t open them. This safeguard is built into the Office for iPad apps to protect you from losing unsaved information, due to the limitation of having only one file open at a time in an iPad app.
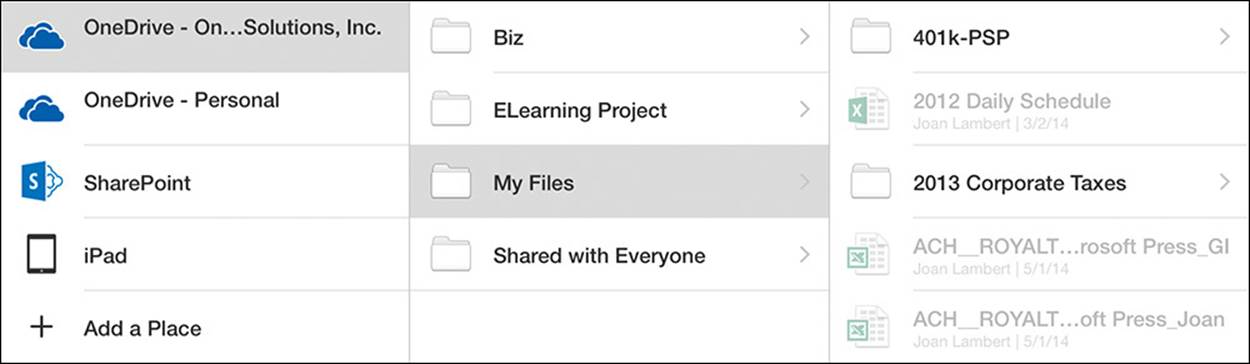
Dimmed files are visible but not available to open
SEE ALSO For related information, see the sidebar “Switch among running apps” in Chapter 2, “Get connected.”
The Recent page of the Backstage view provides quick access to the files you’ve worked with recently on your iPad, desktop computer, or other device. The Recent page displays only files that are related to the app you’re working in: documents in the Word app, workbooks in the Excel app, and presentations in the PowerPoint app.
Tip
Each app recognizes the file types commonly associated with the desktop version of the program. For example, Word for iPad recognizes the current and previous default Word Document file types (.docx and .doc), and templates created for those standards.
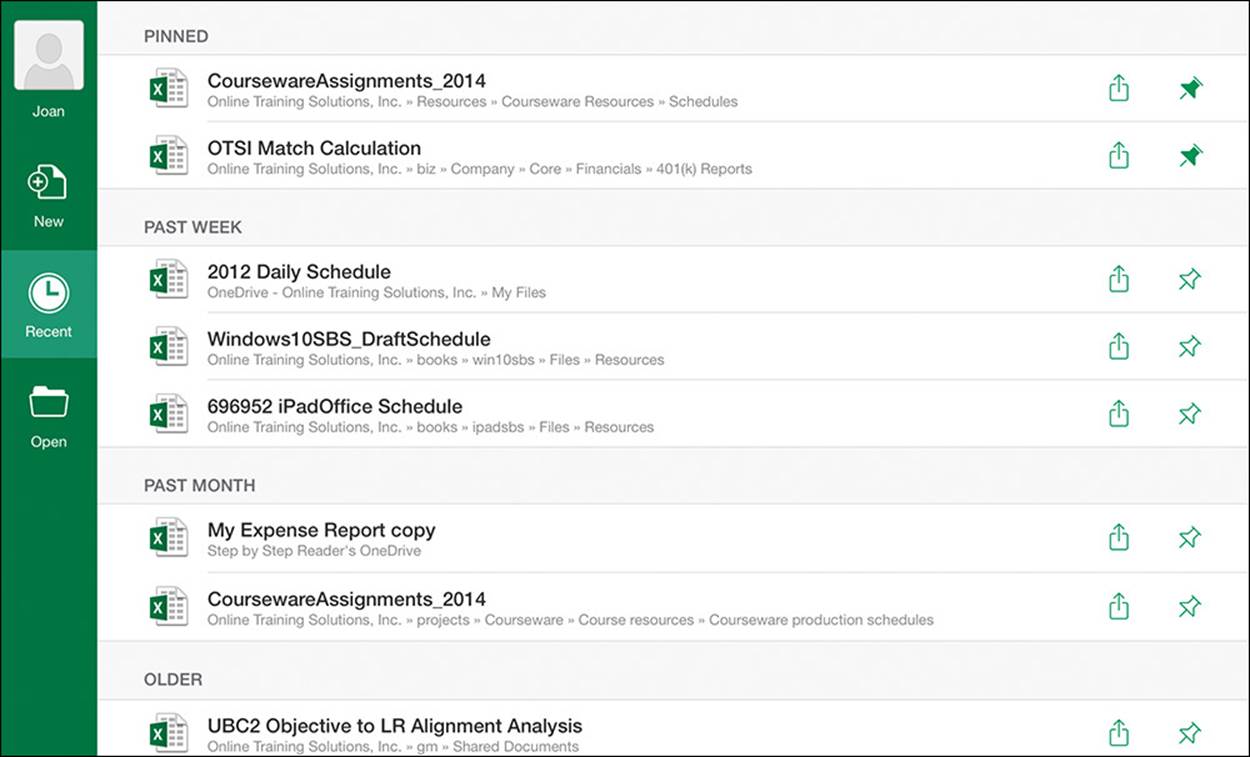
Recently used workbooks associated with a user account
To ensure that you can find a specific file quickly regardless of whether you’ve worked with it recently, you can pin it to the Recent page. Pinned files appear in the Pinned section at the top of the list and are indicated by a colored thumbtack.
To open a recent file from within the relevant app
1. Display the Recent page of the Backstage view.
2. If necessary, scroll through the list to locate the file you want to open. Then tap the file.
3. If the app prompts you to do so, enter the credentials necessary to gain access to the file or storage location.
To pin a file to the Recent file list
1. Display the Recent page of the Backstage view.
2. If necessary, scroll through the list to locate the file you want to pin.
3. Tap the Pin button located to the right of the file name to add the file to the Pinned area at the top of the Recent page.
Font substitution
The desktop versions of the Office programs support more fonts than the Office for iPad apps. The Office for iPad apps have been programmed to handle this situation gracefully by substituting an available font for any unsupported font. Because of this, the file content is fully visible and available for editing.
When you open a file on your iPad that uses fonts that aren’t installed on the iPad, a black warning banner appears briefly below the ribbon to inform you that text in the file might look different than in the original file.
Only the appearance of the text is changed; the original font is still assigned to the text, and any edits you make to the text will be in the assigned font. When the file is displayed on a computer that supports the assigned font, it will appear correctly.
The Font list displays the original font name. You can apply that font to other text within the document by copying the text and then pasting the format onto other text.
If you apply other fonts to the document content while working with it on your iPad, the new fonts will be visible in the document to people who display or edit the document in a desktop version of the program.
SEE ALSO For information about copying and pasting formats, see “Change the appearance of text” in Chapter 4, “Create professional documents.”
To open a file directly from a OneDrive storage site
1. From the App Store, install the OneDrive app.
2. Start the OneDrive app.
3. In the OneDrive app window, browse to and tap the file you want to open.
4. If prompted to do so, enter the Microsoft account credentials associated with the OneDrive, and then tap Sign in.
To open a file directly from a OneDrive for Business storage site
1. From the App Store, install the OneDrive for Business app.
2. Start the OneDrive for Business app.
3. If prompted to do so, enter your organizational account credentials, and then tap Sign in.
4. In the OneDrive for Business app, browse to and tap the file you want to open.
To open an Office file attachment from the Mail app
1. Open or preview the email message that has the attached file.
2. Tap the attachment to display a read-only version of the file content. Then in the upper-right corner of the screen, tap the arrow icon to display a list of apps you can open the file in.
Or
Tap and hold the attachment to display a list of apps you can open the file in.
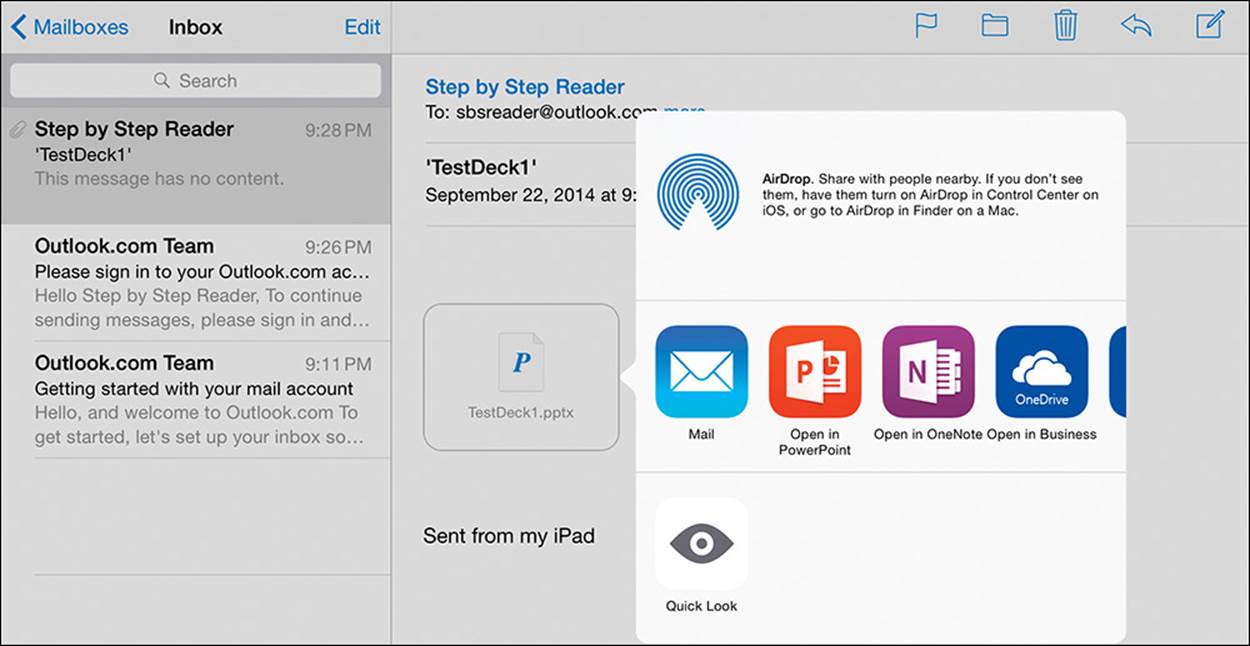
The options that appear in the window vary based on the apps installed on your iPad
3. Tap the icon of the Office app in which you want to open the attachment.
Save files
By default, the Office apps automatically save the file you’re working on and track saved file versions online so that you can revert to earlier versions when necessary.
When the AutoSave function is turned on:
![]() If you’re working in a new, unnamed file, the app saves a temporary copy of the file to your default storage location.
If you’re working in a new, unnamed file, the app saves a temporary copy of the file to your default storage location.
![]() If you’re working in a previously saved file, the app saves a copy of the file to the location in which you opened or last saved it.
If you’re working in a previously saved file, the app saves a copy of the file to the location in which you opened or last saved it.
You can turn off the automatic file-saving function if you prefer to save changes manually.
Tip
When using the Office for iPad apps, you can save files only in the default file format for the app you’re working in. To save a file as a template, macro-enabled file, or one of the many other available formats, use the desktop or online version of the program.
To save and name a file for the first time
1. Tap the File button.
2. On the File menu, tap Name or Save.
Tip
The File menu includes the Name command when AutoSave is turned on, and the Save command when AutoSave is turned off. The command is active until a name is assigned to the file; then it becomes dimmed to indicate that it is unavailable.
3. On the Save As screen, enter a file name in the Name box.
4. In the Choose Name and Location pane, tap the place where you want to store the file.
5. If a list of folders associated with the selected storage location appears in the center pane, tap the folder in which you want to store the file.
6. In the upper-right corner of the pane, tap Save.
To save a copy of a file
1. On the File menu, tap Duplicate.
2. In the Choose Name and Location pane, tap the place where you want to store the file copy. Then if necessary, flick the folder structure to the right to display the top-level folders.
3. In the Name box, enter a name for the new version of the file.
4. In the upper-right corner of the pane, tap Save.
View and edit files online
Most Office 365 subscriptions that include licensing for premium features of Word for iPad, Excel for iPad, and PowerPoint for iPad also include licensing for Word Online, Excel Online, and PowerPoint Online. These Office Online apps—formerly known as the Office Web Apps—run entirely within your web browser and don’t require the installation of an app or desktop software. In spite of this, you can sometimes do more in the Office Online apps than you can in the iPad apps—but only with files that are stored in cloud storage locations that support the Office Online apps, such as OneDrive and SharePoint sites.
If you find that you need more editing functionality than is provided by the iPad app version of a program—for example, if you want to insert footnotes in a Word document—you can start a web browser (such as Safari), browse to the storage location on onedrive.live.com or your SharePoint site, and then open and edit the file in the relevant Office Online app.
Use common Office interface features
The Office apps designed for the iPad share common user interface features, so if you know how to find your way around one app, it’s a less daunting task to learn to use another.
Identify standard features
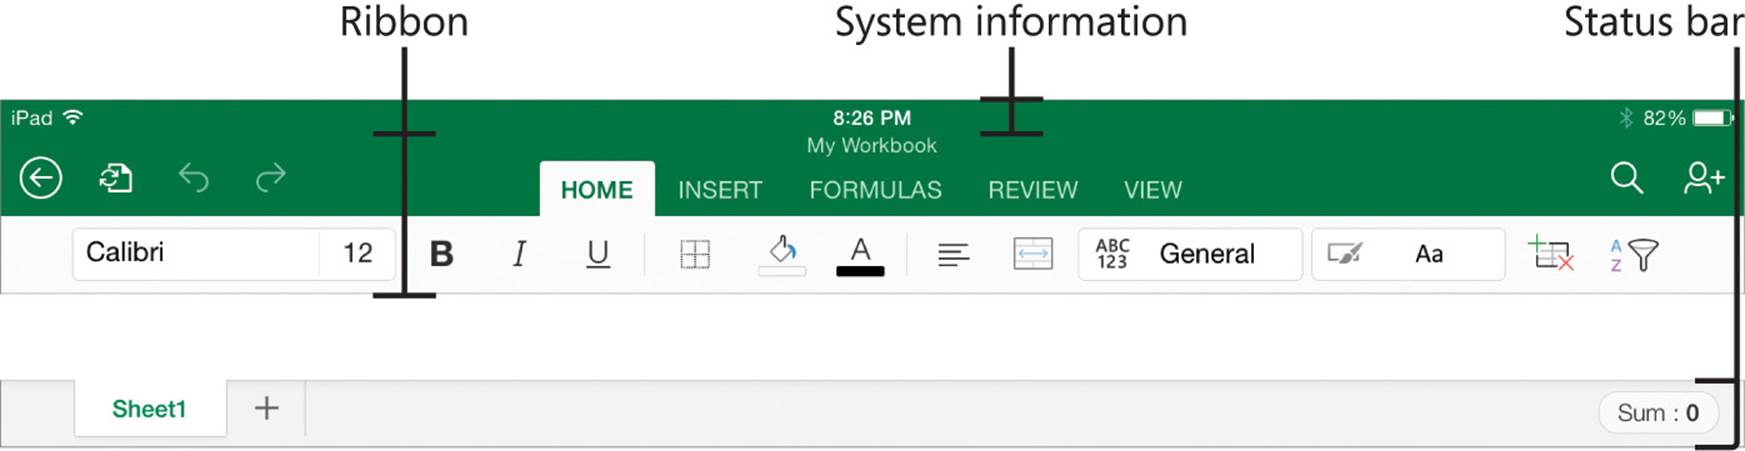
The user interface of a typical Office for iPad app
Word for iPad, Excel for iPad, and PowerPoint for iPad each have a colored pane at the top of the app window, containing these standard window elements:
![]() The system information bar, which displays the time, battery charge, and information about the iPad’s network connections. This system information is independent of the Office app.
The system information bar, which displays the time, battery charge, and information about the iPad’s network connections. This system information is independent of the Office app.
![]() The ribbon, which provides access to commands for working with the app, the current file, and the file content.
The ribbon, which provides access to commands for working with the app, the current file, and the file content.
![]() The name of the active file, which is displayed between the system information bar and the ribbon.
The name of the active file, which is displayed between the system information bar and the ribbon.
Tip
The pane color is specific to the app you’re using—blue for Word, green for Excel, orange for PowerPoint, and purple for OneNote—so you can quickly differentiate between apps when looking at file thumbnails or quick views of app windows.
Excel for iPad also has a status bar at the bottom of the window, which provides information about the currently selected file content.
Tip
The user interface elements of the Office for iPad apps are designed to be easy to access and control by using touch (with fingers) rather than an external pointing device such as a mouse. You can use the iPad’s on-screen keyboard or an external keyboard to input information. If you’re using an external keyboard, the on-screen keyboard doesn’t appear when you’re working in the file content. For more information about the on-screen keyboard, see the sidebar “Reconfigure the on-screen keyboard” later in this chapter.
The Office apps, like other iPad apps, open in full-screen windows. You can’t minimize, resize, or close the apps from within the window.
Change the magnification level of file content
The Office for iPad apps don’t have built-in zoom controls like those in the desktop Office programs—they aren’t necessary, because the iPad is a touch-centric device, and the functionality is built in. You can use gestures to change the magnification level of a document:
![]() Stretch two fingers apart to zoom in, so that the file content appears larger.
Stretch two fingers apart to zoom in, so that the file content appears larger.
![]() Pinch two fingers together to zoom out, to display more of the file content.
Pinch two fingers together to zoom out, to display more of the file content.
You can turn on additional magnification tools in the iPad settings, including these tools, which are useful for working in the Office for iPad apps:
![]() Zoom When this function is turned on, you can display a magnifying tool by double-tapping with three fingers. You can then drag the magnifier around the screen by its handle, or drag the screen with three fingers to change the area shown in the magnifier.
Zoom When this function is turned on, you can display a magnifying tool by double-tapping with three fingers. You can then drag the magnifier around the screen by its handle, or drag the screen with three fingers to change the area shown in the magnifier.
![]() Zoom Controller This round control is available on the screen when the Zoom tool is turned on, and dims when it is idle. Tapping the controller displays a menu of zoom-related commands. Dragging within the controller moves the magnifier around the screen.
Zoom Controller This round control is available on the screen when the Zoom tool is turned on, and dims when it is idle. Tapping the controller displays a menu of zoom-related commands. Dragging within the controller moves the magnifier around the screen.
To turn on the iPad zoom controls you want to use, follow these steps:
1. In the Settings app, display the General page.
2. Tap Accessibility, and then tap Zoom.
3. On the Zoom page, do any of the following:
• Tap the Zoom slider to turn on the magnifying tool.
• Tap the Show Controller slider to turn on the Zoom Controller.
• Tap Zoom Region and then tap either Full Screen Zoom or Window Zoom to specify the area you want to magnify by using the controls.
Work with the ribbon
The commands and procedures available for creating and modifying the content of a Word document, Excel workbook, or PowerPoint presentation are located on the tabs grouped in the center of the ribbon and vary among apps. Each Office app has Home, Insert, and Review tabs, and additional function-specific tabs that provide commands specific to working with content in that app.
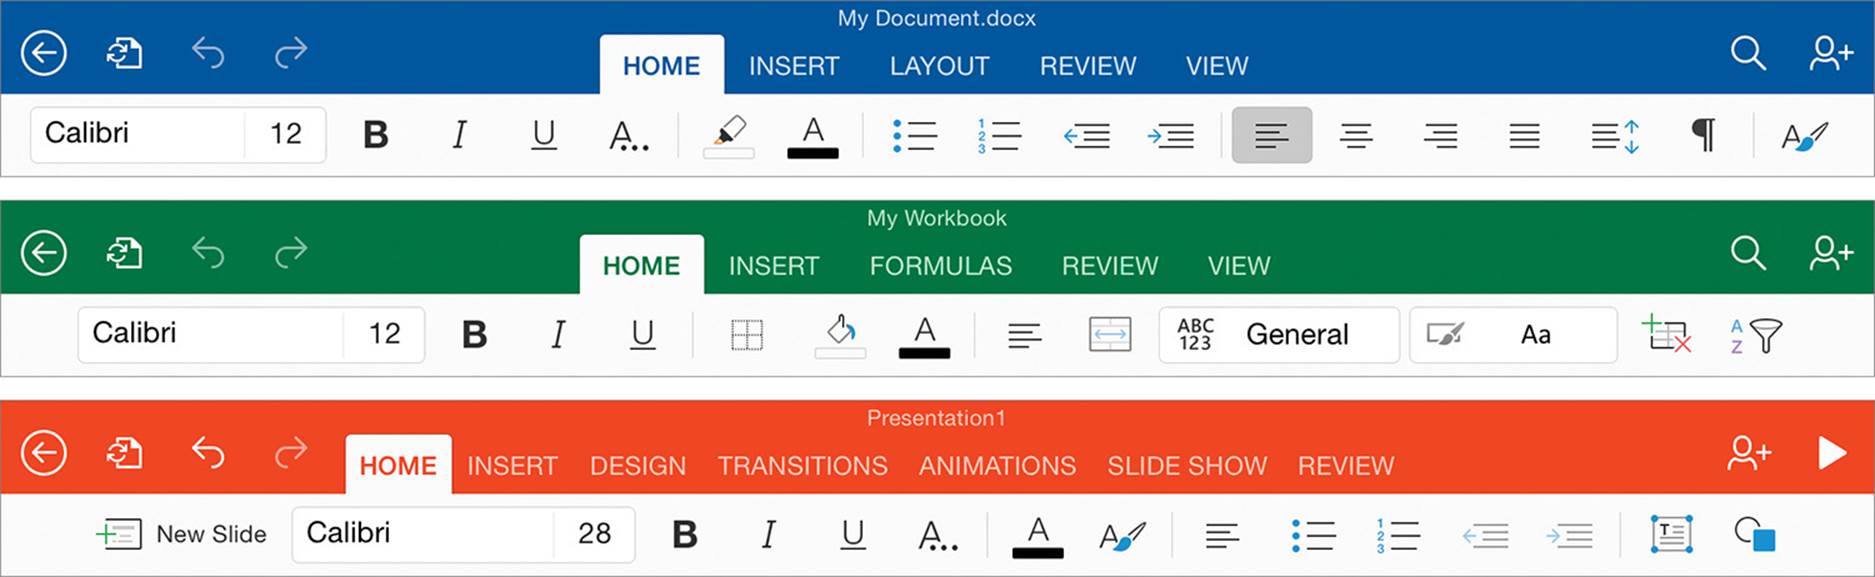
The Home tab for each app contains the most commonly used commands for that app
Tool tabs appear to the right of the primary tabs when certain types of content such as pictures, tables, and shapes are active. A tool tab has a white shadow under the tab name when it isn’t active, to differentiate it from the standard tabs.

Tool tabs contain commands specific to working with the selected element
Because the screen area of the iPad and iPad Mini devices is limited, active areas of the user interface change to make relevant features and commands available. For example, the standard ribbon tabs move to the left to make space for each active tool tab.
Commands that relate to managing, searching, and sharing files are grouped on the left and right ends of the ribbon.
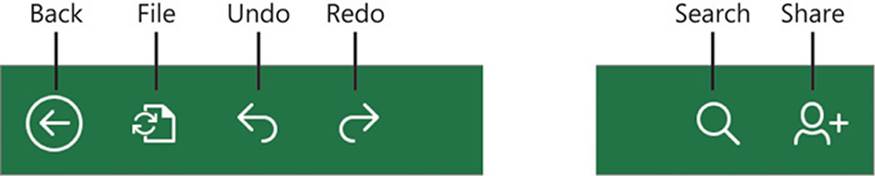
Tapping the Back, File, Search, and Share buttons displays additional screens or menus
The buttons at the left end of the ribbon provide access to the Backstage view and the File menu, and allow you to undo (and redo, if you change your mind) recent actions. The buttons at the right end of the ribbon display options for distributing the file to other people and for either searching the file content (in Word and Excel), or playing a slide show (in PowerPoint).
See Also
For information about searching and sharing, see “Search file content” and “Distribute files” later in this chapter.
Tapping the Back button displays the Backstage view of the app. The Backstage view of each Office for iPad app provides access to commands for connecting to your user account and file storage locations, and for creating and opening files. Some of the information in the Backstage view is shared among all the Office apps that are installed on your iPad. Other information is specific to the app you’re working in.
See Also
For hands-on practice working in the Backstage view, see “Start and activate apps” and “Connect to additional storage locations” in Chapter 2, “Get connected.”
To undo, redo, and repeat recent changes
1. To undo individual changes sequentially, tap the Undo button.
2. To reinstate undone changes, or to repeat the last action, tap the Redo button.
Tip
If you’re using an external keyboard with your iPad, you can press ![]() +Z to undo the last action, and Shift+
+Z to undo the last action, and Shift+![]() +Z to repeat the last action. For other useful keyboard shortcuts, see the Appendix, “Touchscreen and keyboard shortcuts.”
+Z to repeat the last action. For other useful keyboard shortcuts, see the Appendix, “Touchscreen and keyboard shortcuts.”
Manage files
Commands for managing the currently open file (not its content) are available from the File menu that expands when you tap the File button.
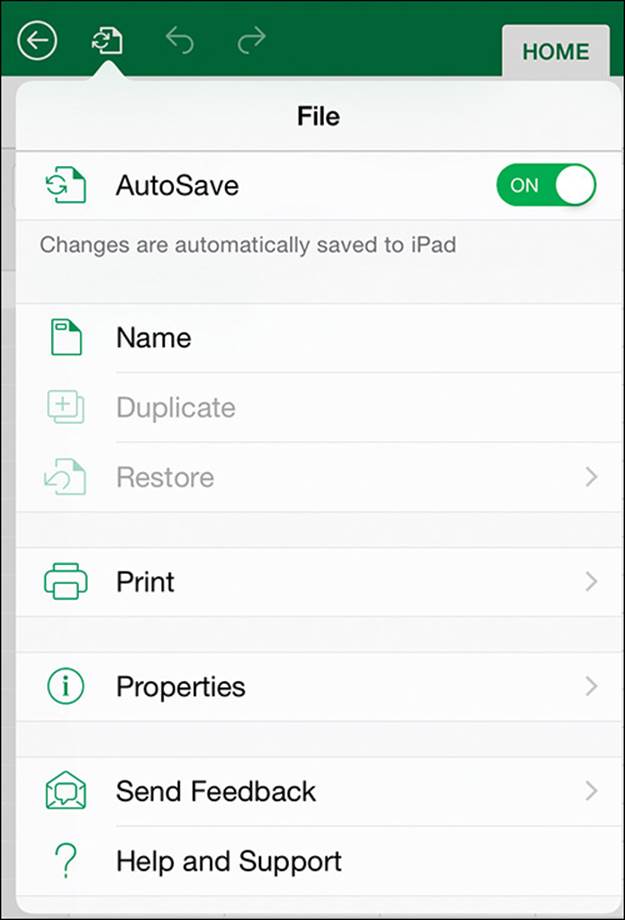
The available commands vary based on the settings configured for saving the file
Important
If the File menu doesn’t display all the commands shown here, tap one of the commands that expands a submenu (such as Print) and then tap Cancel (in the upper-left corner of the submenu) to refresh the display of the File menu.
You control the following functions from the File menu:
![]() AutoSave This function, which is turned on by default, saves a temporary copy of the file at regular intervals.
AutoSave This function, which is turned on by default, saves a temporary copy of the file at regular intervals.
![]() Name This function is available in a new file until the file is saved. Use this function to save a file for the first time in a specific storage location, with a specific name.
Name This function is available in a new file until the file is saved. Use this function to save a file for the first time in a specific storage location, with a specific name.
![]() Duplicate This function is available only in files that have previously been saved. Use this function to create a copy of the current file. You can set the file name and storage location of the copy.
Duplicate This function is available only in files that have previously been saved. Use this function to create a copy of the current file. You can set the file name and storage location of the copy.
Tip
Duplicating a file is an easy way of moving a file to a different location—simply save the duplicate in the new location and then delete the original file.
![]() Restore Periodically you might want to experiment with structural or content modifications, or you might simply find that a change you’ve made didn’t work as intended, and want to undo your changes. The Office for iPad apps provide three levels of change reversion:
Restore Periodically you might want to experiment with structural or content modifications, or you might simply find that a change you’ve made didn’t work as intended, and want to undo your changes. The Office for iPad apps provide three levels of change reversion:
• You can undo one change at a time (and redo that change if you want to).
• You can undo all the changes in the current app session.
• You can roll back to a previous version of the document.
![]() Print Standard printing options include printer selection, print range, and number of copies to print.
Print Standard printing options include printer selection, print range, and number of copies to print.
Tip
In Excel for iPad, the Print command also provides access to layout options such as page size, orientation, and scaling. More extensive layout options are available for Word documents, from the Layout tab of the ribbon.
In addition to these functions, you can display the properties of the current file, send feedback about an app feature that you like or don’t like, and access online Help information about the app.
See Also
For information about the Name and Duplicate functions, see “Create, open, and save files” earlier in this chapter. For information about online Help, see “Get help with Office apps” in Chapter 2, “Get connected.”
The Office for iPad apps display only a few of the available properties for each file, including information such as its location, size, author, and creation date.
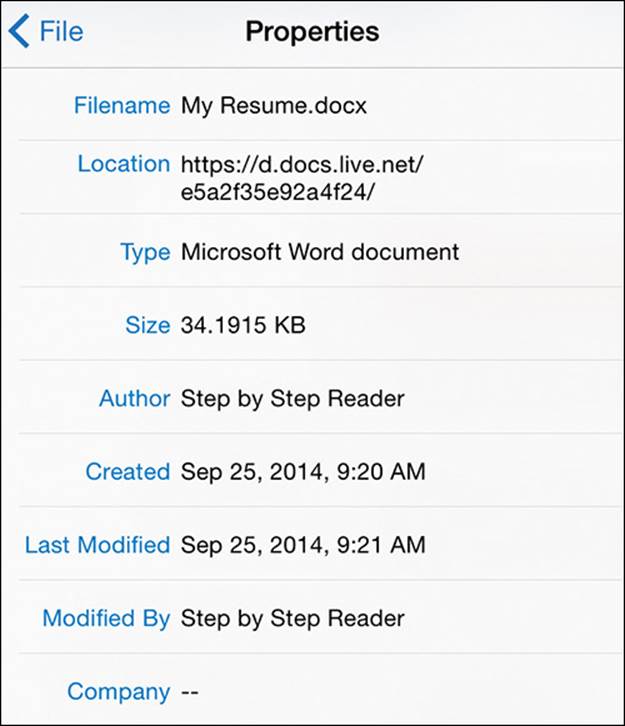
Only basic file properties are displayed
To display file management commands
1. Near the left end of the ribbon, tap the File button.
To stop Office from automatically saving open files
1. Tap the File button.
2. On the File menu, tap the AutoSave slider to change its background to white.
To display file properties
1. Tap the File button, and then tap Properties.
2. Tap anywhere outside of the Properties menu to hide it.
To restore previous file versions
1. To undo all changes made in the current app session, tap the File button, tap Restore, and then tap Restore to Last Opened.
Or
1. To undo changes made in a previous session, tap the File button, tap Restore, and then tap View Version History Online to display the history of changes to the document in your default web browser.
2. Tap the document version you want to restore, and then tap Restore.
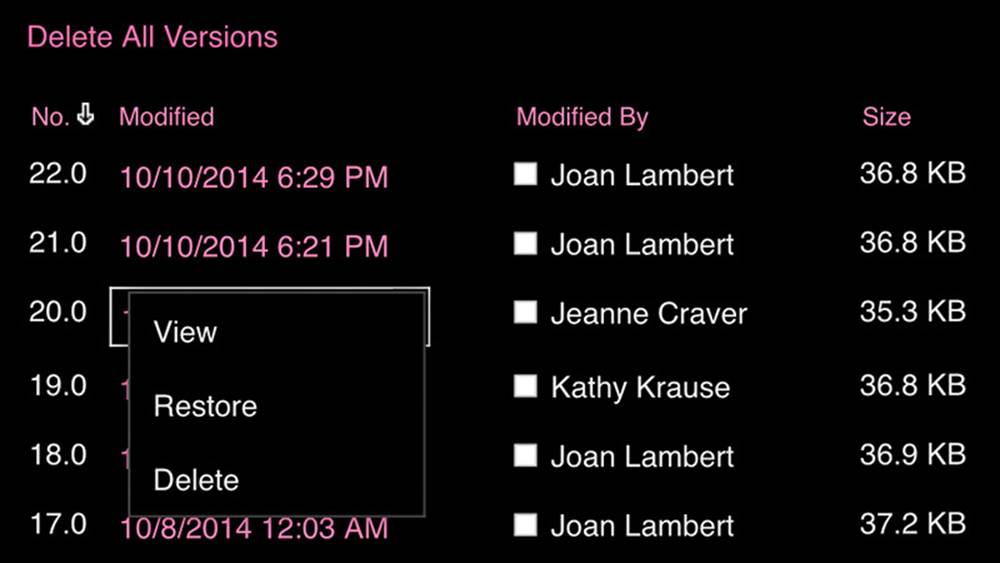
A SharePoint library offers multiple options for working with file versions
Hide and show the on-screen keyboard
When you tap in a location that permits text entry, the on-screen keyboard appears at the bottom of the app window. Elements such as the File menu that expand into the keyboard space are cut off by the keyboard. To display the full menu content, you have to hide the keyboard.
To hide and display the on-screen keyboard:
1. To hide the keyboard, tap the Keyboard key that is located in its lower-right corner.
2. To display the keyboard, tap any text-entry area.
Reconfigure the on-screen keyboard
By default, the on-screen keyboard extends across the bottom half of the screen and covers the content of the file you’re working in. If you prefer to display more of the file content, you can split the keyboard into two halves.
A document open in Word with the split on-screen keyboard
With the active file between the keyboard halves, more of the file content is available while the keyboard is open. You can change the magnification of the file content, but the keyboard halves remain in the same position.
To change the keyboard configuration:
1. To split the keyboard, do one of the following:
• Drag with two fingers from the center of the keyboard to the left and right sides of the screen.
• Press and hold the Keyboard key, and then on the menu that appears, slide to the Split command.
2. To rejoin the keyboard halves, do one of the following:
• Drag the halves with two fingers to the center of the screen.
• Press and hold the Keyboard key, and then on the menu that appears, slide to the Dock & Merge command.
Search file content
You can use the Search function to quickly locate specific information in a document, workbook, or worksheet. (No search functionality is available in PowerPoint for iPad.) After you display the search pane, entering a search term in the Find box immediately displays the number of instances of that term that are in the document or workbook, and selects the first instance. You can move to the next or previous instance by tapping the arrows at the right end of the search pane.
Tip
You can copy a search term from the document or elsewhere and paste it into the Find box to ensure that it is spelled correctly. Tap and hold in the Find box to display the shortcut bar, and then tap Paste.
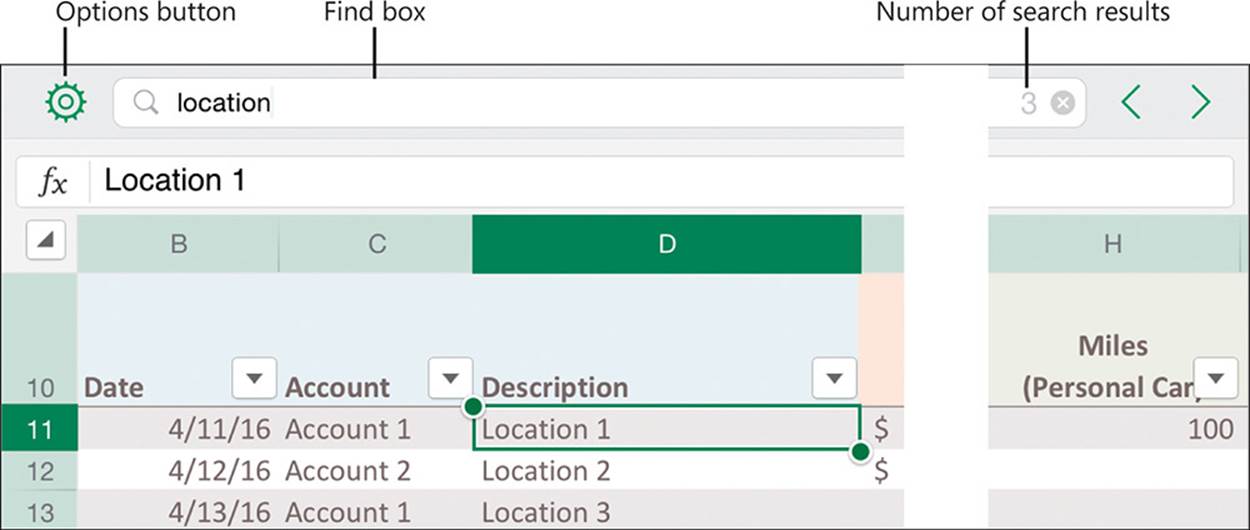
The Search function displays the number of instances of the found term
By default, the Search function locates every instance of the search term. You can restrict the results to only those that exactly match the capitalization of the term as you specify it in the Find box. When searching in an Excel workbook, you can also restrict the search results to cells that contain nothing other than the search term, and restrict the range of the search to the current worksheet.
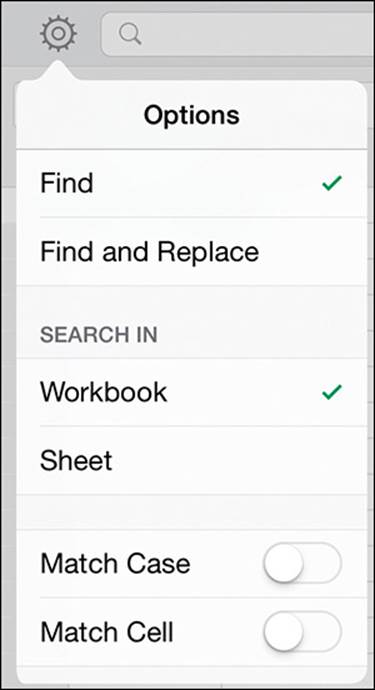
Tapping the Options button in the search pane displays the search options for the current file type
You can also use the Search feature to easily substitute a specific word or phrase for another. When replacing a search term that occurs multiple times in the current file, you can evaluate each search result independently and choose whether to replace it, or you can replace all instances of the search term at the same time.

The Replace box and replacement scope options appear in the search pane
Tip
If you have an external keyboard connected to your iPad, you can move between the Find and Replace boxes by pressing the Tab key. The active box is indicated by the Delete button at the right end of the box.
To search the current file
1. Near the right end of the ribbon, tap the Search button.
2. In the search pane, enter the search term in the Find box.
To move among search results
1. At the right end of the search pane, tap the right arrow to move to the next result.
2. Near the right end of the search pane, tap the left arrow to move to the previous result.
To restrict search results in Word for iPad
1. At the left end of the search pane, tap the Options button.
2. On the Options menu, specify any of the following restrictions:
• Tap the Match Case slider to find only instances of the search term that are capitalized exactly as you enter it in the Find box.
• Tap the Whole Words slider to find only freestanding instances of the search term (not partial words).
Tip
Sliders change from white to green to indicate that the associated function is turned on.
To restrict search results in Excel for iPad
1. At the left end of the search pane, tap the Options button.
2. On the Options menu, specify any of the following restrictions:
• Tap Sheet to search only the current worksheet.
• Tap the Match Case slider to find only instances of the search term that are capitalized exactly as you enter it in the Find box.
• Tap the Match Cell slider to find worksheet cells that contain only the search term.
To replace one or more instances of the search term
1. At the left end of the search pane, tap the Options button.
2. On the Options menu, tap Find and Replace.
3. In the search pane, enter the search term in the Find box and the replacement term in the Replace box.
4. If one or more results are returned, do any of the following:
• Tap All to replace all instances of the search term.
• Tap Replace to replace the current instance of the search term and move to the next instance.
• Tap the right arrow or left arrow to move to the next or previous result without replacing the current instance.
To close the search pane
1. Tap anywhere in the document or workbook content.
Print file content
You can print a document, worksheet, or presentation to a wireless printer on your network. It isn’t necessary to “install” the printer (or drivers); the iPad uses a technology called AirPrint, which is also incorporated into most modern printers. Your iPad will automatically locate available AirPrint printers on your wireless network.
Important
The printing function will locate only printers that support AirPrint technology. A list of these printers is available at support.apple.com/kb/HT4356.
You can configure various options for printing files. The options that are available depend on the file type:
![]() When printing any file, you can select the printer and the number of copies of the file you want to print.
When printing any file, you can select the printer and the number of copies of the file you want to print.
![]() If the selected printer supports double-sided printing, you can turn that function on or off.
If the selected printer supports double-sided printing, you can turn that function on or off.
![]() When printing a document or presentation, you can specify the range of pages or slides you want to print.
When printing a document or presentation, you can specify the range of pages or slides you want to print.
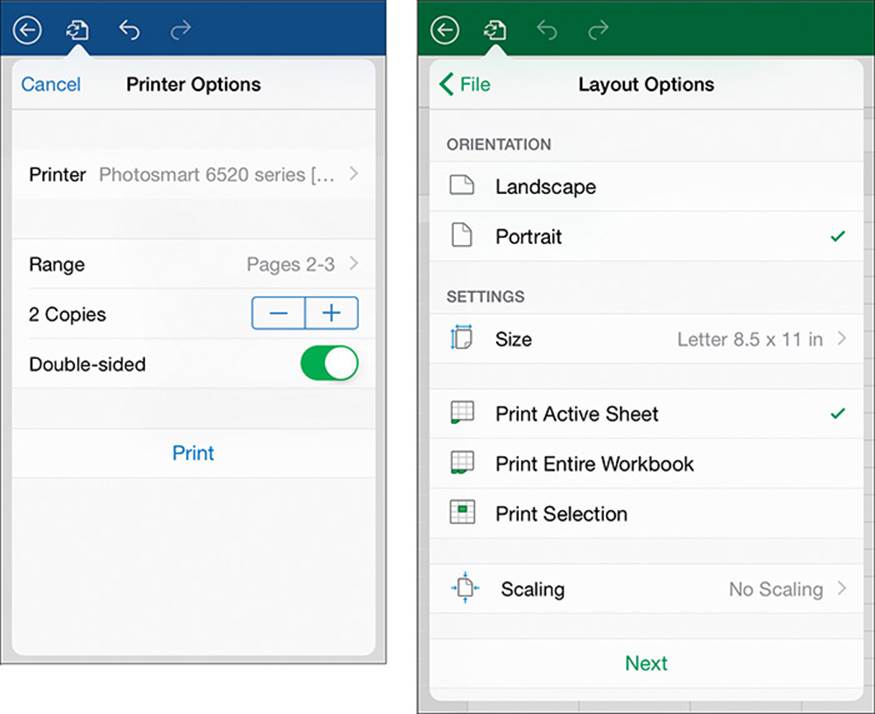
![]() When printing a workbook, you can specify additional layout options, including the page size and orientation, the range of data to print, and whether to fit the entire worksheet, all rows, or all columns on the page.
When printing a workbook, you can specify additional layout options, including the page size and orientation, the range of data to print, and whether to fit the entire worksheet, all rows, or all columns on the page.
Tip
The printing function doesn’t currently offer the opportunity for you to preview the file content before printing it.
Print to AirPrint-enabled printers on your wireless network
To print document or presentation content
1. On the File menu, tap Print.
2. On the Printer Options submenu, tap Printer, and then tap the printer you want to use.
Important
The Print command is available only when a printer is available. If you recently printed from the iPad, the printer might already be selected.
3. If you want to print only part of the document or presentation, tap Range. On the Page Range submenu, scroll to the numbers of the first and last pages or slides in the range you want to print. Then tap Back.
4. If you want to print more than one copy of the document or presentation, tap the plus sign (or minus sign) to specify the number of copies to print.
5. Tap Print to print the document or presentation content according to your specifications.
To print workbook content
1. On the File menu, tap Print.
2. On the
3. Layout Options submenu, do any of the following:
• To change the page orientation, tap Landscape or Portrait.
• To change the paper size from the default, tap Size, tap the paper size you want, and then tap Layout Options.
• To print the currently displayed worksheet, tap Print Active Sheet.
• To print all worksheets in the workbook, tap Print Entire Workbook.
• To print only the currently selected cells, tap Print Selection.
• To shrink or expand the content to fit the paper, tap Scaling. On the Scaling Options submenu, tap Fit Sheet on One Page, Fit All Rows on One Page, or Fit All Columns on One Page. Then tap Layout Options.
4. On the Layout Options submenu, tap Next to display the printer options.
5. On the Printer Options menu, tap Printer, and then select the printer you want to use.
6. If you want to print more than one copy of the workbook, tap the plus sign (or minus sign) to specify the number of copies to print.
7. Tap Print to print the workbook content according to your specifications.
Distribute files
When your file is complete or ready for review, there are several ways in which you can distribute it to other people:
![]() You can print the file or some portion of it.
You can print the file or some portion of it.
![]() You can attach a copy of the original file or a PDF version of the file to an email message.
You can attach a copy of the original file or a PDF version of the file to an email message.
![]() You can send a link to the file in an email message, instant message, or other online communication if the file is stored in a shared location. You have the option of sending a link that permits read-only access or a link that permits read-write access.
You can send a link to the file in an email message, instant message, or other online communication if the file is stored in a shared location. You have the option of sending a link that permits read-only access or a link that permits read-write access.
To attach a file to an email message
1. At the right end of the ribbon, tap the Share button.
2. On the Share menu, tap Email as attachment, and then do one of the following:
• To attach a copy of the current file to the message, tap Send File Type.
• To create a PDF file and attach that file to the message, tap Send PDF.
The Mail app creates an email message with the specified file attached. The message subject is automatically set to the name of the attached file.
3. In the message window, enter the recipient information, modify the subject if you want to, and enter any additional message content.
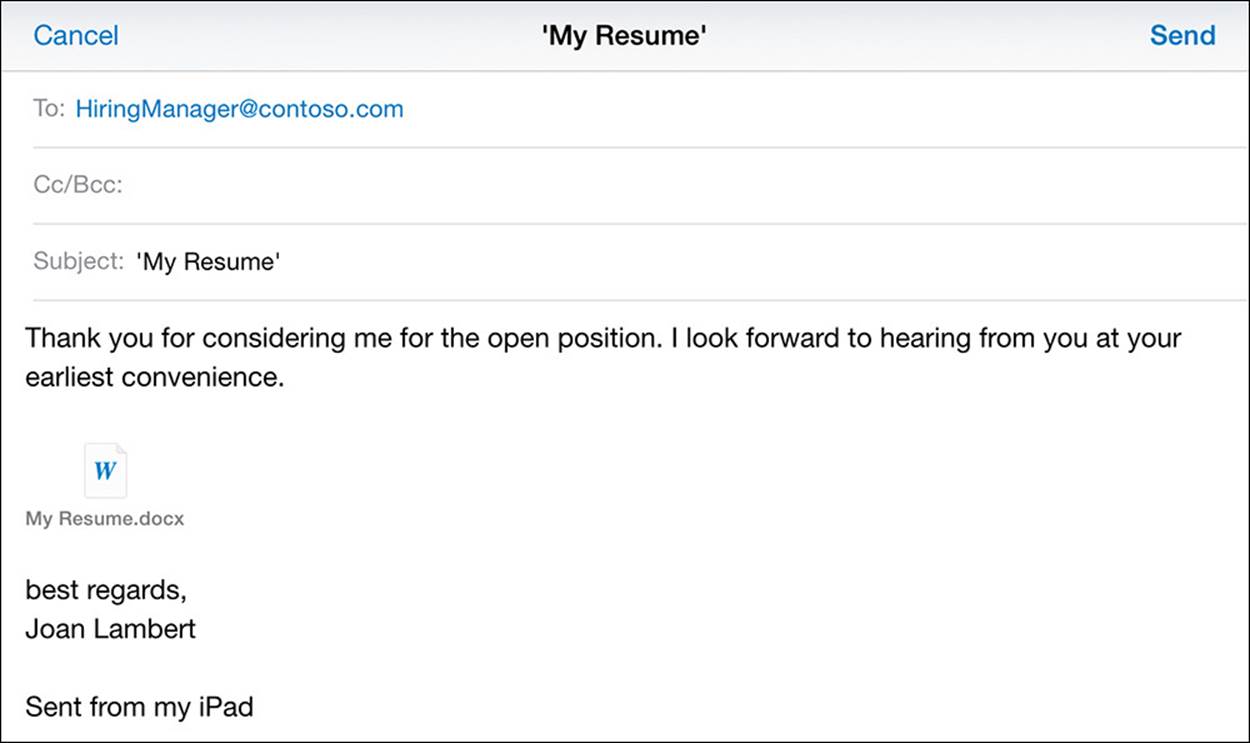
The file attachment is represented by the app icon
4. In the upper-right corner of the message window, tap Send.
To send a file link in an email message
1. Save the file in a shared location such as your OneDrive online storage site or a SharePoint site.
2. At the right end of the ribbon, tap the Share button.
3. On the Share menu, tap Email as Link, and then do one of the following:
• To send a link that permits the recipient to display but not modify the file content, tap View Only.
• To send a link that permits the recipient to display and modify the file content, tap View and Edit.
The Mail app generates an email message that contains the specified link. The subject of the message states that a file has been shared with the recipient.
4. In the message window, enter the recipient information, modify the subject if you want to, and enter any additional message content.
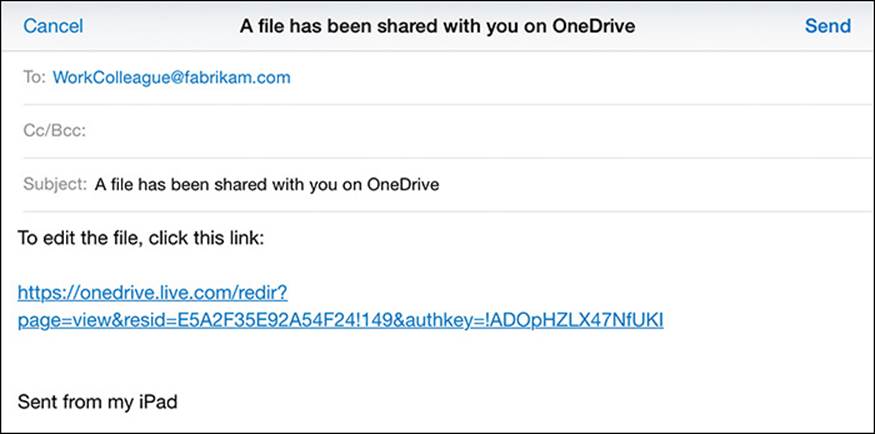
The file link includes the necessary credentials
5. In the upper-right corner of the message window, tap Send.
To create and share a file link
1. Save the file in a shared location such as your OneDrive online storage site or a SharePoint site.
2. At the right end of the ribbon, tap the Share button.
3. On the Share menu, tap Copy Link, and then do one of the following:
• To create a link that permits the recipient to display but not modify the file content, tap View Only.
• To create a link that permits the recipient to display and modify the file content, tap View and Edit.
The app generates a link with the selected permissions. You can paste the link into a message, file, or electronic communication.
Skills review
In this chapter, you learned how to:
![]() Create, open, and save files
Create, open, and save files
![]() Use common Office interface features
Use common Office interface features
![]() Search file content
Search file content
![]() Print file content
Print file content
![]() Distribute files
Distribute files
Practice tasks

The practice files for these tasks are located in the iPadOfficeSBS\Ch03 folder.
Create, open, and save files
Start Excel for iPad, and then perform the following tasks:
1. Create a new workbook based on the Household Budget template.
2. Delete the new workbook instead of saving it for the first time.
3. Create a new workbook based on the Simple To-Do List template.
4. Name the workbook My To-Do List and save it on your iPad.
5. Pin the My To-Do List workbook to the Recent page.
6. From the Open page of the Backstage view, browse to the practice files folder and open the OpenFiles workbook.
7. Save a copy of the OpenFiles workbook on your iPad as My Expenses.
8. From the Recent page, open the My To-Do List workbook.
Use common Office interface features
Open the NavigateOffice document in Word for iPad, and then perform the following tasks:
1. Display each tab of the ribbon and familiarize yourself with the available commands.
2. In the document, tap the image and then the table to activate the corresponding tool tabs.
3. Display the file management commands, and turn off the AutoSave function.
4. Display the file properties, and note the information displayed there.
5. Modify the design of the table, and then undo the change.
6. Add a row to the table, and then add another row by repeating the change.
7. Save a copy of the document in the Ch03 folder as My Travel List.
8. Restore the previous version of the file.
9. Turn on the AutoSave function so that Word automatically saves documents for you.
10. Close the file.
Search file content
Open the SearchReplace document in Word for iPad, and then perform the following tasks:
1. Search for the word Agency and replace all but the first instance with Agent.
2. Search for the word Name, and replace only the second instance with name.
3. Switch to Excel for iPad, and open the SearchScope workbook.
4. Search for the word Itinerary in the following scopes and note the different results:
a. Search only the Vacation Items Checklist worksheet.
b. Search the entire workbook.
c. Search for cells that contain only the search term.
5. Close the search pane.
Print file content
Open the PrintSlides presentation in PowerPoint for iPad, and then perform the following tasks:
1. Print only slide 1.
2. Print the entire presentation, double-sided if your printer has that capability.
3. Switch to Excel for iPad, and open the PrintSheets workbook.
4. On the Vacation Items Checklist worksheet, select cells C4:D22. Then print only the selection.
5. Configure the printer settings to fit all columns on one page, and then print the worksheet.
Distribute files
Open the SendCopy presentation in PowerPoint for iPad, and then perform the following tasks:
1. Send yourself an email message that has a copy of the presentation attached to it. Set the message subject to SBS attachment.
2. Switch to Excel for iPad and open the SendLink workbook.
3. Send yourself an email message that has a link to the workbook in the message body. Set the message subject to SBS file link.
4. Switch to Word for iPad and open the SendReview document.
5. Create a link to the document that permits recipients to display the document, but does not permit them to modify the document content.
6. Send the link to yourself or someone else in any message format other than email.