Microsoft Office for iPad Step by Step (2015)
Part 2: Microsoft Word for iPad
CHAPTER 4 Create professional documents
CHAPTER 5 Add visual elements to documents
CHAPTER 6 Enhance document content
4. Create professional documents
In this chapter
![]() Create documents from templates
Create documents from templates
![]() Enter text in documents
Enter text in documents
![]() Move, copy, and delete text
Move, copy, and delete text
![]() Align, space, and indent paragraphs
Align, space, and indent paragraphs
![]() Structure content manually
Structure content manually
![]() Change the appearance of text
Change the appearance of text
The development and strong adoption of the Office for iPad apps signal the start of an important new era in which the iPad is evolving from a device that is primarily used for entertainment and other content consumption purposes to a device that supports content creation and can serve as a useful business tool.
Word is the undisputed frontrunner among the Office apps. Entering and editing text in a Word document can be more challenging on an iPad than on a computer, because the iPad doesn’t have an external keyboard for fast text entry and a mouse to navigate within or rearrange content. However, you can easily connect an external Bluetooth keyboard to your iPad if you plan to generate a lot of text from scratch.
Practice files
For this chapter, use the practice files from the iPadOfficeSBS\Ch04 folder. For practice file download instructions, see the Introduction.
You can create a simple document with a couple of taps. Whether you create a blank document or start from a prepopulated template, the importance of the document is in the words and images it contains. You can enter text in a document by tapping, typing, or dictating. Then you can provide structure and meaning by formatting the text in various ways.
This chapter guides you through procedures related to creating Word documents, entering and manipulating text, formatting paragraphs, structuring content by using line breaks and tabs, and applying character formats, text effects, and predefined styles to text.
The Word feature set
As the platforms we work on have expanded from computers to tablets to smartphones, Microsoft has developed versions of Word and other programs in the Microsoft Office suite for each of these platforms. The experience of working in each version is similar, but the functionality in some versions is restricted by the limitations of the platform. The good news is that they all work with the same files.
Here is a brief comparison of the features you can use in each version. If you can’t perform a specific task in a document on one platform, you can put the finishing touches on the document in a different version of Word.
Word for iPad features
After you sign in by using a Microsoft account, you can do the following:
![]() Open and edit existing documents and document templates.
Open and edit existing documents and document templates.
![]() Create new documents, modify document content, and manually or automatically save changes.
Create new documents, modify document content, and manually or automatically save changes.
![]() Connect to storage locations, and open, edit, and save documents from SharePoint, OneDrive, and Dropbox sites.
Connect to storage locations, and open, edit, and save documents from SharePoint, OneDrive, and Dropbox sites.
![]() Apply a limited number of fonts and character formats to text, and lay out text horizontally or vertically.
Apply a limited number of fonts and character formats to text, and lay out text horizontally or vertically.
![]() Apply a standard set of paragraph styles and character styles, or the styles that are saved in the active document.
Apply a standard set of paragraph styles and character styles, or the styles that are saved in the active document.
![]() Create lists that use built-in bullet styles and numbering styles.
Create lists that use built-in bullet styles and numbering styles.
![]() Create and format tables, shapes, and text boxes.
Create and format tables, shapes, and text boxes.
![]() Insert and format locally stored photos.
Insert and format locally stored photos.
![]() Provide reference information by using hyperlinks and footnotes.
Provide reference information by using hyperlinks and footnotes.
![]() Configure page size and margins within a limited set of options.
Configure page size and margins within a limited set of options.
![]() Insert page breaks.
Insert page breaks.
![]() Insert and modify headers, footers, and page numbers.
Insert and modify headers, footers, and page numbers.
![]() Track, review, and manage changes and comments.
Track, review, and manage changes and comments.
![]() Check spelling as you type.
Check spelling as you type.
![]() Set and modify tab stops on the ruler.
Set and modify tab stops on the ruler.
![]() Display document statistics including page count, word count, and character count.
Display document statistics including page count, word count, and character count.
![]() Coauthor documents that are stored online, or work offline with local copies.
Coauthor documents that are stored online, or work offline with local copies.
![]() Send a document, a link to a document, or a PDF of a document by email.
Send a document, a link to a document, or a PDF of a document by email.
![]() Print documents (with limited print options).
Print documents (with limited print options).
The following premium features require that you sign in by using an account that is associated with a qualified Office 365 subscription:
![]() Insert section breaks, and configure text in up to three columns.
Insert section breaks, and configure text in up to three columns.
![]() Customize headers and footers for different pages.
Customize headers and footers for different pages.
![]() Change page orientation.
Change page orientation.
![]() Track and review changes.
Track and review changes.
![]() Add custom colors to shapes.
Add custom colors to shapes.
![]() Insert and edit WordArt.
Insert and edit WordArt.
![]() Add shadows and reflection styles to pictures.
Add shadows and reflection styles to pictures.
![]() Add and modify chart elements.
Add and modify chart elements.
If you find that you need to perform tasks within a Word document that aren’t available in Word for iPad, you can save the document to a shared storage location and edit it by using Word Online or a desktop version of Word.
Word Online features
Word Online has greater functionality than Word for iPad in some areas and lesser functionality in others. You can use Word Online to do the following:
![]() Create documents based on professionally designed templates that are available from the Office website.
Create documents based on professionally designed templates that are available from the Office website.
![]() Display (but not edit) citations, bibliographies, tables of contents, and indexes.
Display (but not edit) citations, bibliographies, tables of contents, and indexes.
![]() Translate document content.
Translate document content.
![]() Apply theme fonts and theme colors.
Apply theme fonts and theme colors.
![]() Provide reference information in endnotes.
Provide reference information in endnotes.
![]() Insert pictures from local and online sources.
Insert pictures from local and online sources.
![]() Mark comments as done.
Mark comments as done.
![]() Coauthor documents in real time (with presence indicators and real-time changes).
Coauthor documents in real time (with presence indicators and real-time changes).
![]() Use the Tell Me search feature to quickly find a way to accomplish tasks.
Use the Tell Me search feature to quickly find a way to accomplish tasks.
For more information about Word Online, visit technet.microsoft.com/en-us/library/word-online-service-description.aspx.
Word desktop version features
The desktop versions of Word have the most functionality. You can use Word 2011 on a Mac computer or Word 2013 on a computer running Windows to do the following:
![]() Create documents based on professionally designed templates from within the product.
Create documents based on professionally designed templates from within the product.
![]() Copy and paste content without loss of formatting.
Copy and paste content without loss of formatting.
![]() Create custom bullet styles and numbering styles.
Create custom bullet styles and numbering styles.
![]() Insert and format page borders and line numbers.
Insert and format page borders and line numbers.
![]() Create and modify embedded objects, chart data, and SmartArt graphics.
Create and modify embedded objects, chart data, and SmartArt graphics.
![]() Create and modify captions and citations.
Create and modify captions and citations.
![]() Check spelling and grammar.
Check spelling and grammar.
![]() Find and replace styles and special characters.
Find and replace styles and special characters.
![]() Use gridlines and guides to align document content.
Use gridlines and guides to align document content.
![]() Apply and modify document parts and thematic elements such as content controls, color schemes, font schemes, and preset graphic effects.
Apply and modify document parts and thematic elements such as content controls, color schemes, font schemes, and preset graphic effects.
![]() Insert local and online videos into a document.
Insert local and online videos into a document.
![]() Create and modify advanced document elements such as AutoText, cover pages, bibliographies, tables of contents, tables of authorities, indexes, equations, and watermarks.
Create and modify advanced document elements such as AutoText, cover pages, bibliographies, tables of contents, tables of authorities, indexes, equations, and watermarks.
![]() Compare, merge, and combine documents.
Compare, merge, and combine documents.
![]() Run macros and use advanced controls such as ActiveX controls, embedded OLE objects, and signature lines.
Run macros and use advanced controls such as ActiveX controls, embedded OLE objects, and signature lines.
![]() Set and save zoom levels, display different views of documents, work in split windows, or open a single document in multiple windows.
Set and save zoom levels, display different views of documents, work in split windows, or open a single document in multiple windows.
![]() Install ancillary apps such as dictionaries, map generators, translation tools, search tools, templates, and image galleries.
Install ancillary apps such as dictionaries, map generators, translation tools, search tools, templates, and image galleries.
![]() Create custom bullet styles and numbering styles.
Create custom bullet styles and numbering styles.
![]() Perform mail merge operations.
Perform mail merge operations.
![]() Use advanced document-protection features such as Information Rights Management (IRM) and password protection.
Use advanced document-protection features such as Information Rights Management (IRM) and password protection.
![]() Print documents with full printing options, and create and modify print styles.
Print documents with full printing options, and create and modify print styles.
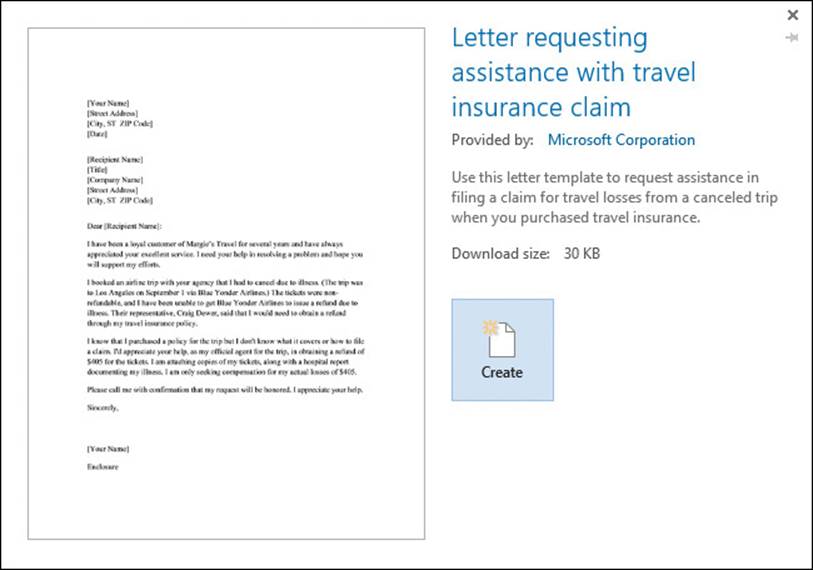
Create documents from templates
It’s common to create new documents from scratch by first creating a new, blank document and then adding content.
If you’re creating a more complicated document, you can often save time and effort by starting from a template. When working in Word for iPad you can create common documents such as brochures, letters, newsletters, resumes, invoices, flyers, and syllabi from any of the built-in templates.
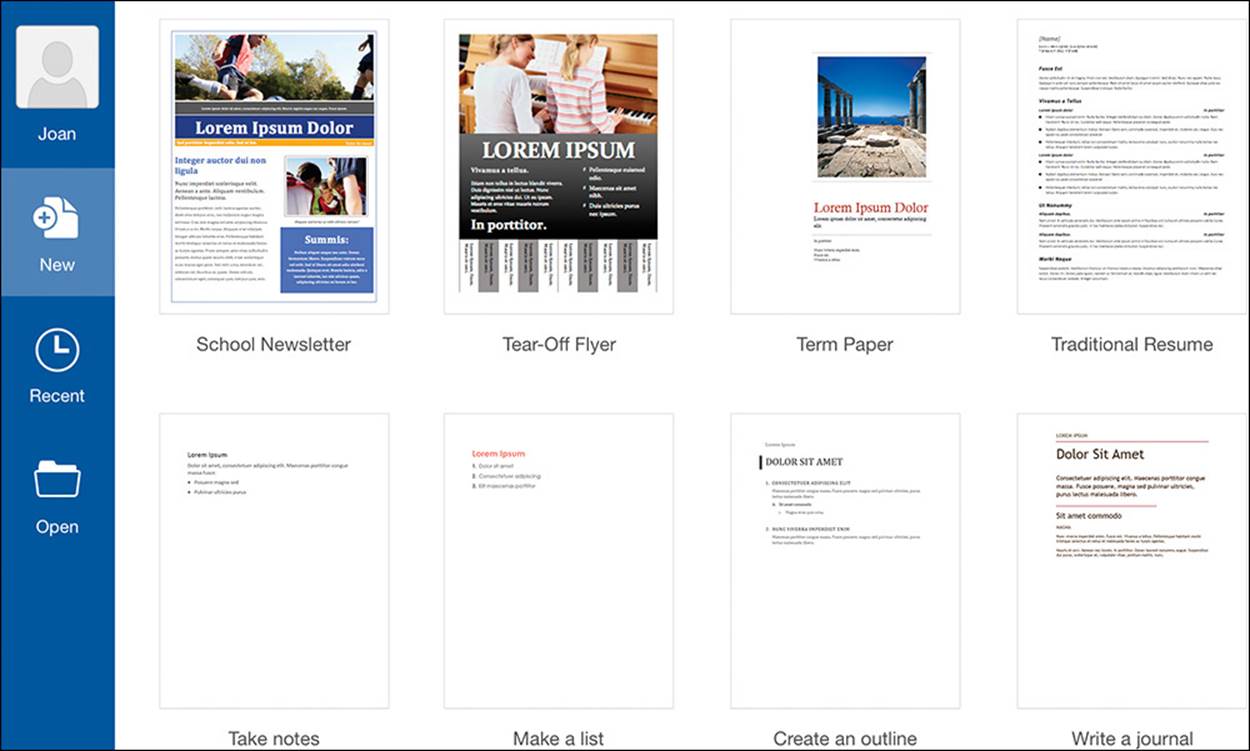
Templates include preformatted placeholder text and images
 Tip
Tip
At the time of this writing, Word for iPad includes 23 built-in templates. Additional templates might be made available with later releases of Word for iPad.
The only templates available from the New page are those that are installed with the Word for iPad app. Hundreds of other templates are available for Word Online and the desktop versions of Word. If you create a document based on one of these templates and save the document to a shared storage location, you can then open and edit the document on your iPad.
You can access templates for Word Online from your iPad by using Safari or another web browser to visit store.office.live.com/templates/templates-for-Word.
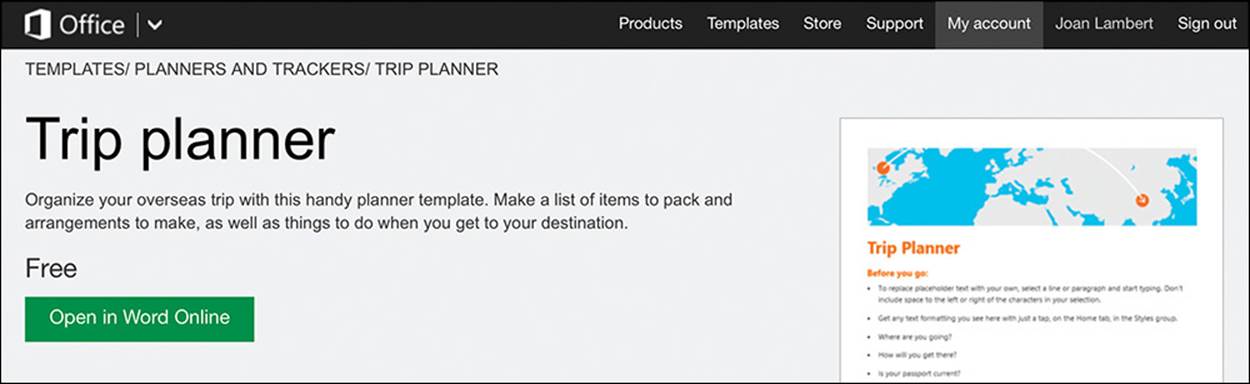
You can preview information about any template by tapping its thumbnail
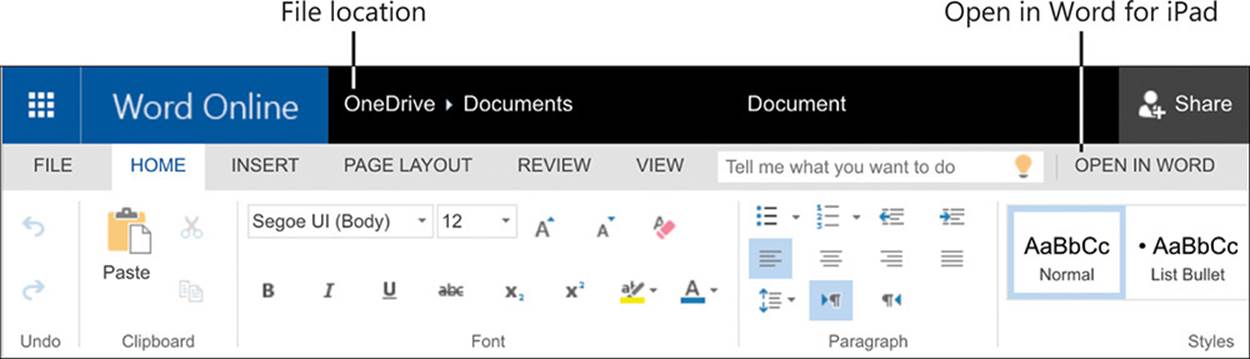
Word Online and Word for iPad interact nicely on your iPad, so the process of creating a document from a Word Online template is reasonably simple. When you open a template, Word Online creates a document based on that template and automatically saves the document to the OneDrive associated with your user account. You can then open the document in Word for iPad by tapping a button in the Word Online window.
You can open a document based on a Word Online template on your iPad
 Important
You perform many tasks in Word for iPad, Excel for iPad, and PowerPoint for iPad by using the same processes. Common processes include those for giving commands in the Office user interface and for opening, saving, searching, and distributing files. For more information, see Chapter 3, “Create and manage files.”
Templates for Word 2011 and Word 2013 are available from the New page of the Backstage view of those programs. To work with a document based on a desktop template on your iPad, you must create the document on a computer and save it to a shared storage location. Then you can browse to that location from the Open page of the Backstage view of Word for iPad.
To create a blank document
1. In the Backstage view, on the File bar, tap New.
2. On the New page, tap New Blank Document.
To create a document from a built-in template
1. In the Backstage view, on the File bar, tap New.
2. Locate and then tap the thumbnail of the document template you want to use.
To create a document from an online template
1. In Safari or another web browser, go to office.microsoft.com.
2. On the link bar at the top of the page, tap Templates. Then on the Templates for Office Online page, in the Browse by Product list, tap Word.
Tip
You can filter templates for Office Online either by product or by category. The steps for creating a workbook from an Excel Online template or creating a presentation from a PowerPoint Online template are the same as those described here.
3. On the Templates for Word page, locate the document template you want to use.
4. Tap the thumbnail of any document template to display its information page. On the information page of the template you want to use, tap Open in Word Online.
5. If prompted to do so, provide the credentials of the user account that is associated with your OneDrive.
Word Online displays the location where it will save the document.
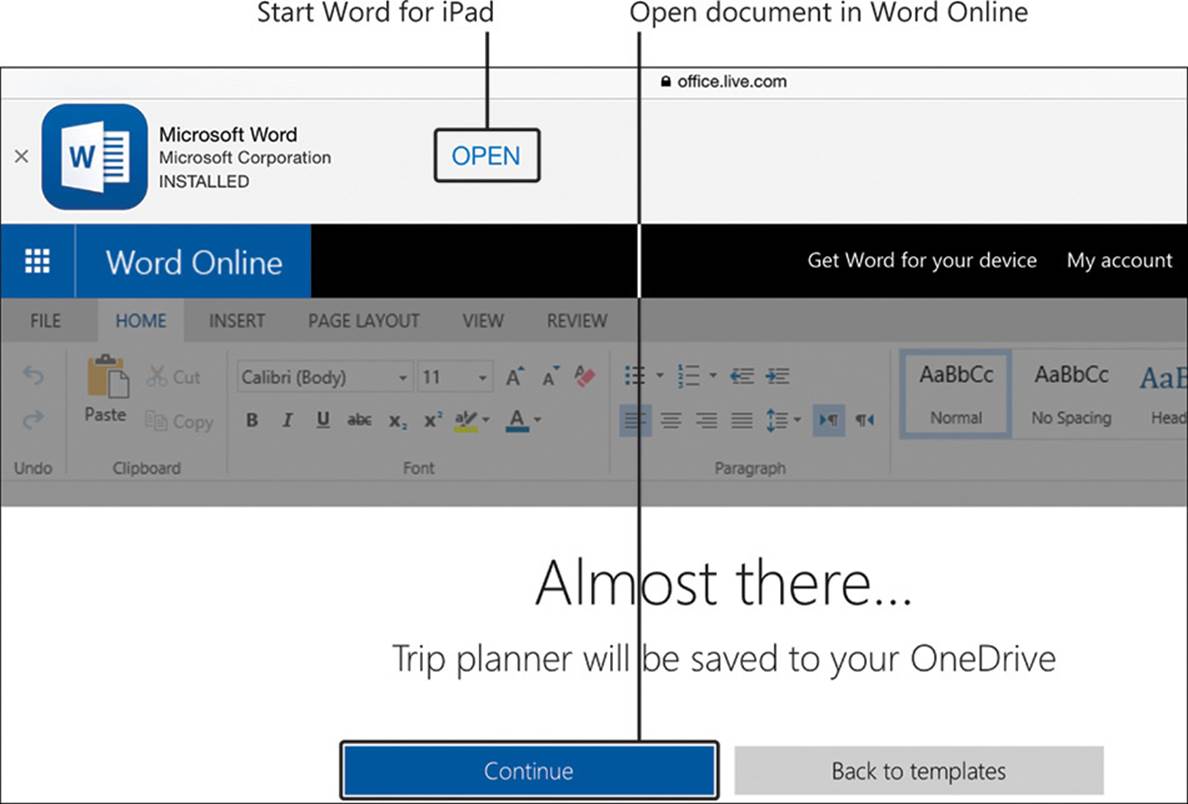
Word Online automatically saves a document based on the template to your OneDrive
Important
Word Online detects that Word for iPad is installed on your iPad. Tapping Open in the banner above the Word Online window opens the Word app window but doesn’t provide a way of working with the template.
6. To save the document to the specified location and open it in Word Online, tap Continue.
7. On the Word Online ribbon, to the right of the tabs and the Tell Me box, tap Open in Word. If prompted to do so, enter your OneDrive credentials.
To create a document based on a Word 2013 template
1. On a computer running Windows, start Word 2013.
2. On the New page of the Backstage view, tap or click the thumbnail of any template to display a preview and additional information.
Desktop versions of Word provide access to hundreds of templates
3. On the preview page of the template you want to use, tap or click Create.
4. Save the document to a shared storage location that you can access from Word for iPad, such as a OneDrive site or SharePoint site.
5. Open the document from within Word for iPad.
To create a document based on a Word 2011 template
1. On a Mac computer, start Word 2011 and display the Document Gallery.
Tip
You can open the Document Gallery by clicking New From Template on the File menu.
2. In the gallery, click the thumbnail of the template you want to use for your document. The template will appear in the preview pane to the right of the gallery.
3. In the preview pane, choose a color scheme or a font scheme if you want to change the defaults, and then click Choose.
4. On the File menu, click Share, choose a shared storage location that you can access from your iPad, and then complete the process of saving the document to that location.
5. On your iPad, start Word and then open the document from the shared storage location.
Tip
If you’re using an external keyboard with your iPad, you can perform many operations by using keyboard shortcuts. For a complete list of keyboard shortcuts, see the Appendix, “Touchscreen and keyboard shortcuts.”
Enter text in documents
The Office for iPad apps were specifically engineered for the screen area and touch-input capabilities of the iPad. There are many ways to add text content to a document when you are using Word for iPad. You can create new text by tapping the on-screen keyboard, typing on an external keyboard, or dictating text. By installing additional on-screen keyboards on your iPad, you can use the on-screen keyboard to enter letters from multiple languages, emoticons, and a huge variety of iconic images into a document.
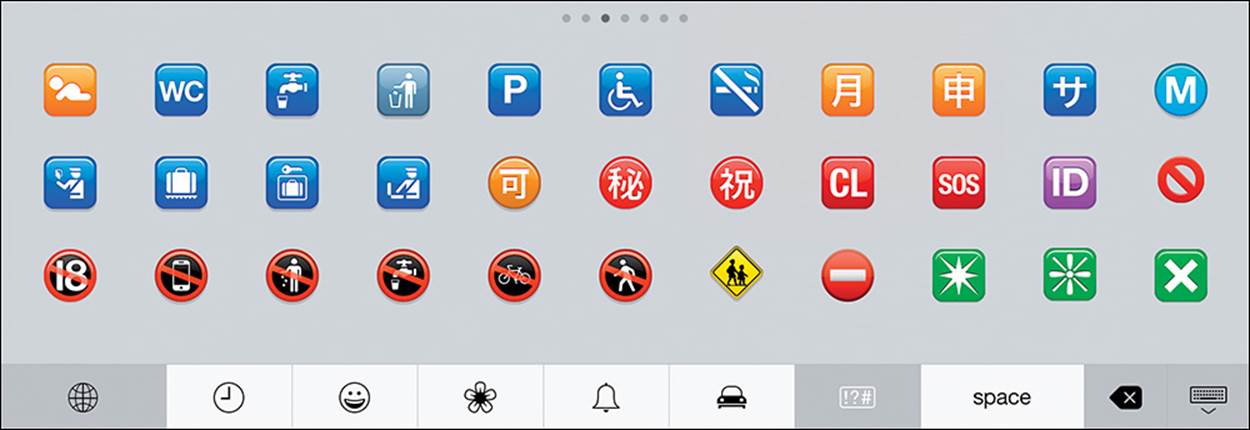
The Emoji keyboard includes nearly 900 emoticon and icon images
Entering a lot of text from the on-screen keyboard can be an arduous task. To simplify the process and tap fewer times to achieve the result you want, you can use the shortcuts described in the following table.
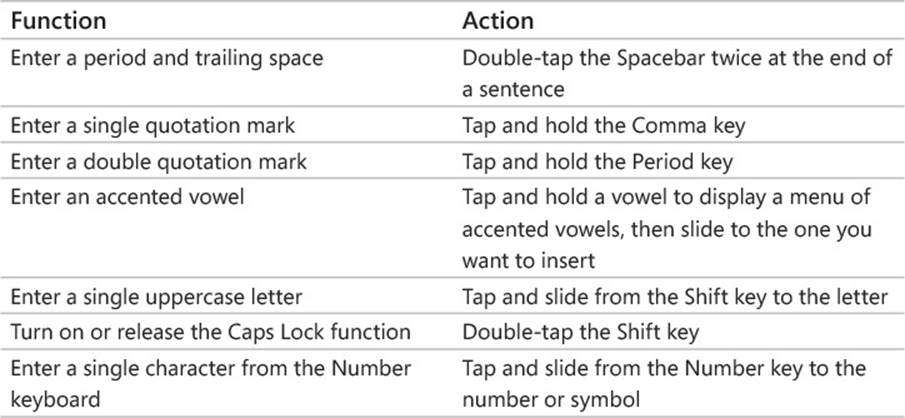
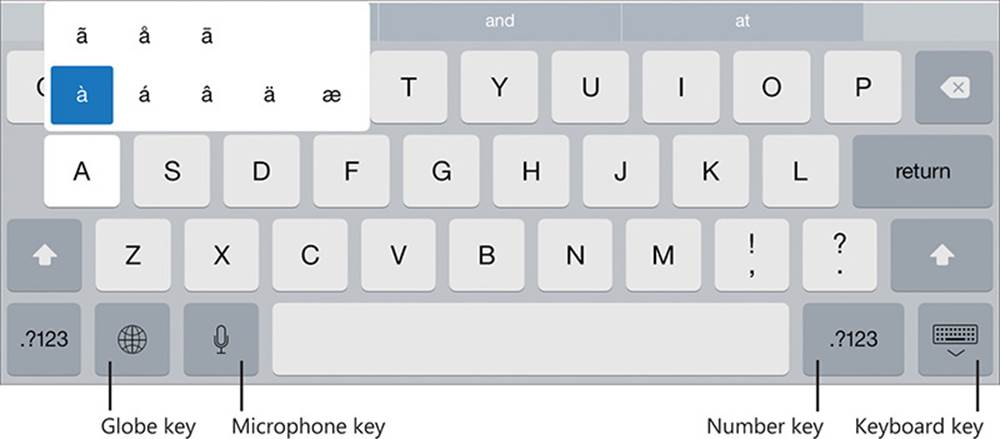
The on-screen keyboard has some handy shortcuts
Given the limitations of tapping and typing text on a small-form device such as the iPad, the Siri dictation function partners smartly with Word for iPad to provide a simple method of quickly entering a lot of text. It doesn’t take much time to become accustomed to dictating at the correct volume and speed, which you can determine by trial and error.
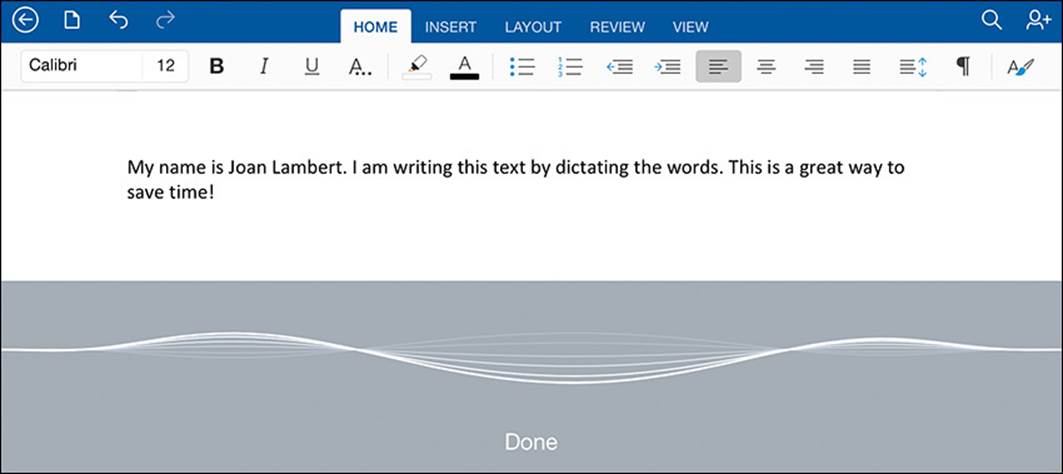
In a Word document, the dictation pane replaces the on-screen keyboard and displays the level of audio input detected
Important
The dictation function and the microphone key are available only when Siri is turned on and your iPad is connected to the Internet, and only in specific languages. You can turn on Siri from the General page of the Settings app. You can find a list of supported languages atwww.apple.com/ios/feature-availability/#quickType-keyboard-dictation.
The following tips can help you successfully dictate text into a Word document:
![]() Speak clearly and enunciate each individual word.
Speak clearly and enunciate each individual word.
![]() Don’t worry about missing spaces or mistaken words while dictating. You can clean up errors manually after entering the text.
Don’t worry about missing spaces or mistaken words while dictating. You can clean up errors manually after entering the text.
![]() Bookmark errors by speaking a specific word (such as mistake) or describing the required correction (such as delete very) so you can easily find them later.
Bookmark errors by speaking a specific word (such as mistake) or describing the required correction (such as delete very) so you can easily find them later.
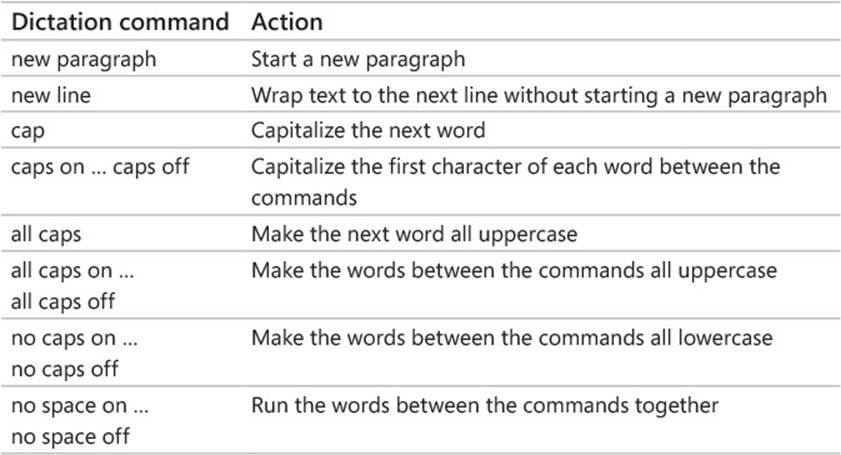
![]() Control text input by speaking the specific commands shown in the following table, which are recognized by the dictation engine.
Control text input by speaking the specific commands shown in the following table, which are recognized by the dictation engine.
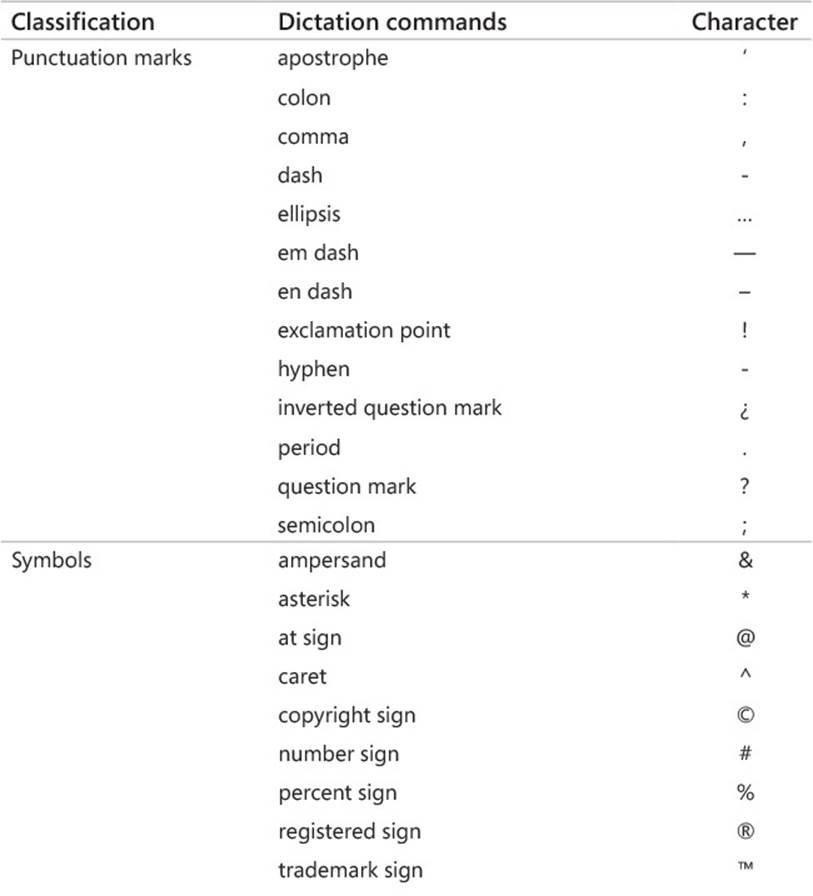
![]() Insert non-alphanumeric characters by speaking these specific commands recognized by the dictation engine.
Insert non-alphanumeric characters by speaking these specific commands recognized by the dictation engine.
Tip
Speaking a punctuation mark command to end a word, phrase, or sentence inserts the punctuation mark and a space.

Tip
Of the symbol commands, only end quote (or unquote) enters a trailing space. Some symbols are produced by multiple commands, but others aren’t. For example, open paren, left paren, open parenthesis, left parenthesis, open parentheses, and left parentheses all enter (, but only percent sign enters %. Speaking percent symbol, percentage sign, or percentage symbol enters the spoken words.
Magnify the cursor position
Tapping to position the cursor can be an inexact practice, and it can be difficult to tap in exactly the right place. Word for iPad includes a convenient tool that can help with this. When you tap and do not lift your finger (tap and hold), a magnifying glass appears and displays a close-up view of the cursor location. When you lift your finger, a shortcut bar appears.

Magnifying the cursor location
To enter text from a keyboard
1. Position the cursor where you want to insert the text.
2. Enter text by tapping the on-screen keyboard.
Or
If you’re using an external keyboard, enter text by typing on the keyboard.
 See Also
For information about the on-screen keyboard, see “Configure iPad and Office app settings” in Chapter 1, “Office for iPad basics,” and the sidebar “Reconfigure the on-screen keyboard” in Chapter 3, “Create and manage files.”
To switch among installed keyboards
1. Near the lower-left corner of the on-screen keyboard, tap the Globe key until the keyboard you want appears.
Tip
When you are switching to an alphabetic keyboard, the keyboard name appears briefly on the Spacebar.
To dictate text into a document
1. Display the on-screen keyboard.
2. On the on-screen keyboard, to the left of the Spacebar, tap the microphone key.
3. Speak clearly at a high enough volume to change the flat line in the dictation pane to a wave form.
4. When you finish, tap Done.
Tip
Take care that you don’t cover the iPad’s microphone or microphones while dictating. These are located in different places depending on the model of your iPad. An iPad Air has dual microphones located on the edge and back of the iPad adjacent to the front-facing camera. An iPad Air 2 has dual microphones located on the edge and back of the iPad adjacent to the rear-facing camera.
Check spelling
Even the most accurate typists occasionally make mistakes, and it’s much easier to do so when you are entering text on a small on-screen keyboard or by using a method such as dictation. Word for iPad includes basic proofing tools to help ensure that your document content is free of spelling errors. These tools are available from the Review tab.
Tapping the Proofing Tools button located at the left end of the Review tab displays the Proofing Tools menu, from which you can select a proofing language and turn on or off the automatic checking of spelling as you enter text in the document.
Move, copy, and delete text
During the process of entering text in a document, there will be times when you want to move or copy content from one area of a document to another, or repurpose content that you already created elsewhere. You can reuse existing text sourced from the same document, another file, a website, or any electronic resource from which content can be copied.
There are five standard operations involved in moving or reusing text and other document content:
![]() Selecting Choosing the content you want to work with
Selecting Choosing the content you want to work with
Tip
Selecting is often inaccurately referred to as highlighting, because of the colored shading that appears over the selected content. Highlighting is applying a translucent screen over text.
![]() Dragging Moving selected content by sliding your finger on the screen
Dragging Moving selected content by sliding your finger on the screen
![]() Cutting Storing selected content on the Clipboard and deleting it from its current location
Cutting Storing selected content on the Clipboard and deleting it from its current location
![]() Copying Storing selected content on the Clipboard without deleting it from its current location
Copying Storing selected content on the Clipboard without deleting it from its current location
![]() Pasting Inserting content from the Clipboard into the file
Pasting Inserting content from the Clipboard into the file
You can also simply delete text that you no longer need.
The Clipboard
The Clipboard is a storage area for cut and copied content. The Clipboard can store brief or lengthy content segments that can include text, images, formatted tables, worksheet data, and any other type of content you can cut or copy from an Office document. Unlike the Clipboard in the desktop versions of Office, in Office for iPad apps the Clipboard stores only one item at a time, and you can’t display the Clipboard contents. You can, however, access the Clipboard contents from any Office for iPad app, which enables you to copy or move content from one app to another.
Word for iPad displays a handy shortcut bar when you select text. You can perform an operation on the selected text by tapping a command on the shortcut bar.
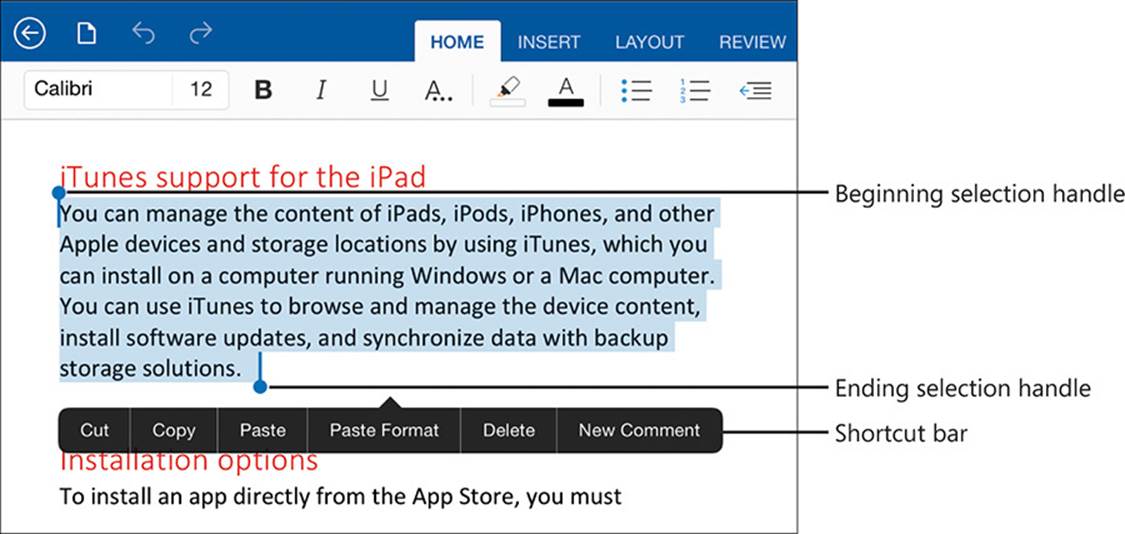
A document with a paragraph selected and the shortcut bar displayed
Because you can have only one document open at a time in Word for iPad, moving or copying content from one document to another isn’t quite as simple as it is in the desktop versions of Word, but the basic process is the same.
To select text
1. To select a word, double-tap the word.
2. To select a paragraph, triple-tap anywhere in the paragraph.
Tip
Selecting any amount of text displays selection handles on each end of the selection, and displays a shortcut bar featuring actions that are relevant to the selection.
3. To expand or contract a selection, drag the selection handles.
4. To select all the content in a document, tap and hold anywhere in the document, and then tap Select All on the shortcut bar.
Paste options
By default, when you paste text into another location, it retains its original formatting. To change the formatting of pasted text, tap the Paste Options button that appears when you paste the text.
The options on the Paste Options menu vary based on the content you’re pasting and the destination formatting. The four primary options when pasting text are as follows.
![]() Keep Source Formatting This is the default option. It retains the original formatting of the pasted content.
Keep Source Formatting This is the default option. It retains the original formatting of the pasted content.
![]() Use Destination Theme This option applies the theme, fonts, colors, and effects of the destination document to the pasted content.
Use Destination Theme This option applies the theme, fonts, colors, and effects of the destination document to the pasted content.
![]() Match Destination Formatting This option merges the pasted content with the destination styles.
Match Destination Formatting This option merges the pasted content with the destination styles.
![]() Keep Text Only This option inserts unformatted text.
Keep Text Only This option inserts unformatted text.
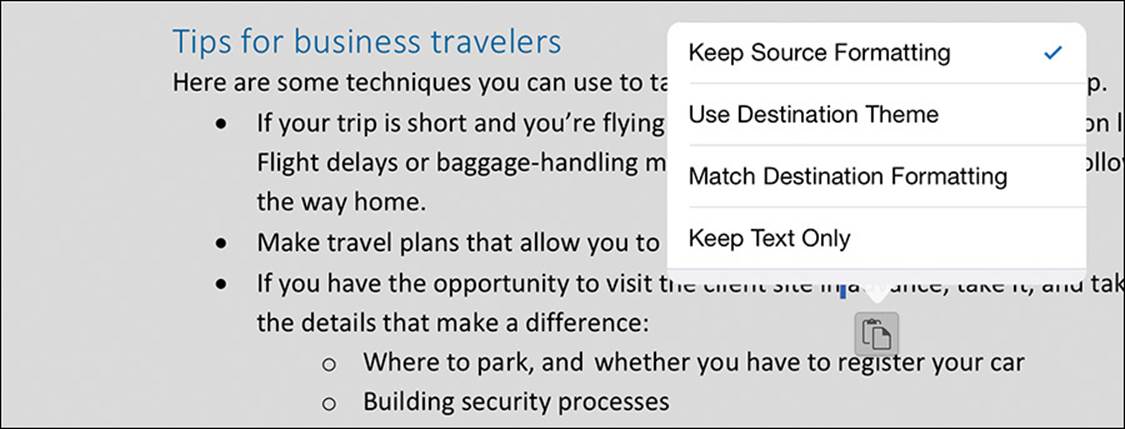
The Paste Options button and menu
Alternatively, you can paste only the formatting of the copied text by using the Paste Format command on the shortcut bar.
To move text to a different location in the same document
1. Select the text you want to move.
2. To move the text to a nearby location, tap and hold the selection and then slide your finger on the screen until the cursor is in the target location.
Or
To move the text to a farther location, tap Cut on the shortcut bar. Double-tap the target location, and then tap Paste on the shortcut bar.
Tip
If you’re using an external keyboard with your iPad, you can press ![]() +C to copy the selected text to the Clipboard,
+C to copy the selected text to the Clipboard, ![]() +X to cut the selected text to the Clipboard, and
+X to cut the selected text to the Clipboard, and ![]() +V to paste the most recent Clipboard content.
+V to paste the most recent Clipboard content.
To copy text to a different location in the same document
1. Select the text you want to copy.
2. Tap Copy on the shortcut bar to copy the selected text to the Clipboard.
3. Double-tap the target location, and then tap Paste on the shortcut bar.
To move or copy text to a different document
1. Select the text you want to move or copy.
2. On the shortcut bar, tap Cut if you want to move the text, or Copy if you want to replicate it.
3. If the AutoSave feature is turned off, tap the File button, and then tap Save.
4. Tap the Back button. From the Backstage view, open the target document.
5. Double-tap the target location, and then tap Paste.
To delete text
1. Select the text you want to delete.
2. Do one of the following:
• Tap Delete on the shortcut bar.
• Tap the Backspace key on the on-screen keyboard.
• If you’re using an external keyboard, press the Backspace key.
Align, space, and indent paragraphs
You create paragraphs by entering text and then tapping Return. A paragraph usually consists of at least three sentences but can be as short as a single sentence or even a single word. Every paragraph ends with a paragraph mark, which looks like a backward P (¶). Paragraph marks and other structural characters (such as spaces, line breaks, and tabs) are usually hidden, but you can display them by tapping the Show/Hide ¶ button (labeled with a paragraph mark) on the Home tab of the ribbon. Sometimes displaying these hidden characters makes it easier to accomplish a task or understand a structural problem.
See Also
For information about working with hidden structural characters, see “Structure content manually” later in this chapter.
You can change the appearance of a paragraph by modifying its left and right edge alignment and vertical spacing from the Home tab of the ribbon, and its left and right indents from the Home tab or from the ruler. The ruler is usually hidden to provide more space for the document content, but you can display it by tapping the Ruler slider on the View tab of the ribbon.

The left indent can be set from the Home tab or the ruler
See Also
For information about displaying the ribbon, see “Configure indents” later in this topic.
If you modify a paragraph and aren’t happy with the changes, you can restore the original paragraph and character settings by resetting the paragraph to the Normal paragraph style.
Configure alignment
The alignment setting controls the horizontal position of the paragraph text between the page margins.
There are four alignment options:
![]() Align Left This is the default paragraph alignment. It sets the left end of each line of the paragraph at the left page margin or left indent. It results in a straight left edge and a ragged right edge.
Align Left This is the default paragraph alignment. It sets the left end of each line of the paragraph at the left page margin or left indent. It results in a straight left edge and a ragged right edge.
![]() Align Right This sets the right end of each line of the paragraph at the right page margin or right indent. It results in a straight right edge and a ragged left edge.
Align Right This sets the right end of each line of the paragraph at the right page margin or right indent. It results in a straight right edge and a ragged left edge.
![]() Center This centers each line of the paragraph between the left and right page margins or indents. It results in ragged left and right edges.
Center This centers each line of the paragraph between the left and right page margins or indents. It results in ragged left and right edges.
![]() Justify This alignment adjusts the spacing between words so that the left end of each line of the paragraph is at the left page margin or indent and the right end of each line of the paragraph (other than the last line) is at the right margin or indent. It results in straight left and right edges.
Justify This alignment adjusts the spacing between words so that the left end of each line of the paragraph is at the left page margin or indent and the right end of each line of the paragraph (other than the last line) is at the right margin or indent. It results in straight left and right edges.
The icons on the alignment buttons depict the effect of each alignment option.
To set paragraph alignment
1. Position the cursor anywhere in the paragraph, or select all the paragraphs you want to adjust.
2. On the Home tab, tap the Align Left, Center, Align Right, or Justify button.
To reset a paragraph to the Normal paragraph style
1. Select the paragraph you want to reset.
2. On the Home tab, tap the Formatting button, and then tap Clear Formatting.
Configure vertical spacing
Paragraphs have two types of vertical spacing:
![]() Paragraph spacing The space between paragraphs, defined by setting the space before and after each paragraph. This space is usually measured in points.
Paragraph spacing The space between paragraphs, defined by setting the space before and after each paragraph. This space is usually measured in points.
![]() Line spacing The space between the lines of the paragraph, defined by setting the height of the lines in relation to the height of the text. This space is usually measured in lines.
Line spacing The space between the lines of the paragraph, defined by setting the height of the lines in relation to the height of the text. This space is usually measured in lines.
Word for iPad provides options for setting the line spacing, but not the paragraph spacing. The default line spacing for documents created in Word for iPad is 1.0 lines. Other available options are 1.15 lines, 1.5 lines, 2 lines, 2.5 lines, and 3 lines. Changing the line spacing changes the appearance and readability of the text in the paragraph and, of course, also changes the amount of space it occupies on the page.
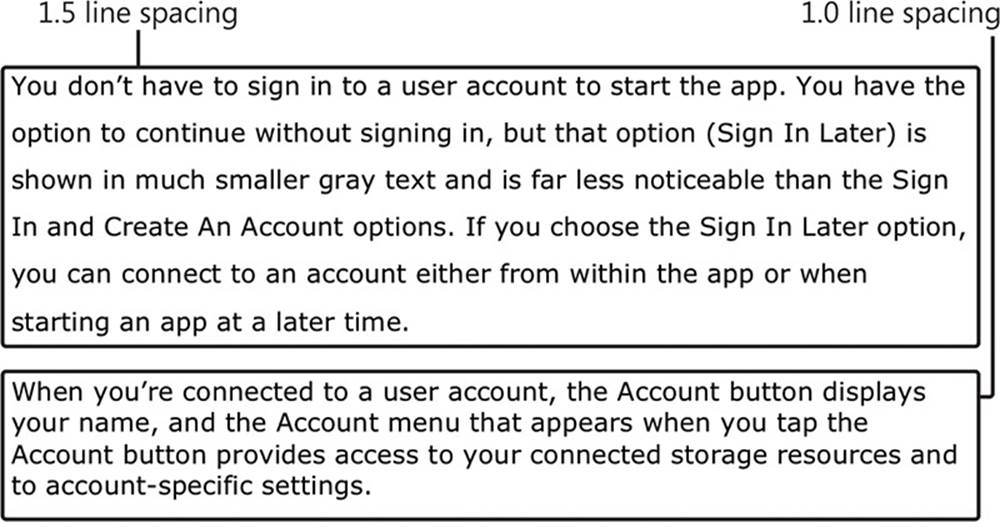
The effect of changing line spacing
 Tip
Tip
Word for iPad offers only the six preset line spacing options, and no paragraph spacing options. You can refine the line spacing and adjust the paragraph spacing in Word Online or a desktop version of Word.
To adjust the space between the lines of a paragraph
1. Position the cursor anywhere in the paragraph, or select all the paragraphs you want to adjust.
2. On the Home tab, tap the Line Spacing button, and then tap the preset line spacing option you want.
Tip
If the on-screen keyboard is displayed, you can hide the keyboard or flick through the Line Spacing list to display all the options.
Configure indents
A paragraph indent is the space from the page margin to the text. When working with a document in Word for iPad, you can move the left indent by tapping buttons on the Home tab, or you can set the indents directly on the ruler. Three indent markers are always present on the ruler:
![]() Left Indent This defines the outermost left edge of each line of the paragraph.
Left Indent This defines the outermost left edge of each line of the paragraph.
![]() Right Indent This defines the outermost right edge of each line of the paragraph.
Right Indent This defines the outermost right edge of each line of the paragraph.
![]() First Line Indent This defines the starting point of the first line of the paragraph.
First Line Indent This defines the starting point of the first line of the paragraph.
The ruler indicates the space between the left and right page margins in a lighter color than the space outside of the page margins.
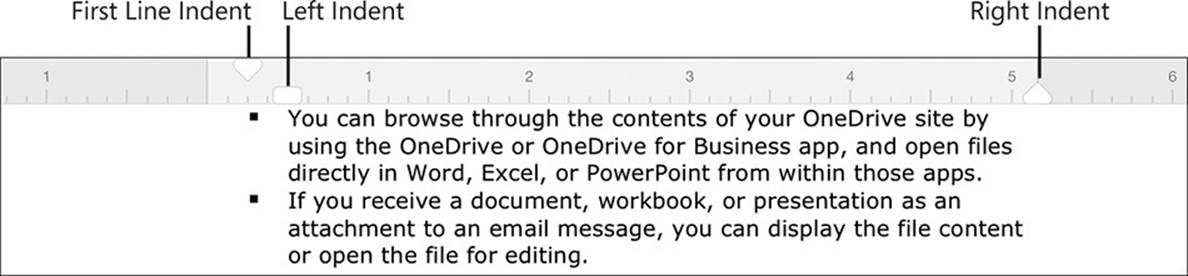
The indent markers on the ruler
The default setting for the Left Indent and First Line Indent markers is 0.0”, which aligns with the left page margin. The default setting for the Right Indent marker is the distance from the left margin to the right margin. For example, if the page size is set to 8.5” wide and the left and right margins are set to 1.0”, the default Right Indent marker setting is 6.5”.
In Word for iPad, you can set the indent marker positions on the ruler only by dragging them; you can’t enter a specific measurement for them as you can in Word Online and desktop versions of Word. However, when you drag the markers, the ruler position of the marker appears on the ruler as you drag it.

Dragging a marker displays its position on the ruler
You can arrange the Left Indent and First Line Indent markers to create a hanging indent or a first line indent. Hanging indents are most commonly used for bulleted and numbered lists, in which the bullet or number is indented less than the main text (essentially, it is outdented). First line indents are frequently used to distinguish the beginning of each subsequent paragraph in documents that consist of many consecutive paragraphs of text. Both types of indents are set by using the First Line Indent marker on the ruler.
 See Also
For information about setting page margins, see “Configure page layout” in Chapter 6, “Enhance document content.”
To display the ruler
1. On the View tab, tap the Ruler slider to change its background to green.
To indent or outdent the left edge of a paragraph
1. Position the cursor anywhere in the paragraph, or select all the paragraphs you want to adjust.
2. To move the left edge of the paragraph in 0.25” increments, tap the Increase Indent or Decrease Indent button on the Home tab.
Or
To move the left edge of the paragraph manually:
a. Display the ruler.
b. On the ruler, drag the Left Indent marker to the ruler measurement at which you want to position the left edge of the body of the paragraph.
Tip
You can’t outdent a paragraph beyond the left page margin by tapping the Decrease Indent button. You can achieve this effect only by dragging the Left Indent marker on the ruler. Be aware, though, that content outdented beyond the page margin might not print.
To create a hanging indent or first line indent
1. Set the left indent of the paragraph body.
2. On the ruler, drag the First Line Indent marker to the ruler measurement at which you want to begin the first line of the paragraph.
Tip
The First Line Indent marker is linked to the Left Indent marker. Moving the Left Indent marker also moves the First Line Indent marker, to maintain the first line indent distance. You can move the First Line Indent marker independently of the Left Indent marker to change the first line indent distance.
To indent or outdent the right edge of a paragraph
1. Position the cursor anywhere in the paragraph, or select all the paragraphs you want to adjust.
2. Display the ruler.
3. On the ruler, drag the Right Indent marker to the ruler measurement at which you want to set the maximum right edge of the paragraph.
Tip
Unless the paragraph alignment is justified, the right edge of the paragraph will be ragged, but no line will extend beyond the right indent or outdent.
Structure content manually
At times it’s necessary to manually position text within a paragraph. You can do this by using two different hidden characters: line breaks and tabs. These characters are visible only when the option to show paragraph marks and formatting symbols is turned on. The hidden characters have distinctive appearances:
![]() A line break character looks like a bent left arrow:
A line break character looks like a bent left arrow: ![]()
![]() A tab character looks like a right-pointing arrow:
A tab character looks like a right-pointing arrow: ![]()
You can use a line break, also known as a soft return, to wrap a line of a paragraph in a specific location without ending the paragraph. You might use this technique to display only specific text on a line, or to break a line before a word that would otherwise be hyphenated.
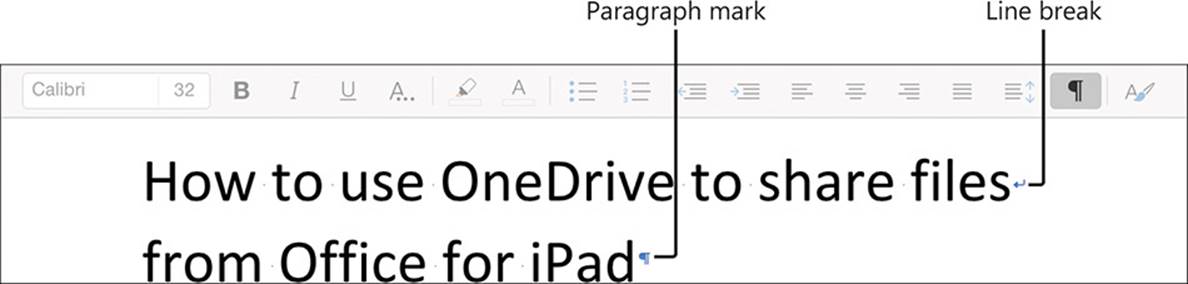
A line break ends the line but not the paragraph
A tab character defines the space between two document elements. For example, you can separate numbers from list items, or columns of text, by using tabs. You can then set tab stops that define the location and alignment of the tabbed text.
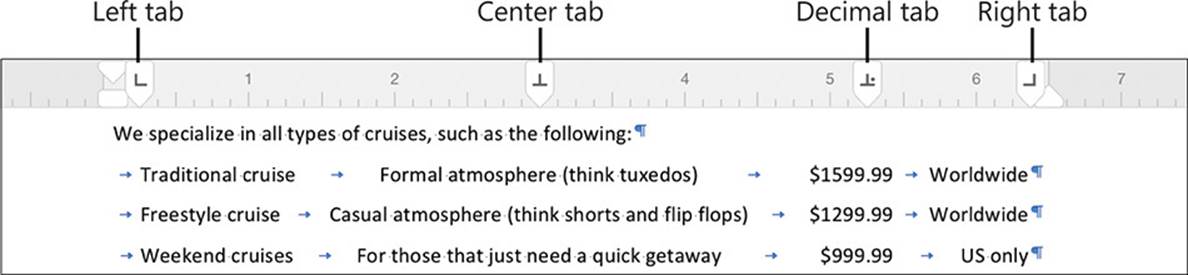
You can align text in different ways by using tabs
To show or hide paragraph marks and formatting symbols
1. On the Home tab, tap the Show/Hide ¶ button.
To insert a line break
1. Tap and hold until the magnifying glass appears. Confirm that the cursor is in the location where you want to insert the line break, and then release to display the shortcut bar.
2. On the shortcut bar, tap Insert and then tap Line Break.
To insert a tab character
1. Tap and hold until the magnifying glass appears. Confirm that the cursor is in the location where you want to insert the tab character, and then release to display the shortcut bar.
2. On the shortcut bar, tap Insert and then tap Tab.
To align a tab and set a tab stop
1. Tap the ruler once to add a left-aligned tab marker.
2. Double-tap the tab marker to change to the next tab alignment, in this order:
• Left
• Center
• Right
• Decimal
• Bar
3. Drag the tab marker to the ruler measurement at which you want to set the tab.
To remove a tab stop
1. Drag the tab marker off the ruler.
Change the appearance of text
The appearance of your document helps to convey not only the document’s message but also information about the document’s creator—you. A neatly organized document that contains consistently formatted content and appropriate graphic elements, and that doesn’t contain spelling or grammatical errors, invokes greater confidence in your ability to provide any product or service.
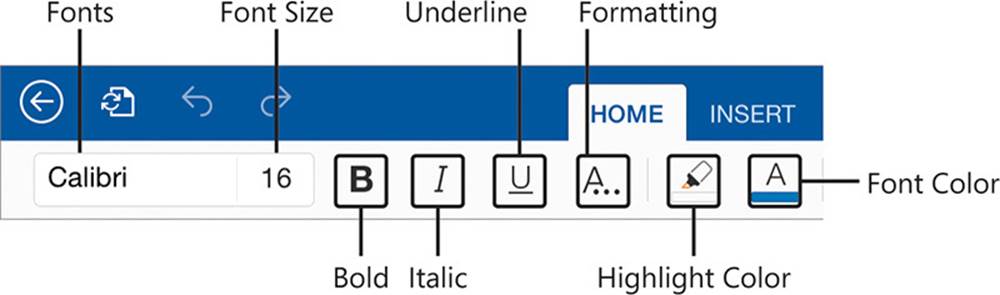
Earlier in this chapter, you learned about methods of applying formatting to paragraphs. This topic covers methods of formatting the text of a document. Formatting that you apply to text is referred to as character formatting. In Word for iPad, you can apply three types of character formatting:
![]() Individual character formats including font, font size, bold, italic, underline, strikethrough, subscript, superscript, font color, and highlight color
Individual character formats including font, font size, bold, italic, underline, strikethrough, subscript, superscript, font color, and highlight color
![]() Artistic text effects that incorporate character outline and fill colors
Artistic text effects that incorporate character outline and fill colors
![]() Preformatted styles associated with the document template, many of which not only affect the appearance of the text but also convey structural information (such as titles and headings)
Preformatted styles associated with the document template, many of which not only affect the appearance of the text but also convey structural information (such as titles and headings)
See Also
For information about graphic elements, see Chapter 5, “Add visual elements to documents.”
The commands you use to apply individual character formats and artistic text effects are grouped on the left end of the Home tab of the ribbon.
Less frequently used formatting commands are available from the Formatting menu
Tapping the Fonts box displays the Fonts menu, which is divided into groups: Theme Fonts, Recent Fonts, Office Compatible Fonts, and iOS Fonts. (The Theme Fonts and Recent Fonts groups exist only if the current document contains fonts associated with those groups.) As you flick through the Fonts menu, the name of the current group is shown at the top of the menu so you can select a font that is compatible with your intended usage.
Word for iPad includes 15 artistic text effects (sometimes referred to as WordArt). Applying a text effect retains the original font and font size but adds various font color, gradient, outline, dimensional, and reflection elements.
Tip
In the desktop versions of Word, you can apply these same text effects as a starting point and then customize the color, outline, shadow, reflection, and glow characteristics of the formatted text.
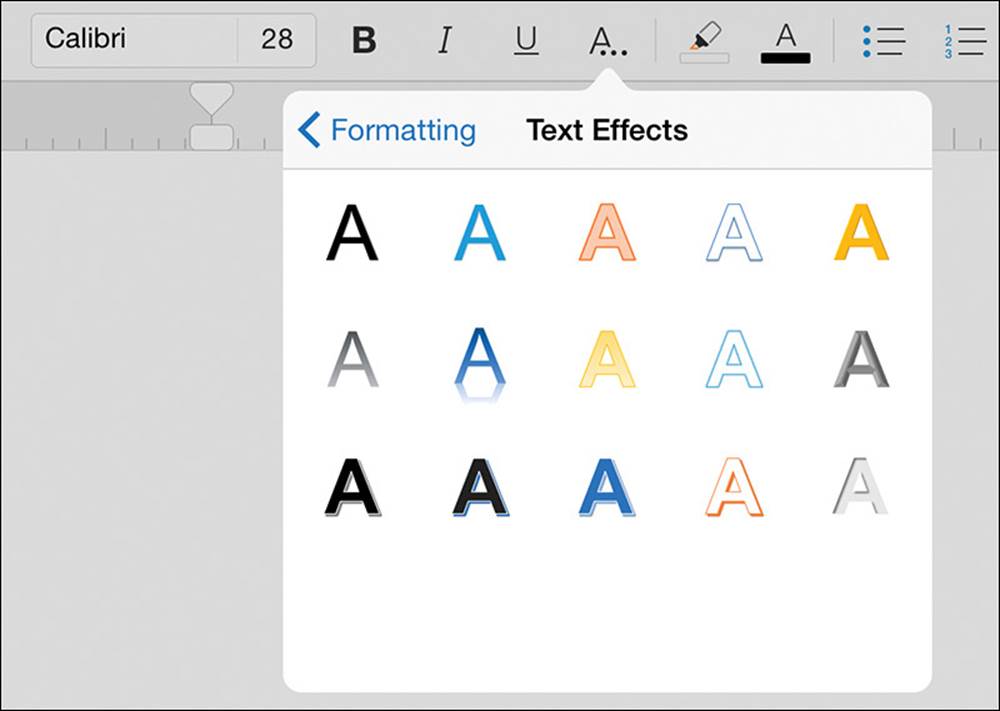
The Text Effects menu displays the 15 available artistic text effects
Each document template includes a selection of preformatted styles that control the appearance of entire paragraphs or selected characters. The most basic style, Normal, is the one that controls the appearance of unformatted text that you enter into the document. Common paragraph styles include Title, Subtitle, Heading 1, and Heading 2. Common character styles include Strong and multiple variations of Emphasis and Reference.
The styles are available from the menu that expands when you tap the Styles button at the right end of the Home tab. The available styles differ based on the document.

The Styles menu displays the styles associated with the current document template
The styles and characteristics of styles that are available in a document are linked to the document template. If you create a document from one of the prepopulated document templates, or if you’re working in a document that is attached to a custom template, the styles will be different from those available when you create a new, blank document directly in Word for iPad.
 Important
The overarching concept behind styles is that you can entirely change the appearance of the document content by modifying the styles. Unfortunately, you can’t directly modify styles in Word for iPad. However, you can modify the styles in a desktop version of Word, and they’ll be available when you open the document on your iPad.
Word for iPad includes only a limited number of individual character formats and styles. However, if the document you’re working in was created in Word Online or a desktop version of Word and contains formatting or styles that you want to reuse, you can easily copy existing formatting from one element to another.
To change the font or size of text
1. Select the text you want to format.
2. On the Home tab, tap the Fonts box.
3. Flick through the Fonts menu to the font you want to apply, and then tap the font.
To make text bold, italic, or underlined
1. Select the text you want to format.
2. On the Home tab, tap the Bold, Italic, or Underline button.
To strike through text
1. Select the text you want to strike through.
2. On the Home tab, tap the Formatting button.
3. On the Formatting menu, tap Strikethrough.
To display superscript or subscript characters
1. Select the characters you want to reposition.
2. On the Home tab, tap the Formatting button.
3. On the Formatting menu, do one of the following:
• Tap Subscript to shift the characters to the bottom of the line.
• Tap Superscript to shift the characters to the top of the line.
To apply artistic effects to text
1. Select the text you want to apply effects to.
2. On the Home tab, tap the Formatting button.
3. On the Formatting menu, tap Text Effects.
4. On the Text Effects menu, tap the effect you want to apply.
To apply preformatted styles to text
1. Select the paragraphs or characters you want to format.
2. On the Home tab, tap the Styles button.
3. On the Styles menu, tap the style you want to apply.
To copy formatting to other text
1. Select the text that has the format you want to copy.
2. On the shortcut bar, tap Copy.
3. Select the text you want to apply the copied format to.
4. On the shortcut bar, tap Paste Format.
To remove all character formatting
1. Select the text you want to clear the formatting from.
Important
If you select an entire paragraph, the process of clearing formatting will clear character formatting and paragraph formatting from the paragraph and reset it to the Normal paragraph style.
2. On the Home tab, tap the Formatting button, and then tap Clear Formatting.
Skills review
In this chapter, you learned how to:
![]() Create documents from templates
Create documents from templates
![]() Enter text in documents
Enter text in documents
![]() Move, copy, and delete text
Move, copy, and delete text
![]() Align, space, and indent paragraphs
Align, space, and indent paragraphs
![]() Structure content manually
Structure content manually
![]() Change the appearance of text
Change the appearance of text
Practice tasks

The practice files for these tasks are located in the iPadOfficeSBS\Ch04 folder.
Create documents and enter text
Start Word, and then perform the following tasks:
1. Create a blank new document, and save the document on your iPad as My Practice Document.
2. Create a new document based on a built-in template for a résumé.
3. By using either the on-screen keyboard or an external keyboard, enter your name, email address, phone number, and any other personal identification specified by the template in the space provided for that information.
4. By dictating to your iPad, enter information about your most current job.
5. Save the document on your iPad as My Resume.docx.
6. Create a document (in the default location on your OneDrive) based on any of the Word Online templates.
7. Open the document in Word Online and then in Word for iPad.
Move, copy, and delete text
Open the ArrangeText document, and then perform the following tasks:
1. Select the bulleted paragraph that begins with Character spacing, and move it to the top of the bulleted list.
2. Select the last heading and the paragraph that follows it, cut the selected text to the Clipboard, and then paste it from the Clipboard to the area below the paragraph that follows the heading Overview.
3. In the heading Manually changing the look of text, select and copy the word Manually. In the Changing the look of paragraphs heading, make the first letter lowercase. Then paste the copied word at the beginning of the paragraph.
4. Select all the content in the ArrangeText document and copy it to the Clipboard. Then open the practice file named PastePractice.
5. In the PastePractice document, delete the heading How to format text and then paste the Clipboard contents into the document. Apply the formatting of the destination document to the pasted content.
Align, space, and indent paragraphs
Open the FormatParagraphs document, display the ruler, display paragraph marks and formatting symbols, and then perform the following tasks:
1. Configure the alignment of the first paragraph so it has a ragged left edge and a straight right edge.
2. Compare the appearance and readability of the first two paragraphs. Then configure both paragraphs so the right and left edges of the paragraphs are straight.
3. Change the line spacing of the first paragraph to 1.15 and the line spacing of the second paragraph to 2.0.
4. Compare the vertical height of the paragraphs and the readability of the paragraph content. Then change the line spacing of both paragraphs to 1.5.
5. Using the markers on the ruler, increase the indent of the left edge of both paragraphs by 0.5”.
6. Using the buttons on the ribbon, decrease the left indent of the first paragraph by 0.25”.
7. Indent the first line of the second paragraph to the 0.5” mark.
8. Indent the right edge of both paragraphs to the 3” mark.
Structure content manually
Open the StructureContent document, display the ruler, display paragraph marks and formatting symbols, and then perform the following tasks:
1. In the title, insert a line break before the word The.
2. Select the three paragraphs after the heading that begins We specialize.
3. Set the following tab stops:
• A left tab stop at the 0.25” mark
• A center tab stop at the 3” mark
• A decimal tab stop at the 5.25” mark
• A right tab stop at the right margin
4. In each of the three paragraphs, do the following:
• Insert a tab at the beginning of the paragraph.
• Replace the colon and the space that follows it with a tab.
• Replace the comma and space before each dollar amount with a tab.
• Replace the final comma and space with a tab.
5. Verify that the tabs align the text with the appropriate tab stops on the ruler.
Change the appearance of text
Open the FormatText document, and then perform the following tasks:
1. Select all the text in the document and change the font to Georgia.
2. Select the words (including the periods after them) Size, Style, Effects, Color, and Character spacing, and then format them as Bold.
3. In the paragraph that begins with Effects, select the word strikethrough, and apply the Strikethrough character format.
4. In the same paragraph, select the word subscript and apply the Subscript character format. Then select the word superscript and apply the Superscript character format.
5. Select the first line of text in the document, How to format text, and apply the WordArt text effect that is blue and has a shadow below it (the second effect from the left in the second row). Then change the font size to 16.
6. Select the Overview paragraph and the two paragraphs that begin with the word Manually, and apply the Heading 2 to all of them.
7. Copy the strikethrough formatting you applied in step 3 to the paragraph that begins with Character spacing.
All materials on the site are licensed Creative Commons Attribution-Sharealike 3.0 Unported CC BY-SA 3.0 & GNU Free Documentation License (GFDL)
If you are the copyright holder of any material contained on our site and intend to remove it, please contact our site administrator for approval.
© 2016-2026 All site design rights belong to S.Y.A.