Microsoft Office for iPad Step by Step (2015)
Part 2: Microsoft Word for iPad
5. Add visual elements to documents
In this chapter
![]() Present content in lists
Present content in lists
![]() Present content in tables
Present content in tables
![]() Insert and format pictures
Insert and format pictures
![]() Insert and format shapes
Insert and format shapes
![]() Arrange images and text
Arrange images and text
Most Word documents consist primarily of text. In many instances, presenting that text within a clear visual structure is key to ensuring that readers can both discover the information you want them to read and locate the information they want to find. In larger documents and publications, such as this book, reader aids and reference materials provide structure and guidance. Typical elements include tables of contents, part openers that list the related chapters, chapter openers that list the chapter objectives, thumb tabs that indicate breaks between chapters, and, of course, the extensive index. It’s not always possible or realistic to include those elements. You can, however, provide a navigable structure and improve the readability of certain types of content by using headings, lists, tables, and images.
Practice files
For this chapter, use the practice files from the iPadOfficeSBS\Ch05 folder. For practice file download instructions, see the Introduction.
The addition of visual or graphic elements such as pictures and drawings can enhance the content of a document, and the presentation of information within the structure of a list or table can more effectively convey information to the reader than if that information were provided in narrative format.
This chapter guides you through procedures related to creating lists and tables, inserting pictures and shapes, and formatting the appearance, position, and flow of text around those graphic elements.
Present content in lists
A list is an effective structure for communicating multiple related pieces of information. In Word for iPad, you can create bulleted lists and numbered lists, and you can combine these list types within multilevel lists. Each type of list serves a specific purpose.
The commands most frequently used when creating lists are located on the Home tab of the ribbon.

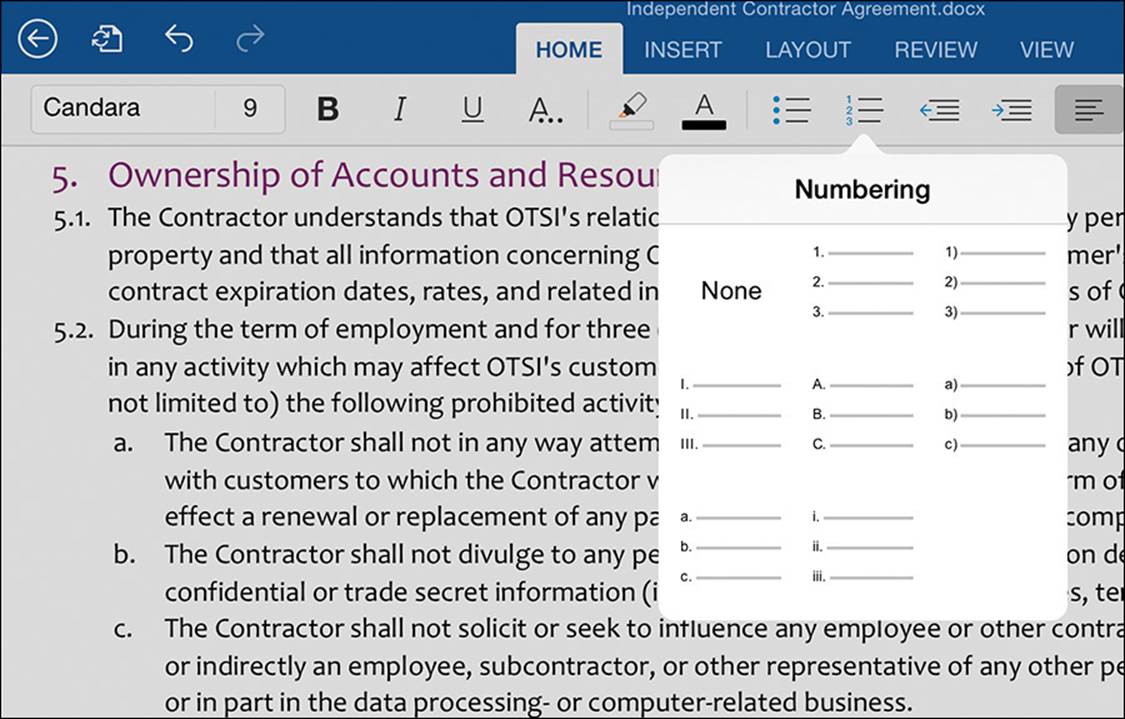
The Bullets, Numbering, Decrease Indent, and Increase Indent commands
Create bulleted lists
Bulleted lists are appropriate for presenting information when the order of the information is not important. For example, bulleted lists can be used to present a set of related items (such as names, tasks, or groceries) or a series of informational paragraphs. Formatting multiple pieces of information as a bulleted list can help them stand out from the surrounding text as a cohesive set.
 Tip
Tip
Bulleted lists are also referred to as unordered lists because the list structure doesn’t connote a specific order, such as order of occurrence or priority. You can, however, introduce a bulleted list with a statement of order, such as “These are my favorite vacation destinations, in alphabetical order.”
You can format existing paragraphs of text as a bulleted list or format an empty paragraph as a bulleted list item and then enter text. Each bulleted list item is one paragraph of text. You can choose from the seven bullet symbols that are available in Word for iPad.
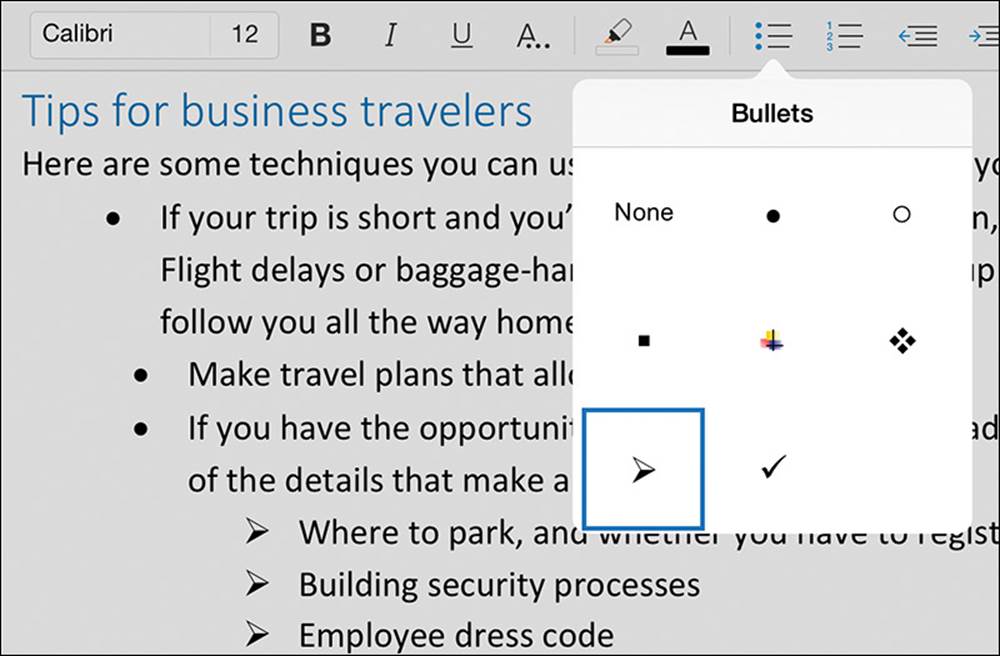
Multilevel bulleted lists can use a variety of bullet symbols to indicate level and add meaning to list items
Tip
In the desktop versions of Word, you can choose any symbols, characters, or pictures as bullet symbols, and you can control the font, size, and color of the bullet symbols. If you need to designate a more complex bullet symbol, save the document to a shared location and open it in a desktop version of the program.
To format existing text as a bulleted list
1. Select the paragraphs that you want to format as bulleted list items.
2. On the Home tab, tap the Bullets button, and then tap the bullet symbol you want to use at the beginning of each list item.
To format a single paragraph as a bulleted list item
1. Position the cursor at the beginning of the paragraph.
2. Enter * (an asterisk) followed by a space.
Tip
If you want to start a paragraph with an asterisk rather than formatting it as a bulleted list item, tap the Undo button.
To create a bulleted list as you type
1. Create a blank paragraph where you want to start the list, and position the cursor in the paragraph.
2. Enter * (an asterisk) followed by a space to format the paragraph as a bulleted list item.
Or
On the Home tab, tap the Bullets button, and then tap the bullet symbol you want to use.
3. Enter the content of the first list item, and then tap the Return key to create the next bulleted list item.
4. Continue to enter content and tap Return to add subsequent list items.
5. To end the list, do one of the following:
• To start the next paragraph at the left margin, tap Return twice.
• To indent the next paragraph at the same level as the list, tap Return and then tap Backspace.
Tip
Starting the paragraph that follows a list item at the margin indicates that it is a continuation of the text that preceded the list. Indenting the paragraph indicates that it is a continuation of the list item.
To change the bullet symbol of an existing bulleted list
1. Tap anywhere in the bulleted list you want to change.
2. On the Home tab, tap the Bullets button, and then tap the symbol you want to use.
To change the bullet symbol of one bulleted list item
1. Select any text in the list item you want to change.
Tip
You can select from one character to the entire paragraph to change the bullet symbol for only the individual list item.
2. On the Home tab, tap the Bullets button, and then tap the symbol you want to use.
Create numbered lists
Numbered lists are intended for the presentation of items in a specific order or quantity; for example, sequential steps for performing a process, or a “top 10” list.
Tip
Numbered lists are also referred to as ordered lists because the list structure does connote an order, such as order of operation, preference, or performance level. The sentence that introduces the list usually specifies the meaning of the order.
You can format existing paragraphs of text as a numbered list or format a blank paragraph as a numbered list item and then enter text. Each numbered list item is one paragraph of text.
Multilevel numbered lists present information in a hierarchical structure and permit readers to refer to specific information by item number
To format existing text as a numbered list
1. Ensure that each list item is in its own paragraph, and then select the paragraphs.
2. On the Home tab, tap the Numbering button, and then tap the number format you want to use.
 Important
At the time of this writing, if you enter or format numbered list items and then separately format adjacent paragraphs as list items, the two lists do not merge; the numbering of each separately formatted set of items starts at 1. To resolve this issue, select all the list items that you want to number consecutively. Display the Numbering menu, tap None, redisplay the Numbering menu, and then tap the numbering style you want to use.
To format a single paragraph as a numbered list item
1. Position the cursor at the beginning of the paragraph.
2. Enter the number 1 followed by a period and a space.
Tip
If you want to start a paragraph with a number rather than formatting it as a numbered list item, tap the Undo button.
To create a numbered list as you type
1. Create a blank paragraph where you want to start the list, and position the cursor in the paragraph.
2. Enter the number 1 followed by a period and a space to format the paragraph as a numbered list item.
3. Enter the first list item, and then tap the Return key to create the next numbered list item.
4. Enter items and tap Return to add subsequent list items.
5. To end the list, do one of the following:
• To start the next paragraph at the left margin, tap Return twice.
• To indent the next paragraph at the same level as the list, tap Return and then tap Backspace.
To change the numbering style of an existing numbered list
1. Tap anywhere in the numbered list you want to change.
2. On the Home tab, tap the Numbering button, and then tap the numbering style you want to use.
Create multilevel lists
Bulleted and numbered lists can have multiple levels, each with a different bullet symbol or numbering style. You can create multilevel lists by increasing the indent of each lower-level list item. Increasing the indent automatically applies the hanging indent, tab stop, and bullet symbol or number style of the next level.
The standard bullet for a first-level list item is a black circle. By default, Word uses a hollow circle for second-level lists and a black square for third-level lists, and then it repeats that pattern for subsequent list levels.
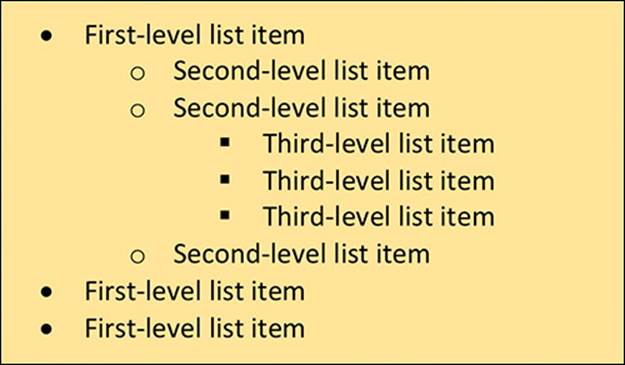
A simple three-level bulleted list
The standard numbering for a first-level list item is the number followed by a period. By default, Word uses lowercase letters for second-level list items and lowercase roman numerals for third-level list items.
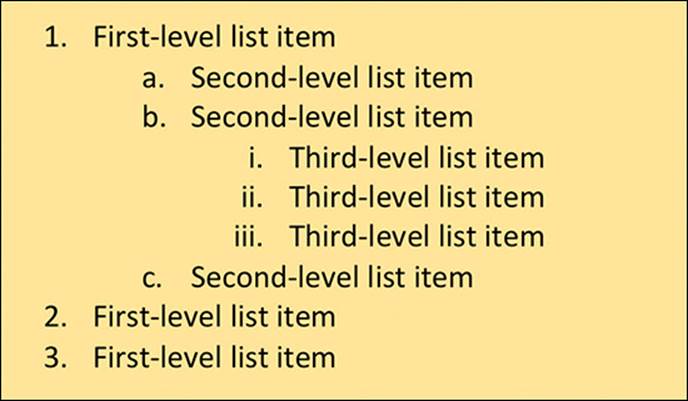
A simple three-level numbered list
It is also common to provide information in bulleted (unordered) lists within numbered (ordered) lists—for example, when presenting options for a specific step of a procedure. In Word for iPad, you can assign any of the available bullet symbols or numbering styles to multilevel list items.
Multilevel lists can mix numbers and bullets
To demote multiple bulleted or numbered list items
1. Select the list items you want to demote.
2. On the Home tab, tap the Increase Indent button.
To demote a single bulleted or numbered list item
1. Position the cursor anywhere in the list item, and then tap the Increase Indent button.
Or
If you’re working with an external keyboard connected to your iPad, position the cursor at the beginning of a list item, and then press the Tab key.
To promote multiple bulleted or numbered list items
1. Select the list items you want to promote.
2. On the Home tab, tap the Decrease Indent button.
Tip
Use the procedures described in the preceding sections of this topic for changing bullet symbols and numbering styles in multilevel and mixed-type lists.
To promote a single bulleted or numbered list item
1. Position the cursor anywhere in the list item, and then tap the Decrease Indent button.
Or
If you’re working with an external keyboard connected to your iPad, position the cursor at the beginning of a list item, and then press the Delete key.
Present content in tables
Tables provide a structure within which you can organize information into a series of columns and rows. Tables can contain text, numeric data, or images.
A basic table with the default formatting and alignment settings
In Word for iPad, you can create a table in a document by using any of these three methods:
![]() Insert a blank table, modify the table structure, and enter content.
Insert a blank table, modify the table structure, and enter content.
![]() Convert existing text to a table.
Convert existing text to a table.
![]() Paste a table from another document or source file, such as an Excel worksheet.
Paste a table from another document or source file, such as an Excel worksheet.
The intersection of each column and row is a cell. Each cell of the table can contain content. If appropriate, you can merge multiple cells within a row or column. Headings that classify the table data are usually presented in the first row of the table, and sometimes in the first column.
When you’re working in a table, the Table tool tab appears on the ribbon. This tab contains commands for inserting and deleting table elements, formatting the appearance of the table, aligning content within cells (both vertically and horizontally), and sizing table columns to fit their content, to fit the page, or to be a specific width.
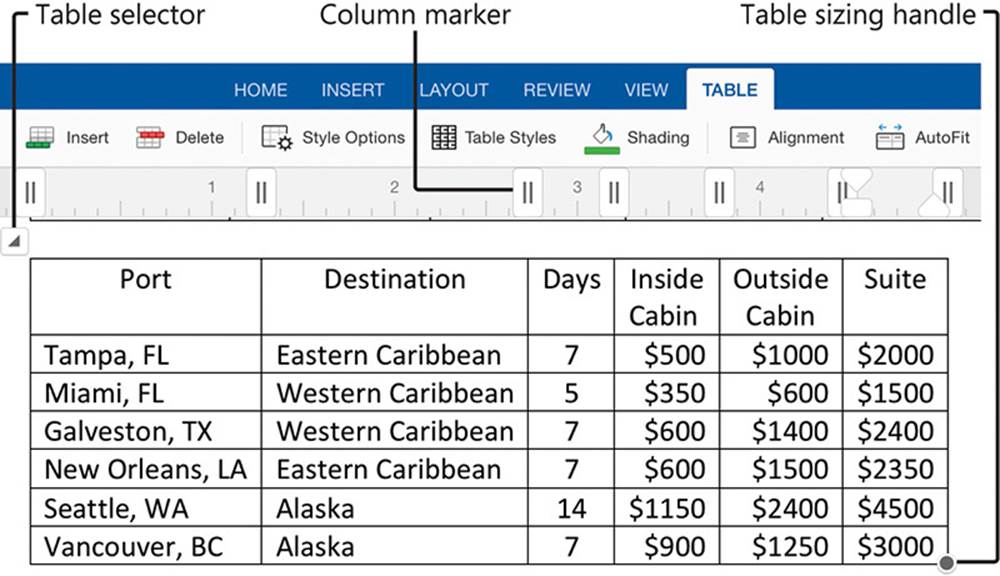
Changing column width and alignment makes a table look more professional
Tip
You can modify the left and right indents of the table and the width and padding of the columns by dragging the markers on the ruler. When a table, is active, the ruler displays markers for the table columns and the content of the current column.
 See Also
For information about configuring the alignment of text within tables, see “Align, space, and indent paragraphs” in Chapter 4, “Create professional documents.”
Word for iPad provides options for formatting the appearance of a table by applying preset border and shading combinations. The placement of the border and shading helps to emphasize any of these table features that you select:
![]() Header row
Header row
![]() Banded rows
Banded rows
![]() Total row
Total row
![]() First column
First column
![]() Banded columns
Banded columns
![]() Last column
Last column
Important
Formatting a Total row in Word for iPad doesn’t make any mathematical operations available within the row. You can insert mathematic formulas into table cells in the desktop version of Word. If you want to perform extensive calculations on the content of a table, you can create or work with the table content in Excel for iPad. For information about formulas and functions, see “Perform data-processing operations” in Chapter 8, “Process and present numeric data.”
The available table color schemes are set by the document theme, so the table formatting will blend in with other colored elements in the document (such as headings and drawings) to give it a professional appearance. You can also select from the 10 standard colors available in all the Office for iPad apps or choose custom colors from a color spectrum.
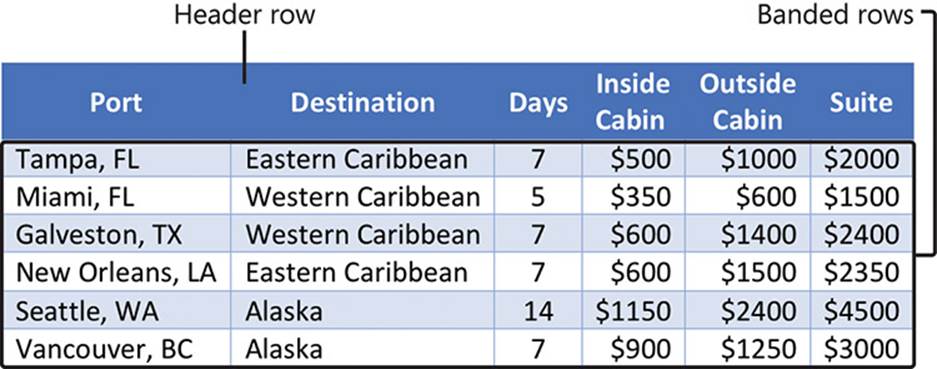
Style options such as banded shading can help readers locate information
To format existing text as a table
1. To create a multicolumn table, put the content of each row into one paragraph and insert a tab character to separate the content of each column.
Tip
To insert a tab character, tap and hold. On the shortcut bar that appears, tap Insert, and then tap Tab.
2. Select the paragraphs.
3. On the Insert tab, tap Table.
Important
To create a multicolumn table, ensure that every paragraph in the selection includes at least one tab character. If any paragraph doesn’t contain a tab character, Word for iPad creates a single-column table with one row for each paragraph and retains the tab characters within the content.
To create an empty table
1. Position the cursor in the location where you want to insert the table.
2. On the Insert tab, tap Table.
Word creates a page-width table that has three columns of equal width and three rows.
To select a table
1. Position the cursor anywhere in the table, or select any table content.
2. Tap the table selector that appears outside the upper-left corner of the table.
To insert rows or columns in a table
1. To insert a single row or column, do one of the following:
• Tap to position the cursor in any cell adjacent to which you want to insert the column or row. On the Table tool tab, tap Insert, and then tap Rows Above, Rows Below, Columns Left, or Columns Right.
• Double-tap to select any cell adjacent to which you want to insert the column or row. On the shortcut bar that appears, tap Insert, and then tap Rows Above, Rows Below, Columns Left, or Columns Right.
2. To insert multiple rows or columns, do the following:
a. Double-tap any cell adjacent to which you want to insert the columns or rows, and then drag to select cells in the number of columns or rows you want to insert.
b. On the shortcut bar or the Table tool tab, tap Insert, and then tap Rows Above, Rows Below, Columns Left, or Columns Right.
3. To double the number of rows or columns, do the following:
a. Position the cursor or select content anywhere in the table.
b. Tap the table selector.
c. On the shortcut bar, tap Insert, and then tap Rows Above, Rows Below, Columns Left, or Columns Right.
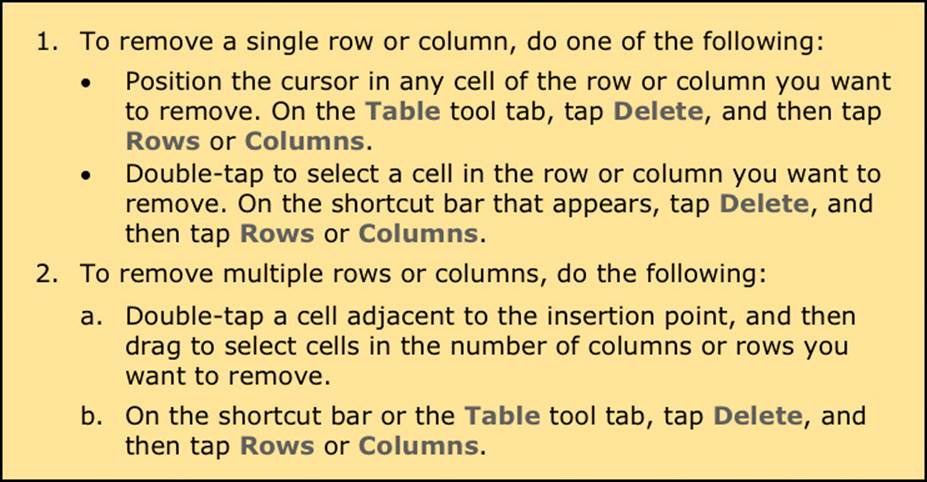
To remove rows or columns from a table
1. To remove a single row or column, do one of the following:
• Tap to position the cursor in any cell of the row or column you want to remove. On the Table tool tab, tap Delete, and then tap Rows or Columns.
• Double-tap to select a cell in the row or column you want to remove. On the shortcut bar that appears, tap Delete, and then tap Rows or Columns.
2. To remove multiple rows or columns, do the following:
a. Double-tap any cell in the range you want to remove, and then drag to select cells in each column or row you want to remove.
b. On the shortcut bar or the Table tool tab, tap Delete, and then tap Rows or Columns.
Important
Word for iPad doesn’t prompt you to confirm the deletion of a table or any of its rows or columns. If you mistakenly delete a table or its content, tap the Undo button to restore the deleted content.
To control the width of table columns
1. Position the cursor anywhere in the table.
2. Drag the table sizing handle to increase or decrease the width of the table and all its columns.
Or
Display the ruler, and drag the column markers on the ruler.
Or
On the Table tool tab, tap AutoFit, and then do one of the following:
• To set each column to the minimum width required to contain its content, tap AutoFit Contents.
• To set the width of the table to the page width and maintain the existing relationship between column widths, tap AutoFit Page.
To change the height of all rows of a table
1. Position the cursor anywhere in the table.
2. Drag the table sizing handle.
Or
Tap the table selector. On the Home tab, tap the Line Spacing button, and then tap a line spacing setting.
To change the height of specific table rows
1. Position the cursor or select content in the row or rows you want to change.
2. On the Home tab, tap the Line Spacing button, and then tap a line spacing setting.
To format text in tables
1. Select the text you want to format; the cells, rows, or columns that contain the text; or the entire table.
2. Use the character-formatting and paragraph-formatting commands on the Home tab.
See Also
For information about formatting text, see “Change the appearance of text” in Chapter 4, “Create professional documents.”
To apply preset table formatting options
1. Position the cursor anywhere in the table.
2. On the Table tool tab, tap Style Options.
3. On the Style Options menu, tap to select or clear the table elements you want to emphasize.
4. On the Table tool tab, tap Table Styles.
Tip
The thumbnails on the Table Styles menu depict the available table styles and selected style options.
5. Flick through the available table styles and tap the style you want to apply.
To apply a different table style
1. Position the cursor anywhere in the table.
2. On the Table tool tab, tap Table Styles.
3. On the Table Styles menu, tap the style you want to apply.
To apply shading to specific cells
1. Position the cursor in the cell you want to shade, or select multiple cells.
2. On the Table tool tab, tap Shading.
3. On the Shading menu, tap any color block.
To format specific table elements
1. Position the cursor anywhere in the table.
2. On the Style Options menu, tap to select or clear the table elements you want to emphasize.
Tip
If a style has been applied to the table, the formatting of the elements you have chosen to change will change immediately. If no style has been applied to the table yet, the changes won’t appear until you apply a table style.
To remove table styling
1. Position the cursor anywhere in the table.
2. On the Table tool tab, tap Table Styles.
3. In the Plain Tables section near the top of the Table Styles menu, do one of the following:
• To remove colors applied by the table style and formatting applied by the style options, tap the first, second, or sixth thumbnail in the row.
Tapping the first thumbnail displays black gridlines, tapping the second thumbnail displays gray gridlines, and tapping the sixth thumbnail hides the gridlines.
• To remove colors applied by the table style but retain formatting applied by the style options, tap the third, fourth, fifth, or last thumbnail in the row.
To repeat table headings when a table runs onto multiple pages
1. Position the cursor anywhere in the table.
Important
Do not select table content. The Repeat Headers command will be unavailable (dimmed) if table content is selected.
2. On the Table tool tab, tap Style Options.
3. On the Style Options menu, tap Repeat Headers.
To delete a table
1. Position the cursor anywhere in the table.
2. On the Table tool tab, tap Delete, and then tap Table.
Or
Tap the table selector. On the shortcut bar, tap Delete, and then tap Table.
Or
1. Select content anywhere in the table.
2. On the shortcut bar, tap Delete, and then tap Table.
Insert and format pictures
Photographs and other digital images can enhance, supplement, or replace text content in documents. In Word for iPad, you can insert an image into a document, apply a variety of picture formats and effects to the image, and control the layout of the image and surrounding text on the page.
Insert and modify pictures
By using Word for iPad, you can insert images into a document from a variety of iPad and iCloud sources, including your iPad Camera Roll and Photo Stream albums.
Tip
In other versions of Word, you can insert images from external online sources. It’s possible that as Microsoft releases additional updates to Word for iPad, other sources will become available. Until then, you can get external images to your iPad by saving them to your iPad from email messages or from another computer to your Photo Stream.
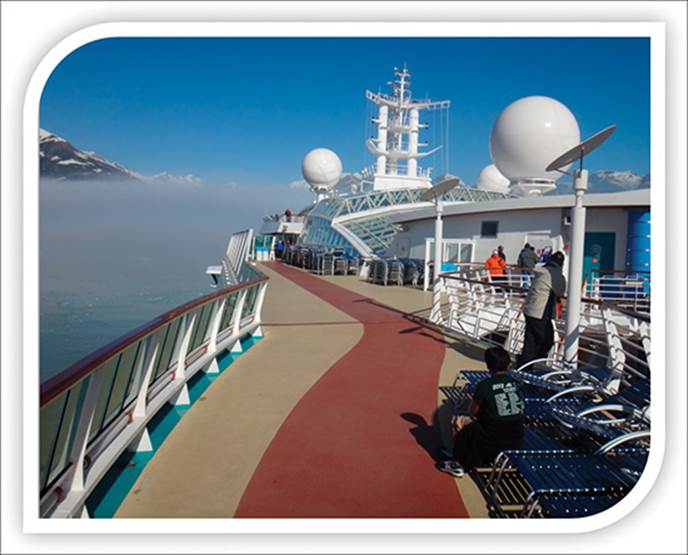
Use pictures to enhance and expand on text content
You can insert a picture in its own paragraph or within another paragraph. The best location is somewhat dependent on how you want text to flow around the image on the page. When you insert an image, it is associated with a paragraph, which is referred to as an anchor. When paragraph marks and formatting symbols are displayed and the image is selected, an anchor symbol indicates the anchor paragraph.
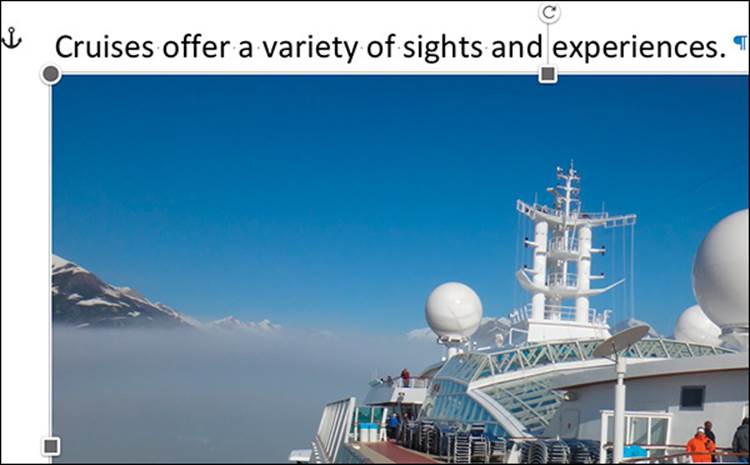
Each image is anchored to a paragraph
See Also
For information about flowing text around images, see “Arrange images and text” later in this chapter.
About Photo Streams
A Photo Stream is an online storage folder that is hosted on iCloud. You can configure your iPad and other devices to automatically copy images that you capture on the devices to the Photo Stream. This creates a backup version of the locally stored image and also makes the image available from other devices (including computers running Windows). You can store up to 1,000 images for up to 30 days each in your Photo Stream.
To turn on the Photo Stream feature for your Apple account, follow these steps:
1. Open iCloud on your Mac or PC.
2. Enter your Apple ID if required, and select either or both photo options: My Photo Stream or Photo Sharing.
To configure your iPad to automatically upload photos to your Photo Stream, follow these steps:
1. Open the Settings app.
2. In the Settings list, tap Photos & Camera, or tap iCloud and then tap Photos.
3. On the Photos & Camera or Photos page, tap the My Photo Stream slider to change its background color to green.
Your Photo Stream is automatically available on the devices that upload images to it—in other words, the devices you sign in to by using your Apple ID. You can also access it from other computers by installing iCloud.
For information about setting up iCloud on an iPad, a Mac computer, or a computer running Windows, visit www.apple.com/icloud/setup/ios.html.
Inserting or selecting a picture activates its sizing handles and the Picture tool tab. This tab contains commands for formatting the appearance of a picture and controlling its position relative to text, images, and other page elements.
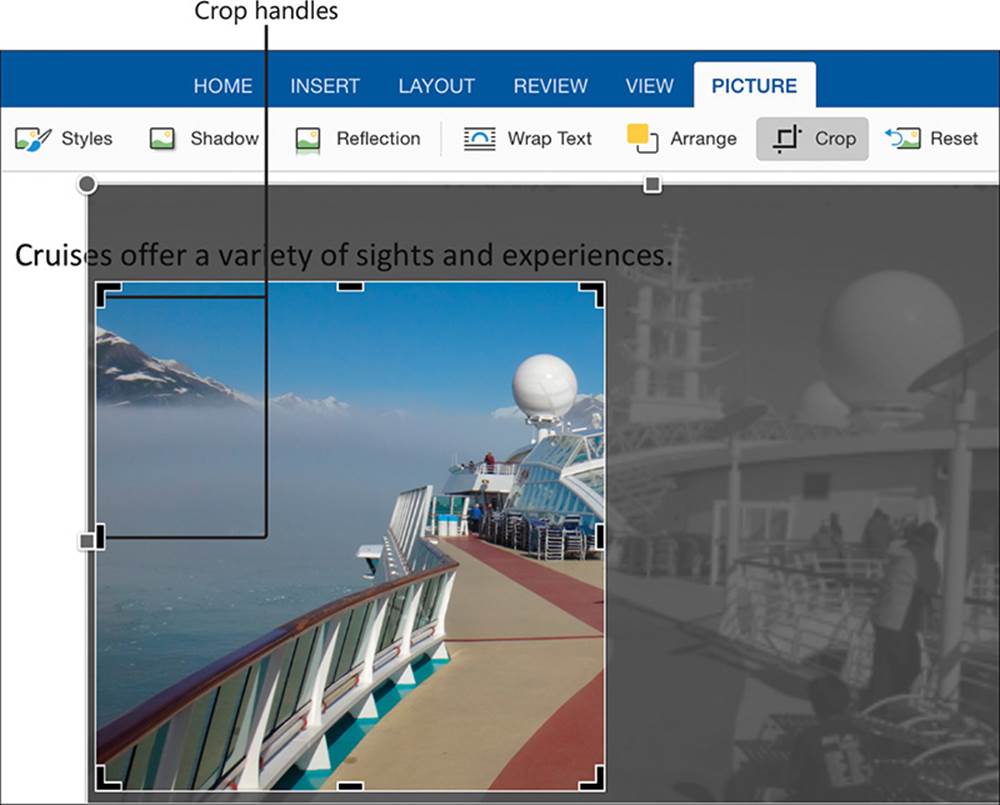
If a picture depicts more content than you want to show—for example, if the background dwarfs the primary subject of the picture or the picture contains content that isn’t pertinent to your purpose, you can crop it. Cropping an image simulates cutting away parts of the image to display only a portion of it.
You have several different options when you crop an image. For example, you can:
![]() Specify or disregard the aspect ratio of the cropped image.
Specify or disregard the aspect ratio of the cropped image.
![]() Move the picture to position the intended subject within the cropped image.
Move the picture to position the intended subject within the cropped image.
![]() Adjust the size of the cropped image to fit the picture content.
Adjust the size of the cropped image to fit the picture content.
![]() Adjust the size of the picture to fit the content to the cropped size.
Adjust the size of the picture to fit the content to the cropped size.
A picture cropped to display a portion of the image at a 1:1 aspect ratio
Resizing, rotating, or cropping a picture affects the appearance of the picture in the document; it doesn’t make any permanent changes to the original picture. You can undo your changes at any time.
You can make several types of changes to pictures that are embedded in documents. Some of these changes appear to change the picture itself; others apply effects to the picture.
You can modify the height and width of a picture by dragging the handles that appear when you tap the picture to select it or activate it for editing. You can also rotate the picture so that it appears at a different angle than the original.
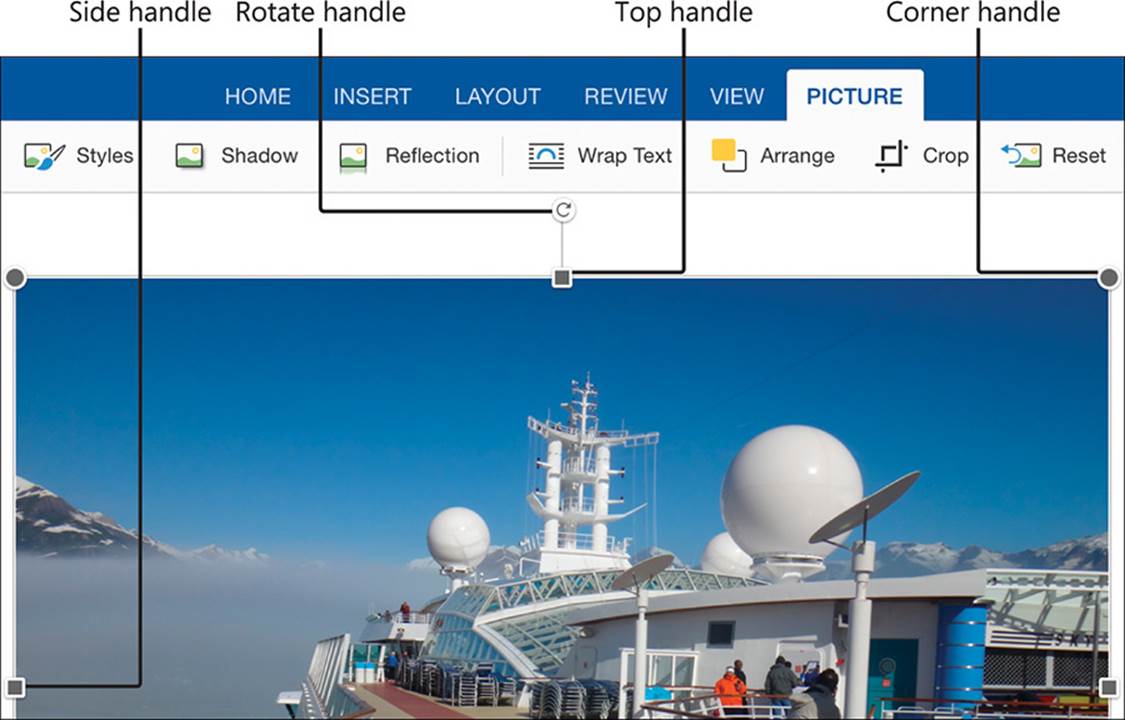
You resize and rotate an image by dragging its handles
Tip
Rotating a picture can make it appear that the picture was taken with the camera held at a different angle—you can use this method to straighten a picture that isn’t properly aligned.
To insert a picture in a document
1. Position the cursor in the location where you want to insert the picture.
2. On the Insert tab, tap Pictures to display the Photos menu.
The content of the Photos menu varies depending on your device, the installed version of iOS, and the storage locations you’ve configured. The Photos menu might display the contents of your local Camera Roll album, your Photo Stream album, your iCloud photo library, or shared albums that you’ve created or subscribed to.
3. On the Photos menu, tap the storage location from which you want to insert the picture. Then locate and tap the picture you want to insert.
To change the size of a picture
1. Tap the picture to select it.
Important
Selecting a picture activates its sizing handles and the Picture tool tab.
2. Drag the handles to resize the picture in any of the following ways:
• To resize the picture and maintain its aspect ratio, drag any round corner handle.
• To change only the picture height, drag the square handle on the top or bottom of the picture.
• To change only the picture width, drag the square handle on the left or right side of the picture.
To crop a picture
1. Select the picture.
2. On the Picture tool tab, tap Crop.
Crop handles appear in the corners and on all four sides of the picture. A shortcut bar displays aspect ratio options.
3. To crop the image without a fixed aspect ratio, do any of the following:
• To change the size of the cropped image while maintaining the original aspect ratio, drag the corner crop handles.
• To change the size and aspect ratio of the cropped image, drag the side crop handles.
• To make the image larger or smaller in the active crop preview, drag the sizing handles.
• To move the image behind the active crop preview, drag it.
4. When you finish adjusting the picture and crop handles, tap the Crop button to implement the changes.
5. To crop the image to a specific aspect ratio, do the following:
a. On the shortcut bar, tap the aspect ratio you want.
b. Drag the image to move it behind the fixed-aspect crop preview.
c. Drag the sizing handles to make the image larger or smaller while keeping the crop size the same.
d. Drag the corner crop handles to change the size of the cropped image while maintaining the selected aspect ratio.
Tip
You can repeat the cropping process to change the aspect ratio, picture size, or magnification, or to remove the cropping effect. For information about resetting an image to its original size and aspect ratio, see “Replace and reset pictures” later in this topic.
To rotate a picture
1. Select the picture.
2. Drag the Rotate handle in a clockwise or counterclockwise direction until the picture is at the angle of rotation you want.
Apply styles and effects to pictures
You can apply preset combinations of visual effects, called picture styles, to a picture. Picture styles incorporate elements such as frames, shapes, edges, shadows, reflections, and angles. Some of these combinations of effects cause the image to appear three-dimensional.
Tip
Word for iPad supports the same 28 picture styles as the full desktop versions of Word.
If you want to enhance a picture without quite as many special effects, you can add a shadow or reflection to it.
You can choose from 23 different shadow effects: nine outer shadows (each emphasizing the outside of one corner or side of the picture, or placed directly behind the picture); nine inner shadows that emphasize the inside of the same locations; and five “perspective” shadows that give the picture a three-dimensional appearance. There are nine reflection variations, presented in three rows. Each row includes the same three options: Tight, which reflects the bottom third of the picture; Half, which reflects the bottom half of the picture; and Full, which reflects the entire picture. The first row positions the reflection touching the picture, the second row positions the reflection 4 points below the picture, and the third row positions the reflection 8 points below the picture.
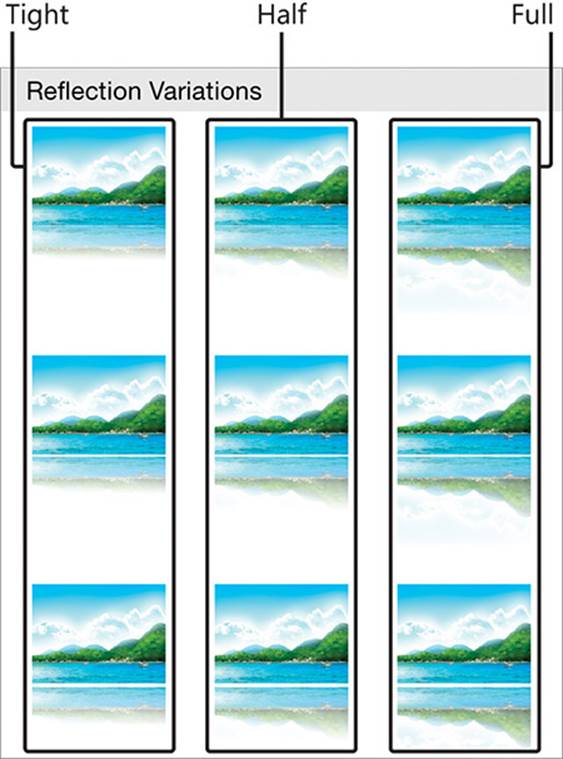
The available reflection variations represent three levels of reflection at varying distances from the picture
To apply a style to a picture
1. Tap the picture to select it.
2. On the Picture tool tab, tap Styles.
3. On the Styles menu, tap the style you want to apply to the picture.
Tip
You can repeat the process of applying a picture style, shadow effect, or reflection effect to apply a different variation of the same type of effect.
To add a shadow to a picture
1. Tap the picture to select it.
2. On the Picture tool tab, tap Shadow.
3. On the Shadow menu, do one of the following:
• To make the picture appear slightly raised above the document content, tap one of the Outer shadow thumbnails.
• To make the picture appear slightly sunken into the background of the document, tap one of the Inner shadow thumbnails.
• To make the picture appear even more raised above or sunken into the document, tap one of the Perspective shadow thumbnails.
Tip
You can add a shadow effect or reflection effect to a picture that has a picture style applied to it.
To remove a shadow applied to a picture
1. Tap the picture to select it.
2. On the Picture tool tab, tap Shadow.
3. On the Shadow menu, tap the thumbnail in the No Shadow section.
To display a reflection of a picture
1. Tap the picture to select it.
2. On the Picture tool tab, tap Reflection.
3. On the Reflection menu, in the Reflection Variations section, tap the level of reflection you want to display.
To remove a reflection applied to a picture
1. Tap the picture to select it.
2. On the Picture tool tab, tap Reflection.
3. On the Reflection menu, tap the thumbnail in the No Reflection section.
Replace and reset pictures
After you insert and format a picture, you might find that another picture is more appropriate for the situation. You can replace an embedded picture with another, without losing the changes you’ve made.
When you replace a picture, Word applies the changes you made to the original picture to the replacement picture. You can take advantage of this if you want to display multiple pictures with the same sizing and effects—insert and format the first picture, copy the picture and paste as many copies as you need into the document, and then replace each of the copies with another picture.
When you apply a style or effect to a picture in a document, the appearance of the picture changes, but the original picture doesn’t. You can change or remove effects that you apply to the picture at any time.
Important
If a picture is significantly larger than the page you insert it on, Word adjusts the proportions of the picture to fit it onto the page. Resetting the size of a picture returns it to its actual dimensions, which will not necessarily be the size it was when you inserted it. You might, therefore, need to resize the picture again to fit the page.
To replace a picture
1. Tap the picture to select it.
2. On the shortcut bar that appears, tap Replace.
3. On the Photos menu that appears, tap the storage location of the replacement photo, locate the photo, and then tap it.
To remove all changes made to a picture
1. Tap the picture to select it.
2. On the Picture tool tab, tap Reset.
3. On the Reset menu, do one of the following:
• To remove styles and effects from the picture, tap Reset Picture.
• To revert the picture to its original size but retain styles and effects, tap Reset Size.
• To undo all modifications to the picture, tap both options in turn.
Insert and format shapes
If you want to add visual interest and impact to a document but don’t need anything as specific as a picture, you can use shapes.
The Shapes menu includes a wide variety of shapes
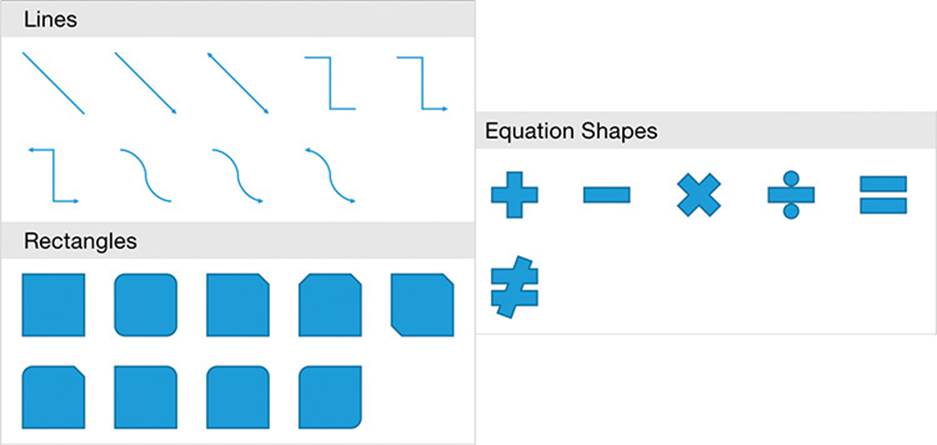
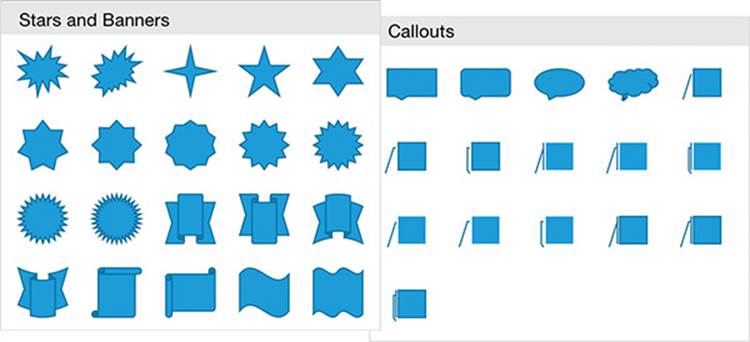
You can choose from many different shapes, which are grouped by category: Lines, Rectangles, Basic Shapes, Block Arrows, Equation Shapes, Flowchart Shapes, Stars and Banners, and Callouts. All the shapes other than those in the Lines category support the addition of text, although some display it better than others.
Many shapes are designed to display text
Word for iPad inserts each shape into the document at the default size and aspect ratio, and anchors it to a paragraph. You can then change the shape’s dimensions, angles, and rotation to create exactly the shape you want. You can arrange multiple shapes to draw iconic images.
Tip
You can add text to any shape other than a simple line. You can format the text on a shape by using the same methods you would to format document text. For more information, see “Insert and animate shapes” in Chapter 9, “Create compelling presentations.”

Nine shapes arranged to create a recognizable image
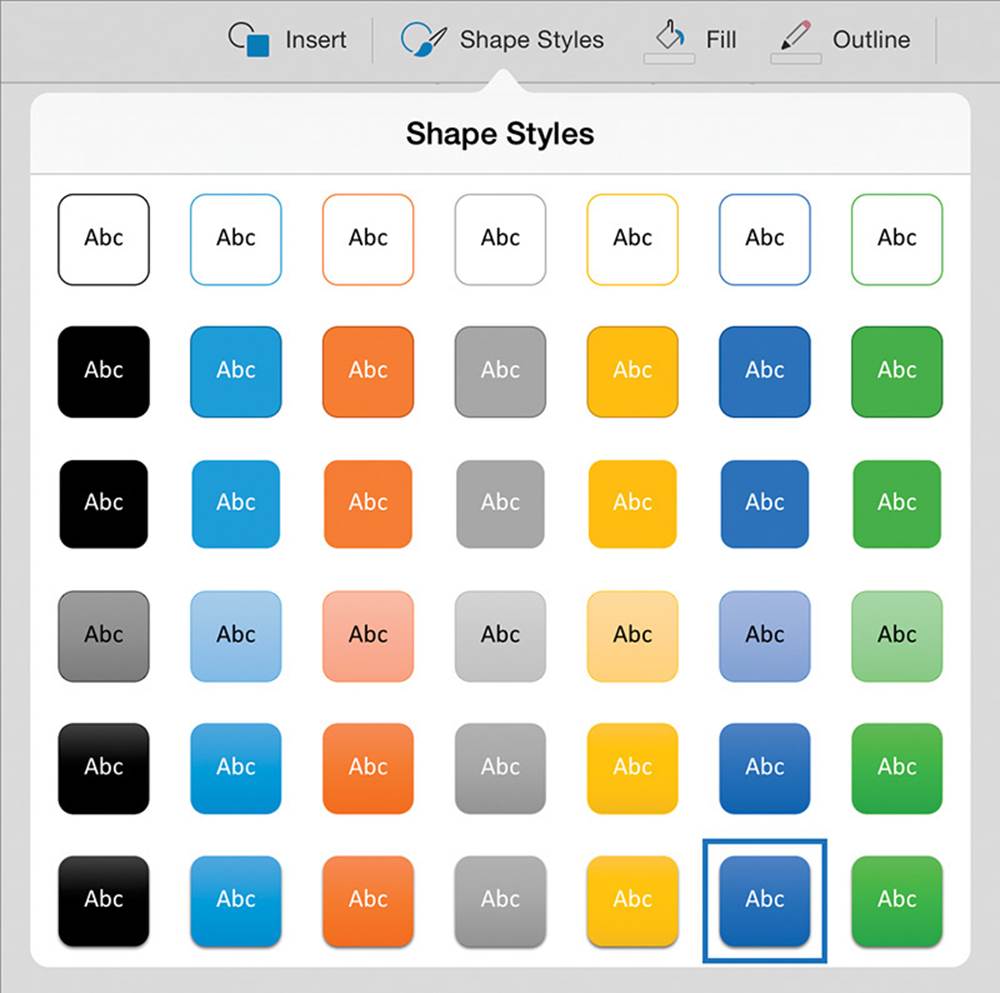
When you insert a new shape it has a blue outline and, depending on the shape, might be filled with blue. You can modify the outline color and fill color independently, or you can apply any of the 42 preformatted shape styles.
The available styles reflect the document color scheme
Shape styles combine fill color, outline color, transparency, and shadows to create a professional palette of options based on the color scheme of the document.
You modify the height, width, and rotation of a shape in the same way that you modify those aspects of a picture.
See Also
For information about resizing and rotating images, see “Insert and format pictures” earlier in this chapter. For information about controlling the position and order of shapes, see “Arrange images and text” later in this chapter.

A happy fan cheering her team to victory!
Tip
At the time of this writing,Word for iPad doesn’t support managing multiple shapes by grouping them as one object or placing them on a drawing canvas.
To draw a shape
1. Position the cursor in the paragraph where you want to insert the shape.
2. On the Insert tab, tap the Shapes button. Then on the Shapes menu, tap the shape you want to insert.
Word for iPad inserts the shape on the page and anchors it to the paragraph.
Tip
When you insert a shape, the Shape tool tab becomes active. You can insert additional shapes in the same location from the Insert menu on the Shape tool tab, and then arrange them the way you want.
To select a shape and activate the Shape tools
1. Tap the shape to select it.
Selecting a shape activates its sizing handles and the Shape tool tab.
To change the size of a shape
1. Select the shape.
2. Drag the sizing handles to resize the shape in any of the following ways:
• To resize the shape and maintain its aspect ratio, drag any round corner handle.
• To change only the height, drag the square handle on the top or bottom of the shape.
• To change only the width, drag the square handle on the left or right side of the shape.
To rotate a shape
1. Select the shape.
2. Drag the Rotate handle in a clockwise or counterclockwise direction until the shape is at the angle of rotation you want.
To apply preset fill and outline colors to a shape
1. Select the shape.
2. On the Shape tool tab, tap Shape Styles.
3. On the Shape Styles menu, tap the style you want to apply to the picture.
Tip
You can change the style that is applied to a shape by repeating the process of applying a style; it isn’t necessary to remove the style.
To change the interior color of a shape
1. Select the shape.
2. On the Shape tool tab, tap Fill.
3. On the Fill menu, do one of the following:
• In the Theme Colors section at the top of the menu, tap any one of the six hues of the 10 theme colors.
• In the Standard Colors section, tap one of the 10 standard colors or a recent custom color (if shown).
• At the bottom of the menu, tap Custom Color, locate the color you want by dragging on the spectrum, and then tap Apply.
To make the interior of a shape transparent
1. Select the shape.
2. On the Shape tool tab, tap Fill. Then on the Fill menu, tap No Fill.
To change the outline color of a shape
1. Select the shape.
2. On the Shape tool tab, tap Outline.
3. On the Outline menu, tap the theme color or standard color you want to apply.
Or
At the bottom of the menu, tap Custom Color, locate the color you want by dragging on the spectrum, and then tap Apply.
To remove the outline from a shape
1. On the Shape tool tab, tap Outline.
2. On the Outline menu, tap No Outline.
See Also
For more information about inserting and formatting shapes, see “Add visual elements to slides” in Chapter 9, “Create compelling presentations.”
Arrange images and text
In a text-heavy document, the relationship of pictures or shapes (collectively referred to in this section as images) to the text on the page can make a significant difference in the readability and professional appearance of the document. You can move images within the document to change their relationship to the document text. You can also configure an image to control the way that text wraps around it.
Text wrapping allows you to incorporate graphics into existing content
The text wrapping options have descriptive names and icons that accurately depict the application of each option. The options are:
![]() In Line with Text The image is placed directly within a paragraph.
In Line with Text The image is placed directly within a paragraph.
![]() Square Text wraps around all four sides of the image. The image sits within a rectangular space that is the maximum height and width of the image.
Square Text wraps around all four sides of the image. The image sits within a rectangular space that is the maximum height and width of the image.
![]() Tight Text wraps around all four sides of the image, but no space is reserved on the left and right sides; the text flows to the edge of the image.
Tight Text wraps around all four sides of the image, but no space is reserved on the left and right sides; the text flows to the edge of the image.
![]() Through Text wraps around all four sides of the image, including through any open space on the top or bottom of the image.
Through Text wraps around all four sides of the image, including through any open space on the top or bottom of the image.
![]() Top and Bottom Text flows above and below the image, but not on either side. This is the default text wrapping for a picture or shape you insert in Word for iPad.
Top and Bottom Text flows above and below the image, but not on either side. This is the default text wrapping for a picture or shape you insert in Word for iPad.
![]() Behind Text The text flow is not affected by the image, which appears behind the text. The text might interfere with the reader’s view of the image.
Behind Text The text flow is not affected by the image, which appears behind the text. The text might interfere with the reader’s view of the image.
![]() In Front of Text The text flow is not affected by the image, which appears in front of the text and might block the reader’s view of the text.
In Front of Text The text flow is not affected by the image, which appears in front of the text and might block the reader’s view of the text.
If you insert several images and then position them so that they overlap, they are said to be “stacked.” The stacking order (which object appears on top of which) is initially determined by the order in which you inserted the images, but it can also be determined by other factors such as the text wrapping setting of each image. If all the images use the same text wrapping style, you can change the order of the images by moving them toward (or to) the top or bottom of the stack.
If you can’t find a way to make an image work within a document, you can, of course, delete it.
To move an image within a document
1. Tap the image to select it.
2. Drag the image to the target location.
Or
On the shortcut bar that appears, tap Cut. Display the target location, double-tap to position the cursor and display the shortcut menu, and then tap Paste.
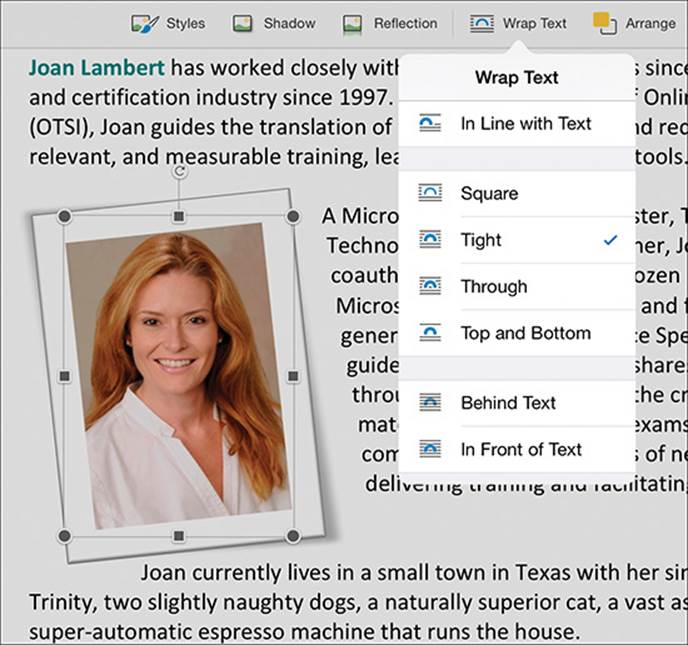
To wrap text around an image
1. Tap the image to select it.
2. On the Shape tool tab, tap the Wrap Text button.
3. On the Wrap Text menu, tap the text wrapping option you want.
4. If necessary, move the image on the page to adjust its position to account for the change in alignment.
To set the order of overlapping images
1. Tap the image you want to move forward or backward in the image stack.
2. On the Picture or Shape tool tab, tap Arrange.
3. On the Arrange menu, do one of the following:
• To move the picture to the top of the stack, tap Bring to Front.
• To move the picture one position closer to the top of the stack, tap Bring Forward.
• To move the picture to the bottom of the stack, tap Send to Back.
• To move the picture one position closer to the bottom of the stack, tap Send Backward.
To delete an image
1. Tap the image to select it.
2. On the shortcut bar that appears, tap Delete.
Skills review
In this chapter, you learned how to:
![]() Present content in lists
Present content in lists
![]() Present content in tables
Present content in tables
![]() Insert and format pictures
Insert and format pictures
![]() Insert and format shapes
Insert and format shapes
![]() Arrange images and text
Arrange images and text
Practice tasks

The practice files for these tasks are located in the iPadOfficeSBS\Ch05 folder.
Present content in lists
Open the CreateLists document, and then perform the following tasks:
1. In the Tips for business travelers section, select the paragraphs from If your trip is short to the end of the section, and then style the paragraphs as bulleted list items.
2. Add a travel tip of your own as a new list item at the end of the list.
3. Select the first bulleted list item and try different bullet symbols. Choose a bullet symbol other than the default and apply it to the entire list.
4. Select the fourth through seventh bulleted list items and demote them to a second-level list.
5. Select the paragraphs in the Don’t forget! section, and then style them as a bulleted list.
6. In the third-to-last item in this bulleted list, convert school, doctor, vet, and alarm company to separate second-level bulleted list items. Then delete the em dash.
7. In the blank paragraph near the beginning of the Snack idea section, enter 1. Take out three bowls, a cookie sheet, a large spoon, and all the ingredients. Notice that the entry becomes a numbered list item.
8. Select all the paragraphs that follow the numbered list item other than the final paragraph. Format these paragraphs as a numbered list. If the two lists don’t automatically merge, take the necessary action to merge the lists.
Present content in tables
Open the CreateTables document, and then perform the following tasks:
1. Select the paragraphs at the top of the document. Note that they contain entries separated by tab characters. Convert the paragraphs to a table.
2. In the blank paragraph at the end of the page, create a table that has two columns and eight rows. Then add the following headers:
• Nearby places I want to visit
• International places I want to visit
3. Add two more rows to the table, and then populate the empty cells by entering names of local and international destinations that you want to travel to.
4. Identify the table row that contains the places you least want to travel to. Delete that row.
5. Use the AutoFit function to size each column and row to fits its content.
6. Apply a table style of your choice.
7. Select the entries of the local and international destinations that you are most interested in visiting, and style them as italic.
8. Format the header row so that it is shaded, and then configure it to repeat at the top of each page if the table runs onto multiple pages.
9. Shade the cells that contain your second-favorite destinations.
10. Remove the table styling from the table above the one you created.
11. Select the table below the table you converted from text, and then delete it.
Insert and format pictures
Open the FormatPictures document, display the ruler, and then perform the following tasks:
1. Crop the image to display an area of the lower-left corner that is approximately 3.5 inches high and 5 inches wide.
2. Resize the picture to about half its height and width, keeping the same aspect ratio.
3. Rotate the picture 90 degrees clockwise.
4. Apply a frame style to the picture.
5. Add various shadow and reflection styles to the picture, and then remove either the shadow or the reflection style, depending on the look you want.
6. Replace the picture with one of your own, and then, if you want to, remove all the changes that are applied to the picture.
Insert and format shapes
Open the FormatShapes document, and then perform the following tasks:
1. Draw a heart shape above the word love.
2. Rotate the heart shape so that it’s leaning on its left side.
3. Resize the heart shape so that it’s wide enough to fit the text displayed below the heart.
4. Change the outline color of the heart to one you like, and then make the interior of the heart transparent.
5. Add the text that is below the heart to the shape, and then make any additional formatting changes that you want.
Arrange images and text
Open the ArrangeImages document, and then perform the following tasks:
1. Wrap the text squarely around the image of the train.
2. Move the image of the plane to the right side of the page, under the Tips for business travelers heading.
3. Wrap the text on the top and bottom of the trail mix image.
4. Move the trail mix image and the train image below the Don’t forget! heading.
5. Overlap the images with the train on the top and the trail mix behind it.
All materials on the site are licensed Creative Commons Attribution-Sharealike 3.0 Unported CC BY-SA 3.0 & GNU Free Documentation License (GFDL)
If you are the copyright holder of any material contained on our site and intend to remove it, please contact our site administrator for approval.
© 2016-2026 All site design rights belong to S.Y.A.