Microsoft Office for iPad Step by Step (2015)
Part 2: Microsoft Word for iPad
6. Enhance document content
In this chapter
![]() Configure text in columns
Configure text in columns
![]() Draw and format text boxes
Draw and format text boxes
![]() Reference additional information
Reference additional information
![]() Configure page layout
Configure page layout
![]() Collaborate on content development
Collaborate on content development
Chapter 5, “Add visual elements to documents,” discussed the various graphic elements you can add to a document to convey information, brand the document, or simply provide decoration. Beyond these visual elements, there are ways that you can format the content of a document to put the finishing touches on it.
You can lay out long segments of text in columns to make them more readable, or long lists of items in columns to fit more on the page. You can draw attention to a quotation by displaying it in a text box that floats on the page. You can provide ancillary text in text boxes or in footnotes, or you can provide a link from within the document directly to a reference webpage.
Practice files
For this chapter, use the practice files from the iPadOfficeSBS\Ch06 folder. For practice file download instructions, see the Introduction.
When the document content is ready, you can specify the dimensions of the printable space and add headers, footers, and page numbers if appropriate. You can then invite other people to review the document, provide feedback, and make edits for your review and approval.
This chapter guides you through procedures related to laying out text in columns or text boxes, linking to external content, creating footnotes, controlling the layout of content on the page, tracking changes, and working with comments.
Configure text in columns
You can configure a section of text to display in two or three columns, rather than a single page-width column. You can use columns for different purposes. For example, long sections of text (such as newspaper articles) are often formatted in partial-page columns so that people can more easily read the content. Columns are also useful for displaying more than one page of short entries (such as a word list) on one page.
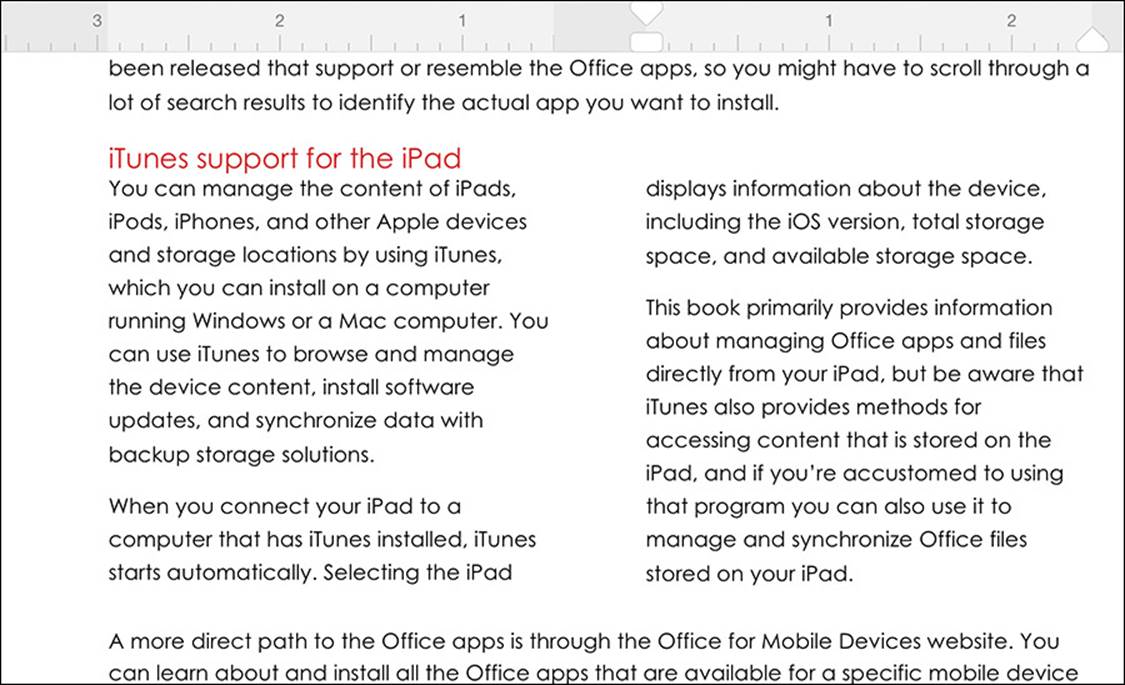
The ruler displays the margins and indents for the active column
By default, Word divides the columns as evenly as possible. If you don’t like the location of the column breaks—for example, if you don’t want to break a column in the middle of a paragraph—you can set them manually.
Display column-related marks and tools
Columnar text is set off from the surrounding text by dividers called section breaks, which are visible when you display paragraph marks, spaces, tabs, and other hidden formatting symbols in the document. It can be useful to display the section breaks when you want to modify the content of the columns or remove them.
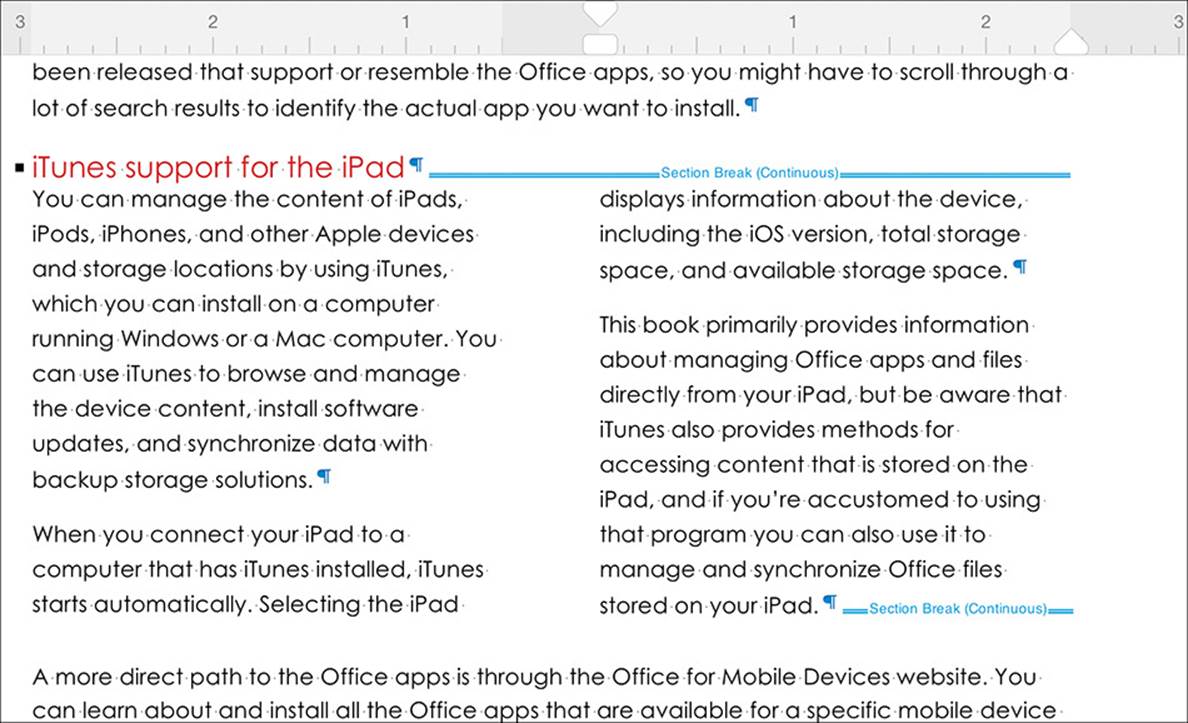
Continuous section breaks mark the beginning and end of the columnar content
Another tool that is useful for working with columns, but not shown by default, is the ruler. You can modify the margins and indents of the active column by dragging the markers on the ruler.
To display hidden formatting symbols, tap the Show/Hide ¶ button located at the right end of the Home tab. To display the ruler, tap the Ruler slider on the View tab to change the slider background to green.
SEE ALSO For information about using page and section breaks to structure document content, see “Configure page layout” later in this chapter. For information about indent and tab markers on the ruler, see “Align, space, and indent paragraphs” in Chapter 4, “Create professional documents.”
To display text in columns
1. Select the text that you want to display in columns.
 See Also
For information about selecting text in Word documents, see “Move, copy, and delete text” in Chapter 4, “Create professional documents.”
2. On the Layout tab, tap Columns, and then do one of the following:
• Tap Two or Three to format the selected text in two or three columns of equal width.
• Tap Left or Right to format the selected text in two columns, with a narrow column on the specified side and a wide column on the other side.
To manually set the column break location
1. Position the cursor at the beginning of the content you want to start the next column with.
2. On the Layout tab, tap Breaks, and then tap Column.
 Tip
Tip
If you’re using an external keyboard with your iPad, you can set the column break location by pressing Shift+Return.
To change the number or width of columns
1. Position the cursor anywhere in the columnar text.
2. On the Layout tab, tap Columns, and then tap the column layout you want.
To change the content included within the columns
1. To add text from outside of the current column content, move the text to the position you want it to appear within the column area.
2. To expand or contract the content that is included in the columns, first display hidden characters.
3. To move the starting point of the column content, tap to position the cursor at the beginning of the section break that precedes the columns.
Or
To move the ending point of the column content, tap to position the cursor at the beginning of the section break that follows the columns.
4. Tap the same location again to display the shortcut bar. On the shortcut bar, tap Select, and then tap Cut.
5. Double-tap at the new starting point or ending point of the content you want to include in the columns, and then on the shortcut bar, tap Paste.
To change the space between columns
1. Display the ruler.
2. Select the content of a column adjacent to the space you want to modify.
3. On the ruler, drag the left margin marker or right margin marker of the column to change its width and adjust the space between it and the next column.
4. Repeat the process if necessary to adjust another space.
See Also
For information about markers on the ruler, see “Align, space, and indent paragraphs” in Chapter 4, “Create professional documents.”
To revert from multiple columns to one column
1. Position the cursor anywhere in the columnar text.
2. On the Layout tab, tap Columns, and then tap One.
Or
1. Display hidden characters.
2. Tap the section break that precedes or follows the columns, and then tap again to display the shortcut bar.
3. On the shortcut bar, tap Select, and then tap Delete.
4. Repeat steps 2 and 3 to delete the other section break.
Tip
Formatting multiple columns as one column retains the section breaks that start and end the columnar text. Deleting the section breaks is a more complete process.
Draw and format text boxes
When you want to display text that is independent of the standard flow of content on a page, you can do so by inserting the content in a text box. Text boxes are containers that you can position either in a specific location on a page or relative to other page elements. Common uses for text boxes are as containers for sidebars and quotes that you pull from the content (referred to as pull quotes).
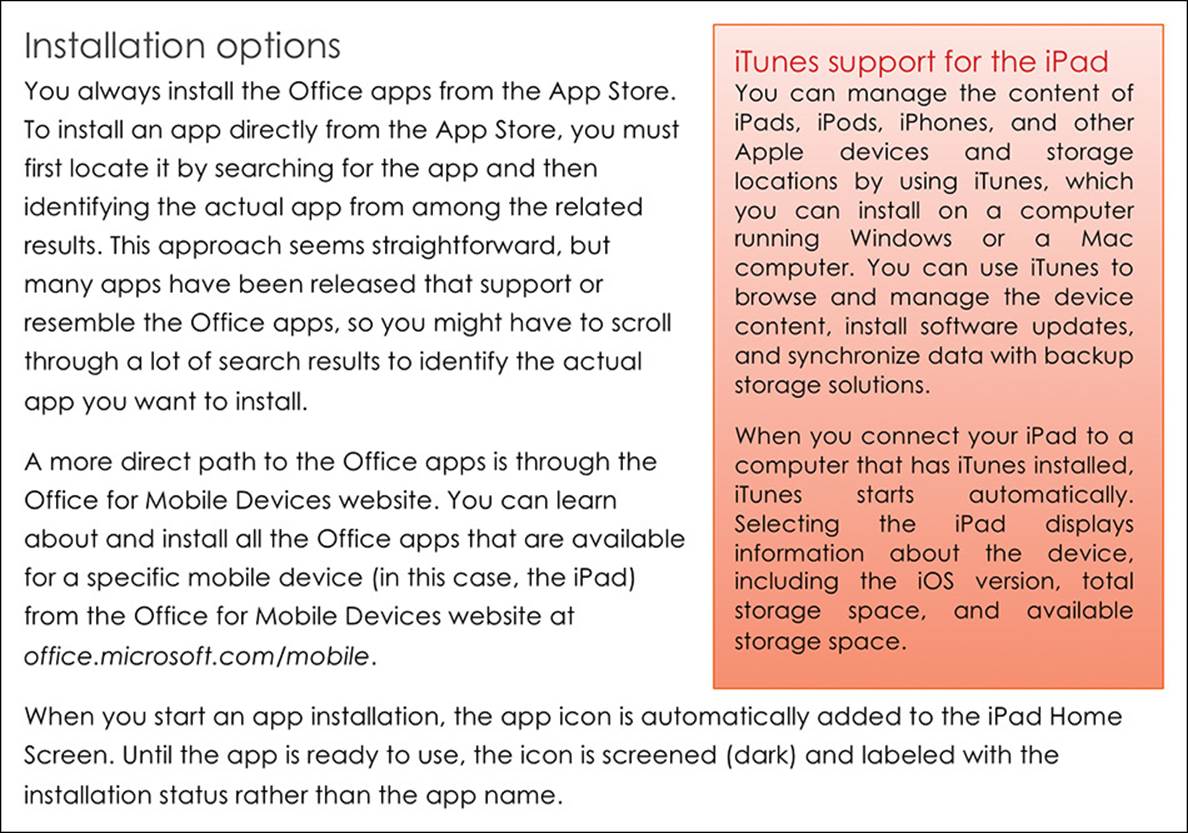
Sidebars can contain ancillary content that you want readers to notice
If the text you want to feature in a text box already exists in the document you can select the text and create a text box around it. Otherwise, you can insert a blank text box and enter content into it. Then you can move, resize, and format the text box.
You format the content of a text box independently of the surrounding text. You can define the outline color, fill color, and text effects (referred to on the Shape tool tab as WordArt Styles).
Text boxes that you create in Word for iPad are always square or rectangular, although you can make the text box appear to be a different shape by placing a shape on top of an unformatted text box.
You control the way that text flows around a text box in the same way that you control the flow of text around a graphic. You can position the text box in line with other text, wrap text around the text box, or position the text box behind or in front of the document content.
See Also
For information about working with shapes, see “Insert and format shapes” and “Arrange images and text” in Chapter 5, “Add visual elements to documents,” and “Add visual elements to slides” in Chapter 9, “Create compelling presentations.”
You can apply a thematic style to the text box or format the text box outline and fill colors independently. You can also apply a WordArt text effect to the text within the text box. (The WordArt effects could be appropriate when placing a title or short slogan in the text box, but aren’t well-suited to longer sections of text.)
See Also
For information about text effects, see “Change the appearance of text” in Chapter 4, “Create professional documents.”
The commands that you use to format text boxes are on the Shape tool tab, which is visible when the text box or its content is active.

Each command on the Shape tool tab displays a menu of options
To create a text box that contains existing text
1. Select the text you want to move.
2. On the Insert tab, tap Text Box.
Tip
You can create a text box from existing text in Word for iPad but not in Excel for iPad, PowerPoint for iPad, or OneNote for iPad.
To insert a blank text box
1. On the Insert tab, tap Text Box to insert a basic square text box.
2. Display the ruler. Using the markers on the ruler as a guide, do the following:
a. Drag the text box to the location where you want it.
b. Drag the handles to roughly resize the text box.
Tip
You can most precisely finalize the text box size after you insert the content.
3. On the Shape tool tab, tap Wrap Text.
4. On the Wrap Text menu, tap the wrapping option you want.
To insert text into a text box
1. If you’re moving or copying existing text into the text box, cut or copy the text to the Clipboard.
2. Double-tap inside the text box to position the cursor.
Or
Tap the text box, and then on the shortcut bar, tap Edit Text.
3. Enter the text you want or paste the text from the Clipboard.
To change the way text fits into a text box
1. If you want to change the text box to fit the text:
a. Tap the text box to select it.
b. Resize the text box by dragging the handles.
2. If you want to change the text to fit the text box:
a. Select all or part of the text.
b. Drag the margin markers on the ruler to set the inside margins.
c. Tap the formatting commands on the Home tab to change the size and alignment of the text.
To apply preset fill and outline colors to a text box
1. Tap the text box to select it.
2. On the Shape tool tab, tap Shape Styles.
3. On the Shape Styles menu, tap one of the 42 preset color combinations.
To fill a text box with color
1. On the Shape tool tab, tap Fill.
2. On the Fill menu, do one of the following:
• In the Theme Colors section at the top of the menu, tap any one of the 6 hues of the 10 theme colors.
• In the Standard Colors section, tap one of the 10 standard colors or a recent custom color (if shown).
• At the bottom of the menu, tap Custom Color, locate the color you want by dragging on the spectrum, and then tap Apply.
To remove the fill color from a text box
1. On the Shape tool tab, tap Fill.
2. On the Fill menu, tap No Fill.
To outline a text box with color
1. On the Shape tool tab, tap Outline.
2. On the Outline menu, do one of the following:
• In the Theme Colors section at the top of the menu, tap any one of the 6 hues of the 10 theme colors.
• In the Standard Colors section, tap one of the 10 standard colors or a recent custom color (if shown).
• At the bottom of the menu, tap Custom Color, locate the color you want by dragging on the spectrum, and then tap Apply.
To remove the outline from a text box
1. On the Shape tool tab, tap Outline.
2. On the Outline menu, tap No Outline.
Tip
Text normally flows from left to right. You can change the direction of the text to read sideways, from top to bottom, as though you were changing the orientation of the page. To do so, first select the text you want to rotate. Then, on the Layout tab, tap Text Direction, and tap Rotate All Text 90°. When working with text in a text box, you also have the option to rotate text 270° so that it reads from bottom to top.
Reference additional information
When you are creating a document, it is sometimes useful to be able to refer the reader to external content on the Internet. You can make that content easily available to readers by inserting a hyperlink from a location in your document to the web content. It is customary to hyperlink from a word or short phrase (such as click here), but you can also hyperlink from images and other content elements. The hyperlinked text or object (the anchor) appears underlined. The reader taps or clicks the underlined content to open the webpage you’ve specified, in his or her default web browser.
If you want to provide only a small amount of ancillary information and make it quickly available within the context of the document, you can insert a footnote at a specific location in the document that refers the reader to the related supporting content at the bottom of the page. Footnotes are often used to attribute quoted information to its original source.
Footnotes that you insert in Word for iPad are identified by numbers, starting with 1, rather than by letters, roman numerals, or symbols. If you want to use something other than consecutive numbers to identify footnotes in a document, or if you want the footnotes to appear immediately after the text on the page or at the end of the document, rather than at the bottom of the page, you can configure those from a desktop version of Word.
To create a hyperlink from document content to a webpage
1. Select the text or object you want to anchor the hyperlink to.
2. On the Insert tab, tap Link.
3. In the Insert Hyperlink box, do the following:
a. In the Address box, enter the URL of the webpage you want to link to.
b. Verify that the information in the Display box is correct.
Tip
Display the webpage you want to link to. Copy the address from the Address bar of the web browser, and paste it into the Insert Hyperlink box.
4. Tap away from the Insert Hyperlink box to close it.
To create a footnote
1. Position the cursor at the location in the document content where you want the footnote reference mark to appear.
2. On the Insert tab, tap Footnote to insert a footnote reference mark in the content and move to the corresponding footnote area.
3. In the footnote area, enter the ancillary information you want to provide to readers.
4. Tap in the document area to return to the document content.
To change footnote content
1. Tap in the footnote area at the bottom of the page.
2. Edit the footnote content.
3. Tap in the document area to return to the document content.
To delete a footnote
1. Position the cursor in the document content, after the superscript number that identifies the footnote you want to delete.
2. Tap Delete on the on-screen keyboard or a connected external keyboard one time to select the number and a second time to delete the number and the associated footnote content.
Configure page layout
Page layout is the way that text and other content fits onto the pages of a document. You can define the basic layout of a document by specifying the dimensions of the content area and the document information that appears outside of the content area. You can control the amount of content that falls on each page. If necessary, you can divide a document into sections and define the characteristics of each section.
Specify the dimensions of the content area
When you are configuring the presentation of a document, the primary boundaries are defined by three settings: the dimensions of the page (the page size), the direction of the page (the page orientation), and the space between the content boundaries and the edge of the page (the page margins).
The commands that are most frequently used to define the content area are available from the Layout tab of the ribbon.
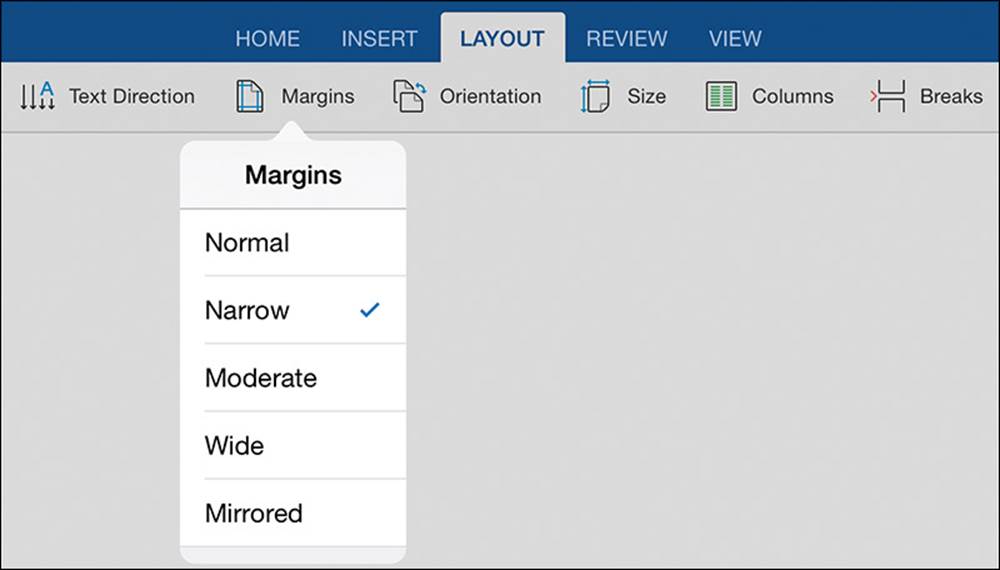
The page layout commands and margin options
There are two page orientation options: Portrait and Landscape. These options are appropriately named for the type of content that would be printed at each orientation. In practice, most documents have a portrait orientation (with the page higher than it is wide). Landscape orientation (with the page wider than it is high) is standard for content that requires a greater width to display appropriately, such as documents with complex tables, worksheets with many columns of data, and full-page slides.
The page size is almost always defined by the paper you’re planning to print on. Word for iPad supports seven page sizes: Letter (8.5 by 11 inches), Legal (8.5 by 14 inches), A3, A4, A5, B4 JIS, and B5 JIS.
![]() The Letter and Legal paper sizes are part of a group of paper size standards known as “loose” standards, which don’t follow any specific guidelines but are the official paper standards of the United States, Canada, and Mexico.
The Letter and Legal paper sizes are part of a group of paper size standards known as “loose” standards, which don’t follow any specific guidelines but are the official paper standards of the United States, Canada, and Mexico.
![]() The A series of paper sizes has an aspect ratio of one to the square root of two (approximately 1:1.4) and is the official paper standard of most European countries and regions.
The A series of paper sizes has an aspect ratio of one to the square root of two (approximately 1:1.4) and is the official paper standard of most European countries and regions.
![]() The JIS-B series represents the Japan Industrial Standard (JIS) paper size standard and has an area approximately 1.2 times that of the corresponding A series paper sizes.
The JIS-B series represents the Japan Industrial Standard (JIS) paper size standard and has an area approximately 1.2 times that of the corresponding A series paper sizes.
The most common paper sizes are 8.5-by-11 inches in the United States and Canada, and A4 in most other countries and regions. Your installation of Word for iPad is probably set to default to the common paper size for your country or region. Sometimes, though, you’ll create a document that you intend to print at a different size, such as a legal contract, and you’ll need to change the page size.
The page margins define the space around the outside edge of the page that is blank other than any headers, footers, or page numbers you choose to display. The following table details the six margin options that Word for iPad supports.
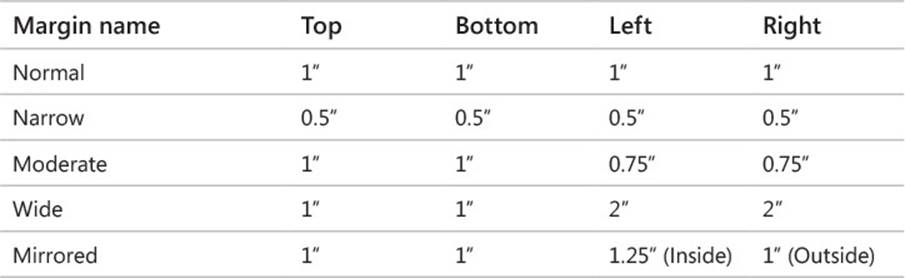
The Mirrored margin settings are intended for use in documents with pages that are printed on both sides of the paper and turned like those of a book.
Tip
These are the same standard margins supported by the desktop versions of Word. The desktop versions also allow you to set custom margins.
To set page margins
1. On the Layout tab, tap the Margins button.
2. On the Margins menu, tap Normal, Narrow, Moderate, Wide, or Mirrored.
To set page orientation
1. On the Layout tab, tap the Orientation button.
2. On the Orientation menu, tap Portrait or Landscape.
To set page size
1. On the Layout tab, tap the Size button.
2. On the Size menu, tap Letter, Legal, A3, A4, A5, B4 JIS, or B5 JIS.
Add page headers and footers
As previously mentioned, document margins are empty of any content other than headers, footers, and page numbers.
The header is a defined area within the top page margin, and the footer is a defined area within the bottom page margin. You can insert text and images in the page headers and footers. By default, the header and footer content appears on every page of the document. You can configure different header and footer content for the first page and for all subsequent pages, and for odd pages and even pages. Here are some examples of when you might want to configure different headers and footers:
![]() If your document has a cover page, leave the header and footer of the cover page blank, and display information only in the headers and footers of subsequent pages.
If your document has a cover page, leave the header and footer of the cover page blank, and display information only in the headers and footers of subsequent pages.
![]() If your document will be printed double-sided and page-turned like a book, configure different headers and footers for odd and even pages, and position the information on the outside margin of each.
If your document will be printed double-sided and page-turned like a book, configure different headers and footers for odd and even pages, and position the information on the outside margin of each.
You can turn on both options (different first page and different odd and even pages) for documents that have a cover page and will be printed double-sided.
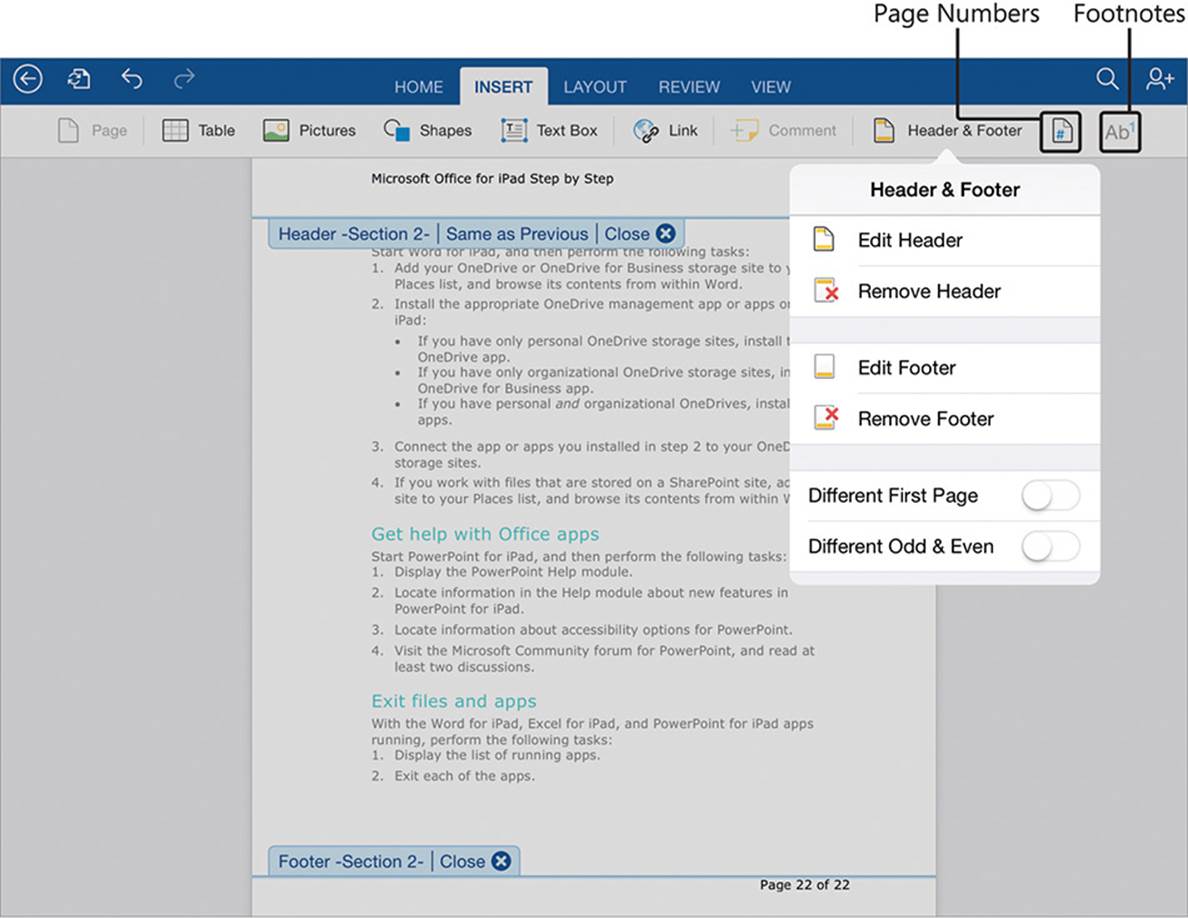
The active header and footer and corresponding options
The header and footer areas have preset tab stops to position content at the left margin, in the center, and at the right margin. Inserting one tab character aligns the subsequent content with the horizontal center of the page; inserting two tab characters right-aligns the subsequent content with the right margin.

You can format the header content and adjust the tab stops to fit your needs
See Also
For information about tabs, see “Align, space, and indent paragraphs” in Chapter 4, “Create professional documents.”
As you flick through a document vertically in Word for iPad, the page number appears temporarily near the bottom of the app window. The page number shown corresponds to the page of the document when it is printed at the current page layout settings. You can also display the page number in the header or footer so that it is visible in the printed document. You don’t have to enter the correct number on each page; Word enters it for you and keeps it up to date.
The default setting when you turn on page numbers is for the number to appear at the right end of the footer on every page of the document. You can configure the position, alignment, and format of the page number, and whether the page number is shown on the first page. (When a document has a cover page, it is standard practice to omit the page number from that cover page.)
To activate the document header or footer area for editing
1. Double-tap the document header area or document footer area.
Or
1. On the Insert tab, tap the Header & Footer button.
2. On the Header & Footer menu, tap Edit Header or Edit Footer.
To display information in a document header or footer
1. Activate the document header or footer.
2. Enter and format the content.
3. Tap the Close button below the header or above the footer to return to the document.
To display a unique header and footer on the first page
1. On the Insert tab, tap the Header & Footer button.
2. On the Header & Footer menu, tap the Different First Page slider to change its background to green. Then tap Edit Header.
3. Move to the first page of the document. Enter the content in the header and footer that you want to display on only that page (or leave them blank).
4. In the second page header and footer, enter the content you want to display on the second and subsequent pages.
To display different headers and footers on odd and even pages
1. On the Insert tab, tap the Header & Footer button.
2. On the Header & Footer menu, tap the Different Odd & Even slider to change its background to green. Then tap Edit Header.
3. In the second page header and footer, enter the content you want to display on even-numbered pages.
4. In the third page header and footer, enter the content you want to display on odd-numbered pages.
Tip
When you turn the pages of a document that is printed double-sided, the odd-numbered pages appear on the right (recto) and even-numbered pages on the left (verso). You can ensure that header or footer content is always on the outside edge of the page by positioning it on the left side of even pages and on the right side of odd pages.
To remove all content from the header or footer
1. On the Insert tab, tap the Header & Footer button.
2. On the Header & Footer menu, tap Remove Header or Remove Footer.
To display page numbers
1. On the Insert tab, tap the Page Numbers button (represented by a page icon with a number sign [#] on it).
2. On the Page Numbers menu, tap the Numbering slider to change its background to green and display the page numbering options.
3. On the Page Numbers menu, do any of the following:
• To remove the number from the first page of the document, tap the Show # on First Page slider to change its background to white.
• To change the location of the page number, tap Position. On the Position menu, tap Top of page (Header) or Bottom of page (Footer).
• To change the horizontal position of the page number, tap Alignment. On the Alignment menu, tap Left, Center, Right, Inside, or Outside.
• To change the page number format, tap Format. On the Format menu, tap the numbering format you want.
To remove page numbers
1. On the Insert tab, tap the Page Numbers button.
2. On the Page Numbers menu, tap the Numbering slider to change its background to white.
Manage page and section breaks
When the content of a document doesn’t fit between the top and bottom margins of one page, Word inserts soft page breaks to create additional pages. If you don’t like the location of a page break, you can break the page earlier by inserting a manual page break. (Or you can change the margins, but that will affect the layout of the entire document.)
Tip
Word for iPad doesn’t provide access to paragraph line and page break settings that permit you to specify whether or where paragraphs can break across pages. For this finer level of control, edit the document in a desktop version of Word.
If you want to change more than a page break, you can divide a document into sections. For each section of the document, you can configure the page layout differently. For example:
![]() If you’re working in a document that has the usual portrait page orientation (with the page higher than it is wide) and you need to display a large table or graphic, or other content that is wider than the page, you can put that content in its own section and configure the section to display and print in a landscape orientation (with the page wider than it is high).
If you’re working in a document that has the usual portrait page orientation (with the page higher than it is wide) and you need to display a large table or graphic, or other content that is wider than the page, you can put that content in its own section and configure the section to display and print in a landscape orientation (with the page wider than it is high).
![]() If you want specific document content to have wider or narrower page margins than the rest of the document, you can put that content in its own section and configure the margins of each section separately.
If you want specific document content to have wider or narrower page margins than the rest of the document, you can put that content in its own section and configure the margins of each section separately.
![]() If you plan to print a multipage document double-sided and want to make sure that a specific page (such as the beginning of a new chapter of a book) prints on the “front” side of the page, you can start a new section and configure the section to start on the next odd-numbered page.
If you plan to print a multipage document double-sided and want to make sure that a specific page (such as the beginning of a new chapter of a book) prints on the “front” side of the page, you can start a new section and configure the section to start on the next odd-numbered page.
Tip
Section breaks are also used to start and end columnar formatting. For more information, see “Configure text in columns” at the beginning of this chapter.
The type of section break you insert determines the starting location of the content immediately following the section break. The section break options are Continuous (which doesn’t force a page break), and Next Page, Even Page, and Odd Page (which forces the content that follows the section break onto the next page, the next even-numbered page, or the next odd-numbered page.
Tip
Section breaks are also used to start and end columnar formatting. For more information, see “Configure text in columns” at the beginning of this chapter.
To start a new page
1. Position the cursor at the beginning of the content that will start the next page.
2. On the Layout tab, tap the Breaks button.
3. On the Breaks menu, tap Page.
To create a section without affecting page breaks
1. Position the cursor at the beginning of the content that will start the next section.
2. On the Layout tab, tap the Breaks button.
3. On the Breaks menu, tap Continuous.
To create a section that starts on the next page
1. Position the cursor at the beginning of the content that will start the next section.
2. On the Layout tab, tap the Breaks button. Then on the Breaks menu, tap Next Page.
To create a section that starts on the next even-numbered page
1. Position the cursor at the beginning of the content that will start the next section.
2. On the Layout tab, tap the Breaks button. Then on the Breaks menu, tap Even Page.
To create a section that starts on the next odd-numbered page
1. Position the cursor at the beginning of the content that will start the next section.
2. On the Layout tab, tap the Breaks button. Then on the Breaks menu, tap Odd Page.
Collaborate on document content
Teams of people frequently work together to develop business documents. Gone are the days of passing around printouts and trying to figure out what changes to enter—by using Word, you and your colleagues can collaborate directly within the document file. Word has many features to simplify the process of collaborating on documents. Chief among these are change tracking and comments.
Track and review changes
During the writing and reviewing processes, document authors can track the changes they make to content, either for their own reference or for other people to review. When change tracking is turned on, Word tracks the insertion, deletion, and movement of text, and changes to formatting. You can turn off the tracking of each of these elements individually.
You can display insertions and deletions inline or in balloons
The commands that you use to manage change tracking and tracked changes are located on the Review tab.

The change tracking management buttons
Simultaneous coauthoring
Within the Office 365 structure, it is increasingly easy for Word users to collaborate with other document authors while developing content. Word for iPad, Word Online, and the desktop versions of Word all support coauthoring of documents that are stored in shared locations such as SharePoint or OneDrive. Multiple people who have access to the document storage location can open the document on their own computers or iPads, review the document content, and make changes to the document content simultaneously.
Coauthoring of files stored in a SharePoint document library works only for files that aren’t checked out for the exclusive use of any one person.
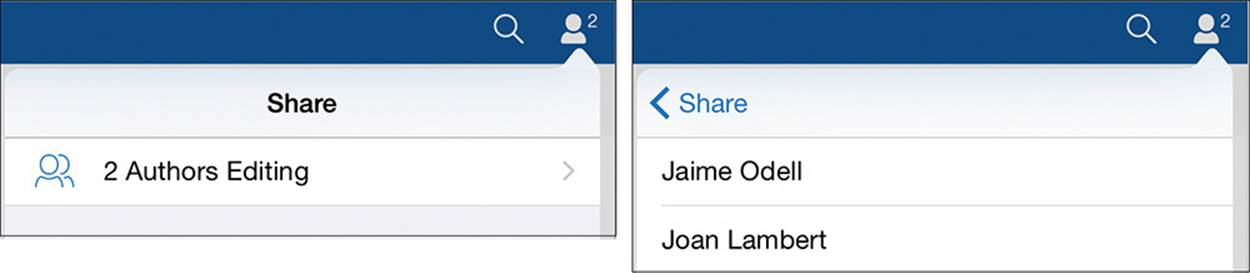
When multiple people are editing a document, the Share icon at the right end of the ribbon changes to display the number of concurrent authors. You can tap the Share icon to display the user account names of the people who currently have the file open.
You can coauthor documents with colleagues who are using Word on any device
Word locks the content of any paragraph for the exclusive use of the person who is editing that paragraph. Depending on the version of Word an author is working in, changes are available to other document authors as soon as they’re made or when the document is saved.
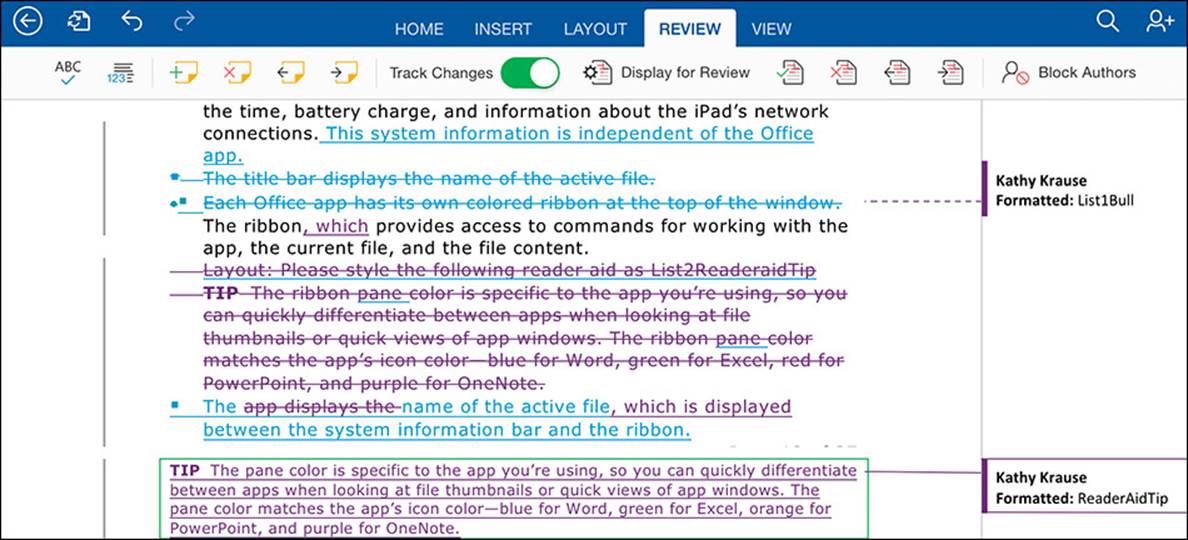
When reviewing a document, you can display it with the tracked changes visible, display the document as it would look if all the changes were incorporated, or display the original version without any of the changes. A vertical gray line in the left margin indicates each line of text that contains changes.
Word assigns a color to each reviewer for the purpose of tracking changes and inserting comments. In Word for iPad the color is based on your user account.
Each user account has a specific color for revisions
Changes can be shown either inline or in balloons in the margin. You can accept or reject individual changes or all changes in the document at one time.
To turn on change tracking
1. On the Review tab, tap the Track Changes slider to change its background to green.
To move among visible changes and comments
1. On the Review tab, tap the Previous Change or Next Change button.
To switch among different views of revisions
1. On the Review tab, tap the Display for Review button.
2. On the Display for Review menu, tap one of the following to specify the visible changes:
• All Markup to display the final content with changes and comments visible
• No Markup to display the final content with changes and comments hidden as though they have all been accepted
• Original with Markup to display the original content with changes and comments visible
• Original to display the original content without any changes
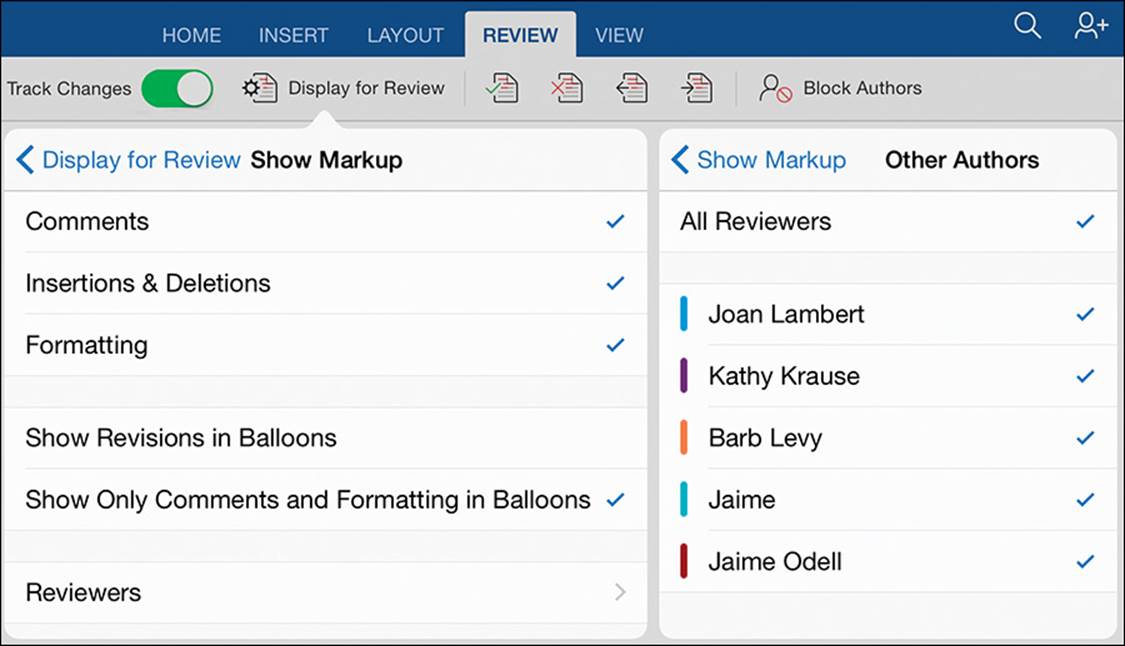
To show or hide specific types of changes or comments
1. On the Review tab, tap the Display for Review button.
2. On the Display for Review menu, tap Show Markup.
3. On the Show Markup menu, tap to select or clear any of the following:
• Comments
• Insertions & Deletions
• Formatting
To show or hide revisions by specific reviewers
1. On the Review tab, tap the Display for Review button.
2. On the Display for Review menu, tap Show Markup.
3. On the Show Markup menu, tap Reviewers.
4. On the Other Authors menu, tap All Reviewers to select or cancel the selection of all reviewers. Then tap any reviewer’s name to display or hide that reviewer’s revisions and comments.
To display insertions, deletions, and formatting changes in the page margins
1. On the Review tab, tap the Display for Review button.
2. On the Display for Review menu, tap Show Markup.
3. On the Show Markup menu, tap Show Revisions in Balloons.
To display insertions and deletions within the text
1. On the Review tab, tap the Display for Review button.
2. On the Display for Review menu, tap Show Markup.
3. On the Show Markup menu, tap Show Only Comments and Formatting in Balloons.
Tip
When displayed within the text, insertions are underlined and deletions are struck through. This is not an actual application of character formatting; it is visible only within the context of the tracked changes.
To accept one or more changes
1. On the Review tab, tap the Accept button.
2. On the Accept menu, tap one of the following:
• Accept & Move to Next to accept the selected insertion, deletion, or formatting change and move to the next insertion, deletion, formatting change, or comment
• Accept Change to accept the selected insertion, deletion, or formatting change and remain at that location in the document
• Accept All Shown to accept all the types of changes that are currently selected on the Show Markup menu
• Accept All to accept all insertions, deletions, and formatting changes in the document
• Accept All & Stop Tracking to accept all insertions, deletions, and formatting changes in the document and turn off change tracking
To reject one or more changes
1. On the Review tab, tap the Reject button.
2. On the Reject menu, tap one of the following:
• Reject & Move to Next to reject the selected insertion, deletion, or formatting change and move to the next insertion, deletion, formatting change, or comment
• Reject Change to reject the selected insertion, deletion, or formatting change and remain at that location in the document
• Reject All Shown to reject all the types of changes that are currently selected on the Show Markup menu
• Reject All to reject all insertions, deletions, and formatting changes in the document
• Reject All & Stop Tracking to reject all insertions, deletions, and formatting changes in the document and turn off change tracking
Tip
To accept or reject all revisions of a specific type, hide the changes you want to remain tracked by clearing their check marks on the Show Markup menu, and then tap Accept All Shown on the Accept menu or Reject All Shown on the Reject menu.
To turn off change tracking
1. On the Review tab, tap the Track Changes slider to change its background to white.
Or
1. On the Review tab, tap the Accept button.
2. On the Accept menu, tap Accept All & Stop Tracking.
Or
1. On the Review tab, tap the Reject button.
2. On the Reject menu, tap Reject All & Stop Tracking.
Insert and manage comments
While reviewing a document in Word for iPad, you can insert comments in the document. Comments are useful for making suggestions, asking questions, explaining changes, or providing additional information. When comments are displayed, they appear in balloons at the right edge of the page.
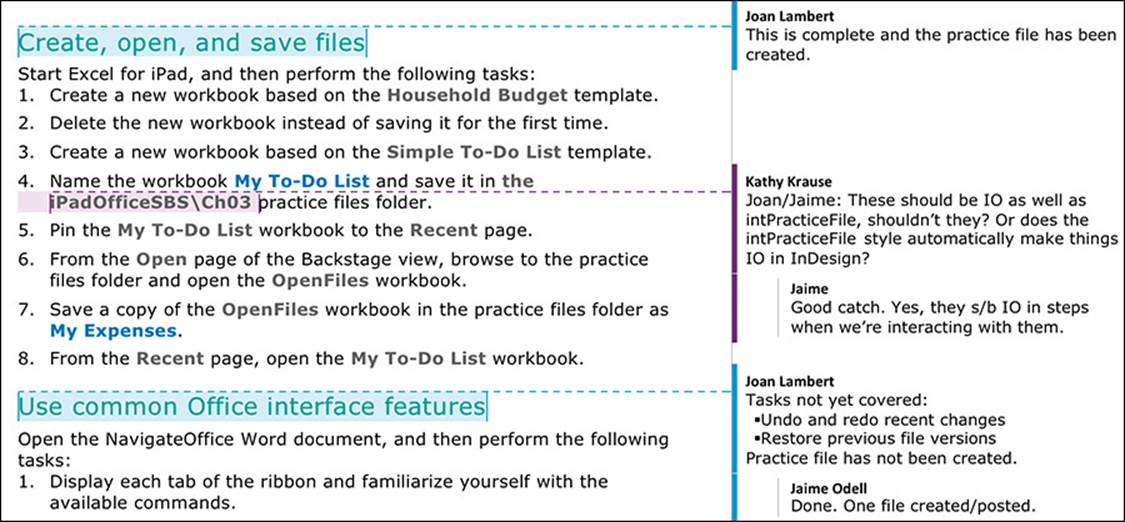
Each user’s comments are shown in the same color as his or her tracked changes
The buttons used for inserting and managing comments are located near the left end of the Review tab.

The comment management buttons
You can also attach a comment to text when you select it, by tapping the New Comment button on the shortcut bar.
You can attach comments to specific text or simply tap to position the cursor in the area where you’d like to insert the comment. Comments can contain elements such as formatted text, graphics, hyperlinks, and lists.
You can review comments as you flick through the text, or move directly from one comment to the next. When using Word for iPad, you can respond to comments by adding text to the existing comment balloon. (Desktop versions of Word have a Reply To Comment feature that is not available in Word for iPad.)
Tip
When responding inline to a comment, start your response with your name or initials to indicate that your response isn’t part of the original comment.
To insert a comment
1. Select the text you want to attach the comment to, and then do one of the following:
• On the shortcut bar that appears, tap New Comment.
• On the Review tab, tap the Insert a Comment button.
Or
Tap to position the cursor where you want to insert the comment. Then on the Review tab, tap the Insert a Comment button.
2. Enter your comment in the active comment balloon.
3. Tap away from the balloon to return to the text.
To move among comments
1. On the Review tab, tap the Previous Comment or Next Comment button.
To show or hide comments by specific reviewers
1. On the Review tab, tap the Display for Review button.
2. On the Display for Review menu, tap Show Markup.
3. On the Show Markup menu, tap Reviewers.
4. On the Other Authors menu, tap All Reviewers to select or cancel the selection of all reviewers. Then tap any reviewer’s name to display or hide that reviewer’s revisions and comments.
To delete one or more comments
1. On the Review tab, tap the Delete Comment button.
2. On the Delete menu, tap one of the following:
• Delete Comment to delete the active comment
• Delete All Shown to delete all comments from the reviewers who are currently selected on the Other Authors menu
• Delete All to delete all comments in the document
Tip
To delete all comments inserted by specific reviewers, hide the comments of the reviewers you don’t want to process by clearing their check marks on the Other Authors menu, and then tap Delete All Shown on the Delete menu.
Skills review
In this chapter, you learned how to:
![]() Configure text in columns
Configure text in columns
![]() Draw and format text boxes
Draw and format text boxes
![]() Reference additional information
Reference additional information
![]() Configure page layout
Configure page layout
![]() Collaborate on content development
Collaborate on content development
Practice tasks

The practice files for these tasks are located in the iPadOfficeSBS\Ch06 folder.
Configure text in columns
Open the CreateColumns document, and then perform the following tasks:
1. Select the text from the heading Parents’ night out and open gym through the end of the paragraph before the heading Movie night in the park.
2. Split the selected text into two columns, and start the second column with the Community Theater and art contest/auction section.
3. Add the Movie night in the park and Potluck/game night sections to the end of the first column.
4. Move the Farmers’ Market park games section to the end of the first column.
5. Set the right indent of each column to 2.5 inches.
6. Configure the modified column content as a single column and ensure that the method you use removes the section breaks.
Draw and format text boxes
Open the CreateTextBoxes document, and then perform the following tasks:
1. At the end of the document, insert a text box that is anchored to the blank paragraph.
2. Resize the text box to approximately 5 inches wide and 4 inches high.
3. Move the text that follows the first paragraph of the Community chalkboard creation and a bouncy house section into the text box.
4. Resize the text box to fit its contents.
5. Outline and fill the text box with standard colors of your choice.
6. Change the text box fill color to one of the 10 theme colors, and outline the text box with a variation of the same color.
7. Remove the outline and fill color from the text box if you want to.
Reference additional information
Open the InsertReferences document, and then perform the following tasks:
1. Display the Pre-festival marketing and fundraising ideas section.
2. In the bulleted item that begins with Scavenger hunt, insert a hyperlink from the word website to a charitable foundation of your choice.
3. In the bulleted item that begins with Potty Protection Insurance, insert a footnote after the word ideas. In the footnote area, suggest possible variations on this fundraiser (for example, using garden gnomes instead of toilets).
4. Edit the footnote you created in the first step in any way you want.
Configure page layout
Open the ConfigurePages document, and then perform the following tasks:
1. Configure the page settings to print the document on A4 paper with a horizontal orientation and wide margins.
2. Display the following information in the page headers:
• On only the first page, display Trey Research Event Highlights.
• On the second page (and any subsequent even pages), display Upcoming events.
• On the third page (and any subsequent odd pages), display Event recap.
3. Display the following information in the page footers:
• On only the first page, display Copyright 2015.
• On all other pages, display the page number.
4. Insert a page break to start the Movie night in the park section on a new page.
5. Insert a section break that doesn’t affect the page breaks before the COMING SOON section.
6. Insert a section break to start the Event recaps section on a new page.
Collaborate on content development
Open the ReviewContent document, and then perform the following tasks:
1. Turn on change tracking. At the end of the document, in the blank paragraph after the For more information paragraph, enter your name.
2. Display the next revision in the document. Jump to each next revision until you arrive back at your name.
3. Display the revisions in balloons, or inline if they are already in balloons.
4. Hide all the revisions and comments in the document.
5. Redisplay the comments, and then hide only the comments made by Robin Wood.
6. Redisplay all revisions and comments.
7. Accept all the revisions in the paragraph that begins The garden is an asset at one time.
8. Accept all the formatting changes in the document at one time.
9. Display all remaining revisions and comments, and then turn off change tracking.
10. In the paragraph that begins The garden needs your help, select $15, and then insert a comment that says $10 might entice more people to attend.
11. In the last full paragraph of the document, reject the change from children to kids.
12. Display the next comment in the document. Jump to each next comment until you have reviewed them all.
13. Delete all the comments entered by Robin Wood.
All materials on the site are licensed Creative Commons Attribution-Sharealike 3.0 Unported CC BY-SA 3.0 & GNU Free Documentation License (GFDL)
If you are the copyright holder of any material contained on our site and intend to remove it, please contact our site administrator for approval.
© 2016-2026 All site design rights belong to S.Y.A.