Microsoft Office for iPad Step by Step (2015)
Part 4: Microsoft PowerPoint for iPad
CHAPTER 9 Create compelling presentations
CHAPTER 10 Prepare and deliver slide shows
9.
In this chapter
![]() Create presentations
Create presentations
![]() Create and manage slides
Create and manage slides
![]() Add text to slides
Add text to slides
![]() Add visual elements to slides
Add visual elements to slides
PowerPoint presentations are no longer used solely by business executives to present information at board meetings. They’re commonly used in business and educational settings to share information, not only in group presentations, but also in electronic communications and online settings. Because of the way that elements on a PowerPoint slide float independently, PowerPoint presentations offer simpler options for creatively presenting information than Word documents and have become an alternative delivery format for reports. Even primary school students are assigned PowerPoint presentations as homework projects.
Practice files
For this chapter, use the practice files from the iPadOfficeSBS\Ch09 folder. For practice file download instructions, see the Introduction.
There are many methods by which you can convey information on PowerPoint slides. Gone are the days of presenters reading a list of bullet points to the audience—now you can use images, diagrams, animations, charts, tables, and other visual elements. Presenters can concentrate on delivering the details, which can be conveniently documented in the speaker notes attached to the slides.
This chapter guides you through procedures related to creating presentations and slides; presenting information on slides by using text, tables, and animated graphics; inserting video content on slides; and managing the playback of audio and video recordings.
The PowerPoint feature set
Microsoft has created multiple versions of PowerPoint that are optimized for various computer, mobile device, and online platforms. The functionality available in each version varies—the version of PowerPoint designed for computers running Windows has the full feature set, and the versions designed for other platforms have less functionality. You can display presentations in all versions, but the extent of the elements that you can create and fully utilize varies. Here is a brief comparison of the features of the versions of PowerPoint you’re likely to have access to if you’re reading this book.
PowerPoint for iPad features
After you sign in to the Office apps by using a Microsoft account, you can do the following:
![]() Create presentations from built-in templates.
Create presentations from built-in templates.
![]() Save presentations on your iPad or on your OneDrive, OneDrive for Business, SharePoint, or Dropbox site.
Save presentations on your iPad or on your OneDrive, OneDrive for Business, SharePoint, or Dropbox site.
![]() Edit presentations in Normal view (only), and display presentations in Slide Show view.
Edit presentations in Normal view (only), and display presentations in Slide Show view.
![]() Add slides to a presentation, rearrange slides, and remove slides from a presentation.
Add slides to a presentation, rearrange slides, and remove slides from a presentation.
![]() Apply built-in themes and slide background colors, and display slide background images.
Apply built-in themes and slide background colors, and display slide background images.
![]() Insert, modify, and format tables, text boxes, and shapes.
Insert, modify, and format tables, text boxes, and shapes.
![]() Align slide elements by using Smart Guides that indicate the position of an element relative to other elements and to the page.
Align slide elements by using Smart Guides that indicate the position of an element relative to other elements and to the page.
![]() Enter, edit, and format text.
Enter, edit, and format text.
![]() Insert, modify, and format pictures that are available on your iPad.
Insert, modify, and format pictures that are available on your iPad.
![]() Add, change, and remove slide transitions.
Add, change, and remove slide transitions.
![]() Play slide animations.
Play slide animations.
![]() Insert video recordings that are available on your iPad, resize and move video images on slides, and play videos on slides or in full-screen view while presenting.
Insert video recordings that are available on your iPad, resize and move video images on slides, and play videos on slides or in full-screen view while presenting.
![]() Play audio recordings on slides while presenting, and control the volume of audio and video recordings during playback.
Play audio recordings on slides while presenting, and control the volume of audio and video recordings during playback.
![]() Remove audio and video recordings from slides.
Remove audio and video recordings from slides.
![]() Display and move among comments.
Display and move among comments.
![]() Document speaker notes for each slide.
Document speaker notes for each slide.
![]() Personalize presentations by hiding slides and changing the slide aspect ratio.
Personalize presentations by hiding slides and changing the slide aspect ratio.
![]() Use presenter tools to annotate or pause a presentation.
Use presenter tools to annotate or pause a presentation.
![]() Print slides and presentations to AirPrint printers.
Print slides and presentations to AirPrint printers.
![]() Email copies of presentations in PowerPoint or PDF file format.
Email copies of presentations in PowerPoint or PDF file format.
The following premium features require that you sign in by using an account that is associated with a qualified Office 365 subscription:
![]() Display presentations, upcoming slide thumbnails, and speaker notes in Presenter View.
Display presentations, upcoming slide thumbnails, and speaker notes in Presenter View.
![]() Format shapes by applying custom line and fill colors.
Format shapes by applying custom line and fill colors.
![]() Insert and edit WordArt.
Insert and edit WordArt.
![]() Add shadows and reflection styles to pictures.
Add shadows and reflection styles to pictures.
![]() Apply shading to individual table cells.
Apply shading to individual table cells.
![]() Add and modify chart elements.
Add and modify chart elements.
PowerPoint Online features
In addition to the features that are available in PowerPoint for iPad, you can use PowerPoint Online to do the following:
![]() Create presentations from online templates and download copies of presentations to your computer.
Create presentations from online templates and download copies of presentations to your computer.
![]() Change the slide layout of a slide and apply slide background images.
Change the slide layout of a slide and apply slide background images.
![]() Modify color schemes by applying theme variants.
Modify color schemes by applying theme variants.
![]() Insert common symbols, local images, and online images.
Insert common symbols, local images, and online images.
![]() Create SmartArt graphics and reorder animation effects.
Create SmartArt graphics and reorder animation effects.
![]() Insert and reply to comments on slides, and review presentations in Reading view.
Insert and reply to comments on slides, and review presentations in Reading view.
![]() Embed a presentation in a blog or on a webpage.
Embed a presentation in a blog or on a webpage.
PowerPoint Online has fewer slide transitions and animation effects than the PowerPoint for iPad app. For more information, visit technet.microsoft.com/en-us/library/PowerPoint-online-service-description.aspx. To start using any of the Office Online apps, go towww.office.com/start.
PowerPoint desktop version features
The desktop versions of PowerPoint—PowerPoint 2011 on a Mac computer and PowerPoint 2013 on a computer running Windows—have the most functionality. You can use PowerPoint 2013 to do the following:
![]() Create presentations from a greater variety of online templates or by importing content from a Word document, save presentations in a wide variety of formats and locations, and export presentations as videos, handouts, or packaged for delivery on a CD.
Create presentations from a greater variety of online templates or by importing content from a Word document, save presentations in a wide variety of formats and locations, and export presentations as videos, handouts, or packaged for delivery on a CD.
![]() Configure options for the appearance and functionality of the PowerPoint working environment.
Configure options for the appearance and functionality of the PowerPoint working environment.
![]() Display and manage slide elements in the Selection pane, and align slide elements with gridlines.
Display and manage slide elements in the Selection pane, and align slide elements with gridlines.
![]() Create and edit slide masters and slide layouts, handout masters, and notes masters.
Create and edit slide masters and slide layouts, handout masters, and notes masters.
![]() Organize slides in sections, manage slides in Slide Sorter view, review content in Outline view, and work on a presentation in multiple windows.
Organize slides in sections, manage slides in Slide Sorter view, review content in Outline view, and work on a presentation in multiple windows.
![]() Find and replace content within a presentation.
Find and replace content within a presentation.
![]() Insert tables of a specific size, draw tables, and create tables from data stored on Excel worksheets.
Insert tables of a specific size, draw tables, and create tables from data stored on Excel worksheets.
![]() Capture and insert screen shots and screen clippings; insert equations, a wide variety of symbols, Flash animations, the date and time, the slide number, or the contents of an external file.
Capture and insert screen shots and screen clippings; insert equations, a wide variety of symbols, Flash animations, the date and time, the slide number, or the contents of an external file.
![]() Apply gradient, texture, and pattern slide backgrounds.
Apply gradient, texture, and pattern slide backgrounds.
![]() Create and edit charts based on data that PowerPoint saves with the presentation.
Create and edit charts based on data that PowerPoint saves with the presentation.
![]() Assign actions that occur when the presenter points to or clicks a slide element.
Assign actions that occur when the presenter points to or clicks a slide element.
![]() Manage the sound, duration, and trigger action for slide transitions and slide element animations, and manage animations in the Animation pane.
Manage the sound, duration, and trigger action for slide transitions and slide element animations, and manage animations in the Animation pane.
![]() Create headers and footers for slides, notes, and handouts.
Create headers and footers for slides, notes, and handouts.
![]() Insert audio and video recordings from online sources, record audio directly in a presentation, and edit audio and video recordings.
Insert audio and video recordings from online sources, record audio directly in a presentation, and edit audio and video recordings.
![]() Record, edit, and run macros.
Record, edit, and run macros.
![]() Create custom slide shows, configure slide show settings for different methods of presentation, rehearse slide timings and record your presentation of a slide show, including audio narrations and gestures.
Create custom slide shows, configure slide show settings for different methods of presentation, rehearse slide timings and record your presentation of a slide show, including audio narrations and gestures.
![]() Compare a presentation with previous versions.
Compare a presentation with previous versions.
![]() Create a grayscale version of a presentation to optimize it for print.
Create a grayscale version of a presentation to optimize it for print.
![]() Create notes in a OneNote notebook that link to specific slide content.
Create notes in a OneNote notebook that link to specific slide content.
Create presentations
When creating a new presentation, you can create a blank presentation or create a presentation that is based on a template. Unlike the templates provided for Word and Excel, PowerPoint templates are most commonly design templates that control thematic elements (colors, fonts, and graphic effects) and slide layouts rather than content templates designed to give you a head start when creating purpose-specific documents or workbooks. Each template has a corresponding theme, so you can create a presentation based on one template but then entirely change its appearance by applying a different theme.
 Tip
Tip
If you’re using an external keyboard with your iPad, you can perform many operations by using keyboard shortcuts. For a complete list of keyboard shortcuts, see the Appendix, “Touchscreen and keyboard shortcuts.”
An important thing to be aware of when you create a presentation in PowerPoint is that you have the choice of two slide aspect ratios, which are referred to (slightly inaccurately) as slide sizes. The default slide size is Widescreen (16:9), which is optimized for narrow rectangular displays such as those found on many laptop screens and desktop monitors these days.
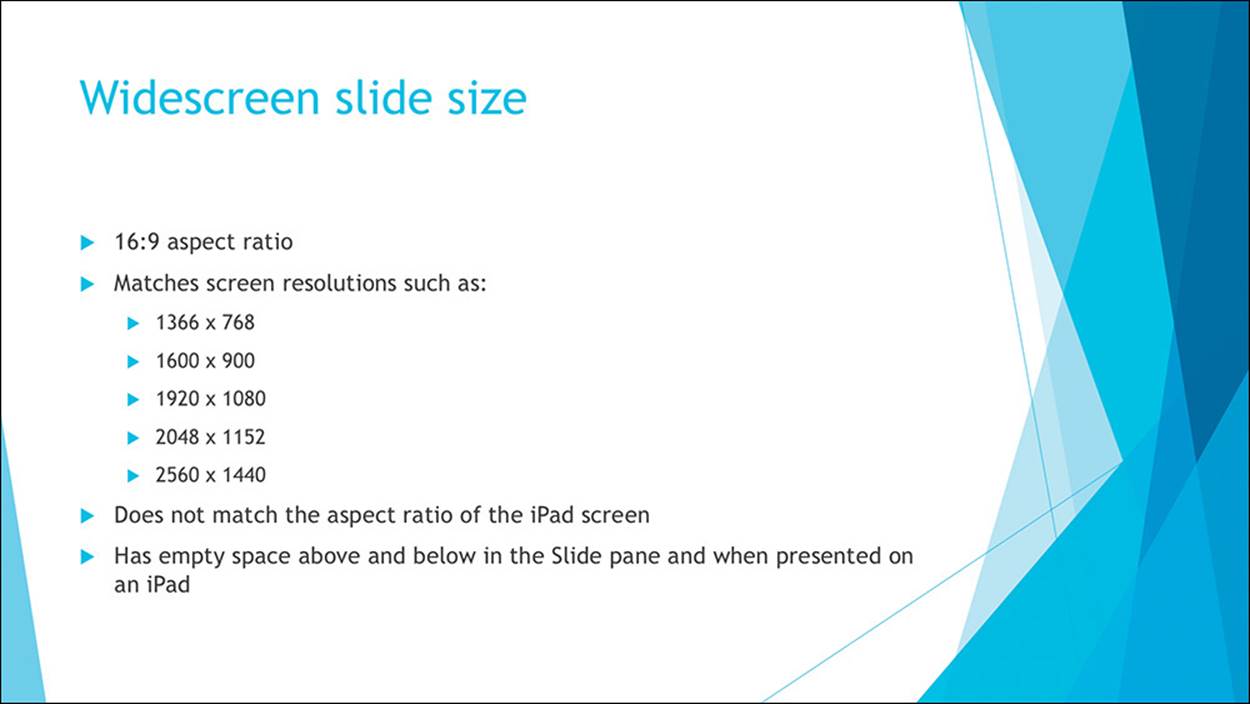
Widescreen slides are shorter than Standard slides
The alternative slide size is Standard (4:3), which is optimized for wide rectangular screens such as that of the iPad.
 Important
You perform many tasks in Word for iPad, Excel for iPad, and PowerPoint for iPad by using the same processes. Common processes include those for giving commands in the Office user interface and for opening, saving, searching, and distributing files. For more information, see Chapter 3, “Create and manage files.”
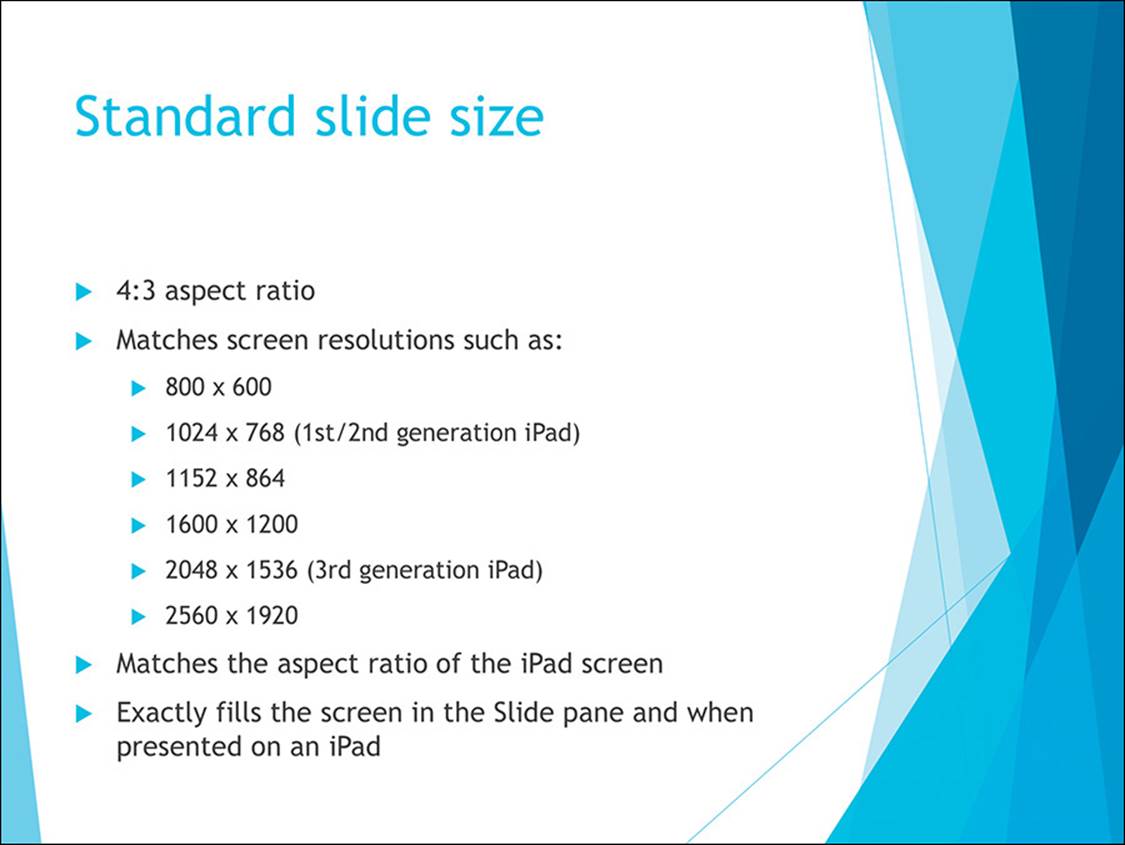
Standard slides fit the iPad screen
When you display the built-in templates on the New page of the Backstage view, the Slide Size setting appears in the upper-right corner of the page. You can change the setting to display the template thumbnails at each slide size.
It’s advisable to select the slide size before you tap a template thumbnail, because tapping the thumbnail creates the slide deck. You can change the slide size after you create the slide deck, but doing so might cause graphic elements (especially those on master slides) to look different, and text and other slide elements to not fit on slides as intended. In other words, if you’re going to change the slide size of a presentation, it’s best to do it before you create the content.
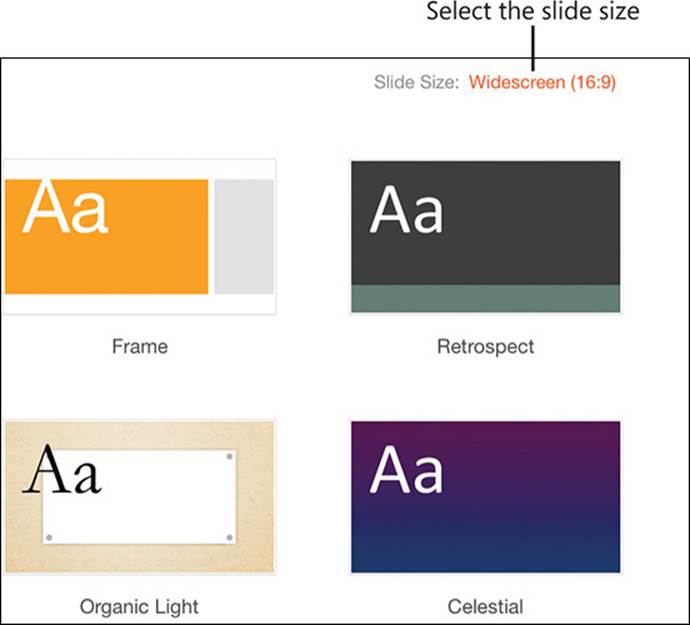
Tap the slide size to display the alternative option
If you find it necessary to change the slide size of a presentation to best fit the display you’re presenting it on, you can easily do so. Remember, though, that you’ll need to carefully review the slides to ensure that your original content still fits. The desktop versions of PowerPoint give you the option of scaling slide content to fit the new slide size; PowerPoint for iPad doesn’t currently provide this option.
Important
Images that are part of the slide layout rather than the content sitting on top of the layout will be squeezed (when changing from Widescreen slide size to Standard) or stretched (when changing from Standard slide size to Widescreen) when the slide size changes. You can correct the problem by changing the Scale Width setting for affected pictures on the slide masters, which you can edit in the desktop versions of PowerPoint. The Scale Width setting is available from the Size & Position task pane for the picture.
The 19 templates that are built in to PowerPoint for iPad have unique color schemes, font sets, and graphic elements. None of the built-in templates include text or any content other than the placeholders and graphic elements on the slide layouts. You can get a good idea of the thematic elements from the thumbnails displayed on the New page of the Backstage view.
The thumbnails depict the title slide layout, graphic elements, and the theme fonts—the uppercase letter represents the Headings font (the default font for headings) and the lowercase letter represents the Body font (the default font for regular text). The other slide layouts generally use similar but sleeker versions of the title slide graphics.
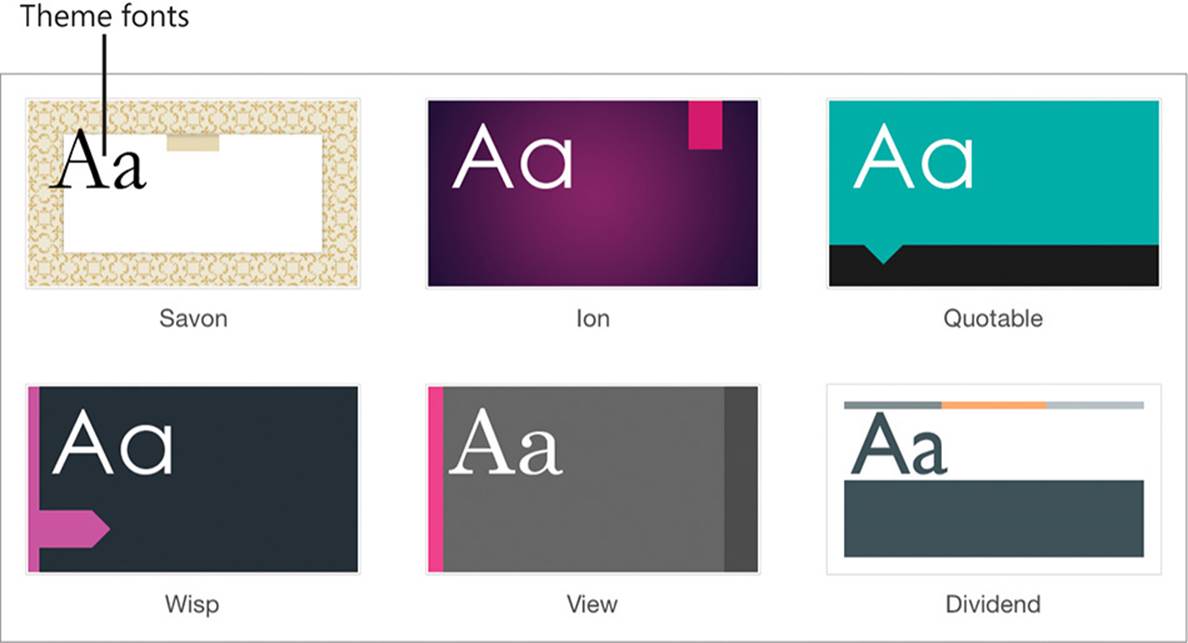
The basic thematic elements of the built-in templates are featured on the title slide thumbnails
Notice that PowerPoint for iPad doesn’t have a Blank template option like that available in Word and Excel. There is no Blank template because every template includes predefined slide layouts in addition to the color and font settings. The Office Light template is the closest match to a blank presentation; it has black text on white slides, uses the default Office fonts—Calibri Light for headings and Calibri for body content—and has no colors or graphic elements integrated with the slide layouts. The Office Dark template is identical to Office Light, other than that it has white text on black slides. If you’re planning to design your own unique template, one of these would be a good place to start.
Tip
A few additional design templates are available for PowerPoint Online, and more than 300 templates are available for PowerPoint for Windows. Some of the PowerPoint 2013 templates include both content and design specifications. For information about creating files from the online and desktop versions of the Office apps, see “Create documents from templates” in Chapter 4, “Create professional documents.”
When you create a presentation from a design template, the only slide that is immediately available is the title slide. This slide is visible in the Thumbnails pane on the left side of the app window and in the Slide pane that takes up most of the window.
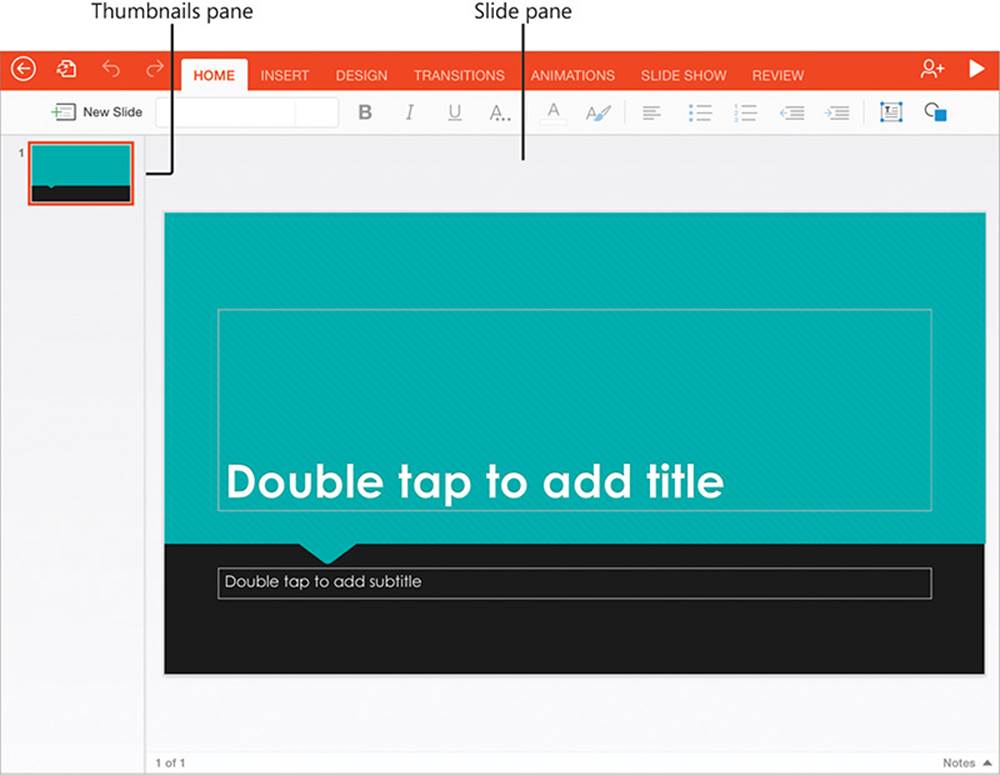
A title slide in the PowerPoint for iPad app window
The width of the Thumbnails pane is fixed in PowerPoint for iPad. You can’t change the relationship between the Thumbnails pane and the Slide pane by dragging the divider.
Tip
The Notes pane is below the Slide pane but is collapsed by default. For information about working in the Notes pane, see “Add notes to slides” in Chapter 10, “Prepare and deliver slide shows.”
 See Also
For information about saving and duplicating Office files, see “Create, open, and save files” in Chapter 3, “Create and manage files.”
To create a new presentation
1. On the New page of the Backstage view, on the File bar, tap New.
2. In the upper-right corner of the window, tap Slide Size, and then tap either Widescreen (16:9) or Standard (4:3) depending on your intended presentation method. If in doubt, tap Standard because it creates a narrower slide; if you later need to change the slide size, the slide content is likely to fit on a widescreen slide.
3. Locate and then tap the thumbnail of the presentation template you want to use.
To change the slide size of a presentation
1. On the Design tab, tap the Slide Size button, and then tap Standard (4:3) or Widescreen (16:9).
2. Review your slides for any content that might have shifted due to the change in aspect ratio.
Create and manage slides
If you’re accustomed to using a desktop version of PowerPoint, one of the first differences you might notice in the PowerPoint for iPad environment is that you can develop and manage slides in Normal view only. This view displays thumbnails of the existing slides in the Thumbnails pane on the left side of the window and a larger version of the currently selected slide in the Slide pane. You insert, cut, copy, paste, duplicate, and delete slides in the Thumbnails pane, and create slide content in the Slide pane.
The appearance and structure of slides is defined by the slide layouts associated with the design template. Slide layouts define the elements on specific types of slides, such as:
![]() Slide backgrounds and incorporated graphics.
Slide backgrounds and incorporated graphics.
![]() Text box locations, sizes, and formats.
Text box locations, sizes, and formats.
![]() Default paragraph and character formats for each text box location.
Default paragraph and character formats for each text box location.
![]() Standard headers or footers.
Standard headers or footers.
Tip
Text boxes can contain static content that can’t be changed by the presentation author (for example, a company logo) or serve as placeholders that define the default formatting of content entered within the text box.
A template could have only one slide layout, but most have unique slide layouts for slides that display the presentation title, section titles, and various combinations of slide titles and content, and a blank slide with only the background. Each slide layout is named; the name suggests the primary application of the slide layout, but you aren’t limited to that suggestion; you can enter any type of content in any slide layout and modify the layout of any slide. The slide layouts that are available in a presentation are displayed on the New Slide menu.
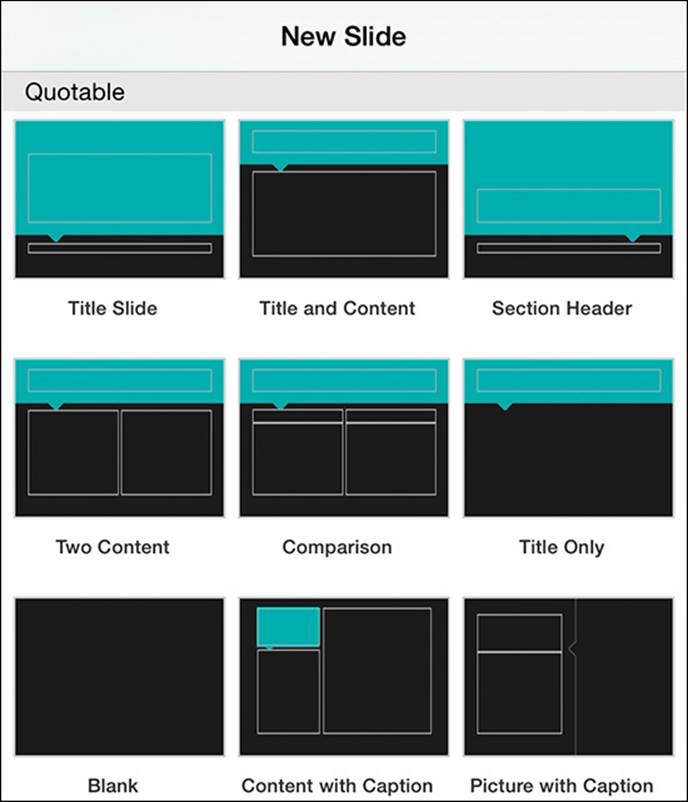
The structure and design of each slide layout is visible on its thumbnail
In the desktop versions of PowerPoint, you can modify the built-in slide layouts, create your own slide layouts, or create entirely new sets of slide layouts called slide masters, and you can reset slides to match their slide layouts, or apply different slide layouts to existing slides.
You can’t edit or create slide layouts in PowerPoint for iPad, but you can arrange and format text, placeholders, and graphic elements on a slide and then duplicate that slide for each similar slide you want to create.
You add a slide to a presentation by selecting the layout of the slide you want to create. The new slide is inserted after the current slide; if necessary, you can move it to a different location within the presentation.
If you create a slide and then later realize that you don’t need it, you can delete it. If you don’t need the slide for a presentation to a specific audience but might need it later, you can hide the slide instead. Hidden slides aren’t presented in slide shows. They remain available from the Thumbnails pane, but their thumbnails are dimmed and marked with a prohibition sign (![]() ), which is also referred to as the universal no symbol.
), which is also referred to as the universal no symbol.
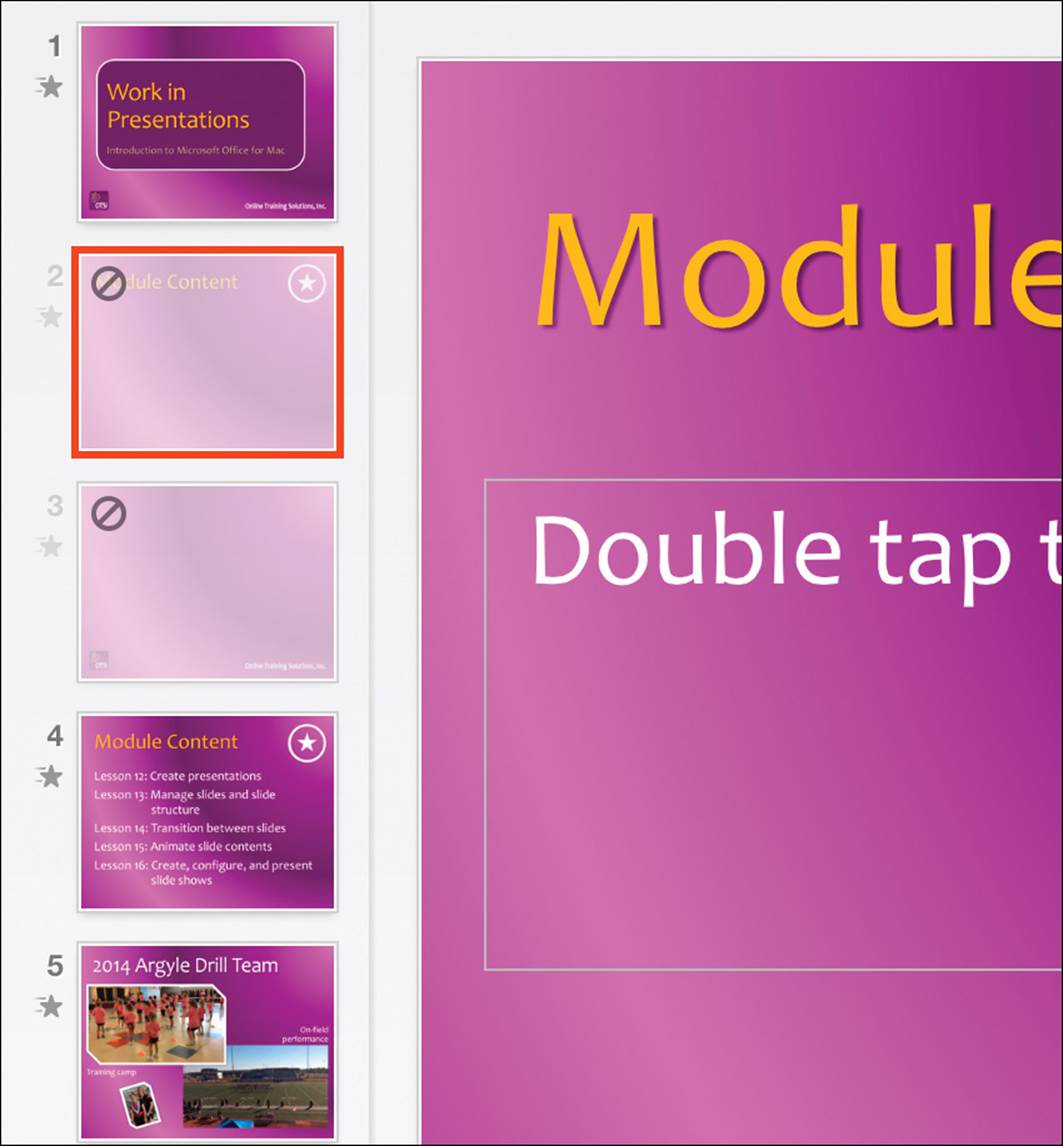
Hidden slide content is active and editable
When you select a hidden slide, the Hide Slide button on the Slide Show tab is shaded to indicate that the command is in effect. You can edit a hidden slide in the Slide pane just as you can any other, so you might use this feature to keep a slide that you’re still working on hidden until it’s final. You can unhide a slide to include it in the slide show.
To add a slide to a presentation
1. In the Thumbnails pane, tap the slide that you want to insert the new slide after.
2. On the Home tab or the Insert tab, tap New Slide.
3. On the New Slide menu, tap the thumbnail of the slide layout you want to insert. (Flick the menu up and down if necessary to display all the slide layouts.)
To select and display a slide
1. In the Thumbnails pane, tap the slide to select it for modification and display it in the Slide pane.
To move a slide within a presentation
1. In the Thumbnails pane, tap and hold the slide that you want to move, until the thumbnail increases slightly in size.
2. Drag the thumbnail to its new position in the Thumbnails pane.
Or
1. Select the slide that you want to move.
2. In the Thumbnails pane, tap the selected slide to display the shortcut bar.
3. On the shortcut bar, tap Cut.
4. In the Thumbnails pane, select the slide that you want to move the cut slide after.
5. Tap the selected slide and then, on the shortcut bar, tap Paste.
Tip
You can move or copy a slide to a different presentation by cutting or copying the slide in the original presentation, opening the other presentation, selecting a thumbnail in the Thumbnails pane, and pasting the cut or copied slide after it.
To insert a copy of a slide immediately following the original slide
1. Select the slide that you want to copy.
2. In the Thumbnails pane, tap the selected slide and then, on the shortcut bar, tap Duplicate.
To insert a copy of a slide elsewhere in the presentation
1. Select the slide that you want to copy.
2. In the Thumbnails pane, tap the selected slide and then, on the shortcut bar, tap Copy.
3. In the Thumbnails pane, select the slide that you want to place the copied slide after.
4. Tap the selected slide and then, on the shortcut bar, tap Paste.
Tip
Repeat steps 3 and 4 to paste additional copies of the slide into the presentation.
To delete a slide
1. Select the slide that you want to delete.
2. In the Thumbnails pane, tap the selected slide and then, on the shortcut bar, tap Delete.
To hide a slide
1. Select the slide that you want to hide.
2. In the Thumbnails pane, tap the selected slide and then, on the shortcut bar, tap Hide.
Or
On the Slide Show tab, tap the Hide Slide button.
To unhide a slide
1. Select the slide that you want to unhide.
2. In the Thumbnails pane, tap the selected slide and then, on the shortcut bar, tap Unhide.
Or
On the Slide Show tab, tap the Unhide Slide button.
Add text to slides
PowerPoint presentations originally consisted primarily of bulleted lists of speaking points. Text is still common on slides, but presenters are incorporating fewer bullet points and more images and animations. Even with all the imagery, a typical presentation uses text on the title slide, in the slide titles, and in the slide content.
Manage text containers
Most slide layouts associated with presentation templates include various configurations of content containers that hold slide titles and slide content. A notable difference between PowerPoint for iPad and the desktop versions of PowerPoint is that PowerPoint for iPad supports only simple text boxes that define the font characteristics of their content, whereas the desktop versions support rich content containers from which you can choose to insert a table, chart, SmartArt graphic, picture, or video.
Tip
When you open a presentation that was created in a desktop version of PowerPoint, any rich content containers that were in the original file appear as simple text boxes.
If the text boxes that are part of a slide layout don’t meet your needs, you can modify the existing text boxes or create your own. It is safest to create your own, because modifications to the slide layout elements can be reset in other versions of PowerPoint by reapplying the slide layout. (You can’t reapply a slide layout in PowerPoint for iPad.)
When you insert a text box on a slide, PowerPoint creates the text box at a default size and location. You can then move and resize the text box, and this is when you’ll discover another of the great features of PowerPoint for iPad—Smart Guides. Smart Guides appear when an edge of the object you’re moving or resizing aligns with another object or creates a symmetrical relationship with other objects. Smart Guides make it easy to position slide content in a perfectly balanced layout.
Tip
You manage and format text boxes on slides by using the same techniques as you do in Word documents. For more information, see “Draw and format text boxes” in Chapter 6, “Enhance document content.”
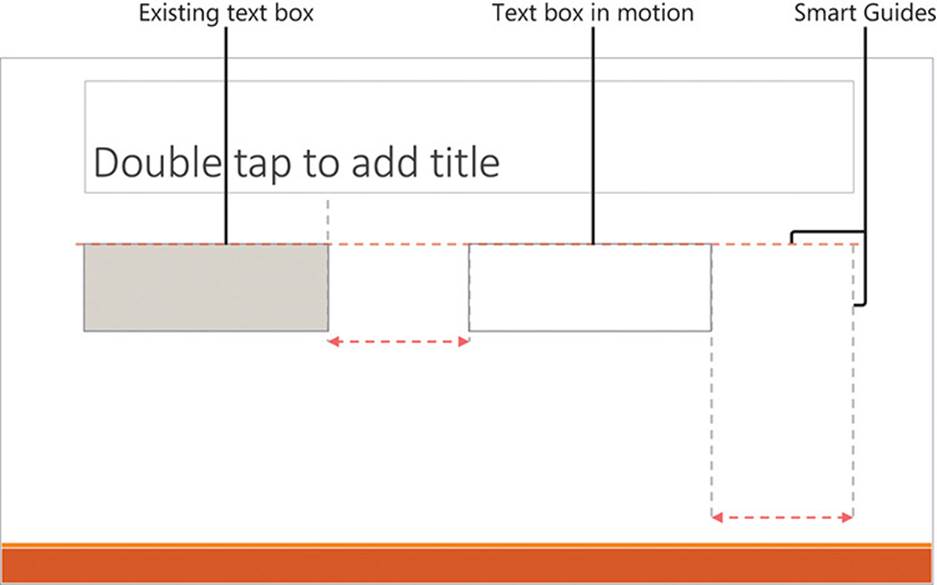
Red guides indicate alignment, and gray guides indicate relationships
You can specify formatting options for a text box and the content that will be entered into it. You can format the text box by applying shape styles, fill colors, and outline colors. You can format the text box content by specifying the font name, size, characteristics, and color; specifying the paragraph alignment, indent, list formatting, and text direction; and applying WordArt styles.
To insert a text box on a slide
1. In the Thumbnails pane, select the slide you want to insert the text box on.
2. On the Insert tab, tap the Text Box button to insert the default text box in the center of the slide.
To select a text box for structural modification
1. Tap the text box once.
To move a text box on a slide
1. Select the text box that you want to move.
2. Drag the text box to the new location.
To move a text box to another slide
1. Select the text box that you want to move.
2. On the shortcut bar, tap Cut.
3. Display the slide that you want to move the text box to.
4. In the Slide pane, tap anywhere on the slide to activate it. Then tap the slide to position the cursor at the approximate location where you want to insert the text box.
5. On the shortcut bar, tap Paste.
To align a text box with other slide elements
1. Drag the text box on the slide until Smart Guides indicate that at least one edge of the text box aligns with another object on the slide.
2. If necessary, drag the sizing handles to align other edges of the text box with objects on the slide.
To remove a text box from a slide
1. Select the text box that you want to remove.
2. Tap anywhere in the selected text box and then, on the shortcut bar, tap Delete.
Insert and manage text
The words you choose to display on the slides of a PowerPoint presentation are important; you need them to convey enough information to be useful without providing so much information that you, the presenter, become unnecessary.
You can enter text directly into any text box on a slide, and then format either the text box (to affect all its contents) or individual text elements. If the text you want to display already exists elsewhere—for example, in a Word document—you can paste the text onto a slide either inside or outside the confines of a text box.
When you paste text outside of a text box, PowerPoint creates a text box that surrounds the text; you can format the text box as you would any other, move the text box where you want it, or move the text into another text box.

You can paste text outside of existing text boxes
When you’re moving and editing text on an iPad screen, it can be difficult to position the cursor precisely within existing text. A nice feature of PowerPoint for iPad and Word for iPad is that you can magnify a circle of text on the slide or document to help you place the cursor in a specific position.

Positioning the cursor precisely is easier with magnification
Tip
You can insert a tab character or new line character (soft return) in text within a text box by displaying the shortcut bar at the cursor and then tapping the character you want to insert. You can’t insert a hyperlink in PowerPoint for iPad, but you can edit hyperlinks that were created on a slide in another version of PowerPoint.
If a word on a slide doesn’t appear in the dictionary that the Office for iPad apps reference, a wavy red underline indicates a possible spelling mistake. From the shortcut bar that appears when you select the word, you can choose the correct spelling from a list of suggestions, or you can add the word to the dictionary.
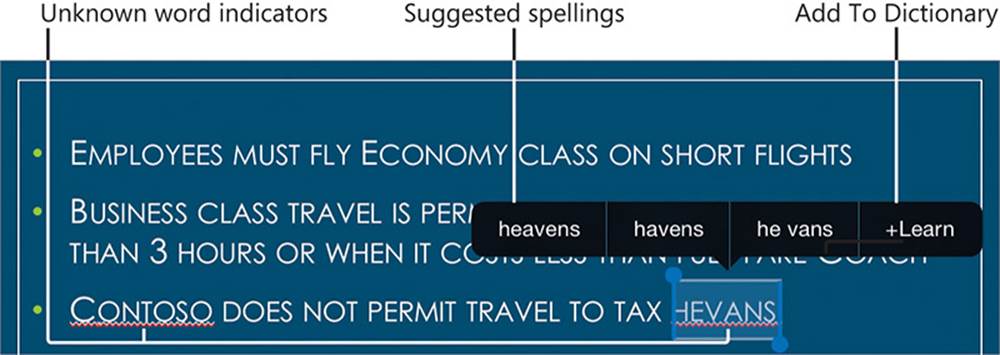
PowerPoint offers corrections for unknown words
To activate a text box
1. Double-tap anywhere in the text box.
Or
1. Select the text box.
2. Tap the selected text box and then, on the shortcut bar, tap Edit Text.
To enter text on a slide
1. Display the slide on which you want to add text.
2. Activate the text box, and then enter the text from the on-screen keyboard or a connected external keyboard.
To insert text from a Word document on a slide
1. Start Word, open the document, and locate the text.
2. Select the text that you want to move and then, on the shortcut bar, tap Copy.
3. Switch to PowerPoint and display the slide that you want to insert the text on.
4. In the Slide pane, tap anywhere on the slide to activate it.
5. Do either of the following:
• To insert the copied text in an existing text box, activate the text box, tap to position the cursor, and then, on the shortcut bar, tap Paste.
• To insert the copied text in its own text box, tap a location on the slide that is outside of any existing text box to position the cursor, and then, on the shortcut bar, tap Paste.
Tip
PowerPoint centers the pasted text on the point that you tapped.
To select text in a text box
1. Use any of these methods:
• To select a word, double-tap anywhere in the word.
• To select a paragraph, triple-tap anywhere in the paragraph.
• To select the contents of a text box, tap anywhere in the text box and then, on the shortcut bar, tap Select All.
To magnify text in a text box
1. Tap and hold until the magnifying circle appears.
2. Without lifting your finger, drag to move the magnifying circle.
To correct spelling errors in slide text
1. Select the word that is marked with a red wavy underline.
2. On the shortcut bar, tap Suggest.
3. On the shortcut bar, tap a suggested spelling of the word to replace it on the slide, or tap +Learn to add the word to the dictionary.
To move text within a text box or to a different text box
1. Select the text that you want to move.
2. On the shortcut bar, tap Cut.
3. If you’re moving the text to a different text box, activate the text box that you’re moving the text to.
4. Tap to position the cursor where you want to insert the text.
5. On the shortcut bar, tap Paste.
See Also
For information about entering text, applying styles and formatting, aligning text, changing text direction, converting text to columns, and deleting text, see Chapter 4, “Create professional documents.” For information about formatting text in lists, see “Present content in lists” in Chapter 5, “Add visual elements to documents.”
Present information in tables
Tables provide a tidy structure for the presentation of text on a PowerPoint slide. When you create a table directly on a slide, PowerPoint for iPad inserts a table that has three rows and three columns and matches the color scheme of the presentation theme. The first row is formatted as a header row, and the following rows are banded. You can modify the structure and appearance of the table by using the same techniques that you do when working with tables in Word for iPad.
See Also
For information about inserting, deleting, formatting, and moving tables and table elements, see “Present content in tables” in Chapter 5, “Add visual elements to documents.”
If the information you want to present is already in a tabular format in a Word document or Excel workbook, you can copy the existing table to your slide and then modify it as necessary to fit your presentation.
To insert a standard blank table on a slide
1. Display the slide that you want to insert the table on.
2. On the Insert tab, tap the Table button to insert a starter table near the center of the slide.
To insert a table from a Word document on a slide
1. Start Word, open the document, and locate the table that you want to copy to the slide.
2. Tap the table selector (outside the upper-left corner of the table) and then, on the shortcut bar, tap Copy.
3. Switch to PowerPoint and display the slide that you want to insert the table on.
4. In the Slide pane, tap anywhere on the slide to activate it. Then tap the slide in the approximate location where you want to insert the table.
5. On the shortcut bar, tap Paste.
To insert a table from an Excel worksheet on a slide
1. Start Excel, open the workbook, and locate the table or data range that you want to copy to the slide.
2. If the information is in an Excel table, tap anywhere in the table, and then tap the table selector.
Or
If the information is in a data range, select the data range, and then tap the selection.
3. On the shortcut bar, tap Copy.
4. Switch to PowerPoint and display the slide that you want to insert the table on.
5. In the Slide pane, tap anywhere on the slide to activate it. Then tap the slide in the approximate location where you want to insert the table.
6. On the shortcut bar, tap Paste.
Review comments
If you’re working with other people to develop a presentation, or if you simply want to leave yourself reminder notes when working on a presentation in a desktop version of PowerPoint, you can enter comments on the slides. You can display and move among existing comments in a PowerPoint presentation when using PowerPoint for iPad, but you can’t create or manage comments.
You can turn on the display of comments on the Review tab. If the Previous Comment or Next Comment button is active, the presentation contains comments and you can move between them by tapping the buttons.

Commands on the Review tab
Comments on slides are indicated by transparent comment icons. Moving to a comment by tapping the Previous Comment or Next Comment button displays the comment text; you can also display the text by tapping a comment icon. The active comment opens in a rounded rectangular callout next to the comment icon.

Each comment includes information about the person who entered the comment and the time it was entered
SEE ALSO For more information about comments, see “Collaborate on document content” in Chapter 6, “Enhance document content.”
Add visual elements to slides
You can incorporate images into slide content to illustrate a concept, to draw attention to something, or just for decoration.
Insert pictures
In PowerPoint for iPad, you can insert pictures that are available on your iPad (such as those in your Camera Roll or Photo Stream album) or shapes. If you want to use an image that is already present in another Office file—for example, a SmartArt graphic embedded in a Word document—you can copy the image from the source file and paste it onto the slide. PowerPoint inserts pictures in the center of the slide, and then you can move them where you want them. When you copy a formatted picture from a document to a slide, it retains the formatting. You can reset it and format it in PowerPoint if you want to.
You insert and format pictures on a slide the same way you do on a document page. The Picture tool tab offers the same options for applying fancy styles, shadows, and reflections, cropping and resetting the picture, and stacking pictures.
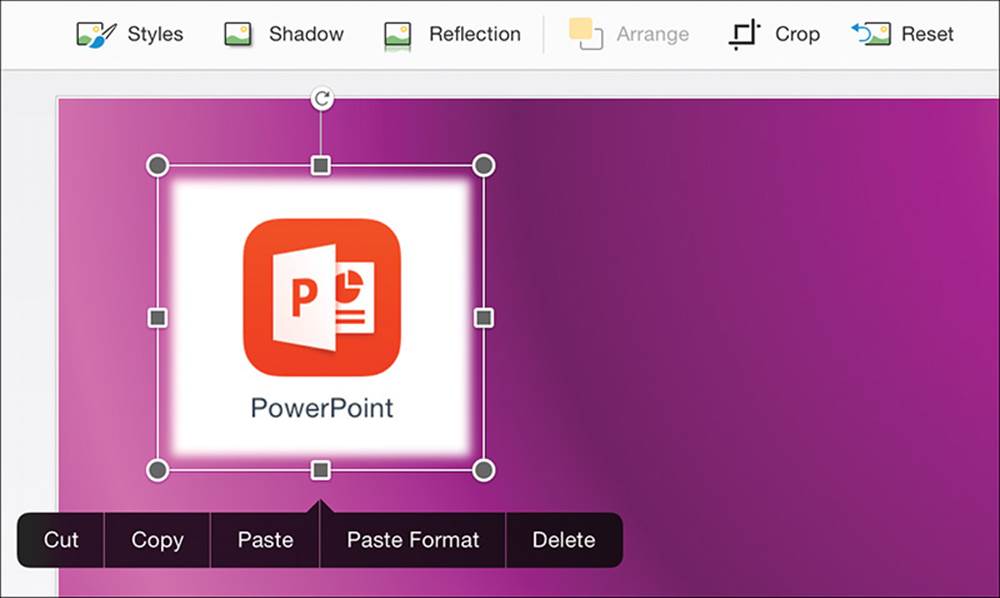
It’s easy to insert, format, and move pictures on slides
See Also
For information about inserting, formatting, and reordering pictures, see “Insert and format pictures” in Chapter 5, “Add visual elements to documents.”
It’s easier to manipulate pictures on a slide than it is in a document, because you don’t have to concern yourself with the way that text wraps around the picture—pictures and text are entirely separate elements. The only modification you might need to make is in the order of pictures, text, and other elements that overlap on a slide.
To insert a picture from your Camera Roll or Photo Stream on a slide
1. Display the slide that you want to insert the picture on.
2. On the Insert tab, tap the Pictures button.
3. On the Photos menu, browse to the picture you want to insert, and then tap the picture to insert it.
To insert a picture from a Word document on a slide
1. Start Word, open the document, and locate the picture that you want to copy to the slide.
2. Tap the picture and then, on the shortcut bar, tap Copy.
3. Switch to PowerPoint and display the slide that you want to insert the picture on.
4. In the Slide pane, tap anywhere on the slide to activate it. Then tap the slide in the approximate location where you want to insert the picture.
5. On the shortcut bar, tap Paste.
To select a picture
1. Tap the picture once.
To remove formatting from a picture
1. Select the picture.
2. On the Picture tool tab, tap the Reset button, and then tap Reset Picture.
To move a picture on a slide
1. Select the picture that you want to move.
2. Drag the picture to the new location.
To move a picture to a different slide
1. Select the picture that you want to move.
2. On the shortcut bar, tap Cut.
3. Display the slide that you want to move the picture to.
4. In the Slide pane, tap the slide to activate it. Then tap it again to display the shortcut bar.
5. On the shortcut bar, tap Paste.
Insert shapes
An extensive library of shapes is available in the Office for iPad apps. You can use these shapes to illustrate a concept on a slide, or you can animate the shapes to convey actions or draw attention to specific elements.
See Also
For information about animating shapes and text on slides, see “Animate slide elements” later in this topic.
Shapes can be simple, such as lines, circles, or squares; or more complex, such as stars, hearts, and arrows. Some shapes are three-dimensional (although most are two-dimensional).
After you insert a shape, you can change its dimensions
Some of the shapes have innate meanings or intentions, and others are simply shapes.
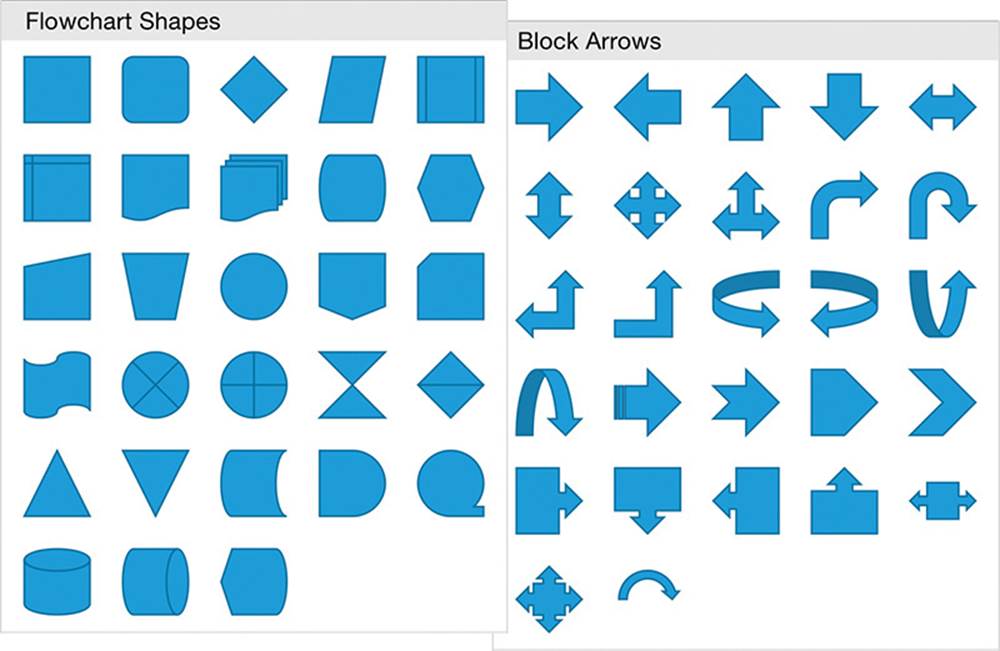
Specialized flowchart shapes represent specific actions or objects
PowerPoint inserts shapes in the center of the slide, and then you can move them where you want them. You can apply different colors to the outline and inside (fill) of a shape. When working with text in shapes, you can apply colors, or you can apply preset text effects (also referred to asWordArt) from the Formatting menu on the Home tab or from the WordArt Styles menu on the Shape tab, whichever is more convenient at the time, in the same way that you do to regular text.
See Also
For information about font formatting and text effects, see “Change the appearance of text” in Chapter 4, “Create professional documents.” For information about shapes, see “Insert and format shapes” in Chapter 5, “Add visual elements to documents.”

Shapes can help to visually reinforce a concept
To insert a shape on a slide
1. Display the slide that you want to insert the shape on.
2. On the Insert tab, tap the Shapes button.
3. On the Shapes menu, locate the shape you want to insert, and then tap the shape to insert it.
To select a shape
1. Tap the shape once.
To move a shape on a slide
1. Select the shape that you want to move.
2. Drag the shape to the new location.
To move a shape to a different slide
1. Select the shape that you want to move.
2. On the shortcut bar, tap Cut.
3. Display the slide that you want to move the shape to.
4. In the Slide pane, tap the slide to activate it. Then tap it again to display the shortcut bar.
5. On the shortcut bar, tap Paste.
To add text to a shape
1. Select the shape that you want to add text to.
2. On the shortcut bar that appears, tap Add Text to activate the cursor within the shape.
3. Enter the text you want to display on the shape.
To format text on a shape
1. Select the shape, and then triple-tap the shape text to select it.
2. On the Shape tool tab, tap WordArt Styles. Then on the WordArt Styles menu, tap the style you want to apply.
Or
On the Home tab, use the font formatting commands to change the font, size, color, or formatting of the text.
Animate slide elements
When used appropriately, animated slide elements can both capture the audience’s attention and effectively convey information. You can animate any individual element on a slide, including each individual text container. You can’t animate the elements on the slide background, other than during the initial transition to the slide.
See Also
For information about slide transitions, see “Animate slide transitions” in Chapter 10, “Prepare and deliver slide shows.”
Animations can be very informative, particularly for audience members who are more receptive to visual input than to auditory input. Animations have the added benefit of being available to provide a very specific, consistent message in a presentation with or without a presenter to discuss or externally illustrate a process.
You can configure animation effects for three processes. The available effects for each process are categorized as Basic, Subtle, Moderate, and Exciting (although you might have a different concept of exciting than the PowerPoint developer who categorized the effects). More animation effects are available for text than for other elements. The three types of effects are:
![]() Entrance effects If an object has an entrance effect, the object is not visible on the slide when the slide is first shown. (It is visible during the development process, but not when you present the slide show.) It then appears on the slide in the manner specified by the entrance effect.
Entrance effects If an object has an entrance effect, the object is not visible on the slide when the slide is first shown. (It is visible during the development process, but not when you present the slide show.) It then appears on the slide in the manner specified by the entrance effect.
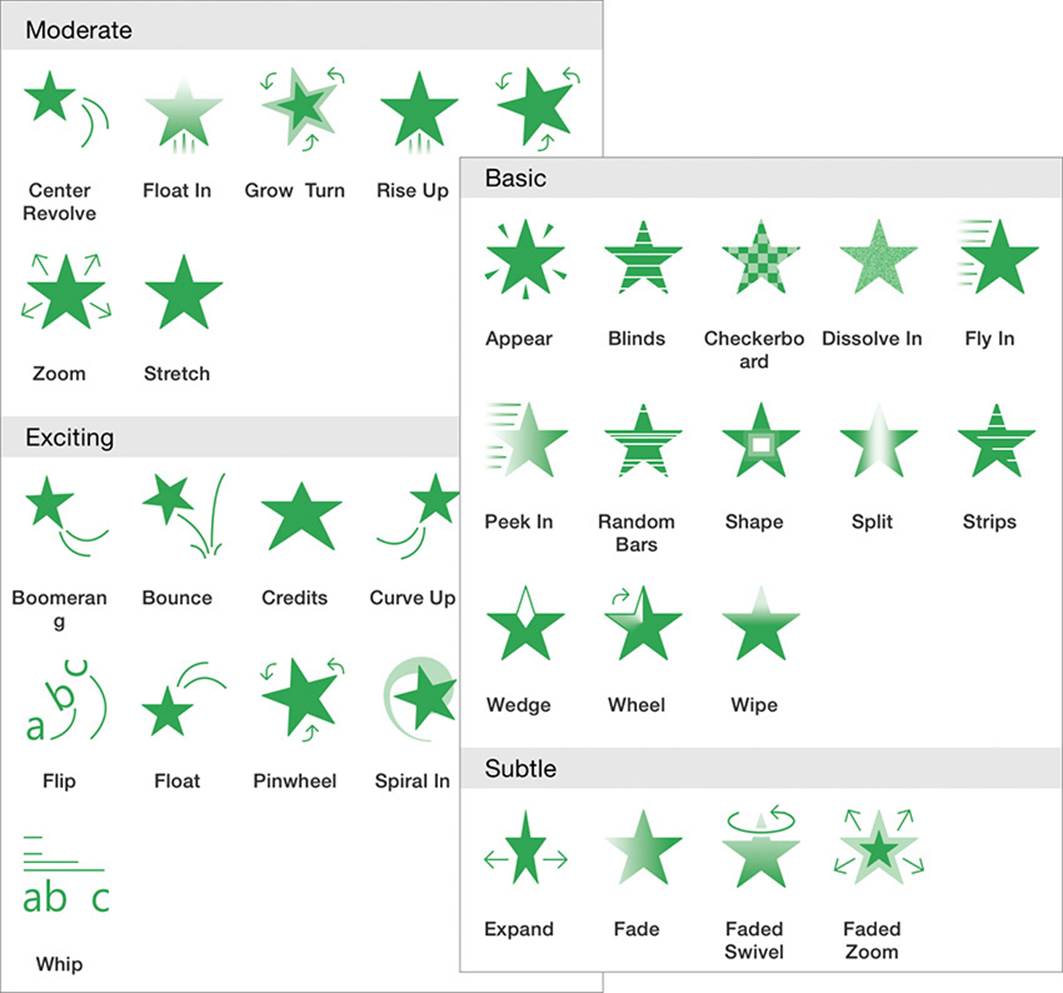
The entrance animation effects available for text and images
![]() Emphasis effects These effects animate an object that is already visible on the slide to draw attention to it, usually by moving it or changing the color.
Emphasis effects These effects animate an object that is already visible on the slide to draw attention to it, usually by moving it or changing the color.
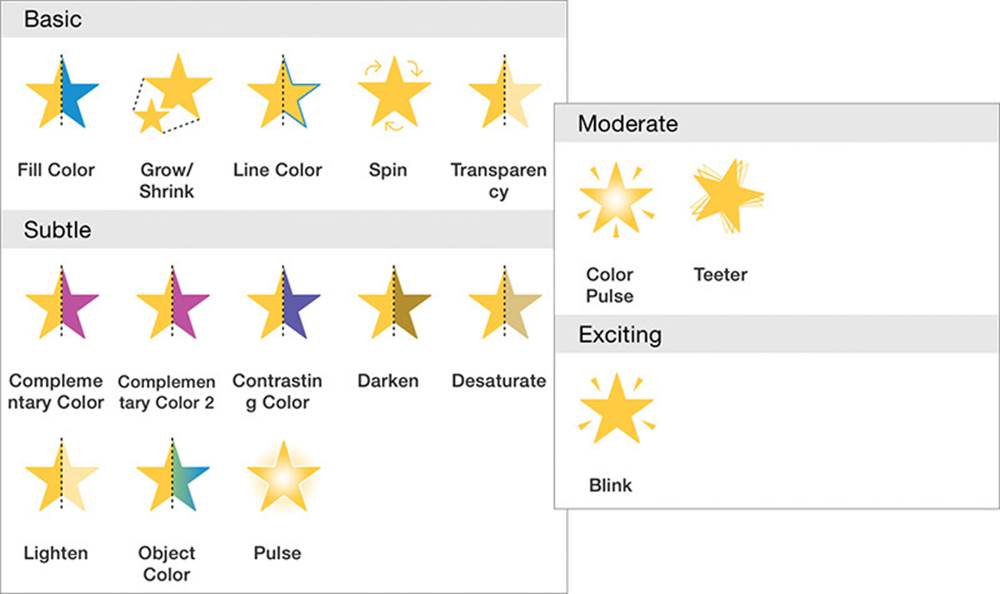
The emphasis animation effects available for images
![]() Exit effects These effects take an existing object through a process that results in the object no longer being visible on the slide.
Exit effects These effects take an existing object through a process that results in the object no longer being visible on the slide.
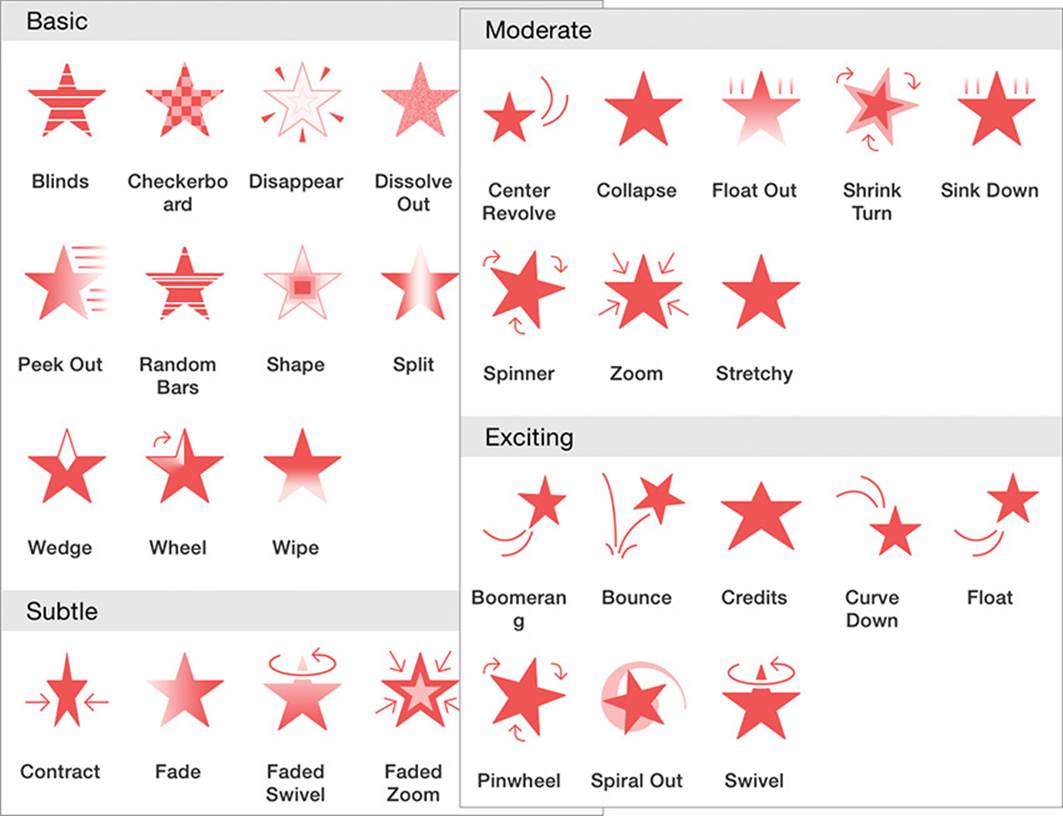
The exit animation effects available for images
Entrance and exit effects cause slide elements to appear and disappear when you’re previewing or presenting a slide. However, all the elements are visible while you’re working in the Slide pane. As you prepare a slide that will contain animated objects, position the objects for animation as follows:
![]() Entrance effects Position the object where you want it to end up after it enters the slide.
Entrance effects Position the object where you want it to end up after it enters the slide.
![]() Emphasis effects Position the object where it will be before and after the effect.
Emphasis effects Position the object where it will be before and after the effect.
![]() Exit effects Position the object where it will be before it leaves the slide.
Exit effects Position the object where it will be before it leaves the slide.
Preparing the slide elements before applying animation effects
You can apply multiple animation effects (for example, an entrance effect and an emphasis effect) to a slide element.
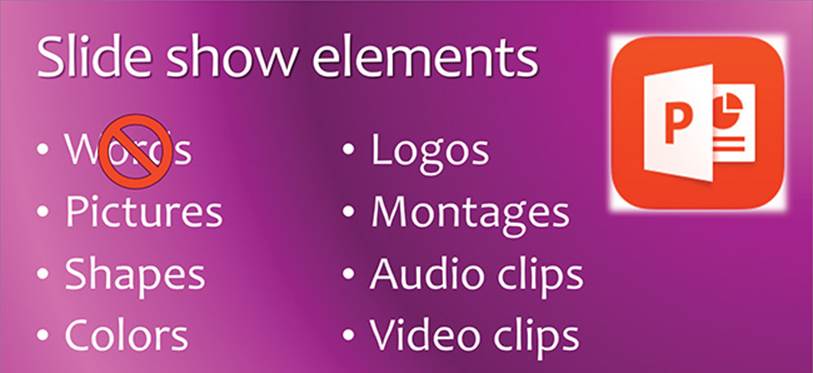
After all the elements are in place, animate them in the order you want the animations to occur. It’s helpful to map out the process before starting. For example, when presenting information about the elements that a slide show can include, you might want to do the following:
1. Start with only the slide title and list items visible.
2. Pulse the list items one by one to draw attention to them.
3. Forcefully display the prohibition sign on top of Words.
4. Subtly remove the prohibition sign.
5. Swoop the PowerPoint icon in like a superhero.
As you animate slide objects, numbers appear on the objects to specify the order of the animation effects. To implement your plan, you could use the animation effects shown in the following table.
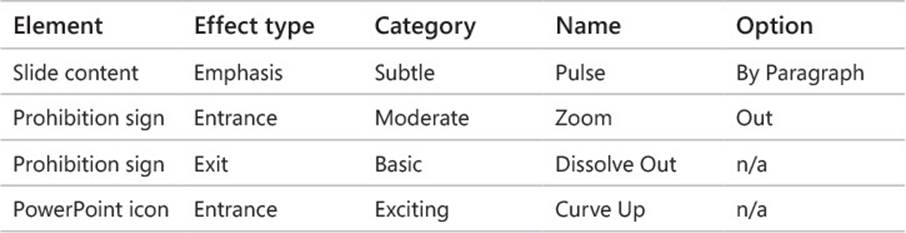
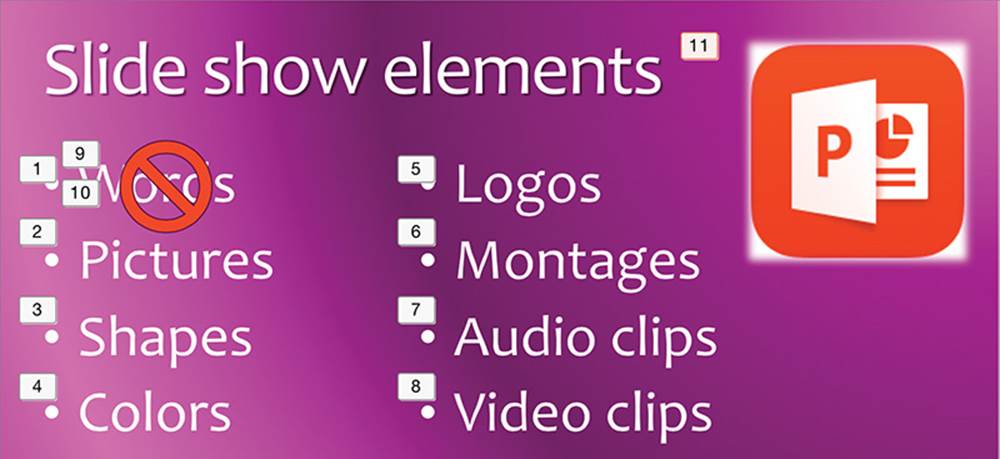
The animated slide elements
After you apply an animation, the selected effect icon appears on the Animations tab, on the button for that effect type, when you select the animated slide element.
To apply an animation effect to a slide element
1. Select the slide element that you want to animate.
2. On the Animations tab, tap the Entrance Effect, Emphasis Effect, or Exit Effect button to indicate the type of effect that you want to apply.
3. On the Effect menu, tap the effect that you want to apply.
4. If the Effect Options button is active, tap it to display the options for the selected effect. Then, on the Effect Options menu, tap the direction or other effect option that you want to apply.
5. If the Effect Color button is active, tap it to display the color charts. Then, on the Effect Color menu, tap the color you want to use in the animation effect.
To select an applied animation effect
1. In the Slide pane, on the slide, tap the number corresponding to the animation effect.
A red outline appears around the number of the currently selected animation.
To choose or change an effect option
1. Select the animation effect that you want to configure.
2. On the Animations tab, tap the Effect Options button if it is available.
3. On the Effect Options menu, select the direction or other option that you want.
To choose or change an effect color
1. Select the animation effect that you want to configure.
2. On the Animations tab, tap the Effect Color button if it is available.
3. On the Effect Color menu, tap the color that you want to use in the animation effect.
To apply more than one effect to a slide element
1. Select the slide element.
2. Apply the first animation effect.
3. Choose the effect option and color, if available.
4. Apply any other animation effects that precede the second effect on the element you animated in step 2.
5. Select the slide element (not the animation number) of the element that you want to apply a second animation effect to.
6. Apply the second animation effect and choose the effect option and color, if appropriate.
Important
You can’t change the order of animation effects in PowerPoint for iPad. If you need to do so, edit the presentation in a desktop version of PowerPoint.
To remove an animation effect from a slide element
1. Select the animation number of the effect that you want to remove.
Important
Be sure to select the animation, not the slide element.
2. On the shortcut bar, tap Delete.
Skills review
In this chapter, you learned how to:
![]() Create presentations
Create presentations
![]() Create and manage slides
Create and manage slides
![]() Add text to slides
Add text to slides
![]() Add visual elements to slides
Add visual elements to slides
Practice tasks

The practice files for these tasks are located in the iPadOfficeSBS\Ch09 folder.
Create presentations
Start PowerPoint, and then perform the following tasks:
1. Create a new presentation by first specifying a Standard (4:3) slide size, and then selecting the Wisp template.
2. Save the presentation on your iPad as My Presentation.
3. Open the ChangeSize presentation. This presentation has a Standard slide size.
4. Review the slides and notice the location of the check marks on the Quiz slides.
5. Change the slide size to Widescreen (16:9). Review the slides again, and notice the change in location of the check marks.
Create and manage slides
Open the ManageSlides presentation, and then perform the following tasks:
1. Insert a blank slide after slide 1.
2. Select slide 7, and then insert a copy of it directly after the slide.
3. Select slide 2, and then insert a copy of it after slide 10.
4. Move slide 3 so that it becomes slide 4.
5. Delete slide 7.
6. Hide slide 2, and then unhide slides 8 and 9.
7. Ensure that the slides are in the following order:
a. Work in Presentations
b. <blank slide>
c. Quiz Question (You import an outline...)
d. Quiz Question (You need to ensure...)
e. Quiz Question (How many transitions...)
f. Quiz Question (Which of the following is a...)
g. Quiz Question (Which of the following keyboard...)
h. Quiz Review
i. Quiz Review (continued)
j. <blank slide>
Add text to slides
Open the AddText1 presentation, and then perform the following tasks:
1. Select slide 2, and then insert a text box.
2. Select the text box, and then move it so that it’s centered below the graphic that’s at the top of the slide.
3. In the selected text box, enter Copyright 2015.
4. Open the AddText2 document in Word for iPad, and then copy the text from the document to the text box on slide 3 of the presentation.
5. In the text box, select the first paragraph (Lesson 11:...), and delete it. Then delete the blank paragraph mark at the bottom of the text box.
6. Magnify any text on the slide, and then drag your finger to move the magnifying circle to other parts of the slide.
7. On slide 40, locate the word silde, which has a wavy underline, and then correct the spelling.
8. Review the comments in the presentation.
9. Open the AddText3 workbook. Copy the table from the workbook to the text box on slide 42 of the presentation.
Add visual elements to slides
Open the AddGraphics1 presentation, and then perform the following tasks:
1. On slide 18, insert a picture from your Camera Roll. Then center the picture above the Thank You! text.
2. Open the AddGraphics2 document. Copy the image in the document to slide 18 of the presentation. Then center the image below the Thank You! text.
3. Move one image from slide 18 to the upper-right corner of slide 1 and resize it so it doesn’t cover any of the slide text.
4. On slide 18, insert a dodecagon shape (a 12-sided polygon) from the Basic Shapes section of the Shapes menu. Then move the shape to the lower-right corner of the slide.
5. In the banner shape, enter Congratulations! You completed the module. Then resize the shape so it’s about the same width as the Thank You! text.
6. Format the text in the shape by using any WordArt style.
7. Select the shape. Apply the Fill Color effect from the Basic section of the Emphasis Effect menu to the shape. Then change the effect color to a different shade of purple.
8. Select the text box below the shape, change the effect option, and add any other effect to the element.
9. Remove your least favorite animation effect from the slide.
All materials on the site are licensed Creative Commons Attribution-Sharealike 3.0 Unported CC BY-SA 3.0 & GNU Free Documentation License (GFDL)
If you are the copyright holder of any material contained on our site and intend to remove it, please contact our site administrator for approval.
© 2016-2026 All site design rights belong to S.Y.A.