Microsoft Office 2016 At Work For Dummies (2016)
Chapter 13
Using Outlook Contacts and Tasks
In This Chapter
![]() Adding and editing contacts
Adding and editing contacts
![]() Viewing and searching the People list
Viewing and searching the People list
![]() Sending a message to a contact
Sending a message to a contact
![]() Forwarding contact data via email
Forwarding contact data via email
![]() Creating and managing tasks
Creating and managing tasks
Outlook is much more than just an email program. It excels at storing information that you need for your daily business and personal dealings, such as contact information and to-do lists. If you can’t keep yourself organized with all these tools available to you, don’t blame Outlook!
In this chapter, I show you how to enter and use contact information in the People area of Outlook. I also show how to create and manage tasks and to-do items in the Tasks area.
Add and edit contacts
The People area of Outlook stores a contact (also called a record) for each person or business that you want to save for later use.
You can access the People area by clicking the People icon in the lower left corner of the Outlook window. (See ![]() in Figure 13-1.)
in Figure 13-1.)
If you have more than one email account set up in Outlook, you might have multiple separate Contacts listings. If so, you’ll see them listed in the navigation pane. Click the one you want to see. (See ![]() in Figure 13-1.)
in Figure 13-1.)
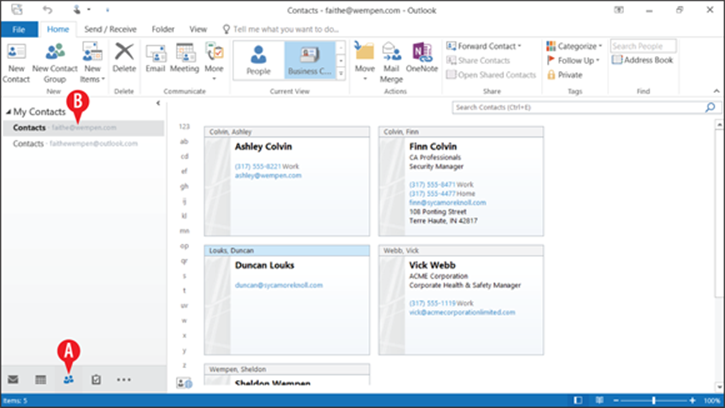
Figure 13-1: Click People to open the People area of Outlook, where contacts are stored.
Create a new contact
Outlook stores complete contact information about the people you want to keep in touch with. You can store not only mailing addresses but also phone numbers, email addresses, pager numbers, and personal information such as birthdays, spouse names, departments, and professions.
To create a new contact, follow these steps:
![]() From the People area of Outlook, on the Home tab, click New Contact.
From the People area of Outlook, on the Home tab, click New Contact.
![]() Fill in the fields with all the information you want to record about that contact.
Fill in the fields with all the information you want to record about that contact.
A summary of the person’s contact information appears in the upper right corner. (See ![]() in Figure 13-2.)
in Figure 13-2.)
 You can store as much or as little information as you like about each contact, and it need not be consistent between contacts. For some people, all you need is an email address. For others, you might need multiple ways to contact the person, as well as personal details such as spouse’s name and birthday.
 When creating a contact, the window in which it appears may truncate the available fields at the bottom if the window is not tall enough. You can increase the window size, but if you are using a very small screen size or low resolution, you might not be able to make the window large enough to see all the fields, and you can’t scroll down to see them because there’s no scroll bar in this window. The bottommost field is the Addresses area, so if you can see that, you’re good.
![]() (Optional) If you need to enter additional information about the contact, click Details and fill in any of the additional fields.
(Optional) If you need to enter additional information about the contact, click Details and fill in any of the additional fields.
![]() Click Save & Close.
Click Save & Close.

Figure 13-2: Start a new contact.
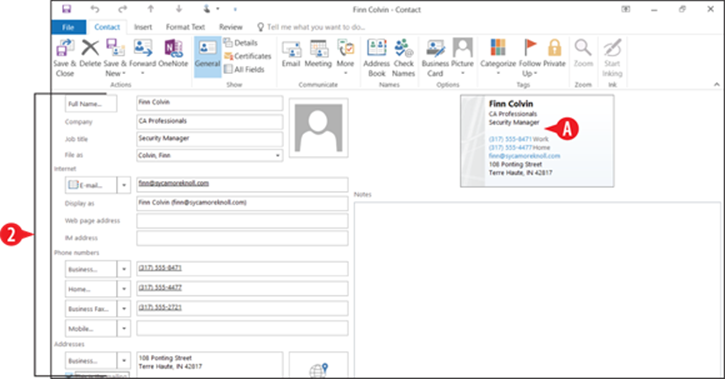
Figure 13-3: Enter the information to store about that contact.
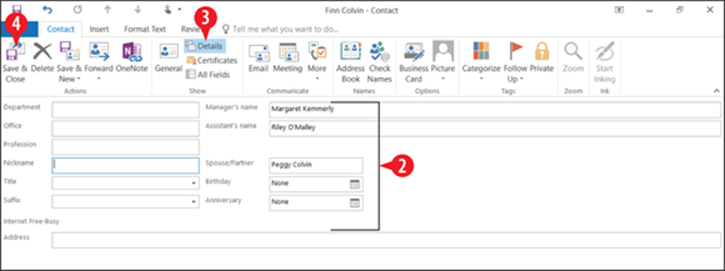
Figure 13-4: Record any additional details as needed.
If you need to make changes to a contact, you can double-click it to reopen it.
Change how a contact is filed
If someone asked you how contacts were alphabetized in Outlook, you would probably say that they’re done by last name, right? And you’d be absolutely … wrong.
The File As setting determines the sort order in the People list. By default, when you create a new contact, the File As setting for it is set to Last Name, First Name. But you can change that to some other setting if you prefer, such as the company name or the first name. Here’s how:
1. Double-click the contact to reopen it for editing.
![]() Open the File as drop-down list and choose a different filing method for the contact.
Open the File as drop-down list and choose a different filing method for the contact.
If you want both the company name and the person’s name to show, choose one of the File As options that includes both. The one that appears first will be how it is alphabetized. For example, Strong, Terry (ACME Corporation) alphabetizes by Strong but also includes ACME Corporation in the title.
![]() Click Save & Close.
Click Save & Close.
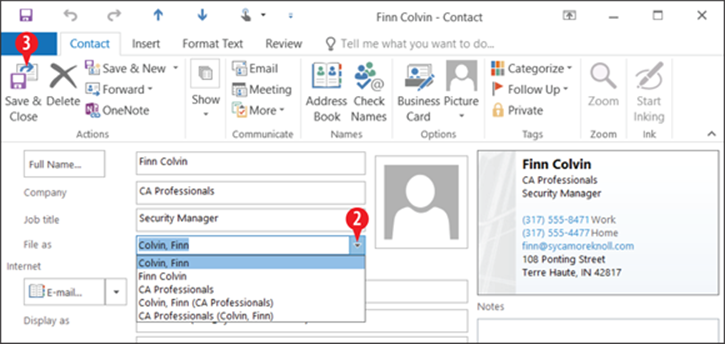
Figure 13-5: Change the File As setting to control how the contact is filed alphabetically.
Delete and restore a contact
With Outlook, you don’t have to tear pages out of a paper address book to get rid of a person’s information; just delete the contact:
![]() To delete a contact, select the contact and then click Delete on the Home tab.
To delete a contact, select the contact and then click Delete on the Home tab.
![]() Alternatively, you can right-click the contact and click Delete.
Alternatively, you can right-click the contact and click Delete.
![]() You can also select the contact and then press the Delete key on the keyboard.
You can also select the contact and then press the Delete key on the keyboard.
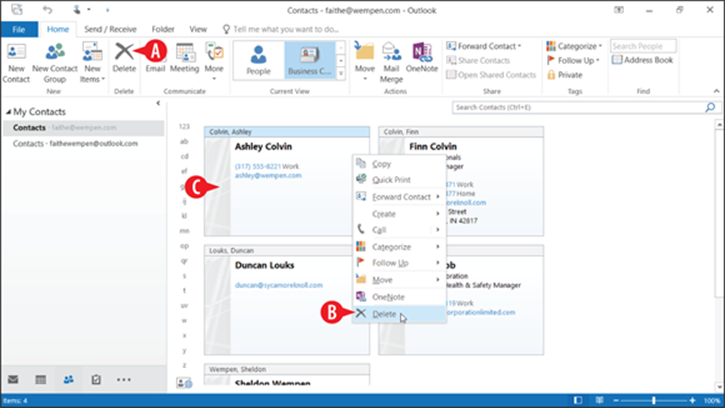
Figure 13-6: Delete a contact.
To restore an accidentally deleted contact, follow these steps:
![]() Click the More (…) button in the lower left corner to open a menu.
Click the More (…) button in the lower left corner to open a menu.
![]() Click Folders. The navigation pane is replaced by a list of folders.
Click Folders. The navigation pane is replaced by a list of folders.
![]() Click Deleted Items.
Click Deleted Items.
![]() Select the deleted contact.
Select the deleted contact.
![]() Drag the deleted contact and drop it on the Contacts folder in the navigation pane.
Drag the deleted contact and drop it on the Contacts folder in the navigation pane.
6. Click the People icon in the lower left corner to return to the People area.
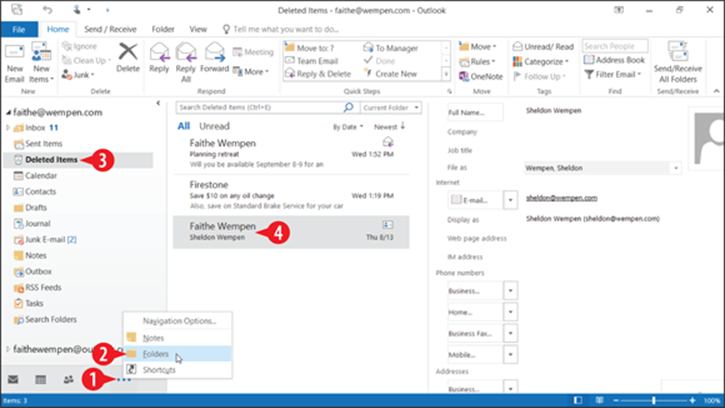
Figure 13-7: Find a deleted contact in the Deleted Items folder.
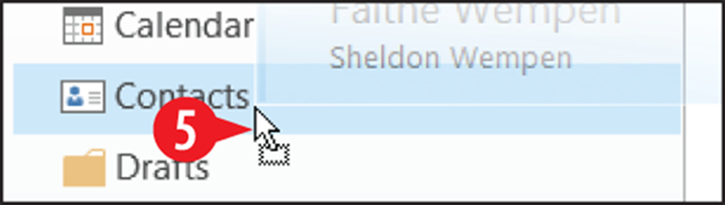
Figure 13-8: Find a deleted contact in the Deleted Items folder.
View and search the People list
Depending on the view you’re using at the moment, each contact may be displayed as a card, a business card, or an item in a list. Consider Figure 13-9:
![]() To change the view, make a selection from the Home tab’s Current View group.
To change the view, make a selection from the Home tab’s Current View group.
![]() You might need to click the More button to see all the choices, depending on the window size.
You might need to click the More button to see all the choices, depending on the window size.
As your list of contacts grows, you might need some help finding a particular contact.
![]() You can click a letter to jump to the corresponding section in the listing. This is a good way to look up a contact if you know what it was filed under (for example, the company name, or the person’s last name).
You can click a letter to jump to the corresponding section in the listing. This is a good way to look up a contact if you know what it was filed under (for example, the company name, or the person’s last name).
![]() If you aren’t sure how the contact was filed, you can search by entering any piece of information you know in the Search Contacts box and pressing Enter. For example, you might search by entering the person’s first name or the city in their mailing address.
If you aren’t sure how the contact was filed, you can search by entering any piece of information you know in the Search Contacts box and pressing Enter. For example, you might search by entering the person’s first name or the city in their mailing address.

Figure 13-9: Choose between different views of the People list.
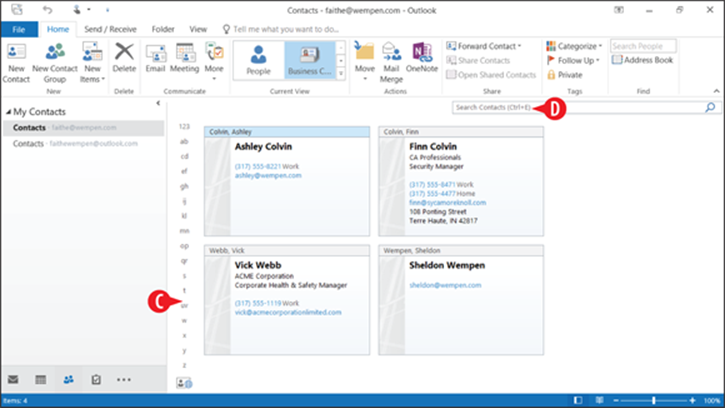
Figure 13-10: Locate a contact.
Send a message to a contact
You can easily address an email message to a contact in your People list. You can initiate this process either from the Contacts area of the program or from the Mail area.
To send from the People area, do the following:
![]() Select the contact.
Select the contact.
![]() On the Home tab, click Email. Outlook starts a new message with the recipient’s email address pre-entered.
On the Home tab, click Email. Outlook starts a new message with the recipient’s email address pre-entered.
3. Compose and send the email as you would normally.
To send from the Mail area, do this:
![]() Click New Email.
Click New Email.
![]() In the new message window, click Address Book, or click the To button.
In the new message window, click Address Book, or click the To button.
![]() In the Select Names window, click the contact’s name.
In the Select Names window, click the contact’s name.
![]() If the name does not immediately appear in the To box, click the To button.
If the name does not immediately appear in the To box, click the To button.
5. Add other names to the To, Cc, and/or Bcc lines as desired.
![]() Click OK.
Click OK.
7. Compose and send the email as you would normally.
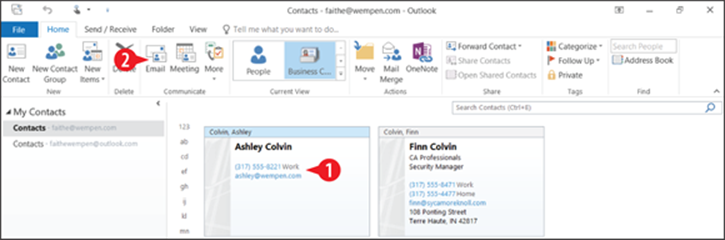
Figure 13-11: Send an email from the People area of Outlook.
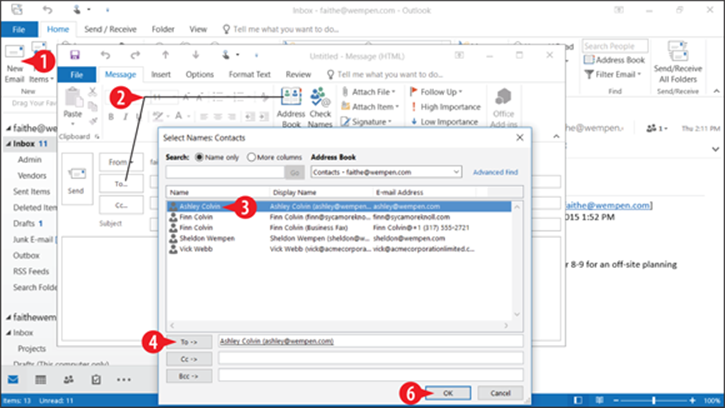
Figure 13-12: Address an email message.
Forward contact data via email
You can share a contact by attaching the contact record to an email in one of these formats:
· Outlook contact: The attachment is an Outlook contact, which only Outlook can accept. The recipient must have Outlook to make use of the attachment.
· Business card: The attachment is in vCard format (.vcf), a standard format for personal data that many programs can accept.
Sharing contact data can be a quick way of transferring information about vendors and customers between employees; you can also use this feature to share your own contact information with people, so they can import your contact info into their address book without having to manually type it in.
To attach contact information to a message:
![]() In the People area, select the contact to send.
In the People area, select the contact to send.
![]() On the Home tab, click Forward Contact.
On the Home tab, click Forward Contact.
![]() Click either As a Business Card or As an Outlook Contact.
Click either As a Business Card or As an Outlook Contact.
![]() In the New Message window that appears, enter or select the recipient(s).
In the New Message window that appears, enter or select the recipient(s).
The contact’s name appears on the Subject line, but you can change this. (See ![]() in Figure 13-14.)
in Figure 13-14.)
The contact information is already attached. (See ![]() in Figure 13-14.)
in Figure 13-14.)
![]() Click Send to send the email.
Click Send to send the email.
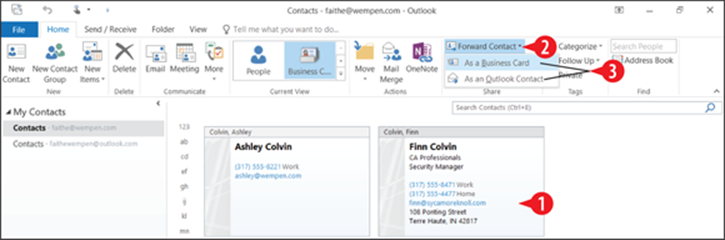
Figure 13-13: Forward a contact to an email recipient.
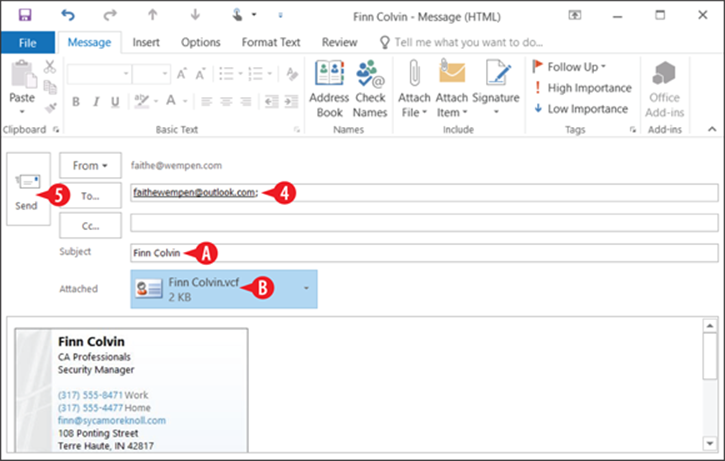
Figure 13-14: Compose and send the message.
Create and manage tasks
A task is a database record that contains information about something that you need to accomplish. For example, when I was writing this book, I used a task in Outlook to keep track of my deadlines and progress.
Don’t confuse tasks with appointments. A staff meeting would be an appointment, and you would enter that in the Calendar area of Outlook. A task, on the other hand, is something that you need to complete by a certain date or time, but not necessarily at that exact date or time. For example, a task might be to turn in your time card before 5 p.m. on Friday.
The Tasks area in Outlook helps you create and manage action items for yourself and others. Not only can Outlook keep track of what you need to do, but it can also remind you of upcoming deadlines, record what percentage of a large job you’ve completed, and even send out emails that assign certain tasks to other people.
Click the Tasks icon to switch to the Tasks area. (See ![]() in Figure 13-15.)
in Figure 13-15.)
It’s important to understand the difference in Outlook between Tasks and the To-Do list:
![]() Tasks are specific items you created in the Tasks area of Outlook. Something isn’t technically a task unless it was created in the Tasks section. If you click Tasks, you see only tasks created in the Tasks section.
Tasks are specific items you created in the Tasks area of Outlook. Something isn’t technically a task unless it was created in the Tasks section. If you click Tasks, you see only tasks created in the Tasks section.
![]() If you have more than one email account, each one may have its own Tasks entry, which opens a separate task list.
If you have more than one email account, each one may have its own Tasks entry, which opens a separate task list.
![]() The To-Do list contains everything from the Tasks list as well as other items you have marked for action, such as email messages you flag for follow-up. If you click To-Do List, you get all your tasks plus any other flagged items from other areas.
The To-Do list contains everything from the Tasks list as well as other items you have marked for action, such as email messages you flag for follow-up. If you click To-Do List, you get all your tasks plus any other flagged items from other areas.
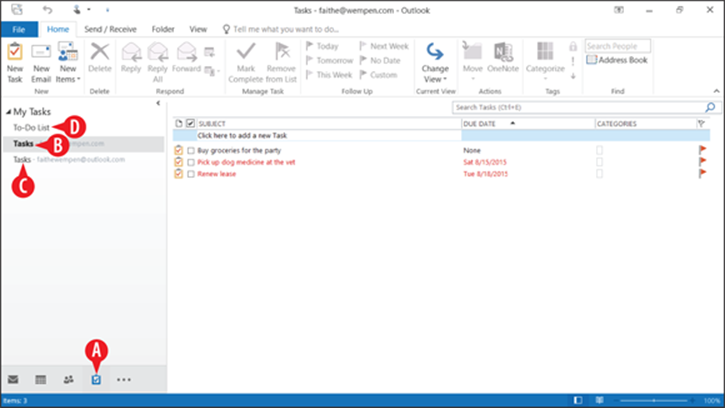
Figure 13-15: Work with the Tasks list.
Enter a new task
Here’s a very simple way to enter tasks. If you have a lot of tasks to enter, and you don’t need to record much information about them, this method is your best bet:
![]() Enter a new task by typing it in the Click here to add a new task box at the top of the task list.
Enter a new task by typing it in the Click here to add a new task box at the top of the task list.
![]() You can enter a due date in the DUE DATE column or leave it blank for no due date.
You can enter a due date in the DUE DATE column or leave it blank for no due date.
![]() The fields available depend on the view you have chosen. See “Change the Tasks view” later in this chapter. Simple List view is shown here.
The fields available depend on the view you have chosen. See “Change the Tasks view” later in this chapter. Simple List view is shown here.
![]() After entering a task this way, you can double-click the task to open it in its own window and enter additional details.
After entering a task this way, you can double-click the task to open it in its own window and enter additional details.

Figure 13-16: Click in the box and begin entering the task.
To enter more information about a task as you create it, use the following method instead:
![]() From the Tasks area, on the Home tab, click New Task.
From the Tasks area, on the Home tab, click New Task.
2. Enter data in the fields in the New Task window. You can enter as much or as little information as you like:
![]() Enter a Start date and/or a Due date.
Enter a Start date and/or a Due date.
![]() Choose a status.
Choose a status.
![]() Choose a priority.
Choose a priority.
![]() Estimate the project’s completion percentage.
Estimate the project’s completion percentage.
![]() Set a reminder.
Set a reminder.
![]() Type any notes about the task.
Type any notes about the task.
![]() Click Save & Close.
Click Save & Close.
To reopen a task for editing, double-click it.
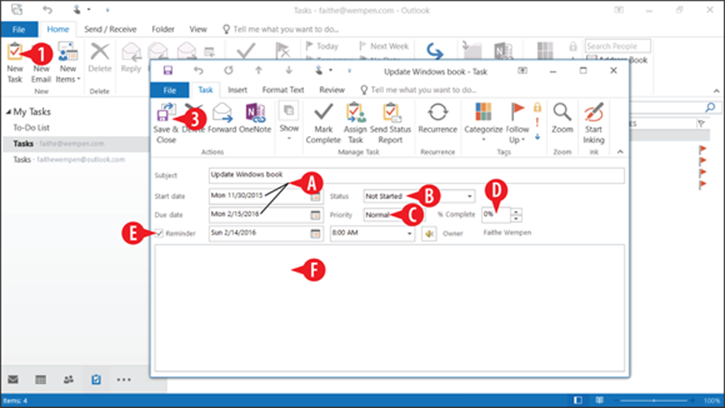
Figure 13-17: Enter information about the task.
Change the Tasks view
There are many different views available for the Tasks list. Here are some tips for working with different views of your tasks:
![]() To choose among the available views, on the Home tab, click Change View and then click the desired view.
To choose among the available views, on the Home tab, click Change View and then click the desired view.
![]() Some views show different fields. For example, Detailed view has several more columns than Simple List view.
Some views show different fields. For example, Detailed view has several more columns than Simple List view.
![]() Some views also filter the task list to show only items with certain statuses. For example, Active shows only uncompleted tasks, and Overdue shows only overdue tasks.
Some views also filter the task list to show only items with certain statuses. For example, Active shows only uncompleted tasks, and Overdue shows only overdue tasks.
![]() Some views place the tasks in a certain order. For example, Prioritized arranges them by their priority status.
Some views place the tasks in a certain order. For example, Prioritized arranges them by their priority status.
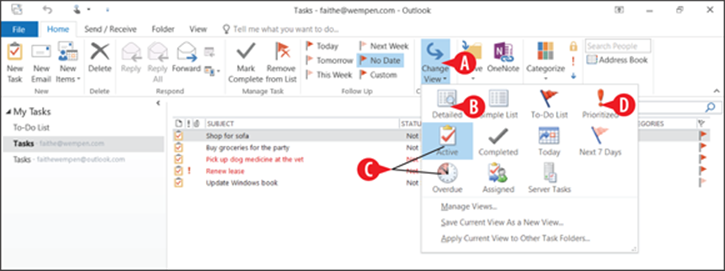
Figure 13-18: Change the view if desired.
Set up a recurring task
You can set up a task once in Outlook and then tell it to reoccur at a defined interval. This can save you a lot of time reentering tasks that are the same every day, week, or month. Here’s how:
1. Double-click an existing task to open it for editing, or start a new task.
![]() On the Task tab, click Recurrence.
On the Task tab, click Recurrence.
![]() Set the task to recur daily, weekly, monthly, or yearly.
Set the task to recur daily, weekly, monthly, or yearly.
![]() Set up the details of the recurrence. The options change depending on your choice in step 3.
Set up the details of the recurrence. The options change depending on your choice in step 3.
![]() If the recurrence should end on a certain date or after a certain number of times, set that up.
If the recurrence should end on a certain date or after a certain number of times, set that up.
![]() Click OK.
Click OK.
![]() In the task window, click Save & Close.
In the task window, click Save & Close.
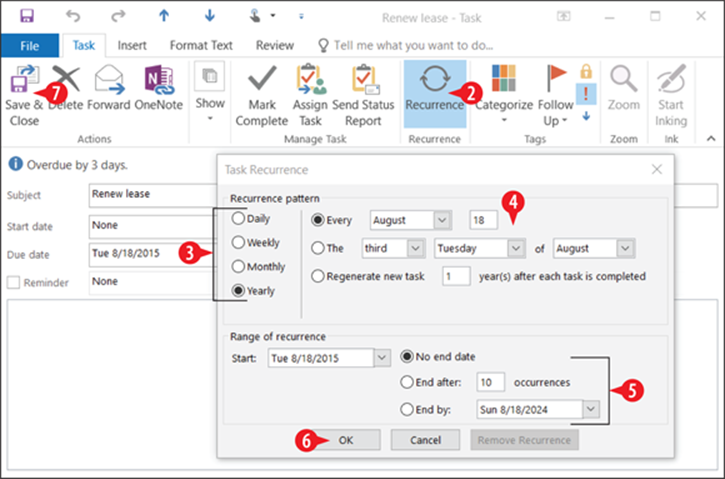
Figure 13-19: Set up task recurrence.
If you want to remove the recurrence on a task, repeat steps 1-2 and then click Remove Recurrence.
Send a status report
Your manager or supervisor will want to know how you are progressing on any work-related tasks. You can quickly send someone a status report on a task by doing the following:
1. From the Tasks area, double-click the task to open it.
![]() On the Task tab, click Send Status Report. A new email window opens.
On the Task tab, click Send Status Report. A new email window opens.
The Subject line shows Task Status Report plus the name of the task. (See ![]() in Figure 13-20.)
in Figure 13-20.)
The status report appears in the message body. (See ![]() in Figure 13-20.)
in Figure 13-20.)
![]() Compose and send the email as you would any other message.
Compose and send the email as you would any other message.

Figure 13-20: Email a status report for a task.
Assign the task to someone else
Assigning a task to someone else in Outlook accomplishes several things at once:
· It sends an email containing the task details to the person to whom you assign it.
· It gives them the choice of accepting or declining the task and sends their reply back to you.
· If they accept the task, it places it on their Tasks list in Outlook (if they use Outlook).
To assign a task, follow these steps:
1. Double-click the task to open it.
![]() On the Task tab, click Assign Task. An email composition screen appears within the task window.
On the Task tab, click Assign Task. An email composition screen appears within the task window.
![]() Type or select the email address of the person who is being assigned the task.
Type or select the email address of the person who is being assigned the task.
![]() Click Send.
Click Send.
After you have sent the assignment, the task’s icon changes in the task list. (See ![]() in Figure 13-23.)
in Figure 13-23.)
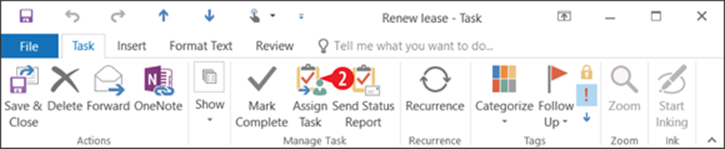
Figure 13-21: Click the Assign Task button in the open task window.
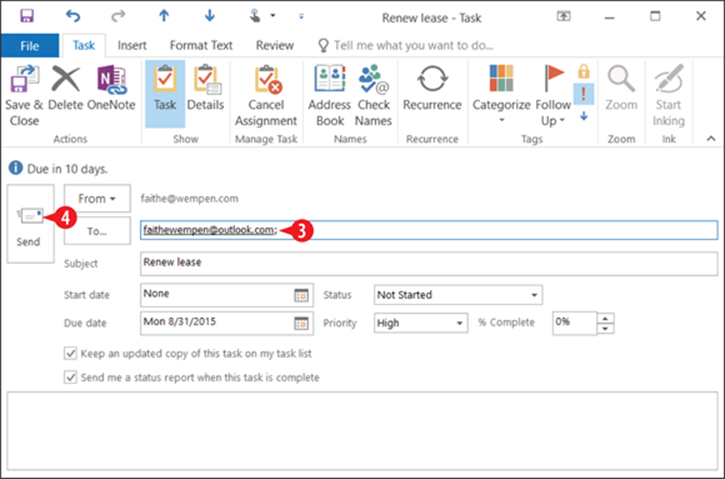
Figure 13-22: Email the task to the person to whom you want to assign it.

Figure 13-23: The task’s icon indicates it has been assigned to someone.
Receive an assigned task
When you receive an email-based task assignment from some other user, it comes to your Inbox along with the rest of your email. When you open it, you see the task information.
1. Accept or decline the task:
![]() To accept the task, click Accept.
To accept the task, click Accept.
OR
![]() To decline the task, click Decline.
To decline the task, click Decline.
![]() The sender will receive an email with your response. If you want to edit that email, click Edit the response before sending. If not, leave Send the response now selected.
The sender will receive an email with your response. If you want to edit that email, click Edit the response before sending. If not, leave Send the response now selected.
3. Click OK.
4. If you chose to edit the response in step 2, make any changes or comments on the email, and then click Send.
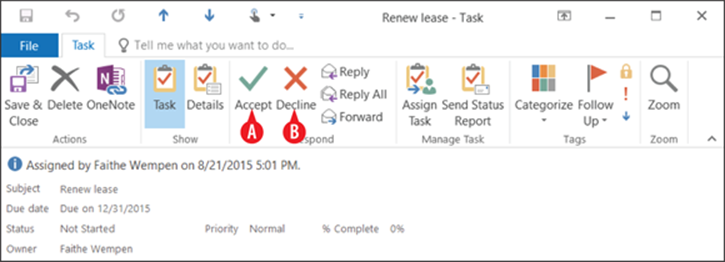
Figure 13-24: Receive and accept a task.
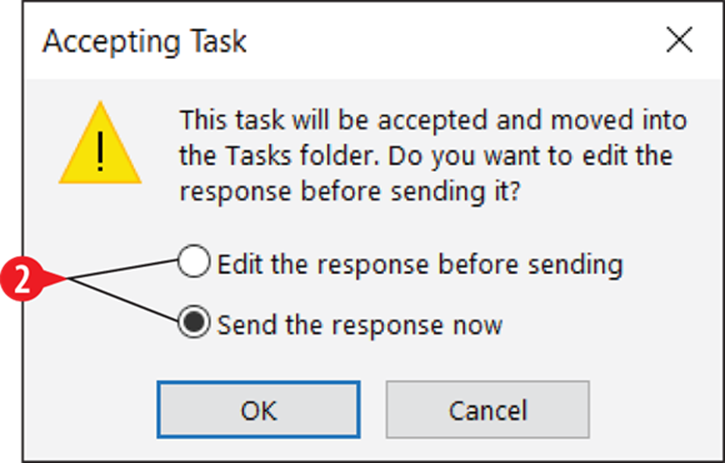
Figure 13-25: Send your response to the requester.
Change a task status
As you make progress on a task, you will want to update its status in Outlook. Here’s how:
1. Double-click the task to open its window.
![]() Open the Status drop-down list and choose a different status if needed.
Open the Status drop-down list and choose a different status if needed.
Completing the task doesn’t delete it, although a completed task may vanish from your list. When you set a task to a status of Completed, it changes which views it appears in. For example, if you are using Active view, a completed task will appear to vanish. Switch to a view that includes completed tasks, like Simple List, and you’ll see it again.
![]() Set the % Complete value to the approximate percent of completion for the task.
Set the % Complete value to the approximate percent of completion for the task.
If you set the % Complete to 100%, the Status field changes to Completed automatically.
![]() Click Save & Close.
Click Save & Close.
You can also update a task’s status from certain views without opening the task’s window. For example, Active view contains a % Complete column, and you can click there and type a different number. (See ![]() in Figure 13-27.)
in Figure 13-27.)
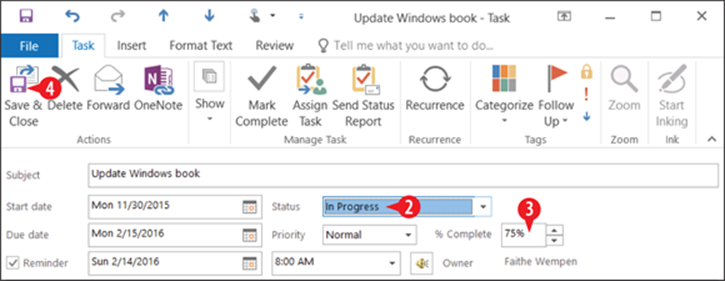
Figure 13-26: Update a task’s status.

Figure 13-27: You can also update a status from certain views.
Delete a task
As I mention earlier, completing a task doesn’t delete it. You might want to keep completed tasks around for later reference. If you don’t want to see them, switch to a view that doesn’t include completed tasks, such as the Active view. If you’re sure you want to delete a task, though, it’s easy enough to delete it.
To delete a task, do any of the following:
![]() Right-click the task and click Delete.
Right-click the task and click Delete.
![]() Select the task and click Delete on the Home tab.
Select the task and click Delete on the Home tab.
![]() Select the task and press Delete on the keyboard.
Select the task and press Delete on the keyboard.
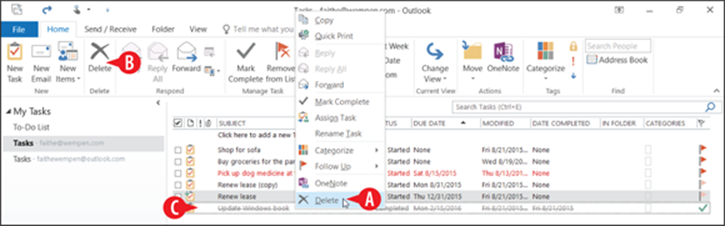
Figure 13-28: Delete a task.
All materials on the site are licensed Creative Commons Attribution-Sharealike 3.0 Unported CC BY-SA 3.0 & GNU Free Documentation License (GFDL)
If you are the copyright holder of any material contained on our site and intend to remove it, please contact our site administrator for approval.
© 2016-2026 All site design rights belong to S.Y.A.