Microsoft Office 2016 At Work For Dummies (2016)
Chapter 12
Managing Email with Outlook
In This Chapter
![]() Navigating the Outlook interface
Navigating the Outlook interface
![]() Setting up a mail account
Setting up a mail account
![]() Receiving and reading email
Receiving and reading email
![]() Composing and sending email
Composing and sending email
![]() Attaching a file to a message
Attaching a file to a message
![]() Creating folders for managing email
Creating folders for managing email
![]() Creating a message-handling rule
Creating a message-handling rule
![]() Configuring the junk mail filter
Configuring the junk mail filter
Outlook is a multipurpose program. It’s an address book, a calendar, a to-do list, and an email handling program, all in one. The most popular Outlook feature, though, is the email handling. Millions of people use Outlook as their primary email program, and for good reason! It’s fast, full-featured, and easy to use and customize.
In this chapter, I show you how to set up an email account in Outlook and then how to use it to send and receive email messages.
Understand the Outlook interface
Outlook 2016 is like other Office 2016 applications in many ways. For example, it has a Ribbon, a File tab that opens Backstage view, and a status bar that shows status messages and provides a Zoom slider for changing the magnification of the application’s content. The following sections explain what is unique about Outlook, and what you might not pick up on immediately on your own.
 If you’ve never used Outlook before this, you might be prompted to set up an email address before Outlook starts working normally. See “Set up a mail account” later in this chapter if you need help with the initial setup.
Understand the Mail section’s layout
The Mail section consists of three panes. From left to right, they are:
![]() Navigation: Lists different locations you can click to make the active location. The default location is Inbox, where your incoming mail is located.
Navigation: Lists different locations you can click to make the active location. The default location is Inbox, where your incoming mail is located.
![]() List: Provides a list of emails stored in the active location.
List: Provides a list of emails stored in the active location.
![]() Reading: Shows a preview of whatever message is selected in the Mail list pane.
Reading: Shows a preview of whatever message is selected in the Mail list pane.
· You can move the Reading pane to the bottom of the screen, or turn it off altogether. On the View tab, click Reading Pane, and then make your selection from the menu. (See ![]() in Figure 12-2.)
in Figure 12-2.)
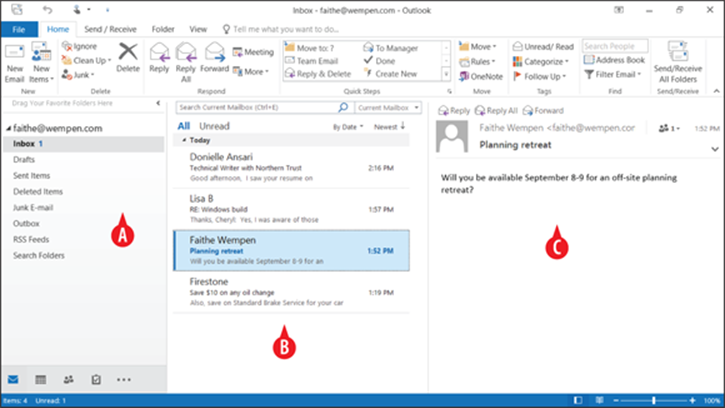
Figure 12-1: The Mail area of the Outlook application.
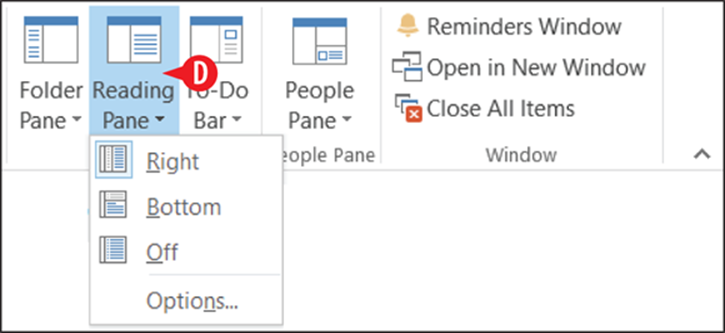
Figure 12-2: Change the location of the Reading pane if desired.
Switch between folders
In the navigation pane, you can click any folder to view its contents in the center (List) pane. The exact folders that appear depend somewhat on the type of email account you have set up and the folders on its server, but will probably include these:
![]() Inbox: This is where incoming email arrives. You will probably spend most of your time in this folder.
Inbox: This is where incoming email arrives. You will probably spend most of your time in this folder.
![]() Drafts: Any messages that you partially compose and then quit working on for some reason wait here for you to complete and send them.
Drafts: Any messages that you partially compose and then quit working on for some reason wait here for you to complete and send them.
![]() Sent Items: Outlook saves a copy of every message you send in this folder, for your reference.
Sent Items: Outlook saves a copy of every message you send in this folder, for your reference.
![]() Deleted Items (or Trash): When you delete a message from any other folder, it goes here instead of being destroyed. To permanently delete a message, delete it from Deleted Items. For some mail accounts this folder is called Trash.
Deleted Items (or Trash): When you delete a message from any other folder, it goes here instead of being destroyed. To permanently delete a message, delete it from Deleted Items. For some mail accounts this folder is called Trash.
![]() Junk Email: If Outlook’s junk mail filter identifies a message as potentially unwanted, it moves it here.
Junk Email: If Outlook’s junk mail filter identifies a message as potentially unwanted, it moves it here.
![]() Outbox: Messages that you have sent but that have not yet been uploaded to the mail server wait here. If a message stays here for more than a few minutes, there may be a problem with your mail server or Internet connection.
Outbox: Messages that you have sent but that have not yet been uploaded to the mail server wait here. If a message stays here for more than a few minutes, there may be a problem with your mail server or Internet connection.
![]() RSS Feeds: RSS stands for Really Simple Syndication. It’s a technology for aggregating updates from multiple websites in a single, easy-to-read location. It’s not very popular anymore, but if you use this service, messages appear here.
RSS Feeds: RSS stands for Really Simple Syndication. It’s a technology for aggregating updates from multiple websites in a single, easy-to-read location. It’s not very popular anymore, but if you use this service, messages appear here.
![]() Search Folders: If you have any saved searches, you can run them from here.
Search Folders: If you have any saved searches, you can run them from here.
You can also create your own mail folders, as you will learn later in this chapter. If you have done so, they will appear in the Navigation pane also.
![]() Notice at the very top of the Navigation pane in Figure 12-3, it says Drag Your Favorite Folders Here. You can drag a folder from the main section of the navigation pane and drop it there to create easily accessed shortcuts to the folders you use most often. This is not that big a deal if you just have a few folders, as in Figure 12-3, but if you start creating your own custom folders, over time you may have dozens of folders, with one inside another, and navigating to the correct folder may become not so simple anymore.
Notice at the very top of the Navigation pane in Figure 12-3, it says Drag Your Favorite Folders Here. You can drag a folder from the main section of the navigation pane and drop it there to create easily accessed shortcuts to the folders you use most often. This is not that big a deal if you just have a few folders, as in Figure 12-3, but if you start creating your own custom folders, over time you may have dozens of folders, with one inside another, and navigating to the correct folder may become not so simple anymore.
![]() If more than one email account is configured in Outlook, you might have multiple sections in the Navigation pane. At the top of each section is the email address to which it pertains. Other email accounts might have their own sections beneath that. Alternatively, all email accounts might use the same set of folders under a generic heading like Outlook or Mail, depending on how they are set up.
If more than one email account is configured in Outlook, you might have multiple sections in the Navigation pane. At the top of each section is the email address to which it pertains. Other email accounts might have their own sections beneath that. Alternatively, all email accounts might use the same set of folders under a generic heading like Outlook or Mail, depending on how they are set up.
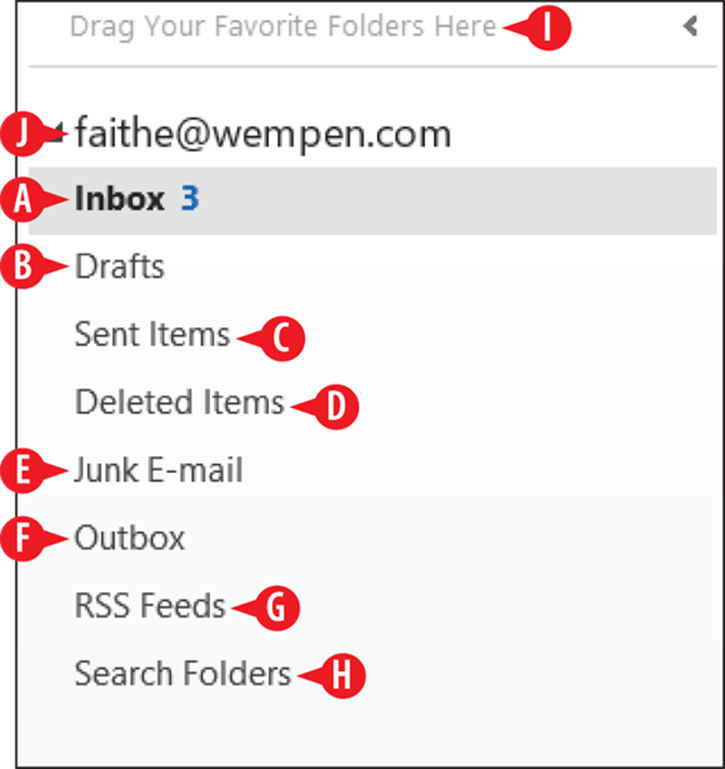
Figure 12-3: Navigate among the available mail folders.
Navigate to other areas of the application
Outlook has several diverse areas, each providing a different service, and each area has a different interface. These areas are Mail, Calendar, People, Tasks, and Notes. (Two other items that are also listed aren’t really separate areas: Folders and Shortcuts.)
Even though this lesson covers only the email component of Outlook, it’s a good idea to familiarize yourself with the entire application so you can get an idea of how the areas fit together.
You click a button in the lower-left corner of the Outlook application window to switch to the area you want to work with, as shown in Figure 12-2:
![]() Mail: Send, receive, and manage email
Mail: Send, receive, and manage email
![]() Calendar: Record and display appointments and events
Calendar: Record and display appointments and events
![]() People: Store and retrieve information about people and businesses
People: Store and retrieve information about people and businesses
![]() Tasks: Record and track the progress of to-do items
Tasks: Record and track the progress of to-do items
![]() More: Open a menu of other areas of Outlook, such as Notes
More: Open a menu of other areas of Outlook, such as Notes
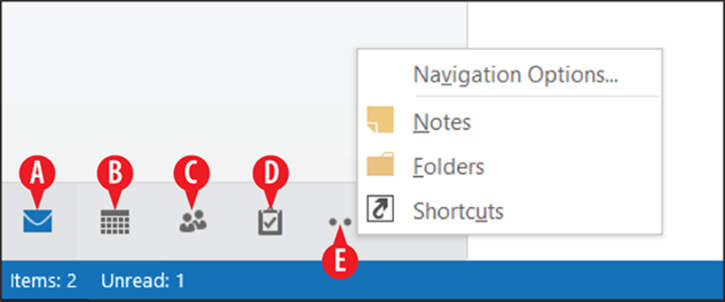
Figure 12-4: Switch among the different Outlook areas using the buttons in the lower left corner.
Set up a mail account
The first time you start Outlook, you’re prompted to complete several setup operations. The most important of these is to set up your email account.
If you are not prompted to set up a mail account, and Outlook simply opens up, your mail account may already be configured. If that’s the case, you don’t have to do anything other than start enjoying it. See the rest of this chapter to learn what to do.
If you are not prompted but you also don’t have a valid email account set up, or if you want to set up additional accounts, use the following steps. If you are prompted, jump into the following steps at step 3.
Setting up an account automatically
First, let Outlook try to configure your account automatically. If it works, you’ve just saved yourself some time and effort:
1. In Outlook, click File to open Backstage view.
![]() Click Add Account. The Add Account dialog box opens.
Click Add Account. The Add Account dialog box opens.
![]() Fill in the information as prompted.
Fill in the information as prompted.
![]() Click Next.
Click Next.
![]() Wait for Outlook to attempt to configure the account. If it is successful, you see a Congratulations message. Click Finish and you’re done.
Wait for Outlook to attempt to configure the account. If it is successful, you see a Congratulations message. Click Finish and you’re done.
Outlook is usually successful if you have a Microsoft Exchange account on the network to which your computer is connected, or if you are using an Outlook.com or Hotmail.com address. That’s because those are Microsoft account types.
6. If the initial attempt failed, you might see the following:
An encrypted connection to your mail server is not available. Click Next to attempt using an unencrypted connection.
If you see that message, click Next to try the alternate, unencrypted method.
7. Wait for Outlook to try the alternate method. You might see a success message, like in Figure 12-7, or another failure message.
![]() If you see another failure message, mark the Change account settings check box at the bottom of the dialog box, and then click Next.
If you see another failure message, mark the Change account settings check box at the bottom of the dialog box, and then click Next.
9. Go on to the next section to continue your mail setup attempt.
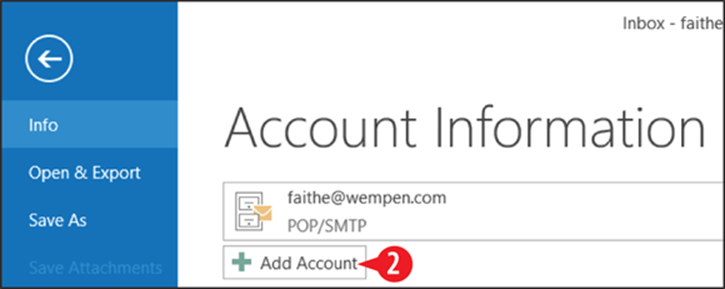
Figure 12-5: Choose to add a new account.
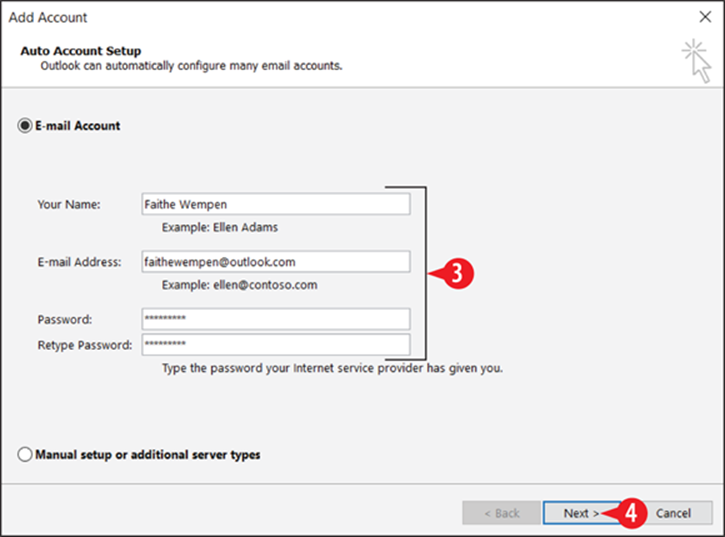
Figure 12-6: Enter the basic information about your email address.
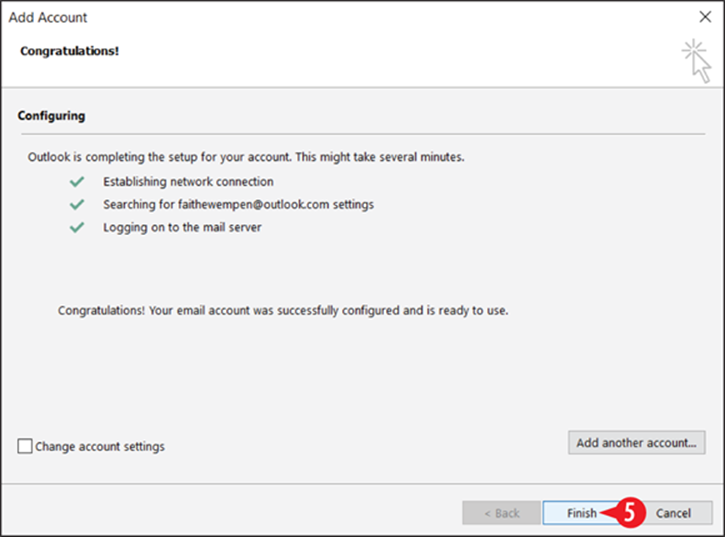
Figure 12-7: Click Finish if Outlook was successful in automatically configuring your mail account.

Figure 12-8: Choose to change the account settings manually.
Setting up an account manually
If the preceding procedure didn’t work out for you, you’ll need to manually enter the settings for your account. That means you’ll need to know a bit more about your email account.
These are different kinds of mail servers. You need to know which type you have before you start setting up your email account in Outlook. Ask your Internet service provider or IT department if needed. If that information is not available, try POP3 first; it’s the more common type.
POP3 (Post Office Protocol 3) is the most common for home use and for most offices. With a POP3 account, mail is stored on the server until you retrieve it, and then it’s downloaded to your PC (and deleted from the server). This is called a store-and-forward system.
With an IMAP (Internet Mail Access Protocol) account, the mail stays on the server at all times. This is convenient because you can get your email from anywhere (and review old messages from anywhere), but it’s slower than POP3 to access and more labor-intensive for the company managing the server. Some companies provide IMAP to their employees who travel a lot so they can get their email from different PCs.
A third kind of email account is available: a web-based account, such as Yahoo! Mail, Gmail, and so on. These are also known as HTTP accounts (HyperText Transfer Protocol). Generally speaking, Outlook doesn’t support this type of email account. However, Outlook does support web-based accounts through Outlook.com, its own service, as well as Microsoft email accounts ending in hotmail.com or live.com.
Workarounds are available for many of the web-based email services, like Gmail and Yahoo! mail that enable Outlook to work with them. Check the provider’s Support section on their website for information.
You not only need to know what kind of account you have, but also the incoming and outgoing mail server addresses. An incoming email server might be something like pop.provider.net or imap.provider.net. An outgoing email server usually starts with smtp (Simple Mail Transfer Protocol), as in smtp.provider.net. Don’t try to guess, though; get the information from the mail provider.
Depending on the account type and provider, you might also need to know the following:
· What kind of authentication does the outgoing mail server require?
· What ports are used (numeric codes) for incoming and outgoing mail? For example, a mail server might use 110 for incoming and 3535 for outgoing mail.
After arming yourself with all that information, follow these steps.
1. If you didn’t come here directly from the previous section, do the following to get caught up so that you see what’s in Figure 12-9: Click File ⇒ Add Account ⇒ Add Account. Then click Manual setup or additional server types, and click Next.
![]() At the Choose Service screen, make your selection of your account type.
At the Choose Service screen, make your selection of your account type.
If you have a Web-based email account or an Exchange server account, choose the first option; if you have an account from an ISP such as through your cable or DSL service, choose the second option.
![]() Click Next.
Click Next.
4. Fill in the information about your email account using the data you gathered from your provider or IT department. Some of the important fields include:
![]() Account Type: Choose POP3 or IMAP.
Account Type: Choose POP3 or IMAP.
![]() Enter the incoming and outgoing mail servers.
Enter the incoming and outgoing mail servers.
![]() For your username, enter your entire email address, not just the portion before the @ sign.
For your username, enter your entire email address, not just the portion before the @ sign.
![]() Enter the password you were assigned for your email account.
Enter the password you were assigned for your email account.
![]() If you choose POP3 as the account type, you have a choice of using an existing Outlook data file or creating a new one to store the received mail for this account. This choice isn’t available for IMAP because IMAP stores messages on the server.
If you choose POP3 as the account type, you have a choice of using an existing Outlook data file or creating a new one to store the received mail for this account. This choice isn’t available for IMAP because IMAP stores messages on the server.
![]() Click More Settings.
Click More Settings.
 Some of the fields will be different depending on the account type.
6. If your mail provider indicated that your outgoing server requires authentication, do the following:
![]() Click the Outgoing Server tab.
Click the Outgoing Server tab.
![]() Mark the My outgoing server (SMTP) requires authentication.
Mark the My outgoing server (SMTP) requires authentication.
![]() Choose and configure the authentication method as directed by your provider.
Choose and configure the authentication method as directed by your provider.
7. If your mail provider indicated that you should use specific ports for mail sending and receiving, do the following:
![]() Click the Advanced tab.
Click the Advanced tab.
![]() Enter the correct port numbers in the Incoming server and Outgoing server text boxes.
Enter the correct port numbers in the Incoming server and Outgoing server text boxes.
![]() Adjust any other settings as directed by your provider.
Adjust any other settings as directed by your provider.
![]() Click OK.
Click OK.
![]() Click Next. Your account settings are tested. If the test is successful, you see Completed in the Status column for both tasks. If not, you see an error message.
Click Next. Your account settings are tested. If the test is successful, you see Completed in the Status column for both tasks. If not, you see an error message.
10. Click Close to close the Test Account Settings box.
11. If the test had errors, correct them and then return to step 10 to try again, or click Cancel to give up for now and go get help.
OR
If there were no errors, click Finish to finalize the account setup.
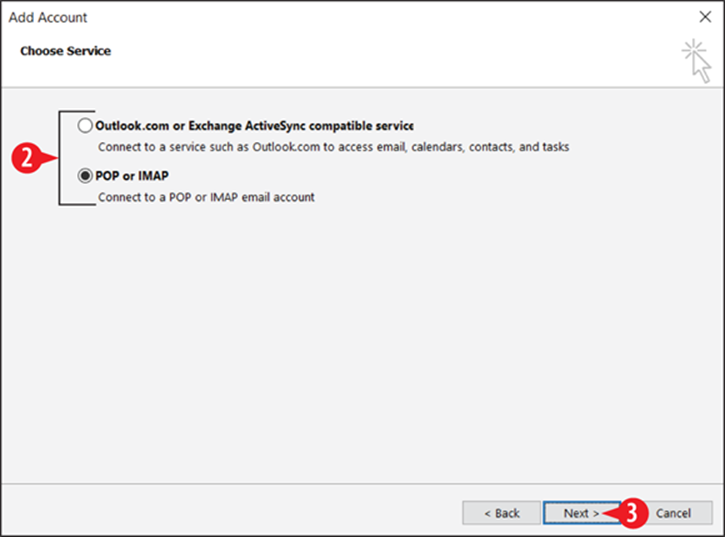
Figure 12-9: Choose the appropriate account type.
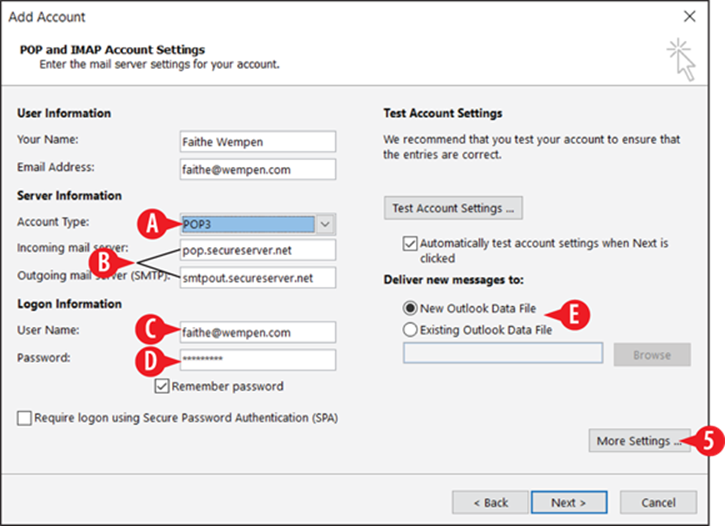
Figure 12-10: Enter your account settings.
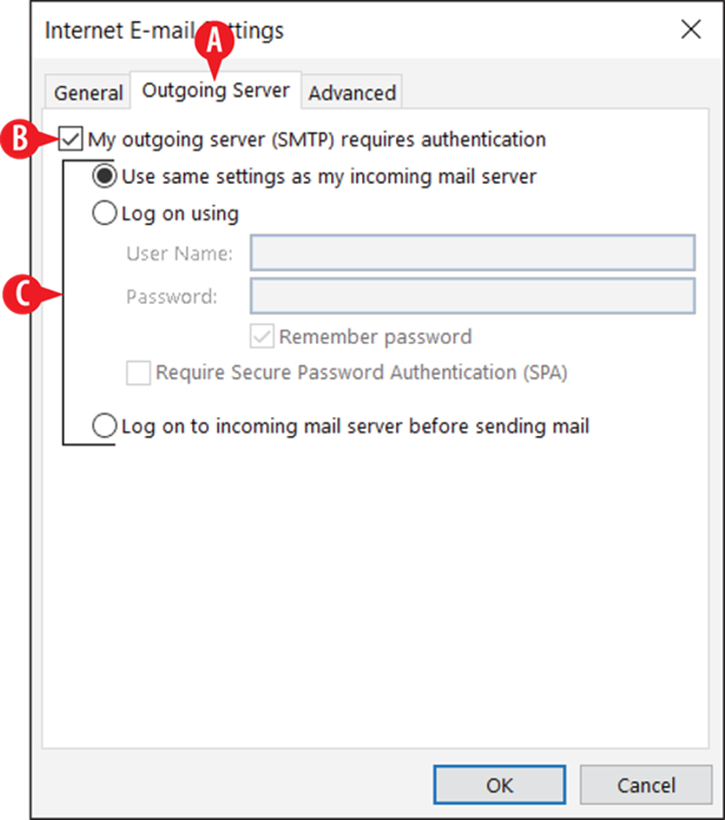
Figure 12-11: Allow Outlook to send authentication to the outgoing mail server.
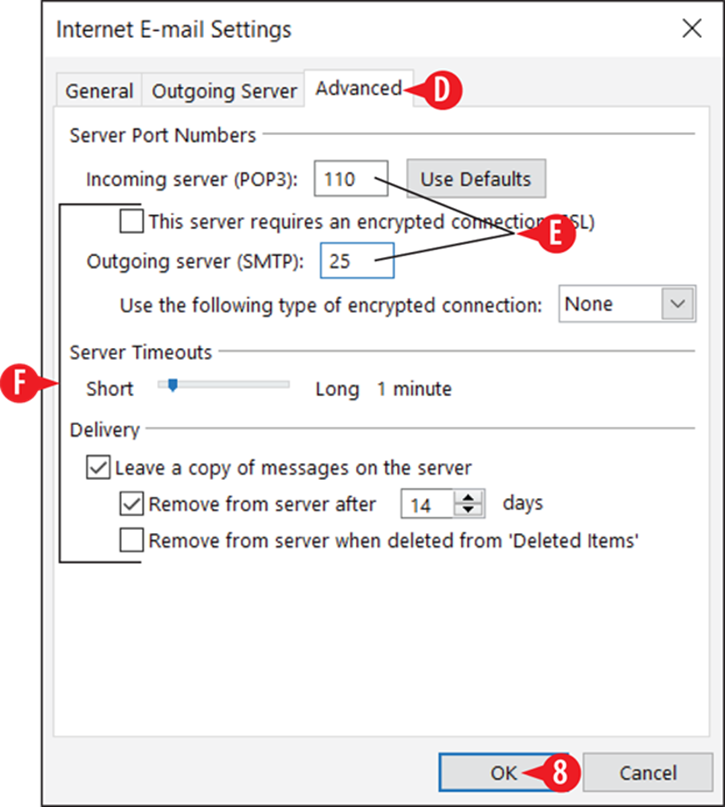
Figure 12-12: Specify port numbers and any other advanced settings.
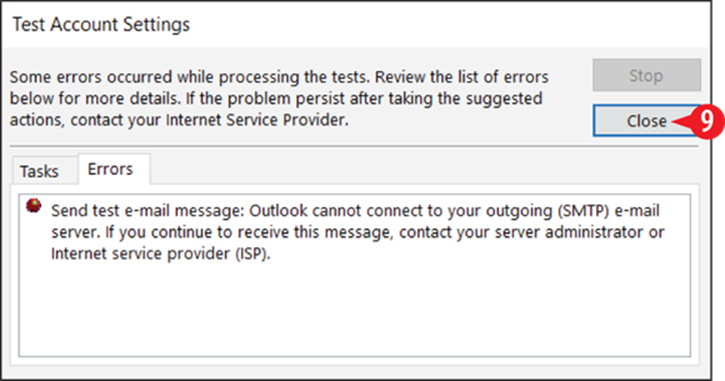
Figure 12-13: Check the results of the test.
Modify an account’s settings
If an account isn’t working right, check with your provider to make sure your settings haven’t changed. For example, my email provider changed the default port for outgoing mail, and I didn’t know until I suddenly couldn’t send mail one day.
To modify an account’s settings:
1. Click File to open Backstage view.
![]() Click Account Settings to open a menu, and then click Account Settings on the menu.
Click Account Settings to open a menu, and then click Account Settings on the menu.
![]() Click the account you want to change.
Click the account you want to change.
![]() Click Change.
Click Change.
![]() Modify the account’s settings. You cannot change the account type (Exchange, POP3, IMAP), but you can change most other properties.
Modify the account’s settings. You cannot change the account type (Exchange, POP3, IMAP), but you can change most other properties.
If you need to change the account type, remove and recreate the account in Outlook.
![]() Click Next. Outlook performs a test send and receive operation.
Click Next. Outlook performs a test send and receive operation.
![]() Click Close.
Click Close.
8. If the test was successful, click Finish. If not, return to step 5.
9. Click Close to close the Account Settings dialog box.
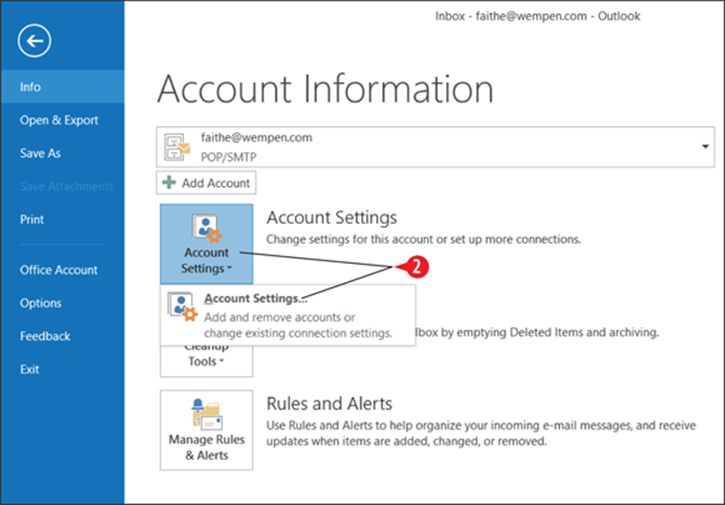
Figure 12-14: Choose Account Settings.
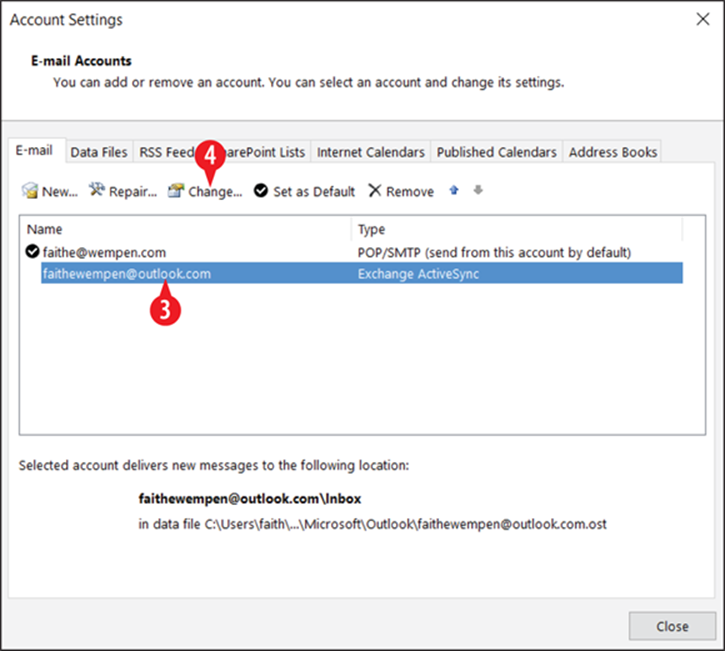
Figure 12-15: Choose the account to change.
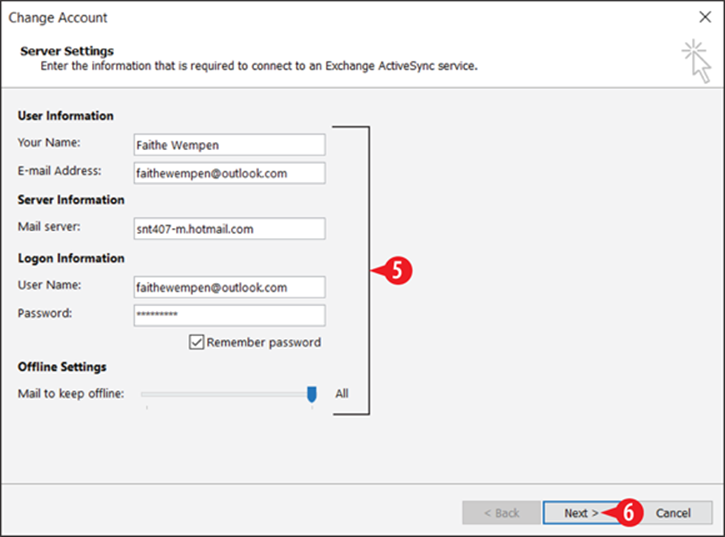
Figure 12-16: Modify the account settings.

Figure 12-17: Click Close to accept the test results.
Compose and send email
You can send a new email message to anyone for whom you have an email address. Just fill in the recipient, subject, and message and then send it off.
If you have stored contacts in the People section of Outlook, you can look up recipients’ email addresses from there. If you are on an Exchange server, you can also use the directory or address book provided on that system.
Compose and send a message
Follow these steps to compose and send a message:
![]() On the Home tab, click New Email.
On the Home tab, click New Email.
![]() If you have more than one email account set up in Outlook, click From and choose the account from which you want to send this message.
If you have more than one email account set up in Outlook, click From and choose the account from which you want to send this message.
![]() In the To box, type the recipient’s email address. For multiple recipients, separate them with semi colons. Or, alternatively, look up addresses, as explained in the section “Address an email” later in this chapter.
In the To box, type the recipient’s email address. For multiple recipients, separate them with semi colons. Or, alternatively, look up addresses, as explained in the section “Address an email” later in this chapter.
![]() (Optional) If you want to send copies to anyone else, enter their email addresses in the Cc box.
(Optional) If you want to send copies to anyone else, enter their email addresses in the Cc box.
You can also send blind copies (Bcc) from Outlook. To do so, click the Cc button and then enter them in the Bcc text box in the dialog box that appears.
![]() In the Subject box, type the email subject. This text will appear in the recipient’s inbox.
In the Subject box, type the email subject. This text will appear in the recipient’s inbox.
![]() Type the body of your message.
Type the body of your message.
![]() If desired, format the text in the message body using the Basic Text group on the Message tab. The controls are nearly the same as on Word’s Home tab.
If desired, format the text in the message body using the Basic Text group on the Message tab. The controls are nearly the same as on Word’s Home tab.
![]() Click Send.
Click Send.
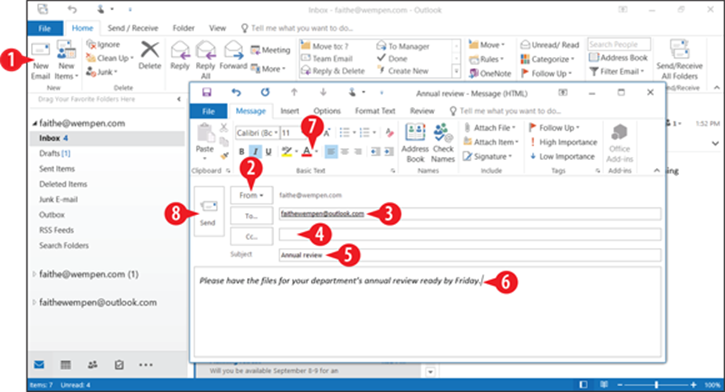
Figure 12-18: Compose and send an email.
Address an email
You can look up recipient email addresses as you compose a message. You can place recipients into one of three categories:
· To: Main recipients
· Cc: Recipients that should receive a courtesy copy
· Bcc: Recipients that should receive a courtesy copy without other recipients knowing about it
Follow these steps to select recipients in one or more of these categories from your company’s address list on its mail server or from your own private list of addresses stored in the Contacts section of Outlook (covered in Chapter 13):
![]() Click the To button in the message composition screen.
Click the To button in the message composition screen.
![]() Double-click the desired name. Repeat this as needed for additional recipients.
Double-click the desired name. Repeat this as needed for additional recipients.
The name moves to the To line in the dialog box. (See ![]() in Figure 12-20.)
in Figure 12-20.)
If the names that appear on the list in the dialog box aren’t the ones you expect, or if the list is empty, you might need to change which address book is shown. To do so, open the Address Book drop-down list and select another source. (See ![]() in Figure 12-20.)
in Figure 12-20.)
![]() (Optional) If you want to choose recipients to receive a Cc copy, move the insertion point into the Cc box and then double-click the desired name.
(Optional) If you want to choose recipients to receive a Cc copy, move the insertion point into the Cc box and then double-click the desired name.
![]() (Optional) If you want to choose recipients to receive a Bcc copy, move the insertion point into the Bcc box and then double-click the desired name.
(Optional) If you want to choose recipients to receive a Bcc copy, move the insertion point into the Bcc box and then double-click the desired name.
![]() Click OK.
Click OK.
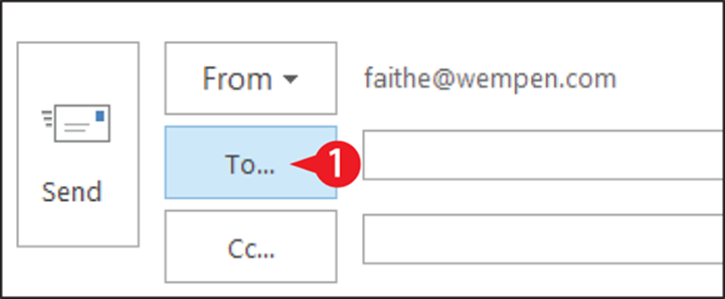
Figure 12-19: Click To.
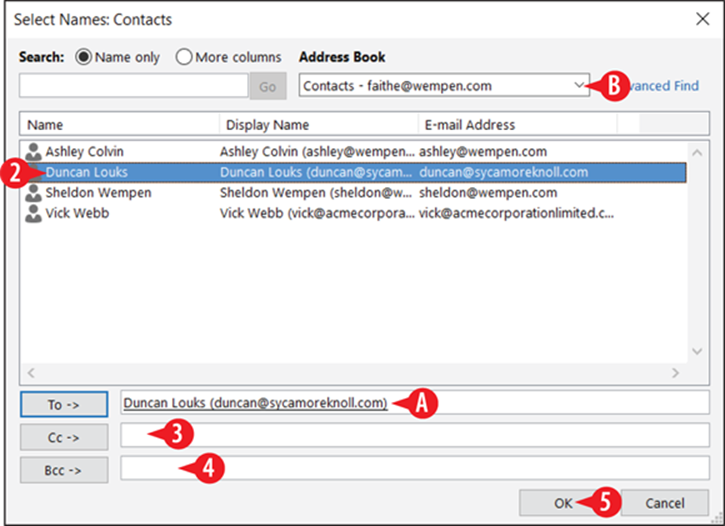
Figure 12-20: Select names for the To field, and optionally for Cc and/or Bcc.
Attach a file to a message
You can attach a file to an email, such as a word processing document or a photo. There is no limit on the number of attachments you can add to an email, although some mail servers have a limit on the size of an email message being sent or received (usually somewhere between 2 and 10MB).
 For your safety, Outlook does not allow you to receive attachments with certain file extensions, such as exe, com, and vbs. That’s because those executable formats can carry viruses. Other people’s email programs may have the same restriction, so any files you send with those extensions might not be received. Therefore if you need to send such files, compress them in a ZIP file or use a file sharing service such as OneDrive or Dropbox.
To attach a file as you are composing an email, follow these steps:
![]() From the message composition window, on the Message tab, click Attach file.
From the message composition window, on the Message tab, click Attach file.
![]() From the menu that appears, click Browse This PC.
From the menu that appears, click Browse This PC.
![]() Navigate to and select the desired file to attach.
Navigate to and select the desired file to attach.
![]() Click Insert.
Click Insert.
5. Finish sending the message as you normally would.
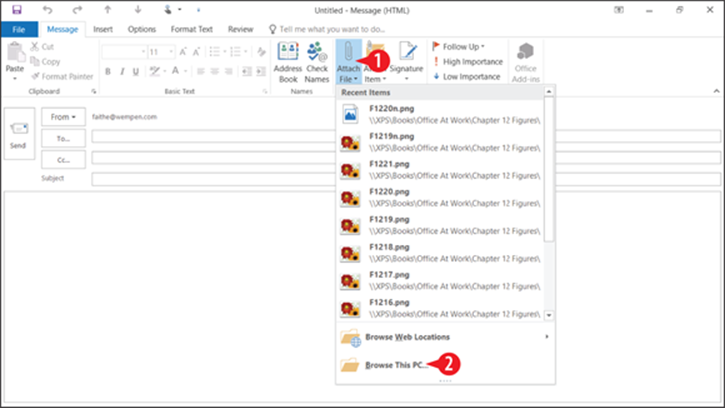
Figure 12-21: Click the Attach File button.
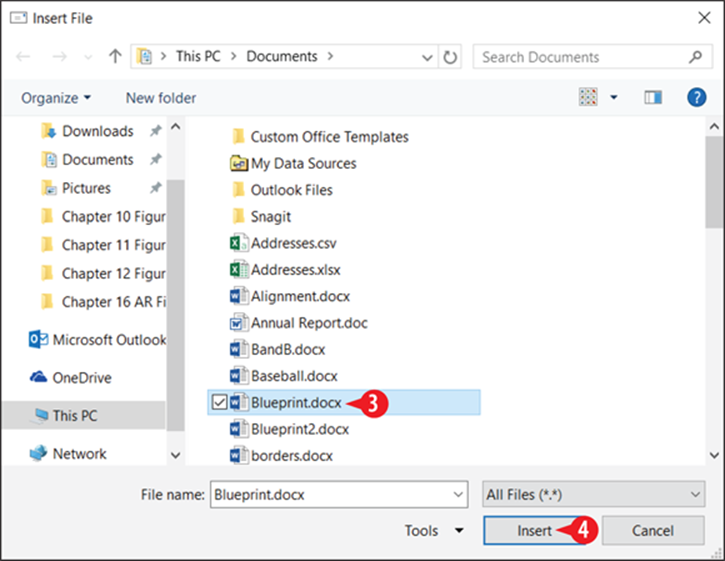
Figure 12-22: Choose the file to attach and click Insert.
Receive and read email
After you configure your email account(s) in Outlook, receiving mail is an automatic process. Outlook automatically sends and receives mail when you start it and also at 30-minute intervals (by default) whenever Outlook is running. Your incoming mail comes automatically into the Inbox folder. You can also initiate a manual send/receive operation at any time.
Send and receive email manually
When you manually send and receive mail, Outlook connects to the mail server(s), sends any mail you have waiting to be sent, and downloads any waiting mail for you.
To send and receive manually, you can either press F9 or do one of the following:
![]() On the Quick Access toolbar, click Send/Receive All Folders.
On the Quick Access toolbar, click Send/Receive All Folders.
![]() On the Send/Receive tab, click Send/Receive All Folders.
On the Send/Receive tab, click Send/Receive All Folders.

Figure 12-23: Perform a manual send/receive.
Change the send/receive automatic interval
If you would like to change the interval at which Outlook automatically sends and receives mail, or disable automatic send/receive altogether, do the following:
![]() On the Send/Receive tab, click Send/Receive Groups.
On the Send/Receive tab, click Send/Receive Groups.
![]() Click Define Send/Receive Groups.
Click Define Send/Receive Groups.
![]() Select the default group name (All Accounts) if it is not already selected. There might not be any other groups.
Select the default group name (All Accounts) if it is not already selected. There might not be any other groups.
![]() Increase or decrease the value in the Schedule an automatic send/receive every ____ minutes box.
Increase or decrease the value in the Schedule an automatic send/receive every ____ minutes box.
You can also turn the automatic send/receive off altogether by clearing its check box. (See ![]() in Figure 12-25.)
in Figure 12-25.)
There are separate settings for when Outlook is offline; this might happen if you were on a dial-up connection that was not always on. Scheduling an automatic send/receive to occur when Outlook is offline would tell Windows to establish the dial-up connection each time, get the mail, and then disconnect. (See ![]() in Figure 12-25.)
in Figure 12-25.)
![]() Click Close.
Click Close.
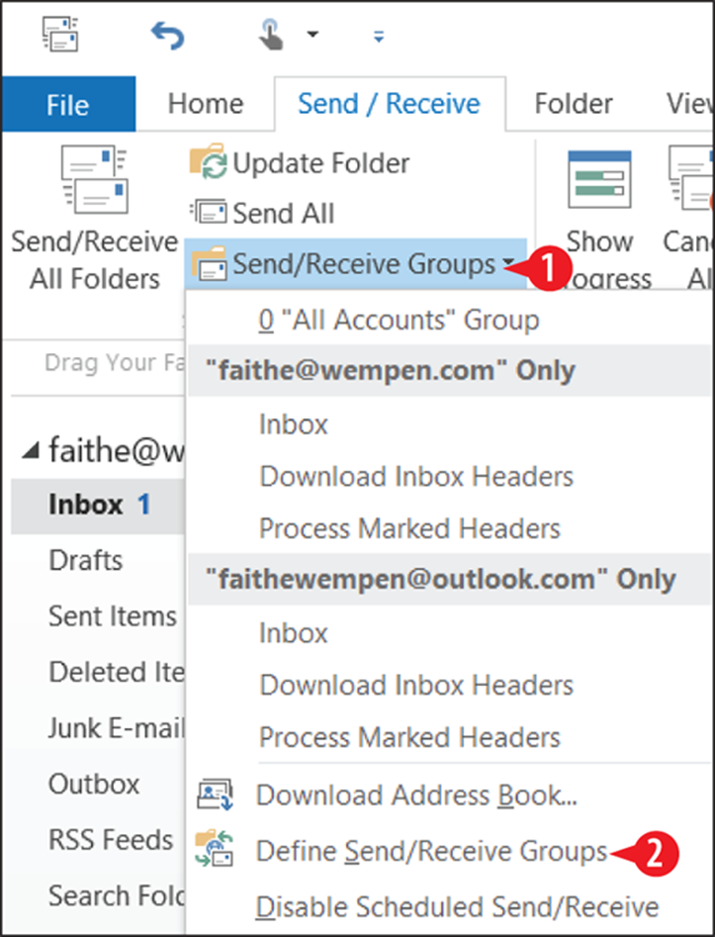
Figure 12-24: Select Define Send/Receive Groups.
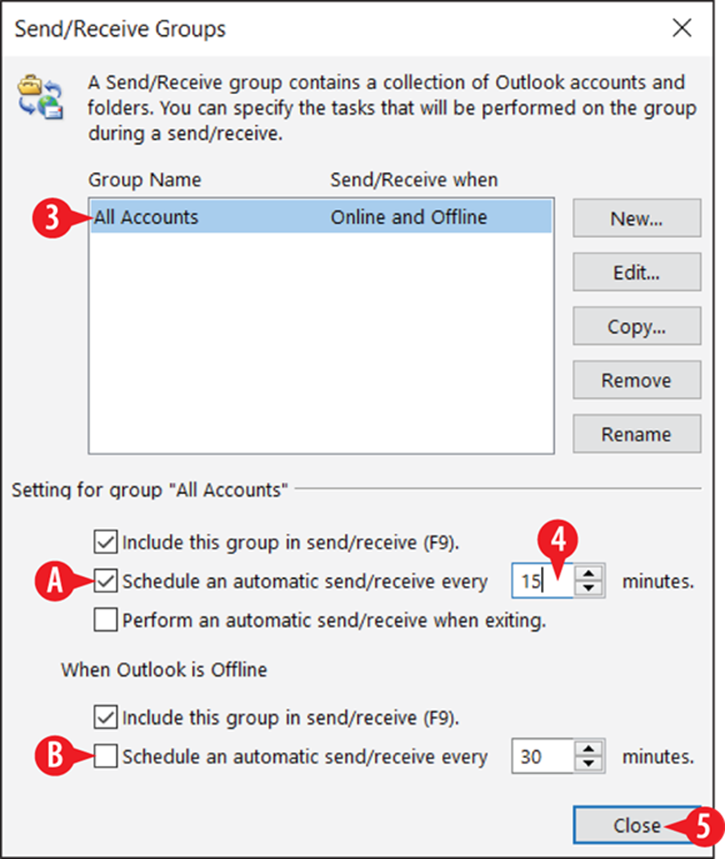
Figure 12-25: Change the interval for automatic sending and receiving.
Read a received email message
![]() Unread messages appear with bold and blue subject lines in the Inbox.
Unread messages appear with bold and blue subject lines in the Inbox.
![]() You can read the selected message in the Reading pane.
You can read the selected message in the Reading pane.
![]() You open a received message in its own separate window by double-clicking the message.
You open a received message in its own separate window by double-clicking the message.
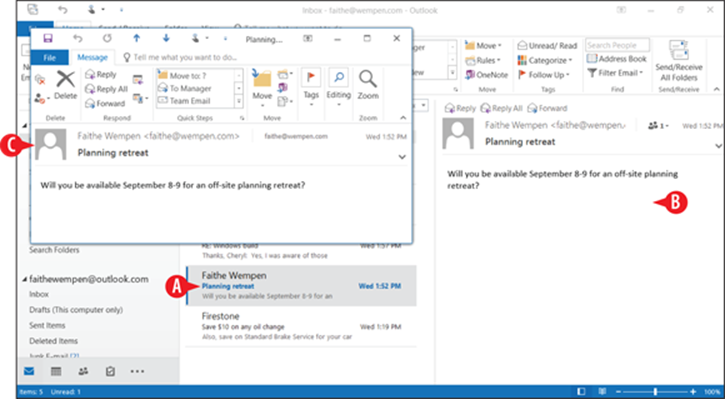
Figure 12-26: Read a message.
Work with a received attachment
After receiving an attachment, you will want to do something with it, such as view it or save it. Here are some tips for working with received attachments:
![]() If the received message has an attachment, a paperclip icon appears in the message list.
If the received message has an attachment, a paperclip icon appears in the message list.
![]() In the Reading pane, the attachment file name appears above the message.
In the Reading pane, the attachment file name appears above the message.
![]() To open the attachment in whatever program is the default for its type on your system, double-click it. Doing so does not automatically save the attachment to your PC, although it remains available via the message in Outlook until you delete that message.
To open the attachment in whatever program is the default for its type on your system, double-click it. Doing so does not automatically save the attachment to your PC, although it remains available via the message in Outlook until you delete that message.
![]() To save the attachment to your PC, or to perform other actions on it such as printing or previewing, click the arrow on the file name in the reading pane.
To save the attachment to your PC, or to perform other actions on it such as printing or previewing, click the arrow on the file name in the reading pane.
![]() Choose Quick Print to print a copy of the attachment on your default printer using default settings.
Choose Quick Print to print a copy of the attachment on your default printer using default settings.
![]() If you choose Save As, the Save Attachment dialog box opens. Navigate to a storage location and click Save.
If you choose Save As, the Save Attachment dialog box opens. Navigate to a storage location and click Save.
![]() If there are multiple attachments and you want to save them all to the same location, use Save All Attachments to save them all at once.
If there are multiple attachments and you want to save them all to the same location, use Save All Attachments to save them all at once.
![]() Remove Attachment is not common, because normally you would want to keep a record of having received the attachment. You might use it if the attachment contained sensitive information, or a virus.
Remove Attachment is not common, because normally you would want to keep a record of having received the attachment. You might use it if the attachment contained sensitive information, or a virus.
![]() Copy places the attachment on the Windows Clipboard; you can then use Paste (Ctrl+V) to paste it somewhere (such as in a location in File Explorer).
Copy places the attachment on the Windows Clipboard; you can then use Paste (Ctrl+V) to paste it somewhere (such as in a location in File Explorer).
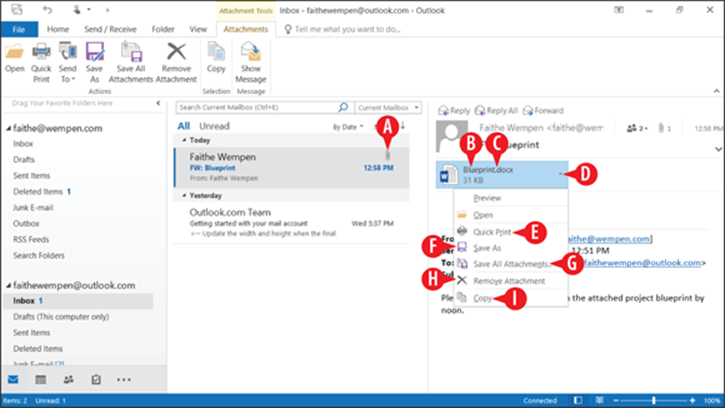
Figure 12-27: You can save or print a received attachment.
Reply to a message
Email messages often consist of multiple back-and-forth exchanges. Rather than starting a new message each time, you can use the Reply feature. Here’s how:
![]() To reply to a message, select the message and then click Reply on the Home tab.
To reply to a message, select the message and then click Reply on the Home tab.
Use Reply All if you want the reply to also go to anyone who was also a recipient of the original message. (This doesn’t include Bcc recipients.) (See ![]() in Figure 12-28.)
in Figure 12-28.)
You can also use the Reply or Reply All button in the Reading pane. (See ![]() in Figure 12-28.)
in Figure 12-28.)
When you reply to a message, the original attachments are not included. That’s because the original recipient probably doesn’t want to get his or her attachment back.
The reply message begins in the Reading pane by default, but you can pop it out into its own window if you want by clicking Pop Out. (See ![]() in Figure 12-29.)
in Figure 12-29.)
The recipient is already filled in, based on the sender of the original message. (See ![]() in Figure 12-29.)
in Figure 12-29.)
The subject is already filled in; it’s the original subject with RE: at the beginning. (See ![]() in Figure 12-29.)
in Figure 12-29.)
![]() Type your reply in the message body.
Type your reply in the message body.
The original message appears quoted. You can delete any portion of it that you don’t want to include in your reply. (See ![]() in Figure 12-29.)
in Figure 12-29.)
![]() Click Send when you are finished composing the reply.
Click Send when you are finished composing the reply.
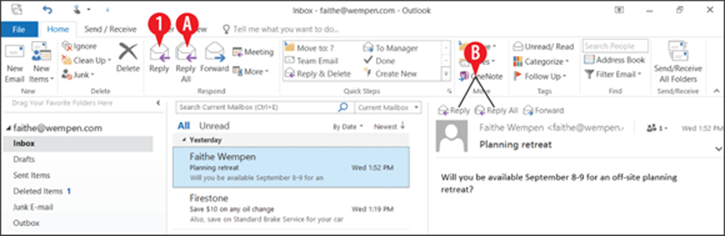
Figure 12-28: Click Reply or Reply All.
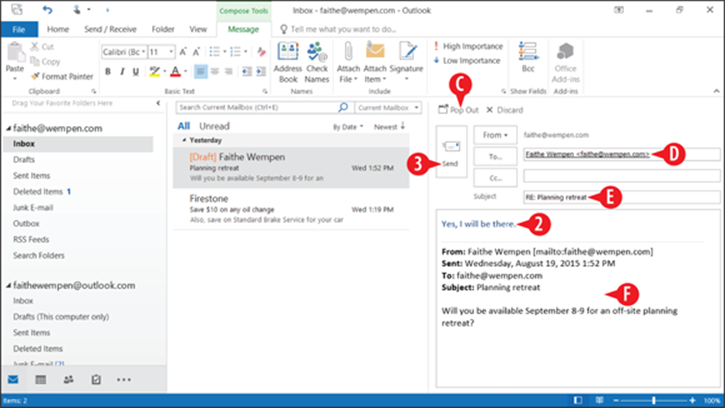
Figure 12-29: Compose your reply.
Forward a message
Forwarding is mostly the same as replying (see the previous section) except the recipient isn’t filled in automatically for you.
To forward a message, follow these steps:
![]() To forward to a message, select the message and then click Forward on the Home tab.
To forward to a message, select the message and then click Forward on the Home tab.
You can also use the Forward button in the Reading pane. (See ![]() in Figure 12-30.)
in Figure 12-30.)
![]() Enter the recipient(s) in the To box, or click To and select them.
Enter the recipient(s) in the To box, or click To and select them.
![]() (Optional) Type any comments or notes you want to include in the message body.
(Optional) Type any comments or notes you want to include in the message body.
![]() Click Send.
Click Send.
Unlike when replying, forwarding includes any attachments that the original contained in the forwarded copy.
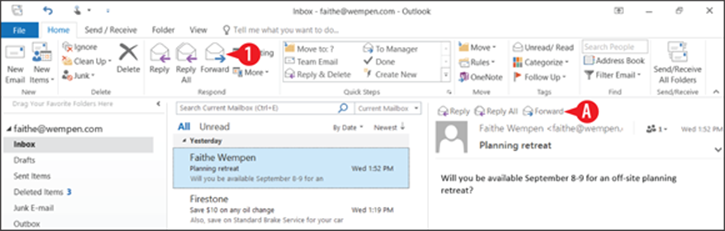
Figure 12-30: Click Forward to begin forwarding a message.
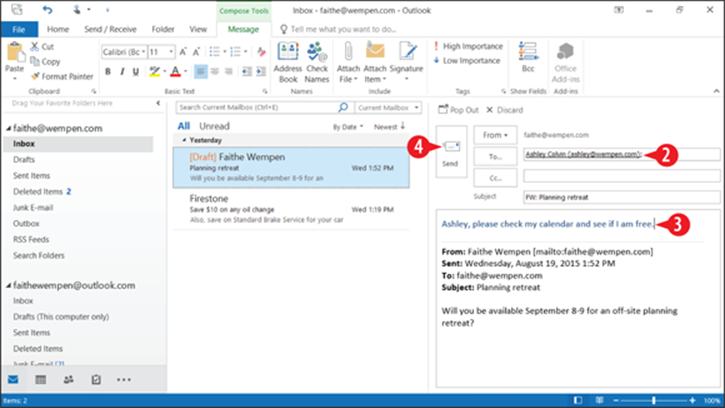
Figure 12-31: Forward a message.
Delete a message and recover deleted messages
Most of the email you receive will eventually be deleted, just as most of the postal mail you receive ultimately ends up in your wastebasket.
To delete a message, select the message and then do any of the following:
· On the Home tab, click Delete.
· Press the Delete key on the keyboard.
· Right-click the message and choose Delete.
If you make a mistake and delete the wrong thing, you can recover it from the Deleted Items folder:
![]() In the navigation bar, click Deleted Items. (Or, depending on your mail account, it may be Trash.)
In the navigation bar, click Deleted Items. (Or, depending on your mail account, it may be Trash.)
![]() Drag the message from the message list to the desired folder in the navigation pane, such as to the Inbox.
Drag the message from the message list to the desired folder in the navigation pane, such as to the Inbox.
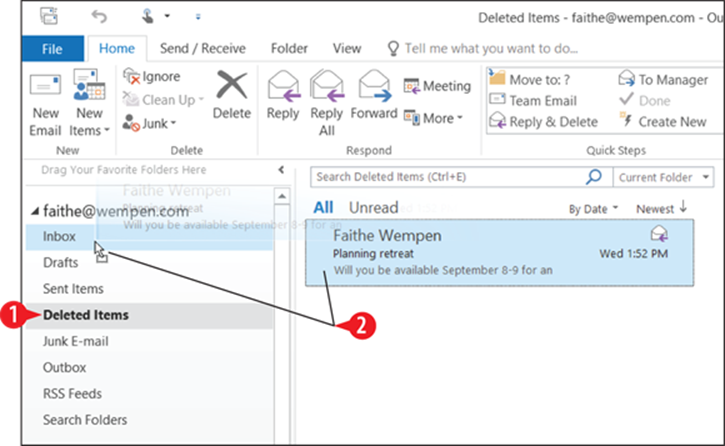
Figure 12-32: Retrieve a deleted message.
Create folders for managing email
As you receive more and more messages, messaging handling becomes increasingly important. You don’t want to have to wade through thousands of messages in your Inbox just to find the one you need in a hurry.
To create a mail folder:
![]() On the Folder tab, click New Folder.
On the Folder tab, click New Folder.
Instead of step 1 you can right-click the Inbox folder and choose New Folder from the shortcut menu.
![]() Type the folder name in the Name box.
Type the folder name in the Name box.
![]() Click Inbox to make the folder a subfolder of your inbox.
Click Inbox to make the folder a subfolder of your inbox.
It’s not required, but it’s a good idea to make all of the folders that will hold received mail subfolders of Inbox. That way when you act upon the Inbox folder (for example, archiving it), all your subfolders will be included in that operation.
![]() Click OK. The new folder appears in the navigation pane.
Click OK. The new folder appears in the navigation pane.

Figure 12-33: Choose New Folder from the Folder tab.
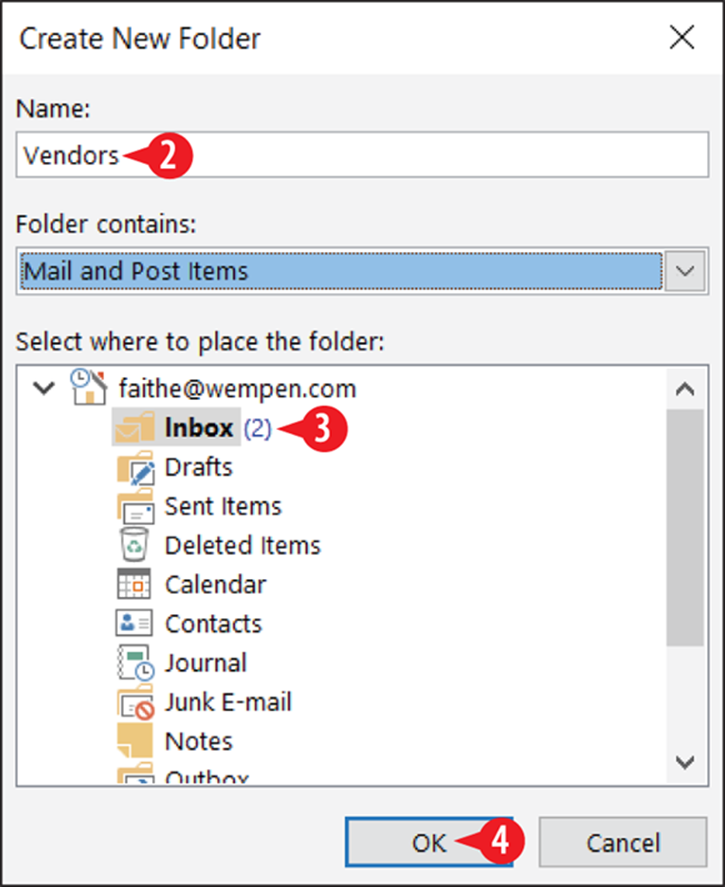
Figure 12-34: Name the new folder.
Moving messages between folders
The main point of creating new folders (covered in the preceding section) is so you can move messages into them for storage.
To move a message, select the message in the message list, and then drag-and-drop it on a different folder in the navigation pane. (See ![]() in Figure 12-35.)
in Figure 12-35.)
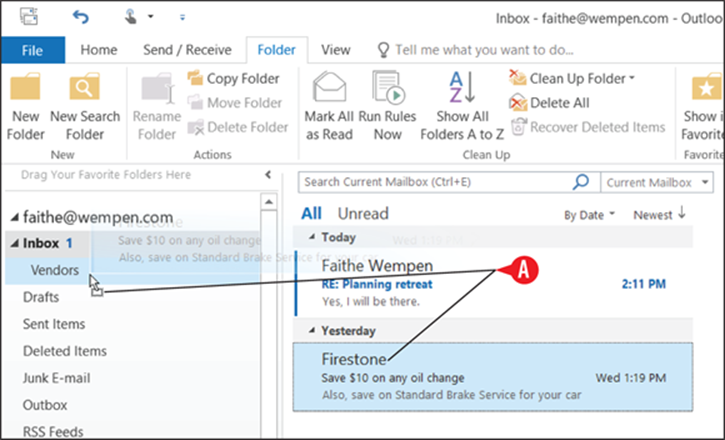
Figure 12-35: Drag a message from its current location to a different folder in the navigation bar.
If drag-and-drop isn’t your thing, here is another way to move a message:
1. Select the message.
![]() On the Home tab, click Move.
On the Home tab, click Move.
![]() Click the desired folder.
Click the desired folder.
If the folder you want doesn’t appear, click Other Folder to browse a more complete list. (See ![]() in Figure 12-36.)
in Figure 12-36.)
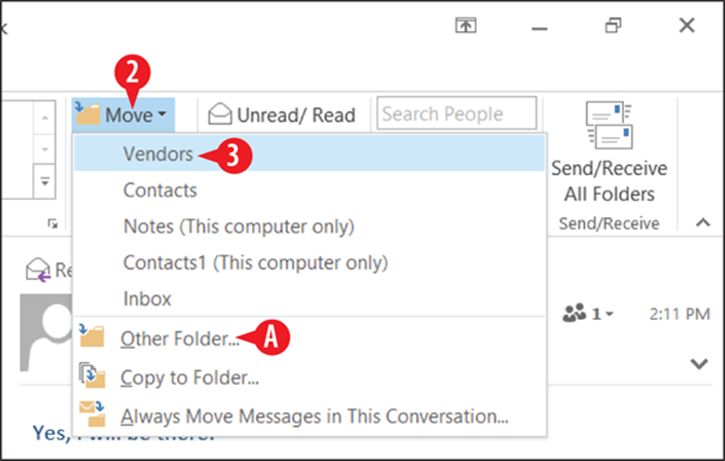
Figure 12-36: Move a folder using the Ribbon.
Create a message handling rule
You may find it tedious to be constantly moving messages into different folders manually. Outlook can help with that chore by running message handling rules.
A message handling rule evaluates the mail and then processes it according to your instructions based on criteria you specify. For example, you might have a rule that evaluates mail when it arrives and, if it is from a certain sender, moves it into a certain subfolder.
Move messages from a specific sender
Here’s a quick way to set up a rule based on a specific sender. To use this method, you must have a message from that sender available to select:
![]() In the message list, select a message that is from the sender for which you want to create a rule.
In the message list, select a message that is from the sender for which you want to create a rule.
![]() On the Home tab, click Rules.
On the Home tab, click Rules.
![]() Click Always Move Messages From Sender where Sender is the person’s name.
Click Always Move Messages From Sender where Sender is the person’s name.
![]() Select the folder into which you want to move the messages.
Select the folder into which you want to move the messages.
If the folder doesn’t exist yet, you can click New to create it on-the-fly. (See ![]() in Figure 12-38.)
in Figure 12-38.)
![]() Click OK. The rule is created and the message moves to the new folder. All other messages from that same sender also move.
Click OK. The rule is created and the message moves to the new folder. All other messages from that same sender also move.
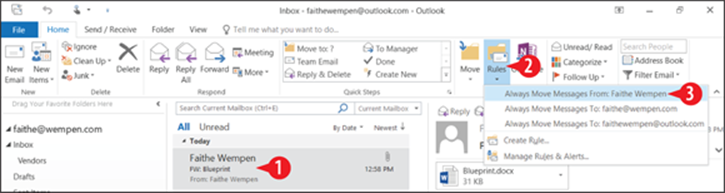
Figure 12-37: Select a message from that sender.
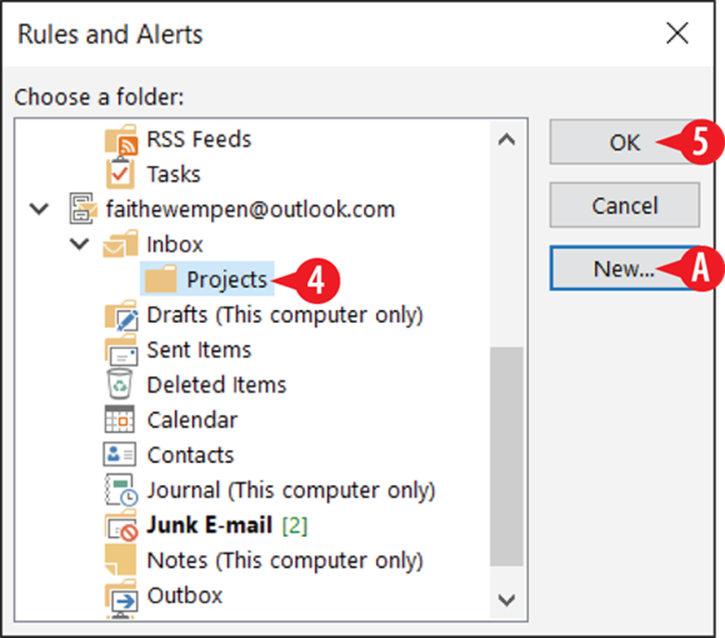
Figure 12-38: Choose a folder to which to move the messages.
Create a message handling rule
The following steps show a method that works for multiple types of criteria, not just the sender’s name. You can use this procedure to filter by subject line, sender, and/or recipient account (if you have more than one email account set up in Outlook).
1. Select a received message that matches the criteria you want to specify.
![]() On the Home tab, click Rules.
On the Home tab, click Rules.
![]() Click Create Rule.
Click Create Rule.
![]() Mark the check boxes for the conditions which must apply for the message. The message must match all of the criteria you choose.
Mark the check boxes for the conditions which must apply for the message. The message must match all of the criteria you choose.
If you want to set up a rule that applies if one condition or the other is met, create two separate rules.
![]() Specify what you want to happen when a message matches the criteria. You can make Outlook play a sound, display an alert, and/or move the message.
Specify what you want to happen when a message matches the criteria. You can make Outlook play a sound, display an alert, and/or move the message.
![]() If you want the item to be moved to a certain folder, make sure the Move check box is marked and make sure the correct folder appears in its text box.
If you want the item to be moved to a certain folder, make sure the Move check box is marked and make sure the correct folder appears in its text box.
Click Select Folder and choose a different folder if needed. (The dialog box for selecting the folder is the same as shown in Figure 12-38.) (See ![]() in Figure 12-40.)
in Figure 12-40.)
![]() Click OK to create the rule. The rule runs.
Click OK to create the rule. The rule runs.
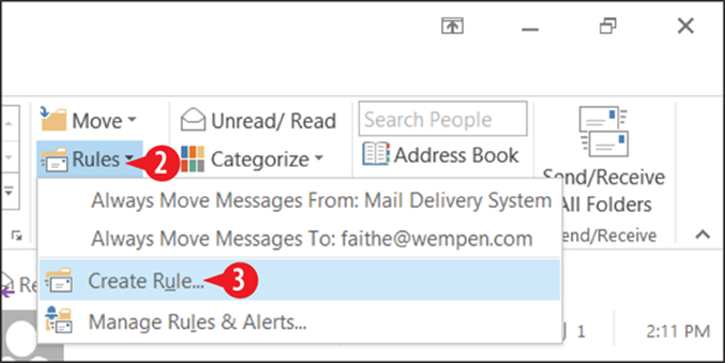
Figure 12-39: Choose to create a new rule.
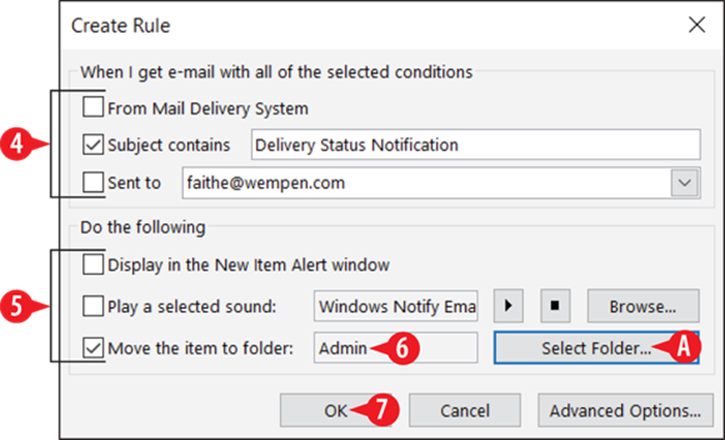
Figure 12-40: Define the rule.
Modify or delete a message handling rule
Over time, your rule needs may change. Some rules may no longer be applicable, and others may need modification. If you later need to make changes to a rule, here’s how.
1. On the Home tab, click Rules, and then click Manage Rules & Alerts.
![]() Select a rule.
Select a rule.
The rule’s description appears in the lower part of the dialog box. (See ![]() in Figure 12-41.)
in Figure 12-41.)
You can delete the selected rule by clicking Delete. (See ![]() in Figure 12-41.)
in Figure 12-41.)
![]() Click an underlined portion of the rule description to modify that section of the rule. For example, to change where to move the message, click the underlined folder name.
Click an underlined portion of the rule description to modify that section of the rule. For example, to change where to move the message, click the underlined folder name.
4. Make a change in the dialog box that appears. The dialog box that appears depends on what portion of the rule you are modifying.
5. Then click OK to return to the Rules and Alerts dialog box.
![]() When you are done modifying the rule, click OK.
When you are done modifying the rule, click OK.
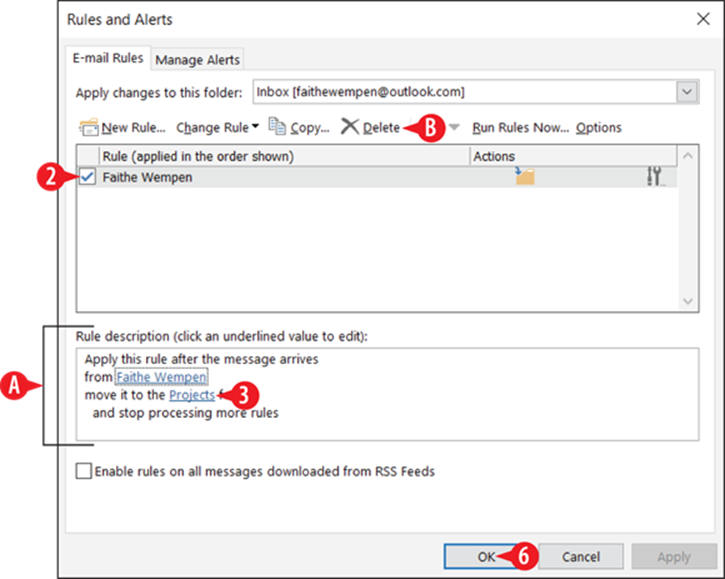
Figure 12-41: Manage rules from the Rules and Alerts dialog box.
Configure the junk mail filter
Outlook isn’t a great tool for spam filtering. You will probably want to add on another one, unless your company’s email server or your ISP has its own spam filter.
Nevertheless, Outlook’s tools do provide some measure of filtering and control. Here’s what Outlook has to offer.
Enable junk mail filtering
Outlook’s junk mail filtering tool evaluates incoming mail and then moves some of it to a Junk Email folder based on its evaluation.
Outlook’s junk mail filtering is disabled by default. You can enable it with your choice of three levels of filtering:
· Low: Moves only the most obvious junk mail to the Junk Email folder.
· High: Moves nearly all junk mail to the Junk Email folder, but some regular mail may be accidentally moved too, so you should check the Junk Email folder frequently.
· Safe Lists Only: Only mail from recipients that you designate as safe senders will appear in your Inbox; everything else will move to the Junk Email folder.
If you opt for Safe Lists Only, you’ll need to set up your list of never-blocked senders, as described in “Manage the blocked and unblocked sender lists” later in this chapter.
To enable junk mail filtering, follow these steps:
![]() On the Home tab, click Junk.
On the Home tab, click Junk.
![]() Click Junk Email Options.
Click Junk Email Options.
![]() On the Options tab, select your preferred level of filtering.
On the Options tab, select your preferred level of filtering.
![]() Click OK.
Click OK.
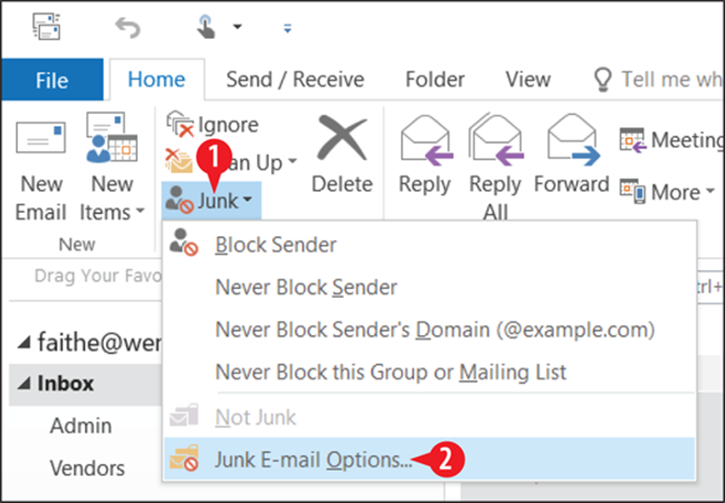
Figure 12-42: Choose to open junk mail filtering options.
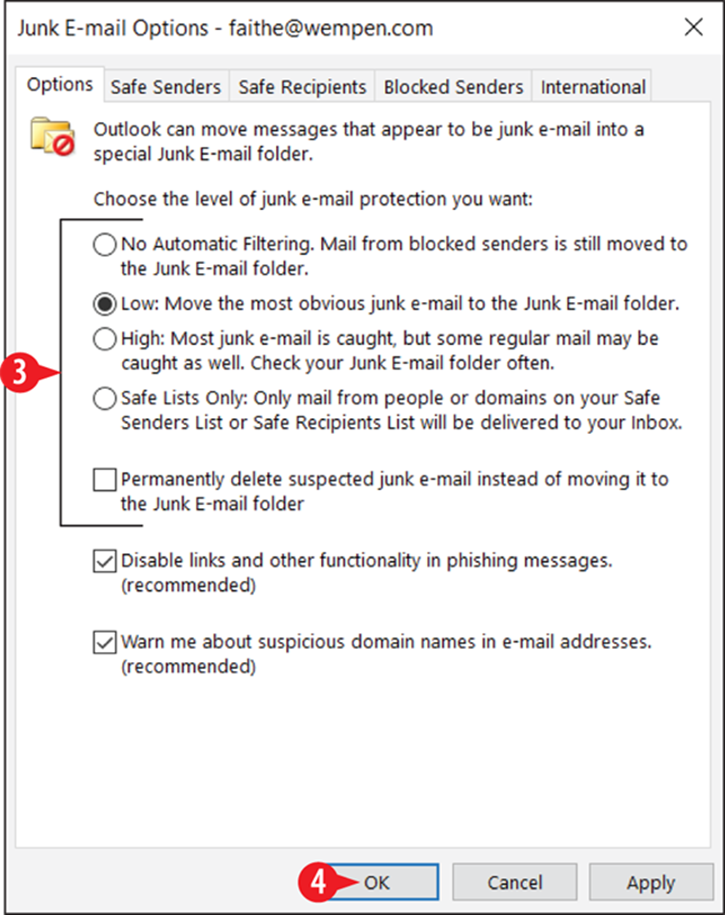
Figure 12-43: Select a filtering level.
Block or never block a certain sender
You can quickly block a particular email address from sending you mail. When you get mail from that address, Outlook will automatically move it to the Junk Email folder. You can also set a particular address to never be blocked.
To block (or never block) a certain sender, follow these steps:
1. Select an email you have received from that sender.
![]() On the Home tab, click Junk.
On the Home tab, click Junk.
![]() Click Block Sender (or Never Block Sender).
Click Block Sender (or Never Block Sender).
4. Click OK at the confirmation message.
If you need to unblock a blocked sender, see the next section.
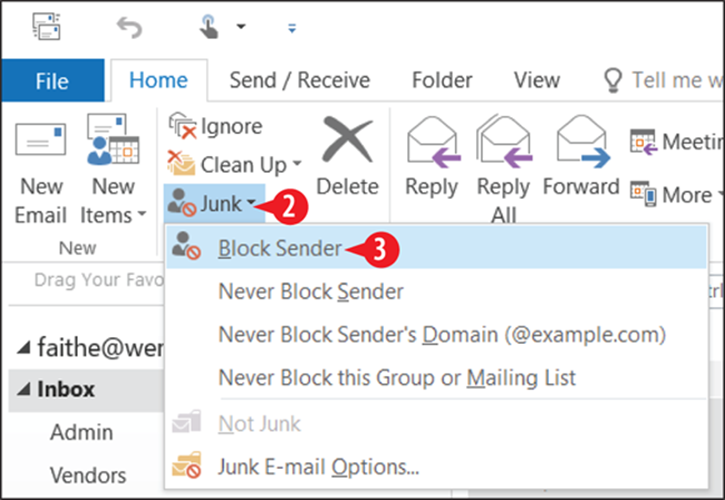
Figure 12-44: Block a sender.
Manage the blocked and unblocked sender lists
You can manually add and remove addresses from the lists of blocked and never-blocked (safe) senders; you don’t have to wait until you have an email from one of them.
To access the lists, follow these steps:
![]() On the Home tab, click Junk.
On the Home tab, click Junk.
![]() Click Junk Email Options.
Click Junk Email Options.
![]() Click the Blocked Senders tab.
Click the Blocked Senders tab.
4. To block an email address or domain, do the following:
![]() Click Add.
Click Add.
![]() Type the address or domain to block.
Type the address or domain to block.
 The domain is the name that follows the @ sign in an address. You can block or allow entire domains with one entry; for example, you might add your company’s domain to your Safe Senders tab.
![]() Click OK.
Click OK.
5. To remove the block on an address or domain, do the following:
![]() Select the address or domain.
Select the address or domain.
![]() Click Remove.
Click Remove.
![]() (Optional) To add to or remove from the list of never-blocked senders, click the Safe Senders tab and then repeat steps 4 and 5 on that tab.
(Optional) To add to or remove from the list of never-blocked senders, click the Safe Senders tab and then repeat steps 4 and 5 on that tab.
Addresses you add on the Safe Senders tab will not be blocked; you are approving the addresses you place here.
![]() Click OK to close the dialog box.
Click OK to close the dialog box.
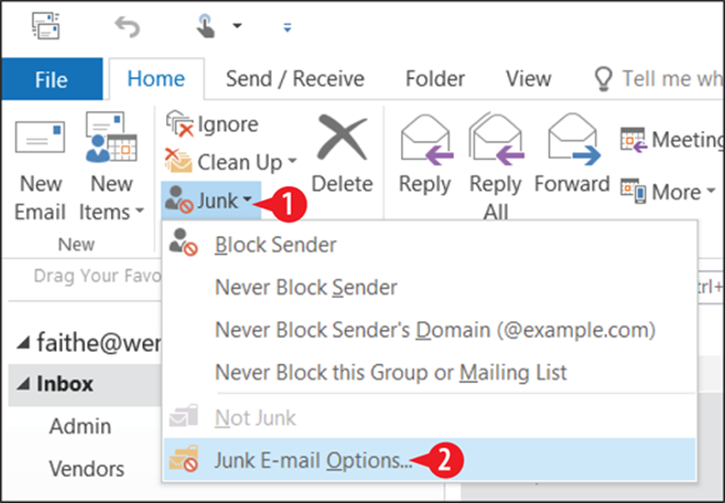
Figure 12-45: Choose to display junk mail options.
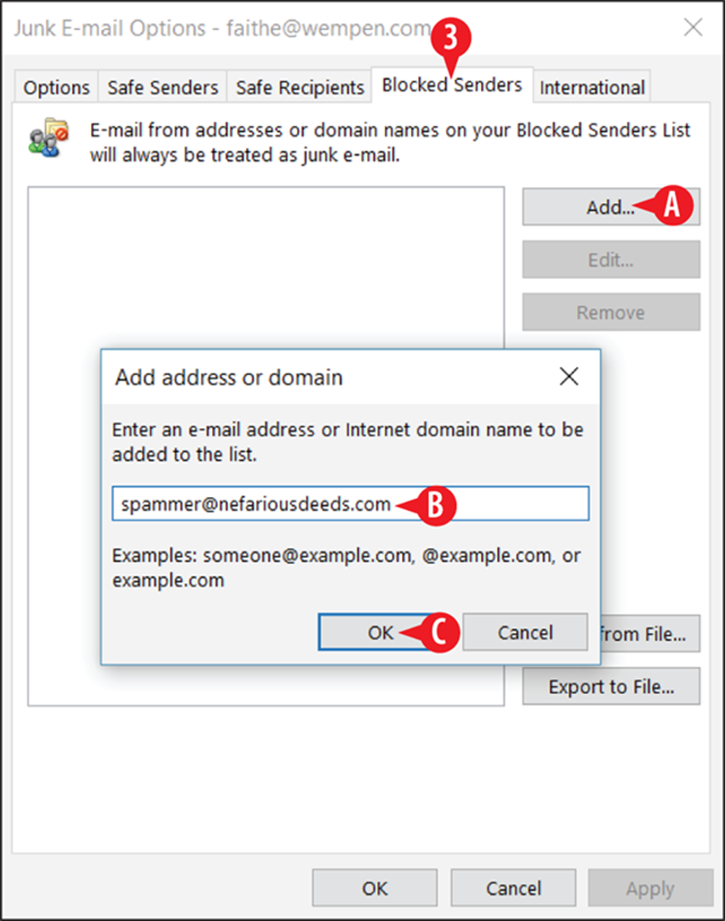
Figure 12-46: Choose to display junk mail options.
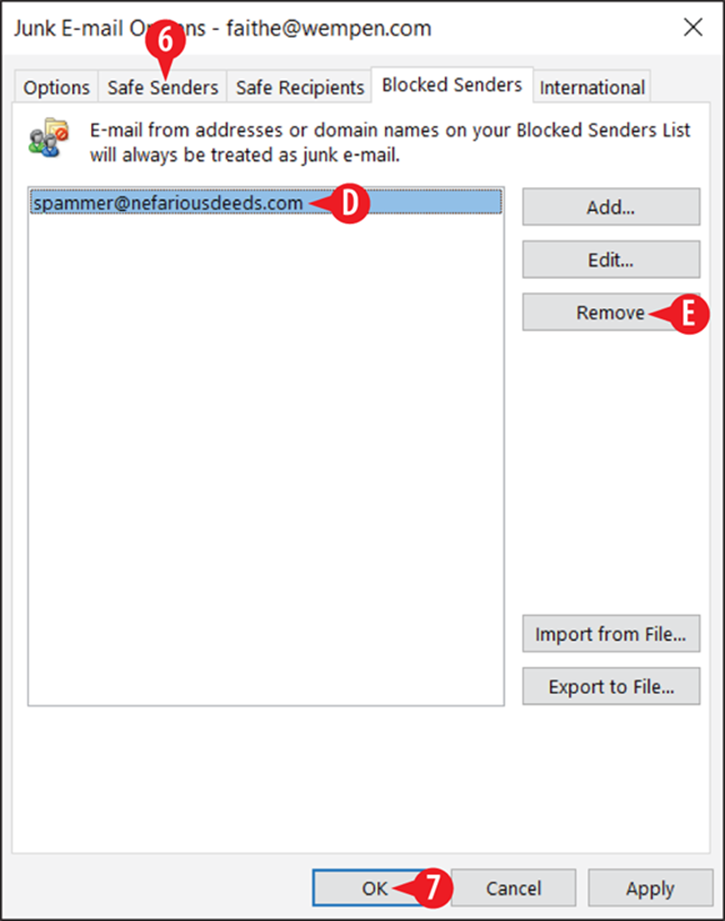
Figure 12-47: Choose to display junk mail options.
Use an automatic signature
Many companies like their employees to append a certain signature block to the end of every message they send from their work email accounts. This could include the company’s name and address, their job title, and/or a privacy notice.
To set up an automatic signature block, follow these steps:
1. Choose File ⇒ Options.
![]() Click Mail.
Click Mail.
![]() Click Signatures.
Click Signatures.
![]() Click New.
Click New.
![]() Type a name for the signature.
Type a name for the signature.
![]() Click OK.
Click OK.
![]() Type the desired signature text in the Edit signature box.
Type the desired signature text in the Edit signature box.
Use the formatting buttons to format the text as desired. (See ![]() in Figure 12-50.)
in Figure 12-50.)
8. Repeat steps 4-7 to create additional signatures if needed.
![]() Open the Email account drop-down list and choose one of your email accounts that should use a signature.
Open the Email account drop-down list and choose one of your email accounts that should use a signature.
![]() Open the New messages drop-down list and choose the signature you just created.
Open the New messages drop-down list and choose the signature you just created.
![]() (Optional) If you want to use a signature on replies and forwards, choose it from the Replies/forwards drop-down list.
(Optional) If you want to use a signature on replies and forwards, choose it from the Replies/forwards drop-down list.
12. Repeat steps 8-10 as needed if you have additional email accounts for which you want to use a signature.
![]() Click OK.
Click OK.
14. Click OK to close the Outlook Options dialog box.
As you are composing an email message, Outlook places the signature in the message body when you open the message composition window. You can manually delete or change the signature as you wish before you send. (See ![]() in Figure 12-51.)
in Figure 12-51.)
You can also open the Signature drop-down list from the Message tab and choose a different signature for the current message. (See ![]() in Figure 12-51.)
in Figure 12-51.)
You can also reopen the Signatures and Stationery dialog box (Figure 12-50) by choosing Signatures. (See ![]() in Figure 12-51.)
in Figure 12-51.)
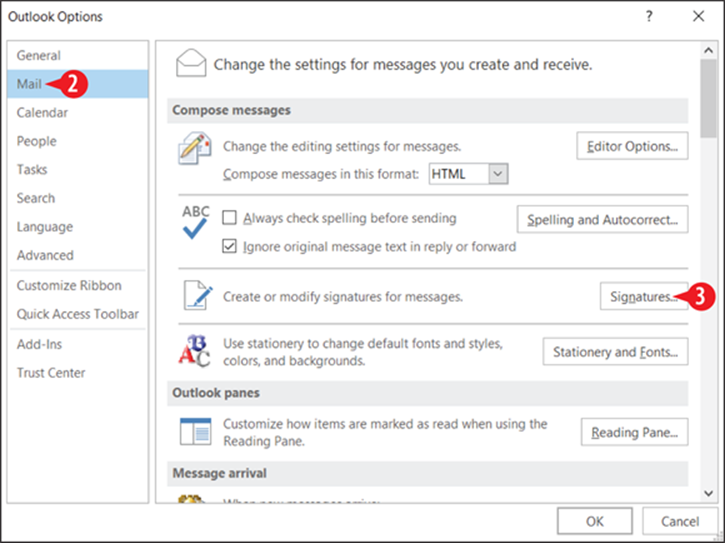
Figure 12-48: On the Mail tab of the Options dialog box, click the Signatures button.
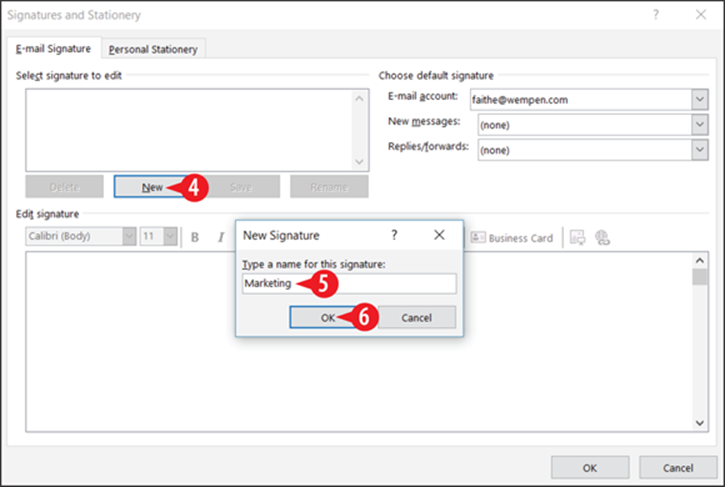
Figure 12-49: Create a new signature.
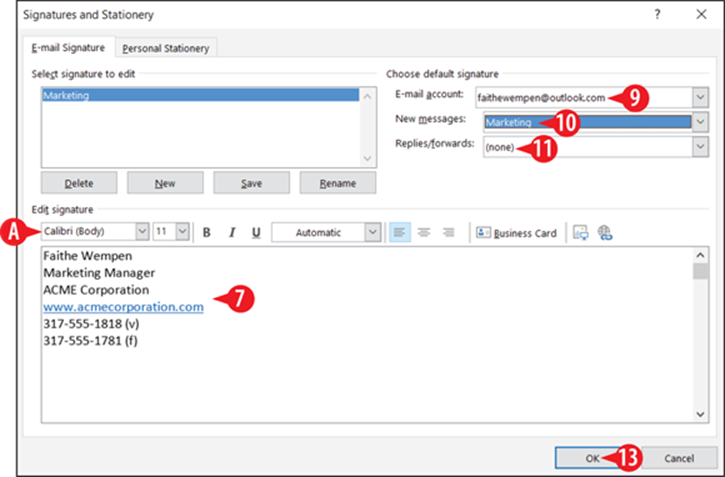
Figure 12-50: Create a new signature.
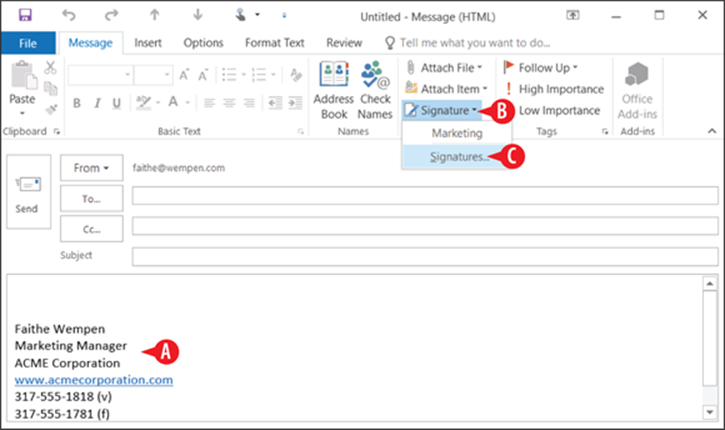
Figure 12-51: Using signatures when composing new messages.