Microsoft Office 2016 At Work For Dummies (2016)
Chapter 17
Presenting a Slide Show
In This Chapter
![]() Displaying a slide show onscreen
Displaying a slide show onscreen
![]() Annotating slides with the Pen tool
Annotating slides with the Pen tool
![]() Using Presenter view
Using Presenter view
![]() Printing handouts
Printing handouts
![]() Exporting handouts to Word
Exporting handouts to Word
PowerPoint gives you various methods for delivering your presentation: You can deliver a presentation live in a meeting room, broadcast it on the Internet, package it on a writeable CD, or send it out via email, just to name a few.
This chapter focuses on the most popular delivery method: delivering a live show to an audience in person. You learn how to display a PowerPoint presentation onscreen, including how to move between slides and how to annotate slides with the Pen tools. You also learn how to print handouts, either in PowerPoint or in Microsoft Word.
 For information about some of the other delivery methods, such as creating a CD or broadcasting and presentation, visit the Help system in PowerPoint or check out my book PowerPoint 2013 Bible, also published by John Wiley & Sons. Even though it is about the 2013 version, the two versions are so similar that 99 percent of the instructions still apply.
Display a slide show onscreen
To give an onscreen show, use Slide Show view. It displays each slide full-screen, one at a time. For larger audiences, you may want to hook up a projector to your computer so the audience can see the slides more easily.
Pressing the Windows key and P connects a notebook PC to a projector or a second screen.
Slide Show view is unlike other views in that you don’t access it from the View tab. On the Slide Show tab of the Ribbon:
![]() Click From Beginning to start Slide Show view with the first slide in the presentation. Keyboard shortcut: F5.
Click From Beginning to start Slide Show view with the first slide in the presentation. Keyboard shortcut: F5.
![]() Click From Current Slide to start Slide Show view from the current slide. Keyboard shortcut: Shift+F5.
Click From Current Slide to start Slide Show view from the current slide. Keyboard shortcut: Shift+F5.
![]() You can also enter Slide Show view at the current slide by clicking the Slide Show icon in the status bar.
You can also enter Slide Show view at the current slide by clicking the Slide Show icon in the status bar.

Figure 17-1: Enter Slide Show view from the Slide Show tab.
![]()
Figure 17-2: Enter Slide Show view from the status bar.
If you want to show your presentation one slide at a time but prefer to do so in a resizable window rather than full-screen, use Reading view (accessible both from the View tab and the status bar).
Move between slides in Slide Show view
To move from one slide to the next or to trigger the next on-click animation on a slide, click the left mouse button, or press any key on the keyboard (except Backspace or the left arrow). To move backwards to the previous slide, press Backspace or the left arrow. That’s all you need to know at the most basic level.
Right-click and choose Help in Slide Show view to get a list of the shortcut keys available.
To jump to a specific slide, do the following:
![]() Right-click to display the shortcut menu, as in Figure 17-3.
Right-click to display the shortcut menu, as in Figure 17-3.
You can also use this shortcut menu to go forward (Next) or back (Previous). (See ![]() n Figure 17-3.)
n Figure 17-3.)
![]() Click See All Slides.
Click See All Slides.
The current slide has a red border around it. (See ![]() in Figure 17-4.)
in Figure 17-4.)
![]() Click the slide you want to display.
Click the slide you want to display.
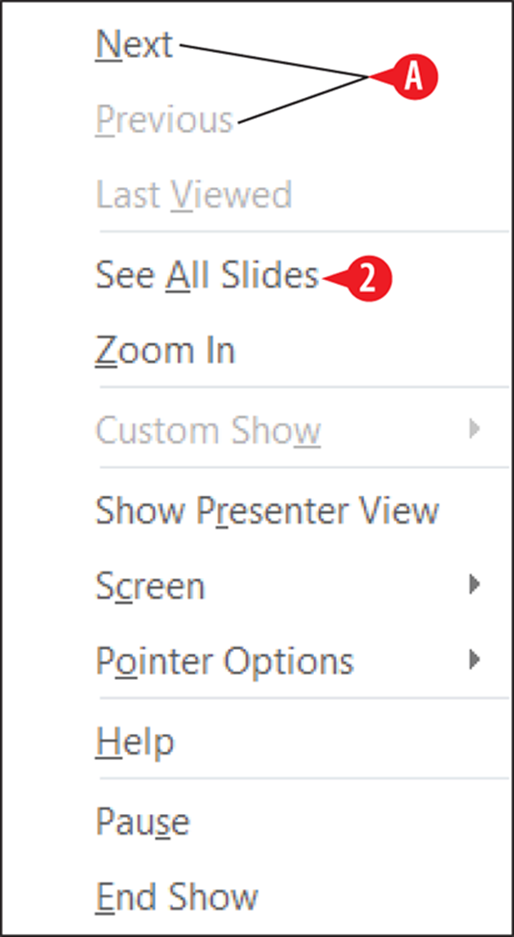
Figure 17-3: Right-click in Slide Show view for a shortcut menu.
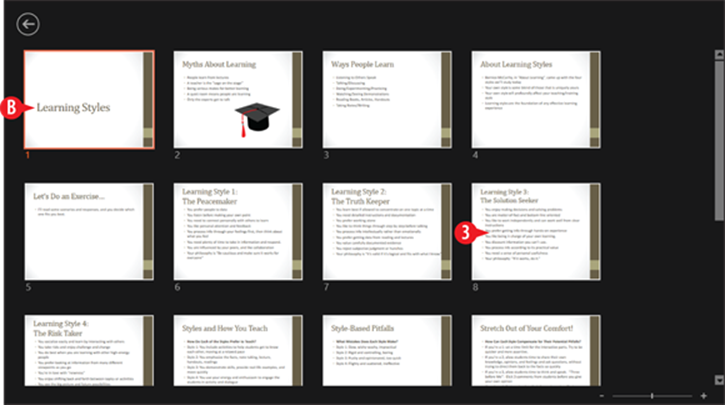
Figure 17-4: From the See All Slides pane, click the desired slide.
Here’s an alternate way to jump to a specific slide:
1. Press Ctrl+S for the All Slides dialog box.
![]() Click the desired slide.
Click the desired slide.
![]() Click Go To.
Click Go To.
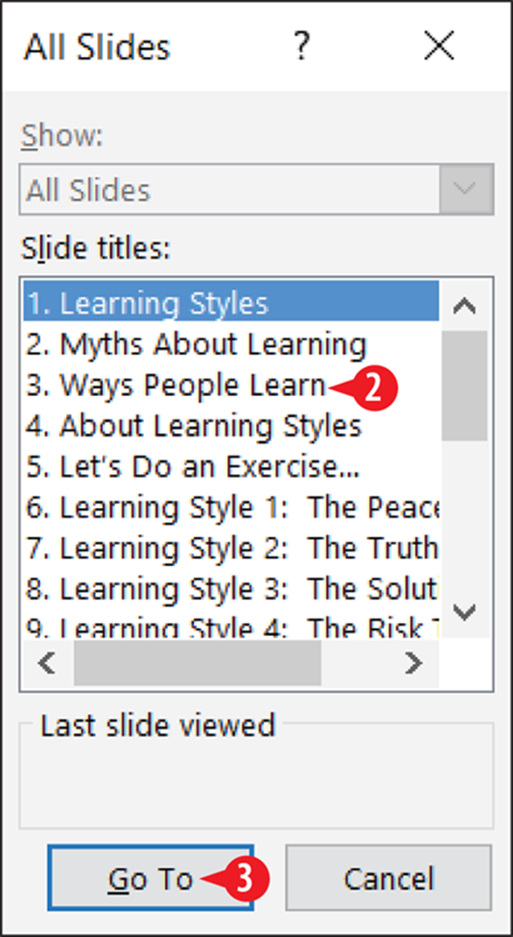
Figure 17-5: Jump to a specific slide with the All Slides dialog box.
If you happen to know a slide’s number, you can type the number and press Enter to jump to it.
End the slide show
A slide show ends automatically when you reach the last slide. A black screen appears, along with a message End of slide show, click to exit. When you click, you are returned to whatever view you were working with before entering Slide Show view.
You can also end a slide show early by pressing the Esc key, or by right-clicking to display the shortcut menu (refer to Figure 17-3) and then clicking End Show.
Use the slide show tools
You can also use the buttons in the lower left corner of the screen in Slide Show view. They’re very faint at first, but if you move the mouse pointer over one, it becomes solid. Click a button to open a menu or click the right- or left-arrow buttons there to move forward and back in the presentation.
I enhanced Figure 17-6 to show all the buttons in their “bright” mode at once, so you can see them better. In reality, a button lights up only when you point at it, and you can point at only one at a time.
The buttons are:
![]() Previous: A left-pointing arrow. Use this to go to the previous slide.
Previous: A left-pointing arrow. Use this to go to the previous slide.
![]() Next: A right-pointing arrow. Use this to go to the next slide.
Next: A right-pointing arrow. Use this to go to the next slide.
![]() Pen: Opens the Pen menu, which you can use to control a mouse-controlled “pen” that draws on the slides. (A closer look at that menu is coming up in the next section.)
Pen: Opens the Pen menu, which you can use to control a mouse-controlled “pen” that draws on the slides. (A closer look at that menu is coming up in the next section.)
![]() Show All Slides: Opens the same pane as in Figure 17-4, showing thumbnails of all slides. Click a slide to jump to it.
Show All Slides: Opens the same pane as in Figure 17-4, showing thumbnails of all slides. Click a slide to jump to it.
![]() Zoom: Changes the mouse pointer to a large rectangular magnifier. Drag it around onscreen to the area you want to magnify and then click. Press Esc to return to regular viewing.
Zoom: Changes the mouse pointer to a large rectangular magnifier. Drag it around onscreen to the area you want to magnify and then click. Press Esc to return to regular viewing.
![]() Options: Opens a menu containing several miscellaneous commands for working in Slide Show view.
Options: Opens a menu containing several miscellaneous commands for working in Slide Show view.
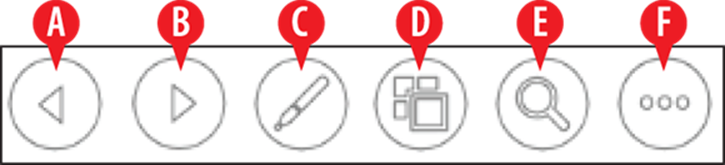
Figure 17-6: The tools in the lower left corner in Slide Show view.
You might wonder why there are so many different methods of doing the same things. For example, why is there a navigation button that does nothing but duplicate the functionality of a right-click menu? And why are there Previous and Next buttons in Figure 17-5 for moving between slides when there are at least three other methods of doing the exact same thing?
Here’s the reason: PowerPoint allows you to lock down or disable certain navigation methods in Slide Show view so that people interacting with your presentation at an unattended computer won’t inadvertently (or purposely) disable or damage the presentation. When one method is disabled, you might need to rely on another method to do what needs to be done.
Temporarily blank the screen
If you need to temporarily suspend the presentation, such as for a break or an impromptu discussion, you may want to blank the screen during the break.
To do so, press the B or . (period) key for a black screen or the W or , (comma) key for a white screen. Press the same key again to toggle back to the presentation.
You can also right-click, point to Screen, and then click either Black Screen or White Screen. (See ![]() in Figure 17-7.)
in Figure 17-7.)
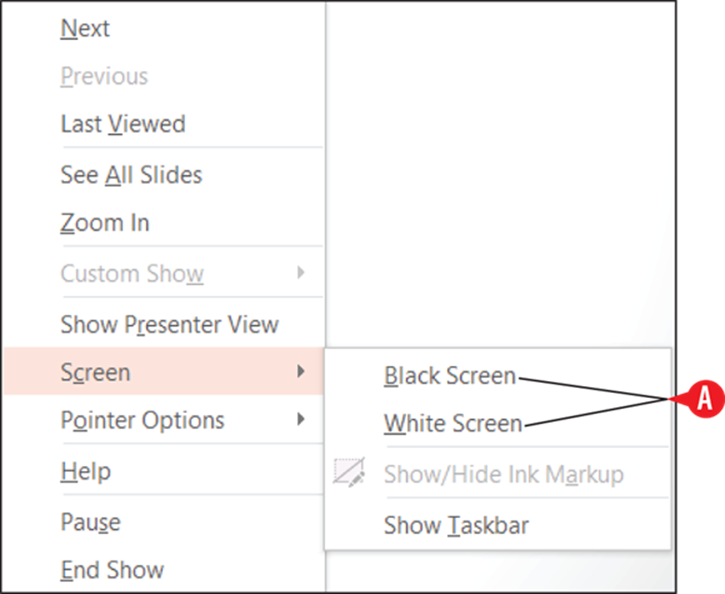
Figure 17-7: Blank the screen (either black or white).
The pen tools work when the screen is blank, so you can blank the screen to give yourself an open area in which to draw a quick diagram.
Pause the presentation
If the slides are set up to automatically advance, you might need to pause the show if there’s a delay, such as an audience member asking a question. To pause an automatically advancing presentation (without blanking the screen), press the S key, or right-click and then click Pause.
Get help
There are a lot of keyboard shortcuts to remember in Slide Show view. To see a list of them, do the following:
1. Right-click in Slide Show view and choose Help.
![]() Review the information provided.
Review the information provided.
![]() Click a tab to see keyboard shortcuts pertaining to a specific activity.
Click a tab to see keyboard shortcuts pertaining to a specific activity.
![]() When you are done getting help, click OK.
When you are done getting help, click OK.
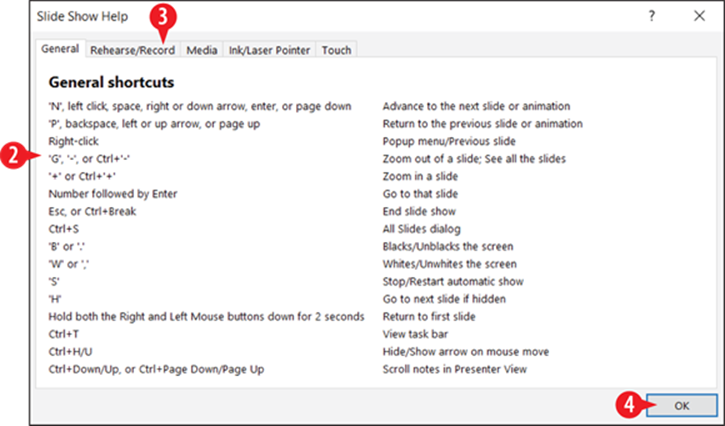
Figure 17-8: Review keyboard shortcut help during a presentation.
Annotate slides with the pen tools
As you’re giving a presentation, you may want to make some notes on the slides, such as circling a word, underlining a phrase, or highlighting a key concept. The Pen tools enable you to do all those things. Making these changes is called annotating.
Here’s a closer look at the Pen menu (from the Pen button in Figure 17-6):
![]() Laser Pointer: This tool does not leave marks on the slide.
Laser Pointer: This tool does not leave marks on the slide.
![]() Pen: The Pen leaves a thin line.
Pen: The Pen leaves a thin line.
![]() Highlighter: The Highlighter leaves a thick, semi-transparent line.
Highlighter: The Highlighter leaves a thick, semi-transparent line.
![]() Eraser: This removes other annotations selectively.
Eraser: This removes other annotations selectively.
![]() Erase All Ink on Slide: This removes all annotations from the current slide.
Erase All Ink on Slide: This removes all annotations from the current slide.
![]() Ink color: This changes the ink color used by the Pen and the Highlighter.
Ink color: This changes the ink color used by the Pen and the Highlighter.
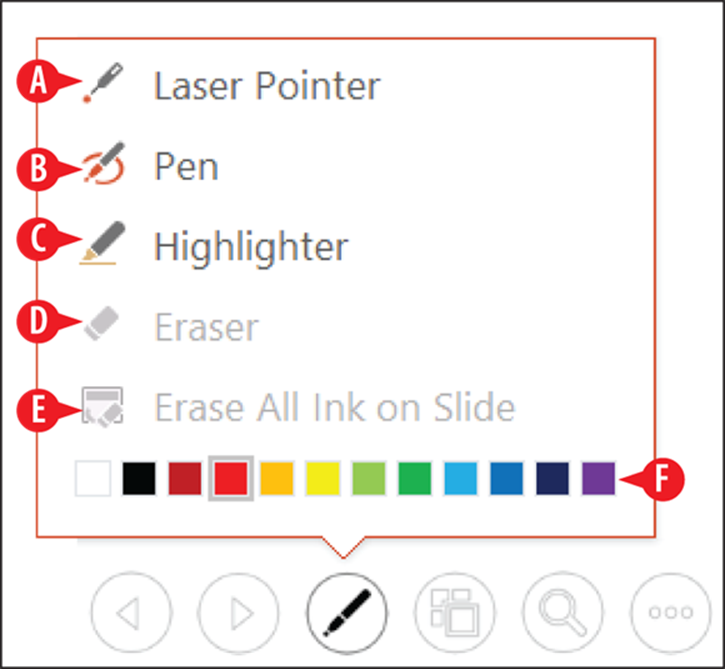
Figure 17-9: The Pen tools enable you to annotate slides.
When you leave Slide Show view after using one of the pen tools, a dialog box pops up, asking whether you want to keep your ink annotations. If you choose to keep them, they appear on the slides as ink annotation objects, which are very much like line drawings that you might create by going to the Insert tab and clicking the Shapes button.
Use Presenter view
Presenter view is like a control panel for a running presentation. With Presenter view running on a separate monitor, you can see any speaker notes for each slide, see what’s coming up next, jump around between slides, and more, all without disturbing what the audience sees.
It’s possible to enter Presenter view on a single-monitor system, but there’s not much point in it, because it interrupts what the audience sees on that single monitor.
From Slide Show view, right-click for the shortcut menu, and then click Show Presenter View.
If the right-click shortcut menu has been disabled for security reasons, here’s an alternate method: Click the Options button in the slide show tools (refer to Figure 17-6) and then click Show Presenter View.
Here are the tools and features available in Presenter View:
![]() Previous: This button displays the previous slide.
Previous: This button displays the previous slide.
![]() Next: This button displays the next slide.
Next: This button displays the next slide.
![]() Pen and Laser Pointer Tools: This is the same menu as in Figure 17-9 for the most part.
Pen and Laser Pointer Tools: This is the same menu as in Figure 17-9 for the most part.
![]() Show All Slides: This opens the Show All Slides pane (Figure 17-4).
Show All Slides: This opens the Show All Slides pane (Figure 17-4).
![]() Zoom In to the Slide: Enables you to zoom in to show a close-up of part of a slide.
Zoom In to the Slide: Enables you to zoom in to show a close-up of part of a slide.
![]() Black or Unblack Slide Show: This temporarily hides the presentation, replacing it with an all-black screen.
Black or Unblack Slide Show: This temporarily hides the presentation, replacing it with an all-black screen.
If you want a white screen rather than black, click more slide show options, point to Screen, and then click White Screen.
![]() More Slide Show Options: This button opens a menu of additional options, such as Pause, Help, Screen, and Hide Presenter View.
More Slide Show Options: This button opens a menu of additional options, such as Pause, Help, Screen, and Hide Presenter View.
![]() Make the Text Larger and Make the Text Smaller: These buttons control the font size of any speaker notes for the active slide.
Make the Text Larger and Make the Text Smaller: These buttons control the font size of any speaker notes for the active slide.
![]() End Slide Show: This ends the slide show (both monitors).
End Slide Show: This ends the slide show (both monitors).
![]() Display Settings: This opens a menu from which you can choose to swap which monitor is showing which image, or make the slide show appear on both monitors (effectively closing Presenter view).
Display Settings: This opens a menu from which you can choose to swap which monitor is showing which image, or make the slide show appear on both monitors (effectively closing Presenter view).
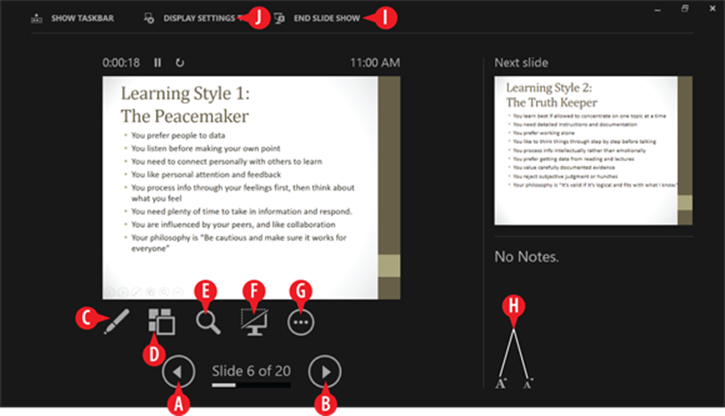
Figure 17-10: Presenter view provides tools for managing a running presentation.
Print handouts
Handouts are paper copies of your presentation that you give to the audience. They give your audience something tangible to refer to and to take home. They can also write on the handouts to make their own notes. (Some handout layouts even include lines for writing.)
When you print in PowerPoint, you have a choice of the type of printout you want. (Technically you can use any of these printout types as handouts, although the Handouts type is obviously custom-made for that purpose.) Here are the choices available:
· Full Page Slides: A full-page copy of one slide per sheet.
· Notes Pages: One slide per page, but with the slide occupying only the top half of the page. The bottom half is devoted to any speaker notes you typed into PowerPoint.
· Outline View: A text-only version of the presentation, structured as an outline, with the slide titles as the top-level outline items.
· Handouts: Multiple slides per page (two to nine, depending on your choice of settings), suitable for giving to the audience to take home.
Different numbers of slides per page have different layouts. For example, if you choose three slides per page, the layout has lines next to each slide so the audience can take notes.
To print handouts, follow these steps:
![]() Click the File tab, and click Print.
Click the File tab, and click Print.
![]() Enter the desired number of copies.
Enter the desired number of copies.
![]() Choose a different printer if needed from the Printer drop-down list.
Choose a different printer if needed from the Printer drop-down list.
![]() Click Full Page Slides to open a menu.
Click Full Page Slides to open a menu.
![]() Click one of the layouts in the Handouts section of the menu.
Click one of the layouts in the Handouts section of the menu.
6. Adjust any other print settings as needed.
![]() Click Print to print the handouts.
Click Print to print the handouts.

Figure 17-11: From the Print page in Backstage view, set print options for the handouts.
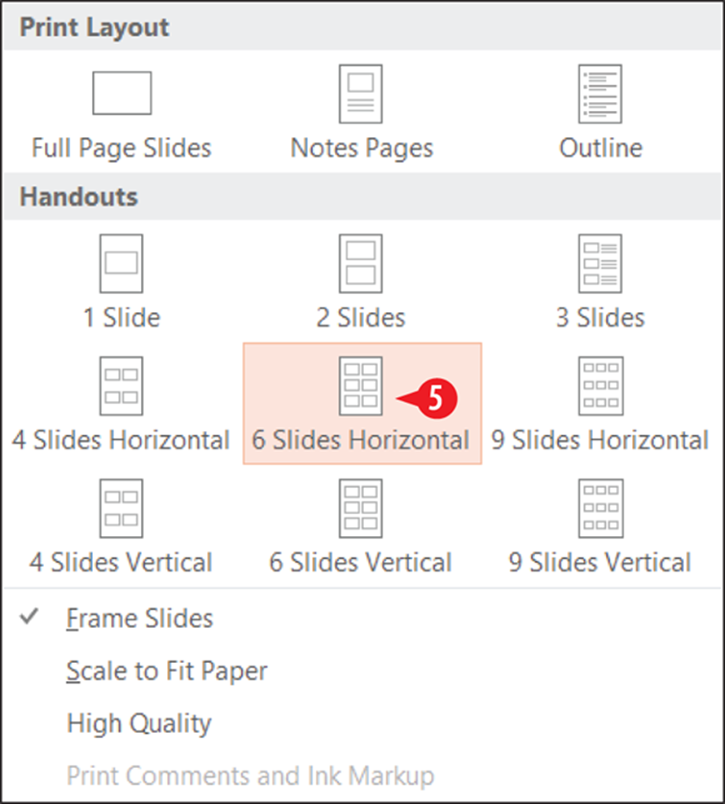
Figure 17-12: Presenter view provides tools for managing a running presentation.
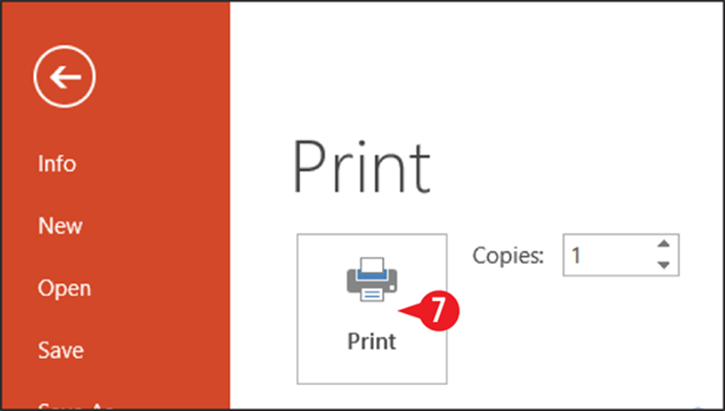
Figure 17-13: Click Print to submit the print job to your printer.
Change the handout masters
When you print handouts from PowerPoint, the Handout Master’s settings determine the details of how the handouts appear. You may want to customize the Handout Master before you print. The Handout Master settings apply only when you’re printing the Handouts layouts, not when printing full-page slides, notes pages, or outline view.
To customize a handout master:
![]() On the View tab, click Handout Master.
On the View tab, click Handout Master.
2. If you see a message about edits being lost when saved to the server, click Check Out.
![]() Open the Slides Per Page drop-down list and select the layout you want to modify.
Open the Slides Per Page drop-down list and select the layout you want to modify.
![]() To change the orientation, click Handout Orientation and then click Portrait or Landscape.
To change the orientation, click Handout Orientation and then click Portrait or Landscape.
![]() To change the slide size, click Slide Size and then click Standard or Widescreen.
To change the slide size, click Slide Size and then click Standard or Widescreen.
![]() To remove any of the placeholders (in the four corners of the page), clear its check box on the Handout Master tab.
To remove any of the placeholders (in the four corners of the page), clear its check box on the Handout Master tab.
![]() To change the theme, select a different one from the Themes button’s menu.
To change the theme, select a different one from the Themes button’s menu.
![]() To change the Colors, Fonts, or Effects, make a selection from those buttons’ menus.
To change the Colors, Fonts, or Effects, make a selection from those buttons’ menus.
![]() To add a background color to the handout, select one from the Background Styles buttons menu.
To add a background color to the handout, select one from the Background Styles buttons menu.
10. Click Repeat steps 3-9 to modify other layouts if desired.
![]() Click Close Master View.
Click Close Master View.
 Using a background style for something designed to be printed, like a handout, will use a lot of printer ink, which can be expensive.

Figure 17-14: Choose Handout Master.

Figure 17-15: Choose which handout master layout to modify.
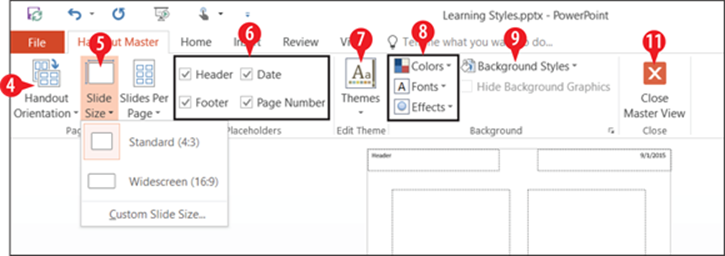
Figure 17-16: Modify the chosen layout.
Export handouts to Word
For more control over handouts, you can export them to Word. When they’re in Word, you can make modifications that aren’t possible in PowerPoint, such as changing the sizes of the slide graphics or adjusting the page margins.
To export handouts to Word, follow these steps:
![]() Click the File tab and click Export.
Click the File tab and click Export.
![]() Click Create Handouts.
Click Create Handouts.
![]() Click Create Handouts.
Click Create Handouts.
![]() Select the layout you want for the handouts.
Select the layout you want for the handouts.
If you want a link between the presentation and the Word document, so that the Word version is updated if the slides change later, click Paste link. Doing so can create problems later if the presentation file is moved, so use this option only if you really need it. (See ![]() inFigure 17-18.)
inFigure 17-18.)
![]() Click OK. Then wait for Word to generate the handout document. It may take a minute or two.
Click OK. Then wait for Word to generate the handout document. It may take a minute or two.
6. In Word, customize the handout document as desired. You have all of Word’s formatting tools at your disposal.
7. Print your handouts from Word, as you would any other Word document.
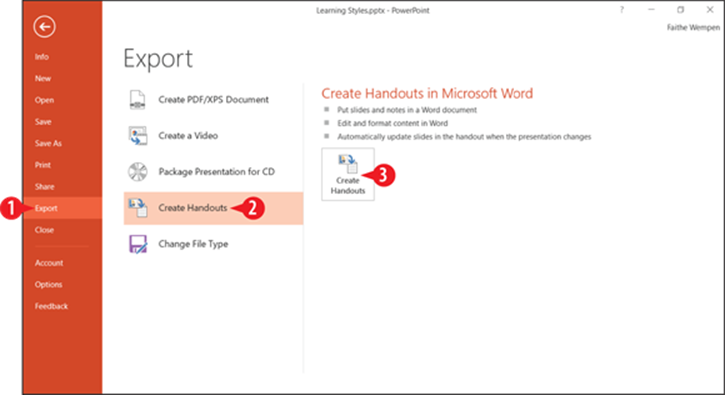
Figure 17-17: Choose to create handouts.
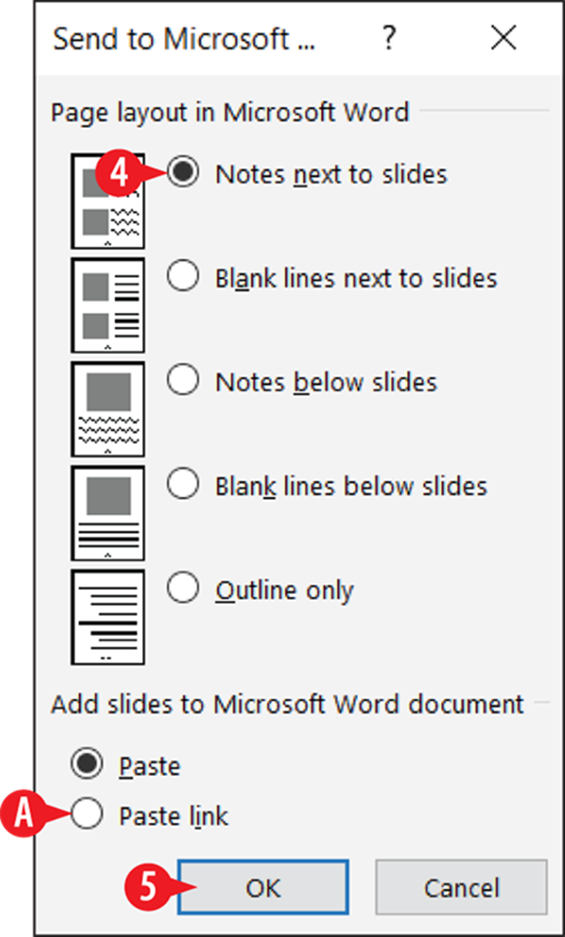
Figure 17-18: Select the handout layout to export.