Microsoft Office 2016 At Work For Dummies (2016)
Chapter 16
Adding Movement and Sound to a Presentation
In This Chapter
![]() Adding slide transition effects
Adding slide transition effects
![]() Setting slides to advance manually or automatically
Setting slides to advance manually or automatically
![]() Animating objects
Animating objects
![]() Inserting a sound clip on a slide
Inserting a sound clip on a slide
![]() Associating a sound with an event
Associating a sound with an event
![]() Inserting a video clip on a slide
Inserting a video clip on a slide
Have you ever heard the phrase “Death by PowerPoint”? It means being bored to death by a dull, long, lifeless presentation, usually with someone droning on about the slide’s text-heavy content in too much detail.
To avoid causing this kind of agony for your audience, you can enliven your slides by adding movement and sound to them. You can set up different transition effects for moving from one slide to another, and you can animate the individual objects on a slide so that they enter or exit the slide or emphasize a certain point. (Don’t go overboard in the other direction, though; too much bling can be worse than none at all.)
You can also add sound and video clips to a presentation. In earlier versions of PowerPoint, some types of video were difficult to integrate, but today’s PowerPoint is greatly improved in this area, and you can integrate many sound and video types seamlessly into your show.
Add slide transition effects
Transitions are movements from one slide to another. The default transition effect is None, which means the slide simply goes away and the next one appears. Some of the alternatives include Fade, Push, Wipe, Split, and Cut, to name only a few. Some things to note about transitions:
![]() You can apply transitions from the Transitions tab.
You can apply transitions from the Transitions tab.
![]() Click More in the Transitions to this Slide group to see more choices.
Click More in the Transitions to this Slide group to see more choices.
Some of the transition effects have options that determine the direction of the action. For example, a Wipe transition might wipe from the left, right, top, or bottom, or from one of the corners. Other effects have no such options because they can happen only one way.
![]() If options are available, you can click the Transitions tab and choose them from the Effect Options button.
If options are available, you can click the Transitions tab and choose them from the Effect Options button.
![]() You can also set several other properties for a transition. You can assign a sound to it, for example. To do so, open the Sound drop-down list and select a sound.
You can also set several other properties for a transition. You can assign a sound to it, for example. To do so, open the Sound drop-down list and select a sound.
![]() At the bottom of the Sound list you can click Other Sound to use a sound file of your own.
At the bottom of the Sound list you can click Other Sound to use a sound file of your own.
![]() To control the speed of the transition, change the Duration setting (measured in seconds). A longer duration will make the transition occur more slowly.
To control the speed of the transition, change the Duration setting (measured in seconds). A longer duration will make the transition occur more slowly.
![]() In most cases, you should make all the slides in your presentation have the same transition, sound (if any), and duration. To quickly do so, click Apply to All after making your choices.
In most cases, you should make all the slides in your presentation have the same transition, sound (if any), and duration. To quickly do so, click Apply to All after making your choices.
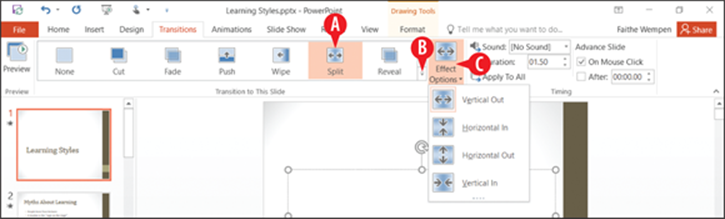
Figure 16-1: Apply transitions from the Transitions tab.
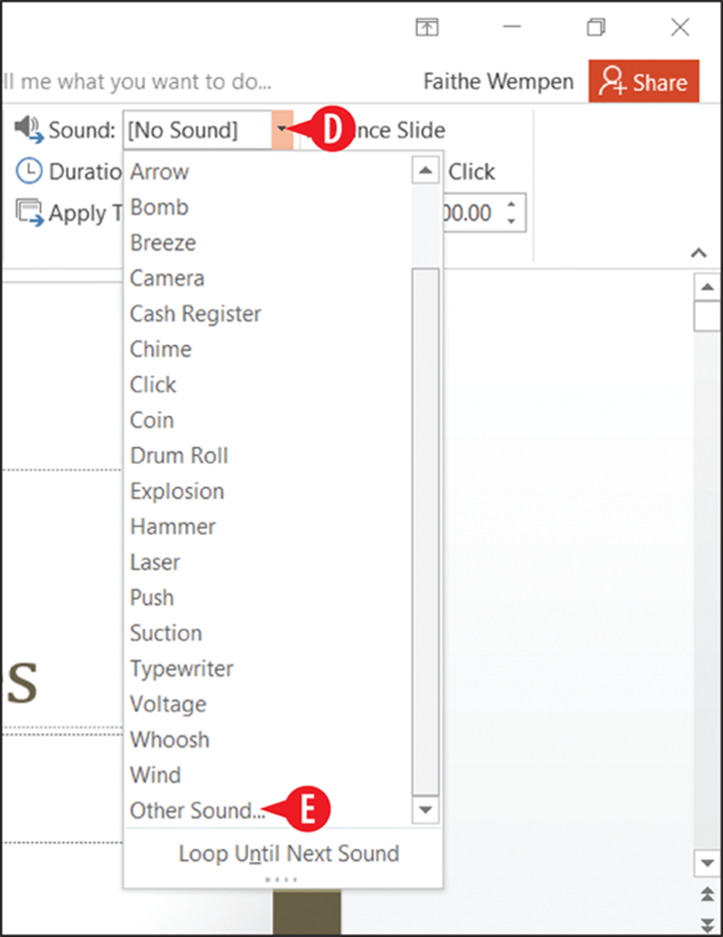
Figure 16-2: Apply transitions from the Transitions tab.
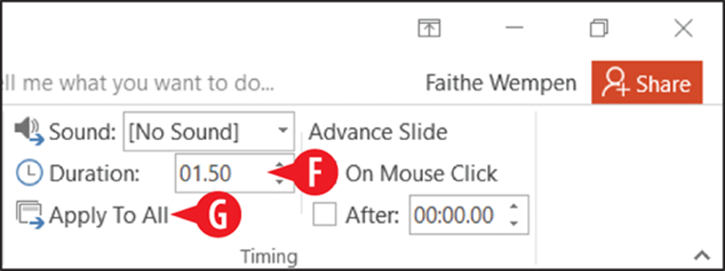
Figure 16-3: Set the transition’s duration, and optionally apply the same transition to all slides.
Set slides to advance manually or automatically
You can choose on the Transitions tab how slides advance even if you do not use any transition effect (that is, transition setting is None).
By default, slides advance only on mouse click. That means that no matter how long you leave a slide onscreen, PowerPoint doesn’t try to advance to the next slide until you give the signal. (That signal can be an actual mouse click or the press of a key, such as Enter, spacebar, or the right-arrow key.)
If you want some (or all) slides to advance automatically after a certain amount of time, you can specify this advancement on the Transitions tab. You can specify an automatic transition instead of or in addition to the default On Click behavior. If you mark both check boxes, slides will advance immediately on mouse click, but will also advance automatically after the specified time interval has passed since the last slide.
To set slides to advance, follow these steps:
![]() Display the slide to affect, or select multiple slides to affect in the Slides pane in Normal view, or in Slide Sorter view. If you want to affect all slides, it does not matter which slide you select.
Display the slide to affect, or select multiple slides to affect in the Slides pane in Normal view, or in Slide Sorter view. If you want to affect all slides, it does not matter which slide you select.
![]() Click the Transitions tab.
Click the Transitions tab.
![]() Make sure On Mouse Click is marked. (It is marked by default.)
Make sure On Mouse Click is marked. (It is marked by default.)
![]() To allow slides to advance automatically, mark the After check box.
To allow slides to advance automatically, mark the After check box.
![]() Use the increment arrow buttons to specify an amount of time (in seconds) in the After box.
Use the increment arrow buttons to specify an amount of time (in seconds) in the After box.
![]() To apply this setting across all slides, click Apply to All.
To apply this setting across all slides, click Apply to All.
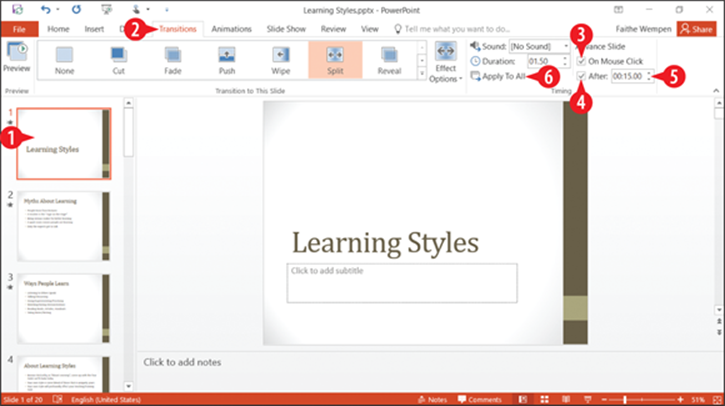
Figure 16-4: Choose how slides will advance.
Animate objects
Animations are movements that are somewhat like transitions except they apply to individual objects on a slide rather than the entire slide. For example, you can animate a picture so that it appears after everything else on the slide has already appeared, or you can make the bullet points on a slide appear one by one rather than all at once.
You can create four types of animations in PowerPoint:
· An entrance animation governs how an object appears on the slide.
· An exit animation governs how an object leaves the slide.
· An emphasis animation makes the object do something to call attention to itself when it is neither entering nor exiting; this might include changing color, moving around, or making a sound.
· A motion path animation (not covered in this chapter) moves an object on the slide following a predefined path you specify. It’s kind of like setting down model railroad tracks and letting the object be the train moving on the track.
Create an entrance animation
Use an entrance animation whenever you want certain content on a slide to appear after the slide background has already appeared (and possibly other content on the slide, too). Any objects that you don’t animate will appear at the same time the slide background does; any objects you animate will appear after that in a sequence you specify.
To create an entrance animation, follow these steps:
![]() Select the object to animate. If you want to animate text, select the paragraph(s) to animate, or select the outer border of a text box to animate all text inside it.
Select the object to animate. If you want to animate text, select the paragraph(s) to animate, or select the outer border of a text box to animate all text inside it.
 Keep in mind that during a presentation, anything that doesn’t have an entrance animation appears when the slide itself appears, and animations happen after that. So, for example, if you animate the first paragraph of a bulleted list but not the other paragraphs, when the slide displays you’ll initially see all the other paragraphs, but not the first one.
![]() On the Animations tab, click Add Animation.
On the Animations tab, click Add Animation.
![]() You can also click the More button in the Animation group to choose an animation; the menu that appears is the same as the menu for the Add Animation button.
You can also click the More button in the Animation group to choose an animation; the menu that appears is the same as the menu for the Add Animation button.
 When animating an object or text that currently has no animation, the menus on the More button and on the Add Animation button work the same. The difference comes in later. If you want to change to a different animation later (of the same type: entrance, emphasis, exit, or motion path), use the menu on the More button. If you want to set up multiple animations for the same object, add each new one with the Add Animation button.
![]() If the animation you want happens to appear in the Entrance section of the menu, you can click it and then skip the rest of the steps.
If the animation you want happens to appear in the Entrance section of the menu, you can click it and then skip the rest of the steps.
![]() Click More Entrance Effects.
Click More Entrance Effects.
![]() Click an entrance effect, and watch the preview of it on the slide, behind the dialog box. Drag the dialog box to the side if needed.
Click an entrance effect, and watch the preview of it on the slide, behind the dialog box. Drag the dialog box to the side if needed.
Effects in the dialog box are ordered by category: Basic, Subtle, Moderate, and Exciting. Your opinion may be different, of course, but these categories provide a starting point for making your choice.
![]() After you have selected the desired effect, click OK.
After you have selected the desired effect, click OK.
After you apply an animation to a text box that contains multiple paragraphs, each paragraph has a number next to it, indicating the order in which the paragraphs will be animated. (See ![]() in Figure 16-7.)
in Figure 16-7.)
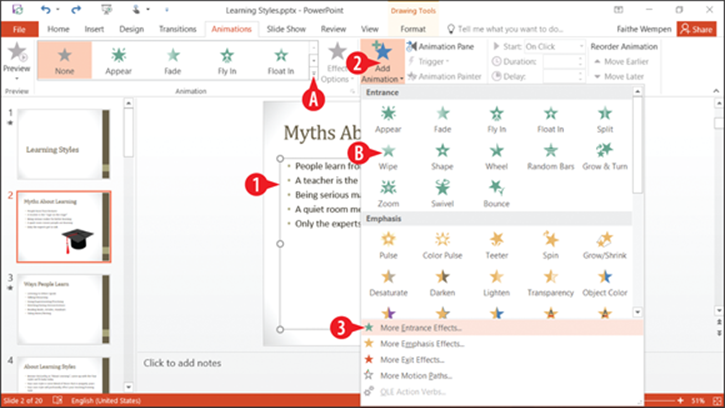
Figure 16-5: Create a new entrance effect.
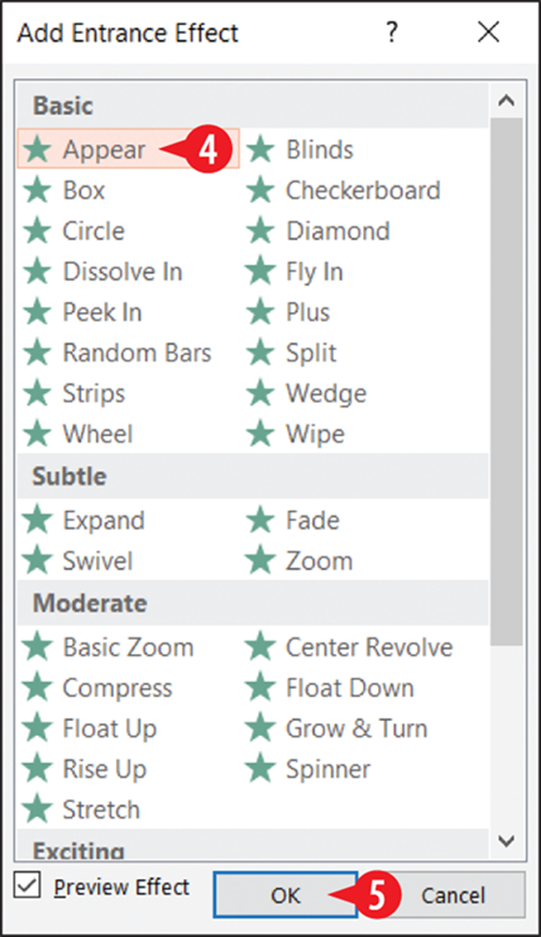
Figure 16-6: Select the desired effect and click OK.
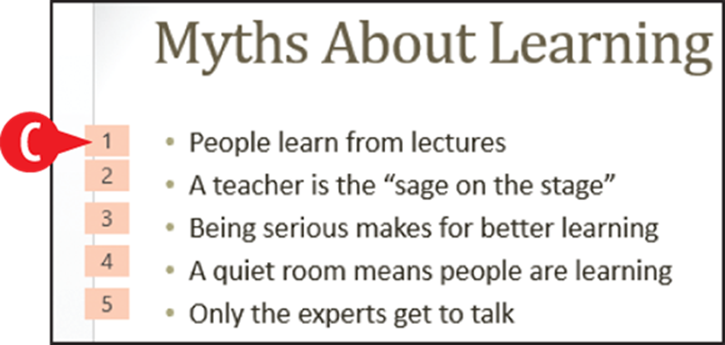
Figure 16-7: Numbers represent the animation sequence.
To adjust an animation’s options, see the section “Change an animation’s options” later in this chapter. To resequence the order of the animations on a slide, see the section “Change animation sequence.”
Create an emphasis animation
An emphasis animation calls attention to an object on a slide when it is neither entering nor exiting. PowerPoint offers many types of emphasis animations, including Grow/Shrink, Spin, and various color changes.
The following process is very similar to that of adding an entrance animation, so glance back at the preceding section for some additional tips and details:
1. Select the object to animate. If you want to animate text, select the paragraph(s) to animate, or select the outer border of a text box to animate all text inside it.
2. On the Animations tab, click Add Animation.
3. Click More Emphasis Effects.
![]() Click an emphasis effect, and watch the preview of it on the slide, behind the dialog box. Drag the dialog box to the side if needed.
Click an emphasis effect, and watch the preview of it on the slide, behind the dialog box. Drag the dialog box to the side if needed.
Some animation effects may be unavailable for the type of object you are animating. For example, Font Color is not available for a graphic. (See ![]() in Figure 16-8.)
in Figure 16-8.)
![]() After you have selected the desired effect, click OK.
After you have selected the desired effect, click OK.
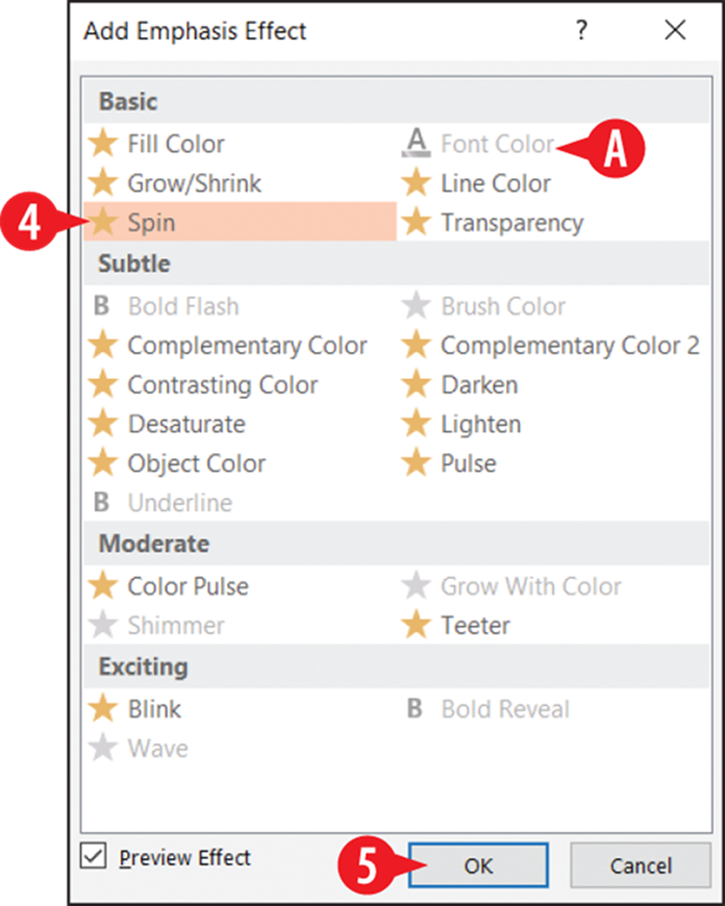
Figure 16-8: Choose an emphasis effect.
Create an exit animation
An exit animation causes an object to leave the slide before the next slide appears. Without an exit animation applied, an object stays onscreen until the next slide appears. Exit animations are often used in combination with entrance animations to make an object enter, stay for a specified time, and then exit.
The following process is very similar to that of adding an entrance animation, so look back at that section for some additional tips and details:
1. Select the object to animate. If you want to animate text, select the paragraph(s) to animate, or select the outer border of a text box to animate all text inside it.
2. On the Animations tab, click Add Animation.
3. Click More Exit Effects.
![]() Click an exit effect, and watch the preview of it on the slide, behind the dialog box. Drag the dialog box to the side if needed.
Click an exit effect, and watch the preview of it on the slide, behind the dialog box. Drag the dialog box to the side if needed.
![]() After you have selected the desired effect, click OK.
After you have selected the desired effect, click OK.
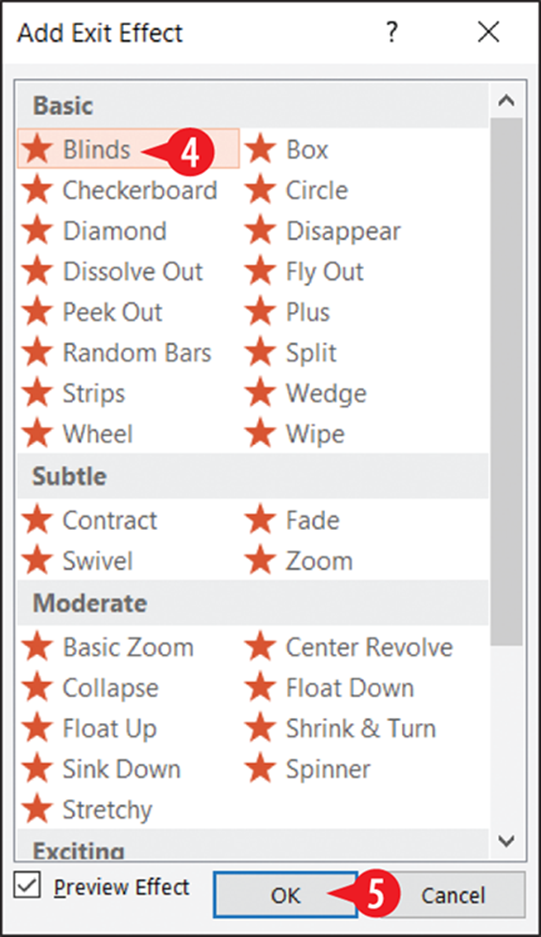
Figure 16-9: Choose an exit effect.
Choose a different animation
To choose a different animation for an object, do the following:
![]() Select the object.
Select the object.
![]() On the Animations tab, click the More button in the Animations group.
On the Animations tab, click the More button in the Animations group.
![]() Click the command that corresponds to the type of animation you want to change to.
Click the command that corresponds to the type of animation you want to change to.
You can also choose one of the options from the menu and skip the rest of the steps. (See ![]() in Figure 16-11.)
in Figure 16-11.)
In step 3, it does not have to be the same type as was previously applied. For example, you can replace an entrance effect with an emphasis effect.
4. Click the desired animation.
5. Click OK.
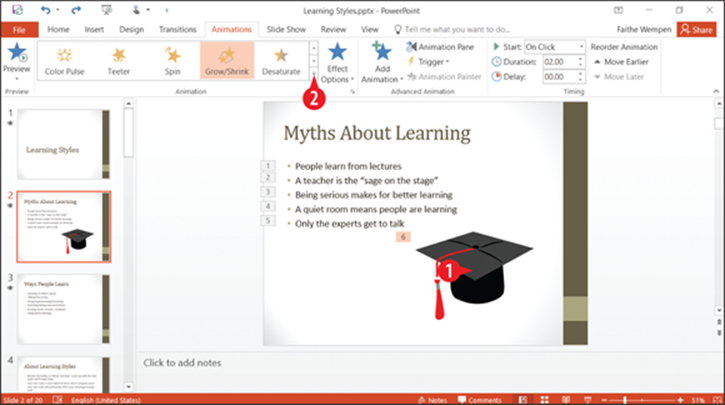
Figure 16-10: Click More.

Figure 16-11: Choose a different animation.
Change an animation’s options
Animation options include the duration, the delay, and the sound effects assigned to an animation. You can set all these from the Animations tab. Consider Figure 16-12:
![]() Set an animation’s start trigger using the Start drop-down list on the Animations tab.
Set an animation’s start trigger using the Start drop-down list on the Animations tab.
An animation event can be set to start in any of these ways:
· On mouse click: The event occurs when you click the mouse (or do some other equivalent action to advance the presentation, such as press Enter).
· With previous: The event occurs simultaneously with the previous animation event. If there is no previous animation event for this slide, it occurs simultaneously with the slide itself displaying.
· After previous: The event occurs after the previous animation event has completed. If there is no previous animation event for this slide, it occurs after the slide itself displays.
![]() The animation’s Duration determines how quickly it executes. A longer duration means a slower execution.
The animation’s Duration determines how quickly it executes. A longer duration means a slower execution.
![]() The Delay setting determines the length of the pause between the previous event and this one.
The Delay setting determines the length of the pause between the previous event and this one.
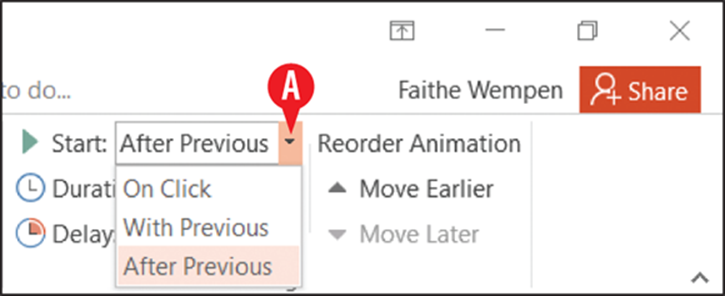
Figure 16-12: Choose what will cause the animation to start.
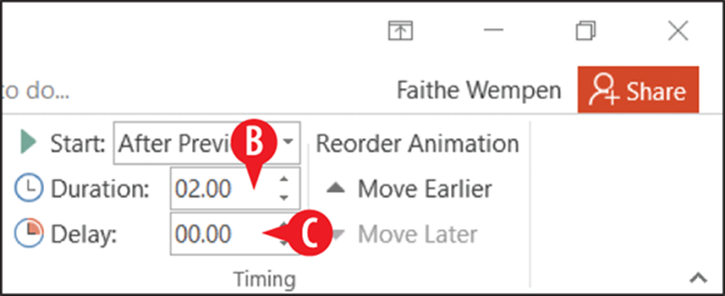
Figure 16-13: Set the animation duration and delay.
You can also choose effect options from a dialog box for more choices. Display the animation pane (covered next), and then right-click the animation effect in the Animation pane and choose Effect Options.
Display the Animation Pane
If you have more than one animated object on a slide, you may find it useful to see all the animations in a list form. The Animation pane provides such a list:
![]() To display the Animation pane, click the Animation Pane button on the Animations tab.
To display the Animation pane, click the Animation Pane button on the Animations tab.
![]() When the paragraphs in a text box are individually animated, they show by default as a collapsed group in the Animation pane.
When the paragraphs in a text box are individually animated, they show by default as a collapsed group in the Animation pane.
![]() You can click the gray bar below the group to expand it to see each paragraph’s animation individually listed.
You can click the gray bar below the group to expand it to see each paragraph’s animation individually listed.
![]() You can tell the animation type by the color of the bar on it. Entrance is green; emphasis is yellow; exit is red; and motion path is gray.
You can tell the animation type by the color of the bar on it. Entrance is green; emphasis is yellow; exit is red; and motion path is gray.
![]() You can tell the duration of an animation by the length of the colored bar.
You can tell the duration of an animation by the length of the colored bar.
![]() The seconds scale gives you a visual benchmark for the number of seconds a colored bar represents.
The seconds scale gives you a visual benchmark for the number of seconds a colored bar represents.
![]() A mouse icon next to an animation means it is triggered on mouse click.
A mouse icon next to an animation means it is triggered on mouse click.
![]() A clock icon means the animation is triggered automatically after the previous animation event.
A clock icon means the animation is triggered automatically after the previous animation event.
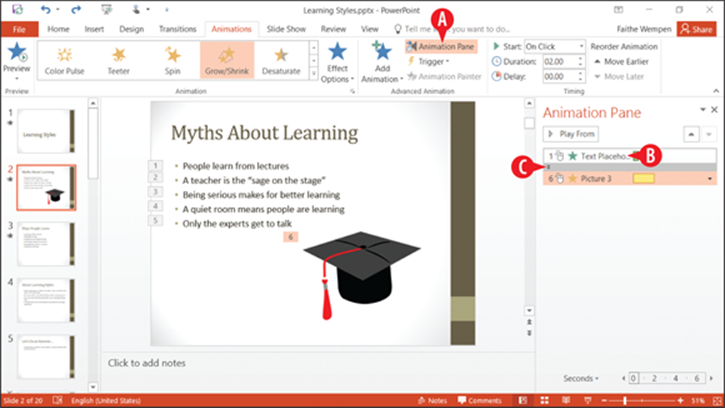
Figure 16-14: Display the Animation pane.
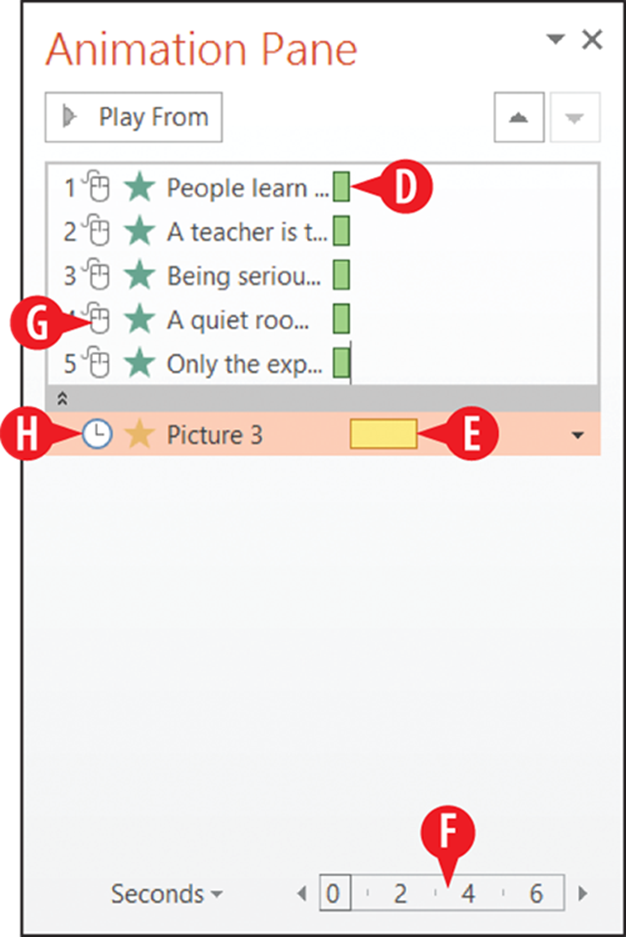
Figure 16-15: Use the Animation pane to get information about the animations.
Set text animation options
You can animate graphic objects or text. If you animate text (for example, a bulleted list), you can control whether the text animates as a whole or paragraph-by-paragraph.
To change the way text is animated, follow these steps:
![]() In the Animation pane, right-click the animation to change. If there are multiple paragraphs, each listed as separate animations, you can right-click any of them in the set.
In the Animation pane, right-click the animation to change. If there are multiple paragraphs, each listed as separate animations, you can right-click any of them in the set.
![]() Click Timing.
Click Timing.
![]() Click the Text Animation tab.
Click the Text Animation tab.
![]() Open the Group Text drop-down list and choose how to separate the text for individual animations.
Open the Group Text drop-down list and choose how to separate the text for individual animations.
![]() (Optional) To animate text from bottom to top (rather than top to bottom, the default), mark the In reverse order check box.
(Optional) To animate text from bottom to top (rather than top to bottom, the default), mark the In reverse order check box.
![]() Click OK.
Click OK.
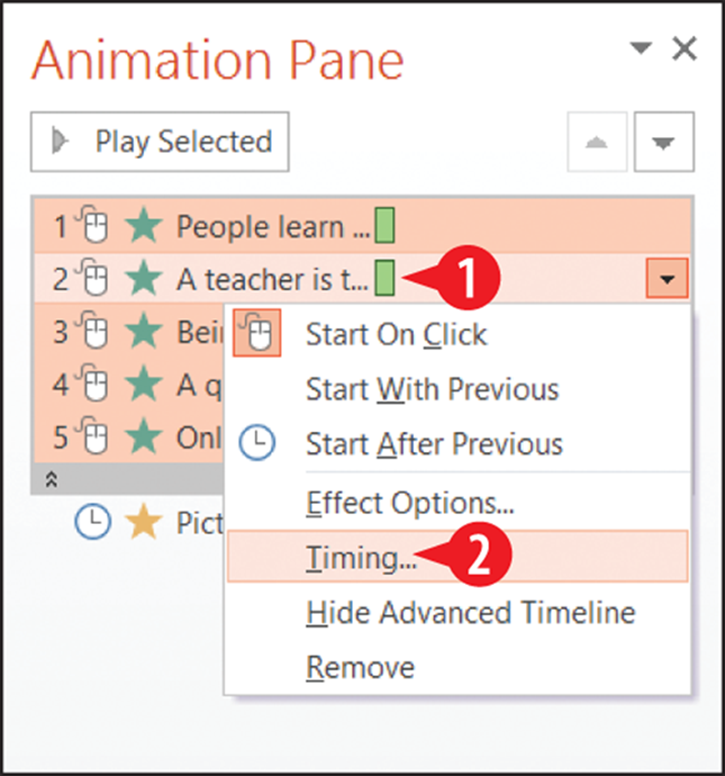
Figure 16-16: Choose Timing to access text animation options.
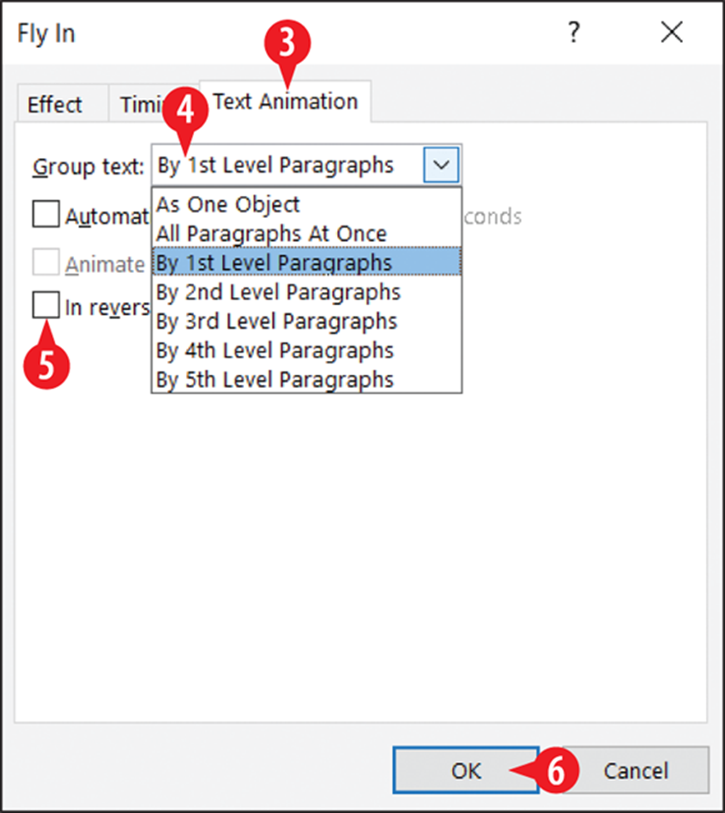
Figure 16-17: Set text animation options.
Copy animation effects between objects
You can quickly copy animations from one object to another with the Animation Painter command. This command is handy when several objects on a slide should be animated identically.
To copy an animation effect:
1. Select the object that contains the effect already.
![]() On the Animations tab, click Animation Painter.
On the Animations tab, click Animation Painter.
3. Click the object that should receive the animation.

Figure 16-18: Use Animation Painter to copy animation.
Change animation sequence
Here are some tips for changing the order in which animations are sequenced on a slide.
![]() Animations are sequenced in the order in which they are created, and they appear in that order in the Animation pane.
Animations are sequenced in the order in which they are created, and they appear in that order in the Animation pane.
![]() The numbers assigned to each animation effect also reflect the order.
The numbers assigned to each animation effect also reflect the order.
To move an animation up or down in the sequence:
![]() Select the effect in the Animation pane.
Select the effect in the Animation pane.
![]() Click The Up or Down arrow to move the animation.
Click The Up or Down arrow to move the animation.
![]() You can also use the Move Earlier or Move Later command on the Animations tab. These are useful if the Animation pane is not open, for example.
You can also use the Move Earlier or Move Later command on the Animations tab. These are useful if the Animation pane is not open, for example.
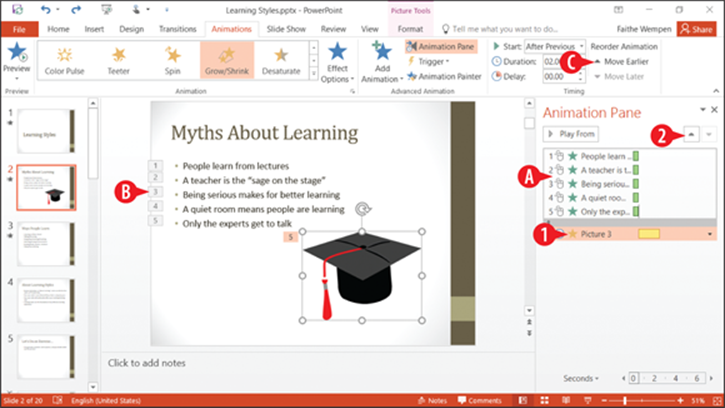
Figure 16-19: Use Animation Painter to copy animation.
You can also drag an animation up or down on the list to change its sequence.
Insert a sound clip
When you place a sound clip (sometimes called an audio clip) on a slide, a speaker icon appears to represent it. Playback controls appear beneath the icon, so you can control the clip during the show. You can also assign a sound to an object, so that clicking the object plays the sound.
Insert a sound clip icon on a slide
With this method, an actual sound object is placed on the slide, represented by a speaker icon. You can set up the sound to play automatically or to wait until someone clicks the speaker icon.
To insert a sound clip icon:
![]() Display the slide on which the sound clip icon should be placed.
Display the slide on which the sound clip icon should be placed.
![]() On the Insert tab, click Audio.
On the Insert tab, click Audio.
![]() Click Audio on My PC.
Click Audio on My PC.
![]() Browse to and select the audio clip. PowerPoint supports a variety of formats.
Browse to and select the audio clip. PowerPoint supports a variety of formats.
![]() Click Insert. The sound clip icon is placed in the center of the slide.
Click Insert. The sound clip icon is placed in the center of the slide.
6. (Optional) Drag the speaker icon to move it if desired.
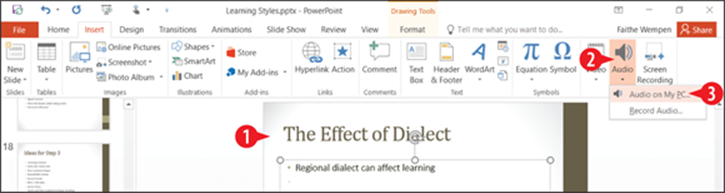
Figure 16-20: Choose Audio on My PC to insert an existing sound clip.
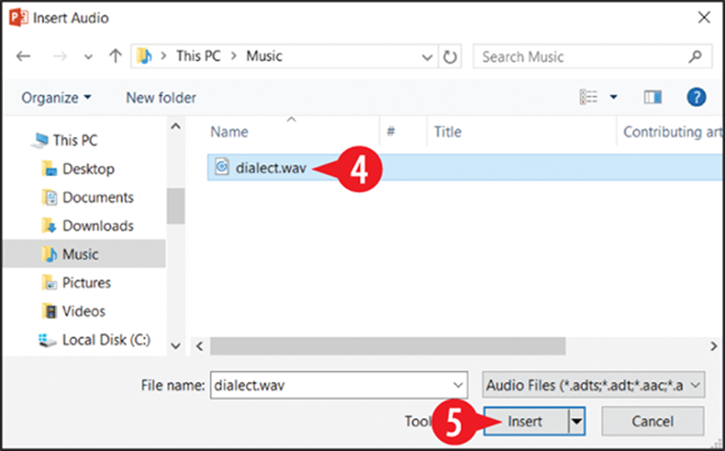
Figure 16-21: Select the sound clip.
After inserting the sound clip, you can adjust it using the options in the Audio Options section of the Audio Tools Playback toolbar, as follows:
![]() Choose how the sound should be triggered. The default is On Click, but you can also choose Automatically so that the sound plays as soon as the speaker icon appears. (It appears when the slide itself appears unless you set an entrance animation for it.)
Choose how the sound should be triggered. The default is On Click, but you can also choose Automatically so that the sound plays as soon as the speaker icon appears. (It appears when the slide itself appears unless you set an entrance animation for it.)
![]() If the sound clip is long, and you want it to continue playing if it isn’t finished when the next slide appears, mark the Play Across Slides check box.
If the sound clip is long, and you want it to continue playing if it isn’t finished when the next slide appears, mark the Play Across Slides check box.
![]() If you want the sound to repeat, mark Loop until Stopped.
If you want the sound to repeat, mark Loop until Stopped.
![]() To hide the speaker icon, mark Hide During Show. Don’t do this if you have the Start setting set to On Click, though, because it’ll make it impossible for the sound to ever be triggered.
To hide the speaker icon, mark Hide During Show. Don’t do this if you have the Start setting set to On Click, though, because it’ll make it impossible for the sound to ever be triggered.
![]() The Play in Background button automatically sets up a sound clip to serve as a soundtrack for the presentation by making the following setting adjustments: Start automatically, Play Across Slides, Loop Until Stopped, and Hide During Show all selected.
The Play in Background button automatically sets up a sound clip to serve as a soundtrack for the presentation by making the following setting adjustments: Start automatically, Play Across Slides, Loop Until Stopped, and Hide During Show all selected.

Figure 16-22: Adjust sound playback options.
Attach a sound to a picture on a slide
If you plan on keeping the speaker icon on the slide, why not replace that boring speaker with a more interesting piece of artwork? This is also a good way to camouflage the sound icon if you need to keep an icon somewhere on the slide for the sound but you don’t want the audience to notice. The drawback of this method is its lack of flexibility; you don’t get playback tools with this method like you do with the speaker icon, and you can’t make the sound play automatically.
To associate a sound with an object, follow these steps:
![]() Select the picture.
Select the picture.
![]() On the Insert tab, click Action.
On the Insert tab, click Action.
![]() On the Mouse Click tab, mark the Play Sound check box.
On the Mouse Click tab, mark the Play Sound check box.
![]() Open the Play Sound drop-down list and choose Other Sound. The Add Audio dialog box opens.
Open the Play Sound drop-down list and choose Other Sound. The Add Audio dialog box opens.
![]() Navigate to and select the audio clip.
Navigate to and select the audio clip.
![]() Click OK.
Click OK.
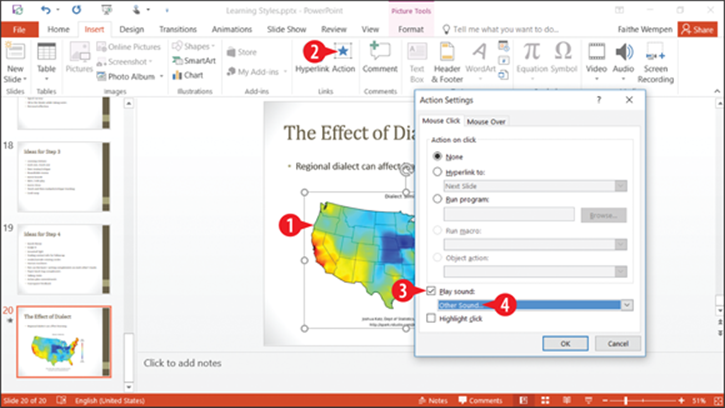
Figure 16-23: Choose a sound as the action associated with the picture.
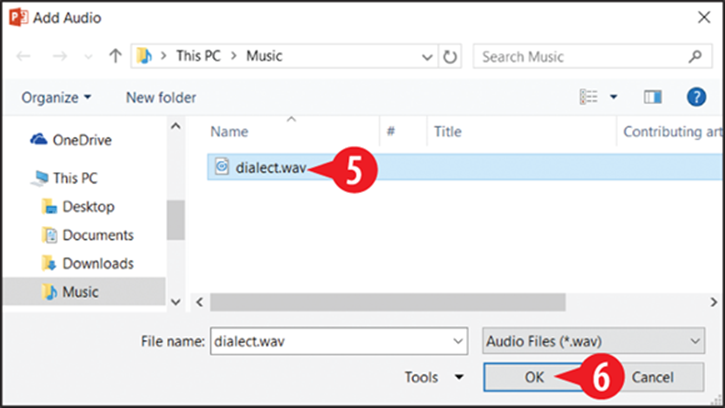
Figure 16-24: Choose the audio clip.
Here’s an alternate method of making a sound play on click of a particular object:
1. Insert the sound icon on the slide, as you learned in “Insert a sound clip icon on a slide” earlier in this chapter.
![]() If needed, insert the object on the slide that should be clicked to play the sound. If you don’t already have one in mind, you might draw a simple circle or square with the Drawing tools, for example.
If needed, insert the object on the slide that should be clicked to play the sound. If you don’t already have one in mind, you might draw a simple circle or square with the Drawing tools, for example.
![]() Select the sound icon.
Select the sound icon.
![]() On the Audio Tools Playback tab, click No Style to clear previous settings.
On the Audio Tools Playback tab, click No Style to clear previous settings.
![]() Mark the Hide During Show check box.
Mark the Hide During Show check box.
![]() On the Animations tab, click Trigger.
On the Animations tab, click Trigger.
![]() Point to On Click Of.
Point to On Click Of.
![]() Click the desired object that should trigger the sound.
Click the desired object that should trigger the sound.
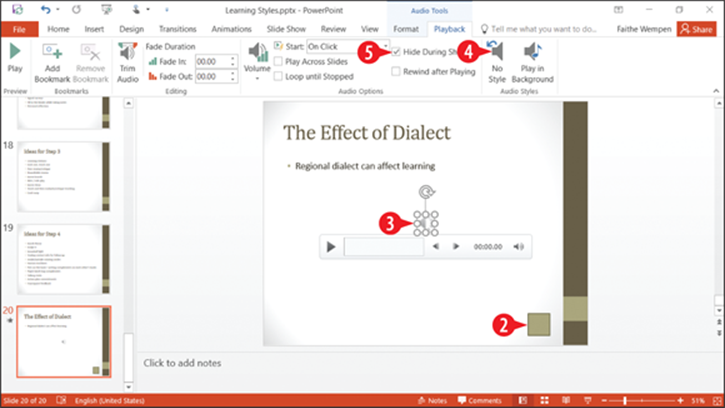
Figure 16-25: Make sure the sound icon is set to not appear during the show.
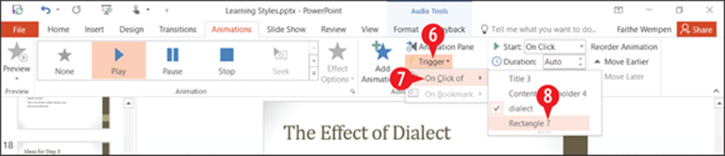
Figure 16-26: Select the object that will trigger the sound.
After creating a trigger-based animation, you will probably want to test it in Slide Show view. From the Slide Show tab, click From Current Slide. Then click the trigger object to see if the sound plays.
Insert a video clip on a slide
PowerPoint 2016 accepts video clips in a variety of formats, including Windows Media, Windows Video, QuickTime, MP4, and Flash. You can place a video clip on a slide either within a content placeholder or as a standalone item. You can also apply formatting to a video clip, such as a video style that governs the shape and appearance of the clip’s frame.
You have a choice of video sources. You can insert a video stored on your own PC, or you can link to an online video.
Link to an online video
Many web sites host online videos. If you will have Internet access during your presentation, you might choose to link to an online copy of a video rather than embed a large video file in your presentation.
To link to an online video, follow these steps:
1. If the video is not on YouTube, go to the site where it is hosting and get an embed code for the video. The exact procedure varies. For example, on a video hosted by Vimeo, here are the steps:
a. On the video clip, click the Share button.
b. Click Embed Code.
c. Select the code and then click Copy or press Ctrl+C to copy the code to the Windows Clipboard.
2. Display the slide on which you want to place the video.
![]() On the Insert tab, click Video, and then click Online Video.
On the Insert tab, click Video, and then click Online Video.
OR
![]() In an empty content placeholder, click the Insert Video icon.
In an empty content placeholder, click the Insert Video icon.
If you use a content placeholder, the video will be placed in the placeholder. If you use the Video command on the Insert tab, the video will be placed as a free-floating object on the slide.
![]() If you copied a code in step 1, click in the From a Video Embed Code text box and then press Ctrl+V to paste the code. Then skip to step 6.
If you copied a code in step 1, click in the From a Video Embed Code text box and then press Ctrl+V to paste the code. Then skip to step 6.
OR
![]() Click in the Search YouTube box and type keywords representing the video you want to find and insert. Then press Enter.
Click in the Search YouTube box and type keywords representing the video you want to find and insert. Then press Enter.
![]() Select the desired video in the search results.
Select the desired video in the search results.
![]() Click Insert.
Click Insert.
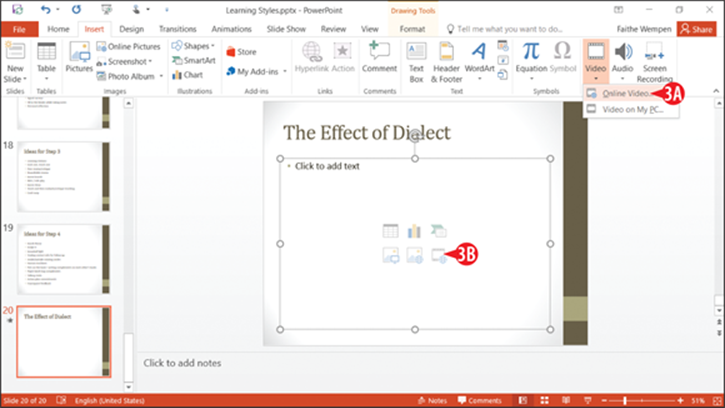
Figure 16-27: Use a content placeholder or choose Video from the Insert tab.
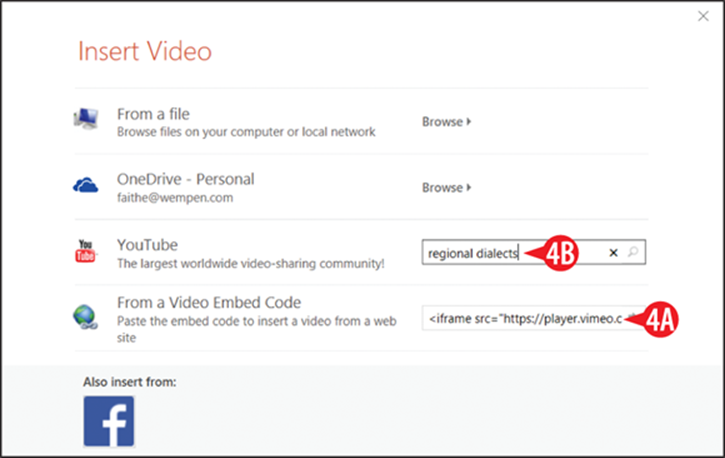
Figure 16-28: Paste an embed code or search YouTube.
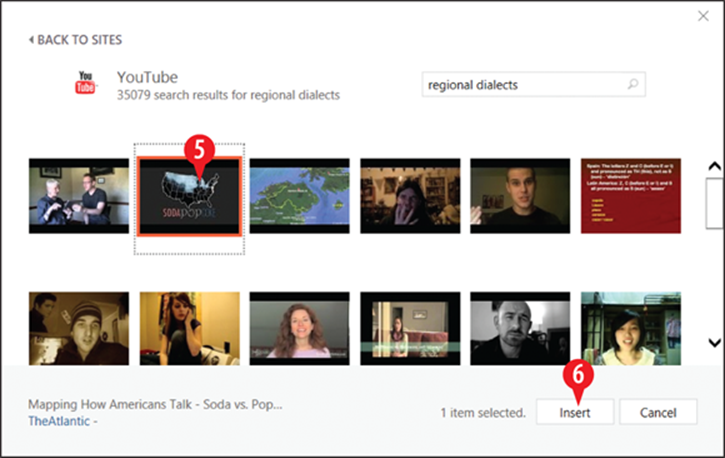
Figure 16-29: Select a video to insert.
Most of the commands on the Video Tools Playback tab on the Ribbon are unavailable for web-hosted video clips.
Insert a video from your PC
When the video is from your own PC, you can insert it into the presentation so that it will be available all the time, even when there is no Internet connection available. The downside is that the video embedded in the presentation file increases the file’s size.
![]() Display the slide on which you want to place the video.
Display the slide on which you want to place the video.
![]() On the Insert tab, click Video, and then click Video on My PC.
On the Insert tab, click Video, and then click Video on My PC.
OR
![]() In an empty content placeholder, click the Insert Video icon. Then in the Insert Video dialog box (refer back to Figure 16-28), click the Browse hyperlink next to From a File.
In an empty content placeholder, click the Insert Video icon. Then in the Insert Video dialog box (refer back to Figure 16-28), click the Browse hyperlink next to From a File.
If you use a content placeholder, the video will be placed in the placeholder. If you use the Video command on the Insert tab, the video will be placed as a free-floating object on the slide.
3. In the Insert Video dialog box, navigate to and select the video clip.
4. Click Insert.
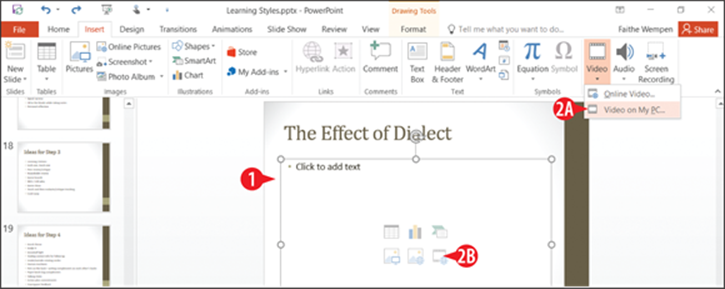
Figure 16-30: Choose to insert a video from a file.
You can control the video’s playback with the Video Tools Playback tab. While video editing in PowerPoint is beyond the scope of this book, here are a few interesting features to experiment with on your own:
· You can trim a video clip to remove unneeded portions at the beginning or end.
· You can make the video fade in or out.
· You can set a volume for the video clip that’s separate from the overall volume.
· You can add a bookmark at a certain point in the video, and then hyperlink to that bookmark elsewhere in the presentation, so that you can jump to a particular spot in the clip easily.