PowerShell in Depth, Second Edition (2015)
Part 1. PowerShell fundamentals
Chapter 3. Using the PowerShell help system
This chapter covers
· Defining PowerShell help commands
· Updating help
· Saving help
· Using help
· Working with common parameters
One of the difficulties associated with command-line interfaces is their inherent lack of discoverability. You won’t find any tooltips, toolbars, context menus, or menus—none of the elements that a graphical user interface (GUI) offers to help you figure out what you can do and how to do it. PowerShell attempts to make up for this shortcoming with an effective and comprehensive help system. We firmly believe that becoming proficient at using the help system is a critical factor in anyone’s ability to succeed at PowerShell. “Be prepared to read the help,” Don says, “or you’ll fail at PowerShell.”
3.1. The help commands
PowerShell’s official command for searching and retrieving help is Get-Help. But you’ll often see people using help or man instead. These aren’t technically nicknames (or aliases, which we cover in the next chapter), but rather they’re a function (help) and an alias to that function (man). Both help and man run Get-Help under the hood, but they pipe its output to more (much like running Get-Help Get-Service|more), resulting in a page-at-a-time display (that you can advance one line at a time by pressing Enter) or a screenful at a time (by pressing the spacebar). For this chapter, we’ll mostly show our examples using help. Note that the page display doesn’t work in the PowerShell ISE, because it doesn’t directly support the use of more. The help in the PowerShell v2 ISE is provided as a compiled help file. Creating a shortcut on your desktop to that file gives an alternative method of accessing help information. In PowerShell v3 and later, the updatable help functionality takes over and there isn’t a compiled help file available for the PowerShell cmdlets.
Note
Technically, help is a function and man is an alias to help. They both accomplish the same thing.
Get-Help produces output, like all other cmdlets, as objects; we’ll get to those in chapter 7, which focuses on working with objects. Piping those to more, as happens with help and man, results in output that’s pure text. For the most part, the conversion to pure text won’t have any impact on you accessing help information whatsoever, which means you can feel free to use any of the commands with which you feel more comfortable.
3.2. Where’s the help?
PowerShell v3 introduced a new feature called updatable help. This is a great feature that has, unfortunately, led to a lot of confusion and gnashing of teeth. For a number of reasons, both technical and nontechnical, Microsoft doesn’t include any of PowerShell’s help files with PowerShell itself. Instead, you must download and install those help files on any computer where you’ll want to read them. To do so, run Update-Help. The command can even download updated help for non-Microsoft shell extensions that have been designed to take advantage of this feature. You should also set yourself a reminder to run it every month or so in order to have the most recent help files on your system, possibly as a scheduled job using another feature introduced in PowerShell v3 (see chapter 11). You can also subscribe to an RSS feed athttp://sxp.microsoft.com/feeds/msdntn/PowerShellHelpVersions that will provide information when new versions of the help files are made available. If you don’t download help, you’ll be prompted to do so the first time you use the Get-Help cmdlet.
Warning
If you don’t download the help files (which are XML files), PowerShell will automatically generate a fairly stripped-down help display when you ask for help. Needless to say, we strongly recommend taking the 30 seconds you’ll need to download the help before you start using the shell.
The Update-Help command has a few parameters that let you customize its behavior. Some of these are designed to accommodate specific operational restrictions that some organizations deal with, so we’ll cover those:
· The –Module parameter accepts one or more module names (in a comma-separated list) and attempts to update help for only those modules. This can be quicker than forcing the shell to check for updated help for every installed module, if you know that only one or two have been updated.
· The –SourcePath parameter provides a comma-separated list of local file paths (UNCs, or Universal Naming Conventions, are valid) where you can find help files. Use this to pull updated help that you’ve downloaded to a file server, for example, rather than attempting to download help directly from the internet.
You don’t need to restart the shell once you’ve downloaded and updated help; it’ll start using the new help immediately. But we have a great big caveat to alert you to about updating the help: Because the Microsoft-provided PowerShell extensions live in the Windows System32 folder, their help files also must live there. Because System32 is protected, you must be running the shell under elevated credentials in order for Update-Help to have permission to write to the necessary folders. You’ll want to make sure the shell’s window title bar says “Administrator” before runningUpdate-Help. You can run Update-Help as often as you like, but it won’t do anything after the first attempt of the day unless you use the –Force parameter.
Help has three cmdlets associated with it:
· Get-Help—Displays help information
· Save-Help—Downloads help files for later use via Update-Help
· Update-Help—Downloads and immediately updates help files (as discussed earlier)
You can use Save-Help in situations where you want to download help files to a network location that all machines can access, and update their help files from this one location:
Save-Help -DestinationPath c:\source\powershellhelp -UICulture en-US -Force
![]() -Verbose
-Verbose
You’ll see a progress bar and messages for each help file that’s downloaded, like the following:
VERBOSE: Resolving URI: "http://go.microsoft.com/fwlink/?linkid=285756"
VERBOSE: Your connection has been redirected to the following URI:
"http://download.microsoft.com/download/F/1/8/F184E1E5-22B3-4899-9C45-5C0E757A7E9A/"
VERBOSE: Microsoft.PowerShell.Management: Saved
C:\Source\PowerShellhelp\Microsoft.PowerShell.Management_eefcb906-b326-4e99-9f54-8b4bb6ef3c6d_en-US_HelpContent.cab.
Culture en-US Version 4.0.3.0
By design Microsoft limits you to one update per day, although you can use the –Force parameter to override that behavior, which allows you to run a Save-Help or Update-Help command for the same module more than once each day. We’ve found it’s sometimes necessary to runSave-Help or Update-Help a couple of times to get all the files downloaded. Notice the use of the –UICulture parameter. The help files come as a pair, for example:
Microsoft.PowerShell.Management_eefcb906-b326-4e99-9f54-8b4bb6ef3c6d_en-US_HelpContent.cab
Microsoft.PowerShell.Management_eefcb906-b326-4e99-9f54-8b4bb6ef3c6d_HelpInfo.xml
The correct culture has to be downloaded to match your system. You can test the UI culture:
PS C:\> Get-UICulture | select -ExpandProperty Name
en-US
You can also test the culture of your system:
PS C:\> Get-Culture | select -ExpandProperty Name
en-GB
PowerShell culture
The use of Get-Culture and Get-UICulture may seem confusing, but there’s a difference.
The Get-Culture cmdlet gets information about the current culture settings. This includes information about the current language settings on the system, such as the keyboard layout, and the display format of such items as numbers, currency, and dates.
The Get-UIculture cmdlet gets information on the user interface (UI) culture. The UI culture determines which text strings are used for UI elements, such as menus and messages.
The help files can then be updated like the following:
Update-Help -Source c:\source\powershellhelp -UICultureen-US -Force –Verbose
You’ll get messages like the following:
VERBOSE: Microsoft.PowerShell.Management: Updated
C:\Windows\System32\WindowsPowerShell\v1.0\en-US\Microsoft.PowerShell.Commands.Management.dll-help.xml. Culture en-US
Version 4.0.3.0
VERBOSE: Microsoft.PowerShell.Management: Updated
C:\Windows\SysWOW64\WindowsPowerShell\v1.0\en-US\Microsoft.PowerShell.Commands.Management.dll-help.xml. Culture en-US
Version 4.0.3.0
Tip
Use Group Policy to set the Source value. Under the Computer Configuration, go to Policies > Administrative Templates > Windows Components > Windows PowerShell and configure the setting “Set the default source path for Update-Help.”
If you’re running a 64-bit OS, the previous example shows that the help for 64-bit and 32-bit versions of PowerShell is updated simultaneously. Updatable help is a great feature that’ll ensure your help information is kept up to date. We strongly recommend that you update your help on a regular basis because Microsoft fixes documentation issues in the help files as they’re reported.
3.3. Saving help
As we mentioned earlier, you can save help to a local share and direct your clients to it. In PowerShell v3 you could download help only for modules installed on your computer. We generally recommended running Save-Help from a Windows 8 desktop that had Remote Server Administration Tools (RSAT) installed (this machine had to be using the en-US culture for RSAT to be installable). With this approach you were likely to include help for most server-based modules. But this approach was not 100% effective because some modules are only installed on servers, which meant you had to download or save help on those computers.
In PowerShell v4, you can download help content for modules that aren’t located on your computer. All you need to do is get the module from the remote computer, which will include the HelpInfoUri, and pass that information to Save-Help. Here’s an example:
PS C:\> Get-Module -Name Hyper-V -CimSession chi-hvr2
![]() -ListAvailable | Save-Help -DestinationPath
-ListAvailable | Save-Help -DestinationPath
![]() \\chi-fp02\PSHelp -Force
\\chi-fp02\PSHelp -Force
We ran this command on a Windows 8.1 desktop (CHI-FP02). The computer CHI-HVR2 is running Hyper-V on Windows Server 2012 R2. We retrieved the module and passed it to Save-Help, saving the help content locally.
Even though your Windows 8.1 desktop has RSAT installed, there are still some gaps. But using PowerShell you can identify the modules that don’t exist locally and save help. First, you need to create a variable with the names of all the locally installed modules:
PS C:\> $local = (Get-Module -ListAvailable).name
Then you can get all the modules on a remote server that aren’t on your local machine:
PS C:\> Get-Module -CimSession chi-hvr2.globomantics.local -ListAvailable |
![]() where {$local -notcontains $_.name}
where {$local -notcontains $_.name}
ModuleType Version Name ExportedCommands
---------- ------- ---- ----------------
Manifest 1.1 Hyper-V
Manifest 1.0.0.0 NetWNV {Get-NetVirtualiza...
Manifest 1.0.0.0 ServerCore {Get-DisplayResolu...
Manifest 1.0.0.0 SoftwareInventoryLogging {Get-SilComputer, ...
Manifest 1.0.0.0 UserAccessLogging {Enable-Ual, Disab...
Manifest 1.0.0.0 WindowsServerBackup
Once you’ve confirmed this works as expected, you can pipe this to Save-Help:
PS C:\> Get-Module -CimSession chi-hvr2.globomantics.local -ListAvailable |
![]() where {$local -notcontains $_.name} |
where {$local -notcontains $_.name} |
![]() Save-Help -DestinationPath \\chi-fp02\PSHelp -Force
Save-Help -DestinationPath \\chi-fp02\PSHelp -Force
The benefit is that you can set up a scheduled PowerShell job on a single computer running PowerShell v4 and have it save help for all of the servers in your enterprise. Each server can then have a separate job to periodically download help from the local source, assuming you need updated help on the server.
Note
If you’ll be in a mixed PowerShell environment—that is, running PowerShell v3 and v4—and plan on saving help, you’ll have to take some extra steps. Help files for the different versions are generally not interchangeable. You wouldn’t want to download v4 help files for a PowerShell v3 system. If you plan on saving help, you’ll need to have separate processes and paths for each version.
3.4. Using the help
The help system in PowerShell v3 is smart. For example, it supports the use of wildcards (the * character), enabling you to search for help topics when you don’t know the name of the specific command you need. When executing a search, it searches not only the shell extensions loaded into memory at the time but also any other installed extensions that are located in the defined module path. That way, you’re searching across not only what’s in memory but also what’s available on the entire computer. If your search term isn’t found in the name of a command or a help file, the help system will proceed to perform a full-text search across the help files’ synopses and descriptions. That can be a bit more time-consuming, but it can help uncover obscure help topics for you.
For example, if you want to find a command for working with services, you might do the following:
PS C:\> help *service*
Name Category Module Synopsis
---- -------- ------ --------
Get-Service Cmdlet Microsoft.PowerShell.Management Gets ...
New-Service Cmdlet Microsoft.PowerShell.Management Creat...
New-WebServiceProxy Cmdlet Microsoft.PowerShell.Management Creat...
Restart-Service Cmdlet Microsoft.PowerShell.Management Stops...
Resume-Service Cmdlet Microsoft.PowerShell.Management Resum...
Set-Service Cmdlet Microsoft.PowerShell.Management Start...
Start-Service Cmdlet Microsoft.PowerShell.Management Start...
Stop-Service Cmdlet Microsoft.PowerShell.Management Stops...
Suspend-Service Cmdlet Microsoft.PowerShell.Management Suspe...
Stop-DnsService Cmdlet DnsShell Stop-...
Start-DnsService Cmdlet DnsShell Start...
Get-NetFirewallServiceFilter Function NetSecurity ...
Set-NetFirewallServiceFilter Function NetSecurity ...
Notice that the last four results are from modules you haven’t loaded into memory yet. PowerShell v3 and v4, by default, automatically load all modules on your module path for you. The shell will search as broadly as possible for you.
This isn’t Bing or Google; the help system is only capable of doing basic pattern matches, not a contextual search. When choosing your search “keyword,” follow these tips:
· Choose a single word or partial word, not multiple words and not phrases.
· Put wildcards (*) on either side of your word. The help system will sometimes do this implicitly. For example, run help iscsi and, because “iscsi” doesn’t match the name of a command or help file, the shell will implicitly run help *iscsi* for you.
· Stick with singular words rather than plurals: “Service” rather than “Services,” for example.
· Go with partial words: “*serv*” will generate more hits than “*service*” will.
Warning
The help system isn’t searching for available commands; it’s searching for available help files. Because Microsoft ships help files for all of its commands, it amounts to much the same thing. But it’s possible for a command to exist without a corresponding help file, in which case the help system won’t find it. A separate command, Get-Command, also accepts wildcards and searches across available commands, so it’s a good companion to the help system.
Once you’ve located the command you want, ask for the help on that specific command in order to learn how to use it:
PS C:\> help Invoke-Command
NAME
Invoke-Command
SYNOPSIS
Runs commands on local and remote computers.
SYNTAX
Invoke-Command [-ScriptBlock] <ScriptBlock> [-ArgumentList<Object[]>]
[-InputObject<PSObject>] [-NoNewScope [<SwitchParameter>]]
[<CommonParameters>]
Invoke-Command [[-ConnectionUri] <Uri[]>] [-ScriptBlock] <ScriptBlock>
[-AllowRedirection [<SwitchParameter>]]
[-ArgumentList<Object[]>] [-AsJob [<SwitchParameter>]]
[-Authentication <AuthenticationMechanism>]
[-CertificateThumbprint<String>] [-ConfigurationName<String>]
[-Credential <PSCredential>] [-Disconnected[<SwitchParameter>]]
[-HideComputerName [<SwitchParameter>]]
[-InputObject<PSObject>] [-JobName<String>]
[-SessionOption<PSSessionOption>] [-ThrottleLimit<Int32>]
[<CommonParameters>]
Invoke-Command [[-ConnectionUri] <Uri[]>] [-FilePath] <String>
[-AllowRedirection [<SwitchParameter>]]
[-ArgumentList<Object[]>] [-AsJob [<SwitchParameter>]]
[-Authentication <AuthenticationMechanism>]
[-ConfigurationName<String>] [-Credential <PSCredential>]
[-Disconnected [<SwitchParameter>]] [-HideComputerName
[<SwitchParameter>]] [-InputObject<PSObject>] [-JobName<String>]
[-SessionOption<PSSessionOption>]
[-ThrottleLimit<Int32>] [<CommonParameters>]
...
You can include a few options when you’re getting help for a command, and these are specified with the following parameters:
· -Full—Displays the full help, including details for each command parameter and usually including usage examples. We suggest you get into the habit of always viewing the full help, because it reveals a lot more detail about the command and its various use cases.
· -Examples—Displays usage examples only. That’s useful for learning how to use the cmdlet.
· -Detailed—Displays details on each command parameter but doesn’t display usage examples.
· -Online—Opens the help in the system’s default web browser, loading from Microsoft’s website. This is a great way to check for the most up-to-date help, and it displays the help in a separate window so that you can look at it as you’re typing a command.
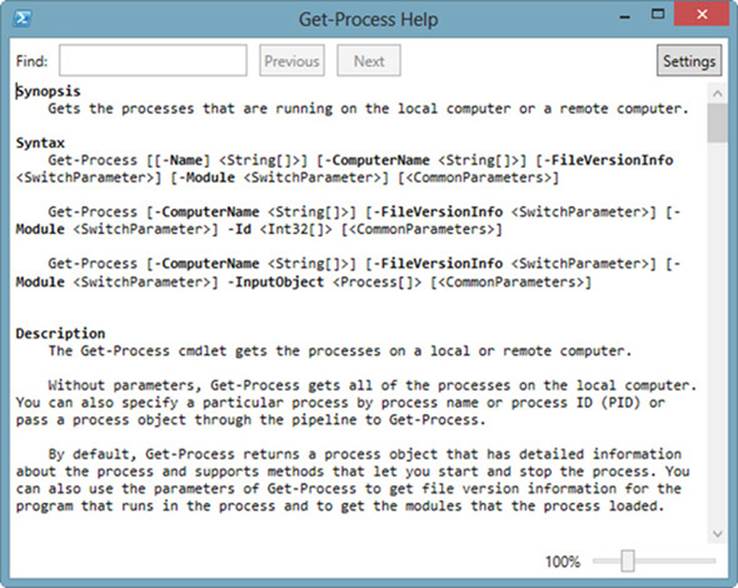
· -ShowWindow—Opens full help in a pop-up window. This makes it much easier to browse through help without giving up your PowerShell prompt. You can also search the help content in this window. See figure 3.1; the display was produced with the command Get-Help Get-Process –ShowWindow. Using –ShowWindow doesn’t lock your PowerShell prompt; the help display is separate. You can have multiple help files open simultaneously by using –ShowWindow and still have a working PowerShell prompt.
Figure 3.1. Results of using the –ShowWindow parameter with Get-Help
Sometimes you may want the detail on a specific parameter. You don’t have to wade through pages of full help; instead, use the Get-Help cmdlet. You may want to run help on Get-Help. If you do, you’ll see that you can run commands like the following:
PS C:\> Get-Help Get-service -Parameter name
-Name <String[]>
Specifies the service names of services to be retrieved. Wildcards are
permitted. By default, Get-Service gets all of the services on the
computer.
Required? false
Position? 1
Default value All services
Accept pipeline input? true (ByPropertyName, ByValue)
Accept wildcard characters? true
3.5. “About” help files
In addition to providing help on commands, PowerShell includes help for general concepts, troubleshooting, and so forth. Usually referred to as “about” files because their filenames start with the word “about,” these files act as PowerShell’s formal documentation. To see a complete list you can run the command yourself, but we’ll truncate it as follows:
PS C:\> help about*
Name Category Module
---- -------- ------
about_AliasesHelpFile
about_Arithmetic_OperatorsHelpFile
about_ArraysHelpFile
about_Assignment_OperatorsHelpFile
about_Automatic_VariablesHelpFile
about_BreakHelpFile
about_Command_PrecedenceHelpFile
about_Command_SyntaxHelpFile
about_Comment_Based_HelpHelpFile
about_CommonParametersHelpFile
about_Comparison_OperatorsHelpFile
about_ContinueHelpFile
about_Core_CommandsHelpFile
about_Data_SectionsHelpFile
about_DebuggersHelpFile
about_DoHelpFile
about_Environment_VariablesHelpFile
about_Escape_CharactersHelpFile
about_EventlogsHelpFile
about_Execution_PoliciesHelpFile
To view any of these files, you can ask for help on the complete help filename:
PS C:\> help about_debuggers
TOPIC
about_Debuggers
SHORT DESCRIPTION
Describes the Windows PowerShell debugger.
LONG DESCRIPTION
Debugging is the process of examining a script while it is running in
order to identify and correct errors in the script instructions. The
Windows PowerShell debugger is designed to help you examine and
Identify
These files are also part of the updatable help system. We strongly recommend using the –ShowWindow parameter with about files because it makes them much easier to read.
3.6. Provider help
As you’ll learn in upcoming chapters, PowerShell relies heavily on providers (technically, PSProviders) to connect PowerShell to various external data stores and systems such as Active Directory or the Registry. Both of these elements can provide help. For example, here’s how to get help on the FileSystem provider:
PS C:\> help filesystem
PROVIDER NAME
FileSystem
DRIVES
C, D
SYNOPSIS
Provides access to files and directories.
DESCRIPTION
The Windows PowerShell FileSystem provider lets you get, add, change,
clear, and delete files and directories in Windows PowerShell.
The FileSystem provider exposes Windows PowerShell drives that
correspond to the logical drives on your computer, including drives
that are mapped to network shares. This lets you reference these
drives from within Windows PowerShell.
The help for providers can be quite extensive, and it often includes valuable details on how to use the provider for various management tasks, including usage examples. These files also document the dynamic changes that providers make to cmdlets. You can find the providers installed on your system by using Get-PSProvider.
3.7. Interpreting command help
Despite the usefulness of provider help and the about help files, you’ll find yourself working primarily with help for individual commands. Learning to interpret the help displays is an incredibly important skill—perhaps one of the most important skills in PowerShell. Let’s look at a quick overview (listing 3.1).
Listing 3.1. Sample help

What you’re looking at are three different parameter sets, each of which represents a slightly different way to use this cmdlet. These parameter sets can be a big source of confusion, so we’ll provide a simple rule to remember: When you’re running the command, you can only choose parameters from a single parameter set to use together. In this case, that means you couldn’t use both –Name and –InputObject at the same time, because they appear in different parameter sets. You can mix and match parameters from one set, but you can’t mix and match parameters from multiple sets.
Now let’s focus on the syntax display by looking at help for Get-WmiObject:
SYNTAX
Get-WmiObject [-Class] <String> [[-Property] <String[]>] [-Amended]
[-AsJob] [-Authentication {Default | None | Connect | Call | Packet | PacketIntegrity | PacketPrivacy | Unchanged}] [-Authority <String>]
[-ComputerName <String[]>] [-Credential <PSCredential>]
[-DirectRead] [-EnableAllPrivileges] [-Filter <String>]
[-Impersonation {Default | Anonymous | Identify | Impersonate |
Delegate}] [-Locale <String>] [-Namespace <String>]
[-ThrottleLimit <Int32>] [<CommonParameters>]
If you know the meaning of all the punctuation, you can extract quite a bit of information from this concise display. Note that the meaning of the punctuation within the help file isn’t the same as when these same symbols are used elsewhere in the shell. Here’s what we know:
· We know that the –Class parameter is positional, because the parameter name (but not its data type <String>) is contained in square brackets. Positional means that you don’t have to type –Class, provided you put the String value in the first position, because –Class is listed first in this help file. In other words you can type Get-WmiObject Win32_ComputerSystem instead of Get-WmiObject -Class Win32_ComputerSystem. Positional parameters are fine to use at the command line, but we recommend you don’t use them in your scripts.
· We know that the –Class parameter is mandatory, because its name and data type aren’t both contained in square brackets.
· We know that the –Property parameter is entirely optional for this command. That’s because the entire parameter, both its name and data type, is contained in square brackets: [[-Property]<String[]>].
· We know that the –Amended parameter doesn’t accept a value—it’s a switch. This means you either provide the parameter or not, but if you do, it doesn’t need a value.
· We know that the –Class parameter accepts a String value, meaning a string of characters. If the string contains a space, tab, or other whitespace, it must be enclosed within single or double quotes.
· We know that the –Property parameter accepts one or more strings, because its value is shown with two square brackets jammed together: <String[]>. That’s a PowerShell indication for an array. You could provide those multiple values as a comma-separated list.
· We know that the –Authentication and –Impersonation parameters are limited to a discrete set of values because those values are supplied in curly braces {}.
Tip
Try to avoid using parameters positionally if you’re getting started with PowerShell. Positional parameters make it harder to interpret commands, and you’re taking on the responsibility of getting everything lined up in perfect order. By typing the parameter names, you’re removing the worry of getting everything in the right order. The order doesn’t matter if you type the parameter names. You’re also making the command line easier to read. Positional parameters should be avoided in scripts or functions. Typing the parameter name now makes reading and maintenance in the future a whole lot easier.
Yes, that’s a lot of information. You can find most of that in a more detailed fashion when you’re viewing the detailed or full help. For example, what follows is the section specifically for the –Class parameter:
-Class <String>
Specifies the name of a WMI class. When this parameter is used,
the cmdlet retrieves instances of the WMI class.
Required? true
Position? 1
Default value
Accept pipeline input? false
Accept wildcard characters? False
In this example, you can see that the parameter is mandatory (required), that its value can be passed in position 1, and that it accepts data of the String type. There’s also a bit more detail about what the parameter does—some parameters’ detailed help even includes brief examples. The list of acceptable values is also often provided in the case of parameters only taking values from a restricted group, as follows:
PS C:\> Get-Help Get-EventLog -Parameter EntryType
-EntryType<string[]>
Gets only events with the specified entry type. Valid values are Error,
Information, FailureAudit, SuccessAudit, and Warning. The default is all
events.
Required? false
Position? named
Default value All events
Accept pipeline input? false
Accept wildcard characters? false
3.8. Common parameters
You’ll notice that every command’s help file references <CommonParameters> at the end of each parameter set. These are a set of parameters that are automatically added by PowerShell to every command. You can read about them in an about file:
PS C:\> help about_common*
TOPIC
about_CommonParameters
SHORT DESCRIPTION
Describes the parameters that can be used with any cmdlet.
LONG DESCRIPTION
The common parameters are a set of cmdlet parameters that you can
use with any cmdlet. They are implemented by Windows PowerShell, not
by the cmdlet developer, and they are automatically available to any
cmdlet.
You can use the common parameters with any cmdlet, but they might
not have an effect on all cmdlets. For example, if a cmdlet does not
generate any verbose output, using the Verbose common parameter
has no effect.
The common parameters are:
· Debug
· ErrorAction
· ErrorVariable
· OutVariable
· OutBuffer
· PipelineVariable
· Verbose
· WarningAction
· WarningVariable
We’ll address each of the common parameters throughout this book, in the chapters that deal with each one’s specific function, so we won’t cover them any further here.
Most commands that modify the system in some way support two other “semi-common” parameters:
· -Confirm—Asks you to confirm each operation before performing it.
· -WhatIf—Doesn’t perform the operation, but instead indicates what would’ve been done. This is kind of a “test run” and generally must only be used with the last command on the command line, because it prevents the command from doing anything. This parameter is usually available only on cmdlets that can perform modifications to your system.
These parameters (referred to in the help file as risk mitigation parameters) must be defined by the cmdlet and supported by the provider. For example, Stop-Service has a –WhatIf parameter that you can see when you’re looking at help:
PS C:\> Stop-Service wuauserv -WhatIf
What if: Performing operation "Stop-Service" on Target "Windows Update
(wuauserv)".
–WhatIf is an example of a great sanity check to make sure your command will execute what you intend. You may also have to check the PSProvider to see if it supports ShouldProcess:
PS C:\> Get-PSProvider | where {$_.Capabilities -match "ShouldProcess"} | Select name
Name
----
Alias
Environment
FileSystem
Function
Registry
Variable
For example, New-Item supports –WhatIf and it works fine in the filesystem. But you may have a snap-in or a module that adds a new provider that might not support it. If in doubt, check the provider.
3.9. Summary
PowerShell’s help system is a powerful tool—and because it’s fundamental to using the shell, we included this chapter in the beginning of the book in hopes you’d find it right away. PowerShell v3 introduced a couple of caveats, such as the need to download the help to your computer before the help system becomes fully functional, but we hope that’ll be a minor hurdle for most administrators. The ability to download help based on the modules installed on a remote machine is an additional feature introduced with PowerShell v4.